#how to find database username and password in phpmyadmin cpanel
Explore tagged Tumblr posts
Visit Tumblr Blog
Explore Tumblr blogs with no restrictions, modern design and the best experience.
Last Seen Tumblr Blogs


Fun Fact
There were a total of 171.5 billion posts on Tumblr in 2019.
Text
Find the step-by-step guide to easily find your WordPress admin username and password from cPanel. Let’s get started & retrieve it!
#how to find wordpress username and password in cpanel#how to check wordpress username and password from cpanel#how to find wordpress admin username and password from cpanel#how to get wordpress username and password from cpanel#how to find database username and password in phpmyadmin cpanel
0 notes
Text
How to Add Admin User to the WordPress Database with phpMyadmin
Adding an Admin User to the WordPress Database With phpMyAdmin becomes necessary when a hacker has locked your website, you have lost access to the WordPress admin panel, or you have forgotten credentials. Here we use the HostBet Shared Hosting cPanel account screenshot.
Step 1: Open the cPanel account Dashboard
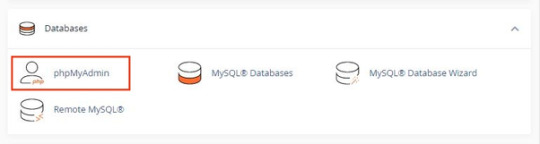
Step 2: Navigate to phpMyAdmin in the Databases section.
Step 3: Click on phpMyAdmin.
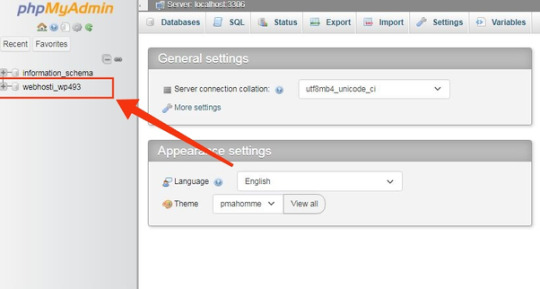
Step 4: Once you’re on the phpMyAdmin dashboard, you need to select your WordPress database.
This will open the WordPress database. You will be making changes to the wp_users and wp_usermeta tables.

First, add a user to the wp_users table.
Step 5: First, you need to navigate the wp_users table and click on it. This will open the users currently listed in the table.

Please note that there is one user ID in our demo website table 1. You need to add a new user using a new unique ID, so we’ll use the 2 numbers.

Step 6: To create a new user, you need to click on the “Insert” tab.

Step 7: Add the following information to the fields on the Insert form:

ID: pick a unique number (in our example, we’ll use 2)
user_login: the username that will be used for login
user_pass: add a strong password, and make sure to select MD5 in the function from the drop-down menu (see the screenshot below)
user_nicename: the user’s full name or nickname ( you can write according to yourself)
user_email: the user’s email address
user_url: your website address
user_registered: select the date and time the user was registered using the calendar
user_activation_key: leave blank
user_status: set this to 0
display_name: the user’s full name or display name
Step 8: Once you have finished, click on the ‘Go’ button to add the new user.
Next adding a user to the wp_usermeta table.
Step 1: To add a new user, you need to navigate to wp_usermeta, click on it, and then click on the “insert” tab (same as the previous steps).
Step 2: Next, you need to add the following information to the Insert form:

unmeta_id: leave this blank
user_id: the user ID you used in the previous step
meta_key: this should be wp_capabilities
meta_value: insert this: a:1:{s:13:”administrator”;s:1:”1″;}
Step 3: After that, you need to find fields for the second row.

unmeta_id: leave this blank
user_id: the user ID you used in the previous steps
meta_key: you need to enter wp_user_level
meta_value: 10
Step 4: Once you finished typing the information into the fields, click the ‘Go’ button. that’s it. You Have successfully added new users.
0 notes
Text
How to Download WordPress Website From cPanel
How to Download WordPress Website From cPanel The process of downloading a WordPress website can be difficult, but it's not impossible. If you're using a hosting account, you can do it through your cPanel. First, you must create a database for WordPress. This is where WordPress will store its content and settings. cPanel If you use a cPanel hosting account, you'll be able to download WordPress files from your account by using the cPanel file manager. First, you'll need to create a database for your WordPress website. This is where WordPress stores its data. To create a backup, sign in to your cPanel account and navigate to the File Manager. Choose the directory in which you wish to download your website files. In most cases, this will be the public_html directory of your site. Double-click this directory and you'll be able to find the files you need. QuickInstall To install WordPress, cPanel users need to sign into their cPanel accounts. From there, they need to click on QuickInstall. The QuickInstall application is a custom script manager that is available for many other software packages as well, including WordPress. Once you have installed QuickInstall, you can manage your installation using the Manage Installations feature. You can also delete the installation by clicking on the "Remove" link. To install WordPress using the QuickInstall tool, you must be able to access your web host's FTP account and have shell access. Next, you must move the directory containing WordPress to the desired location in the root directory. Once you have done this, launch your web browser and begin the installation process. Softaculous Once you have your hosting account, you can download a WordPress website using Softaculous. This software will create a subdirectory in your document root for the installation of WordPress. It will prompt you to enter a username and password, and will also provide the URLs to the domain and the login page. Once the installation is complete, you can log in to your website to view it and post new blog posts. To download a WordPress website from Softaculous, go to cPanel and select Softaculous. The auto installer will search the Softaculous database for WordPress platforms. You can find WordPress under the Blogs category, as well as in the popular applications slider. Once you find WordPress, click Install Now to get started. Exporting WordPress site content There are several ways to export your WordPress site content from your cPanel account. First, you can choose to export all the content or selected areas. The process can take a few minutes, depending on how large your website is. Once the export is finished, you can download the exported files directly from the server. You can also export just the posts and pages on your site. The files you export can be large so take your time and be patient. After choosing the posts and pages you want to export, you can choose the format and export them. Using phpMyAdmin First of all, you should be able to find phpMyAdmin in your cPanel account. You can use this application to export your website's database. You can export the whole database, or just specific tables, if you want. The export process will take a few minutes, depending on the size of your website. Once the export is complete, you can download the files directly by clicking on them. To begin the download, you must first log into your cPanel account. Once you have done that, navigate to the File Manager and select the Public_HTML directory. Double-click on the folder to locate the files of your website. Installing WordPress on a local computer If you want to build a site, you might want to learn how to install WordPress on a local computer. This popular content management system lets you create a website quickly and easily. Once it is installed, you can customize its appearance, add content, and more. To install WordPress on a local computer, go to your webhost's cPanel. Look for the WordPress icon under Sites. Choose Install Now and provide a domain name. The installation page should look similar, regardless of which auto-installer you use. Just make sure to change the default protocol from http to https. How to Download WordPress Website From cPanel Read the full article
0 notes
Text
How to Move Magento Website From One Domain to Another?
Magento is an open-source eCommerce platform that is available for free download. There are three versions of Magento and one of them is free to download. Magento has become a quite popular eCommerce platform in the short amount of time that it has been around. It has been trusted and implemented by many companies as their eCommerce solution.
They are constantly improving by releasing new versions and print versions of their free version for users to download. It is now a very robust and versatile software. Many Magento users buy ready made templates for their website so that it looks different from the standard design that is offered by Magento. On the other hand, there are a great many store owners who have a design of their own in mind and wish their store to look exactly as per their design.
While it is easy to install a ready made template it is not easy to make your own template. It requires the expertise of an experienced Magento Web Developer to do the job in such a situation. Alakmalak is a company that offers Magento web development services. They can help you out with the web design of the layout you have in mind as well as with developing your website.
The standard procedure usually followed is that the website is built by the development company on their database server which is considered a test server and after it has been fully tested it is transferred to the main domain. This article describes how you can keep your website intact while transferring it from one domain to another.

The first thing that you need to do while shifting the website is to take a backup of the database. You need to log in to the existing web server user and load the phpMyadmin section via the cPanel (assuming it is a cPanel). Then after selecting the appropriate database export it to your own computer. This will be a SQL file that will be saved on your computer.
The next thing you need to do is to is backup all the existing websites files. This can be achieved by going to the existing cPanel once again and compressing all the files on the relevant folder. You can then download this compressed file onto your own computer instead of having to download the many small files of Magento The database SQL file downloaded will have references to the existing domain and hence needs to be changed to the new domain. This can be done by loading it in a text editor and simply using the find and replace tool. Alternatively, this can also be done on the web server itself by loading the find and replace tool to the server and running it in context to this database. Either way, the main aim of this operation is to replace the reference to the existing domain with that of the new one. Your database is now ready for upload to the new server. Simply log in to your new server and create a new database; after which you can import this existing database into the new server giving you the data for your Magento website.
The next thing to do as you may have guessed is to transfer all the existing files to the new domain. This can be done by transferring the compressed file to the new domain and then uncompressing it.
The site thus uploaded needs to be configured now. You need to access the new website via FTP and download the file local.html from the directory: \app\etc\ . This file can be opened using any text editor. Once loaded you need to change the section where it says host, username, password, and dbname generally found on lines 43 – 46. The values of the new database need to be entered here. Then upload the file back to the webserver after saving it.
You have successfully transferred your website.
0 notes
Photo

https://www.wpplatformhelp.com/wordpress-tutorials-by-wp-learning-lab/wordpress-post-meta-data-what-it-is-where-to-find-it-in-the-database/
WordPress Post Meta Data - What It Is & Where To Find It In The Database
youtube
WordPress Post Meta Data – What It Is & Where To Find It In The Database https://youtu.be/N2tdhr-uajI
Join our private FB group for WordPress help: https://facebook.com/groups/wplearninglab
A common question I hear is “what is WordPress post meta data?”
The main data of a post is the url, title, and body text of the post. The meta data is things like the author’s name, the post date, categories and tags. I think the term “meta” throws people off. If you take “meta” out you’re left with WordPress post data and that’s what it is. It’s just more information about the post. The “meta” in this case means other or additional. So post meta data is other data that is different from the main data.
It is important to understand how metadata works because it is the basis of custom fields created using a plugin like PODS or Advanced Custom Fields.
You can either watch the detailed video tutorial below or scroll below that to read the image/text version of the tutorial.
Find a Post’s ID
Go to any post on your WordPress site by clicking on the posts link on your dashboard menu.
Click on edit to open the desired post inside the editor.
When you open the post, you’ll see both the main content and the meta data. The main content consists of the URL, the actual content, the title etc. Like I mentioned earlier, the metadata are things like the date, the category, author information etc.
To find the table where the metadata is inserted, first you’ll need to find the post’s ID number in the URL (see the screenshot below).
This post’s ID is 905 so keep that in mind.
Match The ID To The Postmeta Table Entries
Head over to the cPanel and open up phpMyAdmin.
Find the database for your and click on the plus sign. If you’re not sure which of the database listed in the phpMyAdmin is the correct one you can find the database name in the wp-config.php file in your website.
To get there go to cPanel, then File Manager, then the Website Root and finally find the wp-config.php file.
A little ways down the wp-config file you’ll find the database name. You’ll also see the database username and database password. Don’t worry about those. Just find the db name and find that name listed in the phpMyAdmin.
Read the rest on the blog:
Exclusive for WPLearningLab viewers, up to 50% off hosting: https://wplearninglab.com/wordpress-hosting-offer/
Stop brute force attacks before they happen with this workshop: https://wplearninglab.com/brute-force-eliminator-workshop
Grab your free 17-Point WordPress Pre-Launch PDF Checklist: http://vid.io/xqRL
Download your exclusive 10-Point WP Security Checklist: http://bit.ly/10point-wordpress-hardening-checklist
Subscribe to this awesome channel here: http://www.youtube.com/subscription_center?add_user=wplearninglab source
0 notes
Text
New Post has been published on Strange Hoot - How To’s, Reviews, Comparisons, Top 10s, & Tech Guide
New Post has been published on https://strangehoot.com/how-to-increase-mysql-upload-limit/
How to Increase MySQL Upload Limit on Server
MySQL is a free open source Relational Database Management System using Structured Query Language SQL, being the highly favourite language for content addition, access and management of a database. It is highly recommended for faster processing, utmost reliability, ease-of-work experience and flexible approach.
The utility of MySQL includes a broad spectrum of clients like e-commerce, logging applications and data warehousing, but the commonest of all is web database creation.
It stores and manipulates data through emphasizing on the relationship between the tables. Clients request the database thru pre-defined SQL statements to request response-information to get one on clients’ side.
DATABASE () function shows the name of the running database, which is an active one. Queries are subject to get results from and based on the running database. In MySQL, it is possible to substitute the function SCHEMA () with the function DATABASE ().
MySQL shell is an interactive tool to be used and act as an administrator of the MySQL database. Supporting JavaScript, Python or SQL modes has made it convenient for access and administrative use.
SQL being a standard language enabling the user to manage and design databases whereas, MySQL is a relational database management system permitting the storage and retrieval of data from the database. MySQL, at times, uses SQL to perform some specific operations.
The easiest and reliable way to connect to the MySQL server and get a MySQL databases list is running the SHOW DATABASES command. User can omit the -p switch, in case, the user has not set a password as a MySQL user. User can establish a connection to MySQL Database by logging into A2 Hosting account through SSH for which the user has to type the relevant command. The command need some changes like :-
Replace USERNAME with the username:
MySQL -u USERNAME -p.
Type the password at the Enter Password prompt, …
Type the command at the MySQL> prompt: SHOW DATABASES, to get a display of the list of databases.
Launch the MySQL Command-Line Client.
For launching the MySQL Command-Line client, the user must enter the below-given command in the Command Prompt window:
MySQL -u root -p
where -p option is required only in case of a root password has been defined for MySQL.
Users with a no-install package may use the instructions to install MySQL manually. For installing MySQL from a ZIP Archive package is as under:
Extract the main archive to the desired install directory
User may also extract the debug-test archive, which is optional in case plan is to execute the MySQL benchmark and test the software.
Option file can be created using the following commands:-
Choose a MySQL server type
Initialize MySQL
Start the server
Secure default user accounts
PHP, Hypertext Pre-processor is open source widely-used scripting language to be executed on the server. Rasmus Lerdorf generated the initial version of PHP in 1994 to be utilized in managing session tracking, dynamic content with PHP database. PHP is also used in building e-commerce sites.
The Server is a part of computer hardware/software in computing to offer functionality for the programs/devices, referred to as “clients”. The whole architecture is known as the client-server model.
Upload max file size is the maximum size for files that are being posted. The types of POST body data are not subject to the limit. In case you wish to upload large files, you must increase both limits.
Maximum execution time in PHP is of 30 seconds. The phrase “maximum execution time” is vague as it may be taken as
(a) elapsed time since the script started, or
(b) the total CPU time taken by the script, including or excluding the CPU time taken by OSC.
The maximum execution time by default for PHP scripts is taken to be 30 seconds. PHP stops the script and reports an error in case a script runs longer than maximum execution time. Amount of time PHP allows can be controlled by running the scripts for changing the maximum execution time directive in the php.ini file.
Client – Server Connection Ports
The default port used is Port 3306 for the classic MySQL (port) protocol. It is used by the MySQL Connectors, client, or for utilities like MySQL pump, MySQL dump. The port supported by MySQL Connectors or MySQL Shell or MySQL Router for X Protocol (mysqlx_port), is estimated by multiplying 10 to classic MySQL protocol port.
Increase upload / import size
You have a 2mb limit of upload/import size in MySQL which is totally odd and highly inconvenient to import large files. User can get the upload size increased by allowing and editing the server’s php.ini configuration file. Generally, it is located at /etc/php.ini in servers like CentOS.
The following commands can be typed to increase MySQL upload limit on the server
Step 1:
Go to php.ini and find the following and change the values to larger database size.
upload_max_filesize = 40M
post_max_size = 40M
Step2:
Restart the apache service for the new change to get set. Typically the command to restart apache would be: –
service httpd restart for CentOs
service apache2 restart for ubuntu
You can also restart directly from the path as :-
/etc/init.d/apache2 restart or /etc/init.d/httpd restart
In case of shared hosting with no root access or access to the php.ini configuration file, then another way is: –
to create a .ht access file in the application root and then adding the following line;
php_value upload_max_filesize 40M
php_value post_max_size 40M
Increase the MySQL Max Upload Size on Server
The cPanel server puts a cap on the database to be uploaded into PhpMyAdmin. The default limit is subjected to 50MB.
Therefore, it becomes difficult to upload a large database to PhpMyAdmin. But, to increase the max upload size in the PhpMyAdmin of the database file, the user can make changes in configuration in the WHM of the server like: –
Step 1:
Login to the WHM of the server by accessing the link https://yourIPaddress:2087 Or https://yourserverhostname:2087
Step 2:
Navigate to “Server Configuration”.
Step 3:
Select “Tweak Settings” from it. Step 4:
Navigate to PHP in Tweak settings.
Check cPanel max POST size and cPanel max upload size values.
Change the configuration according to the preference and save it.
Login to your PhpMyAdmin and verify the values, where you can see the value have been replaced with the changed one.
You can also go through the same procedure via the CLI:-
Step 1:
Login to your server via SSH.
# ssh root@IPaddress
Step 2:
Execute the following command to display the default PHP .ini file of the server.
# php –ini
Step 3:
Open it with the favourite text editor.
# vi path_to_php.ini (You may replace this with the original file path)
Step 4 :
Search for upload and post by writing M, write the preferred value.
upload_max_filesize = M
post_max_size = M
Step 5:
Restart the apache service.
# service httpd restart
or
# systemctl restart httpd
Read: How to Install Server Nginx on Ubuntu
0 notes
Text
7 Ways to Protect and Secure your Joomla Account/Site

As a popular open source and CMS, Joomla is subjected to attack by hackers. There is no perfect security, but It is important to take all possible measures to protect your Joomla site and improves its security. Follow our guide on how to harden your security and prevent your site from being hacked.
1. Do not use admin as your administrator login to your Joomla account.
Be sure to change the username from phpMyAdmin in cPanel to something else and reset the password. Here is a step by step procedure to effect the username change: - Access the cPanel area - Click phpMyAdmin - Navigate and click the site default database (You can verify the site the current database from the configuration.php file) - Click the Users table (tablePrefix_Users) - Edit the administrator account and rename to something else (ensure the username is not renamed to "admin") - Change the password and encrypt accordingly (Use md5 function). A very secured password string should be deployed. - And finally, click "go" to save the changes
2. Update your Joomla installation to the latest version: (The latest updated version of Joomla is 3.8.3) The update could be applied at the administrative end. Joomla is usually http://domainname/administrator
Here are few security Tips on Joomla Security:
- Secure Administrator login with Strong password
- Don’t leave default administrator account as “admin” and bad password; this is probably the biggest risk in Joomla. By keeping default “admin” and guessable password, you are helping Hacker in their job. Change default administrator login “admin” to something else, which is not easily guessable.
- Use the latest version of Joomla & Extensions. Most of the website owner don’t upgrade to the latest version which is a big risk. Almost every release, you will notice some security fixes so not upgrading to the latest version means keeping your website vulnerable. Review vulnerable extension list provided by Joomla and update the outdated extension. Review the change log each time Joomla release and upgrade if you see any critical fixes.
3. Use a secret key to login into Joomla Admin- Hide your administrator backend from potential hackers and allows those that have secret URL to access the administration area.
- Use login protection extension like KSecure who helps you to add a secret key. This means whenever you need to access admin login page you need to enter the secret key after administrator?. For example: example.com/administrator?testing (testing is the secret key here. If you don’t use this key, then you will be redirected to home page.)
4. Enable Search Engine Friendly (SEF)
SEF make the URLs of your Joomla website more Search Engine Friendly. And good SEF component also gives security benefit. A SEF component masks that information and makes it harder for a hacker to find eventual security vulnerabilities.
Solution: Enable Search Engine Friendly URLs into Joomla Administration area.
- Login into Joomla Administration
- Click on Site >> Global Configuration
- On-Site, tab selects “Yes” next to Search Engine Friendly URLs
5. Keep file/folder permission appropriate
All files should have good CHMOD configuration. Preferably,
- PHP files – 644
- Config Files – 644
- Other folders – 755
6. Use Web Application Firewall
Web Application Firewall (WAF) is essential for any website to protect it from top OWASP 10 most critical web application security risks, known vulnerabilities & malware. If you are hosting your Joomla website on VPS, then you may use ModSecurity which is free. However, if you are on shared hosting or don’t have time, then you may consider cloud-based web application firewall. Using WAF will help you from following.
Bot protection
Login protection
Backdoor protection
DDoS protection
SQL injection
XSS attack
Joomla specific vulnerabilities
7. Monitor your Joomla site
How do you know when your website goes down or defaced? Get notified by email, slack or SMS when your website is not reachable so you can take necessary actions immediately.
Solution: Use a free tool like StatusCake which monitors your website and notifies you when it goes down.
If you follow this guide, the chances are that your Joomla site is more secured. I hope this helps you.
Bunmi J.
2 notes
·
View notes
Photo

How to Install WordPress
What You'll Be Creating
So you want a WordPress site?
That’s great. WordPress is the world’s most popular content management system (or CMS), and for good reason.
With WordPress, you can get yourself a flexible, scalable, and user-friendly website. The software itself is free, and all you have to pay for is the hosting you’ll put it on.
But before you can start, there is one thing you’ll have to do, and that’s set up WordPress. This puts a lot of people off: they think it’s tricky, or long-winded, or requires writing code.
None of these are true. You have two options for installing WordPress, both of which are designed to be quick and easy. I’ll show you how to do both of them in this guide.
Premium WordPress Themes and Plugins
Once you've got your site set up, you'll want to explore the thousands of WordPress themes on ThemeForest and WordPress plugins on CodeCanyon. Purchase these high-quality WordPress themes and plugins and improve your website experience for you and your visitors.
Options for Installing WordPress
There are two ways of installing WordPress: manually, or with the click of a button.
For most non-techies, the click of a button option is the preferred one. But just in case you prefer the more thorough way, I’m going to help you to do it manually too.
Each method has its own advantages and disadvantages.
Automatic Installation
Pros:
It’s easy.
It works.
Cons:
Your hosting provider might add some extra code or plugins, which could cause you problems in the long run or might just annoy you. For most people, this isn’t an issue.
A poor hosting provider might not install the latest version of WordPress. A good one will. (Hint: you should only go with a good one.)
If your hosting provider doesn’t provide cPanel (or something like it) as part of your package, you might not have access to an auto-installer (which is why this is an important criterion when choosing hosting).
Manual Installation
Pros:
You get a clean installation with no extra code or plugins.
Cons:
It takes longer.
It’s not as easy.
Sometimes it doesn’t work properly (although that’s normally due to user error).
For 90% of website owners, the automatic installation is absolutely fine. It’s only if you’re planning to customize the code on your site that you may have issues.
If you fancy trying your hand at manual installation, read through the instructions below and give it a go. But if you prefer an easy life, go with the automatic option.
Installing WordPress with Siteground
If your hosting account is with Siteground, you’ll be pleased to know that installing WordPress is quick and easy, and doesn’t require any technical skills.
Log into your Siteground account and click on Websites to go to the Websites screen.
Click the New Website button at the top of the screen.
You’ll then be prompted for which domain you want to use with your site. You can use one of the following:
a new domain, which you register with Siteground
an existing domain which you already have registered and pointing at your Siteground account
a temporary domain, meaning you can test the new site and then set up the domain once it’s ready
Select the option you want to use and click the Select button beneath it. If you select existing domain, you’ll need to type the domain name into the field that appears. If you’re setting up a new domain, you’ll be given the option to register it with Siteground. If you select a temporary domain, that will appear on the screen.
Click the Continue button to go to the Add New Website screen.
Find the Start New Website box and click the Select button. You’ll be given a choice of apps to use for your new site. Click on Select in the WordPress box.
You’ll then be prompted to type in your login details.
Type in your email address and the password you want to use and click the Continue button.
You’ll then be given the option to add SG Site Scanner to your site. If you want to sign up for that, click Add. If not, click Finish.
The system will then start work creating your site.
And that’s it! The next screen you will see will have details of your new WordPress site.
From here you can view your site or log in to manage it. Check out our complete guide to making a site with WordPress to learn how to add content to your site and get it working for you.
WordPress
How to Make a WordPress Website
Rachel McCollin
Installing WordPress in CPanel
If you’re with a different hosting provider, they’ll probably provide you with an auto-installer that you access via cPanel or via their dashboard.
First, you’ll need to access your control panel with your hosting provider. This is normally called cPanel, although some providers give it a name of their own.
If you’re not sure how to get to this, check the email you received when you set up your hosting account. It should contain a link to cPanel. And if that fails, ask your hosting provider to tell you or google ‘access cPanel [my hosting provider]’.
You should find a section called Autoinstallers. In that section you’re looking for an icon with the word WordPress beneath it. If you can’t find that, you’ll need to use Softaculous instead.
Let me start by demonstrating the process with the dedicated WordPress installer.
Installing WordPress With the WordPress Auto-Installer
Click on the WordPress logo. This will take you to a set of screens for installing WordPress.
If the Install tab isn’t already open, click on it.
Now complete the fields as below.
Version: Leave this as the default.
Protocol: If you have SSL already set up for your site (some providers give you this when you register the domain), select https://. If not or if in doubt, select https://. Note that SSL makes your site more secure and is worth using if possible.
Choose Domain: If you have more than one domain registered, choose the one you want to use.
In Directory: Leave this blank.
Site Name: Enter the name of your site. You can change this later.
Site Description: Your tagline. Again, you can change this later.
Enable Multisite: Leave this unchecked. Some auto-installers don’t have this: don’t worry if you can’t see it.
Admin Username: Type in the username you want to use. Don’t use admin as this isn’t very secure. You can’t change this later, so make sure it’s what you intend to use forever.
Admin Password: Type in the password you want to use. Use something different from your username, with a few upper-case letters and numbers for extra security. You want to make it as hard as possible for people to get into your site. You can change your password later via the WordPress admin screens, to make it more secure.
Admin Email: Type in the email address you want to use for any emails relating to your site. This isn’t publicly displayed.
Select Language: Choose your language.
Select Plugins: Leave all of these unchecked. This will only be an option with some hosting providers: don’t worry if it isn’t there.
WordPress Starter: Uncheck this. Again, this is specific to some hosting providers and you might not have it.
If there are any other options, just leave them unchecked. And ignore any advanced settings: you don’t need to worry about them.
Once you’ve filled out the fields, click the Install button.
The auto-installer will take some time to set up your new WordPress site, and then you’ll be taken to a screen with details of your new site. There will be a link to the site itself and a link to your dashboard. In the screenshot below, I’ve installed WordPress in a subdirectory.
Congratulations, you now have a WordPress site!
Installing WordPress With Softaculous
If your cPanel doesn’t have a dedicated WordPress installer, you can use Softaculous instead. Follow these steps:
Click on the Softaculous icon in cPanel.
From the menu on the left, select WordPress.
Click the WordPress icon at the top of the screen.
Follow the steps in the previous section.
In fact, the WordPress auto-installer is nothing more than a shortcut to the Softaculous installer. So the process is the same.
Once you’ve done that, you can follow the link to your shiny new site and start getting it ready.
Installing WordPress Manually
Alternatively, you can use the "famous five-minute install" to install WordPress manually.
To install WordPress manually, you’ll need:
A web browser.
An FTP client. This will let you upload files to the server where your website is hosted. Personally, I use Coda, a code editing application with an FTP client included, but if you just need FTP, you can choose from our list of the top five FTP clients out there.
Access to your server to create databases—your hosting provider will likely provide you with a tool called phpMyAdmin to do this. If in doubt, ask them!
Note that you won’t need an FTP client if you’re running WordPress locally—that is if you're running it on your computer instead of on the internet.
To install WordPress, you’ll need to follow three steps:
Create a database on your server.
Download WordPress and copy it to your server.
Run the WordPress installation.
Create a Database
The database will hold all of your site’s content, and without it, WordPress and your WordPress site won’t work. You can create yours in one of two ways, depending on your hosting provider’s setup:
via your hosting admin screens
using phpMyAdmin
With my hosting provider, I use their admin screens to create a database, so let’s look at that first.
Using Your Hosting Admin to Create a Database
In your hosting admin screens, find an option called databases, SQL databases, or similar. The exact name will vary depending on your provider.
For example, here’s the screen I use:
If you’re using a similar admin screen, follow these steps:
Give your database a name and type it in the field.
Click on Create Database.
You’ll then be asked to enter a password for the new user associated with this database. Choose a password, type it in, and click OK.
Make a note of the database name, username, and password. You’ll need these later.
And, that’s it—your database is ready!
Using phpMyAdmin to Create a Database
If your hosting provider gives you phpMyAdmin as part of your package, or you’re using MAMP to install WordPress locally, you can use this to create your database.
In your hosting admin screens or the MAMP welcome screen, click the link to phpMyAdmin, which might look something like this:
The phpMyAdmin welcome screen will open. Click on the Databases tab at the top left to open the databases screen:
In the Create Database field, type the name of your database.
Click the Create button.
And with that, your database will be created. Make a note of the database name for later. The username and password will default to root.
Step 1 is done—and that’s the trickiest part. It’s plain sailing from here on in!
Download and Upload WordPress
Now you need to download the latest version of WordPress.
Go to the WordPress download page.
Click the Download WordPress button to download a zip file containing all of the WordPress files to your computer.
Unzip the file on your computer in exactly the same way you would normally unzip any other file. You’ll now have a folder called wordpress with all of the WordPress files in it. Make a note of where that folder is.
Next, you need to upload WordPress to your server.
Open your FTP client. Sign in to the FTP on your server using the FTP login details your hosting provider gave you when you created your account. If you’re not sure about these, ask them. You’ll need the server address, your username, and the password.
In your FTP client, find the wordpress folder on your local machine and the public_html folder on your server. You should be able to see the two of them side by side. As an example, here’s mine in Coda:
Note that my folder on the remote server is empty because I’m installing WordPress in a subdirectory. Yours will have other files in there—ignore those.
Now drag the contents of the wordpress folder (not the folder itself) to your public_html folder. Your FTP client will copy the files to your server.
Wait for the files to finish copying. Now you’re ready for the third and final stage: running the WordPress installation.
Run the WordPress Installation
Your database and files are in place, and you’re ready to install WordPress!
Open your browser and go to your website. You’ll see the first WordPress installation screen.
You should have all this information noted down from when you were creating your database. Click Let’s Go!
On the next screen, input your database name, username, and password. If you’re working locally, the username and password will default to root. Otherwise, they’ll be what you specified when you created your database.
Leave the Database Host and Table Prefix fields as they are (note: if in any doubt, ask your host for what to enter as the Database Host, as this can vary between hosting providers—assuming they haven’t already let you know in a previous email when you initially signed up for their services) and click Submit.
Next, you’ll see my favorite screen—the one that tells you WordPress is ready to install. Well done!
Note: If you’re in the US, it will say ‘All right sparky!’ I’m in the UK, so it uses the more sedate ‘sunshine’. I prefer ‘sparky’ to be honest.
Click Run the install to access the site details screen.
Finally, enter your site details: the site title, your username and password, and email address. If you want Google to find your site, leave the Privacy box checked. Click Install WordPress.
WordPress will be installed, and you’ll see a success screen. Hurray!
Now you can log in to your site by clicking the Log In button and entering the credentials you provided when you were installing WordPress.
This will take you to the WordPress dashboard.
Congratulations, you’ve successfully installed WordPress and can now start managing your site!
Installing WordPress isn’t as tricky as you may think. By following the advice above, you can get yourself a brand new site with the world’s favorite CMS. Enjoy!
The Best WordPress Themes and Plugins on Envato Market
Explore thousands of the best WordPress themes ever created on ThemeForest and leading WordPress plugins on CodeCanyon. Purchase these high-quality WordPress themes and plugins and improve your website experience for you and your visitors.
Here are a few of the best-selling and up-and-coming WordPress themes and plugins available for 2020.
Inspiration
15+ Best WordPress Portfolio Themes for Creatives
Brenda Barron
WordPress
17 Best WordPress Slider & Carousel Plugins of 2020
Daniel Strongin
WordPress
20 Best WordPress Calendar Plugins and Widgets
Daniel Strongin
WordPress Themes
23+ Best Responsive WordPress Themes (For Sites in 2020)
Brenda Barron
WordPress
24 Best WPBakery Page Builder (Visual Composer) Addons & Plugins of 2020
Daniel Strongin
WordPress Themes
20+ Best Coaching & Consulting WordPress Themes (2020)
Brenda Barron
by Rachel McCollin via Envato Tuts+ Code https://ift.tt/3ewc73h
0 notes
Link

Easy Recovery of WordPress Username and Password
In order to recover the password and username, you must access your database management tool. Most of the hosting companies suggest to use phpMyAdmin for WordPress. With this information, let us follow the steps given below.
Access your cPanel and scroll down to the database section. There, click on the Database management tool, phpMyAdmin. Please note that before you make any changes in the database management tool, we suggest you to take a backup of all the MySQL databases. In case you replace something, you will always have a backup. So, download the database to your computer.
Once you are in the database management tool, phpMyAdmin, for instance, you can view a list of all the database you have connecting to your WordPress account. Firstly, expand the table with a click.
You will find all the usernames of each database under the table head, wp_users. This is a default table name. Click on the table name and you will find all the usernames listed on the right hand side. In addition, you will find login, user emails, user passwords, and user nicknames.
You will find the password under the table name user_pass. When you look at it, you will be baffled by the long numerical and alphabetical password. But, don’t be confused. The alphanumeric password is to protect you. However, it is difficult to do WordPress password decrypt work. So, you can either note it down or simply change the password to something of your choice.
Since you do not have access to your email address, you can choose to edit the email address from the table in phpMyAdmin.
To change WordPress password, go to the user_pass row, and hit the MD5 in the drop-down menu. Now, add the new password of your choice in the Value Box. Hit Go and your password for WordPress admin is successfully updated.
Now, using your noted database username and the new password, you can log into your WordPress admin page and manage your website.
#Wordpress website design sydney#Wordpress web design sydney#Wordpress web development sydney#Wordpress web development#Wordpress website development#Wordpress website design
0 notes
Text
The Most Effective Method to Introduce WordPress with Bluehost
Here are the steps to how to install WordPress on Bluehost using Marketplace. Installing WordPress with Marketplace

1. Login to your Bluehost cPanel account. 2. Find the Website section and select Install WordPress. 3. Click the Install button. 4. Choose the domain name to install it to. In the field next to the domain, you can enter a subfolder such as ‘blog’ or leave it blank if you want the site’s main page to be the blog. 5. If necessary, you can edit the email address, username and password for the new WordPress installation. Click “advanced options” and you can change those settings. 6. Read through the license and service agreements and check the boxes. 7. Select the Install Now button. If you have already installed a fresh WordPress and looking for a solution to transfer your local/dev setup to BlueHost.
Migrating WordPress to BlueHost
1. To start, log into your current host and use a provided program (such as phpMyAdmin) to export your site’s database. 2. Use your preferred FTP program (such as Filezilla or Cyberduck) to download and save your wp-content folder (a.k.a. the files that make up your WordPress site.) Of course, You won’t need to download files if your existing site is on local 3. Login to your Bluehost control panel. 4. Install WordPress using the Marketplace, one-click install tool. 5. Create an FTP account in your Bluehost control panel so you can upload your files to your new WordPress site folder. When creating your FTP account, keep in mind that you might want to change its designated directory to something easily identifiable. 6. Launch your preferred FTP program and open a new connection. Log in with your new FTP account info. 7. Overwrite the existing wp-content folder with the one you downloaded from your previous host. 8. Open phpMyAdmin in the Database section of your Bluehost cPanel. 9. Select the database to which you want to import your data. You may need to look up this information. (To do so, go to the File Manager in your control panel and open your public_html folder. Then scroll down to find the wp-config file, right-click the icon, select “Code Edit”, and then “Edit.” In the code edit window, scroll down to identify the database you should use. 10. Back in your phpMyAdmin window, once you’ve selected the correct database, you will see a list of tables. Drop these tables before you import your new data by selecting the “Check All” option at the bottom of the list and then selecting “Drop.” 11. Now it’s time to import! Go to the “Import” tab in phpMyAdmin. Choose “Browse your computer” and find the SQL database file that you exported from your previous site. (It should be named something similar to “bluepm1_wor2.sql”.) Make sure the SQL format is selected and click “Go.” 12. Here is an important step after you import your database. After your database is imported, check to learn the new table names. If your table names begin with ‘wp_’ then you don’t need to make any changes. However, sometimes your tables will import with a name like ‘wrp-‘ Go to your file manager and open the wp-config file in your public_html folder. 13. Right click on wp-config, select “Code Edit”, and then select “Edit.” 14. Scroll down until you find the line “Stable Prefix” line. Edit it to read ‘wp_’. 15. Now that you have your database and site files, it’s time to put everything on your temporary URL. This is how you move your site without any downtime.* First, in your phpMyAdmin site, select wp-options from the menu on the left of the screen. Then, select “Edit” on the “site url” line. (This will typically be line .) Paste in the temporary URL provided to you when you created your Bluehost account and click “Go.” (Tip: if you’re not sure what it is, it can be found in your Bluehost welcome e-mail.) *Note: all of these previous steps can help anyone move their WordPress site. The following steps are for those are want to move their WordPress site without any downtime. 16. Repeat Step 11 for your “Home” line in wp-options. (This is typically line 36.) 17. Now it’s time to see if your work has paid off. Enter the temporary URL into your internet browser and check to see if your site is there. If so, you’re nearly done! 18. Log into your WordPress admin site to save your Permalinks. Go to “Permalinks” under the “Settings” tab of the dashboard and click “Save Changes.” 19. Before you can move from the temporary URL to your permanent one, you must change the nameservers associated with your domain to point to Bluehost. This can be done in the domain manager of your domain registrar, whether it be with Bluehost or another registrar. Use the following: NS1.BLUEHOST.COM and NS2.BLUEHOST.COM. (This indicates that your site is hosted at Bluehost.com. The DNS change can take anywhere from a few hours to several days to propagate. Once it is finished you will be able to use your domain on your new site.) 20. Once the DNS change in complete, log into your WordPress admin site and go to “General” under the “Settings” tab. Then, enter your domain into the “WordPress Address” and “Site Address” fields, and click “Save Changes.” 21. The last step is to enter your domain URL into your internet browser to check to see if your site is live. If so, then congratulations! You have successfully moved your WordPress site to Bluehost. These steps will remain more or less the same for most hosting providers. As you may have already expected, migrating WordPress first time can feel to be a little overwhelming, but once you do it, you would realise it is not much difficult either.
0 notes
Text
What is cPanel? The Complete Guide to cPanel for Beginners
cPanel is one of the most common Web hosting account control panels in Linux. It lets you handle all resources easily in one location. Today cPanel is the industry standard and is well known to most web developers.
Intuitive and simple to use, cPanel empowers you to handle a full performance Web hosting account. Whether it is creating new FTP users and email addresses or tracking tools, subdomains are developed and software enabled.
What is cPanel hosting?
cPanel hosting is essentially Linux Web hosting that includes cPanel installation. CPanel has its advantages and disadvantages but in most situations it works pretty well and makes a sensible choice when you’re looking for a control panel solution. Here’s what you should do:
Pros:
Easy to learn
Easy to use
Saves time and money
Tried and tested
Includes software auto installers
Plenty of tutorials/support available online
Cons:
Number of features can be overwhelming
Relatively easy to accidentally change important settings
Some hosts run outdated software
Can cost more and is rarely offered with free hosting
Alternatives to cPanel
There are thousands of alternatives to cPanel out there and because each hosting company is different, you’ll need to consult with each potential host to get an idea of what control panel solutions they’re using. Here at Hostinger, we’ve built our own custom control panel, which is compatible with all web hosting plans. This shares some parallels with cPanel and helps us to be more versatile when tailoring to our users ‘ needs.
Yet cPanel hosting is something you can also find at our sister company Hosting24. Annual and longer plans include a free domain name, so you can get all the ingredients to make a single purchase on the internet!
Essentially, whether you are using cPanel or an alternative doesn’t really matter, as long as you are able to achieve what you want. If you need to do something different on your control panel then double check with the provider.
cPanel Tutorial: How to Use cPanel
Different cPanel configurations have different features but the good news is that browsing around and getting to know each of the different sections is pretty easy. Normally, when you first log in, you will see some metrics that log your resource usage (such as your CPU usage, your storage space available and your memory usage). It can provide a convenient way to keep an eye on the overall performance of your web site.
Once you’ve become comfortable with the success of your website, it’s time to take a look at the various modules. We gave a description of the most common cPanel modules below.
File Modules:
cPanel File Modules
Preferences:
cPanel Preferences
Databases:
cPanel Databases
If your website uses a content management system (CMS) then it will use a database to store posts, settings and other information. This section, then, is all about managing those databases. Common modules include:
MySQL Database Wizard
MySQL Databases
phpMyAdmin
Remote MySQL
Web Applications:
cPanel Web Applications
This is typically where your cPanel installation will allow you to install different types of software. It includes everything from blogs and portals to CMSs and forums. Common modules include:
Drupal
Joomla
phpBB
WordPress
Domains:
cPanel Domain
It’s not uncommon for webmasters to use one hosting account for multiple sites or to set up subdomains and redirects. This is the section in which you can manage that. Common modules include:
Addon Domains
Aliases
DNS Manager
Preview Website
Redirects
Subdomains
Metrics:
cPanel Metrics
If you run a website then you will want to keep an eye on its results. That is where the modules for the metrics come in. Therefore, it’s all about giving you access to powerful information that can help you make better decisions about how your website functions. Modules include:
Awstats
Bandwidth
CPU and Concurrent Connection Usage
Errors
Raw Access
Visitors
Webalizer
Webalizer FTP
Security:
cPanel Security
For most webmasters, security is a big concern, particularly if they are storing sensitive information such as usernames, passwords or financial information. It module will allow you to keep an eye on your hosting account’s main security settings Modules common to use include:
Hotlink Protection
IP Blocker
Leech Protection
SSH Access
SSL/TLS
Software:
cPanel Software
These modules are largely about PHP and Perl and aren’t necessarily needed unless you’re a more advanced user. Common modules include:
Softaculpis Apps Installer
Optimize Website
Perl Modules
PHP PEAR Packages
CloudFlare
PHP Version Selector
Advanced:
cPanel Advanded
As the title suggests, these settings are also more useful for advanced users. Common modules include:
Apache Handlers
Cron Jobs
Error Pages
Indexes
MIME Types
Track DNS
Email:
cPanel Email
Not all web hosting packages include email, but if your package includes both email and cPanel then this is where you’ll administer all of those email accounts. Common modules include:
Address Importer
Apache SpamAssassin
Autoresponders
Default Address
Email Wizard
Encryption
Forwarders
Global Filters
MX Entry
Track Delivery
User Filters
Conclusion
In short, cPanel is one of Linux ‘ most common web hosting control panels, showing key performance metrics for your server and allowing you to access a number of modules including Files, Preferences, Databases, Web Applications, Domains, Metrics, Protection, Software, Advanced and Email modules.
Above all, cPanel hosting is basically Linux hosting which includes the installation of cPanel, making it a popular choice among webmasters. But there are plenty of alternatives out there, so if cPanel isn’t for you then you’re sure to find an acceptable control panel.
https://www.casbay.com/blog/tips-sharing/what-is-cpanel-the-complete-guide-to-cpanel-for-beginners/
0 notes
Text
how to change wordpress password from cpanel at iwrahost
how to change wordpress password from cpanel at iwrahost
How to Reset WordPress Password
If you forget your WordPress password, you can reset it in one of four ways:
Use the Lost your password link on the login screen
Reset your password through Softaculous (WordPress installed with Softaculous)
Reset your password through QuickInstall (WordPress installed with QuickInstall)
Manually reset the password through the database with phpMyAdmin
Lost Your Password Link
Go to your WordPress login screen at http://example.com/wp-login.php. (Replace example.com with your actual WordPress installation location. This may be your domain, domain + a folder location, or a temporary URL).
Under the login form, click Lost your password.
Enter the username or email address of the account you’re trying to log into.
Click Get New Password to have the reset password email sent to that username’s email.
Softaculous Password Reset
Log into cPanel. of your web hosting account at iwrahost.com
Scroll down to the Software section and click on the Softaculous Apps Installer.
On the main page of Softaculous, click on Installations or, in the upper right-hand corner, click on the Box icon within the navigation bar to show the list of Scripts Installations.
Under Link, find the domain for which you need to reset the password.
On the right-hand side of the row, click the Pencil icon to load the Installation Details.
Go to the Admin Account section on the Installation Details page.
Enter the Admin Username for which you want to change the password.
Enter the new Admin Password.
Scroll down to the bottom of the page, and click on Save Installation Details.
QuickInstall Password Reset
Log into cPanel. if you are reseller hosting under whm find list account and click on a particular cpanel.
Under Software/Services, click on QuickInstall.
At the top of the page, click My Installs.
Locate the installation you wish to modify.
Click Reset Password.
Select the username you wish to change the password for from the drop-down box, then enter a new password.
Check out our guide on how to make a strong, memorable password:
How Can I Make a Stronger Password?
Click the Reset Password button to change the password for the selected user.
Manual Password Reset
Log into cPanel.
Under Databases, click phpMyAdmin.
Click on the WordPress database from the left panel list.
Click wp_users from the left panel list.
Under user_login, you will see the list of registered users. Under the user whose password you wish to reset, click edit.
Under the user_pass column, clear the value on the far right and replace it with what you would like the password to be.
In the Function drop-down menu, select MD5.
At the bottom of the page, click GO.
From https://www.iwrahost.com/how-to-change-wordpress-password-from-cpanel-at-iwrahost/
from https://iwrahost1.wordpress.com/2020/08/07/how-to-change-wordpress-password-from-cpanel-at-iwrahost/
0 notes
Text
how to change wordpress password from cpanel at iwrahost
how to change wordpress password from cpanel at iwrahost
How to Reset WordPress Password
If you forget your WordPress password, you can reset it in one of four ways:
Use the Lost your password link on the login screen
Reset your password through Softaculous (WordPress installed with Softaculous)
Reset your password through QuickInstall (WordPress installed with QuickInstall)
Manually reset the password through the database with phpMyAdmin
Lost Your Password Link
Go to your WordPress login screen at http://example.com/wp-login.php. (Replace example.com with your actual WordPress installation location. This may be your domain, domain + a folder location, or a temporary URL).
Under the login form, click Lost your password.
Enter the username or email address of the account you’re trying to log into.
Click Get New Password to have the reset password email sent to that username’s email.
Softaculous Password Reset
Log into cPanel. of your web hosting account at iwrahost.com
Scroll down to the Software section and click on the Softaculous Apps Installer.
On the main page of Softaculous, click on Installations or, in the upper right-hand corner, click on the Box icon within the navigation bar to show the list of Scripts Installations.
Under Link, find the domain for which you need to reset the password.
On the right-hand side of the row, click the Pencil icon to load the Installation Details.
Go to the Admin Account section on the Installation Details page.
Enter the Admin Username for which you want to change the password.
Enter the new Admin Password.
Scroll down to the bottom of the page, and click on Save Installation Details.
QuickInstall Password Reset
Log into cPanel. if you are reseller hosting under whm find list account and click on a particular cpanel.
Under Software/Services, click on QuickInstall.
At the top of the page, click My Installs.
Locate the installation you wish to modify.
Click Reset Password.
Select the username you wish to change the password for from the drop-down box, then enter a new password.
Check out our guide on how to make a strong, memorable password:
How Can I Make a Stronger Password?
Click the Reset Password button to change the password for the selected user.
Manual Password Reset
Log into cPanel.
Under Databases, click phpMyAdmin.
Click on the WordPress database from the left panel list.
Click wp_users from the left panel list.
Under user_login, you will see the list of registered users. Under the user whose password you wish to reset, click edit.
Under the user_pass column, clear the value on the far right and replace it with what you would like the password to be.
In the Function drop-down menu, select MD5.
At the bottom of the page, click GO.
from https://www.iwrahost.com/how-to-change-wordpress-password-from-cpanel-at-iwrahost/ from https://iwrahost1.tumblr.com/post/625834119903969280
0 notes
Text
how to change wordpress password from cpanel at iwrahost
how to change wordpress password from cpanel at iwrahost
How to Reset WordPress Password
If you forget your WordPress password, you can reset it in one of four ways:
Use the Lost your password link on the login screen
Reset your password through Softaculous (WordPress installed with Softaculous)
Reset your password through QuickInstall (WordPress installed with QuickInstall)
Manually reset the password through the database with phpMyAdmin
Lost Your Password Link
Go to your WordPress login screen at http://example.com/wp-login.php. (Replace example.com with your actual WordPress installation location. This may be your domain, domain + a folder location, or a temporary URL).
Under the login form, click Lost your password.
Enter the username or email address of the account you’re trying to log into.
Click Get New Password to have the reset password email sent to that username’s email.
Softaculous Password Reset
Log into cPanel. of your web hosting account at iwrahost.com
Scroll down to the Software section and click on the Softaculous Apps Installer.
On the main page of Softaculous, click on Installations or, in the upper right-hand corner, click on the Box icon within the navigation bar to show the list of Scripts Installations.
Under Link, find the domain for which you need to reset the password.
On the right-hand side of the row, click the Pencil icon to load the Installation Details.
Go to the Admin Account section on the Installation Details page.
Enter the Admin Username for which you want to change the password.
Enter the new Admin Password.
Scroll down to the bottom of the page, and click on Save Installation Details.
QuickInstall Password Reset
Log into cPanel. if you are reseller hosting under whm find list account and click on a particular cpanel.
Under Software/Services, click on QuickInstall.
At the top of the page, click My Installs.
Locate the installation you wish to modify.
Click Reset Password.
Select the username you wish to change the password for from the drop-down box, then enter a new password.
Check out our guide on how to make a strong, memorable password:
How Can I Make a Stronger Password?
Click the Reset Password button to change the password for the selected user.
Manual Password Reset
Log into cPanel.
Under Databases, click phpMyAdmin.
Click on the WordPress database from the left panel list.
Click wp_users from the left panel list.
Under user_login, you will see the list of registered users. Under the user whose password you wish to reset, click edit.
Under the user_pass column, clear the value on the far right and replace it with what you would like the password to be.
In the Function drop-down menu, select MD5.
At the bottom of the page, click GO.
from https://www.iwrahost.com/how-to-change-wordpress-password-from-cpanel-at-iwrahost/
0 notes
Video
youtube
How To Create New Post On The WordPress Website
In this video tutorial, I am showing with you how to create a post on the WordPress website.
Follow to Steps ================= 1. First, you need to Log in to your WordPress admin panel. 2. Go to the menu and find the posts name, and click the add new. 3. Once you will click the add new then you would be on the posts page, where you will see the lots of options on the screen. 4. Then you only need to fill the title, description and set the featured image from the right side. 5. Once you will be done this process then go to above and click the preview button for checking the post which one you want to create. 6. Once you are satisfied with this then go back to post page and click the publish button. 7. When the posts page would be published then you can click the view post from the top of the menu. 8. Once you click the view post then it will be open on the new tab and see your post on the frontend view.
This is the process of How to create the post on the WordPress website.
Here below some videos can help you, Must watch: =========================================
How to Change Your WordPress Admin Username:-- https://youtu.be/Vg1oMPy_BSk
Install WordPress On Local Host In Hindi:-- https://youtu.be/QtK0nqaWC70
How To Install WordPress in cPanel Using Softaculous 2020:- https://youtu.be/-AEcHtOCFoA
How to Reset WordPress Admin Password in phpMyAdmin Database :- https://youtu.be/BLZmw_EBoQM
Thank You For Watching........:)
0 notes
Photo

How to Install WordPress
What You'll Be Creating
So you want a WordPress site?
That’s great. WordPress is the world’s most popular content management system (or CMS), and for good reason.
With WordPress you can get yourself a flexible, scaleable and user-friendly website. The software itself is free and all you have to pay for is the hosting you’ll put it on.
But before you can start, there is one thing you’ll have to do, and that’s set up WordPress. This puts a lot of people off: they think it’s tricky, or long-winded, or requires writing code.
None of these are true. You have two options for installing WordPress, both of which are designed to be quick and easy. I’ll show you how to do both of them in this guide.
Premium WordPress Themes and Plugins
Once you've got your site set up, you'll want to explore the thousands of WordPress themes on ThemeForest and WordPress plugins on CodeCanyon. Purchase these high-quality WordPress themes and plugins can and improve your website experience for you and your visitors.
Options for Installing WordPress
There are two ways of installing WordPress: manually, or with the click of a button.
For most non-techies, the click of a button option is the preferred option. But just in case you are prefer the more thorough way, I’m going to help you to do it manually too.
Each method has its own advantages and disadvantages.
Automatic Installation
Pros:
It’s easy.
It works.
Cons:
Your hosting provider might add some extra code or plugins, which could cause you problems in the long run. Or might just annoy you. For most people, this isn’t an issue.
A poor hosting provider might not install the latest version of WordPress. A good one will. (Hint: you should only go with a good one.)
If your hosting provider doesn’t provide cPanel (or something like it) as part of your package, you might not have access to an auto-installer (which is why this is an important criterion when choosing hosting).
Manual Installation
Pros:
You get a clean installation with no extra code or plugins.
Cons:
It takes longer.
It’s not as easy.
Sometimes it doesn’t work properly (although that’s normally due to user error).
For 90% of website owners, the automatic installation is absolutely fine. It’s only if you’re planning to customize the code in your site that you may have issues.
If you fancy trying your hand at manual installation, read through the instructions below and give it a go. But if you prefer an easy life, go with the automatic option.
Installing WordPress With an Auto-installer
Let’s start with the quick and easy option.
First, you’ll need to access your control panel with your hosting provider. This is normally called cPanel, although some providers give it a name of their own.
If you’re not sure how to get to this, check the email you received when you set up your hosting account. It should contain a link to cPanel. And if that fails, ask your hosting provider to tell you or google ‘access cPanel [my hosting provider]’.
The hosting provider I use is Siteground. To access cPanel via their client area, I go to My Accounts > Go to cPanel.
You’re then presented with the cPanel screen.
At this point, you might panic. So many options! Databases! Joomla! Mail! Security! How on earth do you know where to start?
You only need to find the WordPress auto installer. Ignore everything else. Just blank it out. Pretend it isn’t there.
You should find a section called Autoinstallers. In that section you’re looking for an icon with the word WordPress beneath it. If you can’t find that, you’ll need to use Softaculous instead.
Let me start by demonstrating the process with the dedicated WordPress installer.
Installing WordPress With the WordPress Auto-installer
Click on the WordPress logo. This will take you to a set of screens for installing WordPress.
If the Install tab isn’t already open, click on it.
Now complete the fields as below.
Version: lLave this as the default.
Protocol: If you have SSL already set up for your site (some providers give you this when you register the domain), select https://. If not or if in doubt, select https:// Note that SSL makes your site more secure and is worth using if possible.
Choose Domain: If you have more than one domain registered, choose the one you want to use.
In Directory: Leave this blank.
Site Name: Enter the name of your site. You can change this later.
Site Description: Your tagline. Again, you can change this later.
Enable Multisite: Leave this unchecked. Some auto-installers don’t have this: don’t worry if you can’t see it.
Admin Username: Type in the username you want to use. Don’t use admin as this isn’t very secure. You can’t change this later so make sure it’s what you intend to use forever.
Admin Password: Type in the password you want to use. Use something different from your username, with a few upper-case letters and numbers for extra security. You want to make it as hard as possible for people to get into your site. You can change your password later via the WordPress admin screens, to make it more secure.
Admin Email: Type in the email address you want to use for any emails relating to your site. This isn’t publicly displayed.
Select Language: Choose your language.
Select Plugins: Leave all of these unchecked. This will only be an option with some hosting providers: don’t worry if it isn’t there.
WordPress Starter: Uncheck this. Again, this is specific to some hosting providers and you might not have it.
If there are any other options, just leave them unchecked. And ignore any advanced settings: you don’t need to worry about them.
Once you’ve filled out the fields, click the Install button.
The auto-installer will take some time to set up your new WordPress site and then you’ll be taken to a screen with details of your new site. There will be a link to the site itself and a link to your dashboard. In the screenshot below I’ve installed WordPress in a subdirectory.
Congratulations, you now have a WordPress site!
Installing WordPress With Softaculous
If your cPanel doesn’t have a dedicated WordPress installer, you can use Softaculous instead. Follow these steps:
Click on the Softaculous icon in cPanel.
From the menu on the left, select WordPress.
Click the WordPress icon at the top of the screen.
Follow the steps in the previous section.
In fact, the WordPress auto-installer is nothing more than a shortcut to the Softaculous installer. So the process is the same.
Once you’ve done that, you can follow the link to your shiny new site and start getting it ready.
Installing WordPress Manually
Alternatively, you can use the "famous five minute install" to install WordPress manually.
To install WordPress manually you’ll need:
A web browser.
An FTP client. This will let you upload files to the server where your website is hosted. Personally, I use Coda, a code editing application with FTP client included, but if you just need FTP you can choose from our list of the top five FTP clients out there.
Access to your server to create databases—your hosting provider will likely provide you with a tool called phpMyAdmin to do this. If in doubt, ask them!
Note that you won’t need an FTP client if you’re running WordPress locally—that is if you're running it on your computer instead of on the internet.
To install WordPress you’ll need to follow three steps:
create a database on your server
download WordPress and copy it to your server
run the WordPress installation
Create a Database
The database will hold all of your site’s content and without it, WordPress and your WordPress site won’t work. You can create yours in one of two ways, depending on your hosting provider’s setup:
via your hosting admin screens
using phpMyAdmin
With my hosting provider, I use their admin screens to create a database, so let’s look at that first.
Using Your Hosting Admin to Create a Database
In your hosting admin screens, find an option called databases, SQL databases or similar. The exact name will vary depending on your provider.
For example, here’s the screen I use:
If you’re using a similar admin screen, follow these steps:
Give your database a name and type it in the field.
Click on Create Database.
You’ll then be asked to enter a password for the new user associated with this database. Choose a password, type it in, and click OK.
Make a note of the database name, username and password. You’ll need these later.
And, that’s it—your database is ready!
Using phpMyAdmin to Create a Database
If your hosting provider gives you phpMyAdmin as part of your package, or you’re using MAMP to install WordPress locally, you can use this to create your database.
In your hosting admin screens or the MAMP welcome screen, click the link to phpMyAdmin, which might look something like this:
The phpMyAdmin welcome screen will open. Click on the Databases tab at the top left to open the databases screen:
In the Create Database field, type the name of your database.
Click the Create button.
And with that, your database will be created. Make a note of the database name for later. The username and password will default to root.
Step 1 is done—and that’s the trickiest part. It’s plain sailing from here on in!
Download and Upload WordPress
Now you need to download the latest version of WordPress.
Go to the WordPress download page.
Click the Download WordPress button to download a zip file containing all of the WordPress files to your computer.
Unzip the file on your computer in exactly the same way you would normally unzip any other file. You’ll now have a folder called wordpress with all of the WordPress files in it. Make a note of where that folder is.
Next, you need to upload WordPress to your server.
Open your FTP client. Sign in to the FTP on your server using the FTP login details your hosting provider gave you when you created your account. If you’re not sure about these, ask them. You’ll need the server address, your username and the password.
In your FTP client, find the wordpress folder on your local machine and the public_html folder on your server. You should be able to see the two of them side by side. As an example, here’s mine in Coda:
Note that my folder on the remote server is empty because I’m installing WordPress in a subdirectory. Yours will have other files in there—ignore those.
Now drag the contents of the wordpress folder (not the folder itself) to your public_html folder. Your FTP client will copy the files to your server.
Wait for the files to finish copying. Now you’re ready for the third and final stage: Running the WordPress installation.
Run the WordPress Installation
Your database and files are in place and you’re ready to install WordPress!
Open your browser and go to your website. You’ll see the first WordPress installation screen.
You should have all this information noted down from when you were creating your database. Click Let’s Go!
On the next screen, input your database name, username and password. If you’re working locally, the username and password will default to root. Otherwise they’ll be what you specified when you created your database.
Leave the Database Host and Table Prefix fields as they are (note: if in any doubt, ask your host for what to enter as the Database Host, as this can vary between hosting providers—assuming they haven’t already let you know in a previous email when you initially signed up for their services) and click Submit.
Next, you’ll see my favorite screen—the one that tells you WordPress is ready to install. Well done!
Note: If you’re in the US, it will say ‘All right sparky!’. I’m in the UK so it uses the more sedate ‘sunshine’. I prefer ‘sparky’ to be honest.
Click Run the install to access the site details screen.
Finally, enter your site details: the site title, your username and password and email address. If you want Google to find your site, leave the Privacy box checked. Click Install WordPress.
WordPress will be installed and you’ll see a success screen. Hurray!
Now you can log in to your site by clicking the Log In button and entering the credentials you provided when you were installing WordPress.
This will take you to the WordPress dashboard.
Congratulations, you’ve successfully installed WordPress and can now start managing your site!
Installing WordPress isn’t as tricky as you may think. By following the advice above, you can get yourself a brand new site with the world’s favorite CMS. Enjoy!
The Best WordPress Themes and Plugins on Envato Market
Explore thousands of the best WordPress themes ever created on ThemeForest and leading WordPress plugins CodeCanyon. Purchase these high-quality WordPress themes and plugins can and improve your website experience for you and your visitors.
Here are a few of the best-selling and up-and-coming WordPress themes and plugins available for 2020.
Inspiration
15+ Best WordPress Portfolio Themes for Creatives
Brenda Barron
WordPress
17 Best WordPress Slider & Carousel Plugins of 2020
Daniel Strongin
WordPress
20 Best WordPress Calendar Plugins and Widgets
Daniel Strongin
WordPress Themes
23+ Best Responsive WordPress Themes (For Sites in 2020)
Brenda Barron
WordPress
20 Best WPBakery Page Builder (Visual Composer) Addons & Plugins of 2019
Nona Blackman
WordPress Themes
20+ Best Coaching & Consulting WordPress Themes (2020)
Brenda Barron
by Rachel McCollin via Envato Tuts+ Code https://ift.tt/2RHR6bv
0 notes