#how to create table in phpmyadmin
Explore tagged Tumblr posts
Text
Discover step-by-step instructions on instantly changing table names in phpMyAdmin, ensuring seamless and efficient database management.
#how to create a table in phpmyadmin#how to create table in phpmyadmin#create table in phpmyadmin#create a table in phpmyadmin
0 notes
Text
Complete PHP Tutorial: Learn PHP from Scratch in 7 Days
Are you looking to learn backend web development and build dynamic websites with real functionality? You’re in the right place. Welcome to the Complete PHP Tutorial: Learn PHP from Scratch in 7 Days — a practical, beginner-friendly guide designed to help you master the fundamentals of PHP in just one week.
PHP, or Hypertext Preprocessor, is one of the most widely used server-side scripting languages on the web. It powers everything from small blogs to large-scale websites like Facebook and WordPress. Learning PHP opens up the door to back-end development, content management systems, and full-stack programming. Whether you're a complete beginner or have some experience with HTML/CSS, this tutorial is structured to help you learn PHP step by step with real-world examples.
Why Learn PHP?
Before diving into the tutorial, let’s understand why PHP is still relevant and worth learning in 2025:
Beginner-friendly: Easy syntax and wide support.
Open-source: Free to use with strong community support.
Cross-platform: Runs on Windows, macOS, Linux, and integrates with most servers.
Database integration: Works seamlessly with MySQL and other databases.
In-demand: Still heavily used in CMS platforms like WordPress, Joomla, and Drupal.
If you want to build contact forms, login systems, e-commerce platforms, or data-driven applications, PHP is a great place to start.
Day-by-Day Breakdown: Learn PHP from Scratch in 7 Days
Day 1: Introduction to PHP & Setup
Start by setting up your environment:
Install XAMPP or MAMP to create a local server.
Create your first .php file.
Learn how to embed PHP inside HTML.
Example:
<?php echo "Hello, PHP!"; ?>
What you’ll learn:
How PHP works on the server
Running PHP in your browser
Basic syntax and echo statement
Day 2: Variables, Data Types & Constants
Dive into PHP variables and data types:
$name = "John"; $age = 25; $is_student = true;
Key concepts:
Variable declaration and naming
Data types: String, Integer, Float, Boolean, Array
Constants and predefined variables ($_SERVER, $_GET, $_POST)
Day 3: Operators, Conditions & Control Flow
Learn how to make decisions in PHP:
if ($age > 18) { echo "You are an adult."; } else { echo "You are underage."; }
Topics covered:
Arithmetic, comparison, and logical operators
If-else, switch-case
Nesting conditions and best practices
Day 4: Loops and Arrays
Understand loops to perform repetitive tasks:
$fruits = ["Apple", "Banana", "Cherry"]; foreach ($fruits as $fruit) { echo $fruit. "<br>"; }
Learn about:
for, while, do...while, and foreach loops
Arrays: indexed, associative, and multidimensional
Array functions (count(), array_push(), etc.)
Day 5: Functions & Form Handling
Start writing reusable code and learn how to process user input from forms:
function greet($name) { return "Hello, $name!"; }
Skills you gain:
Defining and calling functions
Passing parameters and returning values
Handling HTML form data with $_POST and $_GET
Form validation and basic security tips
Day 6: Working with Files & Sessions
Build applications that remember users and work with files:
session_start(); $_SESSION["username"] = "admin";
Topics included:
File handling (fopen, fwrite, fread, etc.)
Reading and writing text files
Sessions and cookies
Login system basics using session variables
Day 7: PHP & MySQL – Database Connectivity
On the final day, you’ll connect PHP to a database and build a mini CRUD app:
$conn = new mysqli("localhost", "root", "", "mydatabase");
Learn how to:
Connect PHP to a MySQL database
Create and execute SQL queries
Insert, read, update, and delete (CRUD operations)
Display database data in HTML tables
Bonus Tips for Mastering PHP
Practice by building mini-projects (login form, guest book, blog)
Read official documentation at php.net
Use tools like phpMyAdmin to manage databases visually
Try MVC frameworks like Laravel or CodeIgniter once you're confident with core PHP
What You’ll Be Able to Build After This PHP Tutorial
After following this 7-day PHP tutorial, you’ll be able to:
Create dynamic web pages
Handle form submissions
Work with databases
Manage sessions and users
Understand the logic behind content management systems (CMS)
This gives you the foundation to become a full-stack developer, or even specialize in backend development using PHP and MySQL.
Final Thoughts
Learning PHP doesn’t have to be difficult or time-consuming. With the Complete PHP Tutorial: Learn PHP from Scratch in 7 Days, you’re taking a focused, structured path toward web development success. You’ll learn all the core concepts through clear explanations and hands-on examples that prepare you for real-world projects.
Whether you’re a student, freelancer, or aspiring developer, PHP remains a powerful and valuable skill to add to your web development toolkit.
So open up your code editor, start typing your first <?php ... ?> block, and begin your journey to building dynamic, powerful web applications — one day at a time.

0 notes
Text
Restaurant Table Booking System using PHP and MySQL
Restaurant Table Booking System using PHP and MySQL is a web-based application. The restaurant Table Booking system project is developed to provide service facilities to restaurants and also to the customer. Customers can reserve the table online and check the status of the reservation.
Project Modules
In this project, we use PHP and MySQL database. It has two modules i.e Admin and user.
User Module
Users can fill out the table reservation form.
User can also check the table reservation/booking status.
Click here: https://phpgurukul.com/restaurant-table-booking-system-using-php-and-mysql/
Admin Module
Secure admin/sub-admin login
Dashboard: In this section, the admin can all the brief details like total sub-admins, total bookings, new bookings, accepted bookings and rejected bookings.
Sub-Admins: In this section, Admin can create the sub-admin, delete sub-admins, edit sub-admins, and reset the passwords of sub-admins.
Tables: In this section, admin can add and delete the tables.
Bookings: In this section, the admin can view the new, accepted, rejected, and all bookings. Admin can take actions on new bookings.
B/w dates report: In this section, admin can generate the report of between two dates bookings.
Account Setting: Admin can update his profile, and change the password.
Admin can also recover the password.
Sub-Admin Module
Sub-Admin and Admin features are the same except Sub-Admin creation. Sub-Admin can’t create the Sub-Admins.
How to run the Restaurant Table Booking System (rtbs) Project
1. Download the zip file
2. Extract the file and copy rtbs folder
3.Paste inside root directory(for xampp xampp/htdocs, for wamp wamp/www, for lamp var/www/HTML)
4.Open PHPMyAdmin (http://localhost/phpmyadmin)
5. Create a database with the name rtbsdb
6. Import rtbsdb.sql file(given inside the zip package in the SQL file folder)
7. Run the script http://localhost/rtbs
Credential for Admin panel :
Username: admin Password: Test@123
PHP Gurukul
Welcome to PHPGurukul. We are a web development team striving our best to provide you with an unusual experience with PHP. Some technologies never fade, and PHP is one of them. From the time it has been introduced, the demand for PHP Projects and PHP developers is growing since 1994. We are here to make your PHP journey more exciting and useful.
Email: [email protected] Website : https://phpgurukul.com
0 notes
Text
Migrate or move WordPress website to a new host in 2025
Why You Might Need to Move Your WordPress Site
Your website is important. But sometimes, your web host may be slow, expensive, or not helpful. When that happens, it’s smart to move your website to a better hosting company. A better host can help your site load faster, stay online, and keep visitors happy.
You can move your website in two ways:
Manually (you do everything step by step)
Automatically (you use a plugin to help)
This full guide will show you both ways. It will also teach you what to do after you move your site to make sure everything works.
If this sounds hard, don’t worry. You can also get help from Creation Wave LLC. We help people move WordPress websites safely and quickly.
Table of Contents
Manual vs Automatic Migration
Manual Migration – Step by Step
How to Move WordPress Without cPanel
How to Use a Plugin to Migrate Your Site
What to Check After Migration
Final Thoughts and Expert Help
Should You Move Your Site Manually or Use a Plugin?
There are two ways to move your WordPress site:
Manual Migration
This is where you download your files and database and upload them to the new host yourself. It gives you more control, but you need to be careful. One small mistake can break your site. This is better for large websites or people with some technical skills.
Automatic Migration
This uses a WordPress plugin to move your site. It is easier and faster. It is perfect for small websites or beginners. You don’t have to touch any code.
If you're not sure which to pick, try a plugin first. If it doesn't work or gives errors, you can move it manually or get expert help.
Need help? Creation Wave LLC offers both manual and automatic WordPress migration services.
Manual WordPress Migration (Step-by-Step Guide)
This part will show you how to manually move your WordPress website to a new host.
Step 1: Choose a New Hosting Company
Make sure your new host is fast, secure, and helpful. Look for companies that offer good customer support and daily backups.
Types of hosting:
Shared hosting (basic and cheap)
VPS hosting (faster and more private)
Managed WordPress hosting (easy and fully managed)
Dedicated server (for very large sites)
If you need help picking the right host, Creation Wave LLC can help you choose the best one.
Step 2: Backup Your WordPress Files
Your website files are very important. They include your theme, plugins, images, and settings.
To back them up:
Use an FTP client like FileZilla.
Connect to your old host using FTP login details.
Find the folder named “public_html” or your WordPress folder.
Download all the files to your computer.
Wait until the download finishes before going to the next step.
Step 3: Export Your Database
Your website database has all your posts, pages, user accounts, and comments.
To export it:
Log in to cPanel on your old host.
Open phpMyAdmin.
Click your WordPress database name on the left.
Click the “Export” tab at the top.
Choose “Quick” and “SQL” format.
Click “Go” to download the file.
Save this file in a safe place.
Step 4: Create a New Database on Your New Host
Now go to your new hosting account. Do this:
Log into cPanel.
Click “MySQL Databases.”
Create a new database.
Create a new user and give it a strong password.
Add the user to the database and give it all permissions.
Write down the database name, user name, and password. You will need them soon.
Step 5: Upload WordPress Files to New Host
Now it’s time to put your website files on the new server.
To upload:
Open FileZilla again.
Connect to your new host with your new FTP details.
Go to the folder named “public_html” or root folder.
Upload all your website files from your computer.
Wait for the upload to finish before moving on.
Step 6: Import Your Database
Now you need to import your old database to the new host.
Log in to cPanel on the new host.
Open phpMyAdmin.
Click your new database name.
Click the “Import” tab.
Choose the .sql file you downloaded earlier.
Click “Go.”
This will add your old content to your new hosting account.
Step 7: Update the wp-config.php File
WordPress needs to know how to connect to the database.
In FileZilla, find and open the file “wp-config.php.”
Right-click and choose Edit.
Update the database name, user, and password:
define('DB_NAME', 'your_new_db_name'); define('DB_USER', 'your_new_db_user'); define('DB_PASSWORD', 'your_new_password');
Save and close the file.
Now WordPress can talk to the new database.
Step 8: Point Your Domain to the New Host
This is the final step.
Log into the account where you bought your domain (like GoDaddy or Namecheap).
Find DNS or Nameserver Settings.
Change the nameservers to the new hosting company’s nameservers.
Save and wait.
It can take 1–24 hours for the DNS to update fully. After that, your site will be live on the new host.
How to Migrate Without cPanel
Some hosting providers don’t use cPanel. That’s okay. You can still migrate your website.
Here’s what to do:
Ask your host for FTP access and MySQL access.
Use FileZilla to upload files.
Use another tool like Adminer or CLI (command-line) to import your database.
Update your wp-config.php file as shown earlier.
If this sounds too technical, Creation Wave LLC can do it for you.
How to Use a Plugin to Migrate Your WordPress Site
If you want an easier way, use a migration plugin. Here are three good ones:
All-in-One WP Migration
Simple drag-and-drop tool.
Great for beginners.
Duplicator
Makes a full copy of your website.
Offers more options for developers.
UpdraftPlus (Paid)
Does backups and migrations.
Good support.
To use a plugin:
Install the plugin on your old website.
Use the plugin to export the full site.
Set up a clean WordPress install on your new host.
Install the same plugin there.
Import the file you exported earlier.
After a few minutes, your site should be live.
What to Check After Migration
After moving your website, test everything. Check the following:
Is your homepage loading fast?
Are all your pages and posts showing?
Are your images loading?
Can you log into the WordPress dashboard?
Are all your plugins working?
Is the site mobile-friendly?
Also test your contact forms, menus, and links. You can use free tools like GTmetrix or Google PageSpeed to check speed.
If anything looks broken, go back and check your steps.
Need help? Creation Wave LLC offers a full post-migration checkup.
Final Thoughts
Moving your WordPress website can feel scary. But with the right steps, it’s not so hard. This guide helps you move your site by yourself or with a plugin. You also learned how to test your site after moving.
A better host can give you faster speed, better uptime, and better support. If you don’t want to take risks or waste time, you can let experts do it for you.
1 note
·
View note
Text
How to Set Up a Local Development Environment for Web Development

If you’re learning web development or working on projects, having a local development environment is essential. It allows you to build, test, and experiment with websites without affecting a live site. Setting this up may sound technical, but it’s easier than you think. In this guide, we’ll go step by step to help you get everything ready.
Why Do You Need a Local Development Environment?
A local development environment allows you to work on a website directly on your computer before making it live. This helps in:
✅ Testing without risk – You can make changes and fix issues without affecting the actual website. ✅ Faster development – No need to upload files every time you make an update. ✅ Better debugging – You can test features in a controlled space before launching.
Now, let’s get started with setting up your local development space.
Step 1: Choose a Code Editor
A code editor is where you write and edit your website files. Some of the best options include:
Visual Studio Code (VS Code) – Free, lightweight, and packed with useful extensions.
Sublime Text – Simple and fast, but some features require a paid license.
Atom – Another free editor, though it’s not as fast as VS Code.
For beginners, VS Code is the best choice because of its ease of use and built-in tools.
Step 2: Install a Local Server
Websites that use PHP, WordPress, or databases need a local server to run properly. Here are some tools that provide everything you need:
XAMPP – Supports Apache (server), MySQL (database), and PHP. Works on Windows, macOS, and Linux.
MAMP – Similar to XAMPP but designed for macOS and Windows users.
Local by Flywheel – Great for WordPress development, offering a simple setup.
How to Install XAMPP (Recommended for Beginners)
Download XAMPP from the official website and install it.
Open the XAMPP Control Panel.
Start the Apache and MySQL services.
Place your project files inside the htdocs folder (inside the XAMPP installation directory).
That’s it! Now, you can access your project by opening http://localhost/yourprojectname in your browser.
Step 3: Install a Version Control System (Git)
Git helps track changes in your project and makes collaboration easier. It’s widely used by professional developers and every website development company in India prefers it for managing code.
Installing Git
Download Git from the official website.
Follow the installation steps and complete the setup.
Open a terminal or command prompt and type:
bash
CopyEdit
git --version
If Git is installed correctly, you’ll see the version number displayed.
For projects that involve teamwork, platforms like GitHub, GitLab, and Bitbucket help store and manage code online.
Step 4: Set Up a Database (If Needed)
If your website uses databases, you’ll need software to manage them. MySQL is the most common choice and comes with XAMPP.
To manage your database visually, use phpMyAdmin, which is included in XAMPP.
How to Access phpMyAdmin
Open your browser and go to http://localhost/phpmyadmin/.
Click New, name your database, and start adding tables.
For larger projects, tools like MySQL Workbench or DBeaver provide advanced database management features.
Step 5: Use a Package Manager (Optional but Useful)
A package manager simplifies installing tools and libraries needed for development. Here are two important ones:
Node.js & npm (for JavaScript-based projects) – Download from the official Node.js website. npm (Node Package Manager) comes included.
Composer (for PHP projects) – Helps manage PHP dependencies efficiently.
Using a package manager ensures you get the latest versions of necessary tools without manually downloading files.
Step 6: Test Your Setup
Before you start coding, make sure everything is working properly.
Open your code editor and create a simple index.html file inside your project folder.
Write a basic HTML structure and save the file.
Open it in your browser or, if using a local server, navigate to http://localhost/yourprojectname.
If everything is displayed correctly, your local development environment is ready!
Step 7: Start Building Your Website
Now that your setup is complete, you can start creating your website. Whether you’re working on static sites, dynamic applications, or WordPress projects, this local setup will make development smoother.
For businesses, having a well-structured development environment is important. If you’re looking for professional help, Dzinepixel, a leading website development company in India, offers expert solutions to build and manage websites efficiently.
Conclusion
Setting up a local development environment might seem technical at first, but once you have the right tools, it becomes easy. Whether you’re building personal projects or working professionally, having a local setup speeds up development, reduces errors, and allows safe testing before going live.Now that your environment is ready, start coding, experimenting, and creating amazing websites! 🚀
#website development company in india#web design company india#online reputation management companies in bhubaneswar#digital marketing services in bhubaneswar#seo services in bhubaneswar
0 notes
Text
How to Develop a Website Using PHP
How to Develop a Website Using PHP
In today's digital era, websites play a crucial role in business growth and online presence. One of the most widely used server-side scripting languages for web development is PHP (Hypertext Preprocessor). It is open-source, easy to learn, and widely supported by web servers and databases. This guide will walk you through the step-by-step process of developing a website using PHP.

Why Choose PHP for Web Development?
Before diving into the development process, let’s explore some key reasons why PHP is a great choice for website development:
1. Open-Source: PHP is free to use, making it cost-effective for developers.
2. Cross-Platform Compatibility: Runs on Windows, Linux, and macOS without compatibility issues.
3. Database Support: Easily integrates with MySQL, PostgreSQL, and other databases.
4. Scalability: Suitable for both small websites and large-scale web applications.
5. Large Community Support: Extensive documentation and active developer communities for troubleshooting and learning.
Prerequisites for PHP Web Development
To develop a website using PHP, you need the following tools:
1. Text Editor or IDE: VS Code, Sublime Text, or PHPStorm.
2. Local Server: XAMPP, WAMP, or MAMP for running PHP scripts.
3. Database System: MySQL or PostgreSQL for data storage.
4. Web Browser: Chrome, Firefox, or Edge for testing the website.
Step-by-Step Guide to Developing a Website Using PHP
1. Setting Up Your Development Environment
To begin developing a PHP website, follow these steps:
· Install XAMPP (or WAMP/MAMP) to create a local server.
· Using the XAMPP Control Panel, launch Apache and MySQL.
· Navigate to htdocs in the XAMPP directory to store PHP project files.
2. Creating the Project Structure
Organizing your files properly enhances maintainability. A typical PHP project structure:
project-folder/
│-- index.php
│-- config.php
│-- assets/
│ ├── css/
│ ├── js/
│ ├── images/
│-- includes/
│ ├── header.php
│ ├── footer.php
│-- pages/
│ ├── about.php
│ ├── contact.php
│-- database/
│ ├── db_connect.php
3. Writing Your First PHP Script
Create an index.php file and add the following code:
<?php
echo "Welcome to My PHP Website!";
?>
Save the file and access it in the browser by navigating to http://localhost/project-folder/.
4. Connecting PHP with MySQL Database
To manage dynamic content, connect PHP with a MySQL database.
Create a Database
1. Open phpMyAdmin from XAMPP.
2. Create a new database, e.g., my_website.
3. Add a users table with fields id, name, email, and password.
Database Connection Code (db_connect.php)
<?php
$servername = "localhost";
$username = "root";
$password = "";
dbname = "my_website";
$conn = new mysqli($servername, $username, $password, $dbname);
if ($conn->connect_error) {
die("Connection failed: " . $conn->connect_error);
}
?>
5. Creating a User Registration System
A simple user registration form using PHP and MySQL.
Registration Form (register.php)
<form method="POST" action="register.php">
<input type="text" name="name" placeholder="Full Name" required>
<input type="email" name="email" placeholder="Email" required>
<input type="password" name="password" placeholder="Password" required>
<button type="submit" name="register">Register</button>
</form>
Handling User Registration (register.php)
<?php
include 'database/db_connect.php';
if(isset($_POST['register'])) {
$name = $_POST['name'];
$email = $_POST['email'];
$password = password_hash($_POST['password'], PASSWORD_BCRYPT);
$sql = "INSERT INTO users (name, email, password) VALUES ('$name', '$email', '$password')";
if ($conn->query($sql) === TRUE) {
echo "Registration successful!";
} else {
echo "Error: " . $conn->error;
}
}
?>
6. Implementing User Login System
Login Form (login.php)
<form method="POST" action="login.php">
<input type="email" name="email" placeholder="Email" required>
<input type="password" name="password" placeholder="Password" required>
<button type="submit" name="login">Login</button>
</form>
Handling Login Authentication (login.php)
<?php
session_start();
include 'database/db_connect.php';
if(isset($_POST['login'])) {
$email = $_POST['email'];
$password = $_POST['password'];
$result = $conn->query("SELECT * FROM users WHERE email='$email'");
$user = $result->fetch_assoc();
if(password_verify($password, $user['password'])) {
$_SESSION['user'] = $user;
echo "Login successful!";
} else {
echo "Invalid credentials!";
}
}
?>

7. Adding Navigation and Styling
· Use Bootstrap or CSS frameworks to improve UI.
· Include a header.php and footer.php for better navigation.
8. Deploying the PHP Website
Once development is complete, deploy your PHP website using:
· Shared Hosting with cPanel for easy management.
· Cloud Hosting (AWS, DigitalOcean) for high performance.
· Domain & SSL Certificate for a secure and professional website.
Conclusion
Developing a website using PHP is an efficient way to create dynamic and interactive websites. By following this step-by-step guide, you can build a PHP-based website from scratch, implement database interactions, user authentication, and deploy your project successfully. Start your PHP development journey today and create powerful web applications!
#web development#seo services#web designing#social media marketing#graphic design#digital marketing#digitalmarketing#marketing#digitalindia#seo
1 note
·
View note
Text
How to Install XAMPP for Windows 10 - XAMPP WordPress For Beginners
To install XAMPP on Windows 10 and set it up for WordPress, follow these steps:
Step 1: Download XAMPP
Go to the official XAMPP website.
Click on the "XAMPP for Windows" button.
Once the installer is downloaded, locate the .exe file (usually in the Downloads folder).
Step 2: Install XAMPP
Double-click the .exe file to start the installation process.
Choose the components you want to install. For WordPress, you need at least Apache, MySQL, and PHP. These are selected by default, so you can leave them as is.
Choose the installation folder (default is usually fine).
Click "Next" and follow the prompts.
During installation, the installer may ask if you want to start the XAMPP Control Panel. Leave it checked and click "Finish."
Step 3: Start Apache and MySQL
Open the XAMPP Control Panel (it should have opened automatically, or you can search for it in the Start menu).
Click the "Start" button next to Apache (this will run the web server).
Click the "Start" button next to MySQL (this will start the database server).
Make sure both Apache and MySQL show "Running" in green.
Step 4: Install WordPress
Download the latest version of WordPress from the official WordPress website.
Extract the WordPress ZIP file.
Move the extracted folder (the WordPress folder) into the htdocs folder of your XAMPP installation (usually located at C:\xampp\htdocs).
Step 5: Create a Database for WordPress
Open your browser and go to http://localhost/phpmyadmin/.
In the phpMyAdmin dashboard, click on "Databases."
Create a new database for WordPress. Give it a name (e.g., wordpress_db) and click "Create."
Step 6: Configure WordPress
Open your browser and go to http://localhost/wordpress (or the folder name you chose).
The WordPress installation screen should appear.
Select your language and click "Continue."
On the next screen, enter your database details:
Database Name: The name you created (e.g., wordpress_db).
Username: root (default for XAMPP).
Password: Leave this blank (default for XAMPP).
Database Host: localhost (default).
Table Prefix: Leave as wp_ unless you want to change it.
Click Submit and then Run the Install.
Step 7: Complete the WordPress Setup
Fill in the site details (site title, admin username, password, and email).
Click "Install WordPress."
Once the installation is complete, you’ll see a success message. You can now log in to your WordPress dashboard at http://localhost/wordpress/wp-admin.
Final Notes
To stop your server, go to the XAMPP Control Panel and click "Stop" for Apache and MySQL.
If you need to make your local WordPress site public, you'll have to configure port forwarding or use a tool like Local by Flywheel or XAMPP for public access.
#installxampp#xamppforbeginners#xamppwindows10#wordpressinstallation#localserversetup#runwordpresslocally#xamppwordpress#webdevelopment#phpdevelopment#wordpressforbeginners#tutorial2025#localwordpress#xamppsetup#installingwordpress#wordpresssetup#beginnerfriendly#xamppguide#developmenttutorial#learnwordpress#wordpresslocally
0 notes
Text
Mastering the Art of Duplicating Pages in WordPress

Duplicating pages in WordPress is a handy skill that can enhance your website’s efficiency. If you're interested in how to duplicate an entire page in WordPress, you’ll find this guide valuable. For a deeper dive into the topic, check out our detailed post on how to Duplicate A Page in WordPress.
Why Duplicate Pages?
Duplicating pages can save significant time and effort, especially when you need to replicate specific layouts or content structures. It ensures consistency and speeds up the content creation process.
Efficient Methods for Page Duplication
Here’s how you can duplicate a page in WordPress using various methods:
Using Plugins
Plugins like "Duplicate Post" simplify the duplication process.
Steps with Plugins:
Install and activate a duplication plugin.
Go to Pages and find the page you want to duplicate.
Click on "Clone" or "Duplicate" to create a copy.
The new page will be saved as a draft for further editing.
Manual Duplication in Block Editor
With the Block Editor, you can manually copy and paste blocks to duplicate content.
Steps for Block Editor:
Open the page to be duplicated.
Select all content blocks and copy them (Ctrl+C or Command+C).
Create a new page and paste the copied blocks (Ctrl+V or Command+V).
Classic Editor Approach
For users of the Classic Editor, duplication involves copying the HTML code.
Steps for Classic Editor:
Open the page in Classic Editor and switch to the "Text" view.
Copy all the HTML content.
Create a new page and paste the HTML code into the "Text" view.
Database Duplication (Advanced)
For more advanced users, duplicating pages via the database can be done using phpMyAdmin.
Steps for Database Duplication:
Log in to phpMyAdmin and find the wp_posts table.
Locate the entry for the page you wish to duplicate.
Copy the entry and create a new row with the updated details.
Best Practices for Duplicating Pages
Ensure Unique Permalinks: Make sure each duplicated page has a unique URL.
Modify Content: Adjust the content of the new page as needed.
Update SEO Settings: Revise SEO settings and meta descriptions for the new page.
Conclusion
Duplicating a page in WordPress can significantly streamline your workflow and ensure consistency across your site. By utilizing plugins, the Block Editor, or manual methods, you can efficiently manage and replicate content to suit your needs.
0 notes
Text
jQuery Dependent DropDown List – States and Districts Using PHP-PDO

In this tutorial, we are going to learn how to change the district dropdown list option based on the selected state name using PHP-PDO.
In this example, we have two dropdowns for listing states and districts. On changing states drop-down values, the corresponding district dropdown values will be loaded dynamically using jQuery AJAX.
Click: https://phpgurukul.com/jquery-dependent-dropdown-list-states-and-districts-using-php-pdo/
File structure for this tutorial
config.php — Database connection file.
index.php — Main file having drop down
get_district.php — used to retrieve the district based on the selected state name.
MySQL Database structure for this tutorial
In this tutorial two MySQL Database table is used.
state
district
state table structure
CREATE TABLE `state` (
`StCode` int(11) NOT NULL,
`StateName` varchar(150) DEFAULT NULL
) ENGINE=MyISAM DEFAULT CHARSET=latin1;
district table structure
CREATE TABLE `district` (
`DistCode` int(11) NOT NULL,
`StCode` int(11) DEFAULT NULL,
`DistrictName` varchar(200) DEFAULT NULL
) ENGINE=MyISAM DEFAULT CHARSET=latin1;
Step 1: Create a database connection file (config.php)
<?php
// DB credentials.
error_reporting(0);
define(‘DB_HOST’,’localhost’);
define(‘DB_USER’,’root’);
define(‘DB_PASS’,’’);
define(‘DB_NAME’,’demos’);
// Establish database connection.
try
{
$dbh = new PDO(“mysql:host=”.DB_HOST.”;dbname=”.DB_NAME,DB_USER, DB_PASS,array(PDO::MYSQL_ATTR_INIT_COMMAND => “SET NAMES ‘utf8’”));
}
catch (PDOException $e)
{
exit(“Error: “ . $e->getMessage());
}
?>
Step2: Create a HTML form with two fields . One is for state and another one is for district.
<form name=”insert” action=”” method=”post”>
<table width=”100%” height=”117" border=”0">
<tr>
<th width=”27%” height=”63" scope=”row”>Sate :</th>
<td width=”73%”><select onChange=”getdistrict(this.value);” name=”state” id=”state” class=”form-control” >
<option value=””>Select</option>
<! — — Fetching States — ->
<?php
$sql=”SELECT * FROM state”;
$stmt=$dbh->query($sql);
$stmt->setFetchMode(PDO::FETCH_ASSOC);
while($row =$stmt->fetch()) {
?>
<option value=”<?php echo $row[‘StCode’];?>”><?php echo $row[‘StateName’];?></option>
<?php }?>
</select></td>
</tr>
<tr>
<th scope=”row”>District :</th>
<td><select name=”district” id=”district-list” class=”form-control”>
<option value=””>Select</option>
</select></td>
</tr>
</table>
</form>
Step3: Getting States using jQuery AJAX
This script contains a function that will be called on changing state dropdown values. It will send AJAX request to a PHP page to get corresponding district dropdown options.
<script>
function getdistrict(val) {
$.ajax({
type: “POST”,
url: “get_district.php”,
data:’state_id=’+val,
success: function(data){
$(“#district-list”).html(data);
}
});
}
</script>
Step 4: Read the district table using PHP based on the selected state name.
This PHP code connects the database to retrieve district table values based on the state id passed by jQuery AJAX call.
<?php
require_once(“config.php”);
if(!empty($_POST[“state_id”]))
{
$stateid=$_POST[“state_id”];
$sql=$dbh->prepare(“SELECT * FROM district WHERE StCode=:stateid”);
$sql->execute(array(‘:stateid’ => $stateid));
?>
<option value=””>Select District</option>
<?php
while($row =$sql->fetch())
{
?>
<option value=”<?php echo $row[“DistrictName”]; ?>”><?php echo $row[“DistrictName”]; ?></option>
<?php
}
}
?>
How to run this script
1.Download the zip file
2.Extract the file and copy statedistdropdown-pdo folder
3.Paste inside root directory(for xampp xampp/htdocs, for wamp wamp/www, for lamp var/www/html)
4.Open PHPMyAdmin (http://localhost/phpmyadmin)
5.Create a database with name demos
6.Import regdb.sql file(given inside the zip package )
7.Run the script http://localhost/statedistdropdown-pdo
PHP Gurukul
Welcome to PHPGurukul. We are a web development team striving our best to provide you with an unusual experience with PHP. Some technologies never fade, and PHP is one of them. From the time it has been introduced, the demand for PHP Projects and PHP developers is growing since 1994. We are here to make your PHP journey more exciting and useful.
Website : https://phpgurukul.com
0 notes
Text
How do I transfer Osclass data to a WordPress website?
Transferring data from Osclass to WordPress involves several steps, and it may require some manual work or custom scripting. Here's a general guide to help you with the process:
1. Export Osclass Data:
Osclass doesn't have a built-in export tool, so you may need to use a custom solution.
Access your database using phpMyAdmin or a similar tool and export the necessary tables related to your Osclass data (e.g., listings, categories, users).
2. Prepare the Data:
Examine the exported data and understand its structure. Osclass and WordPress have different database structures, so you may need to adjust the data to fit WordPress's format.
If your Osclass content includes custom fields or other specific data, you might need to create equivalent custom fields in WordPress.
3. Install and Set Up WordPress:
Download and install WordPress on your server. Follow the installation instructions provided by WordPress.
Set up your WordPress website, including configuring categories, custom fields, and any other necessary settings.
4. Import Data into WordPress:
WordPress has a built-in import tool. In your WordPress admin, go to "Tools" > "Import."
Choose the appropriate import option based on your Osclass data format. If there isn't a direct importer, you may need to use a CSV import plugin or create a custom script to import the data.
5. Adjust Image URLs:
If your Osclass content includes images, you may need to adjust the image URLs in your WordPress posts or custom post types. The file structures for storing media may differ between Osclass and WordPress.
6. Review and Test:
After importing the data, review your WordPress website to ensure that the content, images, and other details transferred correctly.
Test the functionality of your posts or custom post types to make sure everything works as expected.
7. Theme and Styling:
WordPress uses its own themes and styling. If you had a specific look on your Osclass site, you may need to adjust or customize the WordPress theme to match your preferences.
8. Update Links:
If your Osclass site had internal or external links, make sure to update them on your WordPress site, if necessary.
Please note that transferring data between different platforms may not always be straightforward due to differences in data structures and functionality. Depending on your specific requirements, you may need to seek assistance from a developer to create a custom solution for data migration.
0 notes
Text
How to Add Admin User to the WordPress Database with phpMyadmin
Adding an Admin User to the WordPress Database With phpMyAdmin becomes necessary when a hacker has locked your website, you have lost access to the WordPress admin panel, or you have forgotten credentials. Here we use the HostBet Shared Hosting cPanel account screenshot.
Step 1: Open the cPanel account Dashboard
Step 2: Navigate to phpMyAdmin in the Databases section.
Step 3: Click on phpMyAdmin.

Step 4: Once you’re on the phpMyAdmin dashboard, you need to select your WordPress database.
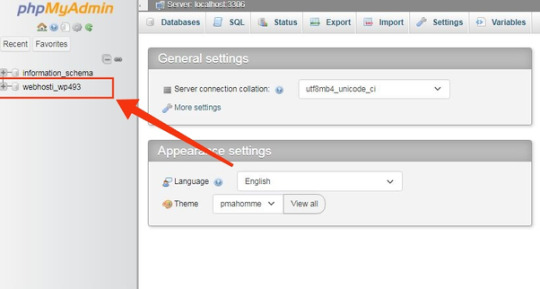
This will open the WordPress database. You will be making changes to the wp_users and wp_usermeta tables.

First, add a user to the wp_users table.
Step 5: First, you need to navigate the wp_users table and click on it. This will open the users currently listed in the table.

Please note that there is one user ID in our demo website table 1. You need to add a new user using a new unique ID, so we’ll use the 2 numbers.

Step 6: To create a new user, you need to click on the “Insert” tab.

Step 7: Add the following information to the fields on the Insert form:

ID: pick a unique number (in our example, we’ll use 2)
user_login: the username that will be used for login
user_pass: add a strong password, and make sure to select MD5 in the function from the drop-down menu (see the screenshot below)
user_nicename: the user’s full name or nickname ( you can write according to yourself)
user_email: the user’s email address
user_url: your website address
user_registered: select the date and time the user was registered using the calendar
user_activation_key: leave blank
user_status: set this to 0
display_name: the user’s full name or display name
Step 8: Once you have finished, click on the ‘Go’ button to add the new user.
Next adding a user to the wp_usermeta table.
Step 1: To add a new user, you need to navigate to wp_usermeta, click on it, and then click on the “insert” tab (same as the previous steps).

Step 2: Next, you need to add the following information to the Insert form:

unmeta_id: leave this blank
user_id: the user ID you used in the previous step
meta_key: this should be wp_capabilities
meta_value: insert this: a:1:{s:13:”administrator”;s:1:”1″;}
Step 3: After that, you need to find fields for the second row.

unmeta_id: leave this blank
user_id: the user ID you used in the previous steps
meta_key: you need to enter wp_user_level
meta_value: 10
Step 4: Once you finished typing the information into the fields, click the ‘Go’ button. that’s it. You Have successfully added new users.
0 notes
Text
Learn to create tables in phpMyAdmin with this comprehensive step-by-step guide to set up tables in your MySQL or MariaDB database efficiently.
#how to create table in phpmyadmin#how to create a table in phpmyadmin#create a table in phpmyadmin#create table in phpmyadmin
0 notes
Text
Using XSAS to develop multiple XOOPS sites locally
This tutorial provides step-by-step instructions for how to develop multiple XOOPS websites locally using XSAS (XOOPS Stand Alone Server). I use this information pretty much on a daily basis, and I hope you find it helpful, too. As always, I welcome any feedback or suggestions you may have.
(It is assumed that the reader has a basic knowledge of folder structures, permission settings, how to perform basic operations in phpMyAdmin, and of course, how to install XOOPS.)
1. Create a folder on your hard drive called Localhost
2. Run the XSAS Setup program in that folder
3. Create your folders in the www root of XSAS to represent the different sites you will be developing (i.e.: Clients, Personal, etc.)
4. Extract a fresh distro of Xoops in a temp folder
5. Copy the html folder from your Xoops package into the various folders you created in step 3.
6. Rename the html folder to represent the particular site to be developed (i.e.: Client1, Site2, etc.)
7. Start the XSAS server on your local machine
8. Open PHPMyAdmin from the advanced tab of the XSAS GUI
9. Create a database that has the same name as the database used for your published website (the site on the Internet)
10. Open a browser and navigate to http://localhost and select the folder of the site you want to install (ex: http://localhost/clients/somecoweb/). This will begin the installation of Xoops as usual.
11. Setup Xoops as you normally would
12. Put the database name of the site you want to develop in the appropriate field, but put root as the database username with no password
13. Make sure you change the prefix for the tables to match the database you will import later (if applicable)
14. Complete your installation as usual
15. Export the database from your site that is on the Internet into a text file. (Be sure you export it with complete inserts and add 'drop table'. This will insure a proper import later.)
16. Open the text file in a text editor and do a find and replace for the url
(i.e.: Find the Internet url that the site would use online and replace it with the local url. ex: Find: http://yourdomain.com/ Replace with: http://localhost/the_directory_where_you_installed_xoops/) Save your file.
**The copy and paste method works best for the aformentioned step.**
17. Open PHPMyAdmin in XSAS and import the database you just edited.
18. Now test your site out.
**If you will be developing multiple sites, I've found it quite convenient to keep a bookmark of http://localhost and I add a bookmark for each additional site when I begin development (i.e.: http://localhost/clients/client1, http://localhost/clients/client2, etc.)**
Now, after you've made all the changes you want to your site locally, you only have a few steps to follow to publish your work online.
19. You essentially repeat steps 15-18, but instead, you export from localhost's database, edit the sql file to change the url to the Internet url, and you import the database into the online SQL server.
**It's also important to note that, if you have added any additional files to your website while developing it locally (i.e.: themes, modules, hacks, etc.), you'll want to upload those files to your web server prior to updating your database.**
On another note. If you want to work on your website away from home, if you've setup your local server as I've outlined, you can just copy the entire Localhost folder onto a USB Pen Drive and take it with you. Then all you have to do is just execute XSAS directly from the pen drive on any Windows 98 and above system. Since XSAS always creates a virtual w: drive, this method works quite well for portable development and demonstration.
This article mainly focuses on XSAS and XOOPS, however, similar steps can be used for virtaully any standalone server software and content management system. These two were used because it is a combination I know to be relatively bug-free and easy to use.
Thanks and regards, Guruji Softwares
1 note
·
View note
Text
How to install Wordpress on localhost (XAMPP)
Wordpress is an open source web management system based on PHP. We can make blogging, eCommerce site by Wordpress. We can install themes easily in WordPress to change the layout. We can install the plugin to extend the functionality of Wordpress. Before installation of Wordpress, We should have apache and MySql server.
Steps to install Wordpress on localhost:
Download the latest version of Wordpress from Wordpress.org and extract it. Make sure your Apache and Mysql servers are running.

Create a database from localhost(localhost/PHPMyAdmin). Enter database name which you want. I have created ‘mywordpress’ database.

Rename extracted file if you want then copy it into htdocs. Type localhost/WordPress on your web browser. Enter Database Name, Database Username, Database Password, Database Host, you can change Table Prefix. Then click on Submit.
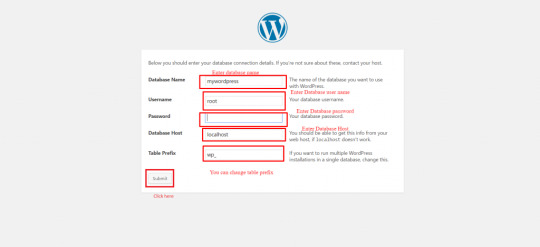
Click on Run the install.
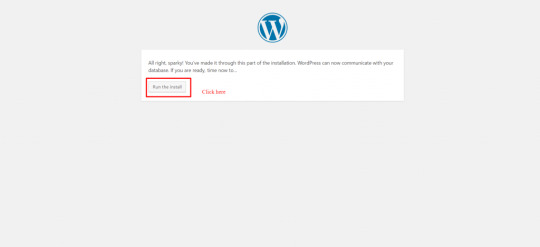
Enter Site Title, Choose Username and Unique Password, Enter Email Address then click on Install Wordpress.
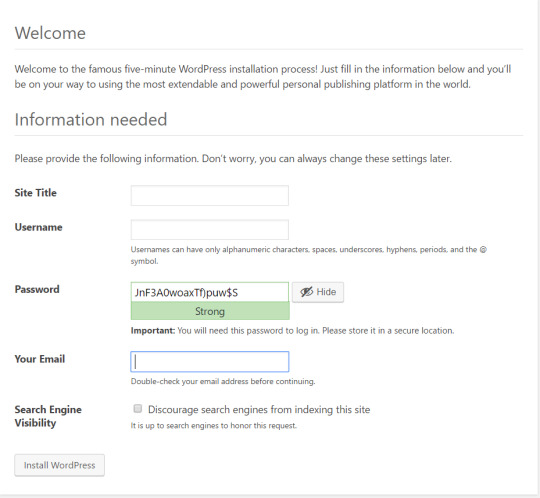
After installation, Login with Your Username and Password. Read the full article
1 note
·
View note
Text
Restaurant Table Booking System using PHP and MySQL

Restaurant Table Booking System using PHP and MySQL is a web-based application. Restaurant Table Booking system project is developed to provide service facilities to restaurants and also to the customer. Customers can reserve the table online and check the status of the reservation.
Project Requirements
Project NameRestaurant Table Booking System in PHPLanguage UsedPHP5.6, PHP7.xDatabaseMySQL 5.xUser Interface DesignHTML, AJAX,JQUERY,JAVASCRIPTWeb BrowserMozilla, Google Chrome, IE8, OPERASoftwareXAMPP / Wamp / Mamp/ Lamp (anyone)
Project Modules
In this project, we use PHP and MySQL database. It has two modules i.e Admin and user.
User Module
Users can fill out the table reservation form.
User can also check the table reservation/booking status.
Admin Module
Secure admin/sub-admin login
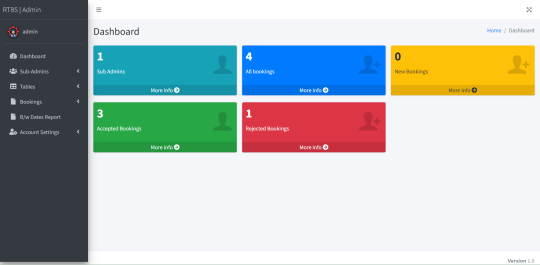
Dashboard: In this section, the admin can all the brief details like total sub-admins, total bookings, new bookings, accepted bookings and rejected bookings.
Sub-Admins: In this section, Admin can create the sub-admin, delete sub-admins, edit sub-admins, and reset the passwords of sub-admins.
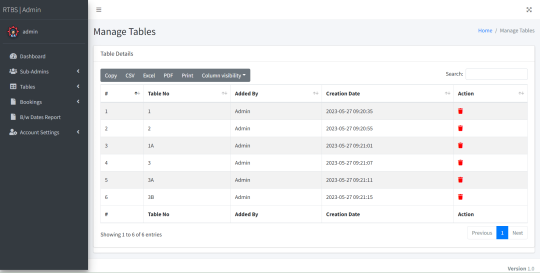
Tables: In this section, admin can add and delete the tables.
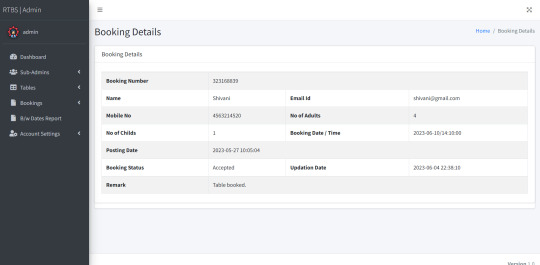
Bookings: In this section, the admin can view the new, accepted, rejected, and all bookings. Admin can take actions on new bookings.
B/w dates report: In this section, admin can generate the report of between two dates bookings.
Account Setting: Admin can update his profile, and change the password.
Admin can also recover the password.
Click Here : https://phpgurukul.com/restaurant-table-booking-system-using-php-and-mysql/
Sub-Admin Module
Sub-Admin and Admin features are the same except Sub-Admin creation. Sub-Admin can’t create the Sub-Admins.
Some of the Project Screens
How to run the Restaurant Table Booking System (rtbs) Project
1. Download the zip file
2. Extract the file and copy rtbs folder
3.Paste inside root directory(for xampp xampp/htdocs, for wamp wamp/www, for lamp var/www/HTML)
4.Open PHPMyAdmin (http://localhost/phpmyadmin)
5. Create a database with the name rtbsdb
6. Import rtbsdb.sql file(given inside the zip package in the SQL file folder)
7. Run the script http://localhost/rtbs
Credential for Admin panel :
Username: admin Password: Test@123
PHP Gurukul
Welcome to PHPGurukul. We are a web development team striving our best to provide you with an unusual experience with PHP. Some technologies never fade, and PHP is one of them. From the time it has been introduced, the demand for PHP Projects and PHP developers is growing since 1994. We are here to make your PHP journey more exciting and useful.
Website : https://phpgurukul.com
0 notes
Text
Changing Your Domain Name on a WordPress Site [A Step-by-Step Guide]

If you're considering changing your domain name on a WordPress site, it’s essential to follow a structured approach. This guide on how to change domain name on WordPress will help you through the process, applicable whether you're using Hostinger, Bluehost, or another host.
Why You Might Change Your Domain
Changing your domain name can be part of a rebranding effort or simply a move to a more suitable or memorable domain. Handling this change correctly is vital to prevent disruptions and maintain SEO performance.
How to Change Domain Name on WordPress
Backup Your Site
Ensure you create a complete backup of your WordPress site before making any changes.
Update WordPress Settings
In the WordPress dashboard, navigate to Settings > General. Change the WordPress Address (URL) and Site Address (URL) to the new domain.
Change Domain in Database
Access your database through phpMyAdmin and update the site and home fields in the wp_options table.
Use a Domain Change Plugin
Plugins like Better Search Replace can help you update all references of your old domain in the database.
Edit .htaccess File
Check and update your .htaccess file to ensure it reflects the new domain for proper URL management.
Update Internal Links and Media
Make sure to update all internal links and media files to point to the new domain.
Test Your Site
Conduct thorough testing to confirm that your site operates correctly after the domain change.
Domain Name Changes on Various Hosts
Hostinger: For Hostinger, adjust your domain settings through their control panel and update your WordPress settings accordingly.
Bluehost: On Bluehost, change domain settings via their control panel and make sure your WordPress settings reflect the new domain.
Additional Advice
301 Redirects: Implement 301 redirects from your old domain to the new one to maintain SEO rankings.
Google Search Console: Update your domain in Google Search Console.
SSL Certificates: Update your SSL certificates for the new domain.
By following these steps, you can change your WordPress domain name smoothly and maintain your site's integrity and search engine visibility. For further details, refer to this how to change domain name on WordPress post.
0 notes