#how to setup wifi extender
Explore tagged Tumblr posts
Visit Tumblr Blog
Explore Tumblr blogs with no restrictions, modern design and the best experience.
Last Seen Tumblr Blogs


Fun Fact
In Q3 of 2020, 31% of US users access the Tumblr app daily.
Text
#wifi repeater setup#wifi.wavlink.com extender setup#wifi.wavlink.com repeater setup#setup tutorial#wavlink wifi repeater setup#wavlink ac600 setup#wavlink n300 wifi repeater setup#wavlink router setup#how to setup wavlink n300 wifi router#wavlink extender setup#wavlink n300 wifi range extender setup#wifi.wavlink.com#wifi.wavlink setup#wifi.wavlink.com login#wifi extender setup#wavlink setup#how to setup wifi extender#wifi range extender setup
0 notes
Text
Step-by-Step Guide to Setting Up Your Netgear Extender!
For easy Netgear extender setup, open the web browser and type the mywifiext.net web address in the browser bar. Now, enter the login details and you reach the smart setup dashboard of the repeater. Here, visit the basic and advanced settings to configure the further settings accordingly. To know more information regarding the same, get in touch with us!

0 notes
Text
How To Setup WiFi Range Extender Netgear, plug it in, connect to the default WiFi network, and launch a web browser. Visit mywifiext.net, connect to your existing WiFi network using the setup wizard, and then configure the extender's SSID and password. Once set up, insert the extender halfway between your router and the desired coverage area.
#How To Setup WiFi Range Extender Netgear#How To Setup#WiFi Range Extender Netgear#Netgear WiFi range extender
0 notes
Text
A Guide 2024 on How to Reset Netgear WiFi Extender

Method 1: Soft Reset via Web Interface

Connect to the Extender:
Ensure your device is connected to the Netgear WiFi extender network.
Open a web browser and enter the default web address “http://mywifiext.net" in the address bar.
Log In:
Enter your admin credentials (username and password) to access the extender’s web interface.
Navigate to Reset:
Locate and click on the “Settings” or “Maintenance” option.
Find the “Reset” or “Restore Factory Settings” option.
Confirm Reset:
Follow the on-screen instructions to confirm the reset.
Allow the extender to reboot, and it will be reset to its default settings.
Method 2: Hard Reset Using the Reset Button
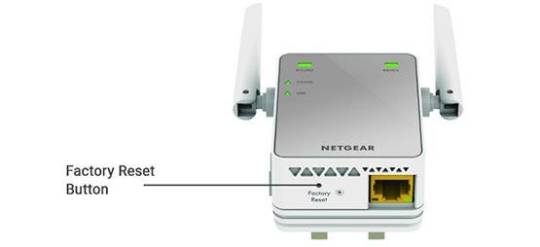
Locate the Reset Button:
On your Netgear WiFi extender, find the reset button. It is usually a small hole labeled “Reset.”
Use a Paperclip or Pin:
With the extender powered on, use a paperclip or pin to press and hold the reset button for about 10 seconds.
Release the Button:
Release the button when the LED lights on the extender start flashing.
The extender will reset to its factory settings.
Method 3: Factory Reset Using Netgear Genie App
Install Netgear Genie:
Download and install the Netgear Genie app on your smartphone or computer.
Launch the App:
Open the Netgear Genie app and log in with your extender’s credentials.
Navigate to Reset:
Find the “WiFi Settings” or “Wireless” option in the app.
Look for the “Reset” or “Restore Factory Settings” option.
Confirm Reset:
Follow the prompts to confirm the reset.
Allow the extender to reboot, completing the factory reset process.
Conclusion:
By following these three methods, you can easily reset Netgear WiFi extender and address various connectivity issues. Remember to reconfigure your extender with the appropriate settings after the reset to ensure optimal performance. Whether you prefer a soft reset through the web interface, a hard reset using the reset button, or a factory reset using the Netgear Genie app, these methods offer flexibility based on your preferences and the extender model you are using.
1 note
·
View note
Text
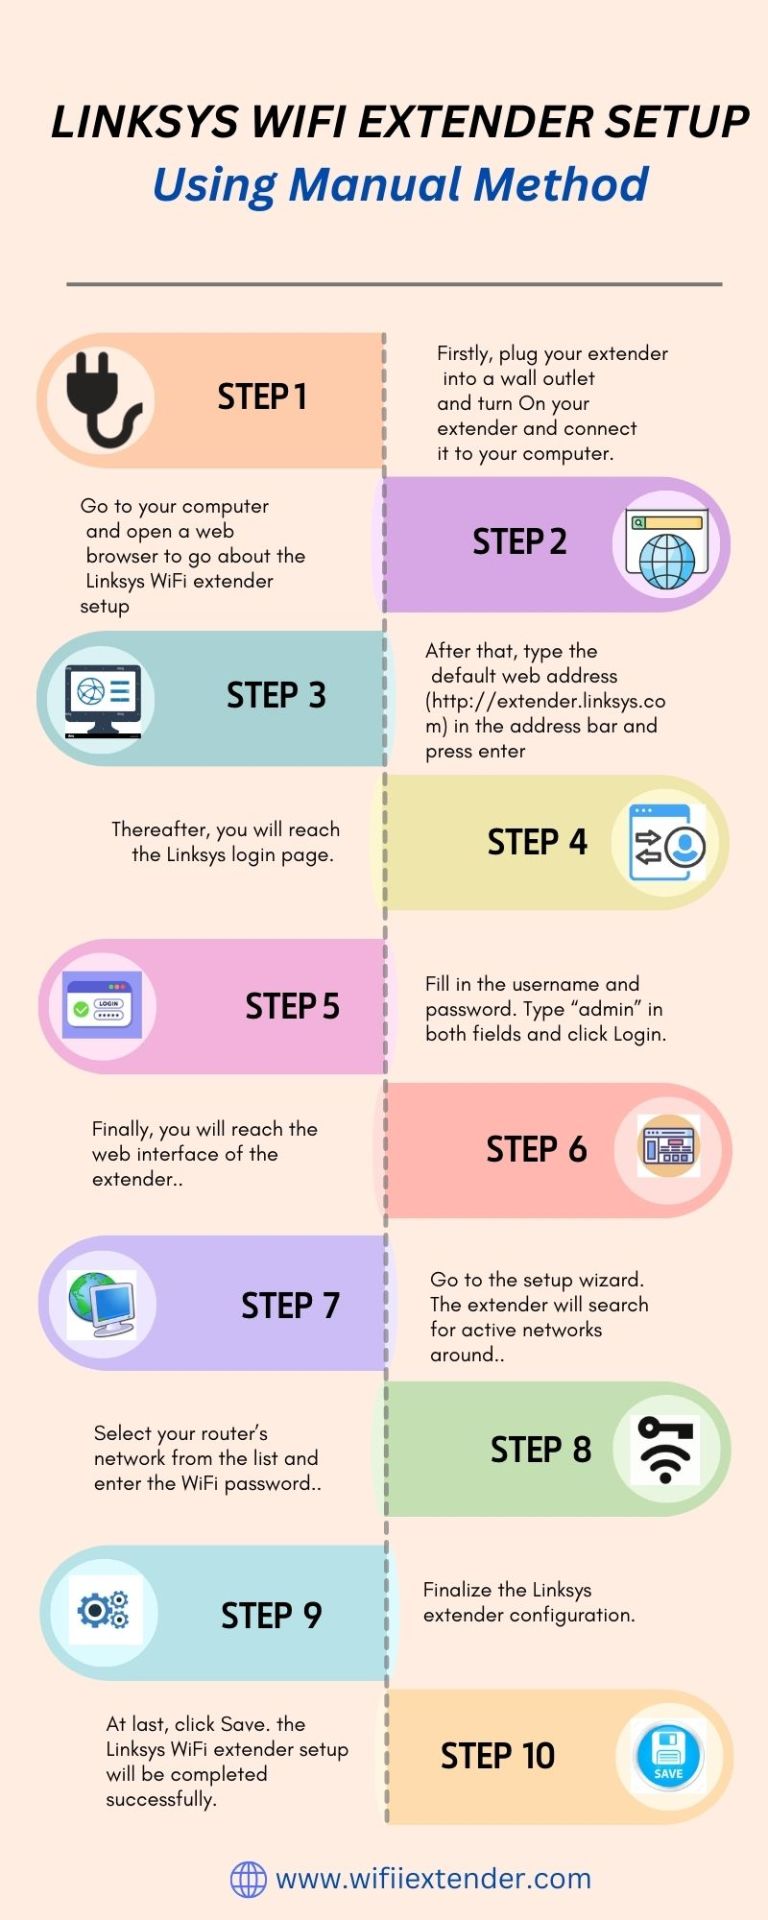
Boost your internet speed with Linksys wifi extender setup! Don't let slow connections hold you back. 🚀 Connect seamlessly by clicking the link in bio. Upgrade your browsing experience today! #TechGuru #WiFiMagic #LinksysLife #TechInnovation #ViralTech #SmoothSailing
0 notes
Text
Seamless Connections Made Easy: MyWiFiLogon's Router and Extender Troubleshooting ? call for support +1-800-413-3531
Struggling with router and extender glitches? Look no further than MyWiFiLogon. We pride ourselves on being your go-to source for resolving connectivity challenges. Our seasoned professionals are well-versed in diagnosing and remedying a variety of network issues, ensuring that you experience seamless online interactions.call for support +1-800-413-3531

#netgearextendersetup#netgearlogin#rangeextender#wifi_extender#wifi extender#wifi connection#how to setup netgear ac1200#netgearlight
0 notes
Text

The installation of a D-Link extender in your home will increase the wireless network’s coverage area. A D-Link extender can greatly expand the range of your home’s wireless network. D-Link extenders not only eliminate dead zones, but also boost the coverage area of an existing wireless network.. The Dlink extender can be configured with the help of a web utility accessible at http://dlinkap.local. This is the default web URL for the Dlink extender login page. While setting up a Dlink extender for the first time at your home, you’ll need to go through both the standard and advanced configuration processes. If you’re having trouble getting online at home, the d’Link wifi extender setup wizard can assist. If you want to know how to setup Dlink extender, you can do so by reading this blog post.
#Dlink extender login page#d’Link wifi extender setup wizard#how to setup Dlink extender#D-Link extender#http://dlinkap.local#dlinkap#dlinkap.local#http //dlinkap.local#dlinkap.local/login.html#http //dlinkap.local login#https //dlinkap.local./#http //dlinkap.local./#dlinkap local#http //dlinkap#http://dlinkap#dlinkap.local login#https //dlinkap.local#http://dlinkap.local./#http//dlinkap.local#192.168.0.50#192.168.0.1#Setup dlink extender
0 notes
Text
SO
This little fucker I've been working on has finally been finished.
I do not want to admit how long I have spent waiting for the obscure parts I ordered to get this to work but hey.
I need to know what I should feed the beast.
@debian-official @arch-official @ubuntu-official
You folks seem like you would have the worst ideas for any upgrades or purposes I should give this thing
If your interested the specs are here
- intel i5-4670s (4t4c 3.1ghz)
- 16GB DDR3 1600mhz (I lied in the video)
- awful Kingston ssd because god is dead
- Nvidia qaudro K2200
If your wondering how I setup the GPU without an x16 pcie slot then your gonna hate me.
There is an MXM slot for a laptop GPU but those fuckers are expensive, so my train of thought was I can get a cheap x16 GPU so I just need to jam that fucker into it. So I did some digging on AliExpress and things, discovering you can take the mini Pcie slots for WiFi cards and jam a USB adapter in it, jerry rig that to a GPU extender.
All of this is shown below

So yeah, USB GPU.
It's so beautifully cursed and I love it <3
#hardware#i should not be left unsupervised#i fucking hate windows tho#so i want to teach myself linux through the use of this fucker#and i fully well know this was a bad idea before anyone says
27 notes
·
View notes
Text
How to Aervy Wifi extender setup?

However, you can easily accomplish the Aervy Wifi extender setup via the WPS button method. Initially, power on your device. Then, locate, press, and hold the WPS button on your router and then on the extender within 2 minutes. Wait for some time till the LED turns blinking to solid green. If you need more help, come to us!
2 notes
·
View notes
Text
How Mesh vs. Traditional Routers Impact Your Wi‑Fi Installation Cost

If you're setting up Wi‑Fi at home or in a business space, you’ve likely asked this: mesh or traditional router? It’s a common question for those searching for wifi installers near me, and the answer affects not just coverage, but your budget too.
Let’s explore how each type of setup works and what it could cost you.
Traditional Routers: Simple but Limited
Traditional routers are the most familiar option. You’ve got one device plugged into your modem, broadcasting signals from a central location. This works well in smaller homes or offices with open layouts. But once you add walls, multiple floors, or long distances between rooms, signal dropouts become a daily nuisance.
Extending the signal often means buying add-ons like range extenders. These can help in specific areas but may create separate networks, slowing things down when you roam from one zone to another. You might end up spending more than expected trying to fill gaps, which impacts the wifi installation cost Brisbane overall.
Mesh Networks: Consistent, Scalable Coverage
A mesh system uses multiple nodes placed around your property. They all communicate with each other, forming a unified network. Wherever you go upstairs, out back, or to the garage, you stay connected to the same network without losing speed.
Installation is typically more involved since the placement of each node affects performance. But the end result is seamless coverage and reliable performance, especially for smart homes, multi-storey properties, or spaces filled with devices.
Mesh systems usually come with a higher upfront cost, but you’re getting broader, smarter coverage without the constant need for boosters or manual switching between networks.
Comparing Costs and Practicality
The cost difference between a mesh system and a traditional router isn’t just about the devices. It’s also about what you avoid in the long run. With mesh, you’re less likely to face dead zones, buffering, or frustrated video calls. That’s something you’d pay extra to fix with a traditional setup either through more hardware or service calls.
Still, not every situation demands a mesh system. For a compact flat or small business with minimal device usage, a well-placed traditional router might do the trick. For larger households or tech-heavy offices, mesh is often the more practical long-term choice.
If you're unsure what suits your space, it’s a good time to speak to wifi experts near me who can assess the layout, recommend the right system, and handle the setup professionally.
Final Thoughts
Choosing between mesh and traditional routers is about understanding your space, usage habits, and how much convenience you’re after. While mesh might cost more upfront, it often saves money and frustration down the line. On the flip side, traditional routers can work just fine for simple setups if placed correctly.
Both options can work beautifully when installed by the right team. Knowing what you need helps keep your installation smooth and your Wi‑Fi strong.
0 notes
Text
Troubleshooting Common Issues Through PLDTHomeWiFiSettings

Dealing with internet slowdowns or connectivity issues can be frustrating, especially when you rely heavily on WiFi for work, streaming, and daily communication. Fortunately, many common problems can be resolved using pldthomewifisettings. This guide will walk you through practical troubleshooting tips and tricks using your PLDT router's admin panel.
Understanding PLDTHomeWiFiSettings
The pldthomewifisettings portal is your gateway to diagnosing and solving most network issues at home. From checking signal strength to rebooting your system remotely, it offers a variety of tools to enhance your internet experience.
How to Access PLDTHomeWiFiSettings
Before troubleshooting, you’ll need to access the settings:
Connect your phone or computer to the PLDT Home WiFi.
Open a web browser and type 192.168.1.1 or 192.168.0.1.
Enter login credentials—usually "admin" and "1234" (or "adminpldt" with a specific password).
You’ll now see the pldthomewifisettings dashboard.
Once inside, you’re ready to start troubleshooting.
Problem 1: Slow Internet Speed
If your internet seems slower than expected:
Go to Status > WAN to check the real-time speed.
Run a speed test from your browser and compare it with your subscribed plan.
Use QoS Settings to prioritize work-related devices or apps.
Reduce the number of connected devices by checking the Client List.
Through pldthomewifisettings, you can quickly allocate bandwidth to where it matters most.
Problem 2: Frequent Disconnections
A common issue with wireless connections is frequent drops. Try the following:
Change the WiFi Channel under Wireless Settings. Avoid crowded channels like 1 or 6.
Switch from 2.4GHz to 5GHz if supported. It’s faster and less prone to interference.
Ensure firmware is updated via System > Firmware Upgrade.
If none of these fixes work, a factory reset through pldthomewifisettings might be necessary.
Problem 3: Unauthorized Users on the Network
Are you noticing unfamiliar devices?
Navigate to the Client List in your dashboard.
Block unknown devices using MAC Filtering.
Change your WiFi password under Wireless > Security and re-authenticate trusted devices.
Regularly monitoring your pldthomewifisettings can help you catch freeloaders before they eat up your bandwidth.
Problem 4: Can’t Connect to WiFi
Sometimes your device might not connect at all:
Restart your router using System > Reboot.
Check if the WiFi signal is hidden. Go to Wireless Settings and make sure SSID broadcast is enabled.
Ensure the device isn’t blocked under MAC Filtering.
This is a common situation easily resolved by checking settings via pldthomewifisettings.
Problem 5: WiFi Signal Weak in Certain Areas
Dead zones in your house?
Try changing the transmission power from “Low” to “High” under Wireless > Advanced Settings.
Reposition your router centrally in your home.
Add a WiFi extender or Mesh system and link it via LAN cable.
While pldthomewifisettings can help optimize range, hardware limitations may also need to be addressed.
Problem 6: Can’t Log In to PLDTHomeWiFiSettings
If you can’t even access the admin panel:
Check the IP address. It should be 192.168.1.1 or 192.168.0.1.
Make sure you're connected to the PLDT WiFi, not mobile data.
Reset the router to factory settings using the small reset button at the back.
Access to pldthomewifisettings is crucial for all troubleshooting, so this step is foundational.
Problem 7: Port Forwarding Not Working
Need to open ports for gaming or remote access?
Navigate to NAT > Port Forwarding.
Input the local IP, start/end port, and protocol.
Save and reboot the router.
If port forwarding doesn’t work even after setup, check with PLDT support—some accounts are on CGNAT which restricts this function.
Preventive Maintenance Tips
Log into your pldthomewifisettings weekly to monitor devices.
Change your password monthly.
Keep firmware updated.
Avoid overloading your network with too many devices.
Preventive maintenance reduces the frequency of technical problems and improves long-term performance.
Conclusion
When problems arise with your internet, don’t panic. Many issues—from speed concerns to unknown users—can be resolved by exploring your pldthomewifisettings. By taking the time to understand the control panel, you empower yourself to maintain a fast, secure, and stable network connection without always needing technical support.
FAQs on PLDTHomeWiFiSettings Troubleshooting
Q1. What should I do if my PLDT WiFi keeps disconnecting? Ans. Check for channel interference, update firmware, and limit the number of connected devices using pldthomewifisettings.
Q2. Can I remove a device from my WiFi using PLDTHomeWiFiSettings? Ans. Yes, go to the device list, find the suspicious device, and block it via MAC filtering.
Q3. What if I forget my PLDTHomeWiFi admin password? Ans. You can reset the router to factory settings and log in using default credentials, then reset the password again.
0 notes
Text
Faster WiFi? How a Signal Booster Can Upgrade Your Speed
In today's world, a strong and reliable internet connection is essential for work, entertainment, and communication. However, many people struggle with weak WiFi signals, leading to slow speeds, buffering videos, and frustrating disconnections. If you find yourself constantly battling poor WiFi performance, a WiFi antenna booster might be the perfect solution. This simple device can significantly enhance your internet connection, ensuring you stay connected without interruptions.

What is a WiFi Antenna Booster?
A WiFi antenna booster is a device designed to amplify and extend the range of your wireless signal. It works by capturing the existing signal from your router, amplifying it, and then redistributing it over a wider area. This allows your devices to receive a stronger connection, even in parts of your home or office that previously had weak or no signal vhf antennas.
There are different types of WiFi antenna boosters, including external antennas, signal extenders, and repeaters. Each type serves a slightly different purpose, but they all work towards improving your overall WiFi experience.
Benefits of Using a WiFi Antenna Booster
Stronger Signal Strength – A WiFi antenna booster amplifies weak signals, allowing for better connectivity even in large homes or offices with multiple rooms.
Extended Coverage Area – If your router's built-in antenna has limited range, a booster can help extend the signal to cover dead zones.
Faster Internet Speeds – A stronger signal often translates to faster internet speeds, reducing buffering and improving performance for streaming, gaming, and video calls.
Better Connection Stability – By minimizing signal drops, you can enjoy a seamless internet experience without frequent disconnections.
Cost-Effective Solution – Instead of upgrading your internet plan or purchasing a new router, a WiFi antenna booster offers an affordable way to enhance your existing setup.
How to Choose the Right WiFi Antenna Booster
When selecting a WiFi antenna booster, consider the following factors:
● Compatibility – Ensure that the booster you choose is compatible with your router and internet service provider.
● Antenna Type – Some boosters come with directional antennas that focus the signal in one direction, while others have omnidirectional antennas that spread the signal evenly.
● Signal Strength and Range – Look for a booster that offers the range and power needed to cover your entire home or office.
● Ease of Installation – Many WiFi antenna boosters are plug-and-play, making them easy to set up without technical expertise.
● Price and Reviews – Compare prices and read customer reviews to find a reliable booster that offers good value for money.
Conclusion
A WiFi antenna booster is a simple yet effective way to improve your internet connection without costly upgrades. Whether you’re struggling with weak signals in certain areas of your home or need a more stable connection for work and entertainment, investing in a booster can make a significant difference. With the right device, you can enjoy faster speeds, wider coverage, and a seamless online experience.
If you're ready to enhance your WiFi performance, consider adding a WiFi antenna booster to your setup today!
#own weather satellite#iridium satellite antenna#tactical antenna#iridium antenna#ads-b lna#vhf antenna#vhf antennas#VHF Mobile Band Antenna#VHF Mobile Antenna#low noise amplifier#iridium external antenna#antenna amplifier#custom antenna design#antenna preamplifier#wifi antenna booster#Low Noise Amplifiers#wifi signal enhancer#wifi signal booster#external wifi booster#improve wifi signal#wifi enhancer#antenna manufacturer
0 notes
Text
How To Setup WiFi Range Extender Netgear
Learn How to Setup WiFi Range Extender Netgear, plug it into a power outlet within the range of your existing WiFi network. Wait for the power LED to light up solid green. Connect to the extender's WiFi network on your device. Open a web browser and enter "www.mywifiext.net in the address bar. Follow the on-screen instructions to complete the setup process, including connecting the extender to your existing WiFi network.
#How To Setup WiFi Range Extender Netgear#How To Setup WiFi Extender Netgear#How To Setup Extender Netgear#Extender Netgear Setup
1 note
·
View note
Text
How to Reset & Reconnect Your Comfast Repeater to WiFi?
To perform comfast wifi extender reset, locate the small, recessed reset button on the extender. With the device powered on, use a pin to press and hold this button for approximately 8-10 seconds until the indicator lights flash. This action restores the extender to its factory default settings, requiring a re-setup. For reconfiguration details, visit us!
1 note
·
View note
Text
How to Fix Common Issues During WiFi Extender Setup

Problems with the TP-Link wifi extender setup? Here's how to fix typical installation issues and have your extender operating at its best.
Make sure you're connected to the extender's WiFi first if the setup page at tplinkrepeater.net won't load. Another option is to use the IP address listed on the label. Changing browsers or clearing your browser's cache can be helpful.
When users enter the incorrect WiFi password when setting up a TP-Link extender, another problem occurs. Before continuing, always make sure your credentials are correct. During the setup procedure, try moving the extender closer to the router if it is unable to locate your primary network.
Restart the router and the extension if they both display a connection, but there is no internet access. To verify that the connection was successful, repeat the TP-Link Range Extender Setup Process.
Is the extender causing slow internet? This could be the result of bad positioning. The extender should not be placed behind heavy furniture or in corners. Locate an area with a strong signal by using the LED indicators on the device.
Holding down the reset button for ten seconds will reset everything if you ever need to. Then follow the following instructions to begin again.
By following these guidelines, you can experience greater wireless coverage without any disruptions and a more seamless TP-Link wifi extender setup.
#tplinkrepeater#tplinkrepeater.net#tp link setup#tp link extender setup#tp-link wifi extender setup#tp link range extender setup#http tplinkrepeater net#tplinkrepeater login
0 notes
Text

How to setup the D-Link DAP 1720 Extender is covered in this article. Everything is available here, including a login page for the D-Link DAP-1720 and a firmware updater. Together with the D’Link DAP 1720 reset instructions, you will also discover advice on how to reset the password for a DLink WiFi extender here.
#How to setup the D-Link DAP 1720 Extender#how to reset the password for a DLink WiFi extender#D-Link DAP 1720#D-Link DAP 1720 setup#D-Link DAP 1720 login#D-Link DAP 1720 reset#dlinkap#dlinkap.local#http //dlinkap.local#dlinkap.local/login.html#http //dlinkap.local login#https //dlinkap.local./#http //dlinkap.local./#dlinkap local#http //dlinkap#http://dlinkap.local#http://dlinkap#dlinkap.local login#https //dlinkap.local#http://dlinkap.local./#http//dlinkap.local#192.168.0.50#192.168.0.1
0 notes