#linksys extender setup
Explore tagged Tumblr posts
Visit Tumblr Blog
Explore Tumblr blogs with no restrictions, modern design and the best experience.
Last Seen Tumblr Blogs


Fun Fact
In 2020, 44% of users from Denmark used Tumblr daily.
Text
How to Connect Linksys WiFi Extender to Xfinity Network Without Hassle
Connect Linksys WiFi extender to the Xfinity network for wider coverage and a stronger signal. Just plug in the extender, access its setup page, and select your Xfinity WiFi. Follow the prompts to complete the connection and enjoy seamless internet throughout your home.
0 notes
Text
Steps For Linksys Extender Setup
Once your Linksys extender is connected to the network, connect your device to Wi-Fi. Go to the Linksys extender setup configuration URL, which is often 192.168.1.1, in an open web browser. To select and input the password for your current network, simply adhere to the setup guidelines. For best results, save your modifications and restart the extender. If you want any more help, kindly visit our website. Do not hesitate to consult our specialists if you require guidance.
0 notes
Text
The Linksys extender setup can be done using the WPS button, first, make sure that the networking device is powered on. Next, locate the WPS button on the extender and the router as well. Now, push down the WPS button on the extender and the router within 2 minutes until the LED begins blinking. For more details, approach us!
0 notes
Text
Boost your internet speed with Linksys wifi extender setup! Don't let slow connections hold you back. 🚀 Connect seamlessly by clicking the link in bio. Upgrade your browsing experience today! #TechGuru #WiFiMagic #LinksysLife #TechInnovation #ViralTech #SmoothSailing
0 notes
Text
https://trustedblogs.co/2023/06/22/how-to-change-linksys-extender-administrator-password/
0 notes
Text
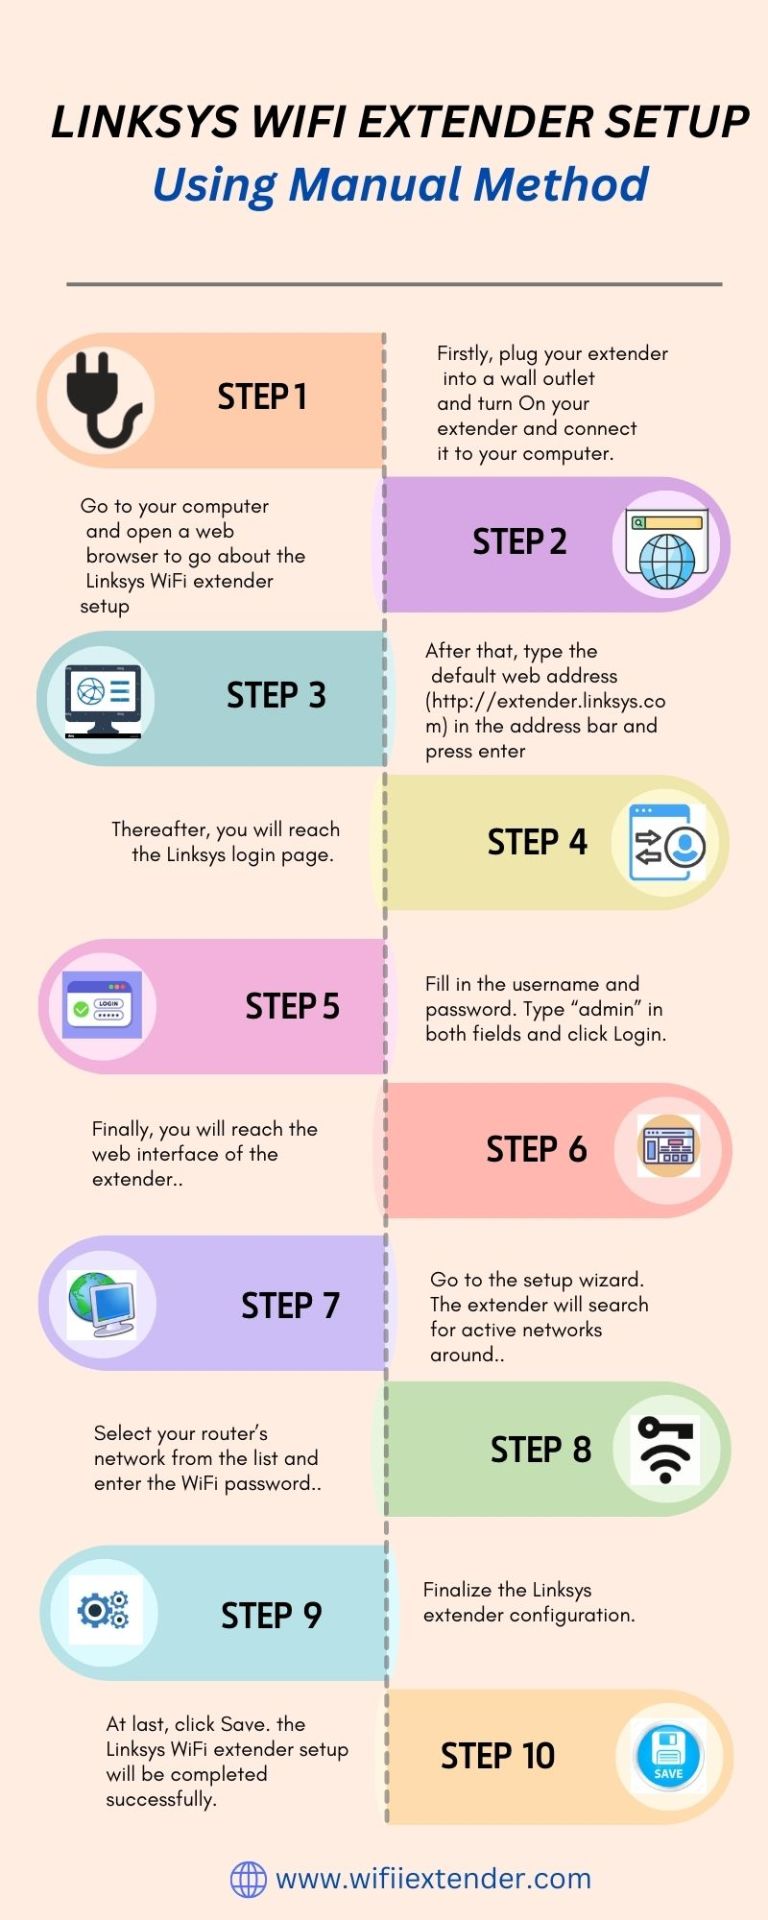
Guide to Linksys WIFI Extender Setup
The Linksys Wi-Fi extender is another magnificent Wi-Fi repeater with a high-speed internet connection. If you wish to extend your current network’s WiFi range, this device is perfect. With the help of the extender, you can say goodbye to all the dead zones in your house. To start using this extender, you need to proceed with the Linksys WiFi Extender Setup.
You can easily set up the Linksys extender with the help of the correct instructions. That’s why we are here with this post to help users with the setup. This post will consist of the setup along with the crucial procedures you must know. Also, we’ll cover the issues you could face with the setup along with the troubleshooting methods.
Steps To Set Up the Linksys WiFi Extender
In this section, we will walk you through the complete procedure for the setup. You should know there are two methods you can use to set up the extender correctly.
Firstly, keep the extender and the router in the same room and power them on.
Now, connect your device to the router’s network to access the login page.
You can use an Ethernet cable to connect the PC to the router’s network.
On the device connected to the extender, open a web browser of your choice.
Hereon enter "extender.linksys.com" in the address bar to access the login page.
When the login page appears, enter the default username and password in the fields.
The home page of the extender will appear on the screen you can initiate the setup.
Now, the extender’s user interface will scan for all the nearby available WiFi networks.
After that, you need to select your WiFi network and enter the correct password.
Give the extender some time to form a connection successfully with the router.
When the connection is successful, you can configure the extender’s settings accurately.
In the end, relocate the extender and connect your devices to the extender’s network.
These are the methods you can use for the Linksys WiFi extender setup. When the setup is complete you can place the extender somewhere else. Just ensure to place the extender inside the router’s range, as the connection will break if the router is too far.
Conclusion
This blog post includes the complete process for you to set up your Linksys extender through a reliable web browser on your device. But if you are unable to set up your extender or facing issues during the process, chat with our technical experts. They will efficiently guide you through the complete setup process.
0 notes
Text
A Comprehensive Guide to Linksys RE6500 Setup for Enhanced Wi-Fi Coverage
In today’s connected world, a robust Wi-Fi signal is essential. The Linksys RE6500 Wi-Fi Range Extender is designed to eliminate dead zones by amplifying your existing network. This guide walks you through the setup process, ensuring seamless connectivity in every corner of your home or office.
What is the Linksys RE6500? The Linksys RE6500 is a dual-band range extender that boosts 2.4GHz and 5GHz networks, offering speeds up to AC1200. Features like the Spot Finder Technology, Ethernet ports for wired connections, and cross-band connectivity make it a versatile solution for extending Wi-Fi coverage.
Unboxing and Initial Setup Inside the box, you’ll find the RE6500, an Ethernet cable, and a quick start guide. Begin by plugging the extender into a power outlet near your router. Wait for the LED light to turn solid red, indicating it’s powered on.
Optimal Placement Using Spot Finder The RE6500’s Spot Finder Technology ensures ideal placement:
Press the Spot Finder button on the extender.
Use a connected device to visit http://extender.linksys.com.
Follow the on-screen instructions to relocate the extender while monitoring signal strength. Aim for a location halfway between your router and the dead zone, avoiding obstructions and interference.
Two Setup Methods: WPS vs. Manual Method 1: WPS Setup (Recommended)
Press the WPS button on your router.
Within 2 minutes, press the WPS button on the RE6500.
Wait for the LED to turn solid green, indicating success.
Method 2: Manual Setup via Web Interface
Connect your device to the extender’s network (e.g., Linksys Extender Setup).
Open a browser and go to http://extender.linksys.com.
Follow prompts to select your Wi-Fi network (2.4GHz or 5GHz) and enter the password.
Customize the extended network’s name (SSID) if desired.
Connecting Devices to the Extended Network After setup, your extended network will appear as your original SSID with “_EXT” appended. Reconnect devices to this new network or use the Ethernet port for a stable wired connection.
Advanced Configuration Tips
Firmware Updates: Regularly check for updates via the extender’s interface to enhance performance and security.
Network Management: Use the dashboard to adjust security settings, create guest networks, or prioritize devices.
Troubleshooting Common Issues
No Connection to Extender: Ensure you’re connected to the extender’s network and the LED is green. Reset the extender if needed.
Weak Signal: Reposition the extender using Spot Finder and avoid interference from appliances.
Incorrect Password: Re-enter your Wi-Fi password carefully during setup.
Browser Issues: Clear cache or try a different browser if the setup page doesn’t load.
Conclusion The Linksys RE6500 setup is straightforward, offering immediate relief from Wi-Fi dead zones. By following this guide, you can enjoy extended coverage, faster speeds, and reliable connectivity. For persistent issues, contact Linksys support for assistance. Transform your Wi-Fi experience today with the RE6500!
0 notes
Text
How to Setup Linksys Extender?

If you desire to install your Linksys extender, it is important to insert it into a socket and place it anywhere in the signal range of your router. Then you simply must first establish the extender's Wi-Fi network with the help of your mobile phone or PC. By the time when the connection is made, you need to unlock a browser and type in either extender.linksys.com or 192.168.1.1 and get to setup page. Click on your Wi-Fi network, as the instructions on the screen say, and then type your password. As soon as the setup is done, the extender will restart change, and a new, even stronger Wi-Fi signal will be accessible to you. In fact, the Wi-Fi signal will be vastly enhanced so that a full signal will be available everywhere throughout your house.
0 notes
Text
Step-by-Step Guide to Linksys Velop Setup with Existing Router for Extended Wi-Fi Coverage
Linksys Velop setup with existing router offers a quick, convenient Wi-Fi connectivity by linking the primary node with your router. With simple app-based setup, you can then add more nodes for enhanced coverage, providing interference-free internet availability in every room.
#Linksys velop setup with existing router#Linksys Velop Login#Linksys velop node#Linksys Velop Setup#Linksys Velop bridge mode#Factory Reset Linksys Velop
0 notes
Text
Get The Steps For Linksys Extender Setup
Plug a Linksys extender into an outlet close to your router to set it up. Link your laptop or mobile device to the built-in Wi-Fi network of the extender. Launch a web browser and navigate to the setup URL (often included in the instruction manual). To link the extender to your current Wi-Fi network, follow the instructions displayed on the screen. Position the extension halfway between your router and the signal-weak region for best results. For more details about Linksys extender setup, visit our website. You may also have a conversation with our experts.
0 notes
Text
Quick And Easy Setup Process For All Linksys Extenders
Do you want to enjoy full connectivity throughout your home or office space but your router isn't allowing you to do so? If yes, then it is a clear indication to buy a Wi-Fi range extender. A good quality Wi-Fi range extender will remove all your connectivity issues and will provide you with full signals, fast internet speed and seamless connectivity. One of the best networking brands that makes high-performing range extenders is Linksys. They have vast options for every need, so you can select the one that fits your preferences, budget and network needs. So, if you choose to buy from them, here's the common easy and simple setup process for you to get started. We will provide three options for the setup process, so you can choose the one, which is easier and more convenient for you.
Before you begin, the first and foremost step which is common for all methods is to place the range extender in a central location of your home which should be near to your existing router. Connect the router and extender with the help of an Ethernet cable. Plug the range extender into an electrical outlet with the provided power adaptor and switch on the entire setup. Wait for a few minutes, so that all the devices are stable and ready for further setup. Now let's see the different methods.
Method 1: Setup With Linksys App
✓ First open the Wi-Fi settings of your device, and connect to the extender's wifi network.
✓ The next step is to download and install the Linksys App. If you are an Android user then download from the Play Store and if you are an iOS user then download from the App Store.
✓ Open the app, create your Linksys account or if you already use the app then login using the set username and password.
✓ Once you log in just follow the instructions to set up and configure the extender. The app will guide you through selecting your Wi-Fi network and entering the necessary details.
And that's all for the app-based setup. Wasn't it super easy and quick?
Method 2: Web Browser Based Setup
We will use extender.linksys.com for this setup method.
✓ Choose any device, and go to its Wi-Fi settings. In the list of all the available networks look for a network named Linksys, upon finding click on Connect. If there is no name as such then refresh the page and the name will appear automatically.
�� Now, on the same device open a browser. You can use any browser like Google Chrome, Edge, Safari or any other of your choice.
✓ In the address bar of the browser enter extender.linksys.com and press enter. This will take you to the login page. If extender.linksys.com doesn't work then try adding http:// in front or you can also use the default IP address which is 192.168.1.1.
✓ Once you enter the login page, you have to enter the default login details. The username and password are both admin or sometimes it's admin for username and password for password. So if one doesn't work try the other combination. For accurate details always check the user manual that came along with your specific Linksys Extender model.
✓ Once you log in successfully, you have to select the name of your current network whose reach you want to extend and enter its password. Now the screen will guide you to complete the whole process, so keep following all the instructions carefully.
✓ Once done, you can now change the extender's settings as per your wish.
That's all for web browser-based setup. We hope you found it easy and straightforward.
Method 3: WPS Method
One of the easiest and quickest methods to set up Linksys Extenders is using the WPS method. So here's how you can perform this method:
✓ Firstly you need to ensure that your router supports WPS (Wi-Fi Protected Setup).
✓ Now, locate the WPS button on your router and press it. Usually, the WPS button can be found by moving the router upside down.
✓ Within two minutes, press the WPS button on your Linksys Extender.
✓ As soon as you press the button on the extender the light on it will start blinking to indicate that it is connecting to the router. Once it stabilizes, it means the setup is successfully done.
Bonus Points To Enhance The Working Of Your Linksys Extenders
Choose a less crowded Wi-Fi channel by visiting the settings of your extender for a better experience.
Regularly check for firmware updates, if found install them immediately for improved performance and better security.
Make sure the place where you have kept the range extender doesn't have any electronic devices or any metal objects as it can disturb the signals of your extender.
Consider changing the default username and password to something difficult and unique so that your network is protected from hackers.
Use Qos settings for Prioritizing bandwidth for critical applications.
1 note
·
View note
Text
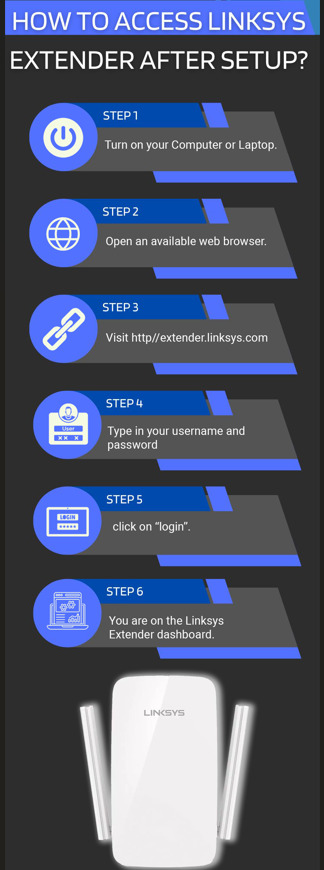
Access Linksys extender after setup.
0 notes
Video
youtube
Linksys RE7000 AC1900 Dual band WIFi Range Extender setup | Linksys re70...
0 notes