#how to update arduino ide
Explore tagged Tumblr posts
Visit Tumblr Blog
Explore Tumblr blogs with no restrictions, modern design and the best experience.
Last Seen Tumblr Blogs


Fun Fact
Tumblr was created by web developers David Karp and Marco Arment.
Text
Embedded Controls Development: From Design to Deployment

Embedded controls development is a critical area in embedded systems engineering, involving the design, programming, and integration of control systems into hardware platforms. These systems are typically found in devices that perform dedicated functions, ranging from consumer electronics to industrial automation and automotive applications. The development process requires a combination of hardware knowledge, software engineering, and systems integration skills.
What Are Embedded Controls?
Embedded controls are computer-based systems that control specific functions within a larger mechanical or electrical system. They use microcontrollers, digital signal processors (DSPs), or microprocessors to monitor inputs from sensors, process data according to a control algorithm, and output control signals to actuators or other system components. These control loops can be simple (like turning on a fan when a sensor detects high temperature) or complex (like managing engine timing and fuel injection in modern vehicles).
Development Lifecycle
The development lifecycle for embedded controls typically follows several key stages:
Requirements Definition: Understanding what the control system needs to do. This includes identifying input/output interfaces, environmental constraints, performance requirements, and safety or compliance standards.
System Design: Creating a high-level architecture that defines how software and hardware will interact. This stage also involves choosing the right microcontroller or processor, selecting sensors and actuators, and outlining communication protocols.
Software Development: Writing code for the embedded control system, often in C or C++. Developers must consider memory limitations, real-time constraints, and hardware-specific details. This stage includes implementing control algorithms, handling interrupts, and developing communication interfaces such as I2C, SPI, UART, or CAN.
Hardware Integration: Integrating the embedded software with physical components. This includes setting up the development board, connecting sensors and actuators, and testing signal integrity and power consumption.
Testing and Validation: Rigorously testing the control system to ensure it functions as expected under various conditions. Unit testing, integration testing, and hardware-in-the-loop (HIL) simulations are commonly used to verify performance and reliability.
Deployment and Maintenance: After development and testing, the system is deployed into the final product. Ongoing maintenance may involve firmware updates, bug fixes, or performance improvements.
Tools and Platforms
A wide range of tools are used in embedded controls development, including:
Integrated Development Environments (IDEs): Tools like Keil µVision, MPLAB X, STM32CubeIDE, and Arduino IDE are popular for writing and debugging code.
Real-Time Operating Systems (RTOS): Systems such as FreeRTOS or VxWorks provide scheduling, task management, and synchronization capabilities for time-sensitive applications.
Version Control Systems: Git is widely used to manage code versions and support collaborative development.
Simulation and Modeling Tools: MATLAB/Simulink is frequently used in control systems design for simulation and code generation.
In-Circuit Debuggers/Programmers: Tools like JTAG or SWD interfaces allow developers to program and debug the target microcontroller directly.
Challenges in Embedded Controls Development
Developing embedded control systems presents several challenges:
Resource Constraints: Embedded systems often have limited CPU power, memory, and energy availability. Efficient coding and hardware optimization are essential.
Real-Time Requirements: Many control systems must respond within strict timing constraints. Missed deadlines can result in system failure or unsafe behavior.
Hardware Dependence: Embedded software is closely tied to specific hardware, requiring deep knowledge of the processor, peripherals, and electrical characteristics.
Debugging Complexity: Diagnosing problems in embedded systems can be difficult due to limited visibility into internal states and limited logging capabilities.
Safety and Reliability: In industries like automotive or medical devices, the control systems must meet rigorous safety standards such as ISO 26262 or IEC 62304.
Applications
Embedded controls are used in countless applications:
Automotive Systems: Engine control units (ECUs), anti-lock braking systems (ABS), adaptive cruise control, and infotainment systems.
Consumer Electronics: Smart thermostats, washing machines, and robotic vacuum cleaners all rely on embedded control systems.
Industrial Automation: PLCs and industrial controllers manage processes on factory floors, often integrating with SCADA systems.
Aerospace and Defense: Flight control systems, unmanned aerial vehicles (UAVs), and radar systems.
Medical Devices: Infusion pumps, pacemakers, and diagnostic equipment all include embedded control systems to ensure safe and accurate operation.
Trends and Future Directions
The field of embedded controls is rapidly evolving. Several key trends are shaping the future:
IoT Integration: Many embedded systems are now connected to the internet, allowing for remote monitoring, control, and firmware updates.
Edge Computing: More processing is being done on the device itself, reducing the need to send data to the cloud and improving response times.
AI and Machine Learning: Embedded systems are beginning to incorporate ML algorithms for pattern recognition, predictive maintenance, and adaptive control.
Model-Based Design: Tools like Simulink allow engineers to design control systems graphically and automatically generate embedded code.
Cybersecurity: As systems become more connected, securing embedded control systems against hacking and data breaches is becoming essential.
Conclusion
Embedded controls development by Servotechinc is a complex but vital discipline that sits at the heart of modern technology. From managing vehicle dynamics to enabling smart home features, embedded control systems play a crucial role in ensuring that machines operate efficiently, safely, and intelligently. As technology advances, the demand for skilled engineers in this domain will only continue to grow.
0 notes
Text
5 Arduino Courses for Beginners
A popular tool for professionals, students, and amateurs interested in electronics and programming is Arduino, an open-source electronics platform with many uses. There are plenty of beginner-friendly classes available to assist you in getting started, regardless of whether you're new to Arduino or want to improve your basic understanding. This list of the top 5 Arduino courses for novices will make learning enjoyable, useful, and efficient.
Arduino for Beginners by Udemy
This extensive Udemy course is ideal for novices who have never worked with electronics or coded before. It guides you through the fundamentals of the Arduino platform, including setting up hardware, using the Arduino IDE to program, and creating easy projects.
Key Features:
Discover how to program motors, sensors, and LEDs.
Get lifetime access to digital resources and video tutorials.
Construct useful projects such as motion detectors and temperature monitors.
Getting Started with Arduino by Coursera
This course, which is offered by the University of California, Irvine, delves deeply into the fundamental ideas of circuit design and Arduino programming. It is a great option for novices seeking a structured learning route because it is a component of a larger specialty.
Key Features:
An introduction to the fundamentals of coding and Arduino components.
uses for real-world projects, such as robotics and home automation.
professional certification after completing the course.
Arduino Step by Step: Getting Started by Tech Explorations
This well-regarded course is ideal for students who want in-depth explanations and practical assignments. Its emphasis on exploration and innovation makes it popular among do-it-yourselfers.
Key Features:
More than 100 courses covering intermediate and fundamental Arduino subjects.
comprehensive instructions for utilizing communication modules, sensors, and actuators.
Regular course updates and lifetime access to video content are provided.
Arduino 101 by EdX
The Arduino team, in collaboration with EdX, offers an introductory course called Arduino 101. Its main goal is to make Arduino understandable to complete novices by combining theory and practical application.
Key Features:
Discover the hardware and IDE components of the Arduino ecosystem.
Use output devices and sensors to create interactive creations.
self-directed education with the possibility of gaining a professional certification.
Arduino Programming and Hardware Fundamentals with Hackster.io
In an engaging and community-driven setting, this free Hackster.io course introduces novices to the world of Arduino. For those seeking a collaborative learning environment, it's perfect.
Key Features:
Concentrate on fundamental hardware and programming ideas.
detailed instructions for creating projects that are appropriate for beginners.
access to a vibrant community for ideas and problems.
Studying An entry point into electronics, robotics, and Internet of Things creation is provided by Arduino. It is an engaging platform for learning hardware and coding at the same time because of its hands-on, project-based methodology. You can make anything with Arduino, including robotics projects, art installations, and automated home systems.
With a combination of interactive elements, real-world projects, and video lessons, each of these courses accommodates various learning preferences. Depending on your objectives, you can use Hackster.io to get hands-on experience or enroll in an organized course like those offered by Coursera or Udemy.
Start your Arduino journey today and unlock your creativity in electronics and programming!
To know more, click here.
1 note
·
View note
Text
UYPP: Ben Ruel's Garage Garden

Back in March, we announced the winners for our Unleash Your Potential Program, in which six participants got to configure their own System76 computer to use for their awesome projects. This first awesome project is the Garage Garden, helmed by awesome project-er, engineer, and mighty green thumb Ben Ruel. We sat down with Ben to see how his project has been growing on the Meerkat.
Can you tell us about the Garage Garden project? What's it all about?
I spent a career with the Coast Guard and came up here—my final tour with the Coast Guard was in Juneau. Being in southeast Alaska, we’re constrained with what they call off-the-road systems, and the only way in or out of town is by boat or by plane. So all of our food comes up here by barge for a small nominal fee, or by aircraft for an incredibly large fee.
When I came up to Juneau with my wife and kids 11 years ago, we noticed that by the time our produce gets up here, it’s lived on a barge a week, two weeks out of Seattle, and you have no shelf life left on them. We started trying to grow food within the first year of getting here, and we came to the conclusion pretty quickly that with 300 days plus of rain every year, outdoor growing wasn’t really a viable option. That’s when we started a hobby farm in a garage growing some stuff in soil under fluorescent lights, as odd as that sounds.
Since then, we’ve progressed into hydroponics, but we’ve done it very manually. We go out every other day and take readings by hand, so I’ve been doing some research about building IOT devices that will talk back and automate some of the readings. My dream would be using it to actually control the concentration of nutrient solutions that we use. The overall goal is we’re going to build the hydroponic monitoring network of IOT devices, and use the Meerkat as a control center for the devices and a repository for all the data. We’ve also been doing some investigating behind the scenes into whether or not it could grow enough legs to become a business.
Is there a specific type of produce that you’re starting with?
We’ve been all over the road. Right now we’ve got lettuce. We’ve always got some kind of green leafy vegetables whether it’s any variety of lettuce that will grow hydro, some bok choy and tatsoi, and we’re growing kale like it’s going out of style. We’ve grown cucumbers to the point where I think I’ve harvested 65 pounds of cucumbers off of 4 plants over the last couple of months, but we’re really constrained by our size.
I live in a relatively small 3-bedroom house, and we’re just using a one-and-a-half car garage as our grow area. Right now I’ve got two tents. As funny as it sounds, cannabis is legal in Alaska and has been forever—my wife and I don’t touch the stuff, but because it’s been legalized, the infrastructure and the supplies that we need are freely available. We’re growing tomatoes in a tent that’s designed for marijuana growth. It works really well. It helps to maintain efficient temperature control; you can maintain temperature and humidity, block out extraneous light if you don’t want it, and cycle the lights on and off.
Depending on whether it’s too hot in the summer we’ll run the lights at night, and in the wintertime we’re looking for extra warmth, we can shift the cycle and run the lights during the day. Our big benefit up here is that, because Juneau’s all on hydroelectric power, electricity is really cheap.

What variables are being monitored?
With hydroponics, there’s a good number of parameters that you’ve got to try and keep track of. You’re basically diluting nutrients in a solution of as pure water as you can get. You want to keep track of things—your pH can’t be too acidic or too alkaline, for example.
The other big parameter is the electrical conductivity, or total dissolved solids. You want to make sure you’ve got the right concentration of nutrients, and that your nutrient solution isn’t salting up. As you’re adjusting pH back and forth, it’ll start demineralizing salt, so tracking that data gives you a good indication for when it’s time to dump the reservoir and start over.
We’re doing it manually now. I go out every couple of days and we take samples, and sit down and log it into a spreadsheet. The Meerkat acts as a control center for programming devices, keeping a repository of the programming for the IOT devices that we’re using (Arduinos with the esp8266 chips) as well as running different database programs as Docker containers, so that they can be spun up and knocked down fast enough as we try and figure out what the best way to move forward is. We’ve got a couple of database servers that I’ve been playing around with, trying to break from traditional SQL and looking at NoSQL type of databases.
I’m not an IT guy by trade. I’m more of an electronics guy, so I’m kind of doing it as a study-by-night type of project.
What has your experience been like with the Meerkat so far?
I’m actually completely blown away by the Meerkat’s performance. It’s astounding what that small form factor and footprint is able to do. I’ve used Linux for a number of years, and basically everybody’s heard of System76. I’ve seen Pop!_OS before and never really played with it all that much, but I’ve actually grown to love it. The feel, the ergonomics, the interface, and even down to the color schemes that come bone-stock right out of the box. They just make more sense to me. I’m looking forward to the COSMIC update after researching that to see how the differences in the workflow will affect things.

What software are you using for this project?
Right now we’re writing in Docker containers and running the Tick Stack from Influx. We’re also running Telegraf, Protograph, Capacitor, playing around with the Time Series Database, I’ve got a container running MongoDB I run with SQLite, and there’s a couple different IDEs I’ve got loaded on there as well for programming Arduinos or esp8266 chip flashing.
How was the setup process for the machine?
It was up and running within 10–15 minutes of pulling it out of the box. I actually took it to work, too. We do a lot of work with government agencies, and I’ve been doing a lot of microwave radio repair. I’ve got a pretty small workbench at our shop here in Juneau, so using the Meerkat to drive all of our test equipment to control the radio while logging data coming out of the radio, it was perfect. It had enough horsepower to remotely control the test equipment. I wasn’t pushing it all that hard, but setting it up and going back and forth between having it at home or at work, it was negligible to get it up and running.
Stay tuned for further updates from Ben Ruel’s Garage Garden and cool projects from our other UYPP winners!
#system76#meerkat#desktop#mini#minicomputer#computers#desktops#laptops#servers#keyboards#NoSQL#Pop!_OS#Ubuntu#Linux#Alaska#Juneau#hydroponics#farming#vegetables#produce#cucumbers#totsui#bok choy#Arduino#Mongodb#IOT#iot solutions#automation#harvest#garage
19 notes
·
View notes
Text
14 Awesome Arduino Cloud Features You Never Knew Existed
Tweet
There are dozens, if not hundreds of amazing Arduino Cloud features. So it’s perfectly understandable if you’ve missed some of them.
So we’ve put together a list of our favorite Arduino Cloud features that you might not know existed.
1) Auto-generate Sketches
We’ve talked elsewhere about getting an understanding of what cloud computing really is, and how it’s not just the domain of experts. The cloud is how total beginners can get started much more easily. There’s no better demonstration of that than our first top Arduino Cloud feature; auto-generated sketches.
When you create a new “Thing” in your Arduino Cloud, you add various bits of info to it. Wi-Fi connection credentials, and any variables you want to control or monitor. The Cloud automatically generates a starting sketch from this info. That sketch can then be sent to your boards, so all your initial configuration is taken care of, without a single line of code.
2) Device-to-Device Communication
There’s simply no easier way to make two microcontroller boards talk to each other than Arduino Cloud. We’ve covered in detail how easy it is to wirelessly connect your boards.
This isn’t just for Arduino devices either. If you want any combination of Arduino, ESP32 and ESP8266 devices to work together, this is how you do it.
3) Over-the-Air Updates
Working through your Arduino Cloud means you don’t have to disconnect any Arduino boards when updating them. If you want to edit or add a new sketch, it can all be done wirelessly, over-the-air.
Anyone who’s had to dismantle a project or device to get to a board’s USB socket will appreciate the simple, vital value of this feature. It’s one of those things that you’ll wonder how you ever lived without.
4) Support for ESP Boards
There’s a reason we call it the Arduino IoT Cloud. This is an all-encompassing platform for Internet of things, home automation, and electronics project control and management. So first we added support for ESP8266 devices. More recently, experimental support for ESP32 boards became available.
So even if your project doesn’t actually have any Arduino products in there, the Cloud is just as useful. Secure, private, and accessible to all kinds of IoT and maker devices.
5) Trigger Actions on Cloud Events
Arduino Cloud makes it super easy to do things that you might normally need the IDE for. But it’s also got lots of exclusive features that you only get in the Cloud.
For example, there are actions that can be triggered based on your board’s interactions with your Arduino Cloud. You can include actions within your sketches when a Cloud connection is successful, and when the Cloud has synced with a device. Or perhaps most useful of all, trigger an action if Cloud connectivity is lost. Getting an indication that a project has disconnected could be incredibly useful!
Here’s an example of using these actions within a sketch.
6) Sharing Your Dashboards
Dashboards are control panels within your Arduino Cloud. It’s one of the most powerful Arduino Cloud features, and essential to making full use of Cloud control. But what’s often overlooked is that you can share dashboards with anyone you want.
For example, let’s say you’re using Arduino Cloud to control your home automation. You can set up a dashboard for a tablet in the living room that the whole family can use, but doesn’t have sensitive admin controls in there. And then another for people to use on their phones.
All Cloud plans include unlimited dashboards. And anyone can have a free Cloud account. So you can create as many dashboards as you like, and share them with literally anyone, anywhere.

7) Alexa Integration
Natural language voice control is genuine Star Trek stuff. So it’s no wonder people love the functionality of Alexa. Did you know it’s incredibly easy to connect your Arduino Cloud to Alexa? And once you have, it effectively adds voice control to every board, and every project. Nothing else needed.
There’s literally no easier way to make an Alexa-controlled device or project than with your Arduino Cloud. You’ll never look back, and you’ll always have someone to talk to.
youtube
8) Full API Integration
For the engineers, coders, developers and those among you who’ve been using Arduino for a long time, API integration is the powerhouse secret feature you’ve been looking for.
The API can be called with any HTTP client, or with languages like Javascript, Python, Golang and more. It’s what you need to incorporate the power of Arduino Cloud features into your systems, platforms and projects.
9) Use IFTT, Zapier and More with Webhooks
There are lots of reasons you might want to include control platforms outside of your Arduino Cloud. Like sending an email or a Tweet when you press a button on a Nano, or a device disconnects from the Cloud (see above).
That’s what webhooks are for, and they give you a universal way to send commands out of Arduino Cloud, and into… well, anything!
IFTTT and Zapier are great examples of services that can do almost anything from a webhook. Get to know this feature, and connected projects suddenly have easy access to the whole web.

10) Easy Firmware Updates
When you connect a new Arduino board, your Arduino Cloud automatically checks its firmware version. If there’s an update available, it offers you the option of applying that update.
Very easy, and you don’t have to worry about finding the correct/latest firmware version yourself. This simple, background function makes sure your boards and projects always have the latest features, security updates and bug fixes.
For people who use a lot of Arduino devices, it’s worth adding them to the Cloud for this feature alone.
11) Full Dashboard Customization
We’ve already talked about unlimited dashboards in your Arduino Cloud. Creating them is easy, but did you know you can customize them too?
Anyone who’s dipped their toe in the home automation waters knows how essential dashboard editing is. Some platforms work great, but offer very little when it comes to controlling your dashboard layout. For many people, that’s a deal breaker.
Your Arduino Cloud widgets can easily be added, edited, removed, repositioned and resized in any configuration you want. It’s as simple as drawing and resizing boxes, but the result makes your Cloud projects infinitely more useable.

12) Watchdog Timer
The Arduino Cloud automatically runs a watchdog timer that will reset your board, hardware or project if it crashes. This is a small feature, but a powerful one that can keep your projects running while unattended.
It means you never have to manually reset it when you eventually realize it’s not been running all day. You can have devices running remotely (very remotely, with SIM or LoRa connectivity) and be sure they’re robust enough to keep on ticking.
It’s included and running automatically, but can easily be disabled if you don’t need it.
youtube
13) Node-RED Integration
Arduino provides a super easy way to use Node-RED for IoT automations. This is a powerful, but very easy-to-use visual programming platform specifically designed for IoT projects.
Complex automations using advanced triggers like sunrise or sunset, presence detection, combined actions or sensor readings and so much more. The possibilities are endless, and learning Node-Red is incredibly easy. Get to grips with this feature, and you’ll be creating IoT automations that would otherwise need an experienced coder.
13A) Fully Functional Free Account
One of the best kept secrets of the Arduino Cloud is that if you’re registered on the Arduino website or forum, you already have a free Cloud waiting for you. Simply head on over to the Cloud site and get started with unlimited dashboards and unlimited sketches. The free tier of Arduino Cloud is fully functional, and it’s ready and waiting for you to give it a try.
In fact, it’s the perfect option especially if you haven’t used Arduino before! Give it a shot and let us know what you think. No credit card required; just your creativity and a passion for connected projects.
TRY YOUR FREE ARDUINO CLOUD RIGHT NOW
The post 14 Awesome Arduino Cloud Features You Never Knew Existed appeared first on Arduino Blog.
Bookmark It


Hide Sites
$$('div.d43157').each( function(e) { e.visualEffect('slide_up',{duration:0.5}) });
14 Awesome Arduino Cloud Features You Never Knew Existed was originally published on PlanetArduino
1 note
·
View note
Text
What is Arduino?
Today, the world is developing so fast. But the question is, are we?
Today’s stunning technologies are used by us all the day, all the time. Sometimes, we are ourselves fascinated by what we are able to do by just the click of a button. But, what if, we could make all of that, ourselves?
INTRODUCTION
So, the question arises, how can I make fascinating technologies?
The answer is simple: Learning electronics.
And, how to start with it?
The answer is: ARDUINO
All those people who are interested in robotics or hardware engineering might be familiar with Arduino, unless you haven’t made anything from it yet. Arduino is a open-source (open to public) electronic platform based on easy-to-use hardware and software. In other words (for a simpler definition), Arduino refers to an open-source electronics board and the software used to program it. Arduino is a fantastic way for anyone to learn about robotics, hardware engineering and programming. Over the years Arduino has been the brain of thousands of projects, from everyday objects to complex scientific instruments. Arduino boards are able to read inputs — light on a sensor, a finger on a button, or a Twitter message — and turn it into an output — activating a motor, turning on an LED or publishing something online.

Excited to learn it? Here we go!
HISTORY
The Arduino project was started at the Interaction Design Institute Ivrea (IDII) in Ivrea, Italy. The project goal was to create simple, low cost tools for creating digital projects. At that time, the students used a BASIC Stamp microcontroller at a cost of $50, a considerable expense for many students. In 2003 Hernando Barragán created the development platform Wiring as a Master’s thesis project at IDII, under the supervision of Massimo Banzi and Casey Reas. Wiring was important for Arduino since it is based on wiring in both software and programming language. In 2005, Massimo Banzi, with David Mellis, another IDII student, and David Cuartielles, extended Wiring by adding support for the cheaper ATmega8 microcontroller. The new project, forked from Wiring, was called Arduino.

Massimo Banzi
“Hardware becomes a piece of culture that anyone can build upon, like a poem or a song.”
-Massimo Banzi
WHY ARDUINO?
We know what is Arduino, but why should we choose it. There are dozens of other options out there, so why Arduino:
Arduino is an open-source electronic platform. This means that, not only can the public openly use the software and hardware, it can also constantly update and modify the hardware and software, proving Arduino to be diverse collection of boards. As a matter of fact, huge amounts of software libraries have been made by people at various communities to make the Arduino capable of working and behaving much better with more and more electronic components which are coming up.
Apart from that, Arduino is also one of the most cloned microcontroller boards out their. This means that Arduino is unexpectedly cheap. Moreover, Arduino gives a lot of options to choose from while building your project. It has several boards, some small, some large, each having their own features.
Not only that, the Arduino IDE (Integrated Development Environment) is an all-in-one software IDE, which allows us to program in the same language, for almost every Arduino board out there! This helps a lot as we do not have to download a different IDE each time we buy a different Arduino board!
Since Arduino is an open-source electronic platform, A worldwide community of makers — students, hobbyists, artists, programmers, and professionals — has gathered around this open-source platform, their contributions have added up to an incredible amount of accessible knowledge that can be of great help to novices and experts alike. :)
“A child educated only in school is an uneducated child”
— Unknown
HARDWARE
Arduino is open-source hardware. This means layout and production files for some versions of the hardware are also available. Although hardware and software designs for the arduino boards are freely available under the copyleft license, the developers have requested the name “Arduino” to be exclusive to the official product and not be used for derived works without permission. Most Arduino boards consist of an Atmel 8-bit AVR microcontroller (ATmega8, ATmega168, ATmega328, ATmega1280, or ATmega2560) with varying amounts of flash memory, pins, and features. The most famous and common boards include Arduino UNO, Arduino Mega and Arduino Nano. The boards use single or double-row pins or female headers that facilitate connections for programming and incorporation into other circuits. This allows for the connection of wires with male heads and also the connections for shields. Shields here refer to special arduino boards that can be attached over other boards, so as to increase their functionality. Some arduino boards also include ethernet connections, while some are as small as your thumb! Special arduino boards like the Arduino Lily can also be stitched upon clothes, to make wearable devices.

SOFTWARE
Any hardware is useless without a software. We need someone to explain the boards what we need them to do. For this, we have to speak the board’s language. This language is known as machine code and it exists as a series of 1’s and 0’s inside the memory of the board or the computer. Although machine code might be great for computers, it is extremely difficult for humans to understand. Early computers in the 1940’s and 1950’s had what was known as an Assembler. The job of this assembler was to translate assembly language into machine code. Users could write instructions for the computer known as a program with numbers and things that almost looked like words. While it was still difficult to understand, the language was also unique to each type of computer. It was better than writing a machine code but having to write assembly and learn a new set of instruction for each new computer was quite burdensome. So, people began to create high-level programming languages in the 1950’s, such as COBOL, Lisp and Fortran. These languages did not talk in the native language of the computers, but relied on a compiler to translate the high-level language into something the computer can understand. A compiler is simply a program that does the above mentioned work. When you write a program in Arduino, you write in the combination of C and C++ which is a high-level programming language used to construct instructions for Arduino. Arduino has a special software known as the Arduino IDE (short for, Integrated Development Environment) which provides us an environment to write our code into and upload it to the Arduino board.
That was all about Arduino, and believe me, this was just an introduction. Further, we will be diving deeper into this marvelous world of electronics, made up of wires and pcb’s!
Do not forget to follow and share with your friends and colleagues. Stay tuned for further updates!
Till then, Keep innovating!!
3 notes
·
View notes
Photo

3 Things You Should to Know About Arduino IDE on Linux
If you trying to get the Arduino IDE running on a Linux computer, so you have to look out this infographic. This infographic showing you “3 Things You Should to Know About Arduino IDE on Linux”. Must watch.
0 notes
Text
Something awesome update #02 - Deadlock
Somehow I spent the last three days working on how to bypass the notification below when I plug the ducky into my Mac, instead of working on file exfiltration code itself.

The Youtube video I found follows the below method:
Press down the reset button, hold and plug in the rubber ducky to get it into the dfu programming mode (i.e. boot loader mode)
Flash the firmware
Upload osx.hex, a version of ducky firmware that happens to configure the rubber ducky in such a way that VID and PID are changed into ones of Apple, leading the system to believe it’s an Apple Keyboard
So I downloaded Macport then configured DFU programmer in an attempt to enter the Arduino into boot loader mode to flash the firmware. But the command to flash the firmware requires the chip number of Arduino Leonardo and somehow the “board information” section in the IDE doesn’t contain this information. So I did some research to figure out how to acquire the chip number, and it turns out that Atmega32u4 doesn’t have an official serial number assigned to it, which is an issue reflected by other users as well.

After half a day of research I realised that Arduino Leonardo uses a totally different way to flash the firmware than the microprocessor employed by the rubber ducky in the video. I’m cooked. What’s worse is that there’s no DFU mode on Leonardo as it uses Caterina as its boot loader, and to get my ducky into boot loader mode I only have to open Arduino Leonardo’s serial port at 1200 baud and close it, which gives me 8 seconds to upload the flash the hex file onto the device.
I did another day of research and found two ways to achieve the last step:
Flash it using python code provided by https://stackoverflow.com/questions/45646127/how-to-upload-a-hex-file-into-an-arduino-leonardo-using-avrdude-from-the-command.
Download Avrdude and flash it with command avrdude -C ../etc/avrdude.conf -v -p atmega32u4 -c avr109 -P port -b 57600 -D -U flash:w:filename.hex:i *given by https://www.reddit.com/r/arduino/comments/5kzqad/help_cannot_figure_out_how_to_flash_a_hex_file/*
Arduino Builder would’ve been a good choice but the tool does not have an OS X version :(
But then I realised that the ducky firmware (i.e. osx.hex file) is probably incompatible with Arduino hardware as it was designed by hak5 for its own ducky device...
So I did a whole half day of research on how to change VID/PID on Arduino Leonardo and finally ended up with a solution inspired by https://forum.arduino.cc/index.php?topic=360330.0.
It took me a while to find boards.txt as somehow the pathways given by my research are only for Linux and Windows...After hours of meaningless searching, this line captured my attention in preference.txt stored in /Library/arduino15: last.ide.1.8.9.hardwarepath=/Applications/Arduino.app/Contents/Java/hardware(Yes I came across a Youtube video revealing the path two days later...mixed feelings indeed)
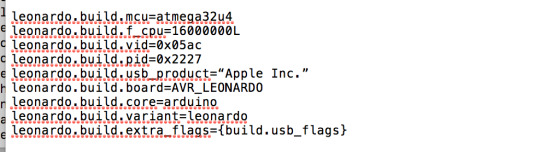
So I jumped into the hardware file and my guts led me to figure out boards.txt eventually. Edited VID/PID as followed:
Restarted the IDE showed me the correct board name but VID/PID remained the same in the board info section. So I did a whole night of research, jumping back and forth in the directory. I tried adding USB_MODEL_PID in the descriptor.h file in usb-serial and usb-dfu, which obviously broke something so I reverted changes. Then I doubted if I should change the #defined AVR_LEONARDO to properly change board configuration, so I spent another hour trying to find the file defining board configuration, which turned out to be in the usb-serial folder and only contained LEDs.h, which had nothing to do with defining Leonardo configuration.
Then I noticed the quotation mark that wraps around the company name is different from the ones used in other sections:

So I changed it, affected nothing.
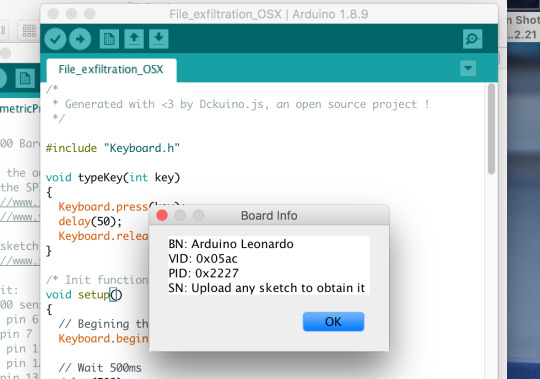
Out of desperation I compiled the file exfiltration code again and did another testing, and miraculously it changed from default 2341:8036 to the allegedly Apple VID/PID I assigned to it:
That marked the breakthrough of the deadlock I’ve been working on for the past few days...A surprisingly simple solution derived from needless trial-and-error efforts :(
1 note
·
View note
Text
Liked on YouTube: Powerful Alternative to ESP32 CAM | Realtek AMB82-Mini IoT AI Camera Board - Getting Started
Powerful Alternative to ESP32 CAM | Realtek AMB82-Mini IoT AI Camera Board - Getting Started 𝗔𝗺𝗲𝗯𝗮 𝗔𝗿𝗱𝘂𝗶𝗻𝗼 𝗦𝗗𝗞 𝗽𝗮𝗴𝗲: https://ift.tt/blXFw0c 𝗣𝘂𝗿𝗰𝗵𝗮𝘀𝗲 𝗟𝗶𝗻𝗸: https://ift.tt/O3HePEl 𝗣𝗿𝗼𝗷𝗲𝗰𝘁 𝗗𝗲𝘀𝗰𝗿𝗶𝗽𝘁𝗶𝗼𝗻: In today's exciting video, we're exploring a power-packed product from Realtek, the AMB82-Mini. This little beast is essentially an IoT AI Camera Arduino Development Board and an impressive replacement for the ESP32 Camera Module. Designed with Artificial Intelligence, Machine Learning, and Neural Networks in mind, the AMB82-Mini boasts ultra-low power consumption. This makes it incredibly efficient and ensures you won't have to worry about draining your power supply. What makes this board special? It features an HDR Camera with a crisp 1080p resolution, superior to the ESP32 CAM. The CPU speed is a whopping 500MHz, more than double the ESP32's 240MHz. The AMB82-Mini supports both 2.4 GHz and 5GHz Wi-Fi bands, and also includes a BLE chip that enables Bluetooth Low Energy 5.1. Storage? We've got 768KB ROM, 512KB RAM, 16MB Flash, and support for MCM embedded DDR2/DDR3L memory up to 128MB. Power-packed, isn't it? In this tutorial, we'll be diving deep into the board design, pin descriptions, features, and capabilities of this remarkable board. We'll also walk you through setting up the Arduino IDE and how to program the AMB82-Mini using this platform. What's more, we'll get hands-on with some practical exercises like making an LED blink, video streaming over a Web server, Object Detection and Identification, and 1080p Video recording. So, if you're ready to explore the possibilities of IoT, AI, and Machine Learning with this powerful board, hit that play button, and let's get started! Don't forget to like, share, and subscribe for more tech tutorials and updates. Your support keeps us going! #AMB82Mini #Realtek #IoT #Arduino #AI #machinelearning 𝗪𝗿𝗶𝘁𝘁𝗲𝗻 𝗧𝘂𝘁𝗼𝗿𝗶𝗮𝗹 𝙇𝙞𝙣𝙠𝙨: 𝟭. 𝗚𝗲𝘁𝘁𝗶𝗻𝗴 𝗦𝘁𝗮𝗿𝘁𝗲𝗱: https://ift.tt/WVai2or 𝟮. 𝗢𝗯𝗷𝗲𝗰𝘁 𝗗𝗲𝘁𝗲𝗰𝘁𝗶𝗼𝗻 & 𝗜𝗱𝗲𝗻𝘁𝗶𝗳𝗶𝗰𝗮𝘁𝗶𝗼𝗻: https://ift.tt/lG3HtQ2 𝟯. 𝟭𝟬𝟴𝟬𝗽 𝗠𝗣𝟰 𝗩𝗶𝗱𝗲𝗼 𝗥𝗲𝗰𝗼𝗿𝗱𝗲𝗿: https://ift.tt/ni4OlpS .................................................................................................................................................................................................................................... Drop a like if you liked this video. Don't forget to subscribe to our channel for more Electronics projects and tutorials. Website: https://ift.tt/L7raVJs Facebook: https://ift.tt/EFchGia Instagram: https://ift.tt/tQKdAHY Twitter: https://twitter.com/how2electronics via YouTube https://www.youtube.com/watch?v=vI6GZMLfGQk
0 notes
Text
Arduino 1.8.5 themes

It generates the clock, acts like a serial port, acts like a disk drive, and so on. The little computer project uses a real Z80 chip and uses an ATMega32A for almost all the support functions. In another way, it is very difficult because the tools want to help you so badly. How hard can it be to update the buffer? In one way, it is trivial. It did seem to work with the default 64-byte buffer, but XModem sends more data than that and it would be easy to imagine it getting overrun. But the upshot was that for XModem transfers, felt like the default Arduino serial buffer wasn’t big enough to be reliable. Details are available in a discussion on Hackaday.io, if you really want to follow it. I won’t bore you with the details about getting the board to work since you will only care if you have one. The Issue: Arduino Serial Buffer Size Limit It’s a trick worth knowing as it will come in handy beyond this single problem. What I ended up with is a way to make your own menus in the Arduino IDE to set compiler options based on the target hardware for the project. I wanted better, and that sent me down a Saturday morning rabbit hole. It looked like the best bet was to do Intel hex files and transfer them copy and paste across the terminal. The only problem was there were not many good options for transferring data back and forth to the PC. But I finally found time to finish it and had CP/M booted up. I got the PCB and - you guessed it - it sat some more, partially assembled. The parts sat partially assembled for a while and then a PCB came out for it. I rarely have time to build things I write about, but I really wanted to try this little computer. A while back I’d written about the $4 Z80 computer by. No matter how you craft your personal environment, the minute your code hits the Internet, someone will try to use it in the IDE. But when you produce things for other people to use, you almost can’t ignore it. On the other hand, I was impressed with how extensible it was if you can dig out the details of how it works internally.įirst, you might wonder why I use the IDE. On the one hand, I despise the lackluster editor for hiding too much detail from me and providing little in the way of useful tools. The solution I arrived at might help you do some other things, so even if you don’t need that exact feature, you still might find it useful to see what I did.įollowing this experience I am genuinely torn. I realized just how much heartburn the other day when I wanted to something very simple: increase the receive buffer on an ATmega32 serial port. But the original IDE always gives me heartburn.
Granted, these days you have more options with the pro IDE and Platform IO, for example. It is pretty well-known that I’m not a big fan of the Arduino infrastructure. Locks and security are our bread and butter, so enjoy some physical key appreciation and digital lock love. We are in advanced territory now, but keep this inspiration train going and drop us a tip to share something you make with this miniature deadbolt. You will be compiling your sketch in Arduino’s IDE, but uploading through ST-Link across some wires you will have to solder. There are a couple of tables for the controller pins and header for your convenience.
The Github upload instructions are illustrated, and you know we appreciate documentation. Three, it’s a piece of (minimal) security hardware, but who knows where that can scale. Two, someone saw a tool they wanted to control and made it happen.
One, the Arduino banner covers a lot of programmable hardware, and it is a powerful tool in a hardware hacker’s belt. connected a Rothult unit to the Arduino IDE in response to Ripping up a Rothult. We are continuously inspired by our readers which is why we share what we love, and that inspiration flows both ways.
0 notes
Text
5 Arduino Courses for beginners
Everyone can learn programming and electronics with Arduino, an open-source, flexible electronics platform. Taking an introductory course can put you on the proper path, whether you're interested in making projects with Arduino as a hobby, aspiration engineer, or just interested. Here are the top five Arduino courses for beginners, which will help you progress from learning the fundamentals to working on real-world projects.
Arduino Step by Step: Getting Started by Udemy
Course Overview: Complete beginners are the target audience for this course. It provides a thorough introduction to the Arduino ecosystem, covering topics such as installing your first Arduino board, creating your first sketch (software), and understanding basic electrical principles. Additionally, you'll discover how to link your Arduino to a variety of parts, including sensors, motors, and LEDs.
Why Choose This Course?
Covers both hardware and software aspects of Arduino.
Hands-on projects with step-by-step guidance.
Lifetime access to course material, including future updates.
Practical assignments and quizzes to test your knowledge.
Introduction to Arduino by Coursera
Course Overview: This Coursera course, provided by the University of California, Irvine, offers an academic approach to studying Arduino. It focuses on fundamental programming abilities, knowledge of coding conventions unique to Arduino, and easy projects. You'll start creating your projects and gain a deeper understanding of microcontroller ideas under the direction of an expert.
Why Choose This Course?
Taught by a university professor with real-world experience.
Mix of theory and practical exercises.
Includes peer-reviewed projects and quizzes.
Offers a certificate upon completion for those who upgrade.
Arduino for Absolute Beginners by Skillshare
Course Overview: For people who want to start with no prior expertise, Skillshare's Arduino for Absolute Beginners course is ideal. It covers all the fundamentals of Arduino, such as how to set up your first project, how to use the Arduino IDE, and how to deal with simple parts like buttons and LEDs. There are several practical tasks throughout the course that allow you to put what you've learned into practice.
Why Choose This Course?
Short, easy-to-follow video lessons.
Project-based approach to learning.
Skillshare’s platform allows for a flexible learning schedule.
Community discussions to share progress and ask questions.
Arduino Programming and Hardware Fundamentals with Hackster by EdX
Course Overview: This course delves further into the principles of hardware and programming. You will investigate different types of sensors and actuators, gain knowledge of breadboarding methods, and have practical experience constructing interactive projects. Additionally, the curriculum covers fundamental concepts in coding, such as variables, loops, and functions, all demonstrated with examples specific to Arduino.
Why Choose This Course?
Detailed coverage of hardware and software concepts.
Interactive hands-on exercises and simulations.
Offers verified certificates for completion.
Partnership with Hackster ensures industry relevance.
Arduino Bootcamp: Learning Through Projects by Udemy
Course Overview: The Arduino Bootcamp course follows a project-based methodology in which you work on a number of beginner to intermediate level projects. Working with various communication protocols, managing outputs, and utilizing sensors are just a few of the principles that have been strengthened and practical skills gained through these projects. You'll be confident enough to start working on your original projects by the end of the course.
Why Choose This Course?
15 hands-on projects that gradually increase in complexity.
Step-by-step instructions suitable for all skill levels.
Lifetime access and downloadable resources.
Great for building a project portfolio.
How to Choose the Right Arduino Course for You
Your Learning Style
Course Duration
Budget
Instructor Support
Beginner's Arduino classes are an excellent way to get started learning about electronics and coding. These five classes offer a great way to get started with Arduino, regardless of your goals: building interactive projects, developing skills for a job, or simply taking up a new pastime. Select one that appeals to you and explore the world of do-it-yourself electronics!
To know more click here:- Fortune Robotics
0 notes
Text
Install and use coolterm

#Install and use coolterm for free#
#Install and use coolterm for mac#
example: /Applications/CoolTermMac/Default. Download CoolTerm for Windows to monitor, troubleshoot, debug, or test serial port connections and performance CoolTerm has had 2 updates within the past 6 months. Setup the program how you like it (For me it was to the cisco specs)īrowse to the location you saved the Default connection from the previous stepĬopy and paste into the location that your CoolTerm program executes. To setup a default configuration, follow the steps below: However after a bit of searching around i found that it was possible.
#Install and use coolterm for mac#
One such serial terminal for Windows is RealTerm and for Mac is CoolTerm. A serial terminal can be used to establish a communication between a PC/Mac and other devices. The driver for CP210x can be installed on all platforms Windows, Mac and Linux. On first glance it looked as though i would have to enter these settings everytime i ran the CoolTerm program, which seemed to be a bit of a drag considering it wasn't the first thing that popped up when the program was opened. If you have Arduino IDE installed, you can just use the Serial Monitor present inside. Active X should be registered automatically. CoolTerm is a simple serial port terminal application (no terminal emulation) that is geared towards hobbyists and professionals with a need to exchange data with hardware connected to serial ports such as servo controllers, robotic kits, GPS receivers, microcontrollers, etc. Personally i liked they way that you could set up a default connection in putty with the required settings such as Baud rate, Data Bits, Parity, Stop Bits & Flow control. Realterm should be installed by an Administrator user on XP, Vista, Win7,8. Coming from a windows background i usually used SecureCRT or Putty.
#Install and use coolterm for free#
Written by Roger Meier, and avaliable for free over at his website. Download the Free Program CoolTerm, or another USB command line application. I came across a few different options but found CoolTerm to be the one for me. However, if your use of the Mintaka DUO / DUO+ / STAR data requires a. CoolTerm is freeware/donationware developed by Roger Meier, and is available for Windows / Mac / Linux devices. CoolTerm is a user-friendly terminal for serial communication with hardware that has been connected to your computer via serial ports. 99% of its use is to configure Cisco switches/routers & wireless access points. Step 3: Select the product feature and click on Install button. Next i was on the hunt to find something that i could actually use with the freshly installed adapter. So recently i finally managed to get my Aten USB to Serial adapter working with my Macbook Pro running OSX Mountain Lion.
0 notes
Text
Download silverlight for mac

Download silverlight for mac how to#
Download silverlight for mac update#
Download silverlight for mac upgrade#
Download silverlight for mac android#
Download silverlight for mac software#
Download silverlight for mac upgrade#
Public preview: Azure Database for MySQL – Flexible Server major version upgrade (Azure Team).
Download silverlight for mac update#
Create, Read, Update and Delete Data in SQL Server Tables (Jan Potgieter).
Microsoft Life: “I believe that hiring people from all cultural backgrounds and all gender backgrounds makes for such a rich story overall.” and “When you engage with other cultures, you expand your mind and have more empathy for others.” and “I work at the intersection of technology and art, and I love every minute of it.” (Diana Ortiz).
Microsoft Research Summit 2022: What’s Next for Technology and Humanity? (Alyssa Hughes).
The Dev Talk Show – Getting rid of passwords with Nick Hodges (Andy Schwam, Rich Ross & Chris Gomez).
A Message from Twilio CEO Jeff Lawson (Jeff Lawson).
Download silverlight for mac software#
Software Engineering Radio Episode 529: Jeff Perry on Career Management for Software Engineers (Kanchan Shringi).
The Stack Overflow Podcast Episode 484 – What science says about flow state (Ryan Donovan).
The Happy Engineer Podcast 065: Emotional Literacy and Mental Health for High-Achieving Engineers with Dr.
Design Details 447: Stranded on Dynamic Island (Brian Lovin & Marshall Bock).
Complete Developer Podcast – Tradeoffs of Single Page Applications (BJ Burns & Will Gant).
PPP 365 | The Top Skill for Women (and Men) To Develop to Take Your Career to the Next Level (Andy Kaufman).
Download silverlight for mac how to#
Syntax Podcast – How To Build an API in 2022 (Wes Bos & Scott Tolinsky).
Azure Podcast Episode 438 – Azure NAT Gateway (Cynthia Kreng, Kendall Roden, Cale Teeter, Evan Basalik, Russell Young & Sujit D’Mello).
Working Code Podcast – Episode 92: The Power Of No (Ben Nadel).
NET Rocks! – Just Enough Design with Kathryn Grayson Nanz (Carl Franklin & Richard Campbell)
How far along in product/idea development do I have to be for TitletownTech to invest? (Microsoft Developer).
Wifi enabled C64 with WiModem talking to a BBS (Scott Hanselman).
New Video: Coding Shorts – Generic Attributes in C# 11 (Shawn Wildermuth).
More Readable C# Code with File-Scoped Namespaces in.
GCast 131: Managing Secrets in an Azure Key Vault (David Giard).
Arduino IDE 2.0 Goes Gold (David Groom).
Download silverlight for mac android#
Designing a harness for readable, thorough Android tests (Chris Mathew).Implementing a Zero Trust strategy after compromise recovery (Matt Thomas).5 Git resources for visual learners (PJ Metz).How to Juggle Praise and Criticism and Why You Should Avoid the Feedback Sandwich (Kim Scott).It doesn’t have to be toxic at work (Oskar Dudycz).Advanced Installer 19.9 (Advanced Installer Team).The subtleties of proper B+Tree implementation (Oren Eini).Unit testing best practices – Naming and Clean code – Using the Early Return technique and Method naming best practices (Henrique Dalcin Dalmas).Creating a lazy-start C++/WinRT coroutine from an eager-start one, part 2 (Raymond Chen).Visual Studio Code Shortcuts Cheatsheet - For Mac, Linux, & Windows (Chris Staudinger).vcpkg Environment Activation in Visual Studio and Dev Containers for C++ in Visual Studio (Marc Goodner).Announcing Entity Framework 7 Release Candidate 1 (Jeremy Likness).SaaS Migration: Transforming your Business One Step at a Time (Jignesh Solanki).Helping Developers Build with Google, Matters (Jeannie Zhang & Kevin Po).Where should you use gRPC? And where NOT! (Derek Comartin).When is it OK to Disable Text Selection? (Daniel Schwarz).Debunking Common Misconceptions About Passwordless Authentication (Salman Ladha).Go Developers Positive About Generics (Janet Swift).Celebrating 1M installs of Edge DevTools for VS Code and Quick tip: embedding YouTube Videos in GitHub pages (Chris Heilmann).Azure Developer CLI (azd) – September 2022 Release (Savannah Ostrowski).Creating a Wordle with TDD in Javascript (Maximiliano Contieri).New Azure Space products enable digital resiliency and empower the industry (Jason Zander).JavaScript APIs You Don’t Know About (Juan Diego Rodríguez).Back Up and Share Docker Volumes with This Extension (Felipe Cruz).A Guide to Rounding Numbers in JavaScript (Darren Jones).Azure SDK Release (September 2022) (Azure SDK Team).Public preview: gRPC support in Azure App Service and Public preview: Soft delete in Azure Container Registry (Azure Team).Uno Platform 4.5: Uno Islands, 4 New Controls, Linux Framebuffer and MUCH more (Uno Platform Team).NET 7 Release Candidate 1 (Jeremy Likness) 8 things you didn’t know you could do with GitHub Copilot (Rizel Scarlett).Visual Studio 2022 17.4 Preview 2 (Marc Goodner).
0 notes
Text
A Tiny Success: Flashing the USBasp

Two weeks ago I posted about my experiment with the ATTiny10. A 12Mhz 8-bit micro controller small enough to be confused with an obese ant. Unfortunately I didn't succeed in programming this tiny guy, so this week I continue my small scale flashing quest.
My first guess was that the tiny wires I used to connect the ATTiny10 to my USBasp flasher weren't working, or I damaged the ATTiny10 in my amateur micro soldering attempts.

To test if these were the causes, I soldered an ATTiny10 and a WS2812 2020 to SOP16 breakout board. This allows me to do some testing on a breadboard. It also made the soldering much simpler, lowering the risk of overheating the components.
Unfortunately, this didn't solve the issue. I still wasn't able to upload firmware to the ATTiny. Time to shift the focus to the next suspect: the USBasp flasher.

To program the ATTiny10 I tried using the USBasp flasher I bought from AliExpress. I used this Flasher to program my Electrocards, so I know it works. The only difference between the electrocard's ATTiny85 and the ATTiny10 is that the latter uses TPI protocol in stead of the ISP protocol to be programmed.
After a small Google session, I found the USBasp project website. Besides some interesting technical details, this website also offers the Firmware downloads. And that's where I noticed that TPI support was only available in the newest firmware. Maybe my cheap chinese USBasp included some old firmware? Time for an update!

To allow the USBasp to be updated, JP2 needs to be closed. In this case, the JP2 is on the back of the PCB. Soldering a short wire between these connection points is enough to enable self programming mode.

Next, I used an Arduino Uno as the programmer. To do so, I uploaded the ArduinoISP sketch to the Uno. This sketch is available in the Examples sketches section of the Arduino IDE. Next I connected the USBasp to the Arduino using the following pin configuration:
ARDUINO --- USBasp 5V ------- 2 (VCC) GND ------- 10 (GND) 13 ------- 7 (SCK) 12 ------- 9 (MISO) 11 ------- 1 (MOSI) 10 ------- 5 (RESET)
(Note that the blue led of the USBasp will not turn on after connecting it. I'll get back to this later ...)
To check if the connection is working, I used the following command in my macOS terminal:
avrdude -c avrisp -P /dev/cu.usbmodem14201 -b 19200 -v -p m8
avrdude is a utility to download/upload/manipulate the ROM and EEPROM contents of AVR microcontrollers.
The -c flag specifies which programmer whe are using. In this case the Arduino usni which is configured as an avrisp programmer.
Using -P I specify to which port the Arduino Uno is connected. In my case this is the /dev/cu.usbmodem14201 port, but in your case it might have a different name/path.
Next, I specify the communication speed using the -b flag. In this case 19200 baud.
To get some feedback, I enable the verbose mode using -v.
And last but not least, I specify the type of AVR I want to program. Since my USBasp has a ATMEGA8A, I specify part m8 using the -p. If you omit the -p flag you'll get a list of all supported AVRs.
After running this command, avrdude will try to communicate with the USBasp's microcontroller using the Arduino avrisp.

Great! This works! Time to do the real work: flashing the USBasp with the new firmware. First I downloaded the latest firmware at: http://www.fischl.de/usbasp. In this case the latest firmware was usbasp.2011-05-28.tar.gz. After downloading and extracting the file (by simply double clicking it in the macOS finder) I navigated to the usbasp.2011-05-28/bin/firmware folder which includes the firmware I need: usbasp.atmega8.2011-05-28.hex.
Uploading the firmware to the USBasp is almost the same command as before:
avrdude -c avrisp -P /dev/cu.usbmodem14201 -b 19200 -v -p m8 -U flash:w:usbasp.atmega8.2011-05-28.hex
In this case I've added the -U flag to do a memory operation:
I want to do an operation on the flash part of the micro controller.
I want to write, so I specify the write flash with the w flag.
And most important: I define the filename of the flash hex file (which is in the current folder)
Let's press enter, and hope for the best ...

Yes! It seems it has worked! :) Since the blue led has turned on after flashing, it really feels like something good has happened. LEDs always make thing better, right?!

Now, most important ... don't be like me: don't forget to open/disconnect that self programming jumper JP2 on the back of the USBasp! When it's connected/closed, the ESPasp won't be able to function.
So, after reconnecting the ATTIny10 to the USBasp, it's time for the most exciting part. Will the Arduino IDE, be able to flash the ATTiny10 using the ATTiny10Core?
How about we just select the USBasp programmer and smash that Upload button?

YEAH! It worked! :)

If you want to read more about this flashing process, make sure to read Roger Clark's great post on this subject...
For me it's time to start working the firmware to get that WS2812 2020 LED working. Don't miss it, so make sure to keep an eye on my blog or follow me on Twitter or Instagram.
7 notes
·
View notes
Link
0 notes
Text
Windows 10 missing wifi icon 無料ダウンロード.引き続きご利用いただく前に
Windows 10 missing wifi icon 無料ダウンロード.Wifi Not Showing In Windows 10 Fix Wifi Option Missing In Windows10 100 Fixed

対応プラットフォーム.画面に出る「バッテリーのアイコン」が消えた。 - Microsoft コミュニティ
Follow Windows Insider Missing: wifi Show error when wireless mode fails Fix bug where Vysor Share All did not work with Androids connected via ethernet or wireless Fix various Wireless Mode bugs Add button to reconnect to a disconnected Wireless window Minor UI improvements Add enterprise licensing option Fix licensing bug Fix bug where Vysor Share All was available to /5(K) Fix: Wireless Icon Missing From Taskbar In Windows Read more Comments. What Can You Do If Windows 10 Time Keeps Changing? Try 4 Windows Update Stuck at 0%? Here is Quick the Fix. Lane Detection on GKE - Code Recollection. audio - Force Windows 10 into mono and disable a speaker
Windows 10 missing wifi icon 無料ダウンロード.Arduino IDE を入手 - Microsoft Store ja-JP
そのため、「System tray」画面の上部にある「Enable missing system tray icons」をクリックして必要なアイコンを「オン」にしておくとよいでしょう。 ただし、電源アイコンに関しては正常に機能しないようなので、「 Battery Mode 」などのツールの使用が推奨されています。 Fix Wifi Not Showing In Windows 10 Settings Fix Missing. Wifi icon is no longer on my taskbar. i went to properties customize select icon in notification area. wifi is not an option. i have my wired hook up listed but nothing for wifi. i had wifi prior to. Since upgrading to windows 10 i have lost the ability to connect to wifi once on my Aug 30, · (if installed on Windows 7 or 8 it will keep the old icon). Win+G now works in Windows 10 to switch between gadgets. (You can disable this in 8GadgetPack Tools if you want to use the game bar). 7 Sidebar now adjusts its style to the Win10 taskbar. The window-manager in the sidebar now supports the new virtual desktops in Windows 10 and hovering over a
Wifi Option Not Showing In Taskbar And Settings Work In. Step 4: restart your windows and reconnect to your wifi again to see whether it helps to fix the windows 10 wifi not showing up issue. solution 2: click the toggle to enable the wi fi step 1: press the windows key i key simultaneously on the keyboard to open settings. Is the wifi option missing in settings app on windows 10?
or wifi not showing on setting or taskbar? in this video, you will find the ways to fix wifi missin. Fix wifi network not showing up on windows if you are facing this issue where your wifi network is not showing up in the available network list then you can be sure that the issue is related to corrupt, outdated or incompatible network drivers.
After the windows 10 update, when i go to show available networks, it only has the option for airplane mode and does not have any available wi fi networks. ive reset the modem, ive enabled network discovery nothing is working and i cant get online. please help. shortvideo fix wifi not showing in settings on windows 10 fix missing wifi short short wifishortwifi option not showing in windows 10,wifi missing.
Windows 10 Network Adapter Missing Working Fixes. For more info about installing updates, see update surface firmware and windows if wi fi settings are still missing: go to solution 3. if wi fi settings are visible: make sure that wi fi is set to on and that your network name appears in the list of available wireless networks. tap or click your network, and tap or click connect. The driver of the wireless adapter to download and install must be the appropriate one for the model of the network adapter installed on your pc and not any wi fi driver.
check if your wireless adapter is listed there and if it is enabled and working. How To Fix Asus Laptop Wifi Not Working On Windows Pc. Local Area Connection Missing Windows 10 Goodsitehotel.
wifi windows10 geekvsjerk is wifi not showing in windows 10 are you need to fix wifi option not showing or wifi option missing errors in windows 10 then is the wifi option missing in settings app on windows 10? in this video, you will find the ways to fix wifi missing wifi option missing in windows 10 settings fix. in this video, you will find the ways to fix wifi missing problem on your wifi option not showing on windows 10 easy fix works in how to fix wifi problem share this video: youtu.
be 6hzunwrhhwe fixed wifi fix wifi option not showing in settings on windows if windows 10 wifi option missing or disappeared from the settings and there is no wifi settings. if the wireless adapter missing in windows 10 or suddenly disappeared then you can fix the problem easily.
there may be multiple reasons behind the missing wifi missing in windows 10, solution for wifi not showing in windows 10 laptop.
chapters: intro ping network reset internet options how to fix and solve wifi option not showing in settings on windows. here in this video tutorial, i will show you guys how to fix wireless adapter missing problem in your windows note: this video has followed all the in this video this kind of problem below why wifi option is not showing in laptop?
where is the wifi option in windows 10? how do i turn my wifi back on best tested fix on wifi network not showing up or wifi network not showing up windows if wifi not showing up windows 10 and if you ask why my laptop is not fix wifi not showing in settings on windows 10 fix missing wifi option not showing in settings on windows 10 wifi connected but no internet.
if you want to fix wifi. Wifi Not Showing In Windows 10 Fix Wifi Option Missing In Windows10 Fixed. Windows 10 Network Adapter Missing Working Fixes For more info about installing updates, see update surface firmware and windows Previous Hello world!
Trends Magdalena Andersson Ahmaud Arbery Darrell Brooks Jennifer Lawrence Ralf Rangnick Marko Grilc Thanksgiving Chelsea — Juventus Grammy nominees Karim Benzema.
0 notes