#update arduino ide
Explore tagged Tumblr posts
Visit Tumblr Blog
Explore Tumblr blogs with no restrictions, modern design and the best experience.
Last Seen Tumblr Blogs


Fun Fact
Tumblr was acquired by Yahoo for $1.1B in 2013.
Text
Embedded Controls Development: From Design to Deployment

Embedded controls development is a critical area in embedded systems engineering, involving the design, programming, and integration of control systems into hardware platforms. These systems are typically found in devices that perform dedicated functions, ranging from consumer electronics to industrial automation and automotive applications. The development process requires a combination of hardware knowledge, software engineering, and systems integration skills.
What Are Embedded Controls?
Embedded controls are computer-based systems that control specific functions within a larger mechanical or electrical system. They use microcontrollers, digital signal processors (DSPs), or microprocessors to monitor inputs from sensors, process data according to a control algorithm, and output control signals to actuators or other system components. These control loops can be simple (like turning on a fan when a sensor detects high temperature) or complex (like managing engine timing and fuel injection in modern vehicles).
Development Lifecycle
The development lifecycle for embedded controls typically follows several key stages:
Requirements Definition: Understanding what the control system needs to do. This includes identifying input/output interfaces, environmental constraints, performance requirements, and safety or compliance standards.
System Design: Creating a high-level architecture that defines how software and hardware will interact. This stage also involves choosing the right microcontroller or processor, selecting sensors and actuators, and outlining communication protocols.
Software Development: Writing code for the embedded control system, often in C or C++. Developers must consider memory limitations, real-time constraints, and hardware-specific details. This stage includes implementing control algorithms, handling interrupts, and developing communication interfaces such as I2C, SPI, UART, or CAN.
Hardware Integration: Integrating the embedded software with physical components. This includes setting up the development board, connecting sensors and actuators, and testing signal integrity and power consumption.
Testing and Validation: Rigorously testing the control system to ensure it functions as expected under various conditions. Unit testing, integration testing, and hardware-in-the-loop (HIL) simulations are commonly used to verify performance and reliability.
Deployment and Maintenance: After development and testing, the system is deployed into the final product. Ongoing maintenance may involve firmware updates, bug fixes, or performance improvements.
Tools and Platforms
A wide range of tools are used in embedded controls development, including:
Integrated Development Environments (IDEs): Tools like Keil µVision, MPLAB X, STM32CubeIDE, and Arduino IDE are popular for writing and debugging code.
Real-Time Operating Systems (RTOS): Systems such as FreeRTOS or VxWorks provide scheduling, task management, and synchronization capabilities for time-sensitive applications.
Version Control Systems: Git is widely used to manage code versions and support collaborative development.
Simulation and Modeling Tools: MATLAB/Simulink is frequently used in control systems design for simulation and code generation.
In-Circuit Debuggers/Programmers: Tools like JTAG or SWD interfaces allow developers to program and debug the target microcontroller directly.
Challenges in Embedded Controls Development
Developing embedded control systems presents several challenges:
Resource Constraints: Embedded systems often have limited CPU power, memory, and energy availability. Efficient coding and hardware optimization are essential.
Real-Time Requirements: Many control systems must respond within strict timing constraints. Missed deadlines can result in system failure or unsafe behavior.
Hardware Dependence: Embedded software is closely tied to specific hardware, requiring deep knowledge of the processor, peripherals, and electrical characteristics.
Debugging Complexity: Diagnosing problems in embedded systems can be difficult due to limited visibility into internal states and limited logging capabilities.
Safety and Reliability: In industries like automotive or medical devices, the control systems must meet rigorous safety standards such as ISO 26262 or IEC 62304.
Applications
Embedded controls are used in countless applications:
Automotive Systems: Engine control units (ECUs), anti-lock braking systems (ABS), adaptive cruise control, and infotainment systems.
Consumer Electronics: Smart thermostats, washing machines, and robotic vacuum cleaners all rely on embedded control systems.
Industrial Automation: PLCs and industrial controllers manage processes on factory floors, often integrating with SCADA systems.
Aerospace and Defense: Flight control systems, unmanned aerial vehicles (UAVs), and radar systems.
Medical Devices: Infusion pumps, pacemakers, and diagnostic equipment all include embedded control systems to ensure safe and accurate operation.
Trends and Future Directions
The field of embedded controls is rapidly evolving. Several key trends are shaping the future:
IoT Integration: Many embedded systems are now connected to the internet, allowing for remote monitoring, control, and firmware updates.
Edge Computing: More processing is being done on the device itself, reducing the need to send data to the cloud and improving response times.
AI and Machine Learning: Embedded systems are beginning to incorporate ML algorithms for pattern recognition, predictive maintenance, and adaptive control.
Model-Based Design: Tools like Simulink allow engineers to design control systems graphically and automatically generate embedded code.
Cybersecurity: As systems become more connected, securing embedded control systems against hacking and data breaches is becoming essential.
Conclusion
Embedded controls development by Servotechinc is a complex but vital discipline that sits at the heart of modern technology. From managing vehicle dynamics to enabling smart home features, embedded control systems play a crucial role in ensuring that machines operate efficiently, safely, and intelligently. As technology advances, the demand for skilled engineers in this domain will only continue to grow.
0 notes
Text
5 Arduino Courses for Beginners
A popular tool for professionals, students, and amateurs interested in electronics and programming is Arduino, an open-source electronics platform with many uses. There are plenty of beginner-friendly classes available to assist you in getting started, regardless of whether you're new to Arduino or want to improve your basic understanding. This list of the top 5 Arduino courses for novices will make learning enjoyable, useful, and efficient.
Arduino for Beginners by Udemy
This extensive Udemy course is ideal for novices who have never worked with electronics or coded before. It guides you through the fundamentals of the Arduino platform, including setting up hardware, using the Arduino IDE to program, and creating easy projects.
Key Features:
Discover how to program motors, sensors, and LEDs.
Get lifetime access to digital resources and video tutorials.
Construct useful projects such as motion detectors and temperature monitors.
Getting Started with Arduino by Coursera
This course, which is offered by the University of California, Irvine, delves deeply into the fundamental ideas of circuit design and Arduino programming. It is a great option for novices seeking a structured learning route because it is a component of a larger specialty.
Key Features:
An introduction to the fundamentals of coding and Arduino components.
uses for real-world projects, such as robotics and home automation.
professional certification after completing the course.
Arduino Step by Step: Getting Started by Tech Explorations
This well-regarded course is ideal for students who want in-depth explanations and practical assignments. Its emphasis on exploration and innovation makes it popular among do-it-yourselfers.
Key Features:
More than 100 courses covering intermediate and fundamental Arduino subjects.
comprehensive instructions for utilizing communication modules, sensors, and actuators.
Regular course updates and lifetime access to video content are provided.
Arduino 101 by EdX
The Arduino team, in collaboration with EdX, offers an introductory course called Arduino 101. Its main goal is to make Arduino understandable to complete novices by combining theory and practical application.
Key Features:
Discover the hardware and IDE components of the Arduino ecosystem.
Use output devices and sensors to create interactive creations.
self-directed education with the possibility of gaining a professional certification.
Arduino Programming and Hardware Fundamentals with Hackster.io
In an engaging and community-driven setting, this free Hackster.io course introduces novices to the world of Arduino. For those seeking a collaborative learning environment, it's perfect.
Key Features:
Concentrate on fundamental hardware and programming ideas.
detailed instructions for creating projects that are appropriate for beginners.
access to a vibrant community for ideas and problems.
Studying An entry point into electronics, robotics, and Internet of Things creation is provided by Arduino. It is an engaging platform for learning hardware and coding at the same time because of its hands-on, project-based methodology. You can make anything with Arduino, including robotics projects, art installations, and automated home systems.
With a combination of interactive elements, real-world projects, and video lessons, each of these courses accommodates various learning preferences. Depending on your objectives, you can use Hackster.io to get hands-on experience or enroll in an organized course like those offered by Coursera or Udemy.
Start your Arduino journey today and unlock your creativity in electronics and programming!
To know more, click here.
1 note
·
View note
Text


Morseduino keyboard based CW keyer
Based on an Arduino nano and CardKB mini keyboard. The parts you need to build it are
Arduino nano
CardKB mini keyboard
BC547 NPN transistor
1K resistor
5v reed relay
Socket for the reed relay
Stereo jack for the output
Two on-off-on switches, for speed and power
3D printer to make the enclosure
link to enclosure below


Wire up the speed switch with the centre pin to D13 of the Arduino, this is the reference pin. Connect the either side of the speed switch to D2 and D3 respectively
Wiring up the relay
The diode is not needed with a reed relay IC

The Arduino code
You will need this for the hardware to work, copy and paste it into Arduino IDE. Please respect my work and leave the top comment in.
/*
(c) 12/10/2024 Morseduino by Robert Rayner, M0YNW
This software has no warranty and you use it at your own risk.
*/
#include <Wire.h>
// Define pins for relay and LED
const int relayPin = 7; // relay output
const int ledPin = LED_BUILTIN; // built in LED (specify pin number if using an external LED)
const int speedSwitchA = 2; // Pin connected to one side of the switch
const int speedSwitchB = 3; // Pin connected to the other side of the switch
const int fastWPM = 20; // Fast speed (20 WPM)
const int slowWPM = 12; // Slow speed (12 WPM)
int wpm = fastWPM; // Default WPM is set to fast
// Morse code timing variables
int dotDuration, dashDuration, elementSpace, letterSpace, wordSpace;
// Morse code representation for characters (A-Z, 0-9, /, =, . ?)
const char* morseCodeMap[43] = {
".-", "-...", "-.-.", "-..", ".", "..-.", "--.", "....", "..", ".---", // A-J
"-.-", ".-..", "--", "-.", "---", ".--.", "--.-", ".-.", "...", "-", // K-T
"..-", "...-", ".--", "-..-", "-.--", "--..", // U-Z
"-----", ".----", "..---", "...--", "....-", ".....", "-....", // 0-5
"--...", "---..", "----.", // 6-9
"-..-.", "..--..", "-...-", ".-.-.-" //Special characters: / . ? =
};
// CardKB I2C address
#define CARDKB_ADDR 0x5F
// Function to map character to Morse code
const char* getMorseCode(char c) {
if (c >= 'A' && c <= 'Z') {
return morseCodeMap[c - 'A'];
} else if (c >= '0' && c <= '9') {
return morseCodeMap[26 + (c - '0')];
} else if (c == '/') {
return morseCodeMap[36]; // Morse for /
} else if (c == '?') {
return morseCodeMap[37]; // Morse for ,
} else if (c == '=') {
return morseCodeMap[38]; // Morse for =
} else if (c == '.') {
return morseCodeMap[39]; // Morse for .
} else {
return ""; // Return empty for unsupported characters
}
}
// Function to read the slide switch and set WPM
void readSpeedSwitch() {
// Read both switch states with internal pull-up resistors enabled
int switchAState = digitalRead(speedSwitchA);
int switchBState = digitalRead(speedSwitchB);
// Update WPM if one switch is high and the other is low
if (switchAState == LOW && switchBState == HIGH) {
wpm = fastWPM; // Set WPM to fast speed (20 WPM)
} else if (switchAState == HIGH && switchBState == LOW) {
wpm = slowWPM; // Set WPM to slow speed (12 WPM)
}
// Update timing variables based on the current WPM
updateWpmTiming();
}
// Function to transmit Morse code
void transmitMorse(const char* morse) {
while (*morse) {
if (*morse == '.') {
digitalWrite(relayPin, HIGH);
digitalWrite(ledPin, HIGH); // Turn on LED
delay(dotDuration);
digitalWrite(relayPin, LOW);
digitalWrite(ledPin, LOW); // Turn off LED
delay(elementSpace);
} else if (*morse == '-') {
digitalWrite(relayPin, HIGH);
digitalWrite(ledPin, HIGH); // Turn on LED
delay(dashDuration);
digitalWrite(relayPin, LOW);
digitalWrite(ledPin, LOW); // Turn off LED
delay(elementSpace);
}
morse++;
}
delay(letterSpace); // Space between letters
}
// Function to read a key from CardKB
char readCardKB() {
char key = '\0'; // Initialize with null character
Wire.requestFrom(CARDKB_ADDR, 1); // Request one byte from the CardKB
if (Wire.available()) {
key = Wire.read(); // Read the byte from the CardKB
}
return key; // Return the key (or null if nothing was read)
}
// Update WPM and timing variables based on new WPM
void updateWpmTiming() {
dotDuration = 1200 / wpm;
dashDuration = dotDuration * 3;
elementSpace = dotDuration;
letterSpace = dotDuration * 3;
wordSpace = dotDuration * 7;
}
void setup() {
Serial.begin(9600);
pinMode(relayPin, OUTPUT);
pinMode(ledPin, OUTPUT); // Set the LED pin as OUTPUT
Wire.begin(); // Initialize I2C communication with the CardKB
// Enable internal pull-up resistors for the switch pins
pinMode(speedSwitchA, INPUT_PULLUP);
pinMode(speedSwitchB, INPUT_PULLUP);
digitalWrite(13, HIGH); //connect this to the centre pin of the speed switch
updateWpmTiming(); // Set initial WPM and timing values
}
void loop() {
// Read the current position of the slide switch
readSpeedSwitch();
// Read key from CardKB
char c = readCardKB();
if (c != '\0') { // If a key was pressed
Serial.print("Key pressed: ");
Serial.println(c);
const char* morse = getMorseCode(toupper(c)); // Convert to uppercase and get Morse code
if (morse[0] != '\0') { // If valid Morse code
transmitMorse(morse);
} else if (c == ' ') { // Handle space between words
delay(wordSpace);
}
}
}
0 notes
Text
ESP32-C3: Der kleine Alleskönner für deine IoT-Projekte

Der Super Mini ESP32-C3 ist ein leistungsstarker Mikrocontroller im Miniformat, der sich perfekt für platzsparende Projekte eignet. Mit seinem 32-Bit-RISC-V-Prozessor, integrierter WiFi- und Bluetooth 5.0-Konnektivität sowie einer Vielzahl von digitalen und analogen I/O-Pins bietet er eine flexible Grundlage für IoT- und Smart-Home-Anwendungen. In diesem Beitrag stelle ich dir die technischen Spezifikationen des ESP32-C3 vor und zeige, warum dieser kompakte Mikrocontroller eine ausgezeichnete Wahl für Entwickler und Bastler ist, die Leistung auf kleinstem Raum benötigen. https://youtu.be/tza4NTj7xgM Der Mikrocontroller wurde von mir für knapp 3 € zzgl. Versandkosten auf Aliexpress erworben. Für einen Mikrocontroller mit einem ESP32-Chip ist das ein äußerst angemessener Preis, besonders angesichts der gebotenen Funktionen und Konnektivitätsoptionen.


Technische Daten des Super Mini ESP32-C3
Der Super Mini ESP32-C3 bietet trotz seiner kompakten Abmessungen eine beeindruckende Leistung. Dank des leistungsstarken 32-Bit-RISC-V-Prozessors, umfangreichen Speicheroptionen und vielseitigen Kommunikationsschnittstellen eignet er sich besonders für IoT-Projekte und andere platzsparende Anwendungen. Die folgende Tabelle fasst die wichtigsten technischen Spezifikationen zusammen: EigenschaftDetailsProzessorESP32-C3, 32-Bit-RISC-V, 160 MHzSpeicher400 KB SRAM, 384 KB ROMFlash-Speicher4 MBDigitale I/O-Pins11, mit PWM-UnterstützungAnaloge I/O-Pins4, 12-Bit-SARADC, 6 KanäleKommunikationWiFi 802.11b/g/n, Bluetooth 5.0, I2C, SPI, 2xUARTSpannungsbereich3,3 bis 6 VAbmessungen22,52 x 18 mm Diese Übersicht verdeutlicht, dass der ESP32-C3 eine solide Grundlage für vielfältige elektronische Projekte darstellt. Pinout des Super Mini ESP32-C3 Nachfolgend das Pinout des Mikrocontrollers:

ESP32-C3 Pinout
Erweiterungsboard für den Super Mini ESP32-C3: Mehr Anschlussmöglichkeiten und autarker Betrieb
Zusätzlich zum Super Mini ESP32-C3 gibt es ein praktisches Erweiterungsboard, auf das der Mikrocontroller gesteckt werden kann. Über dieses Board lassen sich die digitalen I/Os bequem abgreifen, und es bietet die Möglichkeit, Servomotoren direkt anzuschließen. Darüber hinaus ist eine Schnittstelle für eine LiPo-Batterie vorhanden, sodass die gesamte Schaltung auch unabhängig von einer externen Stromquelle betrieben werden kann. Dieses Erweiterungsboard macht den Mikrocontroller noch vielseitiger und besonders geeignet für mobile oder autarke Projekte.

ESP32-C3 mit LiPo Batterie
Programmierung des Super Mini ESP32-C3: Einfache Anleitung mit der Arduino IDE
Der Super Mini ESP32-C3 kann in verschiedenen Entwicklungsumgebungen programmiert werden, darunter Arduino IDE, PlatformIO, Espressif und Visual Studio Code. Jede dieser Umgebungen bietet ihre eigenen Vorteile und Tools, um Projekte zu entwickeln und zu verwalten. Für Einsteiger und alle, die schnell Ergebnisse sehen wollen, bleibt die Arduino IDE jedoch die einfachste und zugänglichste Option. In diesem Abschnitt zeige ich dir, wie du den Mikrocontroller in der Arduino IDE programmierst und die Grundlagen für dein erstes Projekt legst.

klassische Arduino IDE - Version 1.8.19
Arduino IDE 2.3.3 mit neuen Features und Updates Von der Arduino IDE gibt es sowohl die klassische Version als auch die neue 2.x Version, die kontinuierlich weiterentwickelt wird. Für die meisten grundlegenden Arbeiten reicht die klassische Version aus, da sie einfach zu bedienen und funktionsfähig ist. Dennoch empfehle ich, die neue Version zu verwenden, da sie eine verbesserte Benutzeroberfläche und zusätzliche Funktionen bietet, die die Programmierung erleichtern und effizienter gestalten. Die neuen Features unterstützen dich dabei, schneller und einfacher mit deinen Projekten voranzukommen. Einrichten des Mikrocontrollers in der Arduino IDE Bevor wir mit der Programmierung beginnen können, müssen wir den Boardtreiber installieren. Den Boardtreiber können wir jedoch erst installieren, wenn wir die nachfolgende Zeile unter den "Zusätzlichen Boardverwalter URLs" hinzugefügt haben. https://raw.githubusercontent.com/espressif/arduino-esp32/gh-pages/package_esp32_index.json

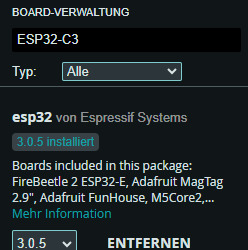
Wenn die URL hinzugefügt wurde, dann können wir im Boardverwalter nach ESP32 oder genauer ESP32-C3 suchen. Es sollte dann der Eintrag "esp32 von Espressif Systems" angezeigt werden, wo wird die Schaltfläche INSTALLIEREN finden. (In meinem Fall steht dort ENTFERNEN, da ich diese bereits installiert habe.)

Beispiel - Ansteuern von LEDs Starten wir mit einem wirklich einfachen Beispiel, dem Ansteuern von Leuchtdioden. Der Mikrocontroller verfügt selber über eine kleine, blaue SMD LED am GPIO8 welche wir ansteuern können. //interne BUILTIN LED am GPIO8 angeschlossen #define led 8 void setup() { //definieren das der Pin der LED als Ausgang dient pinMode(led, OUTPUT); } void loop() { //aktivieren der LED digitalWrite(led, HIGH); //eine kleine Pause von 500 Millisekunden delay(500); //deaktivieren der LED digitalWrite(led, LOW); //eine kleine Pause von 500 Millisekunden delay(500); } Der obige Code bewirkt lediglich, dass die kleine LED im Takt von 500 Millisekunden blinkt. Das kleine Programm können wir auch einfach ändern und um weitere LEDs erweitern.
Vorstellung des Super Mini Arduino Nano Clone
Am Ende dieses Beitrags möchte ich einen weiteren kleinen Mikrocontroller vorstellen: den "Super Mini Arduino Nano Clone". Dieser Mikrocontroller hat ähnliche Abmessungen wie der ESP32-C3 und bietet eine vergleichbare Anzahl von Pins, jedoch mit einigen zusätzlichen Features. Der Super Mini Arduino Nano Clone arbeitet mit einer Taktfrequenz von 16 MHz und verfügt über 32 kB Speicher.

ESP32-C3 & Super Mini Arduino Nano Clone Ein wesentlicher Unterschied zum ESP32-C3 ist, dass dieser Mikrocontroller keine WiFi- oder Bluetooth-Schnittstellen bietet, was ihn weniger geeignet für IoT-Anwendungen macht. Allerdings kann dies, wenn die drahtlose Kommunikation im Projekt nicht benötigt wird, als Vorteil in Bezug auf den Stromverbrauch gesehen werden. Der geringere Stromverbrauch macht ihn zu einer attraktiven Wahl für Projekte, bei denen eine konstante Stromversorgung oder der Einsatz von Batterien erforderlich ist. Technische Daten im Vergleich: Super Mini ESP32-C3 vs. Super Mini Arduino Nano Clone Um die beiden Mikrocontroller besser zu vergleichen, findest du hier eine tabellarische Übersicht der technischen Daten: EigenschaftSuper Mini ESP32-C3Super Mini Arduino Nano CloneMicrocontrollerESP32-C3ATMEGA328Betriebsspannung3,3 bis 6 V5 VDigitale I/O-Pins11 (PWM-Unterstützung)22 (6 sind PWM)PWM-Ausgänge46Analoge Eingänge48Flash-Speicher4 MB32 kB (2 kB vom Bootloader verwendet)SRAM400 KB2 kB (ATmega328P)EEPROM-1 kB (ATmega328P)Taktfrequenz160 MHz16 MHzAbmessungen22,52 x 18 mm21 mm x 27 mmdrahtlose SchnittstellenBluetooth 5.0 WiFi-SchnittstellenUART, SPI, I2CUART, SPI, I2CFeatures-3x RGB LEDs Diese Übersicht zeigt die Unterschiede und Gemeinsamkeiten zwischen dem Super Mini ESP32-C3 und dem Super Mini Arduino Nano Clone und verdeutlicht, für welche Anwendungen jeder Mikrocontroller am besten geeignet ist. Read the full article
0 notes
Text
2024.05.03 - An update from Blanca
"Greetings from the PH team! I've successfully configured the sharing of temperature and humidity data (for now) from DICT, Diliman, Quezon City using Adafruit.io. Initially, I was quite nervous since it was my first time using Adafruit. However, after diving into Adafruit tutorials, setting up with the ESP WROOM 32 microcontroller, and tackling frustrating errors due to numerous library installations in Arduino IDE and other runtime errors, I've successfully set up the Adafruit.io dashboard! 🥰"

0 notes
Video
youtube
An IoT-Based Smart Controlling System of Air Conditioner for High Energy Efficiency Using ESP32 with Blynk App | Best iot based smart air conditioner controlling system for energy efficiency using esp32 with blynk app | IoT Controlled LED using ESP32 with Blynk App | iot based electricity energy meter using esp32 and blynk | iot based smart energy meter project report pdf | iot based energy meter using esp32 | smart energy meter using iot project report | iot based smart energy meter using arduino | iot energy meter with current | voltage and cost monitoring system | esp32 blynk project.***********************************************************If You Want To Purchase the Full Working Project KITMail Us: [email protected] Name Along With You-Tube Video LinkWe are Located at Telangana, Hyderabad, Boduppal. Project Changes also Made according to Student Requirementshttp://svsembedded.com/ https://www.svskits.in/ http://svsembedded.in/ http://www.svskit.com/M1: 91 9491535690 M2: 91 7842358459 We Will Send Working Model Project KIT through DTDC / DHL / Blue Dart / First Flight Courier ServiceWe Will Provide Project Soft Data through Google Drive1. Project Abstract / Synopsis 2. Project Related Datasheets of Each Component3. Project Sample Report / Documentation4. Project Kit Circuit / Schematic Diagram 5. Project Kit Working Software Code6. Project Related Software Compilers7. Project Related Sample PPT’s8. Project Kit Photos9. Project Kit Working Video linksLatest Projects with Year Wise YouTube video Links157 Projects https://svsembedded.com/ieee_2022.php135 Projects https://svsembedded.com/ieee_2021.php 151 Projects https://svsembedded.com/ieee_2020.php103 Projects https://svsembedded.com/ieee_2019.php61 Projects https://svsembedded.com/ieee_2018.php171 Projects https://svsembedded.com/ieee_2017.php170 Projects https://svsembedded.com/ieee_2016.php67 Projects https://svsembedded.com/ieee_2015.php55 Projects https://svsembedded.com/ieee_2014.php43 Projects https://svsembedded.com/ieee_2013.php1100 Projects https://www.svskit.com/2022/02/900-pr...***********************************************************It looks like you're interested in setting up an IoT home automation system using the DHT11 sensor to monitor temperature and humidity, an ESP32 microcontroller, and the Blynk app for notifications and email alerts. This is a great project idea! Here's a step-by-step guide to help you get started:Components Needed:1. ESP32 development board.2. DHT11 sensor (for temperature and humidity measurement).3. Breadboard and jumper wires.4. USB cable for power and programming.5. Blynk app (downloadable from app stores).Steps:1. Set Up the Hardware:• Connect the DHT11 sensor to the ESP32 using jumper wires.• Connect the VCC pin of the DHT11 to the 3.3V pin on the ESP32.• Connect the GND pin of the DHT11 to the GND pin on the ESP32.• Connect the DATA pin of the DHT11 to a GPIO pin on the ESP32 (e.g., GPIO 2).2. Install Arduino IDE and ESP32 Board Support:• Download and install the Arduino IDE from the official website.• Open the Arduino IDE and go to "File" "Preferences".• Add the following URL to the "Additional Boards Manager URLs": https://dl.espressif.com/dl/package_e...• Go to "Tools" "Board" "Boards Manager", search for "esp32", and install the ESP32 board support.3. Install Required Libraries:• In the Arduino IDE, go to "Sketch" "Include Library" "Manage Libraries".• Search and install the following libraries:• "DHT sensor library" by Adafruit.• "Blynk" by Blynk Inc.4. Create a Blynk Account and Get Auth Token:• Download the Blynk app on your smartphone and create an account.• Create a new Blynk project and obtain the authentication token from the email sent to you.6. Air Quality Monitoring:• You can add an additional sensor (e.g., MQ-135) to measure air quality. Connect it to the ESP32 and update the code accordingly.7. Email Alert Configuration:• Blynk provides an email notification widget that you can add to your project.• Configure the widget to send an email when a specific condition (e.g., high temperature or humidity) is met.8. Upload the Code:• Connect your ESP32 to your computer via USB.• Select the correct board and port in the Arduino IDE.• Click the "Upload" button to upload the code to your ESP32.9. Monitor the Data:• Open the Serial Monitor in the Arduino IDE to view the data being read from the DHT11 sensor.10. Monitor Data on Blynk App:• Open your Blynk app and check if the temperature and humidity values are being updated on the Value Display widgets.• Set up email alerts based on your chosen conditions.
0 notes
Text
v2.x.x. is the worst thing they couldve done to the arduino ide
not only did it fuck up my code back when it first updated like 6m ago, but im now finding out they changed the serial plotter to only show 50 points!?
i need to make graphs from the serial output and i need them yesterday, i tried 3rd party programs and not a single one worked cause theyre all in java or python or some such shit
ill have to roll back tmrw and deal w whatever shit that unleashes, fmsbl i do not have time for this i lost the whole day to this
1 note
·
View note
Text

Arduino IDE Boards Manager - Do NOT Install ESP32 by Espressif Systems Version 3.00-alpha1
As usual, I opened the Arduino IDE on my Windows-11 machine, and as a first action, I allowed the recommended updates. Not suspecting any significant problems, I added some code and compiled it, only to end up with multiple error messages. I found nothing wrong with the code I had added, and the error messages didn't make sense. They mainly pointed to the code for the internal CAN controller and ESP timer programming.
1 note
·
View note
Text
Sonification of Electricity usage
I have a smart meter with a display in the hall. Trouble is, I hardly ever look at it and the data shows cumulative values rather than the energy being used right now. I had the idea of sonifying the data being recorded by my ESP8826-based electricity monitor. Currently it reports every minute to my sensor dashboard.
I initially thought of running this on an ESP32 or Pi Pico W since both have onboard Wifi which could be used to retrieve the current data from the dashboard. I looked at a few ways to do this, such as using Midi and even ordered a sound module.
However it occured to me that rather than build a device to play the sounds, it could be done as a web page using JavaScript to play the files. At the very least, this would be very useful for testing sonification schemes .
The key HTML feature is the <audio> tag to define the audio resources and the Javascript API to play the audio track. Playing around with this feature, I realised that audio tracks can be looped and can run in parallel and the volume of each track can be changed as the tracks are played.
An update rate of once a minute is too slow to show devices being turned on and off so the ESP8266 monitor was changed to report to another channel every 6 seconds to the dashboard. Only the latest record is recorded on this channel since a full history would be too large. This reading is fetched from the dashboard at the same rate. I'm exploring the idea of multiple sound tracks whose volume is adjusted in response to the level of usage. Currently I'm using six bird songs. Tracks are allocated to bands and as the level of energy usage, measured in watts, increases, tracks are brought into the soundscape with increasing volume.
This approach looks promising because it can be run on a phone and carried around the house, and can be listened to when away from the house. This is the current version. Data fetching and sounds can be turned on and off and the thresholds changed.
The problem now is to design the soundscape and thresholds to best represent the changing energy level.
Other sonification ideas
I'd like to look at getting the national Grid data - obtainable via an API described in https://bscdocs.elexon.co.uk/guidance-notes/bmrs-api-and-data-push-user-guide
This and data from the tree moisture sensor are multi-channel and will need a different approach to generating the soundscape
Extras
Grid in January 2013
Bought this CJMCU-1334 breakout board for playing MP3 files £9
Tutorial
alternatively ESP32 supports BLE which could be used to send MIDI derived sounds to a phone
Free sounds https://freesound.org/
2 notes
·
View notes
Text
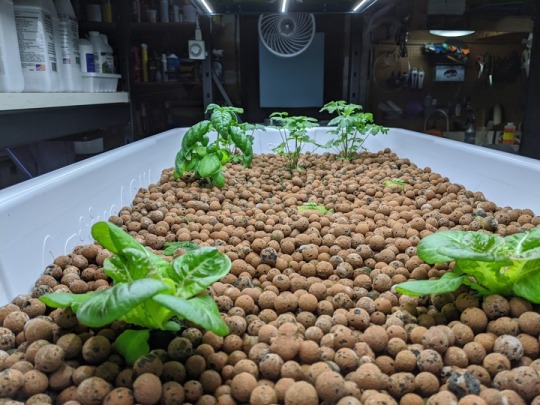
UYPP: Ben Ruel's Garage Garden

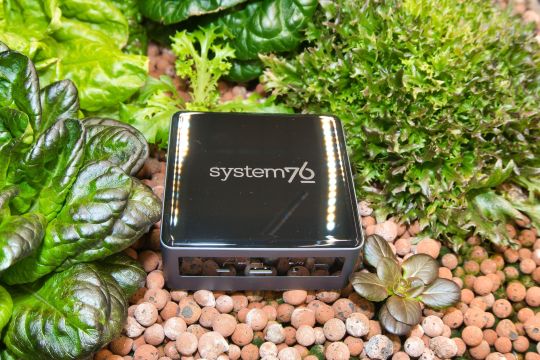
Back in March, we announced the winners for our Unleash Your Potential Program, in which six participants got to configure their own System76 computer to use for their awesome projects. This first awesome project is the Garage Garden, helmed by awesome project-er, engineer, and mighty green thumb Ben Ruel. We sat down with Ben to see how his project has been growing on the Meerkat.
Can you tell us about the Garage Garden project? What's it all about?
I spent a career with the Coast Guard and came up here—my final tour with the Coast Guard was in Juneau. Being in southeast Alaska, we’re constrained with what they call off-the-road systems, and the only way in or out of town is by boat or by plane. So all of our food comes up here by barge for a small nominal fee, or by aircraft for an incredibly large fee.
When I came up to Juneau with my wife and kids 11 years ago, we noticed that by the time our produce gets up here, it’s lived on a barge a week, two weeks out of Seattle, and you have no shelf life left on them. We started trying to grow food within the first year of getting here, and we came to the conclusion pretty quickly that with 300 days plus of rain every year, outdoor growing wasn’t really a viable option. That’s when we started a hobby farm in a garage growing some stuff in soil under fluorescent lights, as odd as that sounds.
Since then, we’ve progressed into hydroponics, but we’ve done it very manually. We go out every other day and take readings by hand, so I’ve been doing some research about building IOT devices that will talk back and automate some of the readings. My dream would be using it to actually control the concentration of nutrient solutions that we use. The overall goal is we’re going to build the hydroponic monitoring network of IOT devices, and use the Meerkat as a control center for the devices and a repository for all the data. We’ve also been doing some investigating behind the scenes into whether or not it could grow enough legs to become a business.
Is there a specific type of produce that you’re starting with?
We’ve been all over the road. Right now we’ve got lettuce. We’ve always got some kind of green leafy vegetables whether it’s any variety of lettuce that will grow hydro, some bok choy and tatsoi, and we’re growing kale like it’s going out of style. We’ve grown cucumbers to the point where I think I’ve harvested 65 pounds of cucumbers off of 4 plants over the last couple of months, but we’re really constrained by our size.
I live in a relatively small 3-bedroom house, and we’re just using a one-and-a-half car garage as our grow area. Right now I’ve got two tents. As funny as it sounds, cannabis is legal in Alaska and has been forever—my wife and I don’t touch the stuff, but because it’s been legalized, the infrastructure and the supplies that we need are freely available. We’re growing tomatoes in a tent that’s designed for marijuana growth. It works really well. It helps to maintain efficient temperature control; you can maintain temperature and humidity, block out extraneous light if you don’t want it, and cycle the lights on and off.
Depending on whether it’s too hot in the summer we’ll run the lights at night, and in the wintertime we’re looking for extra warmth, we can shift the cycle and run the lights during the day. Our big benefit up here is that, because Juneau’s all on hydroelectric power, electricity is really cheap.
What variables are being monitored?
With hydroponics, there’s a good number of parameters that you’ve got to try and keep track of. You’re basically diluting nutrients in a solution of as pure water as you can get. You want to keep track of things—your pH can’t be too acidic or too alkaline, for example.
The other big parameter is the electrical conductivity, or total dissolved solids. You want to make sure you’ve got the right concentration of nutrients, and that your nutrient solution isn’t salting up. As you’re adjusting pH back and forth, it’ll start demineralizing salt, so tracking that data gives you a good indication for when it’s time to dump the reservoir and start over.
We’re doing it manually now. I go out every couple of days and we take samples, and sit down and log it into a spreadsheet. The Meerkat acts as a control center for programming devices, keeping a repository of the programming for the IOT devices that we’re using (Arduinos with the esp8266 chips) as well as running different database programs as Docker containers, so that they can be spun up and knocked down fast enough as we try and figure out what the best way to move forward is. We’ve got a couple of database servers that I’ve been playing around with, trying to break from traditional SQL and looking at NoSQL type of databases.
I’m not an IT guy by trade. I’m more of an electronics guy, so I’m kind of doing it as a study-by-night type of project.
What has your experience been like with the Meerkat so far?
I’m actually completely blown away by the Meerkat’s performance. It’s astounding what that small form factor and footprint is able to do. I’ve used Linux for a number of years, and basically everybody’s heard of System76. I’ve seen Pop!_OS before and never really played with it all that much, but I’ve actually grown to love it. The feel, the ergonomics, the interface, and even down to the color schemes that come bone-stock right out of the box. They just make more sense to me. I’m looking forward to the COSMIC update after researching that to see how the differences in the workflow will affect things.

What software are you using for this project?
Right now we’re writing in Docker containers and running the Tick Stack from Influx. We’re also running Telegraf, Protograph, Capacitor, playing around with the Time Series Database, I’ve got a container running MongoDB I run with SQLite, and there’s a couple different IDEs I’ve got loaded on there as well for programming Arduinos or esp8266 chip flashing.
How was the setup process for the machine?
It was up and running within 10–15 minutes of pulling it out of the box. I actually took it to work, too. We do a lot of work with government agencies, and I’ve been doing a lot of microwave radio repair. I’ve got a pretty small workbench at our shop here in Juneau, so using the Meerkat to drive all of our test equipment to control the radio while logging data coming out of the radio, it was perfect. It had enough horsepower to remotely control the test equipment. I wasn’t pushing it all that hard, but setting it up and going back and forth between having it at home or at work, it was negligible to get it up and running.
Stay tuned for further updates from Ben Ruel’s Garage Garden and cool projects from our other UYPP winners!
#system76#meerkat#desktop#mini#minicomputer#computers#desktops#laptops#servers#keyboards#NoSQL#Pop!_OS#Ubuntu#Linux#Alaska#Juneau#hydroponics#farming#vegetables#produce#cucumbers#totsui#bok choy#Arduino#Mongodb#IOT#iot solutions#automation#harvest#garage
19 notes
·
View notes
Text
5 Arduino Courses for beginners
Everyone can learn programming and electronics with Arduino, an open-source, flexible electronics platform. Taking an introductory course can put you on the proper path, whether you're interested in making projects with Arduino as a hobby, aspiration engineer, or just interested. Here are the top five Arduino courses for beginners, which will help you progress from learning the fundamentals to working on real-world projects.
Arduino Step by Step: Getting Started by Udemy
Course Overview: Complete beginners are the target audience for this course. It provides a thorough introduction to the Arduino ecosystem, covering topics such as installing your first Arduino board, creating your first sketch (software), and understanding basic electrical principles. Additionally, you'll discover how to link your Arduino to a variety of parts, including sensors, motors, and LEDs.
Why Choose This Course?
Covers both hardware and software aspects of Arduino.
Hands-on projects with step-by-step guidance.
Lifetime access to course material, including future updates.
Practical assignments and quizzes to test your knowledge.
Introduction to Arduino by Coursera
Course Overview: This Coursera course, provided by the University of California, Irvine, offers an academic approach to studying Arduino. It focuses on fundamental programming abilities, knowledge of coding conventions unique to Arduino, and easy projects. You'll start creating your projects and gain a deeper understanding of microcontroller ideas under the direction of an expert.
Why Choose This Course?
Taught by a university professor with real-world experience.
Mix of theory and practical exercises.
Includes peer-reviewed projects and quizzes.
Offers a certificate upon completion for those who upgrade.
Arduino for Absolute Beginners by Skillshare
Course Overview: For people who want to start with no prior expertise, Skillshare's Arduino for Absolute Beginners course is ideal. It covers all the fundamentals of Arduino, such as how to set up your first project, how to use the Arduino IDE, and how to deal with simple parts like buttons and LEDs. There are several practical tasks throughout the course that allow you to put what you've learned into practice.
Why Choose This Course?
Short, easy-to-follow video lessons.
Project-based approach to learning.
Skillshare’s platform allows for a flexible learning schedule.
Community discussions to share progress and ask questions.
Arduino Programming and Hardware Fundamentals with Hackster by EdX
Course Overview: This course delves further into the principles of hardware and programming. You will investigate different types of sensors and actuators, gain knowledge of breadboarding methods, and have practical experience constructing interactive projects. Additionally, the curriculum covers fundamental concepts in coding, such as variables, loops, and functions, all demonstrated with examples specific to Arduino.
Why Choose This Course?
Detailed coverage of hardware and software concepts.
Interactive hands-on exercises and simulations.
Offers verified certificates for completion.
Partnership with Hackster ensures industry relevance.
Arduino Bootcamp: Learning Through Projects by Udemy
Course Overview: The Arduino Bootcamp course follows a project-based methodology in which you work on a number of beginner to intermediate level projects. Working with various communication protocols, managing outputs, and utilizing sensors are just a few of the principles that have been strengthened and practical skills gained through these projects. You'll be confident enough to start working on your original projects by the end of the course.
Why Choose This Course?
15 hands-on projects that gradually increase in complexity.
Step-by-step instructions suitable for all skill levels.
Lifetime access and downloadable resources.
Great for building a project portfolio.
How to Choose the Right Arduino Course for You
Your Learning Style
Course Duration
Budget
Instructor Support
Beginner's Arduino classes are an excellent way to get started learning about electronics and coding. These five classes offer a great way to get started with Arduino, regardless of your goals: building interactive projects, developing skills for a job, or simply taking up a new pastime. Select one that appeals to you and explore the world of do-it-yourself electronics!
To know more click here:- Fortune Robotics
0 notes
Text
14 Awesome Arduino Cloud Features You Never Knew Existed
Tweet
There are dozens, if not hundreds of amazing Arduino Cloud features. So it’s perfectly understandable if you’ve missed some of them.
So we’ve put together a list of our favorite Arduino Cloud features that you might not know existed.
1) Auto-generate Sketches
We’ve talked elsewhere about getting an understanding of what cloud computing really is, and how it’s not just the domain of experts. The cloud is how total beginners can get started much more easily. There’s no better demonstration of that than our first top Arduino Cloud feature; auto-generated sketches.
When you create a new “Thing” in your Arduino Cloud, you add various bits of info to it. Wi-Fi connection credentials, and any variables you want to control or monitor. The Cloud automatically generates a starting sketch from this info. That sketch can then be sent to your boards, so all your initial configuration is taken care of, without a single line of code.
2) Device-to-Device Communication
There’s simply no easier way to make two microcontroller boards talk to each other than Arduino Cloud. We’ve covered in detail how easy it is to wirelessly connect your boards.
This isn’t just for Arduino devices either. If you want any combination of Arduino, ESP32 and ESP8266 devices to work together, this is how you do it.
3) Over-the-Air Updates
Working through your Arduino Cloud means you don’t have to disconnect any Arduino boards when updating them. If you want to edit or add a new sketch, it can all be done wirelessly, over-the-air.
Anyone who’s had to dismantle a project or device to get to a board’s USB socket will appreciate the simple, vital value of this feature. It’s one of those things that you’ll wonder how you ever lived without.
4) Support for ESP Boards
There’s a reason we call it the Arduino IoT Cloud. This is an all-encompassing platform for Internet of things, home automation, and electronics project control and management. So first we added support for ESP8266 devices. More recently, experimental support for ESP32 boards became available.
So even if your project doesn’t actually have any Arduino products in there, the Cloud is just as useful. Secure, private, and accessible to all kinds of IoT and maker devices.
5) Trigger Actions on Cloud Events
Arduino Cloud makes it super easy to do things that you might normally need the IDE for. But it’s also got lots of exclusive features that you only get in the Cloud.
For example, there are actions that can be triggered based on your board’s interactions with your Arduino Cloud. You can include actions within your sketches when a Cloud connection is successful, and when the Cloud has synced with a device. Or perhaps most useful of all, trigger an action if Cloud connectivity is lost. Getting an indication that a project has disconnected could be incredibly useful!
Here’s an example of using these actions within a sketch.
6) Sharing Your Dashboards
Dashboards are control panels within your Arduino Cloud. It’s one of the most powerful Arduino Cloud features, and essential to making full use of Cloud control. But what’s often overlooked is that you can share dashboards with anyone you want.
For example, let’s say you’re using Arduino Cloud to control your home automation. You can set up a dashboard for a tablet in the living room that the whole family can use, but doesn’t have sensitive admin controls in there. And then another for people to use on their phones.
All Cloud plans include unlimited dashboards. And anyone can have a free Cloud account. So you can create as many dashboards as you like, and share them with literally anyone, anywhere.

7) Alexa Integration
Natural language voice control is genuine Star Trek stuff. So it’s no wonder people love the functionality of Alexa. Did you know it’s incredibly easy to connect your Arduino Cloud to Alexa? And once you have, it effectively adds voice control to every board, and every project. Nothing else needed.
There’s literally no easier way to make an Alexa-controlled device or project than with your Arduino Cloud. You’ll never look back, and you’ll always have someone to talk to.
youtube
8) Full API Integration
For the engineers, coders, developers and those among you who’ve been using Arduino for a long time, API integration is the powerhouse secret feature you’ve been looking for.
The API can be called with any HTTP client, or with languages like Javascript, Python, Golang and more. It’s what you need to incorporate the power of Arduino Cloud features into your systems, platforms and projects.
9) Use IFTT, Zapier and More with Webhooks
There are lots of reasons you might want to include control platforms outside of your Arduino Cloud. Like sending an email or a Tweet when you press a button on a Nano, or a device disconnects from the Cloud (see above).
That’s what webhooks are for, and they give you a universal way to send commands out of Arduino Cloud, and into… well, anything!
IFTTT and Zapier are great examples of services that can do almost anything from a webhook. Get to know this feature, and connected projects suddenly have easy access to the whole web.

10) Easy Firmware Updates
When you connect a new Arduino board, your Arduino Cloud automatically checks its firmware version. If there’s an update available, it offers you the option of applying that update.
Very easy, and you don’t have to worry about finding the correct/latest firmware version yourself. This simple, background function makes sure your boards and projects always have the latest features, security updates and bug fixes.
For people who use a lot of Arduino devices, it’s worth adding them to the Cloud for this feature alone.
11) Full Dashboard Customization
We’ve already talked about unlimited dashboards in your Arduino Cloud. Creating them is easy, but did you know you can customize them too?
Anyone who’s dipped their toe in the home automation waters knows how essential dashboard editing is. Some platforms work great, but offer very little when it comes to controlling your dashboard layout. For many people, that’s a deal breaker.
Your Arduino Cloud widgets can easily be added, edited, removed, repositioned and resized in any configuration you want. It’s as simple as drawing and resizing boxes, but the result makes your Cloud projects infinitely more useable.

12) Watchdog Timer
The Arduino Cloud automatically runs a watchdog timer that will reset your board, hardware or project if it crashes. This is a small feature, but a powerful one that can keep your projects running while unattended.
It means you never have to manually reset it when you eventually realize it’s not been running all day. You can have devices running remotely (very remotely, with SIM or LoRa connectivity) and be sure they’re robust enough to keep on ticking.
It’s included and running automatically, but can easily be disabled if you don’t need it.
youtube
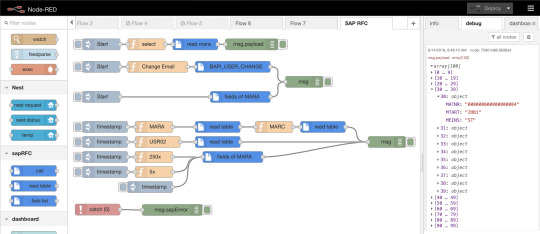
13) Node-RED Integration
Arduino provides a super easy way to use Node-RED for IoT automations. This is a powerful, but very easy-to-use visual programming platform specifically designed for IoT projects.
Complex automations using advanced triggers like sunrise or sunset, presence detection, combined actions or sensor readings and so much more. The possibilities are endless, and learning Node-Red is incredibly easy. Get to grips with this feature, and you’ll be creating IoT automations that would otherwise need an experienced coder.
13A) Fully Functional Free Account
One of the best kept secrets of the Arduino Cloud is that if you’re registered on the Arduino website or forum, you already have a free Cloud waiting for you. Simply head on over to the Cloud site and get started with unlimited dashboards and unlimited sketches. The free tier of Arduino Cloud is fully functional, and it’s ready and waiting for you to give it a try.
In fact, it’s the perfect option especially if you haven’t used Arduino before! Give it a shot and let us know what you think. No credit card required; just your creativity and a passion for connected projects.
TRY YOUR FREE ARDUINO CLOUD RIGHT NOW
The post 14 Awesome Arduino Cloud Features You Never Knew Existed appeared first on Arduino Blog.
Bookmark It


Hide Sites
$$('div.d43157').each( function(e) { e.visualEffect('slide_up',{duration:0.5}) });
14 Awesome Arduino Cloud Features You Never Knew Existed was originally published on PlanetArduino
1 note
·
View note
Text
Erfahrungsbericht: Wie gut sind die neuen E-Paper Displays von Soldered?
Von der Firma Soldered habe ich zwei E-Paper Displays für dieses Review erhalten. Ein E-Paper Display hat die Vorteile, dass es wenig Strom verbraucht und dabei auch noch von allen Winkeln gut lesbar ist. https://youtu.be/EcERNJUgK_U Disclaimer: Dieser Beitrag enthält eine unabhängige Bewertung der E-Paper Displays von Soldered, die mir kostenfrei zur Verfügung gestellt wurden. Die hier geäußerten Meinungen und Erfahrungen sind meine eigenen und wurden nicht durch Soldered beeinflusst.
Was sind die Vorteile von E-Paper Displays?
E-Paper Displays, auch bekannt als elektronische Papierdisplays, bieten eine Reihe von Vorteilen gegenüber herkömmlichen LCD- oder LED-Displays. Hier sind einige der wichtigsten Vorteile: - Geringer Energieverbrauch: - E-Paper Displays benötigen nur Strom, wenn sich der angezeigte Inhalt ändert. Ein statisches Bild verbraucht keine Energie, was die Batterielebensdauer erheblich verlängert. - Hohe Lesbarkeit bei Sonnenlicht: - E-Paper Displays reflektieren das Licht wie echtes Papier, was bedeutet, dass sie auch bei direkter Sonneneinstrahlung gut lesbar sind. - Augenfreundlichkeit: - Da sie kein Hintergrundlicht verwenden, sind E-Paper Displays weniger anstrengend für die Augen und bieten ein angenehmeres Leseerlebnis, ähnlich wie bei gedrucktem Papier. - Dünn und leicht: - E-Paper Displays sind in der Regel dünn und leicht, was sie ideal für tragbare Geräte wie E-Reader und Smartwatches macht. - Breiter Betrachtungswinkel: - Der Inhalt auf E-Paper Displays bleibt aus nahezu jedem Betrachtungswinkel klar und lesbar, im Gegensatz zu vielen herkömmlichen Displays, die bei seitlichem Blickwinkel verblassen oder verzerrt wirken können. - Flexibilität: - Einige E-Paper Displays können auf flexible Substrate gedruckt werden, wodurch sie für innovative Anwendungen wie gebogene oder faltbare Geräte geeignet sind. - Geringere Lichtverschmutzung: - Da sie ohne Hintergrundbeleuchtung arbeiten, tragen E-Paper Displays weniger zur Lichtverschmutzung bei und sind in dunklen Umgebungen diskreter. Diese Vorteile machen E-Paper Displays besonders attraktiv für Anwendungen, bei denen Energieeffizienz, Lesbarkeit und Augenfreundlichkeit im Vordergrund stehen.
6 Farbiges E-Paper Display von Soldered
Von der Firma Soldered bekommst du ein E-Paper Display mit 6 Farben in der Größe von 6 Zoll (was ca. 15 cm Bildschirmdiagonale entspricht). Es können die Farben schwarz, grün, blau, rot, gelb, orange angezeigt werden. Wenn ein Pixel nicht aktiviert ist, dann wird dieser in Weiß dargestellt, somit kommt man sogar auf 7 Farben.

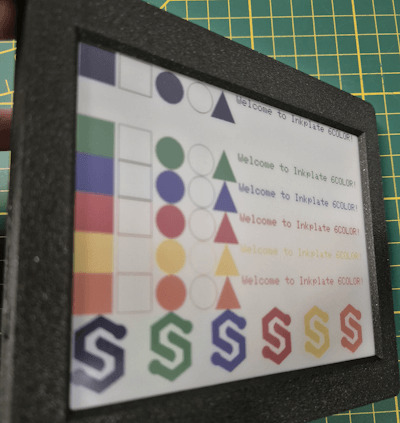
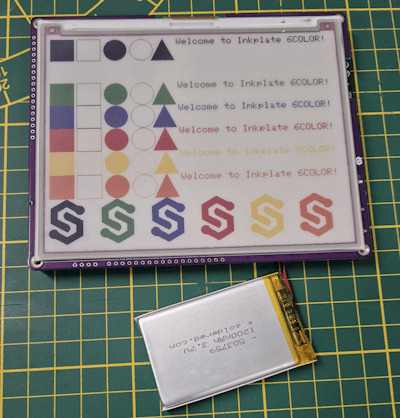
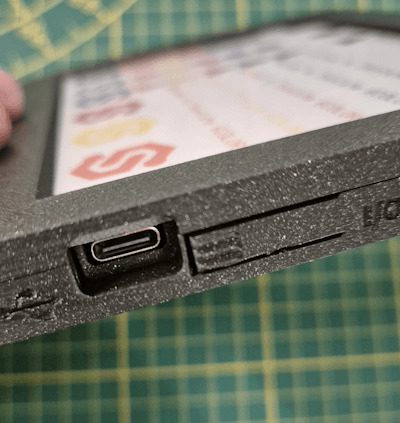
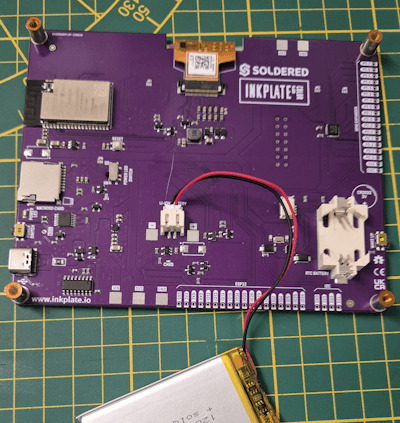
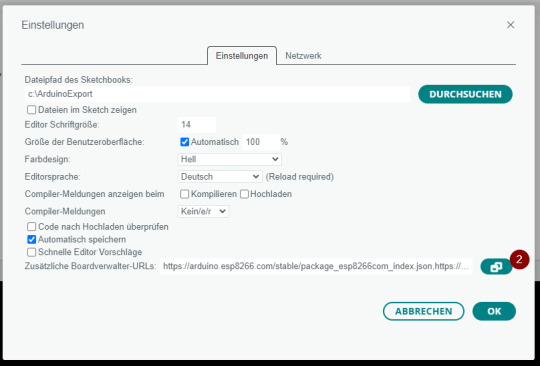
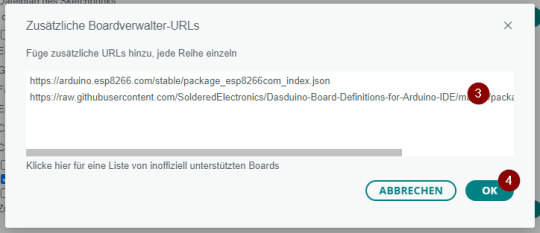
Technische Daten Nachfolgend die technischen Daten des 6 Zoll (ca. 15 cm), 6 Farben E-Paper Display: SchlüsselmerkmaleDetailsDisplaygröße5,85 Zoll (rund 6 Zoll)Auflösung600 x 448 PixelFarbunterstützung7 FarbenBildaktualisierungTeilweise Updates, schnelle InhaltsveränderungMikrocontrollerESP32 mit eingebettetem WiFi und Bluetooth 4.0 (BLE)StromverbrauchSehr gering, 18 µA im Deep-Sleep-ModusStromversorgungLithium-Akku oder USB, integriertes LadegerätSpeicherkartenleserMicroSD KartenleserSchnittstellenZusätzliche GPIO Linien, easyC/Qwiic Kompatibilität, Unterstützung für I²C und SPISoftwareFertige Arduino Bibliothek (100 % kompatibel mit Adafruit GFX) und MicroPythonGehäuseoptionenOptional 3D-gedrucktes GehäuseAkkuoptionenOptional 1200mAh AkkuAbmessungen131,5 x 105,5 x 10 mmAbmessungen mit Gehäuse140 x 119,3 x 13,6 mm Aufbau des E-Paper-Displays Auf der Rückseite des Displays findest du einige Anschlüsse für Sensoren/Aktoren sowie unter anderem das Batteriefach für die Backupbatterie der RTC (RealTimeClock). Einstellungen und dort fügen wir die nachfolgende URL zu den zusätzlichen Boardverwalter URLs ein. https://raw.githubusercontent.com/SolderedElectronics/Dasduino-Board-Definitions-for-Arduino-IDE/master/package_Dasduino_Boards_index.json
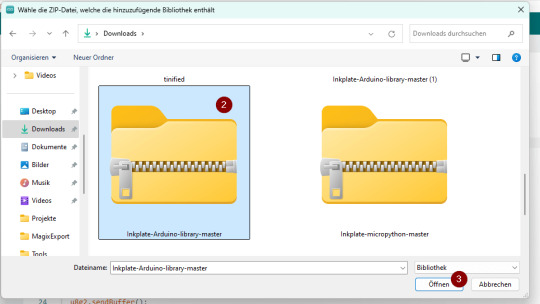
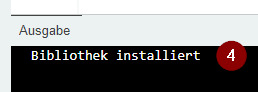
Installieren der Bibliotheken für das Display Der Boardtreiber dient lediglich zum Ansteuern des Mikrocontrollers, damit wir das E-Paper Display ansteuern können, benötigen wir eine zusätzliche Bibliothek, welche wir als ZIP-Datei vom GitHub Repository SolderedElectronics / Inkplate-Arduino-library herunterladen können.

Unterschiede bei der Programmierung von E-Paper Displays von Soldered Beide Display (6 Zoll & 10 Zoll) kannst du sehr einfach über die Arduino IDE programmieren. Der Bibliothek liegen zu jedem Display Beispiele von Einfach bis Komplex bei. Jedoch hat das 10-Zoll-Display ein Feature, welches dem 6 Zoll derzeit fehlt, es ist ein Partial Update. Dieses bewirkt, dass nicht das komplette Display neu geschrieben wird, sondern nur die Daten, welche sich neu im Puffer befinden, somit ist die Anzeige neuer Daten schnell erledigt. Anzeigen von Text & Formen in diversen Farben auf dem Soldered Inkplate 6Color E-Paper Display Zunächst programmieren wir ein kleines Dashboard, welches alle 15 Minuten aktualisiert wird. Auf diesem Dashboard soll nachfolgende Daten angezeigt werden: - die Uhrzeit von der RealTimeClock, - der Status der Webseite http://draeger-it.blog

Das Gute an dem E-Paper Display ist, dass dieses ohne Hintergrundbeleuchtung daher kommt und somit auch nicht so sehr aufträgt, wenn es an der Wand montiert ist. Programm - Dashboard für Status einer WebseiteHerunterladen #include "HTTPClient.h" #include "Inkplate.h" #include "WiFi.h" //Zugangsdaten zum lokalen WiFi Netzwerk const char ssid = ""; const char *password = ""; //Die Webseite welche geprüft werden soll String hostname = "http://draeger-it.blog"; HTTPClient sender; WiFiClient wifiClient; Inkplate display; const int PAUSE = 900000; void setup() { //starten der seriellen Verbindung mit 115200 baud Serial.begin(115200); //Aufbau der WiFi Verbindung WiFi.mode(WIFI_MODE_STA); WiFi.begin(ssid, password); //solange die WiFi Verbindung noch nicht hergestellt wurde, //soll ein Punkt ausgegeben werden while (WiFi.status() != WL_CONNECTED) { delay(500); Serial.print("."); } display.begin(); display.clearDisplay(); display.display(); //Einmaliges setzen der Uhrzeit / des Datums an der RTC. //Dieser Wert wird durch eine Pufferbatterie gehalten! //display.rtcReset(); //display.rtcSetTime(16, 6, 00); //display.rtcSetDate(2, 15, 7, 2024); } //Funktion zum schreiben eines Textes an einer bestimmten Position mit einem Style void setText(String text, int coord_x, int coord_y, int color, int textSize) { display.setTextColor(color); display.setCursor(coord_x, coord_y); display.setTextSize(textSize); display.print(text); } //Prüft ob der Hostname verfügbar ist, also der HTTP-Code gleich 200 ist. bool hostAvailable() { if (sender.begin(wifiClient, hostname)) { int httpCode = sender.GET(); if (httpCode > 0) { Serial.println("httpCode: " + String(httpCode)); return httpCode == 200; } else { Serial.printf("HTTP-Error: ", sender.errorToString(httpCode).c_str()); } } return false; } //liest einen Zeitstempel von der RealTimeClock String readRTC() { display.rtcGetRtcData(); int minutes = display.rtcGetMinute(); int hour = display.rtcGetHour(); int day = display.rtcGetDay(); int weekday = display.rtcGetWeekday(); int month = display.rtcGetMonth(); int year = display.rtcGetYear(); char buffer; sprintf(buffer, "%d/d/d d:d", year, month, day, hour, minutes); Serial.println(buffer); return buffer; } void loop() { //leeren des Displays display.clearDisplay(); display.display(); display.fillScreen(INKPLATE_WHITE); //laden des Logos display.drawImage("https://draeger-it.blog/wp-content/uploads/2024/07/logoSD.bmp", 0, 0, true, false); //schreiben der Überschrift setText("Dashboard", 165, 20, INKPLATE_ORANGE, 3); //schreiben des aktuellen Zeitstempels setText(readRTC(), 165, 50, INKPLATE_GREEN, 2); //zeichnen der Ampel display.drawRoundRect(50, 130, 60, 140, 6, INKPLATE_BLACK); display.drawCircle(80, 170, 20, INKPLATE_BLACK); display.drawCircle(80, 220, 20, INKPLATE_BLACK); //Wenn die Webseite verfügbar ist, dann... if (hostAvailable()) { display.fillCircle(80, 220, 10, INKPLATE_GREEN); setText("Webseite erreichbar!", 120, 215, INKPLATE_GREEN, 2); } else { //Wenn die Webseite NICHT verfügbar ist, dann... display.fillCircle(80, 170, 10, INKPLATE_RED); setText("Webseite nicht erreichbar!", 120, 165, INKPLATE_RED, 2); } //einen Text in den Footerbereich schreiben display.setTextColor(INKPLATE_BLACK); display.setCursor(115, 420); display.setTextSize(1); display.print("Stefan Draeger | https://draeger-it.blog | [email protected]"); display.display(); //einlegen einer Pause von 15 Minuten delay(PAUSE); } Read the full article
0 notes
Text
What is Arduino?
Today, the world is developing so fast. But the question is, are we?
Today’s stunning technologies are used by us all the day, all the time. Sometimes, we are ourselves fascinated by what we are able to do by just the click of a button. But, what if, we could make all of that, ourselves?
INTRODUCTION
So, the question arises, how can I make fascinating technologies?
The answer is simple: Learning electronics.
And, how to start with it?
The answer is: ARDUINO
All those people who are interested in robotics or hardware engineering might be familiar with Arduino, unless you haven’t made anything from it yet. Arduino is a open-source (open to public) electronic platform based on easy-to-use hardware and software. In other words (for a simpler definition), Arduino refers to an open-source electronics board and the software used to program it. Arduino is a fantastic way for anyone to learn about robotics, hardware engineering and programming. Over the years Arduino has been the brain of thousands of projects, from everyday objects to complex scientific instruments. Arduino boards are able to read inputs — light on a sensor, a finger on a button, or a Twitter message — and turn it into an output — activating a motor, turning on an LED or publishing something online.

Excited to learn it? Here we go!
HISTORY
The Arduino project was started at the Interaction Design Institute Ivrea (IDII) in Ivrea, Italy. The project goal was to create simple, low cost tools for creating digital projects. At that time, the students used a BASIC Stamp microcontroller at a cost of $50, a considerable expense for many students. In 2003 Hernando Barragán created the development platform Wiring as a Master’s thesis project at IDII, under the supervision of Massimo Banzi and Casey Reas. Wiring was important for Arduino since it is based on wiring in both software and programming language. In 2005, Massimo Banzi, with David Mellis, another IDII student, and David Cuartielles, extended Wiring by adding support for the cheaper ATmega8 microcontroller. The new project, forked from Wiring, was called Arduino.

Massimo Banzi
“Hardware becomes a piece of culture that anyone can build upon, like a poem or a song.”
-Massimo Banzi
WHY ARDUINO?
We know what is Arduino, but why should we choose it. There are dozens of other options out there, so why Arduino:
Arduino is an open-source electronic platform. This means that, not only can the public openly use the software and hardware, it can also constantly update and modify the hardware and software, proving Arduino to be diverse collection of boards. As a matter of fact, huge amounts of software libraries have been made by people at various communities to make the Arduino capable of working and behaving much better with more and more electronic components which are coming up.
Apart from that, Arduino is also one of the most cloned microcontroller boards out their. This means that Arduino is unexpectedly cheap. Moreover, Arduino gives a lot of options to choose from while building your project. It has several boards, some small, some large, each having their own features.
Not only that, the Arduino IDE (Integrated Development Environment) is an all-in-one software IDE, which allows us to program in the same language, for almost every Arduino board out there! This helps a lot as we do not have to download a different IDE each time we buy a different Arduino board!
Since Arduino is an open-source electronic platform, A worldwide community of makers — students, hobbyists, artists, programmers, and professionals — has gathered around this open-source platform, their contributions have added up to an incredible amount of accessible knowledge that can be of great help to novices and experts alike. :)
“A child educated only in school is an uneducated child”
— Unknown
HARDWARE
Arduino is open-source hardware. This means layout and production files for some versions of the hardware are also available. Although hardware and software designs for the arduino boards are freely available under the copyleft license, the developers have requested the name “Arduino” to be exclusive to the official product and not be used for derived works without permission. Most Arduino boards consist of an Atmel 8-bit AVR microcontroller (ATmega8, ATmega168, ATmega328, ATmega1280, or ATmega2560) with varying amounts of flash memory, pins, and features. The most famous and common boards include Arduino UNO, Arduino Mega and Arduino Nano. The boards use single or double-row pins or female headers that facilitate connections for programming and incorporation into other circuits. This allows for the connection of wires with male heads and also the connections for shields. Shields here refer to special arduino boards that can be attached over other boards, so as to increase their functionality. Some arduino boards also include ethernet connections, while some are as small as your thumb! Special arduino boards like the Arduino Lily can also be stitched upon clothes, to make wearable devices.

SOFTWARE
Any hardware is useless without a software. We need someone to explain the boards what we need them to do. For this, we have to speak the board’s language. This language is known as machine code and it exists as a series of 1’s and 0’s inside the memory of the board or the computer. Although machine code might be great for computers, it is extremely difficult for humans to understand. Early computers in the 1940’s and 1950’s had what was known as an Assembler. The job of this assembler was to translate assembly language into machine code. Users could write instructions for the computer known as a program with numbers and things that almost looked like words. While it was still difficult to understand, the language was also unique to each type of computer. It was better than writing a machine code but having to write assembly and learn a new set of instruction for each new computer was quite burdensome. So, people began to create high-level programming languages in the 1950’s, such as COBOL, Lisp and Fortran. These languages did not talk in the native language of the computers, but relied on a compiler to translate the high-level language into something the computer can understand. A compiler is simply a program that does the above mentioned work. When you write a program in Arduino, you write in the combination of C and C++ which is a high-level programming language used to construct instructions for Arduino. Arduino has a special software known as the Arduino IDE (short for, Integrated Development Environment) which provides us an environment to write our code into and upload it to the Arduino board.
That was all about Arduino, and believe me, this was just an introduction. Further, we will be diving deeper into this marvelous world of electronics, made up of wires and pcb’s!
Do not forget to follow and share with your friends and colleagues. Stay tuned for further updates!
Till then, Keep innovating!!
3 notes
·
View notes
Photo

3 Things You Should to Know About Arduino IDE on Linux
If you trying to get the Arduino IDE running on a Linux computer, so you have to look out this infographic. This infographic showing you “3 Things You Should to Know About Arduino IDE on Linux”. Must watch.
0 notes
Text
Something awesome update #02 - Deadlock
Somehow I spent the last three days working on how to bypass the notification below when I plug the ducky into my Mac, instead of working on file exfiltration code itself.

The Youtube video I found follows the below method:
Press down the reset button, hold and plug in the rubber ducky to get it into the dfu programming mode (i.e. boot loader mode)
Flash the firmware
Upload osx.hex, a version of ducky firmware that happens to configure the rubber ducky in such a way that VID and PID are changed into ones of Apple, leading the system to believe it’s an Apple Keyboard
So I downloaded Macport then configured DFU programmer in an attempt to enter the Arduino into boot loader mode to flash the firmware. But the command to flash the firmware requires the chip number of Arduino Leonardo and somehow the “board information” section in the IDE doesn’t contain this information. So I did some research to figure out how to acquire the chip number, and it turns out that Atmega32u4 doesn’t have an official serial number assigned to it, which is an issue reflected by other users as well.

After half a day of research I realised that Arduino Leonardo uses a totally different way to flash the firmware than the microprocessor employed by the rubber ducky in the video. I’m cooked. What’s worse is that there’s no DFU mode on Leonardo as it uses Caterina as its boot loader, and to get my ducky into boot loader mode I only have to open Arduino Leonardo’s serial port at 1200 baud and close it, which gives me 8 seconds to upload the flash the hex file onto the device.
I did another day of research and found two ways to achieve the last step:
Flash it using python code provided by https://stackoverflow.com/questions/45646127/how-to-upload-a-hex-file-into-an-arduino-leonardo-using-avrdude-from-the-command.
Download Avrdude and flash it with command avrdude -C ../etc/avrdude.conf -v -p atmega32u4 -c avr109 -P port -b 57600 -D -U flash:w:filename.hex:i *given by https://www.reddit.com/r/arduino/comments/5kzqad/help_cannot_figure_out_how_to_flash_a_hex_file/*
Arduino Builder would’ve been a good choice but the tool does not have an OS X version :(
But then I realised that the ducky firmware (i.e. osx.hex file) is probably incompatible with Arduino hardware as it was designed by hak5 for its own ducky device...
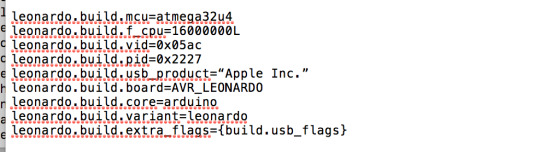
So I did a whole half day of research on how to change VID/PID on Arduino Leonardo and finally ended up with a solution inspired by https://forum.arduino.cc/index.php?topic=360330.0.
It took me a while to find boards.txt as somehow the pathways given by my research are only for Linux and Windows...After hours of meaningless searching, this line captured my attention in preference.txt stored in /Library/arduino15: last.ide.1.8.9.hardwarepath=/Applications/Arduino.app/Contents/Java/hardware(Yes I came across a Youtube video revealing the path two days later...mixed feelings indeed)
So I jumped into the hardware file and my guts led me to figure out boards.txt eventually. Edited VID/PID as followed:
Restarted the IDE showed me the correct board name but VID/PID remained the same in the board info section. So I did a whole night of research, jumping back and forth in the directory. I tried adding USB_MODEL_PID in the descriptor.h file in usb-serial and usb-dfu, which obviously broke something so I reverted changes. Then I doubted if I should change the #defined AVR_LEONARDO to properly change board configuration, so I spent another hour trying to find the file defining board configuration, which turned out to be in the usb-serial folder and only contained LEDs.h, which had nothing to do with defining Leonardo configuration.
Then I noticed the quotation mark that wraps around the company name is different from the ones used in other sections:

So I changed it, affected nothing.
Out of desperation I compiled the file exfiltration code again and did another testing, and miraculously it changed from default 2341:8036 to the allegedly Apple VID/PID I assigned to it:
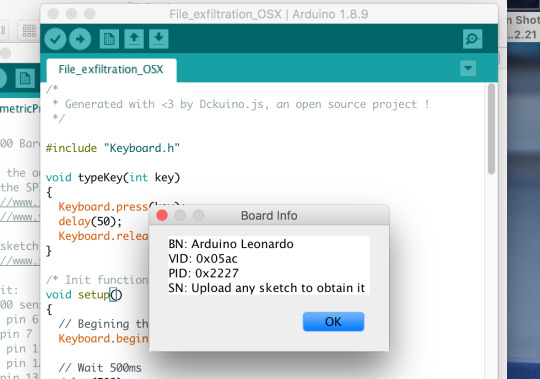
That marked the breakthrough of the deadlock I’ve been working on for the past few days...A surprisingly simple solution derived from needless trial-and-error efforts :(
1 note
·
View note