#i have to get better at cas and screenshots and the tool mod and everything else too fjdjdkdkdj
Text


#ts4#ts4 screenshots#max villareal#lucas munch#pierce delgato#olive tinker#elsa bjergsen#what is this? i have no idea. i got down on the rabbit hole of pose packs and reshade presets and cc. and here we are#i aged up some kids into teens and did a makeover but im not happy with how max and pierce look like ://#max and lucas are very good very very platonic besties#anyway... my first try at trying to make a set like this.. enjoy or ignore and close your eyes idk idk#i have to get better at cas and screenshots and the tool mod and everything else too fjdjdkdkdj#sims 4
10 notes
·
View notes
Text
Some tips for The Sims 3 Buy/Build
Install LazyDuchess’ Smooth Patch to alleviate lag, esp in Buy/Build and CAS.
Keep your CC merged and organized, esp your patterns, this will also alleviate a lotta lag across all modes.
When building on community lots, or any lot rlly, avoid going to the edit world menu, and just put testingcheats enabled into the cheat window, then shift+click the ground of the lot to enter Buy/Build mode. This makes leaving it to save a lot easier, with less “preparing” screens to possibly get hung up in.
Lower your settings, you don’t need any adjacent lots loaded, and you certainly don’t need super water on either. You can always switch these back on when you’re done.
While you’re at it, remove your HQ mod, and turn off your Reshade/Gshade preset, or at least turn off your depth shaders. I only ever turn on my depth shaders when I’m taking screenshots for better fps while playing. The DoF shader esp requires a lotta resources your game could be using to simulate all those 78 townie sims instead.
Save as… vs Save, I Save as… at least every third save. It’s also just good habit to keep backups.
When using the CASt tool, set down everything you plan to CASt first, then switch to a category like the wall tool to avoid eventual lag and drag when using it a lot. Love yourself. You don’t have to suffer using CASt tool in an overpopulated category like misc deco.
Utilize the clone option through testing cheats to duplicate already CASted objects, it’ll keep your design just like the dropper tool, but it’s a lot less time consuming, I promise.
Don’t be afraid to use the swatch save tool for objects you use often, esp community lot objects, as it helps to keep your aesthetic consistent. I also keep all of my favorite streetlamps, benches, and public trash bins etc in a convenient custom collection folder to speed up the process of doing multiple lots in one sitting. These handy tools are there, use them.
The issue with custom counters. They mess up sometimes, if you can’t recolor it suddenly, here’s how to fix that. Now if you can’t place down a cupboard suddenly, even though nothing’s in the way, and you’ve got moveobjects on activated, try putting it on the wall a tile over, and then try adding it to your desired spot again. Lastly if you set down counters or cupboards at a corner, and it messes up the textures, but you can still recolor it, you could do what the video I linked above does, or you could simply pull out the CASt tool, and switch it back to any of its original swatches and click the check, then feel free to recolor it as you want.
Railings will also do the “can’t recolor” trick too, but this is a simple fix, just delete it, and replace it, and you’re good.
“Oh no, I switched between buy and build mode, and now my catalogue won’t load, and I can’t click on anything at all!” Don’t panic, hit F2 and/or F3 on your keyboard, these are shortcuts for switching between them, and if you’re lucky it’ll load properly again. Should you get the bug where you load a category and it’s somehow empty, don’t fret, just click on a different category and this should fix it. Then if you get the bug where all the objects you put down disappear suddenly, sorry your game is haunted. Call an exorcist, or just reload, they might reappear if you do.
Tbh, if you run into any kind of major bugs, it’s likely a sign to either save immediately or just restart your game. These only ever show up when you’ve been at it a while ( at least for me ), therefore starting fresh wouldn’t hurt. Probably also wouldn’t hurt to check whether you might’ve installed something the game didn’t agree with by running Dashboard, or put it through the ol’ Save Cleaner.
Honorable Mention: Keep an eye on the texture sizes and poly counts of objects. I know it’s tempting to build these ultra hyperrealistic lots with clutter at every inch, but unless you’re just doing it for screenshots, or for your story, or using it very sparingly, it is not by any means recommended purely for gameplay. This is just the truth when it comes to any Sims game. You don’t want lag, or max memory crashes, or save errors? The Sims 3 is a 32bit game, that’s almost old enough to drive, be easy on it.
428 notes
·
View notes
Note
Your photos are always so bright and HD! What graphics card do you use and what are your in game settings if you don’t mind me asking?? Could you also give some tips for somebody starting out to take photos in the sims 4 🪐😚
Thank you ♡
I have a low end laptop lol. But i use few tools and tips that help me take some good quality photos. I’ll share them in details so this is going to be a long read !! Sorry ahead and bear with me please 🥰
Let’s start with few things to enhance your in game quality first :
If you don't use HQ mod i recommend you check it out HERE !
Here are pictures without and with HQ mod ( click for better quality )


Do you notice the HUGE improvement in details like eyebrows, skin, eyes and clothes, pretty much everything lol!!
I use HQ Mod Switch to turn HQ mod on and off as i wish. Be aware that HQ mod slows your game !! you can simply turn it on just when you need to take screenshots.
I use This Gentle Cas Lighting ( IT’S A MUST!!)
Now, there are two ways to take good quality pictures that i know of and use :
OPTION 1 :
If you want something quick but does the job then this is your go to :
- SRWE :
Download the zip file and unzip it.
Run The Sims 4 game.
when you are ready to take screenshots whether in cas or in game ( i take mine in cas ) go to settings and change display type to windowed. Here are my in game settings.
Open the SRWE file you downloaded earlier and run the app. ( Make sure you unzipped it 1st )
Click on Select running Application and choose TS4 game then Click open.
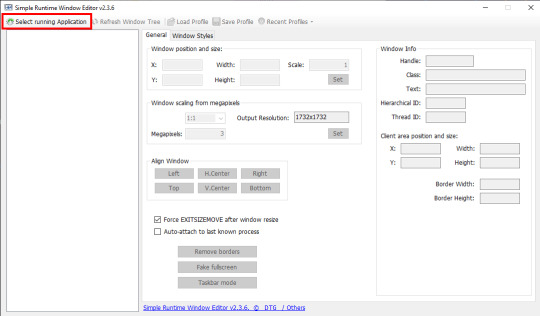
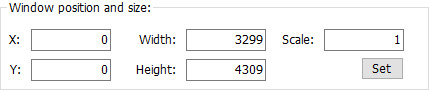
in the Window position and size you adjust the width and height to your liking. Be experimental with it till you are satisfied. These are my settings :
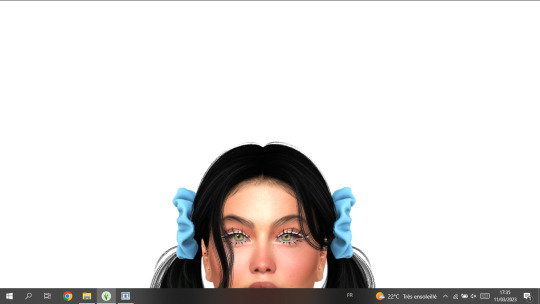
When you go to the game you will notice the change in resolution. Here it’s tricky a little because if you make the resolution too big, you might not be able to see everything on the screen, here is an example
You can move around by clicking on the options in Align Window.
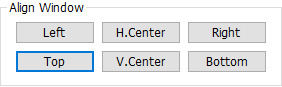
It helps you navigate around the screen. I always go for Left + Top which displays this as a result :

When it's set this way i get to see Traits properly to pose my sims before i take a screenshot .
Please bear in mind that my screen resolution is 1366x768. If your screen resolution is higher you dont have to use same settings as mine !!
FINALLY, you hit C on your keyboard to take screenshots. And you are done.
Tip : If you liked your SRWE settings and want to save them, click on Save Profile then name it so you can load it the next time you use SRWE, without having to type everything all over again. As you can save many profiles with different settings !! feel free
Ps : As you noticed from the previous last two pictures, using SRWE will display part of the screen and not all of it because the resolution is bigger now!! in this case i recommend you go to the screenshots folder of your game and check how the screenshots turned out while you are still running the game so you can decide if you like them enough or not before closing the game!
Here are pictures taken without and with SRWE ( using HQ mod in both )

OPTION 2 :
If you have the patience and time, you should try rendering in Blender.
There are so many tutorials on youtube that can help you learn how to render. I’ll link you the one i liked best HERE !
TIPS :
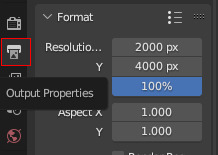
This is my resolution settings for pictures in blender ( you click on Output Properties to set it )
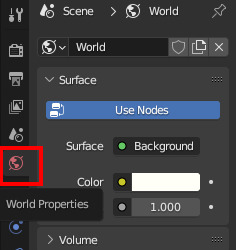
I dont use any lightning in blender, i use World Properties instead by clicking on color then setting the value to 1.000. If you want some cool effects you can have fun trying some lightning options ( watch the video to see how to do it ! )

You can add a background in blender and change its color to your liking. I use transparent background beacuse it's easier to edit the image that way. To get an image with transparent background in Blender go to Render Properties>Film>Transparent

I use Eevee to render my images. It is recommended to use Cycles for better/higher quality but it takes longer time and it can crash if your PC doesn’t support it ! So be aware please!!
HOW I EDIT MY PHOTOS TO LOOK BRIGHT!
I use Photoshop to edit my photos. I don't do much to be honest. i resize images when it's needed and adjust brightness/contrast, tone and color ( 70% of the time i just go for Auto Tone ) which you will find in Image.
Tips : you have some cool options in PS that can give you that bright effect, such as :
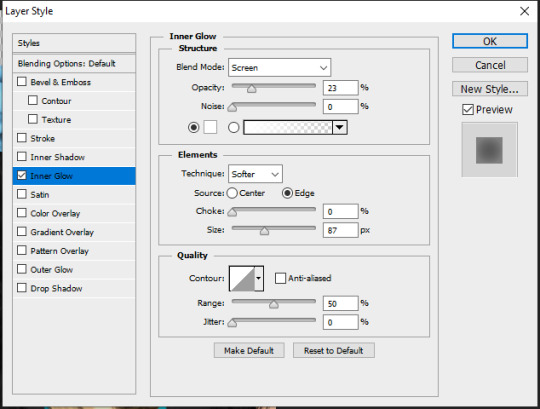
Inner Glow : You can find it in Layer>Layer Style. And here are the settings i use ( they are still adjustable depending on the clothes, hair and skin color of my sims ) :
Outer Glow : you can find it in Layer Style as well. I dont have specific settings for this one. It totally depends on the picture and type of edit i’m going for. I dont always use it unless i want some really bright effect around my sims like In my Fairy post HERE.
You can get creative with other options in Blending Options, which you can find in Layer Style.
For the Glow effect to work properly you have to have a transparent background, or delete the background yourself ! it should look like this !
after adding the Inner Glow + Outer Glow effect it will give you this !
When i add a background (in a new layer) i dont make it 100% white! i go for this color to make the Glow effect pop a little !! and these are the color settings :

ET VOILÀ LE RÉSULTAT.

Lastly, if you made it till here thank you for taking the time to read all that ♡
I hope it was helpful a little. If my explanation was ambiguous or you have any more other questions, don’t hesitate to ask please!
#THIS WAS LONGER THAN IT NEEDEDTO BE!!!#but totally worth it if you are new to this!!#ts4 edit#ts4 cas#the sims 4#ts4 simblr#asks#editing tips#sims 4#simblr#ts4 render#ts4 screenshot
148 notes
·
View notes
Text
Sims 4 cc hair female child

SIMS 4 CC HAIR FEMALE CHILD 64 BIT
SIMS 4 CC HAIR FEMALE CHILD UPDATE
SIMS 4 CC HAIR FEMALE CHILD FULL
SIMS 4 CC HAIR FEMALE CHILD FREE
SIMS 4 CC HAIR FEMALE CHILD 64 BIT
Only one version available to not confuse and updated to 64 bit sims 4.Īll credit goes to Ceejay.dk for the sweetFX tools.
Does not conflict with any other lighting mod.
Untick post processing effects to make the game even faster, the SweetFX does all the post processing itself.
bmps in the main game “.exe” folder where the sweetFX is installed.
Take screenshots with the f10 key, then they are placed as.
As long as your graphics card isn’t ancient you can run any of the HQ sweetFX’s, but only really good moniters and graphics cards will look good with the high or ultra.
I prefer to right click my sims 4 desktop shortcut and go to open file location to get there quickly.
Copy all files in FX folder in your main game “.exe” folder.
Border (also for the gradient and to make the UI look better).
SIMS 4 CC HAIR FEMALE CHILD FREE
Feel free to ask for alterations, I’m doing requests currently. It’s bright and sharp, with a subtle gradient.
SIMS 4 CC HAIR FEMALE CHILD FULL
If the original creation only has cut number 0-2 it will ignore everything from cut 3 and higher.Click the pictures to see the full qualityĪ new SweetFX setting for those who want something less subtle. The reason your hair was incomplete is because it only imported the parts of the hair that had the right cut number. If any of those already say the correct cut number don't change anything. In the section where it says cut do the following:įor S4sstudio_mesh_1 change the cut number to 0000įor S4sstudio_mesh_2 change the cut number to 0001įor S4sstudio_mesh_3 change the cut number to 0002 I have CC for every age category but not child and I'm about to start the American Dream Challenge so I'm looking for one. Rename all of them so they say the following: And I’ll definitely be keeping an eye on this thread in that case because I’d love to find more good CC as well. You may need to tinker with this a bit, but so long as the mesh pieces are down to 3 it should work.Īfter this you should have 3 Mesh objects. **NOTE** I do not know if merging the hair chops with the pieces I did will work for the correct hat types, I did some guesswork by seeing where the hair piece met. After that I merged S4sstudio_mesh_5 and S4sstudio_mesh_6. Then I merged S4sstudio_mesh_4 with the new S4sstudio_mesh_6. Tags this page will be updated when i’m not being lazy Hair Female Male Children Toddler Recolors Makeup Lips Eyeshadow Eyeliner Cheeks Facepaint Eyebrows/Facial Hair Sims. On the Newsea mesh I merged S4sstudio_mesh_1 with S4sstudio_mesh_6. I was able to get the hair to load into studio by doing the following: If you open the newsea mesh in blender you will sea it has S4sstudio_mesh_1-6, if you export LOD 0 of the package you are working with there are S4Studio_Mesh_1-3. Hello, first thing, the Newsea hair has a LOT more pieces than the hair you're trying overwrite.
SIMS 4 CC HAIR FEMALE CHILD UPDATE
If however, you have a piece of CC that broke and has not been update by the creator (if you check back it's probably updated though, so you won't have to do any work there :P) then you can use this tutorial I made awhile back when one of the patches broke a noticeable amount of CC.į/en_US/discussion/890505/how-to-repair-cc-files-that-were-broken-after-the-patch A lot of the ones I encountered were maysims, and she has updated them all now I think, so I'd go back to her site and re-download. If you want to enable all hairs fast, move all your CC from your sims 4 game to another folder (like your desktop) but the hairs/other CAS items you want to enable for both genders, then go to Tools> Batch fixes> CAS >Update CAS CC for both gendersĪlso, for the broken hairs. Then scroll all the way to the bottom and check "part flags" there should be an option "restrict opposite frame" and "restrict opposite gender" untick these. If so, go to categories, make sure that "Female" and "male" are ticked under "Age & Gender flags", if you want it to show up in both enable both "feminine" and "masculine" under fashion choice (if you want it to stay tagged as just one then leave it as is and you can just close the tag in game). It sounds like you are enabling things manually.
1 note
·
View note
Text
a somewhat comprehensive performance guide for the sims 3
what it says on the tin. i’m sticking everything under the cut to avoid clogging everyone’s dash because, hoo boy, this is a looong post
welcome to my kitchen, and hopefully i can help you get your game to run a bit better!
first, if you haven’t already, make sure to launch your game (i recommend just bg so it loads quickly) and check if you need to change your graphics settings. if you’re on windows and would like to play your game in windowed fullscreen:
download and install this program (it’s safe, i promise)
open the program and you should get a notification that it’s running in your tray
with ts3 open (in it’s windowed mode), click on your tray and right click on the program’s icon, then select Add window
go back to ts3′s window and press F3 on your keyboard. you should get a notification that ts3 has been added to the program’s list, and you’re done!
you’ll also need an fps limiter to prevent the game from frying your video card. i use this one, set at 60fps. alternatively, you can download MATY’s fps limiter and place it in your game’s bin. (The Sims 3/Game/Bin)
is your game crashing on startup? check your DEP settings or try using 3booter.
some tips to help your game run better
have as few programs as possible running while ts3 is open.
run a 4gb patch on your game. download this, run the .exe, select the game’s executable (The Sims 3/Game/Bin/TS3W.exe for patch 1.69 or TS3.exe for patch 1.67), and click open. you’ll get a pop up saying it’s patched. please note that your computer needs to have over 2gb of RAM for this! (most do, but do check how much RAM you have!)
if you’d rather increase how much RAM the game uses yourself, follow this tutorial.
download razer game booster. this frees up some memory on your computer to increase performance.
check how much virtual memory your pc is using. follow this tutorial.
delete cache files. the game will generate new ones every time you open the game, so make sure to delete the following files before running the game: CASPartCache, compositorCache, scriptCache, simCompositorCache, socialCache. these files are found in Documents/Electronic Arts/The Sims 3.
if you’re on pc, delete your WoldCaches folder. not everyone will have this folder, and the game may also regenerate the folder. (mine didn’t regenerate the folder, but it’s happened to others) DO NOT do this if you’re on mac!!!!
disable your FeaturedItems folder. this prevents the game from generating a fuckton of store thumbnails you’ll never look at. follow this tutorial or just set the folder to be read only.
turn off the following in your game settings: shop mode, interactive loading screens, and online features. i also recommend turning off story progression and memories and using mods to handle these instead.
edit your GraphicsRules.sgr. this will help your game load textures faster. (it also helps how fast your sims change their clothes!) do it yourself by following these tutorials ( 1 + 2 ) or download avian’s graphics fix (v1.69) (v1.67). i recommend doing the latter more than doing it yourself!
modding your game: a quick crash course
yeah, i know most people know how to download and install custom content + mods, but this is still good to give a read for managing your sims 3 cc!
first, you’ll need a mods folder because ts3 won’t generate one by itself. i recommend you download this framework and follow MTS’ guide to setting it up. it comes with a nifty little no intro video mod!
use the compressorizer redux. you can extract it wherever you’d like, just make sure to keep all its files in the same folder. this program is pretty self-explanatory, it compresses .package and .sims3pack files. to use it, click Add Files to List, select the folder with your files (you can do this multiple times), and click GO! now, just let it do its thing! it may take a while to process everything if you have big files, but you’ll get a pop up saying how many MBs you saved when it’s done. you can also use decrapify mode on .sims3packs (useful for store content!)
i recommend downloading Delphy’s Sims3Pack Extractor. i avoid using the game launcher to manage my cc at all costs, and this tool is useful for extracting .package files from .sims3pack files. follow this tutorial to use it!
Delphy’s Dashboard Tool is also useful for finding any broken, duplicate, or conflicting cc. i don’t recommend using the fix all problems option, do it yourself instead to make sure you don’t delete anything you want to keep.
renaming cc files can also help with lag. follow this tutorial!
you can also merge your package files to help with lag and load times using this tutorial. i don’t do this personally, but my mods folder is pretty small too.
note: the game launcher can only load 500 .sims3pack files at a time. only use the launcher to install absolutely necessary items!
to help reduce lag and load times, you can delete everything in your DCBackup folder (Documents/Electronic Arts/The Sims 3/DCBackup) EXCEPT for ccmerged.package. DO NOT delete ccmerged, it has all the cc installed through the launcher. (ps. you can safely use the compressorizer to compress your ccmerged file!)
final tip: try to control the amount of cc you have installed. i’ve noticed that the game takes a lot longer to load when my mods folder starts to reach a Gb. my mods folder is currently 368Mb, and it takes around 5 minutes to load any saves.
helpful mods for your game
the ETERNAL must have: nraas’ mastercontroller. you’ll need this to run all nraas mods! also be sure to grab overwatch and errortrap while you’re at it! these catch and clean any errors that happen in your game. i also recommend register and traffic.
no (or fewer) auto memories is SUPER useful for controlling memories in the game and helps with game performance. it’s super customizable!
ellacharmed’s world fixes. not really a traditional mod, but this helps with routing and camera control! note: don’t use these on preexisting saves! some lots have been moved and there will be little gaps in the world with preexisting saves.
routing fixes for schools + other lots. be sure to use nraas to reset your school lot after installing!
interaction on sloped terrain. this is mostly just a sanity saver, but very useful!
finally, i recommend grabbing awesome mod. it has a bunch of fixes and is very customizable!
reducing save game bloat
a.k.a. the steps i go through to make sure that my game loads relatively fast and runs with minimal lag.
if i’ve taken any screenshots the last time i played the game, i move those out of ts3′s screenshots folder and into a separate folder.
i delete all generated cache files. see the tips section above for more info
i run kuree’s save cleaner on the save i’m planning on playing. if the latest version (2.1) doesn’t open/work, try using v1.1 instead. you can also do this manually, though i don’t recommend it for the sake of your sanity.
every couple of in-game weeks in a save i run a total reset on the world i’m playing in. this is done through nraas mastercontroller. click on your city hall from map view>nraas>mastercontroller>total reset
tip: to help prevent your saves from corrupting, use save as and keep multiple versions of your save. for example, i have 3 versions of my lepacy save. this way, if a save does corrupt, you have a backup!
misc. ways to reduce lag
don’t run the game with all packs enabled. it’s going to murder your game. only run with packs you know you’ll use. you can also refer to this masterpost for bgc items if you only want certain items from a pack.
don’t keep tons of stuff in your sim’s inventory. use the fridge to keep fish and harvestables instead.
if your sim has the collection helper LTR in their inventory, make sure you have it set to none when you’re not using it.
i recommend downloading simborg’s CAS hiders, ILTS’ CAS Rehaul, and/or sweetdevil-sims’ CAS hiders to reduce CAS load times.
change CAS’ catalogs to show in compact form using nraas mastercontroller. select a sim>nraas>mastercontroller>settings>CAS and look for show in compact form options and set each to true
nona’s no limos mod can help nraas overwatch’s nightly clean up
make sure to turn off any build/buy cheats you activated when you go back into live mode. (even if it’s just to save)
if you’re using CAS a lot in a play session, it’s a good idea to quit to desktop and reload the game every once in a while
try to avoid saving presets and CASt swatches
disconnect from the internet. i don’t do this often because i usually have spotify or carl’s sims 3 guide open alongside ts3.
good resources to refer to
the sims wiki’s game guide to improving performace
nraas’ tips for better game performance
this thread @ MTS
optimization guide @ games4theworld
this post by darkfridaysims
that’s all folks!
if you’d like to know what cc and mods i’m using, here’s my resources page. thanks for reading all this, and if you need any clarification or have anything to add onto this, definitely hmu!
edits
*ps that i won’t be tagging people i credit so i don’t risk clogging their activity, i’ll still include a link to their blog!
the fps and 4Gb patch aren’t needed, it was fixed in a patch! (thank you, create-a-sim!)
#ofc feel free to rb this!#i took me 6 hrs to get this all together so i'd really appreciate it!#sdjkadh how do i tag this#the sims 3#sims 3#ts3#tutorial#tips#reference#sr
682 notes
·
View notes
Text
Moving In
Part 6 of my Custom Neighbourhood Guide
I wasn’t sure what to call this part of the guide, it’s very much a bunch of miscellaneous tasks concerning memories, family albums, family trees, debugging… all that good stuff which ties everything together.
If you’ve been following my steps in order (which you don’t have to do, of course, some creators will prefer a less structured approach) then at this stage you have your terrain, your lots, a bunch of families in the sim bin. If you haven’t already – move them into their houses! If they can’t afford them you can use the familyFunds cheat or SimPE to give them the desired funding.
Back up your neighbourhood at this point! Now, more than ever, you are going to want to be creating regular backups so that you can easily revert to an older version if you make a mistake, or change your mind about any of the story direction.
Once all your sims are moved in you’re going to want to set up the storylines and situations you’ve planned out. There are two main ways to go about this: actually playing the game and editing memories and relationships manually in SimPE. I’ll be covering both methods here and listing the pros and cons of each. You’ll probably find yourself using a combination of the two depending on the situations you’re setting up.
Playing the Game
This is the easiest way to set your families up! Simply play the game as normal, possibly using testing cheats and modded objects to speed things along. With these you can quickly change relationships, age sims up, kill sims, etc.
When I set up Europa, I had a backstory in mind where a schoolteacher and a priest had an affair and a kid together – so when I created the sims I made father Theo an adult rather than an elder, played out their entire affair including the birth of their son, and their subsequent breakup. I also aged the kid up, had Viola manually teach him his skills, aged Theo up… strictly this wasn’t necessary, but it was easier than messing about with SimPE and also let me take in-game screenshots along the way which I used for their storytelling albums.
Penni talked about this too, on her commentary on my last post, and I’m going to paste what she said directly as its also insightful info:
“If you play through a full day of your old, established family, they won’t have a welcome wagon when the player starts the game, which makes sense. Play time also allows you to take advantage of the “training mechanism” to create sims with habits, and allows the sims to give you Better Ideas. Woody’s refused first kiss with Virginia and Candy’s affairs with both Mann men were situations that came up during play - the sims’ ideas, not mine. Developmental play also doubles as playtesting time for your lots. The more real memories your sims get naturally, the less time you have to spend tediously manufacturing them in SimPE. And you can get any storytelling pictures you need.”
As she mentions, actively playing is useful so that you can get welcome wagons out of the way, and let the future player take control at the best possible moment. Both Europa and Widespot (if I’m remembering correctly) start the game on a Friday morning so that downloaders can play out a standard week-day and then have the weekend to play about a bit more. If they start their day in their bedrooms players can also quickly tell whose room is whose! (Don’t have them actually sleeping, though. When opening a neighbourhood for the first time players will usually experience a jump-reset, so it’s best to have your sims standing idle when the neighbourhood is first loaded.)
If you want your storylines to create maximum impact, consider the timing of the events. One family in Europa contained a widower, Ronnie. I wanted his wife to have recently passed away and for the memory to be fresh when the game was first loaded so that the family would cry regularly and seem affected by her death. However, I killed off Viola right at the beginning of my gameplay, and by the end of the week the family seemed somewhat over it. I tried fiddling around in SimPE to change this later but didn’t have much luck - working with the game is a lot easier than working with SimPE, I find! I had to settle for using storytelling images and putting him in aspiration failure. Learn from my mistakes.
One other thing to keep in mind when playing is to avoid corruption at any cost. Read the Wiki guide on avoiding corruption thoroughly and regularly check your game with Hoodchecker. Keep creating those backups!
Game guide: Avoiding corruption
In theory you could set up everything this way without even using SimPE, but it might not always be practical, especially if there are multiple generations to consider, all with their own backstories... you would have to create the founding elders and play out the entire family history! Penni details a few more potential pitfalls:
“But developmental play is time-consuming, can get bewilderingly complicated, and inevitably risks the accumulation of the grit-like minor corruption and/or serious glitches with which we are all so familiar. It might also involve the spawning of NPCs you may not want, or the creation of complications that go against the Vision, requiring quitting without saving or reverting to one of your numerous backups. Only you can do the cost-benefit analysis here.”
Editing & Adding Memories
So, this is where editing memories manually in SimPE might come in handy. It’s good for adding all the standard family memories (toddler training, growing up well/badly, etc.) I’m going to be honest here - I found this a real pain and it took a lot of trial and error to get it right! So keep using those backups. I’ll link the the tutorials and resources I used below:
Memories - Changing and removing {tutorial}
Game guide:Adding memories in SimPE
List of Memories
One really cool thing about editing memories manually is that you do stuff that wouldn’t be possible with normal gameplay, like changing the colour of a memory from the usual way it appears! Katrina Fusilli dislikes her daughter-in-law, and has a negative memory of her son marrying. Stuff like Olive Specter’s memories with the Grim Reaper would also fall under this category! Take a look at the full list of possible memories and see what you come up with.
If you give a memory an unexpected subject instance (possibly like “going steady” with Grim although I haven’t checked this) the Hoodchecker will flag it, but as far as I know it’s not harmful to the game. There’s one of these in Widespot concerning Skye Weiss’s abduction.
Family Trees
If your families are all set up in-game tools with CAS or during developmental play, your family tress are probably going to look fine. But if you’re adding family relationships between households manually, you may find they don’t show up correctly on family trees. I encountered this issue when trying to make all my NPCs related.
The only way, as far as I know, to directly edit family trees is using SimPE! It’s been a while since I did this, and I could only find one tutorial on it, but editing family tress was something I found pretty easy once I knew the correct place to look. I’ll link to the tutorial I used below:
SimPE Family Ties Tutorial
Photo Albums
More storytelling stuff! Each household has a family album composed of in-game snapshots taken with “C”. There is also a neighbourhood album, which will pop up when a neighbourhood is first loaded! You might want to include a quick summary of each household here.
During development play you’ll want to take pictures along the way of critical moments in the story. If you’re trying to avoid actually playing your neighbourhood too much for fear of corruption - no problem! You can stage scenes, take snapshots and then quit without saving. Your gameplay won’t be saved but the pictures will! For Europa, I staged a few family photos using poseboxes I temporarily added to the game.
You can choose which pictures to include in a family album, which order to have them appear, and there’s also an option to include captions. I like imitating the Maxis story albums and leaving the pictures caption-less so that the player can use their imagination, but Maxon used photo captions to great effect in Polgannon!
It’s also possible to use photos taken or edited outside of the in-game camera tool, as Maxon does above and as Maxis does! I know this is done by renaming and re-sizing the files accordingly, but I haven’t ever tried this before and can’t find a full guide on it! If anyone has any insight let me know :)
Biographies and Descriptions
Along with photo captions, you have a few other places you can write! The neighbourhood description itself, the neighbourhood story, household descriptions, and of course sim biographies! It’s up to you how much detail you want to go into on these - you might prefer to keep them vague or to go into lots of detail.
You can also choose whether you want them similarly themed, or more varied in tone. In Veronaville, for example, almost everything is about the family feud, particularly the Juliette/Romeo love affair. Even Tybalt’s biography is about Juliette’s storyline:
The Capps and Montys have been feuding for years, but that hasn't stopped the younger generation from crossing boundaries and falling in love. Will their actions lead to ruin or bring the families together? - Veronaville’s neighbourhood description
Juliette Capp has fallen for Romeo, golden child of the rival Monty clan. Can the Capps set aside their grudge and put Juliette's happiness first? - The Capp household description & neighbourhood story
Juliette loves her family and wants to please them, but her feelings for Romeo are undeniable. Can she make her family proud and make herself happy as well? - Juliette’s bio
Outspoken but surly, Tybalt is proud to carry the Capp name. Will his pride and hatred of the Montys ruin his sister Juliette's chance for happiness with Romeo? - Tybalt’s bio
For a bit of contrast, let’s look at Strangetown! The neighbourhood description is a lot more vague and nonspecific, hinting at the storylines rather than outright stating them. The household descriptions detail the family story, but character bios include fun tid-bits rather than spelling out their role in the story.
Truth-seekers move to Strangetown hoping to discover the secrets the town holds. Do aliens live among us? Do missing Sims mysteriously appear here? In this town nothing is what it seems. - Strangetown’s neighbourhood description
In search of truth and mystery, the Curious brothers got more than they were "expecting." Can Pascal, Lazlo, and Vidcund cope with their new roles as cosmic parents? - Curious family bio & neighbourhood story entry
No matter what happens, Pascal believes there is a logical explanation for everything. In his free time, he practices home psychoanalysis and collects conspiracy theories. - Pascal’s biography
Serious and exact, Vidcund strives to fit the universe into a nice tidy package. He has an unnatural fondness for African violets. - Vidcund’s biography
Juliette’s biography is all about family and forbidden love, but Pascal's make no mention of aliens, abductions or pregnancy. Tybalt’s bio talks about his hatred for the Montys, but Vidcund’s makes no mention of his feud with Loki Beaker or his romantic history with Circe.

I’m being a bit roundabout here, haha, all I’m really saying is there are a lot of ways you can approach descriptions like this! Maybe you have a strong theme or storyline you want to get across to players, or maybe it’s made up of lots of little storylines.
Playtesting & Debugging
The final stage, and most likely not a fun one. Now that you’ve finished everything up, it’s time to playtest it a little. You may do this yourself, or enlist others to help! I’m not very good at spotting my own mistakes, so I created a beta of Europa and sent it to a few playtester-volunteers.
Things you and/your testers will want to be looking out for:
Bugs
Building issues
Playability
Signs of corruption
Spelling and grammar mistakes
Anything that seems missing or wrong
Draw up a big list of all the issues you/your testers encountered and then slowly work on fixing them. If you think you’ve solved the problem, double check it is fixed in your game, and maybe even send an updated version to your tester to verify it’s now working correctly. Don’t cross off issues as “solved” when you haven’t double checked! Some of my playtesters noticed my maid NPC had alien eyes and I never properly checked if I’d fixed it properly, so this glitch is still in the final version, hahaha. Again, learn from my mistakes!
You may also want your testers to offer impressions of the characters and stories, opinions, & suggestions. Be sure to get across to your play-testers the sort of feedback it is you want! Perhaps you just want technical feedback and aren’t interested in any sort of critique. Being open to critique will work in your favour though, and help you make your neighbourhood as good as it can be. At the same time, don’t feel obligated to change things if they feel wrong or don’t match your vision! Ultimately you’ll never be able to please everyone, but you can certainly take their opinions on board :)
Releasing for Download
Not much to say here, really! To share it, all you need to do is compress the neighbourhood folder itself into a RAR or ZIP file. When you put it up for download you’ll likely want to list compatibility info, installation instructions, known bugs, recommended or required downloads (if applicable) and some previews of neighbourhood!
How much information you want to give is up to you. You might want to keep things vague so that there are more surprises for the player, or you might want to give them the full facts. Pictures are always helpful, and can entice more players. Here’s Europa’s download post, for reference.
That about wraps things up, I think. I’m sure I haven’t covered everything as there is no end of stuff you can do, methods you can use and ideas you can have - you might even have thought of things I never even considered! But hopefully this guide proves useful to a few people.
Once again, let me know if there’s anything else you’d like information on - I’ll happily edit these posts and might even make new ones if there’s demand. But for now, thanks for reading :)
49 notes
·
View notes
Last Seen Blogs
ahma-art
Would you be so kind as to reblog my art

savannahsapphiresims
Sims 4 CC Finds

weeguttersnipe
wee guttersnipe

hihinnpepe
Erne

thatstoomanysausages
local gay in distress