#if you make the image smaller and the pixels become more pencil drawing-like it feels like a small illustration over a tabletop statline
Photo
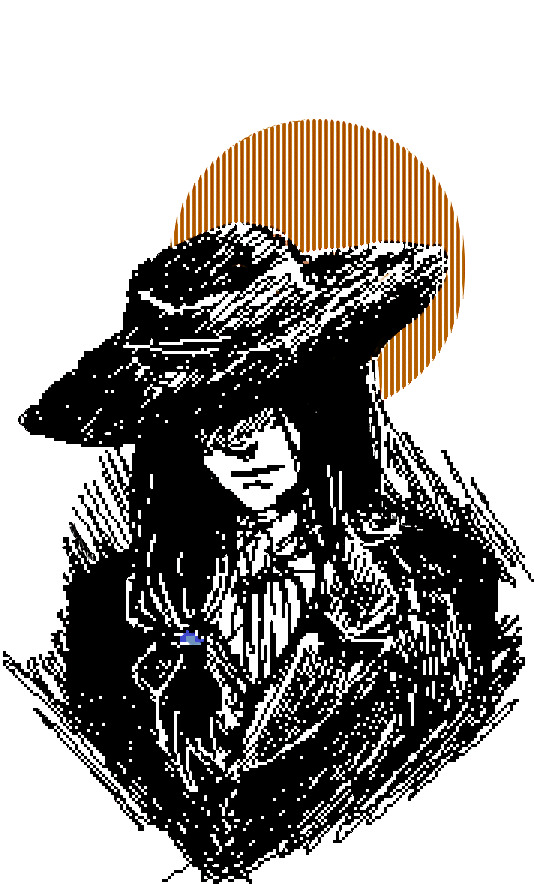
Here we are– you are the first of the 4 in which I completed. MSpaint spooky/thoughtful Cayin doodle. It was fun deciding on what to do. Hope you enjoy, Croc. Hope you don’t mind that I was feeling BB Cayin <3
// AAAAAAAAAAAHHH this is so lovely!! You nail his style perfectly, this came out so cool. Thank you Cat!!
#submission#Your art is always a joy- and when it's about the snake gentleman himself I just feel so lucky ;u; <3#don't mind it being BB Cayin at all! ER may have been my focus lately but I still think a lot about the Victorian snek with a hat#plus you capture him so perfectly#also I have to say I'm a huge fan of your usual artstyle but I also really dig the rougher style of your MSpaint doodles!#this could be a portrait for when you talk to him in a very stylish point-and-click adventure game#the way the lines frame him. The way you incorporate the white into his dark clothing and his overall pose her#is such a cool mood#if you make the image smaller and the pixels become more pencil drawing-like it feels like a small illustration over a tabletop statline#or a quest's description#in other words your art just gets the thoughts in my brain moving and I really like that!#the small touch of the colored bow on his ponytail is a neat detail too#and you know what I kinda love the way that warm sepia-ish tone feels#and you know what I kinda love the way that warm sepia-ish circle in the back could be the moon or the sun depending on how you look at it#because it plays really nicely into the duality of Cayin's shadowy style with the theme of the sun for Yig#gives a bit of an Autumn vibe to the picture too :y#but yes I could go on- love it. Love it to bits 8]#hexenjagd#friend art
9 notes
·
View notes
Text
How to turn a photo into a pencil sketch in Microsoft Word
First, to show you what you’re in for since this’ll be a long post:
Here’s what I ended with
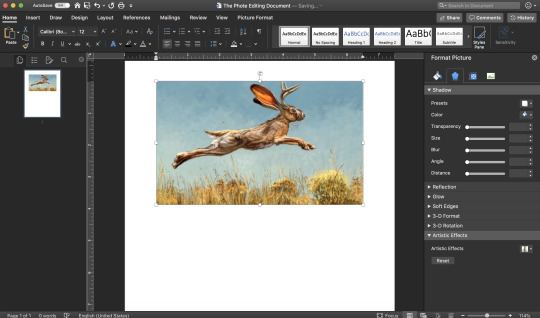
I started out with a picture of a jackalope. You’ll want a picture with a lot of details and a fairly high definition-- no visible pixels. I tried with an axolotl picture earlier and it turned out lame-- too smooth a body
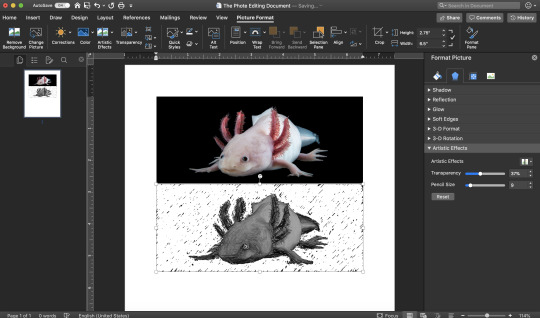
see? that was the best I could do before I gave up.
tutorial below the cut
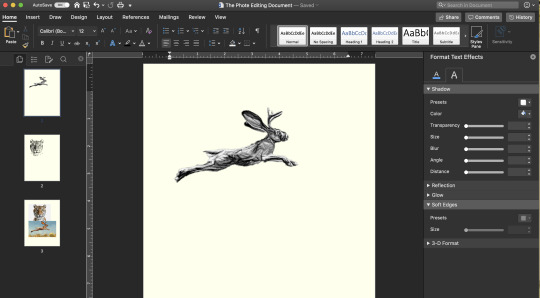
So my first step is removing the background, and this one is the slightly more complicated way of doing it, but in an occupied background you have to
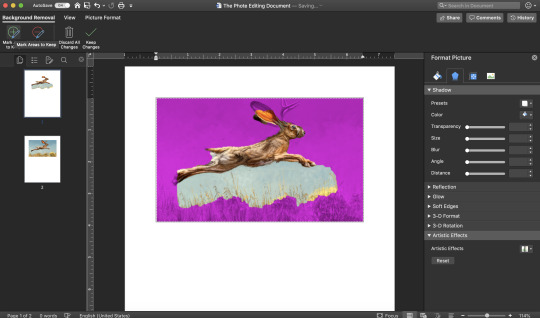
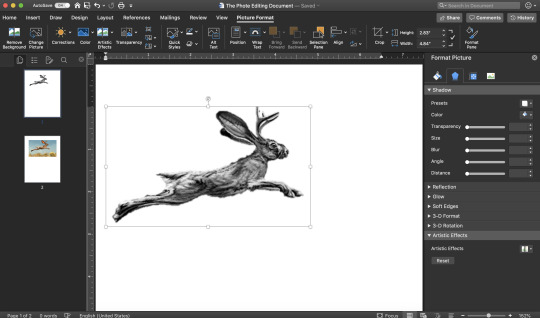
To the side, you can see I copy/pasted the same picture so I could have a ref. So click on picture-> Picture Format-> Remove Background and you get this pink stuff. The pink stuff will become transparent, the stuff that’s white will stay. You have to draw on the picture until it gets it, and warning, this part can be VERY frustrating (I use this tool a lot)

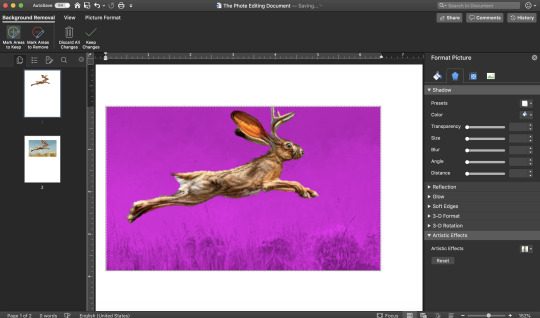
But draw on it until it looks right (You can always press Keep Changes and if it doesn’t look right go back into the tool and fix it)
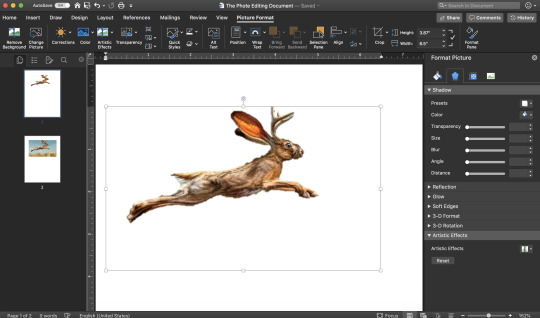
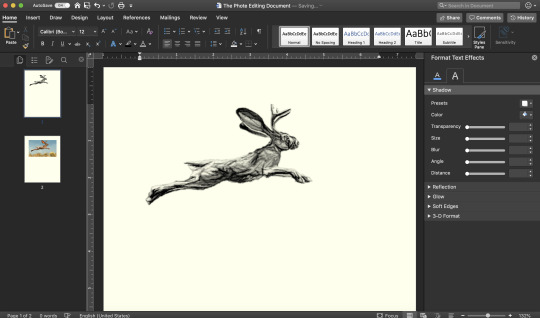
And now it’s just a floating bunny! That in itself is pretty awesome. But we’re sketchi-fying this.
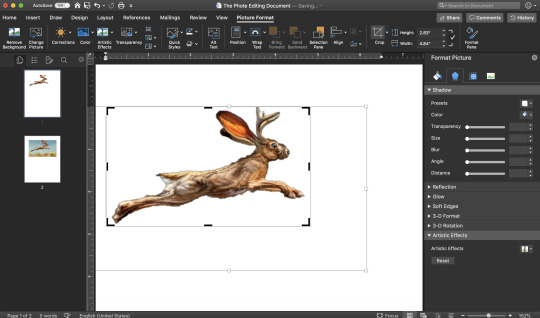
First I usually crop it cuz the new image will usually be smaller

Now, you should grayscale it
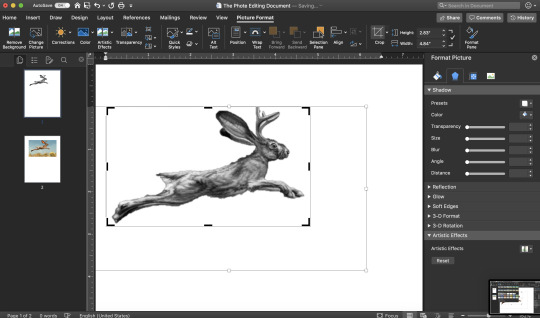
Aw bunny got kinda blurry
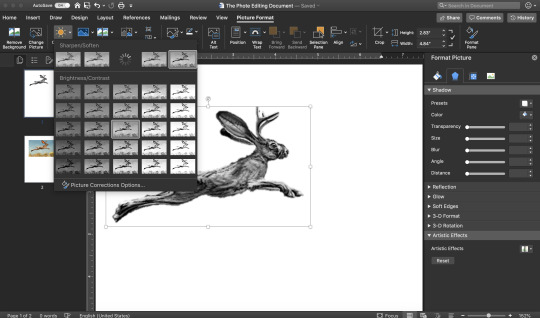
Fix it up in corrections. Sharpen it and fix brightness and contrast. This is always different but play with it until the details are sharp. It’s okay if it looks unrealistic, this is turning it into a drawing.

Okay, so I already have the tool over on the right open, but to get to it yourself click on Artistic Effects Options, and then go to the bottom right where it says Artistic Effects.
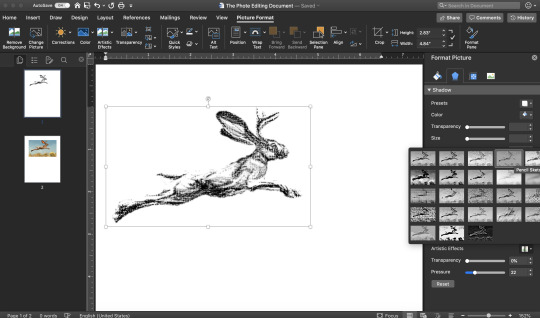
Click the little image thingy and select an effect. The best I’ve found is “Pencil Grayscale” but “Pencil Sketch” also works. It depends on the picture.
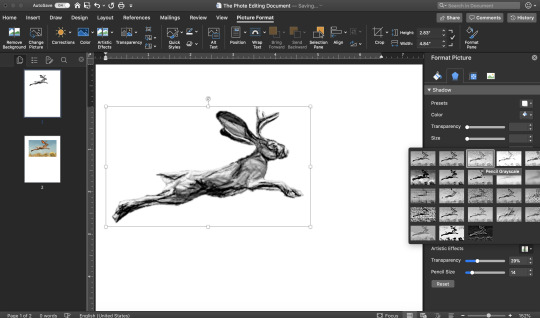
Here’s how they can look different.
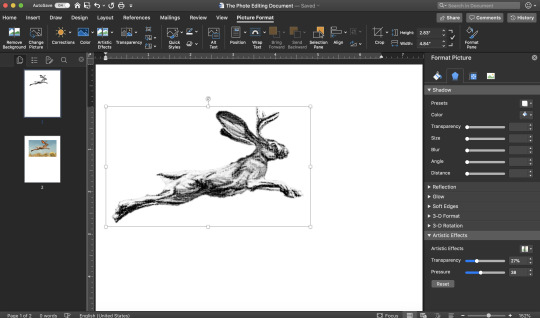
But wait. Those effects were there, why did I have to go to options?
See those two slidy scales? That’s how you get it to look right. FIddle around with the scales until you like how it looks.
Bunny sketch!
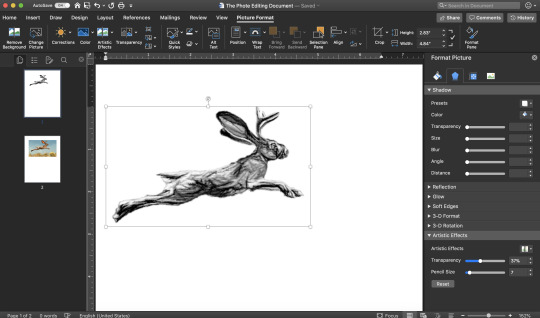
You can be done there but I’m a little crazy. So here I went to Design->Page Color-> and adjusted it to an off-white. So it looks like aged paper.
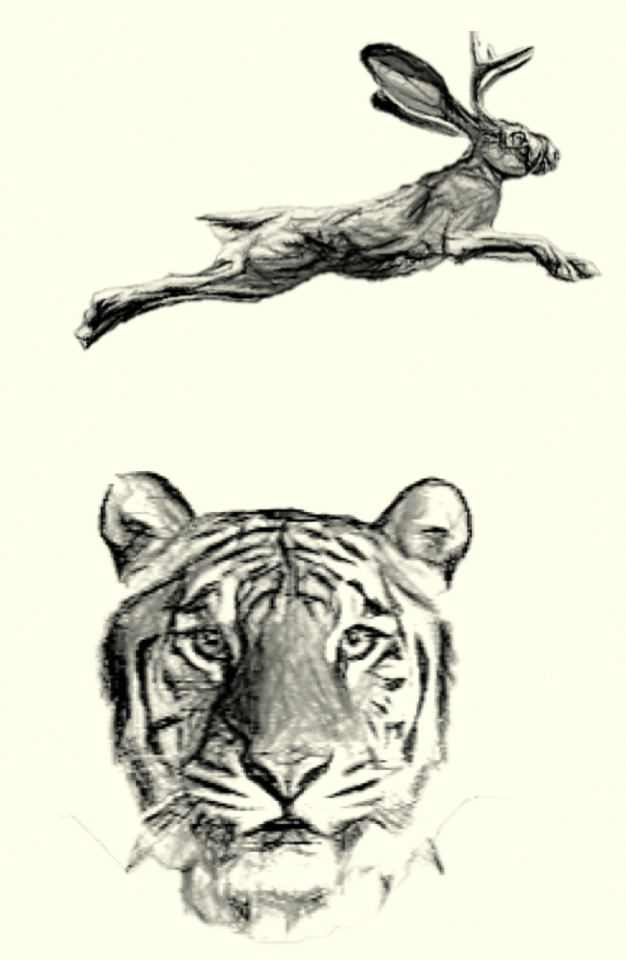
What might happen if you do this is it becomes obvious that there’s white in the image. How’s you get white on yellow paper? (I forgot to take a screenshot when I first did this ignore the tiger to the side)
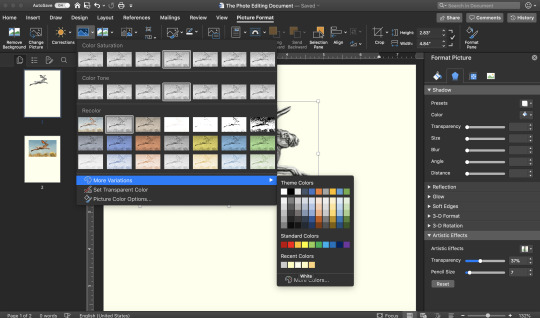
Go back to color->More Variations and click on the same color you used for the background
Now, look at that bunny drawing!
Remember how I said that was the more complicated way to take the background off? When you have a picture with a solid color background like my tiger here

it gets a lot easier
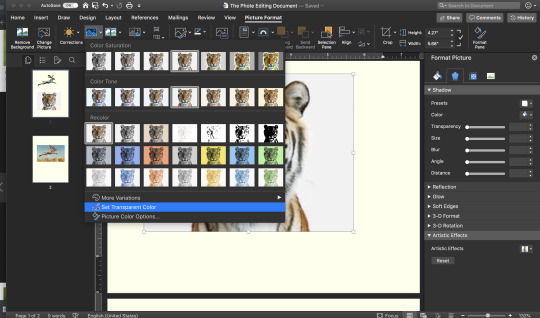
Go back to color, click “set transparent color”
My mouse moved to take the picture. But click on your solid color background
And it’ll make it transparent! This is also useful if at any point the background color stands out from the page.
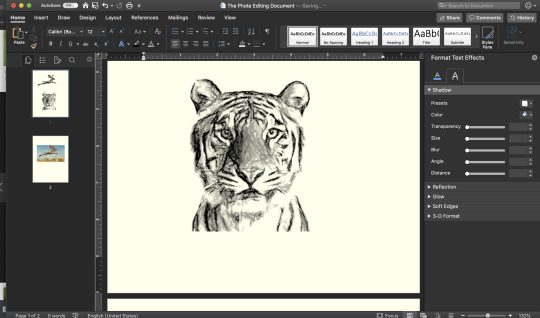
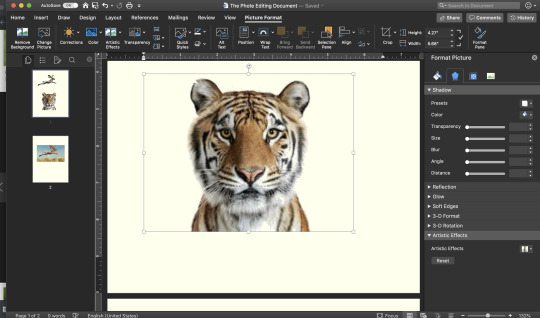
Here’s my sketch. But I don’t like the hard edge along the bottom, you don’t sketch like that. So into Remove background

Yikes, it’s all in his face. But that's okay, that’s just the transparent part, when you exit it looks fine:
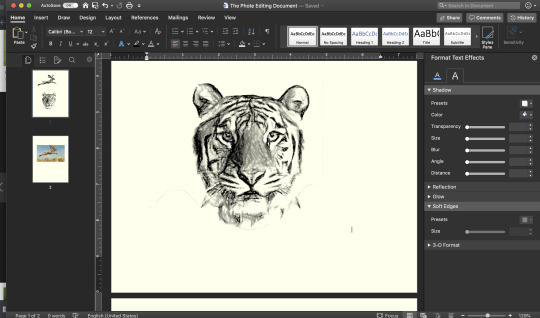
Look at him! He looks great!
And that’s all I got! Hope you enjoyed and learned something! Explore artistic effects, color options-- transparency can also be useful, along with soft edges. Experiment with some of the stuff here, there’s a bunch of different uses!
Oh, if you have trouble positioning your picture on the page, try right click->wrap text-> in front of text (or behind text). If you have that on you can move it anywhere on the page, but if you want text around it you might have to adjust accordingly. The Wrap Text one is good. You can also put it in a textbox.
I’ve been playing with photo editing in Microsoft Word for quite a while now. If you have any questions or want some advice feel free to message me. Oh, and if you do sketchify an image feel free to send it to me I’d love to see!
Have fun!
Jackalope
Tiger
#photo editing#microsoft word#tutorial#microsoft word tutorial#I figured this out making ajournal for a dnd character#and got a little obsessed#Also like#jobs are looking for more microsoft word skills and stuff#exploring some of the options here might help you understand some stuff#I'm so sick of those Ariel sheets with the picture objously just inserted in with no thought for design#not that you have to go that advanced but just the wrap text function looks so much better than the automatic#don't get me started on powerpoints#I used a powerpoint to make projection backgrounds in my theater class and I've got teachers giving me the most basic fill in the blanks#i know they don't have time but there's formats#anyway#hope someone enjoyed/found this useful
3 notes
·
View notes
Text
Information on Digital Illustration
Differences between Pixel and Non-pixel art:
In photoshop, the two main differences between pixel art and non-poxel art is the size of the canvas and the tool you use to draw, this ultimately determines how much detail you'll be able to muster. In a game engine, for example Unity, the differences are bit more pronounced. As I explained in a previous post, pixel art is scaled up by the power of two to keep the sharp lines of the pixel, meaning you can scale it up as far as you'd like and you would have the same image; this doesn't work with drawn art however, because you have no sharp lines in the design at a pixel level, so instead as you scale it up, it will become more and more blurry. This means scaling up is generally out of the picture for drawn art.
When creating drawn artwork, whether it be for video games, posters, movies or whatever application you could think of, you need to create the artwork at the size you need. The most steadfast rule that will actually make sure you experience no issues, is to create the artwork with twice or more the resolution that you'll actually be using, this is because scaling down doesn't ruin an image like scaling up and you end up being able to use the art at a higher resolution. Essentially, it's good to have too much and need less than to have too little and need more.
Using Different Brushes:
The brush is the main tool for drawing and painting in photoshop and it works a tad differently to the pencil. The first difference is scale, the brush is generally used on large canvas while the pencil is mostly used for pixel art on much smaller canvases. Both tools have distinct look to them as well, this due to how photoshop processes visual information. Photoshop is a pixel based program, so everything is made up tiny square, even the largest circles. The pencil tool paints all of these tiny squares with a block colour, while the brush becomes transparent towards the edge, giving it that softer look. Finally the last difference is just how customisable the brush is, the tool is designed to allow you adjust and modify it so you can get the exact brush you desire, whether it be an oil brush or a quickly printable tree.
The internet is filled with different brush sets created by artists who have just tweaked the photoshop options to get their desired results and doing this can give your artwork a unique feel. Though as nice as these options are, they are mostly unnecessary, you can create perfectly acceptable artwork with the default brush alone, as long as you're skilled enough with it.
I personally like to customise the default brush a tiny bit, mostly by changing the rotation slightly and squashing slightly so it creates more of a wedge shape.
The Drawing Tablet:
Thankfully there is an alternative to the nightmare of digitally drawing with a mouse, and that is the digital drawing tablet. These tablets are used to simulate drawing on paper, where the user holds a pen shaped stylus that draws every time the tip of the pen makes contact with the tablet.
These tablets are often pressure sensitive, allowing for the user to create variations in line width depending in how hard they press against tablet. This isn't the only function of the pressure sensitivity thigh, in photoshop it can be linked to the brushes opacity, which then allows shading just like you'd have with a pencil.
Layering Techniques in Photoshop:
Due to photoshop's layer system, drawing your own guides is really simple and is unbelievably useful when it comes to planning out a scene. I will usually create a first layer where I will draw some simple shapes as a guide, whether it be for the enviroment or a character, then I will continue to add layers where the guide will become more defined until it turns into the final drawing, I'll then place all the old guides in a folder and tuck them away incase I need them later.
When adding the colour to a drawing, it's best to keep the colour and the outlines on two separate layers, this means you don't have to be completely worried about colouring inside the lines and it also means the outlines will stay smooth and clean, avoiding that ugly occurrence where the colour covers parts of the outline giving it a very inconsistent width.
Evaluation:
I own my own drawing tablet at home and do a lot of digital drawing, so I was quite happy when I got to incorporate some of that into the project, despite the fact the college's tablets seem to be a lot more sensitive than mine.
Overall, I can't tell which artstyle I prefer, though I think I prefer the pixel art method for the game we'll be making, as it has the potential to he simpler while still looking good. I feel drawn games need a required amount of complexity and detail to be considered good looking games.
0 notes
Text
While the previous generation Samsung Galaxy Tab S6 10.5-inch is more of an Apple iPad Air 10.5 alternative, we are glad to see that Samsung’s flagship tablets, the next generation Galaxy Tab S7 and S7+ are catching up with Apple’s iPad Pro 11 and 12.9 line-up.
Galaxy Tab S7 and S7 plus: Two Sizes
Two Displays vs One to Match Apple’s iPad Pro Offerings
The evidence is in its size. The Tab S7 has an 11-inch LTPS LCD display much like the iPad Pro 11 and the Tab S7+ has a 12.4-inch Super AMOLED display. Both displays packs up to 276 ppi (pixels per inch) with the 12.4-inch having a slightly lower 266 ppi. Plus, both displays also feature rounded corners like the iPad Pros when the Tab S6 had square corners wrapped in narrow bezel and square edge metallic chassis.
It is worth noting that the Galaxy Tab S6 Lite that came out after the Tab S6 comes with a 10.4-inch display with rounded corners. But for cost cutting reason, it uses an LCD panel as oppose to Super AMOLED and is powered by Samsung’s own chip.
It does not stop there, both panels are capable of a high 120Hz response rate. This means instant reaction to motion and no stuttering or jittery effects compared to standard 60Hz display. Gamers will benefit from this when playing high motion games, allowing them to spot everything on the screen. Scrolling will feel smoother with the higher refresh rate and fast action films won’t feel out of place.
Comparing the Two Displays
Galaxy Tab S7 Galaxy Tab S7+ 11-inch 12.4-inch LTPS LCD Super AMOLED WQXGA 2560 x 1600 WQXGA+ 2800 x 1752 500nit Brightness HDR10+ High Dynamic Range 276 Pixel Per Inch 266 Pixel Per Inch DCI-P3 Colour range NTSC Colour range Low Blue Light Certification Eye Care Certification
Galaxy Tab S7 and S7 Plus with Book Cover Keyboard
Faster Processor, Fastest in a Galaxy Tab
But the displays are not the only area that the new generation tablet has improved upon. While previous Tab S6 launched in 2019 spots a Snapdragon 855 chip, these new generation tablets use the groundbreaking Qualcomm Snapdragon 865 Plus mobile platform. This makes them the fastest Galaxy Tabs with 25% faster core performance, 36% faster graphics performance and 77% faster neural performance compared to Galaxy Tab S6.
Both tablets come with standard 6GB memory and 128GB storage. No other storage or memory options available as yet which makes it a no brainer when placing an order. The onboard microSD card slot allows for adding of additional storage should you need this. It is capable of taking memory cards up to 1TB. A must-have for those who capture lots of video and photos and wish to carry their music, TV shows and movie collection.
Gaming and Streaming
Together, the beautiful display and powerful processor makes this a go-to tablet for gaming and streaming movies and TV shows. To complete the who play everything experience, the tablet is equipped with quad speakers pumping out high-quality audio by AKG and support for Dolby Atmos. It is like having your own personal cinema with HDR10+ (High Dynamic Range) and NTSC colour range capable Super AMOLED display on the Galaxy Tab S7+. A true entertainment tablet.
Better Battery Life
Even with all that power, the tablets still manage iPad Pro beating 14 hours on the Tab S7 and 15 hours on the Tab S7+, respectively. Previous generation Tab S6 was already achieving 15 hours on a 10.5-inch form factor. Apple’s iPad Pro on the other hand only manages up to 10 hours of battery life. The Tab S7 has an 8000 mAh capacity battery while the Tab S7+ has a huge 10,090 mAh capacity battery. And, when you are running low, you will be glad to know that Fast Charging is supported but you will need a 45W Fast Charger. This is sold separately.
Dual Rear Camera Setup with Flash
The dual camera setup first featured on Galaxy Tab S6 with 13MP and 5MP sensors are back but this time, these cameras are accompanied by an LED flash on the Galaxy Tab S7 and S7+. The pair of cameras are wide (13MP/F2.2) and ultra wide (5MP/F2.2) which will be sufficient for all manner of photography on the tablet. The cameras are capable of 4K video capture at 30fps and supports mobile photography functions and features like Single Take, Night Mode, Night Hyperlapse, Front and Back Conversion Recording, Scene Optimiser and AR Doodle.
Dimensions and Weight
The Tab S7+ with its 12.4-inch display is slimmer at 5.7mm with an overall dimension of 185.0 x 285.0 x 5.7mm while the smaller Tab S7 with its 11-inch display is 6.3mm thin with an overall dimension of 165.3 x 253.8 x 6.3mm. For reference, iPad Pros measure 5.9mm thin.
Incredibly thin and light, even thinner than the iPad Pro 11 at 5.7mm but the Tab S7+ is a smidge thicker at 6.3mm. With premium anodised aluminium styling and micro-sand blasted finish for a soft buffed texture, it not only looks good but feels nice to touch.
In term of weight, the 12.4-inch model with WiFi weighs 575 grams while the smaller 11-inch model weighs 498 grams, with LTE model weighing 500 grams. Again, for reference, iPad Pro 11 weighs 471 grams (WiFi) and 473 grams (Cellular) while iPad Pro 12.9 weighs 641 grams (WiFi) and 643 grams (Cellular). This makes the Tab S7 heavier than its equivalent and Tab S7+ lighter than its equivalent.
Stylus Included
Even though the Tab S7 and Tab S7+ are already cheaper compared to iPad Pro 11 and iPad Pro 12.9 with 128GB storage, they also come with S Pen included. Which, when compared to Apple Pencil Generation 2 that costs $129 is a huge saving. This on its own is a cost saving and continues to lower the total cost of ownership for the devices, making them much more appealing.
The included S Pen stylus has also received an update, with a promise of low latency, smoother and faster response. You are bound to notice very little lag, a push towards a natural writing and drawing experience. The S Pen air actions or gestures for quick remote control of the apps and navigation on the tablet. And, like the Apple Pencil 2, it will attach magnetically to the back of the tablet when done.
Also Inching Towards a Laptop
With the optional Book Cover Keyboard, sold separately, the new Galaxy Tab S7 and S7+ are also gunning for the hybrid or detachable laptops. With the operating system offering PC-like interface, snap on the keyboard and you get your laptop replacement. The Book Cover Keyboard snaps onto the long edge of the tablet magnetically, coming into contact with the tablet directly, where it gets its power and transfer keystrokes and touchpad.
Book Cover Keyboard All Grown Up: bigger keys and larger touchpad
The optional keyboard has also grown in size, thanks to the increase in display sizes to 11-inch and 12.4-inch. This means the keys are 26% bigger and the key pitch, the space between the absolute center of two keys are also wider apart at 18.3mm. This makes for more ergonomic and comfortable typing. Furthermore, the integrated kickstand on the Book Cover Keyboard offers up to 165° of working angle using a free stop hinge.
Book Cover Keyboard Working Angles
In addition to that, the touchpad is now 42% or 63% larger depending on the keyboard you pick for your device, S7 or S7+ compared to Galaxy Tab S6. This makes multi-finger gestures easier on a more spacious touchpad. Also, on the top of the keyboard a function keys, all 16 of them supporting different intuitive shortcuts that are aligned with Samsung Windows PC and include both Android and Samsung DeX specific keys.
Galaxy Tab S7 Bigger Keys and TrackPad
Always On Connectivity Options
While both tablets are available with WiFi, you can choose cellular options too. Pick either 4G LTE or 5G mobile connectivity options based on the size of the tablet. The Galaxy Tab S7 comes with a 4G LTE cellular model. On the other hand, the Galaxy Tab S7+ comes with a 5G cellular option for always on connectivity. You will never be out of an Internet range. Something that Apple is still very much behind.
Galaxy Tab S7 plus supports 5G
Final Thoughts
What is missing is the onscreen optical fingerprint scanner located on the bottom middle section of the screen in portrait mode, for quick unlock. Also, the previous generation Tab S6 had a second configuration option with 8GB memory and 256GB storage and still support up to 1TB extra storage via SD card slot. Hopefully, more memory and storage options will become available post launch. Remember, the Galaxy Tab S7 Book Cover and Keyboard are sold separately so remember to budget for those if you wish for maximum versatility in using the tablet.
Elsewhere there is mention of Daily Board, a smart home dashboard that lets you manage and control smart appliances including the use of a scheduler and memo board. Like the Tab S6, the new generation tablet will also pair with your smartphone for calls and texts. With the LTE and 5G options, you also get Auto Hotspot, a one-touch tethering feature that turns your tablet instantly into a WiFi router for Internet connectivity. Samsung is also catching up with Apple’s AirDrop feature with their own Quick Share function to easily share files to nearby devices simultaneously.
Both Samsung Galaxy Tab S7 and S7+ are available in black, silver or bronze. In each colour that it comes in, advanced dual colour anodising technique is used to ensure that the shades and hues endure. Making them robust to the daily grind while at the same time, stylish. It uses exquisite aluminum textures created by polycrystalline diamonds, with a micro-sand blasted finish soft to the touch.
App Screens Gallery
We leave you with an image gallery showcasing the different app screens.
#gallery-0-4 { margin: auto; } #gallery-0-4 .gallery-item { float: left; margin-top: 10px; text-align: center; width: 33%; } #gallery-0-4 img { border: 2px solid #cfcfcf; } #gallery-0-4 .gallery-caption { margin-left: 0; } /* see gallery_shortcode() in wp-includes/media.php */
Annotate – Mark Up PDFs
Export to Office Apps
Samsung Notes Sync
Samsung Galaxy Tab S7 & S7+ Catching Up With Apple iPad Pro 11 & 12.9 and more While the previous generation Samsung Galaxy Tab S6 10.5-inch is more of an Apple iPad Air 10.5…
0 notes
Text
The New Apple iPad Pro Evolves Into An Essential For Designers
If you’re already using an Apple iPad, initial improvements delivered by the new Apple 10.5-inch iPad Pro can seem deceptively skin deep. Sure, there’s a larger 10.5-inch screen size, a truly Goldilocks “just right” screen outfitted with a 120Hz refresh rate, illuminated up to 600 nits of brightness, and displaying a wider gamut of colors with True Tone technology for crisp graphic acuity. And inside a new 64-bit A10X Fusion chip with six cores fits within the iPad Pro’s 6.1mm thin case, pushing everything fast, fast, and faster with nary a hiccup. It’s all quite expected, and in sum, results in simply the best iPad we’ve ever tested.
All of these improvements, however welcome (alongside numerous other smaller hardware tweaks, like the most instantaneous TouchID sensor we’ve ever tested) presents a register of unsurprising evolutionary upgrades in comparison to an already solid iPad experience. That’s been the real dilemma for Apple: the iPad has long been a capable and durable device hampered by the limitations of its operating system, one that has never really warranted immediate upgrades on an annual cycle (or even every 3 years). iPad users have a tendency to hold onto their iOS-powered portables for years, satisfied enough with its capabilities even in the face of ever improving screens and chips, or even with the promise of expanded utility offered by the likes of the genuinely capable Apple Pencil.
iOS 11 now includes a feature called Instant Markup, which allows notes to be added onto screenshots and PDFs using the Apple Pencil.
Fortunately, Apple is finally offering a substantive pivotal upgrade, one directed toward the professionals who’ve always most defined Apple’s core culture: designers. iOS 11, the yet-to-be released mobile device operating system, is aimed squarely at improving nearly everything about the iPad Pro (and iPhone, to a lesser degree), unlocking many of the features users have long clamored for: multi-tasking, file management, on-screen annotations, drag-and-drop, and even a dock that makes the iPad feel a little closer to the computer versus a plain ol’ tablet.
Now several months into using iOS 11 Beta, we’re convinced Apple is finally catering to graphic designers, architects, illustrators, and other creatives who operate siloed within a single app, but tend to cross-pollinate ideas and projects across numerous apps and applications throughout the day. What we have now is a tandem effort merging improved hardware with an even more improved operating system that works for, instead of against, the intentions and needs of professionals.
For example, iOS 11 now allows users to select a multitude of files to attach to an email or text using multi-touch. For designers who are perpetually sending images for review and approval, this small yet significant change is a game-changer. Drag-and-drop is fully systemwide, accessible from the Home screen, Dock, Reminders, Calendar, Messages, Search, Files app, Safari, Contacts, iBooks, News, Notes, Photos, Maps, Keynote, Pages, and Numbers. We fully expect shortly after iOS 11’s official launch just around the corner, we’ll see this Developer API supported feature become standard across all apps.
Apple has also changed how iOS handles switching and swiping away apps, taking advantage of the larger screens offered by the new iPad Pro models, also merging the Control Center GUI onto the right for one-stop access. Strangely, this was the feature that took the most getting used to after switching from iOS 10 to 11, attributed to some swipe-up sluggishness.
Normally we’re not prone to recommend others to switch to non-final software, especially operating systems. But in this particular case the benefits delivered by iOS 11 Beta to iPad owners far outweigh the few issues we’ve seen across every incremental update of iOS 11’s Beta phase. Multi-tasking apps into split view, list view of files, and the ability to drag and drop photos and text into other apps all add up to a transformative experience that finally answers the wishes of anyone who has muttered, “If only the iPad could…”.
Just. Download. It.
Even if you’re not planning to jump onto the iPad Pro or iOS 11 upgrade bandwagon yet, there is an ever increasing list of apps designed to help the creative set create rather than consume. The baker’s dozen list below contains some of our current favorite picks for architects and interior designers (many that I’ve loaded/tested while researching apps for a local landscape architecture firm). Those updated with features specific to the new iPad Pro below are noted:
Archisketch, Sketch and Doodle to Scale
A scale-aware sketching program ideal for architects, interior and landscape designers, product designers, design students or anyone working with design on the iPad. Archisketch supports Apple Pencil. Draw to scale and layer over your sketch to further develop your ideas. Visualize your ideas in 3D and use smart one- and two-point perspectives.
AutoCAD – DWG Viewer & Editor
The official AutoCAD mobile app by Autodesk features easy-to-use drawing and drafting tools that allow you to view, create, edit and share AutoCAD drawings. You can upload and open 2D DWG drawings and view all aspects of your DWG file, including external references, layers and image underlays.
youtube
Autodesk FormIt by Autodesk
Autodesk FormIt is a mobile powerhouse solution designed to conceptualize digitally using the iPad and Apple Pencil, one that really benefits from the extra pixel pushing horsepower of these new iPad Pro models. Formit uses real-world site information to help create forms in context and support early design decisions with real building data. Experience a continuous Building Information Modeling (BIM) workflow by synchronizing designs in the cloud for further refinement using Autodesk Revit software products and other applications.
BIMx – Building Information Model eXplorer by GRAPHISOFT
GRAPHISOFT has yet to optimize this BIM communication tool for iOS 11, but users praise the app’s ‘Hyper-model BIMx’ technology for navigating plans and 3D construction models to “share with clients…including the VR features” for on site collaboration and decision making.
Concepts – Sketch, Design and Illustrate *optimized for the new iPad Pro
Concepts intelligently combines sketching with powerful vector manipulation. Optimized for iPad Pro with Apple Pencil, you can bring the power of CAD to your sketches through multi-touch shape guides, automatic measurements and snap-to sketching. It now takes advantage of ProMotion on the new iPad Pro and the native resolution of the 10.5-inch iPad Pro.
Morpholio Trace – Sketch & Design for Architects *optimized for the new iPad Pro
Designed for architects, Trace is best for times when a project requires layered additions to existing photos, images, or background templates, building markups or ideas to generate immediate, intelligent sketches in the app. All ready for a hardware upgrade, Trace is optimized for the native resolution of the 10.5-inch iPad Pro.
youtube
Morpholio Journal: Design & Architect Sketchbook *optimized for the new iPad Pro
Like to journal? Morpholio’s updated app is designed to record, organize, sketch and brainstorm ideas along with photos, images or text to capture and develop your most important thoughts, the entire app optimized for the native resolution of the 10.5-inch iPad Pro. The app includes an array of drawing and writing tools including pens, pencils and paint to capture those first few ideas to use as a springboard.
Morpholio Board: Interior Design, Decor, Moodboard *optimized for the new iPad Pro
A tool now optimized for the native resolution of the 10.5-inch iPad Pro for any creative process or presentation, Morpholio Board allows users to effortlessly layout, collage and illustrate with a series of photos, images, sketches and annotations to generate beautiful and informative boards that are easy to share.
Onshape
Built from scratch for the way today’s engineers, designers, and manufacturers work, Onshape allows you to use intuitive sketch tools, build 3D geometry and interactive assemblies. Fully optimized for Apple Pencil, use it to zoom in on small features, sketch select and interact with 3D models. All designs are stored securely in the cloud and are always up-to-date. Share your Documents with others and work on the same parts and assemblies in real-time with the push of a button.
PlanGrid – Construction Blueprints and Punch Lists
Instantly share construction plans, markups, photos, and reports with your entire project team, right from your iPad. PlanGrid keeps everyone on the current set and manages all your construction documents without relying on paper.
Procreate *optimized for the new iPad Pro
The standard by which all illustration apps are measured against, this powerful sketching, painting and illustration app continues to improve with every hardware/iOS release. Procreate features ground-breaking canvas resolution, 128 brushes and an advanced layer system. It now takes advantage of ProMotion on the new iPad Pro, which makes drawing with Apple Pencil feel even more natural.
youtube
Shapr3D *optimized for the new iPad Pro
A mobile CAD app designed to take advantage of the iPad Pro’s power and the input flexibility offered by the Apple Pencil to create and manipulate 3D models. Great for engineers, industrial designers, 3D hobbyists and architects. Optimized for ProMotion included with the new iPad Pro.
uMake – 3D Sketch, Design, Modeling
Developed around the idea that modeling in 3D should be easy for everyone, uMake lets you create in 3D space in an entirely new way—by simply sketching. Together with iPad Pro and Apple Pencil, uMake allows you to do 3D modeling, graphic design and engineering concepts. Create with vector based NURBS curves and surfaces, and export files to use with other CAD apps.
Are you an architect, landscape designer, or interior designer who uses the iPad professionally? Which apps do you recommend? And what do you still think needs to be improved?
via http://design-milk.com/
from WordPress https://connorrenwickblog.wordpress.com/2017/09/01/the-new-apple-ipad-pro-evolves-into-an-essential-for-designers/
0 notes
Last Seen Blogs

soup-bug
Soup Bug

pumpkinsartblog
PumpkinHuntsman's art blog

rigrub
Hello there

sounknowngiver
Untitled

pixsonas
p i x s o n a s