#inout scripts
Explore tagged Tumblr posts
Visit Tumblr Blog
Explore Tumblr blogs with no restrictions, modern design and the best experience.
Last Seen Tumblr Blogs


Fun Fact
Forty percent of Tumblr users are between the ages of 18 to 25.
Photo

Inout Blockchain FiatExchanger - Secure and Safe Cryptocurrency Exchange Script.
0 notes
Link
Inout Search Engine Script
0 notes
Text
In this guide we shall cover the installation, configuration and usage of MariaDB 10.8 on CentOS 7 / RHEL 7. MariaDB is a ‘drop in’ replacement for MySQL. At the time of its launch, it was 99.9% compatible, and essentially a branch of MySQL. But logically, over time, the two database management systems have diverged and now there are hundreds of incompatibilities between MySQL and MariaDB databases. MariaDB is the default database solution in CentOS 7 / RHEL 7 Linux systems. This guide should only be used for new installations and not for upgrading from an older release of MariaDB server. Also note this guide is applicable for single node database server setups using MariaDB. If you’re interested in a highly available, multi-node deployment, consider using MariaDB Galera Cluster setup. Some of the good features and improvements in MariaDB 10.8 are; InnoDB redo log improvements – autosize innodb_buffer_pool_chunk_size and Improve the redo log for concurrency Lag free ALTER TABLE in replication – ALTER TABLE now gets replicated and starts executing on replicas when it starts executing on the primary, not when it finishes. Auto create partition – You can now use an AUTO keyword to inform the server to create more history partitions automatically JSON Histograms – Histograms in the statistics tables are more precise and stored as JSON, not binary Descending indexes – Individual columns in the index can now be explicitly sorted in the ascending or descending order. Spider Storage Engine Improvements – You can now declare Spider connections using the REMOTE_SERVER, REMOTE_DATABASE, and REMOTE_TABLE attributes and not abuse the COMMENT field for that. mysqlbinlog GTID support – mariadb-binlog (previously mysqlbinlog) now supports both filtering events by GTID ranges through –start-position and –stop-position, and validating a binary log’s ordering of GTIDs through –gtid-strict-mode Improved i18n support on Windows – On Windows 10+ systems, several problems with Unicode input and output in client were fixed Stored Procedures INOUT Parameters – Added support support for IN, OUT and INOUT parameter qualifiers And many Misc. features added as well Install MariaDB 10.8 on CentOS 7 / RHEL 7 The steps provided in this section should help you with the installation, configuration and usage of MariaDB 10.8 on CentOS 7 / RHEL 7 Linux. The installation will fail if you have any other MySQL based database management system on your OS. Ensure the system is clean before you proceed with this guide. Update and reboot your system. sudo yum -y update sudo reboot -f Wait for your system to be rebooted then start the installation using the next step. Step 1) Add MariaDB YUM repository We’ll use official MariaDB YUM repository for RHEL based systems which is added by running the following commands. curl -LsS -O https://downloads.mariadb.com/MariaDB/mariadb_repo_setup sudo bash mariadb_repo_setup --mariadb-server-version=10.8 The script automates the process of setting up repository and importing MariaDB GPG keys. [info] Checking for script prerequisites. [info] Repository file successfully written to /etc/yum.repos.d/mariadb.repo [info] Adding trusted package signing keys... /etc/pki/rpm-gpg ~ ~ [info] Successfully added trusted package signing keys [info] Cleaning package cache... Loaded plugins: fastestmirror Cleaning repos: base droplet-agent extras mariadb-main mariadb-maxscale mariadb-tools updates Cleaning up list of fastest mirrors List all available repositories on the system $ sudo yum clean all $ sudo yum repolist Loaded plugins: fastestmirror Loading mirror speeds from cached hostfile * base: packages.oit.ncsu.edu * extras: mirror.facebook.net * updates: mirrors.tripadvisor.com repo id repo name status
base/7/x86_64 CentOS-7 - Base 10072 droplet-agent/x86_64 DigitalOcean Droplet Agent 11 extras/7/x86_64 CentOS-7 - Extras 512 mariadb-main MariaDB Server 84 mariadb-maxscale MariaDB MaxScale 4 mariadb-tools MariaDB Tools 16 updates/7/x86_64 CentOS-7 - Updates 4050 repolist: 14749 Step 2) Install MariaDB 10.8 on CentOS 7 / RHEL 7 MariaDB 10.8 packages are available on the repo we just added. Let’s install server and client packages. sudo yum install MariaDB-server MariaDB-client MariaDB-backup Confirm the version of MariaDB server and client packages being installed and proceed if okay. Dependencies Resolved ====================================================================================================================================================================================================== Package Arch Version Repository Size ====================================================================================================================================================================================================== Installing: MariaDB-backup x86_64 10.8.3-1.el7.centos mariadb-main 7.0 M MariaDB-client x86_64 10.8.3-1.el7.centos mariadb-main 15 M MariaDB-compat x86_64 10.8.3-1.el7.centos mariadb-main 2.2 M replacing mariadb-libs.x86_64 1:5.5.68-1.el7 MariaDB-server x86_64 10.8.3-1.el7.centos mariadb-main 26 M Installing for dependencies: MariaDB-common x86_64 10.8.3-1.el7.centos mariadb-main 81 k boost-program-options x86_64 1.53.0-28.el7 base 156 k galera-4 x86_64 26.4.11-1.el7.centos mariadb-main 9.9 M libaio x86_64 0.3.109-13.el7 base 24 k
libpmem x86_64 1.5.1-2.1.el7 base 59 k lsof x86_64 4.87-6.el7 base 331 k pcre2 x86_64 10.23-2.el7 base 201 k perl x86_64 4:5.16.3-299.el7_9 updates 8.0 M perl-Carp noarch 1.26-244.el7 base 19 k perl-Compress-Raw-Bzip2 x86_64 2.061-3.el7 base 32 k perl-Compress-Raw-Zlib x86_64 1:2.061-4.el7 base 57 k perl-DBI x86_64 1.627-4.el7 base 802 k perl-Data-Dumper x86_64 2.145-3.el7 base 47 k perl-Encode x86_64 2.51-7.el7 base 1.5 M perl-Exporter noarch 5.68-3.el7 base 28 k perl-File-Path noarch 2.09-2.el7 base 26 k perl-File-Temp noarch 0.23.01-3.el7 base 56 k perl-Filter x86_64 1.49-3.el7 base 76 k perl-Getopt-Long noarch 2.40-3.el7 base 56 k perl-HTTP-Tiny noarch 0.033-3.el7 base 38 k perl-IO-Compress noarch 2.061-2.el7 base 260 k perl-Net-Daemon noarch 0.48-5.el7 base 51 k perl-PathTools x86_64 3.40-5.el7 base 82 k perl-PlRPC noarch 0.2020-14.el7 base 36 k perl-Pod-Escapes noarch 1:1.
04-299.el7_9 updates 52 k perl-Pod-Perldoc noarch 3.20-4.el7 base 87 k perl-Pod-Simple noarch 1:3.28-4.el7 base 216 k perl-Pod-Usage noarch 1.63-3.el7 base 27 k perl-Scalar-List-Utils x86_64 1.27-248.el7 base 36 k perl-Socket x86_64 2.010-5.el7 base 49 k perl-Storable x86_64 2.45-3.el7 base 77 k perl-Text-ParseWords noarch 3.29-4.el7 base 14 k perl-Time-HiRes x86_64 4:1.9725-3.el7 base 45 k perl-Time-Local noarch 1.2300-2.el7 base 24 k perl-constant noarch 1.27-2.el7 base 19 k perl-libs x86_64 4:5.16.3-299.el7_9 updates 690 k perl-macros x86_64 4:5.16.3-299.el7_9 updates 44 k perl-parent noarch 1:0.225-244.el7 base 12 k perl-podlators noarch 2.5.1-3.el7 base 112 k perl-threads x86_64 1.87-4.el7 base 49 k perl-threads-shared x86_64 1.43-6.el7 base 39 k socat x86_64 1.7.3.2-2.el7 base 290 k Transaction Summary ====================================================================================================================================================================================================== Install 4 Packages (+42 Dependent packages) Total download size: 73 M Is this ok [y/d/N]: y With the rpm command package details can be queried. $ rpm -qi MariaDB-server Name : MariaDB-server Version : 10.8.3 Release : 1.el7.centos Architecture: x86_64 Install Date: Wed Jul 13 22:21:21 2022
Group : Applications/Databases Size : 129149443 License : GPLv2 Signature : DSA/SHA1, Thu May 19 12:55:05 2022, Key ID cbcb082a1bb943db Source RPM : MariaDB-server-10.8.3-1.el7.centos.src.rpm Build Date : Wed May 18 13:26:15 2022 Build Host : centos74-amd64 .... Step 3) Configure MariaDB 10.8 on CentOS 7 / RHEL 7 Start and enable mariadb database service $ sudo systemctl enable --now mariadb Created symlink /etc/systemd/system/multi-user.target.wants/mariadb.service → /usr/lib/systemd/system/mariadb.service. Check service status if it’s indeed running. $ systemctl status mariadb ● mariadb.service - MariaDB 10.8.3 database server Loaded: loaded (/usr/lib/systemd/system/mariadb.service; enabled; vendor preset: disabled) Drop-In: /etc/systemd/system/mariadb.service.d └─migrated-from-my.cnf-settings.conf Active: active (running) since Wed 2022-07-13 22:23:07 UTC; 24s ago Docs: man:mariadbd(8) https://mariadb.com/kb/en/library/systemd/ Process: 8189 ExecStartPost=/bin/sh -c systemctl unset-environment _WSREP_START_POSITION (code=exited, status=0/SUCCESS) Process: 8163 ExecStartPre=/bin/sh -c [ ! -e /usr/bin/galera_recovery ] && VAR= || VAR=`cd /usr/bin/..; /usr/bin/galera_recovery`; [ $? -eq 0 ] && systemctl set-environment _WSREP_START_POSITION=$VAR || exit 1 (code=exited, status=0/SUCCESS) Process: 8161 ExecStartPre=/bin/sh -c systemctl unset-environment _WSREP_START_POSITION (code=exited, status=0/SUCCESS) Main PID: 8174 (mariadbd) Status: "Taking your SQL requests now..." CGroup: /system.slice/mariadb.service └─8174 /usr/sbin/mariadbd Jul 13 22:23:07 centos7.example.io mariadbd[8174]: 2022-07-13 22:23:07 0 [Note] InnoDB: File './ibtmp1' size is now 12.000MiB. Jul 13 22:23:07 centos7.example.io mariadbd[8174]: 2022-07-13 22:23:07 0 [Note] InnoDB: log sequence number 45505; transaction id 14 Jul 13 22:23:07 centos7.example.io mariadbd[8174]: 2022-07-13 22:23:07 0 [Note] Plugin 'FEEDBACK' is disabled. Jul 13 22:23:07 centos7.example.io mariadbd[8174]: 2022-07-13 22:23:07 0 [Note] InnoDB: Loading buffer pool(s) from /var/lib/mysql/ib_buffer_pool Jul 13 22:23:07 centos7.example.io mariadbd[8174]: 2022-07-13 22:23:07 0 [Note] Server socket created on IP: '0.0.0.0'. Jul 13 22:23:07 centos7.example.io mariadbd[8174]: 2022-07-13 22:23:07 0 [Note] Server socket created on IP: '::'. Jul 13 22:23:07 centos7.example.io mariadbd[8174]: 2022-07-13 22:23:07 0 [Note] InnoDB: Buffer pool(s) load completed at 220713 22:23:07 Jul 13 22:23:07 centos7.example.io mariadbd[8174]: 2022-07-13 22:23:07 0 [Note] /usr/sbin/mariadbd: ready for connections. Jul 13 22:23:07 centos7.example.io mariadbd[8174]: Version: '10.8.3-MariaDB' socket: '/var/lib/mysql/mysql.sock' port: 3306 MariaDB Server Jul 13 22:23:07 centos7.example.io systemd[1]: Started MariaDB 10.8.3 database server. ... Client version checking with mariadb command: $ mariadb -V mariadb Ver 15.1 Distrib 10.8.3-MariaDB, for Linux (x86_64) using readline 5.1 Use the mariadb-secure-installation script to secure your MariaDB database server $ sudo mariadb-secure-installation NOTE: RUNNING ALL PARTS OF THIS SCRIPT IS RECOMMENDED FOR ALL MariaDB SERVERS IN PRODUCTION USE! PLEASE READ EACH STEP CAREFULLY! In order to log into MariaDB to secure it, we'll need the current password for the root user. If you've just installed MariaDB, and haven't set the root password yet, you should just press enter here. Enter current password for root (enter for none): OK, successfully used password, moving on... Setting the root password or using the unix_socket ensures that nobody can log into the MariaDB root user without the proper authorisation. You already have your root account protected, so you can safely answer 'n'. Switch to unix_socket authentication [Y/n] y Enabled successfully! Reloading privilege tables.. ... Success! You already have your root account protected, so you can safely answer 'n'.
Change the root password? [Y/n] y New password: Re-enter new password: Password updated successfully! Reloading privilege tables.. ... Success! By default, a MariaDB installation has an anonymous user, allowing anyone to log into MariaDB without having to have a user account created for them. This is intended only for testing, and to make the installation go a bit smoother. You should remove them before moving into a production environment. Remove anonymous users? [Y/n] y ... Success! Normally, root should only be allowed to connect from 'localhost'. This ensures that someone cannot guess at the root password from the network. Disallow root login remotely? [Y/n] y ... Success! By default, MariaDB comes with a database named 'test' that anyone can access. This is also intended only for testing, and should be removed before moving into a production environment. Remove test database and access to it? [Y/n] y - Dropping test database... ... Success! - Removing privileges on test database... ... Success! Reloading the privilege tables will ensure that all changes made so far will take effect immediately. Reload privilege tables now? [Y/n] y ... Success! Cleaning up... All done! If you've completed all of the above steps, your MariaDB installation should now be secure. Thanks for using MariaDB! Access to MariaDB shell should only be possible with a password $ mysql -u root ERROR 1698 (28000): Access denied for user 'root'@'localhost' $ mysql -u root -p Enter password: Welcome to the MariaDB monitor. Commands end with ; or \g. Your MariaDB connection id is 14 Server version: 10.8.3-MariaDB MariaDB Server Copyright (c) 2000, 2018, Oracle, MariaDB Corporation Ab and others. Type 'help;' or '\h' for help. Type '\c' to clear the current input statement. MariaDB [(none)]> SELECT VERSION (); +----------------+ | VERSION () | +----------------+ | 10.8.3-MariaDB | +----------------+ 1 row in set (0.000 sec) Step 4) Create a test database/user in MariaDB We can create a test database with the command below: MariaDB [(none)]> CREATE DATABASE mydb; Query OK, 1 row affected (0.001 sec) Check if the database has been created by showing all available databases. MariaDB [(none)]> SHOW DATABASES; +--------------------+ | Database | +--------------------+ | information_schema | | mysql | | performance_schema | | sys | | mydb | +--------------------+ 5 rows in set (0.000 sec) If this setup process progressed as anticipated you should have MariaDB 10.8 installed and running on CentOS 7 / RHEL 7 server or Desktop machine. If you encounter any issues let us know in the comments section.
0 notes
Text
Outlines via Postprocessing
One of my favourite postprocessing effects are outlines. Doing outlines via postprocessing has many advantages. It’s better at detecting edges than the alternative (inverted hull outlines) and you don’t have to change all of your materials to give them the outline effect.
To understand how to create outlines via postprocessing it’s best to have understood how to get access to the depth and normals of the scene first: https://ronja-tutorials.tumblr.com/post/175679764562/postprocessing-with-the-normal-texture

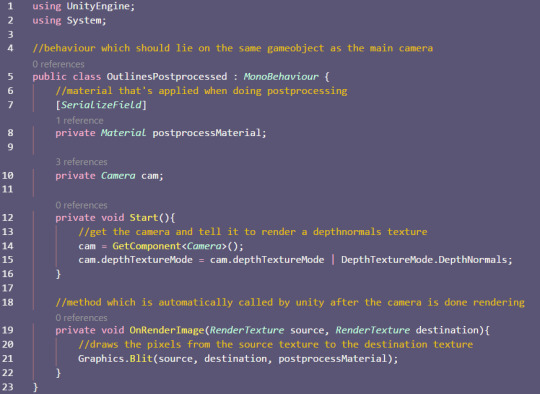
We start with the shader and C# script from the postprocessing with normals tutorial.
The first changes we make is to remove properties and variables which were specific to the “color on top” shader. So the cutoff value and the color. We also remove the view to world matrix, because we our outlines don‘t have a specific rotation in the world so we can ignore it. Then we remove all of the code after the part where we calculate the depth and normals.


Then we remove the part where we write the camera matrix to the shader from our C# script.

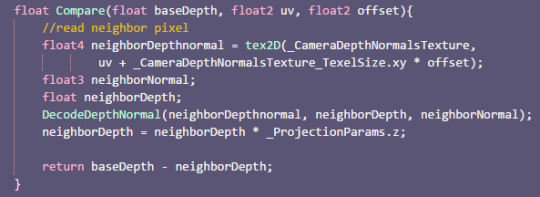
The way we’re going to calculate the outlines is that we’re going to read from several pixels around the pixel we’re rendering and calculate the difference in depth and normals to the center pixel. The more different they are, the stronger the outline is.
To calculate the position of the neighboring pixels we need to know how big one pixel is. Luckily we can simply add a variable with a specific name and unity tells us the size. Because technically we’re working with texture pixels, it’s called the texelsize.
We can simply create a variable called texturename_TexelSize for any texture and get the size.

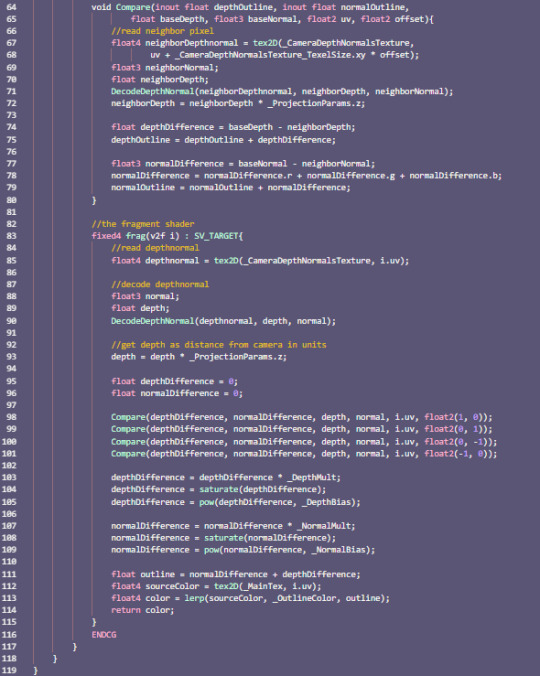
Then we copy the code for accessing the depth and normals, but change the names and we access the texture slightly to the right.

Now that we have two samples we can calculate the difference and draw it to the screen.


With this we can already see the outlines on the left side of the objects. Before we proceed with the next sample, I’d like to put the code for reading the sample and comparing it to the center values into a separate function so we don’t have to write it 4 times. This function needs the depth of the center pixel, the uv coordinates of the center pixel and the offset as arguments. We will define the offset in pixels because that’s the easiest for us to read.
So we simply copy the code from our fragment function to the new method and replace the depth and uv names with the names of the fitting arguments. To use the offset, we multiply it with the x and y coordinates of the texel size and then add the result to the uv coordinates just like previously.
After we set up the new method we call it in the fragment method and draw the result to the screen.

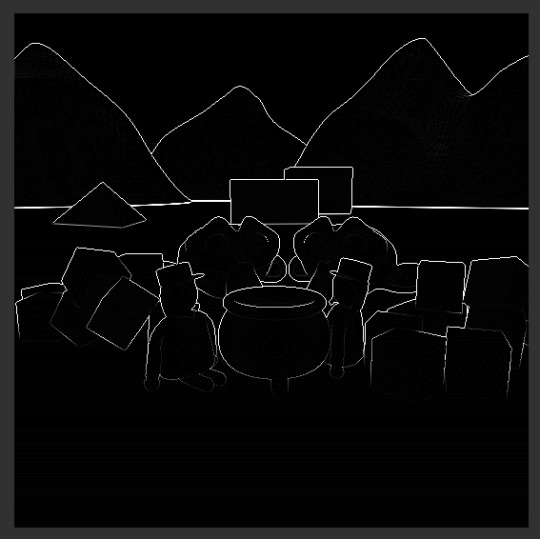
The result should look exactly like previously, but now it’s way easier to expand the shader to read samples in multiple directions. So we sample the pixels up, right and down too and add the results of all samples together.

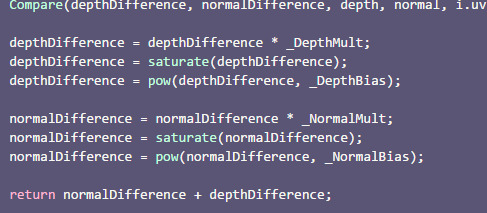
Using the depth already gives us pretty good outlines, but we can go further by also using the normals provided to us. We will also sample the normals in our compare function, but function can only return one value in hlsl so we can’t use the return value here. Instead of using the return value, we can add two new arguments with the inout keyword. With this keyword the value we pass into the function can be written to and the changes apply to the version of the variable pass in, not only the version in the function. Another thing we need to generate outlines from the normal is the outline of the center pixel, so we add that too to the list of our arguments.

Because we now have complete control over the outline variable we can now also do the adding to the existing outline in the method. After we changed that we go back to the fragment method, create a new variable for the difference of the normals and change the way we call the compare method to fit our new arguments.

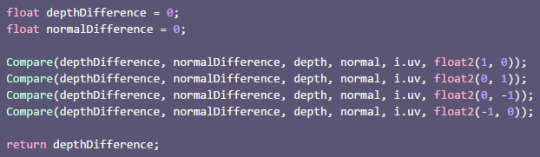
This again shouldn’t change the output of the method, but the new architecture allows us to also change the difference of the normal too. A easy and fast way to compare two normalised vectors is to take the dot product. The problem about the dot product is that when the vectors point in the same direction, the dot product is 1 and when the vectors move away from each other the dot product becomes lower, the opposite of what we want. The way to fixing that is to subtract the dot product from 1. Then, when the result of the dot product is 1 the overall result is 0 and when the result of the dot product becomes lower, the overall result increases. After we calculate the normal difference, we add it to the overall difference and we change the output to show the normal difference for now.


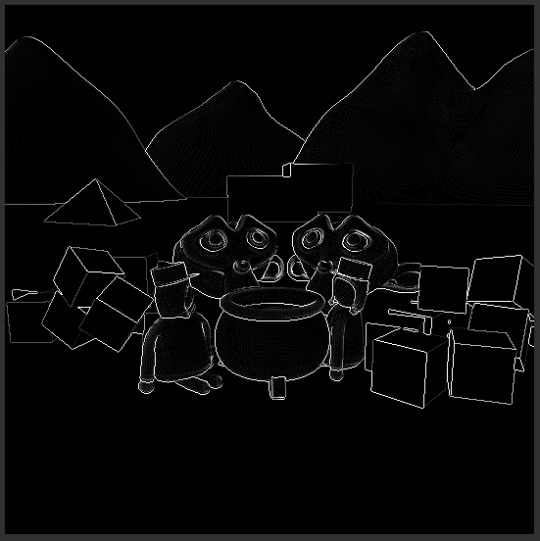
With those changes we can see outlines, but they’re different outlines than before because they’re generated from the normals instead of the depth. We can then combine the two outlines to generatecombined outline.


The next step is to make the outlines more customisable. To archieve that we add two variables for each depth and normal outlines. A multiplier to make the outlines appear stronger or weaker and a bias that can make the greyish parts of the outlines we might not want vanish.


To use the variables, after adding all of the sample differences, we simply multiply the difference variables with the multipliers, then we clamp them between 0 and 1 and get the difference to the power of the bias. The clamping between 0 and 1 is important because otherwise getting the exponent of a negative number can lead to invalid results. HLSL has it’s own function for clamping a variable between 0 and 1 called “saturate”.
With this you can now adjust your outlines a bit in the inspector - I boosted both normal and depth outlines a bit and reduced the noise by also increasing the bias, but it’s best to play around with the settings and see what fits your scene best.


Lastly we want to add our outlines to the scene, not just have them as a separate thing. For that we first declare a outline color as a property and shader variable.


To apply the outlines, at the end of the fragment function, we read from the source texture and do a linear interpolation from the source color to our outline color via the combined outline, that way the pixels that were previously black are now the source color and the white ones have the outline color.


The main disadvantages of postprocessed outlines are that you have to apply them to all object in the scene, The way the system decides what’s a outline and what isn’t might not fit the style your have in mind and you get aliasing (visible stairsteps) artefacts pretty quickly.
While there aren’t any easy fixes for the first two problems, you can mitigate the last one by using antialiasing in your postprocessing like FXAA or TXAA (the unity postprocessing stack provides those to you, but if you use v2 you have to redo the effect as a effect in the stack).
Another important point to keep in mind is that you have to use models that fit this way of doing outlines - if you put too much detail in your geometry the effect will paint most of your objects black, which is probably not the intended behaviour.

You can also find the source here: https://github.com/axoila/ShaderTutorials/blob/master/Assets/18_OutlinesPostprocessed/OutlinesPostprocessed.shader https://github.com/axoila/ShaderTutorials/blob/master/Assets/18_OutlinesPostprocessed/OutlinesPostprocessed.cs
I hope I was able to show you how to add nice outlines to your game and how it works.
If you have any questions feel free to contact me here on tumblr or on twitter @axoila.
9 notes
·
View notes
Photo

New Post has been published on https://primortravel.com/extraordinary-inclusive-hostels-hoscars-finalists-2021/
Extraordinary Inclusive Hostels (HOSCARs Finalists 2021)
Hostels welcome travellers from all around the world and we believe they are some of the most inclusive environments you could ever wish to be in. However, hostel staff, like us, are always learning, becoming mindful of our own unconscious biases, and growing as a result. The HOSCARs’ judges selected the following five hostels as fine examples of hostels getting inclusivity right. Which one gets your vote for Extraordinary Inclusive Hostel 2021?
South Carolina’s, Greenville, may not seem like an obvious choice to form an LGBTQIA+ hostel, with its conservative values and archaic anti-gay resolution. Yet, that is why it’s brilliant, brave and a pocket of rainbow-infused hope for travellers and locals too. The hostel’s founder, Joe Hindman, has quite a story, born into a strict Southern Baptist community he suppressed his identity as a gay man for 25 years until travel and the hostelling experience helped him claim his identity. More than just a safe space for the Queer community, Modal celebrates diversity by hosting events like social-distanced drag nights and pop-up markets to support local artists. You’ll find many of the hostel staff are LGBTQIA+ and the vibe warm, friendly, and inclusive to all. This hostel may well make it into the history books, as Joe’s aiming to impact the social and political scene across rural South-eastern USA.
VOTE for Modal
Bangalore is renowned for being India’s high-tech industrial centre, so ideal for a hostel with a huge goal to enable one million entrepreneurs by 2030. Draper Startup House’s motto is ‘Go big, give back, drive progress’, and it does this by opening its doors, offering affordable accommodation and community as a way into the business world. They recognise that diversity of ideas and inclusivity of all people is of real value to the start-up scene, and power young professionals by equipping them with skills, facilitating networking events, and providing co-working spaces to encourage collaboration.
VOTE for Draper Startup House
Barcelona’s INOUT Hostel is in Collserola Park, which means it’s a peaceful retreat. The team realised that the natural inclusivity of hostels and the open-minded travelling community who stay in them was an opportunity. A chance for non-profit Icària Initiatives Socials to create an accessible hostel and a place of employment for people with disabilities. With over 100 accessible beds, adapted bathrooms, elevators and ramps, INOUT Hostel opens up the hostelling experience to many more travellers. Currently, 50 members of the team are registered as disabled and play crucial roles in the running of this beautiful hostel. The hostel team says it best: ‘Diversity and inclusion are part of our reason for being. At INOUT Hostel everyone fits, we all serve and add value, everyone is welcome.’
VOTE for INOUT Hostel
Hostels (like people) come in all shapes and sizes and Ember just so happens to be in a grand historic mansion in Denver. Battling the pandemic, the revolt against police brutality and a government rolling back many of its citizens’ civil rights, this hostel made inclusivity its priority. In 2020 they employed 15 BiPOC and 9 people who identify as LGBTQIA+. Importantly, this hostel’s leadership team is 50% Black and their focus is on representing their guests and the city they’re based. When guests arrive, they sign the hostel’s zero-tolerance policy against discrimination, so everyone can feel safe and supported. They’ve also partnered with a programme called ‘Network Nola’, which provides travel experiences for the city’s underprivileged Black youth, and also ���Queer in the World’, offering a travel guide to their queer guests.
VOTE for Ember Hostel
Galway’s Kinlay House Hostel celebrates its diverse range of nationalities through hearty homemade dinners. With a team made up of ten different nationalities, they spotted an opportunity to educate through food, and what’s more inclusive than a hostel communal dinner? ‘Nothing’ we hear a million backpackers call back. As well as bringing everyone together, it fuels conversation about native countries, customs and ways of living. In addition to dinner times, this hostel is inclusive through and through with a gender-neutral toilet and shower, and staff with preferred pronouns on display. They’ve also been selected to host the Union of Students in Ireland’s Pink Training, Europe’s largest LGBT+ conference.
VOTE for Kinlay House Hostel
Have you cast your vote? Once you’re done, head back to explore more EXTRAORDINARY HOSCARs finalists, or have a read through their entries in these posts:
HOSCARs 2021: Extraordinary Sociable Experience Hostels
HOSCARs 2021: Extraordinary Sustainable Hostels
HOSCARs 2021: Extraordinary Innovative Hostels
HOSCARs2021: Extraordinary Hostel Heroes
HOSCARs 2021: Extraordinary Community & Social Impact Hostels
HOSCARs 2021: Extraordinary New Hostels
(function(d, s, id) var js, fjs = d.getElementsByTagName(s)[0]; if (d.getElementById(id)) return; js = d.createElement(s); js.id = id; js.src = "http://connect.facebook.net/en_US/sdk.js#xfbml=1&version=v2.5"; fjs.parentNode.insertBefore(js, fjs); (document, 'script', 'facebook-jssdk')); Source link
#Backpack #Backpackers #Backpacking #Travel #Traveling
0 notes
Photo


The sprites clipping is an issue I’ve been meaning to tackle for a while now. I’ve gone through a couple different iterations of strategies for displaying the sprites, but they’ve all relied on the sprite being at a constant angle facing the camera, like so:

Of course at an angle, it’s very easy for the sprite to just go right through walls. Some games avoid this issue altogether by having the collision detection extend out far enough, or having the sprites small enough to fit in a smaller collision area. This was not a design choice I had made, and a collision area large enough would seriously impact mobility with such a steep angle on such a large sprite. I had been trying to make use of the sprite shader’s offset property to force the sprite to render after walls, but if I took the offset far enough so as to draw the whole head above the wall, I’d get diminishing returns and the feet would start rendering above foreground elements(as seen in the first photo), and if I lowered it to a point where that didn’t happen, a portion of the head would still clip at direct angles (as seen in photo 2).
I wondered if I could figure out a way I could have the sprite render perfectly vertically, but with a transformation applied to it to create a false sense of perspective, so that the sprite would not appear squashed.
I decided to scrap everything I had in place for billboarding, which up until now was an attached C# component which just rotated towards the camera, and instead look into rotating from the shader code. I managed to hack together a sort of frankenstein formula for resizing the sprite relative to the model view matrix, but if anyone here is good with geometry, they should hit me up because it’s definitely imperfect (the effect stops working at too steep of an angle), but it works for my use here.
I added this little bit of code to unity's default sprite diffuse shader:
void vert (inout appdata_full v, out Input o) { UNITY_INITIALIZE_OUTPUT(Input, o); float3 forward = normalize(UNITY_MATRIX_V._m20_m21_m22); float3 up = normalize(UNITY_MATRIX_MVP._m10_m11_m12); float3 upXZ = up; upXZ.y = 0; float3 right = normalize(UNITY_MATRIX_V._m00_m01_m02); float4x4 rotationMatrix = float4x4(right, 0, //use the magnitude of the normalized Model View Projection matrix, plus the length between the magnitude between the X and Z values in the MVP, divided by pi float3(0, length(up) + length(upXZ)/3.14159265359, 0), 0, forward, 0, 0, 0, 0, 1); v.vertex = mul(v.vertex, rotationMatrix); v.normal = mul(v.normal, rotationMatrix); #if defined(PIXELSNAP_ON) v.vertex = UnityPixelSnap (v.vertex); #endif o.color = v.color * _Color; }
And it works! No more clipping, and no squashed sprite! And ideally, this is a more efficient solution for billboarding anyway, as it doesn’t require all those C# scripts


As an added bonus, it makes the mirrors work so much better, since the sprites are just now rotated through the render pipeline, they’ll never appear with a warped perspective, and support the same for multiple mirrors

Woah who’s that creepin behind you
#game development#gamedev#indiedev#devlog#Game Dev Blog#game developers#pixel art#2.5d#low poly#shaders#sprites
23 notes
·
View notes
Text
ae script
//カットナンバーを追加する。 //選択したレイヤーの順番でテキストレイヤーを作成する。
app.beginUndoGroup("A"); //アンドゥ位置の設定 var seComp = app.project.selection; var seLayer = app.project.activeItem.selectedLayers; for(i=0; i<get_selectLayer()[1]; i++){ add_text(get_selectLayer()[0] , i , [ get_selectLayer()[2][i] , get_selectLayer()[3][i] ] ); }
function add_text(comp,text,inOut){ var cut_num = parseInt(text)+1 var add_text = "000" + cut_num; var add_text_value = "cut_"+String(add_text).slice(-3);//追加するテキストの内容
var myText = comp.layers.addText( add_text_value ); var textProp = myText.property("Source Text"); var textDocument = textProp.value;
var add_pos = [150,60];//テキストレイヤーのポジション
textDocument.fontSize = 60; textDocument.fillColor = [1,1,1]; textProp.setValue(textDocument);
myText.position.setValue(add_pos); //テキストのプロパティをセット myText.inPoint = inOut[0]; myText.outPoint = inOut[1]; //$.writeln(); }
function get_selectLayer(){ var parent_comp = seLayer[0].containingComp; var get_layer_length = seLayer.length; var layer_inPoint = []; var layer_outPoint = []; for(u=0; u<get_layer_length; u++){ layer_inPoint.push( seLayer[u].inPoint ); layer_outPoint.push( seLayer[u].outPoint ); } // 選択したレイヤーを含んでいるコンポ , 選択したレイヤーの数 , レイヤーのインポイント , レイヤーのアウトポイント return [parent_comp , get_layer_length , layer_inPoint ,layer_outPoint]; } app.endUndoGroup();
0 notes
Text
webapps Inout StickBoard 1.0 Script Improper Access Restrictions
SNPX.com : webapps Inout StickBoard 1.0 Script Improper Access Restrictions http://dlvr.it/N6dC98
0 notes
Photo

Inout Scripts Product in real estate business - Inout Real Estate.
0 notes
Photo

Inout Blockchain FiatExchanger - A cryptocurrency exchange script to your own exchange platform.
0 notes
Link
#zillow clone#real estate#propertymanagement#but trulia clone#inout scripts#trulia clone script#clone scripts
0 notes
Photo

Inout Email Marketer from Inout Scripts to Uplift Your Sales!
http://www.inoutscripts.com/products/email-marketer/
0 notes
Text
Clone Scripts for Online Business

0 notes
Photo

Start your online business in Music with Inout Music.
0 notes
Link
Inout Scripts Reviews
0 notes
Photo

Inout Scripts Reviews.
http://www.inoutscripts.com/reviews-and-testimonials/
0 notes