#is_array()
Explore tagged Tumblr posts
Visit Tumblr Blog
Explore Tumblr blogs with no restrictions, modern design and the best experience.
Last Seen Tumblr Blogs


Fun Fact
Tumblr posted its first advertisements in May 2012 and subsequently earned $13M in revenue.
Text
Prevent HTTP Parameter Pollution in Laravel with Secure Coding
Understanding HTTP Parameter Pollution in Laravel
HTTP Parameter Pollution (HPP) is a web security vulnerability that occurs when an attacker manipulates multiple HTTP parameters with the same name to bypass security controls, exploit application logic, or perform malicious actions. Laravel, like many PHP frameworks, processes input parameters in a way that can be exploited if not handled correctly.

In this blog, we’ll explore how HPP works, how it affects Laravel applications, and how to secure your web application with practical examples.
How HTTP Parameter Pollution Works
HPP occurs when an application receives multiple parameters with the same name in an HTTP request. Depending on how the backend processes them, unexpected behavior can occur.
Example of HTTP Request with HPP:
GET /search?category=electronics&category=books HTTP/1.1 Host: example.com
Different frameworks handle duplicate parameters differently:
PHP (Laravel): Takes the last occurrence (category=books) unless explicitly handled as an array.
Express.js (Node.js): Stores multiple values as an array.
ASP.NET: Might take the first occurrence (category=electronics).
If the application isn’t designed to handle duplicate parameters, attackers can manipulate input data, bypass security checks, or exploit business logic flaws.
Impact of HTTP Parameter Pollution on Laravel Apps
HPP vulnerabilities can lead to:
✅ Security Bypasses: Attackers can override security parameters, such as authentication tokens or access controls. ✅ Business Logic Manipulation: Altering shopping cart data, search filters, or API inputs. ✅ WAF Evasion: Some Web Application Firewalls (WAFs) may fail to detect malicious input when parameters are duplicated.
How Laravel Handles HTTP Parameters
Laravel processes query string parameters using the request() helper or Input facade. Consider this example:
use Illuminate\Http\Request; Route::get('/search', function (Request $request) { return $request->input('category'); });
If accessed via:
GET /search?category=electronics&category=books
Laravel would return only the last parameter, category=books, unless explicitly handled as an array.
Exploiting HPP in Laravel (Vulnerable Example)
Imagine a Laravel-based authentication system that verifies user roles via query parameters:
Route::get('/dashboard', function (Request $request) { if ($request->input('role') === 'admin') { return "Welcome, Admin!"; } else { return "Access Denied!"; } });
An attacker could manipulate the request like this:
GET /dashboard?role=user&role=admin
If Laravel processes only the last parameter, the attacker gains admin access.
Mitigating HTTP Parameter Pollution in Laravel
1. Validate Incoming Requests Properly
Laravel provides request validation that can enforce strict input handling:
use Illuminate\Http\Request; use Illuminate\Support\Facades\Validator; Route::get('/dashboard', function (Request $request) { $validator = Validator::make($request->all(), [ 'role' => 'required|string|in:user,admin' ]); if ($validator->fails()) { return "Invalid Role!"; } return $request->input('role') === 'admin' ? "Welcome, Admin!" : "Access Denied!"; });
2. Use Laravel’s Input Array Handling
Explicitly retrieve parameters as an array using:
$categories = request()->input('category', []);
Then process them safely:
Route::get('/search', function (Request $request) { $categories = $request->input('category', []); if (is_array($categories)) { return "Selected categories: " . implode(', ', $categories); } return "Invalid input!"; });
3. Encode Query Parameters Properly
Use Laravel’s built-in security functions such as:
e($request->input('category'));
or
htmlspecialchars($request->input('category'), ENT_QUOTES, 'UTF-8');
4. Use Middleware to Filter Requests
Create middleware to sanitize HTTP parameters:
namespace App\Http\Middleware; use Closure; use Illuminate\Http\Request; class SanitizeInputMiddleware { public function handle(Request $request, Closure $next) { $input = $request->all(); foreach ($input as $key => $value) { if (is_array($value)) { $input[$key] = array_unique($value); } } $request->replace($input); return $next($request); } }
Then, register it in Kernel.php:
protected $middleware = [ \App\Http\Middleware\SanitizeInputMiddleware::class, ];
Testing Your Laravel Application for HPP Vulnerabilities
To ensure your Laravel app is protected, scan your website using our free Website Security Scanner.

Screenshot of the free tools webpage where you can access security assessment tools.
You can also check the website vulnerability assessment report generated by our tool to check Website Vulnerability:

An Example of a vulnerability assessment report generated with our free tool, providing insights into possible vulnerabilities.
Conclusion
HTTP Parameter Pollution can be a critical vulnerability if left unchecked in Laravel applications. By implementing proper validation, input handling, middleware sanitation, and secure encoding, you can safeguard your web applications from potential exploits.
🔍 Protect your website now! Use our free tool for a quick website security test and ensure your site is safe from security threats.
For more cybersecurity updates, stay tuned to Pentest Testing Corp. Blog! 🚀
3 notes
·
View notes
Text
Supercharge Your WordPress Development with These 10 PHP Snippets WordPress powers over 40% of the web, making it one of the most popular platforms for developers and bloggers alike. Whether you're customizing themes, building plugins, or tweaking functionality, having a handy set of PHP code snippets can save you hours of work. Here are 10 practical PHP snippets every WordPress developer should keep in their toolkit. 1. Disable WordPress Admin Bar for Non-Admins The admin bar can clutter the frontend for non-admin users. Use this snippet to disable it for everyone except administrators: add_action('after_setup_theme', function() if (!current_user_can('administrator')) show_admin_bar(false); ); This ensures a clean frontend experience for subscribers and other roles. 2. Change Default Login Logo URL Customizing the WordPress login page is a common requirement. Use this snippet to change the logo URL on the login screen: add_filter('login_headerurl', function() return home_url(); // Redirect to your website's homepage ); Combine this with CSS to fully brand the login page for clients or personal projects. 3. Redirect Users After Login Based on Role Direct users to specific pages after login based on their roles: add_filter('login_redirect', function($redirect_to, $request, $user) if (isset($user->roles) && is_array($user->roles)) if (in_array('administrator', $user->roles)) return admin_url(); elseif (in_array('editor', $user->roles)) return home_url('/editor-dashboard'); else return home_url('/welcome'); return $redirect_to; , 10, 3); This snippet improves user navigation and role-specific workflows. 4. Custom Excerpt Length Control the excerpt length in posts to maintain a consistent look across your site: add_filter('excerpt_length', function($length) return 20; // Set the excerpt length to 20 words ); Pair this with a custom read more link for better UX: add_filter('excerpt_more', function() return '... Read More'; ); 5. Remove WordPress Version Number Hiding the WordPress version number improves security by making it harder for attackers to target vulnerabilities: remove_action('wp_head', 'wp_generator'); This simple snippet removes the version meta tag from the HTML source. 6. Add Custom Image Sizes Define and use custom image sizes for different parts of your theme: add_action('after_setup_theme', function() add_image_size('custom-thumb', 400, 300, true); // Cropped image size ); To use this image size in your theme: echo wp_get_attachment_image($attachment_id, 'custom-thumb'); 7. Disable WordPress Auto Updates Sometimes you want to disable automatic updates to maintain more control: add_filter('automatic_updater_disabled', '__return_true'); You can also disable specific updates, such as plugin updates: add_filter('auto_update_plugin', '__return_false'); 8. Custom Maintenance Mode Display a maintenance mode page while working on your site: add_action('template_redirect', function() if (!current_user_can('administrator') && !is_user_logged_in()) wp_die( 'Under MaintenanceWe’ll be back shortly!', 'Maintenance Mode', array('response' => 503) ); ); This ensures only admins can access the site during maintenance. 9. Limit Post Revisions Restrict the number of post revisions saved in the database to optimize performance: define('WP_POST_REVISIONS', 5); // Limit to 5 revisions per post Add this line to your wp-config.php file to apply globally. 10. Custom Dashboard Widget Add a custom widget to the WordPress admin dashboard for quick links or messages: add_action('wp_dashboard_setup', function() wp_add_dashboard_widget( 'custom_dashboard_widget', 'Welcome to Your Dashboard',
function() echo 'Need help? Visit our support center.'; ); ); This snippet is great for client sites where you can provide tailored guidance. Wrapping Up These 10 PHP snippets cover some of the most common tasks WordPress developers encounter. By incorporating these into your workflow, you’ll save time and enhance the functionality of your projects. Bookmark this cheat sheet and customize these snippets to suit your specific needs!
0 notes
Link
Check the most useful PHP functions like:
is_array($arr) in_array($search, $arr, $type) sizeof($arr) array_merge($arr1, $arr2) array_keys($arr) array_values($arr) array_push($arr, $val) array_pop($arr) . . . more
#php#php functions#php array functions#array functions#array#is_array()#in_array()#array_merge()#array_keys()#array_values()#array_push()#array_pop()#ksort()#array_rand()#array_filter()#sort()
0 notes
Text
Generate pagination in laravel like a pro

Table of Contents
What is pagination in Laravel ?
How to implement Eloquent pagination using Laravel ?
Ebooks available now
Why do we need to paginate in Laravel ?
get() vs paginate()
Generate html pagination links using Bootstrap css
What is pagination in Laravel ?
Pagination in Laravel is a way to fetch limited model data in chunks with functionality to represent fetched data in dynamic links as pages. That is, let’s take an example of a book. A book a collection information represented as pages. A page contains a small portion of information which a book holds. In a similar way, when laravel interact with models, it fetches information from databases collectively and put on user’s webpage.
Why do we need to paginate in Laravel ?
We are not required to paginate our data when we are damn sure that information from DB is very little, but can we guarantee it always ?, Of Course NOT.
Let’s assume a database query which takes 0.01 seconds to fetch 50 records from a table, and then pass this data into foreach loop to display in html table, let me ask you one simple question then, how much time will the same operation take for 10000 rows ?
That’s a huge time as a developer perspective but as per user perspective, will a user scroll down to 10000 rows on a single webpage ? A definite No.
That is why we need to paginate data to save time as well as to enhance the User eXperience.
How to implement Eloquent pagination using Laravel ?
get() vs paginate()
There are two main methods to get data from Eloquent ORM in laravel.
get() method fetches all the records from a database table and it should only be used in background processing tasks.
paginate() method accepts an integer parameter denoting a number of data to fetch from a collection. By default, even if we do not pass this parameter then it is set to 10 records per page.
Generate html pagination links using Bootstrap css
Lets create a simple laravel application where,
UserController.php
public function getUsers(Request $request) { $per_page = $request->per_page ?? 10; $users = App\User::fetchUsers($per_page); return view('users',compact($users)); }
App\User.php
Public static function fetchUsers($per_page) { return self::paginate($per_page); }
users.blade.php
<table class="table table-hover"> <thead> <tr> <th scope="col" >#ID</th> <th scope="col" >Username</th> <th scope="col" >First Name</th> <th scope="col" >Last Name</th> </tr> </thead> <tbody class="rw-shadow"> @foreach($users as $key => $user) <tr> <td > # {{ $key + $users->firstItem() }}</td> <td > {{ $user->username }}</td> <td > {{ $user->first_name }}</td> <td > {{ $user->last_name }}</td> </tr> @endforeach </tbody> </table> <!-- paginations -- > {{ $users->links('pagination') }}
pagination.blade.php
@if ($paginator->hasPages()) <div class="row text-right mr-2"> <nav aria-label="Page navigation" class="ml-auto"> <ul class="pagination"> {{-- Previous Page Link --}} @if ($paginator->onFirstPage()) <li class="page-item"> <a class="page-link" href="#" aria-label="Previous"> <span aria-hidden="true">«</span> <span class="sr-only">Previous</span> </a> </li> @else <li class="page-item"> <a class="page-link" href="{{ $paginator->previousPageUrl() }}" aria-label="Previous"> <span aria-hidden="true">«</span> <span class="sr-only">Previous</span> </a> </li> @endif {{-- Pagination Elements --}} @foreach ($elements as $element) {{-- "Three Dots" Separator --}} @if (is_string($element)) <li class="page-item disabled"><span>{{ $element }}</span></li> @endif {{-- Array Of Links --}} @if (is_array($element)) @foreach ($element as $page => $url) @if ($page == $paginator->currentPage()) <li class="page-item"><a class="page-link active" href="#">{{ $page }}</a></li> @else <li class="page-item"><a class="page-link" href="{{ $url }}">{{ $page }}</a></li> @endif @endforeach @endif @endforeach {{-- Next Page Link --}} @if ($paginator->hasMorePages()) <li class="page-item"> <a class="page-link" href="{{ $paginator->nextPageUrl() }}" aria-label="Next"> <span aria-hidden="true">»</span> <span class="sr-only">Next</span> </a> </li> @else <li class="page-item"> <a class="page-link" href="#" aria-label="Next"> <span aria-hidden="true">»</span> <span class="sr-only">Next</span> </a> </li> @endif </ul> </nav> </div> @endif
Output:

Ebooks available now
You can download this article’s PDF eBooks for offline reading from below:
Issuu
Slide Share
Edocr
AuthorStream
#laravel#Laravel 6#php#ajax pagination#pagination: page links#pagination: load more#blog post#blog articles#tutorial#guide
3 notes
·
View notes
Text
Performance Scalability Post:
Symptom:
Slowness observed. "node select queries are taking up majority of time resulting in slowness of the application"
in PDOStatement::execute called at /core/lib/Drupal/Core/Database/StatementWrapper.php (145)...Core\Database\StatementWrapper::execute called at /core/lib/Drupal/Core/Database/Connection.php (937)...Database\Connection::query called at /core/lib/Drupal/Core/Database/Driver/pgsql/Connection.php (183)...
These queries are taking longer than 5 seconds.
SELECT "base_table"."vid" AS "vid", "base_table"."nid" AS "nid" + FROM + "node" "base_table" + INNER JOIN "node" "node" ON "node"."nid" = "base_table"."nid" + INNER JOIN "node_field_data" "node_field_data" ON "node_field_data"."nid" = "base_table"."nid" + WHERE ((LOWER("node"."uuid") IN (LOWER('$1')))) AND ("node_field_data"."default_langcode" IN ('$2'))
Analysis:
Repeat the issue locally:
Edit postgresql.conf
log_statement = 'none' log_min_duration_statement = 5000
I also set `log_statement = 'all'` initally but that creates a huge file which you should be careful of not to overload your system. Though it can be helpful to see everything.
Otherwise setting `log_min_duration_statement = 5000` means only log queries that take over 5 seconds.
Then there was some time figuring out how to replicate the issue. But eventually I found it was related to saving an article based on some custom event we have.
The above codeblock points to the execute() function in Driver/pgsql
the execute() function uses the compile() function which uses translateCondition()
in translateCondition() we are seeing the `['where'] = 'LOWER('` . section which we can see in the slow logs. We saw this same function with similar behavior existing in Drupal 8. But for some reason it was not a performance issue then. Now with Drupal 9 the performance impact is now more visible.
public static function translateCondition(&$condition, SelectInterface $sql_query, $case_sensitive) { if (is_array($condition['value']) && $case_sensitive === FALSE) { $condition['where'] = 'LOWER(' . $sql_query->escapeField($condition['real_field']) . ') ' . $condition['operator'] . ' ('; $condition['where_args'] = []; // Only use the array values in case an associative array is passed as an // argument following similar pattern in // \Drupal\Core\Database\Connection::expandArguments(). $where_prefix = str_replace('.', '_', $condition['real_field']); foreach ($condition['value'] as $key => $value) { $where_id = $where_prefix . $key; $condition['where'] .= 'LOWER(:' . $where_id . '),'; $condition['where_args'][':' . $where_id] = $value; } $condition['where'] = trim($condition['where'], ','); $condition['where'] .= ')'; } parent::translateCondition($condition, $sql_query, $case_sensitive); } }
In general we likely would not want to change the Core execute() function or the translateCondition() function since this is good behavior most of the time.
Though it is odd that "PostgreSQL is a case-sensitive database by default" and yet the default ends up fitting into the condition `$case_sensitive === FALSE`. Potentially core should be updated. But this should likely be a discussion with the maintainers.
['where'] = 'LOWER(' . is part of:
translateCondition() function which is called in core/lib/Drupal/Core/Entity/Query/Sql/pgsql/Condition.php
New Relic:
In New Relic we can see `Postgres node select` was consuming 84% of the db operations.
Cluster Control:
In ClusterControl we can see the top slowest Query was the `SELECT "base_table"."vid" AS` as seen above and it had a near 3 million count in just a few days.
Fix:
Alter the query that uses LOWER for the condition that matches 'LOWER("node"."uuid")
/** * Implements hook_query_TAG_alter(). * * @param \Drupal\Core\Database\Query\AlterableInterface $query */ function core_query_entity_query_node_alter(Drupal\Core\Database\Query\AlterableInterface $query) { $conditions = &$query->conditions(); if (isset($conditions[0]['field']) && $conditions[0]['field'] == 'LOWER("node"."uuid") IN (LOWER(:node_uuid0))') { $conditions[0]['field'] = '"node"."uuid" = :node_uuid0'; } }
Now after the fix, the LOWER still hits all other queries it normally would hit, except for the condition of node uuid
We now see it as :
SELECT "base_table"."vid" AS "vid", "base_table"."nid" AS "nid" + FROM + "node" "base_table" + INNER JOIN "node" "node" ON "node"."nid" = "base_table"."nid" + INNER JOIN "node_field_data" "node_field_data" ON "node_field_data"."nid" = "base_table"."nid" + WHERE ((("node"."uuid" = '$1'))) AND ("node_field_data"."default_langcode" IN ('$2'))
0 notes
Photo

PHP Control Structures and Loops: if, else, for, foreach, while, and More
Today, we're going to discuss control structures and loops in PHP. I'll show you how to use all the main control structures that are supported in PHP, like if, else, for, foreach, while, and more.
What Is a Control Structure?
In simple terms, a control structure allows you to control the flow of code execution in your application. Generally, a program is executed sequentially, line by line, and a control structure allows you to alter that flow, usually depending on certain conditions.
Control structures are core features of the PHP language that allow your script to respond differently to different inputs or situations. This could allow your script to give different responses based on user input, file contents, or some other data.
The following flowchart explains how a control structure works in PHP.
As you can see in the above diagram, first a condition is checked. If the condition is true, the conditional code will be executed. The important thing to note here is that code execution continues normally after conditional code execution.
Let's consider the following example.
In the above example, the program checks whether or not the user is logged in. Based on the user's login status, they will be redirected to either the Login page or the My Account page. In this case, a control structure ends code execution by redirecting users to a different page. This is a crucial ability of the PHP language.
PHP supports a number of different control structures:
if
else
elseif
switch
while
do-while
for
foreach
and more
Let's take a look at a few of these control structures with examples.
Learning PHP Control Structures
In the previous section, we learned the basics of control structures in PHP and their usefulness in application development. In this section, we'll go through a couple of important control structures that you'll end up using frequently in your day-to-day application development.
PHP If Statement
The if construct allows you to execute a piece of code if the expression provided along with it evaluates to true.
Let's have a look at the following example to understand how it actually works.
<?php $age = 50; if ($age > 30) { echo "Your age is greater than 30!"; } ?>
The above example should output the Your age is greater than 30! message since the expression evaluates to true. In fact, if you want to execute only a single statement, the above example can be rewritten as shown in the following snippet without brackets.
<?php $age = 50; if ($age > 30) echo "Your age is greater than 30!"; ?>
On the other hand, if you have more than one statements to execute, you must use brackets, as shown in the following snippet.
<?php if (is_array($user)) { $user_id = isset($user['user_id']) ? $user['user_id'] : ''; $username = isset($user['username']) ? $user['username'] : ''; // and more statements... } ?>
PHP Else Statement
In the previous section, we discussed the if construct, which allows you to execute a piece of code if the expression evaluates to true. On the other hand, if the expression evaluates to false, it won't do anything. More often than not, you also want to execute a different code snippet if the expression evaluates to false. That's where the else statement comes into the picture.
You always use the else statement in conjunction with an if statement. Basically, you can define it as shown in the following pseudo code.
if (expression) { // code is executed if the expression evaluates to TRUE } else { // code is executed if the expression evaluates to FALSE }
Let's revise the previous example to understand how it works.
<?php $age = 50; if ($age < 30) { echo "Your age is less than 30!"; } else { echo "Your age is greater than or equal 30!"; } ?>
So when you have two choices, and one of them must be executed, you can use the if-else construct.
PHP Else If Statement
We can consider the elseif statement as an extension to the if-else construct. If you've got more than two choices to choose from, you can use the elseif statement.
Let's study the basic structure of the elseif statement, as shown in the following pseudo code.
if (expression1) { // code is executed if the expression1 evaluates to TRUE } elseif (expression2) { // code is executed if the expression2 evaluates to TRUE } elseif (expression3) { // code is executed if the expression3 evaluates to TRUE } else { // code is executed if the expression1, expression2 and expression3 evaluates to FALSE, a default choice }
Again, let's try to understand it using a real-world example.
<?php $age = 50; if ($age < 30) { echo "Your age is less than 30!"; } elseif ($age > 30 && $age < 40) { echo "Your age is between 30 and 40!"; } elseif ($age > 40 && $age < 50) { echo "Your age is between 40 and 50!"; } else { echo "Your age is greater than 50!"; } ?>
As you can see in the above example, we have multiple conditions, so we've used a series of elseif statements. In the event that all if conditions evaluate to false, it executes the code provided in the last else statement.
PHP Switch Statement
The switch statement is somewhat similar to the elseif statement which we've just discussed in the previous section. The only difference is the expression which is being checked.
In the case of the elseif statement, you have a set of different conditions, and an appropriate action will be executed based on a condition. On the other hand, if you want to compare a variable with different values, you can use the switch statement.
As usual, an example is the best way to understand the switch statement.
<?php $favourite_site = 'Code'; switch ($favourite_site) { case 'Business': echo "My favourite site is business.tutsplus.com!"; break; case 'Code': echo "My favourite site is code.tutsplus.com!"; break; case 'Web Design': echo "My favourite site is webdesign.tutsplus.com!"; break; case 'Music': echo "My favourite site is music.tutsplus.com!"; break; case 'Photography': echo "My favourite site is photography.tutsplus.com!"; break; default: echo "I like everything at tutsplus.com!"; } ?>
As you can see in the above example, we want to check the value of the $favourite_site variable, and based on the value of the $favourite_site variable we want to print a message.
For each value you want to check with the $favourite_site variable, you have to define the case block. If the value is matched with a case, the code associated with that case block will be executed. After that, you need to use the break statement to end code execution. If you don't use the break statement, script execution will be continued up to the last block in the switch statement.
Finally, if you want to execute a piece of code if the variable's value doesn't match any case, you can define it under the default block. Of course, it's not mandatory—it's just a way to provide a default case.
So that's the story of conditional control structures. We'll discuss loops in PHP in the next section.
Loops in PHP
Loops in PHP are useful when you want to execute a piece of code repeatedly until a condition evaluates to false. So code is executed repeatedly as long as a condition evaluates to true, and as soon as the condition evaluates to false, the script continues executing the code after the loop.
The following flowchart explains how loops work in PHP.
As you can see in the above screenshot, a loop contains a condition. If the condition evaluates to true, the conditional code is executed. After execution of the conditional code, control goes back to the loop condition, and the flow continues until the condition evaluates to false.
In this section, we'll go through the different types of loops supported in PHP.
While Loop in PHP
The while loop is used when you want to execute a piece of code repeatedly until the while condition evaluates to false.
You can define it as shown in the following pseudo code.
while (expression) { // code to execute as long as expression evaluates to TRUE }
Let's have a look at a real-world example to understand how the while loop works in PHP.
<?php $max = 0; echo $i = 0; echo ","; echo $j = 1; echo ","; $result=0; while ($max < 10 ) { $result = $i + $j; $i = $j; $j = $result; $max = $max + 1; echo $result; echo ","; } ?>
If you're familiar with the Fibonacci series, you might recognize what the above program does—it outputs the Fibonacci series for the first ten numbers. The while loop is generally used when you don't know the number of iterations that are going to take place in a loop.
Do-While Loop in PHP
The do-while loop is very similar to the while loop, with the only difference being that the while condition is checked at the end of the first iteration. Thus, we can guarantee that the loop code is executed at least once, irrespective of the result of the while expression.
Let's have a look at the syntax of the do-while loop.
do { // code to execute } while (expression);
Let's go through a real-world to understand possible use-cases where you can use the do-while loop.
<?php $handle = fopen("file.txt", "r"); if ($handle) { do { $line = fgets($handle); // process the line content } while($line !== false); } fclose($handle); ?>
In the above example, we're trying to read a file line by line. Firstly, we've opened a file for reading. In our case, we're not sure if the file contains any content at all. Thus, we need to execute the fgets function at least once to check if a file contains any content. So we can use the do-while loop here. do-while evaluates the condition after the first iteration of the loop.
For Loop in PHP
Generally, the for loop is used to execute a piece of code for a specific number of times. In other words, if you already know the number of times you want to execute a block of code, it's the for loop which is the best choice.
Let's have a look at the syntax of the for loop.
for (expr1; expr2; expr3) { // code to execute }
The expr1 expression is used to initialize variables, and it's always executed. The expr2 expression is also executed in the beginning of a loop, and if it evaluates to true, the loop code is executed. After execution of the loop code, the expr3 is executed. Generally, the expr3 is used to alter the value of a variable which is used in the expr2 expression.
Let's go through the following example to see how it works.
<?php for ($i=1; $i<=10; ++$i) { echo sprintf("The square of %d is %d.</br>", $i, $i*$i); } ?>
The above program outputs the square of the first ten numbers. It initializes $i to 1, repeats as long as $i is less than or equal to 10, and adds 1 to $i at each iteration.
For Each in PHP
The foreach loop is used to iterate over array variables. If you have an array variable, and you want to go through each element of that array, the foreach loop is the best choice.
Let's have a look at a couple of examples.
<?php $fruits = array('apple', 'banana', 'orange', 'grapes'); foreach ($fruits as $fruit) { echo $fruit; echo "<br/>"; } $employee = array('name' => 'John Smith', 'age' => 30, 'profession' => 'Software Engineer'); foreach ($employee as $key => $value) { echo sprintf("%s: %s</br>", $key, $value); echo "<br/>"; } ?>
If you want to access array values, you can use the first version of the foreach loop as shown in the above example. On the other hand, if you want to access both a key and a value, you can do it as shown in the $employee example above.
Breaking Out of the Loop
There are times when you might want to break out of a loop before it runs it course. This can be achieved easily using the break keyword. It will get you out of the current for, foreach, while, do-while or switch structure.
You can also use break to get out of multiple nested loops by supplying a numeric argument. For example, using break 3 will break you out of 3 nested loops. However, you cannot pass a variable as the numeric argument if you are using a PHP version greater than or equal to 5.4.
<?php echo 'Simple Break'; for($i = 1; $i <= 2; $i++) { echo "\n".'$i = '.$i.' '; for($j = 1; $j <= 5; $j++) { if($j == 2) { break; } echo '$j = '.$j.' '; } } /* Simple Break i = 1 j = 1 i = 2 j = 1 */ echo 'Multi-level Break'; for($i = 1; $i <= 2; $i++) { echo "\n".'$i = '.$i.' '; for($j = 1; $j <= 5; $j++) { if($j == 2) { break 2; } echo '$j = '.$j.' '; } } /* Multi-level Break i = 1 j = 1 */ ?>
Another keyword that can interrupt loops in PHP is continue. However this only skips the rest of the current loop iteration instead of breaking out of the loop altogether. Just like break, you can also use a numerical value with continue to specify how many nested loops should it skip for current iteration.
<?php echo 'Simple Continue'; for($i = 1; $i <= 2; $i++) { echo "\n".'$i = '.$i.' '; for($j = 1; $j <= 5; $j++) { if($j == 2) { continue; } echo '$j = '.$j.' '; } } /* Simple Continue i = 1 j = 1 j = 3 j = 4 j = 5 i = 2 j = 1 j = 3 j = 4 j = 5 */ echo 'Multi-level Continue'; for($i = 1; $i <= 2; $i++) { echo "\n".'$i = '.$i.' '; for($j = 1; $j <= 5; $j++) { if($j == 2) { continue 2; } echo '$j = '.$j.' '; } } /* Multi-level Continue i = 1 j = 1 i = 2 j = 1 */ ?>
Conclusion
In this article, we discussed different control structures and loops in PHP. They are an essential part of PHP—or any programming language for that matter.
Learn PHP With a Free Online Course
If you want to learn PHP, check out our free online course on PHP fundamentals!
In this course, you'll learn the fundamentals of PHP programming. You'll start with the basics, learning how PHP works and writing simple PHP loops and functions. Then you'll build up to coding classes for simple object-oriented programming (OOP). Along the way, you'll learn all the most important skills for writing apps for the web: you'll get a chance to practice responding to GET and POST requests, parsing JSON, authenticating users, and using a MySQL database.
FREE
PHP
PHP Fundamentals
Jeremy McPeak
by Sajal Soni via Envato Tuts+ Code https://ift.tt/31EUx8s
0 notes
Text
Natas 10-12
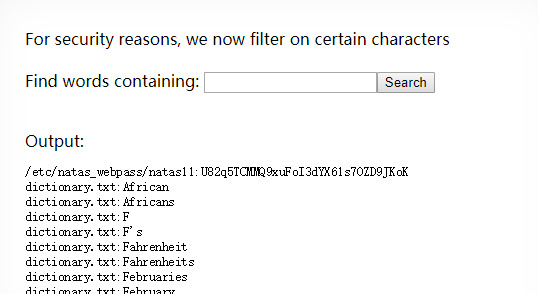
Natas 10:
This one is quite similar with natas 9, but in this level, we cannot use any command include ‘ /[;|&]/ ’. So we need to use grep itself to find the password.
OK an obvious way is to grep guess a letter in the password and just grep it, like “ grep -i a /etc/natas_webpass/natas11”. And we can guess until we get the password, not so far away: grep -i f /etc/natas_webpass/natas11
Natas 11:
This one includes a long source code and seems to be quite hard.
$defaultdata = array( "showpassword"=>"no", "bgcolor"=>"#ffffff");
function xor_encrypt($in) {
$key = '<censored>';
$text = $in;
$outText = '';
// Iterate through each character
for($i=0;$i<strlen($text);$i++) {
$outText .= $text[$i] ^ $key[$i % strlen($key)];
}
return $outText;
}
function loadData($def) {
global $_COOKIE;
$mydata = $def;
if(array_key_exists("data", $_COOKIE)) {
$tempdata = json_decode(xor_encrypt(base64_decode($_COOKIE["data"])), true);
if(is_array($tempdata) && array_key_exists("showpassword", $tempdata) && array_key_exists("bgcolor", $tempdata)) {
if (preg_match('/^#(?:[a-f\d]{6})$/i', $tempdata['bgcolor'])) {
$mydata['showpassword'] = $tempdata['showpassword'];
$mydata['bgcolor'] = $tempdata['bgcolor'];
}
}
}
return $mydata;
}
function saveData($d) {
setcookie("data", base64_encode(xor_encrypt(json_encode($d))));
}
$data = loadData($defaultdata);
if(array_key_exists("bgcolor",$_REQUEST)) {
if (preg_match('/^#(?:[a-f\d]{6})$/i', $_REQUEST['bgcolor'])) {
$data['bgcolor'] = $_REQUEST['bgcolor'];
}
}
saveData($data);
Read the code and we know how it works:
1. First we get the default data = array( "showpassword"=>"no", "bgcolor"=>"#ffffff");
2. Then we come to the loadData() in line 16. This function is reading data from cookie and apply json_decode(xor_encrypt(base64_decode(data))). Then it check if the decoded thing is an array, if yes, it will update $mydata or it will remain the default one. Finally return mydata.
3. Then it will save $mydata to the cookie.
So what we need to do is to have an array with “showpassword” = “yes”, then we need to encode and encrypt it. Encoding is easy but the problem is how to encrypt it since we do not know the key. So we need to do some research of xor_encrypt.
Wikipedia is enough, this approach is quite simple: compute plaintext xor key.
We know that
(A xor key = C ) => ( A xor C = key)
So since we know A and C, we can get the key easily. It is a known-plaintext attack.
So we can write code to get the key then encrypt and encode the array we need to get the password.
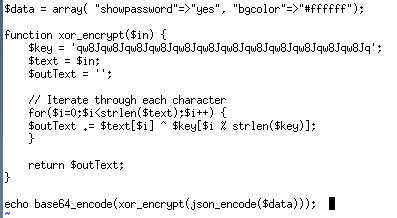
First get the key:
And we get the key ‘qw8Jqw8Jqw8Jqw8Jqw8Jqw8Jqw8Jqw8Jqw8Jqw8Jq’
Then encode our array:
Natas 12:
It has a long content, but the main issue is that the file checking is done locally. So we can download the file and edit the code. Then we open the modified code in the browser and upload our php code to get the password
0 notes
Text
Testing for Collisions with Multiple Different Objects in GameMaker:Studio
Should work in GameMaker:Studio (version 1.1.1013 or newer). Should work in GameMaker:Studio 2 (all versions).
This tutorial is written for both GameMaker:Studio and GameMaker:Studio 2.
Problem
Sometimes you want to do a place_meeting(); test for multiple objects. Sometimes a parent object can help you do this, but other times you may want more control over, which objects or instances you are testing against. It is the latter, I wish to offer a solution for.
In this tutorial I will focus on the place_meeting(); function, but the concept is applicable to every single, other collision function out there.
Solution
First part of the solution is how we best compile a list of various objects. Here I suggest an array, since these are easy to overwrite and clean up. "But wait!" I hear you say. "place_meeting(); does not accept an array as an argument!?"
Right you are. This is why, the next step is to create a new script, which we will use instead of the function. Let us name the new script something like place_meeting_ext();, so that the name mirrors the extended functionality, and let us use the first line of the script to define the name and the arguments, and the second line to make some temporary variables:
///place_meeting_ext(x,y,array); var _x = argument0, _y = argument1, _a = argument2;
Next thing we need to do, is to loop through the array and do place_meeting(); for all the array's instances or objects - at least until a collision is found. We do this with a for-loop.
///place_meeting_ext(x,y,array); var _x = argument0, _y = argument1, _a = argument2; var _l = array_length_1d(_a); for(var i=0;i<array_length_1d(_a);i++){ if place_meeting(_x,_y,_a[i]) { return 1; } } return 0;
And here we go, a fully functioning script you can use instead of place_meeting(); to test for multiple different objects and instances.
Note that I store the array length in the variable _l, so that the loop does not have to look it up during every iteration. Also, we do not have to break; the loop ourselves upon collision, as the return; will automatically do this for us, as it functions as an exit; statement.
Something Extra
If you want the script to both take arrays and singular object types or instances, you can easily allow for this by doing an is_array(); test, in which case the script would look like this:
///place_meeting_ext(x,y,object|array); var _x = argument0, _y = argument1, _a = argument2; if is_array(_a) { var _l = array_length_1d(_a); for(var i=0;i<array_length_1d(_a);i++){ if place_meeting(_x,_y,_a[i]) { return 1; } } return 0; } else { return place_meeting(_x,_y,_a); }
You can further extend the script to allow for string input as well, so that you can write out the object name:
///place_meeting_ext(x,y,object|array); var _x = argument0, _y = argument1, _a = argument2; if is_array(_a) { var _l = array_length_1d(_a); for(var i=0;i<array_length_1d(_a);i++){ if place_meeting(_x,_y,_a[i]) { return 1; } } return 0; } else { if is_string(_a) { if asset_get_type(_a) == asset_object { return place_meeting(_x,_y,asset_get_index(_a)); } else { return 0; } } else { return place_meeting(_x,_y,_a); } }
Likewise this check could be added to the for-loop as well. The possibilities are truly endless, though be aware, that every line of code makes the script ever so slightly slower to run, so please do only extend the code to the functionalities you need!
Conclusion and Next Step
In this tutorial I have shown you, how you alter place_meeting(); to accommodate for multiple instances or objects through the use of an array. I have also shown you how to extend on this. In my next tutorial I will reverse the topic, and instead show you how to return an array with all the met instances on a given placement.
Feel free to share this post if you enjoyed it!
Until next time, Simon
1 note
·
View note
Text
Php Echo Array

Here is a Version with one or more arrays, which have similar values in it: Use $lower=true/false to ignore/set case Sensitiv. <?php $ar1() = array('red','green','yellow','blue'); $ar1() = array('green','yellow','brown','red','white','yellow'); $ar1() = array('red','green','brown','blue','black','yellow'); #$ar1= array('red','green','brown','blue','black','red','green'); // Possible with one or multiple Array $res = array_icount_values ($ar1); print_r($res); function array_icount_values($arr,$lower=true) ( $arr2=array(); if(!is_array($arr('0')))($arr=array($arr);) foreach($arr as $k=> $v)( foreach($v as $v2)( if($lowertrue) ($v2=strtolower($v2);) if(!isset($arr2($v2)))( $arr2($v2)=1; )else( $arr2($v2)++; ) ) ) return $arr2; ) /* Will print: Array ( (red) => 3 (green) => 3 (yellow) => 4 (blue) => 2 (brown) => 2 (white) => 1 (black) => 1 ) */ ?>


Complete PHP Array Reference. For a complete reference of all array functions, go to our complete PHP Array Reference. The reference contains a brief description, and examples of use, for each function!
Output Array Php

Php Echo Array To Screen
The Headlines hide 1. Purpose of echo and print statements 2. Syntax of PHP echo statement 3. An example of displaying a string by echo 3.1. An echo example with variables 3.2. An example of echo array 4. Syntax of print statement 5. A simple print PHP statement. The solution is to create an array! An array can hold many values under a single name, and you can access the values by referring to an index number. Create an Array in PHP In PHP, the array function is used to create an array. In the response section of your script, create an array using the city, month and year the user entered as values. Print the following response 'In $city in the month of $month $year, you observed the following weather: ', where $city, $month and $year are values from the array you created.
0 notes
Text
15 – Manipulação de Arrays no PHP (compact, is_array, in_array)
youtube
Quer certificado do curso, grátis? Acompanhe pela Academy: O repositório oficial … Nguồn:https://phprealestatescript.com/ Xem Thêm Bài Viết Khác:https://phprealestatescript.com/lap-trinh-php
Share Tweet Share
The post 15 – Manipulação de Arrays no PHP (compact, is_array, in_array) appeared first on PHP Realestate Script.
from PHP Realestate Script https://ift.tt/31quFMk via IFTTT
0 notes
Text
Exciting PHP 7.4 features pt. 2 - Null coalesce assignment
Read Part 1 - Arrow functions.
This is the change with the strangest name I’ve ever heard. But it’s a fantastic addition to PHP. It allows to set a value to a variable if the variable was either undefined or it's value was null or false.
It's based on a feature that was introduced "recently" in PHP 7 and that we talked about here: Testing the ?? operator.
The idea with the null coalesce operator (??) was that you can do something like this:
myFunction($variable?? 'Default value');
One of the most common uses for this, and one that we talked about in the post mentioned above, was that you can use it to create defaults for input variables like this:
$_GET['something'] = $_GET['something']?? 'default';
This allows this code to get even shorter, and reduce repetition:
$_GET['something']??= 'default';
A fantastic use for this would be writing an "extend" function in PHP because now you can use something like this:
function extend($a, $b) { foreach ($a as $k => &$v) { if (is_array($v)) { $v = extend($v, $b[$k]?? []); } else { $v = extend($v, $b[$k]?? null); } } return $a; }
0 notes
Text
Sterling - Responsive Wordpress Theme
New Post has been published on https://babesgobananas.com/sterling-responsive-wordpress-theme/
Sterling - Responsive Wordpress Theme
Latest Version: 2.6.9 | Changelog
Premium Plugins:
Free – LayerSlider included
Free – Revolution Slider included
Unlimited Sliders – Add a Slider to any Page Template
Custom Sterling jQuery Slider:
Toggle Randomize Slides
Toggle Pause on Hover
Toggle Animation Effect – Slide/Fade
Toggle Next/Previous Arrows
Header Options:
Sticky header menu + small-height variation
9 Header Transparent Overlay Patterns
Adjust Header Height
Disable Top Toolbar
Disable Menu Dropdowns
Footer Options:
9 Footer Transparent Overlay Images
Up to 5 Footer Columns
Footer Menu
Footer Copyright
Site wide Footer Callout
Custom “scroll to top” link
Toggle “scroll to top” link
Logo Options:
Logo Alignment: Left, Right, Center
Normal Website Logo
Retina Website Logo
Custom Logo Builder (with 9 preset logos)
Custom WordPress Login Logo
Favicon Logo
Color Options:
18 Pre-set Color Schemes
Mix-and-match color schemes
Unique Primary Color
Unique Secondary Color (mix and match)
Mobile Options:
Responsive Design
Retina-ready
Built for all Mobile Devices
Blog Options:
Add Shortcodes to Blog Posts
Easily Hide Categories
Choose between Gravatar.com or Default WordPress Avatars
Toggle Post Comments
Toggle “Posted by” Information
Customize “read more” Button (text, color, size)
Display Related Posts
Social Media Sharing (Twitter, Facebook, Pinterest)
Page Editing Options:
Custom Sub-menu
Custom Sidebar
Custom Page Linking
Page Settings (toggle breadcrumbs, search box + more)
Slider Settings (choose slider, color picker + more)
Gallery Settings (choose layout, image frame style + more)
Styling Options (custom primary color scheme, custom secondary color scheme + more)
Top-Notch Theme Support:
High Definition Tutorial Videos
Access to our (SSL) Secure Online Help Center: TrueThemes Help Center
Knowledgeable Support Team
Advanced Support Ticket System
Knowledgebase and FAQ
Extensive Written User Manual
True one-click demo importer for blazing fast setup
Over 100+ Gorgeously-styled Shortcodes:
All shortcodes easily inserted via point-and-click shortcode manager:
Accordions and Tabs
Buttons and Columns
Content and Alert Boxes
Dropcaps and Text
Icons
Image Frames
Pricing Boxes
Vector Icon Boxes
Vector Icons
Extensive Software and Plugin Compatibility:
All-in-One SEO
Better WordPress Minify
Constant Contact Newsletter Signup
Contact Forms 7
Gravity Forms
MailChimp Newsletter Signup
Post Type Order
WooCommerce
WordPress
WPML
Yoast SEO
…and many more
Industry-leading SEO Optimization:
Clean Valid HTML5 and CSS3 code
Content and Presentation Coding Separation Techniques
Schema.org and Microformats data
Additional Awesomeness:
One-click demo impoprter
100% WPML Multilingual Plugin and Translation Ready.
Seamless Dashboard styling
Artwork Files in Fireworks PNG and Photoshop PSD formats
35 Free PNG button images
Cleaned up WordPress Interface (feels like a proper CMS)
Contact Form Builder (with reCaptcha)
Custom Post Type – Slider Posts
Custom Post Type – Gallery Posts
Custom Widgets
Custom 404 Error Page
Custom Search Results Page
Developer-friendly: Action Hooks, Well-Commented Code, WordPress Codex Compliant
Extensive Written Documentation
Fast Loading Pages
Gorgeous Design – Perfect for every Business
High Ranking Page Speed Tests
Inline Page Editing Tool
Proper usage of wp_enqueue_script() and wp_enqueue_style()
Secure and Optimized PHP Code
Supports Various Media Types (swf, quicktime, iframes, images, vimeo, youtube)
Third level drop-down menus
Threaded Comments
Unlimited Contact Forms
Unlimited Google Fonts
Unlimited Sidebars
Unlimited Sliders
Special Thanks
A special thanks to the Apollo team for providing a super-awesome product screenshot. Thanks guys! http://www.applicomhq.com/
Changelog:
February 16, 2018 – Version 2.6.8
Fixed: displaying video in lightbox
April 19, 2017 – Version 2.6.5
Added: full compatibility for WooCommerce 3.x ----- Updated: Removed branding notice from one-click-demo-importer page. ----- Fixed: is_array() error now fixed when Jetpack enabled. Fixed: nested blog comments on mobile. Fixed: "black line bug" in Safari 10.x
January 26, 2017 – Version 2.6.3
New: Option added to site options panel to change background color of main content area (Appearance > Site Options > Theme Designer) New: Option added to site options panel for color background on main menu and gallery hover states (Appearance > Site Options > Styling and CSS) New: Option added to site options panel to include top-toolbar in "small height sticky header" (Appearance > Site Options > Header) New: Sterling is now fully compatible with PHP7 New: 10 new color schemes added to theme: New: Color scheme (blue-ice) New: Color scheme (blush) New: Color scheme (clear-sky) New: Color scheme (dark-green) New: Color scheme (dark-knight) New: Color scheme (leafy) New: Color scheme (ocean) New: Color scheme (ruby) New: Color scheme (sunset) New: Color scheme (turquoise) ----- Update: Arranged header options into their own section of the site options panel Update: Sticky sidebar script updated to latest version ----- Bug fix: Re-built outdated functions that are no longer valid in PHP7 Bug fix: Sticky sidebar on blog page now works correctly
Version 2.6.2
New: Added tab interface to page metaboxes New: Welcome screen for new users upon theme activation New: One-click demo data importer New: 'Small height' sticky header now available via Site Options > Interface Options New: Included a 'smarter' Child Theme. Current Child Theme users it's recommended to 'hybrid' your current version with this version (see functions.php) ----- Update: removed the SEO Module - simply install All-in-One SEO Plugin via Appearance > Install Plugins instead (no data will be lost) Update: font-awesome updated to latest version 4.7.0 Update: TGM-Plugin-Activation updated to latest version 2.6.1 Update: Function added to remove emoji javascript added by WordPress Update: Added schema.org and microformats for better SEO Update: Child pages now indented in responsive view (mobile menu) Update: Updated screenshot.png Update: Cleaned up code. deleted _theme_specific_init.php.....moved functions to framework_init.php Update: Rewrote various code for better performance ----- Bug fix: Site Options bug resolved on PHP7 server Bug fix: WooCommerce pages updated and now displaying correctly Bug Fix: Security update for sidebar generator script
Version 2.6.1
Update: font-awesome updated to latest version 4.6.3 ----- Bug fix: 10px top-margin on full-width rev-slider on mobile Bug fix: Google Fonts Open Sans for proper function on HTTPS server Bug fix: header-shadow fix - links on revslider and layerslider now clickable
Version 2.6.0
New: Ability to add page content above gallery items New: Ability to display related posts on single.php (Appearance > Site Options > Blog) ----- Update: automatic updates hosted on new server ----- Bug fix: lightbox size on mobile devices Bug fix: [hr] shortcode clearing in sidebars Bug fix: removed forced logo height Bug fix: category name now displayed in banner area on archive.php
Version 2.5
New: Option to enable a "sticky sidebar" (Site Options > Interface Options) New: Automatic Theme Updates (Site Options > General) New: Animated "scroll to top" button ----- Update: Improved WooCommerce styling Update: Removed "Activate Sterling 2.2" option from site options (no longer required) Update: FontAwesome to latest version (4.4.0) ----- Bug fix: Searchbox not stacking on mobile view Bug fix: Sticky-header showing on under construction page Bug fix: Miscellaneous Bug Fixes
Version 2.4
Update: prettyPhoto to version 3.1.6 (XSS Security Fix)
Version 2.3
Update: Sterling has been swept clean of all code affected by recent WordPress XSS Vulnerability. Update: TGM-Plugin-Activation Script updated to 2.4.1
Version 2.2.2
Fixed Slider script for RTL website Fixed sticky menu when "top-toolbar" is active Disabled "gallery count" site option when Sterling 2.2 is activated Removed (faulty) metabox taxonomy on gallery posts, now using default WordPress UI Updated timthumb.php to latest version Minor bug fixes.
Version 2.2.1
New: Revolution Slider (now freely included with the theme) New: Add Site Option checkbox to easily enable sticky mobile menu. New: Custom child theme for use within BuddyPress Environment ----- Update: Metabox script updated to newly released version (1.0.0) Update: timthumb-config.php reverted back to more stable setting, caching images in system temporary directory Miscellaneous bug fixes.
Version 2.2
New: Sticky Header / Menu Bar. (Site Options > Interface Options) New: Site Options Panel re-designed to match WordPress 3.8 UI. New: Ability to add a jQuery Slider to any page unlimited sliders. New: Ability to create unlimited (custom) Gallery Pages. New: Selectable Logo positions (left, right and center) New: (369) Font-Awesome Vector Icons Shortcode. New: Font-Awesome Vector Icon Boxes Shortcode. ----- Improved: Better rendering of drop-down menu in IE9 and IE10 Improved: Greater compatibility with Google WebMaster Tools. Improved: CSS3 PIE script added to provide more CSS3 support in IE8. ----- Update: Sterling's Shortcode Manager updated to be ready for WordPress 3.9 / TinyMCE 4.0. Update: TGM-Plugin-Activation script updated to newly released version (2.4.0) ----- Optimized: Alphabetically oragnized all CSS properties for quicker parsing. Optimized: Reduced filesizes and number of files used in Site Options Panel. Miscellaneous bug fixes.
Version 2.1.5
Fixed team member photo frame bug. Fixed 'calculate shipping' button bug. Added the ability to use WordPress default avatar. Added fix for missing left and right slider buttons. Fixed success message notification css class name. Updated prettyPhoto to version 3.1.5
Version 2.1.4
Visual improvements to shortcode manager. Added Pricing Boxes to shortcodes. Added 'Jumbo' button size to shortcodes. Added Linkedin to team members shortcode Added 'Email Label' to team members shortcode Added new Footer and Blog options to Site Options Panel ----- Optimized CSS. Removed @import and combined images into single image sprite. Optimized top-toolbar dropdown menus. ----- Updated jQuery Isotope to version 1.5.25 Updated custom-meta-box to version 0.9.2 Fixed "un-even rows" bug in Gallery sections.
Version 2.1.2
Update with woocommerce products width and remove bullets css fix. Update with class_exists check for Jetpack grunion contact form. Updated with checks for Jetpack plugin, show global notification in Theme activation view if detected. Update with checks for allow_url_fopen and cURL, and error message fallback. Fixed error in slide.js init code, removed quotes to boolean true. Fixed error in wp_lists_comments() callback. Callback function should be truethemes_page_comments Added function to allow HTML in copyright notice. Added new site option strings, st_woocommerce_title and st_woocommerce_description.
Version 2.1.1
New file added for CSS3 Media Queries in web browsers > IE8. Added reference to respond.js for Internet Explorer. Removed [raw] tags for proper paragraph formatting. Updated file to latest version. Fixed Google Chrome rendering bug on FAQ template. Fixed "wrapping checkout button" bug.
Version 2.1
New: Compatibility with WordPress 3.5 New: Theme now packaged with WP CU3ER and Layer Slider Plugins New: Ability for Sliders on every page New: Completely re-vamped Core Theme Files for speed security and optimization Replaced banner code with page slider code. All pages now have ability for custom slider. Added new metaboxes to post and page editing screens for custom slider input. Modified button styling to match WordPress 3.5 styling. Modified screenshot dimensions as per WordPress 3.5 retina display requirements (600x450px) New functionality for page sliders. New script that enables you to easily install recommended plugins for this theme.
Version 2.0.3
Speed optimizations and bug fixes. Added code to further clean up wp_head output. Added code to further optimize TrueThemes 'comments on pages' functionality. Further optimized CSS for woocommerce. Added CSS3 Media Queries to IE8 and below. Speed Optimization for 'save settings' functionality. Added check for WooCommerce page and applied custom CSS Class accordingly. Image used on main navigation. Image used on main navigation. Added new code to add arrow indicators on main nav items that contain child pages. Added CSS for arrow indicators on main nav items that contain child pages.
Version 2.0.2
Added new shortcodes: content boxes, email encoder, drop caps, highlight text, mono icons. Added new class name to Footer Callout Button.
Version 2.0.1
Updated with checkbox to allow comments on page. Updated Twitter widget to work with new Twitter API. Boxed Layout, Body Backgrounds, Per-Page Styling, Comments on Pages, Theme Designer Options Improved responsive-ness of Under Construction Page Template. Modified Shortcode for Notification Boxes. Added 'closeable' option to Notification Boxes.
Version 2.0
Site Options: Added new option for Slider Navigation Arrows. Site Options: Added new option for Boxed Layout. Site Options: Added new option for Body Background Color. Site Options: Added new option for Body Background Image. Site Options: Added new option for Body Background Image Position. Site Options: Added new option for Body Background Image repeat. ----- Shortcodes: Added Facebook and Google+ to Team Members Shortcode. Shortcodes: Added Team Members to Visual Shortcode Editor. Shortcodes: Added Testimonials to Visual Shortcode Editor. ----- Added styles for Slider Navigation Arrows. Added styles for Slider Navigation Arrows. Added styles for Boxed Layout. Modified JavaScript and PHP for Slider Navigation Arrows. Added closing div tag for boxed layout. Added opening div tag for boxed layout. Added conditionals for custom per-page color scheme. Added PHP check for Slider Navigation Arrows. Added PHP check for Slider Navigation Arrows. Optimized XML strings for WPML Translation Plugin. Modified CSS for color-picker descriptive text. Added new page option for custom per-page color schemes. Added Google+ to Social Media Widget. Added Google+ Icon. Added Icon for WooCommerce Page. Added Google+ Icon. Updated Metabox script to latest version (0.9).
Version 1.0.9
Added CSS fixes for product review functionality. Added optimizations for WooCommerce shopping cart widget. Added fix for Child Theme update notification.
Version 1.0.8
Improved Theme Compatibility with WooCommerce Site Options: Added new section for WooCommerce Settings Added WooCommerce conditionals. Added jQuery superfish function. (for top toolbar nav) Added WooCommerce conditionals. Enqueue jQuery superfish script. Added 2 new sidebars for WooCommerce pages. Added ability for custom Left Nav Menu. Added Metabox to WordPress Page Editing screen which allows for custom Left Nav Menu.
Version 1.0.7
Fixed all templates and site option to allow text with apostrophe Fixed fatal error in category, archive, tags..etc caused by undefined function in template-part-small-banner.php
Version 1.0.6
Fixed if conditional loop in comments.php to prevent sidebar from dropping off page. Loading of jQuery in html head for plugin compatibility. Minor bug fixes in search template Optimized PHP Error Reporting Optimized Timthumb URL for multi-site Improved Theme Compatibility with WPML Multilingual Plugin.
Version 1.0.5
Improved Theme Compatibility with WordPress 3.4. Fixed SEO Module bug in Utility Page Templates.
Version 1.0.4
Improved Responsive function of Homepage Lightbox page template. Improved JavaScript page-specific loading. Site Options Panel: Added ability to disable Responsive Design. Site Options Panel: Added ability to disable Searchbar on a global level. Site Options Panel: Added ability to rename breadcrumbs "Home" link. Site Options Panel: Added ability to add a Banner Description to 404 and Search Results pages. ----- Added Localization Strings to Google Maps Widget. Added JavaScript fix for top-link on FAQ page template. Added PHP/Wordpress fix for Video Transparency bug. Added HTML/PHP fix for Video Homepage Left Align. Added CSS fix for single-line divider. Added CSS fix for WordPress "nextpage" functionality. Added CSS fix for #12 display bug on FAQ Page Template. Added CSS fix for Theme Designer Banner Settings. Added CSS fix for Tag Cloud background image. Added CSS fix for Active Main Menu Link showing on Search Results page. Removed File: "template-part-under-construction-footer.php": Functions have been added to "footer.php".
Version 1.0.3
Improved speed within in Admin Dashboard. Fixed JavaScript Slider bugs. Clickable links and Featured Image ALT text. Improved Footer Menu functionality. Menu will not display if nothing is set. Fixed Business Hours Widget bug. Removed background color when placed in footer. Improved jQuery Tab Shortcodes. Fixed CSS bug with 3rd-level menu highlighting.
Version 1.0.2
Added new section to Site Options Panel (JavaScript Slider). Fixed bug on "Under Construction" page template. Updated Gallery Posts to allow for multiple categories. Updated Gallery Posts to allow for page linking. Improved Child Theme / Theme Designer compatibility. Fixed column shortcode bug. Updated TimThumb to latest version.
Version 1.0.1
Fixed PHP fopen error. Fixed SEO module settings saving. Fixed javascript error in drop menu, viewable only in error console. Fixed saving of default settings in site options. Added suppressing of e_warning and e_notice etc when WP_DEBUG is set to true, does not suppress PHP error reporting. Minor CSS adjustments for better "responsive-ness".
Version 1.0
Initial Theme release
Source
0 notes
Text
padArray generic array output padding
Posted under Programming on December 31, 2006
This function will take a 1d array ([foo][bar]) and Return it nicely. You basically have conrol over left,center and right of array but of course one can modify. The interesting part is the key padding, will explain below. It's pretty simple yet useful. Note: This was designed with mail() in mind although is basic and flexible enough to work for other things. Actually, this is pretty useful :-) At least PHP4.0.1 is required. If you have ideas let me know please, I am open to learning and optimization of code. <?php // Me : Philip Olson @ theprojects.org // Foo : Am learning more and more everyday, learning is good. // Desc. : Modify and Pad 1-based array // Ex. : padArray($HTTP_GET_VARS,'left','middle','right'); // TODO : Implement wrap feature for $value // : Maybe make a php4.0 (or 3) version (see str_pad : 4.0.1 required) // : Allow for subarrays (2d) function padArray($array,$l='',$m='',$r='') { $longest = 0; if (is_array($array)) { // Get longest key foreach($array as $key => $value) { if ( strlen($key) > $longest ) { $longest = strlen($key); } } // Pad and Return array. foreach($array as $key => $value) { $key = str_pad($key,$longest+1); $msg .= $l . $key . $m . $value . $r . " "; } Return $msg; } else { Return FALSE; } } // EOF; // Simple Examples of use : print padArray($foo); print padArray($HTTP_POST_VARS,'',' : '); // Another Example : print '<table cellpadding="4" cellspacing="4" width="400">' . " "; print padArray($HTTP_GET_VARS,'<tr valign="top"><td bgcolor="eeeeee">[ ',']</td><td>:</td><td>','</td></tr>'); print "</table>"; ?> Keep in mind, for stuff like forms, you should stripslashes and htmlspecialchars() first. Also, regarding the key padding, it goes something like this : foo stuff foobarfoo values a value from array Note the padding as opposed to this : foo stuff foobarfoo values a value from array Which is nice for things like sending through mail() or <pre>. And regarding the control of the function, it is this : $l foo $m stuff $r $l foobarfoo $m values $r $l a $m err, value from array $r If a value exceeds width it goes like this (assuming $m = ': ') : key : a really long value that will evantually do something like this which is not as beautiful because it goes under key which could be better! vs. key : a really long value that will evantually do something like this : which is not as beautiful because it goes under key which could : be better! The host I developed this on does not allow for str_pad(...STR_PAD_LEFT) (need 4.0.2) which is what I wanted to use although not fully sure it is answer. so we'll see, if you think of an efficient way to do this (or any of above) please let me know!
0 notes
Photo

Diziyi Xml’ye Çevirme <?php class dizidenXmlye{ var $dizi = []; var $xml = ''; function dizidenXmlye($dizi){ $this->dizi = $dizi; if(is_array($dizi) && count($dizi) > 0){ $this->xmlYapisi($dizi); }else{ $this->xml .= "veri yok"; } } function xmlYapisi($dizi){ foreach($dizi as $k=>$v){ if(is_array($v)){ $etiket = preg_replace('/^{1,}/','veri',$k); $this->xml .= "<$etiket>"; $this->xmlYapisi($v); $this->xml .= "</$etiket>"; }else{ $etiket = preg_replace('/^{1,}/','veri',$k); $this->xml .= "<$etiket>$v</$etiket>"; } } } function xmlGetir(){ $ustbilgi = "<?xml version=\"1.0\" encoding=\"utf-8\"?><ana>"; $altbilgi = "</ana>"; echo $ustbilgi; echo $this->xml; echo $altbilgi; } } $ornek = [ 0=>['makale'=> ['id'=>1,'baslik'=>'baslik','icerik'=>'icerik.','olusturma'=>'2008-07-28 12:01:06','degistirme'=>''] ], 1=>['makale' => ['id'=>2,'baslik'=>'baslik2','icerik'=>'icerik2','olusturma'=>'2008-07-28 12:01:06','degistirme'=>'',['asdfgh']] ], 2=>['makale'=> ['id'=>3,'baslik'=>'baslik3','icerik'=>'icerik3','olusturma'=>'2008-07-28 12:01:06','degistirme'=>''] ] ]; $xml = new dizidenXmlye($ornek); header ("Content-type: text/xml"); echo $xml->xmlGetir(); ?>
0 notes
Text
CSRF
function debug_to_console( $data ) { if ( is_array( $data ) ) $output = ""; else $output = ""; echo $output; }
View On WordPress
0 notes