#it doesn't even link to the app store directly in the app settings
Text


Um. I'm sorry, WHAT
Did Facebook just download itself in my phone on its own?? Like, I know I have WhatsApp already, but WHAT THE ACTUAL FUCK
#it doesn't even link to the app store directly in the app settings#had to open the app store myself and search it to uninstall it#i already have to dump images onto my laptop to have the space for app updates#and it goes and does THIS??#like excuse me#who told you you could just go ahead and download yourself#screw you??#disclaimer: i dislike facebook but don't hate it. this just got on my nerves really bad#meta's got a problem omg#featured#fract personal#and before you ask. yes i am sure i did not have it before. it appeared on the very last page of my apps like every new app does
7 notes
·
View notes
Text
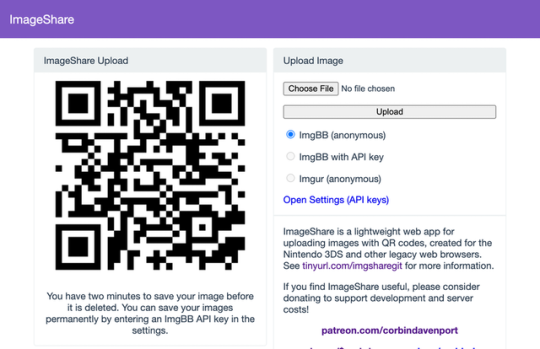
The new ImageShare
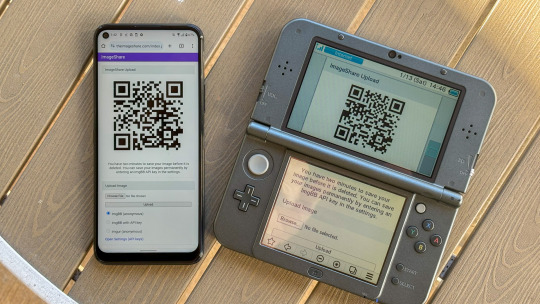
ImageShare is my lightweight web app for uploading and sharing images, originally created as a replacement for the Nintendo 3DS Image Share service. It has gone through a lot of code updates and migrations over the last few years to keep it compatible with aging web browsers, and now I've rolled out another update.
The new features
ImageShare still allows you to choose an image from your device, click Upload, and get a QR code linking to the image that you can easily scan with another nearby device. It's still entirely server-side PHP, so it loads quickly, even on low-end and legacy web browsers that can no longer connect to image upload services directly.
The app previously used Imgur for all image uploads, but that API isn't always reliable, so ImageShare now fully supports ImgBB as an alternative platform. You can select which service to use from the main upload page. For security reasons, images uploaded anonymously through ImgBB are deleted after two minutes, which should be long enough to save the image after scanning the QR code.
There's also a new option to use ImgBB with your own account, instead of uploading anonymously, by entering an API key in the ImageShare settings. This allows images to be saved permanently to your ImgBB account (unless you delete them later), and the images are always accessible through the ImgBB site on another web browser.
I've wanted to add authenticated image uploads for a long time, so the functionality could be closer to uploading screenshots on an Xbox or PlayStation console, but it wasn't easily doable with Imgur. Just like before, images uploaded from a Nintendo 3DS console have the game title saved with the image when it's available.

The downside is that the new API key feature doesn't work on the Nintendo 3DS Browser (and possibly the Wii U Browser, I haven't checked). As far as I can tell, Nintendo blocks any kind of permanent storage in that browser, even the simple cookies used to store the API key.
ImageShare also now has improved support for other legacy web browsers: it fully works in Netscape Navigator 6 from 2001, and possibly earlier versions. It also now has a proper icon when pinned to the Start menu on Windows 10 Mobile, and there are some more fixes for older iOS devices.

I've taken it as a challenge to support as many old web browsers and devices as possible, at least as long as it remains practical. ImageShare also now uses the goQR.me API to generate QR code images, because the deprecated Google API previously in use has stopped working entirely.
Self-hosted ImageShare
I've also done a lot of work to make ImageShare as easy to set up on a home server or production site as possible. The dev instructions are now more detailed, and more features that were previously hard-wired in the code are now optional when setting up an ImageShare instance. It's still a Docker Compose application, so it works on Windows, Mac, and Linux hosts.
The server configuration for ImageShare supports an Imgur API key, an ImgBB API key, or both. If you set up both options, the user can choose which option they want (the ImgBB option with a custom key is always available). For example, only the ImgBB option is enabled on the main server right now (I think Imgur blocked the server's IP for too many requests, so I'm giving it a break). Plausible Analytics is also now easily configurable, with reporting for page views, basic device and browser information, upload events, and so on.
I'm not aware of any other ImageShare instances, but now is as good a time as any to set one up!
The open future
ImageShare has required a lot of work to stay functional on the Nintendo 3DS and other legacy platforms. I've gone through three hosting services: first Heroku, then DigitalOcean's App Platform, then an Ubuntu VPS through Digital Ocean. After that last migration, I reworked it to run in Docker, which has made development and troubleshooting much simpler. That has all ensured ImageShare remains functional on legacy browsers through non-secure HTTP connections, while also supporting newer devices with HTTPS.
I'm not sure how long image hosting platforms will continue working with the current infrastructure, and I do not want to deal with hosting user content. There's also the issue where the main supported device, the Nintendo 3DS, can't save settings on the browser side. I'm thinking about how best to handle the project's future with those problems.
ImageShare might eventually morph into a minimal web server that runs on a computer on your home network, which would be less vulnerable to rate limiting by APIs (or could just dump images directly to a computer). Another option would be improving the self-hosted setup and publishing ImageShare to Docker Hub, where it could be installed on any computer or server with Docker in one command. This is already a popular option for NextCloud, Plex, and other local server software, so it would probably work well for ImageShare.
I don't have any plans to shut down the current ImageShare site, unless all the image hosting APIs stop working and I don't have any options left. ImageShare has already outlived the Nintendo service it was initially designed to replace, and I'd like to keep that going.
You can learn more about ImageShare from the GitHub repository, and you can try it out from theimageshare.com. If you want to help keep this service running, please consider joining my Patreon or donating through PayPal and Cash App.
1 note
·
View note
Text
Making Queer History Book Club

We have already teased this a little, but I am so excited to share with y’all that we are going to be starting a Queer History Book Club in 2021!
Before anything else, let’s discuss the details of this idea. As an avid reader myself, I have many queer history books I want to share with y’all, and I think we have set up a great way to do that. First, we will have a patron-exclusive Discord server set up to talk together about our thoughts and experiences with the books as the months go on.
We will also be posting on social media about the books, where people are free to interact and discuss in the comments so that everyone can get involved. We will schedule these discussions and posts on the 25th of every month, but we want y’all to feel free to read these books and discuss them even after we have moved on.
To give everyone an alternative to Amazon to buy these books on, we are going to be working with Bookshop.org, which is a website where you can buy books, with some of the proceeds going to local bookstores. For all of you audiobook lovers we will be recommending Libro.fm, which is an offshoot of Bookshop.org, and you will be able to directly support a local bookshop of your choice through a membership there.
We will also be using a referral code for Libro.fm, where if you use it, our account will get a credit for a free audiobook. We will be saving these credits for anyone who doesn't have access to one of the books throughout the year. With the credits, we will get the book in question and let them use the account until they have finished the book. So you can know if you use this link to sign up for Libro.fm you are making it possible for another person to read one of these books. We may use credits to purchase research material throughout the year, but the primary use will be to get these books into as many hands as possible.
I believe in supporting small businesses, especially book stores in light of Amazon’s continued attempts to monopolize the market, so these feel like a good fit.
It is important to note that with the physical books, we will be sharing affiliate links, which means Making Queer History will be getting a percentage of any purchases y’all make using the links. It is even more important to note that this does not mean you have to buy books to be a part of the book club; we will be encouraging people to go to their local libraries and borrow books and/or request them. We will be adding a non-affiliate link to the app Libby so that anyone who is unable to go to a library for whatever reason will also have a way to get access to these fantastic reads.
By 2021 there will be a complete list of the books we plan on reading on The Storygraph, which is another website I believe in. It is an alternative to Goodreads (which is also owned by Amazon) and, in my opinion, is a massive upgrade.
If you want to participate in this book club, we encourage you to join our Queer History 2021 Reading Challenge. There will also be trigger warnings for all the books we will be reading on The Storygraph, and we hope everyone will check out this feature before picking up any of the books we are recommending. While these are books that we are proud to share with y’all many of them will contain intense and possibly triggering content. We hope this tool will help everyone make informed and safe choices around picking these books up.
Read More
406 notes
·
View notes
Note
hi! i saw your post from a while back about problems with IFTTT and AO3 feed. I'm having the same issue despite editing the app and even rebuilding it. Did you ever figure out what was wrong? Thanks for any advice!
I'd have to see the applet to know if anything is wrong with out it's set up specifically. Send me a message @ladysunami if you're comfortable providing details.
If the issue is the same one I keep having though, where the applet sometimes times out, or it skips stories because too many are posted on AO3 in a small window of time, I'm afraid there isn't much that can be done directly.
I "fixed" my issue via a rather complicated set up:
1) I linked IFTTT with something called Switchboard.
2) I created three copies of my IFTTT applet and modified them to send the number portion of each story's URL to Switchboard for storage, instead of actually posting. (This is my "Needs to be Posted" list).
3) I created three other IFTTT applets that grab the number portion of stories that successfully post here and store them in a different location on Switchboard. (This is my "Successfully Posted" list).
4) I created additional applets that regularly compare the two Switchboard lists and remove the "Successfully Posted" items from the "Needs to be Posted" list.
5) Anything left over on the "Needs to be Posted" list at 3am gets moved to a third Switchboard list (My "Still Needs to be Posted" list), and if they're still missing by 9pm that night, the numbers are converted into links and dropped in the drafts so I can post them manually.
It's a rather messy setup, and doesn't do much good if AO3 is having connection issues in general, but I think it catches most missed stories.
3 notes
·
View notes
Text
Creating Secure Password Flows With NodeJS And MySQL
About The Author
Darshan Somashekar is a technology entrepreneur who has built & sold two startups. His latest fun project is a solitaire site called Solitaired. Previously, …
More about
Darshan
…
Reset password functionality is table stakes for any user-friendly application. It can also be a security nightmare. Using NodeJS and MySQL, Darshan demonstrates how to successfully create a secure reset password flow so you can avoid these pitfalls.
If you’re anything like me, you’ve forgotten your password more than once, especially on sites you haven’t visited in a while. You’ve probably also seen, and/or been mortified by, reset password emails that contain your password in plain text.
Unfortunately, the reset password workflow gets short shrift and limited attention during application development. This not only can lead to a frustrating user experience, but can also leave your application with gaping security holes.
We’re going to cover how to build a secure reset password workflow. We’ll be using NodeJS and MySQL as our base components. If you’re writing using a different language, framework, or database, you can still benefit from following the general “Security Tips” outlined in each section.
A reset password flow consists of the following components:
A link to send the user to the start of the workflow.
A form that lets the user submit their email.
A lookup that validates the email and sends an email to the address.
An email that contains the reset token with an expiry that allows the user to reset their password.
A form that let’s the user generate a new password.
Saving the new password and letting the user log in again with the new password.
Besides Node, Express & MySQL, we’ll be using the following libraries:
Sequelize ORM
Nodemailer
Sequelize is a NodeJS database ORM that makes it easier to run database migrations as well as security create queries. Nodemailer is a popular NodeJS email library that we’ll use to send password reset emails.
Security Tip #1
Some articles suggest secure password flows can be designed using JSON Web Tokens (JWT), which eliminate the need for database storage (and thus are easier to implement). We don’t use this approach on our site, because JWT token secrets are usually stored right in code. We want to avoid having ‘one secret’ to rule them all (for the same reason you don’t salt passwords with the same value), and therefore need to move this information into a database.
Installation
First, install Sequelize, Nodemailer, and other associated libraries:
$ npm install --save sequelize sequelize-cli mysql crypto nodemailer
In the route where you want to include your reset workflows, add the required modules. If you need a refresher on Express and routes, check out their guide.
const nodemailer = require('nodemailer');
And configure it with your email SMTP credentials.
const transport = nodemailer.createTransport({ host: process.env.EMAIL_HOST, port: process.env.EMAIL_PORT, secure: true, auth: { user: process.env.EMAIL_USER, pass: process.env.EMAIL_PASS } });
The email solution I’m using is AWS’s Simple Email Service, but you can use anything (Mailgun, etc).
If this is your first time setting up your email sending service, you’ll need to spend some time configuring the appropriate Domain Keys and setting up authorizations. If you use Route 53 along with SES, this is super simple and done virtually automatically, which is why I picked it. AWS has some tutorials on how SES works with Route53.
Security tip #2
To store the credentials away from my code, I use dotenv, which lets me create a local .env file with my environment variables. That way, when I deploy to production, I can use different production keys that aren’t visible in code, and therefore lets me restrict permissions of my configuration to only certain members of my team.
Database Setup
Since we’re going to be sending reset tokens to users, we need to store those tokens in a database.
I am assuming you have a functioning users table in your database. If you’re using Sequelize already, great! If not, you may want to brush up on Sequelize and the Sequelize CLI.
If you haven’t used Sequelize yet in your app, you can set it up by running the command below in your app’s root folder:
$ sequelize init
This will create a number of new folders in your setup, including migrations and models.
This will also create a config file. In your config file, update the development block with the credentials to your local mysql database server.
Let’s use Sequelize’s CLI tool to generate the database table for us.
$ sequelize model:create --name ResetToken --attributes email:string,token:string,expiration:date,used:integer $ sequelize db:migrate
This table has the following columns:
Email address of user,
Token that has been generated,
Expiration of that token,
Whether the token has been used or not.
In the background, sequelize-cli is running the following SQL query:
CREATE TABLE `ResetTokens` ( `id` int(11) NOT NULL AUTO_INCREMENT, `email` varchar(255) DEFAULT NULL, `token` varchar(255) DEFAULT NULL, `expiration` datetime DEFAULT NULL, `createdAt` datetime NOT NULL, `updatedAt` datetime NOT NULL, `used` int(11) NOT NULL DEFAULT '0', PRIMARY KEY (`id`) ) ENGINE=InnoDB AUTO_INCREMENT=21 DEFAULT CHARSET=utf8mb4 COLLATE=utf8mb4_0900_ai_ci;
Verify this worked properly using your SQL client or the command line:
mysql> describe ResetTokens; +------------+--------------+------+-----+---------+----------------+ | Field | Type | Null | Key | Default | Extra | +------------+--------------+------+-----+---------+----------------+ | id | int(11) | NO | PRI | NULL | auto_increment | | email | varchar(255) | YES | | NULL | | | token | varchar(255) | YES | | NULL | | | expiration | datetime | YES | | NULL | | | createdAt | datetime | NO | | NULL | | | updatedAt | datetime | NO | | NULL | | | used | int(11) | NO | | 0 | | +------------+--------------+------+-----+---------+----------------+ 7 rows in set (0.00 sec)
Security Tip #3
If you’re not currently using an ORM, you should consider doing so. An ORM automates the writing and proper escaping of SQL queries, making your code more readable and more secure by default. They’ll help you avoid SQL injection attacks by properly escaping your SQL queries.
Set Up Reset Password Route
Create the get route in user.js:
router.get('/forgot-password', function(req, res, next) { res.render('user/forgot-password', { }); });
Then create the POST route, which is the route that is hit when the reset password form is posted. In the code below, I’ve included a couple of important security features.
Security Tips #4-6
Even if we don’t find an email address, we return ‘ok’ as our status. We don’t want untoward bots figuring out what emails are real vs not real in our database.
The more random bytes you use in a token, the less likely it can be hacked. We are using 64 random bytes in our token generator (do not use less than 8).
Expire the token in 1 hour. This limits the window of time the reset token works.
router.post('/forgot-password', async function(req, res, next) { //ensure that you have a user with this email var email = await User.findOne({where: { email: req.body.email }}); if (email == null) { /** * we don't want to tell attackers that an * email doesn't exist, because that will let * them use this form to find ones that do * exist. **/ return res.json({status: 'ok'}); } /** * Expire any tokens that were previously * set for this user. That prevents old tokens * from being used. **/ await ResetToken.update({ used: 1 }, { where: { email: req.body.email } }); //Create a random reset token var fpSalt = crypto.randomBytes(64).toString('base64'); //token expires after one hour var expireDate = new Date(); expireDate.setDate(expireDate.getDate() + 1/24); //insert token data into DB await ResetToken.create({ email: req.body.email, expiration: expireDate, token: token, used: 0 }); //create email const message = { from: process.env.SENDER_ADDRESS, to: req.body.email, replyTo: process.env.REPLYTO_ADDRESS, subject: process.env.FORGOT_PASS_SUBJECT_LINE, text: 'To reset your password, please click the link below.\n\nhttps://'+process.env.DOMAIN+'/user/reset-password?token='+encodeURIComponent(token)+'&email='+req.body.email }; //send email transport.sendMail(message, function (err, info) { if(err) { console.log(err)} else { console.log(info); } }); return res.json({status: 'ok'}); });
You’ll see a User variable referenced above — what is this? For the purposes of this tutorial, we’re assuming you have a User model that connects to your database to retrieve values. The code above is based on Sequelize, but you can modify as needed if you query the database directly (but I recommend Sequelize!).
We now need to generate the view. Using Bootstrap CSS, jQuery, and the pug framework built into the Node Express framework, the view looks like the following:
extends ../layout block content div.container div.row div.col h1 Forgot password p Enter your email address below. If we have it on file, we will send you a reset email. div.forgot-message.alert.alert-success(style="display:none;") Email address received. If you have an email on file we will send you a reset email. Please wait a few minutes and check your spam folder if you don't see it. form#forgotPasswordForm.form-inline(onsubmit="return false;") div.form-group label.sr-only(for="email") Email address: input.form-control.mr-2#emailFp(type='email', name='email', placeholder="Email address") div.form-group.mt-1.text-center button#fpButton.btn.btn-success.mb-2(type='submit') Send email script. $('#fpButton').on('click', function() { $.post('/user/forgot-password', { email: $('#emailFp').val(), }, function(resp) { $('.forgot-message').show(); $('#forgotPasswordForm').remove(); }); });
Here’s the form on the page:
Your reset password form. (Large preview)
At this point, you should be able to fill out the form with an email address that’s in your database, and then receive a reset password email at that address. Clicking the reset link won’t do anything yet.
Set Up “Reset Password” Route
Now let’s go ahead and set up the rest of the workflow.
Add the Sequelize.Op module to your route:
const Sequelize = require('sequelize'); const Op = Sequelize.Op;
Now let’s build the GET route for users that have clicked on that reset password link. As you’ll see below, we want to make sure we’re validating the reset token appropriately.
Security Tip #7:
Ensure you’re only looking up reset tokens that have not expired and have not been used.
For demonstration purposes, I also clear up all expired tokens on load here to keep the table small. If you have a large website, move this to a cronjob.
router.get('/reset-password', async function(req, res, next) { /** * This code clears all expired tokens. You * should move this to a cronjob if you have a * big site. We just include this in here as a * demonstration. **/ await ResetToken.destroy({ where: { expiration: { [Op.lt]: Sequelize.fn('CURDATE')}, } }); //find the token var record = await ResetToken.findOne({ where: { email: req.query.email, expiration: { [Op.gt]: Sequelize.fn('CURDATE')}, token: req.query.token, used: 0 } }); if (record == null) { return res.render('user/reset-password', { message: 'Token has expired. Please try password reset again.', showForm: false }); } res.render('user/reset-password', { showForm: true, record: record }); });
Now let’s create the POST route which is what is hit once the user fills out their new password details.
Security tip #8 through 11:
Make sure that the passwords match and meet your minimum requirements.
Check the reset token again to make sure it has not been used and has not expired. We need to check it again because the token is being sent by a user via the form.
Before resetting the password, mark the token as used. That way, if something unforeseen happens (server crash, for example), the password won’t be reset while the token is still valid.
Use a cryptographically secure random salt (in this case, we use 64 random bytes).
router.post('/reset-password', async function(req, res, next) { //compare passwords if (req.body.password1 !== req.body.password2) { return res.json({status: 'error', message: 'Passwords do not match. Please try again.'}); } /** * Ensure password is valid (isValidPassword * function checks if password is >= 8 chars, alphanumeric, * has special chars, etc) **/ if (!isValidPassword(req.body.password1)) { return res.json({status: 'error', message: 'Password does not meet minimum requirements. Please try again.'}); } var record = await ResetToken.findOne({ where: { email: req.body.email, expiration: { [Op.gt]: Sequelize.fn('CURDATE')}, token: req.body.token, used: 0 } }); if (record == null) { return res.json({status: 'error', message: 'Token not found. Please try the reset password process again.'}); } var upd = await ResetToken.update({ used: 1 }, { where: { email: req.body.email } }); var newSalt = crypto.randomBytes(64).toString('hex'); var newPassword = crypto.pbkdf2Sync(req.body.password1, newSalt, 10000, 64, 'sha512').toString('base64'); await User.update({ password: newPassword, salt: newSalt }, { where: { email: req.body.email } }); return res.json({status: 'ok', message: 'Password reset. Please login with your new password.'}); }); And again, the view: extends ../layout block content div.container div.row div.col h1 Reset password p Enter your new password below. if message div.reset-message.alert.alert-warning #{message} else div.reset-message.alert(style='display:none;') if showForm form#resetPasswordForm(onsubmit="return false;") div.form-group label(for="password1") New password: input.form-control#password1(type='password', name='password1') small.form-text.text-muted Password must be 8 characters or more. div.form-group label(for="password2") Confirm new password input.form-control#password2(type='password', name='password2') small.form-text.text-muted Both passwords must match. input#emailRp(type='hidden', name='email', value=record.email) input#tokenRp(type='hidden', name='token', value=record.token) div.form-group button#rpButton.btn.btn-success(type='submit') Reset password script. $('#rpButton').on('click', function() { $.post('/user/reset-password', { password1: $('#password1').val(), password2: $('#password2').val(), email: $('#emailRp').val(), token: $('#tokenRp').val() }, function(resp) { if (resp.status == 'ok') { $('.reset-message').removeClass('alert-danger').addClass('alert-success').show().text(resp.message); $('#resetPasswordForm').remove(); } else { $('.reset-message').removeClass('alert-success').addClass('alert-danger').show().text(resp.message); } }); });
This is what it should look like:
Your reset password form. (Large preview)
Add The Link To Your Login Page
Lastly, don’t forget to add a link to this flow from your login page! Once you do this, you should have a working reset password flow. Be sure to test thoroughly at each stage of the process to confirm everything works and your tokens have a short expiration and are marked with the correct status as the workflow progresses.
Next Steps
Hopefully this helped you on your way to coding a secure, user-friendly reset password feature.
If you are interested in learning more about cryptographic security, I recommend Wikipedia’s summary (warning, it’s dense!).
If you want to add even more security to your app’s authentication, look into 2FA. There are a lot of different options out there.
If I’ve scared you off from building your own reset password flow, you can rely on third-party login systems like Google and Facebook. PassportJS is a middleware you can use for NodeJS that implements these strategies.
(dm, yk, il)
Website Design & SEO Delray Beach by DBL07.co
Delray Beach SEO
source http://www.scpie.org/creating-secure-password-flows-with-nodejs-and-mysql/
source https://scpie.tumblr.com/post/612405639958986752
0 notes
Text
Creating Secure Password Flows With NodeJS And MySQL
About The Author
Darshan Somashekar is a technology entrepreneur who has built & sold two startups. His latest fun project is a solitaire site called Solitaired. Previously, …
More about
Darshan
…
Reset password functionality is table stakes for any user-friendly application. It can also be a security nightmare. Using NodeJS and MySQL, Darshan demonstrates how to successfully create a secure reset password flow so you can avoid these pitfalls.
If you’re anything like me, you’ve forgotten your password more than once, especially on sites you haven’t visited in a while. You’ve probably also seen, and/or been mortified by, reset password emails that contain your password in plain text.
Unfortunately, the reset password workflow gets short shrift and limited attention during application development. This not only can lead to a frustrating user experience, but can also leave your application with gaping security holes.
We’re going to cover how to build a secure reset password workflow. We’ll be using NodeJS and MySQL as our base components. If you’re writing using a different language, framework, or database, you can still benefit from following the general “Security Tips” outlined in each section.
A reset password flow consists of the following components:
A link to send the user to the start of the workflow.
A form that lets the user submit their email.
A lookup that validates the email and sends an email to the address.
An email that contains the reset token with an expiry that allows the user to reset their password.
A form that let’s the user generate a new password.
Saving the new password and letting the user log in again with the new password.
Besides Node, Express & MySQL, we’ll be using the following libraries:
Sequelize ORM
Nodemailer
Sequelize is a NodeJS database ORM that makes it easier to run database migrations as well as security create queries. Nodemailer is a popular NodeJS email library that we’ll use to send password reset emails.
Security Tip #1
Some articles suggest secure password flows can be designed using JSON Web Tokens (JWT), which eliminate the need for database storage (and thus are easier to implement). We don’t use this approach on our site, because JWT token secrets are usually stored right in code. We want to avoid having ‘one secret’ to rule them all (for the same reason you don’t salt passwords with the same value), and therefore need to move this information into a database.
Installation
First, install Sequelize, Nodemailer, and other associated libraries:
$ npm install --save sequelize sequelize-cli mysql crypto nodemailer
In the route where you want to include your reset workflows, add the required modules. If you need a refresher on Express and routes, check out their guide.
const nodemailer = require('nodemailer');
And configure it with your email SMTP credentials.
const transport = nodemailer.createTransport({ host: process.env.EMAIL_HOST, port: process.env.EMAIL_PORT, secure: true, auth: { user: process.env.EMAIL_USER, pass: process.env.EMAIL_PASS } });
The email solution I’m using is AWS’s Simple Email Service, but you can use anything (Mailgun, etc).
If this is your first time setting up your email sending service, you’ll need to spend some time configuring the appropriate Domain Keys and setting up authorizations. If you use Route 53 along with SES, this is super simple and done virtually automatically, which is why I picked it. AWS has some tutorials on how SES works with Route53.
Security tip #2
To store the credentials away from my code, I use dotenv, which lets me create a local .env file with my environment variables. That way, when I deploy to production, I can use different production keys that aren’t visible in code, and therefore lets me restrict permissions of my configuration to only certain members of my team.
Database Setup
Since we’re going to be sending reset tokens to users, we need to store those tokens in a database.
I am assuming you have a functioning users table in your database. If you’re using Sequelize already, great! If not, you may want to brush up on Sequelize and the Sequelize CLI.
If you haven’t used Sequelize yet in your app, you can set it up by running the command below in your app’s root folder:
$ sequelize init
This will create a number of new folders in your setup, including migrations and models.
This will also create a config file. In your config file, update the development block with the credentials to your local mysql database server.
Let’s use Sequelize’s CLI tool to generate the database table for us.
$ sequelize model:create --name ResetToken --attributes email:string,token:string,expiration:date,used:integer $ sequelize db:migrate
This table has the following columns:
Email address of user,
Token that has been generated,
Expiration of that token,
Whether the token has been used or not.
In the background, sequelize-cli is running the following SQL query:
CREATE TABLE `ResetTokens` ( `id` int(11) NOT NULL AUTO_INCREMENT, `email` varchar(255) DEFAULT NULL, `token` varchar(255) DEFAULT NULL, `expiration` datetime DEFAULT NULL, `createdAt` datetime NOT NULL, `updatedAt` datetime NOT NULL, `used` int(11) NOT NULL DEFAULT '0', PRIMARY KEY (`id`) ) ENGINE=InnoDB AUTO_INCREMENT=21 DEFAULT CHARSET=utf8mb4 COLLATE=utf8mb4_0900_ai_ci;
Verify this worked properly using your SQL client or the command line:
mysql> describe ResetTokens; +------------+--------------+------+-----+---------+----------------+ | Field | Type | Null | Key | Default | Extra | +------------+--------------+------+-----+---------+----------------+ | id | int(11) | NO | PRI | NULL | auto_increment | | email | varchar(255) | YES | | NULL | | | token | varchar(255) | YES | | NULL | | | expiration | datetime | YES | | NULL | | | createdAt | datetime | NO | | NULL | | | updatedAt | datetime | NO | | NULL | | | used | int(11) | NO | | 0 | | +------------+--------------+------+-----+---------+----------------+ 7 rows in set (0.00 sec)
Security Tip #3
If you’re not currently using an ORM, you should consider doing so. An ORM automates the writing and proper escaping of SQL queries, making your code more readable and more secure by default. They’ll help you avoid SQL injection attacks by properly escaping your SQL queries.
Set Up Reset Password Route
Create the get route in user.js:
router.get('/forgot-password', function(req, res, next) { res.render('user/forgot-password', { }); });
Then create the POST route, which is the route that is hit when the reset password form is posted. In the code below, I’ve included a couple of important security features.
Security Tips #4-6
Even if we don’t find an email address, we return ‘ok’ as our status. We don’t want untoward bots figuring out what emails are real vs not real in our database.
The more random bytes you use in a token, the less likely it can be hacked. We are using 64 random bytes in our token generator (do not use less than 8).
Expire the token in 1 hour. This limits the window of time the reset token works.
router.post('/forgot-password', async function(req, res, next) { //ensure that you have a user with this email var email = await User.findOne({where: { email: req.body.email }}); if (email == null) { /** * we don't want to tell attackers that an * email doesn't exist, because that will let * them use this form to find ones that do * exist. **/ return res.json({status: 'ok'}); } /** * Expire any tokens that were previously * set for this user. That prevents old tokens * from being used. **/ await ResetToken.update({ used: 1 }, { where: { email: req.body.email } }); //Create a random reset token var fpSalt = crypto.randomBytes(64).toString('base64'); //token expires after one hour var expireDate = new Date(); expireDate.setDate(expireDate.getDate() + 1/24); //insert token data into DB await ResetToken.create({ email: req.body.email, expiration: expireDate, token: token, used: 0 }); //create email const message = { from: process.env.SENDER_ADDRESS, to: req.body.email, replyTo: process.env.REPLYTO_ADDRESS, subject: process.env.FORGOT_PASS_SUBJECT_LINE, text: 'To reset your password, please click the link below.\n\nhttps://'+process.env.DOMAIN+'/user/reset-password?token='+encodeURIComponent(token)+'&email='+req.body.email }; //send email transport.sendMail(message, function (err, info) { if(err) { console.log(err)} else { console.log(info); } }); return res.json({status: 'ok'}); });
You’ll see a User variable referenced above — what is this? For the purposes of this tutorial, we’re assuming you have a User model that connects to your database to retrieve values. The code above is based on Sequelize, but you can modify as needed if you query the database directly (but I recommend Sequelize!).
We now need to generate the view. Using Bootstrap CSS, jQuery, and the pug framework built into the Node Express framework, the view looks like the following:
extends ../layout block content div.container div.row div.col h1 Forgot password p Enter your email address below. If we have it on file, we will send you a reset email. div.forgot-message.alert.alert-success(style="display:none;") Email address received. If you have an email on file we will send you a reset email. Please wait a few minutes and check your spam folder if you don't see it. form#forgotPasswordForm.form-inline(onsubmit="return false;") div.form-group label.sr-only(for="email") Email address: input.form-control.mr-2#emailFp(type='email', name='email', placeholder="Email address") div.form-group.mt-1.text-center button#fpButton.btn.btn-success.mb-2(type='submit') Send email script. $('#fpButton').on('click', function() { $.post('/user/forgot-password', { email: $('#emailFp').val(), }, function(resp) { $('.forgot-message').show(); $('#forgotPasswordForm').remove(); }); });
Here’s the form on the page:
Your reset password form. (Large preview)
At this point, you should be able to fill out the form with an email address that’s in your database, and then receive a reset password email at that address. Clicking the reset link won’t do anything yet.
Set Up “Reset Password” Route
Now let’s go ahead and set up the rest of the workflow.
Add the Sequelize.Op module to your route:
const Sequelize = require('sequelize'); const Op = Sequelize.Op;
Now let’s build the GET route for users that have clicked on that reset password link. As you’ll see below, we want to make sure we’re validating the reset token appropriately.
Security Tip #7:
Ensure you’re only looking up reset tokens that have not expired and have not been used.
For demonstration purposes, I also clear up all expired tokens on load here to keep the table small. If you have a large website, move this to a cronjob.
router.get('/reset-password', async function(req, res, next) { /** * This code clears all expired tokens. You * should move this to a cronjob if you have a * big site. We just include this in here as a * demonstration. **/ await ResetToken.destroy({ where: { expiration: { [Op.lt]: Sequelize.fn('CURDATE')}, } }); //find the token var record = await ResetToken.findOne({ where: { email: req.query.email, expiration: { [Op.gt]: Sequelize.fn('CURDATE')}, token: req.query.token, used: 0 } }); if (record == null) { return res.render('user/reset-password', { message: 'Token has expired. Please try password reset again.', showForm: false }); } res.render('user/reset-password', { showForm: true, record: record }); });
Now let’s create the POST route which is what is hit once the user fills out their new password details.
Security tip #8 through 11:
Make sure that the passwords match and meet your minimum requirements.
Check the reset token again to make sure it has not been used and has not expired. We need to check it again because the token is being sent by a user via the form.
Before resetting the password, mark the token as used. That way, if something unforeseen happens (server crash, for example), the password won’t be reset while the token is still valid.
Use a cryptographically secure random salt (in this case, we use 64 random bytes).
router.post('/reset-password', async function(req, res, next) { //compare passwords if (req.body.password1 !== req.body.password2) { return res.json({status: 'error', message: 'Passwords do not match. Please try again.'}); } /** * Ensure password is valid (isValidPassword * function checks if password is >= 8 chars, alphanumeric, * has special chars, etc) **/ if (!isValidPassword(req.body.password1)) { return res.json({status: 'error', message: 'Password does not meet minimum requirements. Please try again.'}); } var record = await ResetToken.findOne({ where: { email: req.body.email, expiration: { [Op.gt]: Sequelize.fn('CURDATE')}, token: req.body.token, used: 0 } }); if (record == null) { return res.json({status: 'error', message: 'Token not found. Please try the reset password process again.'}); } var upd = await ResetToken.update({ used: 1 }, { where: { email: req.body.email } }); var newSalt = crypto.randomBytes(64).toString('hex'); var newPassword = crypto.pbkdf2Sync(req.body.password1, newSalt, 10000, 64, 'sha512').toString('base64'); await User.update({ password: newPassword, salt: newSalt }, { where: { email: req.body.email } }); return res.json({status: 'ok', message: 'Password reset. Please login with your new password.'}); }); And again, the view: extends ../layout block content div.container div.row div.col h1 Reset password p Enter your new password below. if message div.reset-message.alert.alert-warning #{message} else div.reset-message.alert(style='display:none;') if showForm form#resetPasswordForm(onsubmit="return false;") div.form-group label(for="password1") New password: input.form-control#password1(type='password', name='password1') small.form-text.text-muted Password must be 8 characters or more. div.form-group label(for="password2") Confirm new password input.form-control#password2(type='password', name='password2') small.form-text.text-muted Both passwords must match. input#emailRp(type='hidden', name='email', value=record.email) input#tokenRp(type='hidden', name='token', value=record.token) div.form-group button#rpButton.btn.btn-success(type='submit') Reset password script. $('#rpButton').on('click', function() { $.post('/user/reset-password', { password1: $('#password1').val(), password2: $('#password2').val(), email: $('#emailRp').val(), token: $('#tokenRp').val() }, function(resp) { if (resp.status == 'ok') { $('.reset-message').removeClass('alert-danger').addClass('alert-success').show().text(resp.message); $('#resetPasswordForm').remove(); } else { $('.reset-message').removeClass('alert-success').addClass('alert-danger').show().text(resp.message); } }); });
This is what it should look like:
Your reset password form. (Large preview)
Add The Link To Your Login Page
Lastly, don’t forget to add a link to this flow from your login page! Once you do this, you should have a working reset password flow. Be sure to test thoroughly at each stage of the process to confirm everything works and your tokens have a short expiration and are marked with the correct status as the workflow progresses.
Next Steps
Hopefully this helped you on your way to coding a secure, user-friendly reset password feature.
If you are interested in learning more about cryptographic security, I recommend Wikipedia’s summary (warning, it’s dense!).
If you want to add even more security to your app’s authentication, look into 2FA. There are a lot of different options out there.
If I’ve scared you off from building your own reset password flow, you can rely on third-party login systems like Google and Facebook. PassportJS is a middleware you can use for NodeJS that implements these strategies.
(dm, yk, il)
Website Design & SEO Delray Beach by DBL07.co
Delray Beach SEO
source http://www.scpie.org/creating-secure-password-flows-with-nodejs-and-mysql/
0 notes
Text
Creating Secure Password Flows With NodeJS And MySQL
About The Author
Darshan Somashekar is a technology entrepreneur who has built & sold two startups. His latest fun project is a solitaire site called Solitaired. Previously, …
More about
Darshan
…
Reset password functionality is table stakes for any user-friendly application. It can also be a security nightmare. Using NodeJS and MySQL, Darshan demonstrates how to successfully create a secure reset password flow so you can avoid these pitfalls.
If you’re anything like me, you’ve forgotten your password more than once, especially on sites you haven’t visited in a while. You’ve probably also seen, and/or been mortified by, reset password emails that contain your password in plain text.
Unfortunately, the reset password workflow gets short shrift and limited attention during application development. This not only can lead to a frustrating user experience, but can also leave your application with gaping security holes.
We’re going to cover how to build a secure reset password workflow. We’ll be using NodeJS and MySQL as our base components. If you’re writing using a different language, framework, or database, you can still benefit from following the general “Security Tips” outlined in each section.
A reset password flow consists of the following components:
A link to send the user to the start of the workflow.
A form that lets the user submit their email.
A lookup that validates the email and sends an email to the address.
An email that contains the reset token with an expiry that allows the user to reset their password.
A form that let’s the user generate a new password.
Saving the new password and letting the user log in again with the new password.
Besides Node, Express & MySQL, we’ll be using the following libraries:
Sequelize ORM
Nodemailer
Sequelize is a NodeJS database ORM that makes it easier to run database migrations as well as security create queries. Nodemailer is a popular NodeJS email library that we’ll use to send password reset emails.
Security Tip #1
Some articles suggest secure password flows can be designed using JSON Web Tokens (JWT), which eliminate the need for database storage (and thus are easier to implement). We don’t use this approach on our site, because JWT token secrets are usually stored right in code. We want to avoid having ‘one secret’ to rule them all (for the same reason you don’t salt passwords with the same value), and therefore need to move this information into a database.
Installation
First, install Sequelize, Nodemailer, and other associated libraries:
$ npm install --save sequelize sequelize-cli mysql crypto nodemailer
In the route where you want to include your reset workflows, add the required modules. If you need a refresher on Express and routes, check out their guide.
const nodemailer = require('nodemailer');
And configure it with your email SMTP credentials.
const transport = nodemailer.createTransport({ host: process.env.EMAIL_HOST, port: process.env.EMAIL_PORT, secure: true, auth: { user: process.env.EMAIL_USER, pass: process.env.EMAIL_PASS }
});
The email solution I’m using is AWS’s Simple Email Service, but you can use anything (Mailgun, etc).
If this is your first time setting up your email sending service, you’ll need to spend some time configuring the appropriate Domain Keys and setting up authorizations. If you use Route 53 along with SES, this is super simple and done virtually automatically, which is why I picked it. AWS has some tutorials on how SES works with Route53.
Security tip #2
To store the credentials away from my code, I use dotenv, which lets me create a local .env file with my environment variables. That way, when I deploy to production, I can use different production keys that aren’t visible in code, and therefore lets me restrict permissions of my configuration to only certain members of my team.
Database Setup
Since we’re going to be sending reset tokens to users, we need to store those tokens in a database.
I am assuming you have a functioning users table in your database. If you’re using Sequelize already, great! If not, you may want to brush up on Sequelize and the Sequelize CLI.
If you haven’t used Sequelize yet in your app, you can set it up by running the command below in your app’s root folder:
$ sequelize init
This will create a number of new folders in your setup, including migrations and models.
This will also create a config file. In your config file, update the development block with the credentials to your local mysql database server.
Let’s use Sequelize’s CLI tool to generate the database table for us.
$ sequelize model:create --name ResetToken --attributes email:string,token:string,expiration:date,used:integer
$ sequelize db:migrate
This table has the following columns:
Email address of user,
Token that has been generated,
Expiration of that token,
Whether the token has been used or not.
In the background, sequelize-cli is running the following SQL query:
CREATE TABLE `ResetTokens` ( `id` int(11) NOT NULL AUTO_INCREMENT, `email` varchar(255) DEFAULT NULL, `token` varchar(255) DEFAULT NULL, `expiration` datetime DEFAULT NULL, `createdAt` datetime NOT NULL, `updatedAt` datetime NOT NULL, `used` int(11) NOT NULL DEFAULT '0', PRIMARY KEY (`id`)
) ENGINE=InnoDB AUTO_INCREMENT=21 DEFAULT CHARSET=utf8mb4 COLLATE=utf8mb4_0900_ai_ci;
Verify this worked properly using your SQL client or the command line:
mysql> describe ResetTokens;
+------------+--------------+------+-----+---------+----------------+
| Field | Type | Null | Key | Default | Extra |
+------------+--------------+------+-----+---------+----------------+
| id | int(11) | NO | PRI | NULL | auto_increment |
| email | varchar(255) | YES | | NULL | |
| token | varchar(255) | YES | | NULL | |
| expiration | datetime | YES | | NULL | |
| createdAt | datetime | NO | | NULL | |
| updatedAt | datetime | NO | | NULL | |
| used | int(11) | NO | | 0 | |
+------------+--------------+------+-----+---------+----------------+
7 rows in set (0.00 sec)
Security Tip #3
If you’re not currently using an ORM, you should consider doing so. An ORM automates the writing and proper escaping of SQL queries, making your code more readable and more secure by default. They’ll help you avoid SQL injection attacks by properly escaping your SQL queries.
Set Up Reset Password Route
Create the get route in user.js:
router.get('/forgot-password', function(req, res, next) { res.render('user/forgot-password', { });
});
Then create the POST route, which is the route that is hit when the reset password form is posted. In the code below, I’ve included a couple of important security features.
Security Tips #4-6
Even if we don’t find an email address, we return ‘ok’ as our status. We don’t want untoward bots figuring out what emails are real vs not real in our database.
The more random bytes you use in a token, the less likely it can be hacked. We are using 64 random bytes in our token generator (do not use less than 8).
Expire the token in 1 hour. This limits the window of time the reset token works.
router.post('/forgot-password', async function(req, res, next) { //ensure that you have a user with this email var email = await User.findOne({where: { email: req.body.email }}); if (email == null) { /** * we don't want to tell attackers that an * email doesn't exist, because that will let * them use this form to find ones that do * exist. **/ return res.json({status: 'ok'}); } /** * Expire any tokens that were previously * set for this user. That prevents old tokens * from being used. **/ await ResetToken.update({ used: 1 }, { where: { email: req.body.email } }); //Create a random reset token var fpSalt = crypto.randomBytes(64).toString('base64'); //token expires after one hour var expireDate = new Date(); expireDate.setDate(expireDate.getDate() + 1/24); //insert token data into DB await ResetToken.create({ email: req.body.email, expiration: expireDate, token: token, used: 0 }); //create email const message = { from: process.env.SENDER_ADDRESS, to: req.body.email, replyTo: process.env.REPLYTO_ADDRESS, subject: process.env.FORGOT_PASS_SUBJECT_LINE, text: 'To reset your password, please click the link below.\n\nhttps://'+process.env.DOMAIN+'/user/reset-password?token='+encodeURIComponent(token)+'&email='+req.body.email }; //send email transport.sendMail(message, function (err, info) { if(err) { console.log(err)} else { console.log(info); } }); return res.json({status: 'ok'});
});
You’ll see a User variable referenced above — what is this? For the purposes of this tutorial, we’re assuming you have a User model that connects to your database to retrieve values. The code above is based on Sequelize, but you can modify as needed if you query the database directly (but I recommend Sequelize!).
We now need to generate the view. Using Bootstrap CSS, jQuery, and the pug framework built into the Node Express framework, the view looks like the following:
extends ../layout block content div.container div.row div.col h1 Forgot password p Enter your email address below. If we have it on file, we will send you a reset email. div.forgot-message.alert.alert-success(style="display:none;") Email address received. If you have an email on file we will send you a reset email. Please wait a few minutes and check your spam folder if you don't see it. form#forgotPasswordForm.form-inline(onsubmit="return false;") div.form-group label.sr-only(for="email") Email address: input.form-control.mr-2#emailFp(type='email', name='email', placeholder="Email address") div.form-group.mt-1.text-center button#fpButton.btn.btn-success.mb-2(type='submit') Send email script. $('#fpButton').on('click', function() { $.post('/user/forgot-password', { email: $('#emailFp').val(), }, function(resp) { $('.forgot-message').show(); $('#forgotPasswordForm').remove(); }); });
Here’s the form on the page:
Your reset password form. (Large preview)
At this point, you should be able to fill out the form with an email address that’s in your database, and then receive a reset password email at that address. Clicking the reset link won’t do anything yet.
Set Up “Reset Password” Route
Now let’s go ahead and set up the rest of the workflow.
Add the Sequelize.Op module to your route:
const Sequelize = require('sequelize');
const Op = Sequelize.Op;
Now let’s build the GET route for users that have clicked on that reset password link. As you’ll see below, we want to make sure we’re validating the reset token appropriately.
Security Tip #7:
Ensure you’re only looking up reset tokens that have not expired and have not been used.
For demonstration purposes, I also clear up all expired tokens on load here to keep the table small. If you have a large website, move this to a cronjob.
router.get('/reset-password', async function(req, res, next) { /** * This code clears all expired tokens. You * should move this to a cronjob if you have a * big site. We just include this in here as a * demonstration. **/ await ResetToken.destroy({ where: { expiration: { [Op.lt]: Sequelize.fn('CURDATE')}, } }); //find the token var record = await ResetToken.findOne({ where: { email: req.query.email, expiration: { [Op.gt]: Sequelize.fn('CURDATE')}, token: req.query.token, used: 0 } }); if (record == null) { return res.render('user/reset-password', { message: 'Token has expired. Please try password reset again.', showForm: false }); } res.render('user/reset-password', { showForm: true, record: record });
});
Now let’s create the POST route which is what is hit once the user fills out their new password details.
Security tip #8 through 11:
Make sure that the passwords match and meet your minimum requirements.
Check the reset token again to make sure it has not been used and has not expired. We need to check it again because the token is being sent by a user via the form.
Before resetting the password, mark the token as used. That way, if something unforeseen happens (server crash, for example), the password won’t be reset while the token is still valid.
Use a cryptographically secure random salt (in this case, we use 64 random bytes).
router.post('/reset-password', async function(req, res, next) { //compare passwords if (req.body.password1 !== req.body.password2) { return res.json({status: 'error', message: 'Passwords do not match. Please try again.'}); } /** * Ensure password is valid (isValidPassword * function checks if password is >= 8 chars, alphanumeric, * has special chars, etc) **/ if (!isValidPassword(req.body.password1)) { return res.json({status: 'error', message: 'Password does not meet minimum requirements. Please try again.'}); } var record = await ResetToken.findOne({ where: { email: req.body.email, expiration: { [Op.gt]: Sequelize.fn('CURDATE')}, token: req.body.token, used: 0 } }); if (record == null) { return res.json({status: 'error', message: 'Token not found. Please try the reset password process again.'}); } var upd = await ResetToken.update({ used: 1 }, { where: { email: req.body.email } }); var newSalt = crypto.randomBytes(64).toString('hex'); var newPassword = crypto.pbkdf2Sync(req.body.password1, newSalt, 10000, 64, 'sha512').toString('base64'); await User.update({ password: newPassword, salt: newSalt }, { where: { email: req.body.email } }); return res.json({status: 'ok', message: 'Password reset. Please login with your new password.'});
}); And again, the view: extends ../layout block content div.container div.row div.col h1 Reset password p Enter your new password below. if message div.reset-message.alert.alert-warning #{message} else div.reset-message.alert(style='display:none;') if showForm form#resetPasswordForm(onsubmit="return false;") div.form-group label(for="password1") New password: input.form-control#password1(type='password', name='password1') small.form-text.text-muted Password must be 8 characters or more. div.form-group label(for="password2") Confirm new password input.form-control#password2(type='password', name='password2') small.form-text.text-muted Both passwords must match. input#emailRp(type='hidden', name='email', value=record.email) input#tokenRp(type='hidden', name='token', value=record.token) div.form-group button#rpButton.btn.btn-success(type='submit') Reset password script. $('#rpButton').on('click', function() { $.post('/user/reset-password', { password1: $('#password1').val(), password2: $('#password2').val(), email: $('#emailRp').val(), token: $('#tokenRp').val() }, function(resp) { if (resp.status == 'ok') { $('.reset-message').removeClass('alert-danger').addClass('alert-success').show().text(resp.message); $('#resetPasswordForm').remove(); } else { $('.reset-message').removeClass('alert-success').addClass('alert-danger').show().text(resp.message); } }); });
This is what it should look like:
Your reset password form. (Large preview)
Add The Link To Your Login Page
Lastly, don’t forget to add a link to this flow from your login page! Once you do this, you should have a working reset password flow. Be sure to test thoroughly at each stage of the process to confirm everything works and your tokens have a short expiration and are marked with the correct status as the workflow progresses.
Next Steps
Hopefully this helped you on your way to coding a secure, user-friendly reset password feature.
If you are interested in learning more about cryptographic security, I recommend Wikipedia’s summary (warning, it’s dense!).
If you want to add even more security to your app’s authentication, look into 2FA. There are a lot of different options out there.
If I’ve scared you off from building your own reset password flow, you can rely on third-party login systems like Google and Facebook. PassportJS is a middleware you can use for NodeJS that implements these strategies.
(dm, yk, il)
Website Design & SEO Delray Beach by DBL07.co
Delray Beach SEO
source http://www.scpie.org/creating-secure-password-flows-with-nodejs-and-mysql/
source https://scpie1.blogspot.com/2020/03/creating-secure-password-flows-with.html
0 notes
Text
Creating Secure Password Flows With NodeJS And MySQL
About The Author
Darshan Somashekar is a technology entrepreneur who has built & sold two startups. His latest fun project is a solitaire site called Solitaired. Previously, …
More about
Darshan
…
Reset password functionality is table stakes for any user-friendly application. It can also be a security nightmare. Using NodeJS and MySQL, Darshan demonstrates how to successfully create a secure reset password flow so you can avoid these pitfalls.
If you’re anything like me, you’ve forgotten your password more than once, especially on sites you haven’t visited in a while. You’ve probably also seen, and/or been mortified by, reset password emails that contain your password in plain text.
Unfortunately, the reset password workflow gets short shrift and limited attention during application development. This not only can lead to a frustrating user experience, but can also leave your application with gaping security holes.
We’re going to cover how to build a secure reset password workflow. We’ll be using NodeJS and MySQL as our base components. If you’re writing using a different language, framework, or database, you can still benefit from following the general “Security Tips” outlined in each section.
A reset password flow consists of the following components:
A link to send the user to the start of the workflow.
A form that lets the user submit their email.
A lookup that validates the email and sends an email to the address.
An email that contains the reset token with an expiry that allows the user to reset their password.
A form that let’s the user generate a new password.
Saving the new password and letting the user log in again with the new password.
Besides Node, Express & MySQL, we’ll be using the following libraries:
Sequelize ORM
Nodemailer
Sequelize is a NodeJS database ORM that makes it easier to run database migrations as well as security create queries. Nodemailer is a popular NodeJS email library that we’ll use to send password reset emails.
Security Tip #1
Some articles suggest secure password flows can be designed using JSON Web Tokens (JWT), which eliminate the need for database storage (and thus are easier to implement). We don’t use this approach on our site, because JWT token secrets are usually stored right in code. We want to avoid having ‘one secret’ to rule them all (for the same reason you don’t salt passwords with the same value), and therefore need to move this information into a database.
Installation
First, install Sequelize, Nodemailer, and other associated libraries:
$ npm install --save sequelize sequelize-cli mysql crypto nodemailer
In the route where you want to include your reset workflows, add the required modules. If you need a refresher on Express and routes, check out their guide.
const nodemailer = require('nodemailer');
And configure it with your email SMTP credentials.
const transport = nodemailer.createTransport({ host: process.env.EMAIL_HOST, port: process.env.EMAIL_PORT, secure: true, auth: { user: process.env.EMAIL_USER, pass: process.env.EMAIL_PASS }});
The email solution I’m using is AWS’s Simple Email Service, but you can use anything (Mailgun, etc).
If this is your first time setting up your email sending service, you’ll need to spend some time configuring the appropriate Domain Keys and setting up authorizations. If you use Route 53 along with SES, this is super simple and done virtually automatically, which is why I picked it. AWS has some tutorials on how SES works with Route53.
Security tip #2
To store the credentials away from my code, I use dotenv, which lets me create a local .env file with my environment variables. That way, when I deploy to production, I can use different production keys that aren’t visible in code, and therefore lets me restrict permissions of my configuration to only certain members of my team.
Database Setup
Since we’re going to be sending reset tokens to users, we need to store those tokens in a database.
I am assuming you have a functioning users table in your database. If you’re using Sequelize already, great! If not, you may want to brush up on Sequelize and the Sequelize CLI.
If you haven’t used Sequelize yet in your app, you can set it up by running the command below in your app’s root folder:
$ sequelize init
This will create a number of new folders in your setup, including migrations and models.
This will also create a config file. In your config file, update the development block with the credentials to your local mysql database server.
Let’s use Sequelize’s CLI tool to generate the database table for us.
$ sequelize model:create --name ResetToken --attributes email:string,token:string,expiration:date,used:integer$ sequelize db:migrate
This table has the following columns:
Email address of user,
Token that has been generated,
Expiration of that token,
Whether the token has been used or not.
In the background, sequelize-cli is running the following SQL query:
CREATE TABLE `ResetTokens` ( `id` int(11) NOT NULL AUTO_INCREMENT, `email` varchar(255) DEFAULT NULL, `token` varchar(255) DEFAULT NULL, `expiration` datetime DEFAULT NULL, `createdAt` datetime NOT NULL, `updatedAt` datetime NOT NULL, `used` int(11) NOT NULL DEFAULT '0', PRIMARY KEY (`id`)) ENGINE=InnoDB AUTO_INCREMENT=21 DEFAULT CHARSET=utf8mb4 COLLATE=utf8mb4_0900_ai_ci;
Verify this worked properly using your SQL client or the command line:
mysql> describe ResetTokens;+------------+--------------+------+-----+---------+----------------+| Field | Type | Null | Key | Default | Extra |+------------+--------------+------+-----+---------+----------------+| id | int(11) | NO | PRI | NULL | auto_increment || email | varchar(255) | YES | | NULL | || token | varchar(255) | YES | | NULL | || expiration | datetime | YES | | NULL | || createdAt | datetime | NO | | NULL | || updatedAt | datetime | NO | | NULL | || used | int(11) | NO | | 0 | |+------------+--------------+------+-----+---------+----------------+7 rows in set (0.00 sec)
Security Tip #3
If you’re not currently using an ORM, you should consider doing so. An ORM automates the writing and proper escaping of SQL queries, making your code more readable and more secure by default. They’ll help you avoid SQL injection attacks by properly escaping your SQL queries.
Set Up Reset Password Route
Create the get route in user.js:
router.get('/forgot-password', function(req, res, next) { res.render('user/forgot-password', { });});
Then create the POST route, which is the route that is hit when the reset password form is posted. In the code below, I’ve included a couple of important security features.
Security Tips #4-6
Even if we don’t find an email address, we return ‘ok’ as our status. We don’t want untoward bots figuring out what emails are real vs not real in our database.
The more random bytes you use in a token, the less likely it can be hacked. We are using 64 random bytes in our token generator (do not use less than 8).
Expire the token in 1 hour. This limits the window of time the reset token works.
router.post('/forgot-password', async function(req, res, next) { //ensure that you have a user with this email var email = await User.findOne({where: { email: req.body.email }}); if (email == null) { /** * we don't want to tell attackers that an * email doesn't exist, because that will let * them use this form to find ones that do * exist. **/ return res.json({status: 'ok'}); } /** * Expire any tokens that were previously * set for this user. That prevents old tokens * from being used. **/ await ResetToken.update({ used: 1 }, { where: { email: req.body.email } }); //Create a random reset token var fpSalt = crypto.randomBytes(64).toString('base64'); //token expires after one hour var expireDate = new Date(); expireDate.setDate(expireDate.getDate() + 1/24); //insert token data into DB await ResetToken.create({ email: req.body.email, expiration: expireDate, token: token, used: 0 }); //create email const message = { from: process.env.SENDER_ADDRESS, to: req.body.email, replyTo: process.env.REPLYTO_ADDRESS, subject: process.env.FORGOT_PASS_SUBJECT_LINE, text: 'To reset your password, please click the link below.\n\nhttps://'+process.env.DOMAIN+'/user/reset-password?token='+encodeURIComponent(token)+'&email='+req.body.email }; //send email transport.sendMail(message, function (err, info) { if(err) { console.log(err)} else { console.log(info); } }); return res.json({status: 'ok'});});
You’ll see a User variable referenced above — what is this? For the purposes of this tutorial, we’re assuming you have a User model that connects to your database to retrieve values. The code above is based on Sequelize, but you can modify as needed if you query the database directly (but I recommend Sequelize!).
We now need to generate the view. Using Bootstrap CSS, jQuery, and the pug framework built into the Node Express framework, the view looks like the following:
extends ../layout block content div.container div.row div.col h1 Forgot password p Enter your email address below. If we have it on file, we will send you a reset email. div.forgot-message.alert.alert-success(style="display:none;") Email address received. If you have an email on file we will send you a reset email. Please wait a few minutes and check your spam folder if you don't see it. form#forgotPasswordForm.form-inline(onsubmit="return false;") div.form-group label.sr-only(for="email") Email address: input.form-control.mr-2#emailFp(type='email', name='email', placeholder="Email address") div.form-group.mt-1.text-center button#fpButton.btn.btn-success.mb-2(type='submit') Send email script. $('#fpButton').on('click', function() { $.post('/user/forgot-password', { email: $('#emailFp').val(), }, function(resp) { $('.forgot-message').show(); $('#forgotPasswordForm').remove(); }); });
Here’s the form on the page:
Your reset password form. (Large preview)
At this point, you should be able to fill out the form with an email address that’s in your database, and then receive a reset password email at that address. Clicking the reset link won’t do anything yet.
Set Up “Reset Password” Route
Now let’s go ahead and set up the rest of the workflow.
Add the Sequelize.Op module to your route:
const Sequelize = require('sequelize');const Op = Sequelize.Op;
Now let’s build the GET route for users that have clicked on that reset password link. As you’ll see below, we want to make sure we’re validating the reset token appropriately.
Security Tip #7:
Ensure you’re only looking up reset tokens that have not expired and have not been used.
For demonstration purposes, I also clear up all expired tokens on load here to keep the table small. If you have a large website, move this to a cronjob.
router.get('/reset-password', async function(req, res, next) { /** * This code clears all expired tokens. You * should move this to a cronjob if you have a * big site. We just include this in here as a * demonstration. **/ await ResetToken.destroy({ where: { expiration: { [Op.lt]: Sequelize.fn('CURDATE')}, } }); //find the token var record = await ResetToken.findOne({ where: { email: req.query.email, expiration: { [Op.gt]: Sequelize.fn('CURDATE')}, token: req.query.token, used: 0 } }); if (record == null) { return res.render('user/reset-password', { message: 'Token has expired. Please try password reset again.', showForm: false }); } res.render('user/reset-password', { showForm: true, record: record });});
Now let’s create the POST route which is what is hit once the user fills out their new password details.
Security tip #8 through 11:
Make sure that the passwords match and meet your minimum requirements.
Check the reset token again to make sure it has not been used and has not expired. We need to check it again because the token is being sent by a user via the form.
Before resetting the password, mark the token as used. That way, if something unforeseen happens (server crash, for example), the password won’t be reset while the token is still valid.
Use a cryptographically secure random salt (in this case, we use 64 random bytes).
router.post('/reset-password', async function(req, res, next) { //compare passwords if (req.body.password1 !== req.body.password2) { return res.json({status: 'error', message: 'Passwords do not match. Please try again.'}); } /** * Ensure password is valid (isValidPassword * function checks if password is >= 8 chars, alphanumeric, * has special chars, etc) **/ if (!isValidPassword(req.body.password1)) { return res.json({status: 'error', message: 'Password does not meet minimum requirements. Please try again.'}); } var record = await ResetToken.findOne({ where: { email: req.body.email, expiration: { [Op.gt]: Sequelize.fn('CURDATE')}, token: req.body.token, used: 0 } }); if (record == null) { return res.json({status: 'error', message: 'Token not found. Please try the reset password process again.'}); } var upd = await ResetToken.update({ used: 1 }, { where: { email: req.body.email } }); var newSalt = crypto.randomBytes(64).toString('hex'); var newPassword = crypto.pbkdf2Sync(req.body.password1, newSalt, 10000, 64, 'sha512').toString('base64'); await User.update({ password: newPassword, salt: newSalt }, { where: { email: req.body.email } }); return res.json({status: 'ok', message: 'Password reset. Please login with your new password.'});}); And again, the view: extends ../layout block content div.container div.row div.col h1 Reset password p Enter your new password below. if message div.reset-message.alert.alert-warning #{message} else div.reset-message.alert(style='display:none;') if showForm form#resetPasswordForm(onsubmit="return false;") div.form-group label(for="password1") New password: input.form-control#password1(type='password', name='password1') small.form-text.text-muted Password must be 8 characters or more. div.form-group label(for="password2") Confirm new password input.form-control#password2(type='password', name='password2') small.form-text.text-muted Both passwords must match. input#emailRp(type='hidden', name='email', value=record.email) input#tokenRp(type='hidden', name='token', value=record.token) div.form-group button#rpButton.btn.btn-success(type='submit') Reset password script. $('#rpButton').on('click', function() { $.post('/user/reset-password', { password1: $('#password1').val(), password2: $('#password2').val(), email: $('#emailRp').val(), token: $('#tokenRp').val() }, function(resp) { if (resp.status == 'ok') { $('.reset-message').removeClass('alert-danger').addClass('alert-success').show().text(resp.message); $('#resetPasswordForm').remove(); } else { $('.reset-message').removeClass('alert-success').addClass('alert-danger').show().text(resp.message); } }); });
This is what it should look like:
Your reset password form. (Large preview)
Add The Link To Your Login Page
Lastly, don’t forget to add a link to this flow from your login page! Once you do this, you should have a working reset password flow. Be sure to test thoroughly at each stage of the process to confirm everything works and your tokens have a short expiration and are marked with the correct status as the workflow progresses.
Next Steps
Hopefully this helped you on your way to coding a secure, user-friendly reset password feature.
If you are interested in learning more about cryptographic security, I recommend Wikipedia’s summary (warning, it’s dense!).
If you want to add even more security to your app’s authentication, look into 2FA. There are a lot of different options out there.
If I’ve scared you off from building your own reset password flow, you can rely on third-party login systems like Google and Facebook. PassportJS is a middleware you can use for NodeJS that implements these strategies.
(dm, yk, il)
Website Design & SEO Delray Beach by DBL07.co
Delray Beach SEO
Via http://www.scpie.org/creating-secure-password-flows-with-nodejs-and-mysql/
source https://scpie.weebly.com/blog/creating-secure-password-flows-with-nodejs-and-mysql
0 notes
Text
Microsoft DOESN'T CARE - WAN Show Aug 16, 2019
Mac or PC, whichever one you personally prefer. You have to admit that there are advantages to the other side. Let me think about it. You simply cannot run, say, Final Cut Pro or Logic Pro on Windows and, at the same time, gaming on Mac OS Sox only there were some way that you could run both of them at near full speed simultaneously on the same PC. Oh, what's that there. I guess there is so behind me and Anthony is a machine that we call the indecision ater. It can be a Mac, it can be a PC and through some software magic it can actually be both of them at the same time as you can see right here so uh. What do you say guys? Should we walk you through how we did it and take it for a spin? I think so after this message from our sponsor Vertigo's PL 4500 RGB LED upgrade kit. Wirelessly connects to your PC and features tons of color customization options, including audio and visual sync, and more check them out at the link in the video description, [ Music ]. If you've seen any of our videos involving hackintosh virtual machines, you'll probably have some idea where we're going with this. If not, here's the twenty second version using Red, Hat's, KVM hypervisor many modern computers can actually have their resources like CPU cores system memory or even graphics cards, divide it up and then allocate it to multiple users or workloads. Using this technology you can even install two operating systems on the same computer that exists completely independently of each other, as we've done in the past. So for today's project, then we've got something really really cool for you guys. So we've taken an AMD reisen. 930. 900. X12 core processor and then what we've done is: we've split those 12 cores straight down the middle between two virtual machines that will run Windows on one side and Mac OS on the other for graphics, we've gone with an RT X, 20 atti for our windows box And a Radeon 7 for our Mac, then we've passed those graphics cards through to their respective VMs, this method of assigning our GPUs results in relatively little lost performance. So the main challenge we ran into for this project. While there were many firsts and videos, legendary code, 43 error, Nvidia, obviously doesn't like consumers running their GeForce GPUs in a VM just go out and buy a Quadro. Combating some weird stuttering in Windows was the next issue that we had to fix and we fixed that by switching to message. Signaled interrupts instead of traditional electrical line based interrupts like you'd, normally get in a processor these days or ever really and finally, getting the mac OS catalina beta to use the drivers that Apple included for virtualized storage. That last one in particular, is prop really exciting, because Apple has never supported it in the past, make sure you're subscribed, because I'm already working on convincing Linus here to let me work on a video on Mac virtualization. Once we get the Mac Pro in yeah. We'Re definitely gonna be doing that. Anywho, where things take a bit of a turn today, is how we're going to interact with our Frankenstein machine. So in the past, if you wanted to use multiple computers, you'd either have to use a hardware switcher and conveniently also call KVM multiple monitors or in the case of the LGU d 79 that we used once before. You would have to be content with 1080p quadrants of a single 16 by 9 4k display. Today. We have something quite special. This display from Phillips is the 499 p, 9 H and it's a 1440p super ultra wide display, with a double wide 32 by 9 aspect ratio, which means that what we're effectively looking at here is a bezel free single display setup where we've got the equivalent of 2 27 inch monitors side by side with no bezel in between them, so we can completely seamlessly interact with both of our VMs. How do you do that? You might be asking well well so did you do that? Yeah? This energy is still kind of trying to work out the kinks of their 2.0 release. So I decided to use a different piece of software, just kind of switched things I'll call share mouse, which has some, unfortunately, agro marketing, but hey if it works, it works and for the most part, although there are some glitches like you can see my Mac OS Cursor is actually still kind of ghosted over here there you go and you can see kind of the header of my windows cursor. For the most part it actually does work. We can move the cursor seamlessly from one of our displays over to the other, as if the imaginary line down the middle didn't exist, in fact, actually we could probably do some really cool stuff. Like pretend that the whole thing is one machine, so I actually don't know how to switch the wallpaper on a Mac, but I'm gonna go ahead and do this one nice, it's an abomination, isn't it beautiful? Oh, I like this too LTTE store.com by a water bottle. Ok, then, so we're good. Essentially, what we've got here is to rise in 5:30 600 systems, but on one machine, we're running Mac OS and, on the other, one we're running Windows with seamless Mouse movement between them, which means, if I wanted to. I could browse the Internet over here in Safari and then potentially use an Apple Magic Trackpad for gesture control. While I fire up, let's say game, like shadow of the Tomb Raider over on the other side. Wait am I just running in a circle right now? Yes, so I'm like okay, I'm bored of playing video games or whatever and I go over - and I browse the forum. Then I'm just like oh yeah, you know what I'm gonna go back to playing video games, freakin nuts yeah and you can set up a keyboard shortcut to switch automatically, so you don't need to Creole tap. We just haven't set that up yet so, let's say game play, isn't your number one priority, maybe you're a content creator like a youtuber or a twitch streamer and that's kind of more of your jam. So what you could do, then, is capture some gameplay with shadow play or OBS and then port that directly over to the Mac by dragging and dropping and there you can use that if you're more comfortable with it check this out. So I just grabbed the clip that I recorded right now, while you're talking dragged it over the middle line and loop there. It is, let's see what the back looks like boom nice just like that now doesn't copy that quickly: we're limited to about 20 megabytes. A second, so there's probably some work. The developer could do on that, but hey the footage is there now. One thing I did want to mention is that we didn't manage to login to the App Store. We think it might be something to do with our copy of Final Cut Pro being on my consumer register at Apple account and this being a developer only OS, because it's still the preview but hey. The point is, if you're comfortable, editing in Final Cut Pro, you can create your content on Windows and then you can edit it together on the Mac, and then you could log into YouTube on Windows, and you can upload it from Windows. If you wanted to pretty cool best of all, if you want, you can select just one of the VMS for full productivity, with the press of a button and another button and another button and another button, this they told us it was gonna, be just like One button to switch yeah yeah. They said that they could actually set it up to just switch by a single button. But as far as I can tell no, but it does have a KVM and that is the keyboard, video mouse rendition of KBM, so ready hat. So, what's cool about that at the very least, is that if you want to use just one set of peripherals for both of your OSS, you can by plugging in through the monitor right? Let me just switch inputs here. Obviously, I could change it to full resolution, but yeah as we can see it's being a little bit dumb and also our Mac needs to be unplugged and replugged. Sometimes, in order to pick up this yeah, that's just Apple things. I think. Okay, it's a little janky, but what's cool about our setup here is that it doesn't even have to be Windows and Mac OS. It'S just that, thanks to the Mac OS catallena beta Mac OS now supports not just virtualized storage like Anthony mentioned before that allowed us to take our single PCIe gen 4. So like this high performance, 2 terabyte SSD and split it up, but it even supports other verdi, o devices. Now so we can get access to near native speeds over the network as well. Like imagine what it would be like to take a machine like this and be able to split something like the upcoming 16 core Raisa 939 50 X, I mean, even without all the PCI Express Lanes and memory bandwidth that you could get from something like a thread. Ripper you'd be compromising very little janky NASA side with a dual setup like this, so I mean. Maybe we should come back to this concept when that launches, make sure you guys are subscribed and stay tuned, because if nothing else we'll definitely be checking out virtualization on the upcoming Mac Pro yeah and by that time I think that there's a lot more, that I Could do to smooth out the experience overall like having a virtualized 9p shared drive between the two OSS that lets it basically become a network drive that native speeds, but that's all we have time for today. So if you haven't seen it already check out our previous Mac, virtualization videos, we'll have them linked below pulse way, is a real-time, remote monitoring and management software that helps you fix problems on the go you can send commands from routerhosting any mobile device and the software is Compatible with Windows, Mac and Linux pulse way, single app gives you remote desktop functionality, so you can get access to real-time status system resources. You can see logged in users, you can monitor network performance, you can manage Continue windows updates and more, in fact, the sky's the limit, because you can create and deploy your own custom scripts to automate your IT tasks so try it for free at pulse wacom or through Our link in the video description hi thanks for watching
youtube
0 notes
Text
Microsoft's new version of Windows 10 doesn't let you make Google your default search engine
Microsoft’s lightweight version of Windows 10 is a bit more locked down than first anticipated.
In an FAQ page for Windows 10 S, as the just-announced variant is called, Microsoft notes that its Edge web browser will be the default in the new operating system.
That much was known already, as the main thing that makes Windows 10 S “lightweight” is the fact that it only runs apps from Windows’ app store. Right now, no other major browser is in that app store to begin with.
What wasn’t specified before, though, was the fact that neither Edge nor Internet Explorer (Microsoft’s older browser) will let you change the default search engine in Windows 10 S. As LaptopMag notes, that means you’ll be sent to Microsoft’s Bing engine whenever you search from the address bar, with no way of switching to Google, DuckDuckGo, or another competitor.
With regular Windows 10, you can dig through a few settings menus in Edge and change the default engine from Bing to your preference.
Beyond that, the FAQ page notes that even if you are able to download another browser from the Windows app store, Edge “will remain the default if, for example, you open an .htm file.” In other words, when you open a link from an email, chat app, and what have you on a Windows 10 S machine, that link will open in Edge every time.
Microsoft likely has its reasons for this — the big ideas it’s selling with Windows 10 S are security and simplicity, with a particular focus on schools. The easiest way to create that, in its eyes, is to put the services it can directly control at the forefront of the OS as much as possible. Getting more people to use its stuff probably doesn’t hurt, either.
But from a consumer standpoint, this kind of closedness is a ways away from the flexibility of standard Windows 10. Bing, while generally fine, has long been less popular than Google Search, even as it’s become more tightly integrated with Windows 10.
It’s worth noting that Microsoft has tried pushing people toward Bing before. Back in 2014 it launched a “Windows 8.1 with Bing” edition of its OS that was aimed at lower-cost hardware, much like Windows 10 S today. It required Microsoft’s device partners to make Bing the default search engine, too, though it gave consumers the ability to opt out if they wanted.
Theoretically, there isn’t much stopping a Google or Mozilla from bringing their web browsers to the Windows app store. And if you really wanted to avoid Bing, you can always make a shortcut to Google Search or whatever else.
But those interested in Microsoft’s flashy new Surface Laptop may want to keep in mind that Windows 10 S really wants you to use Microsoft things, and that Windows 10 S is aimed at schools much more than professionals and heavier PC users. It’s more like Google’s Chrome OS, just with Microsoft in Google’s place.
It’s also worth remembering that schools can upgrade a Windows 10 S machine to full Windows 10 Pro for free. Surface Laptop buyers can do the same until the end of the year — though it may make the hardware a bit less efficient than it’d be otherwise. For every other case, that upgrade fee will be $49.
Microsoft did not immediately respond to a request for comment.
SEE ALSO: Here's what it's like to use Microsoft's new MacBook rival that runs a brand-new version of Windows 10
Join the conversation about this story »
NOW WATCH: Hands-on with Microsoft's newest laptop that's taking on Google and Apple
0 notes
Last Seen Blogs

relentless-j
Deus Vult

gabbypoo
gabbypoo

012398765433125
題名未設定

psykedelli-blog
a soul of unstable electricity

gauchosemfronteiras
Admirador de ursos