#just sew on a zipper and it's basically the same thing
Explore tagged Tumblr posts
Visit Tumblr Blog
Explore Tumblr blogs with no restrictions, modern design and the best experience.
Last Seen Tumblr Blogs


Fun Fact
25% of US internet users with an annual income of $80-100K use Tumblr.
Text
realized that besides his bedazzled collar, i have chikas whole fit in my closet
#actually asides from the belt too cuz i hate them#i can't believe myself and the fact i can recreate most of his outfit#like i have a sleeveless top idk why but i do#just sew on a zipper and it's basically the same thing#i don't have the arms to pull it off tho#chika can get away with wearing sleeveless shit bc mmmmmm his armssss#but i need to hit the gym before i can wear that thing#☆— yapping
10 notes
·
View notes
Text
daddy's girl
my father was the biggest disappointment today, and to make up for that pain, here is Harry being an incredible and kind father on an ordinary day.
---------------
''Daddy,'' Lily-Lu ran down the stairs, her freshly cut red hair was tied back with a white headband that Harry thought didn't suit her style, but the girl was willing to be fashionable so he just accepted, especially because he didn't think he was the most stylish person to give his opinion.
Lily-Luna was completely obsessed with these things, Harry was sometimes lost with the amount of information she knew and wanted to share with him, for example, yesterday when he took her to the hairdresser she told him that they had to go to the pharmacy so she bought a specific color of nail polish because she had seen something in a magazine about strawberry nails or something and wanted to paint her nails the same way.
Of course, Harry stopped by the pharmacy after the hairdresser, as well as the makeup and other trinkets store so she could buy a hairband and a satin cap — ''It's to protect my hair from frizz! Hair like ours daddy easily gets messy''.
''Sew for me?'' She was holding the white and blue dress that she and Ginny had bought the last time they went out together, one that Ginny insisted Lily-Luna needed because she was out of clothes to wear now that she was starting going out with friends to the mall, amusement parks, and birthday parties — which were no longer childish and parents needed to go along.
‘’How did you tear it?’’ Harry wiped his hands on a cloth, he was pruning his bonsai sitting on the balcony table, feeling the breeze of that summer that wasn’t absurdly hot — yet. He was on vacation from work and in order not to die of boredom, he decided to become a gardener, a task that only seemed simple because he needed three different books to understand which fertilizer was best for each plant and how many hours each one needed to be in the sun per day.
‘’I don’t know, I went to close the zipper and then it ripped,’’ Harry didn’t believe it, but agreed, taking the dress and then muttering an accio sewing box and then starting to sew up the small tear on the side of the dress. ‘’Daddy, will you take me?’’
‘’Where are you going?’’ Now that he was on vacation, Harry had basically become his children’s private chauffeur. Just yesterday he went out four times to take each one to a friend's house; not that he minded much, he liked driving and that was at least a reason for him to have something to do. There were parts of the city he had no idea existed.
His children had a much livelier social life than him or Ginny at that age, several of their friends lived in Muggle areas which meant James, Albus and Lily knew much more about the Muggle world than their parents.
''Kelly and I are going to have ice cream, I already told mum,'' She said, putting on the bracelet she had received for Christmas from Fleur, who seemed to love having a fashion-addicted girl to spoil. Victoire didn’t have much affection for this world, and Dominique was in a rebellious phase where she denied this whole “feminine” world. Meanwhile, Lily-Lu appreciated her cousins' lack of interest.
The bracelet had several charms that you could buy after buying the bracelet, which didn't make sense to Harry since, what's the point of buying something if it's not complete? But Lily-Lu loved it, and saved part of her allowance money and the money she received when she did something with one of her uncles to buy more charms. In less than two years, the bracelet was almost complete.
‘’Where?’’ Harry was almost finished, he found it quite satisfying and calming to sew.
''That ice cream shop near the mall, where we always go.'' She said and Harry nodded, he liked it there, it was safe, he knew the environment, and he knew that if something happened, Lily-Luna was in a neighborhood where she was not in danger.
‘’Okay, I’ll take you. Call me when you need to pick you up, I think I'll take advantage and go to the farmer's market... I need new fertilizers.'' His daughter nodded, smiling and kissing his cheek when Harry finished sewing her dress.
‘’Thank you daddy, I love you.’’ And she ran upstairs again.
123 notes
·
View notes
Text
2023 sewing projects - part 2 details at the end of the post (click here for part 1)


Note: I work for a fabric shop so I get most of my fabrics fabric for free as well as some patterns as I have to be wearing our products at work (I definitely consider it a perk). Without this job I would not be sewing as much and I'd probably be buying most of my fabric second hand or on sale as I used to do before. I also sometimes sew during work hours so keep that in mind if you're also a sewist, go at your own rythm 💜 Although I have basic training in pattern drafting I prefer to sew from pre-existing patterns to save on time (as i have to regularly make myself some new clothes for work) and discover new techniques and styles - but I often change stuffs to adapt the designs to my style.
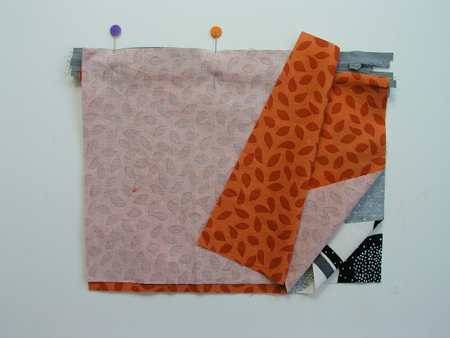
1 - same pants as in part 1 but this time in a double wool crepe from italy (i found it in a charity shop and the border says so in italian - it's absolutely gorgeous, i found 3 pieces of it at once for like 10 € each. I made a dress in the first piece, then these pants in the second)
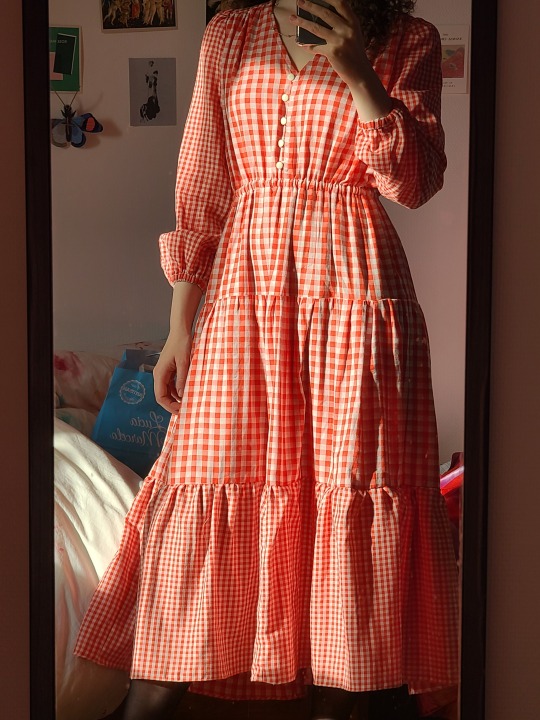
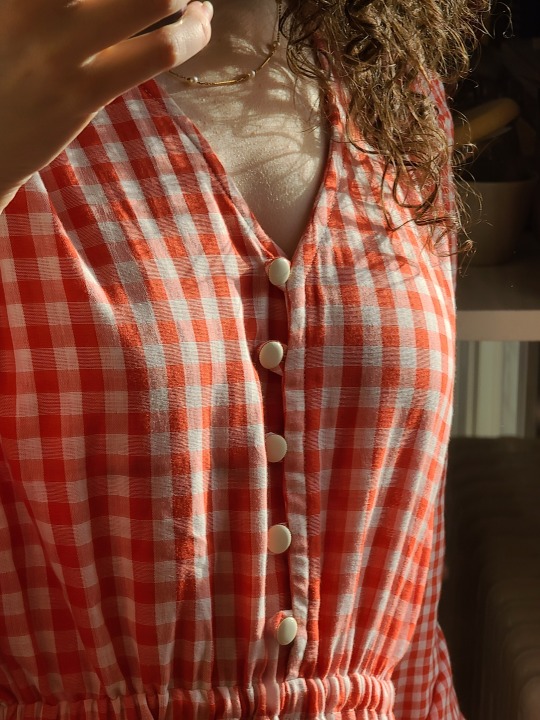
2 - dream dress in a coton double gauze - the gingham is sized differently on each side of the fabric so i had fun deciding where to put which but i had less fun gathering all of that fabric (the nice thing is it's super light and i get a lot of compliments on it) - the pattern has a short sleeves version that i'd like to make for this summer
3 - a simple tee made in ribbing fabric (usually used for the collar and wrist pieces on sweater) - the pants were made last year but they're the same pattern as the pink ones in part 1, just the slim leg version!
4 - another super quick make in a modal fabric (it's so soft and nice to work with), the last one i made in june before my tendinitis stopped me from touching my machine for a couple of months (and tbh i maybe shouldn't have made this one lol)
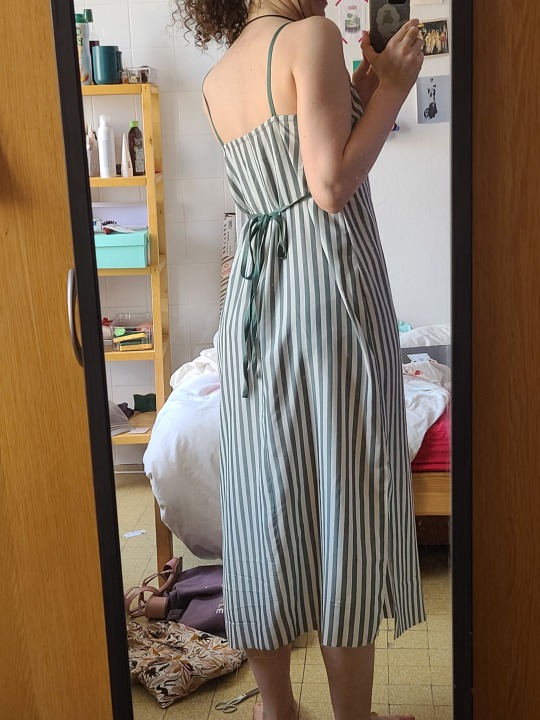
5 - first project back on the sewing machine during the summer holidays, very quick one in the remnants of the linen-viscose blend i used to make the matching set in part 1 (can you tell i love this fabric and this colour?)
6 - a mini retro skirt in coton gabardine - the skirt was made to be short and as i'm taller than the average height used in patterns i lengthened it but almost not enough as i ended up having to do a single fold of 1cm to hem the bottom instead of the usual 1 + 2/3 lol
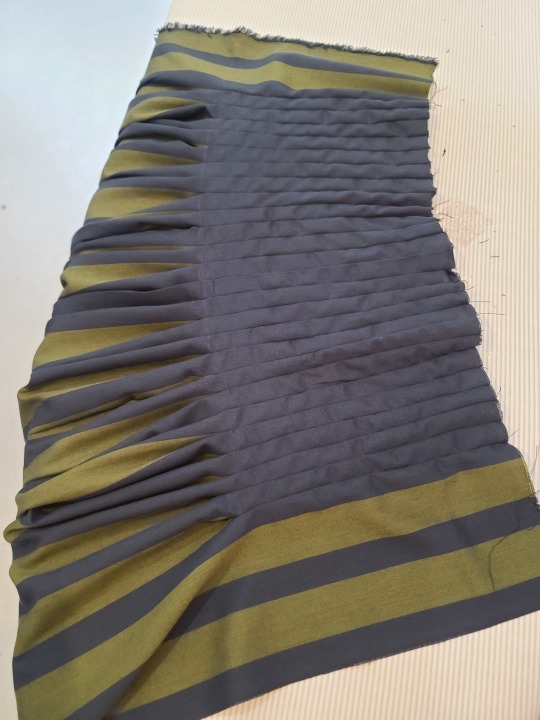
7 - ok so this one...i went in with no pattern and not much thoughts tbh i took this striped fabric and decided to turn thop of the piece into a plain colour by folding it repeatedly so that the folds would reveal the secondary colour by opening - it was super long to make especially because i just cut straight on the side instead of taking into account the fact that I am very much not straight from the waist down to the hips so i had to do a little fixing on the side seams once all the folding and assembling was done before i could put in the zipper. I was very proud of this skirt when I finished it but I've only worn it twice since then (september lol) because it's absolutely awful to iron it (and although i stitched every single fold on one side i still have to press them all one by one)
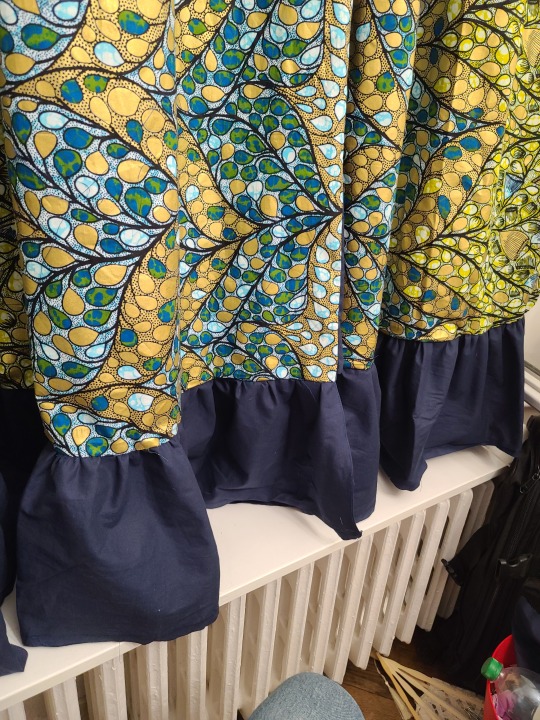
8 - these curtains are made in a wax fabric given to me by my grandmother who got it from a church friend who brought it from her homecountry in Africa (can't remember where that is, sorry) - they're lined in a dark navy coton so they can be more occulting (the same used at the bottom for the ruffles as the piece of fabric was too small for my curtains to go all the way down). I did this project in an evening so the inside finishes are very rough and i didn't even iron them but i was hellbent on finishing them on the day I started (after months of just having the fabric draped over the window as a makeshift curtain) - it doesn't show too well on the pictures but the darker yellow is actually gold!
#vinformation#my sewing#i also made a bag for a colleague who had a baby and a computer pouch for my brother at christmas but i didn't take pics#i might do a post with my mending projects too#sewing#crafts
11 notes
·
View notes
Text
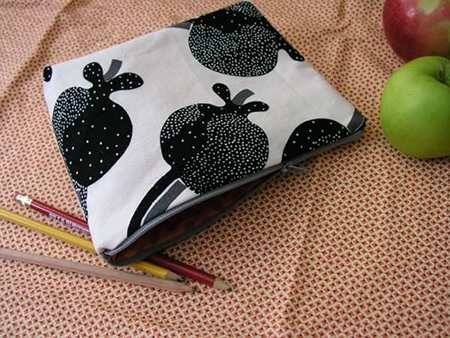
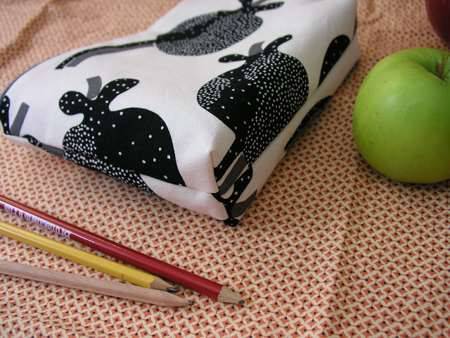
DIY Zippered Case
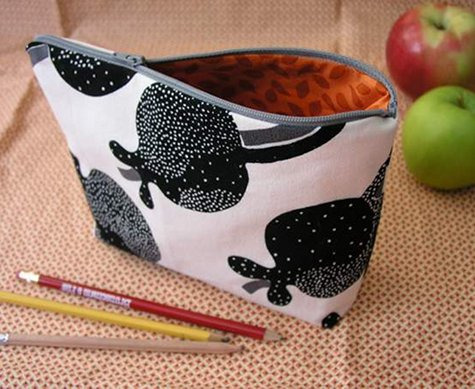
Project by Brett Bara:
It’s back-to-school time, and it’s hard not to have school supplies on the brain even if school days are nowhere in sight for some of us! Inspired by the good old-fashioned pencil case, I thought it would be fun to sew a lined, zippered pouch that you can use for pencils, makeup, electronics or anything else you need to organize and tuck away. The great thing about this bag is that once you understand the basic construction, you can easily make it any size you like. Try a short, long version with a wide base for knitting needles, or a flat bag for electronic cords. You can use oilcloth for the lining to create a waterproof makeup bag, or try stitching a label to the outside to indicate what’s hiding inside. Let’s get started! — Brett Bara
CLICK HERE for the full how-to after the jump!
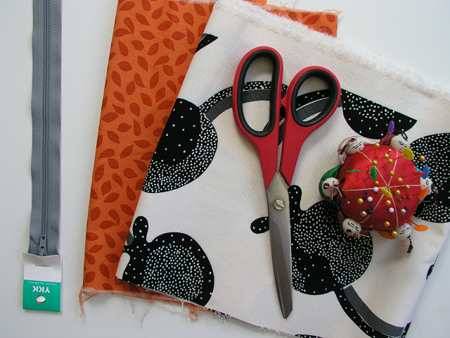
Materials
approximately 1/2 yard of medium or heavy-weight fabric for the bag exterior
approximately 1/2 yard of medium-weight fabric for the lining
standard zipper, at least as wide as your bag will be
scissors
needles
sewing machine
iron
Instructions
1. Cut the fabric.
Decide how large you want your bag to be and cut two pieces of your exterior fabric and two pieces of lining fabric to this size, plus 1″ in length and width for seam allowance. If possible, purchase a zipper that is the same width as your fabric piece or purchase a longer zipper and cut it to size. (Note: if your zipper is only 1 to 2″ longer than your fabric piece, you don’t have to cut it. A small amount of excess zipper length is okay.)
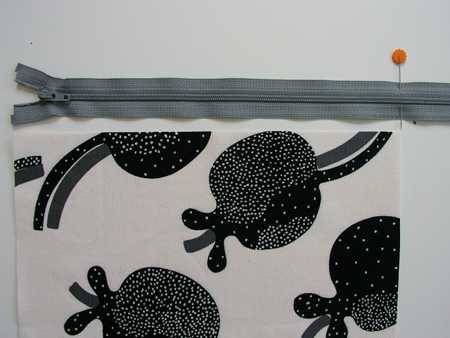
To cut your zipper to size, zip the zipper closed and place the zipper next to your fabric piece, aligning the top end of the zipper with one corner of the fabric. Place a pin in the zipper at the other corner of the fabric piece.

Set your machine to a narrow, short zigzag stitch and sew back and forth across the zipper teeth several times at the point you marked. (Yes, you can sew right across the zipper teeth — your machine can handle it!)
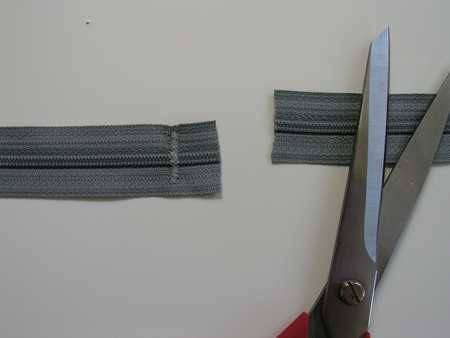
Then cut the zipper about 1/2″ past the spot you sewed. The stitches will act as a stopper on the end of the zipper. And that’s it!
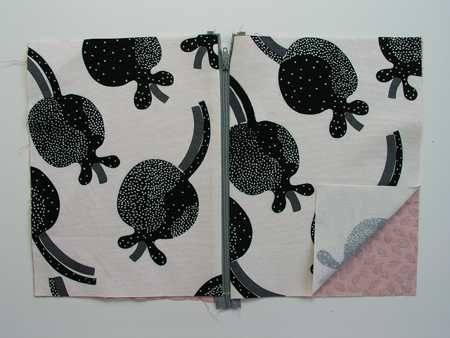
2. Attach the zipper to the fabric.

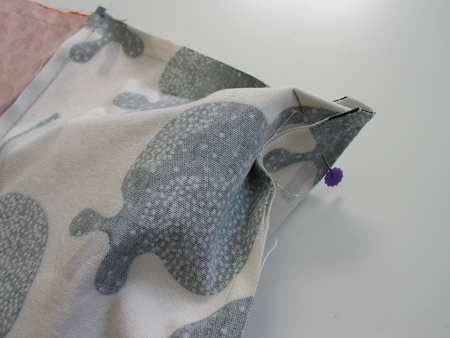
Place your zipper face down on the right side of one of the exterior pieces and pin it in place.
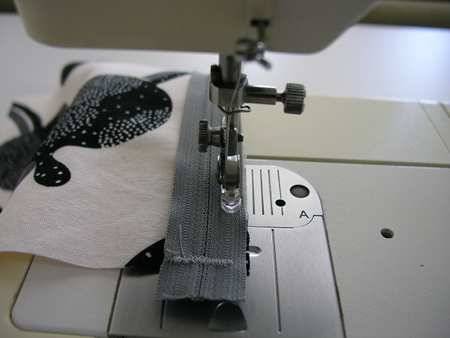
Load your machine with a zipper foot (check your machine’s manual for help with this if necessary) and sew the zipper to the fabric.
3. Attach the lining.
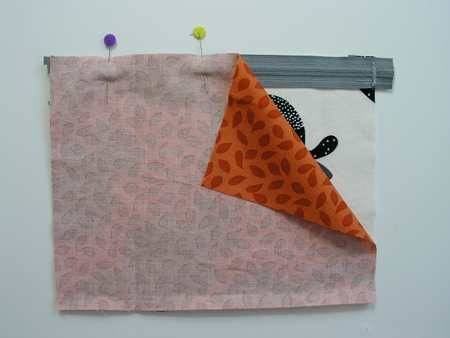
Place the lining right-side down over the zipper and pin it in place. Sew it just as you did the previous piece. (You will be sewing directly over the line of stitching you made when attaching the zipper to the exterior piece. The zipper will now be sandwiched in between the right sides of one lining piece and one exterior piece.)
4. Press the seam.
Press the seams you just sewed, folding each piece of fabric back so that the wrong sides are facing each other. (Be careful when ironing near the zipper — after coming in contact with the iron, the metal zipper can get hot enough to burn you.)
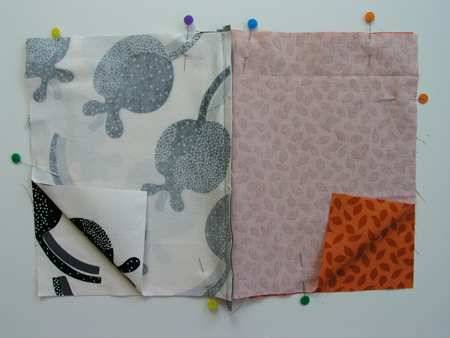
5. Attach the next exterior piece.

Place the second exterior piece wrong-side down over the right side of the zipper. Pin it in place, then sew it as you did the other pieces.
6. Attach the second lining piece.
Flip the piece over and pin the lining piece right-side down over the wrong side of the zipper. Sew it in place. The zipper will now be sandwiched between the right sides of the second exterior piece and second lining piece.
7. Iron it flat.
Iron the seams you just made, folding the fabric pieces back so that the wrong sides are facing each other. The resulting piece will have the zipper in the middle, with one exterior piece and one lining piece on each side, and right sides facing out on all the fabric pieces.
8. Fold and sew around the perimeter.
Next, lift each exterior piece and bring them up to meet each other with their right sides together. Also, bring up each lining piece to meet with their right sides together. The zipper will be in the middle. Fold the seam allowance of the zipper toward the lining and pin everything together on all four sides.
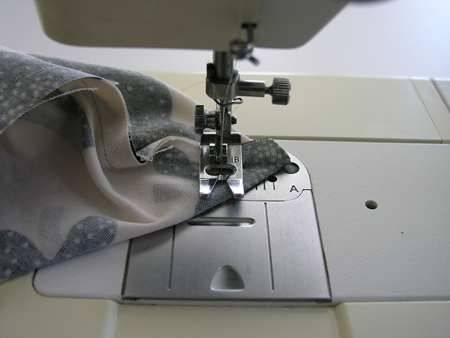
9. Sew the perimeter.

Sew around all four sides of the piece, using a 1/2″ seam allowance and a regular presser foot. Leave an opening of about 4″ on the bottom of the lining side, which will be used to turn the bag right side out.
10. Make the corners.
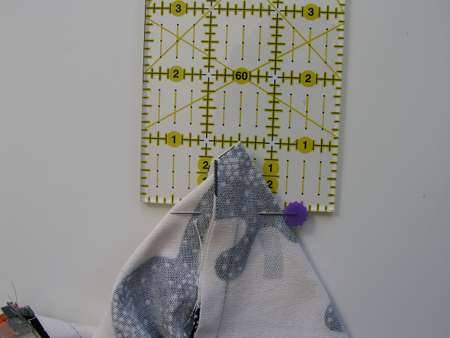
If you prefer a flat bag, you can skip this step. But if you’d like to make corners to add depth to the bag, here’s how: fold the fabric at the corners so that the side and bottom seams meet. Measure from the point of the corner; here I used a depth of 1″, but if you prefer a deeper bag, just measure further from the corner. Mark the line with a pin.
11. Sew the corners.
Sew along the line you marked with the pin, backstitching to reinforce at the beginning and end of the seam. Trim away the excess fabric, cutting about 1/4″ from the seam.
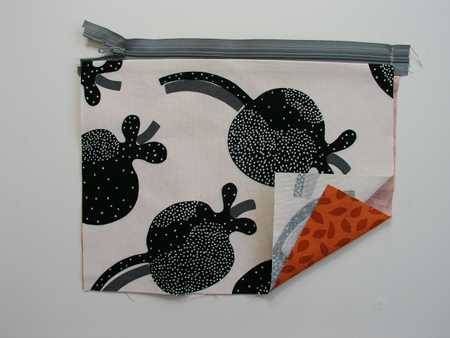
Here’s how the piece will look after you’ve sewn and trimmed all four corners.
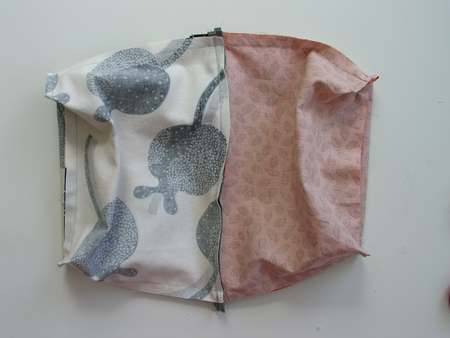
12. Turn it right-side out.

Turn the bag right side out, carefully working the bag through the opening you left in the lining. Press all the seams, then sew the lining closed by hand.
Turn the lining to the inside of the bag, and you’re done!
10 notes
·
View notes
Text
Ok I am a tailor, so let's talk about this. I see a few common points being raised in response.
Even at the low prices (most) real alterations workers offer, any additional expense is unaffordable.
This is very true. To address (1.b) of "the supplies are cheap, learn to do it yourself", that's also not a universal solution - I advocate constantly for anyone who can to learn the basics of sewing, but even if I consider it a very learnable skill, that is a baseline of time, energy, and fine motor skills not everyone has. But let's be honest with ourselves, even if we do figure out how to 3D print clothing (I'll get to that), a capitalistic society isn't going to make that affordable or more custom. Maybe for a little while until it's undercut the craft clothing market, and then it'll be the same ill-fitting one-style-close-enough, prohibitively expensive situation we have now.
Additionally, depending on where you live alterations services might not be cheap or readily available. Around the 40s and 50s, off-the-rack fashion really took off with the advent of the department store and the mail-order catalog. At that time, everyone with a vagina was expected to know how to sew by their mid teens at latest, and tailoring shops were abundant for more specialty work. Heading through the 60s and 70s, the idea of the housewife and her skill set had been eroded and it was no longer a given that half the population would know how to sew, but custom fitted clothing was going out of vogue outside of couture. By the 90s, custom fitting is synonymous with luxury, people don't get clothing altered, they wear things as they came and diet culture is thriving off that, trying to sell everyone on a universal shape. So now many areas used to that model don't even have readily available tailors, supply and demand, the ones who are around can (and must) charge more.
2. It'd be better than now! It'd end clothing being made in sweatshops!
Extremely incorrect. Firstly, there is never going to be a level of automation that doesn't require humans on site to maintain and monitor the machinery. Secondly, I think those making this point misunderstand why and how sweatshops happen - it's not because it's the only way to make the product affordable or something, it's because a region has an utter lack of worker protections and a poor population (because of sociopolitical sabotage to keep it that way) so the companies that want to produce something can pay slave wages to make their stuff there and sell it in a wealthier country for a premium. Printing clothing won't make the sweatshop go away, it'll just push those people into a different kind of sweatshop.
3. The very concept of 3D printing custom-made, perfectly fitted clothing
I don't think you understand how complicated fitted clothing construction is. I understand why, but there is a reason the level of automation we have in clothing production now still requires humans hand-crafting somewhere along the line - it is some complex ass geometry to make that happen.
What you're looking at to print a fully fitted garment is firstly for a company to take a fully body scan of you to know every curvature of your body (why the fuck would you want that), and then... what material are you imagining? Do you want to wear a thin plastic sheet melted to shape? (3.b) yes, 3D printers can print material other than plastic, but the material - by virtue of how the printer works - has to be meltable. No natural fiber does that. Are you imagining a machine that weaves a continuous piece of fabric in the exact shape of your body? Not a technology we have, not a 3D printer, and what about zippers, buttons, snaps - any way to get it on and off? We have yet to create a machine that can piece together a three dimensional work of fiber craft, that's why we still have textiles workers.
I'm also a sci-fi fan, I love the idea of the Star Trek replicator - of sucking the very building blocks of reality out of thin air and materializing it into whatever we want in the exact shape, color, texture, temperature, etc we want it in. That sounds dope as fuck. That is science fiction. 3D printers are not replicators by a miracle mile. Fully 3D printing clothing is, for so many reasons, a tech bro wet dream and nothing more. It's an unachievable solution to the wrong problem.
"3D printing clothes so they can be custom made to fit you" TAILORS THEYRE FUCKING CALLED TAILORS AND THEY DON'T NEED TO WORK WITH MELTED PLASTIC
52K notes
·
View notes
Text
The DIY Tent Design Process
Everything I’ve shared so far is based on personal opinion and should not be taken as gospel. Now, let's move on to something much more interesting—the DIY tent design process.
I have many friends who are into DIY projects, though most of them are not related to tents. The common reason behind these DIY projects is to fulfill a personal need. Many of us share the same experience: we see designs on the market that don’t quite meet our expectations or the prices are too high for us to afford. Yes, it’s true—it’s about that "personal stash" of money!
Step 1: Collecting Materials (For a Tent)
The materials used in tents are varied and include:
Main fabric: 7D / 10D / 15D / 20D / 30D / 40D / 70D / 210D… mainly nylon
Mesh fabric: 10D / 15D / 20D… polyester or nylon
Aluminum poles: 7.9mm / 8.6mm / 9.0mm / 11mm / 13mm… and also carbon fiber poles
Hardware: WJ / UTX / ITW / YNS
These are just a few examples. Let’s take a simple case for precise description: DIY’ing a pyramid tent based on the HillZero Rheum Nobile 4-6 (https://www.hillzerogear.com/).
Firstly, we should prepare 30D nylon fabric. The amount needed depends on the size of the tent, and we should prepare enough for two sets. This tent requires 22 yards of fabric, so we need to buy 44 yards. Since the first model is often a failure, I always prepare a backup fabric set.
Next, we gather other essentials like hardware, sewing thread, YKK zippers, and aluminum poles.
Step 2: Rough Size Calculations
As mentioned earlier, “All tents are based on basic size calculations. As long as the calculations are accurate, it can be done excellently.”
Tent design can be imagined like building a house. We start with the known dimensions of the tent base (depending on the size of the tent you want to create). For example: Diameter 420cm (165 inches), Height 240cm (94 inches).
We calculate the ridge length of the sides. Whether you use a computer drawing program or do it manually, you can easily determine the measurements. Since it's a regular decagon, each panel is identical.
Step 3: Creating the Model (1:20 Scale)
In this stage, we add elements like zippers, ventilation windows, and guy-line attachment points to the model. The model allows for a visual representation of the tent’s overall structure.
Step 4: Preparing Cardboard for Fabric Cutting
Once the model’s details and measurements are correct, we can create a full-scale pattern. Some may wonder why we need to make this pattern—it's to ensure accurate dimensions for cutting the fabric. Tent fabric is large, and it’s impossible to mark directly on the material. We need to prevent size discrepancies since even a 1cm error can drastically affect the final result.
A few things to note:
Sewing allowances must be added. High-quality tents use double stitching, so we add 2cm extra for seams in the pattern.
Straight lines aren’t always straight. Fabric is soft, and tension can cause warping in the middle, so we need to account for this and adjust accordingly.
Fabric classification is crucial. Despite being a decagon pyramid tent, each piece is different due to factors like fabric width and optimal fabric usage.
Fabric grain matters. Straight grain has no stretch, while diagonal grain has elasticity. This affects how we lay out the pieces to avoid future issues.
Step 5: Sewing and Assembly
Typically, small parts like windows, zippers, and reinforcement patches are sewn first. Then, we move on to assembling the larger body of the tent, piece by piece.
Sewing may sound simple, but it’s an art. If you’re unfamiliar with sewing machines, it can be quite a headache.
Achieving high-quality stitching requires skillful hands, and this task is not for beginners. However, DIY enthusiasts can certainly give it a try, and even if it’s imperfect, it’s your very own creation—something you can proudly use.
Final Thoughts
DIY tent making is an incredibly fun and creative hobby that adds energy to your spare time. Each step of the process has its unique challenges, but with patience and persistence, you’ll learn to solve them. Remember, advice from others is helpful, but only through your own effort and understanding can you overcome these challenges.
Thank you for reading! I’ll continue to share more tent-making processes in the future. The pyramid tent is just a beginner’s project, but to make it truly precise requires meticulous work. If you have any questions, feel free to email me at: [email protected]. I’ll do my best to respond!
#Person Backpacking Tent#Hot Tent#Backpacking Hot Tent#Dome Hot Tent#Camo Bushcraft Tent#Hot Tent with Stove Jack
0 notes
Text

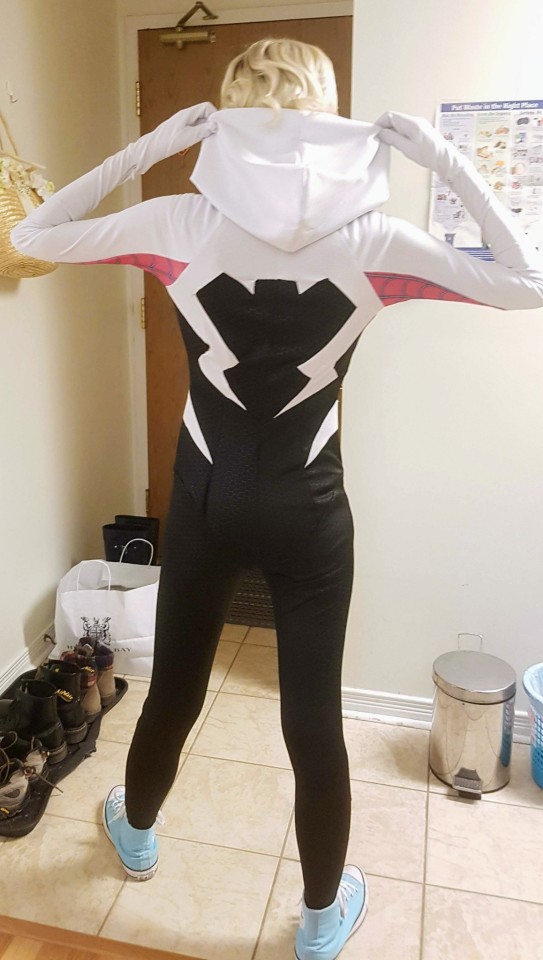
This is a Spider-Gwen jumpsuit I made!
Happy Halloween! I made this bodysuit and I'm super happy with it!
I'm gonna break down step by step what i did but I'm NOT a professional cosplayer or seamstress or fashion designer or anything. This is just to document what I've done in case it could help somebody else!
Materials used:
Scuba hex white (2 yards, available at Joann or Cosplay Fabrics International)
Scuba hex black (2 yards, same as previous links)
Web pattern on Spoonflower (make sure to order it printed on spandex!)
Three zippers (one for the bodysuit, two for the arms)
7mm snap buttons for the collar
Wig from @ardawigscanada so I don't actually have to style it as I am lazy and bad at wig styling
Step One: PATTERNING

I used several patterns as a base:
Yaya Han's Ultimate Bodysuit Pattern for the general design (McCall's M7217)
The Yaya Han pattern with a baseball jersey shirt for the arm sleeves (McCall's M7554)
McCall's M7486 for the hood (or you can trace a hood from a sweater of your choice)
Step Two: DRAFTING
First I tested out the bodysuit pattern solely on its own on some cheap stretchy fabric just to make sure it fits. I find that their smallest size fits me well as I am definitely a very stringy person. But the bodysuit was a bit short so i needed to extend the torso parts.
Then I trace out new patterns and draw the Spider-Gwen design on top of them, and cut.
BUT WAIT THERE'S MORE!!!
I wasn't sure if that would fit me either so I made ANOTHER mockup of the pattern I drafted out of scrap fabric (basically the web pattern I ordered but in the wrong size because I am dumb and I don't check things). Turns out this was a GOOD IDEA because this came out too loose! The fabrics I got were veeeery expensive so I'd rather be safe than sorry!
Step Three: COMMENCE SEWING! (AND HAIR PULLING)
After making the adjustments to my paper patterns, I held my breath and started on the bodysuit proper. Hoping that I don't fuck everything up.
I started with the easy stuff, which were the front panels:
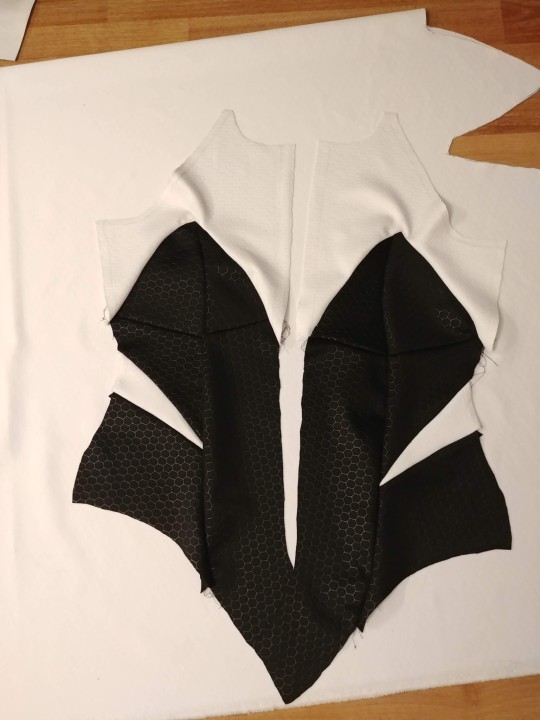
So far so good! I didn't use any special types of stitches, just regular straight stitch. I read that other cosplayers may use zigzag stitches for stretchy fabric but I have very little sewing experience and I do NOT trust my sewing machine at all. Just do what you're comfortable with and you'll be fine!
And important note! Make sure you stretch your fabric slightly while sewing! It's supposed to be a stretchy suit after all!
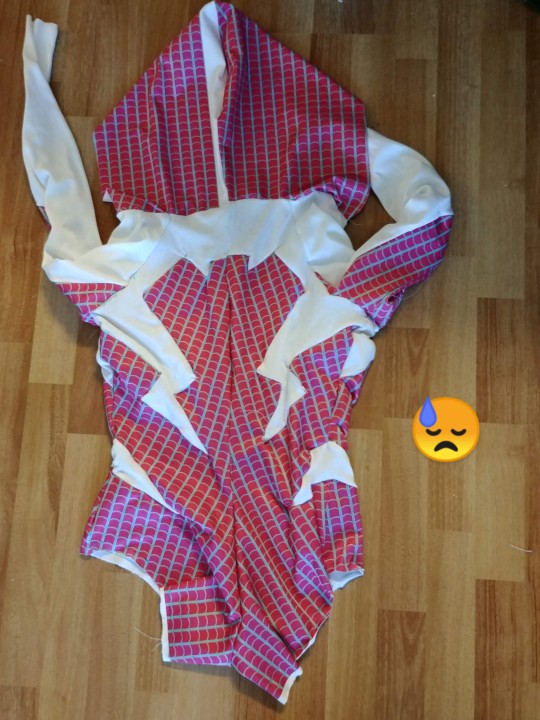
Back panels were a pain, but I got it done... there was a lot of thread pulling and hair pulling and questioning my life choices involved.

then I sewed the sides together! The white and black parts don't align perfectly but you can't really tell in this picture 😅
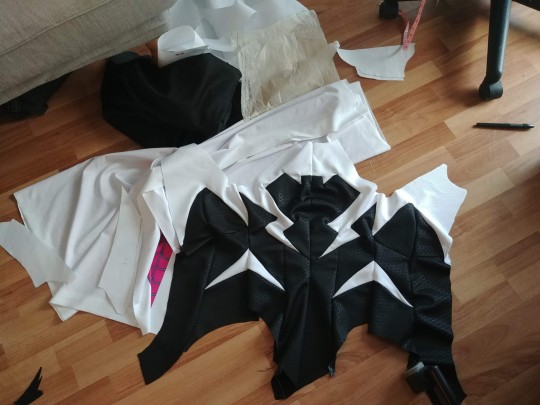
After that, I sewed the web parts onto the sleeves and the sleeves to the shoulders. That part went surprisingly smoothly so I'm just going to move on. Sorry for the lack of images but there's a photo limit on this website.
Step 3.1 Gloves!!!
Okay so I got a separate pattern for the gloves and also left them to basically the last minute to finish as they're so goddamn difficult!
This tutorial helped me out so much!!!
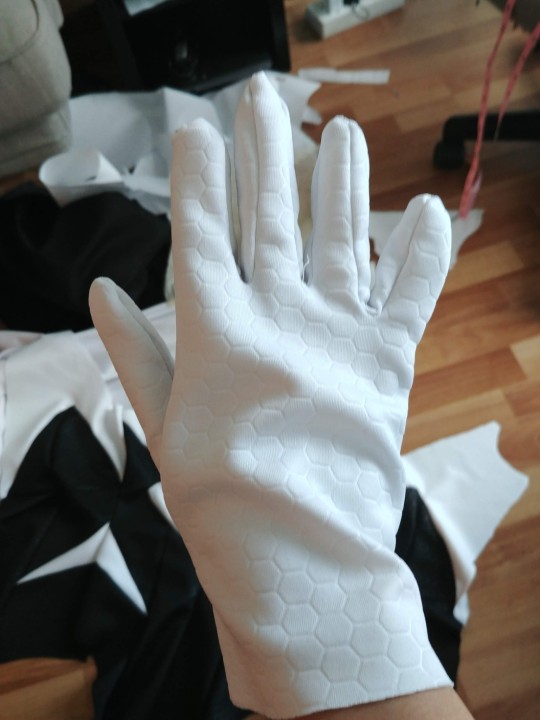

As you can see in these pictures, my first attempt came out a bit too loose. But it was an easy fix. I just had to take in the thumb and the pinky and it fit reasonably well on my hand.
And I also installed zippers on the seams of my sleeves so I can easily remove my gloves while still keeping them attached to the jumpsuit. This is why this project needed three zippers.

Step 3.2 Collar
And finally, the collar. This almost made me gave up on the entire project.
Right after I sewed the hood on, I was well on my way to finishing, or so I thought!
Because I was combining two different patterns with two different types of collars, I needed to figure out how to make them fit together. there were many MANY failed attempts.
Eventually what I did was I cut out two curved trapezoid shaped things out of the white scuba fabric, sewed that to the top of where the hood connects to the bodysuit, and then sewed the collar on top of that. This made sure that the fabric actually conforms to my neck area.
I placed down a t-shirt to trace the curvy trapezoids, and also make sure you measure your neck area appropriately!
CLOSING THOUGHTS
So yeah that's basically what I did. I admit I was too lazy to dye my flats in order to make her ballet flats but I'm sure that's easy compared to this mess! Anyway my Converses worked in a pinch.
Thank you for reading! Good luck and Happy Halloween!
#spider gwen#spider gwen cosplay#into the spider verse#spiderverse#itsv#cosplay#cosplay tutorial#sewing#sewing tutorial#stuff i made
128 notes
·
View notes
Text
I don't usually reblog things but this absolutely eats for hazbin lore. Especially for clothes, I think the way they would have to make and sell clothes would be extremely interesting for Hell.
I do think they'd do commercial clothes still, I just think its the way they do it that'd be different. Probably in a way that uses modern and older solutions. I think they'd either just use a lot more buttons, ribbons, zippers, etc. that would either work as extra embellishments or would accommodate extra arms, tails, ear etc. Or it'd be kinda like how irl clothes aren't built for everyone (ex. Wheelchair users, little people, literally anyone who's a little bigger, etc.) and it becomes yet another problem for sinners who don't fit into that mold. Like how a lot of background characters don't have extra arms, so you can argue that maybe extra arms aren't common enough to be featured in standard clothing. I think that's when tailors come in. I think maybe sinners buy the standard clothing and make it into something wearable for them through a tailor or even just through someone they know who sews.
That and I imagine just knowing how to sew in general is a very common skill because it used to be in older decades. If anything, it was seen as basic life skill in the same way cooking is. A lot of sinners probably just make as much as possible for themselves the same way much older generations would have. It was only recently that it become a less common skill to have. I imagine new sinners (especially those who come in less common forms) would have a harder time adjusting to Hell because of it. A lot of older sinners probably look down on them because they see them as lacking basic life skills and think they're overly reliant on others because of it. Its also why I think Vox would have a lot of reach in newer generations because his whole circle would be some the only things newer sinners would be more familar with.
Honestly I think exploring the way Hell would work is so interesting. I have a lot of extra head cannons about Hell and different characters like Alastor, Cherri Bomb, and Vox because of it. I'm glad someone else thinks about it too because I think its cool to ^^.
Dear Hazbin Hotel Fandom (with special note for reader insert fic writers at bottom)
Been thinking about Hazbin and like, economy, and infrastructure, and fucking culture in hell. And I like to imagine that earth is like, modern age if not a bit further into the future, and Hell is just so far behind
And I see most writers attribute this to old powers that be more or less forcing people to adhere to their affections, but I feel like it's so much more complex than that.
Like if there's any kind of infrastructure in place, like say, oh IDK utilities, that infrastructure in modern times relies very heavily on established modern infrastructure built before it, and a certain degree of cultural niceties to leave it alone, as well as all the means in terms of sourcing labor, resources, and cold hard cash for its construction and continued upkeep.
Which is near impossible in a place like hell. A place where at least once a year, the ritual killing of the masses leads to huge turf wars set to destroy said infrastructure. In such a every man for himself society, who's making sure these roads aren't full of potholes and the lights stay on?
Which leads to a very easy answer, Overlords. This is why Overlords own millions of souls. It's the expected currency for stability. Overlords oversee a certain degree of infrastructure, normalization of life. Depending on your deal, Overlords might guarantee a base degree of normalcy in exchange for souls. Like you might get better rental opportunities in areas where the buildings aren't likely to be torn down regularly. You get running water and electricity, books and other entertainment, access to better food, security during large scale danger events (including the exterminations) ect. And refusing to sell your soul could severely limit opportunities. Imagine if everyone is born into poverty, and you are only allowed the chance to access middle class jobs, houses, ect if you cut off a finger. Everyone does it, you aren't using it anyways, and your life gets significantly easier if you do....
But yeah I think people who write for the fandom are seriously understating the actual affects the lack of a central government probably has on the different areas of the city, and what it actually means to be an Overlord, and why things work the way they do.
Like I am 1000% sure there's no mail in hell. Like mailmen and carriers and an organization system. Unless an Overlord was particularly invested in it... No I think for a very long time long distance communication took place through hired help. People specifically paid for or in one's employ to carry personal missives on an immediate basis as needed. Delivery men. This is why Vox's electronics are such a hit. It provides a degree of luxury unknown to the masses before this; or known of and since lost and have nostalgia for.
I also firmly believe that this is still how Overlords and influentials communicate. Vox's infrastructure is convenient, but it would require seceeding a degree of independence powerful people can't afford to give up. You can order one of your souls to take a message and others to protect them, but to use a phone is to put your communication network in the hands of someone else, and a potential enemy at that.
Lack of infrastructure aside, I also don't want to understate the effects of only a certain percentage of the populace being present has. 100% of the people dropping into hell can know what a blender is, but if not a single souls who drops down knows how one works, then hell just straight up doesn't have blenders. Which is another factor into a lot of the lingering old timey feel of Hell. Technology has to be invented on earth, then become popularized enough that the knowledge of its creation beats out the numbers dropping into hell and it can be made. Not to mention someone has to be interested enough to let it be made in the first place. This is why some Overlords center around such singular niches. They were passionate enough to teach themselves in life the knowledge needed to build that particular luxury from scratch. Even if it had been decades since development in earth, the knowledge just doesn't migrate well.
I also imagine this having a huge impact on the entertainment industry. Lots of writers go on about old songs but not one has the guts to claim an artists is in hell and still making their art in hell
Can you imagine the cutthroat industry developed around having to claw your way up through hundreds of years of new music and nostalgia when your own fan base is still mostly on earth and the other artists have had centuries or decades to establish themselves?
Which brings me to my last and most important point..... Shoes. Well, shoes and clothing, and mass production.
It just ain't fucking happening in Hell.
One, in sure the Pride ring is getting some of their commerce from other rings. I'm talking consumables. Textiles and food. This is also a city spanning millions of people, and what hydroponics isn't used to grow pot is probably being sponsored by Overlords to grow produce for their souls. Which means some production but not nearly enough to feed the city. Which means food probably looks like a large majority of people eating hell based produce from outside the ring, with dedicated smuggling rings (like what we see with IMP, travelers who bring earth commerce home, I'm guessing Lust ring Incu/Sucubi looking for side gigs) bringing back seeds, cuttings, and cultural touchstones like movies, books, and music to be mass copied and distributed. Those living in certain areas or with the right amount of cash can pay for produce grown from that smuggled earth produce.
Meat is predominantly hell born in nature, probably produced from Wrath, and Sloth's oceans, with an uncomfortably large supplemental of cannibalistic meat being corpses harvested by street folk and sold to butchers for cheap, cooked and sold Sweeney Todd style. I do think Cannibalism is far more widespread and normalized than most are comfortable thinking, for practical reasons. There are just so many dedicated cannibals in the colony alone...look, there is neither space for cows nor a means to get them down there.
In any case, clothing.
This is a huge pet peeve for me in fics because I don't think anyone really thinks this one through, the sheer volume of the fashion industry in its infrastructure and how much of that Hell is lacking
Not to even mention that everyone is hell is shaped weird. Head to toe. Weird bodies all the time. Everywhere.
I just don't think mass produced clothing is a thing. Or at least nearly a refined as earth. Off the rack shit is probably very plain, and very vaguely shaped. Lots of missing sleeves, wide arm holes, drawstrings and buttons. The bare minimum. The cloth equivalent of fig leaves. Pride based clothing outlets, if there is any mass production, probably base their shapes a lot of Imps and Hellhounds and mostly humanoid with four limb, just to have a consistent customer base and hope they get lucky with hellborn. You probably have to pay to have a pattern made for your body and then have basic shit seen up from there or learn to do it yourself. Lots of people earning side cash sewing garbage clothes for cheap. Dudes with a bunch of ink and a screen printing custom graphic tees from their apartment making bank.
And don't even get me started on shoes. Most people have hooves or paws, and if they don't have that, there's a sizable chance they won't even have feet. There just isn't mass produced shoes. There physically can't be. There is no consistency in size. It is literally not possible.
All to say, sewing is probably a pretty valuable skill to have. Tailors and cobblers are probably both valued jobs and incredibly necessary. It's also probably pretty damn expensive. Which is actually why we don't see a lot of shoes, and why some folks are strange about clothes. It's just not practical anymore. And it's wildly expensive. Why go through the bother of getting a tailor or cobbler to make time and then get charged through the nose for something that might get destroyed or stolen soon anyways?
Which brings me to my special comment
Dear Reader insert writers. Specifically the Reader/Alastor crew, but this is pretty blanket
Unless your OC, or the clothing, is a very specific shape, Angel is not loaning your OC nothing in terms of textiles. Think real hard about whether your OC's feet will fit into one of his custom made boots... Really think about it. The love is there, but it's Hell. Let your OC struggle with everything. They can't get housing because everywhere outside an Overlord's domain is full and they can't rent without trading their soul to an overlord. They have trouble finding non human meat or palatable produce or even coffee. Their clothes are coming apart at the seams and laundry mats don't exist. Its hell, it's hard, and it's not made for them. If Angel ends them anything, it's gonna fit like a nightmare or be secondhand from another hooker and look like it. And it's going to be expensive AF
This is especially for you Alastor shippers. Textiles work a lot closer to how it functioned in his time than ours. In fact it probably functions closer to Rosie's time than his. And something I need you to remember is courting etiquette. Because I often see this overlooked. The best example I have for this is the song "baby it's cold outside", which viewed through the modern lense sounds like a creepy preamble to that poor woman being accosted, but in the lense of the time period it was written, is seen a feminine strong song, a woman using the tools available of her time to openly flirt and accept an offer to stay overnight. And while most people remember that Al comes from a time where gifting is used to show affection, I don't think they remember why that is. Like yes, there can be, and probably should be, a certain degree of possessiveness involved, given where we are and who we are talking about. But we must remember that this was a time period before women could divorce their husbands in the US. These gifts had social meaning. Women couldn't own property, were discouraged from jobs after settling down, and just didn't have the means to care for themselves. Expensive clothing and jewels were a statement. It told the community that the husband could, and did, provide for his wife financially. It gave the woman tangible items that, if properly cared for, would provide her with capital enough that should her husband die before her, he could be her only husband, that she wouldn't be forced to remarry. It a statement of of societal expectation, but also of how much he cared for her well being. And this is an aspect I see missing from Alastor's commentary. Yes there is a magical aspect of protection often employed, but he doesn't lavish his beau with Fur coats and hand crafted hats with obnoxiously bejeweled pins and easily displayed but hard to care for items that are as much a declaration of love in value as they are in attention. The closest I've ever seen is the fics by corruptedteacups, in which the flapper set gifted to the MC is described just as much in its beauty as the sheer quality of the fabric and beading involved. It feels substantial and expensive.
Just a small fandom peeve of mine, but some desperately needed context and depth I hope people think on.
#hazbin hotel#this is so good#I wish world building was more of a thing for hazbin#Love when theres historical accuracy to Hazbin#Its so neat
54 notes
·
View notes
Text
I've been kind of kicking around an idea of, like, a semi-guided pattern-using and pattern-making series?
So there'd be several steps, starting from using commercial patterns and going all the way to following and translating patterns like you'd get in Otome no Sewing or Gothic&Lolita Bible. There'd be a bunch of items you'd make, and I'd try really hard to make them be things you can actually use in your lolita wardrobe.
But I'd want it to be really interactive (maybe on Discord? I recently got into Discord) where people can ask questions where they run into problems and get feedback and where everyone can celebrate the heck out of anything anyone finishes.
The route would go vaguely: Learn to follow a basic pattern for a non-clothing thing (bags are nice?) > easy pattern based on body size with minimal alteration (bloomers?) > structured piece with something complex like a zipper or button closure, also choosing commercial patterns specifically for ease of modification (skirts with waistbands and shit?) > blouses with collars and cuffs (because how are you going to follow a pattern for this in a language that you don't speak if you can't follow it in a language you're comfortable with) > we move up to OnS/GLB/old Gosurori patterns that arne't based around body size > measuring a Japanese pattern and adding fullness to change body size > grading a pattern that doesn't fit into a pattern that does > do it all again but in Japanese > and I don't know where this will end but, you get the idea.
I'm an asshole and would not allow you to test out of a level. Since the idea is both to learn and to make things, if you can already make a complex blouse then you can make a bag.

Also this would let us make sure everyone is on the same level and let you fancy people who have already made historically accurate lobstertail bustle dresses and worn them for over 16 straight hours flex and make Usakumya rucksacks when the rest of us are making grocery bags.
Also, because I'm me, I will be offering awards for every single piece completed. Each piece will get an award and the award names and significance will be made up by me on the spot and may make no sense.
Anyway, just a crazy little idea; everyone tell me how that'd sound? Maybe i'm too specific at this point but I've been turning this around for a few days.
Also I wanted to use that gif.
53 notes
·
View notes
Text
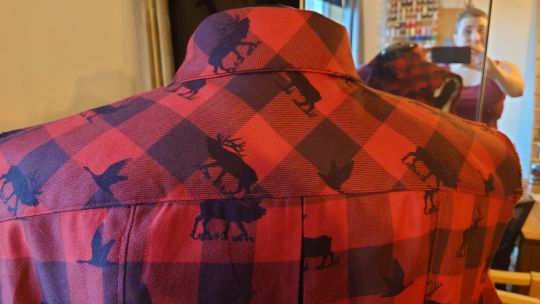
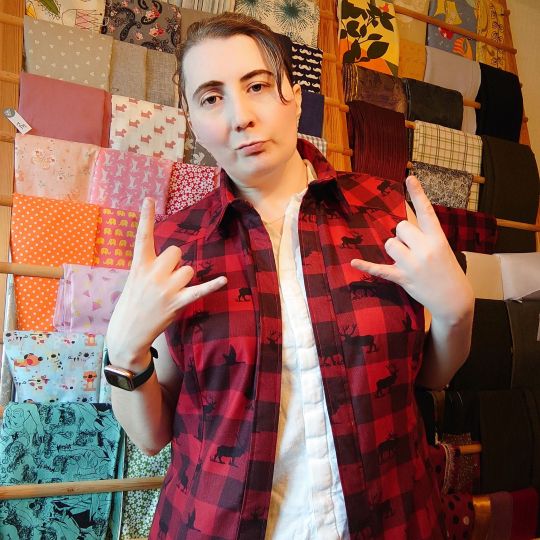
McCalls Sewing Pattern 7470
This is just me talking about sewing so I'll put most of it under the cut.
I made the mistake of buying the fabric BEFORE I had a pattern in mind. I knew I wanted a shirt dress, but wasn't sure what one, and I had this McCalls in my stash and it was in my size (I bought most of my patterns when I was skinnier, and the Big 4 normally stop at 14. You need to buy the 'larger' option (normally 16-24) in their own envelope.
Because I have the worst decision fatigue ever, I figured picking one I had and would fit was easier:
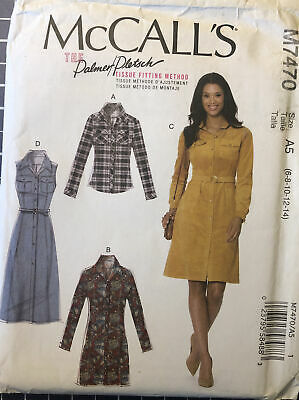
I honestly think I got this free in a magazine many, many years ago as the pattern I have looks different on the front but it's just the same pattern.
My fabric was a DREAM. Like I'm not even gonna lie, I bought 5 yards and I'm seriously thinking about buying more. I love it so much. I got it from Mood, like I'm a proper fashion person. The people who do the Project Runway thing get the fabric from Mood.
It was called Black and Red Buffalo Checks and Animal Silhouettes Peached Cotton, and it cost £5.70 a yard. It feels like flannel and its 100% cotton, which is nice!
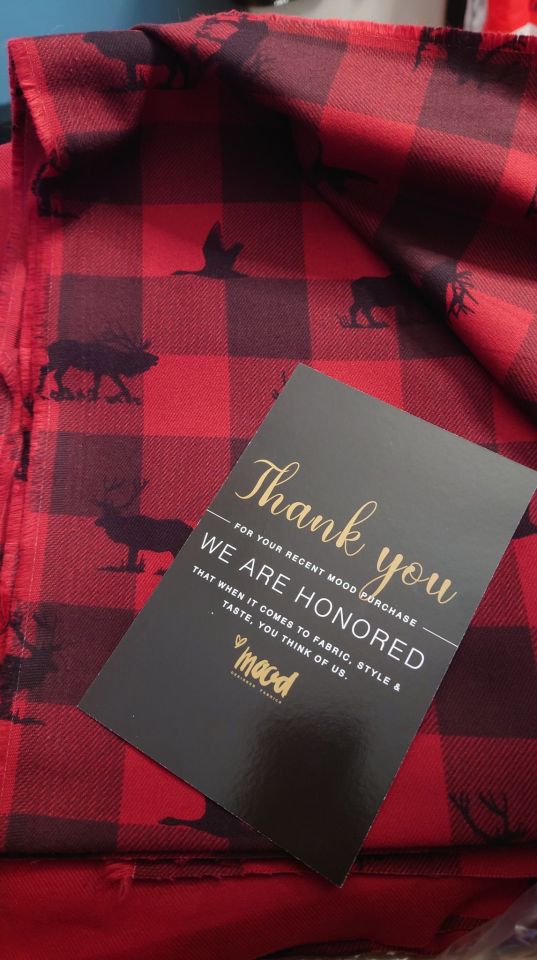
I legit love stags and I know this is moose, I don't care. I love it. It's red and black and check and I'm always gonna love that. I never really got over that Avril Lavigne phase of personal style.
So the style of the dress is princess seams, which I'm not SUPER fond of because I like a waist seam because I think its more flattering.
I didn't fit the paper to myself because I was making a mock up out of an old bedsheet. I've always kinda sucked at fitting patterns and I thought this would be a good time to... try? I did okay but there are a few things I'm not happy about.
The pattern instructions were.... pretty typical for McCalls. The Big 4 always give pretty basic steps, which I'm not super fond of as a self taught seamstress*. They tend to be like "insert zipper" which sucks.
The dress did come together pretty easy, but it was time consuming. I was trying to be as careful as possible with cutting and matching notches as I love this fabric so much and this dress took 3 yards.
There was a lot of top-stitching and I was being real careful.
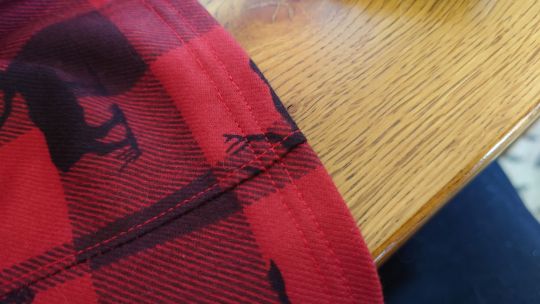
I can't pattern match to save my life and I was also trying to save on fabric, but this was probably the best top stitch I've ever done in my life, because I don't have a twin needle. I've been patting myself on the back for this one for a couple days now.
The collar, which I've struggled with in the past went together nice and easy - so taking my time and checking things a couple times before just jumping in does actually work. Who woulda thunkit?
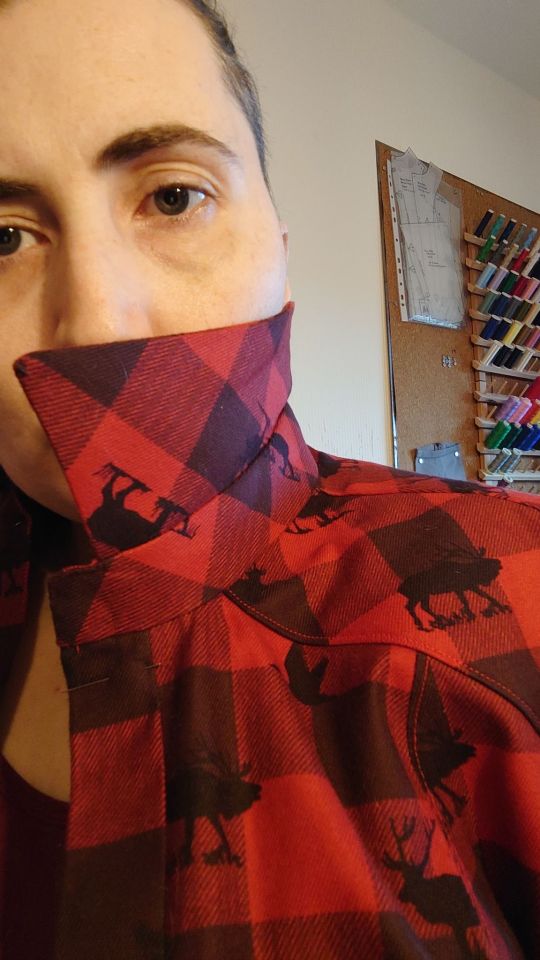
I cut the yoke on the bias because I wanted it to look a little different and I'm really pleased how it came out.
I was going to add sleeves as well, because I like shirts and I think it's more waerable. However it's been fuckin roasting here and I'm not super excited about wearing a FLANNEL shirt dress in this heat

So I made it sleeveless, which makes me feel like a bad ass.
So it does still need buttons which have now arrived, so I'll be adding them on at some point. I may be putting it off because buttons require button HOLES and that means if I fuck it up its VERY VISIBLE.
It took me about 2 weeks to make this shirt dress. I was trying to do a little every day after work. I took it to Bo's once it was finished and she thinks it looks really good and like something you'd get in a shop, although that might be a Primark, so I didn't push it with my 'give me compliments' vibe. She did also say it made her feel like a lumberjack which is also a GREAT vibe!
Overall, I think this is a decent pattern, but I wouldn't make it again. I do like the end result, and will be adding the sleeves at a later date. I really would expect it to come together without too many issues, but the mock up really was needed as there was a LOT of ease it this pattern in the back and also the top of the bust. I EASILY took out 3 inches from the center back and upper bust area. I've recently read that the best thing to do is to measure the upper bust rather than the waist in Big 4 patterns as this can be a common issue, so I'll remember that next time.
*I use seamstress because I'd love to be a member of the Ankh Morpork guild of seamstresses.
20 notes
·
View notes
Text
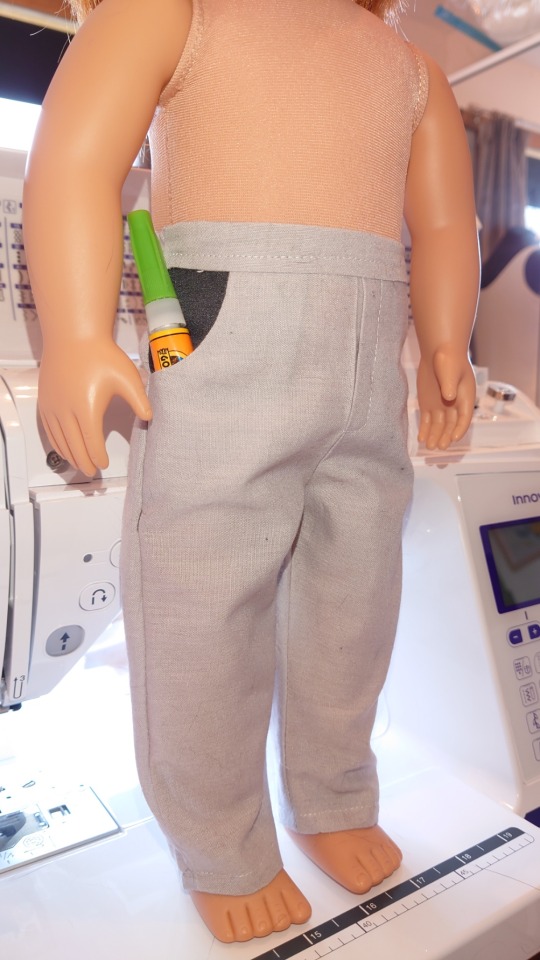
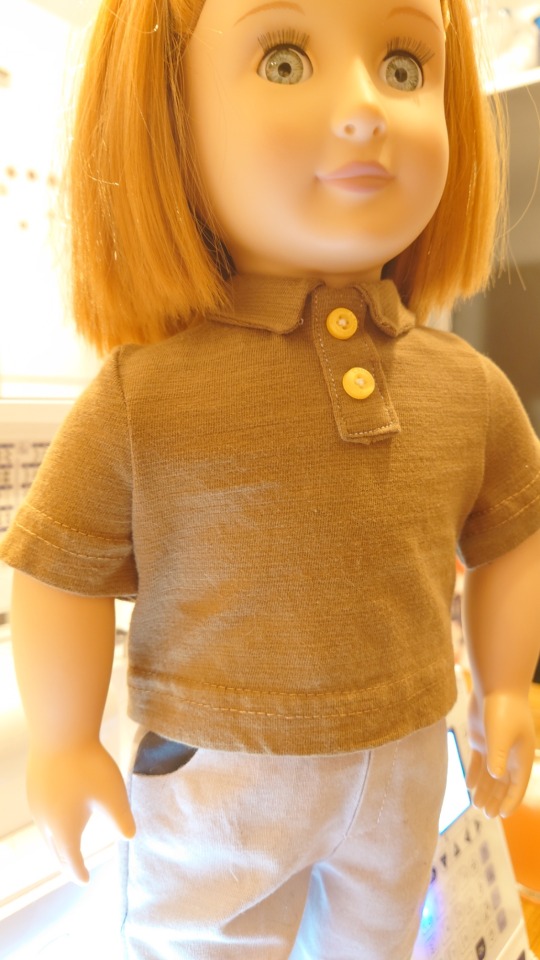
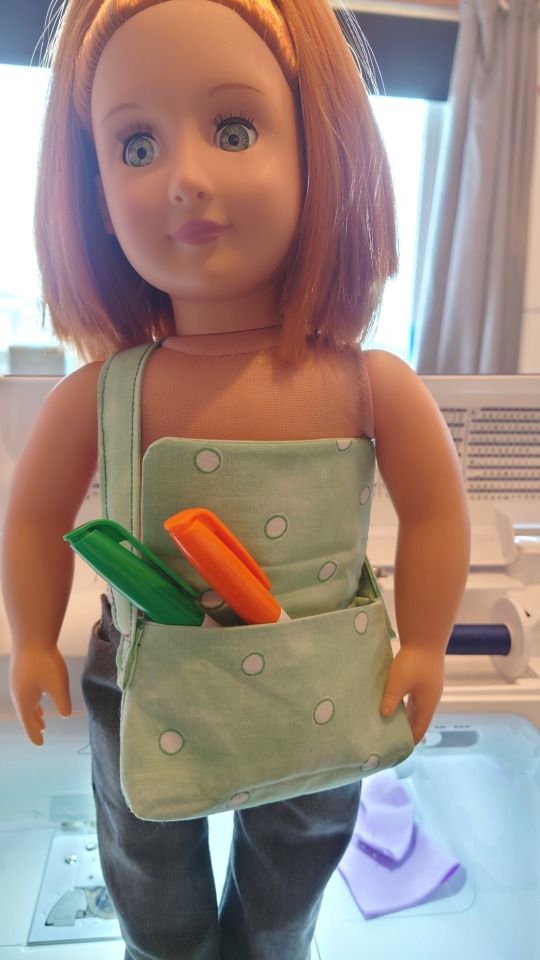
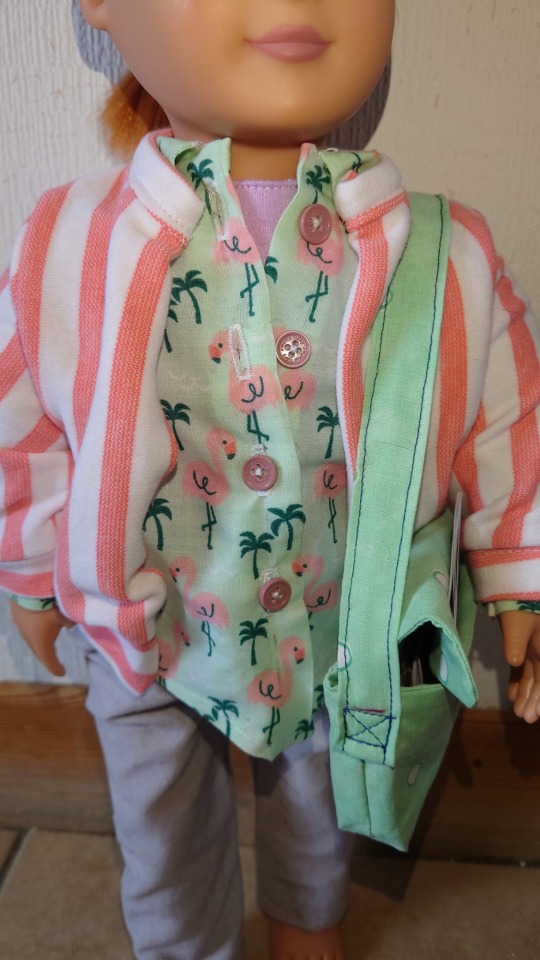
McCalls M7734
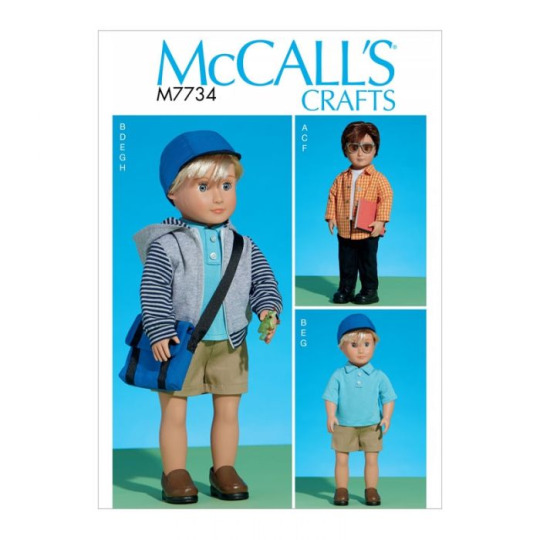
I made everything in the pattern pack and took images. The pack consists of a plain tee, a polo shirt, a pair of shorts, trousers, a hoodie and a baseball cap and bag.
It's a pretty decent pattern pack - the shorts and trousers are basic and make a nice set. I had mine in the style of board shorts and then grey work trousers. I did add in a little pocket to the trousers as I had a scrap of black satin that was the right size.
The little fake fly is really nice and makes for some nice interest if you plan on tucking in the tops, and if you have a small metal button these would also look nice in a denim as jeans.
The two tshirt options are really high necked - it's nice as it covers the dolls soft body totally, but can also look a little suffocating in the plain tee - although that might just be me and getting my seam allowances messed up.

I shortened the sleeves and waist a little in the polo shirt to make it look a little more different from the other plain tee and I will 100% be using that option for the future as I think it looks really stinking cute - despite the fact the colour I picked made April look like she was working for UPS.
The shirt in this back is a winner in my books. I had this adorable remnant in my stash and if I had enough I'd make myself a version out of this too. The pattern calls for snaps and not real buttons but I figured if you were going to sew buttons on the thing you might as well put button holes on it too.
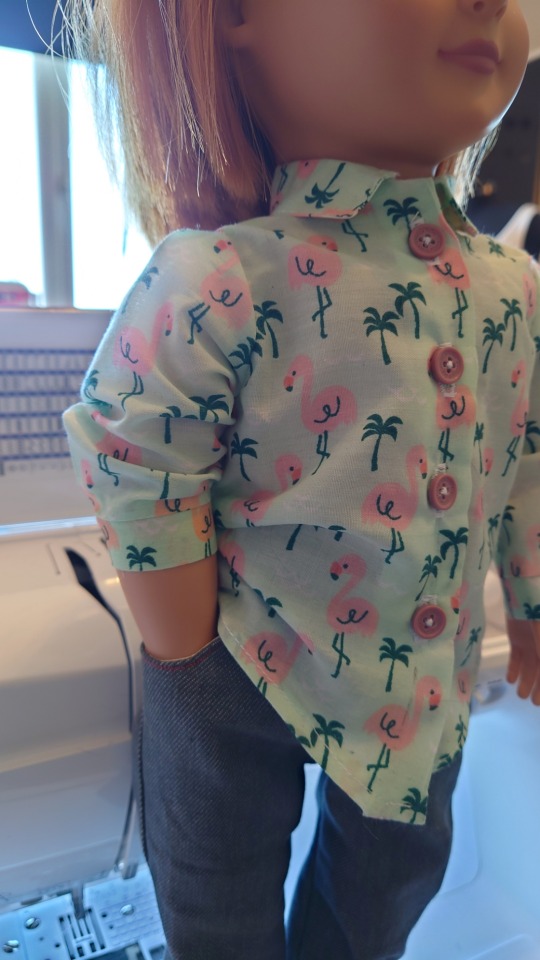
April is wearing a pair of jeans I made her from the trouser pattern in this set, with a couple of modifications (nice deep pockets, coin pocket, back pockets, top stitching etc) and the shirt from this packet. Isn't the shirt super cute? I'd call this particular pattern a winner.
I had some issues with the hoodie. Firstly, the hood needs to be SO BIG to cover the dolls head and with all her hair it's just not practical - she's got a super high ponytail in so it doesn't cover up the collars of things she wears, and trying to find an open ended 8 inch zipper was a nightmare! I have the zip NOW, but at the time I ended up just photographing it without it on.
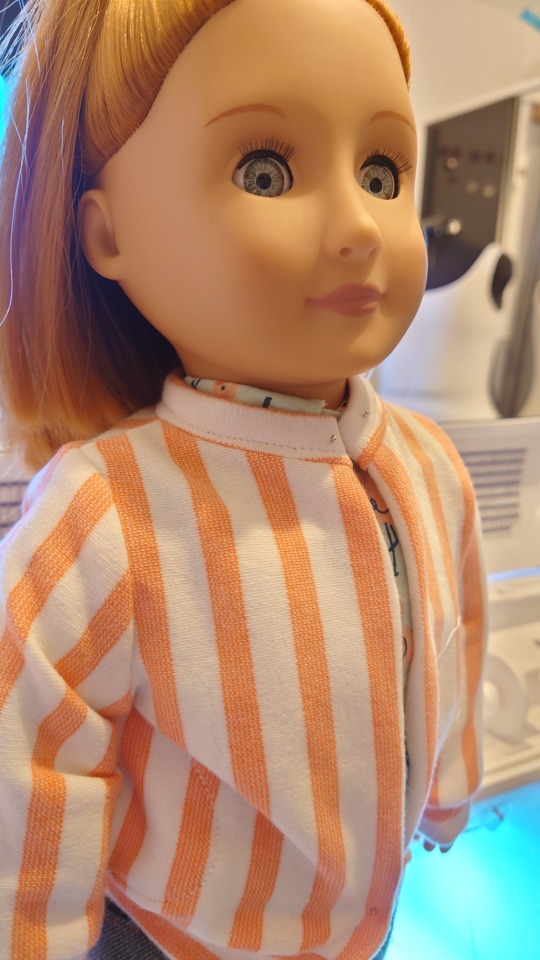
I added a little collar and honestly... I think it looks like the cutest little bomber jacket for summer! it's got little pockets (very little) and fits really nice over other clothes - she's got a tee and the shirt on under this and it's still not too bulky.
The hat and bag... sigh.
I messed these up a bit and it's got nothing to do with the patterns. For some reason, the art of bag making is lost on me so much. I've honestly tried so often to make a bag and I fail every time. No idea why!!


I made a couple of little books and comics for April to put in her bag, and that was that!
I highly rate this pattern and think with a few tiny alterations you could make a very varied looking wardrobe with this packet - the lack of 'boys' clothes and over saturation of dresses and skirts make this a really nice addition to anyones collection.
You could use some really nice alternative fabrics to really change the look of these items - like making jeans, swim shorts, or combats from the trousers, or a little leather bomber or jean jacket with a patch on the back out of the hoodie pattern. It might be really cool to combine them both and make one of those really popular jackets with the jean body and jersey sleeves.
If you have a boy doll, or just like a little variation in the patterns, i would pick this one up for sure.
Items needed: knits and woven fabric, thin elastic, velcro, interfacing, 7 buttons and an 8" open ended zipper. That should cover each item on the packet cover.
Here is April wearing everything in the packet:
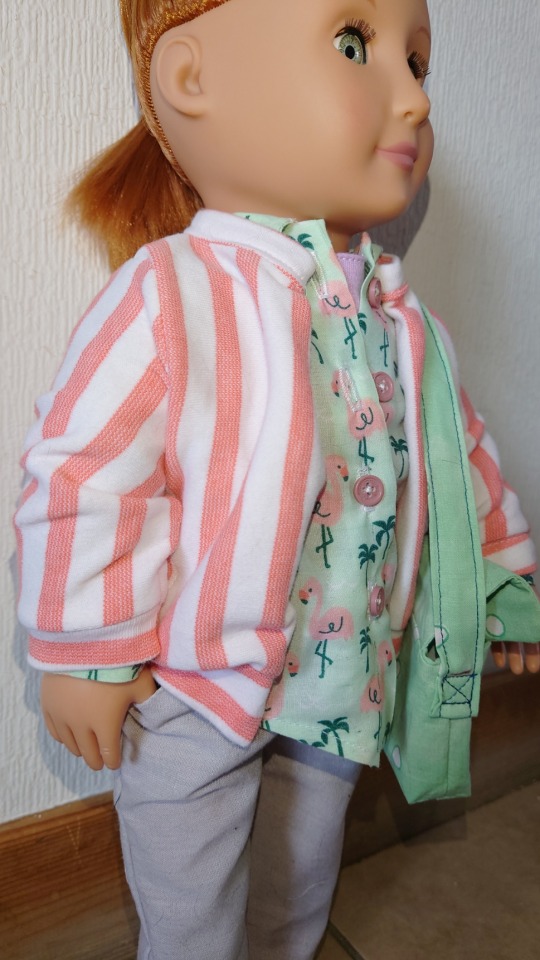
April is an Our Generation Doll and has (mostly) the same measurements as a typical American Girl doll, although I think her movement is more limited as her joints are only back and forward, with no ball rotation. She's had no modifications or changes other than her hair being up in a high ponytail.
I am NOT a doll collector or an accomplished sewist, I do this for fun and mostly give the end results to the littles in my family.
#doll clothing#sewing#sewblr#dolls#our generation dolls#american girl dolls#mccalls pattern#M7734#home sewing
2 notes
·
View notes
Text
Oh so you choose death
Details under the cut so I don't kill your dashes!
SO FIRST
A cricut is basically just a really fancy cutting machine. It doesn't seal the edges of fabric so you need to take in account to some seam allowance. It doesn't attach anything either! HTV (heat transfer vinyl) is already sticky so it's easy to just apply and heat. For the fabric I used a basting glue stick and heat bond! Ideally you'd top stitch it too but I was pressed on time.
For the armor, it's kind of hard to explain how I do it, but basically and I live and die by the cling wrap and duct tape method for most of my armor.
The pauldrons and braces were more 3D, so I traced an outline of my shoulder and arm on paper. Drew the design, transfered it to EVA foam and stuck them together using sharp angles to achieve the bends.


For the pauldrons it's actually the shape I traced connected along the top middle.
I then filled the seams with foam clay and caulk. This was also a big test of foam clay. I used the calpalmy foam clay for most of the designs and 0/10 recommend it flattens so sadly as it dries.
Anyways.
I made my hip armor by holding up some papers taped together to my hip, traced out the design. Transfered it to foam and gave it a lil heat bend.

That's when I sculpted the designs on with foam clay. I later went back to fill in more gaps and even them out.
I originally made my breast plate out of craft foam and worbla. Basically following the tried and true Kamui cosplay method. But the original details I sculpted on it came out really unevenly so I opted for plan B and made it out of craft foam. Basically I made it in two halves. And usually when I do EVA foam cups, I'll assemble them in multiple parts. This time I was feeling MEGA lazy so i achieved that shape with LOTS of triangles taken out. I heated the cups up and shaped them over an acrylic sphere like I would with worbla!
Next I made a TON of bevels and glued them on to everything. Here's them on the hip piece. But my legs and breastplate got the same treatment.

For the hips, since I needed them to be sturdy, I spent 100000 years sending the edges and then carefully and painstakingly draped worbla over it! Here's before I primed it!

For the bracers. I just used craft foam and foam clay to make those decorative pieces. 2mm foam clay really hates to be primed so I had to get creative to keep it's shapes lol.
You can see the top of the pauldrons where I glued them together. I sanded the seams down with a dremel and filled the gaps with kwik seal. Once painted its invisible!
To prime I just used flexbond mixed with water. I love this stuff cus if your EVA foam gets all smooshed and crinkly, you can just use a heat gun to fix it.


Everything got a few coats of spraypaint! Did some dry brushing with black acrylic mixed with gold to weather and give dimension! I made the necklace out of craft foam layers and a googly eye! I sandwiched that in worble and used some scraps to make the diamond thing and the lil half circle shapes on it! I attached it to my pauldrons with chains, and connected a clasp in the back so it can keep it's og design and be adjustable. It looke a lil wonky on my dress form, cus I am twice the size of it but you get the gist from the photos!
For the clothes. I did the seran wrap duct tape method to pattern out the corset. I got some sew in boning to give it structure and attached a zipper on the side.
The skirt I spent 10000000000 hours lining these all up and ironing them on. Here's an example of HTV. The cricut cuts out the design, all I need to do is peel off the excess vinyl leaving this sticky plastic that holds your design down in place while you iron it. You just peel the plastic off and wham bam decals!

This was the most TLDR I can give of how I created all the things! There was a lot more like figuring out how my cursed bracers were going to open and close invisibly. And all the horrors of con crunch forcing me to cut mega corners to make things work haha.
But anyways I hope this helped!
Art vs artist?
Is there actually any difference??
#obligatory no one mention the mess in the backgrounds#thats literally the magic of cosplaying#its a DISASTER zone#if youre not finding all your 1000000 failed patterns around for months did u even do it right
132 notes
·
View notes
Note
Did you see that Simplicity has made some Six the Musical inspired costume patterns? I saw it on a facebook group!
Yes I saw it. And it is bad.

(@/lochnessofficial on tiktok)
This is not me saying don't buy these, if you want them as a base or for a halloween costume go for it. This sort of thing is great for people with no sewing experience who want to make six costumes, and there is enough information online to level them up for a nice look. Just don't expect the result to look like a stage costume. Also read from someone who has used patterns from this line that the plus size patterns are not necessarily good.
First lets get something out of the way. Those patterns are not official. This means simplicity just took show photos and "recreated" very basic versions of what they saw. All this with no permission.
Second. I can't speak for the quality of the patterns, only from what I see in the covers. Simplicity is one of the bigger pattern brands and they have a reputation for creating quality commercial patterns. This means the patterns are made for home sewists who know how to read and follow patterns and have a certain skill level. So basically anyone who is past the begginer stage and can operate a sewing machine. But commercial patterns are not proffesional costume patterns or historical patterns. So even if visually they look like six and would work well for halloween costumes that would see a few wears, they are not great for cosplay that aims for any degree of show accuracy and are probably very different from the show patterns. So even if you add all the necessary layers it probably won't look right. (If it is a base for a first mockup you could have good results after a few rounds of alterations).
As six costumes I just don't trust these, even the ones that look half decent (Aragon top minus the sleeves and Boleyn skirt) have big issues only from the photos. The six patterns are notoriously complicated. In the US six uses a single costume workshop that has makers specialized in a single queen, UK keeps going back to the same makers who are again specialized in one or two queens. The costume makers are editing and improving the patterns to this day, these almost definitely didn't consult them. And I haven't seen a single six cosplayer (myself included) who doesn't want to change at least one fit detail, or changed already. Take a guess as to how someone who has never worked with six or done extensive research will do when creating a pattern. And this isn't against the pattern makers, this is just outside of the things they usually work with.
Now just for fun my quick review of what can be seen. Looks like most are bases with details sewn on top, and it looks like its all fabric, no vinyl, no structure and a lot of spandex. Aragon, collar is too wide, missing front side panel, no shoulder straps, lets not even mention the sleeves, peplum is too narrow and I am not sure it would even fit the skirt underneath, skirt is again super narrow, panels nowhere to be seen. Boleyn, darts instead of princess seams, top is square not fitted, I am 90% sure there is no undersleeve, skirt is not structured, even hem, not sure it flattens to a full circle, the squares definitely don't work like that, looks like squares might be painted?. Cleves, (tell me you referenced Esme without telling me you referenced Esme) looks like the boleyn top with a zipper and no darts, super short, shorts look like regular spandex shorts with the side panels just sewn to the waistband and falling over it. Parr, its just mesh with two bands sewn on top, sleeves are too long and bands are too thin, has a choker for reasons, pants are way too short and look like basic black pants with blue sewn on top. Also you have to love the Boleyn/Parr look switch and the silver Cleves with ponytail and teal Parr.
#ask#six costumes#I do think people need to be warned about this#because at least someone will make this with the fancy vinyl and come out dissapointed from the other side#and I wrote in my to do list for today roast the six patterns#my opinion of this is not great
8 notes
·
View notes
Text
I don't like resolutions usually since they end up feeling so forced. So I'm not doing that, but what I am doing is instead of saying "I'm going to do xyz this year", I'm promising myself that I'm going to work on finishing things - ie, working through the backlog of yarn, sewing, cleaning, etc projects, and also all my unfinished fics that have been just sitting there half-done.
That said, I've started going through my wips folder and realized that I actually have almost half of the next chapter of Here Come the Vultures already done. I've mentioned it a few times as this is the chapter with ~1350 words dedicated to just their clothes (send help). It's probably not going to be finished for a little while, but I'm posting the first part here anyway.
The first two chapters are up on ao3 here, and the accompanying, basically unedited (and fuck does it need to be), oneshot is here. There are already two songs in this chapter, Combustion and Tragedy of the Commons. Also I do have links/reference photos of their outfits if anyone's interested
☆・* ♪ *・☆
The next outfit change went as smoothly as it could. Keith was clinging to Lance, and Shiro was flirting with Adam, but it was still successful. The last part of the day was the one Allura had the most anxiety over. The fourth, and final, shoot was for their tour outfits. They would be doing the main promo shots for the tour while in what they would be wearing on stage during the actual shows. While they all personally picked out and bought what they were wearing, Allura kept their outfits at Oriande under lock and key until leaving for the tour. This was the first time the six saw their clothes in person, and would be one of the last until the tour actually started. Back in the dressing room, every section had a black garment bag and shoebox waiting for each member of Castle of Lions. The room was silent except for the sounds of clothes changing for the next few minutes. Even when they were done, no one left their dressing areas, taking in their new outfits.
“I, um…I am never taking these off,” Keith said to the sound of a soft swish of fabric.
When Pidge had first opened her garment bag, everyone heard, “I like this even more in person.” A few minutes later, “Oh. I really like this even more in person.”
A soft shifting of chains came from Matt. “Ooh, nice.”
Shiro was still getting dressed and making frustrated grumbling sounds. “How in the absolute fuck…ah. Got it.”
“Oh, this is even comfier than it looks,” Hunk said appreciatively.
Lance stomped on the floor once, making chains somewhere on him rattle, and giggled. “I Love that.”
Allura came back after what she had thought was more than enough time to find the main dressing room empty. “Aren’t you six dressed yet?” she asked.
“Oh. Shit. Sorry. I think we all got distracted,” Lance said.
All six members of Castle of Lions walked out of their dressing areas at the same time, looking each other over when they gathered in a loose circle.
Hunk always favored practicality with his fashion. His hooded sleeveless top was a textured black, leather accents at the shoulders, antiqued brass rings and buckle on his right, all brought together by the front lacing. He always wore shorts on stage, and these ones were covered in zippers and buckles, the cargo pockets featuring their own leather straps, studs, and rings, all of the metal hardware in the same antiqued brass as his top. Finishing his outfit were thick-soled, combat-style boots that featured a pair of wide straps, their hardware in antiqued brass as well.
Beside Hunk was Matt, who had also opted for a lack of sleeves, although he cared far, far less for practicality. A tight-fitting tank top sat under the mesh overlay, the solid black broken up by two diagonal lengths of lacing in bright silver chain. Skin tight black pants had a subtle sheen to them, two exposed silver zippers over the right pocket, but it was the V-shaped lacing over both knees that made them out of the ordinary. At their core, Matt’s boots weren’t dissimilar from Hunk’s, but where Hunk’s had two thick, buckled straps, Matt’s had five, all with bright silver buckles, complete with grinning skulls in profile.
Taking up Matt’s other side was Shiro. His outfit was overall more subtle than either Matt or Hunk, and the details were far less likely to be noticed on stage. At a distance, his top looked like not much more than a long-sleeved black tee. Up close, the asymmetrical hem was obvious, as was the black lacing on both his right shoulder and left side from ribs to hem, and the fact that it was just a little sheer. The more unique feature was at the bottom of the sleeves, which ended in a thumb hole and a sort of half glove up his index fingers. Shiro kept his tight black jeans simple only featuring a patch with pewter D-rings on his right hip and a buckled strap around his right thigh that connected to a black chain which clipped to a belt loop. All of the deceptive simplicity let his boots take the spotlight. Knee-high black leather, three thin pewter-buckled straps, layered leather that swept up to his calf, and black leather lacing that stopped just below the top two straps.
Pidge was the most colorful of the band. While her pants would be taken over her cold, dead body, she allowed herself to indulge in her secret love for dresses on stage. This one was deep emerald velvet, black spaghetti straps disappearing into the black ruffled trim along the neckline. The skirt ended at mid-thigh, but the deep, black lace trim brought it almost to her knees. Her favorite lace-trimmed black velvet choker fit perfectly, as did the black and green spiderweb-patterned, elbow-length fingerless gloves topped with wide buckled straps. One thing she would never compromise on were her shoes. Giant chunky 10cm heels and thick platforms every time. It was no different for the knee-high black leather boots with full lacing and three buckled straps that finished off her outfit.
Lance stood between Pidge and his mate. Much like Hunk and his shorts or Pidge’s boots, Lance had his own signature piece. For him it was black damask dress shirts – which started when Keith once told him just how damn good he looked in them. Like every other one he owned, this one had been tailored to his broad shoulders and narrow waist. It was left untucked with a pair of points dipping down at both the front and back. The long sleeves echoed those points, finishing the deep, turned cuffs. Lance usually went for the more traditional button-down, but this one had a zipper, intentionally left partially open and exposing his collarbones and the tattoo-wreathed mating mark that sat just above them, blue-highlighted black wrought iron curling and twisting around the scar Keith left there two years earlier. His flair for drama continued with tight black pants with lacing from hem to thigh up the right leg, more lacing on his left hip, and a leather buckled strap wrapping all the way around the same thigh. Rounding out his outfit were black combat-style boots like Hunk and Matt, with a pair of buckled straps, but it also revealed where the rattling had come from – several heavy pewter chains wrapping the back of each boot, just for that little extra bit of chaos.
Completing the circle was Keith. Narrow, grommeted leather bands that ran from hem to left shoulder framed the cutout and made up half of the wide v-neckline of his black light, woven cotton top. He’d picked it even knowing that its long sleeves were inevitably going to be pulled up under the heat of the stage lights, despite the lacing that ran 4 inches up from the bottom of each sleeve, and that the leather and pewter left shoulder weren’t going to make it any better. Inside the cutout was a layer of sheer black under distressed deep red lace, black lacing crossing over and connecting the bands. The lower neckline showed off his own mating mark, wrapped in a similar tattoo to his mate’s, the more lace-like wrought iron design highlighted in a deep rose-violet. Individually, most of the components of Keith’s black painted-on jeans were nothing out of the ordinary for him. Three buckled straps, one the the thigh, two around his calf, exposed side zipper with spiked studs and dangling zipper pull, and the fact that the pants themselves were shredded, not just ripped, were all things that could be seen on any number of his extensive collection. But these had, attached to a narrow belt threaded through a second set of beltloops that sat just below the usual ones, a pleated half-skirt that wrapped around his left hip and fell to the knee. Not much could top that, and he kept it simple with his choice of footwear. Black leather ankle boots, with two studded straps, studded heels, and a 3cm platform and its 8cm heel completed his outfit.
They all looked each other over appreciatively, some more so than others – Lance and Keith could not take their eyes off each other. The rest of Castle of Lions ignored them, while Allura had gone back to the interview schedule for the rest of the week.
Lance took a step into Keith’s personal space, something that didn’t exist when it came to his mate. “Fuck, you look good.”
“Yeah?” Keith answered, closing the distance, “So do you.”
“Oh my god,” Pidge groaned, no longer able to ignore them, “You’re practically eye-fucking each other. Save it for later. Way. Later.”
“Aw, you’re no fun, Pidgey,” Lance said, not looking away. He slipped his hands around Keith’s waist, nuzzling his omega’s mating mark, despite the scent blocker.
The purr that rolled out of Keith was a soft rumble, the interested and inviting hum that accompanied it anything but innocent. He slid his hands up his alpha’s chest and around his neck, and pulled Lance in for a kiss, the taste of a promise on his lips.
Shiro’s voice broke them apart. “Oh for fuck’s sake. Do I really have to pull you two apart like horny teenagers?”
“Nothing you haven’t threatened before,” Keith shot back although any heat in his voice was muffled by Lance’s neck.
“Alright, last shoot. And if we want to end on time, we need to go now,” Allura said then turned and left the room, not waiting.
Keith refused to let go, even when Pidge, Hunk, and Matt all followed Allura. He squawked indignantly at his brother’s arms around his torso, pulling him away from his mate. Shiro didn’t stop, holding Keith off the floor, leaving him to hang there, looking every bit like a disgruntled cat. Lance, of course, found this hilarious, but took pity on his mate, rescuing Keith from Shiro. Keith sent a pathetic scowl Shiro’s way, wrapping himself around Lance as they left to catch up with the others.
They missed the first few quiet notes filtering down the hall, nearly running into their bandmates who had stopped at the end of the corridor. But then they heard the next echoing chords, what they knew were two different guitars playing together in perfectly synchronized tandem, a keyboard setting the stage. The seven of them fanned out, Keith tucking himself against his mate, all watching the video playing of a concert from their last tour.
Lance was closer to the center of the stage and Keith, who held his own blood red and black guitar. As the music picked up, another stage light came on, illuminating more than just the matepair, Shiro emerging from the shadows. The other lights gradually came on, revealing Hunk, Matt, and Pidge. Keith and Lance alternated between playing together and separately. When asked later, they said that that part wasn’t the most difficult. The hardest part came when all six of them played in total synchronicity, each part keeping perfect time with the others. Keith picked up the melody, switching off with Lance not long after, leaving his alpha to finish the song.
The few seconds of silence between the end of one song and the beginning of another was filled with the roaring scream of the crowd, quieting when the first notes began. Keith’s smoky vocals quickly joined the instrumentals. Unlike the last song, he returned to his usual show behavior, wandering the stage, never staying in one place for long. The rest of Castle of Lions joined in for the backup vocals during the chorus, but the crowd exploded again at the beginning of the third verse when Matt stepped up to provide the growling lyrics. The song began its path to the end, Keith repeating the second half of the chorus, Lance layering over him as that section was split in half. The video stopped only seconds from the end when Adam and Curtis realized they were no longer alone in the studio.
#my writing#ao3#keith kogane#lance mcclain#keith x lance#klance#omegaverse#alpha lance#alpha lance mcclain#omega keith#omega keith kogane#vld#voltron#voltron legendary defender
6 notes
·
View notes
Text
History of Chinese standing collars (part 3: post republican era)
Quick recap: I was debating with myself whether “Mandarin collar” should be a thing because standing collars throughout Chinese history looked different. I went through the Ming and Qing dynasties in part 1 and the republican era in part 2, now I’ll look at what comes after that. I numbered the styles in parts 1 and 2 but they’re only guidelines so you don’t have to remember anything.
So in this post we’ve kind of reached the end of the era where fashion consisted of a single silhouette in any given year and all hell ran loose. I’m having a lot of difficulties classifying things as Chinese or Western because the distinction is really blurred, and I also ran into problems explaining why certain historical European things looked so similar to Chinese ones so there will also be a lot of confusion.
1950s & 60s Chinese application
Summary of 1950s fashion, mainland and others.
Because of the communist victory in the Civil War, fashion in the mainland was different to other (capitalist) areas populated by the Chinese diaspora such as Hong Kong, Macau, Taiwan etc.. Let’s look at capitalist area fashion first; I’ll be referring to Hong Kong because Hong Kong was the center of cheongsam making at the time.
Collars on 50s Hong Kong cheongsam grew taller on the basis of collar style 10 but retained the rounded, tapering edge, resulting in a v shape gap down the middle that weirdly recalls collar style 6 from part 1 and part 2. It’s basically completely identical to collar style 6 but stiffened and extremely form fitting. It’s usually closed with one pankou at the base but because of westernization, 50s cheongsam often had no visible pankou----everything is closed with snap buttons, zippers or hooks and eyes/bars. An important aspect of collars of 50s and 60s Hong Kong cheongsam is that they left out the binding around the neck. All cheongsam prior to this point were bound around the exterior edge, the side closure, the slits and the collar seam (on the bodice not the collar), 50s cheongsam collars purposefully neglected the binding at the collar seam for some reasons. This makes the collar look like it’s one continuous piece of fabric with the bodice, which it isn’t. A lot of modern representation of cheongsam or any Chinese inspired clothing (in video games, books and anime etc.) do this, even if the character is from before the 1950s. It REALLY bugs me. If you are an artist or writer and designing costumes for Chinese characters prior to the 50s, please include binding/trimmings on all three seams, it’s an easy way to bump up historical accuracy. With that said, completely plain collars without any binding or trim was actually the most common. Let’s call this collar style 13.
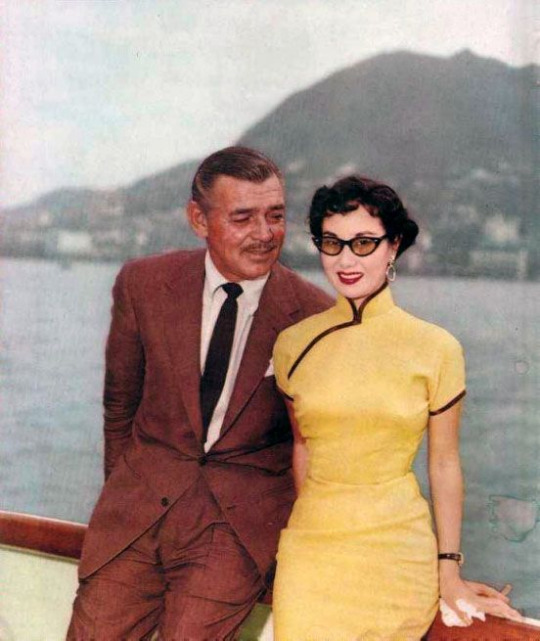
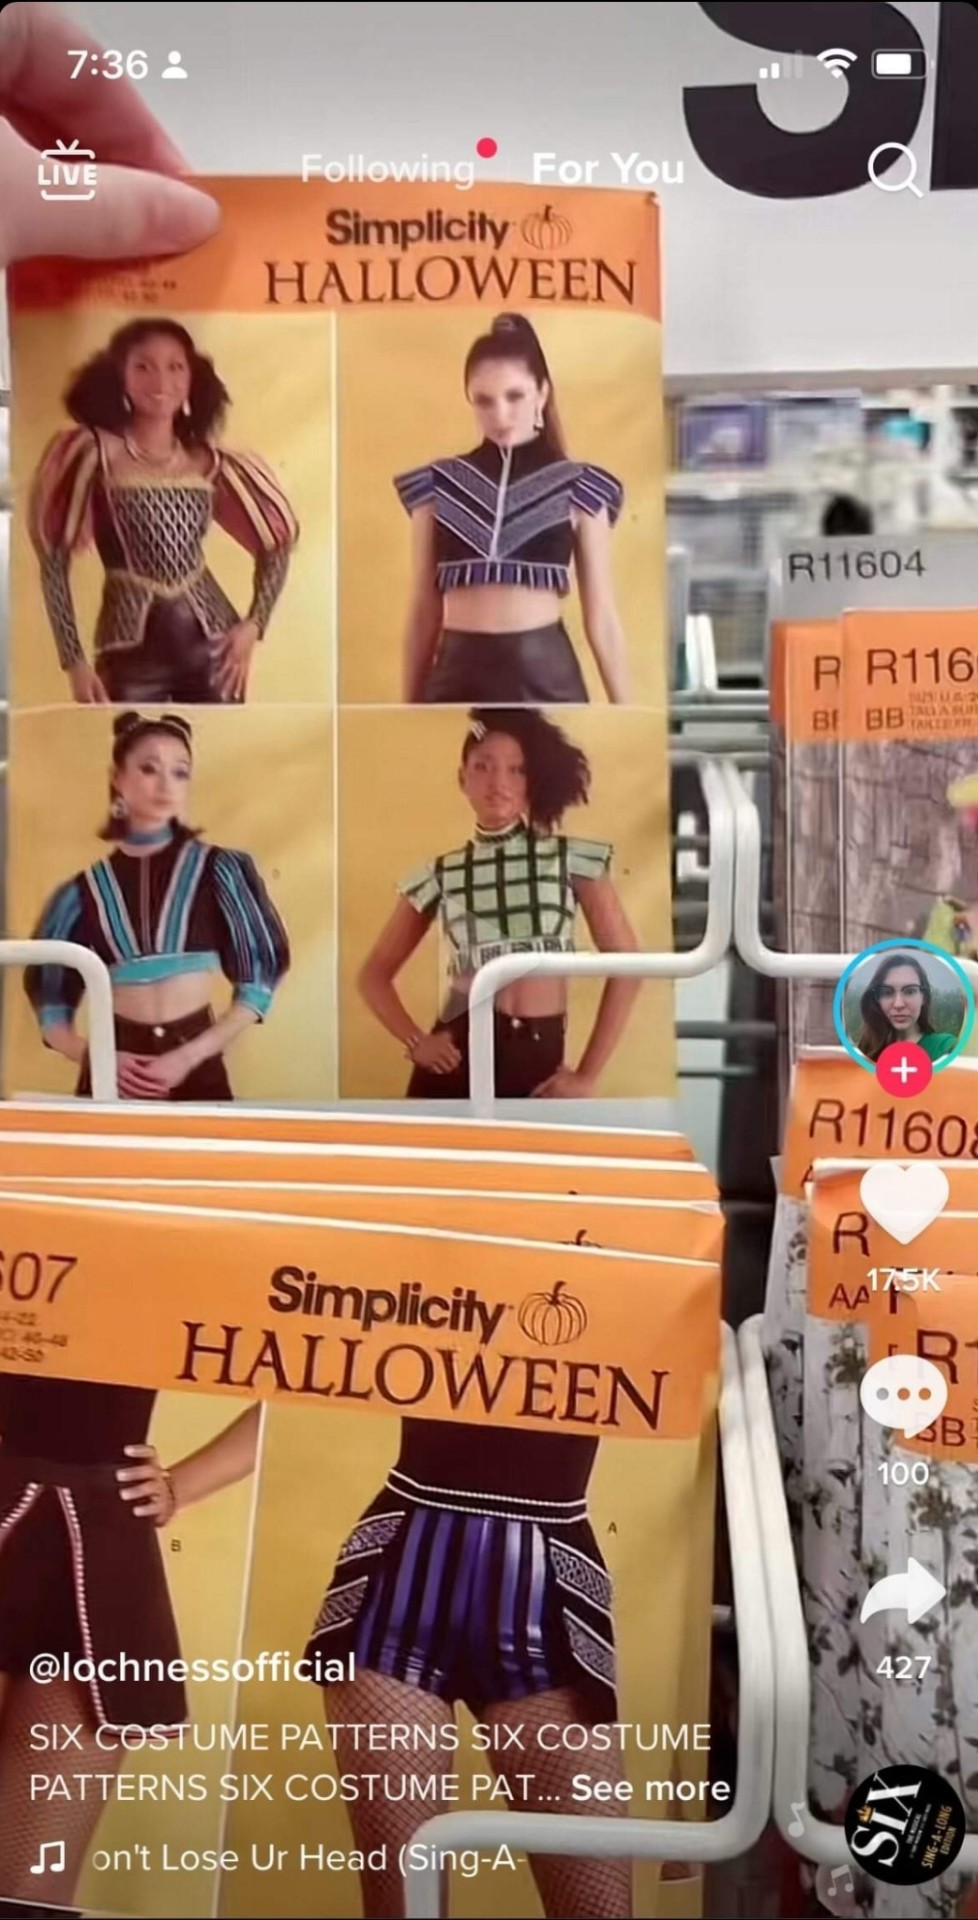
Source here
1954 photograph of Li Lihua and Clark Gable. Collar style 13 with stiffening and no collar seam binding. You can see how firm and neck hugging the collar is, contrary to a lot of modern cheongsam collars which are saggy and loose.
The popularity of collar style 13 continued into the 60s. When the cheongsam fell out of popularity, it ceased to exist as well.
Source here
60s cheongsam with collar style 13. I’m really not a fan of the nude/light lipstick trend of the 60s, like, as a person with no lip color definition it makes me look like a potato.
Now moving on to mainland collars. In the 1950s, cheongsam with the 40s collar style 12 were still occasionally seen, but the fashionable collar shape also became taller and was similar to the Hong Kong collar style 13. Interestingly, some 50s mainland cheongsam retained the binding around the collar seam, making them look more “traditional” in a sense. However, collars both with and without collar seam binding existed and it was just a matter of personal preference.
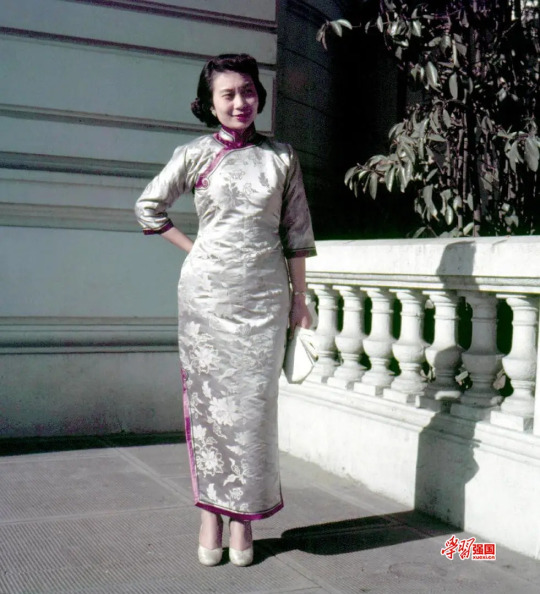
Source here
1950s photograph of a mainland lady in cheongsam. The collar is taller and closes with one button, much like Hong Kong collars of the era, but the neck binding is present.
Aoku robe collars from the 1940s onward mostly had the 40s style low collar, although in the 50s and 60s they rose in height very slightly.

Source here
1964 poster showing a girl in aoku, the robe has a low, rounded collar.
However, garments with a standing collar became worn a lot less frequently in the 50s and 60s in both mainland and non-mainland areas, since a lot of people adopted Western fashion.
Source here
1950s photograph of a group of mainland people wearing jackets of Western construction. Some of them seem to be wearing informal military jackets, commonly known as “Mao suit” or “Zhongshan suit” nowadays, with folded collars.
Source here
1950s photograph of some women in Malaysia, some in cheongsam and some in Western New Look dresses.
Western application
I think it’s also quite important to discuss how Chinese standing collars were perceived by Western designers, because the Western fashion industry does hold a lot more power globally and also reverse influenced Chinese collar designs in the post 1960s era. So, in the 1950s and 60s Western designers thought cheongsam was really cool and produced a lot of affordable sewing patterns for their versions of cheongsam. I think this is also because pre-1950s cheongsam didn’t use the Western construction method and patterns needed to be individually drafted so it was difficult to make mass produced sewing patterns. From all the sewing patterns I have seen personally, the super tall standing collar popular in Hong Kong was not really appreciated by Western designers at all?? Western cheongsam sewing patterns all had the very low 1940s style collar, combined with an hourglass silhouette New Look bodice and skirt, looking rather anachronistic. These collars also didn’t have binding/trim around the collar seam, in line with fashionable Hong Kong cheongsam of the day.

Source here
1950s Advance sewing pattern for cheongsam. The collar is low and has rectangular edges, something about a decade out of fashion in Hong Kong and Shanghai. No collar seam binding.
Source here
1950s Simplicity sewing pattern for cheongsam. Likewise with super low 1940s collars. Collarless cheongsam died in China in the mid 1920s, yet it lives on in the imagination of Western designers. By the way, the frog closures with a quatrefoil shape are not Chinese, I’m gonna write another post about this. I love the look in the middle it’s very glam.
1970s and later
The post 1960s era is what ultimately created the confusion around standing collars nowadays. Around this time Western and Chinese fashions started to merge and become one, and garments made completely in the historical Chinese method were more and more difficult to come by; Western construction techniques reigned supreme.
From the 70s onward, most “Chinese collars” had the 40s rounded edge shape but were either medium low or medium height. The lack of collar seam binding persisted into the current day, which is something I kind of lament because without this binding collars easily read as Renaissance doublet... (more on that later)
I usually avoid calling any standing collars from the 1970s onward Chinese/Mandarin because 1) standing collars were never a uniquely Chinese thing to begin with 2) since cheongsam was no longer fashionable among actual Chinese people, designers who made cheongsam pulled all kinds of shenanigans without any historical precedent whatsoever. Also, since clothes with structured/stiffened standing collars stopped being a staple in the average Western person’s wardrobe, white people started calling everything with the most remote hint of a standing collar Chinese to further stir the pot, emboldened by the cultural appropriation craze of the 60s and 70s. Ok that’s very loaded, but it’s true that in the 60s and 70s there was a lot of Western clothing designs that took inspiration from other cultures without permission. Westerners could totally design and wear Chinese style clothing given that the intention is respectful and they know about the garment in question, but a lot of times the accuracy of the designs leaves much to be desired. There was also a lot of Orientalist inspiration in the 10s and 20s but the borrowing back then wasn’t so... literal. When I look at so called cheongsam sewing patterns from the 70s onward, I sometimes seriously have trouble identifying if something is meant to be Chinese, Vietnamese, Japanese, Polynesian or any other region/culture...
I’ll just find pictures of Chinese inspired clothing from the 70s onward with a “Mandarin collar” label and point out their source of inspiration.
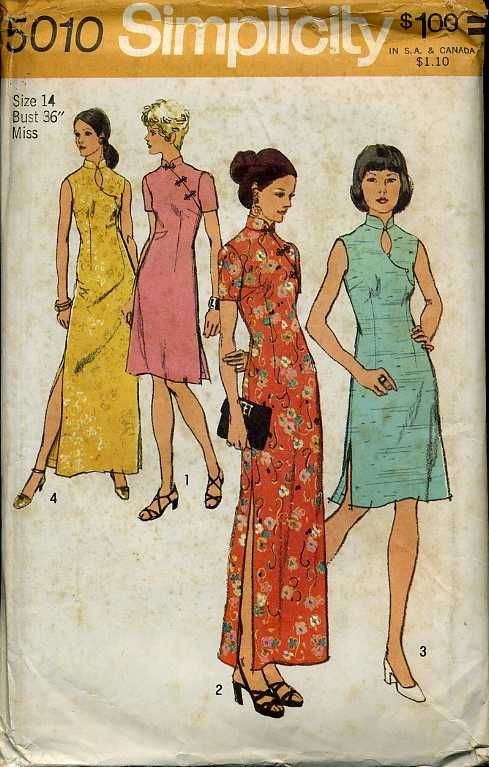
Source here
1972 Simplicity sewing pattern for cheongsam. It’s the same Western collar from the 50s and 60s just slightly taller. Oh and the closures used on the two designs in the middle are again likely not pankou. After the 60s, this neck design with a oval shape keyhole cutout became quite common and that persisted to the current day. Don’t know what the purpose of that was, just because you show 5 square centimeters more skin doesn’t mean your cheongsam is sexier?
Source here
The description of this 70s Simplicity pattern says “Mandarin collar” but the source of inspiration is obviously Japanese military/school uniforms, AGAIN. The collar’s height and rectangular edges, combined with the placement of buttons above the waist on the bodice, everything about this reads as Japanese. The frog closures on the left are once again European and not Chinese pankou (sheesh I really need to make this other post). The original designer probably meant for it to be Japanese but the seller mistakenly labelled it a Mandarin collar design.
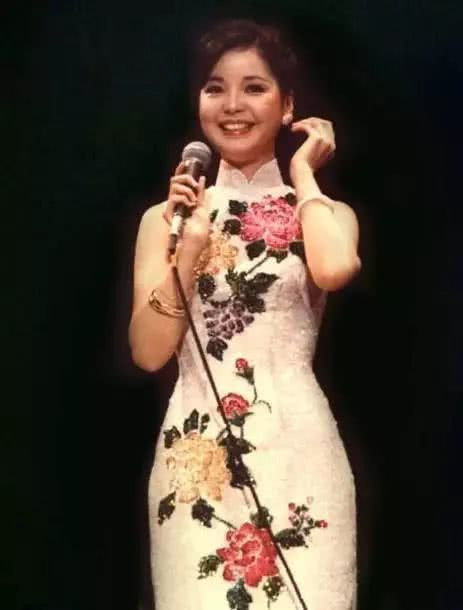
Source here
70s Teresa Teng (rest in power legend) in a theatrical cheongsam with a similar collar, either a stretched version of the 40s collar or a shrunk version of the 50s/60s one.
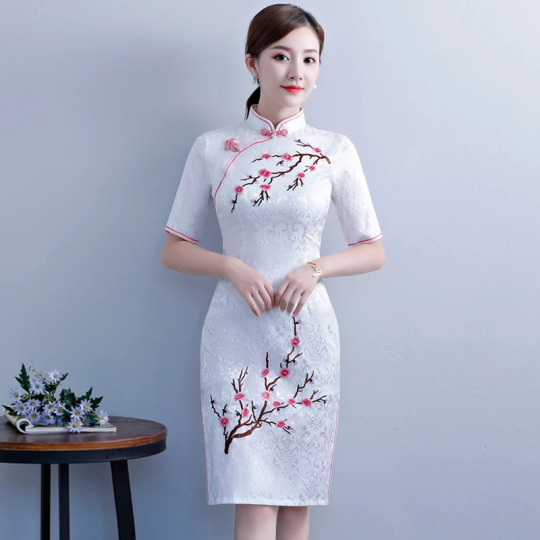
Source here
Google search result for “Mandarin collar dress”. Same Western low collar from the 70s. A new problem with modern mass produced cheongsam is that the collar oftentimes doesn’t fit the wearer and appears too baggy. Or maybe it’s not mass production, just that people nowadays are very unaccustomed to wearing tight fitting standing collars so they assume there needs to be some extra space? As someone who wears stiff standing collars on a regular basis I have to say it actually isn’t uncomfortable at all and elongates your neck a lot better. This is what most cheongsam collars nowadays look like, even the self proclaimed “traditional” ones, they literally originated from 1950s/60s Western sewing pattern companies’ interpretation of contemporary Chinese cheongsam collars.

Source here
Baidu search result for “Mandarin collar suit”. This, is, literally, almost a replica Japanese uniform. The seller is also using the tag Zhongshan suit lmao (I’ve explained in my 1950s mainland post what a Zhongshan suit is not supposed to look like), delusion is not a fragrance I guess. Why is it so hard to let Japan be Japan and China be China??
Conclusion & afterthought
Another thing I need to mention is that standing collars are by no means unique to Chinese historical dress; they were also widely used in European historical fashion, long before standing collars became worn with uniforms of “Mandarins” or Chinese officials, which further proves my point that “Mandarin collar” is not a valid term. Also, standing collars in Europe have always been stiffened/structured, whereas Chinese collars only started to become stiffened around the 1890s, possibly due to European influence as well. For example, the 1950s collar with rounded edges and no collar seam binding reads as European Renaissance doublet very easily. To be fair though, a lot of the collar shapes seen in early 20th century Chinese womenswear had been done before in European Renaissance fashion and during that time period in China only the OG Ming Dynasty collar mentioned in part 1 was used sooooooo
Source here
1630-40 English doublet. The collar looks mighty similar to 1930s Chinese women’s ones. I know next to nothing about Renaissance fashion so I’m not sure how it’s constructed, but it proves the point that collars like these were not a uniquely Chinese phenomenon.
Source here
Meanwhile the Mandarins in China. He’s wearing a crossover collar robe underneath a round collar robe, no standing collar here.

Source here
1780s French men’s coat with a standing collar.
Standing collars were also commonly used in Victorian and Edwardian women’s everyday fashion without any connection to China whatsoever.
Source here
1860s fashion plate for a gown with a low standing shirt collar peeking underneath.
Source here
1887 fashion plate from the Journal des Demoiselles. Bustle gowns with standing collars.
Bonus rant
I have come to the actual point of this series of posts, to answer the question: should “Mandarin collar” be a thing? In which case I’m gonna have to go with no. In the three posts I made on the topic I categorized a total of 13 collar styles, each distinct from each other and some being inspired by Western clothing, and showed that the use of the term “Mandarin collar” nowadays is very vague and ambiguous. I don’t understand why people in the fashion industry give my ancestors all the credits for a design feature as basic and common as a standing collar... Maybe it’s a marketing gimmick like how Sternhalma (a German board game) is advertised in the US as “Chinese checkers”?? Or maybe it shows that a lot of fashion designers lack a basic understanding of historical fashion? Either way it makes no sense. I think the concept is also slightly offensive since it simply ignores the diversity of actual historical Chinese standing collar designs, kind of reinforcing the racist stereotype that non-white fashion histories are static and never changing.
If I do have to pick a most traditional/iconic style of Chinese standing collar, I would go with either the original Ming Dynasty soft collar with metal buttons or the 1940s short collar with collar seam binding used on aoku, cheongsam, changshan and magua. In the mainland Chinese countryside, the 1940s style collar was preserved and actually still made today, but in the post-Mao era it became increasingly seen by the mainland population as 土 (a derogatory term for Chinese folk stuff meaning tacky or cringy) compared to the exciting new Western fashions being imported at the time. As a result, more traditional items of clothing like aoku for women, changshan and magua for men were neglected in favor of more westernized cheongsam designs, leading to some cursed contraptions.
Maybe this is a hot take, I personally really don’t vibe with the concept of 土 because it’s very loaded and usually the gateway drug to massive internalized racism. I’ve heard so many people bash aoku and magua constructed in the historical method and put post-60s Western inspired cheongsam on a pedestal even though the former is grounded in history and the latter is an Orientalist mess. There is nothing wrong with making aoqun, aoku, magua, changshan, cheongsam or any other historical item of clothing in the historically accurate method, they’re charming in their own ways and don’t need to be “modified”. In my opinion, the puckering under the armpits caused by the lack of a shoulder seam and the rounded shoulders are what makes historical Chinese clothing beautiful to begin with :3 I think there’s something inherently modern and authentic in the pedantic, antiquarian pursuit of historical clothing, like you know how whenever a revival happens it actually brings something new to the table? It’s not problematic to wear modern cheongsam designs per se, it’s just important to keep in mind that it doesn’t have much to do with actual Chinese history and represents more of the status quo of Chinese fashion nowadays.
Ok I’m going off the collar track but it’s time to finish this post. Thank you for reading, and as I mentioned, the next post will be about Chinese pankou. I’m almost finished with that one as well and I’m really excited with what I have planned next :D
199 notes
·
View notes
Text
Twinkle Tailor-- yes!!!! thats great honestly, thats exactly the sort of thing i wanted but hadnt quite reached myself. i loved the idea of him having a useless SOUNDING quirk, with a useless sounding name, but managing to be very good at what he does, and be in exactly the right place. i hadnt considered 'multiple thick layers of cloth as armour', thats really cool! if i ever put this side character in a battle i will 100% use that, as well as the distraction thing. the camo was a thing id thought of already, quickly making up big coats or hats to do quick-changes while tailing someone or to help citizens escape unnoticed. im keeping it to 'cloth' though, he cant make a zipper so he cant make chain mail. i feel if he could make chainmail than he could make a sword too. quirks are so weird, i feel like at a base level what his quirk really does is 'create organic cloth from (some kind of stockpiled source)' and its his own creativity and ability to imagine small details and the shapes of clothe and the way sewing should look that lets him make more complicated things. when he was a kid he only understood simple articles of clothing (Tshirts, basic skirts) but still desired to offload that energy source so he constantly was making tshirts and annoying people with it. when he got older more complicated things became available. hes still always dropping novelty shirts around to annoy people and delight fans
5ports-- weird man
Plainclothes-- yes its 100% meant to be in the same area as Foresight. 'if i look you in the eyes while touching you i will see a silent movie play out about all the choices youll make AND what will happen to you from forces outside your control'. Plainclothes knows how dangerous you THINK you are, in the moment. our mc became anxious about how plainclothes would probably see Jin Bubaigawara (twice) walking down the street feeling anxious and scared of his own quirk and his number would skyrocket and plainclothes would mix up 'mental health spiral' with 'im a bad guy with a gun and im gonna hurt everyone!'. he also is wrongfully reading our MCs fear of his own self destructive quirk as a very high power level and assuming it correlates to a THREAT. so in a way its a little bit in line with a magic empathy quirk-- turning basically 'large negative feelings' into a number, and then hes making his own judgement. definitaly just one of those 'magic' quirks! some of them are like that. Ofa stockpiles... SOULS. and also physical strength. sometimes a guy is just magic, and osmetimes that guy is a jerk XD

hold this for me, please and thank you
20 notes
·
View notes