#laravel db seed
Explore tagged Tumblr posts
Visit Tumblr Blog
Explore Tumblr blogs with no restrictions, modern design and the best experience.
Last Seen Tumblr Blogs


Fun Fact
Tumblr is used by 21% of adults online aged 18-29 years.
Text
My Own Blog by Laravel(1)
Make my own blog with Laravel!!
Hi guys, I will make my own blog by Laravel. I'm a Japanese cook in BC. But I don't work now because of COVID-19. So I have much time now. That's why I have started to learn Laravel. I'm not a good English writer. But I will do my best in English. Please correct my English if you would notice any wrong expressions. Thank you!
Anyway, I will post about making a blog by Laravel for a while. Let's get started!
All we have to do
Install Laravel
Create a Project
Database Setting
Migration
Create Models
Seeding
Routing
Make Controllers
Make Views
Agenda
Today's agenda is
Install Laravel
Create a Project
Database Setting
Migration
Create Models
Seeding
Install Laravel
Laravel utilizes Composer to manage its dependencies. So install Composer first if you have not installed Composer yet. Ok, now you can install Laravel using Composer.
% composer global require Laravel/installer
Here we go. So next step is to create a project named blog!
Create a project
Creating a project in Laravel is super easy. Just type a command like below.
% laravel new blog
That's it. So easy. That command bring every dependencies automatically. And you move to blog directory.
% cd blog
Now you can use a new command called 'artisan'. It's a command used for Laravel. For example, you can start server with this command.
% php artisan serve
Do you see command line like this?
% php artisan serve ~/workspace/blog Laravel development server started: http://127.0.0.1:8000 [Mon Apr 20 09:20:56 2020] PHP 7.4.5 Development Server (http://127.0.0.1:8000) started
You can access localhost:8000 to see the Laravel's welcome page! If you want to know the other arguments of artisan, just type like this.
% php artisan list
Then you can see all artisan commands. You can also display the commands for a specific namespace like this.
% php artisan list dusk ~/workspace/blog Laravel Framework 7.6.2 Usage: command [options] [arguments] Options: -h, --help Display this help message -q, --quiet Do not output any message -V, --version Display this application version --ansi Force ANSI output --no-ansi Disable ANSI output -n, --no-interaction Do not ask any interactive question --env[=ENV] The environment the command should run under -v|vv|vvv, --verbose Increase the verbosity of messages: 1 for normal output, 2 for more verbose output and 3 for debug Available commands for the "dusk" namespace: dusk:chrome-driver Install the ChromeDriver binary dusk:component Create a new Dusk component class dusk:fails Run the failing Dusk tests from the last run and stop on failure dusk:install Install Dusk into the application dusk:make Create a new Dusk test class dusk:page Create a new Dusk page class
So let's go to next step!
Database setting
Open .env located under root directory. And edit around DB setting.
DB_CONNECTION=mysql DB_HOST=127.0.0.1 DB_PORT=3306 DB_DATABASE=blog DB_USERNAME=root DB_PASSWORD=
Depends on your database. I use MySQL and I already create database named blog in MySQL. You should create user for only this project when you deploy.
Migration
Laravel supplies the migration system. It allow you to control database using php code. For example, when you want to create database, type the command like this.
% php artisan make:migration create_posts_table
You can see a new migration file database/migrations/xxxx_xx_xx_xxxxxx_create_posts_table.php. Write down columns you need in the function called up() and write down columns you want to delete in down(). Edit it.
public function up() { Schema::create('posts', function (Blueprint $table) { $table->increments('id'); $table->boolean('published'); $table->string('title'); $table->longText('body'); $table->string('tag')->nullable(); $table->timestamps(); }); }
It's ready! Execute this command.
% php artisan migrate
Here we go! Now you got some tables with columns! Let's check them out in MySQL console.
% mysql -uroot
And check tables and columns.
mysql> use blog; Reading table information for completion of table and column names You can turn off this feature to get a quicker startup with -A Database changed mysql> show tables; +----------------+ | Tables_in_blog | +----------------+ | failed_jobs | | migrations | | posts | | users | +----------------+ 4 rows in set (0.01 sec) mysql> desc posts; +------------+------------------+------+-----+---------+----------------+ | Field | Type | Null | Key | Default | Extra | +------------+------------------+------+-----+---------+----------------+ | id | int(10) unsigned | NO | PRI | NULL | auto_increment | | published | tinyint(1) | NO | | NULL | | | title | varchar(191) | NO | | NULL | | | body | longtext | NO | | NULL | | | tag | varchar(191) | YES | | NULL | | | created_at | timestamp | YES | | NULL | | | updated_at | timestamp | YES | | NULL | | | user_id | int(11) | NO | MUL | NULL | | +------------+------------------+------+-----+---------+----------------+ 8 rows in set (0.01 sec)
Good! You could create tables and columns by php. Next step is Create Model.
Create Model
Laravel Framework is MVC application model. MVC is Model, View and Controller. Application works with each role. View works for display to browsers. Controller works as a playmaker. It receives request from router and access databases to get some datas and pass the datas to views. Model connects to the database and gets, inserts, updates or deletes datas.
Now you create a Model.
% php artisan make:model Post
Then you will see the new Post model under app/Post.php.
<?php namespace App; use Illuminate\Database\Eloquent\Model; class Post extends Model { // }
This model has no code. But it's ok. You can leave it for now.
About a model name
A model name is important. A model connects to table of the database with the rule of the name. If you have a posts table, Post model is mapped with posts table automatically.
Seeding
Seeding is very useful function for preparing test datas or master datas. You can use it easily. All you need is just 1. making seeder file and 2. executing it. Let's do that.
Making seeder files
% php artisan make:seeder BooksTableSeeder Seeder created successfully.
Edit seeder files
public function run() { DB::table('posts')->truncate(); $posts = [ [ 'published' => true, 'title' => 'The First Post', 'body' => '1st Lorem ipsum...', 'tag' => 'laravel', 'user_id' => 1 ], [ 'published' => true, 'title' => 'The Second Post', 'body' => '2nd Lorem ipsum dolor sit amet...', 'tag' => 'shiba-inu', 'user_id' => 1 ], [ 'published' => false, 'title' => 'The Third Post', 'body' => '3rd Lorem ipsum dolor sit ...', 'tag' => 'laravel', 'user_id' => 1 ] ]; foreach($posts as $post) { \App\Post::create($post); } }
And edit DatabaseSeeder.php file.
public function run() { // $this->call(UserSeeder::class); $this->call(PostsTableSeeder::class); }
Execute seegding
% php artisan db:seed Seeding: PostsTableSeeder Database seeding completed successfully.
Sweet. Let's check out database.
mysql> select * from posts; +----+-----------+-----------------+-----------------------------------+---------------------------------+---------------------+---------+ | id | published | title | body | tag | created_at | updated_at | user_id | +----+-----------+-----------------+-----------------------------------+-----------+---------------------+---------------------+---------+ | 1 | 1 | The First Post | 1st Lorem ipsum... | laravel | 2020-04-19 19:16:18 | 2020-04-19 19:16:18 | 1 | | 2 | 1 | The Second Post | 2nd Lorem ipsum dolor sit amet... | shiba-inu | 2020-04-19 19:16:18 | 2020-04-19 19:16:18 | 1 | | 3 | 0 | The Third Post | 3rd Lorem ipsum dolor sit ... | laravel | 2020-04-19 19:16:18 | 2020-04-19 19:16:18 | 1 | +----+-----------+-----------------+-----------------------------------+-----------+---------------------+---------------------+---------+ 3 rows in set (0.00 sec)
Perfect! Now we can go next step!
So, see you next time!
References
Installation - Laravel - The PHP Framework For Web Artisans
1 note
·
View note
Text
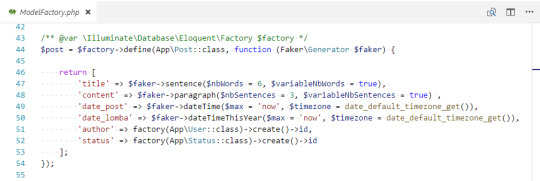
Laravel 5.8 Tutorial From Scratch - e37 - Model Factories - Laravel
Laravel 5.8 Tutorial From Scratch – e37 – Model Factories – Laravel
Laravel 5.8 Tutorial From Scratch – e37 – Model Factories – Laravel
[ad_1]
Model factories offer a very convenient way to add test data to our database during the development phase. Let’s create a factory for our Company’s table now.
For the best experience, follow along in our interactive school at https://www.coderstape.com
DigitalOcean Referral https://m.do.co/c/7dce5364ef4d
Resources Course…
View On WordPress
#database configuration laravel#dotenv#laravel#laravel 5#laravel 5.8#laravel 5.8 install#laravel 5.8 new feature#laravel 5.8 what&039;s new#laravel connect db#laravel database#laravel database seeder#laravel db seed#laravel db settings#laravel factory#laravel for beginners#laravel from scratch#laravel from the ground up#laravel migrate fresh#laravel model factory tutorial#laravel mysql json#laravel preview#laravel tutorial#php carbon immutable#php framework
0 notes
Text
Step docker install laravel
$ cp .env.example .env # Create required directories $ mkdir storage/framework storage/framework/sessions storage/framework/views storage/framework/cache # Enabling the service. This will include PHP, MySQL, and Nginx. $ docker-compose up -d # Run composer install inside the docker container $ docker-compose exec app composer install # Run DB Migration & DB Seeder if necessary $ docker-compose exec app composer dump-autoload $ docker-compose exec app php artisan migrate:fresh --seed Get IP : docker inspect alpha-gw | grep IPAddress # Verify if the service is up and running correctly. If everything is fine, then it should return OK. $ curl -X GET http://localhost:8096/api/v1/healthz
0 notes
Text
How To Use Chart JS In Laravel

The fundamentals of Chart.js are quite straightforward. First, we must install Chart.js into our project. Depending on the settings of your project, you may be installing it using npm or bower, or you may link to a constructed version via a CDN or clone/build from GitHub. Simply connecting to the created CDN version in the sample's blade file would suffice for this brief example. A The fundamentals of Chart js are quite straightforward. First, we must install Chart js into our project. Depending on the settings of your project, you may be installing it using npm or bower, or you may link to a constructed version via a CDN or clone/build from GitHub. In our examples, we'll only link to the built-in CDN version for the purposes of this brief demonstration. We'll just plot the ages of the app users in this case. We're presuming you've already set up the Laravel auth scaffolding and carried out the required migrations to make a Users table. If not, take a look at the information here or modify it for the model you're using for your chart's data. Therefore, before creating any users at random, we'll first add an age column to our Users table. For more information, see our post on how to use faker to create random users, however for this demonstration, let's make a database migration to add an age column by using: add age to users table php artisan make:migration —table='users' To change the up function to: edit this file in the database migrations directory. Schema::table('Users', function (Blueprint $table) { $table->int('age')->nullable(); }); Run php artisan migrate after that, and your Users table should now contain an age column. Visit /database/factories/UserFactory now, and add the following at the end of the array: 'age' is represented by $faker->numberBetween($min = 20, $max = 80), The complete return is thus: return ; Run the following commands to build a UsersTableSeeder: make:seeder UsersTableSeeder in PHP This will produce UsersTableSeeder.php in the database. The run function should include the following: factory(AppUser::class, 5)->create(); When this is executed, 5 users will be created; modify 5 to the number of users you need. After that, we must open DatabaseSeeder.php in /database/seeds and uncomment the code in the run() function. Finally, execute php artisan db:seed. Five new users should appear, each of whom has an age. For our Charts page, we will now develop a model, controller, views, and routes. Run the following command in PHP: make:controller ChartController —model=Chart. To the file /app/Http/Controllers/ChartController.php, add the following: use AppUser; use AppChart; use DB; ... public function index() { // Get users grouped by age $groups = DB::table('users') ->select('age', DB::raw('count(*) as total')) ->groupBy('age') ->pluck('total', 'age')->all(); // Generate random colours for the groups for ($i=0; $ilabels = (array_keys($groups)); $chart->dataset = (array_values($groups)); $chart->colours = $colours; return view('charts.index', compact('chart')); } The random colour scheme is one example of the exciting things you can do with the controller's data, though you can also specify hardcoded colours if you'd choose. In /resources/views/charts/, we must now create an index.blade.php file and add the following (depending on your blade setup and layout; here is an example): Laravel Chart Example Chart Demo Finally, we need to add the following to /routes/web.php: Route::get('/charts', 'ChartController@index')->name('charts'); Go to at your-project-name.test/charts now. Although this should serve as a good starting point for your understanding of the fundamentals of charts and graphs in Laravel, you may refer to the Chart.js documentation for more details on customizing your charts. Read the full article
0 notes
Text
10 Reasons why Laravel is the best PHP framework for 2019

1. Object Oriented Libraries –
One of the strongest reasons of laravel to stand out among other PHP frameworks is its pre – installed object oriented libraries, which are not available in other frameworks. Also it has many advanced features such as, resetting the password, monitoring active users, Cross Site Request Forgery Protection, encryption, Bcrypt hashing etc.
2. MVC-
Another strongest feature of laravel is that it works on MVC architecture. It has multiple in- built functionalities. MVC helps to improve the performance and also better documentation.
3. Packaging System-
Packages are the most ideal approaches to speed up the development process. A packaging system manages not only libraries but also multiple support software that assist the web applications to automate the task. Laravel has a new feature which is Automatic Package Discovery. It automatically detects the packages that users want to install.
4. Authentication and authorization-
It becomes easy and simple to implement authorizing technique in Laravel. Controlling the access to resources is not difficult in Laravel. Using very few artisan commands application will be configured with secure authentication and authorization.
5. Artisan-
Artisan is a command line interface of laravel. As a result, this helps developer to get free from creation of proper code skeleton. You can extend not only the functionality but also the capability of Artisan by using new custom commands. Some common uses of Artisan are seeding boilerplate code for migrations, models and new controls, managing database migrations, package assets etc.
6. Task Scheduling-
Task scheduling is important in every project. Scheduler in Laravel does the programmatic scheduling of periodically executed tasks. This scheduler is called by Corn frequently and Laravel calculates scheduled tasks and executes all the pending tasks. And in that manner, Laravel does managing and scheduling of tasks very easily.
7. Template Engine-
Template engine of laravel is Blade. It permits the developers to write their plain PHP code. Blade, combines one or more templates with a data model to produce the resulting views. Blade helps to write a multi- language application. It is very fast and it caches the compiled perspectives. It helps to build effective designs and include partials to beat redundancy in multiple documents.
8. Testing and security-
It allows unit testing so that user can conveniently test the application. It allows to run hundreds of tests so that to verify new changes done by developers are not breaking anything in web application. This feature also allows developers to write unit- tests for their own code.
Laravel uses Bcrypt hashing algorithm for creating an encrypted password. Laravel includes some security features such as Encryption, authentication users, protecting routes, HTTP Basic Authentications, configuration, storing passwords, password reminders and reset. Here, password will not save as a simple text in DB. Every time when new user log-in, a token is generated so that hackers could not get access to unauthorized web page.
9. Laracasts Tutorials-
Laravel offers Laracasts, which has many free as well as paid tutorial videos in order to help developers to learn. Expert and experienced instructors made these videos. So programmers will effectively learn and develop in progressive way.
10. Pagination-
It paginates all data from database. As a result it gives the best development- friendly environment. Pagination gives benefit to apply different styles and also to change URL parameter. It is combined with Eloquent ORM hence it provides a flexibility for the use of big databases.
Final Words-
These are some important features that makes Laravel the best PHP framework. Also it has a strong community support. Laravel is scalable. And it also helps in fast and cost- effective software delivery.
Do you need to develop a website for your business? We have a dedicated team that believes in benefits and effectiveness of using Laravel framework. Develop a website with Solace that will help you to set you on your way to success of business. Contact us for your effective website development to stand out in the market.
0 notes
Photo

laravelでテストコードを書く前に設定しておいた方が良いこと https://ift.tt/2HqldhW
データベースのテストをする際には、テスト用のDBを用意して、そのDBでテストした方が良い。
理由
テストDBを用意して、テストを実行する際、 DatabaseMigrationsやDatabaseTransactionsを使ってもDBに全く影響を与えないわけでは無いです。
AUTO_INCREMENTの値など、一部は影響を受けてしまいます Laravel 5.4 で手軽にテストを書こう! | 株式会社インフィニットループ技術ブログ
実際に試してみました。
use DatabaseTransactions;が無い状態で、AUTO_INCREMENTのカラムがあるレコードを追加するコードのあるテストを実行(※以降テスト)
use DatabaseTransactions;がある状態テストを実行
use DatabaseTransactions;が無い状態テストを実行
そうするとAUTO_INCREMENTのカラムが連番にリませんでした。
テストをすることで少しでも本番DBなどに影響を与えてしまうのは良くないので、テストする時用でDBを切り替えてた方が良いと思いました。
データベースのテスト 5.4 Laravel
テストDBでのテスト方法
テスト用のDBを作成する。
hoge_testing ※surfixに _testingをつけるとテストDBだということが分かりやすい。
envファイルでDBを切り替えるパターン
開発環境、本番環境、ローカル環境などでテストDB名が違う場合は、このパターンを使うのが良いと思う。
テスト用のenvファイルを作る
ファイル名 .env.testing
DB名の箇所だけ書き換える
DB_DATABASE=hoge_testing
テストDBに対してmigrateを実行する方法
php artisan migrate --seed --env=testing
--env=testingをつけることで.env.testingのenvファイルを読んでmigrateを実行する事ができる。 Laravel5 で別環境(APP_ENV)で artisan コマンドを実行 – Qiita
テストコード内でmigrate:refreshなどを実行しているのであれば、コマンドでのmigrateの実行は不要かと思います。
phpunit.xmlでDBを切り替えるパターン
phpunit.xmlファイル内に<env name="DB_DATABASE" value="hoge_testing"/>を追加。 追加する箇所は以下の通りです。
<php> <env name="APP_ENV" value="testing"/> <env name="CACHE_DRIVER" value="array"/> <env name="SESSION_DRIVER" value="array"/> <env name="QUEUE_DRIVER" value="sync"/> <env name="DB_DATABASE" value="hoge_testing"/> </php>
https://qiita.com/colorrabbit/items/f660a4b6a2575b75a0e7
コマンドからmigrateを実行する場合
config/database.phpのmysqlの設定コピーして、databaseの箇所だけテストDBのDB名に書き換える。
'mysql_testing' => [ 'driver' => 'mysql', 'host' => env('DB_HOST', '127.0.0.1'), 'port' => env('DB_PORT', '3306'), 'database' => 'hoge_testing', 'username' => env('DB_USERNAME', 'forge'), 'password' => env('DB_PASSWORD', ''), 'unix_socket' => env('DB_SOCKET', ''), 'charset' => 'utf8mb4', 'collation' => 'utf8mb4_unicode_ci', 'prefix' => '', 'strict' => true, 'modes' => [ ], 'engine' => null, ],
後は以下のコマンドを実行すればテストDBに対してmigrate:refreshを実行することが出来る。
php artisan migrate:refresh --database=mysql_testing
https://qiita.com/colorrabbit/items/f660a4b6a2575b75a0e7
config をクリアする。
php artisan config:clear
このコマンドを実行せずにArtisan::call('migrate:refresh');など実行があるテストを実行したりすると、本番DBのデータが飛んだりするので要注意です。
DBの初期状態でデータベースのテストをする場合
テストクラスに以下メソッドを追加。
public function setUp() { parent::setUp(); Artisan::call('migrate:refresh'); Artisan::call('db:seed'); }
migrate:refreshを実行する際はmigrationファイルのdownメソッドにupメソッドが行った操作を元戻す処理 を書いておく必要があります。 https://readouble.com/laravel/5.3/ja/migrations.html
外部キー制約がある場合
以下のエラーが出る時があります。
SQLSTATE[23000]: Integrity constraint violation: 1217 Cannot delete or update a parent row: a foreign key constraint fails
以下の様にして一時的に外部キー制約を解除する。
public function down() { Schema::disableForeignKeyConstraints(); Schema::dropIfExists('user'); Schema::enableForeignKeyConstraints(); }
Laravel5でテスト時にtesting設定を使う方法 – アルファブレンド プログラミングチップス
laravelのバージョンが5.5であればRefreshDatabase;が使える。 use RefreshDatabase;を追加することで テスト前にMigrationとSeederが実行される。 LaravelでHTTPテスト – Qiita
テストを実行
‘phpunit’をコマンドで実行
おまけ
setUpBeforeClass以外の方法でクラスで一回だけ実行するメソッドを作る方法
migrate:refreshやdb:seedを、setUpメソッドに記述すると、テストにかかる時間が結構長くなってしまうので、クラスで一回だけ実行すれば場合はsetUpBeforeClassというメソッド内で実行すると良いようです。しかしsetUpBeforeClass内でenv()やlogger()などのlaravelで用意してくれているhelperは使えませんでした。 以下の様な処理がしたかったがenvが呼べない。
public static function setUpBeforeClass() { if(env('DB_DATABASE_TESTING') == 'hoge_testing'){ Artisan::call('migrate:refresh'); Artisan::call('db:seed'); self::insertTestData(); } }
なのでsetUpメソッドを一回のみ実行するようにしました。
private static $isSetup = false; public function setUp() { parent::setUp(); if(env('DB_DATABASE_TESTING') == 'hoge_testing' && self::$isSetup === false){ Artisan::call('migrate:refresh'); Artisan::call('db:seed'); self::$isSetup = true; } }
もっといい方法あるよって方は教えてください。
元記事はこちら
「laravelでテストコードを書く前に設定しておいた方が良いこと」
April 11, 2018 at 02:00PM
0 notes
Photo

New Post has been published on https://programmingbiters.com/junior-laravel-developer-programming-interview-test/
Junior Laravel Developer Programming Interview Test
While expanding my team and working with potential junior developers, I’ve come up with a few tasks to test their practical knowledge. There’s not much value in quizzes or interviews – let them create one simple project. From start to finish. So here’s an example of such project, you can use it for your own needs.
We need to test basic Laravel skills, right? So the project should be simple, but at the same time touch majority of fundamentals. Also, it should be possible to do within a day or so – in some cases, you would even pay them for spending their time.
With that in mind, here’s a project I came up with.
Adminpanel to manage companies
Basically, project to manage companies and their employees. Mini-CRM.
Basic Laravel Auth: ability to log in as administrator
Use database seeds to create first user with email [email protected] and password “password”
CRUD functionality (Create / Read / Update / Delete) for two menu items: Companies and Employees.
Companies DB table consists of these fields: Name (required), email, logo (minimum 100×100), website
Employees DB table consists of these fields: First name (required), last name (required), Company (foreign key to Companies), email, phone
Use database migrations to create those schemas above
Store companies logos in storage/app/public folder and make them accessible from public
Use basic Laravel resource controllers with default methods – index, create, store etc.
Use Laravel’s validation function, using Request classes
Use Laravel’s pagination for showing Companies/Employees list, 10 entries per page
Use Laravel make:auth as default Bootstrap-based design theme, but remove ability to register
Basically, that’s it. With this simple exercise junior developer shows the skills in basic Laravel things:
MVC
Auth
CRUD and Resource Controllers
Eloquent and Relationships
Database migrations and seeds
Form Validation and Requests
File management
Basic Bootstrap front-end
Pagination
Guess what – most of the basics web-applications will have these functions as core. There will be a lot more on top of that, but without these fundamentals you cannot move further.
So this task would actually test if the person can create simple projects. And then it’s practice, practice, practice on more projects, each of them individual and adding more to their knowledge base.
From my own experience, different developers are “creative” in different code places – some don’t use Resource controllers and put Route::get everywhere, some don’t validate forms, some don’t test their code properly etc. That’s exactly the things you want to spot as early as possible.
Extra Task for “Advanced” Juniors
If you feel like this task is too small and simple, you can add these things on top:
Use Datatables.net library to show table – with our without server-side rendering
Use more complicated front-end theme like AdminLTE
Email notification: send email whenever new company is entered (use Mailgun or Mailtrap)
Make the project multi-language (using resources/lang folder)
Basic testing with phpunit (I know some would argue it should be the basics, but I disagree)
Do you agree with such task? What would you change or add to this? And have you had any experience with giving similar tasks, what were your impressions?
0 notes
Text
Laravelチートシート
使用環境/バージョン
MacOSX Sierra 10.12.5
Laravel 5.1 LTS
PHP 5.6
環境構築
PHPインストール
brew tap homebrew/php brew install php56
Composerインストール
brew install composer
実装
プロジェクト作成
composer create-project laravel/laravel hoge "5.1.*"
DB準備(SQLiteを使う場合)
touch database/database.sqlite vi .env
モデル
php artisan make:model Hoge
マイグレーション/シーダー
php artisan make:migration create_hoges_table vi yyyy_mm_dd_HHMMSS_create_hoges_table.php
php artisan make:seeder HogeTableSeeder vi ModelFactory.php vi HogeTableSeeder.php vi DatabaseSeeder.php
php artisan migrate:refresh --seed php artisan migrate:status
ルーティング
vi routes.php
コントローラ
php artisan make:controller HogeController vi HogeController.php
リクエスト
php artisan make:request HogeRequest vi HogeRequest.php
ビュー
vi hoge.blade.php
起動
php artisan serve
テスト
php artisan make:test HogeTest
参考URL
Laravel公式ドキュメント
0 notes
Text
[Sprint#2.2-DZ] Ham::storage, Dzulham Cloud Storage.
Kutipan dari sprint 2.1 karena nyambung pada sprint 2.2
[2017/04/04][~7 Jam]
Hari ini saya lanjutkan untuk membuat API dari webhosting gratis di idhostinger saya untuk menggunakan server tersebut sebagai cloud storage. Awalnya saya tidak berfikir untuk membuat API melainkan sekedar mencari cara untuk mengirimkan files lewat php tanpa perantara form. Berikut cara dasar jika menggunakan form ...
continues...
[2017/04/05][~10 Jam]
Hari ini merupakan jadwal individual review. Saya menceritakan tentang masalah saya tentang cloud storage kepada Pak Ade. Beliau menyarankan untuk memakai MongoDB yang juga dipakai oleh FUKI (salah satu organisasi di Fasilkom UI). Setelah membicarakan tentang MongoDB dengan kelompok, maka diputuskan untuk memakai MongoDB hanya untuk penyimpanan file.
Laravel tidak menyediakan support langsung dengan integrasi mongoDB sehingga untuk itu kita harus melakukannya secara manual.
Instalasi laravel dimulai dengan install program di os masing-masing sehingga memilki mongod.exe. Kemudian untuk support pada developing environment seperti wamp maka dapat menambahkan extension php_mongodb ke dalam folder ext dan mengaktifkannya pada php.ini
Installasi dependensi composer dengan:
composer require mongodb/mongodb
Setelah itu, kita dapat menggunakan kelas MongoDB untuk melakukan koneksi ke server dan memanggil GridFS untuk cloud storage.

Untuk laravel, jenssegers telah membuat MongoDB yang sudah terintegrasi dengan eloquent (Moloquent) sehingga mempermudah penggunaannya.
composer require moloquent/moloquent

PROBLEM!
Penggunaan MongoDB mengharuskan installasi MongoDB pada heroku juga sehingga kembali pada masalah awal, yaitu dependensi heroku.
[2017/04/06][~8 Jam]
Masih pada topik yang sama, pencarian cloud storage dilanjutkan. Singkat cerita, saya menemukan bahwa cURL dapat digunakan untuk mengirimkan superglobal $_POST termasuk $_FILES.

Di atas merupakan fungsi yang saya buat untuk mengirimkan file dengan curl ke server saya (dzulham.ga).
curl_init digunakan untuk memulai koneksi ke alamat yang akan menerima request tersebut. Dalam hal ini, $target_url saya berisi 'http://dzulham.ga/api/ham/'
curl_setopt digunakan untuk pengaturan opsi, CURLOPT_POST true mengaktifkan request sebagai POST. CURLOPT_POSTFIELDS diisi dengan array yang mengandung variable dan nilai yang akan dikirim. CURLOPT_RETURNTRANSFER true mengaktifkan request untuk mengirimkan balik hasil keluaran server.
curl_exec mengeksekusi request dengan opsi yang sudah diberikan sebelumnya.
curl_close menutup koneksi.
Untuk mengirimkan file, maka menggunakan CURLfile:
'file' => new \CURLFile($file, $file->getMimeType(), $file->getClientOriginalName())
[2017/04/07][~12 Jam]
Akhirnya permasalahan telah terlihat solusinya. Saya membuat sebuah class Ham yang dapat digunakan sebagai API cloud storage ke dzulham.ga. Berikut penggunaan Ham (Ham Adorned Mar):
Menggunakan kelas Ham dengan:
use App\Parties\Ham;

Demikian akhirnya saya dapat upload file ke cloud storage tanpa dependensi di GitLab CI maupun Heroku.
[2017/04/08-10][~20 Jam]
Tiga hari berturut-turut ini saya habiskan untuk merge seluruh cabang pada sprint 1 ke cabang develop sehingga dapat terlihat pada deployment server di temanlomba-dev.herokuapp.com. Selama merging, seperti yang sudah saya sampaikan, saya memakai GUI yaitu Visual Studio Code yang juga sudah memiliki fitur untuk mempermudah penyelesaian conflict.

Kemudian pada cabang view_latest_posts. Shandy sudah membuat banyak test database menggunakan DB Facades. Berikut contoh dasar penggunaan DB Facades:
use Illuminate\Support\Facades\DB;
function getUsers() {
return DB::table(’users’)->get();
}
Saya merekomendasikan penggunaan eloquent model sehingga nanti dapat diberikan pada factory untuk seeding.
Eloquent Model Post

Model tadi dapat dipakai pada factory
Sehingga mempermudah otomasi pada Database Seeding

[2017/04/~20]
Karena bagian saya pada sprint ini telah terselesaikan, maka saya memutuskan untuk membantu anggota lain saat bekerja melakukan bagian sprint-nya selama jangka waktu ini.
[Sticky footer problem ]
Dalam pembuatan front-end, Irfan memiliki masalah dalam pembuatan footer yang diinginkan. Ditambah lagi jika menggunakan dropdown yang elementnya overflow, maka footer akan membuat scrollbar menjadi ganda. Berikut workaround yang saya lakukan:


Pada bagian stylesheet.css, terdapat element .container.content yang mengandung konten dari page selepas dari footer. Dengan menggunakan calc(100vh - [some value]px) pada min-height, maka footer dapat stick to the bottom of the page.
[Semantic multiple dropdown search]
Dalam pembuatan fitur create post, terdapat fitur yang menggunakan Multiple Dropdown Search. Maka dari itu, kami menggunakan Semantic UI. Saya menggunakan element tersebut pada bagian skill di fitur edit profile page.

Kemudian pada bagian blade templatenya:

...
0 notes