#dotenv
Explore tagged Tumblr posts
Visit Tumblr Blog
Explore Tumblr blogs with no restrictions, modern design and the best experience.
Last Seen Tumblr Blogs


Fun Fact
Tumblr Inc. is funded by 13 investors.
Text
Access Environment Variable in Nodejs JavaScript Application | Reading ENV Variable Example
Full Video Link https://youtu.be/dxrNopL1sbQ Hello friends, new #video on #reading #accessing #environmentvariables in #nodejs #projeect #application #tutorial #examples is published on #codeonedigest #youtube channel. @java #java #aws #a
In this video, we will read the environment variable in nodejs javascript project. We will learn what “dotenv” module in nodejs javascript. How to use “dotenv” package in our nodejs javascript project. ** Important Nodejs Javascript Packages or Modules ** Dotenv – DotEnv is a lightweight npm package that automatically loads environment variables from a .env file into the process.env object. To…

View On WordPress
#dotenv#dotenv example#dotenv in node js#dotenv module#dotenv module in node js#dotenv module not found#dotenv nodejs#dotenv package#dotenv package install#dotenv package nodejs#dotenv package.json#dotenv tutorial#dotenv tutorial nodejs#environment variable#environment variables#javascript environment variable#linux environment variables#node js javascript#node js javascript tutorial#nodejs#python environment variables#set environment variables
0 notes
Text
Authentication and Authorization in Node.js with JWT

Authentication and authorization are essential for securing modern web applications. In Node.js, using JWT (JSON Web Tokens) has become a trending and efficient way to handle secure access control. JWT allows stateless authentication, making it ideal for RESTful APIs and microservices architecture.
When a user logs in, the server generates a JWT signed with a secret key or a private key (in case of RSA). This token is then sent to the client and stored typically in localStorage or HTTP-only cookies. For each subsequent request, the client sends the token in the header, commonly using the Bearer schema.
The backend uses middleware like jsonwebtoken in combination with Express.js to verify the token and extract user information. If the token is valid, the user gets access to protected routes and resources. Role-based access control (RBAC) can also be implemented to allow specific users access to different parts of the application.
JWTs are widely used in Node.js for API security, real-time applications, and mobile backends due to their lightweight and stateless nature. Key trends include integrating JWT with OAuth2.0, using refresh tokens for long-lived sessions, and enhancing security with HTTPS and token expiration strategies.
Popular npm packages include jsonwebtoken, bcryptjs for password hashing, and dotenv for environment variables. Combining JWT with MongoDB, Mongoose, and Express.js is a common stack for secure backend development in 2025.
0 notes
Text
Build a Personal AI Assistant with ChatGPT API (Step-by-Step Guide)
Learn how to build a personal AI assistant using the ChatGPT API and Python. Step-by-step guide to create your own voice-enabled, smart AI assistant. @maxoncodes
Introduction
Ever wanted your own AI assistant like JARVIS or Siri, but with more customization and privacy? Thanks to OpenAI’s ChatGPT API, you can now build a personal AI assistant tailored to your exact needs. Whether you’re looking to automate workflows, manage daily tasks, or simply build an intelligent chatbot for fun or productivity, this guide will walk you through it — step-by-step.

Let’s build your very own AI assistant using Python and the ChatGPT API, integrating voice, memory, and task automation.
🧠 What Can Your AI Assistant Do?
A personal AI assistant can:
Answer questions using ChatGPT
Perform web searches or fetch real-time data
Read emails or send messages
Automate system commands (e.g., open apps, send notifications)
Remember custom preferences or to-do lists
Also read :how to make money with chatbotsIntegrate with APIs (Google Calendar, Weather, Home Assistant)
🚀 Step 1: Set Up Your Environment
����️ Tools Needed
Python 3.8+
OpenAI API Key (get it here)
IDE (VS Code or PyCharm)
Terminal or Command Prompt
📦 Install Required Libraries
pip install openai python-dotenv pyttsx3 speechrecognition pyaudio Copy
🔐 Step 2: Get Your OpenAI API Key
Go to https://platform.openai.com/
Sign in and navigate to API keys
Create a new key and copy it.
Store it securely in a .env file:
OPENAI_API_KEY=your_api_key_here
Load it in your Python script:
Also read :Is AI threat for future from dotenv import load_dotenv import os load_dotenv() OPENAI_API_KEY = os.getenv("OPENAI_API_KEY")
🧑💻 Step 3: Create the ChatGPT Assistant Script
Here’s a minimal script to get your assistant talking using OpenAI's GPT-4:
Read More >>
1 note
·
View note
Text
Backend Web Development Using Node.js

Node.js has revolutionized web development by enabling developers to write server-side code using JavaScript. If you're already comfortable with JavaScript on the frontend, transitioning to backend development with Node.js is a logical next step. In this post, we'll introduce the fundamentals of backend development using Node.js and how to build scalable, efficient web applications.
What is Node.js?
Node.js is a JavaScript runtime built on Chrome’s V8 engine. It allows developers to use JavaScript to write backend code, run scripts outside the browser, and build powerful network applications. Node.js is known for its non-blocking, event-driven architecture, making it highly efficient for I/O-heavy applications.
Why Use Node.js for Backend Development?
JavaScript Everywhere: Use a single language for both frontend and backend.
Asynchronous and Non-blocking: Great for handling many connections at once.
Vast Ecosystem: Thousands of modules available via npm (Node Package Manager).
Scalability: Ideal for microservices and real-time applications like chats or games.
Setting Up a Node.js Project
Install Node.js from nodejs.org
Create a new project folder:
Initialize the project:
Create your main file:
Basic Server Example
const http = require('http'); const server = http.createServer((req, res) => { res.writeHead(200, {'Content-Type': 'text/plain'}); res.end('Hello, Node.js Backend!'); }); server.listen(3000, () => { console.log('Server running on http://localhost:3000'); });
Using Express.js for Easier Development
Express.js is a popular web framework for Node.js that simplifies routing and middleware management.npm install express const express = require('express'); const app = express(); app.get('/', (req, res) => { res.send('Welcome to the Node.js backend!'); }); app.listen(3000, () => { console.log('Express server running on http://localhost:3000'); });
Common Backend Tasks with Node.js
Handle routing and API endpoints
Connect to databases (MongoDB, PostgreSQL, etc.)
Manage user authentication and sessions
Process form data and JSON
Serve static files
Popular Libraries and Tools
Express.js: Web framework
Mongoose: MongoDB object modeling
dotenv: Environment variable management
JWT: JSON Web Tokens for authentication
Nodemon: Auto-restart server on code changes
Best Practices
Use environment variables for sensitive data
Structure your project using MVC or service-based architecture
Use middleware for error handling and logging
Validate and sanitize user input
Secure your APIs with authentication and rate-limiting
Conclusion
Node.js is a powerful and flexible choice for backend development. Its ability to use JavaScript on the server-side, combined with a rich ecosystem of libraries, makes it ideal for building modern web applications. Start small, experiment with Express, and gradually add more features to build robust backend services.
0 notes
Text
Flexpeak - Front e Back - Opções
Módulo 1 - Revisão de JavaScript e Fundamentos do Backend: • Revisão de JavaScript: Fundamentos • Variáveis e Tipos de Dados (let, const, var) • Estruturas de Controle (if, switch, for, while) • Funções (function, arrow functions, callbacks) • Manipulação de Arrays e Objetos (map, filter, reduce) • Introdução a Promises e Async/Await • Revisão de JavaScript: Programação Assíncrona e Módulos • Promises e Async/Await na prática Módulo 2 – Controle de Versão com Git / GitHub • O que é controle de versão e por que usá-lo? • Diferença entre Git (local) e GitHub (remoto) • Instalação e configuração inicial (git config) • Repositório e inicialização (git init) • Staging e commits (git add, git commit) • Histórico de commits (git log) • Atualização do repositório (git pull, git push) • Clonagem de repositório (git clone) • Criando um repositório no GitHub e conectando ao repositório local • Adicionando e confirmando mudanças (git commit -m "mensagem") • Enviando código para o repositório remoto (git push origin main) • O que são commits semânticos e por que usá-los? • Estrutura de um commit semântico: • Tipos comuns de commits semânticos(feat, fix, docs, style, refactor, test, chore) • Criando e alternando entre branches (git branch, git checkout -b) • Trabalhando com múltiplos branches • Fazendo merges entre branches (git merge) • Resolução de conflitos • Criando um Pull Request no GitHub Módulo 3 – Desenvolvimento Backend com NodeJS • O que é o Node.js e por que usá-lo? • Módulos do Node.js (require, import/export) • Uso do npm e package.json • Ambiente e Configuração com dotenv • Criando um servidor com Express.js • Uso de Middleware e Rotas • Testando endpoints com Insomnia • O que é um ORM e por que usar Sequelize? • Configuração do Sequelize (sequelize-cli) • Criando conexões com MySQL • Criando Models, Migrations e Seeds • Operações CRUD (findAll, findByPk, create, update, destroy) • Validações no Sequelize • Estruturando Controllers e Services • Introdução à autenticação com JWT • Implementação de Login e Registro • Middleware de autenticação • Proteção de rotas • Upload de arquivos com multer • Validação de arquivos enviados • Tratamento de erros com express-async-errors Módulo 4 - Desenvolvimento Frontend com React.js • O que é React.js e como funciona? • Criando um projeto com Vite ou Create React App • Estruturação do Projeto: Organização de pastas e arquivos, convenções e padrões • Criando Componentes: Componentes reutilizáveis, estruturação de layouts e boas práticas • JSX e Componentes Funcionais • Props e Estado (useState) • Comunicação pai → filho e filho → pai • Uso de useEffect para chamadas de API • Manipulação de formulários com useState • Context API para Gerenciamento de Estado • Configuração do react-router-dom • Rotas Dinâmicas e Parâmetros • Consumo de API com fetch e axios • Exibindo dados da API Node.js no frontend • Autenticação no frontend com JWT • Armazenamento de tokens (localStorage, sessionStorage) • Hooks avançados: useContext, useReducer, useMemo • Implementação de logout e proteção de rotas
Módulo 5 - Implantação na AWS • O que é AWS e como ela pode ser usada? • Criando uma instância EC2 e configurando ambiente • Instalando Node.js, MySQL na AWS • Configuração de ambiente e variáveis no servidor • Deploy da API Node.js na AWS • Deploy do Frontend React na AWS • Configuração de permissões e CORS • Conectando o frontend ao backend na AWS • Otimização e dicas de performance
Matricular-se
0 notes
Text
CodeBattle: The Ultimate 1v1 Real-Time Coding Battle Platform
Introduction
Hello coder! How are you , In the world of competitive programming and coding challenges, real-time battles are becoming increasingly popular. CodeBattle is a cutting-edge 1v1 real-time coding battle platform designed to test programmers’ skills in a fast-paced MCQ-based format. Whether you’re a beginner or an experienced coder, CodeBattle offers an exciting and challenging way to improve your coding knowledge.
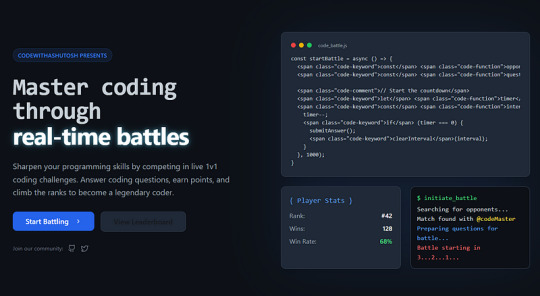
In this article, we will dive deep into the development of CodeBattle, covering project structure, technology stack, real-time matchmaking, styling tips, and live demo setup. Additionally, we will provide code snippets to help you understand the implementation better.
Features of CodeBattle
Real-time 1v1 Coding Battles
MCQ-based Questions with a 20-second timer
Live Scoreboard
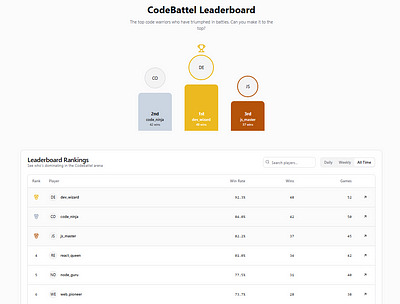
Leaderboard System (Daily, Weekly, and All-time Rankings)
Secure Authentication (Google/Firebase Login)
Admin Panel to manage questions & users
Fully Responsive UI
Tech Stack: React (Next.js), Node.js, Express.js, MongoDB, and Socket.io
Project Structure
CodeBattel/ ├── frontend/ # React (Next.js) UI │ ├── components/ # Reusable Components │ ├── pages/ # Next.js Pages (Home, Play, Leaderboard, etc.) │ ├── styles/ # CSS Modules / Tailwind CSS │ └── utils/ # Helper Functions │ ├── backend/ # Node.js Backend │ ├── models/ # MongoDB Models │ ├── routes/ # Express Routes (API Endpoints) │ ├── controllers/ # Business Logic │ ├── config/ # Configuration Files │ ├── socket/ # Real-time Matchmaking with Socket.io │ └── index.js # Main Server Entry Point │ └── README.md # Project Documentation
Building the Frontend with React (Next.js)
1. Installing Dependencies
npx create-next-app@latest codebattel cd codebattel npm install socket.io-client axios tailwindcss npm install --save firebase
2. Setting up Tailwind CSS
npx tailwindcss init -p
Edit tailwind.config.js:module.exports = { content: ["./pages/**/*.{js,ts,jsx,tsx}", "./components/**/*.{js,ts,jsx,tsx}"], theme: { extend: {}, }, plugins: [], };
Developing the 1v1 Battle System
1. Setting Up Real-Time Matchmaking
import { io } from "socket.io-client"; import { useEffect, useState } from "react";const socket = io("http://localhost:5000");export default function BattleRoom() { const [question, setQuestion] = useState(null); const [timer, setTimer] = useState(20); useEffect(() => { socket.emit("joinBattle"); socket.on("newQuestion", (data) => { setQuestion(data); setTimer(20); }); }, []); return ( <div> <h1>CodeBattel</h1> {question && ( <div> <h2>{question.text}</h2> <ul> {question.options.map((opt, index) => ( <li key={index}>{opt}</li> ))} </ul> <p>Time Left: {timer} sec</p> </div> )} </div> ); }
Building the Backend with Node.js & Socket.io
1. Installing Dependencies
npm init -y npm install express socket.io mongoose cors dotenv
2. Creating the Server
const express = require("express"); const http = require("http"); const { Server } = require("socket.io"); const app = express(); const server = http.createServer(app); const io = new Server(server, { cors: { origin: "*" } });let rooms = []; io.on("connection", (socket) => { socket.on("joinBattle", () => { if (rooms.length > 0) { let room = rooms.pop(); socket.join(room); io.to(room).emit("newQuestion", { text: "What is React?", options: ["Library", "Framework", "Language", "None"] }); } else { let newRoom = "room-" + socket.id; rooms.push(newRoom); socket.join(newRoom); } }); });server.listen(5000, () => console.log("Server running on port 5000"));
Live Demo Setup
Clone the repo:
git clone https://github.com/ashutoshmishra52/codebattel.git cd codebattel
Install dependencies:
npm install && cd backend && npm install
Run the project:
npm run dev
Open http://localhost:3000 in your browser.
FAQ
Q1: What is CodeBattle?
CodeBattle is a 1v1 real-time coding battle platform where players answer multiple-choice questions under a 20-second timer.
Q2: How does matchmaking work?
Players are randomly paired in real time using Socket.io.
Q3: Can I add my own questions?
Yes! The Admin Panel allows you to add/edit/delete MCQs.
Q4: How do I contribute?
Check out the GitHub repository and submit a pull request.
About the Author
Ashutosh Mishra is a full-stack developer, AI researcher, and content writer with 4+ years of experience. He is the founder of CodeWithAshutosh, a platform dedicated to teaching web development, AI, and competitive coding.
For more coding tutorials and projects, follow Ashutosh Mishra.
Conclusion
CodeBattle is an innovative way to enhance your coding skills in a competitive environment. With real-time battles, an engaging UI, and a powerful backend, it stands out as a top-tier coding battle platform. Start coding, challenge your friends, and rise up the leaderboard!
0 notes
Text
Optimizing Django File Uploads: Best Practices for Performance and Security
1. Introduction Optimizing file uploads in Django is crucial for both performance and security. It ensures your application handles files efficiently without compromising on data integrity. This guide will cover best practices, implementation steps, and show you how to avoid common pitfalls. Prerequisites include basic Django knowledge, and we’ll use tools like django-environ, python-dotenv,…
0 notes
Text
OpenAI vs Opus
How does OpenAI compare versus a penguin in the role of a legal secretary? Let’s see… import openai import os from dotenv import load_dotenv, find_dotenv _ = load_dotenv(find_dotenv()) # read local .env file openai.api_key = os.getenv('OPENAI_API_KEY') def get_completion(prompt, model="gpt-3.5-turbo", temperature=0): messages = [{"role": "user", "content": prompt}] response =…

View On WordPress
0 notes
Video
youtube
Reading Environment Variable in Nodejs JavaScript Application Using dote... Full Video Link https://youtu.be/dxrNopL1sbQHello friends, new #video on #reading #accessing #environmentvariables in #nodejs #projeect #application #tutorial #examples is published on #codeonedigest #youtube channel. @java #java #aws #awscloud @awscloud @AWSCloudIndia #salesforce #Cloud #CloudComputing @YouTube #youtube #azure #msazure #codeonedigest @codeonedigest #environmentvariables #nodejs #dotenv #setenvironmentvariables #linuxenvironmentvariables #pythonenvironmentvariables #dotenvnodejs #dotenvinnodejs #dotenvtutorial #dotenvtutorialnodejs #dotenvexample #dotenvmodule #dotenvmoduleinnodejs #dotenvmodulenotfound #dotenvpackage #dotenvpackagenodejs #dotenvpackage.json #dotenvpackageinstall #nodejsjavascript #environmentvariable #nodejsjavascripttutorial #javascriptenvironmentvariable #javascript
#youtube#nodejs#javascript#envrionment variable#nodejs tutorial#javascript tutorial#dotenv#dotenv tutorial
1 note
·
View note
Text
使用 Cursor 半天开发的批量自动化万字长文生成器
一、项目背景与动机
在当今的内容创作领域,高质量的长文内容(如人物传记、产品评测、历史研究等)的需求日益增长,但人工创作既耗时又费力。为了解决这个问题,我利用 Cursor 编辑器和 OpenAI API,开发了一个能够批量生成长文的自动化工具。这一工具不仅极大提升了内容创作的效率,还能保证输出的内容具有专业性和一定的质量。
1.1 核心痛点
人工写作耗时且费力
内容质量难以保证
批量生成存在困难
引用来源不够明确
1.2 解决方案
自动化生成流程,节省时间
AI 辅助内容创作,确保质量
支持批量生成,效率更高
自动添加引用链接,确保内容可靠性
二、技术架构与流程
2.1 创作流程概览
graph TD A[输入主题] --> B[生成关键词] B --> C[搜索相关信息] C --> D[处理搜索结果] D --> E[生成标题] E --> F[创建大纲] F --> G[生成章节内容] G --> H[添加配图] H --> I[添加引用] I --> J[格式化输出]
2.2 使用的工具和 API
** 开发工具 **
Cursor 编辑器:AI 辅助编程
Python 3.11:主要开发语言
Git:版本控制
** 核心 API**
OpenAI API:内容生成
Unsplash API:图片获取
Exa AI:信息搜索
** 主要依赖包 **
openai
python-dotenv
aiohttp
tenacity
beautifulsoup4
使用工具
Cursor 编辑器
OpenAI API
Unsplash API
Exa AI
三、核心特性与优势
3.1 内容生成
自动生成 8000-12000 字的深度长文
多维度内容结构(背景介绍、深入分析、多角度论述等)
智能配图系统,自动为文章添加相关图片
分段生成,确保内容的连贯性和完整性
支持批量处理,一次可生成多篇长文
内置智能纠错和内容补充机制
3.2 技术亮点
** 智能分段生成 **
多层次内容结构
智能内容扩充
自动逻辑关联
** 多源资料整合 **
维基百科资料提取
新闻资讯整合
专业数据库引用
** 内容质量保证 **
事实准确性检查
逻辑连贯性验证
专业术语规范化
四、使用指南
4.1 环境配置
# 1. 克隆项目 git clone https://github.com/whotto/long-article-generator.git # 2. 安装依赖 pip install -r requirements.txt # 3. 配置环境变量 # 创建.env 文件并添加: OPENAI_API_KEY=your_openai_api_key UNSPLASH_ACCESS_KEY=your_unsplash_api_key EXA_API_KEY=your_exa_api_key
4.2 使用方法
准备主题文件(如 test.md):
内容示例:老子、伏尔泰、M4 Mac mini 评测
运行脚本:
python long_article_generator.py test.md
输出结果:
生成的文章保存在 generated_articles 目录中
每篇文章包含标题、导读、正文、配图和引用

4. 生成文章:
[老子](https://yuedu.biz/lao-zi-de-shen-du-jie-xi/)
[伏尔泰](https://yuedu.biz/fu-er-tai-si-xiang-dui-xian-dai-zi-you-de-qi-shi-y/)
[M4 Mac mini 评测](https://yuedu.biz/m4-mac-mini-ping-ce-zhong-xin-ding-yi-zhuo-mian-ji/)
五、实际效果与改进方向
5.1 实际效果
** 生成速度 **:每篇文章约 5-10 分钟
** 文章长度 **:8000-15000 字的深度长文
** 自动配图 **:每篇文章自动添加 5-15 张相关配图
** 结构完整 **:包含五个章节、导读和总结
** 引用准确 **:自动添加信息来源
5.2 可改进方向
** 模型升级 **
使用 GPT-4o 提升生成质量(目前是 GPT-4o-mini)
引入 Claude 等其他模型
优化提示词工程
** 功能扩展 **
添加多语言支持
增加更多文章模板
支持自定义样式
增加 SEO 优化功能
** 技术优化 **
提升并发处理能力
优化内存使用
增加断点续传功能
添加进度可视化
六、适用场景
** 内容创作者 **
博客写手
自媒体运营
产品评测文章
** 教育领域 **
背景资料整理
案例分析报告
研究报告撰写
** 企业应用 **
产品介绍
行业分析报告
技术文档
这个长文生成器项目展示了 AI 技术在内容创作中的巨大潜力。通过合理的架构设计和 AI 技术的结合,我们可以大幅提高内容创作的效率和质量。未来,随着 AI 技术的不断发展,这类工具将变得��加智能和强大,为创作者提供更多助力。
正如古人云:“工欲善其事,必先利其器”。在信息爆炸的时代,善用工具不仅能提升效率,还能让我们腾出更多精力投入到创意和策略的思考中。让我们拥抱技术,创造更多优质内容。
欢迎大家尝试使用这个工具,也期待听到你们的使用反馈!
项目地址:https://github.com/whotto/Long_article_generator
0 notes
Text
From Dotenv to Dotenvx: Next Generation Config Management
https://dotenvx.com/blog/2024/06/24/dotenvx-next-generation-config-management.html
0 notes
Text

Stress
You write a script to automate sending daily email reports using Python. We'll use the smtplib library to send emails and the email.mime modules to create the email content. Here's a step-by-step guide:
Step 1: Install Required Libraries
First, ensure you have the necessary libraries installed. You can install them using pip if they are not already installed.pip install smtplib pip install email
Step 2: Set Up Email Credentials
You need to have the credentials for your email account (e.g., Gmail). For security reasons, it's better to store these in environment variables or a configuration file.
Step 3: Create the Python Script
Here's a sample script that sends an email report daily:import smtplib from email.mime.multipart import MIMEMultipart from email.mime.text import MIMEText import os # Function to send email def send_email(subject, body, to_email): # Email credentials email_address = os.environ.get('EMAIL_USER') email_password = os.environ.get('EMAIL_PASS') # Create the email msg = MIMEMultipart() msg['From'] = email_address msg['To'] = to_email msg['Subject'] = subject # Attach the body with the msg instance msg.attach(MIMEText(body, 'plain')) # Create server object with SSL option server = smtplib.SMTP_SSL('smtp.gmail.com', 465) server.login(email_address, email_password) # Send the email server.send_message(msg) server.quit() print("Email sent successfully") # Function to generate the report def generate_report(): # Implement your report generation logic here report = "This is a sample report." return report # Main function to send daily email report def main(): report = generate_report() subject = "Daily Report" body = report to_email = "[email protected]" # Change to the recipient's email address send_email(subject, body, to_email) if __name__ == "__main__": main()
Step 4: Setting Up Environment Variables
To keep your email credentials secure, set them as environment variables. You can do this in your operating system or by using a .env file with the dotenv package.
Using Environment Variables Directly
Set your environment variables:
On Windows:
setx EMAIL_USER "[email protected]" setx EMAIL_PASS "your_password"
On macOS/Linux:
export EMAIL_USER="[email protected]" export EMAIL_PASS="your_password"
Using a .env File
Create a .env file with the following content:[email protected] EMAIL_PASS=your_password
Then, update the script to load these variables:from dotenv import load_dotenv # Load environment variables from .env file load_dotenv()
Install the python-dotenv package if you use the .env file method:pip install python-dotenv
Step 5: Automating the Script Execution
To run the script daily, you can use a scheduler.
On Windows
Use Task Scheduler to run the script daily.
Open Task Scheduler.
Create a new task.
Set the trigger to daily at your desired time.
Set the action to start a program and browse to the Python executable, then add the script path as an argument.
On macOS/Linux
Use cron to schedule the script.
Open the terminal.
Type crontab -e to edit the cron jobs.
Add a new line for the daily schedule (e.g., to run at 7 AM every day):
0 7 * * * /usr/bin/python3 /path/to/your_script.py
Summary
Install required libraries using pip.
Set up email credentials securely using environment variables or a .env file.
Write the Python script to generate the report and send the email.
Automate the script execution using Task Scheduler (Windows) or cron (macOS/Linux).
This setup will ensure your script runs daily and sends the email report automatically. If you have any specific requirements or encounter issues, feel free to ask!
0 notes
Text
Extracting Structured Data from PDF Files using OpenAI & Langchain

Aim
The aim of this project is to create a paper parser which extracts questions from an exam file and parses it into JSON format leveraging langchain and openAI.
Technologies Used:-
The code is written in JavaScript and utilizes the following technologies: dotenv: A module for loading environment variables from a .env file. zod: A TypeScript-first schema validation library. Langchain : A framework designed to simplify the creation of applications using large language models. fs: A built-in Node.js module for working with the file system.
for more details: Extracting Structured Data from PDF Files using OpenAI & Langchain
0 notes
Text
Catch

So over the last few weeks I've been working on Catch. With work and the festive period I haven't had a lot of time; I finally got the opportunity to finish it last night. :)
It has a medium rating but I wouldn't say it's due to the initial foothold and privilege escalation being difficult- it's more due to there being a couple of rabbit holes (all of which I fell into for a period!)

Enumeration
As always, a port scan kicks off the process. Unfortunately I can't show the output of the port scan as during the time I switched laptops and I'm too lazy to power my old one on. xD However, the results were roughly as follows:
Port 80: HTTP (Catch Global Systems main page)
Port 3000: Gitea(?)
Port 5000: Lets Chat(?)
Port 8000: Cachet status page system
Port 80 was the first location I checked. You're greeted with what appears to be Catch's main application:
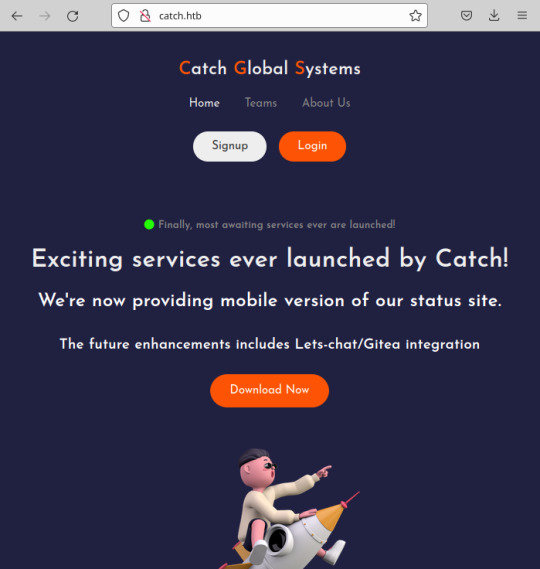
The signup/login functionality isn't present; I did notice the ability to download a file. The file that downloads is an apk.
For those that are unfamiliar with mobile applications, apk is one of the file formats for an Android mobile application which uses XML and Java. Having a little experience with mobile applications, my first thought was to decompile the apk and check for any hidden hardcoded secrets, usually stored in strings.xml.
To decompile the apk, I used apktool.
$ apktool d catchv1.0.apk
This decompiles the apk to near it's original form and places the resulting files in ./catchv1.0/. From here, I viewed ./res/values/strings.xml and found 3 potentially usable tokens for other applications:
$ grep token catchv1.0/res/values/strings.xml <string name="gitea_token">b87bfb6345ae72ed5ecdcee05bcb34c83806fbd0</string> <string name="lets_chat_token">NjFiODZhZWFkOTg0ZTI0NTEwMzZlYjE2OmQ1ODg0NjhmZjhiYWU0NDYzNzlhNTdmYTJiNGU2M2EyMzY4MjI0MzM2YjU5NDljNQ==</string> <string name="slack_token">xoxp-23984754863-2348975623103</string>
Foothold
With these in hand, I started with Lets Chat at random. Lets Chat is an open-source chat application utilizing a REST api. With it being open-source, it didn't take long at all to find how to use the discovered token:
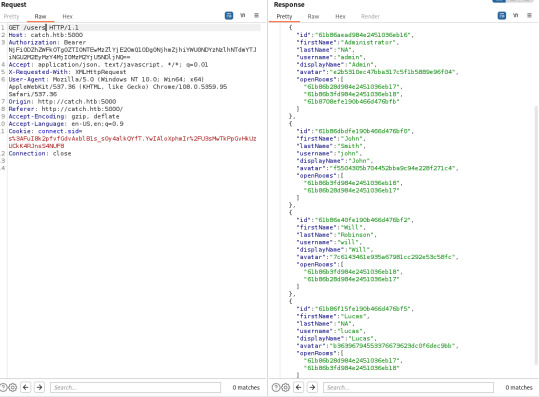

As you can see, a password for John is viewable in one of the chat rooms. This grants you access to another one of their applications called Cachet- open-source yet again.
Cachet is the last stop before system access; admittedly this is where I fell rabbit hole 1 as I did spend some time trying to use the gitea_token, more out of curiosity than anything. After spending some time on this, however, I gave up and focused on Cachet.
As it turns out, the version of Cachet in use had two pubicly known vulnerabilities related to interaction with the application's dotenv file. One allowed you to leak values set in dotenv while the other allowed you to add new values to dotenv which could be used to achieve remote command execution. This is done by hosting a redis server, altering the dotenv file to make the application use your hosted redis server as a session driver and finally changing the value of the session key after the initial connection to a payload generated by phpggc. Better detail off this is given here.
I did spend some time playing around with the RCE vulnerability here, more out of interest as I haven't had any experience with Redis prior to this and it took me a while to get RCE working as the video doesn't explicitly show the process step-by-step.
Originally, I was getting the token from the source code in the application, adding this as a key with the phpggc payload as the value and then altering the dotenv file to connect to my Redis Server. As the RCE occurs when the client connects the second time and reads the value from the original session token, this didn't work.
I did eventually get this working, uploaded a PHP web shell and upgraded this to a reverse shell; this ultimately proved to be a waste of time as you end up in a Docker instance with no ability to break out of it!

With a heavy heart, I turned to the second vulnerability and leaked the database password from the dotenv file. This grants us access to the server through SSH as WIll.
Privilege Escalation
Privilege escalation was actually quite easy! Some simple enumeration reveals the presence of world-writeable directory /opt/mdm/apk_bin. In /opt/mdm, there is a Bash file verify.sh.
verify.sh is used to verify the legitimacy of apks uploaded to apk_bin and is executed as part of a cronjob which is executed as root. While references to verify.sh cannot be directly found, there is reference to 'check.sh' in the root directory in running processes (netstat -ano.)
The interesting lines of the script are here:
app_check() { APP_NAME=$(grep -oPm1 "(?<=string name=\"app_name\">)[^<]+" "$1/res/values/strings.xml") echo $APP_NAME ...
The function app_check is taking the app_name from strings.xml and echoing it back with no form of mitigation against command injection. For example, wrapping the variable name with ${} would have prevented this vulnerability being exploitable as this would have specified that only variable expansion was expected- the app name would have been echoed back as a string and not interpreted as a literal Bash command.
I tested this first by simply making the app name 'Catch; touch /opt/mdm/heuheu' and uploading it using python -m SimpleHTTPServer on my end and curl on Catch's end which achieved the expected outcome.
I did this with APK Editor Studio after encountering some errors trying do manually decompile and then recompile with apktool. Note that you also need to create a key for signing the APK as verify.sh uses jarsigner to verify this.
will@catch:/opt/mdm/apk_bin$ ls -al .. total 16 drwxr-x--x+ 3 root root 4096 Jan 6 21:55 . drwxr-xr-x 4 root root 4096 Dec 16 2021 .. drwxrwx--x+ 2 root root 4096 Jan 6 22:03 apk_bin -rw-r--r-- 1 root root 0 Jan 6 21:55 heuheu -rwxr-x--x+ 1 root root 1894 Mar 3 2022 verify.sh
From here, I went old school and just made /etc/passwd fully accessible by everyone before changing root's password to 'mwaha'
Generating the password:
$ openssl passwd mwaha KW56XEY7wxZuU
Where the password is added in /etc/passwd:
root:KW56XEY7wxZuU:...
There you go. ^-^
#hackthebox#hacking#android apk#apktool#command injection#redis server#dotenv#cachet#lets chat#gitea#cronjob#web shell#reverse shell#ssh#docker#open source
20 notes
·
View notes
Text
[TS] Quick add dotenv to your typescript project
[TS] Quick add dotenv to your typescript project
Here is a super quick way to add and use dotenv package into your typescript project. If you want to use environment configuration file such as .env in your project, then you can use dotenv package yo read .env configuration file for your application. First, add the dotenv package to your package.json using command $ yarn add dotenv Then, in your typescript file, you can import it using the…
View On WordPress
0 notes