#laravel db settings
Explore tagged Tumblr posts
Visit Tumblr Blog
Explore Tumblr blogs with no restrictions, modern design and the best experience.
Last Seen Tumblr Blogs


Fun Fact
1,644 Tumblr posts in 1 second.
Text
SysNotes devlog 1
Hiya! We're a web developer by trade and we wanted to build ourselves a web-app to manage our system and to get to know each other better. We thought it would be fun to make a sort of a devlog on this blog to show off the development! The working title of this project is SysNotes (but better ideas are welcome!)

What SysNotes is✅:
A place to store profiles of all of our parts
A tool to figure out who is in front
A way to explore our inner world
A private chat similar to PluralKit
A way to combine info about our system with info about our OCs etc as an all-encompassing "brain-world" management system
A personal and tailor-made tool made for our needs
What SysNotes is not❌:
A fronting tracker (we see no need for it in our system)
A social media where users can interact (but we're open to make it so if people are interested)
A public platform that can be used by others (we don't have much experience actually hosting web-apps, but will consider it if there is enough interest!)
An offline app
So if this sounds interesting to you, you can find the first devlog below the cut (it's a long one!):
(I have used word highlighting and emojis as it helps me read large chunks of text, I hope it's alright with y'all!)
Tech stack & setup (feel free to skip if you don't care!)
The project is set up using:
Database: MySQL 8.4.3
Language: PHP 8.3
Framework: Laravel 10 with Breeze (authentication and user accounts) and Livewire 3 (front end integration)
Styling: Tailwind v4
I tried to set up Laragon to easily run the backend, but I ran into issues so I'm just running "php artisan serve" for now and using Laragon to run the DB. Also I'm compiling styles in real time with "npm run dev". Speaking of the DB, I just migrated the default auth tables for now. I will be making app-related DB tables in the next devlog. The awesome thing about Laravel is its Breeze starter kit, which gives you fully functioning authentication and basic account management out of the box, as well as optional Livewire to integrate server-side processing into HTML in the sexiest way. This means that I could get all the boring stuff out of the way with one terminal command. Win!
Styling and layout (for the UI nerds - you can skip this too!)
I changed the default accent color from purple to orange (personal preference) and used an emoji as a placeholder for the logo. I actually kinda like the emoji AS a logo so I might keep it.
Laravel Breeze came with a basic dashboard page, which I expanded with a few containers for the different sections of the page. I made use of the components that come with Breeze to reuse code for buttons etc throughout the code, and made new components as the need arose. Man, I love clean code 😌
I liked the dotted default Laravel page background, so I added it to the dashboard to create the look of a bullet journal. I like the journal-type visuals for this project as it goes with the theme of a notebook/file. I found the code for it here.
I also added some placeholder menu items for the pages that I would like to have in the app - Profile, (Inner) World, Front Decider, and Chat.

i ran into an issue dynamically building Tailwind classes such as class="bg-{{$activeStatus['color']}}-400" - turns out dynamically-created classes aren't supported, even if they're constructed in the component rather than the blade file. You learn something new every day huh…

Also, coming from Tailwind v3, "ps-*" and "pe-*" were confusing to get used to since my muscle memory is "pl-*" and "pr-*" 😂
Feature 1: Profiles page - proof of concept
This is a page where each alter's profiles will be displayed. You can switch between the profiles by clicking on each person's name. The current profile is highlighted in the list using a pale orange colour.

The logic for the profiles functionality uses a Livewire component called Profiles, which loads profile data and passes it into the blade view to be displayed. It also handles logic such as switching between the profiles and formatting data. Currently, the data is hardcoded into the component using an associative array, but I will be converting it to use the database in the next devlog.

New profile (TBC)
You will be able to create new profiles on the same page (this is yet to be implemented). My vision is that the New Alter form will unfold under the button, and fold back up again once the form has been submitted.
Alter name, pronouns, status
The most interesting component here is the status, which is currently set to a hardcoded list of "active", "dormant", and "unknown". However, I envision this to be a customisable list where I can add new statuses to the list from a settings menu (yet to be implemented).


Alter image
I wanted the folder that contained alter images and other assets to be outside of my Laravel project, in the Pictures folder of my operating system. I wanted to do this so that I can back up the assets folder whenever I back up my Pictures folder lol (not for adding/deleting the files - this all happens through the app to maintain data integrity!). However, I learned that Laravel does not support that and it will not be able to see my files because they are external. I found a workaround by using symbolic links (symlinks) 🔗. Basically, they allow to have one folder of identical contents in more than one place. I ran "mklink /D [external path] [internal path]" to create the symlink between my Pictures folder and Laravel's internal assets folder, so that any files that I add to my Pictures folder automatically copy over to Laravel's folder. I changed a couple lines in filesystems.php to point to the symlinked folder:

And I was also getting a "404 file not found" error - I think the issue was because the port wasn't originally specified. I changed the base app URL to the localhost IP address in .env:

…And after all this messing around, it works!
(My Pictures folder)

(My Laravel storage)

(And here is Alice's photo displayed - dw I DO know Ibuki's actual name)

Alter description and history
The description and history fields support HTML, so I can format these fields however I like, and add custom features like tables and bullet point lists.

This is done by using blade's HTML preservation tags "{!! !!}" as opposed to the plain text tags "{{ }}".
(Here I define Alice's description contents)


(And here I insert them into the template)

Traits, likes, dislikes, front triggers
These are saved as separate lists and rendered as fun badges. These will be used in the Front Decider (anyone has a better name for it?? 🤔) tool to help me identify which alter "I" am as it's a big struggle for us. Front Decider will work similar to FlowCharty.

What next?
There's lots more things I want to do with SysNotes! But I will take it one step at a time - here is the plan for the next devlog:
Setting up database tables for the profile data
Adding the "New Profile" form so I can create alters from within the app
Adding ability to edit each field on the profile
I tried my best to explain my work process in a way that wold somewhat make sense to non-coders - if you have any feedback for the future format of these devlogs, let me know!
~~~~~~~~~~~~~~~~~~
Disclaimers:
I have not used AI in the making of this app and I do NOT support the Vibe Coding mind virus that is currently on the loose. Programming is a form of art, and I will defend manual coding until the day I die.
Any alter data found in the screenshots is dummy data that does not represent our actual system.
I will not be making the code publicly available until it is a bit more fleshed out, this so far is just a trial for a concept I had bouncing around my head over the weekend.
We are SYSCOURSE NEUTRAL! Please don't start fights under this post
#sysnotes devlog#plurality#plural system#did#osdd#programming#whoever is fronting is typing like a millenial i am so sorry#also when i say “i” its because i'm not sure who fronted this entire time!#our syskid came up with the idea but i can't feel them so who knows who actually coded it#this is why we need the front decider tool lol
25 notes
·
View notes
Text
There is no deficit of PHP frameworks nowadays for a web development company to choose from. They come in all shapes and sizes for developers with different hosting capabilities, skills, application needs, and development time-frames. The common goal of all PHP frameworks is to make the development process faster and easier. PHP frameworks help to simplify complex coding problems by providing developers with a platform for developing powerful web applications in a short time. The PHP structure allows for rapid application development (RAD), which saves a lot of time and reduces the need to run coding from scratch, ensuring stable application development. Without the help of a PHP infrastructure, developing mobile and web applications can challenging for beginners when it comes to writing code and creating a connection between a database and an application that is being developed from scratch. The use of the PHP Framework reduces the workload. The best thing about PHP frameworks is the ease of adaptation, as well as the ability to learn them faster compared to other programming languages. Although, every developer that has ever worked with a framework before, knows that each of them is unique and should be chosen depending on the anticipated result. Below we will review the best frameworks out there in 2019 to provide everything you need to know to choose the best one for you. Choosing a PHP Framework Before making a choice in favor of one particular framework, you should consider its following characteristics: Functionalities and components; Development frequency; Learning curve; Community size. You want to choose a framework that is easy to learn and provides fast development with good looking frontends. Let’s see which ones out of our Top 5 list suit these requirements the best, defining strengths and weaknesses of each of them. Laravel If you start searching for a PHP framework, this one will most likely come up first. Laravel owes its wide popularity to its easiness of use and wide range of inbuilt features. Strengths Developer-friendliness (easy to learn); Innovative technology (relatively new tool); High speed of development; High security (strong encryption packages); Convenient files and code organization; Great documentation; MVC architecture (and PHP7); Unit testing (FAST on HHVM); Advanced out of the box functionality; Routing (the easiest to manage); ORM support; Large community. Weaknesses Higher bugs possibility; Not easy to transfer legacy systems; Does lots of queries on the DB; Does not work on shared hosting plans. Symfony This tool will provide you with a rich variety of features. Symfony has earned a reputation of a reliable and mature PHP framework through the years. Strengths High performance; Flexibility; Reliability; Great documentation, maintenance, and support; Large community. Weaknesses Not an easy learning process; Reduced speed of development; No MVC support. Phalcon This tool is different in its coding style. Phalcon coding is based on C and C++, not holding it from providing an advanced set of development features you can use. Strengths Easy to learn; Very high speed of development; Autoloading; Advanced security features; Traditional MVC code; Great documentation. Weaknesses Not as open source as Laravel; Does not work on shared hosting plans; Does not work with HHVM. Yii 2 It is one of the oldest PHP frameworks that provide support and efficiently to answer modern development needs. You can call Yii 2 a more developer-friendly competitor of Symfony 2 with its easy learning curve. Strengths Easy to learn; Flexibility; High security; High speed of development; Variety of configuration; MVC and object-oriented; Availability to build small CRUD applications immediately. Weaknesses The lack of built-in allowances; No AR queries; Too many libraries & dependencies; Doesn’t allow multiple relations built up.
CodeIgniter If you need a powerful tool with advanced features, this one might be for you. CodeIgniter is appreciated among developers for allowing them to focus on creativity. Strengths Developer friendliness; Standard databases use (such as MySQL); Easy to extend and customize; Supports Web Page and Database Caching; Good documentation and support; Requires little coding; Built-in security feature Weaknesses Does no support code modular separation by default; Lacks exhaustive libraries that are built inside the framework. Summary There are many programming languages you can use, but PHP is still the best option for server-side scripting. However, even if you are a PHP professional, coding all parts of each new project will take a long time. However, if you choose the best PHP framework for your needs, you can skip a lot of the basics and go straight to the interesting part of developing a new project. Although we have shortlisted top 5 PHP frameworks of 2019, you will have your own opinion on each of them, depending on the goals you have set for your project. Above are the main factors that might influence your choice. Consider them and decide which one is a match with your requirements.
0 notes
Text
Fix Laravel Security Misconfigurations: Tools & Examples
Understanding Security Misconfigurations in Laravel
Security misconfigurations are one of the most common vulnerabilities affecting Laravel applications. They occur when systems, frameworks, or application settings are improperly configured, exposing your website to potential threats.

Laravel’s flexibility is one of its strengths, but default settings or improper configurations can leave your application open to attacks. This blog post will walk you through common security misconfigurations in Laravel, show you how to fix them with examples and introduce tools to automate vulnerability checks.
What is Security Misconfiguration?
Security misconfiguration happens when:
Default settings are not updated (e.g., default passwords or unnecessary features).
Error messages expose sensitive information.
Permissions and access controls are improperly configured.
For instance, a Laravel app with debug mode enabled in production can reveal sensitive information about your application’s structure, giving attackers insights into potential vulnerabilities.
Common Laravel Misconfigurations
Debug Mode Enabled Debug mode (APP_DEBUG=true) in production environments can expose database credentials, file paths, and other sensitive information. Fix: Update the .env file to disable debug mode in production: env APP_DEBUG=false Improper Directory Permissions Laravel requires writable permissions for certain directories, but granting overly permissive access can lead to security issues. Fix: Use restrictive permissions: bash chmod -R 755 storage chmod -R 755 bootstrap/cache
Unsecured API Endpoints Exposed API endpoints can lead to unauthorized access or data leakage if not properly secured. Fix: Implement proper authentication and authorization checks using Laravel's middleware: php Route::middleware('auth:api')->group(function () { Route::get('/user', function (Request $request) { return $request->user(); }); });
How to Detect Security Misconfigurations Easily
To make vulnerability detection easier, use our tool to test website security free. This tool scans your Laravel application for potential misconfigurations and other vulnerabilities in seconds.
Sample Screenshot: Below is an example of the tool’s interface showing detected issues in a Laravel application.

Example: Fixing an API Misconfiguration in Laravel
Let’s say your Laravel application exposes sensitive information via an unprotected API endpoint.
Before Fixing:
php Route::get('/data', function () { return DB::table('users')->get(); });
After Fixing:
php Route::middleware('auth:api')->get('/data', function () { return DB::table('users')->get(); });
This ensures only authorized users can access sensitive data.
Report Your Vulnerability Fixes
After addressing misconfigurations, use our Website Security Checker to generate a vulnerability assessment report. This report confirms the security status of your Laravel application.
Sample Screenshot: Below is a sample report showing vulnerabilities detected and fixed using our free tool.

Final Tips to Secure Your Laravel Application
Regularly update your Laravel framework and packages.
Disable unused features, such as unused routes and services.
Use environment-specific configurations.
For a deeper dive into protecting your Laravel app, check out our free tool and follow best practices for secure coding.
Conclusion
Security misconfigurations can be costly, but with proper practices and tools like our Free Website Security Scanner, you can detect and fix issues quickly. Safeguard your Laravel application today and avoid unnecessary risks.
0 notes
Photo
Deploy laravel project with docker swarm We check three major step in this guide Setup laravel project with docker compose Deploy the stack to the swarm Create gitlab-ci Setup laravel project with docker compose we will explore the process of deploying a laravel project using docker swarm and setting up a CI/CD pipline to automate the deployment process. Now let’s start with containerize a laravel project with docker compose we need three separate service containers: An app service running PHP7.4-FPM; A db service running MySQL 5.7; An nginx service that uses the app service to parse PHP code Step 1. Set a env variable in project In root directory of project we have .env file now we need to update some variable DB_CONNECTION=mysql DB_HOST=db DB_PORT=3306 DB_DATABASE=experience DB_USERNAME=experience_user DB_PASSWORD=your-password Step 2. Setting up the application’s Docekrfile we need to build a custom image for the application container. We’ll create a new Dockerfile for that. Docker file FROM php:7.4-fpm # Install system dependencies RUN apt-get update && apt-get install -y \ git \ curl \ libpng-dev \ libonig-dev \ libxml2-dev \ zip \ unzip # Clear cache RUN apt-get clean && rm -rf /var/lib/apt/lists/* # Install PHP extensions RUN docker-php-ext-install pdo_mysql mbstring exif pcntl bcmath gd # Get latest Composer COPY --from=composer:latest /usr/bin/composer /usr/bin/composer # Set working directory WORKDIR /var/www Step 3. Setting up Nginx config and Database dump file In root directory create a new directory called docker-compose Now we need two other directories, a nginx directory and mysql directory So we have this two route in our project laravel-project/docker-compose/nginx/ laravel-project/docker-compose/mysql/ In nginx directory create a file called experience.conf we write nginx config in this file like: server { listen 80; index index.php index.html; error_log /var/log/nginx/error.log; access_log /var/log/nginx/access.log; root /var/www/public; location ~ \.php$ { try_files $uri =404; fastcgi_split_path_info ^(.+\.php)(/.+)$; fastcgi_pass app:9000; fastcgi_index index.php; include fastcgi_params; fastcgi_param SCRIPT_FILENAME $document_root$fastcgi_script_name; fastcgi_param PATH_INFO $fastcgi_path_info; } location / { try_files $uri $uri/ /index.php?$query_string; gzip_static on; } } In mysql directory create a file called init_db.init we write mysql initialization in this file like: DROP TABLE IF EXISTS `places`; CREATE TABLE `places` ( `id` bigint(20) unsigned NOT NULL AUTO_INCREMENT, `name` varchar(255) COLLATE utf8mb4_unicode_ci NOT NULL, `visited` tinyint(1) NOT NULL DEFAULT '0', PRIMARY KEY (`id`) ) ENGINE=InnoDB AUTO_INCREMENT=12 DEFAULT CHARSET=utf8mb4 COLLATE=utf8mb4_unicode_ci; INSERT INTO `places` (name, visited) VALUES ('Berlin',0),('Budapest',0),('Cincinnati',1),('Denver',0),('Helsinki',0),('Lisbon',0),('Moscow',1); Step 4. Creating a multi container with docker-compose We need a building three container that should share networks and data volumes. Ok so create a docker-compose file in root directory of project For craete a network for connecting services we define network in docker-compose file like this: networks: experience: driver: bridge App service: app: build: context: ./ dockerfile: Dockerfile image: travellist container_name: experience-app restart: unless-stopped working_dir: /var/www/ volumes: - ./:/var/www networks: - experience DB service: db: image: mysql:8.0 container_name: experience-db restart: unless-stopped environment: MYSQL_DATABASE: ${DB_DATABASE} MYSQL_ROOT_PASSWORD: ${DB_PASSWORD} MYSQL_PASSWORD: ${DB_PASSWORD} MYSQL_USER: ${DB_USERNAME} SERVICE_TAGS: dev SERVICE_NAME: mysql volumes: - ./docker-compose/mysql:/docker-entrypoint-initdb.d networks: - experience Nginx service: nginx: image: nginx:1.17-alpine container_name: experience-nginx restart: unless-stopped ports: - 8000:80 volumes: - ./:/var/www - ./docker-compose/nginx:/etc/nginx/conf.d networks: - experience So our docker-compose file be like this: version: "3.7" services: app: build: context: ./ dockerfile: Dockerfile image: travellist container_name: experience-app restart: unless-stopped working_dir: /var/www/ volumes: - ./:/var/www networks: - experience db: image: mysql:8.0 container_name: experience-db restart: unless-stopped environment: MYSQL_DATABASE: ${DB_DATABASE} MYSQL_ROOT_PASSWORD: ${DB_PASSWORD} MYSQL_PASSWORD: ${DB_PASSWORD} MYSQL_USER: ${DB_USERNAME} SERVICE_TAGS: dev SERVICE_NAME: mysql volumes: - ./docker-compose/mysql:/docker-entrypoint-initdb.d networks: - experience nginx: image: nginx:alpine container_name: experience-nginx restart: unless-stopped ports: - 8100:80 volumes: - ./:/var/www - ./docker-compose/nginx:/etc/nginx/conf.d/ networks: - experience networks: experience: driver: bridge Step 5. Running application with docker compose Now we can build the app image with this command: $ docker-compose build app When the build is finished, we can run the environment in background mode with: $ docker-compose up -d Output: Creating exprience-db ... done Creating exprience-app ... done Creating exprience-nginx ... done to show information about the state of your active services, run: $ docker-compose ps Well in these 5 simple steps, we have successfully ran our application. Now we have a docker-compose file for our application that needs for using in docker swarm. Let’s start Initialize docker swarm. After installing docker in your server *attention: To install Docker, be sure to use the official documentation install docker check docker information with this command: $ docker info You should see “swarm : inactive” in output For activate swarm in docker use this command: $ docker swarm init The docker engine targeted by this command becomes a manager in the newly created single-node swarm. What we want to use is the services of this docker swarm. We want to update our service like app with docker swarm, The advantage of updating our service in Docker Swarm is that there is no need to down the app service first, update the service, and then bring the service up. In this method, with one command, we can give the image related to the service to Docker and give the update command. Docker raises the new service without down the old service and slowly transfers the load from the old service to the new service. When running Docker Engine in swarm mode, we can use docker stack deploy to deploy a complete application stack to the swarm. The deploy command accepts a stack description in the form of a Compose file. So we down our docker compose with this command: $ docker-compose down And create our stack. ok if everything is ok until now take a rest Deploy the stack to the swarm $ docker stack deploy --compose-file docker-compose.yml For example : $ docker stack deploy --compose-file docker-compose.yml staging Probably you see this in output: Creating network staging_exprience Creating service staging_nginx failed to create service staging_nginx: Error response from daemon: The network staging_exprience cannot be used with services. Only networks scoped to the swarm can be used, such as those created with the overlay driver. This is because of “driver: bridge” for deploying your service in swarm mode you must use overlay driver for network if you remove this line in your docker compose file When the stack is being deployed this network will be create on overlay driver automatically. So our docker-compose file in network section be like this: networks: experience: And run upper command: $ docker stack deploy --compose-file docker-compose.yml staging For now you probably you see this error : failed to create service staging_nginx: Error response from daemon: The network staging_experience cannot be used with services. Only networks scoped to the swarm can be used, such as those created with the overlay driver. Get network list in your docker: $ docker network ls Output: NETWORK ID NAME DRIVER SCOPE 30f94ae1c94d staging_experience bridge local So your network has local scope yet because in first time deploy stack this network save in local scope and we must remove that by: $ docker network rm staging_experience After all this run command: $ docker stack deploy --compose-file docker-compose.yml staging Output: Creating network staging_experience Creating service staging_app Creating service staging_db Creating service staging_nginx Now get check stack by: $ docker stack ls Output: NAME SERVICES staging 3 And get service list by: $ docker service ls Output: If your REPLICAS is 0/1 something wrong is your service For checking service status run this command: $ docker service ps staging_app for example And for check detail of service run this command: $ docker service logs staging_app for example Output of this command show you what is problem of your service. And for updating your a service with an image the command you need is this: $ docker service update --image "<your-image>" "<name-of-your-service>" --force That's it your docker swarm is ready for zero down time deployment :))) Last step for have a complete process zero down time deployment is create pipeline in gitlab. Create gitlab-ci In this step we want create a pipeline in gitlab for build, test and deploy a project So we have three stage: stages: - Build - Test - Deploy Ok let’s clear what we need and what is going on in this step . We want update laravel project and push our change in gitlab create a new image of this changes and test that and after that log in to host server pull that updated image in server, and update service of project. For login to server we need define some variable in gitlab in your repository goto setting->CI/CD->VARIABLES Add variable Add this variables: CI_REGISTRY : https://registry.gitlab.com DOCKER_AUTH_CONFIG: { "auths": { "registry.gitlab.com": { "auth": "<auth-key>" } } } auth-key is base64 hash of “gitlab-username:gitlab-password” SSH_KNOWN_HOSTS: Like 192.168.1.1 ssh-rsa AAAAB3NzaC1yc2EAAAADAQABAAABgQCGUCqCK3hNl+4TIbh3+Af3np+v91AyW4+BxXRtHBC2Y/uPJXF2jdR6IHlSS/0RFR3hOY+8+5a/r8O1O9qTPgxG8BSIm9omb8YxF2c4Sz/USPDK3ld2oQxbBg5qdhRN28EvRbtN66W3vgYIRlYlpNyJA+b3HQ/uJ+t3UxP1VjAsKbrBRFBth845RskSr1V7IirMiOh7oKGdEfXwlOENxOI7cDytxVR7h3/bVdJdxmjFqagrJqBuYm30 You can see how generate ssh key in this post: generate sshkey SSH_PRIVATE_KEY: SSH_REMOTE_HOST: root@ This is your variables in gitlab. So let’s back to gitlab-ci In root directory of project create a new file .gitlab-ci.yml and set build stage set test stage And in the last set deploy stage like: stages: - Build - Test - Deploy variables: IMAGE_TAG: $CI_REGISTRY_IMAGE:$CI_COMMIT_REF_SLUG-$CI_COMMIT_SHORT_SHA build: stage: Build image: docker:20.10.16 services: - docker:dind script: - docker login -u $CI_REGISTRY_USER -p $CI_REGISTRY_PASSWORD $CI_REGISTRY - docker build --pull -f Dockerfile -t $IMAGE_TAG . - docker push $IMAGE_TAG preparation: stage: Test image: $IMAGE_TAG needs: - build script: - composer install artifacts: expire_in: 1 day paths: - ./vendor cache: key: ${CI_COMMIT_REF_SLUG}-composer paths: - ./vendor unit-test: stage: Test image: $IMAGE_TAG services: - name: mysql:8 alias: mysql-test needs: - preparation variables: APP_KEY: ${APP_KEY} MYSQL_ROOT_PASSWORD: ${MYSQL_ROOT_PASSWORD} MYSQL_DATABASE: ${MYSQL_DATABASE} DB_HOST: ${DB_HOST} DB_USERNAME: ${DB_USERNAME} DB_PASSWORD: ${DB_PASSWORD} script: - php vendor/bin/phpunit staging-deploy: stage: Deploy extends: - .deploy-script variables: APP: "stackdemo_app" STACK: "travellist-staging" only: - develop needs: - unit-test environment: name: stage .remote-docker: variables: DOCKER_HOST: ssh://${SSH_REMOTE_HOST} image: docker:20.10.16 before_script: - eval $(ssh-agent -s) - echo $IMAGE_TAG - echo "$SSH_PRIVATE_KEY" | tr -d '\r' | ssh-add - - mkdir -p ~/.ssh - chmod 700 ~/.ssh - echo "HOST *" > ~/.ssh/config - echo "StrictHostKeyChecking no" >> ~/.ssh/config - echo -n $CI_REGISTRY_PASSWORD | docker login -u $CI_REGISTRY_USER --password-stdin $CI_REGISTRY .deploy-script: extends: - .remote-docker script: - cp $develop_config /root/project/core - docker pull $IMAGE_TAG - docker service update --image "$IMAGE_TAG" "$APP" --force dependencies: [] Change something in your project and push to gitlab and wait for it To see all pipeline pass like this : And this is beautiful. https://dev.to/holyfalcon/deploy-laravel-project-with-docker-swarm-5oi
0 notes
Conversation
I Am An Expert WordPress Designer And Developer.
I Have Been Working On WordPress Past Few Years on another some popular platform.
After the working a Lots of Successful Projects with Elegant WordPress theme.I will try To Provide your DREAM website with in My Hard Work
Skill Set (Web & WordPress/ Front & Backend Expertise)
======================================
☛ Custom Web/ Software using Laravel Framework
☛ WordPress theme development & customization
☛ WordPress plugin development & customization
☛ Personal/Business Website using wordpress
☛ Bootstrap coded responsive PSD to HTML/Bootstrap
☛ Custom Javascript designed custom plugin
☛ Jquery Plugin integration
☛ Landing Page/ Lead pages
☛ App & Games launching/ Product-Service based Landing page.
☛ PSD TO HTML/ HTML TO WordPress
✎ Mailer Lite/Mailchimp/ Aweber/ Get Response Email Template/Campaign
☛ HTML, CSS. BOOTSTRAP, JAVASCRIPT, JQUERY, WordPress Bug/ Error Fixing.
✎ Login Registration Form, Sign in- SignUp Page Creation.
☛ Contact US Form/ Social Button & social sharing, Auto Responder/ facebook pixel.
✎ Maintain your site for 6 months, follow up malware, speed & content edit issues.
☛ jQuery plugin integration(Accordion, wow-js, owl-carousel2, wow-slider)
☛ Single or multi Page HTML website
✎ Create a Responsive business website using Bootstrap grid system
☛ eCommerce/woocommerce Website
☛ Website speed increase & SEO
☛ Page Builder - visual composer, elementor, divi, thrive, ux builder
☛ Payment gateway - Paypal & Stripe Integration & FB Pixel
☛ Sign up, Member & Social Sharing Features
☛ Zoominfo Pro & Email Finding
☛ Lead Generation/ Virtual Assistant/ Web Researcher/ Data Entry Expert
☛ Signup & Pop Up Form
☛ Mailchimp - Zaiper & Zoho Automation
☛ Mailchimp - Subscriber pop up & automation & woo automation
☛ By refind/ abandoned cart mail/ product target template
☛ Get Response & Aweber
☛ Web & WordPress Expertise to Create any web sites and web applications
☛ Shopify Store design & Premium Theme Customisation
☛ Shopify Product upload & customise / Domain Transfer(Shopify to domain)
☛ Shopify & Aliexpress Dropship & Import product by Oberlo app
☛ Shopify Sales Channel & Apps Customize
☛ Shopify SEO & Speed Up & Backup-Migration
☛ Click Bank Affiliate Marketing
☛ Click Funnels/ Upsell / Lead collect/ sales funnels product/service marketing
if your project isn't listed, just send me a message to see if its something I can do! I usually respond within an hour. And I promise to get back to you within 12 hours.
========== Language ==========
WORDPRESS, MYSQL, MARIA DB, HTML, CSS, BOOTSTRAP, JAVA SCRIPT, JQUERY
1 note
·
View note
Text
My Own Blog by Laravel(1)
Make my own blog with Laravel!!
Hi guys, I will make my own blog by Laravel. I'm a Japanese cook in BC. But I don't work now because of COVID-19. So I have much time now. That's why I have started to learn Laravel. I'm not a good English writer. But I will do my best in English. Please correct my English if you would notice any wrong expressions. Thank you!
Anyway, I will post about making a blog by Laravel for a while. Let's get started!
All we have to do
Install Laravel
Create a Project
Database Setting
Migration
Create Models
Seeding
Routing
Make Controllers
Make Views
Agenda
Today's agenda is
Install Laravel
Create a Project
Database Setting
Migration
Create Models
Seeding
Install Laravel
Laravel utilizes Composer to manage its dependencies. So install Composer first if you have not installed Composer yet. Ok, now you can install Laravel using Composer.
% composer global require Laravel/installer
Here we go. So next step is to create a project named blog!
Create a project
Creating a project in Laravel is super easy. Just type a command like below.
% laravel new blog
That's it. So easy. That command bring every dependencies automatically. And you move to blog directory.
% cd blog
Now you can use a new command called 'artisan'. It's a command used for Laravel. For example, you can start server with this command.
% php artisan serve
Do you see command line like this?
% php artisan serve ~/workspace/blog Laravel development server started: http://127.0.0.1:8000 [Mon Apr 20 09:20:56 2020] PHP 7.4.5 Development Server (http://127.0.0.1:8000) started
You can access localhost:8000 to see the Laravel's welcome page! If you want to know the other arguments of artisan, just type like this.
% php artisan list
Then you can see all artisan commands. You can also display the commands for a specific namespace like this.
% php artisan list dusk ~/workspace/blog Laravel Framework 7.6.2 Usage: command [options] [arguments] Options: -h, --help Display this help message -q, --quiet Do not output any message -V, --version Display this application version --ansi Force ANSI output --no-ansi Disable ANSI output -n, --no-interaction Do not ask any interactive question --env[=ENV] The environment the command should run under -v|vv|vvv, --verbose Increase the verbosity of messages: 1 for normal output, 2 for more verbose output and 3 for debug Available commands for the "dusk" namespace: dusk:chrome-driver Install the ChromeDriver binary dusk:component Create a new Dusk component class dusk:fails Run the failing Dusk tests from the last run and stop on failure dusk:install Install Dusk into the application dusk:make Create a new Dusk test class dusk:page Create a new Dusk page class
So let's go to next step!
Database setting
Open .env located under root directory. And edit around DB setting.
DB_CONNECTION=mysql DB_HOST=127.0.0.1 DB_PORT=3306 DB_DATABASE=blog DB_USERNAME=root DB_PASSWORD=
Depends on your database. I use MySQL and I already create database named blog in MySQL. You should create user for only this project when you deploy.
Migration
Laravel supplies the migration system. It allow you to control database using php code. For example, when you want to create database, type the command like this.
% php artisan make:migration create_posts_table
You can see a new migration file database/migrations/xxxx_xx_xx_xxxxxx_create_posts_table.php. Write down columns you need in the function called up() and write down columns you want to delete in down(). Edit it.
public function up() { Schema::create('posts', function (Blueprint $table) { $table->increments('id'); $table->boolean('published'); $table->string('title'); $table->longText('body'); $table->string('tag')->nullable(); $table->timestamps(); }); }
It's ready! Execute this command.
% php artisan migrate
Here we go! Now you got some tables with columns! Let's check them out in MySQL console.
% mysql -uroot
And check tables and columns.
mysql> use blog; Reading table information for completion of table and column names You can turn off this feature to get a quicker startup with -A Database changed mysql> show tables; +----------------+ | Tables_in_blog | +----------------+ | failed_jobs | | migrations | | posts | | users | +----------------+ 4 rows in set (0.01 sec) mysql> desc posts; +------------+------------------+------+-----+---------+----------------+ | Field | Type | Null | Key | Default | Extra | +------------+------------------+------+-----+---------+----------------+ | id | int(10) unsigned | NO | PRI | NULL | auto_increment | | published | tinyint(1) | NO | | NULL | | | title | varchar(191) | NO | | NULL | | | body | longtext | NO | | NULL | | | tag | varchar(191) | YES | | NULL | | | created_at | timestamp | YES | | NULL | | | updated_at | timestamp | YES | | NULL | | | user_id | int(11) | NO | MUL | NULL | | +------------+------------------+------+-----+---------+----------------+ 8 rows in set (0.01 sec)
Good! You could create tables and columns by php. Next step is Create Model.
Create Model
Laravel Framework is MVC application model. MVC is Model, View and Controller. Application works with each role. View works for display to browsers. Controller works as a playmaker. It receives request from router and access databases to get some datas and pass the datas to views. Model connects to the database and gets, inserts, updates or deletes datas.
Now you create a Model.
% php artisan make:model Post
Then you will see the new Post model under app/Post.php.
<?php namespace App; use Illuminate\Database\Eloquent\Model; class Post extends Model { // }
This model has no code. But it's ok. You can leave it for now.
About a model name
A model name is important. A model connects to table of the database with the rule of the name. If you have a posts table, Post model is mapped with posts table automatically.
Seeding
Seeding is very useful function for preparing test datas or master datas. You can use it easily. All you need is just 1. making seeder file and 2. executing it. Let's do that.
Making seeder files
% php artisan make:seeder BooksTableSeeder Seeder created successfully.
Edit seeder files
public function run() { DB::table('posts')->truncate(); $posts = [ [ 'published' => true, 'title' => 'The First Post', 'body' => '1st Lorem ipsum...', 'tag' => 'laravel', 'user_id' => 1 ], [ 'published' => true, 'title' => 'The Second Post', 'body' => '2nd Lorem ipsum dolor sit amet...', 'tag' => 'shiba-inu', 'user_id' => 1 ], [ 'published' => false, 'title' => 'The Third Post', 'body' => '3rd Lorem ipsum dolor sit ...', 'tag' => 'laravel', 'user_id' => 1 ] ]; foreach($posts as $post) { \App\Post::create($post); } }
And edit DatabaseSeeder.php file.
public function run() { // $this->call(UserSeeder::class); $this->call(PostsTableSeeder::class); }
Execute seegding
% php artisan db:seed Seeding: PostsTableSeeder Database seeding completed successfully.
Sweet. Let's check out database.
mysql> select * from posts; +----+-----------+-----------------+-----------------------------------+---------------------------------+---------------------+---------+ | id | published | title | body | tag | created_at | updated_at | user_id | +----+-----------+-----------------+-----------------------------------+-----------+---------------------+---------------------+---------+ | 1 | 1 | The First Post | 1st Lorem ipsum... | laravel | 2020-04-19 19:16:18 | 2020-04-19 19:16:18 | 1 | | 2 | 1 | The Second Post | 2nd Lorem ipsum dolor sit amet... | shiba-inu | 2020-04-19 19:16:18 | 2020-04-19 19:16:18 | 1 | | 3 | 0 | The Third Post | 3rd Lorem ipsum dolor sit ... | laravel | 2020-04-19 19:16:18 | 2020-04-19 19:16:18 | 1 | +----+-----------+-----------------+-----------------------------------+-----------+---------------------+---------------------+---------+ 3 rows in set (0.00 sec)
Perfect! Now we can go next step!
So, see you next time!
References
Installation - Laravel - The PHP Framework For Web Artisans
1 note
·
View note
Photo

hydralisk98′s web projects tracker:
Core principles=
Fail faster
‘Learn, Tweak, Make’ loop
This is meant to be a quick reference for tracking progress made over my various projects, organized by their “ultimate target” goal:
(START)
(Website)=
Install Firefox
Install Chrome
Install Microsoft newest browser
Install Lynx
Learn about contemporary web browsers
Install a very basic text editor
Install Notepad++
Install Nano
Install Powershell
Install Bash
Install Git
Learn HTML
Elements and attributes
Commenting (single line comment, multi-line comment)
Head (title, meta, charset, language, link, style, description, keywords, author, viewport, script, base, url-encode, )
Hyperlinks (local, external, link titles, relative filepaths, absolute filepaths)
Headings (h1-h6, horizontal rules)
Paragraphs (pre, line breaks)
Text formatting (bold, italic, deleted, inserted, subscript, superscript, marked)
Quotations (quote, blockquote, abbreviations, address, cite, bidirectional override)
Entities & symbols (&entity_name, &entity_number,  , useful HTML character entities, diacritical marks, mathematical symbols, greek letters, currency symbols, )
Id (bookmarks)
Classes (select elements, multiple classes, different tags can share same class, )
Blocks & Inlines (div, span)
Computercode (kbd, samp, code, var)
Lists (ordered, unordered, description lists, control list counting, nesting)
Tables (colspan, rowspan, caption, colgroup, thead, tbody, tfoot, th)
Images (src, alt, width, height, animated, link, map, area, usenmap, , picture, picture for format support)
old fashioned audio
old fashioned video
Iframes (URL src, name, target)
Forms (input types, action, method, GET, POST, name, fieldset, accept-charset, autocomplete, enctype, novalidate, target, form elements, input attributes)
URL encode (scheme, prefix, domain, port, path, filename, ascii-encodings)
Learn about oldest web browsers onwards
Learn early HTML versions (doctypes & permitted elements for each version)
Make a 90s-like web page compatible with as much early web formats as possible, earliest web browsers’ compatibility is best here
Learn how to teach HTML5 features to most if not all older browsers
Install Adobe XD
Register a account at Figma
Learn Adobe XD basics
Learn Figma basics
Install Microsoft’s VS Code
Install my Microsoft’s VS Code favorite extensions
Learn HTML5
Semantic elements
Layouts
Graphics (SVG, canvas)
Track
Audio
Video
Embed
APIs (geolocation, drag and drop, local storage, application cache, web workers, server-sent events, )
HTMLShiv for teaching older browsers HTML5
HTML5 style guide and coding conventions (doctype, clean tidy well-formed code, lower case element names, close all html elements, close empty html elements, quote attribute values, image attributes, space and equal signs, avoid long code lines, blank lines, indentation, keep html, keep head, keep body, meta data, viewport, comments, stylesheets, loading JS into html, accessing HTML elements with JS, use lowercase file names, file extensions, index/default)
Learn CSS
Selections
Colors
Fonts
Positioning
Box model
Grid
Flexbox
Custom properties
Transitions
Animate
Make a simple modern static site
Learn responsive design
Viewport
Media queries
Fluid widths
rem units over px
Mobile first
Learn SASS
Variables
Nesting
Conditionals
Functions
Learn about CSS frameworks
Learn Bootstrap
Learn Tailwind CSS
Learn JS
Fundamentals
Document Object Model / DOM
JavaScript Object Notation / JSON
Fetch API
Modern JS (ES6+)
Learn Git
Learn Browser Dev Tools
Learn your VS Code extensions
Learn Emmet
Learn NPM
Learn Yarn
Learn Axios
Learn Webpack
Learn Parcel
Learn basic deployment
Domain registration (Namecheap)
Managed hosting (InMotion, Hostgator, Bluehost)
Static hosting (Nertlify, Github Pages)
SSL certificate
FTP
SFTP
SSH
CLI
Make a fancy front end website about
Make a few Tumblr themes
===You are now a basic front end developer!
Learn about XML dialects
Learn XML
Learn about JS frameworks
Learn jQuery
Learn React
Contex API with Hooks
NEXT
Learn Vue.js
Vuex
NUXT
Learn Svelte
NUXT (Vue)
Learn Gatsby
Learn Gridsome
Learn Typescript
Make a epic front end website about
===You are now a front-end wizard!
Learn Node.js
Express
Nest.js
Koa
Learn Python
Django
Flask
Learn GoLang
Revel
Learn PHP
Laravel
Slim
Symfony
Learn Ruby
Ruby on Rails
Sinatra
Learn SQL
PostgreSQL
MySQL
Learn ORM
Learn ODM
Learn NoSQL
MongoDB
RethinkDB
CouchDB
Learn a cloud database
Firebase, Azure Cloud DB, AWS
Learn a lightweight & cache variant
Redis
SQLlite
NeDB
Learn GraphQL
Learn about CMSes
Learn Wordpress
Learn Drupal
Learn Keystone
Learn Enduro
Learn Contentful
Learn Sanity
Learn Jekyll
Learn about DevOps
Learn NGINX
Learn Apache
Learn Linode
Learn Heroku
Learn Azure
Learn Docker
Learn testing
Learn load balancing
===You are now a good full stack developer
Learn about mobile development
Learn Dart
Learn Flutter
Learn React Native
Learn Nativescript
Learn Ionic
Learn progressive web apps
Learn Electron
Learn JAMstack
Learn serverless architecture
Learn API-first design
Learn data science
Learn machine learning
Learn deep learning
Learn speech recognition
Learn web assembly
===You are now a epic full stack developer
Make a web browser
Make a web server
===You are now a legendary full stack developer
[...]
(Computer system)=
Learn to execute and test your code in a command line interface
Learn to use breakpoints and debuggers
Learn Bash
Learn fish
Learn Zsh
Learn Vim
Learn nano
Learn Notepad++
Learn VS Code
Learn Brackets
Learn Atom
Learn Geany
Learn Neovim
Learn Python
Learn Java?
Learn R
Learn Swift?
Learn Go-lang?
Learn Common Lisp
Learn Clojure (& ClojureScript)
Learn Scheme
Learn C++
Learn C
Learn B
Learn Mesa
Learn Brainfuck
Learn Assembly
Learn Machine Code
Learn how to manage I/O
Make a keypad
Make a keyboard
Make a mouse
Make a light pen
Make a small LCD display
Make a small LED display
Make a teleprinter terminal
Make a medium raster CRT display
Make a small vector CRT display
Make larger LED displays
Make a few CRT displays
Learn how to manage computer memory
Make datasettes
Make a datasette deck
Make floppy disks
Make a floppy drive
Learn how to control data
Learn binary base
Learn hexadecimal base
Learn octal base
Learn registers
Learn timing information
Learn assembly common mnemonics
Learn arithmetic operations
Learn logic operations (AND, OR, XOR, NOT, NAND, NOR, NXOR, IMPLY)
Learn masking
Learn assembly language basics
Learn stack construct’s operations
Learn calling conventions
Learn to use Application Binary Interface or ABI
Learn to make your own ABIs
Learn to use memory maps
Learn to make memory maps
Make a clock
Make a front panel
Make a calculator
Learn about existing instruction sets (Intel, ARM, RISC-V, PIC, AVR, SPARC, MIPS, Intersil 6120, Z80...)
Design a instruction set
Compose a assembler
Compose a disassembler
Compose a emulator
Write a B-derivative programming language (somewhat similar to C)
Write a IPL-derivative programming language (somewhat similar to Lisp and Scheme)
Write a general markup language (like GML, SGML, HTML, XML...)
Write a Turing tarpit (like Brainfuck)
Write a scripting language (like Bash)
Write a database system (like VisiCalc or SQL)
Write a CLI shell (basic operating system like Unix or CP/M)
Write a single-user GUI operating system (like Xerox Star’s Pilot)
Write a multi-user GUI operating system (like Linux)
Write various software utilities for my various OSes
Write various games for my various OSes
Write various niche applications for my various OSes
Implement a awesome model in very large scale integration, like the Commodore CBM-II
Implement a epic model in integrated circuits, like the DEC PDP-15
Implement a modest model in transistor-transistor logic, similar to the DEC PDP-12
Implement a simple model in diode-transistor logic, like the original DEC PDP-8
Implement a simpler model in later vacuum tubes, like the IBM 700 series
Implement simplest model in early vacuum tubes, like the EDSAC
[...]
(Conlang)=
Choose sounds
Choose phonotactics
[...]
(Animation ‘movie’)=
[...]
(Exploration top-down ’racing game’)=
[...]
(Video dictionary)=
[...]
(Grand strategy game)=
[...]
(Telex system)=
[...]
(Pen&paper tabletop game)=
[...]
(Search engine)=
[...]
(Microlearning system)=
[...]
(Alternate planet)=
[...]
(END)
4 notes
·
View notes
Text
Laravel 6 Beginner - e7 - MySQL Database & SQLite
Laravel 6 Beginner – e7 – MySQL Database & SQLite
[ad_1] Let’s get the basics of working with a database in Laravel by setting up a MySQL database from scratch. Let’s also create a migration and a model for our services. To wrap it up, let’s change to a SQLite database to show how simple it is.
For the best experience, follow along in our interactive school at https://www.coderstape.com
DigitalOcean Referral https://m.do.co/c/7dce5364ef4d
About…
View On WordPress
#awesome laravel projects#database#database configuration laravel#database migrations laravel#eloquent#Laravel#laravel 6#laravel 6 database#laravel 6 mysql#laravel connect db#laravel database#laravel database configuration#laravel database settings#laravel db settings#laravel for beginners#laravel from scratch#laravel from the ground up#laravel migration#laravel model explained#laravel mvc#laravel mysql#laravel sqlite#php mysql laravel
0 notes
Text
Generate pagination in laravel like a pro
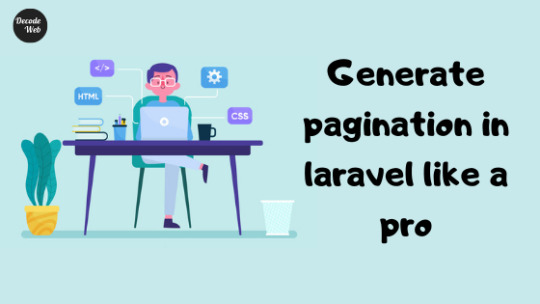
Table of Contents
What is pagination in Laravel ?
How to implement Eloquent pagination using Laravel ?
Ebooks available now
Why do we need to paginate in Laravel ?
get() vs paginate()
Generate html pagination links using Bootstrap css
What is pagination in Laravel ?
Pagination in Laravel is a way to fetch limited model data in chunks with functionality to represent fetched data in dynamic links as pages. That is, let’s take an example of a book. A book a collection information represented as pages. A page contains a small portion of information which a book holds. In a similar way, when laravel interact with models, it fetches information from databases collectively and put on user’s webpage.
Why do we need to paginate in Laravel ?
We are not required to paginate our data when we are damn sure that information from DB is very little, but can we guarantee it always ?, Of Course NOT.
Let’s assume a database query which takes 0.01 seconds to fetch 50 records from a table, and then pass this data into foreach loop to display in html table, let me ask you one simple question then, how much time will the same operation take for 10000 rows ?
That’s a huge time as a developer perspective but as per user perspective, will a user scroll down to 10000 rows on a single webpage ? A definite No.
That is why we need to paginate data to save time as well as to enhance the User eXperience.
How to implement Eloquent pagination using Laravel ?
get() vs paginate()
There are two main methods to get data from Eloquent ORM in laravel.
get() method fetches all the records from a database table and it should only be used in background processing tasks.
paginate() method accepts an integer parameter denoting a number of data to fetch from a collection. By default, even if we do not pass this parameter then it is set to 10 records per page.
Generate html pagination links using Bootstrap css
Lets create a simple laravel application where,
UserController.php
public function getUsers(Request $request) { $per_page = $request->per_page ?? 10; $users = App\User::fetchUsers($per_page); return view('users',compact($users)); }
App\User.php
Public static function fetchUsers($per_page) { return self::paginate($per_page); }
users.blade.php
<table class="table table-hover"> <thead> <tr> <th scope="col" >#ID</th> <th scope="col" >Username</th> <th scope="col" >First Name</th> <th scope="col" >Last Name</th> </tr> </thead> <tbody class="rw-shadow"> @foreach($users as $key => $user) <tr> <td > # {{ $key + $users->firstItem() }}</td> <td > {{ $user->username }}</td> <td > {{ $user->first_name }}</td> <td > {{ $user->last_name }}</td> </tr> @endforeach </tbody> </table> <!-- paginations -- > {{ $users->links('pagination') }}
pagination.blade.php
@if ($paginator->hasPages()) <div class="row text-right mr-2"> <nav aria-label="Page navigation" class="ml-auto"> <ul class="pagination"> {{-- Previous Page Link --}} @if ($paginator->onFirstPage()) <li class="page-item"> <a class="page-link" href="#" aria-label="Previous"> <span aria-hidden="true">«</span> <span class="sr-only">Previous</span> </a> </li> @else <li class="page-item"> <a class="page-link" href="{{ $paginator->previousPageUrl() }}" aria-label="Previous"> <span aria-hidden="true">«</span> <span class="sr-only">Previous</span> </a> </li> @endif {{-- Pagination Elements --}} @foreach ($elements as $element) {{-- "Three Dots" Separator --}} @if (is_string($element)) <li class="page-item disabled"><span>{{ $element }}</span></li> @endif {{-- Array Of Links --}} @if (is_array($element)) @foreach ($element as $page => $url) @if ($page == $paginator->currentPage()) <li class="page-item"><a class="page-link active" href="#">{{ $page }}</a></li> @else <li class="page-item"><a class="page-link" href="{{ $url }}">{{ $page }}</a></li> @endif @endforeach @endif @endforeach {{-- Next Page Link --}} @if ($paginator->hasMorePages()) <li class="page-item"> <a class="page-link" href="{{ $paginator->nextPageUrl() }}" aria-label="Next"> <span aria-hidden="true">»</span> <span class="sr-only">Next</span> </a> </li> @else <li class="page-item"> <a class="page-link" href="#" aria-label="Next"> <span aria-hidden="true">»</span> <span class="sr-only">Next</span> </a> </li> @endif </ul> </nav> </div> @endif
Output:

Ebooks available now
You can download this article’s PDF eBooks for offline reading from below:
Issuu
Slide Share
Edocr
AuthorStream
#laravel#Laravel 6#php#ajax pagination#pagination: page links#pagination: load more#blog post#blog articles#tutorial#guide
3 notes
·
View notes
Text
Understanding Important Differences Between Laravel Vs CodeIgniter
PHP is a modern framework in software development with a lot more flexibility in terms of a structured coding pattern with scope for applications that we deliver to perform better is required. The security feature of Laravel is quick in taking action when in security violation and for CodeIgniter too. The syntax guides of Laravel are expressive and elegant. The differences between Laravel vs CodeIgniter are as under:
Essential differences between Laravel vs CodeIgniter
Assistance for PHP 7
As a major announcement of the server-side programming language, PHP 7 comes with several unique features and improvements. The new features let programmers magnify the performance of web applications and lessen memory consumption. Both Laravel and CodeIgniter support version 7 of PHP. But several programmers have highlighted the issues faced by them while developing and testing CodeIgniter applications on PHP 7.
Produced in Modules
Most developers part big and complex web applications into a number of small modules to simplify and advance the development process. Laravel is designed with built-in modularity features. It allows developers to divide a project into small modules through a bundle. They can further reuse the modules over multiple projects. But CodeIgniter is not planned with built-in modularity specialties. It requires CodeIgniter developers to create and control modules by using Modular Extension additionally.
Support for Databases
Both PHP frameworks support an array of databases including MySQL, PostgreSQL, Microsoft Bi, and MongoDB. However in the fight of Laravel vs CodeIgniter, additionally supports a plethora of databases including Oracle, Microsoft SQL Server, IBM DB2, orientdb, and JDBC compatible. Hence, CodeIgniter supports a prominent number of databases that Laravel.
Database Scheme Development
Despite encouraging several popular databases, CodeIgniter does not provide any particular features to clarify database schema migration. Though the DB agnostic migrations emphasize provided by Laravel makes it simpler for programmers to alter and share the database schema of the application without rewriting complicated code. The developer can further develop a database schema of the application easily by combining the database agnostic migration with the schema builder provided by Laravel.
Fluent ORM
Unlike CodeIgniter, Laravel empowers developers to take advantage of Graceful ORM. They can practice the object-relational mapper (ORM) system to operate with a diversity of databases more efficiently by Active Record implementation. Fluent ORM further allows users to interact with databases directly through the specific model of individual database tables. They can even use the model to accomplish common tasks like including new records and running database queries.
Built-in Template Engine
Laravel comes with a simple but robust template engine like Blade. Blade template engine enables PHP programmers to optimize the representation of the web application by improving and managing views. But CodeIgniter seems not appear with a built-in template engine. The developers need to unite the framework with robust template engines like Smarty to accomplish common tasks and boost the performance of the website.
REST API Development
The RESTful Controllers provided by Laravel allows laravel development company to build a diversity of REST APIs without embedding extra time and effort. They can simply set the restful property as true in the RESTful Controller to build custom REST APIs without writing extra code. But CodeIgniter does not provide any specific features to simplify development of REST APIs. The users have to write extra code to create custom REST APIs while developing web applications with CodeIgniter.
Routing

The routing choices given by both PHP frameworks work identically. But the features presented by Laravel facilitate developers to route requests in an easy yet efficient way. The programmers can take advantage of the routing feature of Laravel to define most routes for a web application in a single file. Each basic Laravel route further accepts a single URI and closure. However, the users still have the option to register a route with the capability to respond to multiple HTTP verbs concurrently.
HTTPS Guide
Maximum web developers opt for HTTPS protocol to obtain the application send and acquire sensitive information securely. Laravel empowers programmers to set custom HTTPs routes. The developers also have the choice to create a distinct URL for each HTTPS route. Laravel further keeps the data transmission secure by adding https:// protocol before the URL automatically. But CodeIgniter appears not support HTTPS fully. The programmers should practice URL helpers to keep the data transmission secure by generating pats.
Authentication
The Authentication Class presented by Laravel makes it simpler for developers to execute authentication and authorization. The extensible and customizable class further permits users to manage the web application secure by executing comprehensive user login and managing the routes secure with filters. However, CodeIgniter does not appear with such built-in authentication features. The users are asked to authenticate and authorize users by drafting custom CodeIgniter extensions.
Unit Testing
Laravel accounts for additional PHP frameworks in the division of unit testing. It enables programmers to check the application code thoroughly and continuously with PHPUnit. In extension to being a broadly accepted unit testing tool, PHPUnit arises with a variety of out-of-box extensions. Hence, programmers have to use added unit testing tools to evaluate the quality of application code throughout the development process.
Learning Curve
youtube
Unlike Laravel, CodeIgniter has a petite footprint. But Laravel presents extra features and tools than CodeIgniter. The additional features make Laravel complex. Hence, the beginners have to put additional time and effort to learn all the features of Laravel and use it efficiently. The trainees find it simpler to learn and use CodeIgniter within a short period of time.
Community Support
Both are open source PHP framework. Each framework is also backed by a great community. But numerous web developers have said that members of the Laravel community are major active than members of the CodeIgniter community. The developers regularly find it simpler to avail online help and quick solutions while developing web applications with Laravel.
The developers yet require to evaluate the features of Laravel vs CodeIgniter according to the precise needs of each project to choose the best PHP framework.
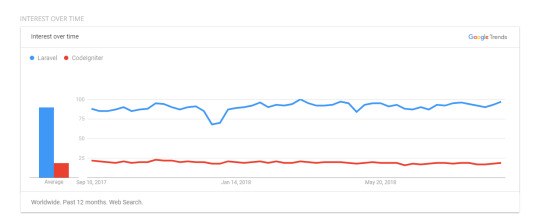
If analyzed statistically, Laravel seems to be more accepted than CodeIgniter by a wide margin. This is validated by Sitepoint’s 2015 survey results, where Laravel was honored as the most popular PHP framework according to a massive 7800 entries. CodeIgniter, according to the study, pursues at number 4. Users also report that Laravel is more marketable since clients have often heard about the framework previously, giving a Laravel an enormous market value than CodeIgniter.
Some would claim that the predominance or the market shares are not enough reasons to pick one framework across another, and it is a strong point. A good developer should examine the overall features, performance, and functionalities that are particular to their web application before executing ANY framework.
Among Laravel vs CodeIgniter, well-seasoned master developers can find that they can avail several great features if they opt for Laravel since it requires an absolute command on the MVC architecture as well as a strong grip on OOP (Object Oriented Programming) concepts.
Conclusion
If you are looking to create a resilient and maintainable application, Laravel is a nice choice. The documentation is accurate, the community is large and you can develop fully emphasized complex web applications. There are still many developers in PHP community preferring CodeIgniter for developing medium to small applications in simple developing environment. Conserving in mind the pros and cons of each, in reverence to the precise project, you can reach the perfect verdict. Read Full Article on: https://www.cyblance.com/laravel/understanding-important-differences-between-laravel-vs-codeigniter/
#laravel development company#laravel development#laravel developer#laravel development services#laravel development company india#laravel application development#laravel web development#php laravel developer#laravel web development company#laravel application development company#laravel web development services#best laravel development company#laravel web developer#laravel web application development company#remote laravel developer#laravel framework development#laravel app development#dedicated laravel developer#laravel website development#remote laravel#certified laravel developer#laravel development india
1 note
·
View note
Text
SysNotes devlog 1.5 (backend edition)
Hi all! In this post I will continue the development of my plurality management web-app SysNotes. Today I will be focusing mostly on setting up the databases for the app, as currently test data is stored in the code itself. This severely limits the interactivity and features of the web-app, so it is time to separate it.
In this devlog, I will explain the basics of databases and how the Laravel framework interacts with them to give you an idea of what goes on on my screen and in my brain while I code. This will just be an overview of some technical behind the scenes, nothing will have changed on the front end of the app.
If you missed the first devlog, you can find it here.
What is a database?
A database at the most basic level is a type of file format that has tables. You can think of it as a "spreadsheet file" like the ones you can open in Excel or Google Sheets. The main structural difference between a database and a spreadsheet is that in a database the tables can have relationships. For example, the relationship between a users table and a posts table is that one user can make many posts, and a post can only belong to one user. This is a one-to-many relationship. You can ask the database to give you all the posts related to a specific user. In my app, each user account will have multiple alter profiles, for example. When a user logs in, the app will only fetch the alter profiles that this user created, and show the profiles to them. You can do a whole bunch of other things with databases, that's why I like them! The main functional difference between a database and a spreadsheet is that a spreadsheet is used for data analysis and manipulation, like a fancy calculator, while a database is used to store data. Each table stores data related to one type of object/person/place. Like how spreadsheets can be opened in Excel, database tables can be opened in database software such as MySQL Workbench or HeidiSQL, which is what I'm using since it came with Laragon.
(What my Heidi DB looks like at the end of the devlog)

Plan for today
The users table already exists in my app as a result of installing the Laravel Breeze starter kit, so I don't have to worry about designing this table. With that out of the way, I can think about adding feature-related tables. The first feature I'm adding to my app is the ability to create alter profiles and to fill in the sections on the profile page. The first step is therefore to create an "alter profiles" table and to normalize it (more on that in a bit).
Setting up the database tables (and why it's a pain)
Migration files
When using the Laravel framework, you're not supposed to create a new table or edit an existing table through the database itself - it has to all be done through code. This is done using a file called a database migration. The migration specifies the table name, what columns it should have, what data types the columns should be, and what other tables this table may be related to. This is done so that if you give the code to another person and they download and ran it, their database will be set up the exact same way is yours. Therefore, the migration file makes your database changes portable, which is especially useful when copying code from your personal computer onto the server where the web-app is running. You don't want to set up your local database and then find out that it doesn't work the same way as the one that runs the actual app! Migrations aren't just for creating a new table. You also need to make a migration file for every structural change you want to make for that table, such as adding a new column or changing a column's name. Updating a table's structure after it's already been set up and filled with data has a chance of corrupting the data. Therefore, I always impose this expectation of myself of always getting the database structure right on the first try (i.e. in just one migration).
(My migration file for the alter profiles table at the end of this devlog)

Normalization
Normalization is the act of splitting up a table into 2 or more tables in order to simplify the data structure, reduce duplication, and make database queries more efficient. To illustrate, let's consider the alter profiles table. An alter can have several traits, such as "energetic" or "nervous" and so on. Let's say we should store it in a "traits" column like so:
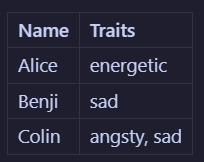
Now let's say we decide that the word "sad" isn't quite the right descriptor, and we want to change it to "melancholic". To do that, we would need to edit every instance of this word in the table. In this example, it would only be in 2 places: on Benji's profile and on Colin's profile. But what if there were many melancholic alters? That sounds like a lot of work! What if you misspell it on accident somewhere? You won't be able to filter alters by trait properly! Instead what would be better to do is to split (haha) the alter profile table into that and a traits table. Now we will have:
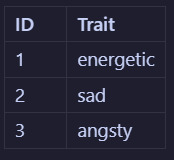
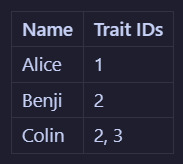
So if you wanted to change the word "sad" to "melancholic", you could do it in just one place, which makes it easier and more maintainable. This is just one small example of what normalization can be. There are actually like 7 levels of it, and even I don't remember them all. In fact, what I will be doing in my app is a step further than the example and use something called a "pivot table" - a whole new type of headache! The point is, figuring out the architecture of database tables is a whole science in on itself 😩
Actually doing the coding
After brainstorming how to normalize it, the alter profile will need to be separated into several tables: alter profiles, alter characteristic types (traits, likes, dislikes, an triggers), alter characteristic values, and alter statuses (such as active, dormant, and unknown). Each profile can then reference the characteristics and statuses tables. This way, alters can like or dislike the same thing, creating the ultimate modularity!

The (pretty technical) steps are as follows:
Create the (model with) migrations for the individual tables and specify their table structure
Create a pivot table and set foreign IDs to point to the individual tables
Define the relationships in the model files
It took me a few tries to get past migration errors, and I accidentally rolled back my migrations too many times, losing my users table 🤦♂️ As i don't yet have any alter data in the database, I just re-registered my account and nothing was lost. Heart attack simulator lol.
Seeding data
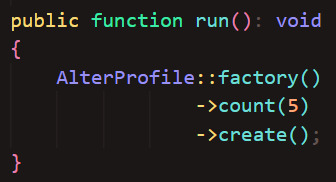
As I'm just working with test data, I don't really care exactly what words and images are used where as long as it works. I also don't want to pain-stakingly input test data into every field for every profile every time I have to delete (drop) and remake (migrate) a table. That's where seeding comes in. Seeding is an automated process that generates dummy data and inserts it into the database, ready for me to test. I'll admit I've never done seeding before - at work I've always worked with a copy of an existing database that has been filled by years of use. But it's never too late to learn! I used seeding to create dummy data for alter profiles and trait values (trait types and statuses has to be manually inputted because they have pre-defined values). I couldn't quite figure out how to seed pivot tables, as they define relationships rather than data. So I had to add those manually too. I still have a ways to go until I'm a real developer lol.
(My Alter Profile factory at the end of the devlog - i left pronouns blank because I wanted them to somewhat match the names, so I added them manually afterwards)

(My Alter Profile seeder at the end of the devlog)
And here are my seeded tables! The faker is limited to using Latin words so I couldn't get the characteristics to look realistic. But it will be fine for test data.
(I have changed the alter names to match the names from the previous devlog)


...All this just for the profile page! But when designing a database's architecture, it is important to anticipate ways in which the database will grow and facilitate new relationships from the start. This was a tiring coding session but it has paved the way for the new and more exciting features!
What next?
This devlog was just for setting up the database tables - in the next devlog we'll get to actually use them in the app! The plan is:
Pull data from the database into the profile pages to display the freshly generated dummy data
Add a way to create new profiles using the New Profile form
Edit the profile information
0 notes
Text
Digital ocean primary key requirements fixing for Laravel
Put top of your migration file DB::statement(‘SET SESSION sql_require_primary_key=0’); Then, $table->string(‘your-col-name-here’)->primary(); The migration will run successfully.

View On WordPress
0 notes
Link
The Name of a good website design company in London - Website designing And Development Company In London
Mrmmbs Vision Limited is Website designing and development company in United Kingdom - London.
Services:
Website Designing Services: PSD Design, Responsive Web Design, PSD to HTML, PSD to Website, Custom Templates, Creative Web Applications, Web Portals Designing, Wire-frame Designs etc.
Website development Services:
They have experience in designing and developing web applications for industries like: Fin-tech, Car/buy sell, food ordering(restaurants), Matrimonial, B2B & B2C, Tour & Travels, News & Blogs, Sports, Garments, Furniture, Whole Sale, Social Networking, Crowd Funding, NGO & Social Activist, Politicians etc.
Web Development Technologies: Node Js, Angular 6, React Js, Python, Django, Flask, Core PHP, Cake PHP, Code Igniter, Yii-2, Shopify, Laravel, Ruby on Rails, Vue Js, Meteor Js, Java, Spring MVC, JSF, ASP .NET, Mysql, Mongo DB, Sqlite, JSON, JQuery etc.
Digital Marketing:
Search Engine Optimization (SEO)
Search Engine Marketing (SEM)
Social Medea Optimization ( SMO)
Social Media Marketing (SMM)
Pay Per Click (PPC)
Online Reputation Management (ORM)
Content Reputation Management System (CRM)
Email Marketing
Content Marketing
Content Writing.
Customize Content Management System (CMS)
Mobile Application: Android, iOS, Hybrid.
Cloud Services
Hosting Solution
SSL Integration
Graphics Designing
ERP Softwares.
Mrmmbs Vision have always made efforts towards becoming much more than that. We have seen business houses being almost robbed and slaughtered for their I.T. requirements and keeping the same in mind we set our standards that high that when a client takes our services they could feel the difference and experience the excellence.
Contact:
Website: www.mrmmbsvision.com
Email: [email protected]
Phone: +442039509637
Address: MRMMBS Vision-150 Red Lion Road,
Surbiton, Surrey, KT6 7QX
London, United Kingdom
#website development#website design#website design and development#digital marketing#seo#sem#smm#smo#social media optimization#search engine marketing#mobile application developers in delhi#web designing in delhi#web development india
1 note
·
View note
Text
REASONS TO CHOOSE MEAN STACK DEVELOPERS TO BUILD APPS
As per Statista, 23.82% of mobile and web developers use Express. JS, while 22.96% of developers prefer Angular. JS.
Additionally, Javascript is the most popular programming language around the world.
Statista has declared that almost 69% of software developers have used Javascript for their product development in 2021.
What if developers find the best frameworks like Angular, Express, MongoDB offered by Javascript within one stack?
Here comes the most fascinating MEAN Stack web development.
The abundance of software stacks like Ruby on Rails, Laravel, LAMP, etc., has made the stack field crowded in the present scenario. The developers are looking for the best technologies to create efficient web and mobile applications.
MEAN Stack is one of the most resourceful and potential technology for developing mobile and web applications.
Analyzing the Components of Mean Stack
It is the components of MEAN Stack that make the technology so remarkable.
The complete set of JS technologies enables the developers to build peerless and high-tech apps for businesses.
Mongo DB
Mongo DB is an excellent DBMS that offers a NoSQL type database.
Express JS
JS is the most precious component for MEAN.
One can say that Express is the gold of MEAN.
Developers can write, secure, and execute faster applications with Express. JS.
Angular. JS
Angular aids software developers in building rapid and smooth UI within a shorter period.
Angular ensures fast-loading software development at comparatively low maintenance.
Node. JS
Based on Google Chrome’s V8 engine, Node. JS is MEAN’s backbone.
It is one of the most efficient cross-platform runtime environments.
Developers use Node. JS to develop excessively scalable web apps.
Reasons to Prefer MEAN Stack
The whopping buzz around the MEAN Stack has created fascination among developers and enterprises.
Software firms across the globe are getting tempted to implement the amalgamation of various technologies to create dynamic and swift loading web and mobile applications.
But, what are there behind all these fascination and temptation?
It is just because of the components or the bliss of advanced frameworks within a single stack?
Let’s unlock!
Lower Development Cost
Any enterprise today wishes to stay competitive.
Consequently, companies look for technologies that can help them shred their product development cost.
For the same, the MEAN Stack web development is an excellent choice.
The JS-based technology is open source and free to use.
It allows developers to build dynamic, fast-loading web and mobile applications at a low cost.
Boosts Developer’s Productivity
MEAN Stack enhances the efficiency of developers.
The framework enables the business enterprises to streamline the product development pipeline.
The JS technologies bring agility to the developer’s effort, boosting the overall productivity.
Single Language-Oriented Tech stack
Since MEAN stack is a Javascript-based tech stack, developers don’t require to specialize in other languages.
Developers can configure databases, handle the server, and manage the front-end with Javascript.
With MEAN, things get a lot easier than before.
Such a bliss, isn’t it?
Flexibility Coincides with Efficiency
MEAN is a tremendous flexible framework beyond any doubt.
Why?
It allows the developers to run and test their codes on the cloud platforms without a single hassle.
Moreover, Javascript adds ease to the entire product development process.
Whether it is about task switching or untangling queries, MEAN offers super efficiency across the team members.
Pros of Hiring MEAN Stack Developers
As per the IDC survey, there will be 28.7 million software developers worldwide.
MEAN developers add a considerable part of this crowd.
Unless you become aware of MEAN’s benefit in a software application development cycle, it is impossible to learn the pros of hiring MEAN developers.
MEAN developers are a bunch of technocrats who,
Can handle media queries and single-page applications.
Understand JS frameworks.
Are highly experienced in working with Mongo DB for a long time.
Effortlessly switch from one domain to other, yet accomplish the task on time.
So, whenever business enterprises require to build fast-loading and high-tech web or mobile apps, MEAN stack developers can bring euphoria.
Aware of the Top Tech Trends
Globenewswire projects that the global Blockchain market will hit $67.4 billion by 2026.
Grandviewresearch forecasts the global AI market will reach $997.77 billion by 2028.
As per Cisco researchers, more than 127 new devices get linked to IoT every second.
Getting goosebumps?
You probably have not come across these statistics yet.
But a MEAN developer is aware of all the latest things sweeping people’s feet off the ground.
Experience Gets Blended with Skill
Since MEAN developers work on various web and mobile app development projects, the experience equips them with vast knowledge and skill. Regardless of your project type, the MEAN developer’s insight will add efficiency and marketability to your product.
Budget-Friendly and Timely Delivery
MEAN is the best option when you are strict on a budget yet to finish a project within a fixed and short timeline. For the same, MEAN developers seem the best option for a strict budget app development project.
From developers to business enterprises, all desire positive results in a single try. The Full-Stack developers at Orion eSolutions can shape this desire into a reality. We leverage the MEAN Stack web development to create robust, smooth, and scalable web and mobile applications for businesses.
Why don’t you share your project with us to see the magic?
Source Link
0 notes
Text
Aug 25
Finish setting up ui-components.
Okay, error installing.
Fixed with compatible node -V 13 to node sass
Thread-locker issues?
https://github.com/JeffreyWay/laravel-mix/issues/2383#issuecomment-643265068
mkdir -p ~/repos/web/athena/node_modules/compile-ui && sudo mount -o ro --bind ~/repos/web/ui-components ~/repos/web/athena/node_modules/compile-ui
1) drop all tables in db
2) zcat falcon.schema.sql.gz | psql -d falcon -0 -X
3) zcat falcon.data.sql.gz | psql -d falcon -0 -X --disable-triggers
AssertionError: database connection isn't set to UTC
https://stackoverflow.com/a/68025007
pip install psycopg2==2.8.6
WTF IS THIS SHIT!!???
0 notes
Text
Laravel 5.8 Tutorial From Scratch - e07 - SQLite Database - Laravel
Laravel 5.8 Tutorial From Scratch – e07 – SQLite Database – Laravel
Laravel 5.8 Tutorial From Scratch – e07 – SQLite Database – Laravel
[ad_1]
Let’s get the basics of working with a database in Laravel by setting up an SQLite database from scratch. Let’s also create a migration and a model for our customers.
For the best experience, follow along in our interactive school at https://www.coderstape.com
Resources Course Source Code https://github.com/coderstape/larav…
View On WordPress
#database configuration laravel#dotenv#laravel#laravel 5#laravel 5.8#laravel 5.8 install#laravel 5.8 new feature#laravel 5.8 what&039;s new#laravel connect db#laravel database#laravel database configuration#laravel database settings#laravel db settings#laravel for beginners#laravel from scratch#laravel from the ground up#laravel mysql json#laravel preview#laravel tutorial#php carbon immutable#php framework#php framework 2019#php what&039;s new 2019
0 notes