#like they just have this lightly crispy crust from the sourdough
Text

I'm so in love with them
#breadventure#personal#baking#cookies#chocolate chip sourdough cookies#like they just have this lightly crispy crust from the sourdough#a little bit of tang to go with the sweet#i have been adjusting the recipe#this time was a little more brown sugar and vanilla extract#a smidge more salt#the salt was perhaps a mistake? but I'm also not mad#i really want to replace 2T of the butter with peanut butter#and give them a little bit of peanut butter chocolate chip flavor#see how that tastes#and i want to try a batch with a smidge of almond extract#alongside the vanilla or to replace it idk yet
71 notes
·
View notes
Text

Talviel's very best sourdough
I've been asked on occasion why Nords don't include yeast in our bread recipes, yet make such delicious, flavourful bread. In Skyrim, we prefer using sourdough starter, where the wild yeast present in flour does the job for us. This recipe is my tried-and-tested favourite, and I usually make these lovely loaves twice a week. It is quite time consuming, so be sure to start at least 24 hours in advance.
For novice bakers, this may be a slight challenge that will take some time to get right, but persistence pays off! Be sure to use the best ingredients you can and follow the recipe closely. For best results, use a kitchen scale.
Note: I cultivated my own sourdough starter from scratch in January 2020, using only water, plain yoghurt, and strong wheat flour. This took a couple of weeks to activate, so if you're keen on getting started on sourdough right away, you can always use prepackaged yeast or buy sourdough starter.
You will need:
300g strong white bread flour (the stronger the better), plus extra for dusting
150g spelt flour
150g rye flour
350g sourdough starter
180ml filtered water, at room temperature
10g caster sugar
10g table salt
2 tbsp vegetable oil, for greasing
Method:
Combine all the ingredients but the oil in a large mixing bowl, and knead until a moist, even dough forms. Depending on the weather and humidity, you may need to add more flour or water to get the right consistency- add only a tablespoon at a time if need be.
Turn your dough out onto a clean surface dusted well with flour. Knead well, turning the dough over often to make sure all the ingredients are evenly incorporated. Continue kneading for at least 5 minutes (preferably 10, depending on how much of an arm workout you can handle).
When your dough is firm, smooth and stretchy, form into a ball and dust lightly with flour. Put 2 tbsp vegetable oil into your mixing bowl, swirling it around to make sure the sides are covered. Pop your dough into the bowl, cover with cling wrap, and leave it in a warm place to rise. Sourdough does take a bit longer than regular bread to rise to double its size. In my experience, at least 2-3 hours in summer and up to 6 hours in winter (I generally put the bowl near a heater in winter).
When your dough has doubled in size, turn it out onto a clean floured surface and knead vigorously again. The oil will have permeated the dough somewhat, so be sure to incorporate it all but avoid adding more flour than necessary to prevent the dough from sticking to your counter.
Once your dough has been knocked back (it should be a firm, smooth ball), pop it back in the bowl and leave it to rise to double in size again, and repeat the previous step. I do this at least twice if I'm pressed for time, but normally I do two proofings on the first day, leave the dough overnight on the counter (be sure to keep it covered!), and do a final proofing the next morning.
Before you start baking, decide on what size you want your loaf to be. This recipe can make two small loaves, but I prefer having one big round loaf. Whether you use a bread tin is up to you! At least one hour in advance, knock back your bread once more, shape it into the form you want, and leave it to rise once more until about 1.5x the original size (if you're using a bread tin, do this before putting the dough in the tin and leave to rise while covered with cling wrap).
Preheat your oven to 200C/390F. When your dough is ready, dust the surface lightly with flour and use a sharp knife to score the surface (a blunt one will create a jagged surface that may let out more air, leading to flat, hard bread). I usually make a big cross or three horizontal scores across the surface, but just make sure that there is enough space for excess steam to escape from the bread evenly as it bakes.
Before putting the bread into the oven, sprinkle the surface with a tablespoon of cold water. This will help the surface get nice and crispy.
Bake for 35 minutes on the middle shelf, give or take, depending on how dark you like your bread crust. You'll know the bread is done when it sounds hollow when tapped. Remove the bread from the oven and leave to cool for about 15 minutes before turning it out onto a wire rack (especially important if you're baking in bread tins as it'll prevent the bread from getting soggy).
This sourdough is best eaten warm and fresh, but it can be kept for up to 10 days unsliced when sealed in a plastic bag and kept in a dry, dark place.
529 notes
·
View notes
Text
Something to chew on

When it comes to toast, my family has strong opinions. For breakfast, we’ll root around in the pantry and fridge, each of us cobbling together a different spread. My dad will chop hard-boiled eggs, mashing the yolks and bits of white into jam, delighting in my sister’s squeals of disgust. My sister’s topping is no less strange as she likes to scatter chunks of frozen salted butter on hers. Sometimes, when the salted butter “isn’t salty enough” or there’s only unsalted butter, she’ll take to the salt shaker zealously. My mother will try to stop her to no avail, but we all know not to get between her and the chocolate hazelnut spread. She’ll first trim the crusts, then slather the bread with chocolate until it forms a dense, toothsome layer.
Then, there’s the bread we choose to have for toast. Each of us are particular about the vehicle used for our chosen condiment. My dad loves bread that bear resemblance to stones, ones with a crunch and a chew. On the other side of the spectrum, my sister prefers hers akin to Wonder bread, something with enough fluff and absence of taste to accentuate the salt and fat of butter. My mom also prefers bread that is spun from air, but the local grocery store isn’t good enough. She will drive forty minutes to the nearest Japanese bakery to obtain a loaf of shokupan.
At this point, you’re probably wondering what strange toast fetish I have. One week, I’ll have Trader Joe’s peppercorn and asiago sourdough smeared with cream cheese. The next, it’ll be oatmeal sandwich bread. Or cinnamon raisin challah. Sometimes I’m so indecisive, I’ll spread my toast with a multitude of jams, making it sing with the sweetness of currants, blackberries, strawberries.
When my family devoured a focaccia at a restaurant for dinner, it seemed like we had found a bread that we could all agree on. As we licked the salt off of our fingers and stared at the loaves delivered to neighboring tables, I knew I had to try making focaccia at home. It had the potential to be the first loaf of bread we broke together.
Now, let me talk about this focaccia. Before you run away, perhaps with a scoff at bread making, or the thought of working with leaveners, stay for just a little bit longer. It’s easy to have good bread these days, but when was the last time you had bread straight from the oven? The kind that melts in your mouth? A crisp exterior that yields a soft, pillowy crumb?
This bread doesn’t demand much—you stir together flour, salt, yeast and water until they’re combined in a big, big bowl. It might be more shaggy dog and less loaf-of-bread-like, but don’t you worry. Cover it in plastic wrap and let it sleep. It will probably get more sleep than you—at least eight hours. If you do get more sleep than that, make sure to wake up at the twenty four hour mark to save your bread baby from ballooning out of control. (If you’re interested in what happens during those eight hours, Kenji Lopez-Alt breaks it all down here).
Perhaps after padding into the kitchen, the weak winter sun as pale and soft as butter on the tiles. Or maybe after your sister sneaks a peak, and tells you that “dough baby is very fluffy,” then, pour the dough onto a lightly floured surface. Plop the wobbly mass into a cast iron skillet, greased with a generous glug of olive oil. Roll the ball around until it glistens, then let it rest some more. After two hours, the ball will look like it sighed, its edges pooling outwards. If it doesn’t fit the pan completely, nudging it gently. When its stretched, dimple it so it can form pockets to hold the toppings of your choice. I scattered mine with shards of rosemary and freshly grated black pepper. I could imagine a version with Meyer lemons, bites of tartness and salt. Or one topped with slices of potato showered with cheese, a finish of caramelized crisp gold. But in truth, the focaccia doesn’t need anything. See I told you? It’s easy.
Give it another stream of olive oil and send it into the oven. The top will toast and char, bubble and brown, filling the air with a rich nuttiness. But the best part is yet to come. When I split the focaccia open, my family peering over my shoulders, it revealed a bubbly, tender crumb. Then, before I could even slice all of the focaccia, my family had beaten me to the punch. Tearing it, you can hear the delicious crackle of the crust.
I had hopes it would last until breakfast for us the next morning. It would have been good with milky mozzarella and a drizzle of balsamic vinegar. Or with a poached egg nestled in soft avocado. Or some honey-roasted grapes mashed with peppery goat cheese.
But, really those things would be for toast fanatics of another kind. Even my family agreed that it was good simply naked. Chewy, salty, juicy. There was no need for hard-boiled eggs or three different jams or varied concentrations of salted butter. As my family fought over the breadcrumbs, it seemed like our opinions on bread had finally converged. Maybe next time it would last long enough for us to make toast.
Delicious graphic created by my talented sister, Floria Tsui.
Rosemary & Black Pepper Focaccia
Adapted from Kenji López-Alt’s “Easy No-Knead Olive-Rosemary Focaccia With Pistachios Focaccia” on Serious Eats
Ingredients:
500 grams (17 1/2 ounces, about 3 1/4 cups) all-purpose or bread flour
15 grams (.5 ounces, about 1 tablespoon) kosher salt
4 grams (.15 ounces, about 1/2 teaspoon) instant yeast
325 grams (11 1/2 ounces, about 1 1/2 cups minus 1 tablespoon) water
1/4 cup extra-virgin olive oil, divided
2 tablespoons of fresh rosemary
Black pepper grinder
Coarse sea salt
Directions:
1. Combine flour, salt, yeast, and water in a large bowl. Mix with hands or a wooden spoon until no dry flour remains. The bowl should be at least 4 to 6 times the volume of the dough to account for some dramatic balloon-ing action.
2. Cover bowl tightly with plastic wrap, making sure that edges are well-sealed, then let rest on the countertop for at least 8 hours and up to 24 hours. Dough should rise dramatically and fill bowl.
3. Sprinkle the top of the dough lightly with flour, then transfer it to a lightly-floured work surface. Form into a ball by holding it with well-floured hands and tucking the dough underneath itself, rotating it until it forms a tight ball.
4. Pour half of oil (1/8 cup) in the bottom of a 12-inch cast iron skillet. Transfer dough to pan, bath baby in oil, and position seam-side-down. Nudge the dough around the skillet, flattening it slightly and spreading oil around the entire bottom and edges of the pan. Cover skillet with a lid and let the dough stand at room temperature for 2 hours. After the first hour, adjust an oven rack to the middle position and preheat oven to 550°F. Things are about to get hot!
5. At the end of the 2 hours, dough should mostly fill the skillet up to the edge. Use your fingertips to press it around until it fills every corner, popping any large bubbles that appear. This part is probably more fun than should be allowed (like playing whack-a-mole but so much more visceral). You probably won’t want to stop, but when most of the air bubbles are gone and the dough is spread evenly around the skillet, you should call it a day. Sprinkle with rosemary and grate black pepper and coarse salt all over the surface of the dough and press down on them with your fingertips to give your baby lots of dimples. Drizzle with remaining olive oil and rub well. This might seem like a lot of olive oil, but trust me it’s what makes this toast, well, toast. We’re essentially pan-frying the dough.
6. Transfer skillet to oven and bake until top is golden brown and bubbly and bottom is crispy when you lift it with a thin spatula, 16 to 24 minutes (Note: 16 minutes was perfect for my oven). Transfer out of skillet, allow to cool slightly, slice, and serve. Extra bread (a phenomenon!) should be stored in a brown paper bag at room temperature for up to 2 days. For optimal toastiness, reheat leftovers in a 300°F oven for about 10 minutes.
#bread#warmth#toast#baking#focaccia#olive oil#rosemary#black pepper#salty#whack a mole#bubble#hot#skillet#bread baby#golden#yeast#cocoa dragon
2 notes
·
View notes
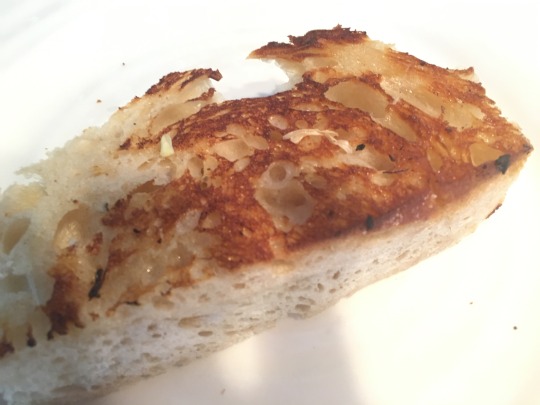
Text
Wood Fired Pizza — Garlic and Cheese

If you haven’t yet tried a wood fired pizza oven, you’re missing out! There’s something special about the way wood fires pizzas turn out. These pizzas bake at 230oC for 5 minutes before sliding them off the trays onto the oven floor. They make a fantastic starter meal! This recipe is a definite must try if you’re in the mood for a wood fired pizza!
Garlic bread
If you are looking for the perfect appetizer or starter to your wood fired pizza, then Garlic bread is for you! The dough for this cheesy pizza is very easy to make, and it tastes fantastic! For this recipe, you will need a pizza peel and a few ingredients, including garlic butter. To make the garlic butter, mix 50g of soft butter with one clove of minced or grated garlic. Mix in black pepper. Spread the mixture over the dough. Add a drizzle of truffle oil, and you have yourself a tasty appetizer.
While a pizza crust is used to make a wood-fired pizza, garlic bread is often prepared on a bread-like base. This crust is crispy, with a generous amount of garlic butter. A few teaspoons of fresh parsley is also a nice touch. The dough can be prepared with the same ingredients as the pizza, and you can even make a garlic bread pizza with leftover dough. The pizza crust is perfect for this recipe, and it is a great way to use up leftover dough! The garlic bread is also delicious when filled with cheese and prosciutto.
Cheesy garlic bread
If you are looking for a delicious side dish to your wood fired pizza, cheesy garlic bread is a must-try. It is easy to prepare and absolutely delicious. Just place the bread close to the oven’s heat and the butter will melt quickly. If you are using mozzarella or tomatoes, you can add them too! You can also top the bread with grated cheese if you wish.
The key to this dish is finding a balance of flavors and textures. If the cheese is too strong or too mild, you’ll end up with a mushy mess. Make sure to slice the bread in two to prevent the topping from spilling over the edges. You can also try halving it before placing it on the pizza. This way, you’ll be able to slice the bread half an inch thick and enjoy it with the pizza in just fifteen minutes.
Wood-fired garlic bread
If you are looking for a way to make your own delicious wood-fired garlic bread, this recipe is definitely for you. This simple recipe can create a delicious garlic bread in less than half an hour. To make it, simply heat a wood-fired oven to optimum temperatures. While waiting for the oven to cool, prepare the garlic butter. While the oven cools, place a damp cloth around the bread peel. After completing the procedure, cover the bread with cling film and chill for a few hours.
The perfect wood-fired garlic bread has a chewy crust with a generous amount of salt. You can top it with chopped tomatoes, cilantro, or other savory toppings, or simply enjoy the crunchy crust and rich garlic flavor. To top it off, drizzle it with truffle oil. You can even use leftover pizza dough for this recipe. If you’d like to add a little more pizza flair, you can always add a slice of pizza to the top of your garlic bread.
Making a cheesy garlic bread
To make a cheesy garlic bread, all you need is a softened butter, minced garlic, parsley and fresh mozzarella. You can use Italian or rustic sourdough bread to make the garlic bread. Then, spread some butter on top of each slice. Bake the garlic bread until the crust browns and the cheese melts. Remove the bread from the oven and spread the remaining cheese over the top.
Start by scraping the dough onto a well-floured surface. Divide the dough into two equal parts and lightly knead to knock out air. Place each portion on a parchment-lined baking tray. Brush the trays with olive oil and bake the dough for eight minutes. Serve with the dipping sauces. Several slices are enough for a pizza.
0 notes
Link
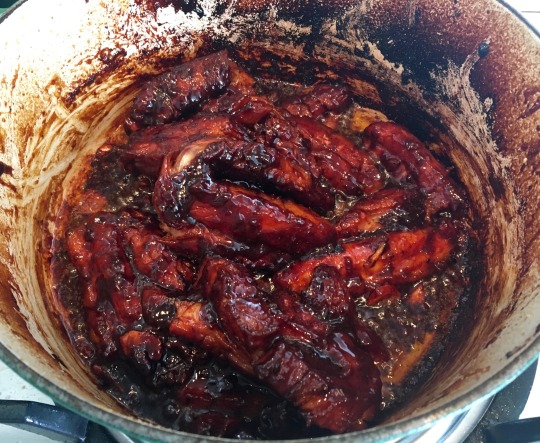
Home made dark rye bread👌👌👌😋😋😋.

Hello everybody, it is Jim, welcome to our recipe site. Today, I will show you a way to prepare a special dish, home made dark rye bread👌👌👌😋😋😋. It is one of my favorites. This time, I'm gonna make it a bit unique. This will be really delicious.
Home made dark rye bread👌👌👌😋😋😋 is one of the most popular of current trending meals on earth. It's enjoyed by millions every day. It is simple, it's quick, it tastes yummy. Home made dark rye bread👌👌👌😋😋😋 is something which I've loved my entire life. They're nice and they look wonderful.
To begin with this recipe, we must prepare a few ingredients. You can have home made dark rye bread👌👌👌😋😋😋 using 2 ingredients and 7 steps. Here is how you cook that.
The ingredients needed to make Home made dark rye bread👌👌👌😋😋😋:
{Make ready of For the pre-ferment 150g rye starter 280g cold water 100g rye flour.
{Prepare of For the dough 350g white bread flour 100g wholemeal flour 50g rye flour 12g salt 10g caraway seeds 15g coriander seeds 60g molasses 40g dark cocoa powder 300g cold water.
Steps to make Home made dark rye bread👌👌👌😋😋😋:
Day 1 The pre-ferment (Yes I know. All great things take some time. especially bread) You need a nice active starter culture full of yeast to make great bread. For that reason, we will mix 150g sourdough starter, 250g cold water, and 100g rye flour together. Let it rest overnight or for at least 12 hours..
The following day mix together the pre-ferment, 350g white bread flour, 50g rye flour, 100g wholemeal flour, 14g salt, 5g freshly ground caraway seeds, 12g whole coriander seeds, 60g molasses, 40g dark cocoa powder, and 300g room temperature water. The mix will be wet. Do not add more flour. It's supposed to be a a wet dough. Work the dough for about 5 minutes with your hands or a wooden spoon..
At this point, just oil your hands, stretch and fold the dough as much as possible and then just cover it up. Don't forget to draw a smiley face and put the time on it. Give it three hours rest to let it prove. While the dough is doing its thing. Line some bread tins or moulds with parchment paper. First oil the tins then parchment paper and then a bit of oil again.
Sprinkle each tin with a bit of semolina, coriander seeds and ground caraway. When your dough has risen you don't smash all the air out like a hooligan. You just gently tap it down and with oiled hands divide the dough in two or make one big bread if your bread tins allow it. Gently even out the top and sprinkle with some more coriander and ground caraway seeds..
Next, we will let the dough rise again lightly covered with plastic wrap. Oil the wrap a bit to make sure it does not stick to the bread. Just in case. Let the Borodinky bread prove one more time till doubled in size about 1,5 hours. Turn your oven up to 220C(428F)..
When ready to bake, place a small metal bowl or tray with water in the bottom of the oven. This will create a bit of steam and the crust of the bread will be beautiful and crispy. It also allows for the bread to finish rising in the oven without the crust forming too quick..
Bake at 220C(428F) for 20 minutes. Turn down the oven to 180C(356) and bake a further 10 minutes. When the ten minutes are done carefully remove from the moulds and bake bottom side up for another 5 minutes. to make sure it's cooked measure the internal temperature with a kitchen thermometer. It should read above 90C(194F) Remove from the oven and let cool on wire racks or kitchen cloth.Leave for few ours if you can😂and after enjoy🤗🤗🤗I love with cheese, honey and figs😋😋😋❤️❤️❤️.
So that is going to wrap this up with this exceptional food home made dark rye bread👌👌👌😋😋😋 recipe. Thank you very much for reading. I'm confident that you can make this at home. There is gonna be interesting food in home recipes coming up. Remember to save this page in your browser, and share it to your loved ones, colleague and friends. Thank you for reading. Go on get cooking!
0 notes
Text
Complete Guide to Integral Sourdough Bread

Integral Sourdough Bread
If you want to know how to make your own bread starter and you want to know how to make an Integral Sourdough Bread, you came to the right place! I will explain to you how to make your own starter and I will give you an integral sourdough bread recipe.
Wild yeast or commercial yeast
We all know that most of the leavened bread recipes use either fresh or dry yeast to help the dough rise. However, traditional sourdough fermentation relies on "wild" yeast and lactic acid bacteria that are naturally present in the air and in the flour to leaven the bread. Wild yeast is more resistant to acidic conditions than any other commercial yeast. This is what allows it to work together with lactic acid-producing bacteria to help the dough rise.
Where can you find lactic acid
Lactic acid bacteria can be found in several other fermented foods, including yogurt, kefir, sour milk products, koumiss, soy sauce, pickled vegetables, and sauerkraut.
What is a starter
The mix of wild yeast, lactic acid bacteria, flour and water used to make sourdough bread is called a "starter." I will explain how to make your own starter further in this post. During the bread-making process, the starter ferments the sugars in the dough, helping the bread rise. Because most of the sugar is consumed by the yeast and bacteria, the dough gets that specific kind of "sour" taste. Even though sourdough bread takes much longer to ferment and rise than other types of bread, it is much better for your health, easier to digest, gives you very good bacteria for your guts, and has a very pleasant texture.
What is the difference between integral flour and whole wheat flour
Whole wheat flour is made from hulled red wheat grain. It is processed to remove some of the bran and germ. Integral flour has all the germ and the bran from the red wheat. It was not processed and it provides much more fiber and other nutrients than any other type of flour.
What do you need to make your own starter
You will need two 1 liter jars. Using two jars makes it easier to feed the starter in a clean jar. Before you prepare the starter, I suggest to clean the jars very carefully. You can even rinse the jars with boiled water to make sure there is no soap residue or any contaminants left inside.

How long does it take to make a bread starter
It will take about 15 minutes of your time each day for 7 days to make the bread starter. After that, you will have to feed it only once a week, and you can keep it for many months just by following this procedure.
How to make a whole wheat bread starter
Day 1: Put the bread flour (50 g white flour and 50 g whole wheat flour) + 110 ml of water into the jar and mix very well. Then close the lid lightly and leave the jar on the counter away from direct sunlight.
Day 2: Take out 75 grams of the starter and put it into the other jar. Discard the rest. Add the flour (50 g white flour and 50 g whole wheat flour) + 110 ml of water into the jar and mix very well. Then close the lid lightly and leave the jar on the counter as before.
Day 3: Take out 75 grams of the starter and put it into the other jar. Discard the rest. Add the flour (50 g white flour and 50 g whole wheat flour) + 110 ml of water into the jar and mix very well. Again, close the lid and leave the jar on the counter. Repeat this step for day 4, day 5 and day 6.

Day 7: Take out 50 grams of the starter and put it into the other jar. You will use 270 g for your bread making. Add the flour (50 g white flour and 50 g whole wheat flour) + 110 ml of water into the jar and mix very well. Then close the lid properly and put the jar into the fridge. Let it rest for a week before you feed it again. Day 7 is the day you can make your bread!

How to feed your bread starter
Once a week, let's say on Saturday night, take out the jar of starter from the fridge, place it on the counter for the night. The next morning, take out 270 g of starter to make your bread. Now add the rest of the starter into a clean jar. Now for the feeding, just add the flour (50 g white flour and 50 g whole wheat flour) and 100 ml of water, mix, close the lid and place it back into the fridge until next week. That's it!
How to make integral bread with whole wheat sourdough starter
Add 270 g of starter into a large mixing bowl. Add 350 ml of warm water (not hot) and mix carefully.

When the starter has dissolved in the water, add the two types of flour, the sea salt and mix with your stand mixer for about 5 minutes.

After 5 minutes, you will see that the dough starts to form a ball in the mixer. When the dough has completely detached from the sides of the bowl, remove it from the mixing bowl, put it into a lightly oiled bowl and cover with a plastic wrap. Let the dough rest in a dark warm place for about 2 hours. After 2 hours, the dough should get much bigger, almost double in size.

Shaping and preparing the dough for proofing
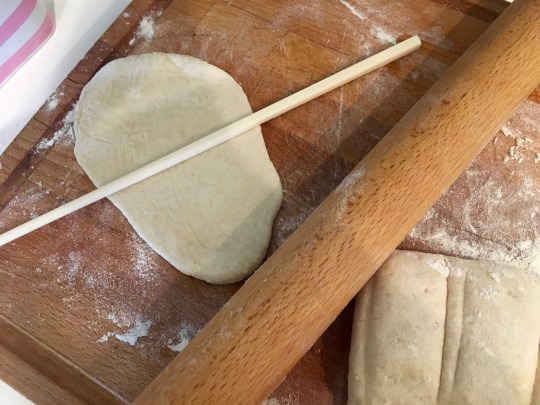
For this step you will need a little bit of flour, proofing baskets, a blade or sharp knife and a bread cutter. First thing, sprinkle some flour onto your working area and place the dough. Now cut the dough into two balls with the bread cutter.

When the dough is cut, you need to form the two balls for proofing. Take one piece of the dough, stretch it and fold it onto the middle. Look at the pictures below.

The edge of the fold should land in the middle of the dough like so.

After that take the opposite half and fold on top of the fold, like so.

Now take the two folds together and fold towards you.

Again make sure the edge of the fold lands in the middle.

After that take the opposite half and fold it on top of the fold. Look at the two pictures below.

Here is the result of this folding method. See picture below.

Now take each ball and with your hands shape the dough to make the ball tighter. To achieve this result, push the ball away from you with your hands and bring it back towards you. The dough will have a rolling movement on the board. By doing so, the dough will roll from top to down naturally. Turn the dough 1/4 turn and repeat these movements until you tightened all sides of the ball.

Now it is time take a proofing basket, sprinkle some flour at the bottom and place the newly shaped ball upside down in it.

Do these steps for both loaves of bread. Cover the proofing baskets with a cotton cloth, and let them rest for another 2 hours.

Baking the integral bread with whole wheat sourdough starter
After 2 hours of proofing, place two Dutch ovens with their lids on into the oven and crank the heat to 475 degrees Fahrenheit.

Preheat them for about 45 minutes. Now (carefully!), take the Dutch ovens and place the proofed dough into them. Now the folded side of the dough will be at the bottom of the Dutch oven, and the stretched side will face up. Make some scars on top of the dough with a blade. Close the lid and put them into the oven. Reduce the oven temperature to 450 degrees. Bake for 20 minutes. After 20 minutes, remove the lid and cook for another 15 minutes or until the crust is golden brown and crispy.

Complete Guide to Integral Sourdough Bread

Do you want to know how to make your own bread starter and how to make an Integral Sourdough Bread? Well, you came to the right place! I will explain how to make your own starter and I will give you an integral sourdough bread recipe that does not require much kneading:) Let’s get started…
Bread Starter Ingredients350 g white flour350 g whole wheat flour770 ml waterIntegral Sourdough Bread Ingredients270 g bread starter350 ml lukewarm water10 g sea salt150 g integral flour (or whole wheat)450 g white flour5 g olive oil (just for oiling the bowl)
Bread StarterDay 1: Put the bread flour (50 g white flour and 50 g whole wheat flour) + 110 ml of water into the jar and mix very well. Then close the lid lightly and leave the jar on the counter away from direct sunlight.

Day 2: Take out 75 grams of the starter and put it into the other jar. Discard the rest. Add the flour (50 g white flour and 50 g whole wheat flour) + 110 ml of water into the jar and mix very well. Then close the lid lightly and leave the jar on the counter away from direct sunlight.

Day 3: Take out 75 grams of the starter and put it into the other jar. Discard the rest. Add the flour (50 g white flour and 50 g whole wheat flour) + 110 ml of water into the jar and mix very well. Then close the lid and leave the jar on the counter as before. Repeat this step for day 4, day 5 and day 6.

Day 7: Take out 50 grams of the starter and put it into the other jar. You will use 270 g for making your bread. Add the flour (50 g white flour and 50 g whole wheat flour) + 100 ml of water into the jar and mix very well. Then close the lid properly put the jar into the fridge. Let it rest for a week before feeding again. Day 7 is the day you can make your bread!To feed your starter, once a week, let’s say on Saturday night, take out the jar of the starter from the fridge, and leave it on the counter for the night. The next morning, take out 270 g of starter to make your bread. Now put the rest of the starter into a clean jar. Now for the feeding, just add the flour (50 g white flour and 50 g whole wheat flour) and 100 g of water, mix, close the lid and place the jar back into the fridge until next week. That’s it!
Integral Sourdough BreadPut 270 g of starter into a large mixing bowl. Add 350 ml of warm water (not hot) and mix carefully.

When the starter has dissolved in the water, add the two types of flour, the sea salt and mix with your stand mixer for about 5 minutes.

After 5 minutes, you will see that the dough starts to form a ball in the mixer. When the dough has completely detached from the sides of the bowl, remove it from the mixing bowl, put it into a lightly oiled bowl and cover with a plastic wrap. Let the dough rest in a dark warm place for about 2 hours. After 2 hours, the dough should get much bigger, almost double in size.

The next step is shaping and preparing the dough for proofing. For this step you will need a little bit of flour, proofing baskets, a blade or sharp knife and a bread cutter. First, sprinkle some flour onto your working area and place the dough. Then cut the dough into two balls with the bread cutter.

When the dough is cut, you need to form two dough balls for proofing. Take one piece of the dough, stretch it and fold one side into the middle. The fold's edge should land in the middle like so.

After that, take the other side and fold it on top of the other fold like so.

Now take the two folds together and fold towards you.

Again fold only to the middle of the dough.After that take the other side and fold on top of the previous fold. Look at the two pictures below.

This will be the result of this folding method (see the picture).Now take each ball and with your hands and shape the dough to make the ball tighter. To achieve this result, push the ball away from you with your hands and bring it back towards you. The dough will have a rolling movement on the board. By doing so the dough will roll from top to down naturally. Turn the dough 1/4 turn and repeat until you have done these movements on all sides of the ball.Now it is time take a proofing basket, sprinkle some flour at the bottom.

Place the newly shaped ball upside down in it (the stretched side facing down).
Repeat these steps with the second loaf. Cover the proofing baskets with a cotton cloth and let them rest for another 2 hours. After 2 hours of proofing, place two Dutch ovens with their lids on into the oven and crank the heat to 475 degrees Fahrenheit.
Preheat them for about 45 minutes. Now, carefully take the Dutch ovens out and place the proofed dough into them. Once in the Dutch oven, the stretched side of the dough will be facing up. Make some scars on top of the dough with a blade. Close the lid, reduce the temperature to 450 degrees, put the Dutch ovens back in and bake for 20 minutes.
After 20 minutes, remove the lid and bake for another 15 minutes or until the crust is golden-brown and crispy.

Read the full article
#bacteria#bread#breads#ferment#fermentedfoods#homemadebread#homemadestarter#Integralflour#lacticacidbacteria#leavened#multigrainbread#sourdough#sourdoughbread#starter#wholewheatbread#whole-wheat#yeast
0 notes
Text
Birds & Brews at WingMill, Neutral Bay
Heads up! There's a brand new American chicken wing and burger joint in town and it's as authentic as you can get. WingMill on Young Street in Neutral Bay is all about birds and brew i.e. chicken wings and beer. There are 8 types of American style wings, loaded fries, frickles, salads gigantic poured root beers and beer on tap!
There's this thing that Ryan always does when he enters a restaurant. He walks over to the chef or someone else in charge, shakes their hands and introduces himself. I don't know whether it's a 1) guy thing or 2) an American thing or 3) a Ryan thing.
By the time Mr NQN and I arrive there Ryan has done his thing and he and Ivy have already ascertained what's good and found out a bit about the place and the chef. And speaking of Americanisms, Ivy found the fortnight old WingMill on her expat facebook group. One woman had vouched for the authenticity of the wings and so a quick date was set to visit WingMill a few days later (we don't mess about!).
The menu is a good size, enough choice but not too much so that you're paralysed with choice. There's a list of eight types of wings as well as other American/Canadian sides and desserts. There are two large flat screens playing American sports games and bluegrass and country musician Robert Earl Keen plays in the background. There is also some outdoor dog friendly bench seating.
Chef Ahmed Kalil is from Modesto, California and he used to work in marketing at General Motors. This is his first food related venture. He moved to Australia in 2009 and he started off doing informal wing parties for friends. What started as 1 friend grew to 5, then 8 and then 14 and then neighbours he didn't even know were showing up at this house for wings.
He is stickler for authenticity-the burger buns are imported from New York and the pickles are real American crinkle cut pickles. Prices are very reasonable, like American prices. He is very modest and friendly.
Root Beer Float $9
My root beer float arrives and it's enormous. It's cold, fizzy and creamy and just about everything that you'd want to toss back with a half dozen wings.
Original Buffalo Wings 6 for $9 plus blue cheese sauce $3
Oh that brings me to the wings. So American wings are single wings, not the double ones that you tend to get here. They are deep fried and served with a hot sauce and blue cheese dressing as well as celery sticks. These original buffalo wings send Ivy and Ryan into raptures from the first bite - I even think there's some swearing. Suffice it to say that these are the real deal.
Hot Hot Wings 6 for $9
The "hot hot" wings are made with a combination of habanero and ghost chilli peppers which gives you an indication that these are hot indeed. Not fiery hot and intolerable like the ghost pepper wings at Wings X Tins (which seem more a death defying novelty). There's a definite, strong kick but they're not self defeating.
Poutine $9
What's a border between countries? I adore Canadian poutine and this one has soft, squeaky cheddar cheese curds (yes real cheese curds!!) and just about the most perfect rosemary and thyme gravy. "That's Thanksgiving dinner gravy right there," says Ivy while I devour half of this serve.
American Smash Burger one x one $9
Round Two! Ryan gets up and orders again because now he's Ahmed's best buddy. You can order the American smash burger with either one or two patties and given how many wings we had ordered we went with the single patty. It's has a seasoned beef patty, melted American cheese, lettuce, tomato, thinly sliced onion, pickles and mill (aka burger) sauce on a potato bun. It's like an In-N-Out burger but better. The bun is soft perfection melting into the patty when you bite into it and we wish we had order two.
Garlic Parmesan 8 for $12 (2 flavours)
Hands down my favourite wings (I do tend to like saucy wings) are the garlic parmesan made with roasted garlic and parmesan cheese served in a creamy sauce. It's intensely flavoured and I just love that creamy sauce against the crispy wings.
Honey Chipotle BBQ Wings 8 for $12 (2 flavours)
These are more the bbq wings that Australians are more familiar with and they describe it as "American BBQ meets smoked chipotle peppers," with the sweetness of honey. I also liked these because of the saucy quality of these where Ivy and Ryan like the drier texture of the original buffalo wings.
Georgia Frickles $8
Ivy is very excited to see the Georgia frickles aka fried pickles (she's from Georgia y'all) and these are American crinkle cut pickles that are battered and deep fried and served with a Sriracha mayonnaise. They're crazy moreish and we also dip them in the blue cheese dressing ($3) and my favourite, the herby ranch dressing ($3).
Mo's Corn Salad $7
You do need some veggies when you go for wings and I loved the salads as much as the wings. The corn salad is simple but so tasty. With juicy corn kernels, mayo, capsicum and onion with crispy tortilla chips it is well seasoned but sweet from the corn.
Apple Coleslaw $7
The coleslaw is made with shredded cabbage, carrot and apples with a creamy dressing. The apple gives it a fresh sweetness without being too distinctly apple in flavour.
Sourdough Grilled Cheese $9
We were enjoying the food so much that we decided to order two more things: the sourdough grilled cheese made with herb crusted sourdough bread with four types of cheese: Monterrey jack, asadero, con queso and cheddar cheeses. It comes meltingly good and dripping with cheese with a side pot of tomato sauce, a pickle spear and some kettle chips on the side.
Cauliflower wings $10
This is a choice that they designed for the vegans. It's lightly battered cauliflower "wings" or florets with a cajun seasoning and Sriracha mayonnaise. It's a pretty damn good imitation of chicken wings in terms of flavour and somewhere between the wings and a salad.
Fried Banana Split $10
There was only room for one dessert and there are two on the menu. Ryan asks his now best buddy to recommend a choice out of the fried banana split or the brownie and Ahmed recommends the banana split. This is a halved banana coated in a cinnamon crumb and deep fried with scoops of vanilla ice cream, whipped cream, strawberry sauce and chopped up Reese's peanut butter cups. I think I'd prefer a caramel sauce to this but the two Americans at the table are smitten.
As we leave, they're already making plans to come back...
So tell me Dear Reader, do you chat to the staff or the chef when you go to a restaurant? Do you have a favourite wing sauce? Do you prefer them saucy or drier?
This meal was independently paid for.
9 Young Street, Neutral Bay, NSW
Open: Tuesday to Thursday 12pm-1pm
Friday & Saturday 12pm-11pm
Sunday 1pm-9pm
Closed mondays
wingmill.com.au/
Source: https://www.notquitenigella.com/2019/04/29/wingmill-neutral-bay/

0 notes
Text
Baked Parmesan Garlic Chicken (4 ingredients!)
This parmesan garlic chicken is perfectly baked tender and juicy chicken that is lightly seasoned with Italian seasoning and garlic powder and then sprinkled with parmesan. All made in under 30 minutes!
I love everything about this meal. So easy to mix everything together and so delicious. We will be having this again and again! For more recipes like this one try this garlic parmesan chicken tenders recipe or this sheet pan crispy parmesan garlic chicken recipe.
Baked Parmesan Garlic Chicken Breast Recipe
This my friends, was fantastic! The best part about it was that it was so easy and packed with flavor! Seriously. It is only four ingredients. I was able to throw this together in 5 minutes and serve it with a side of rice and veggies and my family thought they had a gourmet meal. I loved how the parmesan cheese gave it a delicious crust and the chicken was full of flavor and so tender. A great easy meal that everyone loved! This will definitely make it on your list of go-to meals when you are short on time but still want a nutritious dish! And on an even better note, it is kid- friendly as well.
What is baked parmesan garlic chicken breast?
If not one of the greatest, easiest, and tastiest meals ever?! This dish is incredibly simple. Containing only 4 ingredients, it is exactly what it sounds like. Baked chicken breast with a parmesan and garlic rub to it. It is the perfect combination of savory garlic and parmesan paired with juicy chicken!
It is definitely the meal that will have your house smelling amazing.
What do you need to make baked parmesan garlic chicken breast?
This is one of those meals that is perfect for when you are in between grocery trips and may not have a lot of stuff to choose from. Because this literally calls for 4 things. You are able to make a gourmet dish with just 4 simple ingredients.
As always, remember the exact measurements for all the ingredients needed will be included in the recipe at the very bottom.
Boneless skinless chicken breasts
Dry Italian dressing packet
Garlic powder
Parmesan cheese
How do you make baked parmesan garlic chicken breast?
Preparing dinner has never been so deliciously simple. This meal is by far one of the quickest ones I have ever prepared that is still very rewarding. By the looks and taste of it no one would even know that you whipped this up in just a matter of minutes! Here the 4 simple steps to follow to prepare a mouth watering meal.
Preheat the oven to 400 degrees.
Mix together the Italian Dressing Mix, Parmesan Cheese, and garlic powder.
Wash the chicken and while still damp, coat them with the cheese mixture.
Bake chicken breasts in a shallow dish for 20-25 minutes or until no longer pink.
How much does this recipe yield?
So if you are following along with the 4 chicken breasts, this will provide 4 servings. However depending on the cuts of your chicken, you can always cut the breasts in half (making them thinner) if yours are really thick and would rather have smaller servings.
What can you serve with baked chicken parmesan chicken breast?
This dish is very flavorful yet versatile enough to be served with a variety of things. Having chicken as the main dish opens up a lot of possibilities. There are of course many vegetables you can choose from, having them fresh or steaming them. You can always pair the chicken together with a salad that includes fresh vegetables. Potatoes are also a great side whether you chose to have them mashed, or baked. And for all my garlic lovers there is always the option of putting together some garlic bread or even just some sourdough bread or dinner rolls.
Are there any variations to this recipe
Everyone has their own preferences and different tastes that they like. The nice thing about the recipe is that it is so simple you can afford to switch or add things that you like. You can choose to use bone in chicken breasts if that is what you already have or prefer that is not a problem! Also another common addition is using lemon juice to zest or varnish your chicken right before serving it. This adds to the flavor and is a quick adjustment to make.
You might also enjoy these chicken recipes:
Baked Parmesan Chicken
Monterey Chicken
Chicken and Dumplings Recipe
Homemade Chimichanga Recipe
Honey Garlic Chicken Recipe
Print
Baked Parmesan Garlic Chicken
This parmesan garlic chicken is perfectly baked tender and juicy chicken that is lightly seasoned with Italian seasoning and garlic powder and then sprinkled with parmesan. All made in under 30 minutes!
Course Dinner, Main Course
Cuisine American
Keyword baked parmesan garlic chicken, chicken recipes, parmesan garlic chicken
Prep Time 10 minutes
Cook Time 20 minutes
Total Time 30 minutes
Servings 4 Chicken breasts
Calories 185kcal
Author Alyssa Rivers
Ingredients
4 Boneless Skinless Chicken Breasts
1 package Dry Italian Dressing Packet
1 teaspoon garlic powder
1/2 cup grated parmesan cheese You can also use fresh shredded which I used
Instructions
Preheat oven to 400 degrees.
Mix together the Italian Dressing Mix, Parmesan Cheese, and garlic powder.
Wash chicken and while still damp, coat them with the cheese mixture.
Bake chicken breasts in shallow dish for 20-25 minutes or until no longer pink.
Notes
Updated on March 23, 2020
Originally Posted on April 11, 2013
Nutrition
Calories: 185kcal | Carbohydrates: 1g | Protein: 29g | Fat: 7g | Saturated Fat: 3g | Cholesterol: 83mg | Sodium: 323mg | Potassium: 443mg | Fiber: 1g | Sugar: 1g | Vitamin A: 142IU | Vitamin C: 1mg | Calcium: 144mg | Iron: 1mg
from The Recipe Critic https://ift.tt/3bpWHer
https://ift.tt/2WAsvJD
This parmesan garlic chicken is perfectly baked tender and juicy chicken that is lightly seasoned with Italian seasoning and garlic powder and then sprinkled with parmesan. All made in under 30 minutes!
I love everything about this meal. So easy to mix everything together and so delicious. We will be having this again and again! For more recipes like this one try this garlic parmesan chicken tenders recipe or this sheet pan crispy parmesan garlic chicken recipe.
Baked Parmesan Garlic Chicken Breast Recipe
This my friends, was fantastic! The best part about it was that it was so easy and packed with flavor! Seriously. It is only four ingredients. I was able to throw this together in 5 minutes and serve it with a side of rice and veggies and my family thought they had a gourmet meal. I loved how the parmesan cheese gave it a delicious crust and the chicken was full of flavor and so tender. A great easy meal that everyone loved! This will definitely make it on your list of go-to meals when you are short on time but still want a nutritious dish! And on an even better note, it is kid- friendly as well.
What is baked parmesan garlic chicken breast?
If not one of the greatest, easiest, and tastiest meals ever?! This dish is incredibly simple. Containing only 4 ingredients, it is exactly what it sounds like. Baked chicken breast with a parmesan and garlic rub to it. It is the perfect combination of savory garlic and parmesan paired with juicy chicken!
It is definitely the meal that will have your house smelling amazing.
What do you need to make baked parmesan garlic chicken breast?
This is one of those meals that is perfect for when you are in between grocery trips and may not have a lot of stuff to choose from. Because this literally calls for 4 things. You are able to make a gourmet dish with just 4 simple ingredients.
As always, remember the exact measurements for all the ingredients needed will be included in the recipe at the very bottom.
Boneless skinless chicken breasts
Dry Italian dressing packet
Garlic powder
Parmesan cheese
How do you make baked parmesan garlic chicken breast?
Preparing dinner has never been so deliciously simple. This meal is by far one of the quickest ones I have ever prepared that is still very rewarding. By the looks and taste of it no one would even know that you whipped this up in just a matter of minutes! Here the 4 simple steps to follow to prepare a mouth watering meal.
Preheat the oven to 400 degrees.
Mix together the Italian Dressing Mix, Parmesan Cheese, and garlic powder.
Wash the chicken and while still damp, coat them with the cheese mixture.
Bake chicken breasts in a shallow dish for 20-25 minutes or until no longer pink.
How much does this recipe yield?
So if you are following along with the 4 chicken breasts, this will provide 4 servings. However depending on the cuts of your chicken, you can always cut the breasts in half (making them thinner) if yours are really thick and would rather have smaller servings.
What can you serve with baked chicken parmesan chicken breast?
This dish is very flavorful yet versatile enough to be served with a variety of things. Having chicken as the main dish opens up a lot of possibilities. There are of course many vegetables you can choose from, having them fresh or steaming them. You can always pair the chicken together with a salad that includes fresh vegetables. Potatoes are also a great side whether you chose to have them mashed, or baked. And for all my garlic lovers there is always the option of putting together some garlic bread or even just some sourdough bread or dinner rolls.
Are there any variations to this recipe
Everyone has their own preferences and different tastes that they like. The nice thing about the recipe is that it is so simple you can afford to switch or add things that you like. You can choose to use bone in chicken breasts if that is what you already have or prefer that is not a problem! Also another common addition is using lemon juice to zest or varnish your chicken right before serving it. This adds to the flavor and is a quick adjustment to make.
You might also enjoy these chicken recipes:
Baked Parmesan Chicken
Monterey Chicken
Chicken and Dumplings Recipe
Homemade Chimichanga Recipe
Honey Garlic Chicken Recipe
Print
Baked Parmesan Garlic Chicken
This parmesan garlic chicken is perfectly baked tender and juicy chicken that is lightly seasoned with Italian seasoning and garlic powder and then sprinkled with parmesan. All made in under 30 minutes!
Course Dinner, Main Course
Cuisine American
Keyword baked parmesan garlic chicken, chicken recipes, parmesan garlic chicken
Prep Time 10 minutes
Cook Time 20 minutes
Total Time 30 minutes
Servings 4 Chicken breasts
Calories 185kcal
Author Alyssa Rivers
Ingredients
4 Boneless Skinless Chicken Breasts
1 package Dry Italian Dressing Packet
1 teaspoon garlic powder
1/2 cup grated parmesan cheese You can also use fresh shredded which I used
Instructions
Preheat oven to 400 degrees.
Mix together the Italian Dressing Mix, Parmesan Cheese, and garlic powder.
Wash chicken and while still damp, coat them with the cheese mixture.
Bake chicken breasts in shallow dish for 20-25 minutes or until no longer pink.
Notes
Updated on March 23, 2020
Originally Posted on April 11, 2013
Nutrition
Calories: 185kcal | Carbohydrates: 1g | Protein: 29g | Fat: 7g | Saturated Fat: 3g | Cholesterol: 83mg | Sodium: 323mg | Potassium: 443mg | Fiber: 1g | Sugar: 1g | Vitamin A: 142IU | Vitamin C: 1mg | Calcium: 144mg | Iron: 1mg
from The Recipe Critic https://ift.tt/3bpWHer
via Blogger https://ift.tt/2J8XTH0
0 notes
Text
‘FRISCO FOOD DECODED

There are times – desperate, self-loathing times - when Starbucks can be your best friend. San Francisco at 5.30am is one of those times.
When you sleep the sleep of the terminally insane after an eleven-hour flight, and the only thing that will stop the spiteful, insistent pumping in your head is a flat white and a toasted bagel, the Green Machine on Grant Street delivers when all around it are resolutely shut until way after sunrise.
Are you going to San Francisco? If so, you will need to plan your food because ‘Friscans breakfast late and dine early. Like, 5PM early. The rest of the time, many a working San Franciscan can be seen gliding purposefully, some on rollerblades, most in smart-casual, clutching their macrobiotic lunch boxes on their way to their fintech start-up/angel investor / power spin at Soul Cycle. All pencil slender, glowingly healthy slaves to the algorithm.
After 9PM, when most of Europe and all of South America is just getting started, no one seems interested in rustling you up something tasty. Some restaurants start managing you out of the door after 8 in the evening. Room service grinds to a similar halt and good luck trying a delivery app if you don’t have a US phone. One evening recently, rabid with hunger after a full day at work and a lengthy late workout, the lady in my hotel reception took pity on me and surreptitiously shunted me a note with the name of a local pizza takeaway, which delivered until 2AM. The pizza was delicious – mushroom and feta on a crisp, sourdough crust – but I am sure I detected a hint of New York, not SF, sass when I made the phone order.
However, when you do succeed in squeezing your food into a 9-5 window, it’s worth the time management. I have my personal favourites, and there isn’t a spoonful of spirulina among them. Here are my top five:
Mr Holmes Bakehouse

If you spot badgers as a pastime, then you have the skills to catch Mr Holmes in the few hours they are open. To be fair, this Mr Holmes is an outpost of the Los Angeles original and their tiny premises serve up unctuous, matcha-iced croissants, doughnuts filled with chilli-lime crème pat and more, between 7AM and 2PM. Maybe go a little later if you are on your own: it’s more lower Nob Hill than Tenderloin - the epicentre of the City’s crack problem - but it still doesn’t feel like the safest district to walk around before daybreak.
Chinatown – Old and New

Aside from Sydney, no one does Chinatown like San Francisco. My first experience of it was eating Dim Sum at the City View Restaurant (which, by the way, has no view, of the City or otherwise). We went in intending to order sensibly. Half an hour later we’d gone rogue, stuffing succulent Duck Gyoza into our mouths like Animal the muppet. Newer to the area, China Live on Broadway is a multi-layered emporium of bistro, fine dining and shop. It’s also opposite that 50’s style homage to Psycho, the Royal Pacific Motel, which I intend to stay in someday just for the Instagram creds.

Not something I normally say about a Chinese restaurant, China Live serves a number of delicious vegetarian dishes. These include red dumplings stuffed with scallops and peas, together with some imaginative fish and seafood, heroing the Dungeness Crab (seems to be a thing in this City).

The shop also sold a work of art masquerading as a frying pan which I have been tearing my hair out trying to track down online ever since.
The Food Trucks near Battery Street

If you like Viet, Thai, Indonesian or Malaysian food, then google map these trucks on a Wednesday. The tastiest of them all is The Chairman, serving baked or steamed Bao. Too cool to make an obvious pun of their name and speciality, they let you do the math.

Their crispy pork belly baked Bao is like a luxe burger and the bao chips with seaweed salt (basically deep-fried wonton wrappers) are the fries you never knew you needed.
Boudin’s Sourdough Factory
Yes, it’s by Fisherman’s Wharf, yes, it’s a tourist trap, but damn it! I love their chewy sourdough. Hollowed out and filled with New England Clam Chowder and a basil and cucumber cocktail on the side, thank you please. I used to be able to buy a loaf at the airport in departures, and it was still tasty when toasted a week later in London.
Contigo
In need of some sophistication? Poor you! Well, rich you if you fancy heading to this delicious riff on a Spanish Tapas kitchen in the Castro District. Some lovely vegetarian options, but my hands down favourite dish was their beef cheeks. Not on the menu now as we head into summer, but their current menu is sporting some pretty compelling mechouli lamb.
Wherever you choose to leave your heart, honeymoon or get drunk in San Fran (all genuine songs about the City), try out any or all of these three nods to its cuisine. And eat them at whatever time of day you like.
Clam Sourdough Crostini

It’s the texture of Sourdough that I think is so wonderful – and the way it sponges up the juices of whatever you are cooking. This little number, inspired by a recipe from Harts in Brooklyn, could be served equally well without the clam shells, but the end result wouldn’t look as pretty and scooping out the clam meat at the table at the table is part of the fun. Serves 2-3
Ingredients:
4 tbsp. Olive oil
50g diced pancetta or lardons
4 garlic cloves, 2 sliced 2 left whole
2 banana shallots, finely chopped
½ a fennel bulb, chopped
2 strips lemon zest
1 bay leaf
½ tsp. ground fennel (or smash fennel seeds in a pestle and mortar)
1 glass dry white wine
500g clams
1 tsp chilli flakes
Small bunch parsley, torn
Drizzle of single cream (optional)
2-3 thick slices ideally San Francsico sourdough
How to Make
Heat half the oil in a large frying pan. Add pancetta or lardons and cook, stirring occasionally, until brown and crisp (around 3-4 mins). Add sliced garlic and cook, stirring, until garlic is golden.
Reduce heat and add the shopped shallots and fennel. Cook, stirring occasionally, until softened and onion is translucent. Add lemon zest, bay leaf, ground fennel, ½ cup wine and a pinch of salt. Increase heat, stirring occasionally, until wine is mostly reduced but mixture is still reasonably fluid (this should take about 2-3 minutes). Transfer mixture to a medium bowl; discard lemon zest and bay leaf.
Wipe out the frying pan and pop back on the heat. Heat 2 Tbsp. oil until sizzling. Add sourdough slices and griddle golden brown on both sides. Drain on kitchen towels, then cut 1 garlic clove in half and rub one side of each toast with cut side of garlic.
Back to the frying pan for one last time and heat 1 tbsp. oil. Crush the remaining garlic clove and add to the oil, stirring, until it begins to turn golden. Add clams, the pancetta/ garlic mix and remaining ½ cup wine. Increase heat and bring to a boil. Cook, uncovered, until liquid is reduced by half and clams are open (discard any that do not open), which should take 5–7 minutes. Add a drizzle of cream if desired, together with the chilli flakes and parsley and cook 1 minute longer. Taste and season with kosher salt and more chilli flakes.
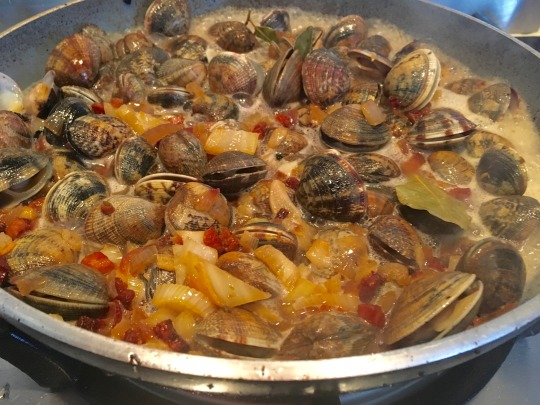
Place fried bread on plates and spoon clam mixture and cooking broth over. Drizzle with oil and serve.

Pork Belly Bao
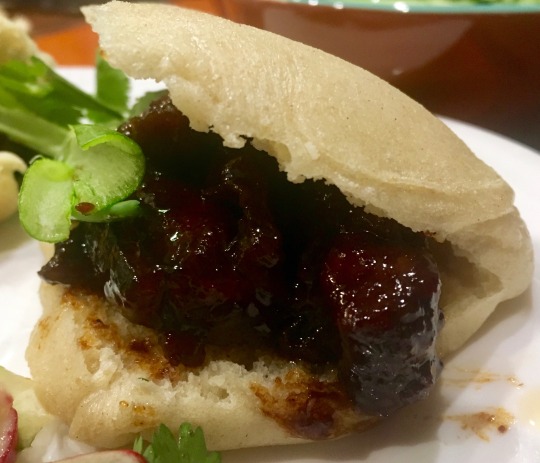
Like I said, food orgasm meets coma once you have eaten a Mr Chairman Bao. Here is my version, using a marinade mix for the pork from China Doll in Sydney.
Makes 10 bao.
Ingredients:
For the Bao dough:
250g plain flour
2 tsp dry active yeast
1 tbsp. Caster sugar
1 tsp kosher salt
100ml tepid water
50ml milk
1 tbsp. sunflower oil
Chopped spring onions and coriander to serve.
For the char siu pork
2 tbsp. sunflower oil
1kilo pork belly, no rind and cut into thick slices
2 tbsp each dark muscovado and 2 tbsp. light brown sugar
4 garlic cloves, finely chopped
Small piece of ginger, sliced
2 star anise
80 ml hoi sin sauce
100 ml Shaoxing wine
2 tbsp. dark soy sauce
100 ml water
¼ tsp five spice powder
Kosher salt and black pepper.
How to make
First, prepare the pork (you can do this ahead and re-heat).
Heat the oven to 160C, or Gas 3.
Season the pork belly generously, heat the oil and brown the pork in a large pot, in batches. Drain and put to one side.
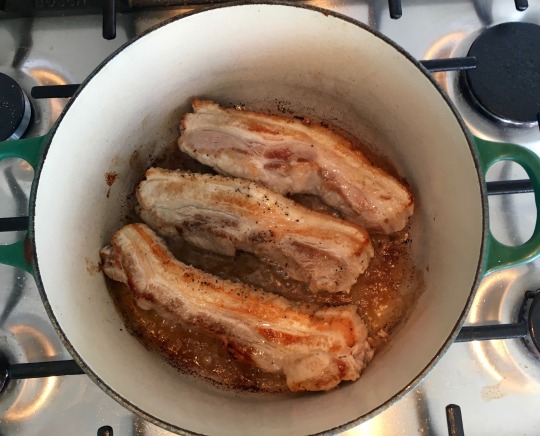
Mix the hoi sin, Shaoxing wine and dark soy sauce in a jug. Drain the saucepan of oil, then put back on the heat, add the sugar and a little water, and watch closely until it starts to turn to caramel. Working quickly, add the chopped garlic, ginger and star anise, stir then add the soy, Shaoxing and hoi sin mix. Add the pork back to the pan, stir to coat, then add the water and the five-spice powder. Cover and pop into the oven for about 1.5 hours.
Take the pot out of the oven and remove the lid (take care to use oven gloves - don’t forget the lid is hot too). Put it on a hob ring and turn the heat up medium/ high, then stir the pork belly while the sauce bubbles down to a sticky mess. Cover and leave to one side.
If you want everything to be ready at the same time, start making the buns while the pork is in the oven. Tip the flour and sugar into a large mixing bowl, preferably in a free-standing mixer with a dough hook. Add the yeast to one side of the flour and the salt to the other (mixing the salt and yeast too soon prevents the yeast from activating). Then add the water, milk and oil and mix with a dough hook for about 10 minutes, until the mix is smooth and elastic.
Pop the ball of dough into a greased bowl, cover and leave for an hour in a warm place until it has doubled in size.
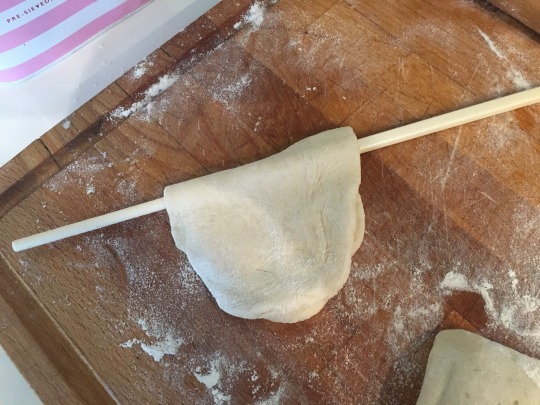
After an hour, tip the dough onto a floured board, and roll it into a sausage, then cut it into 10 equal portions. Have some squares of baking parchment cut and ready on a lightly oiled baking tray or two. Roll each portion of dough into an oval, lightly oil the flat surface, then lay a greased chopstick across it.
Flip one side of the dough over the chopstick so you end up with a half-moon shape, then slide the chopstick out and lay the bun on a square of baking parchment. Repeat with the other 9 portions.
Leave the buns, lightly covered, to rise for another hour.
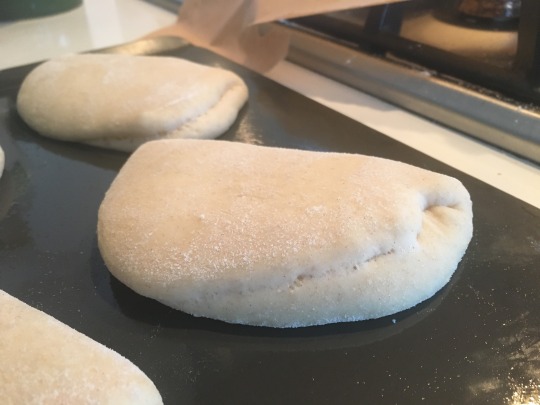
Heat the water in your steamer, and when coming to a rolling boil, add the buns (as many as will fit at a time) cover and steam for 10 minutes. Transfer to a wire rack to cool.
If you cooked the pork much earlier, reheat by adding a cup of water to loosen up the sticky caramel mixture and simmer for about 10 minutes. Transfer the pork to a plate or board and slice up or shred. Chop the spring onions (green stalks included) and roughly chop the coriander.
Spit each bun, fill with sliced/ shredded pork, add some spring onions and coriander and serve.
Turmeric Cake
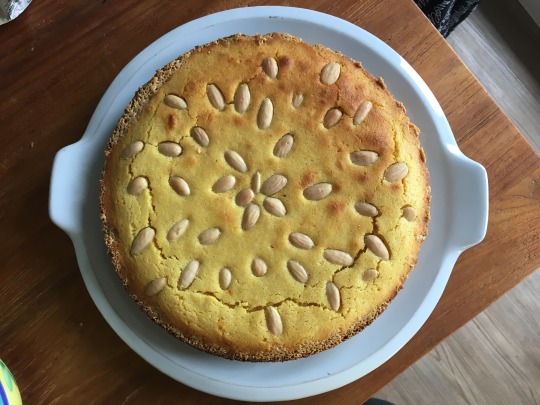
I have never eaten this in ‘Frisco, but I feel that I should have. It’s almost vegan (properly vegan if you swap the milk for almond milk), has the anti-inflammatory rhizome-du- jour, turmeric, as it’s hero ingredient, and has the taste and texture of a light fudge. This is originally a Syrian delicacy and you can find a version in the Almond Bar cookbook. They also sell a delicious version at Café Pera in Twickenham, which uses coconut oil as its fat. It is a combination of the two on which my recipe is based. Serves 10-12.
Ingredients:
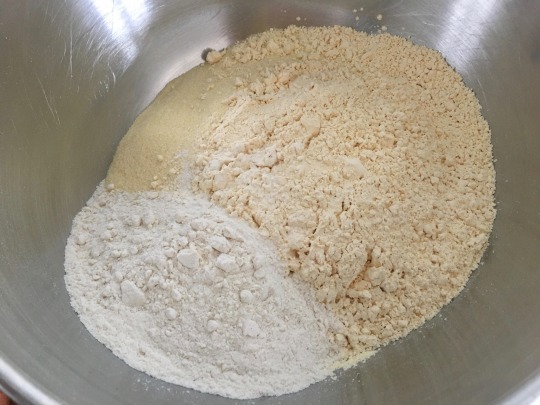
440g fine semolina
100g chickpea flour
60g plain flour
1 tsp baking powder
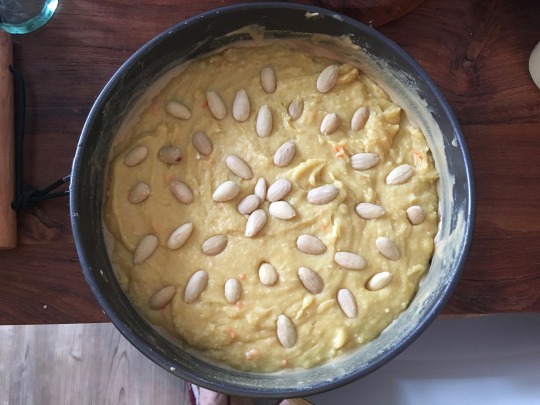
1 cm piece fresh turmeric, peeled and grated
250g coconut oil, melted then cooled.
385g unrefined caster sugar
375 milk or almond milk
2 tbsp. tahini
1 tsp vanilla essence
Whole blanched almonds, toasted.
How to make
Preheat the oven to 190C/ Gas mark 6.
Rub tahini over the base and sides of a 23cm springform cake tin and put to one side.
Combine the flour, chickpea flour, semolina and baking powder in a large mixing bowl.
In a separate bowl, combine the melted coconut oil, sugar, vanilla, milk, grated turmeric and 60ml water and whisk together. Pour into the dry ingredients and mix until smooth and golden yellow.

Pour the cake mix into the prepared tin and top with the lightly toasted whole almonds.
Bake for 35-40 minutes, until the cake turns a golden brown, then remove from the oven and leave in the tin for about 10 minutes before turning out carefully onto a wire rack to cool completely. Transfer to a serving plate.
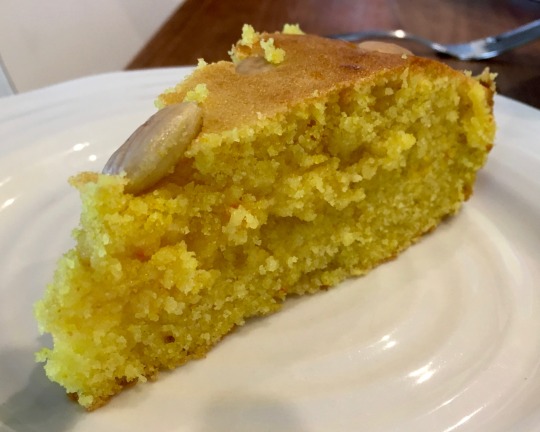
This tin will keep in a tin or wrapped in clingfilm for a week.
0 notes
Text
Best Italian restaurants in Toronto
Zucca
2150 Yonge St., 416-488-5774
For 2 decades, this upscale Midtown haunt is the standard for Italian food that is special. Chef Andrew Milne- the restaurant’s professional servers could educate Parkdale’s cool youngsters a thing or two, and Allan was doing local, seasonal cuisine long before it had been trendy. Made in house every morning, the ever changing pastas are an apparent strength, such as the hand-cut red wine tagliatelle in a duckandbunny ragout—a beautifully pastoral dish. Sophisticated plates, such as the seared muscovy duck breast with bitter treviso roasted figs and also a lemon risotto, showcase the kitchen’s deftness at balancing flavours. A good wine list is broken down by area of Italy, and classic desserts like affogato panna cotta and biscotti are perfect endnotes to a romantic meal.
Bricco Kitchen and Wine Bar
3047 Dundas St. W., 647-464-9100
With its midcentury Scandinavian furniture, whitewashed brick and intricately patterned ceramic plates, this lovely 45- in the Junction is readily among the prettiest spots in town. The polished-but- aesthetic that is unfussy applies to the cooking at the same time, with nuovo rustico dishes from your Piedmont area emphasizing both trendy demo and flavours that are substantial. The antipasto board departs from the typical meat-and-cheese spread to incorporate chickpea fritters, blue cheese–filled dates, outstanding lonza and prosciutto-wrapped bread sticks. Lemon rind balances creamy Arctic char that is uncooked, and large, fluffy gnocchi bring support that is starchy to your rich braised rabbit. Wine rotates every fourteen days, and the trios of two-ounce pours are a great strategy to try the many organic, little-producer alternatives being offered.
Tutti Matti
364 Adelaide St. W., 416 597 8839
Don’t let dinner jazz playlist and the outdated decor only at that Entertainment District trattoria dissuade you— long as you’re starving, there’s no better place to be. Servers are simultaneously efficient and laid-back, a blend that implies an all too-uncommon awareness of authentic hospitality. The menu features humble Tuscan basics—tons of beans— of boar and loads but the dishes arrive to the table exquisitely conceived and expertly cooked. A well-timed glug of amber vin santo catapults chicken livers and sage butter, tossed with golden house-made tagliatelle and briny capers, into a divine plane. While the short ribs are popular, the rabbit entrée is superlative, its meat gently cooked sous-vide before being dusted with flour, deep fried and plated with fingerlings that are lemony and broiled greens. It’s a sly showstopper, memorable just because of its simplicity that is brazen , masterfully executed. Which, come to consider it, additionally describes Tutti Matti to a T.
F’Amelia
12 Amelia St., 416 323 0666
The kitchen of this Cabaggetown favourite continues to wow with its originality, while preserving the Italian heart of simplicity. Appetizers are amazing: lightly battered and grilled calamari comes brushed with garlicky pesto, and an delicious fig salad is livened up by smoky grilled radicchio. Chef Riley Skelton offers an original take on carbonara—possibly the most sacred dish in the Italian canon— adding sautéed red onion, crisped prosciutto and spinach, and using handcrafted tagliatelle in place of spaghetti. Creamy eggplant is the star of a hot lamb sausage pizza. In warmer weather, the patio doubles the size of the eatery and is the perfect place to drink a glass of wine and take in the neighbourhood sights.
Best italian restaurants in Toronto
Ardo
243 King St. E., 647-347-8930
Chef Roberto Marotta’s Sicilian-inspired dishes offer a degree of sophistication that puts this new St. Lawrence area above many of the city’s trattorias. Acciughe—punchy white anchovies and roasted red peppers on crunchy herb butter–soaked crostini—are an ideal two-bite snack (or spuntini, as the Sicilians would have it), and sourdough starter makes an exceedingly bouffant pizza crust. It’s a welcome change from the Neapolitan tyranny.
Bar Buca
75 Portland St., 416 599 2822
Several steps chef Rob Gentile’s King West osteria, from Buca suitable, is casual Bar Buca and his relaxed. Carve the gran fritto misto, a two-tiered bite tray stacked with lightly battered and deep-fried baby artichokes, rock shrimp, tiny smelt and twists of pigskin. Each bite is perfectly crispy and flecked with fennel -flavoured salt or chili. For dessert, there’s old-fashioned Italian pastries: ricotta-stuffed cannoli, lace-patterned pizzelle and sugar -dusted apple butter bombolone.
La Cascina
1552 Avenue Rd., 416-590-7819
Abruzzan chef Luca Del Rosso’s menu changes daily, but his main tools are constantly salt, olive oil and time —each dish is cooked slow, long and soft. The antipasti class brings a series of mini-masterpieces, including creamy pan fried potatoes paired with salty capers and tart tomatoes; slow-cooked lentils and carrots; and a fluffy scramble of eggplant, eggs and ricotta.
Mistura
265 Davenport Rd., 416 515 0009
The handsome, grey-on-gray room is scanned in the comfort of a plush booth. Chef Klaus Rourich sends refined interpretations of classic northern Italian dishes out. A vibrant salad of orange slices, uses ricotta and niçoise olives for seasoning and shaved fennel, and almonds for texture. Octopus, without a touch of mush, is counter by earthy puttanesca. Textbook bolognese, barely bound with milk, is strong with flavour.
Buca Yorkville
53 Scollard St., 416-962-2822
At Rob Gentile’s new Yorkville restaurant, the focus is on top-notch fish and seafood. The “ salami,” made with scallop octopus, swordfish or tuna blood combined with pork fat, are like wonderful headcheese, though nowhere near as popular as deep-fried exotica like Atlantic cod tongue or puffed dumplings dyed a deep black. The day’s catch, cooked in a carapace of salt, is cracked tableside and presented like a devotional offering. Everything is perfect, including the zeppola—an Italian doughnut— stuffed with a rich pistachio and dusted with confectioner’s sugar -mascarpone cream.
0 notes
Link
Sourdough pizza. I like to think of pizza and bread as siblings separated in. This pizza has a super bubbly, soft. Sourdough bakers are always on the lookout for creative ways to put unfed starter to use.

Make amazing pizza at home using Foodgeek sourdough pizza recipe. A naturally leavned dough with amazing taste that bakes up perfectly in your home oven. My first revelation in pizza making was when I realized that sourdough pizza dough was barely different from the bread dough I was already making — just less water and a little olive oil.
Hello everybody, I hope you're having an amazing day today. Today, I will show you a way to prepare a distinctive dish, sourdough pizza. It is one of my favorites. For mine, I will make it a little bit unique. This is gonna smell and look delicious.
Sourdough pizza is one of the most favored of current trending foods in the world. It is appreciated by millions every day. It is simple, it is quick, it tastes delicious. Sourdough pizza is something that I have loved my whole life. They're nice and they look fantastic.
I like to think of pizza and bread as siblings separated in. This pizza has a super bubbly, soft. Sourdough bakers are always on the lookout for creative ways to put unfed starter to use.
To get started with this recipe, we must first prepare a few components. You can cook sourdough pizza using 15 ingredients and 17 steps. Here is how you can achieve it.
The ingredients needed to make Sourdough pizza:
{Make ready of Dough.
{Prepare 250 g of flour (type 00).
{Get 25 g of semolina.
{Get 1/2 tsp of salt.
{Take 100 g of sourdough starter.
{Prepare 160 ml of water.
{Take 25 g of olive oil.
{Prepare pinch of dried yeast.
{Make ready of Toppings.
{Take 1 tin of peeled tomatoes (pelati), 400 g (260 g net).
{Make ready 1 tbsp of oregano.
{Take 1 clove of garlic, crushed.
{Get 1/4 tsp of salt.
{Take 200 g of buffalo mozarella.
{Make ready of anything else is optional, e.g. prosciutto, rocket, salami, mushrooms, basil.
Sourdough pizza crust is simply a crust that uses a sourdough starter instead of yeast to leaven the crust. The end product is a delicious crust that is both crispy and chewy and has all those natural airy. Thus, sourdough pizza is the original pizza; no yeast, milk, or sugar added. Our easy sourdough pizza is a nod to the olden methods in which a piece of scrap dough was rolled thin so it would cook.
Steps to make Sourdough pizza:
Place all the ingredients for the dough into a bowl and mix until just combined..
Cover the bowl, place it in the fridge, and let it ferment for 24 hours..
Lightly dust the counter top with a bit of flour and scoop the dough out on top of it..
Fold the dough into itself a few times until it starts to firm up a bit, then knock the air out of it by gently hitting it with your palm and pulling back with your fingers while slowly rotating the dough. Finally form a ball by tucking it in under itself while rotating..
Divide the dough into 2 or 3 equal portions, depending on whether you want a slightly larger pizza or not..
Roll the portions into small balls by gently pressing down on them with your palm while doing a circular motion on a lightly dusted counter top. Dust your hands with a bit of flour if they are too sticky, but don't use too much..
Cover the dough portions with a kitchen cloth and let it prove for an hour to an hour and a half..
Place a roasting tray upside-down into the oven, and crank the oven up as far as it will go to preheat it..
While the dough is proving and oven pre-heating, prepare your toppings..
Pour the tomatoes out of the tin and into a bowl, and add the salt and garlic. Use your hands to squash them, then strain the excess liquid. You can save the tomato juice to drink it later..
Add the oregano to the tomatoes and mix..
Slice the mozzarella into rings, about half a centimetre thick. Chop and/or prepare any other toppings you might be using..
Dust a large cutting board with a mix of semolina and flour. Place one of the dough portions on the board. Be careful not to squash it all together, try to retain its natural shape while moving it to the board..
Stretch the dough with your fingers from the middle outwards, to form a pizza base, leaving a thicker edge on the outside. If you tear a hole in the dough, just patch it up with a bit of excess dough..
Spread half (or 1/3 depending on how many portions of dough you have) of the tomato sauce over the pizza base, space out the mozzarella slices, and add any of the additional toppings. Drizzle with a little bit of olive oil..
Slide the pizza from the cutting board onto the upside-down tray in the oven. Bake for about 5 minutes on full heat..
While the pizza is cooking, repeat steps 13-17 for the other pizza(s)..
Master the art of making sourdough pizza dough using our comprehensive guide, complete with instructions of how to cook awesome pizza in your Ooni pizza oven! A wet sourdough works amazing with pizza, especially if it's retarted at least one night. If the dough is too wet I sometimes just press it with oiled hands in a non stick paper, but that's when I'm a bit. In recent years, I've often looked for ways to use up the excess or discard The only downside so far has been my inability to stretch and toss the sourdough pizza dough the. Make homemade sourdough pizza with a wonderfully chewy crust.
So that is going to wrap it up with this special food sourdough pizza recipe. Thank you very much for reading. I'm sure that you can make this at home. There is gonna be interesting food in home recipes coming up. Remember to save this page on your browser, and share it to your loved ones, friends and colleague. Thank you for reading. Go on get cooking!
0 notes
Text
Complete Guide to Integral Sourdough Bread

Integral Sourdough Bread
If you want to know how to make your own bread starter and you want to know how to make an Integral Sourdough Bread, you came to the right place! I will explain to you how to make your own starter and I will give you an integral sourdough bread recipe.
Wild yeast or commercial yeast
We all know that most of the leavened bread recipes use either fresh or dry yeast to help the dough rise. However, traditional sourdough fermentation relies on "wild" yeast and lactic acid bacteria that are naturally present in the air and in the flour to leaven the bread. Wild yeast is more resistant to acidic conditions than any other commercial yeast. This is what allows it to work together with lactic acid-producing bacteria to help the dough rise.
Where can you find lactic acid
Lactic acid bacteria can be found in several other fermented foods, including yogurt, kefir, sour milk products, koumiss, soy sauce, pickled vegetables, and sauerkraut.
What is a starter
The mix of wild yeast, lactic acid bacteria, flour and water used to make sourdough bread is called a "starter." I will explain how to make your own starter further in this post. During the bread-making process, the starter ferments the sugars in the dough, helping the bread rise. Because most of the sugar is consumed by the yeast and bacteria, the dough gets that specific kind of "sour" taste. Even though sourdough bread takes much longer to ferment and rise than other types of bread, it is much better for your health, easier to digest, gives you very good bacteria for your guts, and has a very pleasant texture.
What is the difference between integral flour and whole wheat flour
Whole wheat flour is made from hulled red wheat grain. It is processed to remove some of the bran and germ. Integral flour has all the germ and the bran from the red wheat. It was not processed and it provides much more fiber and other nutrients than any other type of flour.
What do you need to make your own starter
You will need two 1 liter jars. Using two jars makes it easier to feed the starter in a clean jar. Before you prepare the starter, I suggest to clean the jars very carefully. You can even rinse the jars with boiled water to make sure there is no soap residue or any contaminants left inside.

How long does it take to make a bread starter
It will take about 15 minutes of your time each day for 7 days to make the bread starter. After that, you will have to feed it only once a week, and you can keep it for many months just by following this procedure.
How to make a whole wheat bread starter
Day 1: Put the bread flour (50 g white flour and 50 g whole wheat flour) + 110 ml of water into the jar and mix very well. Then close the lid lightly and leave the jar on the counter away from direct sunlight.
Day 2: Take out 75 grams of the starter and put it into the other jar. Discard the rest. Add the flour (50 g white flour and 50 g whole wheat flour) + 110 ml of water into the jar and mix very well. Then close the lid lightly and leave the jar on the counter as before.
Day 3: Take out 75 grams of the starter and put it into the other jar. Discard the rest. Add the flour (50 g white flour and 50 g whole wheat flour) + 110 ml of water into the jar and mix very well. Again, close the lid and leave the jar on the counter. Repeat this step for day 4, day 5 and day 6.

Day 7: Take out 50 grams of the starter and put it into the other jar. You will use 270 g for your bread making. Add the flour (50 g white flour and 50 g whole wheat flour) + 110 ml of water into the jar and mix very well. Then close the lid properly and put the jar into the fridge. Let it rest for a week before you feed it again. Day 7 is the day you can make your bread!

How to feed your bread starter
Once a week, let's say on Saturday night, take out the jar of starter from the fridge, place it on the counter for the night. The next morning, take out 270 g of starter to make your bread. Now add the rest of the starter into a clean jar. Now for the feeding, just add the flour (50 g white flour and 50 g whole wheat flour) and 100 ml of water, mix, close the lid and place it back into the fridge until next week. That's it!
How to make integral bread with whole wheat sourdough starter
Add 270 g of starter into a large mixing bowl. Add 350 ml of warm water (not hot) and mix carefully.

When the starter has dissolved in the water, add the two types of flour, the sea salt and mix with your stand mixer for about 5 minutes.

After 5 minutes, you will see that the dough starts to form a ball in the mixer. When the dough has completely detached from the sides of the bowl, remove it from the mixing bowl, put it into a lightly oiled bowl and cover with a plastic wrap. Let the dough rest in a dark warm place for about 2 hours. After 2 hours, the dough should get much bigger, almost double in size.

Shaping and preparing the dough for proofing
For this step you will need a little bit of flour, proofing baskets, a blade or sharp knife and a bread cutter. First thing, sprinkle some flour onto your working area and place the dough. Now cut the dough into two balls with the bread cutter.

When the dough is cut, you need to form the two balls for proofing. Take one piece of the dough, stretch it and fold it onto the middle. Look at the pictures below.

The edge of the fold should land in the middle of the dough like so.

After that take the opposite half and fold on top of the fold, like so.

Now take the two folds together and fold towards you.

Again make sure the edge of the fold lands in the middle.

After that take the opposite half and fold it on top of the fold. Look at the two pictures below.

Here is the result of this folding method. See picture below.

Now take each ball and with your hands shape the dough to make the ball tighter. To achieve this result, push the ball away from you with your hands and bring it back towards you. The dough will have a rolling movement on the board. By doing so, the dough will roll from top to down naturally. Turn the dough 1/4 turn and repeat these movements until you tightened all sides of the ball.

Now it is time take a proofing basket, sprinkle some flour at the bottom and place the newly shaped ball upside down in it.

Do these steps for both loaves of bread. Cover the proofing baskets with a cotton cloth, and let them rest for another 2 hours.

Baking the integral bread with whole wheat sourdough starter
After 2 hours of proofing, place two Dutch ovens with their lids on into the oven and crank the heat to 475 degrees Fahrenheit.

Preheat them for about 45 minutes. Now (carefully!), take the Dutch ovens and place the proofed dough into them. Now the folded side of the dough will be at the bottom of the Dutch oven, and the stretched side will face up. Make some scars on top of the dough with a blade. Close the lid and put them into the oven. Reduce the oven temperature to 450 degrees. Bake for 20 minutes. After 20 minutes, remove the lid and cook for another 15 minutes or until the crust is golden brown and crispy.

Complete Guide to Integral Sourdough Bread

Do you want to know how to make your own bread starter and how to make an Integral Sourdough Bread? Well, you came to the right place! I will explain how to make your own starter and I will give you an integral sourdough bread recipe that does not require much kneading:) Let’s get started…
Bread Starter Ingredients350 g white flour350 g whole wheat flour770 ml waterIntegral Sourdough Bread Ingredients270 g bread starter350 ml lukewarm water10 g sea salt150 g integral flour (or whole wheat)450 g white flour5 g olive oil (just for oiling the bowl)
Bread StarterDay 1: Put the bread flour (50 g white flour and 50 g whole wheat flour) + 110 ml of water into the jar and mix very well. Then close the lid lightly and leave the jar on the counter away from direct sunlight.

Day 2: Take out 75 grams of the starter and put it into the other jar. Discard the rest. Add the flour (50 g white flour and 50 g whole wheat flour) + 110 ml of water into the jar and mix very well. Then close the lid lightly and leave the jar on the counter away from direct sunlight.

Day 3: Take out 75 grams of the starter and put it into the other jar. Discard the rest. Add the flour (50 g white flour and 50 g whole wheat flour) + 110 ml of water into the jar and mix very well. Then close the lid and leave the jar on the counter as before. Repeat this step for day 4, day 5 and day 6.

Day 7: Take out 50 grams of the starter and put it into the other jar. You will use 270 g for making your bread. Add the flour (50 g white flour and 50 g whole wheat flour) + 100 ml of water into the jar and mix very well. Then close the lid properly put the jar into the fridge. Let it rest for a week before feeding again. Day 7 is the day you can make your bread!To feed your starter, once a week, let’s say on Saturday night, take out the jar of the starter from the fridge, and leave it on the counter for the night. The next morning, take out 270 g of starter to make your bread. Now put the rest of the starter into a clean jar. Now for the feeding, just add the flour (50 g white flour and 50 g whole wheat flour) and 100 g of water, mix, close the lid and place the jar back into the fridge until next week. That’s it!
Integral Sourdough BreadPut 270 g of starter into a large mixing bowl. Add 350 ml of warm water (not hot) and mix carefully.

When the starter has dissolved in the water, add the two types of flour, the sea salt and mix with your stand mixer for about 5 minutes.

After 5 minutes, you will see that the dough starts to form a ball in the mixer. When the dough has completely detached from the sides of the bowl, remove it from the mixing bowl, put it into a lightly oiled bowl and cover with a plastic wrap. Let the dough rest in a dark warm place for about 2 hours. After 2 hours, the dough should get much bigger, almost double in size.

The next step is shaping and preparing the dough for proofing. For this step you will need a little bit of flour, proofing baskets, a blade or sharp knife and a bread cutter. First, sprinkle some flour onto your working area and place the dough. Then cut the dough into two balls with the bread cutter.

When the dough is cut, you need to form two dough balls for proofing. Take one piece of the dough, stretch it and fold one side into the middle. The fold's edge should land in the middle like so.

After that, take the other side and fold it on top of the other fold like so.

Now take the two folds together and fold towards you.

Again fold only to the middle of the dough.After that take the other side and fold on top of the previous fold. Look at the two pictures below.

This will be the result of this folding method (see the picture).Now take each ball and with your hands and shape the dough to make the ball tighter. To achieve this result, push the ball away from you with your hands and bring it back towards you. The dough will have a rolling movement on the board. By doing so the dough will roll from top to down naturally. Turn the dough 1/4 turn and repeat until you have done these movements on all sides of the ball.Now it is time take a proofing basket, sprinkle some flour at the bottom.

Place the newly shaped ball upside down in it (the stretched side facing down).
Repeat these steps with the second loaf. Cover the proofing baskets with a cotton cloth and let them rest for another 2 hours. After 2 hours of proofing, place two Dutch ovens with their lids on into the oven and crank the heat to 475 degrees Fahrenheit.
Preheat them for about 45 minutes. Now, carefully take the Dutch ovens out and place the proofed dough into them. Once in the Dutch oven, the stretched side of the dough will be facing up. Make some scars on top of the dough with a blade. Close the lid, reduce the temperature to 450 degrees, put the Dutch ovens back in and bake for 20 minutes.
After 20 minutes, remove the lid and bake for another 15 minutes or until the crust is golden-brown and crispy.

Read the full article
#bacteria#bread#breads#ferment#fermentedfoods#homemadebread#homemadestarter#Integralflour#lacticacidbacteria#leavened#multigrainbread#sourdough#sourdoughbread#starter#wholewheatbread#whole-wheat#yeast
0 notes
Text
Canopy: A (Tree)at of a Lunch
By Matthew Watowich and Harry Feldman
When I heard that I was to eat at a canopy themed restaurant, I had my reservations. I expected some cheesy decorations a la Rainforest Cafe. Instead, Canopy surpassed our expectations as we were met with a beautifully designed dining room with a clever color scheme and tasteful art. As we walked in the front door, we immediately noticed the high ceilings, which were accompanied by a large hanging art piece made up of thin sticks, really emphasizing the canopy aspect of this restaurant. Furthermore, the walls were light warm colors, painted in greens and blues, with some having tree-themed wallpaper. Simple, subtle art covered the walls, which helped create a relaxed, yet comfortable environment.

A view of the restaurant seating area
The inside was lit primarily with natural light, which flooded in from the large glass windows that looked out onto Montrose. One aspect that stood out to us surprisingly was the chairs. Chairs normally are not something that one typically notices at a restaurant, but that’s not the case at Canopy. As soon as we sat down we all let out a collective, “Ah,” as the chairs were extremely comfortable and clearly ergonomic. The only thing that was bad about the atmosphere was that when we first entered, we were all hit with a strong tuna smell, which is not the most pleasant smell in the world. This faded soon, however, as our noses became accustomed to it.
Looking at the menu, we suspected we were in for a treat before we even ordered. The menu contained few items, which we took to mean that they had specialized menu items. The food we ordered was diverse, ranging from seared fishes to beef burgers to light quiches. As we ordered, it became apparent that the service was impeccable. Despite our indecisiveness, the waiter was unfailingly patient and friendly, never forgetting an order. Throughout the meal, he constantly came back to refill our drinks and take our plates, but his presence did not seem too overbearing or aggressive.
After ordering, he brought out what we assumed to be homemade sourdough bread and butter, a pleasant beginning to our meal. The food’s quality became shockingly clear, however, when the cheese plate, our appetizer, was brought out. It featured a brie, a cheddar, and bleu cheese, which were all made at Dairymaids, a local Houston cheese shop. These cheeses were accompanied by a fig jam and an assortment of nuts. The cheese and fig jam were exquisite together, and the smooth texture contrasted well with the crostini.

The cheese plate, a highlight of our meal
The entrees simply continued to impress us. Excepting a few orders that we deemed “okay,” we were collectively blown away by our food. The mac n’ cheese was modestly portioned, but do not be mistaken, it did the job. The small bowl contained few distinct ingredients, but when serving a classic dish, it is important to be respectful to tradition. It’s soft texture complemented the smooth, rich and creamy cheese. The quiche was similarly delicious. Filled with cheddar cheese, caramelized onions and farm greens, the flavors were distinct and well-balanced. The creaminess from the cheese paired well with the drier quinoa-couscous salad, and the broccolini. My only criticism of the quiche was that it was slightly undercooked. It appeared well cooked with a golden-brown crust and lightly browned top, but the inside, rather than being light and fluffy, was too moist and soggy. This, however, did not take away from the overall experience of the quiche as it remained rich and enjoyable.

The quiche with its side salad and brocollini
The BLT Pizza, more like LT Pizza (because we asked for no bacon), had a strong, smokey flavor. Its thin crust, accompanied by roasted tomatoes, arugula, and parmesan cheese, all added to the delightfulness of this dish. Our only critique of the pizza was the excessive use of arugula, which was most likely used to accommodate for the lack of bacon. The Kobe Beef Chili Hot Dog and fries was a delectable blend of beef, cheese, and green onions. The chili laid on top the sausage, and the cheese helped stick them together, which minimized the amount of toppings that fell off of it. The green onions added a nice crunch, and the fries felt more like tubular baked chips than actual fries, as they were cooked to a crispy perfection. In one word, delicious.
The brie and prosciutto melt was similar in this regard. The brie was the same as that of the cheese plate, which we knew was fantastic. The prosciutto was equally rich and sliced delicately, and the fig jam was spread well over the lightly toasted bread. The arugula was unconvincing in its presence, compared to what the menu promised, but this did not mean that the overall sandwich was bad. It was quite tasteful and pleasant, but it just left us wanting a little more.
The crispy chicken sandwich did not impress us as much as the other entrees. Crispy chicken and burger buns do not contrast well as far as texture is concerned. While the bun was toasted well, it just didn’t match the magnitude of the chicken. All the pieces of this meal were well done: the chicken was juicy, the bacon was crisp and delightful, and the buns were well toasted. Our problem arose from the composition of the meal itself; it really just didn’t feel like a well thought out meal. It confused the mouth.

Us enjoying our lunch at Canopy
Canopy is a wonderful spot to eat well rounded American cuisine in a delightful environment. The ambiance, the ergonomic chairs, and the excellent food make this a no-brainer for anyone trying to enjoy themselves on a relaxed night out or lunch date. The price was not quite modest, but definitely fair for the food you’re paying for. We strongly recommend the cheese plate for the table, along with the mac n’ cheese and the quiche.
Ratings:
Food: 8
Service: 9
Atmosphere: 9.5
Price: $20-30
Overall: 8.5
0 notes
Text
Complete Guide to Integral Sourdough Bread

Integral Sourdough Bread
If you want to know how to make your own bread starter and you want to know how to make an Integral Sourdough Bread, you came to the right place! I will explain to you how to make your own starter and I will give you an integral sourdough bread recipe.
Wild yeast or commercial yeast
We all know that most of the leavened bread recipes use either fresh or dry yeast to help the dough rise. However, traditional sourdough fermentation relies on "wild" yeast and lactic acid bacteria that are naturally present in the air and in the flour to leaven the bread. Wild yeast is more resistant to acidic conditions than any other commercial yeast. This is what allows it to work together with lactic acid-producing bacteria to help the dough rise.
Where can you find lactic acid
Lactic acid bacteria can be found in several other fermented foods, including yogurt, kefir, sour milk products, koumiss, soy sauce, pickled vegetables, and sauerkraut.
What is a starter
The mix of wild yeast, lactic acid bacteria, flour and water used to make sourdough bread is called a "starter." I will explain how to make your own starter further in this post. During the bread-making process, the starter ferments the sugars in the dough, helping the bread rise. Because most of the sugar is consumed by the yeast and bacteria, the dough gets that specific kind of "sour" taste. Even though sourdough bread takes much longer to ferment and rise than other types of bread, it is much better for your health, easier to digest, gives you very good bacteria for your guts, and has a very pleasant texture.
What is the difference between integral flour and whole wheat flour
Whole wheat flour is made from hulled red wheat grain. It is processed to remove some of the bran and germ. Integral flour has all the germ and the bran from the red wheat. It was not processed and it provides much more fiber and other nutrients than any other type of flour.
What do you need to make your own starter
You will need two 1 liter jars. Using two jars makes it easier to feed the starter in a clean jar. Before you prepare the starter, I suggest to clean the jars very carefully. You can even rinse the jars with boiled water to make sure there is no soap residue or any contaminants left inside.

How long does it take to make a bread starter
It will take about 15 minutes of your time each day for 7 days to make the bread starter. After that, you will have to feed it only once a week, and you can keep it for many months just by following this procedure.
How to make a whole wheat bread starter
Day 1: Put the bread flour (50 g white flour and 50 g whole wheat flour) + 110 ml of water into the jar and mix very well. Then close the lid lightly and leave the jar on the counter away from direct sunlight.
Day 2: Take out 75 grams of the starter and put it into the other jar. Discard the rest. Add the flour (50 g white flour and 50 g whole wheat flour) + 110 ml of water into the jar and mix very well. Then close the lid lightly and leave the jar on the counter as before.
Day 3: Take out 75 grams of the starter and put it into the other jar. Discard the rest. Add the flour (50 g white flour and 50 g whole wheat flour) + 110 ml of water into the jar and mix very well. Again, close the lid and leave the jar on the counter. Repeat this step for day 4, day 5 and day 6.

Day 7: Take out 50 grams of the starter and put it into the other jar. You will use 270 g for your bread making. Add the flour (50 g white flour and 50 g whole wheat flour) + 110 ml of water into the jar and mix very well. Then close the lid properly and put the jar into the fridge. Let it rest for a week before you feed it again. Day 7 is the day you can make your bread!

How to feed your bread starter
Once a week, let's say on Saturday night, take out the jar of starter from the fridge, place it on the counter for the night. The next morning, take out 270 g of starter to make your bread. Now add the rest of the starter into a clean jar. Now for the feeding, just add the flour (50 g white flour and 50 g whole wheat flour) and 100 ml of water, mix, close the lid and place it back into the fridge until next week. That's it!
How to make integral bread with whole wheat sourdough starter
Add 270 g of starter into a large mixing bowl. Add 350 ml of warm water (not hot) and mix carefully.

When the starter has dissolved in the water, add the two types of flour, the sea salt and mix with your stand mixer for about 5 minutes.

After 5 minutes, you will see that the dough starts to form a ball in the mixer. When the dough has completely detached from the sides of the bowl, remove it from the mixing bowl, put it into a lightly oiled bowl and cover with a plastic wrap. Let the dough rest in a dark warm place for about 2 hours. After 2 hours, the dough should get much bigger, almost double in size.

Shaping and preparing the dough for proofing
For this step you will need a little bit of flour, proofing baskets, a blade or sharp knife and a bread cutter. First thing, sprinkle some flour onto your working area and place the dough. Now cut the dough into two balls with the bread cutter.

When the dough is cut, you need to form the two balls for proofing. Take one piece of the dough, stretch it and fold it onto the middle. Look at the pictures below.

The edge of the fold should land in the middle of the dough like so.

After that take the opposite half and fold on top of the fold, like so.

Now take the two folds together and fold towards you.

Again make sure the edge of the fold lands in the middle.

After that take the opposite half and fold it on top of the fold. Look at the two pictures below.

Here is the result of this folding method. See picture below.

Now take each ball and with your hands shape the dough to make the ball tighter. To achieve this result, push the ball away from you with your hands and bring it back towards you. The dough will have a rolling movement on the board. By doing so, the dough will roll from top to down naturally. Turn the dough 1/4 turn and repeat these movements until you tightened all sides of the ball.

Now it is time take a proofing basket, sprinkle some flour at the bottom and place the newly shaped ball upside down in it.

Do these steps for both loaves of bread. Cover the proofing baskets with a cotton cloth, and let them rest for another 2 hours.

Baking the integral bread with whole wheat sourdough starter
After 2 hours of proofing, place two Dutch ovens with their lids on into the oven and crank the heat to 475 degrees Fahrenheit.

Preheat them for about 45 minutes. Now (carefully!), take the Dutch ovens and place the proofed dough into them. Now the folded side of the dough will be at the bottom of the Dutch oven, and the stretched side will face up. Make some scars on top of the dough with a blade. Close the lid and put them into the oven. Reduce the oven temperature to 450 degrees. Bake for 20 minutes. After 20 minutes, remove the lid and cook for another 15 minutes or until the crust is golden brown and crispy.

Complete Guide to Integral Sourdough Bread

Do you want to know how to make your own bread starter and how to make an Integral Sourdough Bread? Well, you came to the right place! I will explain how to make your own starter and I will give you an integral sourdough bread recipe that does not require much kneading:) Let’s get started…
Bread Starter Ingredients350 g white flour350 g whole wheat flour770 ml waterIntegral Sourdough Bread Ingredients270 g bread starter350 ml lukewarm water10 g sea salt150 g integral flour (or whole wheat)450 g white flour5 g olive oil (just for oiling the bowl)
Bread StarterDay 1: Put the bread flour (50 g white flour and 50 g whole wheat flour) + 110 ml of water into the jar and mix very well. Then close the lid lightly and leave the jar on the counter away from direct sunlight.

Day 2: Take out 75 grams of the starter and put it into the other jar. Discard the rest. Add the flour (50 g white flour and 50 g whole wheat flour) + 110 ml of water into the jar and mix very well. Then close the lid lightly and leave the jar on the counter away from direct sunlight.

Day 3: Take out 75 grams of the starter and put it into the other jar. Discard the rest. Add the flour (50 g white flour and 50 g whole wheat flour) + 110 ml of water into the jar and mix very well. Then close the lid and leave the jar on the counter as before. Repeat this step for day 4, day 5 and day 6.

Day 7: Take out 50 grams of the starter and put it into the other jar. You will use 270 g for making your bread. Add the flour (50 g white flour and 50 g whole wheat flour) + 100 ml of water into the jar and mix very well. Then close the lid properly put the jar into the fridge. Let it rest for a week before feeding again. Day 7 is the day you can make your bread!To feed your starter, once a week, let’s say on Saturday night, take out the jar of the starter from the fridge, and leave it on the counter for the night. The next morning, take out 270 g of starter to make your bread. Now put the rest of the starter into a clean jar. Now for the feeding, just add the flour (50 g white flour and 50 g whole wheat flour) and 100 g of water, mix, close the lid and place the jar back into the fridge until next week. That’s it!
Integral Sourdough BreadPut 270 g of starter into a large mixing bowl. Add 350 ml of warm water (not hot) and mix carefully.

When the starter has dissolved in the water, add the two types of flour, the sea salt and mix with your stand mixer for about 5 minutes.

After 5 minutes, you will see that the dough starts to form a ball in the mixer. When the dough has completely detached from the sides of the bowl, remove it from the mixing bowl, put it into a lightly oiled bowl and cover with a plastic wrap. Let the dough rest in a dark warm place for about 2 hours. After 2 hours, the dough should get much bigger, almost double in size.

The next step is shaping and preparing the dough for proofing. For this step you will need a little bit of flour, proofing baskets, a blade or sharp knife and a bread cutter. First, sprinkle some flour onto your working area and place the dough. Then cut the dough into two balls with the bread cutter.

When the dough is cut, you need to form two dough balls for proofing. Take one piece of the dough, stretch it and fold one side into the middle. The fold's edge should land in the middle like so.

After that, take the other side and fold it on top of the other fold like so.

Now take the two folds together and fold towards you.

Again fold only to the middle of the dough.After that take the other side and fold on top of the previous fold. Look at the two pictures below.

This will be the result of this folding method (see the picture).Now take each ball and with your hands and shape the dough to make the ball tighter. To achieve this result, push the ball away from you with your hands and bring it back towards you. The dough will have a rolling movement on the board. By doing so the dough will roll from top to down naturally. Turn the dough 1/4 turn and repeat until you have done these movements on all sides of the ball.Now it is time take a proofing basket, sprinkle some flour at the bottom.

Place the newly shaped ball upside down in it (the stretched side facing down).
Repeat these steps with the second loaf. Cover the proofing baskets with a cotton cloth and let them rest for another 2 hours. After 2 hours of proofing, place two Dutch ovens with their lids on into the oven and crank the heat to 475 degrees Fahrenheit.
Preheat them for about 45 minutes. Now, carefully take the Dutch ovens out and place the proofed dough into them. Once in the Dutch oven, the stretched side of the dough will be facing up. Make some scars on top of the dough with a blade. Close the lid, reduce the temperature to 450 degrees, put the Dutch ovens back in and bake for 20 minutes.
After 20 minutes, remove the lid and bake for another 15 minutes or until the crust is golden-brown and crispy.

Read the full article
#bacteria#bread#breads#ferment#fermentedfoods#homemadebread#homemadestarter#Integralflour#lacticacidbacteria#leavened#multigrainbread#sourdough#sourdoughbread#starter#wholewheatbread#whole-wheat#yeast
0 notes
Text
Complete Guide to Integral Sourdough Bread

Integral Sourdough Bread
If you want to know how to make your own bread starter and you want to know how to make an Integral Sourdough Bread, you came to the right place! I will explain to you how to make your own starter and I will give you an integral sourdough bread recipe.
Wild yeast or commercial yeast
We all know that most of the leavened bread recipes use either fresh or dry yeast to help the dough rise. However, traditional sourdough fermentation relies on "wild" yeast and lactic acid bacteria that are naturally present in the air and in the flour to leaven the bread. Wild yeast is more resistant to acidic conditions than any other commercial yeast. This is what allows it to work together with lactic acid-producing bacteria to help the dough rise.
Where can you find lactic acid
Lactic acid bacteria can be found in several other fermented foods, including yogurt, kefir, sour milk products, koumiss, soy sauce, pickled vegetables, and sauerkraut.
What is a starter
The mix of wild yeast, lactic acid bacteria, flour and water used to make sourdough bread is called a "starter." I will explain how to make your own starter further in this post. During the bread-making process, the starter ferments the sugars in the dough, helping the bread rise. Because most of the sugar is consumed by the yeast and bacteria, the dough gets that specific kind of "sour" taste. Even though sourdough bread takes much longer to ferment and rise than other types of bread, it is much better for your health, easier to digest, gives you very good bacteria for your guts, and has a very pleasant texture.
What is the difference between integral flour and whole wheat flour
Whole wheat flour is made from hulled red wheat grain. It is processed to remove some of the bran and germ. Integral flour has all the germ and the bran from the red wheat. It was not processed and it provides much more fiber and other nutrients than any other type of flour.
What do you need to make your own starter
You will need two 1 liter jars. Using two jars makes it easier to feed the starter in a clean jar. Before you prepare the starter, I suggest to clean the jars very carefully. You can even rinse the jars with boiled water to make sure there is no soap residue or any contaminants left inside.

How long does it take to make a bread starter
It will take about 15 minutes of your time each day for 7 days to make the bread starter. After that, you will have to feed it only once a week, and you can keep it for many months just by following this procedure.
How to make a whole wheat bread starter
Day 1: Put the bread flour (50 g white flour and 50 g whole wheat flour) + 110 ml of water into the jar and mix very well. Then close the lid lightly and leave the jar on the counter away from direct sunlight.
Day 2: Take out 75 grams of the starter and put it into the other jar. Discard the rest. Add the flour (50 g white flour and 50 g whole wheat flour) + 110 ml of water into the jar and mix very well. Then close the lid lightly and leave the jar on the counter as before.
Day 3: Take out 75 grams of the starter and put it into the other jar. Discard the rest. Add the flour (50 g white flour and 50 g whole wheat flour) + 110 ml of water into the jar and mix very well. Again, close the lid and leave the jar on the counter. Repeat this step for day 4, day 5 and day 6.

Day 7: Take out 50 grams of the starter and put it into the other jar. You will use 270 g for your bread making. Add the flour (50 g white flour and 50 g whole wheat flour) + 110 ml of water into the jar and mix very well. Then close the lid properly and put the jar into the fridge. Let it rest for a week before you feed it again. Day 7 is the day you can make your bread!

How to feed your bread starter
Once a week, let's say on Saturday night, take out the jar of starter from the fridge, place it on the counter for the night. The next morning, take out 270 g of starter to make your bread. Now add the rest of the starter into a clean jar. Now for the feeding, just add the flour (50 g white flour and 50 g whole wheat flour) and 100 ml of water, mix, close the lid and place it back into the fridge until next week. That's it!
How to make integral bread with whole wheat sourdough starter
Add 270 g of starter into a large mixing bowl. Add 350 ml of warm water (not hot) and mix carefully.

When the starter has dissolved in the water, add the two types of flour, the sea salt and mix with your stand mixer for about 5 minutes.

After 5 minutes, you will see that the dough starts to form a ball in the mixer. When the dough has completely detached from the sides of the bowl, remove it from the mixing bowl, put it into a lightly oiled bowl and cover with a plastic wrap. Let the dough rest in a dark warm place for about 2 hours. After 2 hours, the dough should get much bigger, almost double in size.

Shaping and preparing the dough for proofing
For this step you will need a little bit of flour, proofing baskets, a blade or sharp knife and a bread cutter. First thing, sprinkle some flour onto your working area and place the dough. Now cut the dough into two balls with the bread cutter.

When the dough is cut, you need to form the two balls for proofing. Take one piece of the dough, stretch it and fold it onto the middle. Look at the pictures below.

The edge of the fold should land in the middle of the dough like so.

After that take the opposite half and fold on top of the fold, like so.

Now take the two folds together and fold towards you.

Again make sure the edge of the fold lands in the middle.

After that take the opposite half and fold it on top of the fold. Look at the two pictures below.

Here is the result of this folding method. See picture below.

Now take each ball and with your hands shape the dough to make the ball tighter. To achieve this result, push the ball away from you with your hands and bring it back towards you. The dough will have a rolling movement on the board. By doing so, the dough will roll from top to down naturally. Turn the dough 1/4 turn and repeat these movements until you tightened all sides of the ball.

Now it is time take a proofing basket, sprinkle some flour at the bottom and place the newly shaped ball upside down in it.

Do these steps for both loaves of bread. Cover the proofing baskets with a cotton cloth, and let them rest for another 2 hours.

Baking the integral bread with whole wheat sourdough starter
After 2 hours of proofing, place two Dutch ovens with their lids on into the oven and crank the heat to 475 degrees Fahrenheit.

Preheat them for about 45 minutes. Now (carefully!), take the Dutch ovens and place the proofed dough into them. Now the folded side of the dough will be at the bottom of the Dutch oven, and the stretched side will face up. Make some scars on top of the dough with a blade. Close the lid and put them into the oven. Reduce the oven temperature to 450 degrees. Bake for 20 minutes. After 20 minutes, remove the lid and cook for another 15 minutes or until the crust is golden brown and crispy.

Complete Guide to Integral Sourdough Bread

Do you want to know how to make your own bread starter and how to make an Integral Sourdough Bread? Well, you came to the right place! I will explain how to make your own starter and I will give you an integral sourdough bread recipe that does not require much kneading:) Let’s get started…
Bread Starter Ingredients350 g white flour350 g whole wheat flour770 ml waterIntegral Sourdough Bread Ingredients270 g bread starter350 ml lukewarm water10 g sea salt150 g integral flour (or whole wheat)450 g white flour5 g olive oil (just for oiling the bowl)
Bread StarterDay 1: Put the bread flour (50 g white flour and 50 g whole wheat flour) + 110 ml of water into the jar and mix very well. Then close the lid lightly and leave the jar on the counter away from direct sunlight.

Day 2: Take out 75 grams of the starter and put it into the other jar. Discard the rest. Add the flour (50 g white flour and 50 g whole wheat flour) + 110 ml of water into the jar and mix very well. Then close the lid lightly and leave the jar on the counter away from direct sunlight.

Day 3: Take out 75 grams of the starter and put it into the other jar. Discard the rest. Add the flour (50 g white flour and 50 g whole wheat flour) + 110 ml of water into the jar and mix very well. Then close the lid and leave the jar on the counter as before. Repeat this step for day 4, day 5 and day 6.

Day 7: Take out 50 grams of the starter and put it into the other jar. You will use 270 g for making your bread. Add the flour (50 g white flour and 50 g whole wheat flour) + 100 ml of water into the jar and mix very well. Then close the lid properly put the jar into the fridge. Let it rest for a week before feeding again. Day 7 is the day you can make your bread!To feed your starter, once a week, let’s say on Saturday night, take out the jar of the starter from the fridge, and leave it on the counter for the night. The next morning, take out 270 g of starter to make your bread. Now put the rest of the starter into a clean jar. Now for the feeding, just add the flour (50 g white flour and 50 g whole wheat flour) and 100 g of water, mix, close the lid and place the jar back into the fridge until next week. That’s it!
Integral Sourdough BreadPut 270 g of starter into a large mixing bowl. Add 350 ml of warm water (not hot) and mix carefully.

When the starter has dissolved in the water, add the two types of flour, the sea salt and mix with your stand mixer for about 5 minutes.

After 5 minutes, you will see that the dough starts to form a ball in the mixer. When the dough has completely detached from the sides of the bowl, remove it from the mixing bowl, put it into a lightly oiled bowl and cover with a plastic wrap. Let the dough rest in a dark warm place for about 2 hours. After 2 hours, the dough should get much bigger, almost double in size.

The next step is shaping and preparing the dough for proofing. For this step you will need a little bit of flour, proofing baskets, a blade or sharp knife and a bread cutter. First, sprinkle some flour onto your working area and place the dough. Then cut the dough into two balls with the bread cutter.

When the dough is cut, you need to form two dough balls for proofing. Take one piece of the dough, stretch it and fold one side into the middle. The fold's edge should land in the middle like so.

After that, take the other side and fold it on top of the other fold like so.

Now take the two folds together and fold towards you.

Again fold only to the middle of the dough.After that take the other side and fold on top of the previous fold. Look at the two pictures below.

This will be the result of this folding method (see the picture).Now take each ball and with your hands and shape the dough to make the ball tighter. To achieve this result, push the ball away from you with your hands and bring it back towards you. The dough will have a rolling movement on the board. By doing so the dough will roll from top to down naturally. Turn the dough 1/4 turn and repeat until you have done these movements on all sides of the ball.Now it is time take a proofing basket, sprinkle some flour at the bottom.

Place the newly shaped ball upside down in it (the stretched side facing down).
Repeat these steps with the second loaf. Cover the proofing baskets with a cotton cloth and let them rest for another 2 hours. After 2 hours of proofing, place two Dutch ovens with their lids on into the oven and crank the heat to 475 degrees Fahrenheit.
Preheat them for about 45 minutes. Now, carefully take the Dutch ovens out and place the proofed dough into them. Once in the Dutch oven, the stretched side of the dough will be facing up. Make some scars on top of the dough with a blade. Close the lid, reduce the temperature to 450 degrees, put the Dutch ovens back in and bake for 20 minutes.
After 20 minutes, remove the lid and bake for another 15 minutes or until the crust is golden-brown and crispy.

Read the full article
#bacteria#bread#breads#ferment#fermentedfoods#homemadebread#homemadestarter#Integralflour#lacticacidbacteria#leavened#multigrainbread#sourdough#sourdoughbread#starter#wholewheatbread#whole-wheat#yeast
0 notes
Last Seen Blogs

mistifythe7th
Untitled

golden-chariot
The Sun The Sun The Sun


aon1740
Untitled

8-billion-wishes
8billionwishes