#liquid dextrose
Text
⛄ Liquid Luck Roll The Dice Challenge - Winter Edition 2023 | Rules & Information ⛄

Liquid Luck Roll The Dice Challenge - Winter Edition 2023 is here! ⛄
The schedule :
15 November : The first day to get a prompt
1 December : The AO3 Collection opens to Liquid Luck Roll The Dice Challenge - Winter Edition 2023 works
24 January 31 January : The final day to get a new prompt
31 January 7 February : The AO3 Collection closes to Liquid Luck Roll The Dice Challenge works
The prompts :
- This is a prompt-based challenge. Every prompt you’ll receive consists of three different things; a winter prompt, a word you must use in your work, and an emotion. There are 10 winter prompts, 10 words and 10 emotions. Prompts will be decided by three rolls of the dice. To receive a prompt, you can send me a message here on Tumblr, or if you don’t have a Tumblr account you can send me an anon ask with your email (which I will not publish) and I will email you a prompt.
- Winter prompt : This round the winter part of your prompt consists of a photo and a connected winter-themed prompt. For example your photo may be a photo of a snowman, and the connected winter-themed prompt is 'Snowball fight'. It's up to you if you prefer to use the photo as inspiration, or the winter-themed prompt. Or perhaps you'd like to use both. Interpret the prompt as you wish, but make sure it’s in there in some way, shape or form.
- Word : The word must be used in your work. For example, if you word is 'Rose', you may use rose, roses, rosebud etc. But not prose, dextrose, morose etc.
- Emotion : Interpret the emotion as you wish, but make sure it is in your work in some way, shape or form.
Just a few simple rules & guidelines for this challenge :
- Both fics and art are welcome for this challenge. There is no minimum or maximum word count, and all forms of art (moodboard, drawing, fan video etc.) are welcome.
- If you receive a prompt that you really can’t work with, no worries! You can skip up to three prompts during the duration of this challenge. Just let me know, and I’ll roll the dice for a new prompt.
- All works posted to the AO3 Collection will be shared to the Tumblr page. Please give it up to 48 hours for me to share your work to Tumblr. If it hasn’t been shared after that time, there’s a chance I have missed it. Then feel free to send me a message to remind me to share it. The AO3 Collection will be the same as the one for the Liquid Luck Drabble & Art Challenge, but works for the Roll The Dice Challenge will only be accepted between the 1st of December and the 7th of February. After that, the challenge is over and the AO3 Collection is only open to Liquid Luck Drabble & Art Challenge works again.
- If you only post your work to Tumblr / Wattpad etc. and you want it shared to the page, please send me a message with the following information and a link to your work. :
- Title :
- Pairing/Character :
- Rating :
- Warnings (if any) :
- Summary :
- Drabbles / fics will be shared with a post with information and a link to your work. If you create art for the challenge and you tag the page, I will reblog your art, but as tagging doesn’t always work, please send me a message if your art hasn’t been reblogged after 48 hours.
- You can create as many works for this challenge as you like, but you can only request one prompt at a time. And make sure to post your work(s) before the 7th of February.
- Works for this challenge have to be new. Older works that fit the prompt will not be accepted into the AO3 collection or shared to the Tumblr page.
- This is a Harry Potter challenge, and all pairings are allowed, as long as they include characters from the book / movie. This includes Rare Pairs, Next Gen, Cross Gen and characters from connected canon such as Cursed Child and Fantastic Beasts. Your work does not need to include Liquid Luck (the name comes from our ongoing Liquid Luck Drabble & Art Challenge)
- Any rating or theme is allowed for the challenge. But please make sure to put up the correct tags, and to add a warning if your story contains things like MCD, Violence, Non-Con etc.
- Prompts for the Liquid Luck Roll The Dice Challenge may be combined with prompts for other challenges, but please make sure to check with the mods for those other challenges / fests as well!
- A masterlist of all the works created for this challenge will be shared on this Tumblr page after the challenge has ended.
If you have any questions, just send me a message! ❤️
25 notes
·
View notes
Text
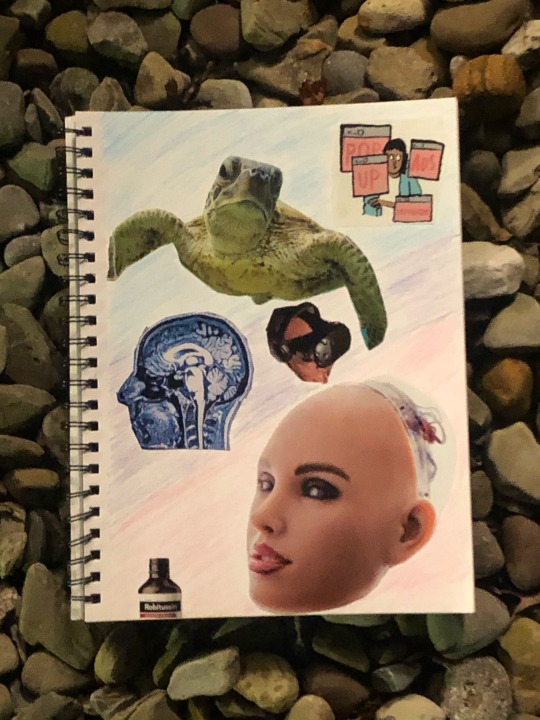
Sea Turtle facts:
Sea turtles are some of the oldest creatures on Earth, with a history dating back more than 100 million years. (Myfwc.com)
Sea turtles are found in warm and temperate oceans worldwide(Seaworld)
Sea turtles' natural lifespan is estimated to be 50-100 years. (Nation Oceanic)
There are only 7 different types of sea turtles (seeturtles.com)
Female sea turtles return to the same beaches where they hatched to lay their eggs, a behavior known as natal homing. (baysoundings.com)
Consumerist and technological facts:
Robitussin: Contains two active ingredients dextrose thorp ham and guaifenesin(Healthline.com)
Pop-up ads: Ethan Zuckerman, the man who invented pop-up ads, has apologized to the world(Forbes)
VR: The first VR headset was patented in the 1960’s and was named the ‘Telesphere Mask’ by inventor Morton Heilig. (Institute of Imagination).
MRI: MRIs are popular because they offer images with more detail than other diagnostic imaging tests. (Kingsbridge private hospital)
AI Robot: by 2045, AI is expected to completely surpass human intelligence. (Valuer.ai)
Attendance Prompt:
"he boiled up a solution of purple-red cochineal and left it under his windowsill to cool. Somehow a phial of acqua regia, a strong acid mixture, broke and spilled across the tin window frame, splashing into the cooling cochineal and instantly turning the liquid bright scarlet."
I thought this was really interesting as someone can accidentally stumble across the color scarlet. It really makes you question if he was able to achieve that specific shade of scarlet again. Could this be achieved without it falling into the cooling cochineal?
2 notes
·
View notes
Text
me: Get this pickup line- "hey baby are you a 5% dextrose intravenous therapy solution that became hypotonic? Because you're too sweet!"
little sister, looking up from her comic: what
me: yk because dextrose is a type of sugar that's used in IV drips in case of blood loss and such,, it's an isotonic fluid, which means it has the proportionate amount of water and solutes in it as the intracelullar liquid, so while hypotonic and hypertonic fluids make extracelullar liquid and intracelullar liquid (respectively) expand - since the water will move to where there's more solutes, thus either leaving the cell through its permeable wall into the water-lacking extracelullar liquid or leaving the extracelullar liquid into the water-lacking cell - but the solution can become hypotonic in excess !! because--
little sister: [heavy, distressed sigh]
#just a small moment where i felt like a stereotype autistic#she usually lets me rant or even asks me to (when it's sleepy time) but she was busy. which. fair#but THAT was the sound of “nobody cares [insert white guy name].”#autism#text post
6 notes
·
View notes
Text
GOLDEN RULES FOR NURSES
NURSES
Golden Points to Remember
➥ Antiemetic drugs prevent vomiting.
➥ Intraosseous injections are given into the bone marrow.
➥ Intrathecal injections are given into the spinal cavity.
➥ Intramuscular injections should be given on 90° angle.
➥ Subcutaneous injections should be given on 45° angle.
➥ Intradermal injections should be given on 15° angle.
➥ Blood group ‘AB’ is known as universal recipient and blood group ‘O is known as universal donor.
➥ Mercury is used in thermometer because mercury is very sensitive to little change in temperature.
➥ For giving enema, left lateral position should be given.
➥ Air cushion is used to prevent bed sores.
➥ Hey’s test is performed for identify bile salts in urine
➥ Smith’s test is performed to found out presence of bile pigments in urine.
➥ Components of Total parenteral nutrition (TPN) are carbohydrates (glucose), amino acids, lipids,vitamins, minerals, and electrolytes.
➥ Insulin may be added to TPN to offset the high concentration of glucose and heparin may be added to limit the formation of a fibrous clot at the tip of the catheter.
➥ The bones in the forearm act as a natural splint by providing support to an I.V. access site.
➥ Don’t select an I.V. site on a paralyzed or traumatized arm.
➥ The basilica vein is normally used for a peripherally inserted central catheter (PICC) line.
➥ Because the insertion of a PICC line is below the level of the heart, an air embolism isn’t an expected occurrence.
➥ If a client has a high temperature, notify the physician before administering any blood product.
➥ No solution or product other than normal saline should be added to blood or blood product.
➥ Maslow’s hierarchy of needs must be met in the following order: physiologic (oxygen, food, water,sex, rest, and comfort), safety and security, love and belonging, self-esteem and recognition, and self- actualization.
➥ To avoid staining the teeth, the client should take a liquid iron preparation through a straw.
➥ Fluid oscillation in the tubing of a chest drainage system indicates that the system is working properly.
➥ The type of assessment that includes data related to a client’s biological, cultural, spiritual and social need is called Comprehensive Assessment.
➥ The Vital Signs are: 1. Temperature, 2. Pulse, 3.Respiration, 4. Blood pressure, and 5. Pain.
➥ Heat loss due to contact with circulating air movement is known as Convection.
➥ The range of marking in glass/clinical thermometer is 95-110° F and 35-43.3°C.
➥ Normal Rectal temperature is 99.6° F (37°C) (1°F ) higher than oral temperature).
➥ Rectal temperature is the most reliable.
➥ Relapsing fever: Fever episodes are separated by intervals of normal temperature for days or weeks.
➥ Rigor: Sudden rise in body temperature with shivering as seen in malaria.
➥ Increased depth of breathing with normal respiratory rate is called Hyperpnea.
➥ Cheyne-Stokes Respiration is characterized by altered period of Tachypnea and Apnea.
➥ Pulse deficit refers to the difference between apical pulse and radial pulse.
➥ A Blood Pressure Cuff that is too large will give falsely low reading of BP.
➥ Beneficence: Doing good for clients and providing benefit balanced against risk.
➥ Isotonic solutions allow free movement of water across the membrane without changing concentration of solutes on either side. E.g. 0.9% NaCl.
➥ Hypertonic solution: Fluids with solutes more concentrated than in cells, e.g. 5% dextrose.
🛑 Explanation
1. Antiemetic drugs prevent vomiting.
Antiemetic drugs are medications used to prevent or treat nausea and vomiting. They work by targeting different receptors in the body, including those in the gastrointestinal tract and the central nervous system.
There are several types of antiemetic drugs available, including:
1. Serotonin antagonists: These drugs block the action of serotonin, a neurotransmitter involved in nausea and vomiting. Examples include ondansetron, granisetron, and dolasetron.
2. Dopamine antagonists: These drugs block the action of dopamine, a neurotransmitter involved in nausea and vomiting. Examples include metoclopramide and prochlorperazine.
3. Histamine antagonists: These drugs block the action of histamine, a neurotransmitter involved in nausea and vomiting. Examples include dimenhydrinate and meclizine.
4. Cannabinoids: These drugs work by activating cannabinoid receptors in the body, which can help to reduce nausea and vomiting. Examples include dronabinol and nabilone.
Other types of antiemetic drugs include benzodiazepines, which can help to reduce anxiety and nausea, and corticosteroids, which can help to reduce inflammation and swelling that can contribute to nausea and vomiting.
Antiemetic drugs may be prescribed for a variety of conditions, including chemotherapy-induced nausea and vomiting, postoperative nausea and vomiting, and motion sickness, among others. It is important to note that antiemetic drugs may have side effects, and should only be taken as directed by a healthcare professional.
GOLDEN POINTS FOR NURSES
2. Intraosseous injections are given into the bone marrow.
Intraosseous injections are given directly into the bone marrow, typically of the long bones such as the femur, tibia, and humerus.
This route of administration is used when intravenous access is not feasible or when a more rapid onset of action is needed, such as in emergency situations.
Intraosseous injections are commonly used in pediatric patients, as well as in adult patients in emergency and critical care settings.
The technique involves using a specialized needle to penetrate the bone and access the marrow cavity, where medications or fluids can be injected directly into the bloodstream.
GOLDEN POINTS FOR NURSES
3. Intrathecal injections are given into the spinal cavity.
Intrathecal injections are given directly into the spinal cavity, specifically into the subarachnoid space surrounding the spinal cord.
This route of administration is used to deliver medications or other substances directly to the central nervous system, bypassing the blood-brain barrier. Intrathecal injections may be used to treat conditions such as chronic pain, spasticity, and certain types of cancer, among others.
The technique involves using a specialized needle to puncture the spinal canal and access the subarachnoid space, where medications or other substances can be injected. Because of the risks associated with this procedure, including infection, bleeding, and damage to the spinal cord or nerves, it is typically performed under strict sterile conditions by trained medical professionals.
Golden rules for NURSES
4. Intramuscular injections should be given on 90° angle.
The angle at which an intramuscular injection should be given can vary depending on the size of the needle and the location of the injection site. In general, a 90-degree angle is appropriate for most adult patients receiving intramuscular injections.
However, for patients who have less subcutaneous tissue or who are receiving injections in areas with less muscle mass, such as the deltoid muscle in the upper arm, a 45-degree angle may be more appropriate. It is important to follow proper injection technique and to consult with a healthcare provider if you have any questions or concerns about administering an intramuscular injection.
Golden rules for NURSES
5. Subcutaneous injections should be given on 45° angle.
The angle at which a subcutaneous injection should be given can vary depending on the size of the needle and the location of the injection site. In general, a 45-degree angle is appropriate for most adult patients receiving subcutaneous injections.
However, for patients who have less subcutaneous tissue or who are receiving injections in areas with less fat, such as the abdomen, a 90-degree angle may be more appropriate. It is important to follow proper injection technique and to consult with a healthcare provider if you have any questions or concerns about administering a subcutaneous injection.
Golden rules for NURSES
6. Intradermal injections should be given on 15° angle.
Yes, that's correct. Intradermal injections are administered at a shallow angle, typically between 5 and 15 degrees, into the dermis layer of the skin.
The angle used for an intradermal injection is much shallower than for an intramuscular or subcutaneous injection, as the goal is to inject the medication just under the surface of the skin.
This type of injection is commonly used for skin testing, such as for tuberculosis or allergies, and is typically given on the inner forearm or upper back. It is important to follow proper injection technique and to consult with a healthcare provider if you have any questions or concerns about administering an intradermal injection.
Golden rules for NURSES
7. Blood group ‘AB’ is known as universal recipient and blood group ‘O is known as universal donor.
Yes, that's correct. Blood group AB is known as the universal recipient because individuals with this blood type can receive blood from any other blood type without experiencing an adverse immune reaction. This is because they have both A and B antigens on the surface of their red blood cells, and therefore do not produce antibodies against either antigen.
On the other hand, blood group O is known as the universal donor because individuals with this blood type can donate blood to individuals with any other blood type without causing an adverse immune reaction. This is because they do not have A or B antigens on the surface of their red blood cells, and therefore do not produce antibodies against these antigens. However, individuals with blood group O can only receive blood from other individuals with blood group O, as their immune system will recognize the A and B antigens as foreign and produce antibodies against them.
Golden rules for NURSES
8. Mercury is used in thermometer because mercury is very sensitive to little change in temperature.
Yes, that is correct. Mercury is often used in thermometers because it is a liquid metal that has a high coefficient of thermal expansion, which means that it expands and contracts in response to changes in temperature. This makes it very sensitive to even small changes in temperature and allows for accurate temperature readings.
In addition, mercury has a low freezing point and a high boiling point, which means that it remains in a liquid state over a wide range of temperatures. This allows it to be used in both low-temperature and high-temperature applications.
However, it is important to note that mercury is a toxic substance and can be harmful if ingested or inhaled. For this reason, many countries have banned the use of mercury in thermometers and other consumer products, and alternative substances such as alcohol or digital thermometers are often used instead.
Golden rules for NURSES
9. For giving enema, left lateral position should be given.
Yes, the left lateral position is commonly used for administering an enema. This position helps to promote the flow of the enema solution into the rectum and prevents it from flowing back out.
To assume the left lateral position for an enema, the patient should lie on their left side with their left leg straight and their right knee bent slightly. They should bring their right knee up towards their chest to further open the rectal area. This position helps to straighten out the rectum and makes it easier to insert the enema tip.
It is important to follow proper enema administration technique and to use sterile equipment to minimize the risk of infection or injury. A healthcare provider should be consulted if you have any questions or concerns about administering an enema.
Golden rules for NURSES
10. Air cushion is used to prevent bed sores.
Air cushions can be used as part of a preventative strategy to help reduce the risk of bed sores, also known as pressure ulcers. Pressure ulcers can occur when there is prolonged pressure on a particular area of the skin, often caused by immobility or being in a seated or lying position for an extended period of time.
Air cushions are designed to distribute pressure evenly over the surface of the cushion, which can help reduce pressure on any particular area of the body. This can help to prevent the development of pressure ulcers and also provide greater comfort for the person sitting or lying on the cushion.
However, it is important to note that air cushions are just one component of a comprehensive pressure ulcer prevention plan. Other strategies may include repositioning the patient regularly, maintaining good skin hygiene, and providing adequate nutrition and hydration. It is important to work with a healthcare provider to develop an individualized care plan for preventing pressure ulcers in each patient.
Golden rules for NURSES
11. Hey’s test is performed for identify bile salts in urine
Hey's test is a laboratory test used to detect the presence of urobilinogen in urine, not bile salts. Urobilinogen is a colorless substance that is produced in the liver during the breakdown of bilirubin, a yellowish substance that is formed when old red blood cells are broken down.
Hey's test involves adding a chemical reagent to a urine sample, which causes any urobilinogen present to oxidize and turn pink or red in color. The intensity of the color change is used to determine the concentration of urobilinogen in the urine.
While Hey's test is not used specifically to identify bile salts in urine, elevated levels of urobilinogen in the urine can be an indication of liver disease or other medical conditions affecting the liver or biliary system, which can lead to the accumulation of bile salts in the urine. It is important to consult with a healthcare provider for proper diagnosis and treatment of any medical condition.
Golden rules for NURSES
12. Smith’s test is performed to found out presence of bile pigments in urine.
No, Smith's test is not used to detect the presence of bile pigments in urine. Smith's test is a laboratory test used to detect the presence of protein in urine.
Bile pigments, such as bilirubin and urobilinogen, may be present in urine in certain medical conditions affecting the liver or biliary system. However, there are other laboratory tests that are more commonly used to detect these substances in urine, such as the bilirubin test or the urobilinogen test.
It is important to consult with a healthcare provider for proper diagnosis and treatment of any medical condition that may be affecting the urinary system or other organ systems in the body.
Golden rules for NURSES
13. Components of Total parenteral nutrition (TPN) are carbohydrates (glucose), amino acids, lipids,vitamins, minerals, and electrolytes.
Yes, that is correct. Total parenteral nutrition (TPN) is a form of nutrition therapy that delivers all of the necessary nutrients, including carbohydrates (glucose), amino acids, lipids, vitamins, minerals, and electrolytes, directly into the bloodstream through a vein. TPN is typically administered when a patient is unable to obtain adequate nutrition through the gastrointestinal tract, such as in cases of severe malabsorption, intestinal obstruction, or other medical conditions.
The specific components and concentrations of TPN are tailored to the individual patient's needs based on factors such as age, weight, medical condition, and laboratory values. TPN is typically administered in a hospital setting and requires close monitoring by a healthcare provider to ensure proper dosing and to monitor for any potential complications or side effects.
Golden rules for NURSES
14. The bones in the forearm act as a natural splint by providing support to an I.V. access site.
Yes, that is correct. The bones in the forearm, specifically the radius and ulna, can act as a natural splint by providing support and stability to an IV access site. When an IV catheter is inserted into a vein in the arm, it can be secured in place using a dressing or tape to prevent movement or dislodgement. However, the bones in the forearm can also provide additional support and stability to the IV catheter, which can help to prevent accidental dislodgement or complications such as infiltration or extravasation.
It is important to ensure that the IV catheter is properly placed and secured, and to monitor the IV site for signs of complications such as swelling, redness, pain, or leakage. If any of these signs are present, it is important to notify a healthcare provider immediately.
Golden rules for NURSES
15. Don’t select an I.V. site on a paralyzed or traumatized arm.
Yes, that is correct. When selecting an IV site, it is important to avoid areas that are paralyzed or traumatized. A paralyzed limb may have reduced blood flow and sensation, which can increase the risk of complications such as infiltration or extravasation. Additionally, a traumatized limb may have damaged blood vessels or tissues, which can also increase the risk of complications.
When selecting an IV site, healthcare providers typically look for a site that has good blood flow, easy access, and minimal risk of complications. The most common sites for IV access are the veins in the arms, but other sites such as the hands or feet may be used if necessary. Factors such as the patient's medical condition, age, and overall health may also be taken into consideration when selecting an IV site.
It is important to properly assess the patient's veins and select the most appropriate site for IV access, while also considering the patient's comfort and safety. Proper insertion and maintenance of the IV catheter, as well as monitoring for signs of complications, can help to ensure optimal outcomes for the patient.
Golden rules for NURSES
16. Don’t select an I.V. site on a paralyzed or traumatized arm.
It is important to avoid selecting an intravenous (IV) site on a paralyzed or traumatized arm. There are several reasons for this:
Risk of further injury: If the arm is already traumatized or paralyzed, there is a risk of further injury or damage to the arm if an IV is inserted in that area. This can result in nerve damage, muscle damage, or other complications.
Difficulty monitoring: If the arm is paralyzed, it may be difficult to monitor for signs of infection or other complications at the IV site. This can lead to delayed diagnosis and treatment of any problems that may arise.
Reduced blood flow: A paralyzed or traumatized arm may have reduced blood flow, which can affect the delivery of fluids and medications through the IV. This can result in poor IV access or incomplete delivery of medication.
In general, it is important to choose a site for IV insertion that is healthy, well-vascularized, and free from any injuries or abnormalities. If a patient's arm is paralyzed or traumatized, it is best to select a different site for the IV. This can help ensure that the IV is placed safely and effectively, without causing any further harm to the patient.
Golden rules for NURSES
17. The basilica vein is normally used for a peripherally inserted central catheter (PICC) line.
The basilic vein is one of the veins that can be used for a peripherally inserted central catheter (PICC) line. A PICC line is a long, thin tube that is inserted through a peripheral vein (usually in the arm) and passed through to the larger veins near the heart. This type of catheter is often used for patients who require long-term intravenous (IV) access for medications, fluids, or other treatments.
The basilic vein is located on the medial (inner) side of the upper arm, and it runs from the elbow to the axilla (armpit). It is one of the larger veins in the arm, making it a good candidate for a PICC line insertion. Other veins that can be used for a PICC line include the cephalic vein and the brachial vein.
When a PICC line is inserted, the healthcare provider will use ultrasound guidance to locate the basilic vein and insert the catheter through the skin and into the vein. The catheter is then advanced through the vein and into the larger veins near the heart. Once the catheter is in place, it can be used for the administration of medications, fluids, or other treatments.
It is important to note that while the basilic vein is a common choice for a PICC line insertion, the healthcare provider will consider several factors when choosing the best vein for each patient. These factors may include the patient's medical history, the size and condition of the veins, and the specific needs of the patient's treatment plan.
Golden rules for NURSES
18. Because the insertion of a PICC line is below the level of the heart, an air embolism isn’t an expected occurrence.
While it is true that the insertion of a peripherally inserted central catheter (PICC) line is typically done below the level of the heart, an air embolism can still occur during the insertion process or while the catheter is in place.
An air embolism occurs when air bubbles enter the bloodstream and block the flow of blood to vital organs. While air embolisms are rare, they can be life-threatening if not promptly recognized and treated.
During the insertion of a PICC line, there is a risk of air entering the catheter or the bloodstream. Healthcare providers take precautions to minimize this risk by carefully priming and flushing the catheter and using specialized techniques to insert and position the catheter.
However, even with these precautions, it is still possible for air to enter the bloodstream. This can happen if the catheter becomes disconnected or if the patient experiences a sudden change in position that allows air to enter the catheter.
To minimize the risk of air embolism, healthcare providers carefully monitor patients during and after PICC line insertion. They may use ultrasound or other imaging techniques to confirm proper catheter placement and check for any signs of air in the bloodstream.
If an air embolism is suspected, immediate treatment is required. This may include stopping the infusion, administering supplemental oxygen, and positioning the patient in a way that prevents the air from traveling to the heart or lungs. In severe cases, more advanced treatments may be necessary, such as hyperbaric oxygen therapy or surgery.
Golden rules for NURSES
19. If a client has a high temperature, notify the physician before administering any blood product.
If a client has a high temperature, it is important to notify the physician before administering any blood product. This is because a high temperature can be a sign of infection or another underlying condition that may be exacerbated by the administration of blood products.
Blood products are typically used to treat a variety of conditions, including anemia, bleeding disorders, and immune system disorders. While these products can be life-saving, they also carry certain risks, such as infection, allergic reactions, and transfusion reactions.
One of the key steps in ensuring the safe administration of blood products is to carefully screen patients for any underlying conditions or risk factors that may increase their risk of complications. This includes monitoring for signs of infection, such as a high temperature, before administering any blood products.
If a client has a high temperature, the physician may want to delay or modify the administration of blood products until the underlying cause of the fever can be identified and treated. This may involve further testing or evaluation to determine if the client has an infection or other condition that could increase their risk of complications from the blood product.
By notifying the physician of any signs of infection or other concerns before administering blood products, healthcare providers can help ensure the safe and effective use of these important treatments.
Golden rules for NURSES
20. No solution or product other than normal saline should be added to blood or blood product.
It is generally recommended that no solution or product other than normal saline should be added to blood or blood products. This is because the addition of other substances can increase the risk of adverse reactions and other complications.
Normal saline, also known as 0.9% sodium chloride, is a sterile solution of salt and water that is used to replace lost fluids and restore electrolyte balance in the body. It is often used as a diluent for blood and blood products because it is compatible with these substances and does not increase the risk of adverse reactions or complications.
Adding other solutions or products to blood or blood products can alter their composition and increase the risk of adverse reactions, such as transfusion reactions, allergic reactions, or infections. For example, adding medications or other substances to blood products can increase the risk of medication errors and other complications.
In some cases, healthcare providers may need to add a medication or other substance to blood or blood products to meet the specific needs of the patient's treatment plan. When this is necessary, it is important to carefully follow established protocols and guidelines to minimize the risk of adverse reactions or other complications.
Overall, the addition of any solution or product to blood or blood products should only be done under the direction of a healthcare provider with appropriate training and expertise in transfusion medicine.
Golden rules for NURSES
21. Maslow’s hierarchy of needs must be met in the following order: physiologic (oxygen, food, water,sex, rest, and comfort), safety and security, love and belonging, self-esteem and recognition, and self- actualization.
Maslow's hierarchy of needs is a theory that suggests that human needs can be organized into a hierarchy, with lower-level needs taking priority over higher-level needs. According to Maslow's theory, the hierarchy of needs must be met in a specific order, with lower-level needs needing to be met before higher-level needs can be addressed.
The hierarchy of needs includes the following levels, in order from lowest to highest:
Physiological needs: These are the most basic needs, including the need for oxygen, food, water, shelter, sleep, and other bodily needs.
Safety needs: Once physiological needs are met, individuals have a need for safety and security, including physical safety, financial security, and stability.
Love and belonging needs: After safety needs are met, individuals have a need for love, affection, and a sense of belonging, including relationships with family, friends, and community.
Esteem needs: Once the need for love and belonging is met, individuals have a need for self-esteem and recognition from others, including achievement, status, and respect.
Self-actualization needs: Once all of the other needs are met, individuals have a need for self-actualization, including personal growth, self-fulfillment, and realizing their full potential.
In order to meet higher-level needs, lower-level needs must first be met. For example, an individual who is hungry and thirsty will not be able to focus on safety needs until their basic physiological needs are met. Similarly, an individual who is struggling to find a sense of belonging may have difficulty focusing on self-esteem needs until they feel a sense of connection with others.
By understanding Maslow's hierarchy of needs, healthcare providers can better understand the needs and priorities of their patients and develop treatment plans that address their most pressing needs first. This can help promote better outcomes and improve patient satisfaction.
Golden rules for NURSES
22. To avoid staining the teeth, the client should take a liquid iron preparation through a straw.
To avoid staining the teeth, it is recommended that the client take a liquid iron preparation through a straw. Iron supplements can cause staining of the teeth, which can be unsightly and difficult to remove. By using a straw to take the supplement, the liquid can bypass the teeth and reduce the risk of staining.
In addition to using a straw, there are other strategies that can help minimize the risk of staining from iron supplements. For example, the client can rinse their mouth with water after taking the supplement to help remove any residual liquid from the teeth. They may also want to avoid brushing their teeth immediately after taking the supplement, as this can actually spread the iron around and increase the risk of staining.
If the client does experience staining from the iron supplement, there are several options for addressing the issue. One approach is to switch to a different form of iron supplement, such as a tablet or capsule, which may be less likely to cause staining. Alternatively, the client may be able to use a whitening toothpaste or receive professional teeth whitening treatment to help remove the stains.
Overall, while liquid iron preparations can be an effective treatment for iron deficiency, they can also cause staining of the teeth. By using a straw and taking other steps to minimize the risk of staining, clients can help ensure that they receive the benefits of iron supplementation without experiencing unwanted side effects.
Golden rules for NURSES
23. Fluid oscillation in the tubing of a chest drainage system indicates that the system is working properly.
Fluid oscillation in the tubing of a chest drainage system does not necessarily indicate that the system is working properly. In fact, fluid oscillation can be an indication of a problem with the system that requires attention from healthcare providers.
A chest drainage system is typically used to remove excess air or fluid from the pleural space in the chest. The system consists of a drainage tube, a collection chamber, and a series of tubing that connects the drainage tube to the collection chamber. The tubing is often clear, allowing healthcare providers to observe the movement of fluid and air through the system.
Fluid oscillation refers to the movement of fluid back and forth in the tubing of the chest drainage system. While some oscillation is normal and can indicate that the system is functioning properly, excessive oscillation can be a sign of a problem. For example, if there is a blockage in the tubing or collection chamber, fluid may be unable to flow freely and can cause increased oscillation. Similarly, if the drainage tube is not properly inserted into the pleural space, air may be drawn into the tubing and cause oscillation.
If a healthcare provider observes excessive fluid oscillation in a chest drainage system, they may need to take steps to address the underlying issue. This may involve adjusting the placement of the drainage tube, clearing any blockages in the tubing or collection chamber, or replacing a malfunctioning component of the system.
Overall, while some fluid oscillation in the tubing of a chest drainage system can be normal, excessive oscillation can be a sign of a problem that requires attention from healthcare providers.
Golden rules for NURSES
24. The type of assessment that includes data related to a client’s biological, cultural, spiritual and social need is called Comprehensive Assessment.
The type of assessment that includes data related to a client's biological, cultural, spiritual, and social needs is indeed called a comprehensive assessment.
A comprehensive assessment is a holistic approach to assessing a client's health status that takes into account various aspects of their life, including their physical health, cultural background, spiritual beliefs, and social environment. By gathering information on these different factors, healthcare providers can gain a more complete understanding of the client's health status and develop a care plan that addresses all of their needs.
In a comprehensive assessment, healthcare providers may gather data through a variety of methods, including interviews, physical exams, laboratory tests, and observation of the client's behavior and interactions with others. They may also use standardized assessment tools to gather information on specific aspects of the client's health, such as their mental health status or their risk for falls.
Overall, a comprehensive assessment is an important tool for healthcare providers in understanding their clients' needs and developing an effective care plan that addresses all aspects of their health and well-being.
Golden rules for NURSES
25. The Vital Signs are: 1. Temperature, 2. Pulse, 3.Respiration, 4. Blood pressure, and 5. Pain.
The vital signs are indeed a set of important measurements that healthcare providers use to assess a client's overall health status. The five vital signs are:
Temperature: The measurement of the body's core temperature. Normal body temperature ranges from 97.7°F to 99.5°F (36.5°C to 37.5°C).
Pulse: The measurement of the heart rate, or the number of times the heart beats per minute. A normal pulse rate for adults is between 60 to 100 beats per minute.
Respiration: The measurement of the breathing rate, or the number of breaths taken per minute. A normal respiration rate for adults is between 12 to 20 breaths per minute.
Blood pressure: The measurement of the force of blood against the walls of the arteries as the heart pumps blood throughout the body. Blood pressure is expressed in two numbers, with the systolic pressure (the top number) indicating the pressure when the heart beats, and the diastolic pressure (the bottom number) indicating the pressure when the heart is at rest. A normal blood pressure reading for adults is typically around 120/80 mmHg.
Pain: The subjective experience of discomfort or distress. Pain is assessed using various scales, such as the numeric rating scale (NRS) or visual analog scale (VAS).
Overall, the vital signs are important indicators of a client's overall health status, and healthcare providers regularly assess these measurements to monitor changes in the client's condition and develop an effective care plan.
Golden rules for NURSES
26. Heat loss due to contact with circulating air movement is known as Convection.
Yes, that is correct. Convection is the transfer of heat from a surface to a fluid (e.g. air or water) that is moving. When air moves over a surface, it carries away heat, causing the surface to cool.
This is why we feel cooler when there is a breeze or wind blowing, even if the air temperature is the same.
Convection is an important factor to consider when designing heating and cooling systems, as well as in understanding the behavior of the atmosphere and oceans.
Golden rules for NURSES
27. The range of marking in glass/clinical thermometer is 95-110° F and 35-43.3°C.
Glass or clinical thermometers typically have a range of markings from 95-110°F (Fahrenheit) and 35-43.3°C (Celsius), which is the normal range of human body temperature.
The thermometer works by using a liquid, usually mercury, that expands or contracts as it is heated or cooled.
The length of the liquid column inside the thermometer changes depending on the temperature, and this is what is used to determine the temperature reading.
It is important to use the thermometer correctly and to read the markings accurately to get an accurate measurement of body temperature.
Golden rules for NURSES
28. Normal Rectal temperature is 99.6° F (37°C) (1°F ) higher than oral temperature)
The normal rectal temperature is generally considered to be about 1°F (0.6°C) higher than the normal oral temperature, which is typically around 98.6°F (37°C).
This is because the rectum is a more accurate indicator of core body temperature, as it is located closer to the internal organs and is not affected by external factors such as food or drink.
However, rectal temperature measurement is generally reserved for medical purposes and is not recommended for routine temperature checks at home.
Oral temperature measurement is a more convenient and less invasive method that can provide a good approximation of core body temperature.
Golden rules for NURSES
29. Rectal temperature is the most reliable
Rectal temperature is generally considered to be the most reliable method of measuring body temperature because it provides a more accurate reflection of core body temperature.
This is because the rectum is located in the central part of the body, close to the internal organs which generate heat, and is not affected by external factors such as food or drink.
However, rectal temperature measurement may not be suitable for all individuals, especially for those who are uncomfortable with the procedure, those who have certain medical conditions, or those who have undergone rectal surgery.
Oral temperature measurement is a convenient and non-invasive alternative that can provide a good approximation of core body temperature for most people.
Other methods of temperature measurement include axillary (underarm) measurement, ear measurement, and forehead measurement, which may be suitable for certain populations or situations.
Golden rules for NURSES
30. Relapsing fever: Fever episodes are separated by intervals of normal temperature for days or weeks
Relapsing fever is a type of fever caused by certain bacterial infections, such as Borrelia species.
The fever episodes in relapsing fever are characterized by sudden onset of high fever, chills, headache, muscle aches, and other flu-like symptoms.
These episodes typically last for several days to a week or more, and are then followed by a period of normal temperature, which can last for days or weeks.
During the periods of normal temperature, the patient may feel completely well and may not have any symptoms.
However, the fever episodes can recur, often with different symptoms or severity, leading to a relapsing pattern of illness.
Treatment for relapsing fever typically involves antibiotics, such as doxycycline or penicillin, and may require several courses of treatment to fully eradicate the bacteria.
Golden rules for NURSES
31. Rigor: Sudden rise in body temperature with shivering as seen in malaria.
Rigor is a medical term used to describe a sudden onset of fever with chills and shivering. In the context of malaria, rigor is a common symptom that occurs during the febrile (fever) episodes, which are a hallmark of the disease.
Malaria is a parasitic infection caused by Plasmodium species, which are transmitted to humans by the bite of infected mosquitoes.
The febrile episodes in malaria are typically cyclical, with sudden onset of high fever, rigor, and other flu-like symptoms such as headache, muscle aches, and fatigue.
The fever may last for several hours to a few days, and is then followed by a period of normal or subnormal temperature.
The cyclical nature of the fever episodes is a key diagnostic feature of malaria, and helps to distinguish it from other febrile illnesses.
Treatment for malaria typically involves antimalarial medications, such as chloroquine, artemisinin-based combination therapy (ACT), or other drugs depending on the species of Plasmodium involved and the location of the infection.
Golden rules for NURSES
32. Increased depth of breathing with normal respiratory rate is called Hyperpnea.
Hyperpnea is an increase in the depth and intensity of breathing, without an increase in the respiratory rate.
It is often seen during exercise or other physical activity, as the body needs more oxygen to meet the increased demand.
It can also occur in response to certain medical conditions, such as metabolic acidosis or congestive heart failure.
Golden rules for NURSES
33. Cheyne-Stokes Respiration is characterized by altered period of Tachypnea and Apnea.
Cheyne-Stokes respiration is a type of abnormal breathing pattern that is characterized by a cycle of alternating periods of tachypnea (rapid breathing) and apnea (temporary cessation of breathing).
The cycle typically lasts between 30 seconds to 2 minutes, and can be seen in patients with various medical conditions, such as heart failure, stroke, and traumatic brain injury.
It is caused by an abnormality in the respiratory centers in the brain, which affects the regulation of breathing.
Golden rules for NURSES
34. Pulse deficit refers to the difference between apical pulse and radial pulse.
Pulse deficit is a condition where there is a difference between the apical pulse (the heartbeat heard through a stethoscope over the apex of the heart) and the radial pulse (the pulse felt at the wrist).
It occurs when some of the heartbeats are not transmitted to the peripheral arteries, leading to a discrepancy between the apical and radial pulse rates.
Pulse deficit can be caused by various medical conditions, such as atrial fibrillation, premature ventricular contractions, and heart block. It is often an indication of an underlying heart problem and should be evaluated by a healthcare provider.
Golden rules for NURSES
35. A Blood Pressure Cuff that is too large will give a falsely low reading of BP.
No, that is not correct.
A blood pressure cuff that is too large will actually give falsely high readings of blood pressure.
This is because the cuff will not be able to adequately compress the artery, leading to an overestimation of the blood pressure.
Conversely, a cuff that is too small will give falsely low readings of blood pressure, as it will compress the artery too much, leading to an underestimation of the blood pressure.
It is important to use the appropriate size of blood pressure cuff for accurate readings of blood pressure.
Golden rules for NURSES
36. Beneficence: Doing good for clients and providing benefits balanced against risk.
Beneficence is one of the four main ethical principles in healthcare, which refers to the obligation of healthcare providers to do good and to promote the well-being of their clients.
This principle requires that healthcare providers act in the best interests of their clients and provide care that maximizes benefits and minimizes risks.
Beneficence also requires that healthcare providers make decisions that are based on the best available evidence and that they continually seek to improve the quality of care that they provide.
Balancing the benefits of treatment against the risks is an important aspect of beneficence, as healthcare providers must weigh the potential benefits of a particular treatment against the potential risks and side effects in order to make informed decisions about the best course of action for their clients.
Golden rules for NURSES
37. Isotonic solutions allow free movement of water across the membrane without changing concentration of solutes on either side. E.g. 0.9% NaCl.
An isotonic solution is a solution that has the same concentration of solutes as the fluid inside the cells of the body.
When an isotonic solution is administered, water moves freely across the cell membrane in both directions, without changing the concentration of solutes on either side of the membrane.
This is because the concentration of solutes in the isotonic solution is equal to the concentration of solutes inside the cells, so there is no gradient to drive the movement of water in one direction or the other.
One example of an isotonic solution is 0.9% NaCl (normal saline), which is commonly used for intravenous fluid administration to replace lost fluids and electrolytes in the body.
Golden rules for NURSES
38. Hypertonic solution: Fluids with solutes more concentrated than in cells, e.g. 5% dextrose.
No, that is not entirely correct.
A hypertonic solution is a solution that has a higher concentration of solutes than the fluid inside the cells of the body. When a hypertonic solution is administered, water moves out of the cells and into the extracellular fluid, causing the cells to shrink.
This is because the concentration of solutes in the hypertonic solution is greater than the concentration of solutes inside the cells, creating a gradient that drives the movement of water out of the cells.
An example of a hypertonic solution is 3% saline, which is used to treat hyponatremia (low sodium levels). 5% dextrose is actually an isotonic solution, because dextrose (a form of glucose) is rapidly metabolized by the body, leaving only water and a small amount of electrolytes in the solution. When 5% dextrose is administered, it initially acts as an isotonic solution, but once the dextrose is metabolized, the remaining fluid becomes hypotonic (lower concentration of solutes than inside the cells).
It is important to note that the effects of hypertonic and hypotonic solutions on the body depend on the concentration of the solutes in the solution, as well as the rate and volume of administration. Administration of hypertonic or hypotonic solutions must be carefully monitored to avoid adverse effects on the body.

2 notes
·
View notes
Text
u/wayb223 asked: “Which type of Agar do you prefer and why?”
Mycochaos response:
You should practice different kinds, honestly. Putting your genetics library through different agar over time keeps it healthy and virile, reducing likelihood of senescence. Here are some ones I enjoy:
1L recipes all sterilized for 30-45 (nothing more than 45 for risk of caramelizing sugars, making the agar useless and promoting of unfavorable mycelial characteristics once caramelized) at 15PSI (w/ 10 min venting):
*Basic MEA (Malt extract agar) for 1L (halve for 500mL recipes): 20g agar + 30g tan malt (+ optional 1g nutritional additive)
*Basic grain soak Agar for 1L: boil grains for 45 minutes, drain grains using the liquid drained for your 1L agar liquid contribution. 20g agar for 1L and 1-2g of gypsum
*Stamets MYPA / MYA (Malt Extract, Yeast Agar)
-20 grams tan malt (brewers malted barley) per 1L
-2 grams nutritional yeast per 1L
-20g agar per 1L
-1g peptone per 1L
*Stamets PDYA / PDYPA (Potato Dextrose Yeast) Agar:
-boil 300g of sliced potatoes for 1 hour, drain that water off into your agar media container, holding back the potaters, a total volume of 1L for this recipe (or half variables for 500mL pours)
-10g dextrose (C6H12O6)
-20g agar per 1L
-2g yeast per 1L
-(optional)1g peptone (soy based)
*Stamets/Pollock Dog Food Agar (DFA):
- 20g dry dog food (assumedly ground up into powder before being added)
-20 g agar
-5g malt or glucose
*Stamets Oatmeal, Malt, Yeast enriched agar (OMYA):
-80g instant oatmeal
-20g agar
-10g malt sugar
-2g nutritional yeast
2 notes
·
View notes
Text
Maize starch Manufacturers in India - Gujarat Ambuja Exports Limited
Starch Manufacturers in India - Gujarat Ambuja Exports Limited
Gujarat Ambuja Exports Limited is a premier name among maize starch manufacturers in India. Renowned for its excellence in the starch industry, the company specialises in producing high-quality maize starch that caters to a wide range of applications across various sectors. As one of the leading starch manufacturers, Gujarat Ambuja Exports Limited employs state-of-the-art technology and stringent quality control measures to ensure the highest standards in their products.
OUR PRODUCTS
1.Maize Starch:

2.Liquid Glucose:

3.Dextrose Monohydrate Powder

4. Dextrose Anhydrous Powder

5.Maltodextrin:

6.High Maltose Corn Syrup

7.Sorbitol 70% Solution

8.Dextrins

The maize starch manufactured by Gujarat Ambuja Exports Limited finds extensive use in multiple industries such as food and beverages, pharmaceuticals, textiles, and paper. In the food and beverage industry, their maize starch is valued for its superior thickening, stabilising, and binding properties. The pharmaceutical industry benefits from its excellent consistency and purity, making it ideal for tablet formulation and other medicinal applications. In textiles, maize starch is used for sizing and finishing fabrics, while the paper industry utilises it for coating and improving paper quality.
As a top-tier starch manufacturer in India, Gujarat Ambuja Exports Limited is committed to innovation and sustainability. Their manufacturing processes are designed to minimise environmental impact, ensuring a sustainable approach to starch production. The company's focus on research and development enables them to continuously improve their product offerings and stay ahead of industry trends.
Gujarat Ambuja Exports Limited's extensive distribution network ensures that their high-quality maize starch reaches customers across India promptly and efficiently. Their dedication to customer satisfaction, combined with their emphasis on quality and sustainability, has earned them a trusted reputation among starch manufacturers in India.
In summary, Gujarat Ambuja Exports Limited stands out as a leading maize starch manufacturer in India, known for delivering superior products tailored to the needs of various industries. Their commitment to innovation, quality, and sustainable practices makes them a preferred choice for businesses seeking reliable and high-performance maize starch solutions.
For More Information
“Ambuja Tower”, Opp.Sindhu Bhavan, Sindhu Bhavan Road, Bodakdev, P.O. Thaltej Ahmedabad 380054.
[email protected](Export Inquiries)
[email protected](Investors Only)
7961556678
https://www.ambujagroup.com/product-category/categories/starch-and-its-derivatives/
0 notes
Text
Sanstar IPO GMP, Price, Allotment, Profit Estimate 2024
Sanstar IPO Description – Sanstar is one of the major manufacturers of plant based specialty products and ingredient solutions in India for food, animal nutrition and other industrial applications. Its products include liquid glucose, dried glucose solids, maltodextrin powder, dextrose monohydrate, native maize starches, modified maize starches and co-products like germs, gluten, fiber and…
0 notes
Text

So, I've been wanting to write this recipe for a while. This is the beer that we created to celebrate the release of the "Time For The Show: The Movie" movie release and, as expected, the name of the beer is "Time For The Show: The Movie: The Beer!"
The request was that we make a yam flavored beer. Specifically Yam. If you're not familiar with the difference between Yam and Sweet Potato, let's just say that there is a difference, and it largely has to do with size and genetic verity.
Anyway, I digress. The recipe is a Yam based recipe, so I bought some Yams and did some calculations in the test kitchen. I have a lot of notes about all these tests, but it basically boils down to the equation that one 40-oz can of yams, if used correctly, will raise the alcohol in one gallon of water by 1%. It can also add a very vegetal taste.
Of course, the other half of any Yam recipe has got to be the marshmallow. You can find "Toasted Marshmallow" flavor extract at any of your local homebrew shops. It's a very strong flavor though. I knew it was strong because I had tasted it in vodkas and other mixes before, and it’s always overpowering. Anyway, I didn't want the marshmallow to overpower the beer, so I cut the recommended dose in half. A typical homebrew supply store will sell you a 4-oz bottle of the chemical flavor that is toasted marshmallow. That 4-oz bottle is intended for a typical 5-gallon batch of homebrewed beer. Using only half of the bottle in a 5-gallon batch was definitely enough; maybe still way more than enough.
Beyond going light on the marshmallow flavor, you also must balance it out with something else. This is where the vegetal flavor of the yams comes in again. Because we boil the yams in spring water for an hour, then add that spring water to the wort, we get the last of the sugar in there, but we also get the vegetal flavor from the yams themselves. That vegetal flavor balances the marshmallow flavor in a way that turned out to be way better than I thought it was going to be.
In the end, the beer was bottled and labeled. It was distributed during the Time For The Show: The Movie: The Release Party, and was subsequently consumed by patrons of the fine arts that had the courage to attend the event. I'm still in possession of the final three bottles, and I'll update this post if I drink one and it aged well.
So without further ado, here are the instructions for brewing it:
Ingredients
Malt:
4.0 Lb Pale DME 30LV or less https://tinyurl.com/2w8hdsna
2.0 Lb Gambrinus Honey Malt https://tinyurl.com/yh5p9e2e
1.0 Lb Dingman's Belgian Biscuit https://tinyurl.com/3vyfaap4
Hops:
0.5 OZ Cluster 60 Min. (Add as soon as the wort comes to a boil. Boil for 60 Min.)
2.0 OZ SAAZ 30 Min. (Add when 30 minutes remain on the boil.)
2.0 OZ SAAZ 5 Min. (Add as soon as you remove the boil pot from heat.)
Yeast:
Safale S-04 Dry Ale Yeast https://tinyurl.com/469tam49
Water:
2-3 GAL Spring Water Any Type
3 GAL Distilled Water Any Type
Other Ingredients:
(5) 40-OZ Can Yams in Syrup Add prior to boil.
2.0 Oz Toasted Marshmallow Flavor https://tinyurl.com/te3u6ytk
½ Cup Dextrose (Corn Sugar) Add prior to bottling
Instructions:
Consult the Ingredients List, seen above, and purchase equivalent ingredients. All of the ingredients can be substituted with similar items. Homebrewing should be fun!

2. Brew the beer by preparing the yam water, mashing the specialty grain, brewing the wort on the stovetop, then fermenting, flavoring, and bottling.
3. Preparing the Yam Water
a. Start by opening all of the canned yams. Drain the liquid contents of the cans in to a container so that it can be used later. A 1-gallon water jug makes a convenient container.

b. Place the physical yams in to a boiling pot. Fill the pot with 2-3 gallons of spring water or any other decent water. Add enough water to cover the yams, and expect to add more later. Boil the yams for at least 1 hour. Add more water if the waterline gets too low.

c. Once the yams have been boiled, strain the yams out and discard them. You can certainly wait for the water to cool before doing so, which makes the process safer. I put a filter over the boil pot and strained the yams out that way, as seen in the following picture.

d. Add the yam syrup that you collected earlier to the remaining water, and use this solution as the base wort. At this point, you should have close to ½ gallon of liquid collected from the cans, and close to 2-gallons of liquid from the water used to boil the yams. You can refrigerate this solution and save it for a couple of days if you don’t plan on brewing today.
e. An additional step that can make things easier is to partition the hops out in to hop-socks. Pre-measuring the hops in to hop-socks makes brewing easier. For this recipe, you will want to prepare 3 hop-socks. One for the Cluster hops, and two other socks with 2oz each of SAAZ hops.

4. Mashing the Specialty Grain
a. On brewing day, prepare a "Handy Masher," or a 3-gallon pot with a tightly controlled temperature, that can mash the grain for one hour. For the handy masher shown, I've found that you should heat your water at least 10°F warmer than your intended mashing temperature. You can spend a lifetime researching the most efficient ways of mashing grain, but if you throw three pounds of grain in a handy masher, pour two gallons of water that is about 170°F on it, close the lid and wait for an hour, drain it in to the boil pot, send another gallon of water across through to wash the grain again, and finally drain that in to the boil pot, you have achieved 90% of the art of brewing beer.
b. When you add the 170°F water to the handy masher, the water will cool rapidly, as it must heat up the handy masher itself. If you have done it correctly, after several minutes you can read the temperature in the center of the handy masher, and it should read something around 155-160°F. You can expect that temperature to drop to as low as 145°F after an hour. Adding some additional hot water can help keep the temperature up during the process. Having a modern electronic thermometer to monitor the temperature is definitely a plus.

c. As mentioned, the grain should steep in the hot water for an hour. After this, use the spigot on the side of the handy masher to drain the water in to your boil-pot. Although you added around 2-gallons of water to the handy masher, don't be surprised to collect only 1-gallon of water on the first drain. Next, close the spigot and add about another gallon of cool spring water. Stir the grain around in the water and make the water as cloudy as possible. Use a cooking spoon, or similar, to dig out grain in the bottom of the handy masher and make sure it is mixed in to the water.
d. Now, drain the water in to the boil pot again. Continue adding more water and draining it in to the boil pot until the water draining from the handy masher is clear. You should have between 2-3 gallons of water in the boil pot at this point, and it should smell delicious already.

5. Brewing the Wort on the Stovetop:
a. Your boil pot should have 2-3 gallons of water already. You should expect at least 6-gallons of water total. Make sure your pot is big enough.
b. Place your boil pot on the stove and add the 1-2 gallons of yam water made in the previous step. Turn on the stove and start heating the pot.
c. Add the Dry Malt Extract, slowly, to the boil pot and stir to dissolve. It may take some time to properly dissolve all of the clumps of DME in the boil pot. Keep stirring. Also, be aware that adding 4 pounds of DME to the pot will definitely raise the level of the liquid. Again, be sure that your pot is big enough.
d. Once the DME has fully dissolved, and the temperature of the wort is above 200°F, you can add the first hop addition and start a 60-minute countdown timer. Stir the wort and treat the hop sock as if it were a bag of tea. You may find that hops help to reduce the amount of foam created from the DME addition. Continue keeping the wort as close to boiling as possible. Continue to stir as necessary. Don’t let the pot boil over or you will make a sticky mess!
e. When 30 minutes remain on the countdown timer, add one of the hop socks containing 2-oz of SAAZ hops. Stir and soak the hop sock in the same way you did with the first addition. You should have two hop socks in the boil pot now, and they will remain there until after the boil is done.
f. When the countdown expires, remove the boil pot from the heat and add the final hop sock addition. As the wort is cooling, stir the final hop sock around and treat it as you did the first two. Leave the hop sock in for 5-10 minutes.
g. As the boil pot is cooling, use a slotted spoon and other utensils to remove each of the hop socks. Be sure to squeeze out all of the liquid in the hops, and let it drain back in to the boil pot. Continue cooling the wort. There are several methods for cooling the wort faster. One method is to cover it and let it sit for several hours. Another method is to use copper tubing to run cool water through the wort. Yet another method is to simply add freezing water to the wort. You may add enough nearly-frozen water as necessary to bring the total volume of the wort up to 5-gallons. Only add distilled water to the wort; this helps preserve the water-to-mineral ratio.
h. It is recommended to transfer the wort from the boil pot to a secondary container, and to use grain-filter to filter out fine particles as you conduct the transfer. Transferring the wort through a filter like this also helps to add oxygen to the wort, which is helpful when getting fermentation started. Moving the wort to a large 5-gallon bucket while filtering it, then moving it to the final fermentation vessel is the correct order of operations. Please ensure that both the intermediate bucket and the final fermentation vessel are properly sanitized before the wort comes in contact with it.
i. Remove a small sample of the wort and set aside to measure the specific gravity. Use a hygrometer to make the measurement once the wort is close to the temperature that the hygrometer is rated for (usually 68-70°F). You will take a second specific gravity measurement once the beer is ready to be bottled. The difference between the specific gravity measurements will estimate the amount of alcohol in the beer.

j. Once the wort is in the fermentation vessel, and the temperature is below 80°F, add the yeast packet. Move the vessel around to agitate the solution and ensure that the yeast is wet. Once the wort has been inoculated with yeast, add a water check-valve to close the vessel, and store the vessel in a low temperature area. A modified refrigerator is ideal. Try to store the wort at around 55°F. Do not exceed 80°F.
k. The wort should remain at a low temperature for approximately 15-25 days or whenever fermentation has completely settled. You can expect a lot of foaming during the first few days. It is handy to have a few water check-valves ready to go so you can quickly swap a clean one on to the fermenter when needed. If it is extremely foamy, you might consider using a blow-off tube and a gallon-jug of water. Be prepared for this; sanitation is crucial during and after fermentation, and you don’t want your beer to have an off flavor because you were unprepared for the amount of foaming that would occur. After 2-4 weeks the wort has become beer and you are ready to bottle it.
6.Flavoring and Bottling:
a. Over the last 10-15 days, you should have seen the wort ferment rapidly, then at a slower rate for another 5-10 days. Once fermentation is complete (when it takes a really long time for one bubble to form in the water check-valve), you can finish the job by bottling the beer and allowing it to carbonate. At this point, All of the following equipment MUST be sanitized!
b. At this point in the process, you want to be sure not to disturb the beer too much. Specifically, splashing it around too much may introduce oxygen in to the liquid mixture. You will want a plan where you can transfer the beer, slowly, to a bottling bucket. Using a siphon, and keeping the hose well below the liquid line is advised. Allowing the beer to splash too much at this stage may introduce a slightly flawed flavor.
c. When transferring the beer to a sanitized bottling bucket, allow some beer to move in, then add the 1/2 cup of corn sugar called for in the recipe. Continue transferring the beer and, as the beer fills the bucket, the sugar will quickly dissolve. This allows you to dissolve the priming sugar in to the beer without using a stirring spoon and introducing oxygen. You may add the Toasted Marshmallow extract at any time during this process. The extract will mix in the beer more easily than the sugar will.
d. Once the beer has been transferred to the bottling bucket you may cover it with aluminum or plastic wrap and leave it for up to several hours. Positioning the bottling bucket in its final location and allowing it to rest there also allows fine particles to settle back down in the bottling bucket. When you are ready, use the spigot (and possibly a short section of vinyl tube) to pour beer in to each bottle. Try to be consistent with the amount that you pour in to each bottle.
e. Once the bottles are filled (you should have around 48-50) send them through the bottle capping process. Be sure to sanitize the bottlecaps first by boiling them. Hopefully your bottles were sanitized with a good sanitizing agent like Iodophor or StarSan too!
f. Once each bottle is capped, check each cap individually, and clean any bottle that may have been splashed with beer.
g. Label the bottles with stickers if you like. Allow the beer to rest for about 4 weeks. When you open a bottle, you should hear the sound of a carbonated bottle opening. Chill and serve. Enjoy the flavor of yams and marshmallow while you contemplate your life choices.

0 notes
Text
Harms of Sugary Beverages
One of the main sources of added sugars in the American diet is sugar-sweetened beverages (SSBs), often known as sugary drinks. Regular use of sugar-sweetened drinks has been linked to gout, a form of arthritis, heart disease, renal illness, non-alcoholic liver disease, tooth decay, cavities, weight gain, obesity, and type 2 diabetes. Reducing the use of sugar-filled beverages can assist people in maintaining a healthy weight and eating habits.
Definition
Sugar-sweetened beverages are any liquids that are sweetened with various forms of added sugars like brown sugar, corn sweetener, corn syrup, dextrose, fructose, glucose, high-fructose corn syrup, honey, lactose, malt syrup, maltose, molasses, raw sugar, and sucrose.
Examples of SSBs include, but are not limited to, regular soda (not sugar-free), fruit drinks, sports drinks, energy drinks, sweetened waters, and coffee and tea beverages with added sugars.
youtube
0 notes
Text
Puravive: The Sweet Truth: Exploring Sugar-Free Diets, Artificial Sweeteners, Stevia, and Reduced Sugar Intake

In today's health-conscious world, sugar has come under intense scrutiny due to its association with various health issues, including obesity and diabetes. As a result, many individuals are turning to sugar-free diets and alternative sweeteners to satisfy their sweet tooth while reducing their sugar intake. In this comprehensive guide, we will delve into the world of sugar-free diets, artificial sweeteners, the natural sweetener stevia, and provide insights on reducing sugar consumption for a healthier lifestyle.
1. Understanding Sugar-Free Diets
Sugar-free diets involve eliminating or significantly reducing the consumption of added sugars from your daily meals. This includes a range of sugars, such as crystalline sucrose (table sugar), high-fructose corn syrup, and other sweeteners. Adopting a sugar-free diet offers numerous benefits, such as weight loss, improved dental health, and reduced risk of chronic diseases like diabetes and heart ailments.
2. Unveiling Artificial Sweeteners
Artificial sweeteners are sugar substitutes that provide sweetness without the extra calories. These synthetic sugar substitutes are intensely sweet, often hundreds of times sweeter than table sugar, allowing for minimal quantities to achieve the desired sweetness. Common artificial sweeteners include aspartame, sucralose, saccharin, and acesulfame potassium (Ace-K). Artificial sweeteners are widely used in various products, including diet sodas, protein bars, and sugar-free desserts. While these alternatives may assist in weight management and blood sugar control, it's important to consume them in moderation and be mindful of potential side effects, such as digestive issues or headaches, which some individuals may experience.
3. The Rise of Stevia: A Natural Sweetener
Stevia is a natural sweetener derived from the leaves of the stevia plant. With its zero-calorie content, stevia has gained popularity as a healthier alternative to artificial sweeteners. It is available in both liquid and powdered forms and can be used for baking, cooking, and sweetening beverages. Apart from being a sugar substitute, stevia also offers potential health benefits such as lowering blood sugar levels, reducing inflammation, and aiding in weight management. However, it is important to note that stevia may have a slightly different taste compared to regular sugar and might require some experimentation to find the right balance for personal preferences.
4. Tips for Reducing Sugar Consumption
Reducing sugar intake is crucial for maintaining a healthy lifestyle, even if you're not following a strict sugar-free diet. Here are some practical tips to help you gradually reduce your sugar consumption:
- Read food labels: Be mindful of hidden sugars in processed foods by checking ingredient lists and nutritional labels. Ingredients ending in "-ose," such as fructose or dextrose, are forms of sugar.
- Control portion sizes: Be aware of how much sugar you're consuming in a single serving. Reducing portion sizes can help limit sugar intake.
- Choose whole foods: Opt for fresh fruits, vegetables, and whole grains which are naturally low in sugar and provide essential nutrients.
- Cook and bake at home: Preparing your meals from scratch gives you full control over the amount of sugar you add to recipes.
- Gradual sugar reduction: Rather than going cold turkey, gradually reduce the amount of sugar in your tea, coffee, or baked goods until your taste buds adjust to lower sweetness levels.
Tags:
1. Sugar-free diets
2. Artificial sweeteners
3. Stevia as a natural sweetener
4. Tips for reducing sugar consumption
Conclusion
Embracing a sugar-free diet, exploring artificial sweeteners, incorporating stevia as a natural alternative, and reducing overall sugar intake are essential steps towards a healthier lifestyle. However, it's important to remember that individual needs and preferences may vary, and moderation is key when it comes to any dietary changes. By being mindful of our sugar consumption and making informed choices, we can enjoy the occasional sweet treat while prioritizing our health and well-being
Revitalize your diet with Puravive's Superfood Blend. Packed with essential nutrients, our blend is the perfect addition to your daily meals, supporting your diet and overall health. Experience the power of superfoods with Puravive. Check out the Puravive Superfood Blend Product Page.
Read the full article
0 notes
Text
⛄ Liquid Luck Roll The Dice Challenge - Winter Edition 2023 | Rules & Information ⛄

Liquid Luck Roll The Dice Challenge - Winter Edition 2023 is here! ⛄
The schedule :
15 November : The first day to get a prompt1 December : The AO3 Collection opens to Liquid Luck Roll The Dice Challenge - Winter Edition 2023 works24 January : The final day to get a new prompt31 January : The AO3 Collection closes to Liquid Luck Roll The Dice Challenge works
The prompts :
- This is a prompt-based challenge. Every prompt you’ll receive consists of three different things; a winter prompt, a word you must use in your work, and an emotion. There are 10 winter prompts, 10 words and 10 emotions. Prompts will be decided by three rolls of the dice. To receive a prompt, you can send me a message here on Tumblr, or if you don’t have a Tumblr account you can send me an anon ask with your email (which I will not publish) and I will email you a prompt.
- Winter prompt : This round the winter part of your prompt consists of a photo and a connected winter-themed prompt. For example your photo may be a photo of a snowman, and the connected winter-themed prompt is ‘Snowball fight’. It’s up to you if you prefer to use the photo as inspiration, or the winter-themed prompt. Or perhaps you’d like to use both. Interpret the prompt as you wish, but make sure it’s in there in some way, shape or form.
- Word : The word must be used in your work. For example, if you word is ‘Rose’, you may use rose, roses, rosebud etc. But not prose, dextrose, morose etc.
- Emotion : Interpret the emotion as you wish, but make sure it is in your work in some way, shape or form.
Rules & guidelines can be found here. ❤️
0 notes
Link
1 note
·
View note
Text
Delicious Wholesale Sugar At Cut Price Costs
If you are pondering to purchase high quality sugar in bulk, you should buy it directly from Indian sugar suppliers through the global trade community of Tradologie.com. Tradologie has 70,000+ verified international suppliers in its community, and through the platform, you can join easily with Sugar suppliers of India for your bulk procurements of sugar. Whether you are looking to buy wholesale natural sugar for bread, beverages, baked items, or any other use, we make sure that you get one of the best choices for all of them. Search for your wholesale needs here, and you'll get the record of probably the most trusted wholesale sugar dealers.
Sugar is the one of the most in style meals ingredients on the earth but it’s additionally among the most controversial. Medical science has debated for years over its results on the human food regimen and well being. Which is why it’s a good suggestion to consider the income features of dropshipping this pure liquid sucrose sweetener. A Flexicon bulk handling system automated the unloading of a number of powders (including sugar) and speeded the blending course of by 25% for an Ohio, USA chocolate producer. Sugar is also one of the supplies handled in a mixing course of for an American natural meals producer.
Our NEW Rose Gold Pearl Cocktail Rimming Sugar to garnish the rim of your glass. Wholesale bulk brown sugar is refined or unrefined sugar with a distinctive brown shade commonly found in kitchens. You can order light, medium, or darkish bulk organic brown sugar in accordance with your shade preference for desserts and baked items. It may additionally be used as an exfoliating ingredient in bathtub and sweetness products. Granulated sugar, possibly dextrose liquid higher known as white sugar, available either from beets or cane in bulk quantities, helps keep muffins, brownies and other baked goods moist or, typically concurrently, creates a crunchy crust. Add it to bread dough to reinforce the flavor or colour and use our granulated sugar to separate your products out of your rivals.
At Cardassilaris Family, we have direct relationships with distinctive sugar producers. We can join you with premium sugar merchandise to meet your actual necessities, trading brown, white, organic and low-calorie sugars. All sugar merchandise meet European requirements and include a Euro1 certificate to allow access to the European Union, free of any taxes for circulation. At Alibaba.com, discover sugar wholesale with superfine, nice, and coarse grains, among that are powdered and others granulated. Added to meals and drinks to make them mouthfeel, toothsome, and savory, sugar wholesale come in various grain sizes and sugary content ranges.
This is why it's extraordinarily essential that you simply follow the usual procedures of a gross sales process for International Trade. It is frequent apply for scammers to pose as pretend patrons and try and get suppliers to send bulk sugar supplier these documents, sometimes before sending proof of funds. Sweetener creates distinctive liquid sugar blends in our own state-of-the-art facility, fastidiously tests every batch, and ships throughout the Western United States using our personal fleet of tank vehicles.
Our customer-friendly insurance policies have encouraged us to become a distinguished presence in a fast-growing wholesale South Africa sugar spectrum. We have maintained our identity as the most interesting high quality sugar supplier, and we're hopeful to supply the very best grocery options to our distinguished client base. A white sugar commonly produced for native consumption in sugar cane rising international locations. It is fashioned by a crystallization course of, without chemical refining.
Enoxu Holdings does orders for 500 metric tons per 30 days and spot contracts of 2000 metric tons minimum. So once they ship past paperwork, they'll usually redact any data that pertains to the shopper to whom they shipped the sugar. Furthermore, sugar suppliers will normally ship these documents bank to financial institution, using a free format swift message through MT799, MT199, or MT999.
0 notes
Link
The global dextrose market as per revenue was estimated to be worth $5.9 billion in 2022 and is poised to reach $8.6 billion by 2027, growing at a CAGR of 7.8% from 2022 to 2027.
0 notes
Text
NURSES
Golden Points to Remember
➥ Antiemetic drugs prevent vomiting.
➥ Intraosseous injections are given into the bone marrow.
➥ Intrathecal injections are given into the spinal cavity.
➥ Intramuscular injections should be given on 90° angle.
➥ Subcutaneous injections should be given on 45° angle.
➥ Intradermal injections should be given on 15° angle.
➥ Blood group ‘AB’ is known as universal recipient and blood group ‘O is known as universal donor.
➥ Mercury is used in thermometer because mercury is very sensitive to little change in temperature.
➥ For giving enema, left lateral position should be given.
➥ Air cushion is used to prevent bed sores.
➥ Hey’s test is performed for identify bile salts in urine
➥ Smith’s test is performed to found out presence of bile pigments in urine.
➥ Components of Total parenteral nutrition (TPN) are carbohydrates (glucose), amino acids, lipids,vitamins, minerals, and electrolytes.
➥ Insulin may be added to TPN to offset the high concentration of glucose and heparin may be added to limit the formation of a fibrous clot at the tip of the catheter.
➥ The bones in the forearm act as a natural splint by providing support to an I.V. access site.
➥ Don’t select an I.V. site on a paralyzed or traumatized arm.
➥ The basilica vein is normally used for a peripherally inserted central catheter (PICC) line.
➥ Because the insertion of a PICC line is below the level of the heart, an air embolism isn’t an expected occurrence.
➥ If a client has a high temperature, notify the physician before administering any blood product.
➥ No solution or product other than normal saline should be added to blood or blood product.
➥ Maslow’s hierarchy of needs must be met in the following order: physiologic (oxygen, food, water,sex, rest, and comfort), safety and security, love and belonging, self-esteem and recognition, and self- actualization.
➥ To avoid staining the teeth, the client should take a liquid iron preparation through a straw.
➥ Fluid oscillation in the tubing of a chest drainage system indicates that the system is working properly.
➥ The type of assessment that includes data related to a client’s biological, cultural, spiritual and social need is called Comprehensive Assessment.
➥ The Vital Signs are: 1. Temperature, 2. Pulse, 3.Respiration, 4. Blood pressure, and 5. Pain.
➥ Heat loss due to contact with circulating air movement is known as Convection.
➥ The range of marking in glass/clinical thermometer is 95-110° F and 35-43.3°C.
➥ Normal Rectal temperature is 99.6° F (37°C) (1°F ) higher than oral temperature).
➥ Rectal temperature is the most reliable.
➥ Relapsing fever: Fever episodes are separated by intervals of normal temperature for days or weeks.
➥ Rigor: Sudden rise in body temperature with shivering as seen in malaria.
➥ Increased depth of breathing with normal respiratory rate is called Hyperpnea.
➥ Cheyne-Stokes Respiration is characterized by altered period of Tachypnea and Apnea.
➥ Pulse deficit refers to the difference between apical pulse and radial pulse.
➥ A Blood Pressure Cuff that is too large will give falsely low reading of BP.
➥ Beneficence: Doing good for clients and providing benefit balanced against risk.
➥ Isotonic solutions allow free movement of water across the membrane without changing concentration of solutes on either side. E.g. 0.9% NaCl.
➥ Hypertonic solution: Fluids with solutes more concentrated than in cells, e.g. 5% dextrose.

1 note
·
View note
Text
Liquid Glucose Manufacturers & Production in India - Gujarat Ambuja Exports Ltd
Liquid Glucose Manufacturers and Production in India - Gujarat Ambuja Exports Ltd

Liquid Glucose, also known as Corn Syrup, is a purified water-based solution of saccharides derived from starch. The Ambuja Group processes and packs this product hygienically, ensuring it meets high-quality standards. Before being distributed to global markets, their liquid glucose undergoes strict quality testing based on well-defined parameters. This ensures that the product is safe, reliable, and effective for use in various applications, including food and beverages.
Liquid Glucose, also known as Corn Syrup, is a widely used food additive and ingredient in many countries. Made from high-quality corn starch, it undergoes a process involving high temperatures and acids under strict quality control. Two enzymatic reactions convert the starch into corn syrup. Liquid Glucose acts as a thickener and sweetener in foods, with moisture-retaining properties that keep products fresh.
As a leading manufacturer, Ambuja Group supplies liquid glucose to the baking and confectionery industries worldwide. Glucose syrup, made from sources like maize, wheat, rice, and potatoes, varies in viscosity and sweetness based on the extent of hydrolysis, rated by its "dextrose equivalent" (DE).
Total capacity: 620 MT/Day
Division: Starch
Plant locations: Himmatnagar, Sitarganj, Hubli, Chalisgaon
Liquid Glucose, also known as Sweetose, Corn Syrup, or simply Glucose, is produced through the partial hydrolysis of starch slurry by acid or enzyme. This process yields a mixture of carbohydrate molecules, resulting from the breakdown of long-chained polysaccharides in starch. By adjusting ingredient content, Liquid Glucose with various DE (Dextrose Equivalent) levels can be obtained for different uses.
Liquid Glucose is a clear, colorless, and viscous solution, making it ideal for applications requiring specific physical properties. It possesses functional characteristics such as high fermentability, viscosity, hygroscopicity, sweetness, and colligative properties. Additionally, it plays a significant role in Maillard’s reaction, essential for flavor and color development in food products.
The DE value of Liquid Glucose directly affects its properties, such as sweetness, freezing point depression, and osmotic pressure. In contrast, properties like cohesiveness, bodying characteristics, foam stabilisation, and prevention of sugar crystallisation are inversely related to the DE value. This variability allows for tailored applications in diverse industries.
The reducing action of glucose makes it unsuitable for use with strong oxidising agents, yet this incompatibility can offer advantages in certain applications.
With a production capacity of 620 MT/Day,Liquid Glucose is manufactured under the Starch division, with plant locations in Himmatnagar, Sitarganj, Hubli, and Chalisgaon. These facilities ensure a steady supply to meet market demands across various sectors, including food, pharmaceuticals, and industrial applications. The versatility and unique properties of Liquid Glucose make it a valuable ingredient in multiple formulations, enhancing product quality and functionality.
For More Information
“Ambuja Tower”, Opp.Sindhu Bhavan, Sindhu Bhavan Road, Bodakdev, P.O. Thaltej Ahmedabad 380054.
[email protected](Export Inquiries)
[email protected](Investors Only)
+91-79-61556678
https://www.ambujagroup.com/product/liquid-glucose-2/
0 notes
Last Seen Blogs

theayse-51
Ayşe Hatun

nepdapurrbeast
neppington

alexi2411
Sans titre

venture-heat-blog
Venture Heat®

backwardsintohell
shakin' hands with the clock