#lora arduino board
Explore tagged Tumblr posts
Visit Tumblr Blog
Explore Tumblr blogs with no restrictions, modern design and the best experience.
Last Seen Tumblr Blogs


Fun Fact
Mobile US users spent an average of 115.8 minutes on Tumblr app monthly.
Text
Best Electronic Components Suppliers in Delhi - Campus Component
In the ever-evolving world of electronics, finding a reliable and trustworthy source for high-quality electronic components is essential. Campus Component, a leading electronic components distributor in India, stands out as a premier destination for a wide range of components catering to diverse industry needs. With a commitment to excellence, Campus Component has established itself as the go-to partner for engineers, hobbyists, and businesses seeking top-notch electronic components and exceptional customer service.
A Comprehensive Range of Electronic Components
Campus Component boasts an extensive inventory of electronic components, encompassing a vast spectrum of categories, including:
Microcontrollers and Development Boards: Discover a comprehensive selection of microcontrollers and development boards from renowned brands like Arduino, ESPRESSIF, and NUVOTON, empowering you to bring your electronic creations to life.
Sensors: Enhance your projects with a diverse range of sensors, including temperature sensors, proximity sensors, and accelerometers, enabling you to interact with the physical world with precision and accuracy.
Relays: Control and regulate electrical circuits with a broad assortment of relays, including power relays, PCB relays, and solid-state relays, ensuring reliable and efficient power management.
Wireless Modules: Expand the connectivity of your projects with a wide array of wireless modules, including Bluetooth modules, Wi-Fi modules, and LoRa modules, enabling seamless communication and data exchange.
Campus Component: Your Trusted Source for Electronic Components
In a landscape brimming with electronic components distributors, Campus Component distinguishes itself with its unwavering commitment to quality, customer-centric approach, and dedication to innovation. Whether you're seeking a single resistor or a comprehensive suite of components for your next project, Campus Component stands as a reliable partner, ensuring you have access to the high-quality electronic components you need to bring your ideas to life.
Embrace the Power of Electronics with Campus Component
Join Campus Component's growing community of engineers, hobbyists, and businesses and discover the power of high-quality electronic components. With an extensive inventory, unwavering commitment to quality, and customer-centric approach, Campus Component is your one-stop shop for all your electronic components needs.
#buy electronic components online india#buy electronic components in bulk#electronic components online in india
0 notes
Text
Transferência de Arquivos via LoRa
Um projeto que venho fazendo há alguns meses e que muitas pessoas estavam interessadas em transmitir imagens e agora será possível, mas claro, respeitando as limitações.
Transferência da arquivos via LoRa é possível assim como qualquer outra modulação, mas existem desafios particulares nessa tarefa que em outras modulações podem ser mais fáceis. Sobre a modulação LoRa Antes mesmo de partimos para a transferência de arquivos via LoRa, é preciso entender que o LoRa não foi feito para esse tipo de aplicação e sim para dispositivos IoT, mesmo embora tenha uma taxa…

View On WordPress
#arduino lora antenna#biblioteca lora arduino#esp32 lora arduino#esp32 lora arduino library#lora and arduino#lora arduino#lora arduino adafruit#lora arduino board#lora arduino example#lora arduino library#lora arduino projects#lora transmitter and receiver arduino#module lora arduino#multiple lora arduino#rfm9x lora arduino
0 notes
Text
A farming Arduino
Arduino Pro redefines smart agriculture with the new Edge Control
_
Experience the intelligent future of outdoor environments Arduino Pro announces the launch of the Arduino Edge Control, a smart remote solution for monitoring and control, designed to deploy AI on the edge. Optimized for outdoor environments and easy to place anywhere, it is ideal for precision farming, smart agriculture, and any application requiring intelligent control in isolated locations.The Arduino Edge Control can be expanded with 2G, 3G, CatM1, or NB-IoT modems, Lora, Sigfox, Wi-Fi, or Bluetooth connectivity; it can be managed remotely via the Arduino Cloud or third-party solutions and powered via solar panels. The option to power the device via solar panels as well as the range of connectivity options means the Edge Control can be used in the most remote of locations and monitored from afar. The Arduino Edge Control is able to connect sensors, provide real-time monitoring and automatically drive actuators – such as latching valves commonly used in agriculture – reducing production-related risks. Through this advanced solution, smart agriculture sensors collect data about weather conditions, soil quality, crop growth, and more. The data is then sent to the Arduino IoT Cloud, where valuable analytics can be retained to support business at different levels – enabling better decisions about equipment efficiency, plant growth, and staff productivity, or even automating processes such as fertilization, irrigation, and pest control to boost the quality of crops and minimize human error. During product development, Arduino partnered with Challenge Agriculture to integrate the Edge Control into Irriduo®, the French company's new smart irrigation solution and water management application, the first in a new generation of water management products. Combining Challenge Agriculture's R2-DX with the Arduino Edge Control , Arduino MKR GSM1400 for connectivity and firmware, and including access to a dedicated cloud, Irriduo® takes a closer look at the soil to actively tell farmers how to achieve the best yield while minimizing water consumption and maximizing soil preservation. The inherent nature of arable farming sets its own unique set of challenges: remote locations, changeable soil conditions based on field topography, and specific crop rotation schedules to mention but a few. Challenge Agriculture and Arduino worked to create an optimal solution for these needs, with 6 sensors per field providing accurate readings for 6 crop cycles of 3-4 months each (i.e. 4,000 measurements), or for as long as 4 years in the case of perennial crops. Constant sensing and monitoring are only half the story - by automating irrigation controls, Irriduo® also reacts in real-time to changing conditions. This is especially important in regions suffering from droughts, where strict regulations are enforced to limit the volume of water that can be used and the time of day/night irrigation can be activated. Commenting on the launch, Arduino’s CEO Fabio Violante said, “People are constantly needing to solve everyday problems and improve productivity through their own creativity and ingenuity, and we truly believe they can do this with the Edge Control. We are ready to help companies take the next step in agricultural automation, providing smart irrigation solutions and the ability to apply machine learning on the edge to optimize crop production and increase yields.” Xavier Eftimakis, Founder & CEO at Challenge Agriculture, added, “The Edge Control allows many cost-effective solutions for multiple smart agriculture projects.” The Edge Control’s robust design and solar-powered capabilities mean that it is suited for controlling applications in any outdoor environment. For example, it can be used on construction sites and real estate to monitor and automate access control; moreover, swimming pool maintenance and cleaning companies could take advantage of its capabilities to change their service offering by monitoring and controlling the condition of the pool water remotely. As usual, it is expected that countless ingenious solutions will be provided by the Arduino community using this technology. The Arduino Edge Control is available for €166/US$199 on the Arduino Store. For more information, please visit: arduino.cc/pro
About Arduino Arduino is an open-source hardware, software, and content platform with a worldwide community of around 30 million active users. It has powered thousands of projects, from everyday objects to satellites and complex scientific instruments. This success has been made possible by combining a wide variety of electronic boards, easy-to-use tools, a collaborative community, and practical project examples to suit all levels. Press contact Luisa Castiglioni [email protected]
39 notes
·
View notes
Text
Hack and Tell #26

This time we had 4 interesting presentations
To no one's great surprise, the 26th Hack&Tell began with the Photography Turntable: Part Two, told by Darius. Those who attended the previous Hack&Tell, know that the first iteration of this project turned out to be somewhat limited due to the friction and lack of rigidity, that the stepper motor could not overcome. This time, Darius used a larger, more robust case, a powerful PSU from a PC, and a Raspberry Pi to control it all. Since photography is a light-sensitive matter, the feedback from this device was provided by a synthesized voice, speaking (or cursing) in Russian, as the Lithuanian variant was simply incomprehensible. This time, PCB was milled rather than etched. There was a more though-out gear and belt reduction system, and a ball bearing to support larger weights on the turntable top. With a white background stand and light-diffusing fabric, the device finally works like intended and can be used to take pictures of objects as large as a CRT TV.
youtube
Next, Marius made a shot for the stars with a telescope project. The inspiration for it came from the book "How to make a telescope" by J. Texereau, which described the procedure of grounding telescope mirrors but omitted the explanation of how they should be aluminized. Because of that, the idea was put on hold, but then, during the Makerspace clean-up effort, Marius adopted an old video projector that was about to be thrown out and decided to use its lense to build a Keplerian telescope. This type of telescope does not require precisely grounded lenses, nor a very accurate assembly and the math behind the dimensions is quite simple. Using a cylindrical bottle box, a cut-off PVC pipe, and another, little lense from a microscope, Marius assembled it all and even took a few test shots. Now, all that remains is a more robust frame, a tripod mounting point, and a proper attachment for a photo camera.
youtube
Hack&Tell continued with Renardas story about a remotely controlled lamp that he developed from scratch to a final product, after being contracted by local hunters who needed illumination for specific spots in their hunting grounds. Since this lamp is operated off a custom made 18650 LiPo cell battery bank, it required a reliable, long-range, power-saving method of communication, LoRa fit that description perfectly. After testing data transfers between two Arduino Nano microcontrollers connected to LoRa receivers-transmitters, Renardas soldered it all on perf-boards and housed in separate plastic cases. The lamp itself was a high-powered LED, so powerful that it even required a heat sink. Even though this project took much more time and money than initially intended, Renardas delivered the final product without compromise and even wrote a user manual for it. Heres the link to his blogpost http://9v.lt/blog/remote-controlled-outdoor-light/
youtube
Finally, Justinas told us about a small-scale model of a sailing dinghy that he is developing and planning to construct a full-scale next summer. The key point of this design is a double floor - an air-tight compartment that provides extra buoyancy and allows the boat to bail the water through the transom without the need for the sailor to waste his time with a bucket during a race. This boat was designed with Solidworks, scaled-down, parts were flattened and designed to fit on two A4 cardboard sheets, and then cut out with Makerspace laser cutter. The tiny pieces were then glued together, the assembled model was varnished for waterproofing, and tested out in the sink. The double floor and water bailing system worked fine, but testing revealed that the stability of this boat isn't that great, and will require further improvements to make it viable for a full-scale build. Perhaps there will be a Part Two for this project as well?
youtube
After a nerve-stretching vote, Darius continued his invincible winning streak with yet another victory. The bar is set really high now...


1 note
·
View note
Text
[Media] TTGO T-Beam ESP32 LoRa
TTGO T-Beam ESP32 LoRa The TTGO T-Beam is a long-range wireless capable board supporting LoRa, built around a dual-core ESP32 chip with 4MB of SPI flash onboard, providing both Wi-Fi and Bluetooth LE. The board's LoRa support comes in three different variants, operating at 433MHz, 868MHz, and 915MHz depending on region, with an included SMA antenna. Location tracking is provided by the onboard u-blox NEO-6M GPS module with ceramic antenna, and the board offers 26-pin headers with GPIO, ADC, VP/VN, DAC, touch, SPI, I2C, UART, 2דLoRa” pin, and power signals (5V/3.3V/GND). The board can be programmed using the Arduino development environment, and example code shows you how to both send and receive data via LoRa. The board also includes a battery holder for a 18650 Li-Ion cell. Repository: https://github.com/Xinyuan-LilyGO/LilyGo-LoRa-Series Buy online: 🛒 https://alii.pub/6mgzin 🛒 https://amzn.to/3Z2WUh4 #radio #lora #mesh #ESP32

0 notes
Text
Séance 11 à l'IUT
Onzième séance :
Pour cette dernière séance voici les dernières tâches que nous devions réaliser :
Nous avons imprimés nos pièces en 3D pour faciliter l'implantation des capteurs et du tableau de bord sur le Kart.
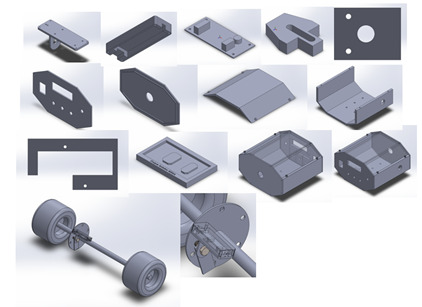
Sur cette photo on a le support pour le capteur de vitesse ainsi que le boitier du tableau de bord qui accueillera toute l'électronique embarquées. Il y a aussi la face avant permettant de mettre l'afficheur LCD, les leds, l'interrupteur et un switch pour le mode d'affichage. On a aussi le support pour la carte Arduino MEGA.
Pour de ce qui est le boitier de réception nous avons récupéré un boitier déjà existant à l'IUT.


Dans ce boitier on y trouve une carte Arduino avec un module LoRa pour recevoir les données.
Nous avons également imprimé une carte PCB pour le module LoRa du coté émission.


Cette carte permet de relier les pattes de LoRa que l'on utilise sur la carte MEGA.
On a également fabriqué un shield pour accueillir toute les connexions des capteurs et des différents modules.
En cas de secours pour l'alimentation on a utilisé un Traco pour nous fournir différentes tensions dont nous avons besoins.
Voici le schéma eagle ainsi que le board :
Cette petite carte doit permettre de nous fournir plusieurs tensions pour pouvoir alimenter chaque capteur ainsi que notre boite avec l'Arduino
On a également avancé le rapport de projet ainsi que le diaporama pour la soutenance.
0 notes
Text
IoT Standards & Protocols Guide - Arya College

The essence of IoT is networking that students of information technology college should be followed. In other words, technologies will use in IoT with a set protocol that they will use for communications. In Communication, a protocol is basically a set of rules and guidelines for transferring data. Rules defined for every step and process during communication between two or more computers. Networks must follow certain rules to successfully transmit data.
While working on a project, there are some requirements that must be completed like speed, range, utility, power, discoverability, etc. and a protocol can easily help them find a way to understand and solve the problem. Some of them includes the following:
The List
There are some most popular IoT protocols that the engineers of Top Engineering Colleges in India should know. These are primarily wireless network IoT protocols.
Bluetooth
Bluetooth is a wireless technology standard for exchanging data over some short distances ranges from fixed and mobile devices, and building personal area networks (PANs). It invented by Dutch electrical engineer, that is, Jaap Haartsen who is working for telecom vendor Ericsson in 1994. It was originally developed as a wireless alternative to RS-232 data cables.
ZigBee
ZigBee is an IEEE 802.15.4-based specification for a suite of high-level communication protocols that are used by the students of best engineering colleges to create personal area networks. It includes small, low-power digital radios like medical device data collection, home automation, and other low-power low-bandwidth needs, designed for small scale projects which need wireless connection. Hence, ZigBee is a low data rate, low-power, and close proximity wireless ad hoc network.
Z-wave
Z-Wave – a wireless communications protocol used by the students of Top Information Technology Colleges primarily for home automation. It is a mesh network using low-energy radio waves to communicate from appliance to appliance which allows wireless control of residential appliances and other devices like lighting control, thermostats, security systems, windows, locks, swimming pools and garage door openers.
Thread
A very new IP-based IPv6 networking protocols aims at the home automation environment is Thread. It is based on 6LowPAN and also like it; it is not an IoT protocols like Bluetooth or ZigBee. However, it primarily designed as a complement to Wi-Fi and recognises that Wi-Fi is good for many consumer devices with limitations for use in a home automation setup.
Wi-Fi
Wi-Fi is a technology for wireless local area networking with devices according to the IEEE 802.11 standards. The Wi-Fi is a trademark of the Wi-Fi Alliance which prohibits the use of the term Wi-Fi Certified to products that can successfully complete interoperability certification testing.
Devices that can use Wi-Fi technology mainly include personal computers, digital cameras, video-game consoles, smartphones and tablets, smart TVs, digital audio players and modern printers. Wi-Fi compatible devices can connect to the Internet through WLAN and a wireless access point. Such an access point has a range of about 20 meters indoors with a greater range outdoors. Hotspot coverage can be as small as a single room with walls that restricts radio waves, or as large as many square kilometres that is achieved by using multiple overlapping access points.
LoRaWAN
LoRaWAN a media access control protocol mainly used for wide area networks. It designed to enable students of private engineering colleges in India to communicate through low-powered devices with Internet-connected applications over long-range wireless connections. LoRaWAN can be mapped to the second and third layer of the OSI model. It also implemented on top of LoRa or FSK modulation in industrial, scientific and medical (ISM) radio bands.
NFC
Near-field communication is a set of communication protocols that enable students of best engineering colleges in India two electronic devices. One of them is usually a portable device like a smartphone, to establish communication by bringing them within 4cm (1.6 in) of each other.
These devices used in contactless payment systems like to those used in credit cards and electronic ticket smartcards and enable mobile payment to replace/supplement these systems. Sometimes, this referred to as NFC/CTLS (Contactless) or CTLS NFC. NFC used for social networking, for sharing contacts, videos, photos,or files. NFC-enabled devices can act as electronic identity both documents and keycards. NFC also offers a low-speed connection with simple setup that can be used by the students of top btech colleges in India to bootstrap more capable wireless connections.
Cellular
IoT application that requires operation over longer distances can take benefits of GSM/3G/4G cellular communication capabilities. While cellular is clearly capable of sending high quantities of data. Especially for 4G with the expense and also power consumption will be too high for many applications. Also, it can ideal for sensor-based low-bandwidth-data projects that will send very low amounts of data over the Internet. A key product in this area is the SparqEE range of products including the original tiny CELLv1.0 low-cost development board and a series of shield connecting boards for use with the Raspberry Pi and Arduino platforms.
Sigfox
This unique approach in the world of wireless connectivity; where there is no signalling overhead, a compact and optimized protocol; and where objects not attached to the network. So, Sigfox offers a software-based communications solution to the students of top engineering colleges in India. Where all the network and computing complexity managed in the Cloud, rather than on the devices. All that together, it drastically reduces energy consumption and costs of connected devices.
SigFox wireless technology is based on LTN (Low Throughput Network). A wide area network-based technology which supports low data rate communication over larger distances. However, it mainly used for M2M and IoT applications which transmits only few bytes per day.
0 notes
Text
Suitable for Arduino 3.3V RFM95 RFM69CW RFM12 RFM69HCW RFM92 RFM98 RFM96 Wireless LoRa module development board
Suitable for Arduino 3.3V RFM95 RFM69CW RFM12 RFM69HCW RFM92 RFM98 RFM96 Wireless LoRa module development board

lastest_volume
87
Just For Today
Click Here To Visit The Shop
N€W Suitable for Arduino 3.3V RFM95 RFM69CW RFM12 RFM69HCW RFM92 RFM98 RFM96 Wireless LoRa module development board
0 notes
Text
Learn Arduino with “Arduino Workshop, 2nd Edition: A Hands-on Introduction with 65 Projects”
After eight years and much feedback from various readers, I’m proud to offer the second edition of my first book “Arduino Workshop”, from No Starch Press. This is a revised update to this very popular book which is aimed at any person who wants to make electronic devices using the Arduino platform – but has no experience in electronics, programming or microcontrollers.
The reader doesn’t need to buy or read any other book first to get started, from the beginning they are introduced to the basic concepts, required software installation and then introduced to various topics from blinking an LED to controlling devices remotely via a cellular phone.
Contents include:
Chapter 1: Getting Started Chapter 2: Exploring the Arduino Board and the IDE Chapter 3: First Steps Chapter 4: Building Blocks Chapter 5: Working with Functions Chapter 6: Numbers, Variables, and Arithmetic Chapter 7: Expanding Your Arduino Chapter 8: LED Numeric Displays and Matrices Chapter 9: Liquid Crystal Displays Chapter 10: Creating your own Arduino Libraries Chapter 11: Numeric Keypads Chapter 12: Accepting User Input with Touchscreens Chapter 13: Meet the Arduino Family Chapter 14: Motors and Movement Chapter 15: Using GPS with Your Arduino Chapter 16: Wireless Data Chapter 17: Infrared Remote Control Chapter 18: Reading RFID Tags Chapter 19: Data Buses Chapter 20: Real-time Clocks Chapter 21: The Internet Chapter 22: Cellular Communications
You can also review the entire book index from here.
Once the reader has progressed through “Arduino Workshop”, I have found that many people use it as a reference guide for various topics, and saves them time and effort. Instead of searching randomly for various videos, web pages or whatnot – this book offers solid, tried-and-tested information that can be relied on without worry.
Readers of the first edition will also be introduced to new chapters in this edition, such as learning how to create your own Arduino libraries, introduction to the new v2.0 IDE, using new types of LED displays, remote control of devices with LoRA wireless shields, an updated cellular chapter that uses contemporary 3G wireless, and more.


The book is printed using a convenient lie-flat technology, so you can have the book open to your side and not worry about the pages flapping about and losing your position while working on your projects. All the required code (or Arduino “sketches”) are included in the book, however you can also download them along with a list of parts and supplier information from the book’s website.
The Arduino platform in my opinion is still the easiest and most approachable way of learning about electronics and microcontrollers, and opens up a whole new world of creativity or even the pathway to a career in technology, and a copy of “Arduino Workshop” is the best guide to this world.
You can learn more about the book and order from the No Starch Press online store, amazon, kindle, or your preferred bookseller. Orders from No Starch Press also include a free electronic copy so you can get started immediately.
And whatever you do, have fun and make something!
Learn Arduino with “Arduino Workshop, 2nd Edition: A Hands-on Introduction with 65 Projects” was originally published on PlanetArduino
0 notes
Text
Hardware solutions for Eclipse IOT Challenge: Exploring LoRa/LoRaWAN
The Eclipse IOT challenge lead me to research more in depth different technologies both from the hardware and the software aspect. As part of product development and delivery one has to come up with the solution for a problem. In this case the problem is parking in urban areas, or the lack of smarter parking solutions. Such implementation would not only allow end users to have a better parking experience while saving time in finding an adequate spots but also provides the city with valuable data to be used for city planning and city improvement projects.
Once the issue is identified, it was important to find a technical solution that would align with our needs. For city implementations, given the broad area that needs to be covered, we would need a type of communication that is long range and low cost, both in cost of sending data and power consumption. I first tackled the hardware needs once the design was evaluated. The prototype for a smart city solution needs to also be scalable while adding the least overhead in cost and infrastructure needed.
In this article I will go more in depth on the research done to identify one of the key components of the project. I will share a summary of my findings in hopes of helping others that are also exploring similar solutions.
Evaluating communication solutions:
I evaluated BLE, bluetooth, cellular, satellite, Wi-Fi, SigFox, Zigbee and Lora. Bluetooth and Wi-Fi, given its range limitation and cost were not considered for this prototype. Cellular communications have a higher cost as well, and at even steeper price comes satellite communication; both this options were also discarded. SigFox and LoRa/LoraWAN were the runner up candidates. I came across a comprehensive post on the comparison of SigFox and LoRa that is worth the read https://www.link-labs.com/blog/sigfox-vs-lora . The winner was LoRa.
Why Lora?
As explained by Libelium on http://www.libelium.com/development/waspmote/documentation/lora-vs-lorawan/ LoRa contains only the link layer protocol and is perfect to be used in P2P communications between nodes. LoRa modules are a little cheaper that the LoRaWAN ones.. LoRaWAN includes the network layer too so it is possible to send the information to any Base Station already connected to a Cloud platform. LoRaWAN modules may work in different frequencies by just connecting the right antenna to its socket..
LoRa which stands for long range wireless operates at a low bandwidth, meaning that its best application is for sending smaller pieces of data such as sensor data. LoRaWAN is known for its good penetration and long coverage which has been recorded to reach over 10 KM distance. LoRaWAN operates on unlicensed bands, so in most countries is legal to have you own LoRaWAN gateway cutting down the cost given that you will not have to pay a carrier or third party to supply you with the service.
Additionally a selling point for me personally was the wide accessibility to various developer platforms and hardware solutions such as DIY LoRa kits, libraries and Arduino compatible LoRa modules. The Things Network offers a strong platform with access to resources, documentation and a great community of IOT LoRa enthusiast.

Gateway
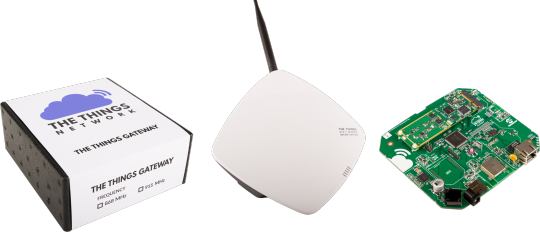
Lets take a look at one of the hardware pieces now. “Gateways form the bridge between devices and The Things Network. Devices use low power networks like LoRaWAN to connect to the Gateway, while the Gateway uses high bandwidth networks like WiFi, Ethernet or Cellular to connect to The Things Network. Gateways are routers equipped with a LoRa concentrator, allowing them to receive LoRa packets”(see more at https://www.thethingsnetwork.org/docs/gateways/). Below is a list of some gateways that were evaluated for this project. I spent time looking at their platform flexibility, the documentation and support provided and what would be the most cost effective solution for a minimum viable product (MVP).
Lorixone
https://lorixone.io/
LORIX One is the first low cost gateway designed and assembled in Switzerland. Its technical specifications include Runx Linux Yocto 4.X SX1301 gateway chip SPI based 8 channels, 49 demodulators @ 868MHz
Lorixone counts with great documentation accessible at https://www.thethingsnetwork.org/labs/story/install-awesome-lorix-one-gateway

Kerlink
Details at https://www.kerlink.com/iot-solutions-services/IoT%20LoRaWan%20Solutions/
Wirnet iBTS is a range of modular and upgradeable gateways designed for IoT public operators. It can be upgraded up to 64 LoRa™ channels to offer an answer to massive messages supporting. I was unable to identify the price point for this gateway.
The Things Gateway
Details at https://www.thethingsnetwork.org/docs/gateways/gateway/
Retails: € 300.00 € 280.00 (ex VAT)
Originally started as a Kikstarter campaign viewable at https://www.kickstarter.com/projects/419277966/the-things-network it provides 10 km / 6 miles radius of network coverage, it can server thousands of nodes and its an straight forward to set up. It counts with ample documentation and a strong community.
Technical specifications:
Fastest way to get started with LoRaWAN (Long Range WAN)
Set up your own LoRaWAN network in as little as 5 minutes
Connects easily to your WiFi or Ethernet connection
Wireless range of up to 10 km (6 miles)
Engage with a global community of IoT developers
Easy cloud integration with popular IoT platforms
Based on open source hardware and software standards
Devices can freely communicate over all gateways connected to The Things Network
XBEE slot for future connectivity protocols or homebrew add-ons.
Security through the https connection and embedded in the LoRaWAN protocol
Can serve thousands of nodes (depending on traffic)
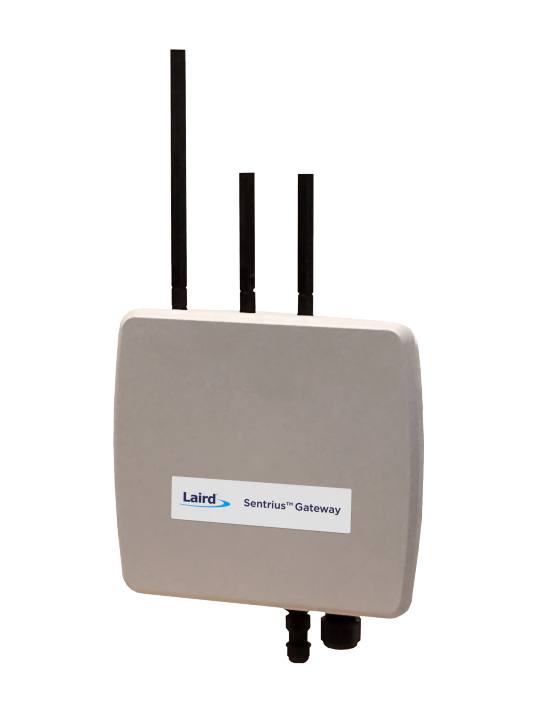
Laird — RG1xx
Details at: https://www.lairdtech.com/products/rg1xx-lora-gateway
Retail 400+ US dollars
This gateway counts with a dual-band Wi-Fi, BT v4.0 (BLE and Classic) and wired Ethernet; LoRa range up to 10 miles and pre-loaded LoRa Packet Forwarder software
Technical specifications:
Full Linux operating system — Kernel v4.x running on Atmel A5 Core @ 536 MHz
Multiple interfaces such as LoRaWAN, 802.11a/b/g/n, Bluetooth v4.0, and Ethernet
8-Channel LoRaWAN support with up to +27dBM max transmit power
Comprehensive Certifications for FCC / IC (RG191) and CE (RG186) (all pending)
Industrial temperature range (-30º to 70º C)
Advanced deployment tools including intuitive web-based configuration, integrated LoRa packet forwarder, and default settings for multiple LoRaWAN Network Server vendors
Enterprise-grade security built on Laird’s years of experience in wireless
Industry-leading support works directly with Laird engineers to help deploy your design
LoRa Network Server pre-sets — The Things Network, Loriot, Stream and Senet
Multitech
Developer resource http://www.multitech.net/developer/products/multiconnect-conduit-platform/
Retail 675–685 US dollars
Breakdown: base gateway MTCDT-H5–210L-US-EU-GB https://www.digikey.com/product-detail/en/multi-tech-systems-inc/MTCDT-H5-210L-US-EU-GB/881-1236-ND/5246365() $490, antenna (https://www.digikey.com/product-detail/en/multi-tech-systems-inc/AN868-915A-10HRA/881-1242-ND/5246371) $13, LoRa module MTAC-LORA-915 (https://www.digikey.com/product-detail/en/multi-tech-systems-inc/MTAC-LORA-915/881-1239-ND/5246368) $180
The MultiConnect® Conduit™ is a configurable, scalable cellular communications gateway for industrial IoT applications. Conduit allows users to plug in two MultiConnect mCard™ accessory cards supporting wired or wireless interfaces. It counts with open source Linux development, wwo mcard slots, Lora 8 channel receiver, Spred spectrum frequency hopping that is ued to Up to 10 miles line of sight. MultiConnect has done a great job with its documentation and it counts with its own platform that can be used as well.

Lorrier LR2
Details at: https://lorrier.com/#introducing-lr2
Developer resource: https://github.com/lorriercom
Retail €615.00 €755.00
Based on LoRaWAN™ protocol. This is a fully outdoor device intended to establish a wide coverage network by telecommunications operators and local network by individuals or IoT connectivity service providers. The whole solution, including both HW and SW parts, follows the Lorrier culture, and it is shared as an Open Source.
The gateway is based on iC880a LoRaWAN™ concentrator by IMST which uses Semtech SX1301 base band processor designed for use with LoRa® networks. BeagleBone Green with 1GHz (2000 MIPS) processor and fully operational on fast SPI bus was chosen as a powerful control unit.

LoRa/LoRaWAN Gateway — 915MHz for Raspberry Pi 3
Details at https://www.seeedstudio.com/LoRa%2FLoRaWAN-Gateway-915MHz-for-Raspberry-Pi-3-p-2821.html
Retails 289.00 US dollars
If you want to build you own LoRa network, there are 3 things that you should prepare to get started: a Gateway, at least one Node and a local server where you can monitor all your devices. This kit provides a gateway & local server that allows you to collect and transfer data among all your LoRa nodes. By connecting the gateway with Seeeduino LoRaWAN and Grove modules, you can build your IOT prototype within minutes.
Regarding the gateway module RHF0M301, it is a 10 channel(8 x Multi-SF + 1 x Standard LoRa + 1 x FSK) LoRaWan gateway moduel with a 24pin DIP port on board, users can easily connect the RHF0M301 with PRI 2 bridge RHF4T002, adapter for Raspberry Pi 3 and RHF0M301.

RisingHF gateway
Details at http://www.risinghf.com/product/rhf0m301/?lang=en
I have seen this solution mentioned and used across the LoRaWAN community. Its technical specs are RHF0M301 is a 10 channels (8 x Multi-SF + 1 x Standard LoRa + 1 x FSK) LoRa/LoRaWAN gateway or concentrator module. The module is integrated one 24 pins DIP hearder, with this header user could connect RHF0M301 with his own embedded platform to build a customized gateway easily.
LG01 LoRa OpenWrt IoT Gateway by Dragino Tech
Details at https://www.tindie.com/products/edwin/lg01-lora-openwrt-iot-gateway/?pt=ac_prod_search
Retails 56.00 US dollars
This gateway is a long distance wireless 433/868/915Mhz, OpenWrt, LoRa IoT Gateway
The LG01 is an open source single channel LoRa Gateway. It lets you bridge LoRa wireless network to an IP network via WiFi, Ethernet, 3G or 4G cellular.
DYI options:
There are various posts on DYI options based both from Raspberry Pi and Arduino boards. Below are a few:
Build your own gateway
https://www.thethingsnetwork.org/docs/gateways/start/build.html
Building a Raspberry Pi Powered LoRaWAN Gateway
https://www.rs-online.com/designspark/building-a-raspberry-pi-powered-lorawan-gateway
Hardware IMST iC880A LoRaWAN “concentrator” board and Raspberry Pi
The iC880A — LoRaWAN https://wireless-solutions.de/products/long-range-radio/ic880a iC880A is able to receive packets of different end devices send with different spreading factors on up to 8 channels in parallel. In combination with an embedded Linux board like Raspberry Pi, Beagle Bone, Banana Pi and the HAL software from https://github.com/Lora-net a complete LoRaWAN® gateway can be setup easily.
From zero to LoRaWAN in a weekend
https://github.com/ttn-zh/ic880a-gateway/wiki
Based iC880a concentrator board and a Raspberry Pi 2.
A DIY low-cost LoRa gateway
http://cpham.perso.univ-pau.fr/LORA/RPIgateway.html
The gateway is based on a Raspberry PI. RPI 1B+/2B/3B can be used. The LoRa modules comes from (a) Libelium LoRa radio module, (b) HopeRF RFM92W/HopeRF RFM95W (or RFM96W for 433MHz), © Modtronix inAir9/inAir9B (or inAir4 for 433MHz), (d) NiceRF LoRa1276. Libelium LoRa and RFM92W use the Semtech SX1272 chip while RFM95W, inAir9/9B and NiceRF LoRa1276 use the SX1276 which is actually more versatile.
Note: The LoRa module and the LoRaWAN module are not compatible because the protocols are different. The LoRa module implements a simple link protocol, created by Libelium. However, the LoRaWAN module runs the LoRaWAN protocol, a much richer and more advanced protocol, created by the LoRa Alliance.
Check out their Github page with detailed documentation https://github.com/CongducPham/LowCostLoRaGw
Conclusion on gateways:
The gateway is a key portion of this solution given that the sensors will need to send the information “somewhere” where it can either be analyzed on the edge or sent to the cloud. After considering price ranges on both the parts needed for a DIY solution or a full blown gateway I considered those solutions that would be cost effective and which I was most familiar with. The “LG01 LoRa OpenWrt IoT Gateway by Dragino Tech” seemed the best approach. The developer kit counts with an Arduino developer node and a Developer gateway. Note that this solution only counts with ONE channel, in comparison with other solutions that allow 8+ channels. This was a compromise that was evaluated and given that this will be a prototype the one channel option seemed sufficient.
In the following articles I will showcase both the remaining hardware parts and the software portion along with updates on how the project is coming along.
17 notes
·
View notes
Text
Séance 10 à l'IUT
Dixième séance :
Finalisation de tout nos modules arduino. Durant cette séance nous avons terminés les 4 fonctions qui constitue notre système d'implantation sur le Kart. La fonction mesures, affichages, stockage et transmission.
Durant cette séance nous avons finalisé la fonction transmission avec le module Arduino LoRa.
Pour ce faire nous avons du faire deux programmes, premier consiste à envoyer nos données et le second permet de les réceptionner et de les afficher sur le port série du PC.
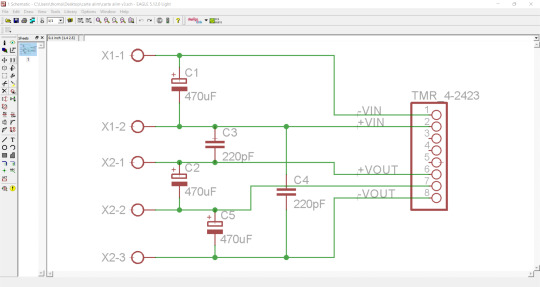
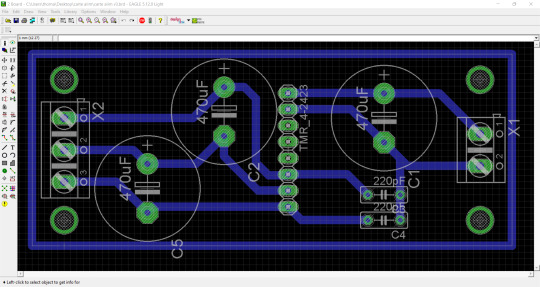
Voici le module LoRa :

Ce module est directement implanté sur la carte MEGA . Nous avions du connecter correctement les pattes MISO, MOSI et SCK à l'aide de câble car les pins de la LoRa ne sont pas reliées au bon endroit sur la carte MEGA. Pour palier ce problème de fil nous avons crée un Shield sur la Lora en circuit imprimé que voici :
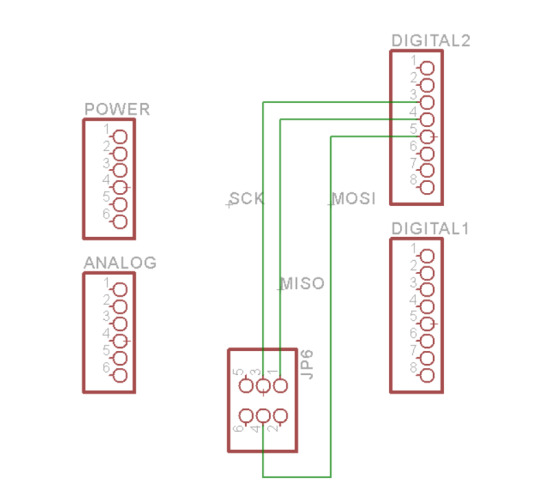
Schéma Eagle.
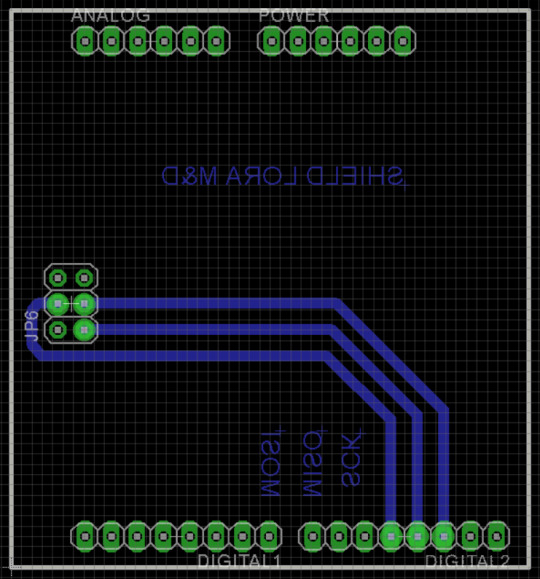
Board eagle.
Voici la partie programme permettant de recevoir les données :
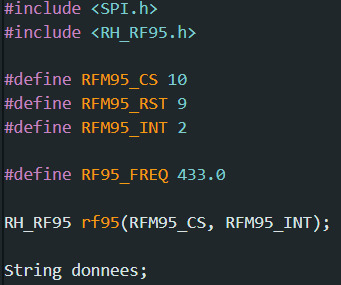
Dans cette partie nous définissons nos variables. Nos données nous allons les recevoir en chaine de caractères. On définit les pattes du SPI qui sont la 10, 9 et 2. On règle notre fréquence de transmission et de réception à 433 Mhz.
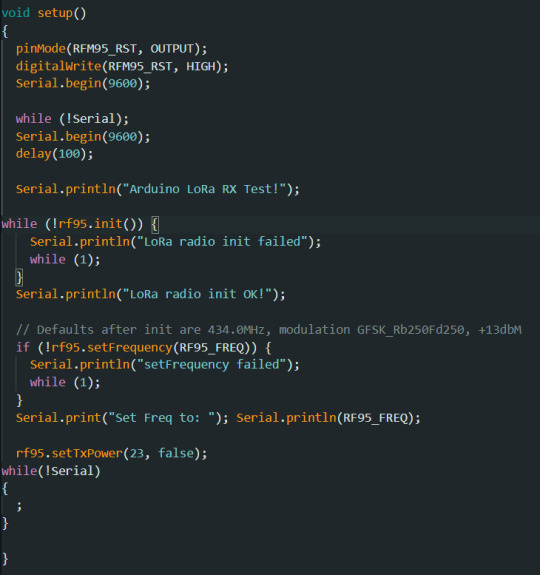
Dans la partie Setup on va initialiser le module et paramétrer la connexion des deux modules.
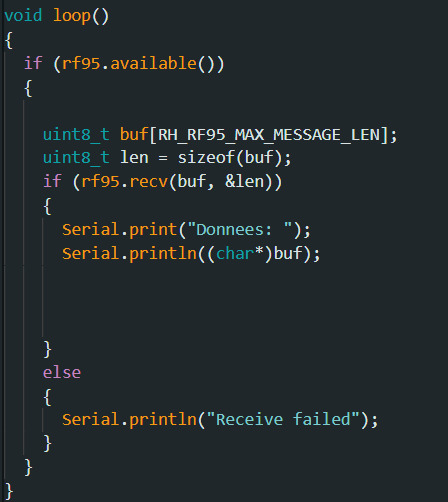
Dans la Loop nous allons venir récupérer nos données en chaine de caractères et les afficher sur notre moniteur série.
Voici maintenant la partie programme pour le transmetteur :
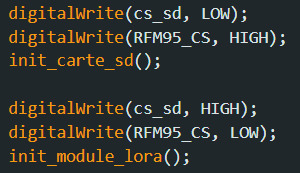
Dans la partie Setup on va initialiser nos modules qui fonctionnent en SPI pour ne pas avoir d'interférence, en l'occurrence le module de LoRa et la carte SD. On choisit à qui on va s'adresser. Ces paramètres là sont rajoutés juste devant l'initialisation de chaque module dans la partie Setup.
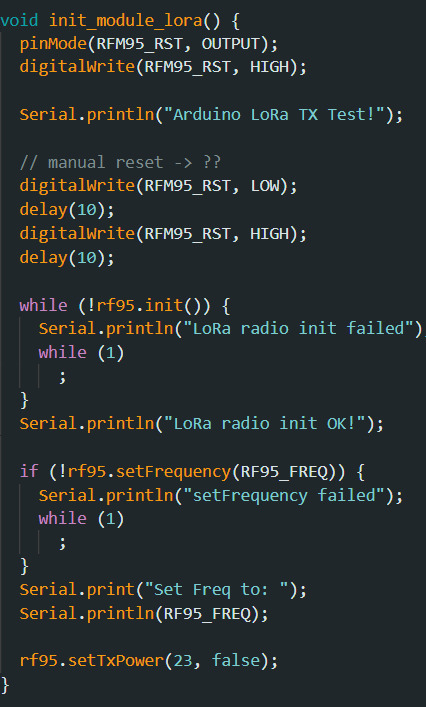
Voici la partie initialisation du module de transmission qui est quasiment identique à la partie initialisation du module de réception.
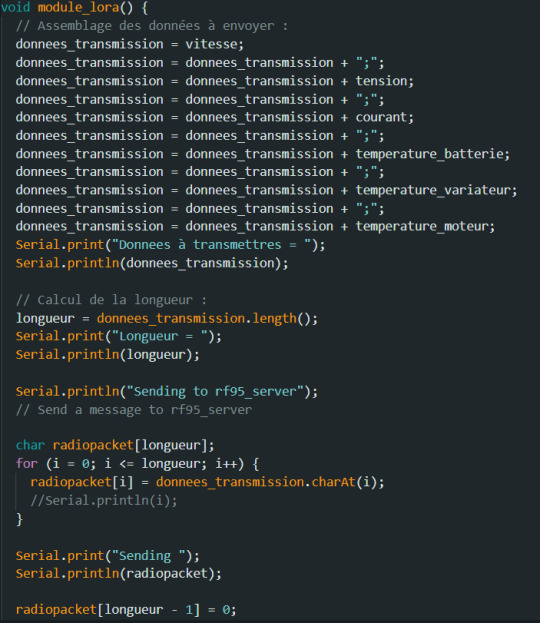
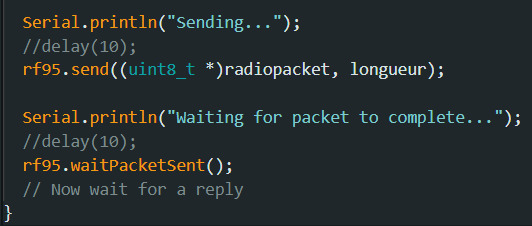
Dans cette partie de programme on vient mesurer la longueur de notre chaine de caractères. On utilise la fonction charAt qui nous permet d'envoyés des variables en caractère. Dans le début du programme on récupère nos données qui sont aussi stocker sur carte SD et on les envoies directement à notre module de réception.
Voici le résultat de la réception :
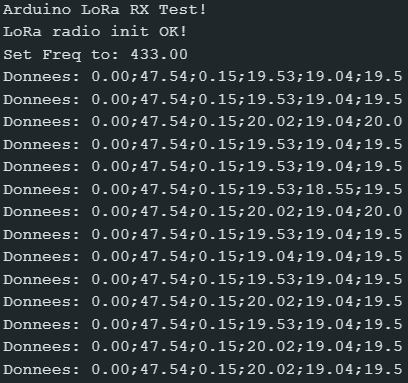
On peut observer dans la première colonne la vitesse qui est nul, ensuite la tension, le courant et les 3 capteurs de températures.


Une fois toute cette partie terminée, il faut qu'on modélise nos boite en 3D pour ranger notre électronique, faire le tableau de bord et fabriquer une carte en circuit imprimée pour toute nos connectiques.
NE PAS OUBLIER DE RACHARGER LES BATTERIES POUR LA PROCHAINE FOIS !!!!
0 notes
Link
0 notes
Text
Arduino Board Pair Boasts LoRa and GSM Capabilities
Arduino has introduced a pair of new Internet-of-Things (IoT) boards with embedded LoRa and GSM capabilities. The boards were first unveiled at World Maker Faire New York. The Arduino MKR WAN 1300 and MKR GSM 1400 enable system developers to … Continue reading → from Circuit Cellar http://ift.tt/2xykDrH
1 note
·
View note
Text
Sense the Future of Smart Agriculture with Arduino Edge Control
The Arduino Pro lineup continues to grow with the introduction of the new Arduino Edge Control. This is a remote monitoring and control solution optimized for outdoor environments. Easy deployment makes it suitable for smart agriculture, precision farming, and other intelligent control applications in remote locations.
youtube
Featuring built-in Bluetooth, Arduino MKR boards can expand connectivity with 2G/3G/CatM1/NB-IoT modems, LoRa®, Sigfox and WiFi. With solar power capabilities you can place it anywhere while leveraging AI on the edge. Once installed in the field, it can then be managed remotely using Arduino IoT Cloud (or other services).
Real-Time Monitoring with Edge Control Sensors
You can also connect sensors, provide real-time monitoring, and drive actuators — commonly used in agriculture — thereby reducing production-related risks.
Particularly aimed at smart agriculture, the sensors can collect real-time data. Weather conditions, soil quality, crop growth and any other data you need. Once sent to Arduino IoT Cloud, the data value chain becomes valuable analytics that support business processes at various levels. For example, crop yield, equipment efficiency, staff performance and so forth. The Edge Control can improve crop quality, reduce effort and minimize error by automating processes like irrigation, fertilization or pest control.
Remote Access and Maintenance
With its robust design, the Edge Control is a fitting solution for applications in any outdoor setting. For example, using it on construction sites or in real estate to automate access control. Similarly, swimming pool maintenance and cleaning companies could monitor and control the condition of pool water from remote locations. As usual, we expect the Arduino community to come up with countless ingenious ways to implement this new technology.
To learn more about how you can use the Edge Control, check out how to get started.
The Edge Control is now available for €169/US$199 on the Arduino Store.
The post Sense the Future of Smart Agriculture with Arduino Edge Control appeared first on Arduino Blog.
Sense the Future of Smart Agriculture with Arduino Edge Control was originally published on PlanetArduino
0 notes
Text
Compact, Linux-driven edge server supports Nvidia T4 GPUs
Compact, Linux-driven edge server supports Nvidia T4 GPUs
[ad_1]
Atos’ suitcase-sized “BullSequana Edge” server runs Linux on a 6th Gen Xeon-D and supports AI edge processing via optional Nvidia T4 GPUs and FPGAs. Other specs include SATA, USB 3.0, GbE, and optional 10GbE, WiFi, 3G/4G, and LoRa. Establishing our scope of coverage on the low end is pretty easy — aside from the occasional new Arduino board, we tend to limit our coverage to embedded…
View On WordPress
0 notes