#mechanical keyboard pcb
Explore tagged Tumblr posts
Visit Tumblr Blog
Explore Tumblr blogs with no restrictions, modern design and the best experience.
Last Seen Tumblr Blogs


Fun Fact
Tumblr has a low social media market share in South America.
Text

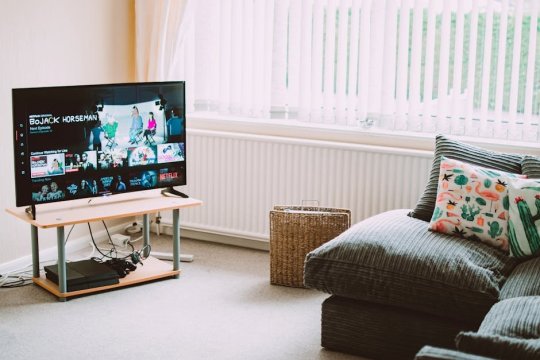
Got the alphasmart I’m gonna mod with a mechanical keyboard in
It needs cleaning, and if I can’t get the permanent marker off I’m gonna probably spray paint it too, but it’s in overall good shape
Typing on it feels absolutely horrible though and really makes me appreciate the Neo2 I already have
Also I wonder if I can potentially give it a bit of a better screen too…
#alphasmart#if I could get the screen like what’s on the Neo2 that would be great#but I’ll be happy if I can just get the mechanical keyboard there#I’m going to order the pcbs soon and can only order a minimum of 5#so I could potentially have some PCBs for sale later#I could do the necessary soldering and whatnot too but that could start getting expensive if people want certain switches and whatnot#but it’s potentially something I might have in the future so if you’re interested in doing the mechanical keyboard mod and might wanna buy#lmk
4 notes
·
View notes
Text
Start your custom keyboard journey with our high-performance Mechanical Keyboard PCBs. These PCBs are designed to provide a reliable and customizable foundation for your keyboard project. Featuring multiple layout options and support for different key configurations, they allow you to create a keyboard that matches your specific requirements. Our Mechanical Keyboard PCBs also offer advanced features like QMK and VIA compatibility for easy key mapping and firmware customization. Whether you're building a minimalist 40% keyboard or a feature-packed 75%, our PCBs provide the versatility and quality you need. Make your keyboard unique and functional with a PCB that's built to last.
0 notes
Text
Best Custom Keyboard Manufacturers- Cutek Circuits
Cutek Circuits stands out as a premier Custom Keyboard Manufacturer, embodying excellence in every keystroke. With a passion for innovation and a commitment to quality, they craft personalized keyboards that redefine the typing experience. Meticulously designed, each keyboard reflects a harmonious blend of aesthetics and functionality, tailored to individual preferences. Backed by a team of skilled artisans, Cutek Circuits transforms keystrokes into an art form, making them the ultimate choice for those seeking a truly exceptional typing companion. Discover the intersection of technology and creativity with Cutek Circuits - where every press brings a symphony of tactile delight.
#custom keyboard manufacturers#Custom Keyboard Manufacturers#best mechanical keyboard#keyboard india#customized membrane keyboard#bezel#pcb manufacturers near me#mechanical keyboards#membrane keypad manufacturer in india#keyboard#Membrane Keyboard#membrane keypad#keyboard manufacturers in india#membrane switch#pcb manufacturing
0 notes
Text
I bought an 8bitdo Retro mechanical keyboard!

(Picture not mine, source from PC World.)
I wanted a plastic keyboard, I really do not actually use the knob on a Keychron board I have, it still comes in a scooped keycap profile, and it has a companion numpad with a calculator built in. Win/win/win!
This keyboard comes in four designs (not colorways, full designs) themed after the NES, the Famicom, the IBM Model M, and the Commodore 64 keyboard. The NES keycaps have multiple different fonts on them, the Famicom keycaps have Japanese sublegends, the Model M keycaps have a mock stepped Caps Lock key, and the Commodore 64 keycaps are an apparently off-the-shelf SA set from one of many, many, many keycap companies floating around China (I recognize their font and profile shape from Akko ASA keycaps and numerous other scooped profile keycap sets you can have cheaply off of Aliexpress and Amazon. Do check those out, genuinely, you'd struggle to find a bad scooped keycap set these days and I love scooped profiles over Cherry and OEM.)
The build quality of the actual keyboard itself is good, feels like a very similar plastic blend to what 8bitdo uses for its controllers like their Pro 2. Stabilizers are smooth and don't rattle, the legends on the keycaps are reasonably sharp and in NES-appropriate font, the keycaps themselves are MDA profile (I would prefer SA, but beggars can't be choosers) and are somewhat thin but still good quality, dye-sublimated PBT, no warp on the spacebar. Arrow keys are a separate color from the two tones that make up the main keycap set and made to resemble a d-pad. The keyboard itself is somewhat light, but my perception is skewed from using a metal keyboard for a long time, and this is after all a plastic shell, top-mounted keyboard. Even so I think I'll probably end up cracking open the keyboard and putting in some liquid silicone as noise-dampening and additional weight.
Two knobs control both wireless functionality and computer software volume, the wireless knob is heavy with only three options while the volume one is light with many individual steps. The volume knob can be somewhat unresponsive on individual steps. Bluetooth is very responsive and wants to pair with my computer the moment it's flicked over to, and 2.4ghz wireless comes with a receiver that slots into the back of the keyboard magnetically for storage. A power light on the right of the keyboard mimics the NES power light and pulses while charging, is steady while using wireless or when fully charged and connected over USB.
The underlying PCB is south-facing hotswap sockets (who the hell cares their orientation, this only matters for lighting, which this keyboard doesn't have). By default the keyboard comes with Kailh box whites, a very light clicky switch. I yanked them out immediately and put Boba U4T tactiles in because they're the king of all switches. They thunk nicely in this chassis, the Kailh whites weren't slouches either, they did pick a good stock choice for switch without resorting to Gateron or Outemu blue horseshit.
The NES version of the keyboard came with a two-button macro pad that hooks over TRRS cable (you recognize it as a 3.5mm jack or headphone cable) to one of four ports on the top-right of the keyboard. These are essentially just two keyboard switches with giant keycaps on a separate board and the buttons are populated by Gateron greens. The switches are nowhere close to heavy enough to approximate a button, and I gave them Kailh box navies. Still not enough, but better.
These keyboards also come wiiiiiith a companion number pad!

(Picture credit the 8bitdo store.)
While I don't actually have this one in hand just yet I do have it on order. It looks like it'll be about the same build quality as the main keyboard, and it caught my eye for four reasons and ended up making me purchase the full set as a result:
The numpad has a built in calculator.
Same aesthetic choices as the main keyboard (NES, Famicom, IBM Model M, Commodore 64)
Magnetically attaches to the right side of the keyboard to transform it into a more era appropriate full-size.
Far and away the cheapest wireless mechanical numpad with calculator on the market, sitting at $45.
An important note though is that the Famicom and NES keypads don't attach to their respective keyboards, simply because their respective keyboards don't have magnets inside the sides of the chassis to allow for it. I have some cheap button magnets laying around that I'll use for this purpose and probably see if they're strong enough to be placed on the inside of the board and allow for the numpad to connect to it. I also imagine there's going to be a repop or v2 of this keyboard in the future that has this done already, seeing as the Commodore 64 version of the board and I believe the Model M version of the board already have that.
I'll reblog this and give some actual definitive thoughts on the numpad once it's in my hands.
As far as the board itself is concerned, I quite like it. The keycap profile is agreeable, the nostalgia pandering targeted me with laser precision, the board sounds quite good acoustically (especially for being a top-mount keyboard!) and it has a volume knob I'll see if I can reprogram some day. While I normally hate TKL layouts, I'm putting up with it because it will eventually be a fullsize with the numpad. Worth $150 total? Don't know, can't answer that for you, it's worth it to me but I very specifically wanted a keyboard themed after an old Nintendo console with no setup required and no chasing down or commissioning GMK keycap sets. I also wanted a calculator numpad.
#look at my flop reviews boy#mechanical keyboards#keyboards#mechanical keyboard#keyboard#tech#gadgets#computers#nintendo#NES#nintendo entertainment system
47 notes
·
View notes
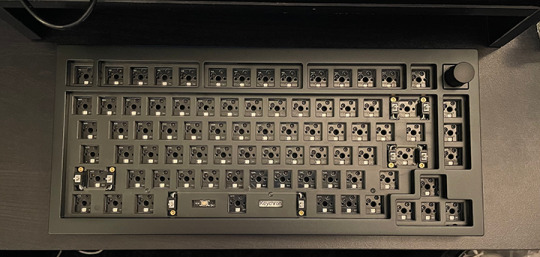
Text
I built a custom mechanical keyboard!
I used a barebones Keychron V5 96% with knob for the case/PCB, Gateron Green clicky switches, XVX PBT pudding keycaps, O-rings, and electrical tape mod on the back of the PCB.
11 notes
·
View notes
Note
Henlooo beautiful! What is something that you really want to do with tech? What is something that you like about tech ::3.
Hiiiii haii haii hii!
What is something I really want to do with tech? I really wanna build a cyberdeck at somepoint!
Not like, raspberry-pi in a pelican case that a lot of people seem to post these days, but like a proper keyboard-'puter an HMD :3
My (plan at least) current first steps r trying to design a keyboard PCB for a mechanical keyboard, in a layout similar to my old Steelseries Apex 350 keyboard !
N use the skills I learn from that to build a proper cyberdeckk
Something I like about tech? Taking it apart an getting my grubby little hands all over it ;b
ty for the ask!!!!!!!!!!!!!!!!!!!!!!!!!!!!!!!!!!!!!!!!
3 notes
·
View notes
Text
all right friends! 😁
my keyboard is complete! words cannot express how much i love this keyboard. i spent so much time thinking about what kind of pcb (body) i wanted, what switches i wanted, and what keycaps i wanted. i even asked for your help! i knew i wanted the body of my keyboard to be aluminum... and it is heavy... and i keep forgetting just HOW heavy it is. i now understand why changbin was lifting felix's keyboard now lol.
anyway, below i will have some pictures and some explanations about the keyboard and how i built it. it's okay if you don't care about any of the details and just look at the pictures lol
onto the build! i'll link everything i used in case you're interested!
for my pcb i have the Keychron Q1 Pro, in black. you can also get this pcb in white or silver. i spent a lot of time looking for a keyboard that would be mac friendly. the GMMK Pro that i was originally looking at, some of the reviews said that the mac settings didn't work that well, even with the proper software. so i went with Keychron, bc i know their keyboards are formatted to play nice with macs. i should also mention that my keyboard is hot-swappable. which means that the switches are not soldered into my pcb. if you want to get a mechanical keyboard and make changes to it, make sure it says, "hot-swappable." also my keyboard has a knob! bc why not, knobs are fun and my knob controls the volume! there is a program that you can use with Keychron to program the knob to do whatever you want it to do. but i like that it controls the volume, there's a satisfying "click" for each turn.
the keycaps are also Keychron. it took me a while to even get to the keycaps. there are too many options for keycaps out there, so be careful! you could end up with too many options like i did 😅 so, i know that in my poll, the dark keys with cmyk text won, but they are out of stock and i wasn't able to find them in the Keychron amazon storefront. i was going to go with the winner between the Akko keycaps... but they tied. so i asked GBF to pick and he chose the cyan and black. but when i was looking at the Keychron amazon storefront, i found an option that was slightly cheaper than the Akkos. but i also chose the Keychron ones bc like i said, Keychron plays nice with macs and had the "command" and "option" keys i would need.

next, switches! in a mechanical keyboard, switches are what make the keys work. in a regular keyboard (or a membrane keyboard), there's a membrane (sometimes it's silicone) that sits between the keys and the board and sends a signal when you press a key. same thing in a mechanical keyboard, except each switch operates on its own. so if a key stops working, you can simply pull the switch out and replace it with a new one! anyway, my switches happen to be mint. did i buy them bc they were mint? no. am i kind of happy that they're mint? yes. i bought them bc they're quite tactile switches. tactile means there's a little bump when the key is fully pressed to let you know that you've hit the key. i've had trouble with linear switches being too sensitive in the past. i ended up getting Durock shrimps! what a cute name lol and i might buy more to put them into my work keyboard...
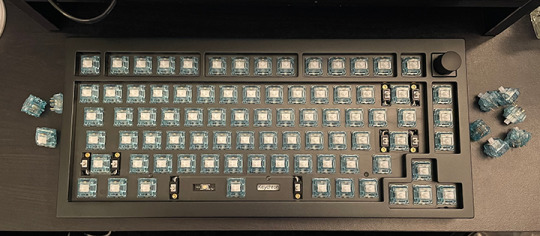
onto placing keycaps! originally i was going to put o-rings on my keycaps to prevent any more noise, but my switches are already so quiet that it wasn't really necessary. but i also did a typing test and the o-rings actually added too much bulk and didn't allow the switch to fully descend when the key was pressed. so i took them out.
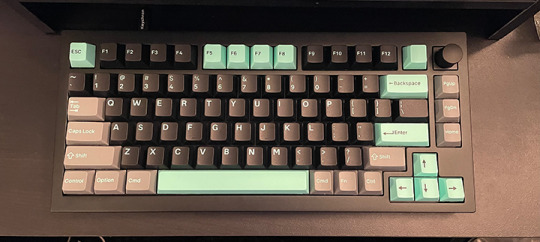
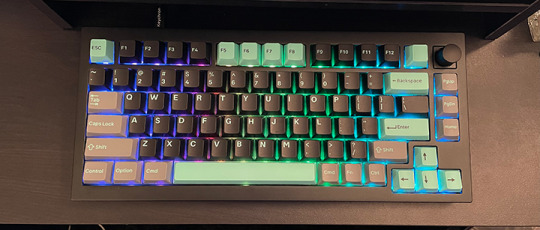
but here is my keyboard fully assembled! the rgb is so pretty too. even though i can't see it through my keycaps, it's still lovely. and the beauty of my keyboard is that i can change the keycaps whenever i want. so if i ever get bored of this lovely, black, mint, and gray combo or those dark keycaps with cmyk text come back in stock, i can always change them!
okay, i know that was a lot and again, it's totally okay if you didn't read any of it and just looked at the pictures 😂 also, my monitor stand came as well, i mentioned that earlier. but it looks so good! my desk looks so organized now! and the only thing missing from my setup is my imac now!
i hope you're doing well, stay safe out there, and stay hydrated my friends! 💖
6 notes
·
View notes
Text
another new toy


I've been planning to get a number of accessories for my new computer. A new monitor, microphone, maybe one of those vr headsets. But after having it for a few weeks, one thing jumped out as needing an upgrade more urgently than anything else - the stock full size keyboard that came with it was just too large and awkward for my little keyboard shelf. I was tempted to go back to the Microsoft Compact Bluetooth keyboard that I was using with the Steam Deck... but I haven't had a "real" computer, like a proper desktop computer in decades, I wanted a "real" keyboard to go with it. Like a proper mechanical keyboard with switches and buttons and such. And so I typed "mechanical keyboard reviews" into a youtube search, blissfully unaware of the rabbit hole I was about to fall down.
If you know then you already know, but it came as a surprise to me that membrane keyboards are so cheap and so easy to mass produce that they've taken over the casual market altogether, forcing mechanical keyboards into the domain of the ⋆ ˚。⋆˚enthusiast⋆ ˚。⋆˚
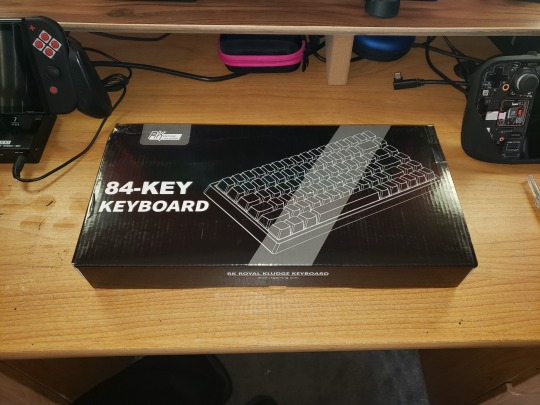
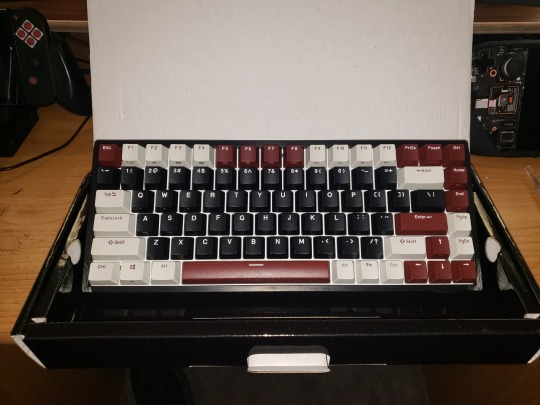
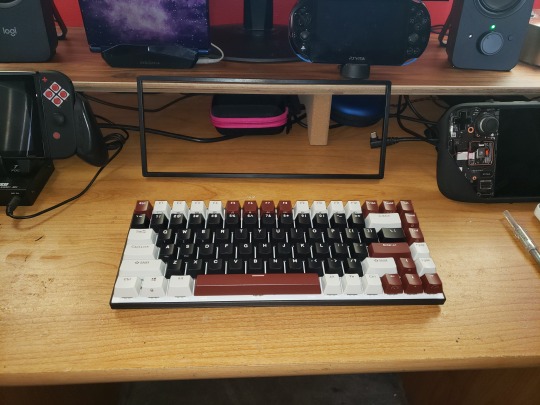
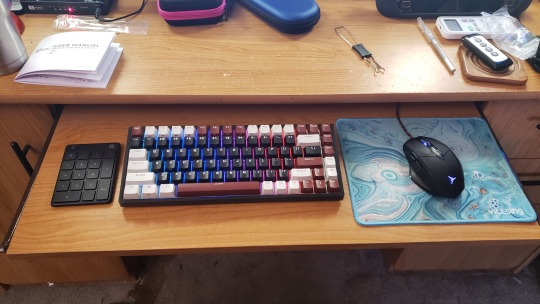
Yes, it seems proper keyboards are a hobby now, not a very cheap one either, and the very last thing I need is another expensive hobby. But every hobby has its more affordable and approachable on ramps, and there are a number of pre-built budget boards occupying this space in world of mechanical keyboards. After watching a few dozen hours of youtube videos and reading a bunch of reviews and tutorials, I eventually settled on the RK84 'limited edition' from Royal Kludge for us$80. Which is like twice what I expected to pay when I in my naive innocence began shopping for keyboards, but I've come to understand that eighty bucks absolutely counts as "budget" in this hobby.
Pricing aside, I really do love my new keyboard. The 75% form factor is ideal, better centering the typing keys and saving a bunch of extra space on my little shelf while maintaining all the functionality of a full size board save only for the number pad. While I do like to use a number pad, I don't mind taking one out when I need it, and the keyboard even has a couple usb ports to easily plug a mouse and separate number pad into, which is super convenient and such an obvious idea that I really have to wonder why all keyboards aren't doubling as USB multi-dongles at this point, with additional usb ports, sd card ports, and so on.
For $10 more than the regular RK84 wireless, the 'limited edition' version has better keycaps, factory-lubed switches, some filler foam in the housing to reduce the hollow sound, an additional layer of sound dampening foam sandwiched between the top plate and the pcb, and a snazzy color scheme, the version I chose combining a black body and mostly black keys with a white top plate that better reflects the swirly rainbow rgb backlighting. The sound is decent, at least to my untrained ear, right out of the box. Which is ideal, as I'd like to avoid the temptation to start modding it.
Because I've gone about as far down this particular rabbit hole as I want to go.
Though I suppose it is tempting to open it up, as some basic tape & band aid mods would be cheap and easy and might improve the sound a bit...
And as much as the pre-lubed yellow linear switches are nice, I did make sure to get a hot-swappable board so it's easy to change them out later if I want to try alternatives, and I do think I might prefer tactile switches for typing...
And the rgb lighting is nice enough that it really is a shame these caps aren't shine though. Yeah, yeah, shine-through is tacky, but Cringe is Dead, and some black top pudding caps might really make the lighting pop. Or maybe a mix of black, white and some accent color to match the color layout that the board came with?
The abyss, it tempts me so...
#mechanical keyboard#keyboards#computers#I really can't be starting any expensive new hobbies#student loan payments start back up in September
3 notes
·
View notes
Link
[ad_1] It seems like everywhere you look, there's another magnetic switch gaming keyboard vying for your attention, from mainstream gaming companies like Glorious and the ultra-budget-friendly Redragon to smaller brands like Arbiter Studio. Luminkey is the latter, and its most recent keyboard is compact, well-built, and surprisingly budget-friendly (not quite budget-friendly enough to land a spot on our list of best budget mechanical keyboards, but close).The Magger 68 is a compact, 68-percent wired magnetic switch keyboard with a full aluminum case, a hot-swappable PCB, and up to an 8,000 Hz polling rate — pretty much optimally designed for gaming, in other words. In that vein, it also features bright, per-key RGB lighting that can be customized in Luminkey's software. The lighting even operates on a separate lighting control chip to ensure it doesn't compromise the keyboard's performance. On the enthusiast side, the board features a sandwich mount design and comes in three colorways (black, white, and gold) with matching high-quality dye-sub keycaps with translucent accent keys.The Magger 68 comes in two variations: the "Performance" version, which costs $119 and features Gateron Magnetic White Pro switches, and the "Professional" version, which costs $149 and features Gateron Magnetic Jade Pro switches. We took a look at the Performance version in the champagne / gold color.Design and Construction of the Magger68The Magger 68 is a wired magnetic switch gaming keyboard with a 68-percent layout, which is slightly bigger than a 65-percent layout. It has alphanumeric keys, arrow keys, and a column of four additional keys — PgUp, PgDn, Delete, and the grave accent key, which is on the right side (the Escape key is on the left side). It comes in three colorways: Black, white, and champagne (gold). Each colorway comes with matching keycaps and accent keys. Our review unit came in champagne, with gray and black keycaps and translucent red accent keys. The keycaps are high-quality, dye-sub PBT and have a Cherry keycap profile — lower profile than standard OEM keycaps, with sculpted rows and lightly curved tops.Image 1 of 3(Image credit: LUMINKEY)(Image credit: LUMINKEY)(Image credit: LUMINKEY)The champagne color comes with black and gray keycaps with red translucent accent keys, and has sort of a nostalgic vibe. The black colorway has black, gray, and white keycaps with translucent gray accent keys, while the white colorway has white keycaps with orange accent keys (it also has hiragana printed on the keycaps, which is cool even though all of Japan uses romaji, not kana, input to type Japanese).Image 1 of 3(Image credit: Tom's Hardware)(Image credit: Tom's Hardware)(Image credit: Tom's Hardware)The keyboard has a nicely machined fully aluminum case with a small bezel around the keys. The keyboard's name (Magger) is engraved in the bezel in the upper-right corner. There's a small cut-out for the USB-C port, which is located on the left side of the keyboard, along the top. There's not much to say there, except that I personally prefer when keyboards have center ports, because of how my cables are set up. However, the Magger 68 comes with its own "custom 8K high-quality data cable," which has an "independent shielding ring" to block signal interference, so I needed to switch up my cable setup anyway.Image 1 of 4(Image credit: Tom's Hardware)(Image credit: Tom's Hardware)(Image credit: Tom's Hardware)(Image credit: Tom's Hardware)The 68-percent layout is still highly compact, and won't take up too much space on your desk, measuring 12.56 inches (319mm) wide by 4.33 inches (110mm) deep. At its thickest point the case is 1.18 inches (30mm) thick; it has a lower-profile front — the case is just 0.65 inches (16.5mm) thick, for a more comfortable, wristpad-free typing experience. This does make for a slightly steeper typing angle (7 degrees versus the usual 5), but it doesn't detract from the keyboard's comfort.(Image credit: Tom's Hardware)The back of the keyboard is a fairly simple slab of aluminum, with four small rubber anti-slip strips. These aren't really necessary, as this is a pretty hefty keyboard despite its small footprint. Our review unit weighed 2.6 pounds (1,177.5g) without any of the accessories, making it almost half a pound heavier than Arbiter Studio's Polar 65 magnetic switch keyboard, a similarly-sized 65-percent gaming keyboard. Still, the slim bezel and lower-profile front end does make it feel like a very small keyboard on your desk.(Image credit: Tom's Hardware)The Magger 68 comes with a five-foot (1.5m) braided USB-C to USB-A cable, a dual keycap/switch puller, and an extra switch in the box.SpecsSwipe to scroll horizontallySize68%Number of keys68SwitchesGateron Magnetic White-ProBacklightingYesOnboard StorageYes / NoDedicated Media Keys0Game ModeYes / NoAdditional Ports0ConnectivityWired (USB-C)Cable5ft. / 1.5m, braided USB-C to USB-AKeycapsDoubleshot PBTConstructionAnodized aluminumSoftwareLuminkey HEDimensions (LxWxH)12.56 x 4.33 x 1.18 inches / 319 x 110 x 30 mmWeight2.6lbs / 1,177.5gMSRP / Price at Time of Review$119.00Release DateOct. 14, 2024Typing and Gaming Experience on the Magger68The Magger 68 is a wired magnetic gaming keyboard with magnetic Hall Effect switches — Gateron Magnetic White Pro linear switches in the performance version and Gateron Magnetic Jade Pro linear switches in the professional version. The Magnetic White Pro switches are pre-lubed dual rail linear switches with 30gf of initial force. They're linear, so they have smooth, consistent keypresses with no tactile bump or audible click. The switches are lighter than other switchesImage 1 of 2(Image credit: Tom's Hardware)(Image credit: Tom's Hardware)Typing on the Magger 68 is a pleasant experience: the switches are lightweight and smooth, and the keycaps' lower profile make for quick travel — I was able to type slightly faster (around 130 wpm) on this keyboard than I normally type (120 - 125 wpm), but the lighter weight did mean I made more typos at this speed. These are magnetic switches, so you can adjust the actuation (between 0.1mm and 3.5mm), which I did to tweak the accuracy a little. While typing on this keyboard was fine, it wasn't one of my favorite keyboards for feel or sound — I'm not the biggest fan of linear switches, and while these were fine, the bottom-out sounded a little hollow and there was some stabilizer rattle in the space bar.Like other magnetic switches, these also support Rapid Trigger and Dynamic Keystrokes, as well as the semi-controversial Simultaneous Opposing Cardinal Directions (SOCD), which you'll also find on magnetic keyboards like the Arbiter Studio Polar 75 Pro. These features probably won't mean much unless you're a gamer (and might not even then, depending on the types of games you play), and this is definitely a keyboard that's aimed at gamers. It features up to an 8,000 Hz polling rate, and comes with a special "8K high-quality data cable" with an "independent shielding ring" to prevent signal interference from causing any lag or latency. Realistically, however, if you're getting latency on a keyboard with an 8,000 Hz polling rate, it's probably not signal latency that's the issue — it's probably the constant reporting causing strain on your system. I'm not convinced that an 8,000 Hz polling rate is necessary for a mouse — which is moving constantly — let alone a keyboard. But it's there, if you want it.Unnecessarily high polling rates aside, the Magger 68 is a nice little gaming sidekick with its compact layout and magnetic switches. The lightweight linear switches are good for quick presses, and the keyboard is very responsive (even at a more normal 1,000 Hz polling rate).Features and Software of the Magger68The Magger 68 can be configured using Luminkey's Luminkey HE Driver software, which can be downloaded from Luminkey's site. It's not the best software I've used, but it's also not the worst — some parts, such as the performance section where you can adjust the keyboard's magnetic switch options, are a little confusing to navigate at first, but Luminkey does a decent job of explaining each feature in the software.Image 1 of 6(Image credit: Tom's Hardware)(Image credit: Tom's Hardware)(Image credit: Tom's Hardware)(Image credit: Tom's Hardware)(Image credit: Tom's Hardware)(Image credit: Tom's Hardware)Luminkey HE lets you remap keys, adjust the keyboard's magnetic switch settings — actuation, Rapid Trigger sensitivity, Dynamic Keystrokes, and SOCD, as well as toggle keys and mod-tap, which lets you set a key to perform different functions if you tap it or hold it down. The software has a macro recorder and a firmware updater, as well as a lighting section — unlike keyboards that rely on the open-source QMK / VIA software, Luminkey HE lets you set the keyboard's per-key lighting... per key. It's not really a necessary feature, but it's rarer than you might expect in a keyboard like this.Image 1 of 2(Image credit: Tom's Hardware)(Image credit: Tom's Hardware)The Magger 68 has bright RGB lighting, though its keys are not shine-through (minus the accent keys, which are translucent). It's still fairly noticeable, though, and can be customized in the Luminkey HE software or adjusted using preset shortcuts on the keyboard — you can cycle through over 20 preset lighting modes using Fn + U, and you can also change the color (Fn + Y), brightness (Fn + F / G), and speed (Fn + H / J).The Bottom LineThe Magger 68 is a nice little magnetic switch gaming keyboard with a compact, low(ish)-profile chassis and an 8,000 Hz polling rate. It's a solid option if you're looking for a budget-friendly magnetic keyboard, but do you really need an 8,000 Hz polling rate? Probably not. And if you don't need an 8,000 Hz polling rate, we prefer the way the Arbiter Studio Polar 65 sounds and feels for typing — and it's priced similarly ($125).If you're looking for something a little bigger, you can pick up the stylish Akko MOD007B-HE for just $110 — $10 cheaper than the Magger 68. Or, if you're looking to splurge, Keychron's gaming branch Lemokey just launched its 75-percent Lemokey L5 8K HE ($199), which has magnetic switches and an 8,000 Hz polling rate. [ad_2] Source link
0 notes
Text
does anyone want a birth chart reading because i. bricked my mechanical keyboard pcb
0 notes
Text
okay friends!
if anyone was curious about what i decided for the keycaps from my poll results...
i decided to go with these keychrons, they are still cherry profile, but they are closer to the black and cyan akko keycaps in terms of color scheme. i went with these bc they are in stock and slightly cheaper than the akko's. while i do like the ASA profile of the akko's, i am spending a lot of money on this keyboard and anywhere i can save a little money helps. and after buying all of this... i need to STOP spending money 😂
so i have ordered everything i need for my new, fully customized mechanical keyboard! the keycaps, switches (silent switches!), and o-rings (a new addition) should be arriving at the beginning of next week. my keychron Q1 pro pcb should arrive in 4-6 business days after it ships.
to say i'm excited is an understatement. i do have a little experience with pulling keycaps and replacing switches, but i have never fully built a keyboard. i'm not sure if i'll do any other modifications to the pcb, like a tape mod. i guess i'll put it all together and see what i think about the sound. i might like the "ping" from the aluminium case.
my new desk is also assembled. i was going to hold off putting it together, but yesterday was kind of stressful and i wanted to take my mind off work so i built my desk. i am so happy with all the storage space i now have! i'll be moving my desk into my room tomorrow. we're going to clean the house, so my rugs will be nice and clean before placing the new desk!
i know most of you don't really care about this but i am just really excited 😂 i hope you're having a good week/weekend, please stay safe out there, and stay hydrated my friends! 💖
2 notes
·
View notes
Text
How to Choose the Right Switch for Your Electronics Project
In the world of electronics, switches are fundamental components that can make or break your project—literally. Whether you're building a simple LED circuit or a complex control system, selecting the right switch is crucial for functionality, reliability, and user experience. This comprehensive guide will walk you through the process of choosing the perfect switch for your electronics project.
Understanding Switch Basics
Before diving into the selection process, let's review some basic concepts about switches.
What is a Switch?
A switch is an electromechanical device that interrupts or diverts current flow in an electrical circuit. It's the physical interface between the user and the electronic system, allowing control over the circuit's operation.
Key Switch Terminology
Poles: The number of separate circuits a switch can control.
Throws: The number of positions each pole can connect to.
Contacts: The conductive parts that open or close the circuit.
Actuator: The part of the switch that the user interacts with.
Types of Switches
Let's explore the most common types of switches used in electronics projects.
Toggle Switches
Description: A classic switch with a lever that moves between two or three positions.
Best for: Projects requiring a clear on/off state or multi-position control.
Examples: Power switches, mode selectors.
Pushbutton Switches
Description: Activated by pressing a button, these can be momentary or latching.
Best for: User interfaces, reset buttons, or temporary activations.
Examples: Doorbell buttons, keyboard keys.
Slide Switches
Description: Features a sliding actuator that moves between two or more positions.
Best for: Compact designs or where visual state indication is important.
Examples: Volume controls, function selectors on small devices.
Rocker Switches
Description: Similar to toggle switches but with a rocking actuator.
Best for: Applications requiring a large, easy-to-use switch.
Examples: Power switches on appliances, light switches.
DIP Switches
Description: Small switches arranged in a dual in-line package.
Best for: Circuit board level configurations.
Examples: Setting device addresses, configuring hardware options.
Rotary Switches
Description: Switches that rotate between multiple positions.
Best for: Selecting between multiple options or settings.
Examples: Fan speed controls, multi-mode selectors.
Factors to Consider When Choosing a Switch
Selecting the right switch involves considering various factors. Let's break them down:
Electrical Specifications
Voltage Rating: Ensure the switch can handle the circuit's voltage.
Current Rating: Check that the switch can safely carry the required current.
AC vs. DC: Some switches are designed specifically for AC or DC circuits.
Mechanical Characteristics
Size and Form Factor: Consider the available space in your project.
Actuation Force: How much force is required to operate the switch?
Lifecycle: How many operations can the switch perform before failing?
Environmental Factors
Temperature Range: Will the switch operate in extreme temperatures?
Moisture and Dust Resistance: Consider IP ratings for outdoor or industrial use.
Vibration and Shock Resistance: Important for mobile or rugged applications.
User Interface Considerations
Ease of Use: Is the switch comfortable and intuitive to operate?
Visual Feedback: Does the switch provide clear indication of its state?
Accessibility: Consider users with different abilities or limitations.
Project-Specific Requirements
Functionality Needed: Momentary, latching, multi-position?
Mounting Method: PCB mount, panel mount, or chassis mount?
Signal Type: Digital or analog switching required?
Step-by-Step Selection Process
Follow these steps to choose the right switch for your project:Define Your Requirements:
List all the functional and environmental needs of your project.
Determine the electrical specifications required.
Narrow Down Switch Types:
Based on your requirements, identify which types of switches could work.
Consider the pros and cons of each type for your specific application.
Check Electrical Compatibility:
Ensure the switch can handle your circuit's voltage and current.
Verify AC/DC compatibility if relevant.
Evaluate Mechanical Fit:
Measure the available space in your project.
Consider the ergonomics of switch placement and operation.
Assess Environmental Suitability:
If applicable, check temperature ratings and IP codes.
Consider additional protection or sealing if needed.
Consider User Experience:
Think about how the end-user will interact with the switch.
Prototype if possible to test usability.
Review Lifecycle and Reliability:
Check the switch's rated number of operations.
Consider the consequences and ease of replacement if the switch fails.
Compare Costs:
Look at both unit cost and any additional implementation costs.
Consider long-term reliability in your cost calculations.
Source and Availability:
Ensure the switch is readily available from reliable suppliers.
Consider lead times and minimum order quantities.
Prototype and Test:
If possible, obtain samples and test in your actual circuit.
Verify all specifications and functionality in real-world conditions.
Common Mistakes to Avoid
Underrating Electrical Capacity: Always choose a switch rated higher than your maximum expected load.
Ignoring Environmental Factors: A switch that works fine indoors may fail quickly in a humid or dusty environment.
Overlooking Ergonomics: A switch that's difficult to use can frustrate users and lead to operational errors.
Focusing Solely on Cost: The cheapest option may lead to reliability issues or frequent replacements.
Neglecting Future Needs: Consider if your project might need upgrades or modifications in the future.
Conclusion
Choosing the right switch for your electronics project is a critical step that influences functionality, user experience, and reliability. By understanding the available switch types and carefully evaluating your project’s specific needs, you can select a switch that optimizes both performance and design.
The ideal switch balances electrical specifications, mechanical fit, environmental durability, and ease of use. Take the time to follow the selection process, prototype, and test thoroughly to ensure your switch meets all requirements.Need Help with Your Electronics Project?If you're looking for expert advice or high-quality components for your project, reach out to Electronify India. Our experienced team can guide you through the selection process and provide the best switches and other electronic components to meet your needs. Contact Electronify India today for reliable solutions and support!
0 notes
Text
ASUS ROG Strix X870-A Gaming WiFi Motherboard Features

Dive deep: Discover the ROG Strix X870-A Gaming WiFi, a powerful and attractive motherboard in the ROG X870E/X870 range. Its outstanding looks may be the first thing you notice. Its cobble-gray PCB is offset by striking white and silver embellishments. Combine it with other white-themed PC DIY components from the comprehensive portfolio, such the ROG Hyperion chassis in white, to create a striking first impression. However, this motherboard is more than cosmetic. It’s a premium option for gaming-focused PCs using AMD Ryzen CPUs.
ROG Strix X870-A Gaming WiFi Features
ROG Strix X870-A Gaming WiFi builds a full next-gen PC as an X870 motherboard. The AM5 socket supports the newest AMD Ryzen 9000 Series CPUs. Your PC is equipped for the fastest graphics cards and M.2 SSDs of today and future since the main M.2 slot and PCIe x16 slot are wired for PCIe 5.0 bandwidth. This board has it PCIe Q-Release Slim mechanism for quick graphics card installation. Removing a card requires no latch release or button pressing.
DDR5 memory kits with high bandwidth and capacity are supported. This board can overclock compatible kits to 8000 MT/s or more. You may tweak your RAM for maximum performance or stability with this motherboard. AEMP memory profiles optimize settings with a click, even for PMIC-restricted components. AMD’s new processors include several benefits, including quicker baseline memory support for a wonderful out-of-the-box experience.
Durable VRM architecture
Gaming, AI operations, and content production all have higher computational needs. Modern CPUs with large core counts are meeting user needs, but powering them is difficult. These processors need high power output and advanced control circuitry to dynamically alter power in microseconds to ensure a steady and clean supply under fluctuating workloads.
ROG Strix X870-A Gaming WiFi has a powerful VRM design with a paired arrangement to address these problems. Its 16 Vcore power stages and two Vsoc voltage power stages, each with an SPS design rated for up to 90A, ensuring the power module can meet CPU needs.
Dual 8-pin ProCool II power connections with solid pins provide reliable power supply, heat dissipation, and current capacity for overclocking and high-wattage workloads on the ROG Strix X870-A Gaming WiFi. Damage-resistant metal shields protect connections. We add an LED signaling system to the connections to verify good connection.
Next-gen WiFi 7 networking
The ROG Strix X870-A Gaming WiFi supports WiFi 7, a networking revolution. WiFi 7 is 4.8X quicker than WiFi 6 due to the 6GHz band and 4K QAM. Devices may connect on various bands using Multi-Link Operation (MLO) for quicker speeds and dependability. Wireless communication is improved with Bluetooth 5.4 and 2.9Gbps on the ROG Strix X870-A Gaming WiFi.
The ASUS WiFi Q-Antenna simplifies networking optimization. The WiFi Q-Antenna boosts 5GHz and 6GHz signal throughput with PCB improvements and improved inner pin connections.
Plus, Armoury Crate optimizes this directional antenna. Direction Finder quickly detects signal strength and locates the optimal antenna placement, while Fast Check checks signal strength and ensures the best connection. The new Traffic Monitor function tracks WiFi channel use across 2.4GHz, 5GHz, and 6GHz bands. Channel Switch lets you switch to a less crowded channel for better network performance.
Flexible And abundant USB Ports
ROG Strix X870-A Gaming WiFi motherboards include two high-speed USB4 ports, allowing for endless possibilities. USB4’s 40 Gbps bi-directional bandwidth makes it ideal for speedy external storage device connections.
A DisplayPort 1.4 monitor with 8K@30Hz may be connected to USB4 ports. Daisy-chaining numerous screens and gadgets to one USB4 port is another option. You may connect two monitors and three devices, such a mouse, keyboard, or USB headset, with one wire, creating a neater configuration.
Dual USB4 ports are the ROG Strix X870-A Gaming WiFi‘s main rear I/O ports, however there are more. There’s also a USB 10Gbps Type-C port with 30W Power Delivery 3.0. It delivers fast, dependable power to almost everything you plug in by delivering several voltage levels based on the device’s specs.
ROG Strix X870-A Gaming WiFi lets you connect a high-speed, multipurpose USB port to your case’s front panel. The header has a USB 20Gbps connection for fast communication.
The back panel has five USB 10Gbps and four USB 5Gbps Type-A connections for connecting your battle station. One has USB BIOS Flashback to upgrade UEFI without a CPU or RAM. Standby power, a USB flash drive, and the update filename are enough. BIOS Flashback may never be needed, but having it provides you piece of mind.
Build that large storage array
PC users nowadays require speedy storage everywhere. AAA games’ installation sizes aren’t shrinking. AI procedures start with enormous datasets, and camera operators need a place to store high-resolution objects.
All these situations need plenty of M.2 slots. The ROG Strix X870-A Gaming WiFi does that. It has four M.2 slots, two of which are CPU-direct. One is wired for PCIe 5.0, allowing you to install a fast main drive for application loading.
The new motherboards make SSD installation simpler than ever. The ROG Strix X870-A Gaming WiFi‘s M.2 Q-Latch moves down a track to securely accommodate M.2 drives of various lengths. The M.2 Q-Latch technology makes drive installation easy and tool-free, so you never have to worry about dropping a tiny screw into your chassis.
It also making M.2 heatsink installation as simple as drive installation. The main drive slot has an M.2 Q-Release heatsink on the ROG Strix X870-A. One side button releases the heatsink. Snap the heatsink back on after inserting your drive.
Easily Configured And Optimized
It’s easy to concentrate on the ROG Strix X870-A Gaming WiFi‘s hardware enhancements, but the software is as exciting. It begins with major BIOS interface modifications. It are increasing the BIOS interface resolution to 1920×1080. This modification will let you view more material at once, making it simpler to discover the options you need.
The new BIOS Q-Dashboard interface connects BIOS settings to motherboard layout, which may be even more useful to beginner PC builders. It shows your motherboard model in BIOS with all the important components and connections identified. New PC builders learn their hardware and motherboard operation via these visual correlations.
Keeping your device drivers updated helps your new PC run smoothly. However, you may miss an update unless you regularly check for updated drivers. ASUS introducing ASUS DriverHub to fix this. This one-stop solution simplifies ASUS driver and utility management to keep your system optimum. ASUS DriverHub is accessible in the Armoury Crate app and after OS installation for convenience.
Conclusion
The Powerful ROG Strix X870-A Gaming WiFi is white. For your next PC, the ROG Strix X870-A Gaming WiFi is ideal. It supports a next-gen AMD Ryzen 9000 Series CPU, DDR5 RAM, and fast storage. The newest features ease PC building and optimization. The white-and-silver hue makes it stand out.
Read more on Govindhtech.com
#ASUSROGStrix#ROGStrixX870-A#StrixX870-A#GamingWiFi#Motherboard#AMDRyzenCPUs#WiFi7#BIOS#USB4#News#Technews#Technology#Technologynews#Technologytrends#govindhtech
1 note
·
View note
Text
making a keyboard, pt. 2

with the switchplate arriving in the mail, i could finally solder everything together and have a completely functional (albeit barebones) keyboard! i designed this in fusion360 like all my CAD projects, using a basic plate generated from a script as a base and then heavily modifying it to accommodate for the MCU and case mounting points. in future revisions i may pay closer attention to acoustics, but this plate's design was to be simple, affordable, and effective. material is lasercut 1.5mm galvanized steel plate.

soldering the 69 (nice) switches took ~1.5 hours. combine that with the time taken to hot-air solder the SMD components on the PCB brings us to about 3 hours of total build time. not bad! and let's ignore the fact that i soldered the split spacebar switches before inserting stabilizers ;_; an error i fixed in post.

for the switches, i chose Novelkeys cream clickies. In keeping with the goal of this keyboard to be something uniquely suited to my preferences and typing needs, these switches are probably tied for 1st place among my favorite clicky switches. they utilize a plate spring to produce clickiness but manage to feel almost completely linear - quite unique indeed! check out this short video for a great teardown and explanation of the mechanics involved.
it's starting to actually look like a keyboard now! but still a ways to go. more soon :3
1 note
·
View note
Text
Build your dream keyboard with our versatile Mechanical Keyboard Cases. These cases are designed to provide a sturdy and stylish housing for your custom mechanical keyboard. Available in various materials and finishes, our cases offer options for every preference, from sleek aluminum to durable plastic. The cases are engineered for easy assembly, with precise cutouts and mounting points for switches, PCBs, and other components. With a focus on quality and design, our Mechanical Keyboard Cases ensure that your keyboard not only looks great but also feels solid and reliable. Create a personalized typing experience that suits your style and needs with our range of cases.
0 notes
Text
Gaming Keyboards for Big Hands
Gaming Keyboards for Big Hands Choosing the right gaming keyboard is crucial for gamers with big hands. The market offers a variety of options designed to provide comfort and improve gaming performance. A keyboard with larger keys, ample space between keys, and an ergonomic design can significantly enhance gaming sessions. It's important to consider the switch type, keycap size, and wrist support features. We explore a selection of keyboards that stand out for their suitability for gamers with big hands. alt="A gaming keyboard illuminated with LED lights" src="https://ae01.alicdn.com/kf/S613be4247adc4ef68d308139a2dd06a7I.jpg" />
Top Picks for Gamers with Big Hands
Extra-Large Mechanical Keyboards Find More > Keyboards with Adjustable Key Spacing Explore Options > Ergonomic Designs for Comfortable Use Learn More > Keyboards with Programmable Keys View Products > Durable Keyboards for Intense Gaming Sessions Check Availability > LED Backlit Keyboards for Night Gamers Discover Selection >
class="o-ProductRoundup--image-advanced" src="https://ae01.alicdn.com/kf/Sf75d6305d8124ec2a247b8d59d1385a7O.jpg" alt="68 Keys Gaming Keyboard" /> 68 Keys Gaming Keyboard USB Wired Portable 20 RGB Backlight Keyboard for Windows Laptops Computer > class="o-ProductRoundup--review-advanced" href="#product-4597d76a-c8c3-4ab7-a0c2-e089db5fedce" > src="https://ae01.alicdn.com/kf/H0f7f283a5527481a8018a3e58624cdd31.png" alt="English Laptop keyboard for Asus TUF Gaming" /> For ASUS TUF Gaming Series English Laptop keyboard for Asus TUF Gaming FX505 - US Backlit > href="#product-4597d76a-c8c3-4ab7-a0c2-e089db5fedce" > src="https://ae01.alicdn.com/kf/S639501bbf5c7405c923aa3eb093ec230b.jpg" alt="CSTC40 40% Mechanical Keyboard PCB" /> CSTC40 RGB 40% Mechanical Keyboard Hot Swappable PCB Programmed with VIA & VIAL software > href="#product-4597d76a-c8c3-4ab7-a0c2-e089db5fedce" > src="https://ae01.alicdn.com/kf/S5bc818ca10e14a6287d0a7d5f96d2f33b.jpg" alt="AULA F2088 Mechanical Gaming Keyboard" /> AULA F2088 Keyboard Full Key Programmable Macro Keyboard for Vast Gaming Experience > href="#product-4597d76a-c8c3-4ab7-a0c2-e089db5fedce" > src="https://ae01.alicdn.com/kf/S613be4247adc4ef68d308139a2dd06a7I.jpg" alt="VIAL Programmable 42 Key Mechanical Split Keyboard Gaming DIY Kit" /> VIAL Programmable 42 Key Keyboard Programmable Mechanical Split Keyboard Gaming DIY Based on QMK Hot swaps RGB Backlit Keypad Kit > href="#product-4597d76a-c8c3-4ab7-a0c2-e089db5fedce" > src="https://ae01.alicdn.com/kf/Sdbfdc5b053ea4e41ac05e6098a7e87d4s.jpg" alt="Gaming Keyboard Russian EN Keyboard RGB Backlight" /> Gaming Keyboard for Big Hands 104 Keys USB Wired Gamer Keyboard with RGB Backlight for Tablet Desktop > href="#product-4597d76a-c8c3-4ab7-a0c2-e089db5fedce" > src="https://ae01.alicdn.com/kf/S613be4247adc4ef68d308139a2dd06a7I.jpg" alt="VIAL Keyboard Programmable 42 Key Mechanical Split Keyboard" />
VIAL Keyboard Programmable 42 Key Programmable Mechanical Split Keyboard Gaming DIY Based on QMK Hot swaps RGB Backlit Keypad Kit
View More Product Features: 42 Key Programmable Layout ideal for gamers with big hands Mechanical switches for precision and durability RGB Backlit for gaming in low light conditions Possible Cons: Might be too large for those with smaller hands Programming knowledge needed for full functionality Designed for expert gamers and DIY enthusiasts, this VIAL keyboard boasts a 42 key programmable layout, mechanical switches for increased longevity and precision, and customizable RGB backlighting. Its split design is aimed at offering ergonomic benefits, potentially making it a solid choice for gamers with big hands looking for comfortable gaming keyboards. Connectivity: Wired (USB) Compatibility: PC, Mac, Linux Programmable: Yes, via QMK software src="https://ae01.alicdn.com/kf/Sf75d6305d8124ec2a247b8d59d1385a7O.jpg" alt="68 Keys Gaming Keyboard" />
68 Keys Gaming Keyboard USB Wired Portable 20 RGB Backlight Keyboard for Windows Laptops Computer
View More Product Highlights Portable 68-Key Design perfect for gamers with big hands 20 RGB Backlight Modes to enhance your gaming experience USB Wired for fast, reliable connections Considerations May not be suitable for users who prefer wireless keyboards Limited key count might not be ideal for users requiring dedicated macro keys This 68 Keys Gaming Keyboard is designed keeping in mind the needs of users with big hands, featuring a compact yet spacious layout that provides comfort during long gaming sessions. The vibrant 20 RGB backlight settings not only give it a stylish look but also ensure that the keys are visible in low light, enhancing the overall gaming atmosphere. USB wired connection guarantees minimal latency, making it a reliable option for competitive gaming. Key Count 68 Backlight 20 RGB Modes Connection Type USB Wired src="https://ae01.alicdn.com/kf/S639501bbf5c7405c923aa3eb093ec230b.jpg" alt="CSTC40 40% hot Swappable Mechanical Keyboard RGB" />
CSTC40 40 RGB 40% hot Swappable Mechanical Keyboard PCB Programmed VIA VIAL software Macro Firmware rgb switch type c planck
View More Product Highlights 40% compact layout RGB backlighting Hot swappable switches Considerations Might be too small for users with large hands Requires getting used to the compact layout The CSTC40 40 RGB Mechanical Keyboard is an excellent choice for gamers with big hands looking for a compact option without sacrificing performance. Its hot swappable feature and RGB backlighting not only provide flexibility but also add a stylish look to any gaming setup. However, it's crucial to note that the 40% compact layout might require some adjustment time for those not used to smaller keyboards. Type Mechanical Keyboard PCB Compatibility Hot Swappable switches Software Programmed VIA VIAL src="https://ae01.alicdn.com/kf/Sdbfdc5b053ea4e41ac05e6098a7e87d4s.jpg" alt="Gaming Keyboard Russian EN Keyboard RGB Backlight" />
Gaming Keyboard Russian EN Keyboard RGB Backlight Keyboard 104 Keys USB Wired Gamer Keyboard for Tablet Desktop
View More Key Features RGB Backlight for enhanced experience 104 Keys for full control USB Wired for reliable connectivity Cons Might be large for users with smaller hands Russian EN layout may require adaptation for some users Designed with gamers in mind, this RGB Backlight Keyboard combines functionality and style. Its full 104 keys ensure you have every command at your fingertips, while the USB wired connection offers uninterrupted gaming sessions. Ideal for users with big hands, its ergonomic design provides comfort during extended use. However, its large size and Russian EN layout might require some adjustment for certain users. Connection Type USB Wired Layout Russian EN Backlight RGB src="https://ae01.alicdn.com/kf/H0f7f283a5527481a8018a3e58624cdd31.png" alt="English Laptop keyboard for Asus TUF Gaming FX Series" />
English Laptop keyboard for Asus TUF Gaming FX505 FX505G FX505D FX505GD FX505GE FX505GM FX505DY FX505DV fx505dt US Backlit
View More Details Pros of English Laptop Keyboard for Asus TUF Gaming Backlit for ease of use in low light conditions Designed specifically for Asus TUF Gaming FX series laptops US layout ideal for English-speaking users Cons of English Laptop Keyboard for Asus TUF Gaming May not be compatible with non-Asus laptops or other Asus models Limited color options available This backlit English laptop keyboard is specifically designed for Asus TUF Gaming FX series, providing an optimal gaming experience for English-speaking users with big hands. The backlit feature makes it easy to use in various lighting conditions, enhancing your gaming setup's aesthetics and functionality. Compatibility Asus TUF Gaming FX505, FX505G, FX505D, FX505GD, FX505GE, FX505GM, FX505DY, FX505DV, fx505dt Layout US Feature Backlit src="https://ae01.alicdn.com/kf/S5bc818ca10e14a6287d0a7d5f96d2f33b.jpg" alt="AULA F2088 Mechanical Gaming Full Key Programmable Macro Keyboard" />
AULA F2088 Mechanical Gaming Full Key Programmable Macro Keyboard
View more details Key Features Full key programmable via macro Anti-ghosting technology for better gaming experience Wire mixed light for an immersive gaming atmosphere Cons Might be bulky for users with smaller desks Customization software may have a learning curve The AULA F2088 Mechanical Gaming Keyboard is designed for gamers with large hands, offering a comfortable and responsive typing experience with its full key programmable macro keys and anti-ghosting switches. Its mixed light feature adds to the gaming mood, making it a great addition to any gaming setup. Switch Type Mechanical Lighting Mixed RGB Keycap Material Korea Russian Arabic cap > Gaming Keyboards for Big Hands Finding the right gaming keyboard when you have big hands can be a bit of a challenge. Most keyboards seem to be designed with a one-size-fits-all approach, which doesn’t always work for those with larger hand sizes. The key to comfort and improved gaming performance for people with big hands is in the size of the keys, the spacing between them, and the overall design and ergonomics of the keyboard. In this guide, we’ll highlight some of the best gaming keyboards that cater specifically to gamers with big hands, ensuring a more comfortable and efficient gaming experience. Keyboards with adjustable key sizes and spacing for custom comfort Ergonomic designs that reduce strain during long gaming sessions Models featuring mechanical keys for better tactile feedback and durability Keyboards with programmable macros for enhanced gaming efficiency Options that include backlit keys for late-night gaming sessions It’s important to try out different keyboards to find what works best for your hand size and gaming style. Look for keyboards that offer a good balance between responsiveness and comfort. Many manufacturers are now recognizing the need for more inclusive designs, so there are plenty of options available on the market. Remember, investing in the right gaming keyboard can not only improve your gaming experience but also help prevent potential strain and fatigue, making it a crucial accessory for gamers with big hands. Read the full article
0 notes