#micro:bit
Explore tagged Tumblr posts
Visit Tumblr Blog
Explore Tumblr blogs with no restrictions, modern design and the best experience.
Last Seen Tumblr Blogs


Fun Fact
Women make up for the other 50% of Tumblr’s audience.
Text
My electronics stuff
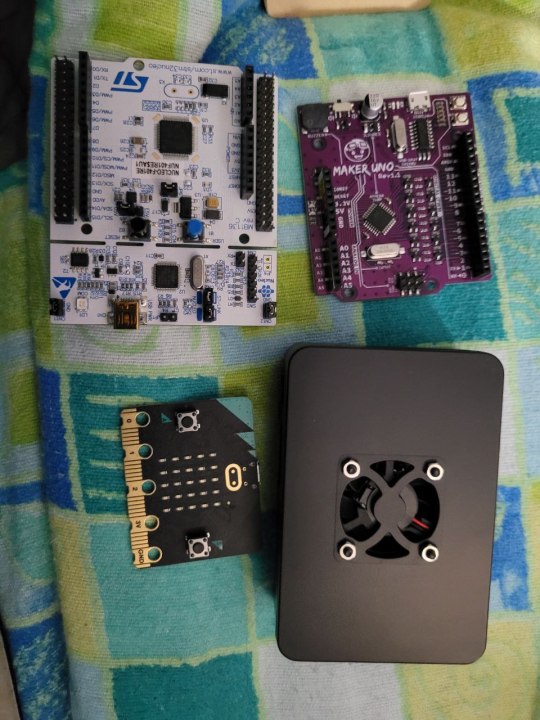
Nucleo - F401RE
Maker Uno
Micro:bit
Raspberry pi 4, 4gb
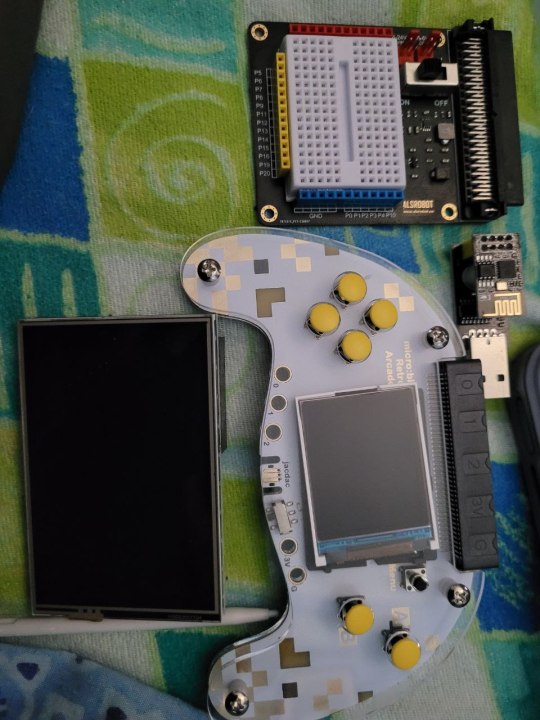
Shield for micro:bit and Raspberry monitor
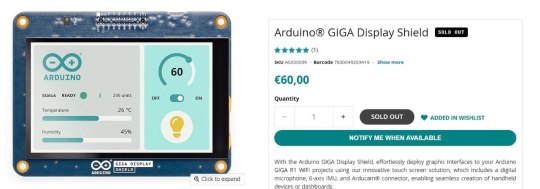
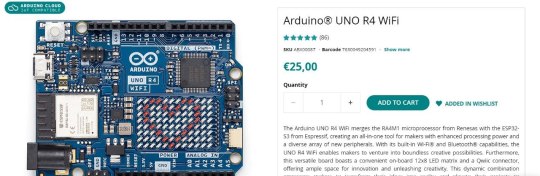
My wish list, for the moment *-*
2 notes
·
View notes
Text
Just helped run the final presentations for a middle school hackathon. Pretty fun. I wish I had more opportunity to interact with science kids
The challenge was to find a way to use a micro:bit to combat climate change. There were a bunch more teams but this was the finals, so we had 5 teams, presenting their finished projects with any updates they had made since judging in earlier rounds
Two groups made educational video games, using the micro:bit as a controller. Another person used the micro:bit to make an AI lens, which would be used to help sort waste! The prototype was only programmed to recognize a few kinds of garbage, but the idea is, you present the trash in front of the lens, it says "recycling" or "garbage", and then opens the correct bin. So instead of opening the bins yourself, you pass the object before the lens and the right bin opens. I thought this was an awesome idea!
Another group used them to rig up a whole bunch of sensors: wind speed, ground moisture, temperature, etc., to create a warning system for wildfires. They even build a prototype sand dispenser, which would be set to go off at a certain level of Fire risk or if a fire was detected, to help stop the spread before it starts.
The kid that won did a tree watering program. The idea is that the micro:bits are hooked up to moisture sensors that detect the level of moisture in soil around community trees, which all have a tree name or a letter assigned to them. He made these micro:bit keychains that link up to the sensors, and the LEDs will flash to show you the trees that most need Water in the neighborhood. So it's a community initiative! You sign up and get a keychain, and can know that 2hen you Water the trees that are flashing up, you're being helpful and not overwatering
The kids are alright
5 notes
·
View notes
Text
Getting Started with Embedded Systems Programming

Embedded systems programming is the backbone of modern electronics. From smartwatches to washing machines, embedded systems power the intelligent functions of countless everyday devices. This guide will introduce you to the basics of embedded programming, key tools, and how to begin building your own embedded applications.
What is an Embedded System?
An embedded system is a computer integrated into a larger system or device, performing dedicated functions. Unlike general-purpose computers, embedded systems are designed for specific tasks, often with constraints on power, memory, and processing.
Examples of Embedded Systems:
Microcontrollers in home appliances
Sensor-based devices (e.g., temperature sensors, motion detectors)
Medical equipment
Automotive control systems
IoT (Internet of Things) gadgets
Core Components of an Embedded System
Microcontroller or Microprocessor: The brain of the embedded system (e.g., Arduino, STM32, ESP32).
Memory: RAM and ROM to store instructions and data.
Input/Output Interfaces: Connects to sensors, displays, motors, and communication modules.
Software: Custom firmware developed for specific functions, typically in C or C++.
Popular Programming Languages
C: Most widely used due to its efficiency and low-level hardware access.
C++: Used when object-oriented design is required.
Assembly: For highly optimized or time-critical routines.
MicroPython: Python for microcontrollers (e.g., ESP8266, Micro:bit).
Getting Started with Embedded Programming
Select Your Platform:
Beginners: Arduino (easy setup, wide community support)
Advanced: STM32, Raspberry Pi Pico, ESP32
Set Up Your Development Environment:
Install IDEs like Arduino IDE, PlatformIO, STM32CubeIDE
Download necessary drivers and board support packages
Write and Upload Code: Create simple programs like blinking an LED, then expand to sensors, displays, and communication modules.
Example: Blink an LED with Arduino
void setup() { pinMode(13, OUTPUT); // Set pin 13 as output } void loop() { digitalWrite(13, HIGH); // Turn LED on delay(1000); // Wait for 1 second digitalWrite(13, LOW); // Turn LED off delay(1000); // Wait for 1 second }
Tools and Debugging
Serial Monitor: For real-time debugging and logging.
Oscilloscope & Logic Analyzer: For electrical signal inspection.
In-Circuit Debuggers: Like JTAG or ST-Link for low-level debugging.
Best Practices
Write modular and readable code.
Use debouncing for physical inputs like buttons.
Handle memory carefully to avoid overflows.
Optimize power usage in battery-powered devices.
Conclusion
Embedded systems programming is both fun and powerful, offering endless possibilities for innovation in hardware and software. Whether you’re building a home automation project or diving into the world of IoT, understanding the basics of embedded programming gives you the foundation to create smart, responsive devices.
0 notes
Text
RP2040:bit – GPIO-Zuordnung und alternative Stromversorgung

In diesem kurzen Beitrag beantworte ich zwei konkrete Fragen aus der Community zum RP2040:bit-Board, die mir als Kommentar unter meinem ursprünglichen Blogpost gestellt wurden. Ziel ist es, dir schnell und übersichtlich zu zeigen, welche GPIOs auf die Bananenstecker-Anschlüsse des Boards gelegt sind und welche Möglichkeiten es gibt, das Board alternativ zum Micro-USB-Port mit Strom zu versorgen. Der Beitrag richtet sich an alle, die das RP2040bit flexibel in eigenen Projekten oder im Bildungsbereich einsetzen möchten. https://youtu.be/RQHz4GcfwO0 Ein herzliches Dankeschön an Anton F. für den konstruktiven Kommentar und die gezielten Fragen zum RP2040bit! Genau solche Rückmeldungen aus der Community helfen dabei, wichtige Details zu ergänzen und den Beitrag für alle Leser noch wertvoller zu machen.

RP2040:bit

Rückseite des RP2040:bit

Pinout & Aufbau des RP2040:bit
Um das volle Potenzial des RP2040bit-Boards auszuschöpfen, lohnt sich ein genauer Blick auf den Aufbau und die Pinbelegung. In diesem Abschnitt zeige ich dir, wie die einzelnen GPIOs verteilt sind, welche Funktionen die Anschlüsse bieten und worauf du beim Anschluss von Sensoren oder Aktoren achten solltest. So behältst du stets den Überblick – egal ob im Experimentieraufbau oder beim Einsatz mit Erweiterungsmodulen.

Aufbau des RP2040:bit Mikrocontrollers Der RP2040bit orientiert sich nicht nur im Formfaktor am bekannten BBC micro:bit, sondern bietet auch eine kompatible Belegung der Schneidklemme (Edge Connector). Dadurch lassen sich viele Erweiterungen und Zubehörteile, die für den micro:bit entwickelt wurden, auch problemlos mit dem RP2040bit verwenden – ein großer Pluspunkt für alle, die bereits passendes Zubehör besitzen oder auf eine breite Auswahl an Erweiterungsboards zugreifen möchten.

RP2040bit - Pinout EdgeConnector
Features des RP2040:bit Mikrocontrollers
Der RP2040bit bringt alle grundlegenden Elemente mit, um direkt mit dem Programmieren loszulegen: Eine Micro-USB-Buchse zur Stromversorgung und Programmierung, zwei frei belegbare Tasten, eine 5x5 LED-Matrix in rot sowie eine Debug-Schnittstelle auf der Rückseite. Darüber hinaus bietet das Board zahlreiche GPIO-Pins – sowohl über die Schneidklemme (Edge Connector) als auch über zusätzliche Lötpunkte auf der Rückseite.
RP2040:bit
Rückseite des RP2040:bit Im Vergleich zum BBC micro:bit fällt auf, dass der RP2040bit auf zusätzliche Sensoren wie Kompass, Beschleunigungssensor oder Bluetooth verzichtet. Wer diese Funktionen benötigt, ist mit dem micro:bit besser ausgestattet. Für reine GPIO-Projekte oder zum Einstieg in die RP2040-Welt bietet der RP2040bit jedoch eine solide Basis mit großem Potenzial.
Alternative Stromversorgung
Der einfachste Weg, den RP2040bit mit Strom zu versorgen, ist über die Micro-USB-Buchse. Du kannst dazu ein USB-Netzteil, eine Powerbank oder auch deinen PC verwenden. Falls in deinem Projekt jedoch keine USB-Stromversorgung möglich ist, lässt sich der Mikrocontroller auch über eine externe Spannungsquelle betreiben. Nutze hierfür den VSYS-Pin auf der Rückseite des Boards. An diesem Pin kannst du eine Spannung zwischen 1,8 V und 5,5 V einspeisen.

Pins für die externe Spannungsversorgung 🔋 Meine Empfehlung: Verwende eine stabile 5V-Spannungsquelle – damit konnte ich den RP2040bit im Test zuverlässig betreiben. ⚠️ Wichtig: Wenn die Stromversorgung über VSYS erfolgt, steht am VBUS-Pin keine 5V-Spannung mehr zur Verfügung. Du kannst darüber dann keine externen Komponenten mehr mitversorgen.

RP2040:bit mit zwei Breadboardkabel für externe Stromversorgung
Betrieb des RP2040:bit über eine externe Stromversorgung
Um zu zeigen, dass der RP2040bit auch ohne USB-Verbindung zuverlässig läuft, habe ich eine einfache Schaltung mit einer blinkenden LED aufgebaut. Die Besonderheit: Die Stromversorgung erfolgt nicht über die Micro-USB-Buchse, sondern über eine externe 5V-Spannungsquelle, die direkt am VSYS-Pin angeschlossen wird. Ideal eignet sich hierfür ein Batteriefach mit 3× AA-Batterien. Für den Aufbau der Schaltung verwende ich folgende Komponenten: - einen RP2040:bit Mikrocontroller* - ein 400-Pin Breadboard* - ein Power-Supply-Modul* für Breadboards - ein Batterieclip für 9V Block Batterie*, mit Jack Adapter - zwei 5 mm LEDs* - zwei 220 Ohm Vorwiderstände* für die LEDs - vier Breadboardkabel*, männlich - männlich - zwei Prüfkabel mit Krokoklemmen* Hinweis von mir: Die mit einem Sternchen (*) markierten Links sind Affiliate-Links. Wenn du über diese Links einkaufst, erhalte ich eine kleine Provision, die dazu beiträgt, diesen Blog zu unterstützen. Der Preis für dich bleibt dabei unverändert. Vielen Dank für deine Unterstützung! Die LED wird über einen Vorwiderstand an GPIO 26 angeschlossen und blinkt im Sekundentakt. Damit lässt sich sehr gut demonstrieren, dass der RP2040bit auch autark und mobil betrieben werden kann – ideal für Projekte ohne festen USB-Anschluss oder für den Einsatz unterwegs. - 🔧 Wichtig: Der Mikrocontroller wird weiterhin über die Micro-USB-Buchse programmiert. Achte darauf, dass während des Programmierens die externe Stromquelle vom VSYS-Pin getrennt ist, um Schäden an Board oder Computer zu vermeiden.

RP2040bit - externe Stromversorgung und Wechselblinken Quellcode für das Wechselblinken zweier LEDs am RP2040:bit Mikrocontroller 💾 Hinweis zur Ausführung beim Start Damit der Code automatisch beim Einschalten des RP2040bit ausgeführt wird – also auch ohne Verbindung zum PC oder manuelles Starten über die Entwicklungsumgebung – muss das Skript als boot.py (oder alternativ als main.py) auf dem Mikrocontroller gespeichert werden. In diesem Fall speichern wir das Blink-Beispiel als boot.py. So startet das Programm sofort, wenn der Mikrocontroller über die externe Stromquelle (z. B. über den VSYS-Pin) mit Spannung versorgt wird – ganz ohne USB-Verbindung oder Benutzerinteraktion. ✅ Tipp: In Thonny, Mu Editor oder rshell kannst du die Datei direkt auf dem Dateisystem des RP2040bit speichern. Achte darauf, dass du bestehende boot.py oder main.py-Dateien ggf. überschreibst oder sicherst. # Importiere das 'time'-Modul, um Pausen im Programm einzubauen import time # Importiere die 'Pin'-Klasse aus dem 'machine'-Modul zur Steuerung der GPIOs from machine import Pin # Initialisiere GPIO 26 als Ausgang (für grüne LED) ledGruen = Pin(26, Pin.OUT) # Initialisiere GPIO 27 als Ausgang (für rote LED) ledRot = Pin(27, Pin.OUT) # Endlosschleife: LEDs abwechselnd ein- und ausschalten while True: ledGruen.value(1) # Schalte grüne LED ein ledRot.value(0) # Schalte rote LED aus time.sleep(0.5) # Warte 0,5 Sekunden ledGruen.value(0) # Schalte grüne LED aus ledRot.value(1) # Schalte rote LED ein time.sleep(0.5) # Warte 0,5 Sekunden Read the full article
0 notes
Text
La IA como aliada en la enseñanza de robótica para futuros maestros

La integración de la tecnología en las aulas de educación infantil es cada vez más importante, pero ¿Cómo preparamos a los futuros maestros para este desafío? El pasado mes de diciembre Raquel Hijón Neira, Celeste Pizarro, Sergio Cavero y yo publicamos, en la revista Education Sciences" el trabajo AI-Generated Context for Teaching Robotics to Improve Computational Thinking in Early Childhood Education, en el que presentamos una solución innovadora: el uso de contextos generados por Inteligencia Artificial para enseñar robótica educativa.
¿Cómo se realizó el estudio?
La investigación se llevó a cabo con 122 estudiantes universitarios de Educación Infantil, divididos en dos grupos: experimental y control. Ambos grupos recibieron formación durante 6 semanas sobre robótica educativa, pero con una diferencia clave: el grupo experimental utilizó contextos generados por IA para sus actividades prácticas.
Herramientas y recursos utilizados
Los estudiantes trabajaron con un conjunto diverso de robots educativos:
Cubetto: un robot de madera para enseñar programación básica
Matatalab: un set de codificación sin pantalla
Micro:bit: un microordenador de bolsillo
Makey Makey: un kit de invención para crear interfaces
ScratchJr: una herramienta de programación visual, la versión para infantil de la famosa Scratch
Metodología de evaluación
Se utilizaron tres tipos de evaluaciones:
Test de pensamiento computacional para educación infantil: para medir habilidades como depuración, algoritmos y estructuras de control
Modelo de Aceptación Tecnológica (TAM): para evaluar la percepción y aceptación de la tecnología
Test de conocimiento sobre robots: para medir la confianza en el uso de cada robot específico
Resultados destacados
Los estudiantes que utilizaron contextos generados por IA mostraron una mejora significativa en su confianza para enseñar con robots educativos
El grupo experimental demostró mayor comprensión del pensamiento computacional
Se observó una actitud más positiva hacia la integración de tecnología en el aula
Hubo una mejora notable en las habilidades de resolución de problemas y pensamiento algorítmico
Implicaciones para el futuro
Este estudio demuestra que la IA puede ser una herramienta valiosa para la formación de docentes. Los contextos generados por IA ayudan a:
Hacer más accesible el aprendizaje de la robótica
Proporcionar ejemplos prácticos y relevantes
Aumentar la confianza de los futuros maestros
Mejorar la comprensión de conceptos tecnológicos
La investigación sugiere que integrar la IA en la formación docente podría ser clave para preparar educadores mejor capacitados para las aulas del siglo XXI, especialmente en áreas como la robótica y el pensamiento computacional.
Hijón-Neira, R., Pizarro, C., Borrás-Gené, O., & Cavero, S. (2024). AI-Generated Context for Teaching Robotics to Improve Computational Thinking in Early Childhood Education. Education Sciences, 14(12), 1401. https://doi.org/10.3390/educsci14121401
0 notes
Text
#element14 Electronics#Micro_bit_Educationa#innovation#powerelectronics#powermanagement#powersemiconductor
0 notes
Text
Welcome!
Hey there!

Welcome to my tumblr for my Teacher and Technology project. Please note that tumblr orders posts in reverse chronological order, so the newest posts are FIRST and at the top of the page. You'll have to go the END (over here) for the first posts. Alternatively, you could use my handy post-in-order post here and click on each one. I'll leave you to make your choice.)
I have a record of all my tinkering under the tag #journal, and they can also be accessed under the journal link in the sidebar.
My lesson plans are here (and also accessible on the sidebar)
I also did a summary of the boards I had on hand, but that would end up becoming irrelevant as I progressed as I eventually chose to focus only on the micro:bit.
I apologize in advance for the mild chaos of my journals. My normal thinking pattern is uh...not very computational and does 10,000 things at once. I am also very guilty of starting in the middle of my stories...WHOOPSIES
0 notes
Text
La Domotica di un frontaliere ventimigliese
La Domotica di un frontaliere ventimigliese https://ift.tt/DGzglb1 Fonte: Flavio Palermo Da parecchi anni faccio esperienze con IoT. L'Internet of Things (IoT) è una rete di oggetti e dispositivi connessi (detti “cose”), dotati di sensori (e altre tecnologie), che consentono loro di trasmettere e ricevere dati, da e verso altre cose e sistemi. Oggi l'IoT è ampiamente utilizzato in ambito industriale (IIoT) ed è sinonimo di Industry 4.0. L'impianto elettrico elettronico del mio appartamento è gestito appunto dall'IoT con un Arduino MEGA nel quadro elettrico ed Home Assistant. Home Assistant, software open-source in grado di controllare tutti i dispositivi Smart all'interno di un'abitazione, dalle luci, ai condizionatori, alle automazioni per le tapparelle. Installato su un Raspberry 4 pi 8Gb ssd 250Gb. Al di là dei tecnicismi, Raspberry Pi può essere considerato un “computer in miniatura”, un intero ecosistema hardware raccolto in un’unica board. Nasce in Inghilterra per favorire la diffusione della programmazione e della cultura informatica, ma il suo incredibile successo ne ha svelato miriadi di altri utilizzi. Considerando la motivazione primaria, appare assolutamente adeguato il motto che campeggia sulla homepage del progetto: “Our mission is to put the power of computing and digital making into the hands of people all over the world” (“La nostra missione consiste nel mettere il potere della programmazione e della creazione digitale nelle mani di persone di ogni parte del mondo”). Questa frase è una sintesi perfetta per raccontare uno strumento che ha favorito il fiorire della creatività nel mondo senza limitazioni politiche, sociali o economiche: strada poi percorsa da BBC micro:bit, altro prodotto inglese. L'impianto elettrico elettronico del mio appartamento è gestito appunto dall'IoT con un Arduino MEGA nel quadro elettrico ed Home Assistant". Arduino è una piattaforma hardware composta da una serie di schede elettroniche dotate di un microcontrollore. È stata ideata e sviluppata nel 2005 da alcuni membri dell'Interaction Design Institute di Ivrea come strumento per la prototipazione rapida e per scopi hobbistici, didattici e professionali. Poi ad un certo punto ho spento tutto e ti spiego il perché. Agosto 2022: acquisto un misuratore di energia che installo nel quadro elettrico. Ed effettivamente mi rendo conto che in mia assenza avevo un consumo di ben 300Watt a vuoto e una bolletta bimestrale di 275 euri. Modem Nas, videosorveglianza, allarme, tutti i dispositivi IoT ecc. Ecc. Accesi che magari mi collegavo 10 minuti al giorno da Monaco. Quindi ho deciso di spegnere tutto per fare una prova abbassando il consumo da 300W a 5W. Bolletta? Da 275 a 55 euro 1/5. Be', visti i risultati, è da agosto 2022 che quando esco di casa si spegne in automatico. Dovrei brevettare il progetto: ECOMOTICA... Flavio Palermo, 31 luglio 2024 Fonte: Flavio Palermo Non sono in grado di affermare se il termine "Domotica" si applichi al meglio alle situazioni descritte qui da Flavio Palermo, ma all'epoca dei suoi primi esperimenti telematici - che circa trent'anni fa cercò di farmi capire la parola era molto diffusa (e densa di aspettative che non so in realtà quanto si siano verificate) - in circoscritti ambiti del mio lavoro, così che mi piace usarla, al confine tra una citazione e l'autoironia. Adriano Maini via Aspetti rivieraschi https://ift.tt/zOZvkoL August 05, 2024 at 08:12AM
0 notes
Text
Fim da vida útil da plataforma Arm Mbed definido para julho de 2026 - Planos Arduino
O anúncio recente da Arm de que a plataforma e o SO Mbed chegarão ao fim da vida útil em julho de 2026 tem implicações significativas para a comunidade de desenvolvimento embarcado. Esse desenvolvimento afeta particularmente marcas como micro:bit, Raspberry Pi e Arduino, que se beneficiaram do suporte da Arm ao longo dos anos. Essas plataformas ganharam força em ambientes educacionais e entre a…

View On WordPress
0 notes
Text
#microbit programming for kids#microbit#microbit lessons#micropython#online coding for kids#coding classes for kids
0 notes
Text
MicroCode: Portable programming for the BBC micro:bit - Microsoft
📣 StatesOne — https://news.google.com/rss/articles/CBMiYmh0dHBzOi8vd3d3Lm1pY3Jvc29mdC5jb20vZW4tdXMvcmVzZWFyY2gvYmxvZy9taWNyb2NvZGUtcG9ydGFibGUtcHJvZ3JhbW1pbmctZm9yLXRoZS1iYmMtbWljcm9iaXQv0gEA?oc=5&utm_source=dlvr.it&utm_medium=tumblr
0 notes
Text
Engaging Minds: Teaching Mathematics with Robotics & Coding
Are you tired of hearing kids say, “I hate math!” or “Math is boring!”? It’s time to change the narrative and make math exciting for kids. Well, there’s a way to turn math into a thrilling adventure through robotics and coding — the dynamic duo that’s revolutionizing math education! Imagine learning math while building robots, solving real-world problems, and having fun!
Why should we blend math with robotics and coding, you ask?
Teach students the concept of variables and how they can be used in algebraic expressions with Robot Movement
https://makersmuse.in/wp-content/uploads/2024/01/blog-29.webp
Teach students to solve linear equations through practical applications with a Maze-Solving Robot.
Teach students how to graph linear equations and understand slope-intercept form with Drawing Robots
Teach students about algebraic functions and how they can be programmed and visualized with Micro:bit
SpaceX, Tesla, and Amazon are all recruiting employees with excellent mathematics and coding abilities. We are not only making math interesting by incorporating robotics and coding into the curriculum, but we are also preparing children for the future job market. Another example of this synergy is the “FIRST LEGO League,” in which children use maths, coding, and collaboration to build robots that tackle hard problems. It’s not just about finding the correct answer; it’s about the experience of discovery and the rush of achievement.
So, whether you’re a teacher or a parent, think about incorporating some digital magic into math teaching. Let’s make math into an adventure, with robots as heroes and equations as riches to be discovered with Makers’ Muse. We can fire the love for learning and inspire the mathematicians of the future if we work together.
Do you have questions regarding our STEM program?
Contact us anytime.
Take your first step into the magical world of coding for kids
0 notes
Text
May the 4th Be With You: Art, AI & Robotics | by Nettrice Gaskins | Medium.com
See on Scoop.it - Education 2.0 & 3.0
Constructionism is a process in which people create their own unique ways of knowing with prototypes, devices, and tools that others can use and critique. Last summer we ran an Art, AI & Robotics course at Lesley University. In class we explored ‘constructionist-inspired’, techno-vernacular creativity methods such as such as design (concept) mapping and modular prototyping can help students think creatively and solve problems. Modular prototyping includes separating and combining components. Students can use digital prototyping tools such as BBC micro:bits to add electronic components to their projects and create machines that act like R2D2, the astromech droid from the Star Wars film series.
0 notes