#minification
Explore tagged Tumblr posts
Visit Tumblr Blog
Explore Tumblr blogs with no restrictions, modern design and the best experience.
Last Seen Tumblr Blogs


Fun Fact
Tumblr.com is the 103rd most visited website in the world.
Text
Tumblr excels at perf fail!
Tumblr's static CDN does not compress, cache, or minify any of their resources! Lots of room for improvement.

Digging deeper, it looks like anytime you upload an asset to static.tumblr.com, the file is stashed directly into S3 and is then served via CloudFront, which doesn't gzip, minify, or provide any kind of sane caching policy for any of the files.
To make matters worse, Tumblr also doesn't play nice with third party CDNs: their custom domain checks fail, forcing you to use their own infrastructure only. So, even if you wanted to, you couldn't easily fix this, short of hosting the assets yourself on a third party domain. Hmm...
How do we solve this dilemma? CloudFront can serve compressed files, but to do that you need to upload the gzip'ed assets to S3 with correct headers. Also, prior to uploading compressed files, Tumblr should minify and version uploaded files, which would allow them to use a far-future cache expire. With that, we'd have gzip, minification, and caching in place!
10 notes
·
View notes
Text
Sort ruleset properties for even better CSS compression
If you're not using it already, cssmin is a CSS minifier that's really worth looking into. It handles the basic stuff, like removing comments and minification (duh) but solves some other annoying problems really well. It allows you to write standard CSS3 rules and have them automatically rewritten to vendor-specific counterparts, for example.
And now, to really squeeze the last bit of compression out of your CSS, the SortRulesetProperties filter implemented by my colleague Rowan Beentje has been merged into 3.0.1.
The filter works by sorting ruleset properties by name, improving the gzip compression ratio of your CSS files if you're using an engine like Apache mod_deflate.
9 notes
·
View notes
Text
W3 Total Cache: Better CSS/JS placement
If you're running a self-hosted WordPress blog and you're looking to squeeze out every last bit of performance, there's a good chance you are using the W3 Total Cache plugin. If you are, then this tutorial is right up your alley!
As you likely already know, one of the options W3 Total Cache provides is the automatic/manual combination and minification of self-hosted CSS and JavaScript files. This is great news! However, if you've ever used this option before and browsed your page source, you'll notice that W3 Total Cache, by default, places your minified files directly after the <head> tag. This can and will cause issues if, for instance, your self-hosted CSS stylesheets rely on external stylesheets to be loaded first, as is the case if you are using Yahoo's CSS Reset or Google Web Fonts, for example. More likely than not, you will want your CSS files to be place right before your </head> tag and your JS files to be placed above your </body> tag.
To remedy this, you will need to modify the source of the W3 Total Cache plugin, as there doesn't appear to be any built-in setting available in the the Minify panel that allows you to change where the minifed files are placed. Note: If you're using the manual mode, a setting for specifying where to place JavaScript files is available, but for some reason, is not for CSS files.
Using the Plugin Editor
Luckily for us, WordPress has its own plugin editor, so making changes to certain files is not that big of a problem.
After logging into your admin panel, expand the Plugins sub-menu and click Editor.
Select "W3 Total Cache" as the plugin you wish to edit.
Next, select "w3-total-cache/lib/index.html". Note: It can be a little tricky to find the right file as WordPress only displays a handful of them at a time.
Then, select "w3-total-cache/lib/W3/Plugin.php".
Finally, select "w3-total-cache/lib/W3/Plugin/Minify.php".
The Code Changes
Once you have successfully opened the "w3-total-cache/lib/W3/Plugin/Minify.php" file, press Ctrl+F in your browser to allow you to easily search the contents of the file and begin searching for the following code:
$head_prepend = '';
Add the code below directly after the code above:
$head_append = '';
Next, search for the following code:
$head_prepend .= $style;
Replace it with the code below (there should be two instances of the code above, search for and replace both):
//$head_prepend .= $style; $head_append .= $style;
Then, once again, search for the following code:
$head_prepend .= $script;
Just like last time, you will need to replace it with the code below (this there should be three instances of the code above, however you will need to search for and replace only the very first instance):
//$head_prepend .= $script; $body_append .= $script;
Finally, we will need to define what $head_append should do (it doesn't exist by default). To do this, search for the following code:
if ($head_prepend != '') { $buffer = preg_replace('~<head(\s+[^<>]+)*>~Ui', '\\0' . $head_prepend, $buffer, 1); }
Add the following code directly below the code above:
if ($head_append != '') { $buffer = preg_replace('~<\\/head>~', $head_append . '\\0', $buffer, 1); }
All Done!
Click 'Update File' to save your changes. If everything went well, you should see a big yellow box running across the screen displaying the message, "File edited successfully."
If any fatal errors occurred, WordPress will tell you and automatically disable the plugin. In this case, you should restore Minify.php to its original state and ask for help either in a comment below or on the WordPress support forums, more specifically this thread.
Thank you for reading! If this helped you out, share this with a friend or add a comment below. I'd really appreciate it...
5 notes
·
View notes
Text
Google's Closure, Advanced Optimizations, and AJAX data
I recently came across Google's closure compiler, which I really like for its advanced optimizations feature. It bothered me, since I'm writing a webapp, that most compilers take too much care in respecting that all of the attributes of my methods be available in the global scope, at the expense of a lot of kilobytes.
After fixing up jQuery using the appropriate closure externs file (see http://code.google.com/p/closure-compiler/source/browse/trunk/contrib/externs/jquery-1.7.js), I was still having issues getting my code to run with ajax data. Specifically, parts of my code accessed the data from a callback:
function onSuccess(data, status, request) { if (data.success) { ... }
Whenever closure would compile this bit of code, it would replace data.success with something like d.st. Of course, since the server didn't know that success was renamed, the success token was actually in d.success. The workaround, it turns out, is to write a thin translation library, and to process all of your data both before looking at received data and before sending data back to the server. This way, the client code can translate variables from the longhand that the server might use to the shorthand in the minified JS. The code looks like this:
//This is a dict containing all of the attributes that we might see in remote //responses that we use by name in code. Due to the way closure works, this //is how it has to be. var closureToRemote = { ts: 'ts', snippet: 'snippet', username: 'username' , hasMore: 'hasMore', success: 'success', multi: 'multi' , id: 'id', multiWithSelf: 'multiWithSelf', since: 'since' }; var closureToLocal = {}; for (var i in closureToRemote) { closureToLocal[closureToRemote[i]] = i; } function _closureTranslate(mapping, data) { //Creates a new version of data, which is recursively mapped to work with //closure. //mapping is one of closureToRemote or closureToLocal var ndata; if (data === null || data === undefined) { //Special handling for null since it is technically an object, and we //throw in undefined since they're related ndata = data; } else if ($.isArray(data)) { ndata = [] for (var i = 0, m = data.length; i < m; i++) { ndata.push(_closureTranslate(mapping, data[i])); } } else if (typeof data === 'object') { ndata = {}; for (var i in data) { ndata[mapping[i] || i] = _closureTranslate(mapping, data[i]); } } else { ndata = data; } return ndata; } function closureizeData(data) { return _closureTranslate(closureToLocal, data); } function declosureizeData(data) { return _closureTranslate(closureToRemote, data); }
Usage is pretty straightforward - the first line of the onSuccess() method becomes
data = closureizeData(data);
And the first line of my gateway method for sending data to the server becomes
dataToSend = declosureizeData(dataToSend);
After that, my application worked completely with closure's advanced optimizations, for a size reduction from 206kb with YUI compressor's minification down to 134kb with Google Closure's advanced compilation minification.
4 notes
·
View notes
Quote
Make the CSS/JS code readable and maintainable first and foremost, then worry about file size later.
http://coding.smashingmagazine.com/2011/08/26/writing-css-for-others/
3 notes
·
View notes
Link
Great performance optimization features
3 notes
·
View notes
Text
Speeding up Orchard: Packaging and Minification
Orchard is really flexible and modular. This has a big drawback while performance tuning: it's really hard to package the static resources. Each module has its own javascript and css files, and one module doesn't know about the files of the other. Time to hack performance into it!
The solution I implemented was a plain batch file. It gets fed a list of css and js files and minifies them to one output file. It does take a few steps to include a new js or css file, but it performs a lot better!
Here's the bat file, using the Microsoft Ajax Minifier and DotLess:
for /R %%i in (*.less) do ( tools\dotless.compiler.exe "%%i" "%%i.css" ) tools\AjaxMin-4.37.exe -js -clobber -xml "minify.xml" -out "Orchard.Web\min"
So first of all I take each *.less file and run it through the dotless compiler. The output is a *.less.css file next to each original, which I've included in the minify.xml file that AjaxMin parses. Here's a portion of it:
<root> <output path="js.js"> <input path="c:\inetpub/Modules/Viaselect/Scripts/plugins/jquery.ba-hashchange.min.js" /> <input path="c:\inetpub/Modules/Viaselect/Scripts/menu.js" />
</output> <output path="css.css"> <input path="c:\inetpub/Themes/CharmeQuality/styles/base.less.css" /> <input path="c:\inetpub/modules/viaselect/styles/datepicker.less.css" /> </output> </root>
Unfortunately I didn't get it to work with relative paths, so I had to make them absolute. We'll cross that bridge when we get there :)
So now I have a js.js and a css.css that I include in the layout.cshtml:
Script.Require("jQuery").AtHead(); Script.Include("~/min/js.debug.js", "~/min/js.js"); Style.Include("~/min/css.debug.css", "~/min/css.css");
And of course when you're in debug mode, you want firebug to give you the right codelines! Here's how to tackle that one; the debug files contain the following:
@import url("/Themes/CharmeQuality/styles/base.less"); @import url("/modules/viaselect/styles/datepicker.less");
document.write("<script src='/Modules/Viaselect/Scripts/plugins/jquery.ba-hashchange.min.js'><\/script>"); document.write("<script src='/Modules/Viaselect/Scripts/menu.js'><\/script>");
It's not the best solution, but for now it speeds up the site considerably! I wouldn't know how to create a module that takes care of this. The ResourceManager is way too complicated to just include the package if the file you're requesting is inside the xml file. If any of you have good ideas, let me know! I'd love to facilitate this module :)
2 notes
·
View notes
Text
#javascript#JS#Minification#minify#increase#increase pagespeed#pagespeed#Js compress#js minify#js minification
1 note
·
View note
Text
now that I’ve got an appropriate contact lens prescription I kind of hate my glasses.
1 note
·
View note
Link
This is one of the better online tools for minifying png assets. We even use it ourselves.
1 note
·
View note
Text
Ускорение Magento: советы по улучшению производительности.

Многие знают, что начисто установленная Magento может быть очень медленной в работе. Используя приведённые здесь советы, мы оптимизирует работу нашего магазина.
Включите Управление кэшем в Административной панели Magento
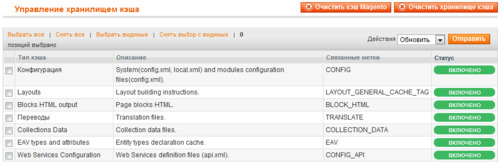
Это первое, что вы должны сделать, перед тем как открыть сайт для посетителей - включить управление кэшем! Это позволить значительно улучшить производительность Magento. Перейдите к вкладке Система > Управление кэшем и включите каждый тип кэша. Просто убедитесь, что при обновлении системы вы очистили кэш, чтобы увидеть изменения.
Включите объединение файлов Javascript и CSS в панели управления Magento
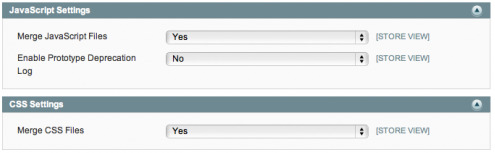
Ещё одна простая настройка находится в Система > Расширенные настройки > Для разработчика. Объедените ваши Javascript и CSS файлы, чтобы сэкономить на первой загрузке, когда посетитель впервые заходит на ваш сайт. Без этого, ваши посетители будут загружать каждый JS/CSS файл по отдельности, один за другим, а использование данной опции резко уменьшит количество HTTP-запросов.
Установите Fooman Speedster через Magento connect
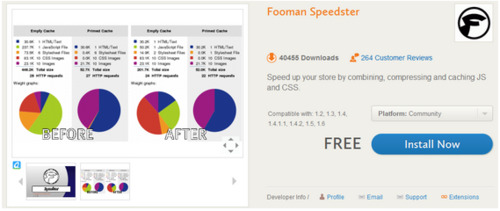
Это бесплатное расширение от Fooman уменьшит ваши JavaScript и CSS файлы используя PHP minify library. А также сожмёт ваш код и обеспечит автоматическое управление версиями. Для установки, нажмите Install Now и получите ключ для вашей версии Magento connect. Потом зайдите в Система > Magento Connect > Управление Расширениями. Вставьте полученный код и установите расширение. Вам может потребоваться установить права на запись для папки через SSH, в установочной директории Magento. Более подробную информацию можно прочитать в руководстве для этого расширения.После установки, ваши файлы будут уменьшены мгновенно.
Установите HTML Minification от Jeemon

Хотя это расширение находится в бета-версии, я не испытал никаких проблем с ней, оно простое и лёгкое в настройке. Получите ключ для установки, следуйте тем же инструкциям, что и в Fooman Speedster. убедитесь, что вы разрешили установку бета-версий расширений, на вкладке настроек Magento Connect. Ваши html файлы будут автоматически уменьшены в размере. Это очень просто.
Оптимизируйте ваш .htaccess файл для большей производительности
Есть много методов оптимизации, которые вы можете использовать, чтобы резко увеличить работу Magento через конфигурацию .htaccess. Вот список:
Включите Gzip компрессию
<IfModule mod_deflate.c>
# Force deflate for mangled headers developer.yahoo.com/blogs/ydn/posts/2010/12/pushing-beyond-gzipping/
<IfModule mod_setenvif.c>
<IfModule mod_headers.c>
SetEnvIfNoCase ^(Accept-EncodXng|X-cept-Encoding|X{15}|~{15}|-{15})$ ^((gzip|deflate)\s,?\s(gzip|deflate)?|X{4,13}|~{4,13}|-{4,13})$
HAVE_Accept-Encoding
RequestHeader append Accept-Encoding "gzip,deflate" env=HAVE_Accept-Encoding
</IfModule>
</IfModule>
# HTML, TXT, CSS, JavaScript, JSON, XML, HTC:
<IfModule filter_module>
FilterDeclare COMPRESS
FilterProvider COMPRESS DEFLATE resp=Content-Type /text/(html|css|javascript|plain|x(ml|-component))/
FilterProvider COMPRESS DEFLATE resp=Content-Type /application/(javascript|json|xml|x-javascript)/
FilterChain COMPRESS
FilterProtocol COMPRESS change=yes;byteranges=no
</IfModule>
</IfModule>
Используйте Expires Headers для лучшего управления кэшем
“Веб-страницы становятся всё более сложными, с большим количеством скриптов, множественными таблицами стилей, изображений и флеш на них. При первом посещении страницы может потребоваться несколько HTTP-запросов для загрузки всех компонентов. Используя Expires Headers эти компоненты становятся кэшируемыми, что избавляет от ненужных HTTP-запросов при последующих просмотрах страниц. Expires Headers чаще всего ассоциируются с изображениями, но они могут и должны быть использованы на всех компонентах страницы, в том числе скрипты, таблицы стилей и флеш.”
# ----------------------------------------------------------------------
# Expires headers (for better cache control)
# ----------------------------------------------------------------------
# These are pretty far-future expires headers.
# They assume you control versioning with cachebusting query params like
# <script src="application.js?20100608">
# Additionally, consider that outdated proxies may miscache
# www.stevesouders.com/blog/2008/08/23/revving-filenames-dont-use-querystring/
# If you don't use filenames to version, lower the CSS and JS to something like
# "access plus 1 week" or so.
<IfModule mod_expires.c>
ExpiresActive on
# Perhaps better to whitelist expires rules? Perhaps.
ExpiresDefault "access plus 1 month"
# cache.appcache needs re-requests in FF 3.6 (thanks Remy ~Introducing HTML5)
ExpiresByType text/cache-manifest "access plus 0 seconds"
# Your document html
ExpiresByType text/html "access plus 0 seconds"
# Data
ExpiresByType text/xml "access plus 0 seconds"
ExpiresByType application/xml "access plus 0 seconds"
ExpiresByType application/json "access plus 0 seconds"
# RSS feed
ExpiresByType application/rss+xml "access plus 1 hour"
# Favicon (cannot be renamed)
ExpiresByType image/x-icon "access plus 1 week"
# Media: images, video, audio
ExpiresByType image/gif "access plus 1 month"
ExpiresByType image/png "access plus 1 month"
ExpiresByType image/jpg "access plus 1 month"
ExpiresByType image/jpeg "access plus 1 month"
ExpiresByType video/ogg "access plus 1 month"
ExpiresByType audio/ogg "access plus 1 month"
ExpiresByType video/mp4 "access plus 1 month"
ExpiresByType video/webm "access plus 1 month"
# HTC files (css3pie)
ExpiresByType text/x-component "access plus 1 month"
# Webfonts
ExpiresByType font/truetype "access plus 1 month"
ExpiresByType font/opentype "access plus 1 month"
ExpiresByType application/x-font-woff "access plus 1 month"
ExpiresByType image/svg+xml "access plus 1 month"
ExpiresByType application/vnd.ms-fontobject "access plus 1 month"
# CSS and JavaScript
ExpiresByType text/css "access plus 1 year"
ExpiresByType application/javascript "access plus 1 year"
ExpiresByType text/javascript "access plus 1 year"
<IfModule mod_headers.c>
Header append Cache-Control "public"
</IfModule>
</IfModule>
Удалите ETag’и
“ Теги объектов (ETag) являются серверным механизмом и используется браузером, чтобы определить, соответствует ли компонент в кэше браузера такому же на сервере. Так как Etag’и, как правило, построены с использованием атрибутов, которые делают их уникальными для конкретного сервера хостинга сайта, теги не будут совпадать, когда браузер получит оригинальный компонент с одного сервера, а потом попытается проверить этот компонент на другом сервере.”
# ----------------------------------------------------------------------
# ETag removal
# ----------------------------------------------------------------------
# FileETag None is not enough for every server.
<IfModule mod_headers.c>
Header unset ETag
</IfModule>
# Since we're sending far-future expires, we don't need ETags for
# static content.
# developer.yahoo.com/performance/rules.html#etags
FileETag None
Удалите не используемые JavaScript файлы в ваших Layout XML файлах
Там очень много JavaScript наворотов. Вы можете спокойно удалить определённые файлы и повысить производительность. Вот пример page.xml layout файла:
<action method="addJs"><script>prototype/prototype.js</script></action>
<action method="addJs"><script>lib/ccard.js</script></action>
<action method="addJs"><script>prototype/validation.js</script></action>
<!--<action method="addJs"><script>scriptaculous/builder.js</script></action>-->
<action method="addJs"><script>scriptaculous/effects.js</script></action>
<!--<action method="addJs"><script>scriptaculous/dragdrop.js</script></action>
<action method="addJs"><script>scriptaculous/controls.js</script></action>
<action method="addJs"><script>scriptaculous/slider.js</script></action>-->
<action method="addJs"><script>varien/js.js</script></action>
<action method="addJs"><script>varien/form.js</script></action>
<!--<action method="addJs"><script>varien/menu.js</script></action>-->
<!--<action method="addJs"><script>mage/translate.js</script></action>-->
<action method="addJs"><script>mage/cookies.js</script></action>
Я закомментировал весь Scriptaculous код и translate.js. Menu.js так же был удалён, для кастомного jQuery кода.
Установите APC, Eaccelerator или Xcache на ваш сервер
Это будет более сложнее - вам потребуется ssh доступ, чтобы установить один из них, на вашем сервере. Эти системы кэширования делают PHP более отзывчивым, за счёт кэширования вашего PHP кода, освобождая интерпретатор от повторной компиляции кода при каждом запросе. Я использовал APC в прошлом и имел смешанные результаты при использовании его с Magento, но попробуйте и посмотрите, увеличится ли производительность вашей страницы.Если вы задумываетесь, какой из них использовать, посмотрите сюда APC vs. Eaccelerator vs. Xcache на StackOverflow.
Переместите jQuery и пользовательский JavaScript код в Footer
Если вы используете jQuery (надеюсь) и кастомный код, вы определённо захотите включить эти файлы в конце, перед окончанием тега body. Таким образом, ваш сайт быстрее отобразится на экране и не надо ждать, пока загрузятся эти дополнительные JS файлы. Больше информации о JS файлах в футере.
Использование Amazon S3 для хостинга картинок и установка OnePica_ImageCDN через Magento Connect

Amazon S3 является экономически эффективным способом отдачи фотографий товаров в вашем м��газине Magento. Это дёшево и быстро в установке. К счастью есть бесплатное расширение Magento, которое позволяет вам подключится к вашей Amazon S3 корзине. Используя OnePica_ImageCDN вы можете легко создать свой сервер CDN для изображений, с помощью Amazon S3. Почему вы должны использовать Amazon S3/CDN?
“Маленькое время отклика. Развёртывание контента на нескольких, географически распределённых серверов, помогает пользователям чувствовать, что страницы загружаются быстрее.”
Создавайте CSS Спрайты для уменьшения количества HTTP-запросов
Вот ещё один стандарт фронтенд оптимизации: группируйте ваши фоновые изображения CSS в Спрайты. Браузер загружает изображения, используемые в вашем CSS, когда ваш CSS файл загружается, замедляется скорость отображения. спрайт включает столько изображений, сколько вам требуется, всего в одном файле. Обычно я группирую рейтинги звёзд и кнопки государств в свои собственные, уникальные спрайты, вместо того, чтобы иметь отдельные изображения для каждого государства или рейтинга, например button_hover.gif, button_active.gif или rating_1.gif, rating_2.gif и т.д. Тем не менее, это становится своего рода сложным. Если у вас есть repeat-x или repeat-y фоны, вы не можете поместить их вместе в один спрайт. при создании спрайтов вы используете перекрывание: скрываете в вашем CSS и отрезаете часть спрайта, чтобы показывать только одну часть спрайта. чтобы узнать больше информации нажмите здесь.
Тестируйте скорость вашей Magento Темы

Если вы хотите увидеть, как быстро работает ваша Magento тема во фронтенде, используйте Developer Tools в Chrome, или Firebug в Firefox или установите расширение YSlow для вашего браузера.
Надеемся, эти советы помогут вам в ваших поисках сделать Magento как можно быстрее!
1 note
·
View note
Text
0 notes
Video
youtube
ASP.NET MVC Tutorials | Bundles and Minification, Web API | rudrait
Please Subscribe me @ Youtube: https://bit.ly/2pxUMCC Please Like me @ Facebook: https://www.facebook.com/rudraitjobs Please Like me @ LinkedIn: https://www.linkedin.com/in/rudrait Please Like me @ twitter: https://twitter.com/RUDRA60465690 Please Like me @ Web site: https://rudraittutorials.wordpress.com
0 notes
Text
Plugin WordPress pour l'Optimisation de Site et l'Analyseur de Performance
Plugin WordPress pour l'Optimisation de Site et l'Analyseur de Performance
Website Optimization & Performance Analyzer WordPress Plugin<a class="prixcodecanyon" Prix : <a class="prix" Prix : 9$ et <a class="ventes" Prix : 8 ventes Introduction: Optimisation de Check: Vérification du Rapport d'Optimisation de votre Site Web Note: Beaucoup de nouvelles fonctionnalités arrivent bientôt. Peu de fonctionnalités intéressantes liées au SEO arrivent bientôt. Avez-vous lutté…
View On WordPress
#google#minification#minify#optimization#optimize#optimize plugin#Page Speed#pagespeed#performance#rank#search#seo#speed
0 notes
Text
.Net Bundling and Minification
I like to use the bundling and minification that comes out of the box with .Net, as i figure why use another tool when i've got something already there.
A gotcha i've found with this is that the minification in this library is a bit flakey and fails with certain tags (e.g. using “@import” in a css file). If the minification fails it does it silently, and just returns the unminified content of the file.
To check if you have any minification errors you need to use the dev tools in your browser, and look at the Response of all your minified bundles.
If minification is failing you will see something like this:
/* Minification failed. Returning unminified contents. (87,442-449): run-time error JS1019: Can't have 'break' outside of loop: break n */
if you see this, scroll down through the contents. The javascript/css that could minify will be minified, the rest will not be. So you can pinpoint the culprit that way.
You’ll probably have to use pre-minified files for this if it’s a third party dependency, or modify your javascript if it’s one of your own.
0 notes
Photo

Been doing some #optimization on my site. Seems to be working! • • • • #wprocket #domainsharding #minification #prefetch #maxcdn #cloudflare #imagecompression
0 notes