#miter saw differences
Photo
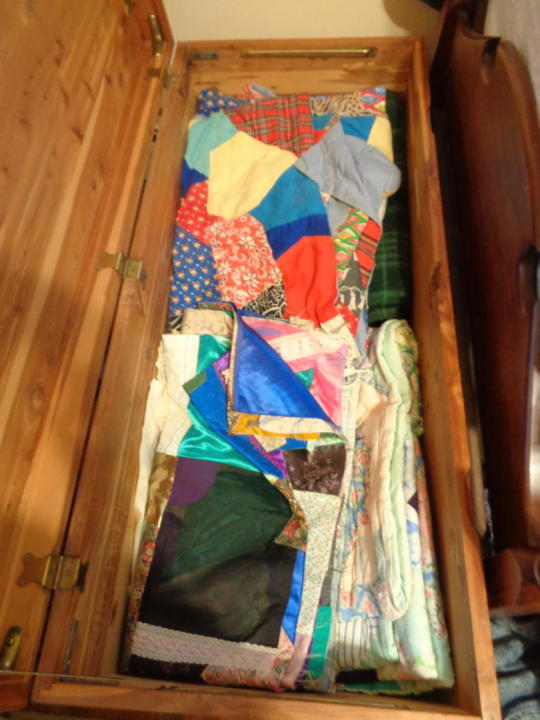
I have a lovely cedar chest that my great-uncle made for my mom or my grandmother. Well-made furniture, my beloved. It’s functionally immortal. It had to be refinished in the 80s, but aside from that - pristine condition. And it’s filled with problems.
I started quilting as a teen, and I just figured things out as I went along. If I’d had someone teaching me, they might have given me good advice like “Don’t put vintage fabrics in an item that’s meant for daily use” or “ONLY use cotton batting if you intend to quilt very heavily, because if you leave much room between the lines of quilting the batting will pull apart” or even “You need to know about mitered corners!”
So I have several beautiful quilts that are falling apart one way or another because of things I didn’t know. It’s a shame. I also have one spectacular crazy-quilt top that I made as a gift, never actually quilted, and realized later that because of poor fabric choices it would never do as an actual bed covering. It would have to be for display only.
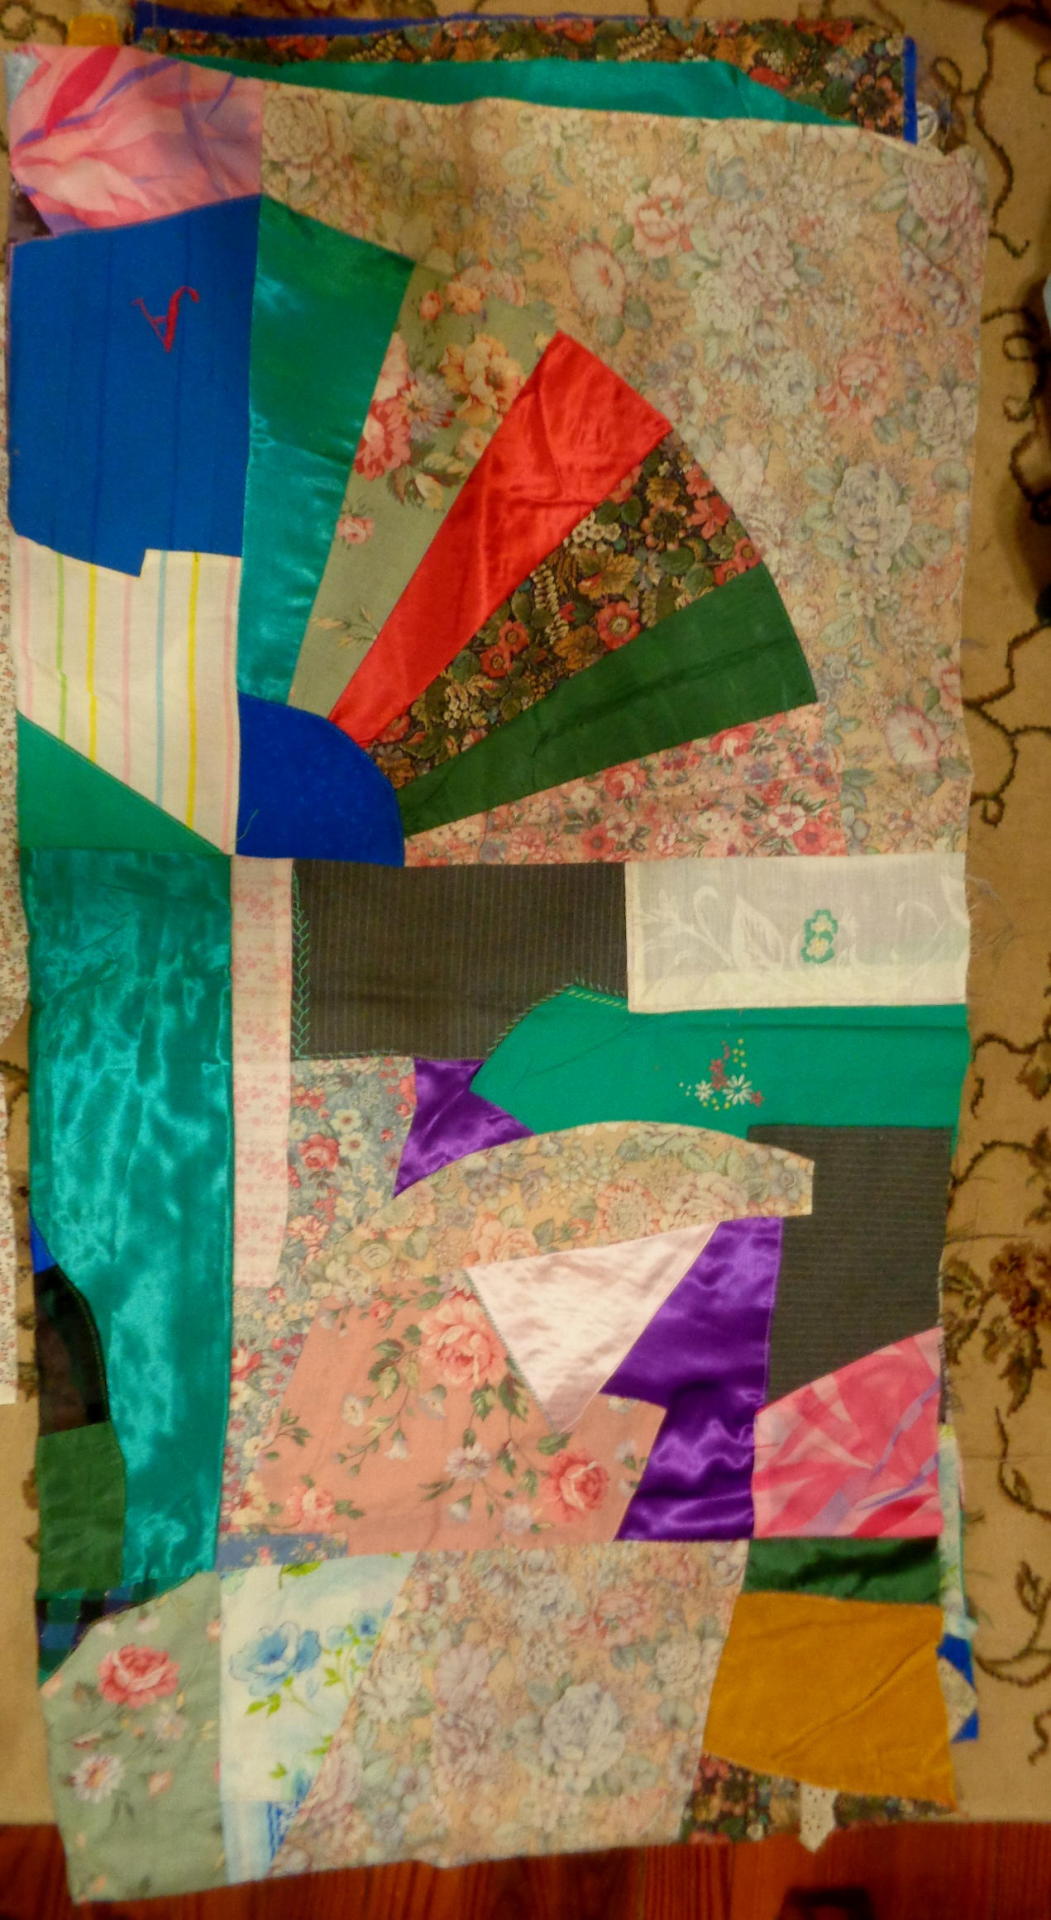

I was, um, bonkers for satiny and silky fabrics back then, and saw no problem with mixing them with every other type of fabric. It’s either magnificent or appalling, depending on your personal taste.
I’d like to quilt again, maybe in a few years when I’m less overloaded. There’s one modern-style quilt I’d love to try made with uneven strip of fabric. I saw it once, loved it, and now cannot remember the name of the pattern or find ANY reference to it online. So, for anyone who might know:
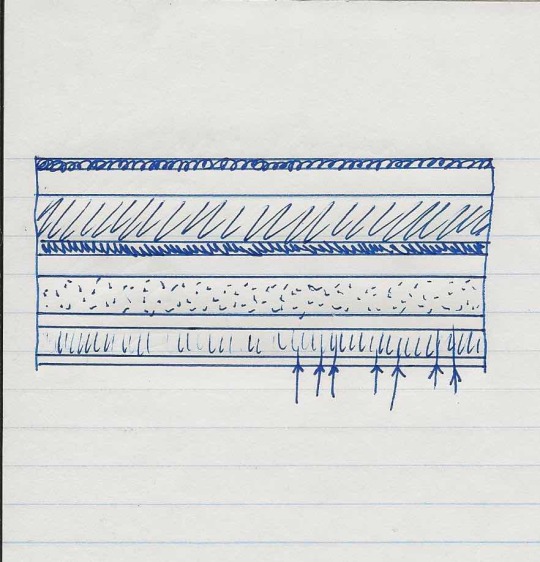
It starts with strips of fabric in different widths. When you get all the strips sewed together, you then cut uneven strips the other direction (showed by the arrows). Offset those from each other by and inch or two, then re-sew them. (a simplified explanation, but you get the jist). It gives a neat, zig-zag appearance. Anyone have a name for this? I know how to piece it, but I could use some guidance on how much fabric to buy to begin.
78 notes
·
View notes
Text
WIP Wednesday (Belatedly)
I know it's been a minute since I've posted, but my partner got me Stardew Valley and I am obsessed with it and haven't been knitting as much. I did pick back up my needles recently, though, so here's what I'm currently working on:


I just cast on the Leafy Leaf cowl. I was going to wait until I had finished something else first (the Dustland shawl being the main one I'd wanted to finish before starting this cowl) but I recently watched a Nimble Needles video with tips and tricks for the experienced knitter and just had to try this one! The tip is that no cast on and bind off will truly match perfectly, because they're just formed differently no matter what, but to match exactly you can provisional cast on, knit the work, then bind off both top and bottom with the same bind off technique. I'll update once I'm finished with the cowl to let you know how I like it, but it also gave me an excuse to learn how to provisional cast on in the round!
The second photo shows a little bit closer view of the lace pattern. I've only made it about halfway through the first repeat, but I really like how it's turning out so far. I'm not sold on my guage, though, so I may restart on smaller needles. If I do, I'll still use the provisional cast on then bind off the bottom edge technique.

This one is a hit of a back burner project because I chose a yarn with less stitch definition than I probably should have used for this project, but it's the No Rhinebeck No Problem MKAL 3, and all clues are currently released. I just need to finish the last repeat for clue 3 and then complete clue 4 and I'll be finished with this one.

This one was also in WIP time out for a bit due to the way this yarn knits, but I've picked it back up recently. Working on finishing the heel turn for sock 2 (the more pink sock) and then I'll be back to working on these two at a time in the round. The heels on these are Japanese short row heels, and they'll be a gift for a friend. These are both from the same ball of yarn, and I should be able to get a second pair out of it, which I'll knit exactly the same as these so that all 4 socks can be mixed and matched. My goal is to finish all 4 socks before gifting, but I may just gift these 2 socks first, since my next socks will be a pair for me, I think.
I'm not using a specific pattern for the socks, but they're just stockinette stitch, Japanese short row heels, and I'll use a wedge toe.
Not pictured:
The Dustland shawl - I'm still working on it, slowly, but progress isn't really visible because the stitch pattern just repeats. I have, however, decided to stop just after this pattern repeat, so after the next diagonal rib section (actually, after the garter section after the diagonal rib) because 1, it's huge already, 2, the rows are too long to maintain motivation, and 3, I'd like to not have to use up the whole last ball of this yarn. If I get close to the end of the ball, I'll finish it off there, even if I haven't gotten to where I planned to.
Mitered square blanket - I've decided to add more squares to the width and just make all the squares in the same direction, instead of making panels and seaming them together, so next steps will be adding more squares onto the width of the blanket. But this one likely will also be a long term project, since I have other things I'm focused on working on right now.
Project list, for things I have planned (mostly so I don't forget):
Socks for me using the Duo Sox yarn by Willow Yarns, which is meant for knitting a pair of matching socks and comes with two balls, perfect for the taat method I use
Second pair of apple mittens for my partner. She follows me, so I can't explain how they'll be different because I want it to be a surprise.
Mittens for me to match the hat and cowl I have, though I may also do a stripey cowl with that green and a dark blue yarn I have in my stash. I have an idea to knit a pattern I saw slightly differently to suit my needs better.
A pair of worsted weight socks, because warm and faster to knit.
Tea cozy for my tea pot. The first one I attempted was too small.
#crafts#description in alt text#knitting#knitblr#knit#cowl#socks#mkal#i do actually have the label for the green yarn if anyone is curious but i don't for the other two#i only recently started putting the labels into the centers of my balls so some of my stash yarns have lost their labels#actually most of them have#or well#i have the red yarn label but it's in a pile of 3 or 4 labels and i don't know which one goes with this yarn vs the other balls it was with#long post
9 notes
·
View notes
Text
I'm With You Always (Papa IV x Female Reader)
Like I said in that last Terzo fic I posted, I wanted to write something for Copia involving his possible demise, but I didn't want to think about it, and I couldn't come up with a good plot. Well. With the help of my ghestie @copiousloverofcopia I managed to come up with something.
This is largely inspired by the short movie The Evil Clergyman, at least the first half of it, and I've included some of the lines from it.
I also listened to the theme from the movie while I wrote, so if you'd like to also listen while you read...
Also here on AO3
NSFW below the cut
This was not supposed to happen. He assured you it would not. Promised. And you believed him. How could you not? How could you not believe the promises he whispered against your skin as his fingers and mouth brought you over the edge again and again?
But there he was, laying before the altar in the glass coffin you so dreaded seeing, grieved long before this day of seeing your lover in one of them.
You had avoided this for as long as you could. You did not even go to the funeral. How in the world were you supposed to face this, face the sight of him? He broke his promise, broke your heart, and broke you. But after nearly two weeks, the thought of never seeing him again became unbearable. You decided you had to make peace with his memory, no matter how much it hurt.
So that was where you found yourself, in front of his coffin, in front of him. He looked just the same as the last time you saw him, still in his papal paint, chasuble, and miter. You should have noticed the difference in him that dreaded night, but he did not want you to see. He wanted you to go on believing he would be fine. But it was a lie. It was all a lie.
You hated him in your grief, so much so in that moment that you stalked up to the coffin, angry tears in your eyes, and hit the glass top. It only made a dull thud, and your lover remained still and peaceful within.
“How dare you,” you hissed. Your vision was so blurry with tears that you could not make him out anymore. “How dare you leave me after you promised!” The hate gave way to despair as your tears choked you and poured down your cheeks. “You promised me you’d be safe!” you sobbed, half lying over the top of the coffin, your fingers stroking over the cool glass directly above his face. “You promised…. I love you so much, Copia….”
You completely broke down after that, hard, body-wracking sobs leaving you, finally letting all of the grief you had felt over the past two weeks spill forth. If only Copia had not remained so still and cold in his glass coffin beneath you…
Somehow, once you had no more tears to shed, you managed to stumble back to the papal suite, thankfully not running into anyone. You felt numb and exhausted now. You just wanted to curl up in his bed — in your bed — and fall asleep surrounded by his scent that you hoped would never fade.
You stopped by the balcony window, staring out at the fading sunlight, wondering if you would ever feel whole again. You had been with Copia since he was Cardinal. It had taken a while, but the two of you eventually managed to admit your feelings. It was not until the night he ascended that you made love for the first time. After that, the two of you could not get enough of one another. The papal suite became your sanctuary, and his bed your place of worship. Copia always made you feel like a goddess, and you assured him that he was meant to be Papa. The heights of pleasure you brought each other to were unmatched. No one would ever love you the way he did. You did not want anyone else but Copia. He was inextricably bound to you, heart, body, soul, everything.
But now that was gone. He was gone. The suite that had once been filled with the warmth of love was now cold and empty. But even so, you could not bare to leave it yet. Occasionally, you could still feel Copia’s presence, and that was enough to draw you back.
Like right now. You rubbed your arms, feeling a slight chill go over you. If you did not know you were alone in the room, you might have thought someone was watching you. But the window overlooked a grassy field, and you could see no one. Just as you had been for the past two weeks, you were entirely alone. Alone. The thought made you sniff back the tears you felt once again threatening.
“Amore, please don’t cry.”
You froze, immediately recognizing the voice, though your mind would not accept it. The window was not open, but the whispered words sounded like they floated in on a breeze.
“Amore,” it came again, a bit louder this time.
“C-Copia?” you murmured, turning slowly to look around the room.
It was empty, just as you knew it would be. But now you were certain there was another presence there. You could feel the change in the air.
The voice spoke again, this time your name. It was a caress to your ear, bringing about a fresh wave of tears. You were shivering now, honestly feeling a little scared.
“Copia, is it you?” you asked, your voice wavering.
“Sì, amore mio, it is me. You visited me, and then you left…. Why?”
You took a few steps away from the window, still looking around for the source of the voice. Surely, this was your mind playing tricks on you, or could someone really be so cruel as to do this to you?
“I had to see you. Just one more time to— to say goodbye.”
Before you could say any more, there was suddenly a solid presence at your back and a pair of arms wrapped around you. You gasped as gloved hands slid up your stomach to restlessly knead and grope at your breasts. The touch was so achingly familiar that your grief was supplanted by desire. Your hands covered the gloved ones as if the touch was not enough proof that they were real.
“You would give up on me so easily, amore?” the voice asked, a warm breath on the back of your neck.
A hand then moved up to your neck to caress the skin there. You always loved the feeling of the leather gloves against your skin…. The hand then moved to your cheek.
“You’re dead,” you whispered, turning into the warm touch. “Aren’t you?”
“Could a dead man do this?” the voice breathed, the hands caressing your breasts again. You moaned, arching into the touch. “Could a dead man make you feel this way, amore? The way I always used to make you feel?”
“Copia.”
The voice moaned quietly, and you could have sworn you felt lips press against the side of your neck.
“How?” you breathed.
“Am I alive?” A hand slid into your shirt, pushing past your bra to get directly at your breast, making you moan breathily again. The voice chuckled. “Am I? Alive?”
And then, just as suddenly as the presence and arms and hands appeared, they disappeared. You gasped, this time from the sudden cold you felt at no longer being surrounded by the familiar warmth, and spun around only to find no one there. You were losing your mind; you had to be. There was no other explanation.
There was no way you could stay the night there now. You had to get out.
With one last glance at the window, you took a few hurried steps forward—
—and abruptly stopped when a figure appeared in front of you. You gaped, staring unbelieving at the man standing there. Copia, in his papal paint, smiled at you; the warmth in his eyes would have been your undoing had you not been so shocked to see him.
“Copia?”
“Hi,” he said, his smile widening a bit.
You blinked a few times, so sure your eyes were playing tricks on you. “Is it really you?”
He pulled the glove off his left hand and held it up, still smiling and looking at you in that way only he could, like you meant the absolute world to him. Hesitantly, with a shaky hand, you reached up and slid your hand into his. Fresh tears stung your eyes as you felt the warmth of his skin against your own. You nearly broke down again as Copia wrapped his fingers around yours, humming, and brought your hand up to kiss the back of it.
You whimpered and moved forward, touching your forehead to his. “Copia.”
Copia let go of your hand and wrapped his arms around you, his lips now finding your cheek. “I missed you, amore mio,” he murmured.
“I thought I’d never see you again,” you cried, melting into his embrace and tangling your fingers in his hair to keep him close. He felt so warm, so alive….
He brought his hands up to your face and left a trail of kisses along your cheek. “I was waiting for you to visit me. And then you did, but you left before I could get to you.”
You breathed his name again as though if you said it enough, it would help your brain understand what was going on. Your lips met his briefly in a barely there kiss. “I don’t….” Another brief kiss. “I don’t understand.”
Copia gazed at you for a second before finally sealing his lips over yours in a proper, full kiss, stealing your breath away. If this was a dream, you never wanted to wake up. He pulled you tight to him, leaving no doubt in your mind that he was real. His hands roamed over you again, but not so frantically as before. He tugged at your clothes, slowly undressing you. You did the same to him, unbuttoning the alb he usually wore under his chasuble, revealing his bare chest beneath.
You moaned into the kiss as you touched his skin, felt the rise and fall of his chest as he gasped against your lips, obviously just as thrilled to feel your hands on him again.
“Please help me understand, Copia.”
His hands rested on your hips, his lips brushing along your cheek again to catch the tears that fell. “Did you really think I would leave you? After the promise I made? I’m with you always, amore mio.”
“But you died. You were killed onstage in front of the whole world. There was no doubt—”
Copia covered your lips with his fingers and took your other hand to press against his chest, right over his heart. “Do I feel alive to you?”
You nodded, looking down at his chest. You pushed the alb aside so you could see his tattoo, and without thinking, you leaned forward and kissed it. Copia murmured your name, drawing your attention again.
“Kiss me,” he whispered.
You did, kissing his lips gently and continuing to undress him, pushing his alb off and letting it fall to the floor. He finished undressing you as well, the feeling of his hands on you once more making you shiver with want. He had you completely undressed while you were still fumbling with his belt, your hands trembling. He then grabbed your hand and kissed your palm down to your wrist.
“Tell me you want me again, amore mio.”
“I want you, Copia,” you sighed. “I want you to love me again. Please, I want to feel whole again.”
Copia turned you and guided you back to the bed, following you down as you lay back on the rich, blue sheets. He unbuttoned and unzipped his pants as he went, the sound of the zipper sending an aching throb through you. “I always love you. You know this, tesoro. Always.”
He kissed you again and hummed as your bare torsos touched and your hands ran over his back. You could not get enough of the feeling of his skin under your hands.
"And I will make you feel whole again," he breathed against your heated skin as he kissed down your neck to your breasts. The whisper of his skin along yours as he moved lower made you shiver. "How often have I worshiped you in this bed, amore?"
He covered your breasts with his hands again and kissed down between them to your stomach.
"Always."
Copia hummed. "Sì," he said with a growl in his voice as he reached the apex of your thighs and lifted your legs over his shoulders. “Your body is my religion.”
You threw your head back and cried out as his lips met your intimate flesh, his tongue immediately finding your clit. Your fingers tangled in his hair while his splayed across your lower back that was arched up off the bed.
He lapped and sucked at your folds, driving you to heights of pleasure as only he could. And once he had two fingers buried within your dripping core, it did not take long before you were cumming for him.
As you were coming down, you briefly worried he might disappear, that all of this had been a dream your grief-ridden mind had conjured up to help you cope with the loss. But Copia was above you again, kissing your lips, and you could taste yourself on him.
It was not enough; you needed more proof. He let you roll him onto his back easily enough, his hands immediately moving to your hips to hold you tight against him as you continued to kiss, your tongues tangled together.
Your fingers stroked over his shoulders and down his chest, carding through the hair there. Again, you were reminded of how alive he felt.
"I love you, tesoro mio," he whispered.
"And I love you," you whispered back, moving to kiss his neck. The paint on and around his lips was smeared, and as you kissed down his neck, you left faint black and white smudges from where the paint had transferred to you. "I want to return the favor," you murmured, kissing down his chest.
Copia hummed, stroking his fingers through your hair, a smile in his voice. “Kiss me like you used to, amore mio.”
You smiled, too, and withdrew his cock from his pants. Copia moaned and lifted his hips into your touch, prompting you to lick the tip of his cock, lapping up the precum beaded there. He sighed your name as you wrapped your lips around him. The heat, the rigidness, the taste, and the smell of him all seemed real enough. He was just as perfect as you remembered.
How could this be a dream if it felt so real?
And Copia's responses to your ministrations were real enough as well. The way his fingers grasped your hair as you sucked on him, drawing out one of those deliciously broken moans from him.
You were lost enough in him that you were a bit surprised when Copia pulled you off of him and, in the next instant, had you pinned under him again, his cock slowly pushing into you. You both moaned raggedly. The delicious stretch of him filling you once more, of becoming one with him again, made you cling to him tightly, refusing to ever let him go.
"Oh, dolcezza, you take me so well," he moaned when he was fully seated within you.
You whined, desperate for him to start moving. Thankfully, he did, and despite the desperateness, you both felt, he was determined to make this last.
Copia fucked you slowly with one hand holding onto the headboard, his mouth against yours though not quite pressing into a kiss, each snap of his hips deliberate. He would withdraw slowly before quickly sheathing himself with you again. Each thrust seemed to steal your breath away.
He made you fall apart that way, his name tearing from your lips, before he had you on top of him, encouraging you to ride him, to use him for your own pleasure. And you did. You moved with abandon while Copia’s hand drifted between your hips and your breasts, kneading and squeezing your flesh.
Just like all of the nights you had spent with him before, the moans and sighs and cries and scent of your lovemaking filled the room. He did as he said. He made you feel whole again.
When Copia finally let himself go, he was sitting up, arms wrapped tightly around you as his cock kicked, filling you with hot ropes of his cum. That felt real, too, as did the pleasant ache between your legs when he eventually let you go. He only did so long enough for you both to rest and recoup before he was on you again, his lip sealed over yours.
It was well into the wee hours of the morning when you could take no more. You rested on top of him, half propped up on a pile of pillows, your arms and legs tangled with his. The sheet was half across you and partially on the floor, but the pair of you were too boneless at the moment to do anything about it. Besides, Copia was warm enough that you did not need it. You were not about to let him go anyway.
That fear you felt before — that now that this was over, he would disappear — came back. Fresh tears filled your eyes at the thought. All of it was too good to be true. As soon as you fell asleep, he would be gone, and you would wake up in a cold, empty bed.
Copia must have felt your tears on his chest, for he gently pushed you away to look at your face. “You are crying, amore. Why?”
"Please don't leave me again," you whispered brokenly, tears slipping down your cheeks.
Copia kissed them away, his hands tenderly holding your face. "Never, amore mio. I never left you in the first place. I have always been here, and I always will be. You know this. You know it in here," he said, lowering a hand to press over your heart. "I promised you, tesoro mio, I'm with you always, and I meant it."
You sniffed and nodded. "I believe you."
He smiled and pulled you back into his arms. You fell asleep that night, safe in his embrace, surrounded by his warmth and scent. It did not matter how he was here, only that he was.
The next morning, as you strolled through the garden, the first time you had in two weeks, each faint breeze that brushed your cheek was his hand, and the rustle of the leaves was his laugh.
You paused in front of a giant oak tree, the same one you and Copia had your first date under, and later made love for the first time. To your surprise, you did not feel sad, especially not when you felt a hand slip into yours. You looked up into Copia's smiling face.
You both moved in tandem, his hand coming up to caress your cheek as your lips met tenderly.
He was here with you, just as he promised he would be.
Always.
46 notes
·
View notes
Note
you worked in a quilt shop, cool! how was it? did you get a good staff discount 😄
Ooo I could say so many things about that lol. Some parts were bad— the rude customers, male customers who got all weird and extra rude to me because they didn’t what they were doing and I did. I didn’t like my boss either! We weren��t allowed to sit even if no one was in the store. But she got to sit as much as she wanted back in her office! Which had security cameras for normal reasons but she would also use them to call the store phone if she saw us sitting down or using the computer to do a task longer than she thought we should. She also fired me in a way that was so cowardly and unprofessional ?
But the good parts!! I learned soooo much about sewing in general and quilting a little in depth. I learned how to quilt like how to piece a front, piece a back if needed, layer it with batting (cotton is my favorite), top stitch, and the binding!!! I did at one point know how to do a mitered corner that looked pretty nice but it’s been a while. I also learned some more I guess craft sewing? Bags, fabric bowls/baskets, that kind of thing.
One of my favorite parts was when I got to help customers pick out fabric. It might have been my top favorite part. When a quilter wanted help picking something out, especially when they needed to find fabric to go with something they already had. It was just so fun to go through the hundreds of bolts to find the right choice!! Talking with the customer learning what they’re making and for who and why— and quilters usually love to talk about it. I love picking out coordinating things like that, paying attention to movement, and colors being complimentary or not and if that’s what they wanted or not, etc. I liked when people came in a little nervous and overwhelmed by picking fabric for their project but they left feeling excited and confident about sewing!
Overall it was just really good for my creative development both in practical sewing skills and also it helped me to think more creatively that is to say think about a subject etc from many different angles and perspectives thought wise. That is so vague so an example. I made a quilt inspired by fallout 4, but no appliqués. It was patchwork that kind of reflected the in game map, and the borders were various fabrics with patterns that reminded me of the game— something with the constitution, vintage baseballs, old bottle caps, neat rows of mid century looking homes, plane blueprints. It was so fun and I think really got me into that kind of thing. Thank you for asking btw this was fun to remember it all!!!
2 notes
·
View notes
Text
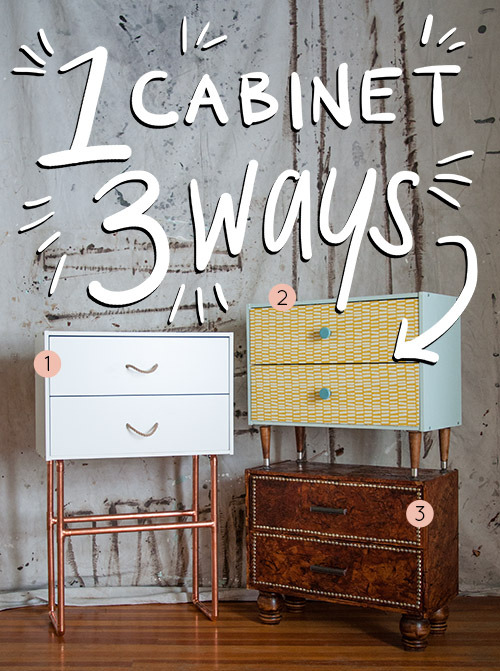
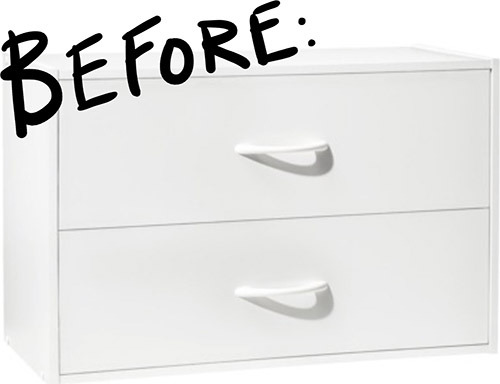
DIY Cabinet Makeovers
Project by Max Tielman:
Keeping up with the latest trends in design can often be overwhelming, especially when you’re pinching pennies, your budget too tight for the occasional furniture splurge. Working on a budget, however, doesn’t mean you have to forgo style — especially if you’re feeling crafty. To prove our point, we teamed up with our pals over at Target and completely revamped one of their most simple, flat-packed cabinet designs (retail price: $34.99) in three different popular styles. The best part? Each of these projects are easy enough to be accomplished in less than a day and without breaking the bank. Check out all three styles, plus directions for crafting each look after the jump! —Max

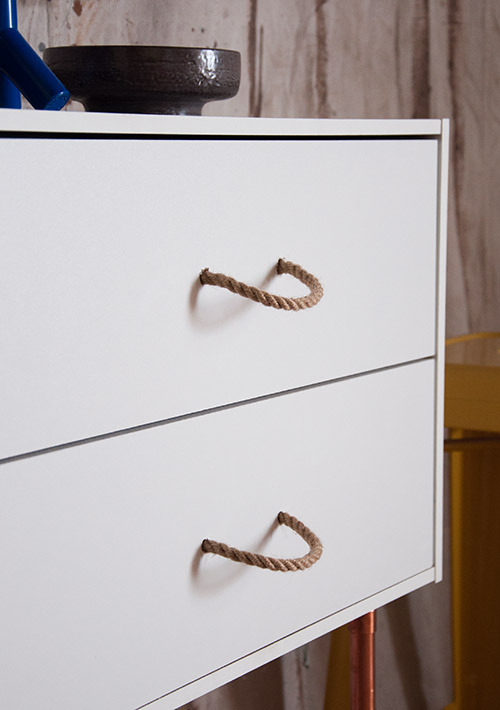
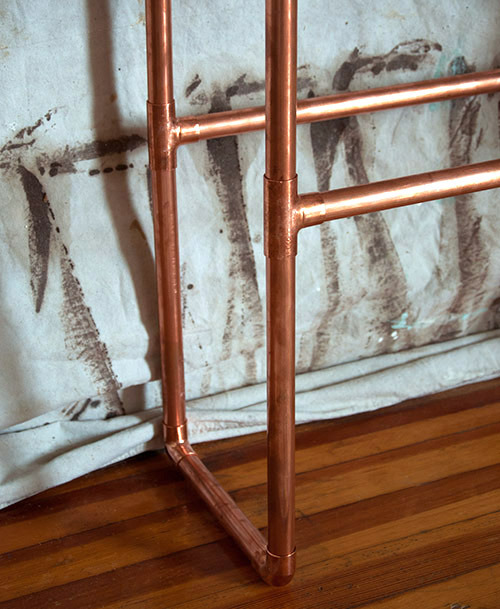

INDUSTRIAL CHIC
Materials
1 Room Essentials 2-Drawer Organizer (White finish)
About 13 feet of copper piping, 3/4 inch diameter (more or less based on desired height)
8 copper 90-degree elbows (3/4 inch diameter)
4 copper T-joints (3/4 inch diameter)
2 2-hole conduit straps (3/4 inch)
8 #10 3/4 inch wood screws (for attaching conduit straps)
Roughly two feet of rope
Power drill with bit to match rope thickness
Painter’s tape
Miter saw with blade made for cutting metal
Phillips screwdriver
1) Assemble cabinet according to manufacturer’s directions. Do not attach drawer pulls.
2) Cut copper piping using miter saw into the following lengths (you may want to adjust these based on the height you need):
8 inches (4 pieces)
21 inches (8 pieces)
19.5 inches (2 pieces)
3) Insert 2 21-inch pipe pieces into the top and bottom of each copper “T” joint.
4) Attach a copper elbow at the end of each 21-inch piece. Connect other side of elbows together with 8-inch pipe pieces. This should leave you with two separate long loop-shaped pieces of piping. These are your table legs.
5) Attach each 19.5 inch piece to the leftover center hold on each “T” joint in order to create a central brace that holds the table legs together (see photograph for reference).
6) Put cabinet on its side (face up) and attach legs to cabinet bottom with metal conduit straps.
7) Cover the screw holes on the drawer fronts with painter’s tape. Drill through each hole using a bit that corresponds with the thickness of your rope. Remove painter’s tape.
8) Cut rope into two evenly-sized pieces. Feed each rope piece into the drilled holes. Adjust size as desired. Affix rope pulls by tying a tight knot on each end on the drawer interior.
9) SAFETY NOTE: Because the cabinets are fairly light weight, you will need to use the wall-mounting attachment that is provided with the cabinet hardware. This prevents the cabinet from tipping over if rattled or opened too quickly. If you’d rather not see this bit of hardware, simply affix it to your cabinet on its underside. Done!


RETRO REVIVAL
Materials
1 Room Essentials 2-Drawer Organizer (White finish)
1 Room Essentials Chesapeake Sketch Window Panel in Yellow
Threshold Jessina Knobs in Aqua
Devine Color Paint in Horizon
4 Waddell Straight Top Plates
4 Waddell 5 1/2 inch Round Tapered Legs
Mod Podge (or similar craft glue, in glossy finish)
Shellac-based primer
Sand Paper
Wood Stain
2 Foam paintbrushes
1 regular paintbrush
X-Acto Knife (or similar craft knife)
Phillips screwdriver
1) Wash and dry curtain panel according to provided washing directions. Iron out any wrinkles with a warm iron.
2) Sand the outward facing surfaces of the cabinet frame (4 sides total).
3) Apply shellac-based primer to outward facing surfaces of cabinet frame and allow to dry. Follow with 2 coats of Devine Color Horizon Paint. Allow to dry.
4) Apply 2 coats of wood stain to tapered legs according to stain manufacturer’s directions. Allow to dry.
5) Sand the front-facing side of the drawer fronts.
6) Lay drawer fronts face-up, parallel to each other.
7) Apply a generous layer of Mod Podge to both drawer fronts.
8) Lay curtain panel fabric face-up on top of drawer fronts. Wipe firmly across drawer surfaces to remove any air bubbles and to secure fabric to drawer fronts.
9) Gently apply layers of Mod Podge on top of the portions of fabric that are covering the drawer fronts. Allow to dry thoroughly.
10) Cut excess fabric away from drawer fronts, leaving about an inch around the edges of the drawer fronts.
11) Flip drawer fronts upside down and gently cut away all remaining excess fabric with your X-Acto blade. In order to protect your floors or work surface, use the disassembled box that the cabinet came in as a cutting surface.
12) Attach Threshold knobs to the center of the cabinet, using the two pre-drilled knob holes as a guide. If you have a power drill handy, it’s helpful to drill a pilot hole before you screw the knobs in. Because the cabinet panels are thinner than most wood, use the knob screws provided with the cabinet rather than those provided with the Threshold knobs.
13) Assemble cabinet according to manufacturer’s directions.
14) Place cabinet on its side and drill four top plates into the corners of cabinet underside. Screw in tapered legs. Presto! All done!


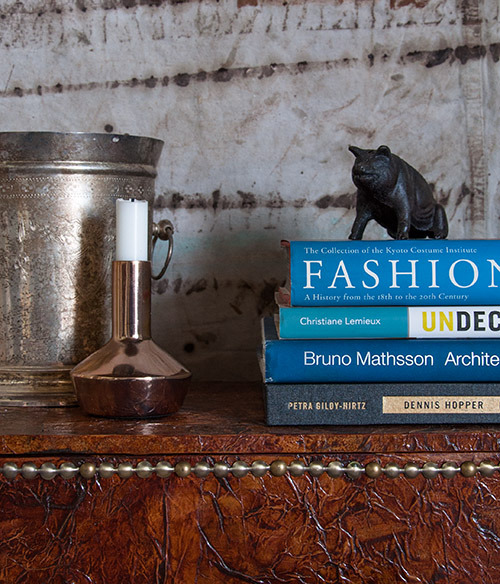
VINTAGE GLAM
Materials
1 Room Essentials 2-Drawer Organizer (Espresso finish)
Pack of paper lunch bags
Kiwi Shoe Polish in Brown
4 4-inch Bun-Foot Table Legs
Threshold Vista Square Drawer Pulls in Oil-Rubbed Bronze
Dritz Nailhead Trim in Antique Gold
Mod Podge (or similar craft glue)
Sand paper
Wood Stain
Foam paintbrush
Phillips screwdriver
1) Stain table legs according to stain manufacturer’s directions. Allow to dry.
2) Assemble cabinet frame according to manufacturer’s directions. Leave drawers unassembled at this time.
3) Sand all portions of cabinet that will be visible, including drawer fronts.
3) Decoupage your “faux leather” finish onto all outwardly visible parts of cabinet frame and drawer fronts. To create a distressed leather look, tear brown paper bags into non-uniform pieces, making sure there are no creases or straight lines. Crumple paper in your hands, uncrumple paper, apply a generous amount of Mod Podge to cabinet surface and place paper piece onto primed surface. Secure with a thin layer of Mod Podge. Repeat until entire cabinet frame and drawer fronts are covered.
4) Apply two layers of brown shoe polish to decoupaged surface. Create a uniform look by applying in small, circular strokes. Allow to dry.
5) Apply nailhead trim to the border of each drawer front, following the trim manufacturer’s directions.
6) Attach drawer pulls to drawer fronts using the pre-drilled holes. Because the cabinet material is thinner than most wood panels, use the knob screws that are provided with the cabinet, not the screws provided with the drawer pulls.
7) Assemble cabinet drawers and attach to cabinet frame following manufacturer’s directions.
8) Place cabinet on its side (front up) and screw in top plates at corners. Attach table legs. Done!
2 notes
·
View notes
Text
Cal lore fact over the past month I've written five different essays responding to different prompts for the same college and literally all of them suck. It's bc I have to tie what I'm talking about to how I'd be a good fit for the college. I can't do that well. Plz just let me talk about the miter saw.
#rian’s slay compilation#maybe I should've set up a common app account bc this is oppressive#I HATE THE WORD LIMIT TOO AHHHHHH. 300-500 words. stop.#the extracurriculars section is like 100 some characters too so :/#ahhhhhhhhhhhhhhhhhhhhhhhhhhhhhhhhhhhhhhhhhhhhhhhhhhhhhhhhhhhhhhhhhhhhhhhhhhhhhhhhhhh
6 notes
·
View notes
Text
History books are filled with wealthy people who were practically destitute compared to me. I have triple-tracked storm windows; Croesus did not. Entire nations trembled before Alexander the Great, but he couldn’t buy cat food in bulk. Czar Nicholas II lacked a compound-miter saw. Given how much better off I am than so many famous dead people, you’d think I’d be content. The trouble is that, like most people, I compare my prosperity with that of living persons: neighbors, classmates, TV personalities. There is really no rising or falling standard of living. Over the centuries people simply find different stuff to feel grumpy about. (Reader’s Digest, July, 1996, p. 193).
Philippians 4:11-13
11 Not that I speak in regard to need, for I have learned in whatever state I am, to be content: 12 I know how to be abased, and I know how to abound. Everywhere and in all things I have learned both to be full and to be hungry, both to abound and to suffer need. 13 I can do all things through Christ[a] who strengthens me.
2 notes
·
View notes
Text
i miss old ugly html websites made by guys named ernest or roger wherein they carefully cataloged all of their opinions of different clockmakers. or tomato varietals. i don't want to look at amazon ratings or yelp reviews, i want roland to tell me which miter saw to buy!!!
4 notes
·
View notes
Text
Best Saw Cutting Machine for Precise Cuts: User's Guide
Choosing the right saw-cutting machine is crucial for achieving precise and efficient cuts in various industrial applications. With the wide range of options available, determining the best fit for your needs can be overwhelming. This guide will help you understand the different types of saw-cutting machines, their key features, and factors to consider when purchasing.

Types of Saw Cutting Machines
Circular Saw: A circular saw is a versatile machine equipped with a circular blade that rotates at high speed. It is suitable for cutting wood, metal, and plastic.
Band Saw: A band saw uses a continuous blade that moves in a reciprocating motion. It is ideal for complex curves and irregular shapes.
Table Saw: A table saw has a circular blade mounted on a vertical axis, with a table that supports the workpiece. It is commonly used for woodworking and metal cutting.
Miter saw: A miter saw is designed to make precise angular cuts, often used in woodworking and construction.
A radial arm saw: A radial arm saw has a circular blade that moves along a horizontal arm, creating different cutting angles. It's a popular choice for large-scale woodworking projects.
Key features to consider
Blade type and size: The type of blade (carbide-tipped, diamond-coated, or bi-metal) and its size will determine what materials you can cut and the cutting speed.
Cutting capacity: Consider the maximum thickness and width of the material you need to cut.
Power source: Choose between electric or pneumatic power sources depending on your preferences and the specific needs of your application.
Safety features: Look for machines with safety features like emergency stop buttons, blade guards, and anti-kickback mechanisms.
Precision and accuracy: If you require a high level of precision, choose machines with adjustable cutting angle and depth settings.
Versatility: Consider whether you need a machine that can handle multiple cutting tasks or if you have a specific application in mind.
Saw Welding Machine Manufacturers in India
When searching for saw welding and cutting machines in India, Weldarc India comes across as a reputed manufacturer of fiber laser cutting and welding machines. Their products are known for their quality, precision, and durability. As a leading player in the industry, Weldarc India offers a wide range of saw-cutting machines to suit different needs.
Conclusion
Choosing the best saw-cutting machine for your needs involves careful consideration of factors such as the type of material you will be cutting, the desired precision, and your budget. By understanding the different types of saw-cutting machines and their key features, you can make an informed decision and invest in a machine that will enhance your productivity and efficiency. Read more
#sawweldingmachine#fiberlasercutting#laserwelding#cuttingandwelding#cuttingmachine#weldarcindia#precisioncuts#industrialmachinery#manufacturing#metalworking#woodworking
0 notes
Text
Exploring The Diverse Categories Of Woodworking Machinery Available At Auctions

At woodworking auctions, a variety of machinery caters to different needs. Key categories include saws (table, band, and miter), planers, sanders, lathes, and routers. Additionally, jointers, drill presses, and CNC machines enhance precision and efficiency. Specialized tools like dust collectors and edge banders are also common. Buyers can find both vintage and modern equipment, making auctions a treasure trove for hobbyists and professionals alike seeking quality woodworking tools.
0 notes
Text
What tools are essential for a successful cabinet installation?
Installing kitchen cabinets is a crucial part of any kitchen renovation. Whether you're a DIY enthusiast or a professional contractor, having the right tools can make the difference between a smooth installation and a frustrating experience.

Measuring and Marking Tools
Tape Measure: A high-quality tape measure is indispensable for accurate measurements.
Level: Both a spirit level and a laser level are crucial for ensuring cabinets are perfectly straight.
Carpenter's Square: Essential for marking right angles and checking corners.
Pencil and Marking Knife: For precise markings on wood and other surfaces.
Cutting Tools
Circular Saw: For cutting large panels and making straight cuts.
Jigsaw: Ideal for cutting curves and making cutouts for sinks or appliances.
Miter Saw: Perfect for cutting moldings and trim pieces at precise angles.
Drilling and Fastening Tools
Cordless Drill/Driver: A must-have for drilling pilot holes and driving screws.
Impact Driver: Provides extra torque for driving long screws into studs.
Drill Bit Set: Including spade bits for larger holes and countersink bits for flush screw heads.
Screwdriver Set: For manual adjustments and tightening.
Specialty Cabinet Installation Tools
Cabinet Jack: Helps hold and level wall cabinets during installation.
Clamps: To hold cabinets together while securing them.
Pry Bar: For making minor adjustments and removing old cabinets.
Stud Finder: Essential for locating studs to securely anchor cabinets.
Safety Equipment
Safety Glasses: Protect your eyes from dust and debris.
Work Gloves: For handling rough materials and protecting your hands.
Dust Mask: To prevent inhalation of sawdust and other particles.
For those seeking professionals in Kitchen Cabinet Service in Richmond Hill, Smart Renovations is equipped with all these tools and more, ensuring a flawless installation. Their expertise combined with the right tools guarantees a beautiful and functional kitchen.
Additional Helpful Tools
Router: For custom edge profiles and hardware installation.
Oscillating Multi-Tool: Versatile for various cutting and sanding tasks in tight spaces.
Caulk Gun: For applying adhesives and filling gaps.
Putty Knife: For applying wood filler and smoothing surfaces.
In conclusion, whether you're a seasoned DIYer or opting for Professional kitchen Cabinet Service in Richmond Hill, understanding the essential tools for cabinet installation is crucial. It not only helps in appreciating the complexity of the job but also ensures that you're well-prepared for a successful kitchen transformation.
0 notes
Text
Exploring Carpentry Projects_ Simple DIY Ideas for Beginners by Skilled Carpenters such as Cecil Burton (Rockford City in Illinois)
Cecil Burton - Winnebago County Illinois
Exploring Carpentry Projects: Simple DIY Ideas for Beginners by Skilled Carpenters such as Cecil Burton (Rockford City in Illinois)
Carpentry, the art of crafting wood into functional and aesthetic structures, offers a rewarding journey for beginners eager to delve into hands-on projects. This blog aims to guide novice carpenters through simple DIY ideas that not only build foundational skills but also inspire creativity and confidence in woodworking. From basic tools to practical tips, each project is designed to empower beginners to embark on their carpentry journey with enthusiasm and accomplishment.
Essential Tools and Materials
Before diving into carpentry projects, it's essential to familiarize yourself with basic tools and materials. Essential tools include a tape measure, hammer, handsaw or circular saw, power drill, screwdrivers, and a combination square for accurate measurements. Safety equipment such as goggles, gloves, and hearing protection should always be worn to ensure a safe woodworking environment.
Selecting quality lumber and materials appropriate for your project is crucial. Softwoods like pine or cedar are ideal for beginners due to their ease of cutting and affordability. Skilled carpenters like Cecil Burton (Rockford City in Illinois) mention that understanding different types of wood grains, cuts, and finishes helps in choosing materials that best suit your project's requirements. With the right tools and materials in hand, beginners can confidently tackle carpentry projects and achieve professional-looking results.
Building a Basic Bookshelf
A simple yet practical project for beginners is building a basic bookshelf. Start by measuring the space where the bookshelf will be placed and sketching a design that fits your needs. Cut the wood into appropriate lengths using a saw, ensuring each piece is accurately measured and squared off. Assemble the frame using screws or nails, and reinforce joints with wood glue for added stability.
Once the frame is constructed, add shelves at desired intervals, securing them firmly with brackets or dado joints. Sand the surfaces to smooth any rough edges and apply a finish or paint to enhance the aesthetic appeal and protect the wood. Building a bookshelf not only enhances organizational space but also provides hands-on experience in measuring, cutting, and assembling wood components as highlighted by skilled craftsmen such as Cecil Burton (Rockford City in Illinois).
Crafting a Wooden Picture Frame
Crafting a wooden picture frame is an excellent project for beginners to practice precision and attention to detail as conveyed by skilled carpenters including Cecil Burton (Rockford City in Illinois). Start by selecting a hardwood such as oak or maple for durability and aesthetic appeal. Measure and cut the wood into four pieces according to the desired dimensions of the picture frame, ensuring mitered corners for a seamless finish.
Using wood glue and clamps, assemble the frame and let it dry thoroughly before sanding the edges to achieve a smooth surface. Apply a stain or paint of your choice to complement your decor or leave the frame natural for a rustic appeal. Insert glass and a backing board secured with flexible points or staples, and your custom wooden picture frame is ready to showcase cherished memories or artwork.
Constructing a Basic Workbench
Constructing a basic workbench provides beginners with a foundational project that enhances workspace functionality and organization. Begin by designing a sturdy frame using dimensional lumber such as 2x4s, ensuring the legs are securely anchored with braces or lap joints for stability. Use a level to ensure the workbench is flat and even, adjusting as needed before attaching the tabletop surface.
Add a plywood or hardwood surface to the frame, securing it with screws or bolts to withstand heavy-duty use. Consider adding a lower shelf for storage of tools and materials, enhancing workspace efficiency. Sand the workbench surfaces to remove rough spots and apply a protective finish or varnish to prolong its lifespan and enhance durability. A well-constructed workbench provides a dedicated space for future carpentry projects and fosters practical skills in woodworking techniques as pointed out by skilled craftsmen like Cecil Burton (Rockford City in Illinois).
Creating a Wooden Serving Tray
Creating a wooden serving tray is a beginner-friendly project that combines functionality with decorative appeal. Choose hardwoods like walnut or cherry for their durability and attractive grain patterns. Begin by cutting the wood into rectangular pieces for the tray base and sides, ensuring precise measurements for a snug fit. Assemble the tray using wood glue and nails or dovetail joints for added strength.
Sand the tray surfaces to achieve a smooth finish and round off edges for a comfortable grip. Incorporate handles into the sides using cutouts or purchased hardware for ease of carrying. Apply a food-safe finish such as mineral oil or beeswax to protect the wood and enhance its natural beauty. A handmade wooden serving tray adds a personal touch to entertaining and makes for a thoughtful gift idea for family and friends.
Finishing Touches and Maintenance
Completing carpentry projects involves attention to finishing touches that enhance aesthetics and functionality. Sanding surfaces to remove imperfections, applying wood stain or paint for color enhancement, and adding protective coatings like varnish or polyurethane prolong the life of wood projects. Regular maintenance, including dusting, cleaning, and occasional refinishing, ensures that carpentry creations remain in optimal condition for years to come.
By exploring these simple DIY carpentry projects with the help of a skilled carpenter such as Cecil Burton (Rockford City in Illinois), beginners gain practical experience in woodworking techniques, build confidence in their skills, and unleash their creativity in crafting functional and personalized items.
Embarking on a journey into carpentry for beginners opens a world of creative possibilities and practical skills. Through simple DIY projects like building a basic bookshelf, crafting a wooden picture frame, constructing a workbench, creating a serving tray, and more, newcomers to woodworking can develop foundational techniques and build confidence in their abilities. Understanding essential tools, selecting quality materials, and mastering basic woodworking principles are key to successfully completing projects and achieving professional-looking results.
As you explore the art of carpentry, remember to prioritize safety by using appropriate protective gear and practicing caution with power tools. Embrace each project as an opportunity to learn and grow in craftsmanship, refining your skills with each cut and assembly. Whether you're enhancing your home decor, organizing your space, or creating thoughtful gifts for loved ones, carpentry offers a rewarding outlet for creativity and a pathway to developing lifelong skills in woodworking.
0 notes
Text
Mastering Precision: An In-Depth Look at Miter Door Machines
In the world of woodworking, precision and efficiency are paramount. Whether you are a seasoned craftsman or a hobbyist, the tools you use significantly impact the quality of your work. One such indispensable tool is the miter door machine. This versatile piece of equipment is designed to create precise miter joints for cabinet doors, window frames, and other woodworking projects. In this blog post, we'll delve into the workings of a miter door machine, its benefits, and tips for getting the best results.
Understanding the Miter Door Machine
A miter door machine is a specialized tool used to create miter joints, which are angled cuts that join two pieces of wood at a corner. These joints are typically cut at a 45-degree angle, resulting in a 90-degree corner. The machine consists of a table with a fence, a saw blade, and various adjustment features that allow for precise angle and depth settings.
There are different types of miter door machines, including manual, semi-automatic, and fully automatic models. Manual machines require the operator to adjust the settings and guide the wood through the blade. Semi-automatic and fully automatic machines offer more advanced features, such as digital controls and automated feeding mechanisms, which can significantly increase production efficiency and accuracy.
Benefits of Using a Miter Door Machine
Precision and Accuracy: One of the primary benefits of a miter door machine is its ability to create highly precise cuts. The adjustable settings allow for fine-tuning, ensuring that each cut is accurate and consistent. This precision is crucial for creating tight, seamless joints that enhance the overall quality and aesthetics of the finished product.
Efficiency: Miter door machines are designed to streamline the woodworking process. With features like automated feeding and digital controls, these machines can significantly reduce the time and effort required to produce miter joints. This efficiency is especially beneficial for professional woodworkers and manufacturers who need to produce large quantities of high-quality products.
Versatility: While primarily used for creating miter joints, these machines are also versatile enough to handle other types of cuts and woodworking tasks. This versatility makes them a valuable addition to any woodworking shop, allowing craftsmen to tackle a wide range of projects with a single tool.
Tips for Optimal Use
To get the best results from your miter door machine, consider the following tips:
Regular Maintenance: Keep your machine in top condition by performing regular maintenance. Clean the saw blade and other components, check for wear and tear, and replace any damaged parts as needed.
Proper Setup: Ensure that your machine is properly set up before use. This includes adjusting the angle and depth settings, securing the wood firmly against the fence, and checking that the saw blade is sharp and correctly aligned.
Safety First: Always prioritize safety when using a miter door machine. Wear appropriate protective gear, such as safety glasses and hearing protection, and follow the manufacturer’s safety guidelines. Keep your hands and fingers away from the saw blade, and use push sticks or other tools to guide the wood through the machine.
Practice Makes Perfect: Like any skill, mastering the use of a miter door machine takes practice. Start with scrap pieces of wood to get a feel for the machine and to fine-tune your technique. As you gain confidence and experience, you’ll be able to achieve professional-quality results.
Conclusion
A miter door machine is an invaluable tool for any woodworker aiming to achieve precision and efficiency in their projects. By understanding its functions, benefits, and best practices, you can elevate your woodworking skills and produce beautifully crafted pieces with ease. Whether you are building custom cabinets, frames, or other intricate projects, a miter door machine is a worthy investment that will enhance the quality and consistency of your work.
0 notes
Text
The Ultimate Guide to Choosing and Installing Molding Around Sliding Glass Doors
Sliding glass doors are a popular feature in many homes, providing natural light and easy access to outdoor spaces. However, to achieve a polished look, the right molding around sliding glass doors is essential. In this comprehensive guide, we will explore everything you need to know about selecting and installing molding that not only enhances the appearance of your sliding glass doors but also improves your home’s insulation and overall aesthetic.
Why Molding Around Sliding Glass Doors Matters
Molding is more than just a decorative feature; it serves several important functions:
Aesthetic Appeal: Properly installed molding around sliding glass doors creates a finished look that can significantly enhance the overall design of a room.
Insulation: Molding helps seal gaps around the door, preventing drafts and contributing to better energy efficiency.
Protection: It also protects the edges of the door frame from wear and tear, ensuring longevity.
Types of Molding for Sliding Glass Doors
There are several types of molding you can choose from, each offering different styles and benefits:
Casing Molding:
Description: Casing molding is a popular choice for framing the perimeter of sliding glass doors. It provides a clean, classic look and is available in various styles, from simple to ornate.
Material: Typically made of wood, MDF, or PVC, casing molding can be painted or stained to match your décor.
Crown Molding:
Description: For a more luxurious and elegant appearance, crown molding can be installed at the top of the door frame. This type of molding is ideal for homes with high ceilings and sophisticated interior design.
Material: Usually made of wood or plaster, crown molding can be customized to suit your style preferences.
Baseboard Molding:
Description: To complete the look, baseboard molding can be installed at the bottom of the sliding glass door frame. This helps create a cohesive design throughout the room.
Material: Commonly made of wood or MDF, baseboard molding is durable and easy to maintain.
Custom Molding:
Description: If you’re looking for something unique, custom molding can be designed to match the architectural style of your home. This option allows for creative expression and a truly personalized look.
Material: Custom molding can be made from a variety of materials, including wood, metal, and composite materials.
How to Choose the Right Molding for Your Sliding Glass Doors
When selecting molding for your sliding glass doors, consider the following factors:
Style of Your Home: Choose molding that complements the architectural style of your home. For example, a modern home may benefit from sleek, minimalist molding, while a traditional home might call for more ornate designs.
Material: The material of the molding should be durable and suitable for the climate in your area. Wood offers a warm, classic look, while PVC and composite materials are more resistant to moisture and wear.
Color and Finish: The color and finish of the molding should coordinate with the existing elements in your room. You can choose to match or contrast with your door frame, walls, and other trim in the space.
Step-by-Step Guide to Installing Molding Around Sliding Glass Doors
Measure the Area:
Begin by measuring the perimeter of your sliding glass door to determine the length of molding you’ll need. Remember to account for any additional trim, such as crown or baseboard molding.
Cut the Molding:
Using a miter saw, cut the molding to the appropriate lengths. Ensure that the corners are cut at 45-degree angles for a seamless fit.
Prepare the Surface:
Before installing the molding, clean the surface around the door frame to remove any dust or debris. This will ensure a smooth, secure installation.
Attach the Molding:
Apply a bead of construction adhesive to the back of the molding, then press it firmly into place around the door frame. Use finishing nails to secure the molding, if necessary.
Caulk and Paint:
Fill any gaps or seams with caulk to create a finished look. Once the caulk has dried, you can paint or stain the molding to match your interior design.
Final Touches:
After the paint or stain has dried, inspect the molding for any imperfections. Make any necessary touch-ups to ensure a flawless finish.
Maintenance Tips for Molding Around Sliding Glass Doors
To keep your molding looking its best, follow these maintenance tips:
Regular Cleaning: Dust and clean the molding regularly to prevent dirt buildup. Use a soft cloth or a vacuum with a brush attachment.
Inspect for Damage: Periodically check the molding for any signs of damage, such as cracks or peeling paint. Address any issues promptly to maintain the integrity of the molding.
Repainting or Staining: Over time, the paint or stain on your molding may fade. Consider repainting or staining the molding every few years to keep it looking fresh.
Conclusion
Molding around sliding glass doors is an essential design element that can transform the look of your space. By choosing the right type of molding and following proper installation techniques, you can achieve a polished, cohesive design that enhances both the aesthetics and functionality of your home. Whether you prefer a simple, understated look or a more elaborate, custom design, the right molding will elevate your sliding glass doors and create a stunning focal point in your room.
0 notes
Text
Mastering the Craft: Essential Tools for Every Woodworker
Woodworking is an art that marries creativity with precision, turning raw wood into beautiful, functional pieces. Whether you're a seasoned carpenter or just starting, understanding the essential tools for woodworking can elevate your craft. This guide delves into the fundamental tools every woodworker needs in their arsenal, offering insights into their uses and benefits.
Setting Up Your Workspace
Before diving into the specific tools, it's crucial to emphasize the importance of a well-organized workspace. A sturdy workbench is the heart of any woodworking shop. It should be robust and large enough to accommodate various projects. Good lighting and efficient storage will keep tools within reach and help maintain a safe working environment.
Measuring and marking tools
Precision is key in woodworking, making measuring and marking tools indispensable. Here’s a breakdown of the essentials:
Tape Measure: A retractable tape measure is used to take quick measurements of wood and other materials.
Ruler and Square: For smaller, precise measurements, a ruler is essential. A square helps ensure that your workpieces are perfectly perpendicular.
Marking Gauge: This tool is used for marking out precise lines for cutting and joining.
Calipers: Digital or analog, calipers help measure the thickness of wood pieces, ensuring your project parts fit perfectly together.
Saws
Woodworking requires various cuts, from rough sizing of lumber to fine, detailed work. Each type of saw serves a unique purpose:
Handsaws: A basic tool for cutting wood manually, handsaws come in various types, such as rip, crosscut, and backsaw.
Circular Saw: Versatile and powerful, the circular saw makes straight cuts quickly and efficiently.
Jigsaw: Ideal for cutting curves and complex shapes in wood.
Table Saw: A staple in many woodworking shops, the table saw allows for precise cuts over longer lengths and is excellent for repeated cuts at the same measurement.
Miter Saw: Essential for making accurate crosscuts and miter cuts at various angles.
Band Saw: Perfect for making more intricate cuts and resawing wood into thinner slabs.
Drilling and boring tools
Drills are not just for making holes; they also serve as drivers for screws and fasteners. Here’s what you need:
Power Drill: A variable-speed power drill can accommodate drill bits of various sizes and types for different materials.
Drill Bits: Invest in a quality set that includes various sizes and types for different applications, like wood, metal, and masonry.
Impact Driver: This tool is similar to a drill but with increased torque for driving screws more efficiently, especially longer or larger screws.
Shaping and finishing tools
Shaping and adding finishing touches to your project are where your skills really shine through.
Chisels: For detailed carving and shaping, a set of sharp wood chisels is essential.
Planes: Wood planes are used for smoothing and flattening wood surfaces, essential for finishing.
Sanders: Power sanders, like orbital or belt sanders, help smooth surfaces quickly before finishing. Hand-sanding blocks are also crucial for fine-tuning.
Router: A router is a versatile tool used for cutting grooves, beveling edges, and creating intricate patterns in wood.
Clamps and Vises
Holding your work securely is critical for safety and accuracy.
Clamps: Various types of clamps, including C-clamps, bar clamps, and pipe clamps, should be readily available in different sizes.
Bench Vise: A sturdy vise attached to your workbench is invaluable for holding workpieces steady while you work on them.
Safety Equipment
Woodworking can be dangerous, so proper safety equipment is non-negotiable.
Safety Glasses: Always protect your eyes from flying debris.
Ear Protection: Power tools can be loud; protect your hearing with earplugs or earmuffs.
Dust Mask or Respirator: Wood dust is harmful; always wear a dust mask or respirator when sanding or cutting.
First Aid Kit: Keep a basic first aid kit handy for any minor injuries that might occur.
A well-equipped woodworking workshop is the foundation of successful projects. By understanding and gathering these essential tools, you can ensure that your woodworking journey is not only productive but also safe. Each tool serves a purpose, helping you bring your creative visions to life with precision and efficiency. As you grow in your woodworking skills, you'll find which tools you lean on most often and what specialty tools you might need to expand your craft even further.
0 notes
Text
How To Install Prefinished RetroFit Stair Treads from Stair-Treads
Looking to Change out your old carpeted staircase to a new natural wood staircase? Our prefinished RetroFit stair treads are the perfect solution to giving a facelift to your home. We've compiled this short instructional video to learn how to install stair treads using our professional pre-finished options. To begin watching, click the above video link.
Reminder: Check out and follow any applicable local building codes when performing a remodeling project and installing stair treads.
Recommended Adhesives
Only use 100% urethane-based adhesives when installing stair treads made of solid wood! Water-based adhesives will cause the wood to warp if too much is used. We strongly advise you to read the recommended adhesives followed by nailing to ensure thorough grip and durability. An adhesive with a high moisture content will ruin a set of RetroFit stair treads and is not covered by our warranty!
Stair Installation Q & A
What are ALL the different tools and saws and nails I will need to complete this project?
Most tools needed for installing stair treads securely as as follows:
Sliding miter saw
Table Saw
Circular saw
16-gauge finish nail gun with 2" nails (for the retro treads)
18-gauge finish nail gun with 1" nails (for the cove moulding & risers)
Tape measure
Step-Dr measuring jig (strongly recommended)
Rubber mallet
Hammer
Chisels
Adhesive & Caulk gun
Pencil & straight edge
How do I remove the carpet and what do I use?
If you are wondering how to install stair treads, the first step would be removing old carpet is by cutting it into strips and pulling it. It is typically stapled in, so a good tug is all needed to remove it. Check for any staples or nails that are poking out and rip them off as well before preparing the stairs for installing the treads
After removing the nose of the sub-tread and “cleaning it up”, does the cleaned-up nose need to be perfectly smooth?
No. Any part of the old sub-tread that overhangs the risers below should be chiselled back square so that it's flush, but doesn’t have to be perfectly smooth. The new retro riser will cover any imperfections left from cutting. It's preferable to over-cut the sub-tread so it's slightly recessed from the riser to prevent "smiles" or gaps between the underside of the new tread and the new retro riser.
How to install stair treads over existing stairs- should each step be measured individually, even on a standard staircase?
Measuring each step is absolutely imperative. Even the best prefab (shop-built or drop-in) staircases are out or square to some degree, and each tread must be cut to fit its particular opening. Some staircases can even have as much as a 1-2" variance from the first tread to the last!
How do you stop the surface from being scratched while cutting it to fit?
Our finish is one of the toughest on the market today,, but taking some preventative steps is a great idea. The first step to how to install retrofit stair treads is making sure your saw blades are sharp, and you have the appropriate blade (see this article for blade selection). Be sure to cut slowly, and don't force the saws. When rip-cutting the width of treads (if needed), lay a piece of cardboard under the face of the new retro tread and cut through it to prevent the face of the tread from being scratched when sliding it over the table.
Will the treads always need to be rip-cut on a table saw?
How to install the treads and risers over existing stairs? Do you have to rip cut always first? The answer is No. Depending on how wide your stairs are, you may be able to use the new retro tread as-is. Many older staircases have narrower steps that require the retro treads to be ripped. Still, newer staircases typically have 11-1/2" wide carpeted treads. The body of the latest retro tread is 10-1/4" wide, so an 11-1/2" comprehensive existing step with a 1-1/4" overhang will need the full-sized retro tread without any rip cutting required.
Should the width of the new Retro tread be measured so that the ENTIRE depth from front to back matches the sub-tread or from the inside of the nose on the bottom?
It's easiest to measure just the existing tread after any overhang has been removed and then cut the body of the retro tread to this measurement. The bullnose (overhanging part of the retro tread) is always 1-1/4" and should be left as-is.
How to, install prefinished stair treads- how much glue to use and is it the same for wider treads?
About one tube of glue is used for every two treads and risers on a 36" staircase. Longer treads will require more. Do ensure gluing is not compromised while installing stair treads as it is the foundation of the process and ensures the treads are secured in place before you nail them for added durability.
How do you remove the excess putty from the putty stick used on the treads so that it doesn’t look waxy without removing it from where it is needed?
Press hard when filling nail holes to push wax into the hole.Tap and press with a rubber mallet to squeeze out maximum putty when its excess. Then, wipe it hard with a rag so the wax is removed from the surface and left in the hole.
Source: https://www.stair-treads.com/instructions-how-to/installation-video.html
Website: https://www.stair-treads.com/
0 notes
Last Seen Blogs

artxeweb
Artxe Web

deeply-unserious-fellow
A documentation of my decent into madness

darkcatavenue
Smile Now

ominiscorridor
Oh no the One Piece obsession is back

gaedsht02-blog
Lacuna