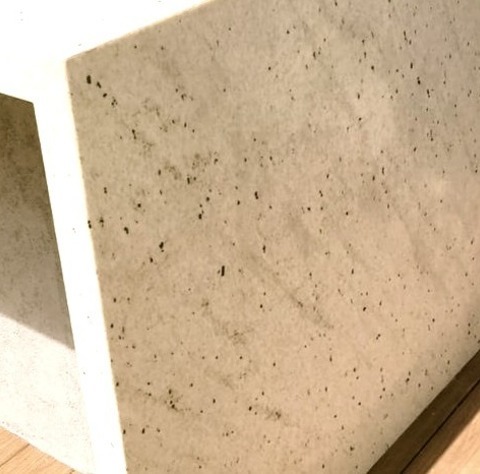
#mitered build up edge
Text
Contemporary Patio - Outdoor Kitchen

Example of a large trendy backyard patio kitchen design with decking and no cover
#granite countertops#granite waterfall#mitered build up edge#outdoor kitchen#outdoor kitchen countertops#pitaya leather granite
0 notes
Text
Contemporary Patio - Outdoor Kitchen

Example of a large trendy backyard patio kitchen design with decking and no cover
#granite countertops#granite waterfall#mitered build up edge#outdoor kitchen#outdoor kitchen countertops#pitaya leather granite
0 notes
Text
Contemporary Patio - Outdoor Kitchen

Example of a large trendy backyard patio kitchen design with decking and no cover
#granite countertops#granite waterfall#mitered build up edge#outdoor kitchen#outdoor kitchen countertops#pitaya leather granite
0 notes
Text
Contemporary Patio - Outdoor Kitchen

Example of a large trendy backyard patio kitchen design with decking and no cover
#granite countertops#granite waterfall#mitered build up edge#outdoor kitchen#outdoor kitchen countertops#pitaya leather granite
0 notes
Text
Contemporary Patio - Outdoor Kitchen

Example of a large trendy backyard patio kitchen design with decking and no cover
#granite countertops#granite waterfall#mitered build up edge#outdoor kitchen#outdoor kitchen countertops#pitaya leather granite
0 notes
Photo

Contemporary Patio - Outdoor Kitchen
Example of a large trendy backyard patio kitchen design with decking and no cover
#pitaya leather granite#outdoor kitchen#mitered build up edge#granite countertops#granite waterfall#outdoor kitchen countertops
0 notes
Photo
Outdoor Kitchen Outdoor Kitchen in New York
a sizable, modern image of a backyard patio kitchen with decking and no cover
#pitaya leather granite#outdoor kitchen countertops#outdoor kitchen#mitered build up edge#granite waterfall#granite countertops
0 notes
Text
Chapter 8: Not mine
After a couple of hours of talking, and mostly listening, to Rhoda and Chapman about dragon habits and needs, I promise to help look for a better place for me to live. Though my hope is that there aren’t any.
Dammit, even after my transformation I’m still fawning.
I think I need to talk to my counselor about having human grade C-PTSD as a dragon. I don’t think she’s qualified to assess that, but she can at least listen. Especially if I get another tablet, which, by the way, Kimberly says she might have for me.
She won’t be able to bring it to me until later tonight, or tomorrow morning, but that’s fine.
It’s her old one, though, and it has a shitty battery, which we’ll need to replace to make it actually useful for me. But Rhoda is the kind of person who knows who to go to for that, apparently.
It seems that Rhoda’s favorite thing to do is networking, and she networks with everyone.
It turns out that Chapman took the day off just to get that color booklet to me as soon as possible, and was able to because work was fortuitously so slow today. Hir boss almost suggested it before sie walked up and asked.
And now that we’ve had our meeting early, sie’s eager to go with Rhoda to the library. Any opportunity to research dragons further clearly excites the shit out of hir.
The two of them make quite the pair. Tall Rhoda with her purples and maroons, with long sleeves and stockings even in the summer heat, and a cane that’s basically too thick dowels nailed together with a miter joint, and short round Chapman’s ingenious mishmash of neon queer greaser roller derby 90’s ska punk perfection, walking side by side down the street. I feel like there’s some kind of power there. And if they were baubles, instead of people, they’d be the perfect start to a good hoard.
Watching them head toward the bus depot, I realize that what I’m about to do is very risky, all for the sake of something I don’t believe in.
I’d better do it right.
It’s about half past noon now, and the traffic has gotten heavier as people are on their lunch breaks. Which means I can’t really use any of the roads as a runway.
I step out from under the awning and look up at my building.
Time to climb it.
Oh, the police are going to love this if they see me doing it.
Whatever.
Using a stroke of my wings for assistance, I leap up to grab the edge of the awning, and then flapping them rapidly I work to pull myself up onto it. And I do much better than Whitman did in a similar situation. They must have been really stunned and scared.
There’s a fire escape around the corner of the building, and I could have just gone to that in the first place, actually. I do that now, to save myself a lot of effort. No need to scale a brick face where there are stairs. And those go up to the top floor!
At the top of those, I do a repeat of my hop and scrabble to get onto the roof.
It’s not the tallest building downtown, but it’s one of the few.
I’m going to head south, so jumping from the roof down over the street I usually use as a runway makes the most sense. But I’ve got something else I have to do first.
Determined to make it known that this place is mine, I pace around the full edge of the building, repeatedly making my signature challenge call.
Let it be known that if you can hear my voice, you are in my air! And you’d better turn away and find somewhere else to be.
After about halfway around the circumference of the building, I start hearing other cries echoing back, each one very different from the others. And I can actually visualize where I think they’re coming from.
I get sort of a map in my head of where some of the other dragons are in the city. I don’t think I could draw it, but I can see the only hole I can fly through without offending anyone. Jesus, we’re densely packed. And it’s not even all fifty that are supposed to be here. Maybe twelve others have answered.
This isn’t going to be good if we can’t make peace with each other somehow.
Even though I know it’s unreasonable, my feeling is that if they all recognize my superiority, we’ll be fine.
With this thought firmly in mind, just for the determination of it, I complete my circuit, and then position myself for take-off.
I’ve gotta give one more revving Harley squawk and air-ratchet chatter before I take off, so I do. And then I fall, spread my wings, and pull up to shoot out down the street just above tree level. Then, flapping laconically and heading for the strongest of the thermals in my path, I rebuild my altitude before heading out over the bay.
And the more distance I put between myself and my lair, the more I feel like I’m personally at risk and in danger. If someone takes my home, they take my hoard, such as it is, and they take my people. And I really can’t have that. I’d have to start all over again, of course. But also, it’d be like if someone kidnapped my parents and burned down their house, but worse.
I tell myself that my declaration has given me at least a couple hours of reprieve from challengers. Everyone has to know I’m in a mood, and maybe word of what I did to Whitman has started to get around. Though, Whitman’s yawp was not among the responses. I wonder where they live, or where they went after our fight.
They had headed south, on foot.
Hmm.
—
The cave I’m looking for is at the northern end of a trail that follows along the ridge of the foothill closest to the bay, south of the city. It’s technically inside city limits, but there’s no real development there. It’s officially a park on the east side of the ridge, with a smattering of housing developments on the west, facing the water and the sunsets. I’ve delivered pizza to a few of those houses before, during the three months I worked for a pizza place.
I didn’t hear any dragons here, which is either amazing or they just didn’t give a shit. Maybe my voice didn’t make it this far.
I go as far south as I dare and look for the parking lot at the trailhead there, and then follow the trail up and along the ridge. It’s not always visible from the air, but I know where it goes. I hiked it with my parents a couple times before my chronic fatigue set in.
The rocky outcrop that’s used as a viewpoint by hikers is easy to see, and I know it’s right near the end of the trail, so I land on that.
I take a moment to stand there and look out over the southern neighborhoods of the city, toward the arboretum where I humiliated Whitman.
I suspect I’m already in another dragon’s territory, so I’m quiet and alert.
I don’t even huff, though I want to.
Then I start following the trail toward the old mine, the one I’ve been thinking about for the past day. As quietly as I can move. Which is really amazingly quiet. I think. I’m not sure my ears work as well as they used to. They’re kind of hidden behind my head armor.
Whitman had parabolic bat-like ears. If this is Whitman’s territory, I’m going to have to assume they know I’m coming.
This is so stupid.
It’s also more of a hike down than I remember. Almost halfway back down the side of the mountain. And it is just tall enough to be registered as a mountain. Though, I think part of the onerous nature of my skulking exploration is that I’m walking on all fours and being as cautious as possible every inch of the way.
And with each step, I’m afraid I’m going to be ambushed with napalm. Or teeth the size of my own horns and jaws designed to crush small boulders. Well, maybe two watermelons at the same time.
The thing is, though, I do think that this isn’t really Whitman’s kind of terrain. I’m probably more at home here than they are. If I see them coming, I should be able to dodge around trees so much more easily than they can follow.
But that doesn’t assuage my fear at all. Because if I don’t see them coming, I’m probably dead.
But, eventually I see the big mound of dirt jutting out from the side of the mountain that marks the opening of the mine.
I stop and listen. Then I taste the air.
I taste it repeatedly and a lot, moving my head back and forth.
I could actually sort of do this before my transformation. My tongue was always way more sensitive than my nose, and plugging my nose never made it so I couldn’t taste anything. But it’s nicer and more effective to have a longer tongue that’s split and more flexible, with a sort of hole in the center of my lips for it to slip out. And it is way more sensitive than it was before.
I don’t taste anything that I’d identify as another dragon.
And, also, the mouth of that man made cave isn’t any warmer than its surroundings.
I think that means that if there’s a dragon there it’s not Whitman. But I can’t bring myself to be sure that it’s vacant.
Maybe I should make a strategic noise. A call of challenge for this one only. Quiet, but not too quiet.
I’d rather call them out, bristling and ready to fight, than to stick my head into a gout of napalm.
Or maybe I should just leave, because this was a bad idea.
Experimentally, I rumble. And I stand there and rumble for quite a while, and nothing happens.
Realizing that it’s not working, I then make a squawk about the volume I’d use to call to someone across a crowded pub.
It sounds a lot louder than I’m comfortable with.
But there’s no response.
I stay still a while longer, still tasting the air and using my ears. My hearing might not be as good as it was, but I’m not not using it! I’m also keeping an eye out for any movement.
When I’m certain that there’s no dragon here that’s going to make themself known, I approach the cave.
But at the mouth of it, I taste the air again. Or, rather, I don’t stop tasting it the whole way, but I pause there to wave my head back and forth some more.
If anything, the air tastes like forest duff and vaguely of human urine.
Gross.
There is no heat in the cave. Even an endothermic dragon would likely be warmer than their surroundings. I think that once they got as cold as their surroundings, they’d need to warm them up somehow to not go into torpor, with how cool it is in there.
I’m just guessing. But it’s what I’m telling myself to get myself to go deeper in.
I move so slowly, one footstep at a time. Nothing.
Nobody.
As my eyes adjust to the darkness, I can tell clearly that the cave is completely empty. It doesn’t even go that far back. Maybe thirty feet, just as I remember.
I also remember my parents telling me not to go all the way back, because in an abandoned mine that’s maybe a hundred years old, that’s really dangerous. Even though the walls and ceiling are solid rock. And, of course, it’s a square shaft.
Still, now I’m curious if I could even make it a comfortable home. It’s pretty small, with no room for even what I call a hoard. But I could put something in here and if I can turn around alright, maybe it’ll do while I work to assert my dominance over a larger region.
I want to know how it feels, and I just… I just…
It might be nice to sleep in here. Like, right now.
A Tumblr post I reblogged just last week comes to mind, and I’m sufficiently alarmed. No, no, no. I’ve got to get out of here quickly.
I’ll die.
I start backing up, scrunching up as I go, getting my head out of the back of this mine as fast as I can, when I hear, or rather feel, a powerful thump behind me.
In a horrific panic, without even really thinking, I scramble up the wall and across the ceiling like I’m trying to leave the bathroom in my apartment after using the toilet. And, wings held tightly against my ribs, tail scraping along the lower corner of the wall until it whips out behind me, I land facing the entrance without having advanced any further that way.
A quick breath gives me more oxygen than before, which is good.
Because there, right in front of me, are all the teeth of Whitman, coming right at me.
Two steps back, and another quick intake of air, this time not into my lungs, and I just barely avoid having my head snapped off.
We’re nose to nose, and I don’t even know if they can see me around their snout.
Their mouth opens quickly again to make another attack.
And I exhale.
The result is not good for either of us.
There is fire everywhere.
And even though my nictitating membranes have successfully protected my eyes from burning and from being hurt by the glare of heat, and my scaly hide seems to shrug off my own napalm just fine, the fire is eating up the oxygen in the mine extremely fast.
I have to get out as fast as I can. But to do that I have to go through an enormous flaming Whitman.
And they’re thrashing about in terror and pain, slamming their head against the sides, ceiling, and floor of the mine shaft, and I know better than to get any closer to that.
I can’t stop myself from taking another step back, despite that way being certain death. But I also can’t stop myself from making a noise.
At first it’s my ultra bass rumble, low enough that pebbles on the floor of the mine dance. Whitman’s got to feel it.
But they’re too distracted by napalm in their gullet to care.
I can’t even really see what’s going on. My eyes are cloudy with natural protection, and fire and chaotic movement is creating an unintelligibly blur of light and shadow. And I think I’m asphyxiating.
Needing as much oxygen and breath as I can get, I take a big breath of dangerous air, which might be a huge mistake, and start making the most humiliating sound I can think of. Humiliating for Whitman.
I fill the cave with a fire engine’s siren. No honks, no braps, just a constant, long warbling wail. And I start advancing, to make it get louder.
I want those ears to bleed.
Visually, I can’t tell if it’s working. My own snout is probably still aflame. But I do hear thumbs, scrapes, and yawps as Whitman continues to struggle and thrash.
They didn’t come very far into the cave, because I wasn’t all that far in there. They should be running out of walls to hit if they’re backing up. But I keep going, because I have no other choice. And I’ll know if I’ve misjudged when I get hit in the face with a hippo-dragon snout.
I lower my head, present my horns, and brace my neck to make a plunge, and then, convinced I’m committing suicide, I charge.
There’s a thump, a “Grawp”, and a big sliding sound as I move, but I don’t make impact.
Instead I come flying out of the mine through smoke and flames, and scrabble right over Whitman as they’re sliding down the far slope of the mine’s discarded rubble.
And I keep running. I’m not going to face that monster any longer than I have to.
I’m not on my own territory.
At some point I find a good place to take to the air, and I start heading home, out of breath and wobbling in the sky.
I notice when the fire on my snout goes out from the wind and exhaustion of fuel, because I can see again.
And I need to rest somewhere soon, but I’m headed straight for home over the territories of other dragons, and there’s nowhere safe between here and there.
—
The next morning falls with dew upon my head, and grows with a ravenous hunger in my belly. And I can hear seagulls crying out, begging me to eat them.
I’m on the roof of my building, where I collapsed after my flight home. And it seems I’ve slept unchallenged there for fifteen hours or so, if I’m reckoning time right.
Tentatively and gingerly licking my snout with my tongue, I find that I have not been burned by my own flame, but I can taste the traces of chaired fluids on my scales. My nictitating membranes flick into place as I lick my eyes, successfully cleaning them. And then I raise my head and look around.
I didn’t do any damage landing on the roof, so it seems I had a reasonable amount of control even then. Though I don’t fully remember that part.
I remember the flight as being longer than heading out to the cave, and filled with challenges from below. And I remember being quiet, because I needed my breath.
I remember gliding as much as I could to conserve energy and let oxygen build up in my blood.
And I remember deciding, no longer in lucid thought, that my building is my domain and determining to keep it, regardless of what any human says. It’s so fragile, and another dragon could knock it down or set it aflame. But it’s mine, and I’ve just got to do whatever I can to keep it safe.
And now I think about Whitman.
They’re in such a bad spot, with no shelter but a forest that doesn’t suit them, and hardly any people to call their own, unless they do have claim to the west side of the ridge.
I know it’s a bad spot, because they fell back to it after making the effort to drive into the heart of the city and try to take mine.
They must have been watching and tracking me, too. And used their infravision to pick out my apartment. Which speaks to a calculated scheme.
Do I, by chance, have a coveted spot? Or was I just the most vulnerable looking candidate in the downtown area. I am nearly in the center of it, and the nearest other dragons are in other neighborhoods. Which seems unlikely, by population densities. Statistically there should be another dragon or two nearer than that. I think.
Maybe Whitman was another downtown dragon, and that’s why they attacked so viciously and desperately.
I get up and stretch and raise my head to the sky.
After a long and loud challenging cry, I hear reports from my neighbors.
I almost feel reassured by them.
I do it again, and they repeat themselves.
Another.
It feels like they all enjoy this.
I wait.
Someone else calls out, and everyone else replies, including me.
I wonder what the rest of the city is thinking as we do this, joining the birds in the morning song.
And then when we’re done, I start looking out over my domain, looking for likely breakfasts.
I suspect that eating a seagull or two is going to be a confusing experience for me, but it’s going to happen.
10 notes
·
View notes
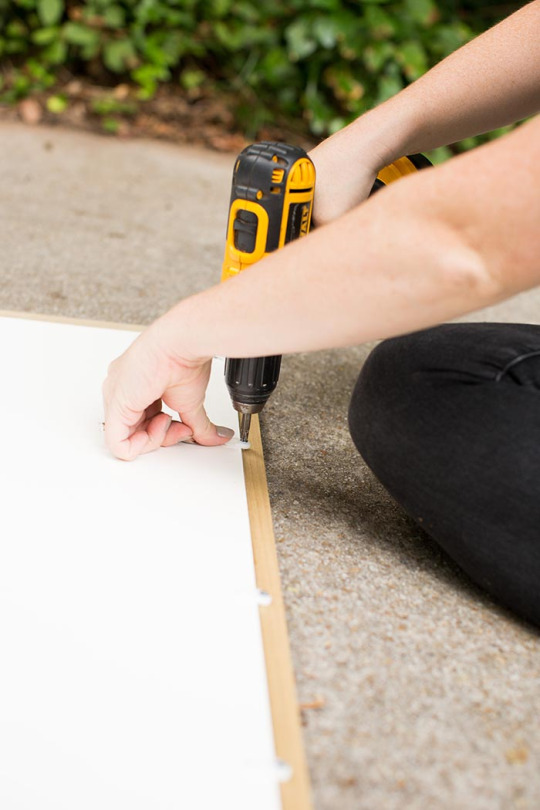
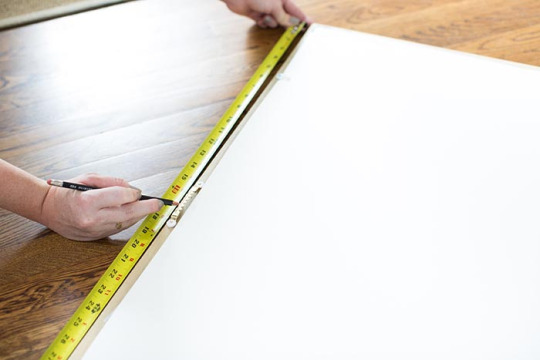
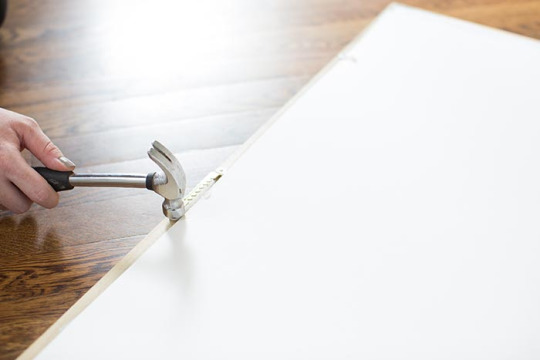
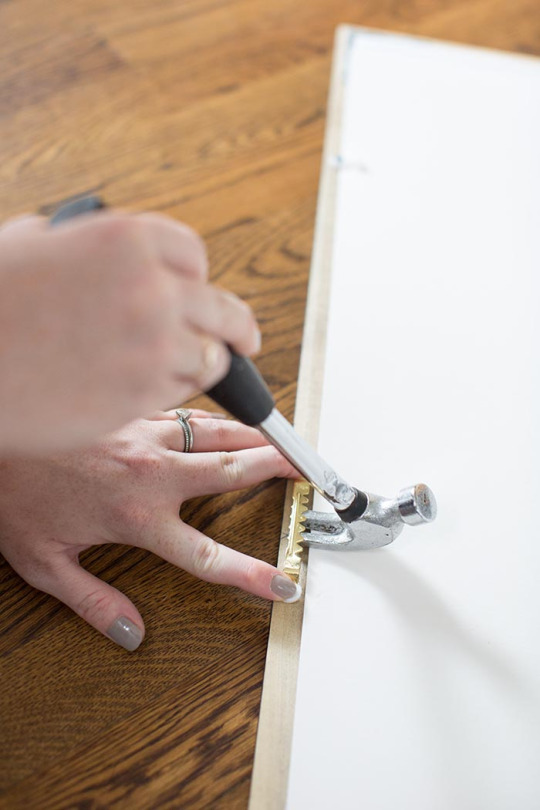
Text
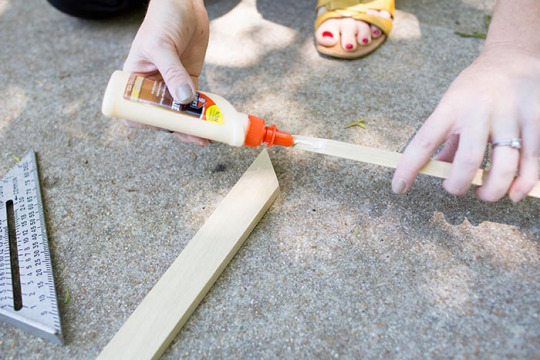
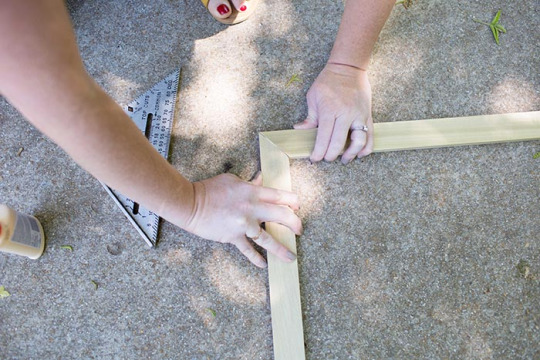
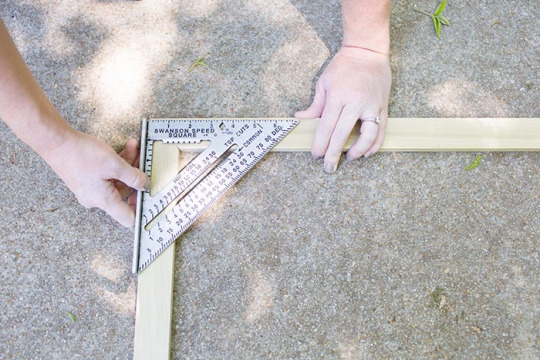
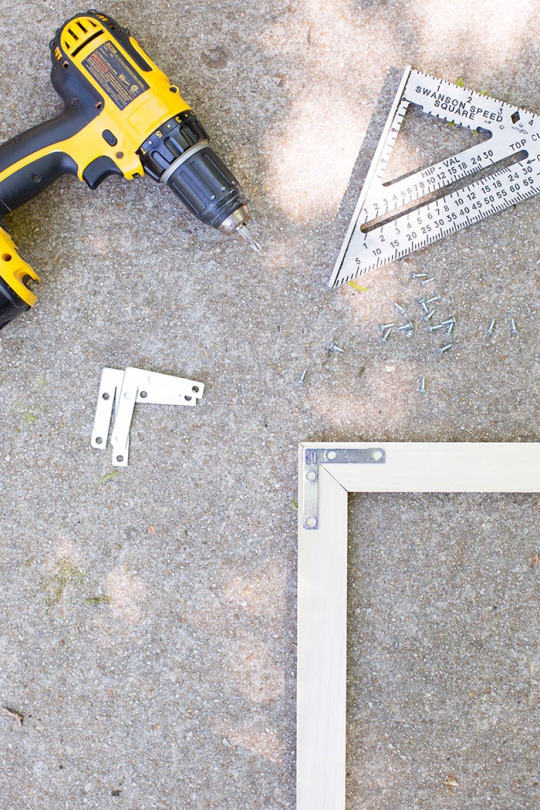
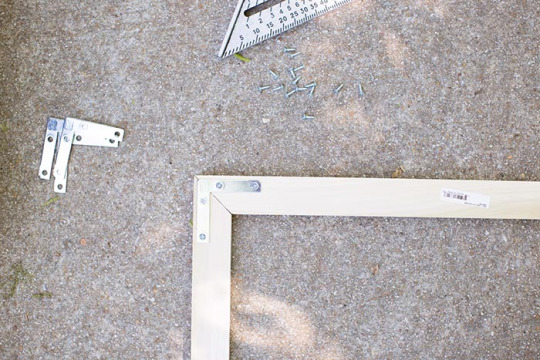
DIY Large-scale Picture Frame

Project by Erica Loesing:
Tools + Materials
-Large print/photo/something pretty to frame (see tips below!)
-White illustration board (make sure it’s thick/dense enough to stand without waving)
-Acrylic sheet (such as Plexiglass, I used a 32 x 44 inch sheet)
-Spray mount
-Straightedge + utility knife
-4 wood boards (I chose 1/2” x 2” Poplar – you won’t want much narrower than this)
-Pencil
-Tape measure
-Saw + miter box
-Fine sandpaper or sanding block
-4 corner braces (I used 1/2” x 2.5″), + tiny screws that won’t puncture the face of your wood frame
-Drill + Phillips bit (could use a manual Phillips screwdriver, too!)
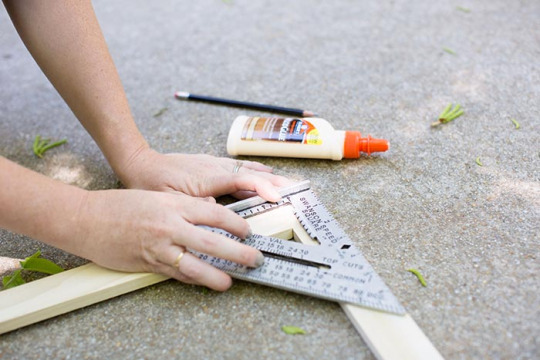
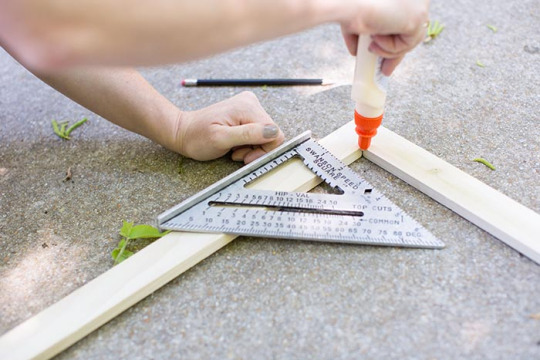
-Square tool
-Wood glue (I like Elmer’s)
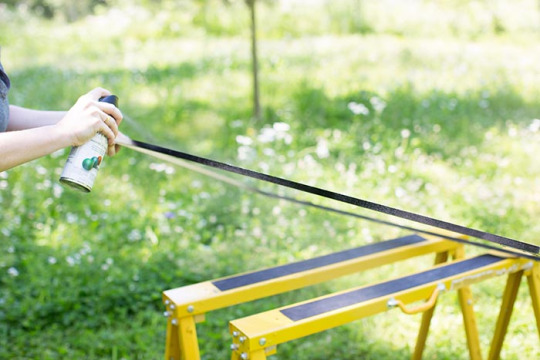
-Paint or stain (I used a black satin spray paint)
-Turn buttons (I used nylon)
-Large picture hook (you may need a hammer to attach this)
Notes
Somewhat of a secret is that most office store print shops (I used Staples) offer something called an “engineer print.” Large-scale prints for only a few dollars! So that’s what I did here. I had this super cute pear illustrated and then printed nice and big in a matter of hours for only a few dollars. (I have also seen people print photos using this process and have great results!) The paper is pretty thin and the print isn’t necessarily photo quality, but I think it works so great for this application and would totally recommend it if you’re mindful of your costs and feel it wouldn’t compete with the aesthetic of your project.
Now I want to mention a few constraints here. Of course there will be a maximum print size at your local print shop (most likely 36 x 48 inches). But the largest acrylic I could find locally was 33 x 44 inches. So I sized my print to be no larger than this, choosing 33 x 40 inches. And here are the reasons I chose acrylic over glass — while it does have more size restrictions (yet you can typically buy larger pieces of acrylic than glass at a basic hardware store), the acrylic is very lightweight (and I didn’t want to have to build a frame within my frame to support glass), you can cut it with a knife (and they’ll also cut it down for you in the store, typically for free!), and it won’t shatter. I just didn’t have the courage to handle such a large sheet of glass. The downsides are that it is, well, plastic and not glass, and I think it tends to have a bit more of a glare. I don’t love that you can tell it’s acrylic, but again, I was trying to be mindful of costs, time, and my low skill level. And honestly, I never notice it now that it’s hanging on the wall.
How-to
First, spray mount your print to a board. Since my print was on thin paper with a lot of negative space and you could sort of see through it, I used a white illustration board to back it. You want to use something that isn’t too thick (the thicker this backing is, the further from the wall your frame will rest), but also something dense enough that can stand on its own without waving or warping. This will be the backing of your frame. I first tried sandwiching everything together without mounting, but since my paper was so thin it looked terrible behind the glass (since it’s so large and gravity wants to pull it to the bottom). Also, if you are using something thin like I was, be extra careful for bubbles and other ugly errors when spray mounting. I may or may not have had to redo mine the first time around…
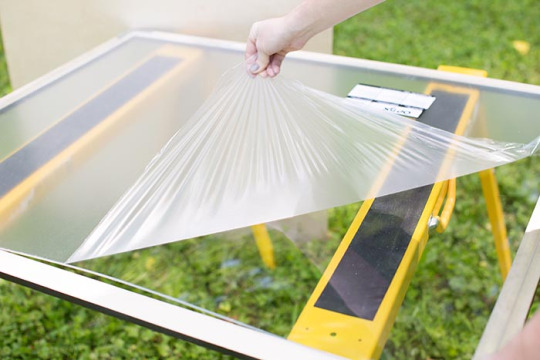
You can now trim the mounted print down to whatever size you’d like it to be, keeping in mind the size constraints of the acrylic. Measure your print. You want your acrylic to be about the same size as your mounted print. Again, you can have this cut exactly to size at your hardware store. Or, if you’re feeling up to it, acrylic sheets can be cut at home with a utility knife and a straightedge! You don’t even have to worry if your edge isn’t perfect because it will be hidden behind the frame.

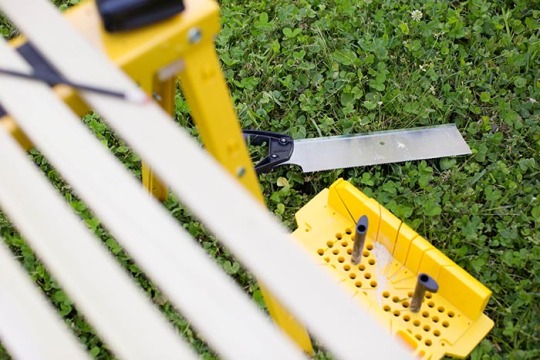
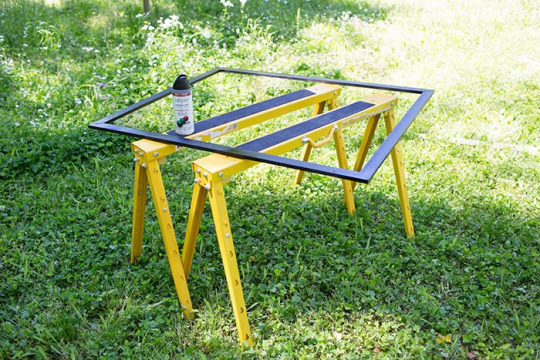
Moving onto the frame. All you need for this step is a pencil, a tape measure, a saw, and your four wood boards. (For this step I set up my wood on sawhorses in my backyard, but the sawhorses aren’t necessary. I just prefer working at table height.) I created mitered corners for my frame, which is typical for framing, so I also used a miter box for accuracy, which came with my saw. I love that I can get the exact angle I need, and everything will fit together nicely without needing any fancy tools or causing extra frustration. Of course you could opt for square corners and skip this step! Or use a power saw, or a handy friend! There are a bunch of ways to achieve the look you want.
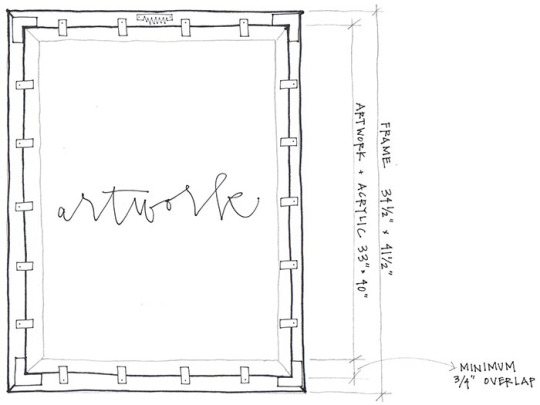
When measuring your boards, first consider the size of your mounted print + plexiglass. Then consider the size of your corner braces and how much space you’ll need to leave for them. (I would sketch this out. See below for the sketch I did for my project, based on the measurements I was using.) Obviously, you want the interior measurement of your frame to be overlapped by your plexi/print, and I recommend planning for a solid 3/4” on all sides.
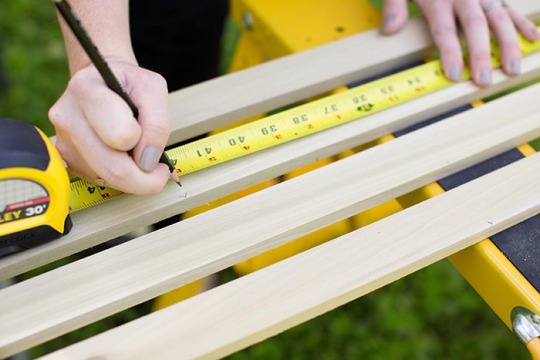
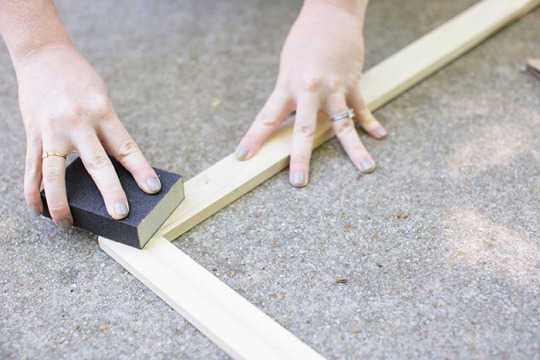
Using your saw, cut your measured boards down to size, at 45-degree angles. You want your frame to be as square as possible, which means cutting equal angles and equal lengths. I always check mine after each cut to be sure.
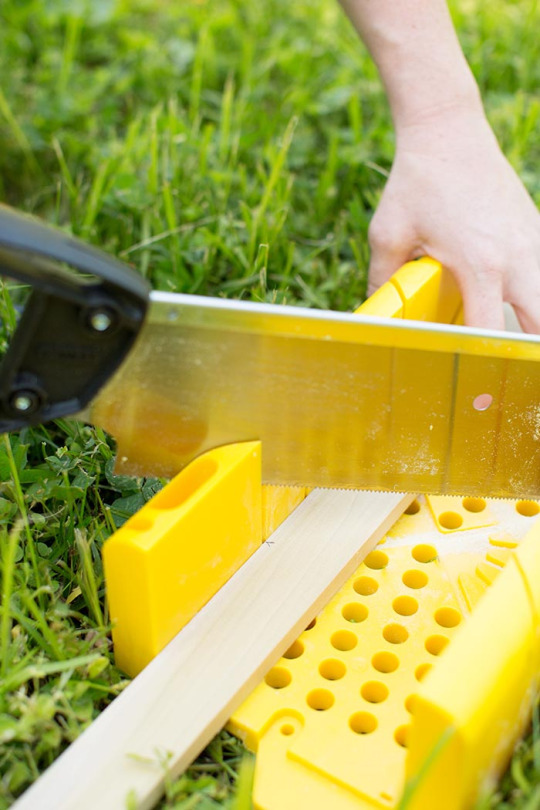
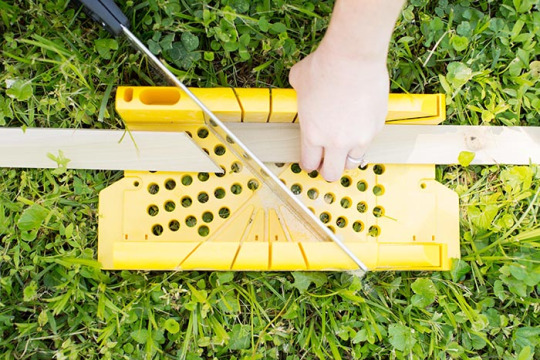
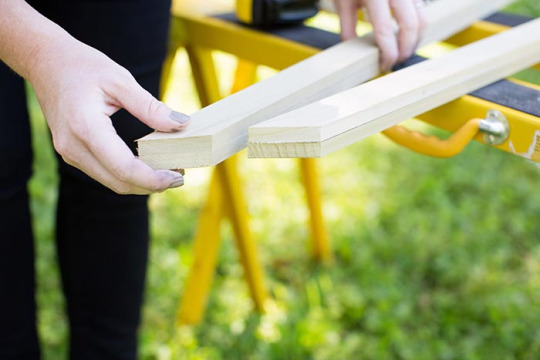
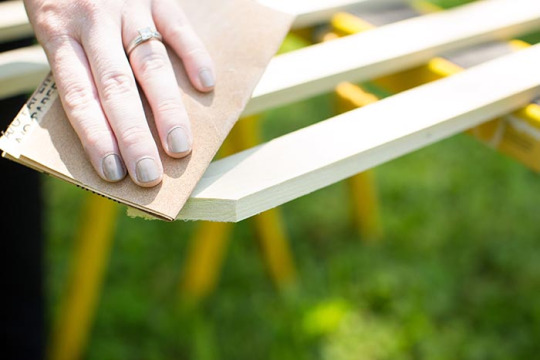
Once all four boards are cut to equal size, use a fine sandpaper or sanding block to sand the rough edges.
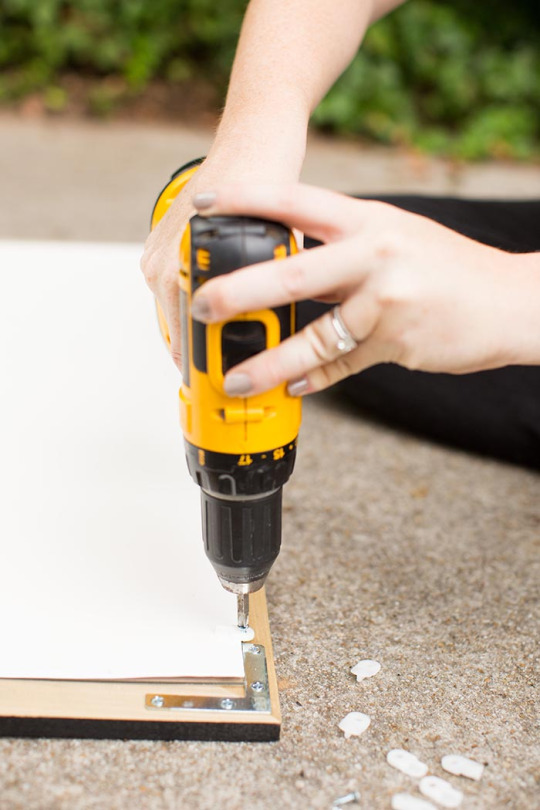
Now we are ready to assemble! For this step you need wood glue (I love Elmer’s), and I also like to use a square tool to check that the corners meet up nice and, well, square. Apply wood glue to each mitered end, and join your frame together, checking your corners with the square as you go. Give the glue a little bit of time to dry. Now, you could choose to stop here. Depending on the size of your frame and how tight your mitered edges meet, maybe you don’t need the corner braces. While the wood glue is surprisingly strong, I still chose to use the braces, just for peace of mind that my frame would stay together when it was all said and done.
The corner braces are as simple as screwing them into place, one at each corner. (Be sure to choose screws that will not poke through the front face of your frame. I had to buy smaller screws than the ones that came with the braces.) It is helpful to place your print/acrylic sheet on the glued frame at this point to use as a guide; be sure there is enough space for the braces to be screwed outside the outer edges of your acrylic. The braces make a nice little shelf on the bottom for the print to rest upon, too! (I recommend marking the location of each of your four braces with your pencil.) Once the brackets are screwed into place, flip the frame over and use your square to once again check your corners. If everything looks good, hooray! As a final detail I like to use a little bit of the wood glue to fill any open spaces where the corners meet on the front face of the frame, especially if you will be painting over it. This is the last step using the wood glue. Once this dries, use your sandpaper to lightly sand all of your faces and edges that will be visible when displaying your frame.
Time to paint! I chose to spray paint my frame in a black satin. You could choose to leave the wood bare, stain it, or paint it any color of the rainbow.
Once your paint is dry, flip the frame over and set your print + acrylic into place. During this step I finally removed the protective coating from my acrylic. I like to keep it on as long as possible to prevent any scratches. Note that the acrylic is extremely attractive to any bit of dust or dirt or whatever may be nearby. (In hindsight, I would have done this step inside on a clean surface.) Time to install your turn buttons. Just like the corner braces, these are as easy as simply screwing in place. They are the same as you’ve probably seen used on a wall mirror. Again, check the length of screw you’re using given the thickness of your wood frame. For the size of my frame I used five turn buttons up the sides, then four at the top and bottom. (Avoid placing one in the center of the top, since a picture hook will eventually go here!)
It will be so tempting to flip your frame over and call it a day, but there is one more tiny step! Measure across the top of your frame and mark the center point. Use this mark to install a picture hook if you plan on hanging your frame (probably using a hammer). I chose the largest picture hook I could find to accommodate the thickness of the backing. If you choose too small of a hook, the frame may not hang flush on the wall, but instead protrude out at the bottom. Even though I used a really large picture hook I still went back and used the back of my hammer to bend it slightly outward to accommodate the board + turn button thickness.
VOILA! My frame is hung and I am just so pleased with the result. It’s large and cool and makes such an impact for only a little bit of cost + skill. And I was glad to spend a pretty day outside working with my hands and building something I could show off on my otherwise big, blank wall. I hope you will be able to follow my instructions and learn from my many mistakes on my first go-round, but please don’t hesitate to ask if you have any questions!

7 notes
·
View notes
Text
Gutter Cleaning Near Me
Looking for a Gutter Cleaner?
We can help you find the best options available.
If it's your first time searching for a Gutter Cleaner and you're unsure where to begin, just tell us about your project. We'll provide you with a list of Gutter Cleaners to review, allowing you to compare profiles, read past reviews, and request more information before making a decision. Share your specific needs—whether you require an urgent gutter cleaning or a routine maintenance service to prevent blockages.
Based on your requirements, our expert gutter and roofing contractors will provide you with free quotes from local professionals. Choose the ideal gutter cleaning service
Each professional has a unique profile with reviews, ratings, and contact details, allowing you to ask questions and choose the best fit for your needs.
Find the right gutter cleaning service for you
To prevent water damage
The main role of guttering is to channel water away from your building. Blockages can cause water to overflow, potentially damaging your roof or foundation. If you notice water damage in your home, one of the first things to check is your gutters.In case of water damage, a professional can quickly repair your gutters. Routine professional gutter cleaning can also serve as preventative maintenance, which is simpler and more cost-effective than repairing water damage.
Professional roof and gutter cleaning services can also help deter pests. If you're worried about pests like mosquitoes, cockroaches, or flies, having your gutters cleaned professionally can help prevent these potential health hazards.
Preventing future issues
A professional gutter cleaner can identify potential problems early. For example, they might suggest new tiles for your roof. To prevent future issues, consider asking about gutter guard installation, which can stop large debris and organic materials from building up.
Many professionals offer gutter cleaning as part of a broader range of services. Ask about other work they can perform on your property, such as window and fascia cleaning, tiling, and roofing.
Getting it right the first time
A professional gutter cleaner will conduct a survey to determine what needs to be done. If a blockage is found and cleared, they may also discover damage to the gutters. If any parts need replacing, inquire about the warranty on materials to ensure long-term value.

How to Install Gutters in 8 Steps
1. Mark Layout Lines
Begin by marking the highest point on the fascia board where the gutter will be attached, about 1 ¼ inches below the metal drip-edge flashing. If the fascia is extra-wide, position the gutter lower. Next, identify the lowest point of the gutter run at the opposite end of the fascia or at the downspout location if it's in the middle. The gutter should slope downward at a rate of approximately ½ inch for every 10 feet. Snap a chalk line between these two points. Before proceeding, inspect the fascia for any rot and make necessary repairs.
2. Install Fascia Brackets
Identify the rafter tails behind the fascia, typically spaced 16 inches apart. Mark every other rafter tail along the chalk line. Drill ⅛-inch pilot holes through the fascia into the rafter tails at these marks. Secure the fascia brackets using ¼-inch stainless steel lag screws, ensuring the screws penetrate the rafters by at least 2 inches. To make the screws easier to drive, apply soap to them.
3. Cut the Gutter to Length
Cut the gutter sections to the required length using a hacksaw and aviation snips or a power miter saw with a carbide-tipped blade. If the gutter runs around a corner, cut a 45-degree angle at the end. For longer runs requiring two sections of gutter, overlap the sections by 8 inches and secure them with self-tapping stainless steel screws or pop rivets, arranged in two rows of four, on the sides of the gutter.
4. Attach End Caps
Attach a spherical end cap to the square-cut end of the gutter using aluminum pop rivets. If the gutter does not turn a corner, secure an end cap to both ends. Hold the end cap in place temporarily with a sheet-metal screw, drill a 1/8-inch hole, and install a pop rivet. Remove the temporary screw and replace it with another rivet. Seal the rivets and the seam with a high-quality siliconized caulk for a watertight finish.
5. Create Downspout Holes
Mark the location for the downspout hole at the low end of the gutter using a downspout outlet. Turn the gutter upside down, place the outlet on top, and trace around it to mark the hole location. Drill a ¼-inch hole at the center of this outline. Then, using a 4-inch hole saw, cut out the downspout hole, or alternatively, use a hammer and chisel.
6. Mount the Gutter
Position the gutter into the previously installed brackets on the fascia. Rotate the gutter upward so that its back edge hooks into the top of the brackets. Drill a 3/16-inch hole through the screw-mounting hole in each bracket into the gutter's front edge, then secure with a 1-inch #8-32 stainless steel machine screw and flanged nut. The gutters and brackets can be spray-painted to match or contrast with the house trim.
7. Form Strip-Miter Joint at Corner
For gutter corners, cover the joint with a 3-inch-wide strip of aluminum, known as a strip miter. Wrap the strip tightly around the gutter's underside and secure it with eight pop rivets or sheet-metal screws. Cut a triangular piece from the top of the strip miter, then fold down the resulting flaps over the gutter's top edge. Seal the joint with high-quality siliconized caulk for added waterproofing.
8. Attach Downspout to Gutter
Secure the downspout outlet to the gutter with four pop rivets or screws. Attach a downspout elbow to the outlet tube extending from the gutter. Measure and cut a piece of downspout to fit between the outlet elbow and another elbow positioned against the house. Slightly crimp the elbow with needle-nose pliers to fit the downspout, then secure the parts with pop rivets or screws.
Cost of Rain Gutters
A company known for its unique half-round reproduction gutters has provided materials for several This Old House TV projects. The aluminum gutters featured, painted dark green, cost $2.75 per linear foot for the materials alone. They are mounted to the fascia using cast-aluminum, closed-curl brackets priced at $8 each, which the homeowners spray-painted antique gold. The gutters are paired with 4-inch diameter corrugated aluminum downspouts, available in white to match the house trim, costing $1.75 per linear foot.
To ensure proper drainage, gutters should slope approximately ½ inch for every 10 feet toward a downspout. For runs exceeding 40 feet, it's advisable to pitch the gutters downwards from the center towards a downspout at each end, or from both ends towards a single downspout positioned in the middle. It's important to determine the best configuration for your home before purchasing gutters and related accessories.
Conclusion
Need a trustworthy gutter and roofing contractor? Our skilled team focuses on giving great services to shield and boost your home. We install strong gutters that move water away from your foundation and put in roofs that can take on the worst weather. We do it all. We use good materials and give you plenty of styles and colors to match your home's outside. Do you want a whole new roof regular upkeep, or gutter cleaning and fixes? We bring quality work and care about making customers happy. Count on us to protect your home with expert roofing and gutter work.
#roof installation#roofing company#roofers#gutter installation#gutter cleaning#srs roofing#home design
0 notes
Text
How To Install Prefinished RetroFit Stair Treads from Stair-Treads
Looking to Change out your old carpeted staircase to a new natural wood staircase? Our prefinished RetroFit stair treads are the perfect solution to giving a facelift to your home. We've compiled this short instructional video to learn how to install stair treads using our professional pre-finished options. To begin watching, click the above video link.
Reminder: Check out and follow any applicable local building codes when performing a remodeling project and installing stair treads.
Recommended Adhesives
Only use 100% urethane-based adhesives when installing stair treads made of solid wood! Water-based adhesives will cause the wood to warp if too much is used. We strongly advise you to read the recommended adhesives followed by nailing to ensure thorough grip and durability. An adhesive with a high moisture content will ruin a set of RetroFit stair treads and is not covered by our warranty!
Stair Installation Q & A
What are ALL the different tools and saws and nails I will need to complete this project?
Most tools needed for installing stair treads securely as as follows:
Sliding miter saw
Table Saw
Circular saw
16-gauge finish nail gun with 2" nails (for the retro treads)
18-gauge finish nail gun with 1" nails (for the cove moulding & risers)
Tape measure
Step-Dr measuring jig (strongly recommended)
Rubber mallet
Hammer
Chisels
Adhesive & Caulk gun
Pencil & straight edge
How do I remove the carpet and what do I use?
If you are wondering how to install stair treads, the first step would be removing old carpet is by cutting it into strips and pulling it. It is typically stapled in, so a good tug is all needed to remove it. Check for any staples or nails that are poking out and rip them off as well before preparing the stairs for installing the treads
After removing the nose of the sub-tread and “cleaning it up”, does the cleaned-up nose need to be perfectly smooth?
No. Any part of the old sub-tread that overhangs the risers below should be chiselled back square so that it's flush, but doesn’t have to be perfectly smooth. The new retro riser will cover any imperfections left from cutting. It's preferable to over-cut the sub-tread so it's slightly recessed from the riser to prevent "smiles" or gaps between the underside of the new tread and the new retro riser.
How to install stair treads over existing stairs- should each step be measured individually, even on a standard staircase?
Measuring each step is absolutely imperative. Even the best prefab (shop-built or drop-in) staircases are out or square to some degree, and each tread must be cut to fit its particular opening. Some staircases can even have as much as a 1-2" variance from the first tread to the last!
How do you stop the surface from being scratched while cutting it to fit?
Our finish is one of the toughest on the market today,, but taking some preventative steps is a great idea. The first step to how to install retrofit stair treads is making sure your saw blades are sharp, and you have the appropriate blade (see this article for blade selection). Be sure to cut slowly, and don't force the saws. When rip-cutting the width of treads (if needed), lay a piece of cardboard under the face of the new retro tread and cut through it to prevent the face of the tread from being scratched when sliding it over the table.
Will the treads always need to be rip-cut on a table saw?
How to install the treads and risers over existing stairs? Do you have to rip cut always first? The answer is No. Depending on how wide your stairs are, you may be able to use the new retro tread as-is. Many older staircases have narrower steps that require the retro treads to be ripped. Still, newer staircases typically have 11-1/2" wide carpeted treads. The body of the latest retro tread is 10-1/4" wide, so an 11-1/2" comprehensive existing step with a 1-1/4" overhang will need the full-sized retro tread without any rip cutting required.
Should the width of the new Retro tread be measured so that the ENTIRE depth from front to back matches the sub-tread or from the inside of the nose on the bottom?
It's easiest to measure just the existing tread after any overhang has been removed and then cut the body of the retro tread to this measurement. The bullnose (overhanging part of the retro tread) is always 1-1/4" and should be left as-is.
How to, install prefinished stair treads- how much glue to use and is it the same for wider treads?
About one tube of glue is used for every two treads and risers on a 36" staircase. Longer treads will require more. Do ensure gluing is not compromised while installing stair treads as it is the foundation of the process and ensures the treads are secured in place before you nail them for added durability.
How do you remove the excess putty from the putty stick used on the treads so that it doesn’t look waxy without removing it from where it is needed?
Press hard when filling nail holes to push wax into the hole.Tap and press with a rubber mallet to squeeze out maximum putty when its excess. Then, wipe it hard with a rag so the wax is removed from the surface and left in the hole.
Source: https://www.stair-treads.com/instructions-how-to/installation-video.html
Website: https://www.stair-treads.com/
0 notes
Text
Dura Craft Farm House 500 project mania!
We are back on our bullshit. A surprising swath of time got wiped out by Dad's wanting to do a booth at a swap meet geared specifically for his skilled trade... in Las Vegas. Mentioning Vegas always gets "you partied too hardy" sniggers, but we did not party at all. We drove 10 hours across the desert (EV, significant charging stops), spent 8 am to noon the next day laboring in the 95-degree sun (the sponsors provided free shaved ice desserts, and I love them for it), sold very little (neither did anyone else), did a quick tour of quaint Boulder City, then drove back across the desert, with a stop for the downtown Bakersfield antique stores because if I had to spend another minute in the car, bickering about the range of a heavily loaded EV, I was going to scream.
This was, in aggregate, exhausting. So it's later, and we have pieces of dollhouse on every flat surface in the dining room and kitchen.


To the left, the window frames that I'm repainting after Dad glued them together with beautiful mitered corners. He sanded off glue specks, and a good bit of the earlier paint. There are a bajillion of them because the way he's doing windows, there are identical frames, with interior edges (so the frame is kind of L-shaped) on interior and exterior. I don't feel good about this holding in "leaded glass" printed on transparencies, but that's a problem for later.
To the right, Dad's been reinstalling the bars of wood that support the second floor and attic floor. The original builder had hot-glued them in place, so of source they came off while we were regluing the walls. These have to be painted in the trim color -- semi-gloss Pearl Essence -- because they will function as ceiling trim.
Meanwhile, we have started the base!

This is where we question our life decisions, as 40" is HUGE. I'd swear that when I had this house in 2008, it was about 2/3 this size. That would strongly suggest it was a different house, but I can't find any photos, so we'll never know.
With glue and paint drying, I pulled out the staircase parts to decide if I wanted to paint or stain the steps before glue was involved. I clearly stated this to Dad and got acknowledgement. I then went upstairs to dig in the guest room closet to see if we had a Houseworks staircase for comparison. When I came downstairs, Dad was happily gluing treads to their base.

The short answer on the Houseworks staircase is that it addresses the problem of stairs taking so much volume by being off-scale in width (only 1.5", or an 18" stair in real life) and steepness. The original Dura Craft stair, at 3" wide, is more accurate.
Now, there was a kerfluffle on r/Dollhouses the other day because someone said "dollhouses don't need stairs" and got brutally attacked by people yelling REALISM. I took the anti-stair side, as I view my dollhouse projects as somewhere between art installations and stage sets. I don't electrify; I omit stairs where possible; I don't worry unduly about closet space or doors.
Me to Dad: "I'm only doing the staircase because I know you'll insist on having a staircase."
Dad: "I'm about at the point of wanting to leave out stairs. They take up so much space."
Me: "It's really easy, You just cut scrap wood to fit the hole, glue on the sides, tape it up level to dry, then do a fancy scrapbook paper ceiling to cover the lines. I never build stairs."
Dad: "Oops, I guess a key part of the stairs was missing from the kit. Oh well. We'll have to just skip them."
Triumph! The living room will be a decent size due to omitting the stairs!
1 note
·
View note
Text
Which Are the Types of Components to Buy from Gutter Accessories Suppliers?
Roof gutters and downspouts are not only functional necessities; they protect our homes' foundations and exteriors and can be decorated with various accessories. These elements can add beauty, enhance effectiveness, and improve your building's curb appeal and resale value.
Various parts of the gutter system work together smoothly to efficiently lead rainwater away from your property. A single malfunctioning piece can only disrupt this harmony and render the complete system ineffective, so let's dive into the details surrounding rain gutter components so you can better understand how they work together and what happens when they break. Always source them from reliable gutter accessories suppliers.

Types of gutter accessories:
A functional gutter system consists of multiple parts and accessories, each of which plays a unique role in diverting rainfall away straight from your home. Let's examine this anatomy more closely.
Gutters channels
Gutter channels are the central part of the gutter system that you see. They typically appear as half-pipe or box-like structures affixed along the edge of your roof. They primarily catch falling precipitation from the ceiling, protecting your walls and roof from the destruction by directing it towards a specific drainage area through other gutter accessories.
End caps
End caps function like the sealed ends for gutters, preventing water spillage from the non-drainage-designed points. Usually created from aluminum or vinyl, they fit securely at the other end of the gutter line.
Miters
You can visualize miters as the corner pieces on the gutter system that connect two linear segments at the various angles (typically 90°). Many homes incorporate roofs with sharp angles, so having custom-angled miter joints to permit the uninterrupted movement of water around corners is crucial.
Elbows
Elbows act as connectors between various sections within your overall gutter set-up. Primarily arching simply at right angles, they help when you need to change direction abruptly within your gutter system, such as channeling accumulated rainfall through downspouts.
Gutter Spikes and Ferrules
Gutter spikes are extra-long nails driven through the entire gutter system, holding everything right in place and securely attaching it to the walls. The included ferrules also prevent the gutters from deforming under heavy rainfall or even surviving damage from a ladder's weight. However, this is an old method of hanging in gutters, and some homes may lack these components.
Gutter Hangers
This is a modern way of attaching a gutter system to your home. They fasten to the eaves while being relatively concealed from sight, offering a seamless appearance. If necessary, they can work alongside spikes and ferrules to deliver additional structural integrity.
Downspouts
Downspouts serve one primary purpose: They channel the rainwater collected by the gutters to the ground in a much controlled manner. Without them, rainwater would spill over the edge of your gutters, causing potential damage like soil erosion and basement flooding. Additionally, these gutter parts prevent unorganized spillover that can lead to stains on the siding around your property.
Downspouts are typically tube-shaped and very vertically oriented. They attach to the end portion of gutters through an accessory called an elbow – another critical component of your gutter accessories.
Pipe Cleats
Paired with downspout brackets, these simple metal strips secure downspouts onto walls. With pipe cleats, the stability and functionality of your gutter system will be protected, and your home will not be able to manage rainwater effectively.
0 notes
Text
How to Cut Miter Joints: Master the Perfect Angles Effortlessly
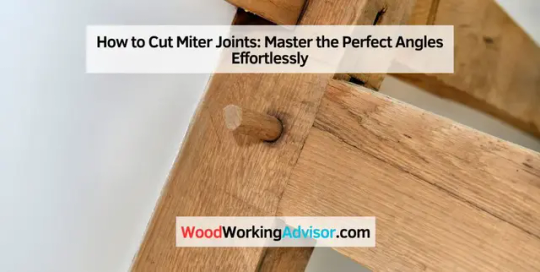
To cut miter joints, measure and mark the desired angle on the workpiece, then use a miter saw or a miter box and handsaw to make the cuts. When it comes to cutting miter joints, having accurate and precise cuts is essential for a professional finish.
Miter joints are commonly used in woodworking for creating clean and seamless corners, such as in picture frames, molding, or furniture. By following a few simple steps, you can easily achieve perfect miter joints. Start by measuring and marking the desired angle on the workpiece.
Then, using a miter saw or a miter box and handsaw, carefully make the cuts. Taking your time and ensuring accuracy will result in tight-fitting joints that are both visually appealing and structurally sound. Mastering the art of cutting miter joints will open up endless possibilities for your woodworking projects.
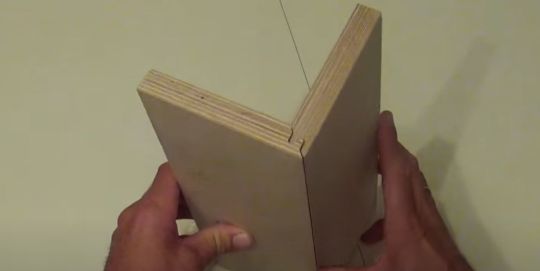
Basics Of Miter Joints
Miter joints are created by cutting two pieces of material at an angle to form a corner. To cut miter joints, use a miter saw or a miter box with a handsaw. Always measure accurately and set the cutting angle correctly for a precise fit.
What Are Miter Joints?
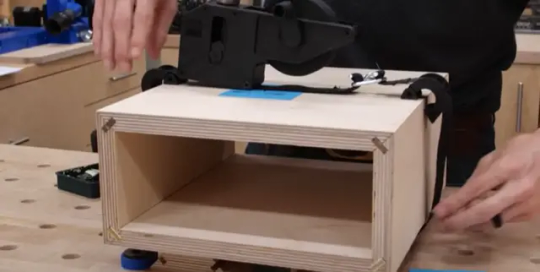
A miter joint is a type of joint where two pieces of material are cut at an angle and joined together to form a seamless 90-degree corner. This joint is commonly used in woodworking, especially for projects that require precise angles and clean finishes. Miter joints are often used in the construction of frames, molding, and furniture.
Common Uses
Miter joints are widely used in various woodworking projects due to their versatility and aesthetic appeal. Some common uses of miter joints include:
- Picture frames: Miter joints are commonly used to create clean and seamless corners in picture frames. This adds a professional touch to the finished piece.
- Trim and molding: Miter joints are essential in achieving seamless corners and tight joints in trim work and molding installation.
- Furniture making: Miter joints are often used in furniture making, particularly for constructing corners in cabinets, tables, and other pieces of furniture with angled edges.
- Decorative accents: Miter joints are also employed in creating decorative accents such as cornices, crown moldings, and baseboards, where clean and precise angles are desired.
By understanding the basics of miter joints and their common uses, you can confidently incorporate this technique into your woodworking projects. Whether you're building your own picture frames, adding elegant trim to your home, or constructing custom furniture, miter joints offer a versatile and visually appealing solution.
Tools And Materials
Cutting miter joints requires the use of specialized tools and materials like a miter saw, measuring tape, and clamps. Proper techniques and careful measurements are essential for achieving precise and seamless joints in woodworking projects.
Cutting miter joints with precision requires the right tools and materials. Whether you're a beginner or a seasoned woodworker, having the essential tools for the job is crucial. Additionally, using quality materials will ensure a strong and durable joint that stands the test of time.
Essential Tools
To achieve accurate miter joints, you'll need the following essential tools:
- A miter saw: This power tool is the cornerstone of any miter joint cutting project. It allows you to make precise angled cuts effortlessly.
- A miter box and backsaw: If you don't have access to a miter saw, a miter box and backsaw combination can do the job. The miter box guides the saw to ensure accurate cuts.
- A measuring tape: Accurate measurements are crucial when cutting miter joints. Using a measuring tape enables you to mark the correct angles and lengths for a seamless fit.
- A drafting square: This tool helps ensure your miter cuts are perfectly square, resulting in tight and seamless joints.
- A pencil or marking knife: Marking the angles and lengths on your workpieces is essential for precise miter cuts.
- A clamp: A clamp is useful to hold your workpieces securely in place while cutting the miter joints.
- Safety equipment: Always prioritize safety when working with power tools. Wear safety goggles, ear protection, and a dust mask to protect yourself from any possible harm.
Recommended Materials
Choosing the right materials for your miter joints can significantly impact the overall quality and longevity of your project. Here are some recommended materials to consider:
- Wood: Selecting high-quality wood is paramount for achieving strong and durable miter joints. Hardwoods like oak, maple, and walnut are often preferred for their stability and strength.
- Wood glue: Using wood glue in combination with your miter joints provides additional strength and stability to the joint. Look for a reliable wood glue that is designed for furniture and woodworking projects.
- Screws or nails: Depending on the project, you may choose to reinforce your miter joints with screws or nails. Ensure they are the appropriate size and type for the wood you're working with.
- Sanding materials: After cutting your miter joints, sanding the edges and surfaces will give your project a smooth and professional finish. Use sandpaper or a sanding block to achieve the desired result.
- Finish: Applying a finish to your miter joint project not only enhances its appearance but also adds another layer of protection. Consider using varnish, stain, or paint to suit your desired aesthetic.
With the right tools and materials on hand, you're well-equipped to embark on your miter joint cutting journey. Remember to prioritize accuracy, take your time, and enjoy the process of creating beautiful and structurally sound miter joints.
Understanding Angles
Understanding angles is crucial when it comes to cutting miter joints. To achieve a precise fit, it's essential to grasp the concept of angles and how it applies to this woodworking technique. Let's explore the importance of accuracy and how to calculate angles for immaculate miter joints.
Importance Of Accuracy
In woodworking, precision is paramount. Miter joints demand exactness to ensure a seamless connection. Even the slightest inaccuracy can lead to gaps or misalignments, compromising the joint's strength and aesthetic appeal.
Calculating Angles
When cutting miter joints, understanding how to calculate angles is pivotal. It's crucial to measure and cut the angles accurately to achieve a perfect fit. Here's a simplified process to calculate miter angles:
- Measure the angle for the joint.
- Divide the angle by 2 to determine the miter angle for each piece.
- Set your miter saw to the calculated angle and make your cuts.
Cutting Techniques
When it comes to cutting miter joints, there are a few different techniques you can use. The method you choose will depend on your tools and personal preference. In this section, we will explore two popular techniques: using a miter saw and hand-cutting methods.
Using A Miter Saw
If you have access to a miter saw, it can be a quick and efficient way to cut miter joints. Here's how to do it:
- Measure and mark: First, measure and mark the angles of your miter joint using a protractor or a miter gauge. Make sure to mark the correct angles on both pieces of wood.
- Set up the saw: Set the miter saw to the desired angle. Most miter saws have pre-set stops for common angles like 45 degrees.
- Position the wood: Place the first piece of wood flat on the saw's base against the fence, making sure the marked angle aligns with the blade.
- Make the cut: Lower the saw's blade and make a smooth, steady cut through the wood. Repeat this step for the second piece of wood, making sure the angles align correctly.
- Check the fit: Once you have made the cuts, test the fit of the two pieces together. They should create a tight, seamless joint.
Hand-cutting Methods
If you don't have a miter saw or prefer a more traditional approach, there are hand-cutting methods you can use to achieve miter joints. Here are a couple of techniques:
- Backsaw and miter box: A backsaw and miter box is a simple and precise way to cut miter joints by hand. The miter box holds the wood securely while the backsaw cuts at the desired angle.
- Hand plane and shooting board: If you are skilled with a hand plane, you can use a shooting board to achieve perfectly square and accurate miter cuts. This method requires patience and practice.
These hand-cutting methods may take more time and practice to perfect, but they can yield excellent results. Whichever technique you choose, remember to measure carefully, use sharp tools, and practice on scrap wood before cutting your final pieces.
Troubleshooting And Tips
While cutting miter joints may seem challenging at first, with practice and the right techniques, you can achieve excellent results. However, it's not uncommon to encounter some issues along the way. In this section, we will address common mistakes and provide pro tips for achieving perfection in your miter joints.
Common Mistakes
Creating flawless miter joints requires precision and attention to detail. Here are some common mistakes beginners may encounter and ways to avoid them:
- Not properly measuring the angles: Ensure that you accurately measure the angles for the miter joint. A slight deviation can lead to misaligned joints.
- Incorrect blade tilt: Make sure to set your saw blade at the correct angle before making any cuts. A misplaced tilt can result in uneven joints.
- Poor-quality blades: Investing in high-quality, sharp blades is essential for achieving clean, precise cuts. Dull blades can cause tear-out or uneven edges in your miter joints.
- Inadequate clamping: Failing to secure the pieces tightly together during cutting can result in distorted joints. Use clamps to hold the material firmly in place.
- Not checking for squareness: Before making your cuts, verify that your saw and workbench are properly squared. Ignoring squareness can lead to inaccurate angles and ill-fitting joints.
Pro Tips For Perfection
To ensure impeccable miter joints, consider the following expert tips:
- Double-check your measurements: Take the time to measure twice and cut once. Double-checking your angles and dimensions will save you from costly mistakes.
- Use a miter sled: A miter sled is a valuable tool that helps stabilize your workpiece and provides additional support during cutting. This reduces the chance of errors and produces better results.
- Use a zero-clearance insert: When cutting delicate materials, incorporating a zero-clearance insert on your saw table can minimize tear-out, resulting in neater miter joints.
- Practice on scrap pieces: Before tackling your actual project, practice cutting miter joints on scraps of the same material. This allows you to perfect your technique and make any necessary adjustments before moving to the final work.
- Perform test cuts: When adjusting your saw's settings or trying out a new blade, always perform test cuts on sacrificial pieces. This ensures that you have the right setup and prevents mistakes on your final work.
By avoiding common mistakes and following these pro tips, you'll be well on your way to creating impeccable miter joints. Remember to always prioritize accuracy and practice regularly to refine your skills.
Frequently Asked Questions For How To Cut Miter Joints
How Do You Cut A Mitre Joint?
To cut a mitre joint, follow these steps:
1. Measure and mark the angle you want on the workpiece.
2. Set your miter saw or table saw to the corresponding angle.
3. Position the workpiece against the saw fence and hold it securely.
4. Make the cut, ensuring a straight and clean edge.
5. Repeat the process for the second piece, ensuring a precise fit when joining the two together.
How Do You Cut A Perfect 45 Degree Angle?
To cut a perfect 45-degree angle, use a miter saw and adjust the angle to 45 degrees. Secure the board, make the cut, and double-check the angle for precision.
How Do You Find The Angle Of A Miter Cut?
To find the angle of a miter cut, measure the length of the piece you're cutting and the width of the surface you're joining it to. Use a miter saw or protractor to determine the angle that will create a tight joint between the two pieces.
How Do You Cut A Perfect Miter Joint On A Table Saw?
To cut a perfect miter joint on a table saw, follow these steps:
1. Set the miter gauge to the desired angle.
2. Position the workpiece securely against the fence.
3. Make sure the blade is aligned with the desired angle.
4. Slowly push the workpiece through the blade, keeping a steady hand.
5. Double-check for accuracy before removing the cut piece.
Conclusion
Mastering the art of cutting miter joints requires practice and patience. By following the proper steps and using the right tools, you can achieve seamless and precise miter joints for your woodworking projects. Incorporating these techniques will elevate the quality of your craftsmanship and bring your projects to the next level.
Practice, dedication, and attention to detail are key in perfecting this essential woodworking skill.
Read the full article
0 notes
Text
Essential Woodworking Tools for Beginners
Embarking on a woodworking journey is an exciting endeavor, but having the right tools is crucial for success. As a beginner, building up your toolkit doesn't have to be overwhelming. Here are some essential woodworking tools to get you started:
Circular Saw: Perfect for straight cuts, a circular saw is versatile and user-friendly. It's an excellent choice for breaking down large sheets of plywood.
Chisels: Chisels are indispensable for carving and shaping wood. Invest in a good set of varying sizes to cover different woodworking tasks.
Miter Saw: Ideal for making accurate crosscuts, a miter saw is a must-have for any woodworking shop. It's efficient for tasks like framing and molding.
Router: Routers are fantastic for adding decorative edges to your projects and hollowing out areas of wood. They come in both hand-held and table-mounted varieties.
Drill and Bits: A power drill is a woodworking essential. It's used for making holes and driving screws. Make sure to have a selection of drill bits suitable for wood.
Random Orbital Sander: Achieving a smooth finish is crucial in woodworking, and a random orbital sander helps you do just that. It's versatile and can handle various grits for different stages of sanding.
Wood Glue: Quality wood glue is the unsung hero of woodworking. It's essential for joining pieces securely and creating sturdy projects.
Clamps: You can never have too many clamps. They hold your pieces together while the glue dries, ensuring a tight bond.
Tape Measure: Accurate measurements are vital in woodworking. Invest in a quality tape measure for precision in your projects.
Safety Gear: Last but certainly not least, prioritize safety. Safety glasses, ear protection, and a dust mask are essential when working with wood.
Remember, quality over quantity is key when building your tool collection. Start with these essentials, and as your skills grow, you can expand your toolkit accordingly.
1 note
·
View note
Text
Essential Woodworking Tools for Beginners
Embarking on a woodworking journey is an exciting endeavor, but having the right tools is crucial for success. As a beginner, building up your toolkit doesn't have to be overwhelming. Here are some essential woodworking tools to get you started:
Circular Saw: Perfect for straight cuts, a circular saw is versatile and user-friendly. It's an excellent choice for breaking down large sheets of plywood.
Chisels: Chisels are indispensable for carving and shaping wood. Invest in a good set of varying sizes to cover different woodworking tasks.
Miter Saw: Ideal for making accurate crosscuts, a miter saw is a must-have for any woodworking shop. It's efficient for tasks like framing and molding.
Router: Routers are fantastic for adding decorative edges to your projects and hollowing out areas of wood. They come in both hand-held and table-mounted varieties.
Drill and Bits: A power drill is a woodworking essential. It's used for making holes and driving screws. Make sure to have a selection of drill bits suitable for wood.
Random Orbital Sander: Achieving a smooth finish is crucial in woodworking, and a random orbital sander helps you do just that. It's versatile and can handle various grits for different stages of sanding.
Wood Glue: Quality wood glue is the unsung hero of woodworking. It's essential for joining pieces securely and creating sturdy projects.
Clamps: You can never have too many clamps. They hold your pieces together while the glue dries, ensuring a tight bond.
Tape Measure: Accurate measurements are vital in woodworking. Invest in a quality tape measure for precision in your projects.
Safety Gear: Last but certainly not least, prioritize safety. Safety glasses, ear protection, and a dust mask are essential when working with wood.
Remember, quality over quantity is key when building your tool collection. Start with these essentials, and as your skills grow, you can expand your toolkit accordingly.
1 note
·
View note
Last Seen Blogs

gaycutieee
🏳️🌈DoomsdayGay🏳️🌈

bostondentalwellness
Boston Dental Wellness

importantkidbearcookie
Untitled

wills132442
Whatever floats your boat...

descriptivistlinguist-blog
Untitled