#mod_php
Explore tagged Tumblr posts
Visit Tumblr Blog
Explore Tumblr blogs with no restrictions, modern design and the best experience.
Last Seen Tumblr Blogs


Fun Fact
The total number of visits Tumblr.com received during January 2021 is 327 million.
Text
What is an Apache server?
what is apache server and how it works you ask? Well, let's delve. An Apache server is also referred to as an Apache HTTP server. It is one of the widely used open-source web server software that servers website content to users over the internet. It is one of the most widely used and popular web servers. It is mostly known for its flexible performance and more for its flexibility and reliability.
Furthermore, this blog lets us see how the Apache server actually works.
Functionality of Apache server
1. Web server
As you know web server is a core. Apache server is one of those web server software that listens to the incoming requests of the clients and gives the responses back through serving web pages, files, or other resources. Basically, it acts as a middleman between a user’s browser and the web application or website.
2. Open source
Apache as previously mentioned is an open-source software, which indirectly means its source code is freely available to anyone to view, modify, and distribute. It has mainly contributed to the widespread mass server community by successfully adopting and continuing over the years. As it is an open source software it is easily accessible to the public without any restrictions.
3. Cross-platform
Apart from all these factors the main thing is Apache server is cross-platform which means it can easily be run on numerous other operating systems, including Linux, Unix, Windows, and macOS. This is one of the main advantages of Apache server as this versatility indirectly helps it to serve a wide range of applications and platforms.
4. Configurability
Apache is built as a very powerful platform the reason it is highly configurable through its configuration files. Administrators can easily tune into its behavior and can understand it easily to meet the specific requirements. This easy flexibility makes the Apache server more suitable for hosting simple and static websites as well as complex applications.
5. Modular architecture :
Apache server is been structured as a module architecture form, meaning it can be extended to and can also be easily customized through modules and plugins. This module also has many other additional functionalities and can be enabled and disabled as per your need. Some of the common modules are mod_ssl for SSL/TLS support, mod_php for PHP integration, and mod rewrite for URL rewriting.
6. Security :
Now the most important factor is security. Apache is basically been designed with security in mind. As it offers features like easily accessible control, authentication, and mechanisms. It also has the ability to access specific directories and files. Not only that administrators can easily configure security settings to protect against various other online malicious attacks and also from many other online web vulnerabilities.
7. Performance :
Apache is mainly known for its powerful performance and scalability. As you know there is no other server in its comparison. It can easily handle a large number of concurrent connections and more efficiently various other web contents too. Not only that to make the performance smoother and secure the server holder can also easily clear caching and can maintain the load balance.
Conclusion
Apache is basically a powerful and versatile web server software that plays a vital role in delivering web content to users worldwide. Because of its nature of cross-compatibility and flexibility, it is one of the most popular choices for hosting web applications.
Source
0 notes
Text
Anuko TimeTracker Login error - How to Fix

If you don't know Anuko TimeTracker, and you are looking for a good web-based time tracking application that you can install on premise (i.e. without getting poor by paying a monthly fee to Timely, Wrike and the likes), you should definitely give it a try: Anuko Time Tracker is a simple, easy to use, open source, web-based time tracking application written in PHP that allows you to track the time that employees, colleagues, or teammates spend working on projects and tasks. It needs a web server such as Apache, IIS, etc. to run on, and a database to keep the data in, such as MariaDB or MySQL. Before proceeding, it's worth noting that we are not affiliated to Anuko in any way: we just love the software and use it a lot, and also suggest it to all our client and customers that manifest the aforementioned requirements. We also developed a custom mod to allow an Excel export (CSV-based, but it works!) for the timesheet, which we'll be talking about in a upcoming post.
The Problem
Despite its greatness, Anuko has a small yet nasty issue: its login / auth implementation is quite convoluted and tends to give opaque signs - or, to better say that, no signs at all - whenever there are authentication issues. When this happens, you will often experience the login page reloading itself with no apparent reason: you type the (correct) username and password, hit login and get the reload, without significant errors.

The Anuko Time Tracker login page: if you're reading this post, there's a good chance you've already started to hate it. That's quite frustrating, isn't it? Luckily enough, we got such issue covered. Before giving out the actual solution, let's try to understand what happens under the hood. The issue is caused by an odd behaviour within the ttAccessAllowed function, which is declared in the WEB-INF/lib/common.lib.php page (line 372 or so): if you look there, you'll see that there is a hard redirect to the login page if the $auth->isAuthenticated() method returns FALSE. This is what actually happens: The user gets firstly redirected to the login.php page (see above screenshot), where he can fill up the login form by typing its username and password. The user types the credentials and hit the Login button, thus issuing a POST request. The application gets the POST request and, after a small bunch of high-level checks, will redirect the request to one of the starting pages, depending on the user's rights: for example, if the authenticating user is a standard user, it will be sent to the time.php page. The time.php page calls the ttAccessAllowed function to ensure that the authenticated user has the proper rights to access its content... and there goes the issue! The ttAccessAllowed function calls the $auth->isAuthenticated() method, which returns FALSE, and therefore redirects the user to the login.php page: since the login page gets reloaded from scratch, being at the end of a request redirect cycle, it won't be showing any error message, warning or anything else. Now, the fact that we're getting no significative error message is, at least partly, a PHP/HTTP design issue: however, the real culprit - which causes the $auth->isAuthenticated() method to return FALSE - often lies elsewhere: let's see where.
The Solution
The causes of this problem are almost always related to a wrong configuration of the PHP session folder - the FileSystem directory where PHP stores the session files. Most of the times we're talking of permission issues: more specifically, the session folder must be owned by the PHP process owner, i.e. the one specified in the relevant PHP configuration files, depending on the PHP implementation used by the web server: for mod_php, see /etc/httpd/conf.d/php.conf for php-fpm, see /etc/php-fpm.d/*.conf The session folder is defined by the session.save_path setting within the php.ini file, and it's usually /var/lib/php/session/; however, just to be sure, it can be easily checked by performing the following steps: Create a phpinfo.php file in the Anuko TimeTracker folder; Fill it with the following PHP code one-liner: Open a web browser and navigate to that page. You will be able to see the php.ini file path and the session.save_path setting value in a single shot. Once you've successfully determined where the path actually is, you can go there and change the relevant permissions by setting the owner and the group accordingly. As soon as you do that, your issue should be fixed: PHP will be able to create its session files, and you'll be able to login to Anuko Time Tracker again!
Conclusion
That's it, at least for now: we sincerely hope that this post will help other system administrators and/or php developers struggling to make their web application login page working again. See you next time, and... happy tracking! Read the full article
0 notes
Link
0 notes
Text
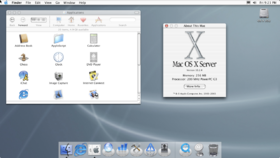
Macos Server 5.6.3

Macos Server 5.6.3 Software
Macos Server 5.6.3 Iso

XAMPP is a free and open source cross-platform web server solution stack package, consisting mainly of the Apache HTTP Server, MySQL database, and interpreters for scripts written in the PHP and Perl programming languages. Many people know from their own experience that it's not easy to install an Apache web server and it gets harder if you want to add MySQL, PHP and Perl. XAMPP is an easy to install Apache distribution containing MySQL, PHP and Perl. XAMPP is really very easy to install and to use - just download, extract and start. To install XAMPP you only need to download and extract XAMPP, that's all. There are no changes to the Windows registry (not true if you use the Windows installer version of XAMPP) and it's not necessary to edit any configuration files. It couldn't be easier! The distribution for Windows 2000, 2003, XP, Vista, and 7. This version contains: Apache, MySQL, PHP + PEAR, Perl, mod_php, mod_perl, mod_ssl, OpenSSL, phpMyAdmin, Webalizer, Mercury Mail Transport System for Win32 and NetWare Systems v3.32, Ming, FileZilla FTP Server, mcrypt, eAccelerator, SQLite, and WEB-DAV + mod_auth_mysql.
Macos Server 5.6.3 Software
Click Title for torrent OS X Server 5.6.3 MAS MAS 207 MB. Custom designed for OS X and iOS, OS X Server allows you to share files, schedule meetings, synchronize contacts, develop applications, hosting a website, publish wikis, configure Mac, iPhone and iPad devices, remotely access a network and much more. MacOS Server 5.6.3 includes multiple services and runs on macOS 10.13 High Sierra. It can be installed on 10.14.0 but you only get the very limited feature set which is the same as 5.7.x. It will not run on macOS 10.14.1-10.14.6 - if you install it on these versions macOS will require you to upgrade to 5.7.x.
Macos Server 5.6.3 Iso
Download futaba usb devices driver. Can anyone find MacOX Server 5.6.3 (High Sierra) on the App Store? Seems like they are forcing everyone to update to Mojave, and Server 5.7.1 with reduced functionality. Since Mojave is so new and possibly buggy, I rather not upgrade my soon-to-be server from 10.13.6. MacOS Server 5.4-5.6.3 requires a Mac with macOS 10.13 High Sierra installed on it so you can only run macOS Server 5.4-5.6.3 on a Mac that supports macOS 10.13 High Sierra. Drivers hamamatsu driver for mini-spectrometer.
0 notes
Text
The most effective method to Install PHP on Windows
This instructional exercise gives every one of the means needed to introduce PHP 8 on Windows 10. The means ought to be comparative on different renditions of Windows.
At times, we need to create or test our application against a particular variant of PHP or to introduce it independently. In such cases, we can download it from the authority website as opposed to utilizing a packaged bundle as XAMPP or WAMP. Once introduced, we can arrange the furthest down the line PHP to work with the web workers including Apache and NGINX.
Stage 1 - Download PHP 8 for Windows
Go to the authority download connect and download the necessary form of PHP 8 for Windows. The appropriations are given as tar and windows doubles. While composing this instructional exercise, PHP 8.0.3 is the latest one, thus we will talk about the establishment steps explicit to PHP 8.0.3. Snap the Windows Download Link and it will open the page having Binaries and Sources bundled for Windows.
We can see that PHP is accessible either as Thread Safe and Non Thread Safe. In basic terms, we can utilize Thread Safe PHP on the off chance that we are utilizing mod_php as specialist MPM in Apache which traverses various strings simultaneously to deal with the solicitations and Non Thread Safe can be utilized for CGI. The Thread Safe rendition is needed for web workers running in a multithreaded setting.
The download page additionally gave doubles to both 32-cycle and 64-bit Operating Systems. We will download the Zip Thread Safe form for 64-bit Operating System having the title as - VC15 x64 Thread Safe. As an ordinary client, we needn't bother with the Debug Pack which is needed for PHP designers.
Stage 2 - Extract the Zip
Concentrate the downloaded speed at a particular area. It will appear to be like the one having the PHP executable document.
Stage 3 - Verify Installation
Open the order brief and type php - rendition to check the accessible form. It will seem to be like Fig 4 in the event that current PHP renditions are accessible.
We need to arrange the climate variable to get to PHP from the order line. You can follow the beneath referenced strides to do as such.
Right Click - > My Computer(This PC) - > Properties - > Scroll Down - > Advanced System Settings.
The above advances will open the Windows Settings Panel.

Presently click the Environment Variables Button, select Path under either User factors or System Variables dependent on your inclination, and snap the Edit Button. We need to add/update the way of the introduced PHP to the framework Path.
Snap the New/Edit Button and add/update the way to the PHP canister which is E:\tools\php\php-7.3.1 for my situation. Press the OK Button multiple times to close every one of the windows. This sets the PHP 8 on framework climate factors to get to something similar from the support.
Presently again open the comfort and test the PHP variant.
These are the fundamental advances needed to introduce PHP 8 on Windows 10.
Stage 4 - Getting Started With PHP Development
In this progression, we will compose a straightforward program and print Hello World on the reassure utilizing the PHP executable designed by us in the past advance. Open your #1 proofreader and compose the program.
Presently save the record as index.php and execute it utilizing the order.
Thusly, we can execute the PHP program on the comfort. In spite of the fact that PHP is intended for web improvement, we can likewise utilize it for support based turn of events. The most recent PHP upholds the advanced programming ideas for example Oh no and it likewise upholds exacting composing.
Stage 5 - Configure With Apache
You may have introduced the Apache Web Server either freely or introduced it as a feature of the packaged bundles including WAMP, XAMPP, and so on In this progression, we will basically arrange the Apache Web Server to utilize the PHP introduced by us in the past advances.
Duplicate the document php.ini-improvement accessible at the way where we have removed PHP and save it as php.ini at a similar area.
Open the httpd.conf record of your Apache Web Server establishment and quest for the line having LoadModule php7_module or LoadModule php_module. Presently remark on the line and add the way to your PHP.
We have effectively arranged the most recent PHP introduced by us to work with the Apache Web Server.
For More Info: how to install php on windows
0 notes
Link
LAMP means Linux, Apache, MySQL, PHP. This tutorial shows how to install Apache 2.4 web server on Ubuntu 16.04 server (Xenial Xerus) with PHP 7 (mod_php) and MySQL / MariaDB support. I will also install PHPMyAdmin to facilitate MySQL administration. LAMP configuration is the perfect foundation for CMS systems such as Joomla, WordPress or Drupal. In this blog, we are going to explain you to How to install and configure LAMP (Linux,Apache Mysql/MariaDB,Php) with Joomla CMS in Ubuntu 16.04. in a very easy way. For complete knowledge for the same please go through the below-given link: https://cloudminister.com/how-to-install-and-configure-lamp-linuxapache-mysql-mariadbphp-with-joomla-cms-in-ubuntu-16-04/
0 notes
Text
PHP web pages returned no content, 2020-03-25 00:06-00:33
We investigated reports that websites hosted under various domains by the SRCF were returning no content when loaded. Our Apache webserver’s mod_php module was found to have corrupted its memory: reasons for this are unclear, but the webserver was restarted to fix the issue.
0 notes
Text
Wargames.my 2017 - MailMarketer
We are landed to default page of Ubuntu. The hints are:
what are other default page for apache2 with mod_php installed - ok, must be index.php
Just do it! - still dont understant until now. lol.
As the challenge is MailMarketer, the bug might be in “mail“ function related. There are a page to sent email and the function works. We try to sent email and look at the headers (took some time to notice this). They use phpmailer version 5.2.21 which has public exploit. You can refer to this: https://www.exploit-db.com/exploits/43056/.
The exploit payload is using <img src="<file to read>">. So, what do we need to read? After some fuzzing, there are flag.php file. We include the file:
<img src="</var/www/html/flag.php>">
...sent email and we got the flag.php as attachment which contain flag.
Flag: WGMY:{3Ma1L_H3ad3r_1z_Ju1cy}that is for mail
1 note
·
View note
Text
mod_php with Apache on OSX Sierra
This is a followup to my previous post Apache Server on OSX Sierra. Once again, this is mainly for my own use, so YMMV.
OSX ships with php 5.x and apache, so we basically just need to enable it.
Open Terminal
Edit the httpd.conf: sudo vi /etc/apache2/httpd.conf Uncomment the following line: LoadModule php5_module libexec/apache2/libphp5.so
Restart apache sudo apachectl restart
If you need to test that it works, throw a phpinfo page somewhere with a php extension <?php phpinfo(); ?>
2 notes
·
View notes
Text
How to Install Nextcloud on Ubuntu Server
New Article has been published on http://computingondemand.com/install-nextcloud-ubuntu-server/
How to Install Nextcloud on Ubuntu Server
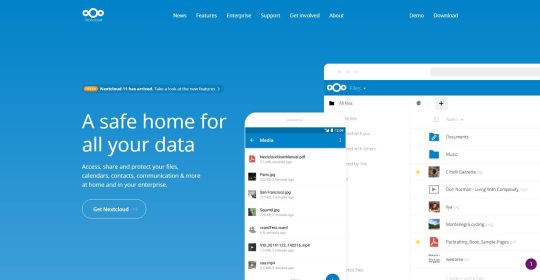
There are a lot of things Windows Server does well. However, coming off of the NAS environment, there are a lot of things that it doesn’t. One of these is a simple method for web access to various files and folders, along with the ability to share them via user login or simple url. Until recently, there had been only one real player in this space, OwnCloud. I had fiddled with the product for some time, but features were slow to show and it just didn’t work the way I had been hoping it would.
When I had finished the last server build, I had been looking for a way to simply address the needs that QNAP had been fulfilling for me with ease. With MyQNAPCloud I could easily share files or folders without issue. While on the hunt for the latest release of OwnCloud, I hit Google and just tried something. I tried “OwnCloud vs” and let the magic of Google happen. That is how I found Nextcloud.
While I won’t get into how Nextcloud came to be, I will tell you that there are a ton of similarities between the two products. When you do some research, it will become clear why that is. However, that is neither here nor there, the product is attractive, seamless, but a major pain in the … to get running. As usual, the best things in life are on linux. With that in mind, I created a Hyper-V hosting Ubuntu Server LTS 16.04 and started my journey.
Much of what I detail out here will be under the assumption that you have a CLEAN Ubuntu LAMP server up and running. For me, Hyper-V was a quick and logical start, but that doesn’t limit you to anything. Feel free to run VirtualBox, VMWare, or dedicated hardware.
Considerations
Before you build out your virtual machine for this install, there are some considerations to make. For instance, you need to plan for the amount of space that your VM will occupy. For me, it is easy, all my folders reside on another server, so a 100GB virtual hard drive is overkill. I have seen some “paid” for preconfigured VMs running around in 500GB and 1TB flavors.
System Requirements
(Taken Directly from Nextcloud.com)
Memory
Memory requirements for running an Nextcloud server are greatly variable, depending on the numbers of users and files, and volume of server activity. Nextcloud needs a minimum of 128MB RAM, and we recommend a minimum of 512MB.
Recommended Setup for Running Nextcloud For best performance, stability, support, and full functionality we recommend:
Red Hat Enterprise Linux 7 / Ubuntu 16.04 LTS
MySQL/MariaDB
PHP 7.0 +
Apache 2.4 with mod_php
Supported Platforms
Server: Linux (Debian 7, SUSE Linux Enterprise Server 11 SP3 & 12, Red Hat Enterprise Linux/CentOS 6.5 and 7 (7 is 64-bit only), Ubuntu 14.04 LTS, 16.04 LTS)
Web server: Apache 2 (mod_php, php-fpm) or Nginx (php-fpm)
Databases: MySQL/MariaDB 5.5+; PostgreSQL; Oracle 11g (currently only possible if you contact us <https://nextcloud.com/enterprise> as part of a subscription)
PHP 5.6 + required
Hypervisors: Hyper-V, VMware ESX, Xen, KVM
Desktop: Windows XP SP3 (EoL Q2 2015), Windows 7+, Mac OS X 10.7+ (64-bit only), Linux (CentOS 6.5, 7 (7 is 64-bit only), Ubuntu 12.04 LTS, 14.04 LTS, 14.10, Fedora 20, 21, openSUSE 12.3, 13, Debian 7 & 8).
Mobile apps: iOS 7+, Android 4+
Web browser: IE11+, Microsoft Edge, Firefox 14+, Chrome 18+, Safari 7+
Database Requirements for MySQL / MariaDB
The following is currently required if you’re running Nextcloud together with a MySQL / MariaDB database:
Disabled or BINLOG_FORMAT = MIXED configured Binary Logging (See: MySQL / MariaDB with Binary Logging Enabled)
InnoDB storage engine (MyISAM is not supported)
“READ COMMITED” transaction isolation level (See: Database “READ COMMITED” transaction isolation level)
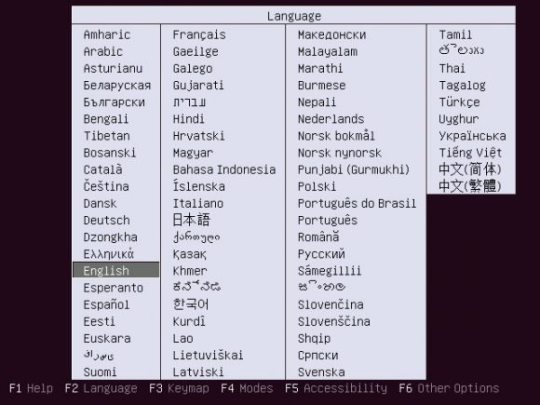
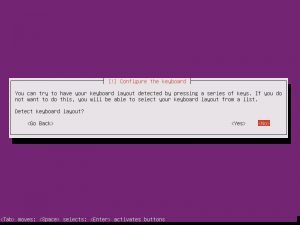
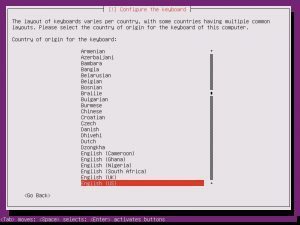
Installing Ubuntu Server
Download: https://www.ubuntu.com/download/server/thank-you?version=16.04.1&architecture=amd64
Walking through the standard install, for the most part, is a series of next and enter clicks. There isn’t much excitement. After you get past choosing your language, Install Ubuntu Server.
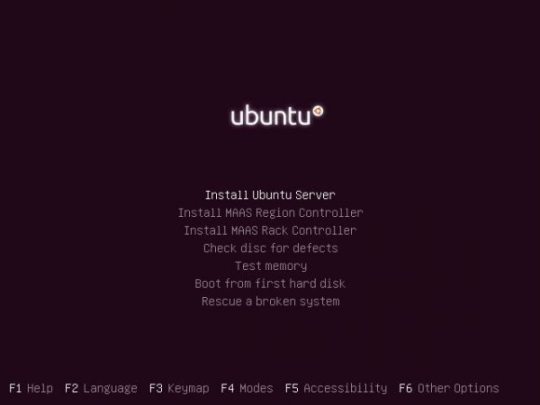
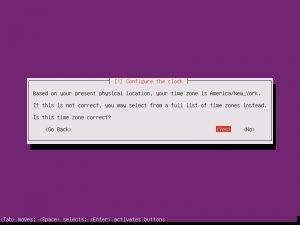
The installation will guide you through a series of pretty standard questions:


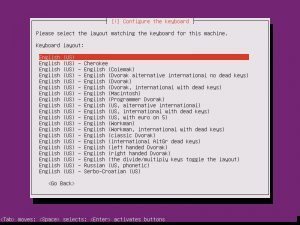
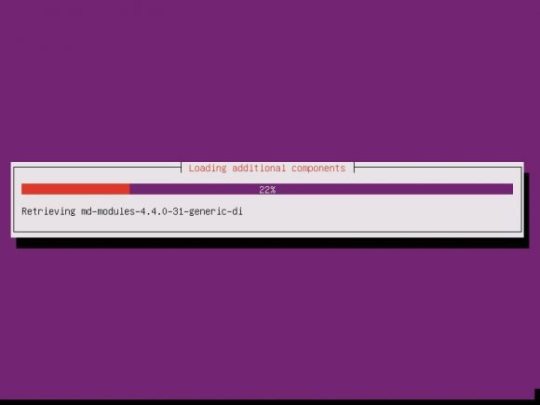
Once the additional components are completed, it is time to pick your system’s hostname. If you don’t know, a hostname is a label assigned to a device for identification. I named mine “nextcloud”, but while creating this tutorial, I left the default in place.

The username and password you choose are completely up to you. Make them something you will not forget!
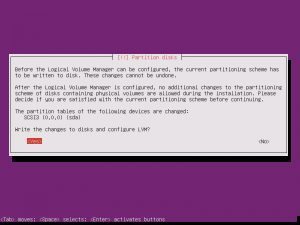
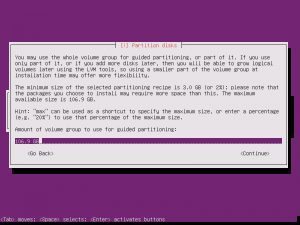
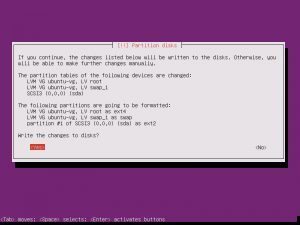
When asked the next few questions, the easiest way to go is with the defaults, that is until you get to Paritition Disks.
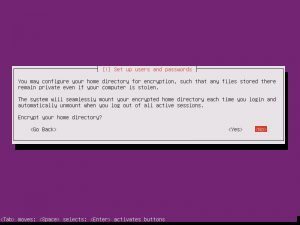
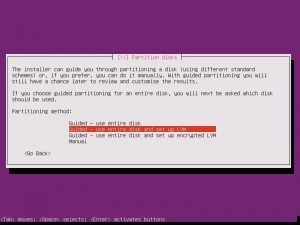

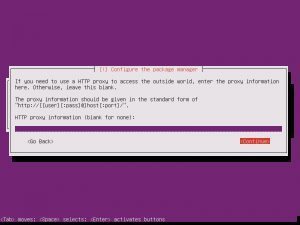
Partition disks, Yes. Full Size, Yes. Write Changes, Yes. Proxy, continue.
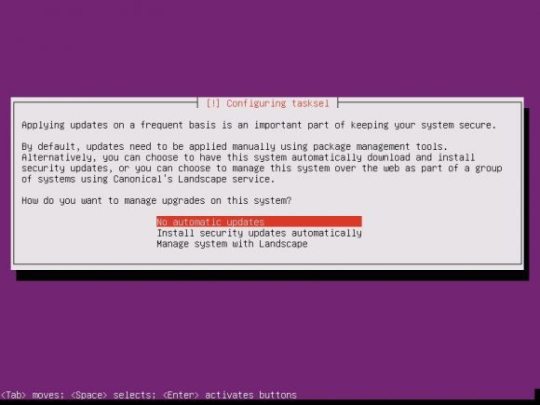
Choosing whether Ubuntu will install updates automatically is up to you, this is something you can change.
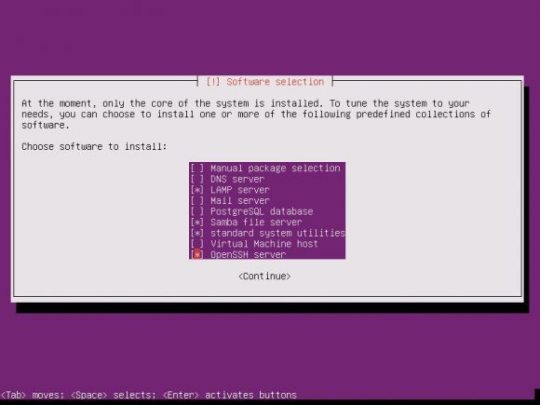
Software selection is the start. Here, the easiest way to proceed is to select LAMP, SAMBA, OpenSSH.
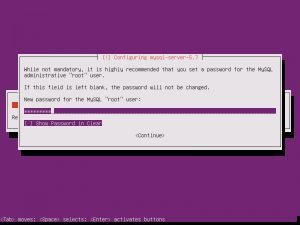
If you selected the previous recommendations, you will eventually be asked for a MySQL password. Pick a password that is easy to remember but hard enough to guess.

Install GRUB
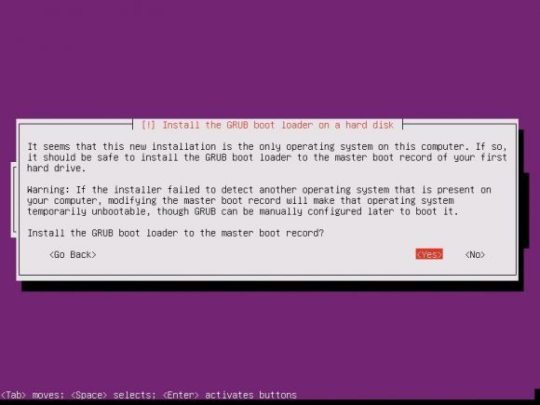
As your installation finishes, it is important to take note that you have a basic install of Ubuntu Server. This is not a hardened version nor are there any security considerations made. Security is not something to take lightly and there are plenty of threads on many great sites that can get you going.

Installing Nextcloud
Once your system has rebooted, the fun work of installing Nextcloud can begin. I would like to start off by saying, I am not the author of this entire process. While some of it is mine, I have also collected the information from various websites and collected them into a single tutorial.
Log into your system with the username and password you provided during your install.
When you first log into your server, you will be dropped in your user’s home directory. The path for this will be, by default, /home/username
There are a few modules that Nextcloud will need
sudo apt-get install libxml2-dev php-zip php-dom php-xmlwriter php-xmlreader php-gd php-curl php-mbstring
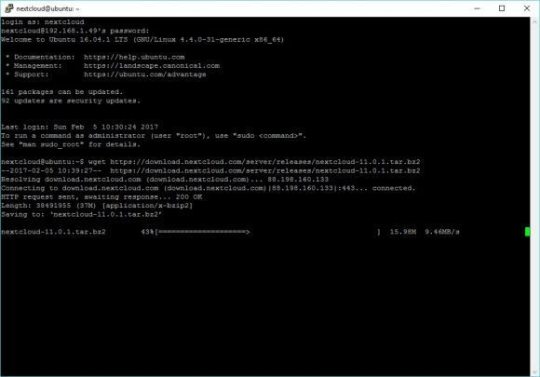
Let’s start by fetching the latest build, available at the time of this tutorial, of Nextcloud
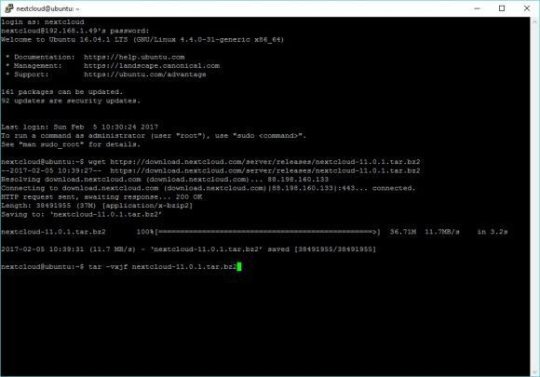
wget https://download.nextcloud.com/server/releases/nextcloud-11.0.1.tar.bz2
Now, we need mod_rewrite
a2enmod rewrite
Restart Apache
sudo service apache2 reload
Once the download has completed, let’s untar.
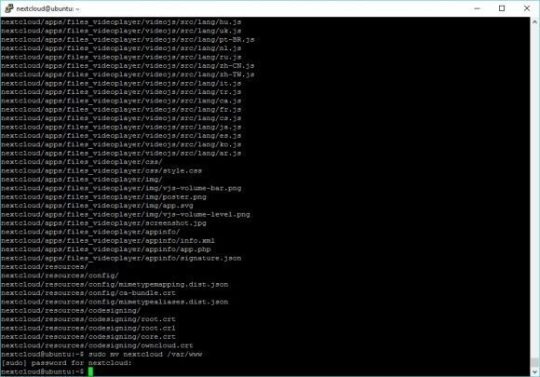
tar -vxjf nextcloud-11.0.1.tar.bz2
Move the folder to /var/www. When you first run “sudo” you will have to re-enter your password.
sudo mv nextcloud /var/www
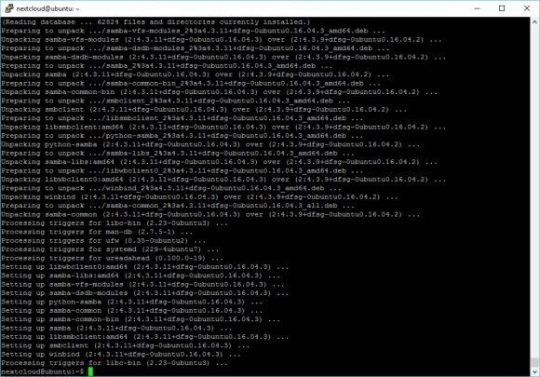
If you plan on connecting Nextcloud to your Windows Server, like I am, you will have to make sure you have Samba installed and configured. In my efforts, I have found that SMB2 is required for Nextcloud to function properly.
sudo apt-get install smbclient php-smbclient
Change the configuration of samba for SMB2
sudo nano /etc/samba/smb.conf
When the file opens, you will have to add teh following lines under [global]
max protocol = SMB2 client max protocol = SMB2

To exit the editor CTRL-X and click Y to confirm, then Enter to save
Create the apache configuration file
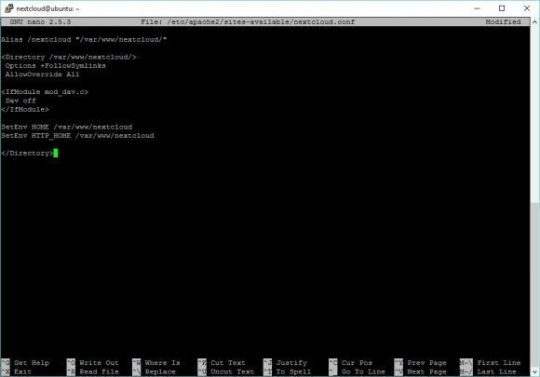
sudo nano /etc/apache2/sites-available/nextcloud.conf
Paste the following into the file and save.
Alias /nextcloud "/var/www/nextcloud/"
Alias /nextcloud “/var/www/nextcloud/” Options +FollowSymlinks AllowOverride All Dav off
SetEnv HOME /var/www/nextcloud SetEnv HTTP_HOME /var/www/nextcloud
To exit the editor CTRL-X and click Y to confirm, then Enter to save
Create a symbolic link for apache
sudo ln -s /etc/apache2/sites-available/nextcloud.conf /etc/apache2/sites-enabled/nextcloud.conf
Enable the apache modules required for Nextcloud.
sudo a2enmod headers
restart apache
sudo service apache2 reload
Create the DB for Nextcloud
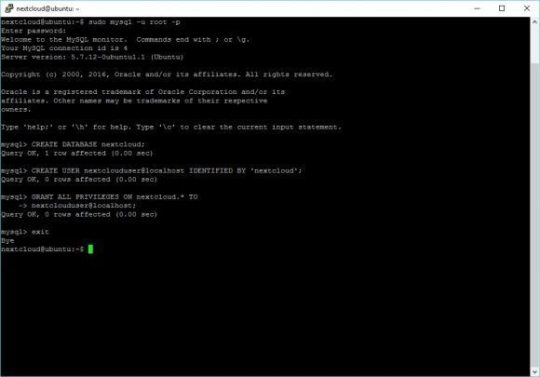
sudo mysql -u root -p
When prompted, enter the password your created for your database during the install
Create the user for your database. In the example below, I chose nextcloud as the password for the user nextclouduser. DO NOT USE THAT PASSWORD! Create your own password.
CREATE USER nextclouduser@localhost IDENTIFIED BY 'nextcloud';
Grant all privileges for that user
GRANT ALL PRIVILEGES ON nextcloud.* TO nextclouduser@localhost;
Exit
Secure and provide write abilities for Nextcloud (nextcloud in the example below is the username I chose during install)
sudo nano /home/nextcloud/grantperm.sh
Paste the following
#!/bin/bash ocpath='/var/www/nextcloud' htuser='www-data' htgroup='www-data' rootuser='root'
printf “Creating possible missing Directories\n” mkdir -p $ocpath/data mkdir -p $ocpath/updater
printf “chmod Files and Directories\n” find $ocpath/ -type f -print0 | xargs -0 chmod 0640 find $ocpath/ -type d -print0 | xargs -0 chmod 0750
printf “chown Directories\n” chown -R $rootuser:$htgroup $ocpath/ chown -R $htuser:$htgroup $ocpath/apps/ chown -R $htuser:$htgroup $ocpath/config/ chown -R $htuser:$htgroup $ocpath/data/ chown -R $htuser:$htgroup $ocpath/themes/ chown -R $htuser:$htgroup $ocpath/updater/
chmod +x $ocpath/occ
printf “chmod/chown .htaccess\n” if [ -f $ocpath/.htaccess ] then chmod 0644 $ocpath/.htaccess chown $rootuser:$htgroup $ocpath/.htaccess fi if [ -f $ocpath/data/.htaccess ] then chmod 0644 $ocpath/data/.htaccess chown $rootuser:$htgroup $ocpath/data/.htaccess fi

To exit the editor CTRL-X and click Y to confirm, then Enter to save
Grant execution privileges
sudo chmod +x grantperm.sh
Run the script
sudo ./grantperm.sh
Open a browser, navigate to the IP address or hostname of the server you just completed to finalize the Nextcloud install
http://ipaddress/nextcloud
If you don’t know the IP address of the machine, you can use ifconfig to find it
ifconfig


Fill in the required fields and enjoy. If you followed this tutorial to the letter, pick a username and password for nextcloud admin
Database user: nextclouduser Password: nextcloud Database: nextcloud Database host: localhost
There are more things to do, for instance, there are a ton of security concerns to consider. There are also caching recommendations. I also highly recommend that you consider using https for your server.
Caching: https://docs.nextcloud.com/server/11/admin_manual/configuration_server/caching_configuration.html Security: https://docs.nextcloud.com/server/11/admin_manual/configuration_server/harden_server.html Backups: https://docs.nextcloud.com/server/11/admin_manual/maintenance/backup.html
0 notes
Text
Trọn bộ thông tin về Apache là gì? Ưu – nhược điểm của Apache
1. Apache là gì? Tổng quan sâu về máy chủ web Apache 1.1. Khái niệm Apache và máy chủ web Apache là một phần mềm máy chủ web miễn phí và mã nguồn mở cung cấp khoảng 40% các trang web trên toàn thế giới. Tên chính thức là Máy chủ HTTP Apache và được Quỹ Phần mềm Apache duy trì và phát triển. Nó cho phép chủ sở hữu trang web phân phát nội dung trên web - do đó có tên là máy chủ web. Đây là một trong những máy chủ web lâu đời nhất và đáng tin cậy nhất, với phiên bản đầu tiên được phát hành cách đây hơn 20 năm, vào năm 1995. Khi ai đó muốn truy cập một trang web, họ nhập một tên miền vào thanh địa chỉ của trình duyệt của họ. Sau đó, máy chủ web cung cấp các tệp được yêu cầu bằng cách hoạt động như một người giao hàng ảo. Thiết lập đặc biệt này cho phép người dùng tối ưu hóa các tính năng mà nó đem lại. Nó cải thiện đáng kể hiệu năng của máy chủ b��ng cách bù các mặt yếu hơn của một phần mềm với các điểm mạnh của phần mềm khác. Song song với khái niệm Apache người ta thường nhắc đén máy chủ web. Một máy chủ web là máy chủ tệp, máy chủ cơ sở dữ liệu, máy chủ thư viện và máy chủ web sử dụng các loại phần mềm máy chủ khác nhau. Mỗi ứng dụng này có thể truy cập các tệp được lưu trữ trên một máy chủ vật lý và sử dụng chúng cho các mục đích khác nhau. Công việc của một máy chủ web là phục vụ các trang web trên internet. Để đạt được mục tiêu đó, nó hoạt động như một người trung gian giữa máy chủ và máy khách. Nó lấy nội dung từ máy chủ theo từng yêu cầu của người dùng và đưa nó lên web. Thách thức lớn nhất của máy chủ web là phục vụ nhiều người dùng web khác nhau cùng một lúc - mỗi người đang yêu cầu các trang khác nhau. Các máy chủ web xử lý các tệp được viết bằng các ngôn ngữ lập trình khác nhau như PHP, Python, Java và các ngôn ngữ khác. Bằng cách biến chúng thành các tệp HTML tĩnh và phục vụ các tệp này trong trình duyệt của người dùng web. Khi bạn nghe thấy máy chủ web từ, hãy nghĩ về nó như là công cụ chịu trách nhiệm cho giao tiếp máy chủ-máy khách thích hợp. Apache là một trong những máy chủ web phổ biến nhất cho phép bạn chạy một trang web an toàn mà không phải quá đau đầu. Đó là sự lựa chọn thường xuyên nhất mà các doanh nghiệp nhỏ muốn có sự hiện diện trên web. Bạn có thể cài đặt một trang web WordPress trên máy chủ web Apache mà không cần bất kỳ tùy chỉnh nào. Ngoài ra, Apache hoạt động liền mạch với nhiều hệ thống quản lý nội dung khác ( Joomla , Drupal , v.v.), các khung web (Django, Laravel, v.v.) và ngôn ngữ lập trình. Điều này làm cho nó trở thành một lựa chọn chắc chắn cho tất cả các loại nền tảng lưu trữ web, chẳng hạn như VPS hoặc lưu trữ chia sẻ . Tầm quan trọng của web không nên được đánh giá thấp, nó đã giúp mở ra thế giới, dân chủ hóa thông tin và là một trong những phát minh vĩ đại nhất từng có. Mặc dù nó có ảnh hưởng sâu sắc đến thế giới, web được tạo thành từ nhiều yếu tố khác nhau, chẳng hạn như phần mềm máy chủ web. Apache chạy trên 67% tất cả các máy chủ web trên thế giới và được thiết kế để nhanh chóng, đáng tin cậy và an toàn cũng như có khả năng tùy biến cao để có thể đáp ứng nhu cầu của các môi trường khác nhau. Một máy chủ web hoạt động bằng cách kiểm tra trang web đã được yêu cầu và cung cấp cho người dùng trang web. Apache và các máy chủ web khác, sau đó có khả năng xử lý các giao tiếp với trang web, xử lý các yêu cầu và đảm bảo rằng các mô-đun đã sẵn sàng để sử dụng. Hơn nữa, nó cũng xóa bộ nhớ, bộ nhớ cache và các mô-đun cho khách hàng mới sử dụng trang web 1.2. Máy chủ web Apache hoạt động như thế nào? Mặc dù gọi Apache là máy chủ web, nhưng nó không phải là máy chủ vật lý mà là phần mềm chạy trên máy chủ. Công việc của nó là thiết lập kết nối giữa máy chủ và trình duyệt của khách truy cập trang web (Firefox, Google Chrome, Safari, v.v.) trong khi phân phối tệp qua lại giữa chúng (cấu trúc máy khách-máy chủ). Apache là một phần mềm đa nền tảng, do đó, nó hoạt động trên cả máy chủ Unix và Windows. Ví dụ: khi khách truy cập muốn tải một trang trên trang web của bạn, trang chủ hoặc trang của bạn Giới thiệu về chúng tôi, trình duyệt của họ sẽ gửi yêu cầu đến máy chủ của bạn và Apache trả lời phản hồi với tất cả các tệp được yêu cầu (văn bản, hình ảnh, v.v. .). Máy chủ và máy khách liên lạc qua giao thức HTTP và phần mềm Apache chịu trách nhiệm liên lạc thông suốt và an toàn giữa hai máy. Apache có khả năng tùy biến cao, vì nó có cấu trúc dựa trên mô-đun. Các mô-đun cho phép quản trị viên máy chủ bật và tắt các chức năng bổ sung. Apache có các mô-đun để bảo mật, lưu trữ, lưu lại URL, xác thực mật khẩu và hơn thế nữa. Bạn cũng có thể thiết lập các cấu hình máy chủ của riêng mình thông qua một tệp có tên .htaccess , đây là tệp cấu hình Apache được hỗ trợ với tất cả các gói Hostinger . 1.3. Apache so với các máy chủ web khác Ngoài Apache, còn có nhiều máy chủ web phổ biến khác. Mỗi ứng dụng máy chủ web đã được tạo cho một mục đích khác nhau. Trong khi Apache được sử dụng rộng rãi nhất, nó có khá nhiều lựa chọn thay thế và đối thủ. 1.3.1. Thiết kế máy chủ lưu trữ của Apache vs Nginx Nginx, phát âm là Engine-X, là một ứng dụng máy chủ web mới hơn được phát hành lần đầu tiên vào năm 2004. Cho đến ngày nay, nó đã trở nên khá phổ biến trong các chủ sở hữu trang web. Nginx được tạo ra để giải quyết vấn đề được gọi là c10k , có nghĩa là một máy chủ web sử dụng các luồng để xử lý các yêu cầu của người dùng không thể quản lý hơn 10.000 kết nối cùng một lúc. Do Apache sử dụng cấu trúc dựa trên luồng, chủ sở hữu của các trang web có lưu lượng truy cập lớn có thể gặp phải các vấn đề về hiệu suất. Nginx là một trong những máy chủ web giải quyết vấn đề c10k và có lẽ là máy chủ thành công nhất. Nginx có một kiến trúc hướng sự kiện mà không tạo ra một quy trình mới cho mỗi yêu cầu. Thay vào đó, nó xử lý mọi yêu cầu đến trong một luồng. Quy trình tổng thể này quản lý một số quy trình công nhân thực hiện xử lý các yêu cầu thực tế. Mô hình Nginx dựa trên sự kiện phân phối các yêu cầu của người dùng giữa các quy trình công nhân một cách hiệu quả, do đó dẫn đến khả năng mở rộng tốt hơn nhiều. Nếu bạn cần quản lý một trang web có lưu lượng truy cập cao, Nginx là một lựa chọn tuyệt vời, vì nó có thể làm điều đó bằng cách sử dụng các tài nguyên tối thiểu. Không thể ngẫu nhiên mà nó được sử dụng bởi nhiều trang web có khả năng hiển thị cao như Netflix, Hulu, Pinterest và Airbnb. Tuy nhiên, đối với người chơi vừa và nhỏ, Apache mang đến một số lợi thế so với Nginx, chẳng hạn như cấu hình dễ dàng, nhiều mô-đun và môi trường thân thiện với người mới bắt đầu. 1.3.2. Thiết kế máy chủ lưu trữ của HTTP Apache vs Tomcat Tomcat là một máy chủ web cũng được phát triển bởi Quỹ phần mềm Apache, do đó tên chính thức của nó là Apache Tomcat . Đó cũng là một máy chủ HTTP, tuy nhiên, nó cung cấp năng lượng cho các ứng dụng Java thay vì các trang web tĩnh. Tomcat có thể chạy một số đặc tả Java khác nhau như Java Servlet, JavaServer Pages (JSP), Java EL và WebSocket. Tomcat đã được tạo riêng cho các ứng dụng Java, trong khi Apache là máy chủ HTTP có mục đích chung. Bạn có thể sử dụng Apache cùng với các ngôn ngữ lập trình khác nhau (PHP, Python, Perl, v.v.) với sự trợ giúp của mô-đun Apache thích hợp (mod_php, mod_python, mod_perl, v.v.). Mặc dù bạn cũng có thể sử dụng máy chủ Tomcat để phục vụ các trang web tĩnh, nhưng mục đích đó kém hiệu quả hơn so với máy chủ Apache. Chẳng hạn, Tomcat tải trước Máy ảo Java và các thư viện liên quan đến Java khác mà bạn sẽ không cần trên hầu hết các trang web. Tomcat cũng ít cấu hình hơn so với các máy chủ web khác. Ví dụ: để chạy WordPress , lựa chọn tốt nhất là máy chủ HTTP có mục đích chung như Apache hoặc NGINX. 2. Ưu và nhược điểm của Apache Một máy chủ web Apache có thể là một lựa chọn tuyệt vời để chạy trang web của bạn trên nền tảng ổn định và linh hoạt. Tuy nhiên, nó cũng đi kèm với một số nhược điểm bạn cần chú ý. Ưu điểm: - Nguồn mở và miễn phí, ngay cả cho mục đích thương mại. - Phần mềm ổn định, đáng tin cậy. - Thường xuyên cập nhật, vá bảo mật thường xuyên. - Linh hoạt do cấu trúc dựa trên mô-đun của nó. - Dễ dàng cấu hình, thân thiện với người mới bắt đầu. - Đa nền tảng (hoạt động trên cả máy chủ Unix và Windows). - Hoạt động tốt với các trang web WordPress. - Cộng đồng lớn và hỗ trợ dễ dàng có sẵn trong trường hợp có vấn đề. Nhược điểm: - Vấn đề về hiệu suất trên các trang web cực kỳ lưu lượng truy cập. - Quá nhiều tùy chọn cấu hình có thể dẫn đến lỗ hổng bảo mật. Hy vọng rằng thông qua bài viết này bạn đã nắm được những thông tin về Apache là gì cũng những giải đáp thắc mắc liên quan cho mình.
Đọc nguyên bài viết tại: Trọn bộ thông tin về Apache là gì? Ưu – nhược điểm của Apache
#timviec365vn
0 notes
Text
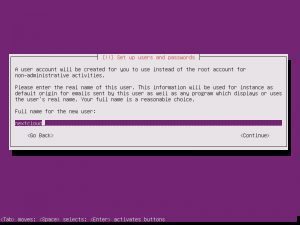
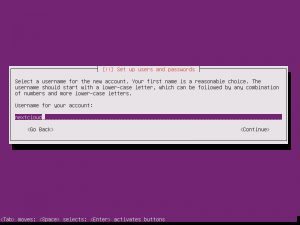
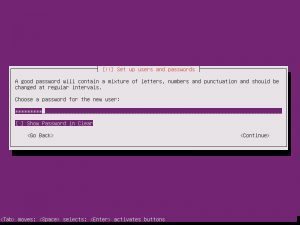
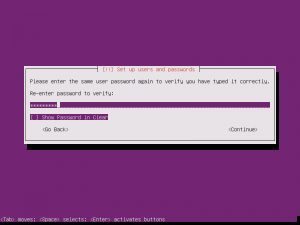
Setting up the sample application
https://adrenaline-studios.com/ I want to show the lowest possible level of functionality.
Our example PHP application is extremely skinny. I want to put as much as possible lower level functionality, without any magic framework. I also did not want to use this API, for example, Twitter, because they may change unexpectedly, you need to configure authentication, which can be a problem and you cannot explore the implementation.
To run the sample application, you need to install PHP5 and web server with a mechanism to run php. Current version should be no lower version 5.2 to access the json_encode () and json_decode () functions.
As for servers, the most common option is Apache with mod_php, but you can use any alternatives that you comfortable. There is an Apache configuration example that contains rules. rewrites to help you quickly configure the application. All requests to Any URL starting with / clients / should be sent to our server.php file.
In Apache, you need to enable mod_rewrite and place the attached mod_rewrite configuration somewhere in your apache configuration or in your the .htacess file. Thus, server.php will respond to all requests, coming from the server. The same should be accomplished with nginx, or with any other server you decide to use.
0 notes
Text
Original Post from Rapid7 Author: boB Rudis
The joke was on roughly 2 million servers on Monday (April 1!), as the Apache Foundation released a patch for a privilege escalation bug (CVE-2019-0211) in Apache HTTP Server 2.4 releases 2.4.17–2.4.38. Unfortunately, this is no laughing matter, since this vulnerability makes it possible for module code—software components that enhance the functionality of Apache HTTPD servers—and scripts executed via modules such as mod_php to run code with the privileges of the parent process, which is usually root. This only impacts Apache servers running on UNIX-like systems, which is the majority of them, especially on internet-facing servers.
This privilege escalation bug is especially problematic for hosting providers that still offer “shared web hosting” plans where a site is running alongside other ones, all of them sharing the same parent Apache server. Even if a vulnerable Apache server is running on its own, this flaw could be used in combination with other attack methods to execute code at a higher privilege level.
There are 21 separate 2.4.x releases between 2.4.17 and 2.4.38, and Rapid7 Labs Project Sonar harnesses the power of our open source recog utility to fingerprint nodes as we scan them. We found roughly 2 million distinct systems vulnerable to CVE-2019-0211 in our most recent HTTP scans, with 50% of them residing in the “usual suspects” (big cloud-hosting providers).
The bulk of affected systems are in the United States (~770,000), Germany (~224,000), and France (~111,000).
While this is not a remote code execution (RCE) vulnerability, it does provide a vehicle for attackers to perform actions most hosting providers have worked to avoid. Organizations should consider applying Apache’s fix as soon as possible. And, if organizations host their website(s) in a shared hosting context impacted by this exposure, they should encourage their provider to patch as quickly as possible or consider moving to a different provider/platform.
Rapid7 Labs has no direct reports of any exploitation of this vulnerability but will be working with our external research partners to keep an eye out for active exploits and update this blog if we start to see attacker activity ramp up.
#gallery-0-5 { margin: auto; } #gallery-0-5 .gallery-item { float: left; margin-top: 10px; text-align: center; width: 33%; } #gallery-0-5 img { border: 2px solid #cfcfcf; } #gallery-0-5 .gallery-caption { margin-left: 0; } /* see gallery_shortcode() in wp-includes/media.php */
Go to Source Author: boB Rudis Apache HTTP Server Privilege Escalation (CVE-2019-0211): What You Need to Know Original Post from Rapid7 Author: boB Rudis The joke was on roughly 2 million servers on Monday (April 1!), as the Apache Foundation…
0 notes
Text
PHP在线视频上传分享程序 AVS v7.0
AVS 在线视频上传分享网站源码简介
AVS 在线视频上传分享源码系统需求
AVS 在线视频上传分享源码更新日志
AVS 在线视频上传分享网站源码安装
目录
AVS 在线视频上传分享网站源码简介
AVS在线视频上传分享脚本是一个老牌的国外视频CMS,您可以使用该源码创建在线视频,照片,游戏网站。 用户可以上传自己的视频、照片以及flash游戏,程序有多语言支持,还有很多很多功能,这里的简介都不方便说。经常逛国外视频站的应该对这个程序或者说界面熟悉的很呢,这次发布的版本是官网最新的7,但通过reishi的测试,似乎只能在php5.6下会上传和视频转码。
AVS 在线视频上传分享源码系统需求
Any Linux OS
Apache or NGINX Web Servers
Support for AcceptPathInfo
Support for MultiViews (or mod_rewrite which is slower)
MySQL 5.x
Recommended configuration:
interactive_timeout = 1000
connect_timeout = 1000
wait_timeout = 1000
PHP 5.x and 7.x (mod_php/CGI)
Support for GD2 Library
Support for MySQL
Support for Curl
Support for uploadprogress PHP extension (only if you want to display a progress bar on uploads)
Recommended PHP Configuration
safe_mode off
open_basedir off
max_execution_time 7200
max_input_time 7200
memory_limit (with 1MB more then the maximum video upload size)
post_max_size (maximum video upload size)
upload_max_size (maximum video upload size)
exec() should be allowed
PHP CLI 5.x (see above + register_argc_argv ON)
FFmpeg (recommended version 3.0+)
AVS 在线视频上传分享源码更新日志
仅仅是一部分
completely recoded for PHP 7 compatibility
smarty engine upgraded to latest version (3.0)
mySQLi extension (MySQL Improved) implemented
AVS 在线视频上传分享网站源码安装
1. 编辑 include/config.paths.php 文件,在 $config['BASE_URL'] 处输入你的网站地址.
2. 可选项: 如果在子目录里安装本程序,请在 $config['RELATIVE'] 这里设置你的子目录 (举个栗子:
$config['RELATIVE'] = '/子目录名')!
3. 可选项: 如果在子目录里安装本程序,请在 loader.php 文件,请在 $relative 这里设置你的子目录
(举个栗子: $relative = '/子目录名')!
4. 创建数据库. 编辑 include/config.db.php 文件,输入你的数据库信息.
5. 导入 sql/cs.sql 数据库文件,可以使用 phpMyAdmin.
6. 上传 /upload 下的全部文件到服务器上.
7. 修改下面列表中的文件和文件夹属性为 0777. 当然你也可以在后台面板里选择修复属性:
Settings > General > System Check
/include/config.local.php
/cache/frontend
/cache/backend
/images/logo
/images/notice_images
/images/notice_images/thumbs
/media/albums
/media/categories/game
/media/categories/album
/media/categories/video
/media/csv
/media/games/swf
/media/games/tmb
/media/games/tmb/orig
/media/photos
/media/photos/tmb
/media/player/logo
/media/users
/media/users/orig
/media/videos/tmb
/media/videos/vid
/media/videos/h264
/templates/backend/default/analytics/analytics.tpl
/templates/emails
/templates/emails/*.tpl
/templates/frontend/(your_template)/static/*.tpl
/tmp/albums
/tmp/avatars
/tmp/downloads
/tmp/logs
/tmp/sessions
/tmp/thumbs
/tmp/uploader
/aembed.sh
8.到此,安装基本完事,打开 www.domain.com/siteadmin 登陆后台,用户名和密码都是admin
程序依赖FFmpeg插件,涉及到视频转码,请在服务器上安装此软件。
虽然说7版本可以在php7下使用,但是通过测试,转码上传似乎只能在5.6下成功,也可能是我某些地方设置不正确造成的,进攻参考。
from 站长源码 https://zz04.net/2888.html
0 notes
Photo

New Post has been published on https://zitseng.com/archives/16726
Website Upgrade to Ubuntu 18.04.1
Ubuntu 18.04 LTS has been released for several months now, with the first point release update 18.04.1 arriving in late July. Users wanting to use the prescribed upgrade mechanism from an older Ubuntu LTS release had to wait till this point release update. Here’s my Ubuntu 18.04 LTS upgrade notes, coming from the previous 16.04 LTS release.
I am writing this with my blog website as reference. You can read my Making Of A Techie’s WordPress Site post for some background on the build components of this website, as well as my Apache, HTTP/2 and PageSpeed on Ubuntu pre-16.04 post for some build nodes. They will establish some context about what I’m upgrading from.
Notably, I had been running a version of Apache 2 from Ondrej Sury’s PPA. The main reason for that is my want for HTTP/2 support via Apache mod_http2 which, at that time, Ubuntu considered to be experimental and did not build that into their release repository. With Ubuntu 18.04, I established that mod_http2 is now included, and I prefer not to depend on a third party repository (no offence to Ondrej).
I want to return to Ubuntu’s own Apache 2 packages, but the downside is that their version is slightly older: Apache 2.4.29 vs Ondrej’s 2.4.34. It’s no big deal. I’ll still go with stock Apache 2 from Ubuntu 18.04. There is another issue; I’ll get into that later.
Ubuntu, unlike CentOS, has a very elegant, convenient, way to upgrade from release to release. The do-release-upgrade command does all the magic, including starting up SSH server on an alternate part as a backup remote access method in case the main SSH service breaks. Start the upgrade by simply running:
$ do-release-upgrade
Follow the on-screen instructions. Remember to read and digest the information properly before just hitting “next” or going with the suggested default action. Where applicable, I suggest that you keep locally modified configuration whenever Ubuntu detects a conflict with default configurations from the package. It should be fine to remove old, outdated, packages.
The actual upgrade is pretty quick if you have a good Internet connection. Mine was done in about 15 minutes.
Then, let’s switch Apache 2 back into the stock distribution version using ppa-purge to remove Ondrej’s repository.
$ apt install ppa-purge # ppa-purge ppa:ondrej/apache2
The Ubuntu 18.04 upgrade switches Apache 2 back to the prefork MPM because Php 7.2 is not thread safe. I don’t need mod_php, as I’m using the php-fpm method. So I can remove mod_php and safely go back to the event MPM.
a2dismod php7.2 a2dismod mpm_perfork a2enmod mpm_event
There’ll be messages along the way to suggest restarting Apache 2 via systemctl restart apache2. You can do that, but I don’t because the php-fpm setup is still broken, so my website won’t work yet anyway. This the next step here, to get php-fpm up.
$ apt install php-fpm php-mysql $ a2enconf php7.2-fpm
Then edit /etc/php/7.2/fpm/pool/www.conf and modify as needed. I had changed the user/group from www-data to my site-specific user. The new php-fpm also changes its socket location, so I needed to modify where Apache 2 expects to find it. This is usually configured in /etc/apache2/conf-enabled/php7.2-fpm.conf. I had mine configured via ProxyPass in another configuration file.
You can now restart Apache 2 with systemctl restart apache2.
At this point, the Ubuntu 18.04.1 with Apache 2 setup should be complete and working.
The other matter I had an issue with is about brotli compression. This was included in Ondrej’s Apache 2 PPA, but not available in the stock Ubuntu 18.04 repository. Although I can download I compile any needed software myself, I often prefer to go with a package that can be provided by some repository. This is on the assumption that a well-maintained repository is more likely to keep the packages more up-to-date than I can or have the time to. I decided to break my rule this time, and even though mod_brotli can be obtained from the official Apache 2 sources, I’ll go with this build via Github from Ayesh.
Here are the steps, starting first to remove brotli if it’s already installed:
$ rm /etc/apache2/mods-enabled/brotli* $ rm /etc/apache2/mods-available/brotli*
Then get on with the build and install from Github:
$ cd /tmp $ git clone --depth=1 --recursive https://github.com/kjdev/apache-mod-brotli.git $ cd apache-mod-brotli $ ./autogen.sh $ ./configure $ make $ install -D .libs/mod_brotli.so /usr/lib/apache2/modules/mod_brotli.so -m 644 $ cd /etc/apache2/mods-available $ echo “LoadModule brotli_module /usr/lib/apache2/modules/mod_brotli.so” > brotli.load
Create brotli.conf in /etc/apache2/mods-available/brotli.conf with the following contents:
<IfModule brotli_module> # Compression ## BrotliCompressionLevel: 0-11 (default: 11) BrotliCompressionLevel 10 ## BrotliWindowSize: 10-24 (default: 22) BrotliWindowSize 22 # Logging # Filter note BrotliFilterNote Input brotli_in BrotliFilterNote Output brotli_out BrotliFilterNote Ratio brotli_ratio #LogFormat '"%r" %brotli_outn/%brotli_inn (%brotli_ration)' brotli #CustomLog $APACHE_LOG_DIR/brotli_access.log brotli # Output filter AddOutputFilterByType BROTLI text/html text/plain text/css text/xml AddOutputFilterByType BROTLI text/css AddOutputFilterByType BROTLI application/x-javascript application/javascript AddOutputFilterByType BROTLI application/rss+xml AddOutputFilterByType BROTLI application/xml AddOutputFilterByType BROTLI application/json # Global output filer if necessary. # SetOutputFilter BROTLI # SetEnvIfNoCase Request_URI \.txt$ no-br </IfModule>
Restart Apache 2 with systemctl restart apache2 and we’re done.
This is the setup at zitseng.com right now:
Ubuntu 18.04.1
Apache 2.4.29 with HTTP/2, TLS,
php7.2-fpm
WordPress
0 notes
Text
Upgrade Joomla! PHP Version
Joomla is one of the most powerful and secure CMS on the planet now. But Joomla itself is not enough to protect your site if you are running old version of PHP. People often criticize, its CMS fault when their site get hacked but they didn’t realized it's could be their server stack.
Joomla recently raised its PHP version requirements to PHP 5.6 or 7 however it can run on PHP 5.3.10+ too. PHP 7 is already released and it's a breakthrough of PHP history. So, its high time to upgrade your server PHP version to PHP 7 or at least 5.6+. In this tutorial, I’m going to show you how you can do that.
**IMPORTANT : If you decided for PHP 7 make sure your Joomla version is 3.5+ in order to work properly.
Managed or Shared Hosting
The Easiest Way
Ask your host to update PHP version of your hosting. Most likely, they will do it for free and it’s the most easiest way to update. However, if they are refused or unable to do so, it's high time to switch to a reliable provider.
Upgrade PHP From cPanel
Most cPanel based hosting provider allow you to update PHP version from your cPanel. Search PHP Version Manager or PHP Configuration option and click on it.
Select PHP version 5.6+ or 7 and save.
Upgrade from .htaccess file
If above 2 method doesn’t work for you, your best bet is to upgrade PHP version using .htaccess file.
Go to cPanel, File Manager and choose "Web Root (public_html/www)". There create a new file (or edit the existing one) called .htaccess and add the following line:
To switch to PHP 5.6
AddHandler application/x-httpd-php56 .php .php5 .php4 .php3
To switch to PHP 7.0
AddHandler application/x-httpd-php70 .php .php5 .php4 .php3
This setting will apply recursively to all of the subdirectories. In case you'd like to have a different version of PHP in a subdirectory, create a new .htaccess file in it with the directive for the desired PHP version in it.
VPS or Dedicated Server
If you are running Ubuntu 14.04 or below you can update using this commands :
sudo apt-get upgrade sudo apt-get dist-upgrade
Lets add php repo in our list. Pleaes choose approprite version.
For PHP 5.6
sudo apt-add-repository ppa:ondrej/php5-5.6
For PHP 7.0
sudo apt-add-repository ppa:ondrej/php
Upgrade to PHP 5.6
sudo apt-get install php5
Your PHP version is upgraded now and you just need to restart your server
Apache : sudo service apache2 restart
Nginx : sudo service nginx restart
Upgrade to PHP 7
Upgrading to PHP 7 require a little amount of extra work. Depends on your webserver you can perform this commands.
Upgrading mod_php with Apache
First, install the new packages. This will upgrade all of the important PHP packages, with the exception of php5-mysql, which will be removed.
sudo apt-get install php7.0
Note: If you have made substantial modifications to any configuration files in /etc/php5/, those files are still in place, and can be referenced. Configuration files for PHP 7.0 now live in /etc/php/7.0.
If you are using MySQL, make sure to re-add the updated PHP MySQL bindings:
sudo apt-get install php7.0-mysql
Upgrading PHP-FPM with Nginx
This section describes the upgrade process for a system using Nginx as the web server and PHP-FPM to execute PHP code.
First, install the new PHP-FPM package and its dependencies:
sudo apt-get install php7.0-fpm
You'll be prompted to continue. Press Enter to complete the installation. If you are using MySQL, be sure to re-install the PHP MySQL bindings:
sudo apt-get install php7.0-mysql
Note: If you have made substantial modifications to any configuration files in /etc/php5/, those files are still in place, and can be referenced. Configuration files for PHP 7.0 now live in /etc/php/7.0.
Now update your Nginx server block with new php7.0 socket path.
fastcgi_pass unix:/run/php/php7.0-fpm.sock;
Save and exit the file. Now you are just a restart away.
sudo service nginx restart
Check your PHP version for Joomla admin > System > System Information. You can see your PHP version number there.
I strongly recommend to upgrade to PHP 7 because its PHP's later version and it will make your website blazing fast without doing anything.
0 notes