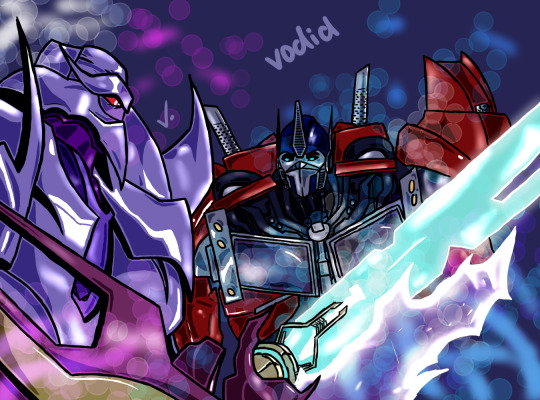
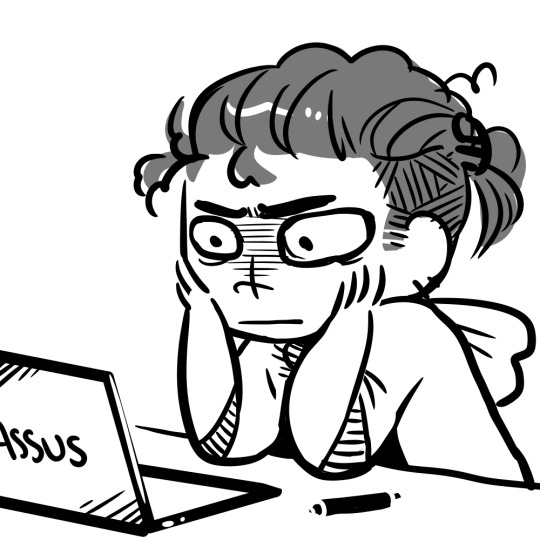
#my best advice is take your time with your lineart because then you don't have to try as hard with the shading
Note
How do you shade/render your drawings?? It looks so nice!
thank you!!
i'll make a proper tutorial one day but right now there's not much to say since i'm always changing how i do things. mostly i use a hard circle brush for skin/clothes and one of my lineart brushes for hair. i don't do a lot of actual rendering, just one multiply layer on top of flat colour and then details on top of the lineart. the lighting is normally just a hard light layer coloured with an airbrush.
when i finish a drawing, i sharpen the png a few times to crisp up the edges which makes it look a lot more refined than it is.
tl:dr: i cheat, quite a lot.
#ramble#bg3#i actually liked the sketch for this a lot more#my best advice is take your time with your lineart because then you don't have to try as hard with the shading#also use references for clothes!!!!!!!!! fabric is very hard
453 notes
·
View notes
Note
Do you have any tips or tricks on how to start a comic like this? Or even just how you got started?? I've had my own au for years that I so badly wanna put out into the world but I've been struggling with finding a good way to start it!!!!
Hm!! Ok!! This is a tough question with many different answers even just from me. I'll do my best to answer tho!! 😮
The main bit of advice I want to give, and which I think is vital to anyone creating anything:
☆ Know yourself.
When looking up advice for creating, people love to tell you that by doing things a specific way is the best and only way to go. Often advice of this sort has solid points, you should plan ahead, you should have easy character designs, buut... You don't have to.
I do not work well with outlines or scripts. I dislike sketching. You'd think that'd make being a long form comic artist impossible for me, but nope.
I know theres things I cannot do, so I've put all my practise to what I can do. My lineart style allows me to almost skip sketching completely, my scripts are more of an A to B structure than law. I improv 90% of the time when making pages. It's kinda like dnd with myself.
I would absolutely not reccomend what I'm doing to others, but I know it works for me. People can tell me I'm doing it wrong but its either wrong or no comic at all, SO. Suck it. 👍
Er. Rambling now.
My point is, figure out what you can and cant do, and do your best to give yourself the ideal work enviorment and process.
☆ Deal with being overwhelmed
Making just a few panels and suddenly realising its gonna take years to get anywhere is SO demoralising. It's gonna happen and its gonna happen again, and again, and—
But continuing with the earlier advice, you gotta ask yourself what would help you. Are you willing to sacrifice quality? Do you just need a break? Maybe you're like me and like to include smth you love in every update so you'll have something to get excited about making.
That feeling of overwhelm is trying to tell you something, so figure out what that is so it wont end the project for you.
☆ Start it
You wont like what you make when starting. I've never heard of an artist who has.
I'm not saying start this instant, not everyone is as into improv and flailing around as me. But I will say you'll never feel ready. Figure out the minimun of what you need to start and do it. Show friends first if youre afraid to post.
Also where to start? Well sure there's lots of good advice online about that, but you can also just doodle random stuff until you feel like diving deeper. That's what LV started with, just Twi and Wild hanging out with animals and some headcanons. It may not be the most tightly written work but theres beauty in the humanity of a mess.
☆ Extras
A "failed project" or "forgotten WIP" is only a failure if you let yourself feel that way. Yea it can be a hauntingly strong feeling thats hard to deal with... But it can be beaten. WIPS are proof you tried and not everyone can say they have.
Lv is far from done and I have no intention of dropping it, but because the journey has been so nice I'd satisfied even if I had to call it here. Its smth that helps me with the overwhelm... What I've made is beautiful even now.
Comparing yourself to others is gonna rip your heart out. I love that theres other links meet aus out there and hope the best for those artists but I caNNot follow any of them or I'll crumble to dust.
So Uhm.
Basically. Have fun and be yourself. 👍
Ps. Readability is basically the most important thing for a comic artist to pay attention to, that and not destroying yourself with details and rendering. 🙌 Good luck out there!
#Ask#I love discussing stuff like that but it always ends up so rambly and long ahsjjdjr#I hope I said at least smth slightly concrete
84 notes
·
View notes
Note
This is random and I don’t know how to say this, but I just adore your art— your way of drawing plants/animals, patterns, etc is insanely technically skilled, and the compositon and style is amazingly creative! I love how there’s such a variety of patterns and subjects, yet they’re all connected through similar styles, colors, etc.
Sorry for rambling! All this is to ask if you have any tips for beginner artists/artists wanting to start with digital art/improve their work.
Have a nice day/night! :)
Hi! So sorry for not answering this for forever, it got lost in the inbox ;-;
Thank you so much for the love! I really appreciate it. As for tips, it's always hard to come up with something that hasn't already been parroted a million times xD but, I'd say some of the best advice I've ever received is that you should focus less on the end result of your art and more on the process it takes you to get there.
It's easy to end up cultivating a style that looks stunning at the end, but that you dislike every moment of getting to that end result. That's a great way to burn out and start avoiding art. However, if you try and forget for a moment about what you think the end result should be, and just focus on enjoying the process of creation, then you'll end up happier and more fulfilled.
Now, it's good to still challenge yourself and you shouldn't discard techniques simply because you aren't skilled with them yet. But if you've worked at something and learned how to apply it, but you still dislike the act of doing it, then don't force yourself to keep going. For example, my art style includes little-to-no lineart and is highly stylized. This was, in large part, driven by my actual dislike of drawing lineart. I just rarely found it fun, despite having the skill to do it. Likewise, I actually used to paint realistic pet portraits for commissions. Eventually I realized how much I didn't enjoy the long rendering process and I shifted away from realism. Focusing on color and shape and pattern are all things I really love about my process and style.
TLDR; At the end of the day, just chase the things you enjoy.
Hope that was helpful! <3
38 notes
·
View notes
Note
hi! I saw your post about critiquing another persons art work and it made me realize i dont like my current drawing process
Mostly because I have shaky hands and don’t really like line art because it takes me too long and i still dont like how it looks so im trying to switch to a more painterly style
Do you have any advice? Particularly on defining 3d forms?
P.S.
(I love your art style! You draw so beautifully and I love how you stylize anatomy and hair particularly)
yeah i feel you, i think everyone starts digital art with a lineart heavy style in mind and then gradually drop it as it is pretty hard to master
i'm not sure i'm the best person to ask about defining 3D forms as i myself struggle with that, but i thing that i noticed is that if you don't have a stable base or foundation to paint over then the process will become exponentially harder. So what i do is i make sure i have a cohesive sketch. Not a clean one, not a pretty one, but one where i am sure where everything goes and one that helps me predict and better visualize how things will end up once i get there. If the sketch is so messy to the point where i can't tell a leg apart or i don't know the general form of the fabric then i'll have a much, much harder time rendering later on.. So i think making sure the "skeleton" of your art is set in place. Again it's not about it looking good or clean it's about knowing what you'll be doing with it in the later stages.
But let's say you do have a clean sketch, or even lineart. I think the easiest way to give form to your subject is by choosing a light source ( it doesn't have to be dramatic, it can just be ambient light ) and then paint shadows in the areas where light can't reach. It depends on your style really, but for me i use a darker (but still saturated) color under the chin, under the eyes, where the bangs/hair meets the face and for the nose area i kinda just make a blob (i don't paint noses that much as you might have noticed bdshj but you know,, check out other artists you like and examine how they handle shading). Just try to think of everything as oversimplified shapes. limbs are cylinders, the torso is like a parallelipiped or a box or a sack of beans or whatever you see fit, the head another box etc... just keep it simple, Less is more
Oh and also, for a painterly style, i suggest avoiding overkilling it with the rendering. Let the brush strokes speak for themselves and keep it vague/ abstract. Our brains are smart and they loove filling in blanks for us if they're given some general information so let the viewer do the hard work, don't explain everything.. this is also a good way to practice developing an artstyle but i'm getting off topic if i wasn't blabbering enough already. A painterly style is imperfect and messy and vague at times and you should let it be that way, don't force perfection onto it as you'll deprive it of humanity
these are my two cents on the matter hope it made sense and helped in any way? if not you can always watch yt videos or listen to more qualified people than me
#sinix marco bucci ahmed aldoori#i think that's the holy trinity#they explain stuff pretty well#also don't forget to analyze other's work and see what They do#no need to reinvent the wheel u know#ask iztea
20 notes
·
View notes
Note
Hello! Do you have any advice with painting? Every time I start I end up just doing lineart with colours underneath, and when I do kindles art it looks kind of like plastic. Am I supposed to merge the two layers and then start shading? What would you recommend?
Hey anon!! I actually do have some advice for that!! I'll shove it under a cut because it got way longer than I thought it would, sorry for the infodump everyone _(:3 」∠)_
quick tl;dr: painting process should consider both personal taste & the desired aesthetic of a painting, & to avoid plastic-y colours, make sure your hues vary within your values (and layer modes are ur friend) ♥
there's a million ways to start paintings & its all down to personal preference -- the end goal for the illustration can often influence the approach you take; a crisp digital painting might call for meticulous layering & sharp edged flats, but if you want something to look like an oil painting, you should try and mimic that process as close as you can! here's some examples:
this is the sketch for my FYR zine piece from last year; i intentionally approached it in a way that looks like traditional underpaintings so that when I worked directly on top, those orange tones would peek through like this:

after doing that undersketch, i manually painted everything -- no fancy layer modes, just me, one layer, and screaming ಥ_ಥ it was hard but it worked for the vibe i wanted!!
now v.s something like this:
simple shapes, roughly blocked in shading that just gets merged and painted over, as well as lots of layer modes on top for those colour changes! this is by far the easier one & the one i'd probably recommend, solely because it lets you keep more control. i go more in depth here on that -- but to quickly answer, i personally block everything (including shading) in before I merge & render!
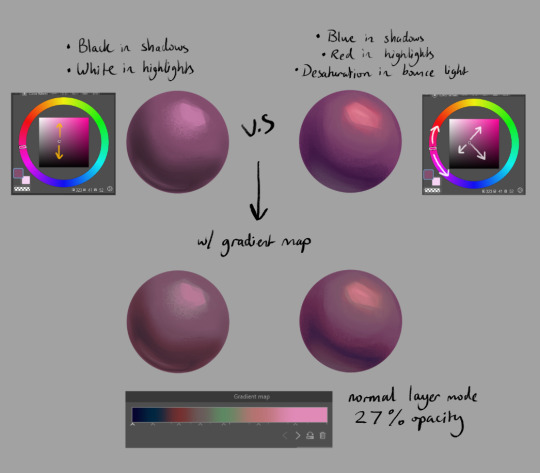
for the other thing you mentioned, a lot of the times that 'plastic' feeling can come from either a lack of transitional shades or only using white/black for your value tones. this tweet thread (direct image links 1, 2 & 3) by frozensoba demonstrates it incredibly well -- by adding certain colour shifts in your values, it can create extra depth which is what makes stuff look more alive!! don't be afraid to really push it and get wacky
an easy way to add it while you're learning is using gradient maps to add richness in your midtones. It's not perfect since different surfaces & materials diffuse light differently, but adding one at the end of a drawing can help tie everything together. If you can do both at once though it always looks best; here's some very quick 2 minute orbs as an example:
ok I'm almost done (and im so sorry for how long this got... special interest moment TM) -- one last thing is to try varying your brush strokes & adding textures if you want. using only an airbrush or heavily relying on blurring brushes can make things look plastic too; sometimes you want that, but for the times you don't, adding some texture & leaving brush marks in can do a lot!!
lastly, since this is just me rambling, here are some artists that are incredibly talented & i highly recommend looking at for their advice & processes because it will be much more coherent than this:
Marco Bucci -- amazing educational content. if you check out any of these artists, he's the one to look at first imo. his 10 minutes to better painting series is a great place to start
Sinix Design has some amazing tutorials on anatomy & the mechanics of painting! This video & the intermediate part 2 are super
Dao Trong Le -- a veritable goldmine of speedpaints
Bo Chen & any of the riot splash artists. If that's the vibe you're after, you can't go wrong with the LoL splashes as reference
i hope that helps!!!
#tutorial#any time i have the opportunity to barf out art talk i will do it#tysm for the question too ♥#not art#asks
91 notes
·
View notes
Text
Live-Drawing Summary
On August 18th, Webtoon CANVAS did a creator summit where Webtoon authors could teach others and share their process. Sleepacross was one of the many artists who were invited, and they did a live-drawing session.
The Webtoon moderators said that the stream was recorded, but we have no idea as to when it will be published, so I thought it'd be nice to write down the questions and answers that were said in the stream!
This is very much paraphrased and spoken from memory, so some things might be a bit off (and I apologize). I marked the things I am not completely sure about with a "(?)"
If you were in the event too and want to correct me on something, just tell me and I'll edit the post!

QUESTIONS AND ANSWERS:
Q: Which character changed the most and which character changed the least from how they were in the beginning?
A: Sayeon changed the most, Min changed the least.
Q: Who do you like to write more and who do you like to write the least?
A: Sleepacross likes to write Ryujin best, because they like angry women, but doesn't like to write Min as much, because it's hard to get across what Min is thinking.
Q: Who looks better in a suit?
A: [REDACTED]
Q: What are your sources of inspiration for Hand Jumper?
A: Videogames. They cited The Witcher and the author of Berserk as an inspiration. "Thank you to old men."
Q: What will you do after Hand Jumper is finished?
A: Not quite sure. Sleepacross is studying to be a Visdev for videogames. Maybe they will make another webtoon, as they have other ideas, but they are unsure.
Q: How many seasons will Hand Jumper have?
A: Probably 3. Hand Jumper can be a little longer or shorter depending on the pacing of the story.
Q: What character are you most excited to show more of?
A: Samin and Sara Lee.
Q: How did you come up with the magic system for Hand Jumper?
A: Sleepacross wanted to make something a little mystical but that also was a little grounded in reality. They also mentioned that there is soft magic in Hand Jumper. (but their stream froze while they were speaking, so I didn't catch the rest </3)
Q: How do you balance out college and Hand Jumper?
A: They don't.
Q: How did the pitching for Hand Jumper work?
A: Word vomited into a google docs for 2 days and apparently that was good enough for Webtoon, who greenlit the series.
Q: How many assistants do you have?
A: Two flat color assistants, one editor.
Q: Biggest challenge when creating Hand Jumper? (?)
A: Sleepacross wanted to do everything on their own at first, but it was tiring. Eventually they got assistants to help out, and said that we should look for assistants too, if we ever decide to make a comic.
A: Not too far.
Q: How far along was the original Hand Jumper when the originals version got released?
Q: How many episodes did you have ready when you began uploading the original Hand Jumper on Webtoon?
A: Just 2. Don't do that.
Q: Advice for others who are starting their webcomic?
A: Draw what you like, write for yourself, and do test panels to know how the webtoon will look like.
Q: Are there plans to have a physical copy of Hand Jumper?
A: Not yet, but the idea sounds nice. Either way they'd have to redraw the old chapters because they'd rather gauge their eyes out than have them be printed.
Q: What character would you personally simp for who isn't Samin?
A: Ryujin (? I think ?)
Q: Is Iseul actually nice or is he a psycopath?
A: Iseul is nice. They added by saying "Nice characters are nice in my Webcomic."
Q: How much time do you spend working on Hand Jumper?
A: No idea.
Q: What takes the most time to draw in Hand Jumper? (?)
A: Action scenes.
Q: What's most important when making a custom brush on CSP?
A: The pen pressure, so you can get a better feel of your tools.
Q: What brush do you use to lineart? (?)
A: A custom brush lovingly nicknamed "sleep2"
Q: About the songs in Hand Jumper...
A: Sleepacross will upload the songs on youtube eventually, and is working on a new song which they will feature in the first episode of season 2.
Q: When will season 2 come out?
A: No idea, but they are working on it.
Q: Can you make your college work Hand Jumper related?
A: Sadly no, their assignments don't have anything to do with Hand Jumper
Q: What characters do you like the most? (?)
A: Sayeon and Officer Han
19 notes
·
View notes
Note
Okay first of all...your artstyle is AMAZING and the story elements and details are great! But lord the angst is SO good, dude it's no joke giving my daily dose of angst lol. I do have a question...I really want to make my own comic on paper but have no idea on how to do the panels right, any tips??
YES!!!! The first collage course I did in comics and comic design I had to do on paper so i can absolutely help you!!
Use a ruler.
So whatever width you want your boarder to be around the frames, always mark it with a ruler (this is if you're going for a more clean look, but i would also suggest using a ruler for the baseline sketches on a messier panel)
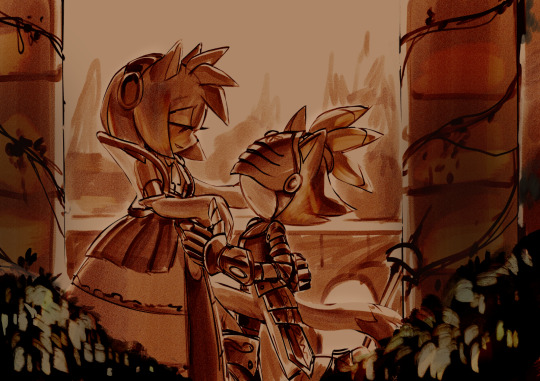
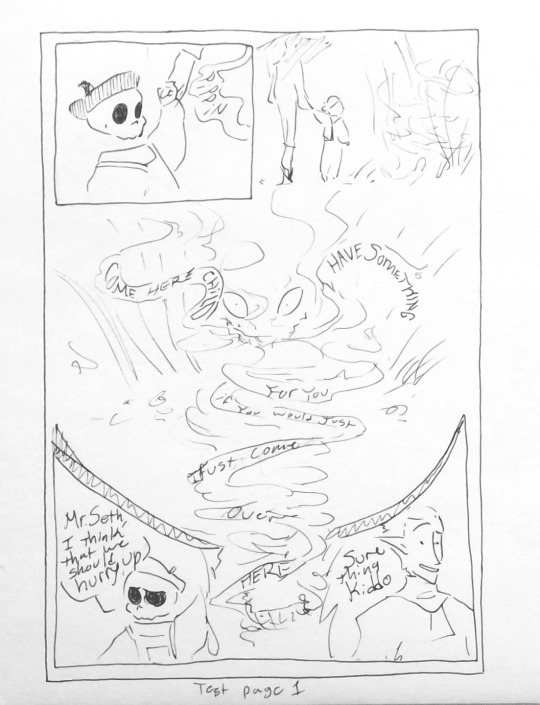
Thumbnail!! Always thumbnail!! It's a good idea with comics to like, lay out the foundation before you start to sketch the actual drawing and go all in, because you wanna see how it flows best. I'll show an example of the last 6 pages for It Runs in The Family (the FA comic)
And you can see that I changed some thigs but generally its helpful to go in with a plan, cus you don't want to have sketched out and ruled out all the panels on the actual one and then decide that it looks goofy and you want to change it, its a lot of work lol.
Use whatever pen you like, comic's don't have to look nice to do well. It's more about the story and how you emote lol!! Use the frames to your advantage too. Don't be afraid to go beyond the normal square and rectangle ones.
the way you do the boarders is really really important in expressing the urgency or the feel of the page. Don't be afraid to take and place the character outside of the boarder and coming into the gutter (the gutter is the space in-between frames on a comic)
I don't normally like using Onomatopoeias (fancy word for sound descriptors I just like saying haha) but they can really ad a lot to a frame, espessially if you're going for impact. ie WAM, SLAM, BOOM, etc
(these are some of my OCs)
You can colour comic pages you drew traditionally digitally.
One, you want to make sure your lines are clear and dark enough. So mess around with the contrast brightness and make sure there's no saturation when you take a photo of your page lol. Two, put it into your art program, I use CSP but I used to use sketchbook autodesk so I know at least that has the layer mode you're going to need.
You're going to need to take the Photo you put in and change the layer mode to "Linear burn"
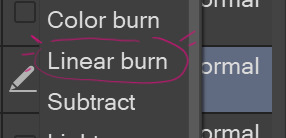
Linear burn make's it so that the lighter the shade in your drawing, the less opaque it is So, that means you can use the lineart you did digitally, if you have it edited so that its basically black and your paper is almost white, works just as normal lineart
(now i'm pretty sure there's a way in CSP to take all of one colour and change it to a different one, which means you can take all of white and make it transparent but I am a big dumby and don't know how to do that)
And the final piece of advice I can give you is littarally just start drawing your comic if you want to. Because we all have to start somewhere. Don't go waiting to start it because you want "to be able to do it right" or "you're not good enough yet" because FOOL!! THERES NO RIGHT WAY TO DO IT AND YOU ARE GOOD ENOUGH RIGHT NOW!!
It may not come naturally to you at first, but keep at it and you'll get there. Everything takes time. Have fun!!
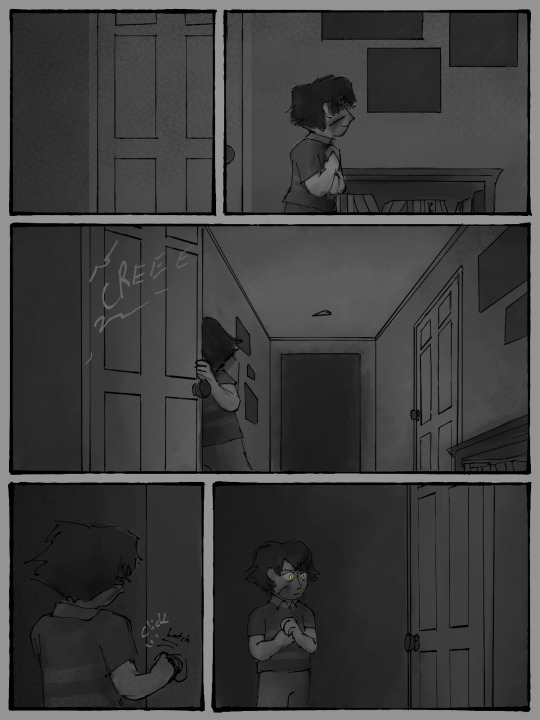
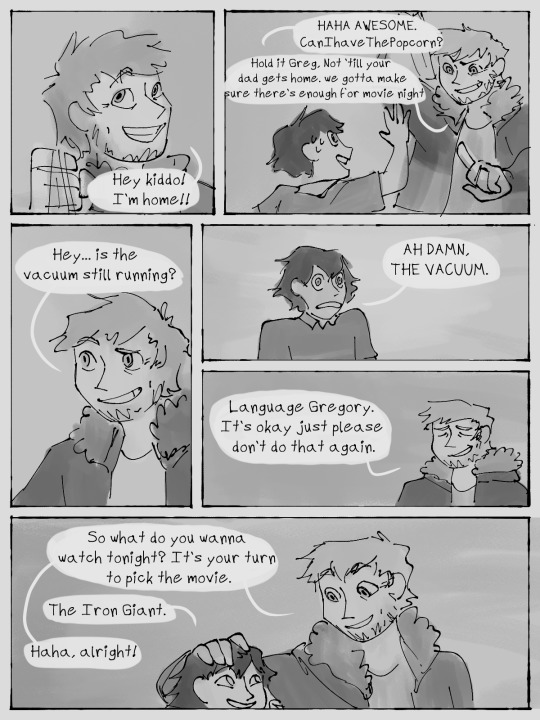
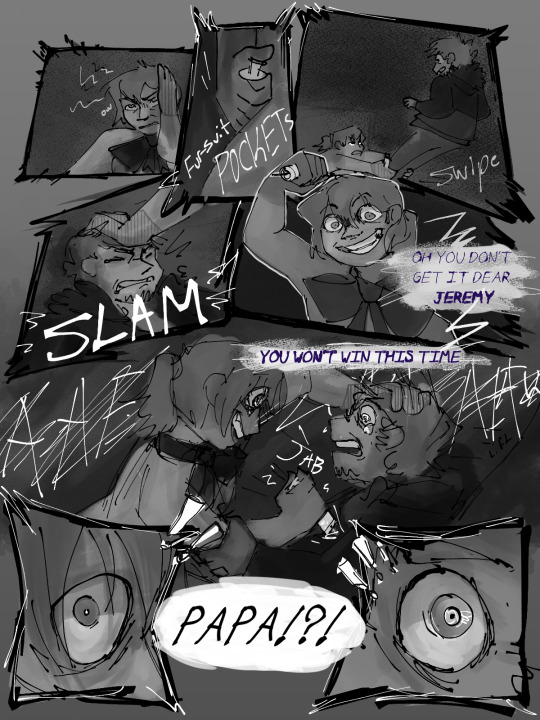
#birdieghostalks#ask#answer#gregory fitz afton au#comic#comic page#birdieghostart#my art#doodle#art tips#comic tips#comic pages#hahahha#it runs in the family
199 notes
·
View notes
Note
Any advice on how to sketch faster? Feels like it takes HOURS for me to make a sketch for just one drawing...
ok this is a hard one for me because it genuinely just. kinda comes naturally to me actually. like i remember my art teachers in elementary school getting annoyed with me because i could draw so fast and i would finish before everyone else. BUT there are some things that i think have helped me get even faster over the years!
the first one is quick figure drawing. I like to do 1 or 2-minute gesture drawings because they really force you to move fast and think more about the form itself than get bogged down in the details. (in art school they make you take a ton of classes that are JUST figure drawing if you're majoring in illustration. i love it.) The absolute best way to do this is a live model session, but i understand that not everyone is in art school lmao so the website quickposes is a good resource! go to timed practice and set the interval to 60 or 90 seconds, and then just focus on getting the IDEA of the form down instead of all the details. This can be scary at first but eventually you'll become much more confident and your hand will naturally start to move faster when you sketch! figure drawing this quickly will also help you loosen up and get a better idea of the forms of the human body instinctually, which will in turn make it easier for you to sketch faster even without a reference!
The second thing that i think really helps me go fast is kinda a natural progression from the figure drawing tbh, and it's not worrying TOO too much about 100% anatomical accuracy. What my professors have told me in my drawing classes is basically that as long as it LOOKS believable, it doesn't matter if it's actually perfect. don't worry too much about realism or accuracy when you're laying down a preliminary sketch. focus on the energy you want your pose to convey, and let your sketch reflect that. if anything is HORRIBLY wrong anatomy-wise you can fix it later, but a little bit of limb-lengthening or otherwise unrealistic proportioning isn't the end of the world, especially in very stylized art. When you aren't super worried about 100% accuracy you have a lot more freedom to move quickly and ignore little mistakes!
thirdly, lose all the steps in your artmaking process that you don't like. when i first started digital art, I thought that i HAD to do a stick -figure pose sketch, block in the body on top of that, then clothes, then lineart, coloring, shading, etc. there were SO many steps in that process that took me a really long time to do and that i just... did not enjoy doing. nowadays I've almost completely cut lineart from my process because i like the sketchy look, and i often don't even draw the full body before i begin blocking in the clothes, hair, or face. Obviously you need some preliminary knowledge of how these aspects of your character are going to interact before you can do this, but once you're able to it really shaves off a lot of time. I found that when i was trying to do things what i thought was the "right" way, even steps that i hated, my art looked worse and took longer because I wasn't having as much fun.
#I do just naturally sketch fast but i think a LOT of it is that i dont worry too much about little imperfections yknow?#anyways. hope this helps lol#asks
73 notes
·
View notes
Note
my toxic trait is looking at your art and thinking that i could do that too. everytime i try drawing Transformers it ends up lookin like a pile of metal that got ran over by two semi trucks blasted to cybertron and back then got the shit beaten out of it by Optimus Prime himself 😭
but fr though, how do you do it? like what kinds of shapes are they made of? how do all their weird alien metal parts move?
what may work for my style might not for you, as i've unfortunately learned through my years of yearning for/trying out another artist's skill, and that's okay. but i am very honored to be that kind of artist to you 💗 beating yourself up for not being like me won't help you, though 🥹 your art is great, regardless of if it looks like mine or not. i'm going on 7 years of doing this after all! (also i started with bayverse of all things 😵)
and honestly, a lot of it is just experimenting and finding what's right for you, what you need to improve/improvise on, and what you want out of your art. for me, i found that i have a very difficult time actually getting that sharp, blocky industrial style of robots down and eventually opted for a more organic, squishier look. but i do maintain their proportions as they're wildly different from a human's ghsdfsjs
you're already off to a great start doing exactly what i did to learn: redrawing screenshots from the shows. i learned most of what i know from tfp, with a lot of bayverse and g1 mixed in there. it took me about two years of that before i felt confident enough to start making original art consistently. it takes time (and tbf, i was still learning how to art in general when i started. so you really are off to a great start)
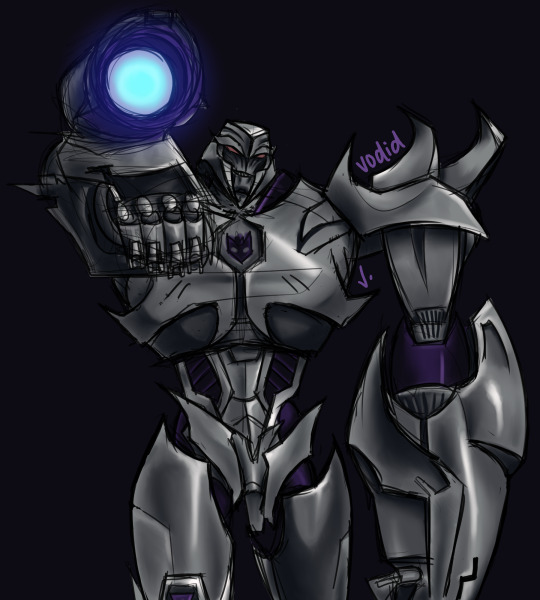
this is the kind of art i made in 2017:
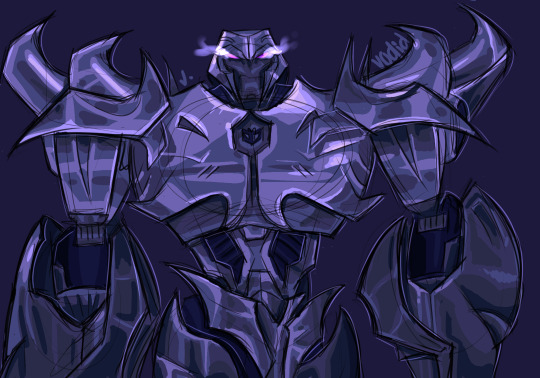
massively different from my art now, right? through all these screenshots, i'd test out new ways to draw and color. at one point, every piece i made was trying something new. and it was okay if it didn't work out. means i know what not to do next time lol generally though, i'd NEVER do lineart. i mostly focused on building up my sketching and coloring skills, as seen here in my 2018 art:
and that kind of fucked me over for life so now i am left with painting over the sketch 😂 i digress though
in all honesty i've spent my entire art career figuring out how the fuck all their weird alien metal parts move 💀 a lot of it is BSing, some is recycling the same poses to make things easier on yourself and the rest is studying studying studying. cannot tell you the amount of times i've rewatched certain bayverse scenes frame by frame to figure out how all their parts move in tandem — i still don't know! 😅 g1 was a nightmare to figure out because of its blocky simplicity and limited range of motion. it's still a struggle to this day haha
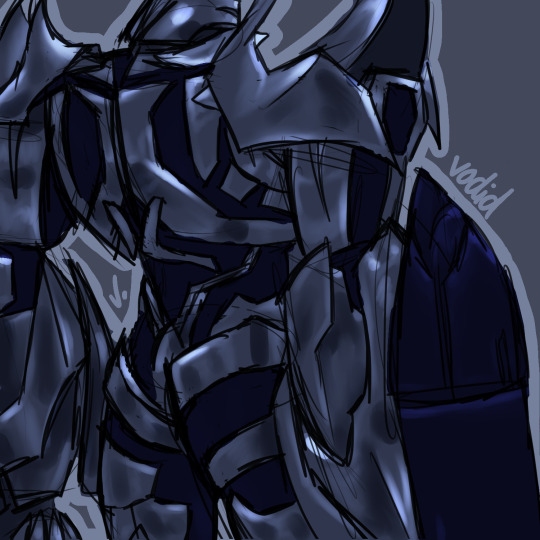
it's really difficult how to explain how exactly i draw transformers, as it's just... something i do nowadays. there's not a ridiculous amount of thought put into it since i've built up my skill. but here's generally how i sketch their bodies and what shapes i use:
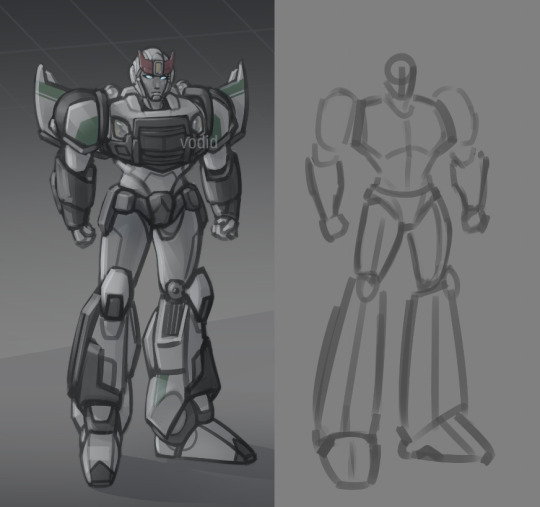
the first is slightly different as its a more detailed approach than g1 so just imagine the arms are a little rounder — "marshmallow," as my brother would call it — like the sketches in the second (even if those are a little more advanced in the process than the first)
my best advice to you is to learn their proportions and articulation via redrawing screenshots — various ones! i chose the most dynamic poses for my megatron practices in 2018 to nail it in my head lol but yes shows like tfp and earthspark are great for that (you could probably even do with looking at the storyboard animations for earthspark to help!)
and remember, i'm still learning too! i'm not gonna pretend like i know what i'm doing. but i'm glad i inspire you :)
12 notes
·
View notes
Note
Heya, same anon who asked you for art advice! First, I wanted to thank you for answer my questions and listing all that wonderful advice! I just have some followups. It’s really okay to just draw without even knowing how to put down a line? Won’t that just lead to bad habits or not learning the right techniques? And you mentioned learning how to draw the human body, will the sites you listed help, or are there other resources I should look up (like maybe on Pinterest?). Again, thanks!
Combining your asks into one. Thank you for the kind words! I'll be happy to continue helping where I can :)
So in terms of bad habits and practices, this is where my advice will fall flat haha because I myself don't know what's a good practice actually - I just do what I want to do even if its the worst way to do something anyone's ever seen! For example, my way of doing 'lineart' (just cleaning up my sketches) is to draw big fat lines and then slowly carve it with an eraser into a line I deem good enough. Someone who could grab a pen and draw a perfect line on the fly would probably be like wtf watching me meticulously erase my one fat line lol
But!
If you really don't know how to put down a line at all yet, your best bet really is to just start. There's not really a trick or technique too it, its just practice. I think unless you were trying to go into art school or something and needed to work on a portfolio (btw again I am not the person to ask for that), there's not really a 'bad habit,' its just as long as you're having fun. In my earlier example about my 'lineart' I pretty much know I'm doing it in such a dumb way, but I actually find it really fun to carve away my line with an eraser haha. Yea I could put in the effort to actually learn how to do things properly, but I like wasting hours just nitpicking on this little thing just because its fun to me. (I do the same thing for coloring also. I'll scribble my entire screen and then use an eraser to start carving things out lmao)
Of course while you're drawing and you're doing something that makes you think "hey this actually sucks actually-" that's when you take the opportunity to grow and learn something new that you didn't know before. This is a digital art thing: but for the longest time I literally didn't know anything about layers and my thoughts were just "man there's got to be a better way to do this" which throws me into a rabbit hole of searching "how do I do This Thing"
If you're really into learning art techniques though it might be good to slowly go over all of the 'art fundamentals' especially when it comes to like shading and perspective. I looked at this blog post and it looks like it would help start you out with some links to other resources: link then of course you can look up the corresponding Youtube videos to see someone actually do the fundamental for real. I'd also honestly recommend like a beginners artist course in person if that's something affordable and accessible to you. It's been one of my dreams to go to like random art classes for fun haha but alas life happens so its just me and my tablet until I'm rich as hell I guess. I've never taken a digital course either, but if that's one of the ways you're able to learn that's great too and I'd recommend it!
Next on human body:
Sorry I should have talked about them more in depth at the time, but yes they will help but only if you're determined to use them correctly! So the sites I listed basically show a pose for 30 seconds, and the idea is you're supposed to just try to take in the shape/form of the pose and draw it without nitpicking over minor details. You can also set the timer higher if you need (I used to set it to at least 60 seconds just because I was just a slow ass artist). But basically it should help you break down the human body into simple shapes and lines.
Now what I mean by using the sites correctly: So there's two ways to approach drawing from references:
1. "eye tracing" which is where your eyes are kind of just following the outline of whatever you're drawing but you're not really processing what exactly you're doing to help you later down the line. I have a bad habit of doing this and I tend to struggle later again for the same pose.
2. Breaking down the reference into small chunks and shapes, and then morphing those shapes into your piece. And later down the line you should start to be able to think of things like "oh the Circle piece of the body normally goes Here!"
Here's a random google image I found to help illustrate what I'm kind of talking about:
So eye tracing would kind of be like a less refined version of #3. Just a blobby but like you can somewhat tell what it is and that's cool I guess, but its not very helpful for when you want to try drawing a variant of the pose above. Breaking down the reference is like steps #1 and #2, simple shapes and blocks that help guide and outline the final shape you want. #1 in particular is very easy to change around should you want to.
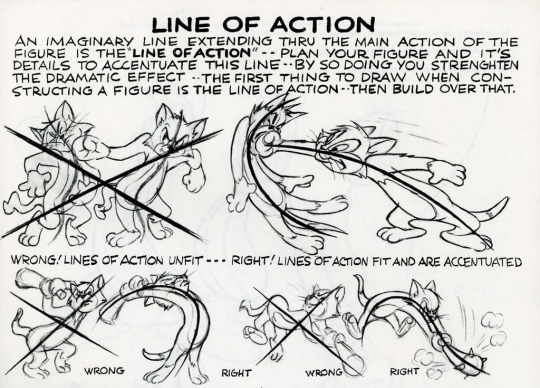
So while you're on the sites I linked, you should try to break down each pose into its shape instead of drawing exactly what you see. You should also keep in mind the 'line of action' while doing so:
It's definitely a lot to take in all at once, so I'd honestly recommend just loading up the site and doing your best to replicate the pose, 'eye tracing' or not. Once you get more used to the routine and flow, then try to branch into learning more appropriate techniques. I've seen around that some people also recommend removing the time limit on the poses, as some people learn better by taking their time on one thing and breaking things down even further from there, but that's definitely up to you. You could also go out and try drawing random people if that helps and if you're bold!
My experience with Pinterest has mostly been for inspiration or cool things I've never thought of before, though I'm sure others are able to use it better than I can haha. I'm sure there are step by step guides to help you out around there!
I think resources to learn how to draw better really do come down to what kind of learner you are in the first place. Lots of people learn really well from Youtube tutorials for example, or maybe reading and following along with a book about anatomy would work for you too. I have like the most god awful attention span ever, so what works for me is just raw trial and error and hoping for the best. tbh idk how I even got this far haha but i am happy that I've progressed at all
Let me know if you have more questions and I'll definitely do my best to answer them! If you're looking for more advice regarding traditional art learning fundamentals, I'm sure there are many other artists that would be happy to answer your questions as well!
Best of luck! :)
6 notes
·
View notes
Note
Any advice you can give to someone who can only want to do pixel art, but really wants to do More non-pixel art :D (Sorry if this specific I really just need some beginner art tips since your art is amazing. :'D)
I did once did a post with little tips for art but I can definitely give more! Since, since that time I've actually learned quite a lot.
To start off, I will say the most mundane thing. You prob need reference. I myself can't do without reference even if to only take some inspiration or to use a picture as a guideline.
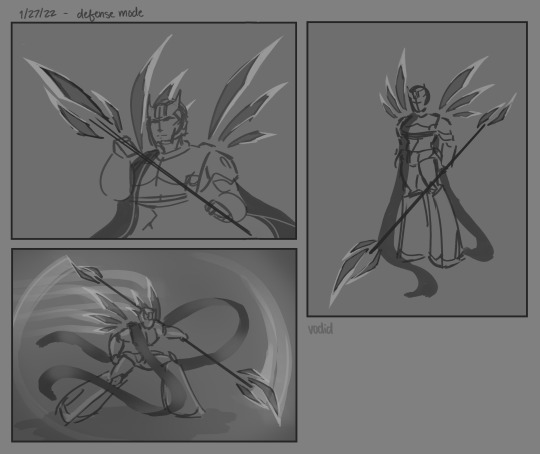
For example, in my latest illustration, I was using this picture from Pinterest as a guide line:

It is totally not what my illustration looked like in the end, but it help me put poses into perspective.
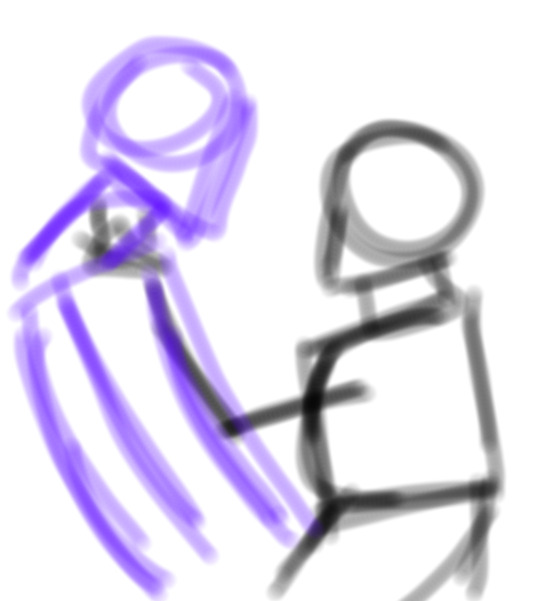
I often use a thick airbrush to sketch out the poses. It really helps with not overthinking or being worried that it doesn't look right, because for me at the start it doesn't needs to look right. Its basically the skeleton of the drawing that we will put flesh onto as we go:
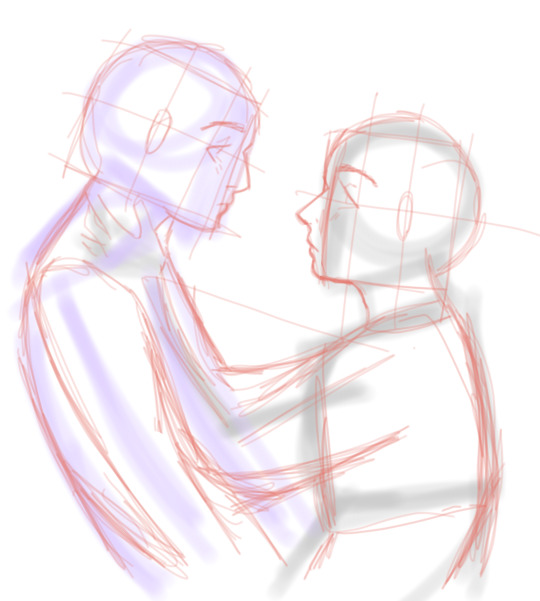
I put layers on top of these and try to figure out how would the body look like. It's not perfect bc I sometimes also think of clothes. I've also put in faces into boxes, it helps lot more to put the face into perspective for me.
I very much color code the clothes, hair, accessories etc. It doesn't mesh all together thanks to it!
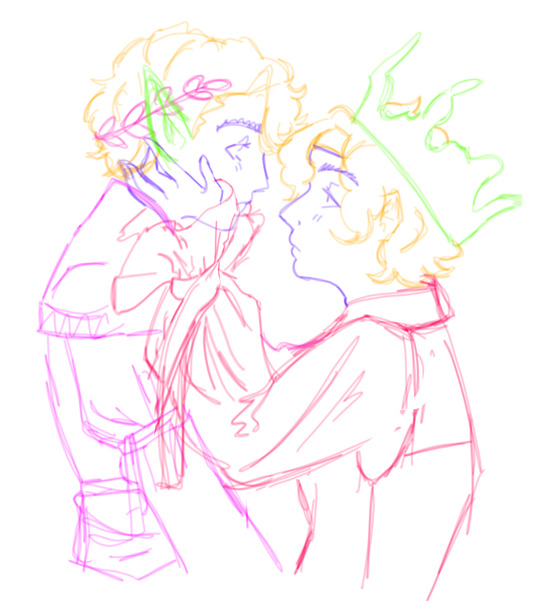
Then comes lineart and base color:

After that you just take a darker color and put in shadows in places you believe the shadow falls! When it comes to rendering and shadows I can't really say much, as there are a lot of different ways to do so, so I really recommend to watch some videos about it!
But when it comes to my silly little design characters, it's very much cartoonish and stylized. But I do the same tactic! I use a big airbrush and go over the same steps.
Tho its been very much influenced by the rubber horse art style, which is this very cartoon old style, like bendy and the ink machine.
I don't do lineart for it most of the time, instead, I use lasso fill over the sketch :D
Thought the best way I can recommend learning is by looking at and studying people's art styles. See how other people do stuff, how they color, render, and do linear, and make it your own.
For the longest time I've been observing Lavender Towne and her way of making art has taught me A LOT, yet we don't have similar art styles at all.
I've been even inspired by Wassup its E, and hell, I know for a fact E is so talented. The color theory that art brings is MWUAH. And I've learned some from looking at E's art, despite our art styles being practically opposite.
With E having those very bright, very impressive, and sharp eyes, it's pretty opposite for me. Lmao
But the best I can say is to use references and break the poses into shapes, or always helps! Or at least that's the advice I can give on top of my head. If you have anything more specific I will probably elaborate.
5 notes
·
View notes
Note
Hiiiiii!!!! Its goood to see you after a while, sorry to hear you aren't feeli g good at the moment :( Hope u feel better soon! Take care out there 💕
For the Q&A
What's your favorite part to draw? Do you a favorite color pallete you love to use? Any art tips?
It is good to be back! And thank you so much 😘
I'd say that my favorite part would be doing lineart! It is so fun (thought it does take me forever to finish) and I like to see how much it makes my art look do much better and cleaner!
As for art tips, my best advice would be to just go crazy and experience with whatever you have and know. If you have noticed, my artwork is never the same, that's because I like to try different things and see what looks good and goes well with whatever I'm drawing. And yes it can look bad even after you try a lot of things but that is the fun of it!
I hope this helps even a little bit, I would have told you more but I really don't know what I'm doing most of the time 😅 I just go with the flow.
4 notes
·
View notes
Note
Love your coloring and art style 💖 can I ask you a question how you get better at drawing? I'm new (year 2) and struggling with digital art off and on. It's only been two years I'm drawing digitally but I just want to draw better. Like even better. If you have advice or tips, that's awesome. Hopefully it doesn't come off the wrong way. But thanks in advance.
not me forgetting that I had asks on 😭 if you're still interested, here's the (extremely) late response (again, super sorry 😭)
In terms of coloring, there isn't a lot I can say (being a learner as well), but I think seeing how others color can be really interesting! Do they use reddish hues or blueish hues for shades? Or do they use both? I personally use a slightly desaturated salmon pink-ish color with a low opacity (also desaturated) sky-blue. It can help to try out a variety and finding what works for you!
example: (this is an old piece of mine and I used red and blue as my tools for shading)
The same can be said for base colors. For those, I recommend color-studies and seeing how relative colors can influence how you perceive the entire piece. Rather than focus on the colors as separate entities (blue as blue, yellow as yellow), it's really helpful to instead look at it instead as something meant to intermingle with (if that makes any sense 🥲).
In a blue-prevalent piece, straight-up grey might look reddish or even pink. In a purple piece, the skin-tone might look like light-magenta than a peachy color. Yet, when you look at the piece as a whole, it definitely looks like a skin-tone.
example: you can tell that the skin looks like a skin tone, but when you actually pull it out and look at it in comparison to a peachy tone, it's purple! And this is because of the idea of relative colors. Against a white background, a color might seem saturated and dark, but against a dark background, the same color might seem super light.

For lineart (if you do them at all), it might help to experiment with brushes and thickness of lines! Do you prefer boxy lines? Smooth lines? Thick or thin lines? It might seem redundant, but you'll eventually find yourself a style that fits you the best, even if it doesn't seem that way ^^
Another tip I have is that if you have a bunch of artists you really like (whether that be their composition, style, coloring, etc), examine what exactly you like about them and try to imitate it and see how well it works for you! If it doesn't, then that's fine, but if it does, then thats even better!
If you have artist mutuals, do the 'friends' artstyle challenge'! You might learn something interesting that might take your fancy and at the worst, you'll just have more experience under your belt when it comes to style :D
Though it may seem like everyone's saying this and it feels of little use, studies (whether that be pose or coloring) will help a lot! Also, try tracing over those free dynamic pose photos if you want to improve in the aspect of anatomy! Try see where limbs are placed and how they work. It's sort of like seeing the answers to a math question: once you know the answer, you can work backwards to see how to get it :D
Sorry for the delay and super sorry if this isn't of any help at all 😭 Honestly, I don't really know how to do the stuff I do at all, either. Half of the time, I'm just winging it and tweaking stuff until it looks decent, but I hope this helped!
(Also, really really sorry for not replying 😭)
6 notes
·
View notes
Note
Hi, I would really want to learn more about rendering because it's what I struggle with the most. Would give some tips or explain how you do it? If you had some time of course. I love your works and you are genuinely such a good artist. Have a good day!!
Thank you! First of all, if i have to be honest, i don't know exactly how to give a good advice on rendering. For me It becomes almost an unconscious process (or subconscious at least).
When i first try to actually do rendering, it was because i accidentally turned off the lineart layer. And i discovered "oh! It brings such a great effect without the distracting of the lineart, but also add up to have an equivocal result" thats when i thought i was missing out something on what i called "render" at that moment.
So rendering is the final steps to improve ur drawing. Simply, the advice on it is trying to find your weakness (something that you can fix in the finals steps)
My personal advice is to focus on the shapes more than the line art. There are shapes in coloring, shapes in shadowing. Further, what i actually mean is, ignoring ur lineart LOL.
For me when i draw i merge everything in 1 subject into 1 layer, treating it as a canvas, it can be hard at first, but trust me, once you get used to it, its actually the easiest way to draw.
For example i can say if i was working with lineart separate to color, i saw something wrong during the progress: like the hands look off or smth, to fix it i need to fix the lineart and fix the color on different layers, its two separate job(even more). Meanwhile with 1 layer only, it becomes so much easier to resize and replace something.
Obviously i don't recommend "let's merge everything!" Because you shouldn't. There should always be some object that would be easier to draw when its laying on another layer. And it's depending on what you draw. The purpose of working on 1 layer is to make thing easier, if its not, simply don't do it.
My second advice is. Welp, trying to copy. You can try to copy a real life reference, start with small object first can help. When you do that you will realize a lot of thing that could be helpful for your works. (Ex: like reflection of a texture, the logical of a lighting, the deep of a layer. Etc etc)
Last advice. Plsssss useeee reference, fuck anyone who say: "using reference is tracing and cheating!" Fuck them. I studied in an art uni, one of the best in my country and all of my teacher would say the same stuffs:"use reference" don't listen to those who doesnt even know art. (Sorry maybe its rude)
You can't understand everything, you don't know everything. Drawing is the same with writing, when you write, do you often have to do research on certain thing ? Thats reference, so why its cheating when you do the same on art.
Brain can trick you, don't believe it. Sometimes it would say: "blood is red" and in fact, nope, blood is almost a black shade, with a deep red at the edge of it depends on the amount of blood when where it lied down. (Yk like how we see our veins look purple and green under the tone of skin, its bc color changes, layer, color theories) When you realize something is unrealistic, take a reference, comparing, its how to win rendering.
Oh ok final last advice, Brain can really trick you, and it also need rest. I prefer draw straight but its just bc i'm lack of motivation to continue the job the next day.
In fact, if you stare at your renderinf for too long you probably can't recognize the mistake in it. When you draw too much, lets your brain and eyes rest, do something else. Come back the next day and you might see it in a different view and everything will be so much easier. (Its also to avoid burn out too)
Ok i have a lot more to say but i realize i might be rambling a bit too much so it gonna end here sjkwksms. Thank you again for the ask and things ❤✨🙏 hope you will be able to find your way soon! And improve ur drawingggg.
5 notes
·
View notes
Note
Hi Chekhov! Really enjoying your white diamond au! I had a quick art question: How do you start comissions? I've been improving my drawing skills and thinking about drawing for others after having fun in artfight, but I don't know where to start? How much to charge, how to get paid, etc. Do you have any tips? Hope you're doing well! :)
Alright, since a few people have asked, I’ve decided to put together a few things about how to get started on commissions - what you need, what you should make, and how to keep things organized.
This will get a little long, so I’ll divide it into 4 main sections:
1) Draw Art - Getting started
2) Get Commissioned - Making a commission sheet, Advertising
3) ??? - Communicating, Setting Limits, Running the Business
4) Profit - Pricing Yourself and Getting Paid
* Disclaimer: I’m an artist, so this How-To will be illustration-focused. I’m sure many of these tips can apply to ANY types of commissions, but I will be focusing on the type I know best. If you are proficient in other types of commissions for other types of art - music commissions, photography, etc - feel free to chime in and leave a comment or make your own tutorial!
1) Draw Art
I think this is probably the most obvious part, but it needs to be said:
Before you start making art for other people, you must first be comfortable making art in general.
I’m not saying your art has to be Disney-quality, or industry-level! Not at all.
BUT! You must be comfortable creating what you sell. If you try to sell something you have little confidence in, you will stress yourself out and possibly end up losing time AND money.
Don’t shoot for the moon if you haven’t landed on it even once. Sell what you know you’re good at. Your commissions don’t HAVE to include full-body illustrations if you don’t know how to draw feet/solid stances. Limit yourself to what you can do.
Things you need to should probably have before starting commissions:
1. Access to art materials or a fully downloaded art program
DO NOT - Use a free tutorial version that will expire in a month and leave you without a way to draw! If you are having trouble finding a program, try free ones like MediBang Paint Pro.
2. Free time to complete the amount of commissions you want to take.
DO NOT - Take on or offer commissions if you KNOW you’re going to be overwhelmed with school or personal life for the next 2+ months. Pace yourself, otherwise you’ll burn out, get stressed, and get discouraged.
3. A reliable way to communicate with your customers like a commissions-only email
DO NOT - Use your friend/family/college email. It’s hard to keep track of things as it is, and creating new emails is easy and free. And keep it professional if you can! Not many people will reach out to dong-wiggles20434 to ask for a design. Ideally, your email should be close to your brand - however you want to brand yourself. Usernames are fine!)
DO NOT - Use Instagram/Twitter/Tumblr to collect commission info unless you are ready to do the organizing yourself. Some people make it work, but in my experience, if you use these SNS sites to communicate with friends and network... you’re going to be losing commission inquiries right and left and accidentally ignoring people. Email is much easier to organize and sort into folders.
4. A portfolio or at least 2-3 pieces of each type of art you’re planning to sell.
DO NOT - Advertise commissions without having any examples of the art you plan to sell. People will find it difficult to trust you if you can’t even give them a vague idea of what sort of drawing they’ll be getting.
Disclaimer: These are not hard ‘do not’s. If you have had a different experience, I respect that. I’m simplifying for the sake of streamlining this advice.
.
2) Get Commissioned
So - you have your art, you have your art program, and you’ve got all the time in the world. That means.... that’s right! It’s time to let the world know you’re taking commissions.
One of the most common ways artists signal to their audience that they can do commissions is by creating a commissions sheet. There are MANY ways to make this - and they range from simple and doodly ones to VERY complex designs. For example, here’s mine!
There are many ways to organize a commission sheet. At its core, a commission sheet should display the types of art you WANT to be commissioned to make. Let’s go over a few ways they can be done!
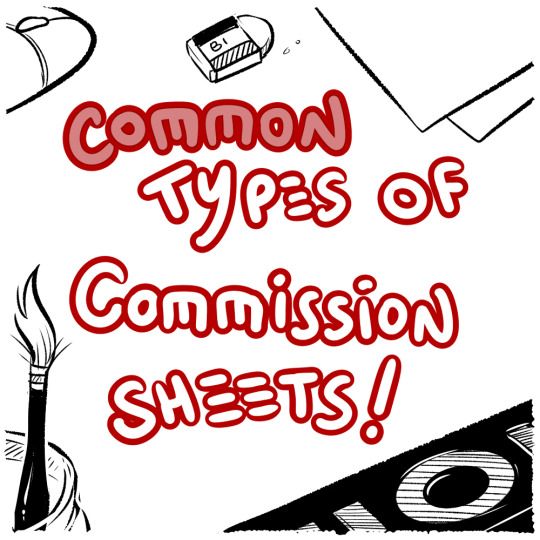
#1.... Body Portion Dividers!

This sheet is most common with those who want to capitalize on drawing people and characters. If you want to draw lots of characters, this is a great way to offer several tiers of pricing based on how much of their character your customers want to see.
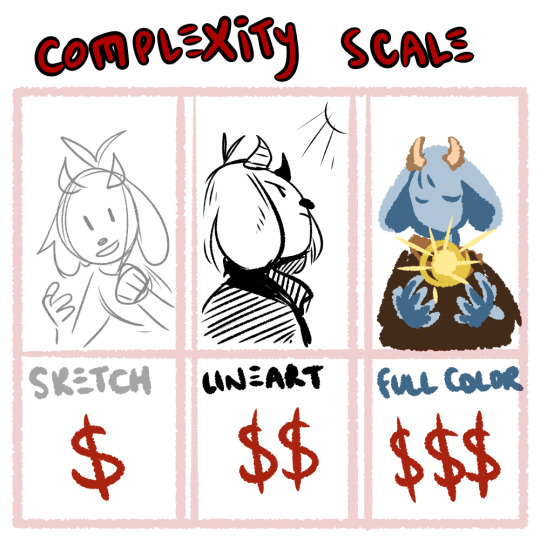
#2... Complexity Scale
If you’re open to drawing many things but want to base your pricing off of how complex something is, you can split your tiers into done-ness. This type of commission is popular with those that draw characters AND animals, furries, etc.
#3.... Style and Type

If you’re more on the design side of things, or if you have various niche art styles that you can’t quite lump together, display a variety of your skills alongside each other! It helps if all the ones you have can be organized under a common customer - like those looking to advance their own business and get logos, websites, or mascots made for them!
.
3) ???
You got your first commission... what happens now???
Well, ideally you have the time, tools and motivation to make things happen! Now all you have to do is... sit down and... draw.......
I’m going to say something that may be a little controversial:
Commissions aren’t fun.
No, no, hear me out: I have fun doing commissions! I genuinely enjoy drawing characters and coming up with designs. But even with all that said, commissions are, first and foremost: WORK
I’m not saying this to discourage you, I’m saying this to keep things realistic. When I first began commissions, I thought it would be just like any other type of drawing. I would sit down, imagine a thing, draw it... it would be fun!
But then I realized that I couldn’t just draw what I wanted - another person had an idea in mind and had asked me to do it. I stressed over getting the design correct from descriptions. I stressed over not having the right reference for the pose the commissioner wanted. I stressed over not being able to draw the leg right in the way I had promised I would do. I stressed about billing. I stressed about digital money transfers. It was difficult, and time-consuming, and I did not enjoy it. At all.
And a part of that is definitely on the commissioner - we, as artists, NEED to demand proper references or descriptions. We, as artists, NEED to limit the amount of changes we’re going to make at the flick of a finger. We NEED to demand clear instructions and set boundaries. That’s also super important.
But also - don’t be discouraged if you find yourself exhausted drawing your first commission. MANY artists go through this. Adjust your rules, fix up your limits, practice putting your foot down on finicky commissioners who expect you to read their mind! It does get easier, but you have to communicate and put in the effort and act as your own manager AND your own customer service AND your own accountant. That’s what you’re looking at.
Good limits and boundaries to set:
Limit the amount of changes a person can ask to make. “I want blue hair.” Next email: “No wait, yeah, make it red.” Next email: “Actually I changed my mind, can I get the blue but like, lighter?” Next email: “No, not that light.” ... At some point, we have to stop. I personally allow 2-3 changes on the final stages of a commission before I start refusing or start asking for extra money.
Demand clear instructions and/or references. If something isn’t described, you have to take artistic liberty and design it, but that’s difficult! And if the customer is not happy with it but can’t tell you more? That’s not your problem - the burden of reference is on THEM. You cannot read their mind, and that’s not your fault.
Get at least half the payment up front! This is a good balance between the ‘pay before art’ and the ‘pay after art’ conundrum that will limit the amount of woes between artist and customer. (I’ll touch upon this a little more in the Profit section.)
Organization:
Where possible, create good habits! Tag your emails and organize your folders. I have a tag on my emails for active and finished commissions. I also keep my emails on Unread until I have time to sit down and properly look at/reply to them.
My Commissions in the folder are also organized chronologically and I mark down which ones are paid and which ones are not.

(I understand not everyone can do this, but if you want to give it a try, it does make things easier in the long run. Again, this advice is just what I have found personally helps.)
One last thing - I do not want to shame ANYONE for taking their time with commissions! Commissions are complex, and they take time and work. You can draw in 8 hours, but some things take research, materials, etc. Some illustrations realistically take up to half a year, or, depending on what’s involved, several years!!
THAT BEING SAID - it’s good manners to be upfront with your customers about how long you expect the commission to take. If you think you’re busy, just say that! Explain that you have a lot going on, and you will probably take (insert time period here).
And if your commissioners are worried, work out a system to keep them updated! I send my commissioners updates when I finish the lineart/flat colors/etc and I try to be clear about how long everything will take. I try to estimate with a +3-5 days buffer to give myself extra time... and recently I’ve been using it. Always say a bigger number than you think you’ll need.
If someone wants a rushed commission... make them pay more. If ANYONE wants a commission done ‘by the end of the week’ - that’s an automatic rush-job for me because I’m juggling an irl job and several commissions at once. I WILL charge a rush fee and I won’t feel bad about it.
If someone wants a commission within 24 hours...... Well, they better be paying you 3x your normal amount, or more. And remember - you CAN refuse! It’s perfectly reasonable to say ‘No, sorry, that sort of turnaround time is not realistic for me.’
Food For Thought - Invoicing
Many artists I’ve commissioned in the past have not used Invoicing, but I’ve recently begun to fill out invoices and file them in my Commissions folder just to keep track of things. It’s not necessary until you start getting into the Small Business side of Freelancing, but it’s not a bad idea to get into the habit early in case you might need to do it later for tax purposes.
Here’s what my Invoice looks like, for example.
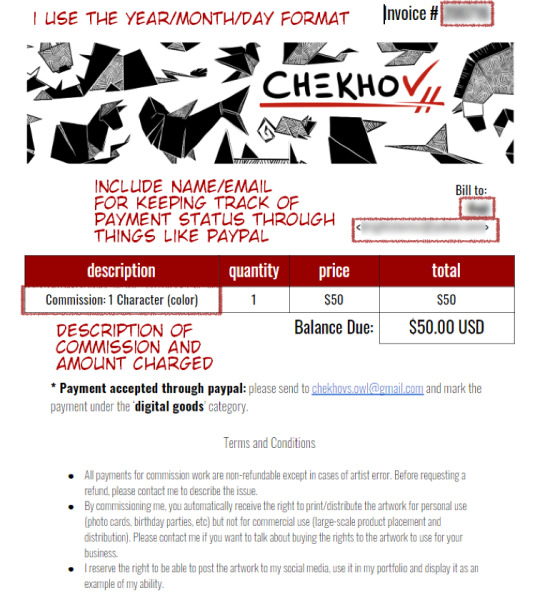
I’ve optimized it to help me remember who, what, and how much is involved! It also contains important info for my customers like where to send the money.
Which brings us to...
.
4) Profit
One of the hardest things for artists is pricing themselves. I’m not going to tell you which way is BEST - there is no BEST way, only the best way for YOU.
One of the options available to you is pricing by the hour. It includes averaging out how long it takes you to draw a specific type of art (whatever you’re offering as a commission) and multiplying that by an hourly wage you’ve decided on.

When you do this, I stress - do NOT price yourself below minimum wage if you can help it. When you first start out, aim for the $15/hour mark and adjust accordingly.
Other ways to price your art:
- Per complexity: Portraits vs full body should be scaled based on how difficult you find one vs. the other. You can also easily decide on a price for a sketch and double it for lineart, triple it for full color, etc.
- Per type: Look up for industry prices for website design and logo design. They may surprise you! You don’t have to charge that much, but it helps to keep things in perspective.
It’s okay to change your prices! Keep your commission sheet image handy so you can update the amounts as you grow. :)
Payment up front or after completion?
Some artist take full payment up front. Some only demand payment after they’ve finished and sent out the piece. I personally think these are both risky for everyone involved.
I recommend doing at least HALF of the payment BEFORE you start the commission. Calculate your full price and ask for half before you start working on it in earnest, to make sure the person can actually pay you. Then, when they receive the full piece and are satisfied, they can complete the payment.
I personally work in this structure:
> Someone emails me with their idea/reference
> I send back a rough draft sketch that shows the idea/pose (only takes me 10-20 minutes so not a huge loss if they ghost) and quote them a price
> They can pay the full thing upfront OR pay half
> I finish the commission and send updates when I do the lineart/colors to double check anything so they have multiple chances to spot any errors
> If the person paid only half on completion, I send them a low-res version of the finished thing, they finish up their payment and THEN I send them the full-res version plus any other filetypes/CYMK proofs, etc.
Many of the people who commission me pay me up front even though I offer they pay half - and I’m really flattered that they trust me that much! Because of that, I feel encouraged to update them frequently and ask for their input as I work, so they have the peace of mind knowing I’m actually doing their commission.
Great, but how do I get PAID????
There are NUMEROUS ways - these days money is relatively easy to transfer over digital means, and you have a few options.

Paypal is perhaps one of the oldest digital wallets and is geared towards businesses. By setting up a PayPal and connecting it to your debit card of bank account, you can tunnel a pathway from your online business directly into your hands in a matter of days.
Paypal also offers Invoicing - you make an invoice, price it and send it to the person’s email and they can pay whatever way they need! (It also allows partial payments.)
Pros: transfers from PayPal to bank account are free, and take a couple of business days. It also has no upper limit to the amount of money you can move in/out each month. It can force refunds due to the nature of its business-oriented payment system.
Cons: Because it’s used by businesses for larger transactions, PayPal may demand a more rigorous proof of your identity. It may also take longer to set up and be harder to get used to. I’ve also heard that they can be a hassle when it comes to closing your account.

Venmo is another type of digital wallet that acts much like paypal, except for a few key differences - it is NOT made for businesses (so depending on whether you’re officially registered as a freelancer, you may not be able to use it). I personally don’t use venmo, so I cannot speak to its usefulness, but I know a few people that use it for casual transactions. It’s easy and quick! :)
Keep in mind that you cannot force a refund over venmo! The transactions are final.
There’s also CashApp, GooglePay (which could load gift cards but also allows peer-to-peer transactions) and I’ve heard good things about Due, though I’ve never personally used it.
Other ways to pay: I’ve had people pay me over Patreon by upping their pledge, and I’ve had people pay me over Ko-Fi by donating a specific amount.
Many people even use Etsy - the website specialized for independent small businesses selling art - by listing their commission sheet and offering up several ‘slots’ of commissions, which allows you to track taxes AND allows your clients to pay using whatever they feel comfortable with.
If you’re in Canada, you can even pay by emailing money directly from bank account to bank account - check whether your country offers this type of service! There’s no shortage of ways to move money in the digital world.
Just like everything else, there’s no singular ‘Best’ way. It just depends on what works for you.
I think that just about wraps it up! I can’t quite think of what else to put here - but I’m sure other artists will chime in with their own advice. :) I’m very sorry this became so long but I hope it was helpful!
Obligatory Disclaimer: I’m not qualified to give legal or accounting counsel. Please double-check the laws in your own country/state in regards to taxation of freelancing work and do your own research. If you are underage, DEFINITELY get an adult’s permission before you start doing commissions, and have the adult help you through the process.
. . . . . . . . . . . .
OTHER POSTS YOU MAY FIND USEFUL:
An Extended Post on Pricing Yourself for Commissions
Dealing with Imposter Syndrome/Feeling ‘Not Good Enough’
Growing Your Audience
Advice for Starting Digital Art
2K notes
·
View notes
Note
I hope you don't mind but like.
What do you use to draw?
Is it a tablet a app like what is it?
——
Also, I have been meaning to try digital art, and like do you have any advice?
Thank you lots💛
When it comes to what tool I use to draw, I have a Wacom Intuos
I’ve had it for about 5 years and it hasn’t let me down since :) Only time I had a problem with it was when my old laptop restarted out of nowhere and completely messed with my preferred settings but I guess that’s mostly my old laptops fault. I also use my phone but only to color because my current laptop doesn’t really display colors very well.
As for apps, I use Medibang Paint Pro!
I really like this app because I can alternate between using my phone and drawing tablet. I can use the cloud feature to connect both devices. So like, I’ll draw something on my laptop at home, save it in cloud, and then color the same drawing on my phone at school whenever I have free time. Speaking of free, the app is also free! And you can create an account for free! It’s also a great program for beginners! It has a pretty simple layout and you can always change it to your preferences
Ahhh I’m not the best at advice but I’ll try to give some tips? (but keep in mind I’m no expert and all of my experience has only been on Medibang)
- I recommend watching tutorials to figure out how the app works and learn all the fun little tricks to it. I actually just experimented with the app and learned on my own for the most part but I picked up smaller things when watching speedpaints and talking to other artists
-Also!!! Speedpaints!!!! Are very good to watch!! You can learn things from them
-It takes a while for people to learn a program and get used to the new type of medium. Don’t feel discouraged if the first drawing you make doesn’t come out the way you want it. I get it can be frustrating but it’s all in the learning process! Start out with smaller drawings instead of full on masterpieces
-If you’re using a computer or laptop, CTRL+S IS YOUR FRIEND!! It’s a surprise tool that’ll help you later ;))) But definitely learn other short cut keys. It’s really convenient and saves time. You can also change the settings of the shortcut keys to your personal preferences (CTRL+Z is undo 👀💕)
-For clean line art, there’s a feature called “correction.” I don’t know how to describe it???? But like, the higher number it is, the smoother your lineart will be. But also, drawing the line would be very slow if you choose a high number. I typically stick around 10-25. Medibang goes up to 40 (that’s probably a sh*tty explanation 😭)
-There’s a feature called “Protect Alpha” for layers and it’s v v v nice UwU You can use it to color your lineart or make it easier to color in something. I attached a link that’ll do a good job of explaining what it is
-Clipping layers and layer modes are your friends 😳
-I’d say label your layers but I’d be a hypocrite if I did LMAO but but but to be fair,,,, I do label them when I’m working on a detailed drawing or a drawing with multiple characters
You can find more specific tips and tricks for Medibang :) they’re probably more helpful (they have pictures too!!)
I wish you the best of luck with your digital art journey. It may seem all overwhelming at first but it’ll quickly become second nature if you keep practicing. Have fun!
53 notes
·
View notes
Last Seen Blogs