#no more cc for me till I can get rid of the 100s I don’t want
Text
I really need an easy way to go through and delete certain cc items without having to spend hours doing it. My computer is struggling 😭
#*#help#please send tips#cc problems#sims4#the sims 4#ts4#no more cc for me till I can get rid of the 100s I don’t want#text#nonplay
6 notes
·
View notes
Text
Make It Rain!!!
This story happens to me very recently while at work. I didn’t want to share this story as it’s recent, but I have decided that I’m just going to change some things. Long story, TL:DR at the end.
This story is too good. I don’t want this memory to be lost in time, like tears in rain. (Blade Runner reference. Best movie)
I work in security, and it’s an easy job, real easy. However sometimes things come along and you have to deal with them. Like a naval personal banging on the door thinking it’s his ship (real drunk)
Most of it is homeless, drug addicts, or drunks. Easy stuff usually no problems. The real issues are when people I’m working with, find it important to push their weight around.
Queue Mr BD (Big Dick). Now BD and I don’t have a lot of interactions. We don’t really talk to one another. Considering the building I’m in charge of is away from the rest of the company security.
Since that’s the case I have my own rules and guidelines. They were approved by my superiors, for this specific building and for its environment.
The building I work in has a lot of artistic types. The places does commercials, ads, product placements. You get the idea.
The head of marketing we will call him HM. Is in charge of everyone in that building. He talks to me on a very, very regular basis. He comes to my office more than a few times a day to chat, smoke breaks and all that.
It’s very friendly, very simple. Everyone knows the rules. I talk to them all like I have been around for years. It’s a very wholesome place.
It’s a normal day things are running fine. Half the workers in the building are gone doing an off site shoot.
I get a phone call telling me that the custodial staff found lost money. I thought it was weird, since no one stated they were missing money.
No problem I’ll deal with it personally. Now when someone says they found lost money, I think they found it in a common area. You know in the bathroom, lounge, or cafeteria. Some place like that.
I get the custodial staff member to take me to where they located the missing money. He takes me to the highest floor and leads me to the office of.... You guessed it HM
He points to the desk and all I can say is “Ok, umm how is it lost.?” The money he is talking about is a nice stack of 100’s on HM’s desk.
Now the stack of 100’s are clearly fake. Not by how they look, but for the fact that they have pink Chinese writing on them. It clearly states in Chinese that the bills are used for training.
It’s usually used to teach Chinese bank tellers to count American money.
HM uses the fake money to reward everyone. Once every 6 months they get rid of all the stuff they can’t use for further sets. They have a HUGE auction. The only thing you can use, is the fake money. HM loves to say “Make it Rain.” While he does the money shuffle. It’s his favorite quote. He passes it out like candy.
I thanked the custodial staff for showing me, but it wasn’t a problem. I fill out the paper work indicating the money was fake, and no actual money was missing. I submit the paper work.
A few hours later I get a call from BD.
OP. “Hello, This is OP, how can I help you?”
BD “OP your paper worked is F’d. I’m looking at your report, about the missing money. How do I know what you said is true? How do I know you didn’t just take it, and claim it’s fake?”
OP “I clearly state what happened in the report, and what the mistake was.”
BD “Not good enough I have a report of stolen money and I can’t let this be tossed to the side, because you said so. you will get pictures and submit them as well.”
It’s kinda a hassle for me to do this , but it’s not a big deal. I can also see where he is coming from.
OP “Ok, I just want to make it clear no one reported money being stolen. Nor was any money actually missing. However no problem I’ll take photos, but I promise you will laugh when you see the pictures of the money it’s clearly fake.” I chuckle
BD “OP who is in charge here? You or me?”
OP “I’m the supervisor of this building, if that’s what you mean.”
BD “NO OP, who is in charge of you.? It’s me, do what I tell you. I don’t want to hear you back talk me.”
OP. “Listen BD I meant no disrespect, I already told you I was going to take care of it. Thank You for your call.” I hang up after.
As I walk back to HM’s desk. It’s eating away at me how he talked to me. We are a team and should respect one another. He first called me a liar, accused me of stealing, then claimed I was disrespecting him.
Ok perhaps he is having a bad day. I haven’t really talked to him much. I let it go and proceed to take photos.
To be sure it’s clear where it’s located. I take photos of the money, desk, office, surrounding area,and direct hallway location. Just so the report showed everything.
I resubmit the paper work with about 20 photos attracted. There should be no question as to what the money was, or what it was used for. I clearly state why HM has it to begin with.
An hour latter I get another call it’s BD again.
BD “This report is still bad but it’s better. I don’t believe this is fake money and I want you to confiscate it. Turn it in for review.”
OP “We don’t do that here. This building has clear guidelines stating we don’t confiscate, and We don’t look in people’s bags when they come in. This building has different rules. Approved by CEO, HM, and Head of security. I can’t do what you are asking me to do.”
BD “First of all OP. I’m not asking you, I’m telling you. Confiscate the bills, and if anyone else is seen with money confiscate it as well. I don’t believe the heads would agree to such an unsafe protocol.”
Now at this point I would make it clear that phone calls are recorded for “better costumer service.” Everything he is saying is being recorded on his end and mine.
It’s silent on the phone for a few seconds. While I think about this. I come up with an idea.
BD “HELLO?!!!!”
OP” To confirm what you are saying. You want me to go around and literally look into peoples bags against policy 50, and then confiscate any fake money they have, against policy 51?
BD “Stop trying to trip me up with your bs. Do your damn job, or I will fire you!! Is that clear?!!!”
OP “You got it BD.”
BD hangs up
It’s very clear to me that this will go south real fast. I know I have to handle this perfectly, or I could be fired.
I write up an email explaining everything even connect the report to it. I also clearly make statements about the conversation I had with BD. Making it very visible the order he demanded I carry out, and copy past of the policies it violates. I cc Head of security, and HM.
This guy either has it out for me, or doesn’t understand how the building and it’s rules. I’m not going to have him hang over my head like this. Threatening my job, because he doesn’t want to understand.
I know all I have to do is catch the right person, and BD is screwed. I know the staff should be coming back soon from their shoot.
I go down to the front of the building. I wait till I see the group coming back. I stop them at the front door. Stating “Excuse me who is lead of this group.” “I am.” HM steps past some people.
He looks at me with a confused look.
HM “OP is something wrong??”
I pull him aside and tell him the situation. All the while he is waving people past him into the building.
HM “What?? Are you serious? This is unacceptable. I have known you for 2 years. I’m not going to let this stand. Let me make some calls. Can you shoot me an email of that report please?”
OP “Already done.” I smile at him
HM “Did you know I would react this way?”
OP “ I had a feeling you would in some way, after all you like to make it rain!!”
His face grows wide with a smile. “MAKE IT RAIN!!” He does the money shuffle and starts walking away.
HM “Don’t worry OP I like you to much to see you leave, I got this.”
About an hour or so goes by, I get a call from HM.
Apparently BD claimed I never said the money was on HM desk, or that it was fake. He also said that I acted alone and with no orders from him. HM completely denies threatening to fire me.
OP”I see.... well it’s a good thing I recorded my conversations with him.”
HM “Wait you record all your phone calls?”
OP “ if it’s on one of the security phones, like the one I’m on yes.”
HM “I see...MAKE IT RAIN!!!” He then hangs up.
He calls back a few seconds latter and tells me to send him a file of the recording. He is going to have a conference call with Head of Security. They have know each other since they were teens.
The next day I come in to a surprising large amount of emails. All about event requests the normals stuff.
The very last email I got was an email from Head of Security cc’d with HM. He apologized, for having to deal with that situation. Thanked me for compiling with BD until I was able to get things straighten out.
BD has been terminated the day prior after the voice recording was listened to.
I was also given full ability to run the building. The only person I answer to is Head of Security. Kinda a small promotion.
TL:DR Guy threatens to fire me if I don’t do as he says. Clearly violating policies. Only to find himself fired instead.
(source) (story by Darigone)
421 notes
·
View notes
Note
Hi! I'm sorry to bother you but I was wondering if you've ever done an icon tutorial? Your icons are really the most beautiful I've seen, and I'd love to know your secrets 😊. But if you aren't interested in posting them I totally understand. I hope you're having a great day!!
EXTENDED ICON TUTORIAL
Hey sorry this took so long to get around to but I finally felt inspired to make this. A couple things first. I want to give a special shout out to argetnallison cuz I learned how to make icons from her tutorials here. I picked up a few tips and tricks that aren’t included in other tutorials so we’re gonna call this an extended icon tutorial. I’ve also been told I explain things well but if there’s anything from this that needs clearing up later just send me a message and i will be happy to help guide you through it. This Is my first time making a tutorial so bare with me if I ramble.
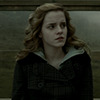
we will be going from this:
to this
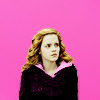
to this

Ok so things you willneed..
photoshop (i personally use the 2014 CC version or something like that but that’s just my preference for layout and stuff)
kmplayer (kmplayer is how i get most of my screencaps. Sometimes I go to google or screencapped.net or other sites that have precapped content when i feel lazy)
Alright so we start off with figuring out which screencap to use.
so basically here i open whatever movie/tv show episode file i want to use and skim in kmplayer till i find a scene that works. Then I hit start and play it until i have the scene i want and then stop,

these are my capture settings for kmplayer.
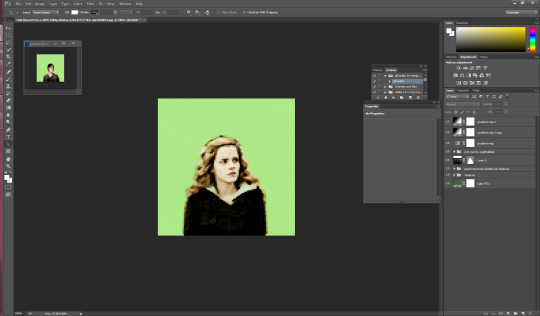
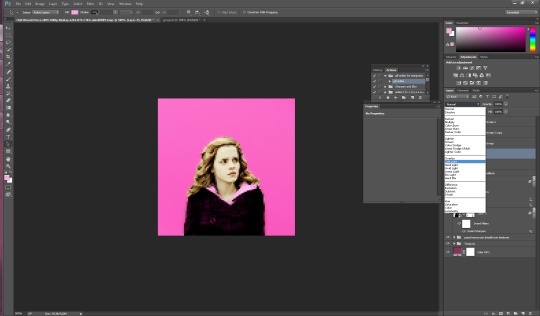
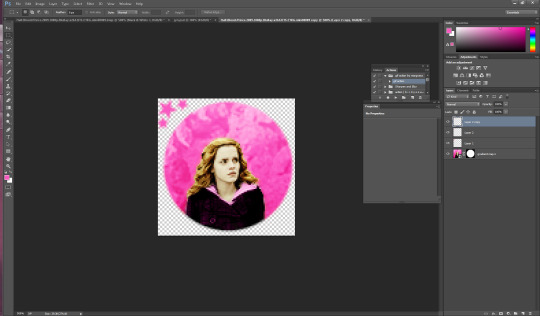
Alright so I picked this scene of Hermione in HBP (aka the hardest movie to color.
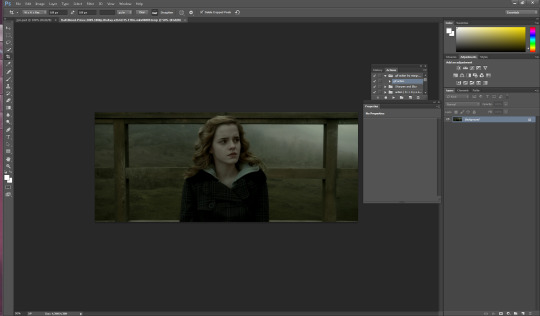
Okay disclaimer here, I don’t actually use anything on the left and rely totally on shortcuts on the keyboard so that’ll be how I explain things here.
People do this step differently but what i tend to do is crop my image before i mask it. I hit “c” on my keyboard. I set my w x h at the top to 100 x 100. Then what i do is I take my mouse and click on the top bar of the crop box and extend it till Jyn is a more icon like size.
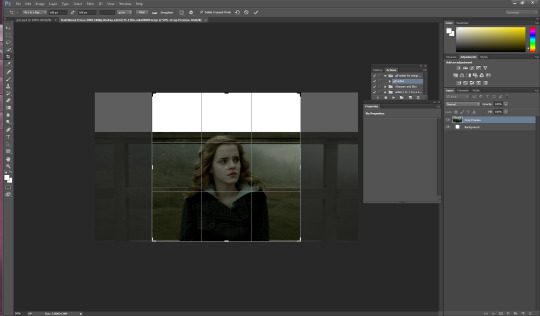
after she is at a size I think is ok for this icon i hit enter and it looks like this

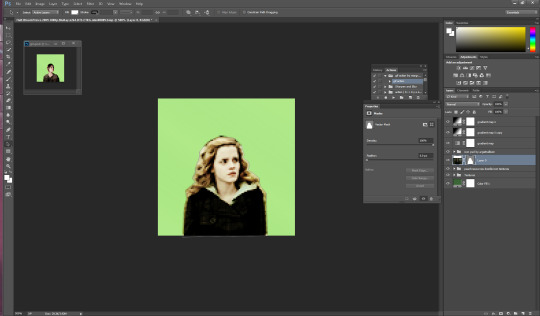
alright now for the fun part. this is honestly the hardest part of icon making, the rest is simple if you’ve used photoshop before. Its time to mask the image and get rid of the background around Hermione. So we start by pressing “p” on our keyboard, p for pen is how i remember, and then we start at one end of her shoulder and work our way around. Basically how this works is u click around the image of her and keep clicking until u have an outline around her like I have below. this does not need to be perfect because we’re gonna have to use the eraser tool anyways.
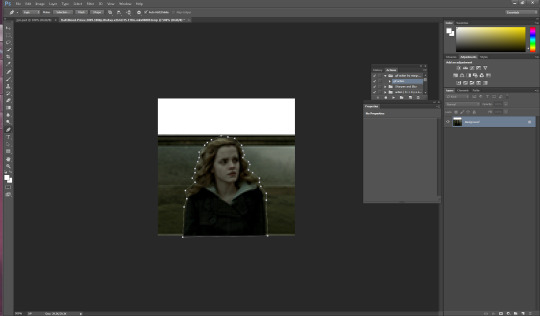
you should have something that looks like this. Also tip here is that you can use ctrl + and ctrl - to make the image bigger or smaller when doing this part.
ok so now we have a rough outline of hermione and we wanna create this mask so we right click within the image somewhere and we hit “create vector mask” which should be the first option (i donno what its like in other versions of ps sorry)

ur image should now look like this
be sure your starting dot and your connecting dot come together at the end or it won’t let you do this part.
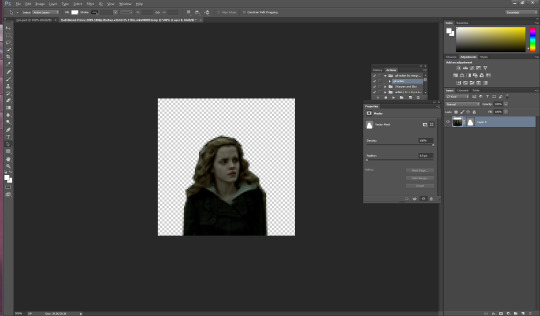
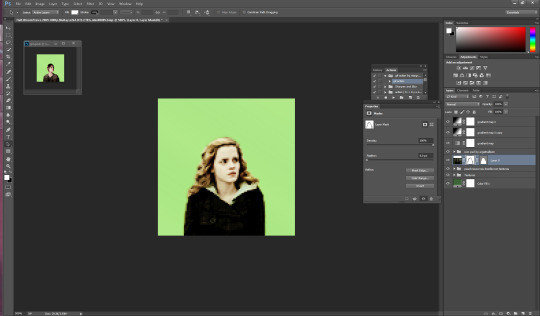
Alright so here is where i add my psd and my fancy textures and things. I use argetnallison’s psd (no claiming as ur own, give her credit if you use this) and adjust it as needed because i am really bad at making my own (seriously props to everyone who makes their own psds its hard and i salute you).
so how I do this next part is i take my psd file (this also contains my textures and stuff to make it easier and quicker to do stuff) I take the jyn file with the psd and i ctrl/alt/a toselect everything quickly like this and then drag it onto the hermione image.
i move some of my layers under the hermione image like the solid color layer and the texture pack so she’s visible again and keep going.
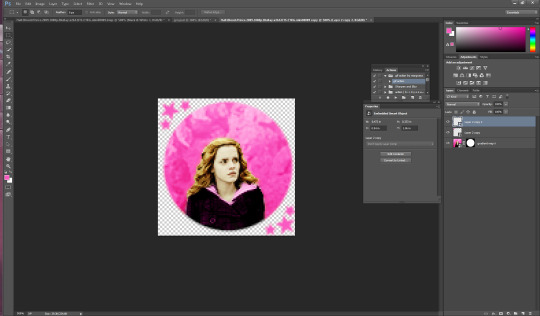
alright so another thing to note is if u click on the mask next to hermione you will get a box that has the vector mask and density and feather
you’re going to want to go to feather and where it says 0.0 make it 0.3 (some people do 2 or 1 just mess with it till it suits you).
so i have set mine to 0.3 and now its time to erase the stuff around hermione that’s still visible. i press e on my keyboard and zoom in on it a little Here it is also really helpful to create another layer mask so that it doesn’t mess with the mask of her you already have (ps weird and it’ll get messy trust me) so i go down to the bottom right and hit add layer mask its the third one from the left

the white square between the hermione picture and the mask is where you’re gonna wanna click and then start erasing.
if you mess up along the way and erase too much you can press b on your keyboard for brush and it’ll bring it back.
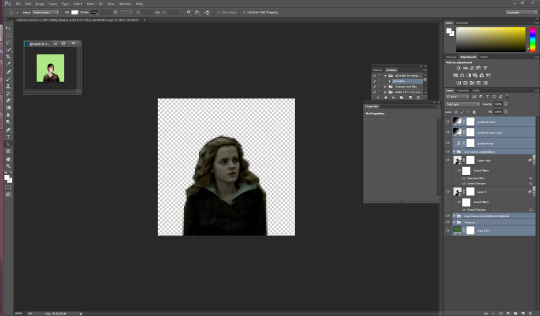
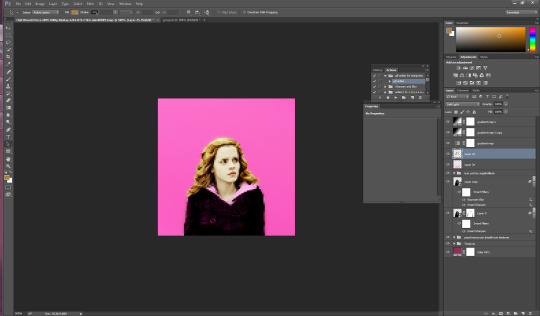
ok now its time to sharpen the image. i have an action i really like but its from a blogger who’s changed user since then and i donno her new one or i’d 100% credit. I will try and find it and add the link here. anyway I convert the hermione picture to a smart object (right click on the hermione picture and its on the left towards the middle) hit play and add the action to the image Mine looks like this now

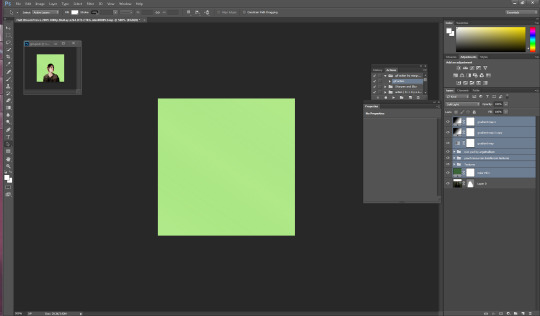
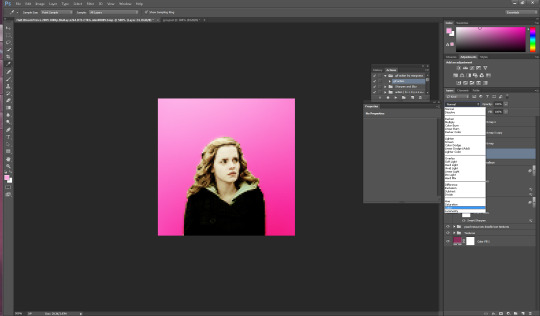
so for this next part i usually have green as my default layer but i wanna change the color so i’m gonna double click on the dark green box

i’ve settled for this pink. Now if you follow my icon making at all you know I like to match my background and clothes together so that’s what i’ll show you next.
so next its time to use the eyedropper tool (which was very confusing for me initially so if you have questions don’t hesitate to ask). We start by hitting “i” on our keyboard and finding a spot in our picture that we want her to match so I’m going to click some of the lighter pink in the top left corner.

as you can see in mine in the top right it now has that pink we just selected so now we get to add it to hermione’s jacket.I usually do it right above the psd so i make sure i have that clicked and then i make a new layer for the jacket by hitting ctrl/shift/n on my keyboard. with that layer selected, I hit ‘b’ for brush on my keyboard and set this new layer to “color” then i hit enter and begin to brush over the jacket (in my ps its the second to last one down). The default name is “normal” and its right next to opacity”)
now my picture looks like this: (you can use the “e” to erase if you brush over her skin by accident as well)

now its time to do the same with her hair so i do ctrl/shift/n again to create another layer but this time we’re going to set it to “soft light” instead of color.
just like with the jacket we are going to use the eyedropper tool again but we’re gonna click on a lighter part of her hair.
you can change the opacity here if you would like but for this image i am going to keep it at 100%.
You could honestly leave this image here and have a perfectly good icon but a lot of people have asked me how i do the circle ones like my current one so I will take this one step further. (i learned from this tutorial here in case that helps you better).
First i’m gonna add a texture by checking one of the boxes in my texture stash (feel free to hunt on yeahps and deviantart for some seriously amazing textures that’s where i get all of mine from).
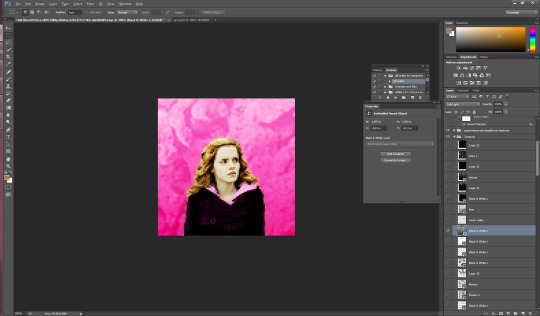
now i’m going to do a duplicate image (so that i can use the original to edit it in different colors). to do this i go to “image” at the top (third option after “file” and “edit” and then i go down to where it says “duplicate”.

i hit ok and then i begin to make my circle icon
What i do here is i convert everything to a smart object so i hit ctrl/alt/a and right click and convert to smart object.

then i hit ctrl/shift/n and create a new layer where we create our circle.i make sure that the circle is white by going to the top right and setting it to white. Then i hit “b” and right click on the hermione picture
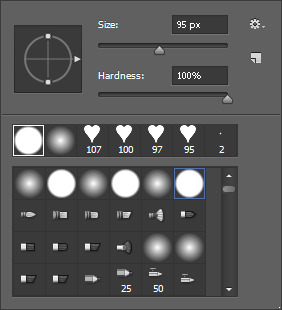
i use the selected brush and have the size at 95 px. Then I click in the middle of the image and it looks like this
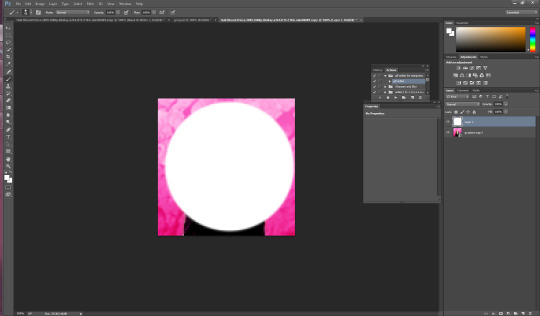
now what I want to do is make sure that the white circle is centered so i’m going to hit “m” on my keyboard Then i wanna right click and hit “free transform” in the middle. you’ll know its in the middle because there’ll be these two purple ish lines that create a plus.

now you hit enter and you have your circle. Now what I do is hit “w” on my keyboard and click your mouse in the circle somewhere (very important to stay clicked on the circle layer here). now that you’ve selected the circle, select the pink hermione image. go to the bottom and click “create layer mask” which again is the third from the left, and you should have a circle next to the hermione picture. You should have something that looks like this

now i just click on the circle layer and delete it and it’ll look like so:
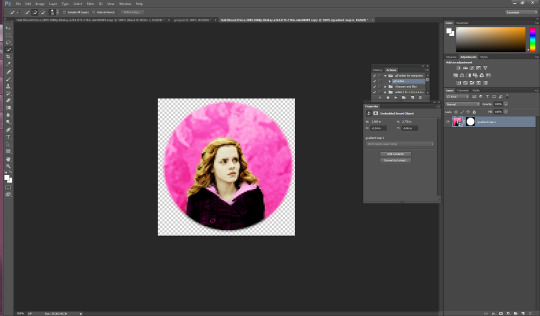
again. you could ctrl/s and save it here and leave as is but i’m a bit on the extra side so we’re gonna take it a step further and add little designs cuz it makes it look more fun.
So what I did in the beginning is I googled a ton of different types of brushes and used search things like “heart brushes for photoshop, deviantart” or “star brushes” or whatever i wanted and i just dug around until ifound what I was looking for. its a fun scavenger hunt but you can deff check out yeahps too or itsphotoshop for resources. Then you go to “edit” and all the way down to “presets” and a drop down will show up and you click “preset manager”. you will see something like this pop up
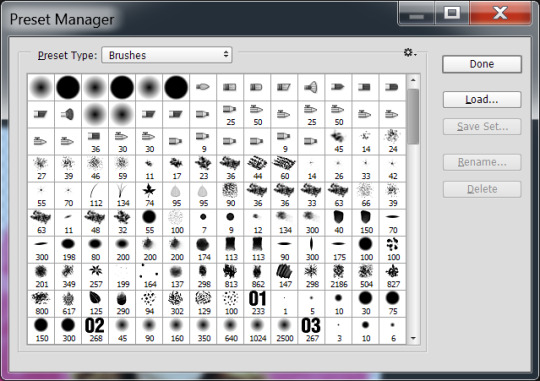
go to the right and hit load and then click on the file you’ve extracted from winrar (if you need help with this part just message me). Ok, once you’ve loaded some brush presets into your ps you can start the next part. once again you have to create a new layer ctrl/shift/n, i then click my star brush and set it to 14 px.

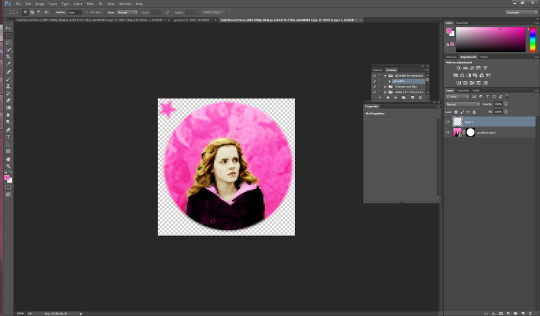
alrighty so before we start clicking and creating stars I want to make them the same color as the background so its time to bring out our “i” for eyedropper again and click somewhere on the pink, then hit “b” again and you should now have pink stars when you click. So Here i go to a transparent corner and i just create my star on the new layer. Sometimes i click it twice so that its more visible ut now i have something like this:

now I’m thinking i want it situated a different way so I use the “m” tool and use “free transform again” to adjust (using the corners like with cropping) to where i want the star to be.
now i have it here and i use the arrows on the keyboard as well sometimes to adjust it. Now what I usually do is create another layer for the smaller stars so i hit ctrl/shift/n again and then i set this new star to 9 px by right clicking on the picture. Then I repeat the steps above and have something like this

Now i just hit ctrl/j and duplicate the little star. then i hit “m” on my keyboard once again and move it to the opposite side of the big star.
now you have this picture:
Now what i do is i select all 3 star layers and right click and convert them to smart object so theyre easier to deal with. Then i hit ctrl/j and duplicate the stars.

now i hit “m” on the duplicate layer and click “free transform once again” now right click and hit “rotate 180″ and the result is like this

move the rotated stars to the opposite side of the picture with the mouse. Now it should look like this
and that’s it! just hit ctrl/s and save as a .png and you have yourself an icon. I hope this helps. If i need to clarify anything please don’t hesitate to ask me. This is my first tutorial so I hope I explained things ok. Feel free to tag me in ur new icons I’d love to see them!
1K notes
·
View notes
Last Seen Blogs

sarah-de-herdt
Sarah De Herdt (Unofficial)

playar4
Untitled

relicdarkeness
Nevereverland
selkra-souza
𓃩 Likes to Draw Aliens & Emotions 𓃩
bheege-naina
A World of My Own