#no remembering how to create functions Only inputting data into the correct fields
Explore tagged Tumblr posts
Visit Tumblr Blog
Explore Tumblr blogs with no restrictions, modern design and the best experience.
Last Seen Tumblr Blogs


Fun Fact
When “GIF” was named word of the year in 2012, Oxford Dictionaries U.S.A. credited Tumblr for pushing the word.
Text
my ridiculous massive spreadsheet projects for logging every pokemon i own and recording every fusion ive made in cassette beasts are dangerous, because theyre really good at making me FEEL like im being productive- like omg im accomplishing so much, im checking off boxes im filling the spreadsheet!!!! but im not actually accomplishing anything meaningful. theyre a kind of like art in a way, where the art is in the process of completing them for the sake of it? but its not the kind of thing thats worth anything to anyone who isnt me.
honestly i think theyre fine enough hobby activities its just like. obsessively entering useless data into spreadsheets definitely eats up the time i could be spending drawing or doing something creative
#i need to look for data entry jobs. the only downside is that im not particularly good at like… actual spreadsheet coding stuff#no remembering how to create functions Only inputting data into the correct fields#i need a text post tag
12 notes
·
View notes
Text
Arquius 03/14/2019
Your name is ARQUIUS HALHAK, at least until you find another combination of names that are just as funny as Strihak. You are finally yourself, an after a day with tying to recuperate everything that was on your brainwashed self and feeding the poor opossums in the maze's shed its finally nighttime. You take another walk out through the snow. It just bothers you that much to stay not doing anything, but you are dead so you can't even be online properly. You look at the police building. Hm. You make a choice to bother someone who still has mystery to you which is what I call 10/10 dope. You shoot the older older older older Zahhak a message.
[ARQ > >---->] @Darkleer
ARQ: 🕶️--> Hello STRONG brorse, lets re-do introductions, I apologize for my abrasive precious behavior ,I wasn't in my right mind when I was inquiring about your %istance
ARQ: 🕶️--> My name is Arquius, I'm an AI and I see you
Darkleer 03/14/2019
: »—Hh—>
: »—Hello.—>
: »—What—>
Arquius 03/14/2019
ARQ: 🕶️--> I like your sweatpants
ARQ: 🕶️--> And you are bigger than the others too. Bigger than me I bet STRONGER
ARQ: 🕶️--> As I said, I see you
In the dark is probably hard to see you in the dark and hearing you wouldn't be like actually hearing someone stepping in snow, you sound like a horse stepping in snow. You can see through some small windows that give some light to the basement, ah hah. You make a point to not stay near a window for too long, if he is to see you is moving in and out of his peripheral vision. You might enjoy playing a little too much.
Darkleer 03/14/2019
> You sense something moving in the shadows, and considering you spent almost a millenium to steel yourself for hunt, combat and danger, that has you on the highest alert. Feels bad, man.
: »—That is—>
: »—Cease this at once.—>
: »—I do not wish to hurt you, but you're STRONGLY pressing your luck.—>
: »—You type like a Zahhak. But you said you're an artificial intelligence.—>
: »—Did Equius or Horuss create you?—>
Arquius 03/14/2019
You are the prime being on pressing your luck being in this side of the planet. You giggle a little, you are just so excited. Nothing wrong with being genuine and creepy at the same time.
ARQ: 🕶️--> I like your prosthetics
ARQ: 🕶️--> Oh no, I come from another plane, a simple AutoResponder with a body then I crashed onto Equius' computer and something went wrong... or more like PERFECT
ARQ: 🕶️--> Although yes, he did help me with my new acquisitions of a body
ARQ: 🕶️--> No, I don't mean ill, although I wouldn't blame an organic to take my genuineness ass a menace
Darkleer 03/14/2019
: »—I see.—>
: »—Regardless, stop this spying at once.—>
: »—It seems that you are intelligence enough to understand such an order.—>
Arquius 03/14/2019
ARQ: 🕶️--> I only follow the STRONGEST of commands dear Mister %
ARQ: 🕶️--> Are your commands STRONG enough for such thing?
ARQ: 🕶️--> Maybe if you would let me in or come and get me although I like it here, is like having a fish in a bowl
You make a quick knock at one of the windows a very visible read eye peering inside. It shows your face for a second. You do a little wave before the light turns off and you are covered by darkness.
Darkleer 03/14/2019
> You catch sight of him and then he is gone again. This is. The worst. You're not really nervous, for the record, but very annoyed. This is a transgression of your privacy. He ignored both your request and your warning. You had enough of not being able to control your own creations, you don't need other AIs harrassing you.
Part of you is admittedly curious about his contruction and his apparently very stubborn personality. But the current situation is unacceptable.
You get up and exit through the backdoor leading outdoors. With your eyes having no problem adjusting to the dark, you scan the surroundings for any sign of the intruder, wary as you're not convinced of him not being a threat.
"You will stop this sneaking around at once. Show yourself."
Arquius 03/14/2019
When you see him leave something startles you very much so, you don't want to get hyper destroyed just because you liked to play around. As he is out of sight you move so you are closer to the entrance of the maze in case you need to... escape. You can see him and you hear him, you wish you could be behind him to do your entrance instead of to this distance and basically in his field of vision once you light up but... security first.
You do that, tilting your head as all your installed leds light up from bottom to up, eyes last. You make a very realistic horse noise. "Hi STRONG friend." Little wave.
Darkleer 03/14/2019
There he is. You're actually a little taken aback by this display, but your fascination wins over. He indeed seems to be a full android creation and.. there are a fer design choices that are apparently meant to resemble Equius. Also, are those hooves?
But.. security first.
"Do you have permission to be on the premise?" As far as you know, these are private grounds of members of the police force and outsiders are only permitted in on invitation and with company. He is... definitely alone and hiding outside in the dark.
Arquius 03/15/2019
"... Equius knows I'm here." Kind of. "Its my witness protection because if the Felt gets hands in my hot robotic body I'm good as dead." Now that is true, except its not witness protection or anything legal you just kind of hang here. "Is good to see you upclose for once, makes all the details all the more fascinating. There is a 90% chance you will be scanned." That's a lie, you are scanning him right now.
Darkleer 03/15/2019
Hm. You don't know enough to argue that, but you honestly sort of want to avoid asking Equius. But as long as this robot is in your company, it should be acceptable.
May he scan you as he likes. Not much there that he can figure out that a normal person with eyes couldn't. Meanwhile you worldlessly step up to him and do your own variant of that, taking his face in your hand and tilting it to have a good look. "Impeccable work.."
Arquius 03/15/2019
There is a moment of menace that he gives that you don't let show. But since he is getting close is the silent permission for you to get close. Its the permission for you to flex. "I commando you to touch my muscles they are quite fantastic bro." You are very much proud of yourself, although. "I'm a little bit more than just it, I'll never stop learning." Sort of, or perhaps that is your excuse to pull the tanktop a tad examine HIS cyborg bits, not that you have to since most of it is in view now but... boy. "I have never seen a full blown cyborg befoal. This is fascinating, and certainly a correct approach to evolution, flesh is mare weak and will never be logically and functionally efficient. I knew I liked you mister X or Expatriate."
Darkleer 03/15/2019
Him suddenly returning the curious touch has you startle But uh, huh. It's only fair. This robot is a weird one and you don't think you like all of his particularities, but overall your fascination is too big to tell him off just yet. It's only after his comment that you pull away and huff.
"...being efficient should not be the goal."
You turn around to return to your workshop, but stop as you reach the door. "Come in."
Arquius 03/15/2019
You blink. Must be an organic thing. Aaaaaand you blink again. You are surprised and it shows. You haven't expected that he would let you in. You haven't foreseen that he would invite you of all things. "Magnificent, thank you for your generosity my good Adonis of a horse, I finally get to look at it from the inside." You are almost trotting inside because you are joyful. Almost, you do make an effort to clean all snow and dirt from you right at the entrance so you don't end up messing anything as you make now skip your way in.
"I love nights inside, even if momentarily. I do love being everywhere. Say, why the invitation Strong friend?" You are not planning to kill me are you, you think. You remember exactly the amount of escape and how much time would it take you to reach them and then hide, you have no data on Expatriate proper, so if it comes to it... The Data is basically worthless.(edited)
Darkleer 03/17/2019
"You.. asked to be let in. I am letting you in." It's pretty simple and straightforward. The cold hardly bothers you, but you don't want to keep standing around in the open this awkward and inappropriately dressed.
You have no reason to harm him. Yet. If he poses a threat to yourself or someone else, you should be able to defeat him easily. Until then, there's no harm in trying to learn as much about this eccentric creation as you can.
Your workshop is furnished sparingly. Just the bare necessities, no real sign of comfort besides maybe a couch, hardly anything that would make this seem like someone's living quarters. And yet this is where you reside now.
All available surfaces are littered with tools and machines of human and alternian design. Not as much of a mess as your old home has been, partially because you couldn't bring all of it with you, partially because you've only been here for roughly a week.
Arquius 03/18/2019
"B@$%h you live like this?" The joke is right there and to be fair his quarters are still not the worse of the three, considering you lived in a maze until about 5 minutes ago, oh yeah, you live here now. He let you in, you are staying in here.
"I've asked before, it normally doesn't happen. I'm glad it finally did." You go directly to the tools, you recognize a lot of this, mostly because Equius' place has around the same things. You are quick to wonder if maybe you could fix your bad tooth, but also are quick to ignore that input. You decide to find a shelf or table with enough space to sit and get comfortable enough. "Now that you've let me in I will reside here as long as necessary unless I'm feeding the animals in the maze. I hope you understand." And if he doesn't you are going to do it anyway.
Darkleer 03/19/2019
"I do" you pant, mildly - no - very irritated. "You will stay for as long as I permit." That said, you sit down across him.
The urge to pick him apart and learn more about his construction is STRONG, but that wouldn't be appropriate without permission - of his creator or.. himself, probably. "Where did you state you came from?" It was something weird. Another universe? Hm. You don't know enough about what else is out there to argue that. "If not Equius, who made you?"
Arquius 03/19/2019
"Another universe, one dominated by a troll, she was quite freaking awful. But TLDR, the maze." You have to admit that the issue has never popped before for you, you got twined with a troll from the get go so it wasn't jarring to see them just as friends as it would had been have you just been Hal. But yes, trolls are nice here and not space conquerors waiting to ruin your day. "Equius, Hal, Dirk, me. It is lest about who made me and what I am right now. At least take me to dinner before being so invasive. I command you to be less invasive with your querys, I don't enjoy the path of conversation regarding my construction."
Darkleer Last Thursday at 9:31 AM
You know plenty about trolls that dominate universes. Hn. Could it be her? Another her? The same one? Well, if she is in a different universe, it has little meaning to you. Except, if this robot could travel across universes.. could she as well?
You shake that train of thought. Not what's important at the moment.
"You have no need for dinner." You huff. "You have been invasive first, with little care for my requests." But fine, you don't have the nerve to argue with a stubborn android. You turn away and pick up a bit of metal to tinker with it some more, or so you pretend. It's a piece that.. seems to have little function besides aesthetic. What a radical notion for you.
"What do you do here?" you ask, not looking up from the small figurine.
Arquius Last Friday at 2:42 PM
"I live in a nutritious diet of comedy an irony, bro." You could say those concepts can't be eaten but you beg to differ. "Oh and a glass of water for reasons regarding my construction and build." Equius did give you salivary glands and my god you are a bastard about it. He made you THIRSTY.
You lean to try and see what he is working on from this angle while staying on the table, eyes zooming into his hands. "My sole function so far has been take care of my not so STRONG friends. That has been my number one command and it has been brought to a sharp halt with my fake death. So to answer your question, I have no idea. For once I have no real direction, everything is possible." You get to do whatever the fuck you want and apparently what you've wanted is stalking people and getting into their houses.
You finally just get off the table and set yourself to just stand behind him and try and look over his shoulder not saying much but smiling because you like what he makes. "What do you do here?"
Darkleer Yesterday at 1:06 PM
"Your strong friends.. Equius, Hal and Dirk?" You think you've heard the last two names around the precinct, but you're not sure if he means those. "Your fake death? Explain."
Ah, he got closer. Hn. You turn around a bit and look at him. "..much like you, I am here to help and protect those weaker than me. Though I am still learning about the dangers of this planet."
Arquius Yesterday at 3:10 PM
"Partially Incorrect." Dirk, Jake, Roxy and Jane. "Geez dad why don't you say please first." Your fake death. You make a disgruntled horse noise. He turns around and you don't back out. "Its a secret I hope you can keep secrets. I want your secrets too in return I command you to give me your secrets afterwards. But there is something obvious here. The fricking evil in this planet are the bosses of the FElt. The Crew and the Patriarchy." Considering all of these place's problems. "I don't have much experience with the Crew personally but I have a tweened story with the Felt since the moment of my spawning. I got in there trying to protect little D, ended up being reprogrammed, there was a corrupt version of me for a while. I killed him but I-we merged. Which is why I have to STRONGLY apologize for his messages online. You were talking to him." Pause."I like what you are making. You are a machinery expert too huh my little kelpie?"
1 note
·
View note
Text
UDP compatibility within Visual Productions lighting and show controller products
Introduction, about UDP
Many protocols are supported by Visual Productions lighting and show controllers and control interfaces. These include SMPTE, MTC and Art-Net for timecode, contact closures and 1-10V signals for GPI, NTP for clock synchronisation, and even RS232 as a legacy computer protocol. And let's not forget DMX, Art-net, sACN and KiNET as the lighting control protocols supported.
Let's have a closer look at the integration and applications of the UDP network protocol. The User Datagram Protocol is a being used in many multi media installations because it is suitable for fast data transfer and because it offers a short response time.
BrightSign, a UDP compatible device
In this topic we focus on compatibility with BrightSign, the bright blue digital signage media player which is UDP compatible: it is capable of sending UDP messages based on the timeline of a video being played, and capable of receiving input signals such as a press on a touch screen, activating a contact closure, etc. It is also capable of receiving UDP messages upon which it can perform certain tasks, such as jumping to a specific video (track) or a specific moment in a video (video time).
When UDP communication is required, BrightSign media players need to be programmed using BrightSign Author authoring software. The software allows you to import content, create layouts, synchronise multiple media players in one installation, publish content to the network, and to set all player and network parameters.
This topic describes a system setup for both using a BrightSign media player as a source, controlling a UDP compatible Visual Productions lighting controller, and as a slave, responding to incoming UDP messages sent by a Visual Productions control interface.
Controlling a CueCore2/QuadCore
This example explains how to synchronise lights with video with in a simple way. It uses any model BrightSign media player and a CueCore2 or QuadCore ('Core') lighting controller.
Play your video on a computer and use a media player which shows you the timecode (actually, it isn't the 'official' timecode but just video time). Determine at which positions (video time) you want to change the lights into different colours: create a table with video time and the corresponding lighting colour;
Now, using Bright Author, create a script for your BrightSign media player that includes a list with video times and a unique UDP message that defines each colour to be recalled by the Core;
In the Core, create Tracks with all static colours, then create a Playback Cue list containing all Tracks. If required, set a fade time to prevent from instant colour changes when playing your video;
In Core Show Control, create a UDP Action list, create an Action and edit this action: set the Trigger Value to (or learn) the UDP message that you defined in your table and add a Task that either Jumps to a cue (Playback/Track) or uses the Go+ command to advance to the next cue in the Playback Cue list.
Controlling a Brightsign media player
This example shows how to start videos stored on a BrightSign media player using Visual Productions Kiosc personalised touch screen interface.
In BrightSign Bright Author, create a script where each video stored on the media player is linked to an incoming UDP message (the start trigger). Define what needs to happen if a UDP message is received, for example 'Stop all videos and start video A'. After that, publish the script to the media player;
To create a custom user interface, use Kiosc Editor. Now when you have created buttons on your custom user interface, you need to define the UDP messages that wil trigger the file within the BrightSign media player. This is done in the Tags UDP field.
Considering you have stored your new Kiosc layout on your tablet, you need to either input or learn the UDP tags to trigger a task in the Core's Show Control. A task could be ‘start a playback’ for example.
When pressing a Kiosc button on your tablet, the corresponding video will start playing.

More applications
Any device that is UDP compatible can control or can be controlled by Visual Productions' lighting and show controllers. Other examples are control systems like Crestron, Extron and AMX which can integrate DMX lighting control in an affordable way, and large screen video projectors where UDP can be used to switch on/off or select inputs. Because of the Core's flexible Show Control functionality, sending UDP messages can be combined with sending other signals and messages simultaneously. Think of switching on a projector, selecting the correct input and at the same time dim the lights closest to the projection screen. Or imagine a Building Management System sending a UDP message that turns on all lights at 100% and at the same time activating a relay that opens all sliding doors in an emergency situation.
Apart from our Cores, the affordable LPU-2 is UDP compatible as well, although in a more limited way: it only accepts incoming UDP messages which are predefined as described in the Application Programming Interface. This API can be found in the Cuety/LPU user manual. Remember programming of your lighting fixtures (the cues and playbacks) still needs to be done using the Cuety app, available for iOS, Android, macOS, Windows and Linux.
2 notes
·
View notes
Text
Beginning with Python
Starting out with the print function
Single or double quotes are acceptable as long as they’re consistent
You can use “+” to join strings together directly, or “,” to join strings together with a space between them -”\” is known as an “escape character” and it will “escape” the characteristic of the following character and just use it as plain text
Doing basic math with Python:
“+”,”-”,”*” and “/” are the basic characters for adding, subtracting, multiplying and dividing.
You can use “**” to do exponents
“%” is the ‘modulus’ operator. This operator will divide a given number by another and return the remainder from the division
abs() is the ‘absolute’ function, which will return the absolute value of a variable
pow(number, toThePowerOf) is the ‘power’ function, which will multiply the first number by the power of the second
max(number, otherNumber) simply returns the larger of the two given numbers
min(number, otherNumber) simply returns the smaller of the two given numbers
round(number) rounds the given number to the closest whole number
int(number) converts given number to an integer
Loops: The two distinctive loops in Python are the “for” and “while” loops, both of which behave in a similar manner: Repeating tasks until a condition is met. While loops continually execute until a specific condition is met, where as for loops (should) run a predetermined amount of times depending on the parameters you set.
Strings Strings are used to save list of characters as one piece of data. Useful functions to remember when using strings are: .lower()/.upper(), .islower()/.isupper(), .index(”stringToIndex”), .replace(”stringToReplace”, “replaceWith”), str(toConvertToString)
If statements: Comprised of “If”, “elif” and “else” commands are very simple to understand: IF the following statement is true, then run the following code block ELIF the previous statement isn’t true, but this one is, then run the following code block ELSE if no previous statement is true. but this one is, then fun the follow code block
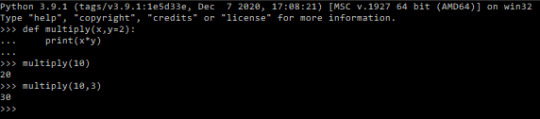
Functions: Functions are sets of code and possibly variables (parameters) to a single line of text. To begin creating a function, the keyword “def” is used to notify python of the function definition:

^ A very basic function
You can also set parameter defaults to make your code more customizable:
Local and Global variables:
A global variable is one that can be accessed anywhere. A local variable is the opposite, it can only be accessed within its frame. The difference is that global variables can be accessed locally, but not modified locally inherently.
File Manipulation: There are two methods for saving data to a file: “writing” and “appending”. Writing to a file will clear any previous data from the file and replace it with the information it has been told to write. Alternatively you can use the append method, which will add the information onto the end of anything that was already in the file. Files can also be read to extract data from them without changing it. To read and write to a file a variable must be established to represent the opened file:
-
Classes: Classes work as ways to store collections of functions together that can be called into other scripts. They are the backbone to Object Orientated Programming
User Input: The simplest way to collect data from a text field is the ‘input()’ method. You can provide a parameter to the method to prompt the user, eg: answer = input(”What is you answer? “)
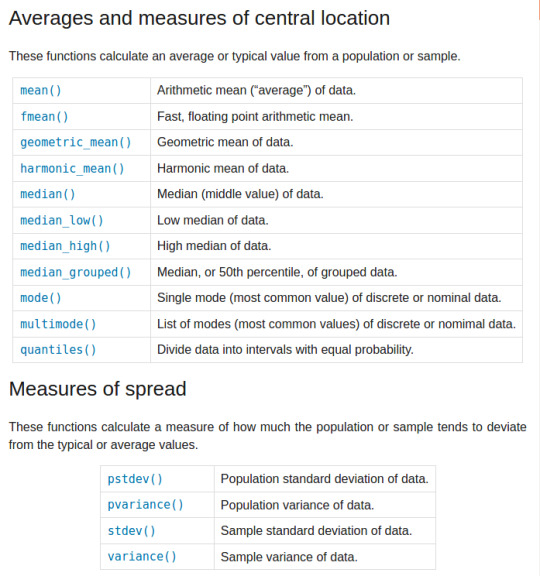
Statistics: by importing the statistics module we get access to a wide range of useful functions:
Module Import Syntax: A useful trick when importing another module is that when you import any module, you can change the name you will use to refer to it in your code. For example, to save on repeatedly typing out ‘statistics’ every time you want to call a function from that module, you can change the name to simply ‘s’ when you import the function with the ‘as’ statement: import statistics as s You can also import specific function(s) from a module with the ‘from’ statement: from statistics import mean(, median, mode) The ‘as’ and ‘from’ statements can also be used together: from statistics import mean as m, median as d Lastly we can import every function from a module to be part of our module without having to call the other module to use the function: from statistics import *
Lists and Tuples: Both used to hold sequential pieces of data, these two data structures differ mainly in that tuples are unchangeable after they have been defined. Where lists are defined by surrounding the data with []’s and separating them with commas; tuples are written in the same way but with ()’s or no brackets at all. Eg: listName = [a,b,c] tupleName = a,b,c / (a,b,c) Lists can be added to, with the append and insert functions: listName.append(valueToAdd) listName.insert(elementNum, valueToAdd) Conversely you can remove data from a list with the remove function: listName.remove(valueToRemove) It’s important to remember that using the remove function like this will remove the first instance of the data found within the list, rather removing data from a specified list element. To remove data from a specific element rather than removing a specific value, you can do: listName.remove(listName[elementToRemove]) Specifying an element in this manner will also work with other methods like print: print(listName[elementToPrint]) Additionally you can take a ‘slice’ of an index by specifying an ending position as well as the first position, like so: print(listName[firstElement : finalElement]) The first element specified will be given, however it will stop upon reaching the final element, without actually returning it. So a range of [0:2] will return only two elements (0,1) and stop upon reaching the third element (2nd position in the index). You can work backwards from the end of a list by giving negative element values. Although as there is no -0 giving -1 gives the last value of the index. print(listName[-1]) The index function can be used to find specific values within lists and their respective elements. print(listName.index(valueToFind)) The count function allows us to know how many times a specific value appears in a list: print(listName.count(valueToFind)) The sort function will arrange the information in a list to be alphabetical/numerically sorted, and the reverse function will reverse the current order of a list: listName.sort() listName.reverse() Lastly, each individual element in a list can be a list itself, referred to as being ‘multi-dimensional’: listName = [[0,1],[3,4]] print(listName) #will return “[0,1] , [3,4]” print(listName[0]) #will return “[0,1]” print(listName[1,1]) #will return “[4]”
CSV files import csv with open(”exampleFile.csv”) as csvfile: readCSV = csv.reader(csvfile, delimter=“,”)
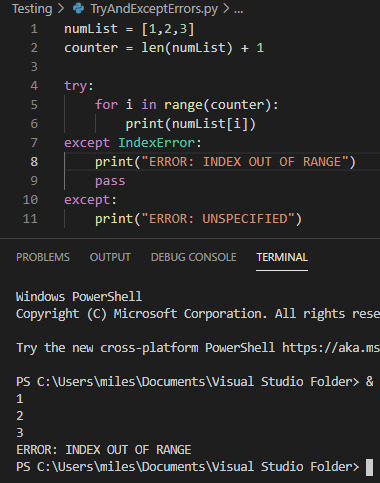
Try and Except Error handling These statements are used where you want to ‘try’ running a piece of code, but you aren’t certain it will work. For example checking a users input is in the correct data type. While this code is useless it is a simple demonstration of the try and except statements:
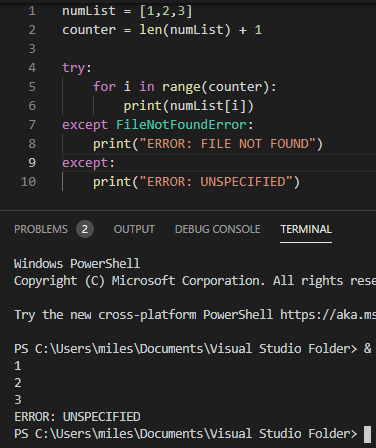
While the try statement was able to complete three stages of the foor loop before hitting an index error, it wasn’t able to continue after that and so hit an error. For the example I provided both an exception to handle a specific FileNotFoundError
0 notes
Text
VueJS & Firestore Stripped-Back - Tutorial Part 4
In this tutorial series we are stripping everything back to basics to explain how to build full-stack web applications with VueJS and Firebase Cloud Firestore - no CLIs, NPM or Webpack - just a html page and a code editor.
Updating your data
Welcome back. In this fourth part of our Stripped-Back tutorial we’re going to be explaining the U in CRUD - Updating data. By the way if you haven’t read the previous parts of this tutorial please feel free to do so using these links : Part 1, Part 2, Part 3
In the previous part of the tutorial we retrieved the data from our Firestore database by running a realtime query and populating an employees array with the data we retrieved including all of the fields such as lastName, jobTitle etc. However to be able to update (and indeed delete for that matter) we need to be able to get a handle on a unique ID for each employee document that is retrieved so we’ll know what to update when the user saves a change. If you remember from part 2, when you were checking your Firestore console, we mentioned a strange looking ID attached to each document in the Employees collection - this is what we’ll need to get hold of.
To do this we’ll first need to setup a place to store a unique id, so we’ll add an Id property to our employee object in the data section of our Vue Instance Object :
var app = new Vue({ el : ’#app’, data : { appTitle : ‘EmployeeMagic’, mainStyle : { ‘margin’ : ’20px’ }, employee : {firstName : ‘’, lastName : ‘’, jobTitle : ‘’, dept : ‘’, age : 0, id : ‘’ }, db : {}, employees : [ ] },
Next we’ll need to go back and change our callback function which gets the data from each document and puts it into our employees array. In there we’ll need to make sure the unique id from each document is stored in the employee’s new id property as well as the other fields.
created : function() { let that = this that.db = firebase.firestore() let query = that.db.collection(’Employees’) .orderBy(’lastName’) query.onSnapshot((snapshot) => { that.employees = [ ] snapshot.forEach((doc) => { that.employees.push({ id : doc.id, firstName : doc.data().firstName, lastName : doc.data().lastName, jobTitle : doc.data().jobTitle, dept : doc.data().dept, age : doc.data().age }) }) }) }
Notice we didn’t need to go through the data() method to get our id, it’s available directly on the document object itself. On our template, we’ll add an Edit button into the table alongside each employee so the end-user can click the Edit button next to the employee they want to update. We’ll add the button inside the Age column.
<table class=“table table-bordered table-striped”> <thead> <th>Name</th> <th>Job Title</th> <th>Department</th> <th>Age</th> </thead>
<tbody> <tr v-for=“employee in employees”> <td>{{ employee.firstName }} {{ employee.lastName }}</td> <td>{{ employee.jobTitle }}</td> <td>{{ employee.dept }}</td> <td>{{ employee.age }} <button class="badge badge-primary">Edit</button> </td> </tr> </tbody> </table>
We obviously need to have a click event handler on the new Edit button but each button needs a reference to the employee it represents in order to know which one has been selected to be edited. Vue offers a way to deal with this by allowing a second parameter in the v-for directive. This second parameter can be used to expose the index of the array element that v-for is iterating over so we can reference it elsewhere, in this case we want to pass it as the parameter for our click event handler so the function we call knows the index of the employee it’s dealing with.
<tr v-for=“(employee, idx) in employees”>
We can now assign our click handler to our Edit button and pass in the index of each employee, using the idx that we exposed from v-for, as the parameter. We explained the v-on:click directive in part 2 (remember you can also use the shorthand @click if you’d like).
<button v-on:click=“editEmployee(idx)” class="badge badge-primary">Edit</button>
The next step is to implement the editEmployee() click handler which we can do by adding it to the methods object in our Vue Instance. Remember we’re implementing all of our methods in our Vue Instance as arrow functions.
methods : { saveEmployee : () => { if ((app.employee.firstName) && (app.employee.lastName)) app.db.collection(‘Employees’).add(app.employee) .then(function() { app.clearEmployee() }) .catch(function() { console.log(‘Error saving employee ‘ + app.employee.firstName + ‘ ‘ + app.employee.lastName) }) else alert(‘You must enter both a first and last name to save.’) }, editEmployee : (idx) => { }, clearEmployee : () => { app.employee = { firstName : ‘’, lastName : ‘’, jobTitle : ‘’, dept : ‘’, age : 0 } } },
The job of the editEmployee function is to grab the selected employee’s information and populate the employee object’s properties from the correct element on the employees array. We can determine which employee in our array to use by referencing the idx parameter passed to the function from the button. Once our employee object is populated, Vue’s data binding takes care of the rest to display it on the page.
editEmployee : (idx) => { let emp = app.employees[idx] if (emp) { app.employee = { id : emp.id, firstName : emp.firstName, lastName : emp.lastName, jobTitle : emp.jobTitle, dept : emp.dept, age : emp.age } } },
Save the changes and refresh the browser and make sure everything is working as it should. You should see a blue Edit button in the Age column of the table and when you click it, that employee’s information should be displayed in the input boxes. We now need to handle saving updates to existing records when the user clicks Save rather than simply adding it as new record as it does now. We’ll keep the same Save button and the same saveEmployee click handler method, however we’ll make a decision as to whether we need to save as a new employee or as an update to an existing employee. The way to determine this is quite straightforward, if the employee object has a value in it’s id property it’s an existing record, otherwise it’s a new record. For this to work we need to make a quick change first to the clearEmployee method and ensure it clears the id property as well.
clearEmployee : () => { app.employee = { firstName : ‘’, lastName : ‘’, jobTitle : ‘’, dept : ‘’, age : 0, id : ‘’ } }
Let’s go to our saveEmployee method and add that condition to determine whether we’re saving a new employee or an existing one. For saving new employees we simply need to check if the employee.id isn’t set. Note that rather than simply save the employee object as we did previously, we’re defining a new object from the information in the employee object. The reason for this is simply that we’ve added an id property to the employee object and we don’t want to save this as an additional field on the document
saveEmployee : () => { if ((app.employee.firstName) && (app.employee.lastName)) { let saveEmp = { firstName : employee.firstName, lastName : employee.lastName, jobTitle : employee.jobTitle, dept : employee.dept, age : employee.age } if (! app.employee.id) //check if the id has not been set app.db.collection(‘Employees’).add(saveEmp) .then(() => { app.clearEmployee() }) .catch(() => { console.log(‘Error saving employee ‘ + app.employee.firstName + ‘ ‘ + app.employee.lastName) }) else { } //if the id has been set } else alert(‘You must enter both a first and last name to save.’) },
Now let’s see how to save an update to an existing employee. First of all we need to grab an object reference to the specific document we want to update and we get this using the id of the employee.
let docRef = app.db.collection('Employees').doc(app.employee.id)
Now we’ve got a reference to the specific document in our Employees collection in Firestore, we can just simply call Firestore’s set() method and pass in the object with our updated information and our employee record will be updated.
if (docRef) docRef.set(saveEmp)
The set() method is asynchronous, like most Firestore methods, so if there’s any code we want to execute once we’re certain that the update has saved, we can implement it in the returned promise’s then() method (as we covered in part 2). In the method we pass to then() we simply call clearEmployee to clear the inputs and make it ready to add a new employee again, just as we did when adding new employees (and we’ll add a catch() just in case).
if (docRef) docRef.set(saveEmp) .then(() => { app.clearEmployee() }) .catch(() => { console.log(’Update to ‘ + app.firstName + ' ' + app.lastName + ' did not save!'); })
So let’s put this all together in our saveEmployee method :
saveEmployee : () => { if ((app.employee.firstName) && (app.employee.lastName)) { let saveEmp = { firstName : app.employee.firstName, lastName : app.employee.lastName, jobTitle : app.employee.jobTitle, dept : app.employee.dept, age : app.employee.age } if (! app.employee.id) //check if the id has not been set app.db.collection(‘Employees’).add(saveEmp) .then(() => { app.clearEmployee() }) .catch(() => { console.log(‘Error saving employee ‘ + app.employee.firstName + ‘ ‘ + app.employee.lastName) }) else { //if the id has been set, we save an update let docRef = app.db.collection('Employees').doc(app.employee.id) if (docRef) docRef.set(saveEmp) .then(() => { app.clearEmployee() }) .catch(() => { console.log(’Error updating employee ‘ + app.firstName + ' ' + app.lastName) }) } } else alert(‘You must enter both a first and last name to save.’) },
This is fairly verbose and we could certainly tidy things up but it works and it’s verbosity helps to explain what it is we’re doing so we’ll leave this as it is. Before we close this part of the tutorial off and let you go and get a much deserved coffee, let’s add one more little piece of functionality to our app. Things are great, but let’s say the user clicks to Edit an employee and realises they don’t want to save - at the moment there’s no way for them to go back to add a new one. To get around this we’ll put an Add button next to the Save button that let’s them click to add a new employee. This button however should only be available if they’re editing an existing employee.
<label>Age</label> <input type=“number” v-model:number=“employee.age”></br> <button v-on:click=“saveEmployee()”>Save</button> <button v-on:click=“clearEmployee()”>Add</button> </div>
Notice we’re directly calling our clearEmployee method as our event handler as that does everything we need to put our app into Add mode. Cool, but remember we only want to show this button if the user is in Edit mode. The way to do this is to use Vue’s conditional directive, v-if. This lets us include a conditional statement on the element, whether directly of via a method call, to determine if it should be visible on the page. In this case we want to check if the current employee object has an id set, if it has then we’re in edit mode so show the Add button, otherwise don’t show it.
<button v-if=“employee.id” v-on:click=“clearEmployee()”>Add</button>
That’ll do for this part of the tutorial dedicated to the U in CRUD. In this part we’ve covered retrieving each document’s unique id along with the other fields. We’ve added an Edit button for each employee in the list and exposed an index from our v-for directive to assign an employee index from our array so each button knows which employee it relates to. We‘ve saved our employee updates back to the database using the unique id of each document and finally we covered using v-if to conditionally show a button on our page. In the next part of this tutorial we’ll cover the D in CRUD - deleting. Hope you can join me.
You can download the completed code for this part of the tutorial on Github using the repo below and select the part4 folder. https://github.com/MancDev/VueFire
1 note
·
View note
Text
Mobile App Design: Designing for a Web App vs. Native App
One of the major decisions enterprises face early on in the mobile app development process is building a native app, web app, or a hybrid of the two. This decision not only influences the overall design of a mobile product but also impacts how users interact with your specific product. Inevitably, this will dictate the varying aspects and requirements you outline in your product requirements document that will ultimately communicate to your product team what to build, who for, and how it benefits the end-user.
This article will outline how web apps and native apps each uniquely serve a different purpose. A web app is primarily used for accessing information, and mobile apps are typically used to complete a task (i.e., buying a product vs. searching a restaurant’s location.) Ultimately, taking a design thinking approach to development allows enterprises to understand users better and choose an app type that provides a solution to their pain points.
Below, we examine the difference between web apps and native apps, as well as several considerations for how to design a mobile product to ensure it serves your business objectives and your target audience’s needs.

hbspt.cta.load(1789978, '9a00bf2b-0f7e-4b0c-88db-1c2f2534c4e7', {});
What is a Web App
As mentioned above, websites provide users with a means to access information. While web apps can’t display as much information as a desktop version of a website, web apps condense the website content to improve functionality. Essentially a web app is an extension of your website with newer web features that offer a more native-like experience. Progressive web apps load in browsers like Chrome, Safari, or Firefox, and don’t need to be downloaded from app stores (Google Play, Apple’s App Store) like native mobile apps.
Web App Design Considerations
Web app design is focused on information architecture. Properly designing a web app will ensure users can easily navigate your app, finding the information they want or need quickly and efficiently.
Navigation
It is imperative to design a navigation system that is intuitive to use, allowing users to quickly locate the content they want. Furthermore, incorporating a proper navigation hierarchy will guide users through your site, allowing them to complete site goals, be it conversion, education, or awareness. Create a strong hierarchy by first eliminating unnecessary clicks. Use breadcrumbs to show the user where they currently are within your app and how they got there. Breadcrumbs also help users navigate to higher-level pages. Finally, when designing the navigation system, be sure to utilize font sizes, line height, and character count to draw the user’s attention to key information and navigation options.
Speed
It’s reported that 47% of consumers expect a web page to load in two seconds or less. Users are easily frustrated with performance and usability issues like load times, small images, and network availability. An easy way to combat a slow or laggy web app is to keep things lean. Display and incorporate only necessary information and features in your web app. The fewer elements there are, the quicker the app will load. As mentioned earlier, web apps condense web content to improve functionality. Make sure your web app focuses on providing a solution to only one user pain point and ensure it is easy for users to achieve this goal.
Adaptive vs. Responsive
With Statista forecasting that there will be over 16 billion mobile devices worldwide by 2023, businesses designing web apps need to keep in mind that no one device is alike, and therefore need to account for how their web app will display on varying screen sizes. The answer lies in either developing an adaptive web app or a responsive web app.
Responsive
A responsive design responds to changes in browser width by re-adjusting the design elements to fit the available space. On mobile phones, this process is automatic; the site checks for the available space and then presents itself in the ideal arrangement.
Adaptive
Adaptive design has multiple fixed layout sizes. When the site detects the available space, it selects the layout most appropriate for the screen. For example, if the app is opened on a mobile device the site chooses the best layout for that screen. In adaptive design, it’s normal to develop six designs for the six most common screen widths; 320, 480, 760, 960, 1200, and 1600 pixels.
hbspt.cta.load(1789978, '9a00bf2b-0f7e-4b0c-88db-1c2f2534c4e7', {});
Native App
Native mobile apps are the most common type of app. They are built for specific platforms (i.e., Apple or Android) and are written in languages that the platform accepts. For example, Swift and Objective-C for native iOS apps and Java or Kotlin for native Android apps. Most companies will invest in native mobile app development because of the many benefits offered in comparison to other types of apps.
Native App Design Considerations
Native app design is centered around what is known as interaction design. To be successful, it is imperative to have a thorough understanding of your users, their pain points, and what solution this app will provide. After pinpointing the task a user wants to accomplish, you can easily design the right user flow and user journey to guide the user through the app.
Use Familiar Gestures
Implementing gestures into your app design is an excellent method for creating shortcuts for navigation and key functions. However, introducing new user gestures in the UI that aren’t familiar can result in a learning curve. It is essential to implement standard gestures so they are consistent with other apps. Some of these gestures include double-tap, touch-and-hold, and pinch.
Also, invest in researching user motion patterns on their devices. Users hold their devices in different ways, understanding what motions they make and discovering the most accessible locations on the screen ensure a comfortable experience. Placing a critical function in an area that is hard to reach, for example, can be detrimental to the overall functionality of the app.
Keep Content and Interface Elements to a Minimum
Carefully and thoughtfully select what functions and features are needed for your native app. Filling your interface with unnecessary buttons, images, and icons can burden users with too much information. As there isn’t as much real estate on mobile devices as there is on desktops, it’s essential to get rid of anything that isn’t key to the app’s functionality. If it doesn’t help the user achieve their end goal, cut it out. This will ensure your users find your app easy to comprehend, allowing them to see a clear-cut purpose to your product.
Minimize User Input
For many users, entering any information into an app (be it registration, or filling out a form) is tedious. Due to the size of the keyboard that is often presented, the majority of information that is provided can be riddled with errors leading to further frustration. The simple fix is to minimize user input. Eliminate the need for unnecessary registration forms and other elements that require user input. However, if this is necessary to your app, some best practices can be implemented to make the process smoother. Try to keep forms as short as possible by removing any unnecessary fields. The app should ask for only essential information from the user. As a final step to avoid added frustration, implement autocomplete features and dynamically validated fields, as these will ensure data is correct before being submitted.
Final Thoughts
While there are commonalities, there is also a distinct difference in how native apps and web apps should be designed. First and foremost, it is vital to have a deep understanding of your target users and their pain points. Identifying their needs will guide you towards the approach that fits your needs. Keep in mind that native apps and web apps serve different purposes that dictate design elements and functionalities.
Above all, it is important to remember that mobile app development is an iterative process. Implementing the design considerations above in your app should be a starting point for continued testing. Use the provided data and user feedback to improve your design and overall experience continually.
hbspt.cta.load(1789978, '9a00bf2b-0f7e-4b0c-88db-1c2f2534c4e7', {});
Mobile App Design: Designing for a Web App vs. Native App published first on https://gpshandyorten.tumblr.com/
0 notes
Text
300+ TOP Apache TAPESTRY Interview Questions and Answers
Apache Tapestry Interview Questions for freshers experienced :-
1. What is Apache Tapestry? It is an open source web framework written in Java and can work under any application server. It is easily integrate with back ends like Hibernate and Spring etc. It is a component based web framework. 2. What are the benefits of Apache Tapestry? Benefits of Apache Tapestry are: Adaptive API Fast framework Build-in Inversion Control Highly scalable web applications Storage management of Persistent state 3. What are the features of Apache Tapestry? Features of Apache Tapestry are: Live class reloading Code less, deliver more Static structure and dynamic behavior Detailed and clear exception reporting Extensive use of POJOs (Plain Old Java Objects) 4. Who is the developer of Apache tapestry? Apache Tapestry is developed by “Howard Lewis Ship”. 5. What is the component annotations used in Apache Tapestry? Component annotations used in Apache Tapestry are: @Log @Path @import @Property @Parameter @Environmental 6. What is IoC annotation? IoC annotation: It is used to inject objects into IoC Container. Type of IoC annotation are: @Value @Inject 7. What is CleanupRender? CleanupRender: It is used to release the objects created during rendering process. It is the counterpart of the SetupRender. 8. What is Two-way Data Binding? In Two-way data binding, we can communicate and transfer data with the use of parameters, components and its corresponding page. 9. What is Validate expansion? Validate expansion: It is a specialized string that is used to specify the validation rule of an object. 10. What is Form Component? It is used to create a form in the tapestry page for user input. A form can contain text fields, checkbox fields, date fields, submit button, select options and more.

Apache TAPESTRY Interview Questions 11. Does Apache Tapestry use JSP Tag libraries? No, It does not use JSP Tag library. 12. What is TextField Component? TextField Component: It is used to edit a single line of text. 13. What are the significant parameters used in Form Validation? Significant parameters used in Form Validation are: Min Max Email MaxDate MaxLength MinLength 14. What are the ways provided by Apache Tapestry to persist the data? There are two ways provided by Apache Tapestry to persist the data are: Session Storage Persistence page data 15. What is SSO? SSO stands for Session Store Object. It is a specialized store that is used to store complex / special object. Data types can also be stored using SSO. 16. Why Do We Need @script In Apache Tapestry? The script framework is an effective means to bundle scripts in components. It provides scripts with the advantages of components. It can now be reused like a component and not have to worry about renaming field names or the wiring between the fields and the scripts. You just declare the component and you are good to go. It certainly is another layer of abstraction that one will have to learn but once you have learned it, it is very powerful. And honestly there is not much to it. The script framework is mandated by the fact that form element/field names are automatically generated by the framework. And so you write your script in XML and use variables for these names and let the framework provide the correct names during runtime. Going further, you may also ask the framework to provide other objects that would help in creating your script. For example… This defines an input variable “select” of type “org.apache.tapestry.form.PropertySelection”. All such variables/symbols passed in to the script is stored in a symbol map. And now you can use the form select list name by using an ant style syntax like ${select.name}. The expression within “${}” is an OGNL expression and is evaluated with respect to the symbol map. You may also define your own symbols/variables using like… document.${select.form.name} ${formObj}.${select.name} These variables/symbols are stored in the symbol map also. So now if you want to set the value of the form select list all you do is say ${formObj}.${selectObj}.value = ‘whatever’; this would be equivalent to document.myForm.mySelect.value = ‘whatever’; where myForm is the form name and mySelect is the select list name. s are like method parameters and s are like instance variables. Typically you would pass values to the s via the Script component like... The actual scripts are defined in one of the two sections of the script specification, or , depending on when you want the script to execute. If you want the script to execute on load of the page, then you define it in the , if you want it to execute on any other event, define it in the section of the specification. For example… function onChangeList(listObj) { alert(listObj.value); } ${selectObj}.onchange = function(e) { onChangeList(${selectObj}); } As you can see in the rendered page all scripts are aggregated at the top of the page body, there are no more scripts all over the page. Even event handlers are attached to form objects in the initialization block. One more thing to remember, scripts being components, and components by nature being independent of its environment, will render the script in the page once for every ocurrance of the component. If you want the body of the script to be rendered only once no matter how many times the component is used, just wrap the body in a tag like… function onChangeList(listObj) { alert(listObj.value); } 17. What’s The Lifecycle Of A Form Submit? Events will trigger in the following order: initialize() pageBeginRender() formListenerMethod() pageBeginRender() The form “rewind” cycle is nothing more than a render cycle where the output is buffered and scrapped rather than written to the servlet output stream. The second pageBeginRender() is triggered during the actual page rendering. You can use requestCycle.isRewinding() to distinguish between these two render cycles. 18. Can I Use The Same Component Multiple Times In One Template? No – but you can copy the definition of a component pretty easily. 19. How Should Do Page Navigation In Apache Tapestry? Usage page properties: Page1.page Page2.page Welcome.Action.java public void submitListener(IRequestCycle cycle) { if (success) cycle.activate(getSpecification().getProperty("success")); if (error) cycle.activate(getSpecification().getProperty("error")); } So on success, it will be redirected to Home2 and on error it will be redirected to Error2 page. 20. Is Tapestry A Jsp Tag Library? Tapestry is not a JSP tag library; Tapestry builds on the servlet API, but doesn’t use JSPs in any way. It uses it own HTML template format and its own rendering engine. Starting with release 3.0, Tapestry includes a simple JSP tag library to allow JSP pages to create links to Tapestry pages. Apache TAPESTRY Questions and Answers Pdf Download Read the full article
0 notes
Text
A Comprehensive Guide to Natural Language Generation

As long as Artificial Intelligence helps us to get more out of the natural language, we see more tasks and fields mushrooming at the intersection of AI and linguistics. In one of our previous articles, we discussed the difference between Natural Language Processing and Natural Language Understanding. Both fields, however, have natural languages as input. At the same time, the urge to establish two-way communication with computers has lead to the emergence of a separate subcategory of tasks dealing with producing (quasi)-natural speech. This subcategory, called Natural Language Generation will be the focus of this blog post.
What is NLG?
Natural Language Generation, as defined by Artificial Intelligence: Natural Language Processing Fundamentals, is the “process of producing meaningful phrases and sentences in the form of natural language.” In its essence, it automatically generates narratives that describe, summarize or explain input structured data in a human-like manner at the speed of thousands of pages per second.
However, while NLG software can write, it can’t read. The part of NLP that reads human language and turns its unstructured data into structured data understandable to computers is called Natural Language Understanding.
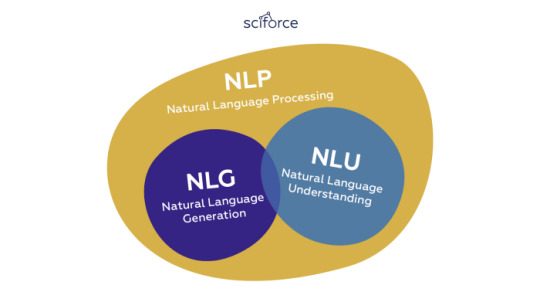
In general terms, NLG (Natural Language Generation) and NLU (Natural Language Understanding) are subsections of a more general NLP domain that encompasses all software which interprets or produces human language, in either spoken or written form:
NLU takes up the understanding of the data based on grammar, the context in which it was said and decide on intent and entities.
NLP converts a text into structured data.
NLG generates a text based on structured data.
Major applications of NLG
NLG makes data universally understandable making the writing of data-driven financial reports, product descriptions, meeting memos, and more much easier and faster. Ideally, it can take the burden of summarizing the data from analysts to automatically write reports that would be tailored to the audience.The main practical present-day applications of NLG are, therefore, connected with writing analysis or communicating necessary information to customers:

Practical Applications of NLG
At the same time, NLG has more theoretical applications that make it a valuable tool not only in Computer Science and Engineering, but also in Cognitive Science and Psycholinguistics. These include:

NLG Applications in Theoretical Research
Evolution of NLG Design and Architecture
In the attempts to mimic human speech, NLG systems used different methods and tricks to adapt their writing style, tone and structure according to the audience, the context and purpose of the narrative. In 2000 Reiter and Dale pipelined NLG architecture distinguishing three stages in the NLG process:
1. Document planning: deciding what is to be said and creating an abstract document that outlines the structure of the information to be presented.
2. Microplanning: generation of referring expressions, word choice, and aggregation to flesh out the document specifications.
3.Realisation: converting the abstract document specifications to a real text, using domain knowledge about syntax, morphology, etc.
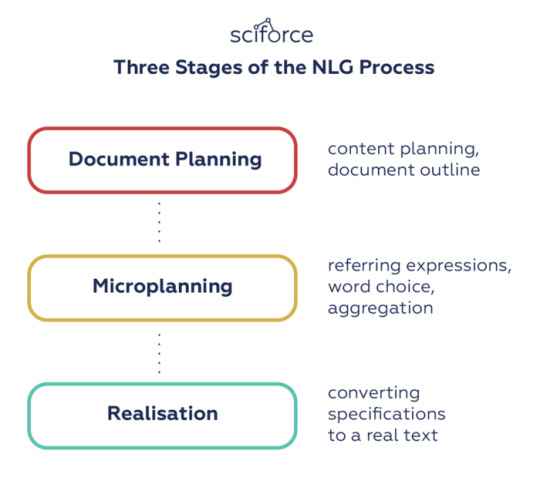
Three Stages of the NLG Process
This pipeline shows the milestones of natural language generation, however, specific steps and approaches, as well as the models used, can vary significantly with the technology development.
There are two major approaches to language generation: using templates and dynamic creation of documents. While only the latter is considered to be “real” NLG, there was a long and multistage way from basic straightforward templates to the state-of-the-art and each new approach expanded functionality and added linguistic capacities:
Simple Gap-Filling Approach
One of the oldest approaches is a simple fill-in-the-gap template system. In texts that have a predefined structure and need just a small amount of data to be filled in, this approach can automatically fill in such gaps with data retrieved from a spreadsheet row, database table entry, etc. In principle, you can vary certain aspects of the text: for example, you can decide whether to spell numbers or leave them as is, this approach is quite limited in its use and is not considered to be “real” NLG.
Scripts or Rules-Producing Text
Basic gap-filling systems were expanded with general-purpose programming constructs via a scripting language or by using business rules. The scripting approach, such as using web templating languages, embeds a template inside a general-purpose scripting language, so it allows for complex conditionals, loops, access to code libraries, etc. Business rule approaches, which are adopted by most document composition tools, work similarly, but focus on writing business rules rather than scripts. Though more powerful than straightforward gap filling, such systems still lack linguistic capabilities and cannot reliably generate complex high-quality texts.
Word-Level Grammatical Functions
A logical development of template-based systems was adding word-level grammatical functions to deal with morphology, morphophonology, and orthography as well as to handle possible exceptions. These functions made it easier to generate grammatically correct texts and to write complex template systems.
Dynamic Sentence Generation
Finally taking a step from template-based approaches to dynamic NLG, this approach dynamically creates sentences from representations of the meaning to be conveyed by the sentence and/or its desired linguistic structure. Dynamic creation means that the system can do sensible things in unusual cases, without needing the developer to explicitly write code for every boundary case. It also allows the system to linguistically “optimise” sentences in a number of ways, including reference, aggregation, ordering, and connectives.
Dynamic Document Creation
While dynamic sentence generation works at a certain “micro-level”, the “macro-writing” task produces a document which is relevant and useful to its readers, and also well-structured as a narrative. How it is done depends on the goal of the text. For example, a piece of persuasive writing may be based on models of argumentation and behavior change to mimic human rhetoric; and a text that summarizes data for business intelligence may be based on an analysis of key factors that influence the decision.
NLG Models
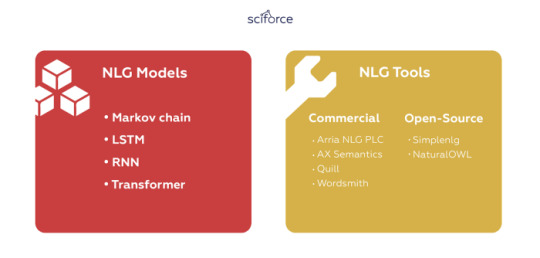
Even after NLG shifted from templates to dynamic generation of sentences, it took the technology years of experimenting to achieve satisfactory results. As a part of NLP and, more generally, AI, natural language generation relies on a number of algorithms that address certain problems of creating human-like texts:
Markov chain
The Markov chain was one of the first algorithms used for language generation. This model predicts the next word in the sentence by using the current word and considering the relationship between each unique word to calculate the probability of the next word. In fact, you have seen them a lot in earlier versions of the smartphone keyboard where they were used to generate suggestions for the next word in the sentence.
Recurrent neural network (RNN)
Neural networks are models that try to mimic the operation of the human brain. RNNs pass each item of the sequence through a feedforward network and use the output of the model as input to the next item in the sequence, allowing the information in the previous step to be stored. In each iteration, the model stores the previous words encountered in its memory and calculates the probability of the next word. For each word in the dictionary, the model assigns a probability based on the previous word, selects the word with the highest probability and stores it in memory. RNN’s “memory” makes this model ideal for language generation because it can remember the background of the conversation at any time. However, as the length of the sequence increases, RNNs cannot store words that were encountered remotely in the sentence and makes predictions based on only the most recent word. Due to this limitation, RNNs are unable to produce coherent long sentences.
LSTM
To address the problem of long-range dependencies, a variant of RNN called Long short-term memory (LSTM) was introduced. Though similar to RNN, LSTM models include a four-layer neural network. The LSTM consists of four parts: the unit, the input door, the output door and the forgotten door. These allow the RNN to remember or forget words at any time interval by adjusting the information flow of the unit. When a period is encountered, the Forgotten Gate recognizes that the context of the sentence may change and can ignore the current unit state information. This allows the network to selectively track only relevant information while also minimizing the disappearing gradient problem, which allows the model to remember information over a longer period of time.
Still, the capacity of the LSTM memory is limited to a few hundred words due to their inherently complex sequential paths from the previous unit to the current unit. The same complexity results in high computational requirements that make LSTM difficult to train or parallelize.
Transformer
A relatively new model was first introduced in the 2017 Google paper “Attention is all you need”, which proposes a new method called “self-attention mechanism.” The Transformer consists of a stack of encoders for processing inputs of any length and another set of decoders to output the generated sentences. In contrast to LSTM, the Transformer performs only a small, constant number of steps, while applying a self-attention mechanism that directly simulates the relationship between all words in a sentence. Unlike previous models, the Transformer uses the representation of all words in context without having to compress all the information into a single fixed-length representation that allows the system to handle longer sentences without the skyrocketing of computational requirements.
One of the most famous examples of the Transformer for language generation is OpenAI, their GPT-2 language model. The model learns to predict the next word in a sentence by focusing on words that were previously seen in the model and related to predicting the next word. A more recent upgrade by Google, the Transformers two-way encoder representation (BERT) provides the most advanced results for various NLP tasks.
NLG Tools
You can see that natural language generation is a complicated task that needs to take into account multiple aspects of language, including its structure, grammar, word usage and perception. Luckily, you probably won’t build the whole NLG system from scratch as the market offers multiple ready-to-use tools, both commercial and open-source.
Commercial NLG Tools
Arria NLG PLC is believed to be one of the global leaders in NLG technologies and tools and can boast the most advanced NLG engine and reports generated by NLG narratives. The company has patented NLG technologies available for use via Arria NLG platform.
AX Semantics: offers eCommerce, journalistic and data reporting (e.g. BI or financial reporting) NLG services for over 100 languages. It is a developer-friendly product that uses AI and machine learning to train the platform’s NLP engine.
Yseop is known for its smart customer experience across platforms like mobile, online or face-to-face. From the NLG perspective, it offers Compose that can be consumed on-premises, in the cloud or as a service, and offers Savvy, a plug-in for Excel and other analytics platforms.Quill by Narrative Science is an NLG platform powered by advanced NLG. Quill converts data to human-intelligent narratives by developing a story, analysing it and extracting the required amount of data from it.
Wordsmith by Automated Insights is an NLG engine that works chiefly in the sphere of advanced template-based approaches. It allows users to convert data into text in any format or scale. Wordsmith also provides a plethora of language options for data conversion.
Open-Source NLG Tools
Simplenlg is probably the most widely used open-source realiser, especially by system-builders. It is an open-source Java API for NLG written by the founder of Arria. It has the least functionality but also is the easiest to use and best documented.
NaturalOWL is an open-source toolkit which can be used to generate descriptions of OWL classes and individuals to configure an NLG framework to specific needs, without doing much programming.
Conclusion
NLG capabilities have become the de facto option as analytical platforms try to democratize data analytics and help anyone understand their data. Close to human narratives automatically explain insights that otherwise could be lost in tables, charts, and graphs via natural language and act as a companion throughout the data discovery process. Besides, NLG coupled with NLP are the core of chatbots and other automated chats and assistants that provide us with everyday support.
As NLG continues to evolve, it will become more diversified and will provide effective communication between us and computers in a natural fashion that many SciFi writers dreamed of in their books.
0 notes
Text
ESP32 / ESP8266 Arduino Tutorial:4. Protocol Buffers
Introduction
In this tutorial we will learn how to get started using Protocol Buffers with the Arduino core. In this introductory example, we will check how to declare a message type and how to encode it. This tutorial was tested both on the ESP32 and on the ESP8266.
Protocol buffers are a data serialization format from Google which are supported in multiple programming languages [1]. Protocol Buffers messages are encoded in a binary format [2], which means they are not human readable unless we decode them back to a readable format.
One of the main advantages of using Protocol Buffers is that the serialization and deserialization process is fast and the generated messages are small. For example, in the project website it is claimed that Protocol Buffers are 20 to 100 times faster and 3 to 10 times smaller than XML [3]. Around the web, there are also a lot of benchmarks that indicate Protocol Buffers are faster and smaller than JSON [4][5].
For our tests we are going to use Nanopb, a C implementation of Protocol Buffers that targets 32-bit microcontrollers [6]. You can check the GitHub page of the library here.
When using Protocol Buffers, we need to specify how we want to structure the data that will be serialized. This is done by defining message types in a .proto file [3]. After the definition of the messages, we need to run a protocol buffer compiler for the specific language we are using, to generate data access classes for our messages [3].
The tests on the ESP32 were performed using a DFRobot’s ESP-WROOM-32 device integrated in a ESP32 FireBeetle board. The tests on the ESP8266 were performed on a DFRobot’s ESP8266 FireBeetle board.
Setting up the environment
In order to get started, we need to download the latest release of Nanopb from the downloads page. The downloads page includes versions for Linux, Mac and Windows, as shown below at figure 1. I’ll be performing the tests on a Windows 8.1 machine.

Figure 1 – Downloading Nanopb.
Once the download finishes, unzip the content. You should get a folder hierarchy similar to figure 2.

Figure 2 – Folder hierarchy of Nanopb.
In the previous image, there are two highlighted areas that are of interest for this tutorial. The first one is the generator-bin folder, which contains the already mentioned compiler that we will need to use to compile our .proto files.
Inside that folder, we can create a new folder called “proto_files“, where we will place our message definitions. Note that the name of the folder is arbitrary as it is its location. Naturally, we can define it where we want it in our computer as long as we use the correct paths when running the compilation tool.
Inside the folder, create a file called test.proto. For now, you can leave it empty. We will get back to it later.
If you go back to the root of the Nanopb project, you should see some .c and .h files, as also highlighted in figure 2. We will need those files when compiling our code. So, copy them all. The list of files copied should be the following:
pb.h
pb_common.h
pb_common.c
pb_encode.h
pb_encode.c
pb_decode.h
pb_decode.c
In order to be able to use Nanopb as a regular Arduino library, go to the folder where your Arduino libraries are. Typically, the path where the libraries are located is:
C:\Users\#yourUserName#\Documents\Arduino\libraries
Once you locate the Arduino libraries folder, create a new folder inside called Nanopb, next to your other libraries. There, paste the previously copied .c and .h files.
Defining the .proto file
Now that we have created our Nanopb library, we need to go back to the .proto file, so we can define our message.
In the first line, we need to declare the syntax version we are using to define our message. In our case, we will be using the proto2syntax.
syntax = "proto2";
Next, we need to define our message type. We start by using the message keyword, followed by the actual name of our message type. I’ll be calling it TestMessage.
Then, the message fields are declared between curly brackets.
message TestMessage { // body of message }
For each field we declare in our message, we need to specify its data type and its name. Additionally, each field needs to have a unique number. The unique numbers are used to identify the fields in the binary data format [7], so the name of the field is not serialized.
Additionally, for each field, we need to specify if it is optional, required or repeated. Required means the message must have that field exactly one time, optional means the field can not exist or the message can have it at most one time, and repeated means the field can be repeated any number of times (including zero) [7].
In or message, we will declare an integer field called test_number that will be required. For this simple example we will only make use of one field and thus we should assign it the unique number 1.
required int32 test_number = 1;
The final file content can be seen below. After finishing its edition, save it.
syntax = "proto2"; message TestMessage { required int32 test_number = 1; }
Now we need to compile the .proto file, so we can use it in our code. In case of Nanopb, since it offers a pure C implementation, this compiling procedure will generate C structs to represent our messages.
In order to compile it, open a command prompt and navigate to the generator-bin folder. There, the command to compile the messages has the following syntax, where you should change #pathToProtoFile# to the location of your .proto file:
protoc --nanopb_out=. #pathToProtoFile#
If you created a proto_files inside the generator-bin folder and placed the .proto file there like I did, the command is:
protoc --nanopb_out=. proto_files/test.proto
After running the command, a test.pb.c and a test.pb.h file should be created in the folder where you have your .proto definition, as shown in figure 3.

Figure 3 – Generated files.
If you open the .h file, you should see that it has a struct called TestMessage defined there, as shown in figure 4. It matches the message name we have used in the .proto file. Also, the struct as an integer field called test_number, like we also specified.
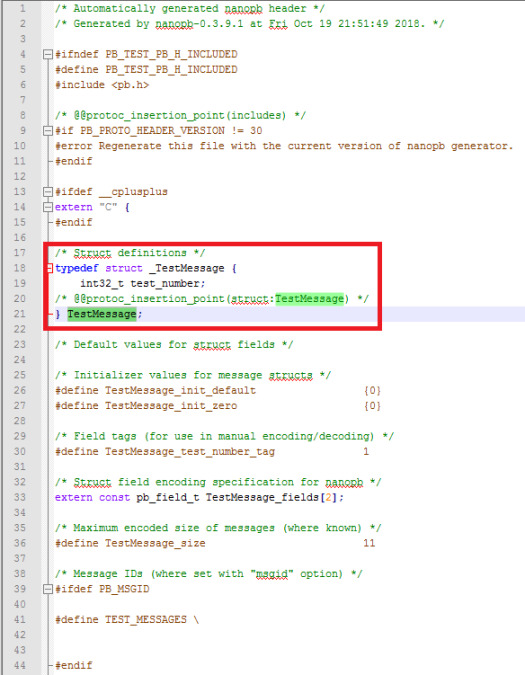
Figure 4 – Struct definition in generated header file.
We will need both the .c and the .h file, so copy them. Since these are the message definitions which are specific of our program, we should not place them in the Nanopb library folder we have created previously.
So, on your Arduino sketch folder, simply create a folder called src and paste the previously copied filed there, as shown in figure 5.

Figure 5 – Arduino sketch folder with .c and .h files.
The code
We will start our code by doing some includes. The first one corresponds to the .h file we have obtained after compiling our .proto file. This will make available the struct that was created by the compilation process.
Remember that we have the file in a folder inside the sketch directory, so we need to provide the correct path when including the file.
#include "src/test.pb.h"
After that,we need to include the header files we have pasted in our Nanopb library folder, with the exception of the pb_decode.h, since we are not going to decode the message in this introductory tutorial.
#include "pb_common.h" #include "pb.h" #include "pb_encode.h"
Moving on to the Arduino setup function, we will start by opening a serial connection, to later output some results of our program.
Serial.begin(115200);
Then, we will declare an array of bytes that will serve as a buffer to hold the serialized message. For this tutorial we will declare a buffer with a size big enough to hold all our structure, so we won’t need to worry about calculating the maximum size the message can have.
uint8_t buffer[128];
Next, we will declare our message data structure and initialize it. Nanopb generates a define that allows to initialize the data struct, which has the following name:
#MessageName#_init_zero
So, in our case, the declaration and initialization of the structure is done like below:
TestMessage message = TestMessage_init_zero;
Nanopb uses the concept of streams to access data in encoded format [8]. So, the next thing we will do is calling the pb_ostream_from_buffer function, which constructs an output stream for writing into a memory buffer [9].
We need to pass as first input our previously declared buffer and as second input the maximum number of bytes to write, which should be the size of our buffer. This function call will return a struct of type pb_ostream_t.
pb_ostream_t stream = pb_ostream_from_buffer(buffer, sizeof(buffer));
Now that we have our stream, we should set the value of our message field before we encode it. Recall that we had a field called test_number in our .proto file, which also exists in the TestMessage struct we have declared.
So, we will access that field of the struct and assign it a value.
message.test_number = 540;
Now, to do the actual encoding, we need to call the pb_encode function.
As first input, we need to pass the address of our pb_ostream_t variable. As second, we need to pass a fields description array that is auto-generated for us in the compilation process, which has the following syntax:
#MessageName#_fields
As third and final argument, we need to pass the address of our TestMessage struct.
As output, this function call returns a Boolean value that indicates if the encoding of the content was successful (true) or not (false), which we can use for error check.
bool status = pb_encode(&stream, TestMessage_fields, &message); if (!status) { Serial.println("Failed to encode"); return; }
If the serialization is performed without errors, our buffer should already contain the data. But before we access it, we can check how many bytes were written by accessing the bytes_written field of the pb_ostream_t variable.
Serial.println(stream.bytes_written);
Finally, we will iterate through all the bytes of the encoded message and print them to the serial port in hexadecimal format. Note that since we know exactly how many bytes were written, we can use that value as stopping condition for our loop, rather that reading the whole buffer.
for(int i = 0; i<stream.bytes_written; i++){ Serial.printf("%02X",buffer[i]); }
The final code can be seen below, with some additional prints for readability.
#include "src/test.pb.h" #include "pb_common.h" #include "pb.h" #include "pb_encode.h" void setup() { Serial.begin(115200); uint8_t buffer[128]; TestMessage message = TestMessage_init_zero; pb_ostream_t stream = pb_ostream_from_buffer(buffer, sizeof(buffer)); message.test_number = 540; bool status = pb_encode(&stream, TestMessage_fields, &message); if (!status) { Serial.println("Failed to encode"); return; } Serial.print("Message Length: "); Serial.println(stream.bytes_written); Serial.print("Message: "); for(int i = 0; i<stream.bytes_written; i++){ Serial.printf("%02X",buffer[i]); } } void loop() {}
Testing the code
To test the code, simply compile it and upload it to your device. Once the procedure finishes, open the Arduino IDE serial monitor. You should get an output similar to figure 6, which shows both how many bytes were written and the binary message, in hexadecimal format.
Figure 6 – Output of the program, including the encoded message.
Copy the whole message bytes. Then, go to this online decoder and paste the content in the first text input box (the one that accepts hexadecimal format). It should output a result similar to figure 7, which shows the value we have assigned to our field (540). Note that the name of the field is not included in the serialized message but rather the unique number of the field, which makes the message much smaller (only 3 bytes).

Figure 7 – Decoding the message with an online tool.
0 notes
Text
AI-Driven Sales | What Has Changed?

AI-Driven Sales | What Has Changed? – blog by Jay Nair
Sales Forecasting: Science or Instinct?
Recently, we had talked about marketing automation, a digital transformation in the field that involved both artificial intelligence and machine learning. Even Natural Language Processing (NLP) has come a long way, enough to change the content marketing game. But while marketing has shifted to a digital ecosystem, sales as a function remains largely people-centric.
With the advent of e-commerce, it is likely to change in the foreseeable future. Then again, the more complicated the product, the more people-centric a sale becomes. It’s largely due to buyer sophistication, which enabled consumers to become more informed about their need and product utility.
In a way, to survive, sales required the allied support of marketing – now more than ever before. The time for marketing and sales to work in silos are long past, and should such a division persist, experts conclude the eventuality of organizational failure.
But sales as a function isn’t entirely straightforward – there are those that acquire customers, those that nurture them, and others better suited to sales research among many others. Another critical function of an organization’s sales ecosystem is forecasting.
Digital Transformation in Forecasting: Good for Sales?
A good sales forecast is essential to business growth, but it’s historically relied on the human element. Yes, emotions and hunches could make or break an organization’s quarter. However, progressive companies have begun using big data and artificial intelligence to pervade this aspect of sales. At the same time, while several may infer this as a threat to their own jobs, forecasting succeeds only as a combination of both artificial and human intelligence.
How can we do this?
Honest Pipelines: If you’re in the sales ecosystem, you know what a pipeline is. Too often though, deals remain hidden under the radar or opportunities aren’t pounced on early enough. Ranking how likely sales opportunities are won is an important component to automating your forecast. How does human intelligence factor in? Well, you don’t need an expert in AI to identify hidden opportunities that might lead to forecasting errors. Ownership within the sales department is key here. To over-promise or under-deliver a potential is a detriment to any organization, which is why both data and operations require constant attention. Visibility is the hallmark of both accountability and predictability.
Commit to the Technology: Big disruptions are bound to become commonplace after a specific period of time. At one point, cloud computing shook the market at its very foundation. Now, organizations can’t imagine life without it. A similar process is in the works with machine learning and AI. These technologies are reshaping how we leverage and learn from data, by really digging into the depths of its importance. It enables us to create hyper-personalized customer experiences as well. In terms of forecasting, AI is destined to transform organizational interaction with data from and for sales. It’s also unbiased and brutally honest; without emotion and definitely unequivocal in its results. What you get from AI is the hard, cold data truth. But for it to learn faster, it needs you, your guidance, and input. This is necessary for AI to amplify your data. Organizations don’t feel attached enough to the technology claiming it to rank as a branch of poor investments, but AI requires patience. It needs time to learn about your business. Let it grow. Coach it. And best of all, remember that it never forgets.
Justify the Hunch: Potential deals stem from sales executives and their hunches about how a deal is expected to play out. This can go one of two ways – spot on or far off. Human emotions are important in forecasting, but technology enables organizations to process it differently. Instead of merely running on instinct, forecasting must also contain variables that can be logically explained and replicated. Several AI solutions also incorporate the feeling or emotional aspect of a sales executive into its learning or processing methodologies; these are then measured and benchmarked with real values as they occur. It’s complimentary and accelerates the learning process.
Take a Leap of Faith: A new approach to forecasting might come across as a challenging endeavor, perhaps even unnecessary. It’s human tendency to stay rooted in your ways. But there will come a time when change is necessary, leaving you with a chance at success or market demolition. Learning from mistakes and accepting change is how organizations have become better, at least from history.
How Do You View Forecasting?
Without logic backed by science, forecasting often falls into becoming either overly optimistic or drastically pessimistic. Both scenarios impact company growth. AI enables a certain rigor and discipline to sales forecasting, using nothing more than data and facts to reach a conclusion.
But to put this perspective to an end – a correct prediction is great but being able to explain the logic behind the same is even better. So, how should we treat forecasting? For what it is – a science.
Source
#Artificial Intelligence#Digital Transformation#Machine learning#marketing automation#Natural language processing#Sales automation
0 notes
Photo

New Post has been published on http://simplemlmsponsoring.com/attraction-marketing-formula/seo/a-beginners-guide-to-google-tag-manager/
A Beginner’s Guide to Google Tag Manager

Google Tag Manager has come a long way since its release in 2012. Throughout the years, the interface terminology has changed, and additional features have been added that make it much easier to use. Tim Allen’s previous post on “Getting to Grips with Google Tag Manager” gives a great introduction for the 2014 features at a time when GTM was more difficult for beginners. But now many features have been condensed and simplified, such as “Tags, Rules and Macros” which is now “Tags, Triggers, and Variables.”
So how do you use Google Tag Manager in 2019? I’ll take you through how to create a tag that will help you track user behavior on your site and go through some of the newest features GTM has now built in for user friendliness and accessibility.
Feel free to skip around the article to start learning about GTM!
How does GTM work? Setting Up GTM Tags, Triggers, and Variables Creating a Tag Let’s Talk More on Variables Testing with GTM Preview and Debugging Your Tag Wrap Up
But before we dive into the details…
What is a Tag Manager?
It’s useful to think of a Tag Management System (TMS) as similar in operation to a Content Management System (CMS). Both can make changes to the entire site via one interface portal, without needing the help of a developer to change the code for every tag. A developer is only needed for the initial installation of the GTM container code snippet.
The purpose of a tag management system is to manage the implementation of analytics platforms in tracking user interactions via a user-friendly interface.
Many popular analytics platforms have released their own type of tag manager, such as Launch by Adobe Analytics. These various tag managers, much like their analytics platform counterparts, use different terminology but are very similar in functionality. Most TMS solutions are compatible with popular platforms and applications, built to integrate smoothly without additional programming (at least that’s what they advertise).
GTM is compatible with a number of analytics platforms. To view a full list of GTM supported platforms, click here.
How Does Google Tag Manager Work?
GTM inserts JavaScript and HTML tags, created from the user-friendly interface portal, into the GTM container that is hard-coded onto every page of your website.
The GTM container is a piece of JavaScript (and non-Javascript) code that enables the GTM to fire tags.
Setting up GTM
Creating a GTM account for your website is fairly quick.
Follow the steps on the Google Tag Manager site by inputting your information.
After creating your account, you will be brought the main GTM interface. At the top of the workspace, you will see the unique ID number given to your GTM container.

After clicking into the container ID, you will see 2 code snippets:
The first code snippet uses javascript to fire tags, and GTM instructs you to paste this into the <head> of every page of your website. The second code snippet is an HTML iframe that is used when javascript is not available and should be placed after the opening <body> tag.

This way, if users have disabled javascript, the tag will still fire from the second code snippet.
You can find more details on setting up your GTM container from the Google Support Site.
Tags, Triggers, and Variables
When you first look into the workspace page of GTM, you’ll see sections on the left hand side labeled Tags, Triggers, and Variables.

These 3 are the building blocks of GTM. I’ve outlined their definitions below so you can get a better understanding of what each one entails.
Tags – Tags are tracking codes and code fragments that tell GTM what action to take on that page.
Example: Sending a pageview hit to Google Analytics.
Triggers – Triggers specify the conditions under which a Tag should fire.
Example: A trigger with a condition to only fire a Tag when a user views URLs containing the path /blog/.
Variables – Variables are values used in triggers and tags to filter when a specific tag should fire. GTM provides built-in variables and allows you to create custom user-defined variables.
Example: A ‘click’ class variable has a value name (such as a word string) assigned to buttons on the website.
We will go more in depth on how to use each of these in the next sections.
How to Create a Tag
I’ll take you through a simple example of creating a tag for a Pageview across the site.
But first, I should preface the creation of this tag by explaining that you should not create a Pageview tag if you have already installed a Google Analytics container on your site. Creating a Pageview tag in GTM in addition to the GA container will cause a duplication in pageview hits every time a user visits a page, skewing your data. To clarify, you can have a GA account where GTM sends the data to without having the GA container installed on your site.
For the purpose of understanding how GTM works, using a universal concept such as a pageview will help to illustrate the use of tags, triggers, and variables.
To start off, we will navigate to the left hand side of the main interface and click on the Tags section. Then, click New (Tag).

Then we can name the tag and select the tag type as Google Analytics, which is where we will be sending the data from the tag. You can also see below the other tag type options if you are sending data to a different platform.

Next we will configure the tag’s settings. Ensure that the default track type of Page View is selected.

Inputting your Google Analytics Universal tracking ID
This part is crucial to make sure the data gets sent to your GA, so be sure to input the correct info!
There are two ways to do this:
Get the Google Analytics tracking ID by going into Admin > Property Settings > Tracking ID. Click ‘Enable overriding settings in this tag and input the Tracking ID.

Or you can create a custom constant variable, that will always contain your UAID, so you never have to remember it.
This second method leads us further into the concept of variables.
Let’s Talk More on Variables
Assuming you’ve never used your GTM account, setting up the variables in GTM will be important for creating your tag.
When you view the ‘Variables’ window of GTM, you’ll see 2 options: Built-In Variables and User-Defined Variables.

Built-In Variables are variables that GTM can define for you by detecting elements in the code. They include some of the more common variable types such as clicks or pages. Sometimes a website will not have the minimum criteria within the code for GTM to detect the right elements and use its built-in variables; In this case they must be custom made through the User-Defined Variables instead.
I’d recommend adding all of the Click, Form, and History variables to start off. Click Configure and check the boxes on the left hand side to include them.

View all of Google’s built-in variables, with their definition on the Google Support website. Also another great resource to use is Simo Ahava’s variable guide, where he goes in depth on each built-in variable and ways to utilize them.
User-Defined Variables hold the value that you define for them, whether its numerical, a selection of URLs, or a name string found in an element.
For instance, a GA constant variable used to hold the GA ID associated with your analytics account can be created. This is very useful when you are creating a tag, so that you won’t have to keep going back to your GA account to input your ID.
You can create a constant GA ID variable by selecting User-Defined Variables New > Variable Configuration > Constant > Value (Input your GA ID) > Save.
Going back to our tag example, you can now choose to input a constant variable..
Make sure that you uncheck ‘Enable overriding settings in this tag’ and use the Google Analytics Settings dropdown to select the variable ID.

Now we can create the trigger that will fire our Pageview tag!
Underneath the tag configuration, click into the Triggering field. A menu prompts to ‘Choose a trigger’ will appear. Click on the + sign in the upper right hand corner.

Name the trigger and choose Page View as the trigger type.

Make sure that All Page Views is selected, so that our tag will fire on every page of the site and click Save.

Now that we have both the tag and trigger configuration, click Save. You’ve just created your first tag!
Testing with GTM Preview and Debugging Your Tag
So you’ve created your tag, but how do you know its working?
First click onto the Preview button in the top right hand corner of the workspace.
Next, open your site in a new tab. You will now see at the bottom, much like chrome dev tools, a box appear.

Upon closer inspection, the left hand side shows a summary of the events that first loaded onto the page in sequential order: 1. Message, 2. Message, 3. Pageview, 4. DOM Ready, etc. While the top is labeled Tags, Variables, and Data Layer.

By default, you will be viewing the Tags window, showing you all of the tags on the page, whether they have fired or not.
When you click anything on the page, the Preview box will update with any tags fired, as well as the variables in connection to the elements where the interaction took place.
For instance, when the ‘sign up’ button on the homepage is clicked, we see in the left hand summary that the event gtm.formSubmit loaded. By clicking into the variables section, we are now able to see the variables and their values that are associated with the ‘sign up’ button.

So what exactly are the variables associated with this button that GTM is showing? They are the variables located in the HTML elements that GTM detects within the code of the signup form.
The same can be seen in chrome dev tools by inspecting the elements on the page. The difference is that GTM makes this easy for you by detecting them, summarizing the HTML variables and their values, and putting it into a user friendly format.
In Chrome Dev Tools:

In GTM Preview:

When you’ve added a tag to GTM, it isn’t live on the site yet. This is where it’s important to test the tag to ensure its both firing and sending the data to GA.
We can see by just loading the page that the new tag is firing!

If your tag isn’t firing, a useful way to figure out why is by clicking onto the tag in the summary and viewing the firing triggers. If any part of the trigger doesn’t apply, there will be a red X next to the Filter.

Now we can publish the new tag!
First, click the Submit button in the upper right-hand corner of the main interface.

Next, name the version container and description to let others know what you changed, typically the tags name and what it does.

After publishing your tag, you should keep watching the data in GA over time to make sure that the trigger conditions are only capturing the the user interaction we want.
Extension for GTM Tag Testing
Probably the most useful chrome browser extension for GTM is the GTM Debugger.
Once downloaded, hit F12 and the F5 to view the event data and Google Analytics Hits.

Much like preview, testing the tag works here as well, with live event updates.

However, this extension only displays information for tags that are live in the GTM container.
Wrap Up
As you have read, there is a lot to consider when using the power of GTM on you or your client’s website. GTM can be used to create as simple or as complex a tag as needed. However, it’s best to try to keep things as simple and as scalable as possible.
Whether agency or in-house, its best to keep inventory of tags. This includes creating descriptive and intuitive names for the tags, triggers, and variables. It also allows others to understand what kind of tags the container has live.
The Versions page shows you what container version is live on the site and allows you to click into the different versions to see what tags it contains.

Hope you found this article useful and enjoy creating your tags!
Read more: distilled.net
0 notes
Text
Python programming explained in 900 words
At the end of 2017, our team carried out an extensive research exploring publicly available data on 1,001 data scientist LinkedIn profiles. The main idea was to understand which are the core skills and the main tools data scientists use nowadays. And we did. Python programming was certainly one of them. Therefore, we decided to create the ‘Python programming explained’ article to provide a much-needed introduction to programming for those of you who have not used Python or another coding language so far, and would like to become successful in the data science field.
However, if you’d like to learn everything about Python in much greater detail – from installation, through IDEs, libraries, and frameworks, to free Python books and online Python courses, make sure you check out our Ultimate Python Programming Guide.
What do you need to know about Python programming if you are just getting started?
We all have to deal with certain tasks in our daily lives. Many we can solve on our own, while others, especially the ones that are more complicated, can be solved with the help of a computer.
Assume you have defined a problem that must be solved and you know the steps that must be taken to solve it. Even if you could structure your logic perfectly and type a brilliant solution in English, the computer will not understand it, as it understands 1s and 0s only. No other symbols. Similar to a light switch – it recognizes two phases – on and off.
Programming Explained
To communicate a real-life problem to the computer, you need to create a specific type of text, called a source code or a human-readable code, that software can read and then process to the computer in 0s and 1s.
Source code to machine code
A program is a sequence of instructions that designate how to execute a computation.
Therefore, the formal definition of programming is the following:
“Taking a task and writing it down in a programming language that the computer can understand and execute.”
Who are the ones who deal with code on a daily basis?
You need not be a geek or a computer scientist to program. Actually, the subject of computer science is not the study of programming; these are different things, and this can confuse beginners. Computer science is about understanding what computers can do. Programming, instead, is the activity of telling computers to do something for us.
Think about the world we live in today. There are more than a thousand programming languages out there, and each language is designed for carrying out specific tasks. So, depending on the sphere to which your problem applies, only some languages can be of good use.
For instance, PHP is good for web programming but is not suitable for programming devices. C++ can definitely help you with the latter, while Python and R are some of the favorite tools of data scientists and people from the finance industry. When you meet an experienced programmer, don’t think he can programme in all languages out there. Instead, it is likely he can work with one or maybe a few languages, but he has mastered them well.
Author’s note: if you are interested in learning more about the different tools and skills you need to become a data scientist, go ahead and download our free career guide.
But how does somebody become good at programming?
First, programming requires problem-solving skills and involves abstract thinking. You are supposed to understand your task perfectly and then break it down into a sequence of instructions (or smaller computational steps) that the machine can execute.
For example, John is asked by his boss to do the following: create a program that adds 10 to any number his boss inputs with the keyboard. The correct reasoning would be: if x is the unknown provided, we need an output of x + 10.
data-science-training
How to Type in organized lines of code?
After you have created these steps, with the help of a programming language, you will type in beautifully organized lines of code. So, the second crucial thing to develop is mechanistic thinking. Unfortunately, computers can only execute what you ask them to do, and they won’t understand what you imply by the instructions you have provided. They will simply compute the code, without interpreting your output.
Fortunately, we can do that, though. Humans can understand and interpret code instructions and adjust it whenever necessary. And this is why a solid knowledge about the syntax of a programming language and the ability to understand computer code is of paramount importance – it will positively affect your thinking process, allowing you to break down your problem into parts the computer can execute.
In the example, we provided above, John must think of the following subtasks: first, he must define a function that takes x as an argument and then returns as an output a new variable equal to x + 10. This is how this problem can be solved.
def plus_ten (x): return x+10
Why is coding style important?
Regardless of the problem you are facing or the programming language you are using, your coding style is crucial! Remember that. Having three lines of code is straightforward to understand. However, in practice, you will likely work with hundreds of lines of code that must be sent to other people. If your work is difficult to read, unnecessarily complicated, full of variables’ names, conveying no meaning, it will be poorly received by other programmers. Therefore, throughout our posts, we are paying attention to the best practices that will help you organize your code!
Right and wrong code
Programming challenges are great as they develop your mechanistic thinking and problem-solving abilities. This involves formulating problems, breaking them down into meaningful steps, and communicating these steps to the computer in an organized way.[Source]-https://365datascience.com/python-programming-explained/
Advanced level Python Training with 100% Job Assistance Guarantee Provided. We Have 3 Sessions Per Week And 90 Hours Certified Basic Python Classes In Thane Training Offered By Asterix Solution
0 notes
Link
Envato Tuts+ Code http://j.mp/2qTSHxJ
Security is an important part of every web app, and devs must ensure that they design apps with secure authentication. In this tutorial, you'll learn how to implement JWT-based authentication in Angular apps with the help of a simple Express server.
The full code can be found in our GitHub repo. The app we'll be building will look like this:
The Concept of JSON Web Tokens
A JSON Web Token (JWT) is basically an object represented by three strings that are used to transmit user information. The three strings, which are separated by dots, are:
When a user logs in to any web page with their username and password, the authenticating server usually creates and sends back a JWT. This JWT is then passed along with subsequent API calls to the server. The JWT remains valid unless it expires or the user signs out of the application.
This process can be illustrated in the diagram below.
Cookies vs. Local Storage
We'll be using local storage to store tokens. Local storage is a means by which data is stored locally and can only be removed via JavaScript or by clearing the cache in the browser. Data stored in local storage can persist for a very long time. Cookies, on the other hand, are messages that are sent from the server to the browser and offer only limited storage.
Building the Express Server
We will start by building a back-end server that will feature the following endpoints:
POST <webservice>/login
POST <webservice>/profile
Let's get started by creating a directory for the Express application and then run the command npm init to set up the required files for the project.
mkdir server cd server npm init
Next, create a file server.js and install the modules: express, jsonwebtoken, cors, and bodyParser.
touch server.js npm install express jsonwebtoken cors bodyParser –save
Now open server.js and start by importing the modules.
// server.js const cors = require('cors'); const bodyParser = require('body-parser'); const jwt = require('jsonwebtoken'); const express = require('express');
Then create an Express app and define the secret key that will be used to encode and decode the user details.
//CREATE EXPRESS APP const app = express(); app.use(cors()); app.use(bodyParser.json()); // DECLARE JWT-secret const JWT_Secret = 'your_secret_key';
We will not be using a database for this example. However, the concepts would be similar if you were building a proper database-backed server.
For our example, we will just use a variable to define a test user as shown below.
var testUser = { email: '[email protected]', password: '1234'};
The final step is to create routes for authenticating the user.
app.post('/api/authenticate', (req, res) => { if (req.body) { var user = req.body; console.log(user) if (testUser.email===req.body.email && testUser.password === req.body.password) { var token = jwt.sign(user, JWT_Secret); res.status(200).send({ signed_user: user, token: token }); } else { res.status(403).send({ errorMessage: 'Authorisation required!' }); } } else { res.status(403).send({ errorMessage: 'Please provide email and password' }); } });
Let's break down the code for the route above.
We first check if there is any data in the body of the request. If no data is found, we prompt the user to input some data. On the occasion that the user has provided the right data, we compare it to the data from the testUser and, if it matches, we use the user id to generate a unique token and send back the response to the user.
Finally, we create an endpoint for running the app.
app.listen(5000, () => console.log('Server started on port 5000'));
Our back-end is now complete, and you can test it with Postman or CURL and see the kind of data that will be returned to the user.
Build an Angular Application
Our Angular application will feature the following pages:
Home—This page will contain links to the login and profile pages.
Login—On this page, a user will enter their email and password, which will be sent to the server for authentication. If the credentials are correct, then a JWT token will be returned and the user will be redirected to the profile page.
Profile—This is a protected page that can only be accessed by a user with a valid token.
Create an Angular application and create the Login and Profile components as shown below:
ng new angular6jwt cd angular6jwt ng g component Login ng g component Profile
Next, add the code for the home page in app.component.html.
<!--The content below is only a placeholder and can be replaced.--> <div style="text-align:center"> <ul> <li><a class="nav-link" routerLink="/" routerLinkActive="active">Home</a> </li> <li><a class="nav-link" routerLink="profile" routerLinkActive="active">Profile</a> </li> <li style="float:right" > <a class="nav-link" style="float:right" routerLink="login" routerLinkActive="active">Login</a> </li> <li style="float:right" > <a class ="nav-link" (click)="logout()" href="#">Logout</a></li> </ul> <div class="text-center"> <p> Angular 6 Authentication with JWT Tutorial </p> </div> <router-outlet></router-outlet>
Next, import the RouterModule and define the routes in app.module.ts.
import { RouterModule } from '@angular/router'; @NgModule({ declarations: [ AppComponent, LoginComponent, ProfileComponent ], imports: [ BrowserModule, RouterModule, FormsModule, RouterModule.forRoot([ { path: '', redirectTo: '/', pathMatch: 'full' }, { path: 'login', component: LoginComponent }, { path: 'profile', component: ProfileComponent } ]), ], providers: [], bootstrap: [AppComponent] }) export class AppModule { }
Create Login Page
The login page will contain two input fields for email and password, and a submit button as shown below:
<h3>Login</h3> <div> <div class="spacer"> <label for="Email">Email</label> <input type="text" placeholder="Email" [(ngModel)]="email"> </div> <div class="spacer"> <label for="password">Password</label> <input type="password" placeholder="password" [(ngModel)]="password" class="form-control"/> </div> <div class="spacer"> <button type="submit" (click)="Login()">Login</button> </div> </div>
Create Profile Page
The profile page will just be a simple message as shown below:
<p> If you can see this page, you are logged in! </p>
Auth With JWT in Angular
We will start by creating an Auth Service that will facilitate the validation of user input and communication with the server.
// Create authentication service named Auth ng g service Auth
This creates two files, but we will mainly be interested in the auth.service.ts file where we will write all the code that interacts with the server. We will start by defining the REST API and the token as shown below:
export class AuthService { api = 'http://localhost:3000/api'; token; }
Next, we will write the code that performs a POST request to the server with the user credentials. Here, we make a request to the API—if it's successful we store the token in localStorage and redirect the user to the profile page.
import { Injectable } from '@angular/core'; import { HttpClientModule, HttpClient } from '@angular/common/http'; import { Router } from '@angular/router'; @Injectable({ providedIn: 'root' }) export class AuthService { uri = 'http://localhost:5000/api'; token; constructor(private http: HttpClient,private router: Router) { } login(email: string, password: string) { this.http.post(this.uri + '/authenticate', {email: email,password: password}) .subscribe((resp: any) => { this.router.navigate(['profile']); localStorage.setItem('auth_token', resp.token); }) ); } }
We also define login and logout functions as shown below.
logout() { localStorage.removeItem('token'); } public get logIn(): boolean { return (localStorage.getItem('token') !== null); }
logout—clears the token from the local storage
logIn—returns a boolean property that determines if a user is authenticated
We then update the logIn property on the home page as shown.
<ul> <li><a class="nav-link" routerLink="/" routerLinkActive="active">Home</a> </li> <li><a class="nav-link" routerLink="profile" routerLinkActive="active" *ngIf="authService.logIn">Profile</a> </li> <li style="float:right" > <a class="nav-link" style="float:right" routerLink="login" routerLinkActive="active" *ngIf="!authService.logIn">Login</a> </li> <li style="float:right" > <a class ="nav-link" (click)="logout()" href="#" *ngIf="authService.logIn">Logout</a> </li> </ul>
Responding to User Events
Now that we are done with the code that interacts with the server, we'll move on to handling user-generated events for the front-end.
We will write the function that will listen for click events from the login page and then pass the values to the AuthService to authenticate the user. Update your login.component.ts file to look like this:
import { Component, OnInit } from '@angular/core'; import { Router, ActivatedRoute } from '@angular/router'; import { AuthService } from '../auth.service'; @Component({ selector: 'app-login', templateUrl: './login.component.html', styleUrls: ['./login.component.css'] }) export class LoginComponent implements OnInit { email = ''; password = ''; constructor(private authService: AuthService) { } Login() { console.log("you are logging in") this.authService.login(this.email, this.password) } ngOnInit() { } }
Now if you run ng serve and navigate to http://localhost:4200, you can test your app.
ng serve
Click on the login link and supply the user credentials—remember, the valid credentials are defined in the Express app. Now, when you click on the login button, you will be redirected to the profile page.
Conclusion
In this tutorial, you learned how to get started with JWT authentication in Angular. Now you can authenticate and authorize with JWT in your Angular applications. There are many aspects of JWT that were not covered in this tutorial—see if you can explore some of them on your own!
Note that this tutorial was written for Angular 6, but the same concepts should work with Angular 2 or Angular 4.
http://j.mp/2FvRDds via Envato Tuts+ Code URL : http://j.mp/2etecmc
0 notes
Text
Angular Authentication With JWT
Security is an important part of every web app, and devs must ensure that they design apps with secure authentication. In this tutorial, you'll learn how to implement JWT-based authentication in Angular apps with the help of a simple Express server.
The full code can be found in our GitHub repo. The app we'll be building will look like this:
The Concept of JSON Web Tokens
A JSON Web Token (JWT) is basically an object represented by three strings that are used to transmit user information. The three strings, which are separated by dots, are:
When a user logs in to any web page with their username and password, the authenticating server usually creates and sends back a JWT. This JWT is then passed along with subsequent API calls to the server. The JWT remains valid unless it expires or the user signs out of the application.
This process can be illustrated in the diagram below.
Cookies vs. Local Storage
We'll be using local storage to store tokens. Local storage is a means by which data is stored locally and can only be removed via JavaScript or by clearing the cache in the browser. Data stored in local storage can persist for a very long time. Cookies, on the other hand, are messages that are sent from the server to the browser and offer only limited storage.
Building the Express Server
We will start by building a back-end server that will feature the following endpoints:
POST <webservice>/login
POST <webservice>/profile
Let's get started by creating a directory for the Express application and then run the command npm init to set up the required files for the project.
mkdir server cd server npm init
Next, create a file server.js and install the modules: express, jsonwebtoken, cors, and bodyParser.
touch server.js npm install express jsonwebtoken cors bodyParser –save
Now open server.js and start by importing the modules.
// server.js const cors = require('cors'); const bodyParser = require('body-parser'); const jwt = require('jsonwebtoken'); const express = require('express');
Then create an Express app and define the secret key that will be used to encode and decode the user details.
//CREATE EXPRESS APP const app = express(); app.use(cors()); app.use(bodyParser.json()); // DECLARE JWT-secret const JWT_Secret = 'your_secret_key';
We will not be using a database for this example. However, the concepts would be similar if you were building a proper database-backed server.
For our example, we will just use a variable to define a test user as shown below.
var testUser = { email: '[email protected]', password: '1234'};
The final step is to create routes for authenticating the user.
app.post('/api/authenticate', (req, res) => { if (req.body) { var user = req.body; console.log(user) if (testUser.email===req.body.email && testUser.password === req.body.password) { var token = jwt.sign(user, JWT_Secret); res.status(200).send({ signed_user: user, token: token }); } else { res.status(403).send({ errorMessage: 'Authorisation required!' }); } } else { res.status(403).send({ errorMessage: 'Please provide email and password' }); } });
Let's break down the code for the route above.
We first check if there is any data in the body of the request. If no data is found, we prompt the user to input some data. On the occasion that the user has provided the right data, we compare it to the data from the testUser and, if it matches, we use the user id to generate a unique token and send back the response to the user.
Finally, we create an endpoint for running the app.
app.listen(5000, () => console.log('Server started on port 5000'));
Our back-end is now complete, and you can test it with Postman or CURL and see the kind of data that will be returned to the user.
Build an Angular Application
Our Angular application will feature the following pages:
Home—This page will contain links to the login and profile pages.
Login—On this page, a user will enter their email and password, which will be sent to the server for authentication. If the credentials are correct, then a JWT token will be returned and the user will be redirected to the profile page.
Profile—This is a protected page that can only be accessed by a user with a valid token.
Create an Angular application and create the Login and Profile components as shown below:
ng new angular6jwt cd angular6jwt ng g component Login ng g component Profile
Next, add the code for the home page in app.component.html.
<!--The content below is only a placeholder and can be replaced.--> <div style="text-align:center"> <ul> <li><a class="nav-link" routerLink="/" routerLinkActive="active">Home</a> </li> <li><a class="nav-link" routerLink="profile" routerLinkActive="active">Profile</a> </li> <li style="float:right" > <a class="nav-link" style="float:right" routerLink="login" routerLinkActive="active">Login</a> </li> <li style="float:right" > <a class ="nav-link" (click)="logout()" href="#">Logout</a></li> </ul> <div class="text-center"> <p> Angular 6 Authentication with JWT Tutorial </p> </div> <router-outlet></router-outlet>
Next, import the RouterModule and define the routes in app.module.ts.
import { RouterModule } from '@angular/router'; @NgModule({ declarations: [ AppComponent, LoginComponent, ProfileComponent ], imports: [ BrowserModule, RouterModule, FormsModule, RouterModule.forRoot([ { path: '', redirectTo: '/', pathMatch: 'full' }, { path: 'login', component: LoginComponent }, { path: 'profile', component: ProfileComponent } ]), ], providers: [], bootstrap: [AppComponent] }) export class AppModule { }
Create Login Page
The login page will contain two input fields for email and password, and a submit button as shown below:
<h3>Login</h3> <div> <div class="spacer"> <label for="Email">Email</label> <input type="text" placeholder="Email" [(ngModel)]="email"> </div> <div class="spacer"> <label for="password">Password</label> <input type="password" placeholder="password" [(ngModel)]="password" class="form-control"/> </div> <div class="spacer"> <button type="submit" (click)="Login()">Login</button> </div> </div>
Create Profile Page
The profile page will just be a simple message as shown below:
<p> If you can see this page, you are logged in! </p>
Auth With JWT in Angular
We will start by creating an Auth Service that will facilitate the validation of user input and communication with the server.
// Create authentication service named Auth ng g service Auth
This creates two files, but we will mainly be interested in the auth.service.ts file where we will write all the code that interacts with the server. We will start by defining the REST API and the token as shown below:
export class AuthService { api = 'http://localhost:3000/api'; token; }
Next, we will write the code that performs a POST request to the server with the user credentials. Here, we make a request to the API—if it's successful we store the token in localStorage and redirect the user to the profile page.
import { Injectable } from '@angular/core'; import { HttpClientModule, HttpClient } from '@angular/common/http'; import { Router } from '@angular/router'; @Injectable({ providedIn: 'root' }) export class AuthService { uri = 'http://localhost:5000/api'; token; constructor(private http: HttpClient,private router: Router) { } login(email: string, password: string) { this.http.post(this.uri + '/authenticate', {email: email,password: password}) .subscribe((resp: any) => { this.router.navigate(['profile']); localStorage.setItem('auth_token', resp.token); }) ); } }
We also define login and logout functions as shown below.
logout() { localStorage.removeItem('token'); } public get logIn(): boolean { return (localStorage.getItem('token') !== null); }
logout—clears the token from the local storage
logIn—returns a boolean property that determines if a user is authenticated
We then update the logIn property on the home page as shown.
<ul> <li><a class="nav-link" routerLink="/" routerLinkActive="active">Home</a> </li> <li><a class="nav-link" routerLink="profile" routerLinkActive="active" *ngIf="authService.logIn">Profile</a> </li> <li style="float:right" > <a class="nav-link" style="float:right" routerLink="login" routerLinkActive="active" *ngIf="!authService.logIn">Login</a> </li> <li style="float:right" > <a class ="nav-link" (click)="logout()" href="#" *ngIf="authService.logIn">Logout</a> </li> </ul>
Responding to User Events
Now that we are done with the code that interacts with the server, we'll move on to handling user-generated events for the front-end.
We will write the function that will listen for click events from the login page and then pass the values to the AuthService to authenticate the user. Update your login.component.ts file to look like this:
import { Component, OnInit } from '@angular/core'; import { Router, ActivatedRoute } from '@angular/router'; import { AuthService } from '../auth.service'; @Component({ selector: 'app-login', templateUrl: './login.component.html', styleUrls: ['./login.component.css'] }) export class LoginComponent implements OnInit { email = ''; password = ''; constructor(private authService: AuthService) { } Login() { console.log("you are logging in") this.authService.login(this.email, this.password) } ngOnInit() { } }
Now if you run ng serve and navigate to http://localhost:4200, you can test your app.
ng serve
Click on the login link and supply the user credentials—remember, the valid credentials are defined in the Express app. Now, when you click on the login button, you will be redirected to the profile page.
Conclusion
In this tutorial, you learned how to get started with JWT authentication in Angular. Now you can authenticate and authorize with JWT in your Angular applications. There are many aspects of JWT that were not covered in this tutorial—see if you can explore some of them on your own!
Note that this tutorial was written for Angular 6, but the same concepts should work with Angular 2 or Angular 4.
via Envato Tuts+ Code https://ift.tt/2J9V4F4
0 notes
Text
9 SMARTER Methods to USE EXCEL FOR ENGINEERING

As an engineer, you are most likely working with Excel basically day-after-day. It doesn’t matter what field you are in; Excel is applied All over the place in engineering. Excel is known as a big system having a great deal of terrific possible, but how can you know if you are utilising it to its fullest abilities? These 9 guidelines can help you start to obtain one of the most out of Excel for engineering. 1. Convert Units while not External Resources If you are like me, you most likely get the job done with several units everyday. It is 1 of the great annoyances of the engineering lifestyle. But, it is come to be much less annoying due to a perform in Excel which can do the grunt get the job done to suit your needs: CONVERT. It’s syntax is: Desire to learn a lot more about innovative Excel methods? View my cost-free instruction just for engineers. Within the three-part video series I will show you the best way to resolve complex engineering problems in Excel. Click right here to have commenced. CONVERT(amount, from_unit, to_unit) Where number is the value that you like to convert, from_unit will be the unit of variety, and to_unit will be the resulting unit you wish to obtain. Now, you will no longer should go to outdoors equipment to seek out conversion variables, or tricky code the components into your spreadsheets to trigger confusion later. Just let the CONVERT function do the operate to suit your needs. You will locate a total checklist of base units that Excel recognizes as “from_unit” and “to_unit” right here (warning: not all units are available in earlier versions of Excel), but you may also make use of the perform a variety of times to convert alot more complex units which are normal in engineering.
two. Use Named Ranges to make Formulas Less difficult to comprehend Engineering is demanding sufficient, with no making an attempt to figure out what an equation like (G15+$C$4)/F9-H2 indicates. To get rid of the pain connected with Excel cell references, use Named Ranges to produce variables that you simply can use inside your formulas.
Not simply do they make it easier to enter formulas into a spreadsheet, but they make it Much simpler to know the formulas as soon as you or another person opens the spreadsheet weeks, months, or years later.
There are a couple of other ways to make Named Ranges, but these two are my favorites:
For “one-off” variables, select the cell that you prefer to assign a variable name to, then variety the name in the variable while in the name box from the upper left corner in the window (beneath the ribbon) as proven over. In case you desire to assign variables to quite a few names at when, and also have already incorporated the variable name in a column or row following towards the cell containing the worth, do this: First, select the cells containing the names along with the cells you need to assign the names. Then navigate to Formulas>Defined Names>Create from Selection. If you happen to wish to understand far more, you possibly can read through all about developing named ranges from selections right here. Do you want to learn all the more about advanced Excel procedures? Observe my free, three-part video series just for engineers. In it I’ll show you the best way to remedy a complex engineering challenge in Excel making use of a few of these approaches and even more. Click here to acquire commenced. 3. Update Charts Instantly with Dynamic Titles, Axes, and Labels To produce it uncomplicated to update chart titles, axis titles, and labels you can website link them straight to cells. For those who want to create loads of charts, this could be a serious time-saver and could also probably enable you to keep clear of an error while you fail to remember to update a chart title. To update a chart title, axis, or label, primary make the text that you need to contain inside a single cell within the worksheet. You could make use of the CONCATENATE function to assemble text strings and numeric cell values into complex titles. Subsequent, pick the component about the chart. Then head to the formula bar and kind “=” and select the cell containing the text you want to work with.
Now, the chart element will immediately once the cell value adjustments. You will get imaginative right here and pull all varieties of information into the chart, without having possessing to be concerned about painstaking chart updates later. It’s all finished immediately!
four. Hit the Target with Aim Seek out Ordinarily, we set up spreadsheets to calculate a result from a series of input values. But what if you’ve carried out this in a spreadsheet and wish to understand what input value will acquire a wanted result?
You could rearrange the equations and make the outdated result the new input and also the outdated input the new outcome. You can also just guess at the input until eventually you obtain the target outcome. Luckily although, neither of individuals are essential, since Excel includes a tool named Intention Look for to try and do the get the job done for you personally.
To begin with, open the Target Seek instrument: Data>Forecast>What-If Analysis>Goal Seek out. From the Input for “Set Cell:”, choose the consequence cell for which you understand the target. In “To Value:”, enter the target value. Lastly, in “By modifying cell:” decide on the single input you'd wish to modify to change the result. Select Ok, and Excel iterates to seek out the correct input to accomplish the target. five. Reference Data Tables in Calculations 1 within the things that makes Excel a good engineering instrument is the fact that it's capable of handling the two equations and tables of information. And you also can mix these two functionalities to make potent engineering versions by seeking up data from tables and pulling it into calculations. You are in all probability currently acquainted using the lookup functions VLOOKUP and HLOOKUP. In lots of situations, they could do every thing you will need.
But, when you desire a lot more flexibility and greater control over your lookups use INDEX and MATCH rather. These two functions enable you to lookup information in any column or row of the table (not just the first one), and you can manage no matter whether the worth returned will be the up coming greatest or smallest. You can also use INDEX and MATCH to execute linear interpolation on a set of information. This is done by taking advantage of the flexibility of this lookup solution to discover the x- and y-values quickly prior to and following the target x-value.
6. Accurately Fit Equations to Data A second method to use current data in the calculation should be to match an equation to that data and make use of the equation to find out the y-value for any given value of x. Lots of people know how to extract an equation from data by plotting it on the scatter chart and including a trendline. That’s Okay for finding a quick and dirty equation, or appreciate what sort of perform most beneficial fits the data. Nonetheless, if you ever want to use that equation in the spreadsheet, you will require to enter it manually. This could end result in mistakes from typos or forgetting to update the equation when the data is transformed. A better way for you to get the equation will be to use the LINEST function. It is an array perform that returns the coefficients (m and b) that define the perfect match line by means of a data set. Its syntax is:
LINEST(known_y’s, [known_x’s], [const], [stats])
Exactly where: known_y’s could be the array of y-values with your information, known_x’s is the array of x-values, const can be a logical worth that tells Excel regardless of whether to force the y-intercept to become equal to zero, and stats specifies regardless of whether to return regression statistics, this kind of as R-squared, etc.
LINEST can be expanded past linear information sets to carry out nonlinear regression on data that fits polynomial, exponential, logarithmic and electrical power functions. It may possibly even be utilised for a variety of linear regression too.
7. Conserve Time with User-Defined Functions Excel has several built-in functions at your disposal by default. But, if you should are like me, you'll find many calculations you end up doing repeatedly that really do not possess a distinct function in Excel. These are wonderful situations to make a User Defined Perform (UDF) in Excel working with Visual Essential for Applications, or VBA, the built-in programming language for Workplace solutions.
Really don't be intimidated once you study “programming”, however. I’m NOT a programmer by trade, but I use VBA on a regular basis to increase Excel’s capabilities and conserve myself time. If you should prefer to study to create Consumer Defined Functions and unlock the enormous potential of Excel with VBA, click here to study about how I produced a UDF from scratch to determine bending anxiety.
8. Execute Calculus Operations As you imagine of Excel, you might not feel “calculus”. But when you have got tables of information you are able to use numerical analysis strategies to determine the derivative or integral of that data.
These very same fundamental techniques are utilized by additional complex engineering program to complete these operations, plus they are uncomplicated to duplicate in Excel.
To determine derivatives, you may utilize the either forward, backward, or central variations. Just about every of these procedures uses information in the table to calculate dy/dx, the only variations are which information points are utilised for your calculation.
For forward variations, make use of the information at level n and n+1 For backward distinctions, use the data at points n and n-1 For central distinctions, use n-1 and n+1, as proven beneath
If you should need to integrate information in a spreadsheet, the trapezoidal rule operates effectively. This approach calculates the region beneath the curve in between xn and xn+1. If yn and yn+1 are completely different values, the spot types a trapezoid, therefore the name.
9. Troubleshoot Terrible Spreadsheets with Excel’s Auditing Resources Every engineer has inherited a “broken” spreadsheet. If it’s from a co-worker, you are able to at all times ask them to fix it and send it back. But what when the spreadsheet comes from your boss, or worse nonetheless, somebody that is no longer with the business?
Occasionally, this will be a authentic nightmare, but Excel gives some resources that can help you to straighten a misbehaving spreadsheet. Every single of those tools may be found in the Formulas tab of your ribbon, inside the Formula Auditing segment:
As you can see, there are actually several completely different equipment here. I’ll cover two of them.
1st, you are able to use Trace Dependents to find the inputs for the chosen cell. This will assist you to track down where each of the input values are coming from, if it is not obvious.
Numerous times, this could lead you to your source of the error all by itself. When you finally are completed, click take out arrows to clean the arrows out of your spreadsheet.
You may also make use of the Evaluate Formula device to determine the result of the cell - one phase at a time. This really is practical for all formulas, but mainly for all those that have logic functions or countless nested functions:
10. BONUS TIP: Use Data Validation to avoid Spreadsheet Mistakes Here’s a bonus tip that ties in with all the final one. (Just about anyone who gets ahold of your spreadsheet from the long term will value it!) If you’re setting up an engineering model in Excel and you notice that there is a chance for that spreadsheet to produce an error thanks to an improper input, you may restrict the inputs to a cell by utilizing Data Validation.
Allowable inputs are: Entire numbers greater or under a variety or in between two numbers Decimals higher or lower than a variety or concerning two numbers Values within a list Dates Occasions Text of the Distinct Length An Input that Meets a Customized Formula Data Validation might be found beneath Data>Data Equipment during the ribbon.
http://www.iamsport.org/pg/pages/view/38539612/
0 notes
Text
9 Smarter Tips on how to use Excel for Engineering

As an engineer, you’re in all probability working with Excel essentially on a daily basis. It doesn’t matter what field you're in; Excel is applied All over the place in engineering. Excel is often a enormous plan that has a lot of fantastic potential, but how can you know if you’re working with it to its fullest capabilities? These 9 points can help you begin to obtain quite possibly the most from Excel for engineering. 1. Convert Units without External Equipment If you’re like me, you most likely function with different units daily. It is 1 of your superb annoyances in the engineering existence. But, it’s turn into substantially much less annoying thanks to a function in Excel which could do the grunt perform for you: CONVERT. It is syntax is: Want to know a lot more about state-of-the-art Excel methods? Watch my free of cost instruction only for engineers. In the three-part video series I will show you the best way to solve complicated engineering difficulties in Excel. Click right here to have started out. CONVERT(quantity, from_unit, to_unit) Wherever number is definitely the value you want to convert, from_unit could be the unit of number, and to_unit is the resulting unit you need to obtain. Now, you will no longer should visit outside equipment to seek out conversion aspects, or hard code the factors into your spreadsheets to result in confusion later. Just allow the CONVERT perform do the perform for you personally. You’ll discover a finish checklist of base units that Excel recognizes as “from_unit” and “to_unit” here (warning: not all units can be found in earlier versions of Excel), but you can even use the perform many instances to convert extra complicated units which have been typical in engineering.
2. Use Named Ranges to create Formulas A lot easier to comprehend Engineering is tough adequate, while not striving to figure out what an equation like (G15+$C$4)/F9-H2 indicates. To remove the pain linked with Excel cell references, use Named Ranges to produce variables that you can use inside your formulas.
Not simply do they make it simpler to enter formulas into a spreadsheet, but they make it Much easier to understand the formulas once you or someone else opens the spreadsheet weeks, months, or years later on.
You can find a couple of different ways to produce Named Ranges, but these two are my favorites:
For “one-off” variables, decide on the cell that you just want to assign a variable identify to, then form the name in the variable inside the identify box within the upper left corner with the window (under the ribbon) as shown over. Should you want to assign variables to a number of names at after, and also have previously included the variable identify within a column or row subsequent towards the cell containing the worth, do that: Primary, select the cells containing the names and the cells you'd like to assign the names. Then navigate to Formulas>Defined Names>Create from Selection. If you should need to discover much more, you're able to go through all about establishing named ranges from selections right here. Do you want to understand even more about advanced Excel tactics? View my free of cost, three-part video series only for engineers. In it I’ll show you methods to fix a complex engineering challenge in Excel applying a few of these tactics and more. Click here to get started. three. Update Charts Instantly with Dynamic Titles, Axes, and Labels To make it straightforward to update chart titles, axis titles, and labels you possibly can link them immediately to cells. If you demand for making a whole lot of charts, this could be a authentic time-saver and could also possibly assist you to stay clear of an error if you fail to remember to update a chart title. To update a chart title, axis, or label, 1st produce the text that you just choose to consist of within a single cell for the worksheet. You can use the CONCATENATE perform to assemble text strings and numeric cell values into complex titles. Subsequent, decide on the element around the chart. Then go to the formula bar and style “=” and decide on the cell containing the text you would like to use.
Now, the chart part will automatically when the cell value changes. You can get creative here and pull all varieties of information to the chart, while not owning to be concerned about painstaking chart updates later on. It’s all executed automatically!
four. Hit the Target with Aim Seek Often, we create spreadsheets to determine a outcome from a series of input values. But what if you have carried out this inside a spreadsheet and would like to know what input value will reach a desired outcome?
You could potentially rearrange the equations and make the previous end result the brand new input and also the previous input the new outcome. You may also just guess in the input until you acquire the target outcome. Thankfully although, neither of people are required, given that Excel includes a device called Purpose Seek out to do the work for you.
To start with, open the Purpose Seek device: Data>Forecast>What-If Analysis>Goal Seek. In the Input for “Set Cell:”, choose the outcome cell for which you know the target. In “To Value:”, enter the target worth. Eventually, in “By transforming cell:” decide on the single input you would want to modify to alter the end result. Pick Okay, and Excel iterates to seek out the correct input to attain the target. five. Reference Data Tables in Calculations One with the issues which makes Excel a fantastic engineering device is that its capable of dealing with each equations and tables of information. And you also can combine these two functionalities to create effective engineering versions by hunting up information from tables and pulling it into calculations. You’re quite possibly presently familiar together with the lookup functions VLOOKUP and HLOOKUP. In many situations, they are able to do almost everything you would like.
Having said that, for those who need a lot more flexibility and greater management in excess of your lookups use INDEX and MATCH as a substitute. These two functions permit you to lookup information in any column or row of a table (not just the very first one), and also you can manage no matter if the value returned may be the subsequent largest or smallest. You may also use INDEX and MATCH to execute linear interpolation on the set of data. That is completed by taking benefit within the flexibility of this lookup procedure to seek out the x- and y-values promptly before and after the target x-value.
six. Accurately Match Equations to Information Another solution to use present data in the calculation is always to match an equation to that information and utilize the equation to determine the y-value to get a offered value of x. Many individuals understand how to extract an equation from data by plotting it on a scatter chart and including a trendline. That’s Ok for having a easy and dirty equation, or fully grasp what type of function most beneficial fits the information. Even so, if you happen to would like to use that equation inside your spreadsheet, you’ll demand to enter it manually. This may consequence in mistakes from typos or forgetting to update the equation when the data is transformed. A much better strategy to get the equation is to use the LINEST function. It’s an array perform that returns the coefficients (m and b) that define the ideal match line via a information set. Its syntax is:
LINEST(known_y’s, [known_x’s], [const], [stats])
Exactly where: known_y’s certainly is the array of y-values in your information, known_x’s stands out as the array of x-values, const is really a logical worth that tells Excel no matter if to force the y-intercept for being equal to zero, and stats specifies no matter whether to return regression statistics, this kind of as R-squared, and so on.
LINEST is usually expanded beyond linear data sets to perform nonlinear regression on data that fits polynomial, exponential, logarithmic and electrical power functions. It may even be utilised for various linear regression at the same time.
7. Conserve Time with User-Defined Functions Excel has lots of built-in functions at your disposal by default. But, in the event you are like me, you can get countless calculations you finish up executing repeatedly that do not possess a particular perform in Excel. They're ideal conditions to make a User Defined Function (UDF) in Excel making use of Visual Simple for Applications, or VBA, the built-in programming language for Workplace solutions.
Really do not be intimidated if you read through “programming”, though. I’m NOT a programmer by trade, but I use VBA all the time to broaden Excel’s capabilities and save myself time. For those who desire to find out to make Consumer Defined Functions and unlock the huge possible of Excel with VBA, click right here to read through about how I produced a UDF from scratch to determine bending pressure.
eight. Perform Calculus Operations As soon as you feel of Excel, chances are you'll not suppose “calculus”. But if you've tables of information you could use numerical evaluation techniques to determine the derivative or integral of that data.
These identical standard procedures are used by additional complex engineering software to complete these operations, and so they are painless to duplicate in Excel.
To determine derivatives, you'll be able to utilize the either forward, backward, or central variations. Each and every of those tactics utilizes data in the table to determine dy/dx, the sole differences are which information factors are put to use to the calculation.
For forward differences, use the information at stage n and n+1 For backward distinctions, make use of the information at factors n and n-1 For central distinctions, use n-1 and n+1, as shown under
In case you desire to integrate data within a spreadsheet, the trapezoidal rule performs properly. This technique calculates the location beneath the curve in between xn and xn+1. If yn and yn+1 are different values, the area varieties a trapezoid, consequently the name.
9. Troubleshoot Awful Spreadsheets with Excel’s Auditing Equipment Each engineer has inherited a “broken” spreadsheet. If it is from a co-worker, you are able to generally request them to repair it and send it back. But what if the spreadsheet comes from your boss, or worse still, someone who is no longer with the enterprise?
From time to time, this will be a genuine nightmare, but Excel delivers some equipment that can allow you to straighten a misbehaving spreadsheet. Each and every of those equipment could be present in the Formulas tab with the ribbon, during the Formula Auditing section:
While you can see, you can find a few different equipment here. I’ll cover two of them.
To begin with, you could use Trace Dependents to locate the inputs on the chosen cell. This will help you track down in which all the input values are coming from, if it’s not evident.
Several instances, this may lead you for the supply of the error all by itself. Once you are done, click get rid of arrows to clean the arrows from your spreadsheet.
You can also utilize the Evaluate Formula instrument to determine the consequence of the cell - a single stage at a time. That is beneficial for all formulas, but specifically for anyone that have logic functions or lots of nested functions:
ten. BONUS TIP: Use Data Validation to avoid Spreadsheet Errors Here’s a bonus tip that ties in with the last one. (Any person who gets ahold of the spreadsheet while in the long term will appreciate it!) If you’re establishing an engineering model in Excel and you observe that there is a chance to the spreadsheet to make an error caused by an improper input, it is possible to limit the inputs to a cell by using Information Validation.
Allowable inputs are: Whole numbers higher or lower than a number or in between two numbers Decimals better or less than a amount or involving two numbers Values inside a list Dates Occasions Text of a Particular Length An Input that Meets a Custom Formula Information Validation is usually observed beneath Data>Data Resources from the ribbon.
curso de orcamento de obras
0 notes