#nutripot
Explore tagged Tumblr posts
Visit Tumblr Blog
Explore Tumblr blogs with no restrictions, modern design and the best experience.
Last Seen Tumblr Blogs


Fun Fact
Tumblr.com is the 103rd most visited website in the world.
Photo

Hasil harini. #nutripot (at Sekolah Kebangsaan Rengit) https://www.instagram.com/p/BwiwhD6lyQD/?utm_source=ig_tumblr_share&igshid=ptnwiex377s3
0 notes
Text
Vegetable Biryani, a flavourful rice dish with vegetables in aromatic Indian spices is a treat for vegetarians.Now cook your favourite Vegetable Biryani in Instant Pot/Pressure Cooker within 30 minutes.
The traditional way of making biryani is an elaborate process, remember my post Lucknowi Vegetable Dum Biryani. There I have explained the detailed process of preparing Biryani that tastes exactly like the one you get in restaurants. Now with the convenience of Instant Pot you can skip all the time-consuming steps and make the flavourful dish just like the way you get in restaurants and that too within 30 minutes.
I like to call this Vegetable Biryani Pulao. Biryani Pulao?? Yes as I make this Vegetable Biryani in Instant Pot just like the way we cook Pulao. As we all know there is a difference between Biryani and Pulao, for those who do not know, here are few pointers that may help..
Biryani Vs Pulao..
Biryani is rich and more robust in flavours of spices and is a time-consuming elaborate process whereas cooking Pulao does not take that long.
Pulao is a one pot meal where rice is cooked with vegetables/meat in a single pot The vegetables/eat are cooked first then raw and pre-soaked rice is added,with predetermined quantity of water and cooked with the absorption process.
In Biryani, vegetables/meat are cooked separately and rice is parboiled and then layered and cooked in Dum style in a sealed vessel. No water is added and the ingredients are cooked in the steam. Only saffron infused milk is added for the color and aroma. Essence like Rose, Kewra are also added as required and preferences.
Dum style of cooking is where the dish is cooked in a sealed vessel. It is known to be one of the best ways of cooking as the nutrients are not lost due to over-cooking of the ingredients. Though it is a time-consuming process
Compared to Biryani, Pulao is a simple dish in terms of the time consumed in cooking and spices. It may or may not have the dried nuts and fruits and it can be made even with a single vegetable like Peas Pulao. Biryani is rich in spices and has strong flavours as per the region and the variations there.
Coming back to this Vegetable Biryani Pulao, it has all the strong subtle flavours of Biryani, when you will serve it your guests no one will know that this Biryani is prepared just like Pulao.
Let’s see how I make this Vegetable and what are the ingredients that go in making this Biryani Pulao..
Vegetables
Use any Vegetable of your choice like carrots, peas, corn, mushrooms, cauliflower and finely sliced onions . Use fresh or frozen vegetable as per availability. I also add paneer as kids love it.Ginger and Garlic with Green chillies.
Spices
I do not use Biryani Masala, you can use homemade or store-bought. I use a mix of Garam Masala, Red Chilli Powder, Turmeric Powder and Whole spices like Cardamoms, Bay Leaves, Cloves, Black Peppercorns, Cinnamon and Star Anise and saffron for making saffron infused milk.
Other main Ingredients..
Milk for saffron infused milk, Curd/yogurt,and a good quality Basmati Rice.Fresh Mint and Coriander/Cilantro leaves.
To make a good quality Pulao/Biryani one should not shy from using ghee. Though many hesitate adding ghee for everyday cooking, but trust me it enhances the flavour and texture of the dish.
An age-old test that my Naani (grandmother) told us about a good quality Pulao or Biryani is, if you drop a handful if cooked biryani or Pulao on floor, the grains should fall on the floor like pearls, no two grains sticking to each other.
#gallery-0-10 { margin: auto; } #gallery-0-10 .gallery-item { float: left; margin-top: 10px; text-align: center; width: 20%; } #gallery-0-10 img { border: 2px solid #cfcfcf; } #gallery-0-10 .gallery-caption { margin-left: 0; } /* see gallery_shortcode() in wp-includes/media.php */
Steps for making Biryani in Instant Pot..
Start with washing and soaking the rice. Soak rice for at least 30 min to 1 hr.
If using fresh vegetables cut into desired shape and size. Cut vegetable pieces of the same size for the uniform cooking.
Switch on the Instant Pot, to sauté mode on high, set the timer for 10 minutes.
When the display shows ‘HOT’ add ghee/oil in the inner pot, add the whole spices and cumin seeds. Then add the finely sliced onions, and sauté onion still these start turning brown.
#gallery-0-11 { margin: auto; } #gallery-0-11 .gallery-item { float: left; margin-top: 10px; text-align: center; width: 33%; } #gallery-0-11 img { border: 2px solid #cfcfcf; } #gallery-0-11 .gallery-caption { margin-left: 0; } /* see gallery_shortcode() in wp-includes/media.php */
Cancel the ‘SAUTE’ mode
Take out half of onions and keep aside for later use. Add some water(about 2-3 tbsp) to clean the bottom of inner pot as onions stick to it while frying. Cleaning the bottom is an important step, the rice and masala may get stick, which can burn the food at the bottom. Instant Pot gives the BURN signal whenever any food at the bottom burns. To avoid this sauté the masala at the Medium setting. Also, if any masala sticks to the bottom, add some water(3-4 tbsp) and clean the pot.
Add ginger-garlic paste, dry spices and curd. I mix dry spices in curd, and then add to the inner pot. Stir curd well after adding.
Next add vegetables and paneer and mix well with the curd onion mixture. Cancel the SAUTE Mode.
Add rice and salt and mix lightly.
Add water around 1/2 cup and saffron infused milk and roughly torn mint and coriander leaves.
#gallery-0-12 { margin: auto; } #gallery-0-12 .gallery-item { float: left; margin-top: 10px; text-align: center; width: 25%; } #gallery-0-12 img { border: 2px solid #cfcfcf; } #gallery-0-12 .gallery-caption { margin-left: 0; } /* see gallery_shortcode() in wp-includes/media.php */
Seal the lid of the Instant Pot, set the PRESSURE COOK Mode to 5 minutes on HIGH, once the timer goes off, wait for 3 minutes, then do the Quick Pressure Release, open the lid, and check for the doneness of rice. Fluff lightly with spoon or fork.
Add the fried onions and garnish with more fresh coriander leaves and serve hot with raita of your choice.
Please Note..The cooking time for Biryani is 5 mins excluding the time Instant Pot takes to come to pressure. It varies from 5-6 minutes.
Vegetable Biryani in Instant Pot

Vegetable Biryani cooked in Instant Pot within 30 minutes. A one pot gluten-free meal. Easy and quick to prepare Vegetable Biryani in Instant Pot.
2 Cups Basmati Rice
1 Cup Mixed Vegetables(Fresh or Frozen)
1/2 Cup Paneer/Indian Cottage Cheese
1/2 Cup Yogurt/Curd
1/4 Cup Milk
1 Cup Finely Sliced Onions
4-5 Garlic Cloves
1" Ginger piece
1-2 Green Chillies
1/2 Cup Mint and Coriander
Whole Spices
1-2 Bay Leaves
1-2 Black Cardamom
1 Cinnamom Stick(small)
4-5 Black Pepper
4-5 Cloves
1 tsp Cumin Seeds
8-10 Saffron Strands (for Saffron Infused Milk)
Dry Spice Powder
1-2 tsp Garam Masala
1 tsp Red Chilli Powder(or as required)
1/2 tsp Turmeric Powder
Salt as required
Wash and soak rice. Soak rice for at least 30 min. Add saffron strands in milk and keep it aside.
If using fresh vegetables cut into desired shape and size. Cut vegetable pieces of the same size for the uniform cooking. Cut Paneer into cubes.
Make paste of ginger garlic and chillies. I did not use green chilli this time. Use chillies as per your spice level.
Switch on the Instant Pot, to SAUTE mode on HIGH set the timer for 10 minutes.When the display shows ‘HOT’ add ghee in the inner pot, add the whole spices and cumin seeds. Then add the finely sliced onions, and saute onion still these start turning brown.
Cancel the ‘SAUTE’ mode.Take out half of onions and keep aside for later use. Add some water(about 2-3 tbsp) to clean the bottom of inner pot as onions stick to it while frying.
Mix dry spices in curd, and then add to the inner pot. Stir curd well after adding to onions.
Next add vegetables and paneer and mix well with the curd onion mixture. Cancel the SAUTE Mode.
Add rice and salt and mix lightly. Add water around 1/2 cup and saffron infused milk. Add roughly torn mint and coriander leaves.
Seal the lid of the Instant Pot, set the PRESSURE COOK Mode to 5 minutes on HIGH.
Once the timer goes off, wait for 3 minutes, then do the Quick Pressure Release, open the lid, and check for the doneness of rice. Fluff lightly with spoon or fork.
Add the fried onions and garnish with more fresh coriander leaves and close for another 2-3 minutes. Serve hot with raita of your choice.
For Vegan option…
Use any Plant-based Milk instead of Dairy milk, use vegan unsweetened curd/yogurt.
USe oil instead of ghee and substitute Tofu with Paneer.
You can use store-bought Ginger-garlic paste instead of making fresh paste.
Do make this Instant Pot Biryani Pulao for the weekend brunch or when guests come.Treat them to this flavourful rice preparation that is wholesome, filling and so flavourful.
Give your feedback how you liked and if you have any queries do write to me.
Do visit my social media accounts.. FB, Pinterest and Instagram. Whenever you make this, do post on my FB page or tag me on Instagram. Pin the recipes for later use.
If you like my work, then do hit the follow button and subscribe to the blog to get notifications on new posts and share the blog with your loved ones. I promise won’t spam your mailbox 🙂.
This is 16th in my series of A-Z Biryani/Pulao/Khichdi dishes, that I am taking to Mega Blogging Marathon April ’19.
Day 22. V. Vegetable Biryani in Instant Pot
This is an event where I along with a group of fellow bloggers are blogging everyday about Biryani/Pulao/Khichdi dishes this whole April, with Sundays off.
My earlier posts for the event..
Day 1. A.. Aloo Matar Ki Tehri
Day 2. B..Broccoli Mushroom Pulao
Day 3 . C..Chana Dal Khichdi
Day 4. D..Dhaniya Pulao
Day 5. E.. Easy Steamed Rice in Instant Pot with Pot in Pot Method
Day 6. F.. Fresh Mint and Peas Pulao
Day 7. G.. Gatte Ka Pulao
Day 8. H.. Hari Moong Dal Khichdi
Day 9. I.. Iyengar Puliyogare(Instant)
Day 10. J.. Jeera Rice
Day 11. K.. Kashmiri Pulao
Day 12. L.. Lucknowi Veg. Dum Biryani
Day 13. M.. Mixed Veg Pulao
Day 14. N.. No-Onion No-Garlic Kadhai Paneer Pulao
Day 15. O.. Oats and Moong Dal Khichdi
Day 16. P.. Pearl Pulao
Day 17. Q..Quinoa Pulao
Day 18. R.. Rajasthani Kabuli(Jodhpuri Pulao)
Day 19. S.. Spicy Chilli Garlic and Bell Pepper Rice
Day 20. T.. Tomato Corn and Basil Pulao
Check out the Blogging Marathon page for the other Blogging Marathoners doing BM#99

Vegetable Biryani in Instant Pot Vegetable Biryani, a flavourful rice dish with vegetables in aromatic Indian spices is a treat for vegetarians.Now cook your favourite Vegetable Biryani in Instant Pot/Pressure Cooker within 30 minutes.
#featured#Guten-free#Instant Pot#Instant Pot Biryani recipe#Nutripot Biryani Recipe#Rice#Vegetable Biryani Recipe
0 notes
Video
instagram
This delicious cake will surely do wonders to your spirit! The word " cake" has Viking roots. It comes from the old Norse word " kaka". Wanna "Take the Cake" !! You can make this fantastic cake with @wondercheflife #nutripot #nutripot2018 #wonderchefcookware #wonderchefindia #kitchenrobot #healthycooking #touchabutton #instacooking #cookingrevolution #healthy #food #foodie #nutrition
#nutripot#nutripot2018#wonderchefcookware#wonderchefindia#kitchenrobot#healthycooking#touchabutton#instacooking#cookingrevolution#healthy#food#foodie#nutrition
0 notes
Photo

pokok nenas dalam Nutripot Ringkas #JomTanamSayur #NutripotRingkas https://jomtanamsayur.blogspot.com/2019/02/putik-buah-nenas.html?m=0 https://www.instagram.com/p/Bt_CaJ9BNxm/?utm_source=ig_tumblr_share&igshid=1d2inls96fnmh
1 note
·
View note
Text
NUWAVE NUTRIPOT 6-Quart DIGITAL PRESSURE COOKER with Sure-Lock Safety System; Dishwasher-Safe Non-Stick Inner Pot; 11 Pre-Programmed Presets; Detachable Pressure Pot Lid for Easy Cleaning; and Chef Tested 200 Recipe Pressure Cooking Cookbook. (6-Quart)
NUWAVE NUTRIPOT 6-Quart DIGITAL PRESSURE COOKER with Sure-Lock Safety System; Dishwasher-Safe Non-Stick Inner Pot; 11 Pre-Programmed Presets; Detachable Pressure Pot Lid for Easy Cleaning; and Chef Tested 200 Recipe Pressure Cooking Cookbook. (6-Quart)
Price: (as of – Details) Product Description The NuWave Difference For over two decades, we have truly lived up to our philosophy to “Live Well For Less” with each and every one of our products. We are driven by the pursuit of safe, green products that can improve the quality of life. Throughout the company history, we have been committed to exceeding industry-standard best practices regarding…

View On WordPress
0 notes
Text
TANAMAN NUTRIPOT
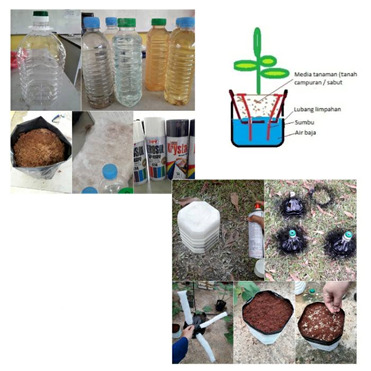
TANAMAN NUTRIPOT
Pada minggu ini kami telah mempelajari suatu kaedah penanaman baru iaitu kaedah tanaman NUTRIPOT. Kaedah tanaman nutripot adalah kaedah bercucuk tanam yang mudah dan diperkenalkan untuk mengatasi masalah kekerapan menyiram air. Kerja menyiram pokok atau tanaman sekali dua hari adalah suatu masalah bagi kami kerana kolej kediaman jauh dari tapak perladangan. Dengan menggunakan kaedah ini, kami tidak perlu kerap menyiram tanaman tetapi perlu memastikan air di dalam pasu tersebut sentiasa mencukupi. Berikut adalah bahan-bahan dan langkah-langkah untuk menghasilkan kaedah tanaman NUTRIPOT :
Bahan-bahan :
· Botol kosong (5liter ke atas) / Pasu / Baldi
· Span akuarium/ Kain / Kapas / Sumbu (bahan yang boleh menyerap air)
· Cocopit (sabut kelapa)
· Baja A dan Baja B
· Gunting
· Spray cat
Langkah-langkah :
1. Potong bahagian atas botol kosong. Buatkan 3 lubang yang sederhana besar untuk masukkan sumbu dan 1 lubang kecil untuk mengalirkan air yang lebih keluar. Kemudian cat botol tersebut menggunakan cat spray untuk kelihatan lebih menarik. Bahagian atas botol dicat menggunakan warna hitam manakala bahagian bawah botol dicat menggunakan warna putih. Biarkan botol tersebut sehingga cat kering.
2. Setelah botol kering, masukkan sumbu ke dalam 3 lubang yang dibuat tadi. Sumbu perlu dipasang di bahagian atas botol dan dijulurkan keluar ke bahagian bawah botol. 2 sumbu di bahagian atas botol perlu ditinggikan sama paras dengan kepala botol agar aliran air sampai ke bahagian atas.
3. Kemudian, masukkan cocopit (sabut kelapa) ke dalam bahagian atas botol dengan penuh.
4. Bahagian bawah botol perlu diisi air kosong kerana ia bertindak sebagai tempat simpanan air untuk di serap oleh sumbu ke bahagian atas botol iaitu cocopit.
5. Setelah itu, masukkan Baja A sebanyak 2 penutup kecil botol mineral kedalam air kosong tadi. Kacau sebati. Kemudian, masukkan Baja B 2 penutup kecil botol mineral dan kacau sebati.
6. Letakkan bahagian atas botol secara bertindih ke atas bahagian bawah botol. Air dibahagian bawah botol akan mengalir ke bahagian atas botol melalui 3 sumbu tersebut. Kemudian taburkan biji benih sayuran seperti bayam merah ke permukaan cocopit.
7. Biarkan selama 7 hari di bawah kawasan yang redup. Perlu pastikan air dan baja sentiasa mencukupi pada bahagian bawah botol agar proses pertumbuhan berjalan dengan lancar.
Kandungan Baja
Baja A- Kalsium nitrat,potassium nitrat, iron, ammonium.
Baja B- Pottasium sulfat,potassium nitrat, magnesium sulfat.
0 notes
Photo

Project NutriPoT Fayyadh. (at Rengit De Janeiro) https://www.instagram.com/p/Bs-Z6O5ln0v/?utm_source=ig_tumblr_share&igshid=dr31lijvp73q
0 notes
Text
Bhuna Masala, tomato onion based cooked paste or thick sauce used to prepare many North Indian curries and vegetables.
Bhuna Masala recipe for everyday curries.
Many of North Indian basic curries have almost the same masala as base with some differences in the spices and herbs used. Making masala to cook curries may take some sometimes and when one is pressed on time it can come very handy..
What is Bhuna Masala
Bhuna Masala is basic onion and tomato based masala for basic North Indian curries.
Keep Bhuna Masala handy for quick meal options on weekdays. Very useful for busy mums and working professionals. Many times they have to rely on the house help/cooks or take aways for their meals, in case they have to rush office early in mornings or reach home late evenings. And when you have kids at home one can’t compromise on the quality of everyday food. If you have bhuna masala in your refrigerator/freezer,easy and wholesome meals can be prepared in jiffy without spending much time in making curries that time in making masala.
Commercially prepared bhuna masala is also available in stores (in India). Instead of buying the readymade stuff with preservatives why not make it at home and use as required.
How to make Bhuna Masala
It takes hardly 30 minutes to make a big batch of masala and one is sorted out for at least 10-15 days. Make basic masala paste and you can add more garlic/ginger/ spices or herbs as per the curry.
To make Bhuna masala, I use basic ingredients that are used for North Indian curries. onion, tomatoes, green chillies, ginger and garlic.
If you do not like to add garlic and some of your curries do not have garlic, skip adding to it. Many people like to add whole red chilli (Kashmiri Lal Mirch) for the bright red color of the masala, but I avoid it and keep the spice level to minimum for my son and hubby who doesn’t like very spicy food.
Also, I add only garam masala and do not add coriander powder as I don’t add it in my legume/lentils like Maa Chane di Daal.
For curries like Aloo Tamatar or Matar Mushroom, coriander powder, cumin powder and other spices can be added accordingly while preparing the curry.
Add little salt that acts as preservative if storing for about a month. Last year when I went to India for month long vacation, I made a big batch of masala and kept in freezer (divided in portions) . My used it whenever he needed that in making dals or other curries. Some of it was left when I came back and it was good to use even after 6 weeks.
Can we make Bhuna Masala in Instant Pot or Nutri Pot
Bhuna Masala can be made conveniently in Instant Pot or Nutri Pot. It takes just a few minutes.. there is a seperate post for How to make Bhuna Masala in Instant Pot.
Storing Bhuna Masala
Bhuna Masala can be refrigerated or freezed. Stays good for about 10-12 days in refrigerator and about a month if stored properly. Store it in airtight container preferably glass ones and avoid plastic.
Avoid freezing masala in bulk in one container. Thawing the whole batch again and again, will decrease the shelf life and masala can get spoiled also.
Divide it in small portions enough for one time curry as per your family size and use it accordingly. Use small containers or silicone cake molds or ice cube trays, freeze the portions and then store in big containers or ziplock bags.
How can I use Bhuna Masala..
Rajma Masala, Aloo Matar, Matar Mushroom, Kofta Curries(Lauki Ke Kofte), Paneer dishes or even veggies like Aloo Baigan(Potato and Brinjal curry) or Parwal can be prepared with it.
To make cream based paneer/tofu curries, add cream or milk(dairy or non-dairy), tomato sauce/fresh tomato puree, spices and herbs as required and creamy curry is ready to relish.
Cooking in Instant pot or Nutripot can be so easy and mess free. For making legume based curries like Chole Masala, Rajma Masala(Red Kidney beans Curry), saute bhuna masala in inner pot , add spices cook for a minute, add legumes and set on the pressure cook mode and timer and here you have your the curry ready without any fuss.
I have the habit of removing froth that accumulates on top while cooking dal and other legumes. Pre-pared bhuna masala comes handy for such lentils. Just add the paste mix and cook.
Let’s see how I make this handy masala for everyday curries.. Bhuna Masala Stove -top version
Bhuna Masala
Bhuna Masala recipe for everyday Curries. Learn how to make use Bhuna Masala.
3 Onions(Medium Sized)
5-6 Tomatoes(Medium Sized)
7-8 Garlic Cloves
1" Fresh Ginger
1 tbsp Cumin Seeds/Jeera
1-2 tsp Garam Masala Powder
1-2 tbsp Mustard Oil/Any Vegetable Oil
Peel, wash and roughly chop onions.
Peel garlic cloves .
Wash and roughly chop tomatoes.
In food processor make paste of onions, garlic cloves, fresh ginger and green chilies.
In a pan heat oil add cumin seeds, once seeds crackle add onion paste.
Saute onion paste till light golden brown.
Puree tomatoes and add to pan.
Cook till the liquid of from tomatoes dries and tomatoes are cooked.
Add garam masala and other spices(like turmeric powder, coriander powder and red chilli powder) if adding.
Cook till masala leaves oil.
Cool and store in airtight containers and refrigerate or freeze as required.
How to use in curries
Thaw before using.
In pan add masala, cook for few seconds, add spices as per the curry and add other ingredients of the curry like vegetables or lentils.
You can puree masala to smooth paste before storing or if you like coarse paste store it just like that.
#gallery-0-4 { margin: auto; } #gallery-0-4 .gallery-item { float: left; margin-top: 10px; text-align: center; width: 33%; } #gallery-0-4 img { border: 2px solid #cfcfcf; } #gallery-0-4 .gallery-caption { margin-left: 0; } /* see gallery_shortcode() in wp-includes/media.php */
So make this bhuna masala and keep it ready for quick meals whenever pressed on time. You can adjust the amount of onion, tomatoes and other spices in masala as per your requirement.
Also you can puree onions, tomatoes or cooked masala in fine paste and store as per your preferences.
Do give me your feedback about the post and recipe.
Do visit my social media accounts.. FB, Pinterest and Instagram. Whenever you make this, do post on my FB page or tag me on Instagram(#foodtrails25). Pin the recipes for later reference.
If you like my work, then do hit the follow button and subscribe to the blog to get notifications on new posts and share the blog with your loved ones.
Thanks for stopping by and keep coming back!!
Bhuna Masala Bhuna Masala, tomato onion based cooked paste or thick sauce used to prepare many North Indian curries and vegetables.
0 notes
Text
Aloo Matar, a simple everyday curry made with potatoes(Aloo) and green peas(Matar). This simple curry goes well with chapatis, paranthas and even jeera rice.
This curry is quite popular in North India it has but also relished in almost every state.The dish is quick one to make as no grinding and roasting of masala is needed. Everyone has their own version of this curry. Here I bring you the simplest and quickest way, the way I make it. I make this curry quite often when I run out of ideas on what to make for quick dinner.
It tastes best with fresh seasonal peas now a days people make it with frozen peas.
Aloo or potatoes are most of the time available in pantry. We North Indians have the habit of combining Aloo or potatoes with almost everything.. Jeera Aloo,Aloo Gobhi, Aloo Tamatar, Aloo ke paranthe, Aloo Caspsicum, Aloo Beans and the list goes on.
Potatoes give a lot of texture to Indian curries and vegetables and make it filling. Many people like to stay away from potatoes but contrary to the belief that these are bad for blood sugar, one can use potatoes in moderation. To lower the starch content in potatoes, these can be dipped in water for 3-5 minutes after peeling and cutting into cubes. My grandmothers did and mom do the same. I am not sure whether it lowers the starch content to how much, but you can see the lot of starch when we discard the water.
How to cook Aloo Matar
Aloo Matar is cooked in onion tomato masala, it can be curry based or dry. Also you can adjust the water as per your choice. I like to keep it neither too thick nor too thin. Commonly cooked in pressure cooker to reduce the cooking time. If you have boiled potatoes then you can cook it in open pan/kadhai. Also with Instant Pots /Nutripots in our life, we can cook this curry conveniently in these. This post I am covering the pressure cooker version, will update the Instant Pot version soon.
Let’s see how I make this simple curry Aloo Matar..
Aloo Matar
Aloo Matar, a simple everyday curry made with potatoes(Aloo) and green peas(Matar). This simple goes well with chapatis, paranthas and even jeera rice.
2-3 Potatoes(Medium)
1/2 Cup Peas
2-3 Tomatoes
1 Onion
1/2" Ginger(small piece)
1-2 Green Chillies
1-2 tsp Coriander Powder
1/2 tsp Turmeric Powder/Haldi
1 tsp Garam Masala
1/2 tsp Red Chilli Powder (optional)
1/4 tsp Asafoetida/Hing (skip for gluten-free option)
1-2 tbsp Oil(Mustard/Olive /Peanut)
Salt to taste
Fresh Coriander for garnish
Wash nicely and peel potatoes. Cut into medium sized cubes.
Soak frozen Peas in water.
Puree tomatoes, ginger and green chillies.
Very finely chop the onions.
Switch on the gas on medium flame, add oil in pressure cooker. Once the oil is warm enough, add cumin seeds and hing/asafeotida.
When the seeds crackle, add onions and saute till light pink
Add tomato puree and cook fr 4-5 minutes, till th puree is cooked well.
One one add all the dry spice powders mix and then add potatoes and peas. Cook for a minute, then add water and pressure cook for 3-4 whistles on medium flame. Then switch off the gas.
Let the pressure release on itself and then, open the lid and mash 2-3 potato cues lightly. This will add a rich texture to the gravy.
Garnish with finely chopped fresh coriander/cilantro leaves.
Serve hot with chapatis/ jeera rice or even pooris or paranthas.
You can a cook this curry in an open pan also. Use boiled potatoes to shorten the cooking time.
Stepwise pic of making Aloo Matar(Last pic where we add water and the final cooked curry is missing, will update soon)
#gallery-0-4 { margin: auto; } #gallery-0-4 .gallery-item { float: left; margin-top: 10px; text-align: center; width: 25%; } #gallery-0-4 img { border: 2px solid #cfcfcf; } #gallery-0-4 .gallery-caption { margin-left: 0; } /* see gallery_shortcode() in wp-includes/media.php */
Serve it to your guests, it’s a great option with rice to be packed in office goers lunch box. My kids love this with rice and I also serve it with Methi Paranthas.
Taking it to my facebook #195Foodie Bloghop group where the theme this week is #ThirdLetterMagic suggested by Amrita Iyer who blogs at Food Samaritan. For the theme all the participating members have to cook a dish starting with the Third Letter of their name. Since, A is the third letter in my name (Swati), I finalized to make Aloo Matar. Lot many dishes came to my mind, but then this is one curry which is regular in my house and till now was not up on my blog. So, I decided to go with Aloo Matar.
Related curry recipes for with potatoes and peas.. Rassewale Aloo Tamatar, Matar Paneer
Do try this Aloo Matar Curry my way and let me know how you liked it.
Do visit my social media accounts.. FB, Pinterest and Instagram. Whenever you make this, do post on my FB page or tag me on Instagram. Pin the recipes for later use.
Hit the follow button and subscribe to the blog to get notifications on new posts and share the blog with your loved ones.
Thanks for stopping by!!
Aloo Matar Aloo Matar, a simple everyday curry made with potatoes(Aloo) and green peas(Matar). This simple curry goes well with chapatis, paranthas and even jeera rice.
0 notes
Text
Kadhi one of the most popular yogurt based gravy thickened with or without chickpea flour(besan) , prepared in minimum spices and tempered with fenugreek seeds/ mustard seeds /cumin seeds and curry leaves(optional) with chickpea fritters(pakora/pakodi)
Today I have here one of my favourite food. Kadhi Pakodi or Pakoda..I love Kadhi Pakora and I really miss Kadhi cooked by my mom. Whether I go to my parent’s house or she comes to our place this is one thing that we all want her to cook for us. Whenever I make Kadhi, my kids always tell me “why don’t you cook kadhi like naani(maternal grandmom)”. The kadhi made by her is so perfect !! the pakoras are melt in mouth and she doesn’t even add baking soda to it as many people add to the batter while making pakora for softness!!
Kadhi is a favourite comfort food among most of the Indians. It is very popular especially in the states of Uttar Pradesh(U.P), Haryana, Punjab, Rajasthan and Gujrat. Other states too have their own version. Each version is equally delicious and comforting with it’s own uniqueness. Kadhi from Gujarat is has a sweeter taste to it and it is made with or without besan/chickpea flour. In U.P it has a sour taste as it is made from Khatta dahi(sour yogurt). Punjabi Kadhi is very much similar to the one from U.P. In rajasthani kadhi no pakodi are added , also it is thinner in consistency and it is mainly served with Pyaz Ki Kachoris. Down in south India, yogurt based curries are popular but are made without the addition of chickpea flour and have different local ingredients like coconut.
The kadhi pakodi that I am presenting here s from U.P. I learnt this from my daadi(grandmom) and mom. My daadi used to make amazing kadhi and like my kids look forward to kadhi made by mom, we look forward to her preparation.
Traditionally we used khatta dahi/buttermilk for making it. In India, many people use homemade yogurt/curd. Every night they make a new batch. Due to the hot climate in India, the curd turns sour very soon . People avoid eating sour curd especially at night,as it is considered harmful to health.The leftover is stored for making butter and ghee. Buttermilk that is left from the butter preparation for ghee, is used for making Kadhi. The sour curd can also be used for making Kadhi. So, Kadhi is a weekly or fortnightly affair in many households.
The popular combination with Kadhi is Steamed Rice. But I like it even with chapatis. My mom always makes some Jeera Aloo along whenever she makes Kadhi. Kadhi Chawal(Kadhi and Rice) aur aloo ki subzi was one of our favorite weekend meal at my Mom’s house. My hubby was not a Kadhi fan when I got married, and I was like.’why doesn’t he eats Kadhi 🤷 but slowly and gradually he also has started eating it😉. My kids just love Kadhi Chawal but they like to have it without jeera aloo.
How to Cook Kadhi.
Kadhi means ‘to cook on slow flame”.Yogurt and chickpea flour mixture is cooked on slow flame till it thickens. When my grandmom lived in village she always cooked kadhi on Chulha a kind of earthen brick stove, though she had gas -stove too. It took around an hour or so to make it. But, the taste of the kadhi used to just so different and just so delectable.. Those who have eaten kadhi made on slow flame on chulla or have eaten at dhabas will agree with me. Still many people do that. Now a days, people don’t have much time so and also to save the wood and reduce smoke they cook on gas stoves, in a heavy bottomed kadhai or pan. And with the introduction of Instant Pot/Nutripot(in India) we can now cook kadhi under 30 minutes from start to end. After I have bought my Instant Pot I always cook Kadhi in it. This is how things change with time and technology!!
Pakora/Pakodi for Kadhi
Pakora/Pakori as chickpea fritters that we add to Kadhi. You can make plain fritters or can also add finely chopped fresh spinach/fenugreek/coriander cilantro leaves to it.
For Pakodi, make the batter of besan/chickpea flour,add caraway/ajwain seeds and salt. The batter should be of thin consistency. Many people complain that the pakodi come out hard To get soft pakodi, keep these pointers in mind while making pakodi.. you will never get hard pakodi.
To get soft and melt in mouth Pakodi, always beat the batter well. Just like the way we beat batter for Dahi Vada. The batter should be light and airy. This is the secret to making melt in mouth pakodi for Kadhi.
You can also add a pinch of baking soda if you don’t want to do all the muscle work!!
Drop the batter into hot oil and fry till medium brown. Drop small lumps of batter you can use a tsp for that. The batter swells up
To test whether the batter is light enough to fry and give soft pakodi, take water in a bowl, drop a tsp of batter in water. If it floats up the batter is ready.
#gallery-0-10 { margin: auto; } #gallery-0-10 .gallery-item { float: left; margin-top: 10px; text-align: center; width: 33%; } #gallery-0-10 img { border: 2px solid #cfcfcf; } #gallery-0-10 .gallery-caption { margin-left: 0; } /* see gallery_shortcode() in wp-includes/media.php */
Making Kadhi
To make Kadhi we need yogurt/curd/dahi,chickpea flour or besan. Kadhi is made by mixing besan with yogurt and water along with turmeric powder, salt. You can add some red chilli powder also along with it. If you don’t like sour yogurt add a tsp of sugar to it.
I use mustard oil for making Kadhi and tempering it with fenugreek seeds and cumin seeds with hing or asafoetida. I also use garlic and onions for tempering kadhi when I cook it and also before serving it.
#gallery-0-11 { margin: auto; } #gallery-0-11 .gallery-item { float: left; margin-top: 10px; text-align: center; width: 33%; } #gallery-0-11 img { border: 2px solid #cfcfcf; } #gallery-0-11 .gallery-caption { margin-left: 0; } /* see gallery_shortcode() in wp-includes/media.php */
To temper Kadhi in pan, heat mustard oil till it’s smoking point. Cool it a bit then add 1 tsp of asafoetida/hing. Add fenugreek seeds and cumin seeds along with whole red chillies. Once the spices give aroma, add coarsely garlic and green chilli(optional), saute till the garlic turns light brown. Add finely sliced onions and fry till onions are light brown. Add chilli powder if you want. Add the tempering to Kadhi and cover with lid for a while, till the aroma of spices and garlic infuses in kadhi.
#gallery-0-12 { margin: auto; } #gallery-0-12 .gallery-item { float: left; margin-top: 10px; text-align: center; width: 33%; } #gallery-0-12 img { border: 2px solid #cfcfcf; } #gallery-0-12 .gallery-caption { margin-left: 0; } /* see gallery_shortcode() in wp-includes/media.php */
Few pointers to keep in mind to get the right consistency of Kadhi ..
Mix besan/chickpea flour well in curd. Take care it does not form lumps. If you get lumps strain it through a sieve..
If you are making Kadhi for first time, follow the recipes, later you can adjust the recipe as per your required consistency(thick or thin). Also, kadhi gets thickened once it starts to cool down. Add ,1/4 cup or as required lukewarm water to it before serving to get the right consistency.
Soak the fenugreek seeds a 2-3 minutes before preparing tempering. Drain water and dry the seeds on a paper towel before adding to tempering.
Once you add kadhi to pan to cook keep mixing it for first few minute, else it will curdle.
You can also add curry leaves to the tempering. Add a tsp of desi ghee before serving it. Ghee enhances the taste of Kadhi.
So let’s see my version of Kadhi Pakora..
Kadhi Pakodi/Pakora
Kadhi Pakodi recipe from Uttar Pradesh, Instant Pot and Stove-top recipe included. How to make delicious Kadhi a yogurt based soup recipe with (pakodi) chickpea fritters.
For Pakoda/Fritters
1/2 Cup Chickpea Flour
1/4 tsp Caraway Seeds/Ajwain
1/2 tsp Salt
Water to make the batter
For Kadhi
2 Cups Yogurt/Dahi/Curd (preferably sour)
1/2 Cup Chickpea Flour
1/2 tsp Turmeric Powder
Salt as per taste
4-5 Cups Water or as required
Make Pakodi
In a bowl add caraway seeds with besan and salt.
Add little water to mix the batter. The batter should be thick than the cake batter. Beat the batter for 4-5 minutes till you get fluffy batter.
Take water in a bowl and drop a tiny potion of batter. If it floats on top, batter is ready for making fritters.
Keep aside the batter of 5-10 minutes. Meanwhile heat oil in a kadhai to fry the pakodi.
Drop tiny portions of batter in hot oil and fry till golden in color. Do not fry on high flame else pakora will stay raw from inside.
Once done, take out on kitchen towel and keep aside.
Make Kadhi
Soak Fenugreek seeds in water fro 5 minutes. Just before using for kadhi preparation drain water from the seeds and dry these on a kitchen towel. This way seeds won’t turn black while sauteing and also won’t splatter when we add wet seeds to oil in pot.
In a mixing bowl, add yogurt, chickpea flour and salt. Mix together, till no lumps remain. Add water and mix well. Ensure no lumps are there in the mixture.
Kadhi in Instant Pot
Switch on the SAUTE MODE of Instant Pot on and set the timer to 10 minutes.
When the display shows hot, add oil in the inner pot. Add asafeotida , whole red chilli and fenugreek seeds.
Add finely chopped or coarsely crushed garlic and green chilli. You can also finely chop garlic.
Add finely chopped onions and fry till onions are translucent. Cancel the saute mode.
Add the yogurt and chickpea mixture slowly into the pot, and stir it continuously for 2-3 minutes. set the SAUTE mode ON again, set time to 5 minutes.
Keep stirring kadhi for another 2 minutes. Wait till it gets a boil. This will take another 5 minutes.
Stir again and cancel the SAUTE Mode, cover the lid and set the SOUP Mode ON. Keep the Pressure on LOW and set timer for 12 minutes.
Once the timer goes off, wait for 2-3 minutes and then do a manual quick release(QRP). Check the thickness of Kadhi.
If the Kadhi is thin as your liking, cook Kadhi for another 5 minutes on high. If the Kadhi is thick, add around 1/4 or more warm water to kadhi and mix. Add Pakodi to kadhi.
Kadhi on Stovetop
Take a heavy bottomed kadhai, add ghee/oil to it. When the oil is hot enough add hing, fenugreek seeds, garlic and green chillies.
Add finely chopped onions and fry till onions are translucent.
Add the yogurt and chickpea mixture slowly into the pot, and stir it continuously for 2-3 minutes., till a boil comes. Lower the flame to minimum.
Cook Kadhi for another 20-25 minutes or till it thickens. Keep stirring in between. Add pakodi to kadhi.
Prepare the tempering
In a pan add mustard oil/desi ghee. When the oil is hot enough add a pinch of hing, cumin seeds and 1 whole red chilli(optional).
When the seeds crackle, add finely chopped garlic, saute till light brown, add red chilli powder. Saute for a few seconds and add tempering to Kadhi.
Close the Lid of Instant pot or cover kadhai for few minutes till the aroma of tempering infuses in Kadhi.
Serve hot with a tsp of Desi ghee added, ith Steamed Rice or Chapatis!!
I use Mustard Oil for Making Kadhi for that..
When the display shows hot, add mustard oil in the inner pot. Heat the oil for another 1-2 minutes or till it’s smoking point.
You can use any vegetable oil/desi ghee for making Kadhi.
Adding water to the yogurt and chickpea mixture depends on the thickness of yogurt and and chickpea flour. Add 4 cups water to 2 cups of yogurt and adjust afterwards as required.
Skip Onion and garlic to make it no-onion no-garlic recipe.
To make it gluten-free, skip asafeotida.
So, do try my version of Kadhi Pakodi either in Instant Pot or on stove top kadahi, I am sure you will surely like it. Hot Kadhi with steamed rice with some onions on side is for sure a comforting treat. I make a big batch of Kadhi and usually keep it at least for myself for the next day. I can even have it like a soup with any rice or chapati. I feel Kadhi just like Dal Makhani tastes better the next day. Temper it again with a pinch asafoetida, cumin seeds and red chilli powder before having it.
You can make it without pakodi or add some boondi to it, if you are on low-fat diet or don’t like to add pakodis in it. Make Pakodi in Appe Pan if you have, for the non-fried version.
Skip garlic and onion for no-onion no-garlic version and for the gluten-free version skip asafoetida.
Linking my Kadhi Pakodi recipe to my Foodie Monday Bloghop Facebook group for the theme #191DahiDelights, suggested by Priya Iyer who blogs at The World Through My Eyes.Do check her blog where she has some amazing recipes from South Indian and Gujarati Cuisine.
Also,do check what my fellow bloggers have brought to the Dahi Delights!!
Hope you will love my version of Kadhi Pakora as much as we love it!! Do give it a try.
Visit my social media accounts and say hello to me there… FB, Pinterest and Instagram. Whenever you make this,do post on my FB page or tag me on Instagram. Pin the recipes for later use.
If you like my work, then do hit the follow button and subscribe to the blog to get notifications on new posts and share the blog with your loved ones. I promise won’t spam your mailbox 🙂.
Thanks for stopping by!!
Kadhi Pakodi Kadhi one of the most popular yogurt based gravy thickened with or without chickpea flour(besan) , prepared in minimum spices and tempered with fenugreek seeds/ mustard seeds /cumin seeds and curry leaves(optional) with chickpea fritters(pakora/pakodi)
0 notes