#obd code
Explore tagged Tumblr posts
Visit Tumblr Blog
Explore Tumblr blogs with no restrictions, modern design and the best experience.
Last Seen Tumblr Blogs


Fun Fact
Tumblr is used by 21% of adults online aged 18-29 years.
Text
Bluetooth OBD2 Scanner and Car Code Reader for iPhone & Android
The FIXD car scanner and OBD app instantly translates 7000+ engine fault codes into plain English on your phone. Wireless Bluetooth connection. Set up in minutes. No car knowledge needed.
2 notes
·
View notes
Text
Here are a few important OBD codes for Land Rover errors. Keep them in mind during Land Rover service. Know more

0 notes
Text
Why do my headlights keep going out?
The following is a systematic analysis and solution based on the problem of frequent headlight extinguishing of your vehicle:
I. Core fault causes 1. Circuit overload causes fuse to blow
Short circuit or overload: Damage to the insulation layer of the wiring harness (such as friction between the wiring harness and metal parts in the engine compartment) will cause a short circuit, or the modification of high-power LED bulbs (such as 100W) exceeds the original circuit design capacity.
Detection method: Use a multimeter to measure the resistance at both ends of the fuse. If it is close to 0Ω, there is a short circuit; if the resistance value is normal but the fuse blows repeatedly, it is necessary to check whether the load exceeds the standard.
2. Relay/switch aging failure
Relay contact adhesion: Long-term current shock causes contact oxidation, and the circuit cannot be disconnected normally, which may cause intermittent power outage of the headlight.
Carbonization of the combination switch: The internal contacts of the headlight switch form high resistance (>5Ω) due to arc erosion, resulting in voltage fluctuations that cause the light to flicker or go out.
3. Poor connector contact
Plug oxidation: When the headlight socket is damp, the metal contacts generate copper oxide (especially in rainy areas), the resistance increases to more than 10Ω, and the current transmission is unstable.
Wiring harness is not connected: The terminal is not tightened during maintenance or the vehicle vibration causes the connector to loosen (common in off-road vehicles), and the measured voltage fluctuation can reach ±3V.
4. Bulb and circuit compatibility issues
Poor quality LED modification: Non-automotive grade LED driver EMC is unqualified, generating high-frequency harmonics to interfere with BCM control signals.
Halogen filament breakage: After the filament is partially melted, it may be briefly overlapped, showing random extinguishing (typical symptoms at the end of life).
II. Diagnostic process and tools Step-by-step troubleshooting table: Step Operation Tool/parameter Normal value range 1 Check fuse specifications and blown state Visual inspection + multimeter Original rated current (usually 10-20A) 2 Measure headlight socket voltage (ignition switch ON) Digital multimeter 11.5-14.2V 3 Shake the wiring harness to observe light changes (simulate vibration interference) Manual test Voltage fluctuation should be <0.5V 4 Replace relay test Relay of the same model Contact resistance <0.1Ω 5 Read BCM fault code OBD-II diagnostic instrument (such as Autel) No U0100/U0155 code
III. Targeted solutions 1. Circuit protection upgrade
Replace slow-blow fuses (such as ATO series), which have a surge current resistance 300% higher than fast-blow fuses.
Install ceramic insulation sleeves to protect the wiring harness in the engine compartment, which can withstand temperatures up to 1000℃.
2. Connection reliability optimization
Replace the original tin-plated plugs with gold-plated terminals, and the contact resistance is reduced to below 0.02Ω.
Apply conductive silicone grease (such as Dow Corning DC-4) in the socket to prevent oxidation and enhance sealing.
3. Control module reset
Perform a hard reset on the BCM: disconnect the negative pole of the battery for 10 minutes to clear the historical fault memory.
Update BCM firmware: Some models (such as Volkswagen after 2018) need to be upgraded to SW026 or above to fix the lighting control BUG.
Fourth, repair costs and suggestions Fault type Typical repair solution Cost range (RMB) Fuse/relay replacement Original spare parts + labor ¥80-200 Wiring harness repair Partial wiring + heat shrink tube insulation ¥300-600 BCM programming 4S shop special equipment matching ¥500-1,200 Full vehicle lighting system detection Diagnostic instrument + load test ¥200-400
Operation warning:
Do not use copper wire instead of fuse, which may cause the wiring harness to melt (case: a car owner caused a cabin fire).
LED modification requires simultaneous upgrade of the cooling system, and it is recommended to choose an integrated assembly with IP67 protection level.
If self-diagnosis fails, it is recommended to use an infrared thermal imager to scan the circuit (abnormal heating points are often the source of the fault), or contact a professional technician to perform oscilloscope waveform analysis (capture power ripple and relay control signals).

#led lights#car lights#led car light#youtube#led auto light#led light#led headlights#led headlight bulbs#ledlighting#young artist#car culture#race cars#classic cars#car#cars#coupe#suv#chevrolet#convertible#supercar#car light#headlight extinguishing#headlight bulb#headlight restoration#headlight#headlamp#car lamp#lamp#lighting#repair
2 notes
·
View notes
Text
lmfao my car keeps throwing a transmission problem code. $20 obd reader was worth it, but god, at what cost.
anyway, hopefully I can afford to fix whatever Fuckening is happening this time.
2 notes
·
View notes
Text
I found my OBD-II reader and managed to get the check engine light to turn off.... By just clearing the code.
I should probably actually go check on the part that actually threw the code in the first place. But it's cold outside and the light has stayed off so far.
2 notes
·
View notes
Text
7 Incredibly Useful Check Engine Light Tips for Small Businesses
For small businesses that rely on vehicles for daily operations, the check engine light (CEL) can be a frustrating and costly issue. Whether you own a fleet of delivery vans, rideshare vehicles, or service trucks, understanding and addressing the check engine light effectively can save time and money. If you're searching for "car repair near me" or "auto repair near me," here are seven useful tips to keep your business vehicles running smoothly and minimize downtime.
1. Don’t Ignore the Check Engine Light (CEL)
Many small business owners make the mistake of ignoring the check engine light, hoping it will turn off on its own. However, the CEL is an early warning system for potential problems that can escalate if left unaddressed. If your business vehicles are frequently on the road, timely action is essential to avoid expensive repairs and unexpected breakdowns.
2. Use a Diagnostic Tool for Quick Answers
Investing in an OBD-II scanner can help you quickly determine the cause of the CEL. These scanners provide error codes that indicate issues with the engine, transmission, or emissions system. If you’re unfamiliar with these codes, a professional mechanic in Vancouver can interpret them and recommend the necessary repairs.
3. Check for Common Issues First
Before rushing to a repair shop, check for simple causes like a loose or damaged gas cap, which can trigger the CEL. Ensuring your gas cap is tightly sealed can sometimes turn off the warning light without needing further repairs. If the light remains on, it’s time to seek professional assistance.

4. Find a Reliable Auto Repair Shop
Finding a trusted car repair near me or auto repair near me can save your business significant money in the long run. Regular maintenance and prompt repairs prevent minor issues from turning into costly breakdowns. If you're in the Vancouver area, look for a specialized check engine light repair Vancouver service to diagnose and fix the issue efficiently.
5. Keep Up with Regular Maintenance
Routine maintenance, such as oil changes, spark plug replacements, and air filter checks, can prevent the CEL from coming on. Small businesses should establish a maintenance schedule to keep their vehicles in peak condition. Partnering with a reliable mechanic in Vancouver can help keep track of necessary services.
6. Act Fast if the Light is Flashing
A steady CEL typically indicates a less urgent issue, but a flashing check engine light signals a severe problem that requires immediate attention. Driving with a flashing CEL can cause severe engine damage, potentially leading to costly repairs or even complete engine failure.
7. Consider Professional Check Engine Light Repair in Vancouver
If your business is based in Vancouver, seeking a professional check engine light repair Vancouver service can save you time and ensure accurate diagnostics. Many repair shops offer quick turnaround times, helping small businesses minimize vehicle downtime and keep operations running smoothly.
Conclusion
For small businesses that rely on vehicles, the check engine light should never be ignored. Whether it's a minor issue like a loose gas cap or a more serious engine malfunction, addressing the CEL promptly can prevent costly repairs and disruptions. Searching for auto repair near me or mechanic Vancouver can help you find the right professional for the job. Regular maintenance and professional diagnostics are key to keeping your business vehicles in top shape and ensuring long-term reliability.
#Check engine light#check engine light repair vancouver#car repair near me#auto repair near me#Mechanic Vancouver
2 notes
·
View notes
Text
Engine Repair Instruction Full Guide
Engines are the heart of any vehicle, powering everything from your daily commute to long road trips. Knowing how to repair an engine can be a game-changer, whether you're an enthusiast who loves getting your hands dirty or someone looking to save money on mechanic bills. This guide will walk you through the entire process of engine repair, from diagnosing problems to reassembling your engine and ensuring it runs smoothly.

Understanding the Basics of an Engine
Before diving into the repair process, it’s crucial to understand how an engine works. Most vehicles use an internal combustion engine, which combines fuel and air, ignites it, and transforms that explosion into mechanical energy.
Components of an Internal Combustion Engine
The main components include:
Cylinder Block: The engine's core where combustion occurs.
Cylinder Head: Houses the valves and spark plugs.
Pistons: Move up and down to create the force needed to turn the crankshaft.
Crankshaft: Converts the pistons' up-and-down movement into rotational motion.
Camshaft: Controls the opening and closing of the valves.
Valves: Regulate the flow of fuel and air into the engine and exhaust gases out.
How an Engine Works: A Simple Explanation
An engine works by pulling in a mixture of air and fuel, compressing it, igniting it with a spark (in gasoline engines), and then expelling the exhaust gases. This cycle—intake, compression, power, and exhaust—happens in each cylinder and repeats hundreds of times per minute.
Tools and Equipment Needed for Engine Repair

Whether you're performing a basic repair or diving into more complex work, having the right tools is essential.
Essential Tools for Basic Repairs
Socket Set: For removing and tightening bolts.
Wrenches: Different sizes for various engine parts.
Screwdrivers: Flathead and Phillips for screws and clips.
Pliers: For handling wires and small parts.
Torque Wrench: Ensures bolts are tightened to the correct specifications.
Specialized Equipment for Advanced Engine Work
Engine Hoist: For removing the engine from the vehicle.
Cylinder Hone: Prepares cylinders for new piston rings.
Compression Tester: Checks the health of each cylinder.
OBD-II Scanner: Diagnoses engine codes and issues.
Safety Gear and Precautions
Gloves: Protect your hands from cuts and chemicals.
Safety Glasses: Shield your eyes from debris.
Work Boots: Offer protection against heavy parts or tools.
Diagnosing Engine Problems
Accurately diagnosing engine problems is the first step in any repair process. Understanding the symptoms can save time and prevent unnecessary work.
Common Symptoms of Engine Issues

Check Engine Light: Indicates a problem detected by the car's computer.
Strange Noises: Knocking, tapping, or grinding sounds can signal internal damage.
Excessive Smoke: Blue smoke might mean burning oil, while white could suggest a coolant leak.
Loss of Power: Often linked to fuel or air delivery issues.
Step-by-Step Diagnostic Process
Listen and Observe: Note any unusual sounds, smells, or behaviors.
Check Engine Light Codes: Use an OBD-II scanner to retrieve error codes.
Perform Compression Test: Assesses the health of your engine’s cylinders.
Inspect Fluids: Look for contamination or leaks in oil, coolant, and other fluids.
Step-by-Step Guide to Reassembly
Prepare Your Workspace: Ensure that your workspace is clean, organized, and well-lit. Lay out all the parts and tools you'll need in the order of reassembly. Keep the engine manual handy for specific torque specs and sequences.
Install the Crankshaft: Place the crankshaft back into the engine block, ensuring it is seated correctly. Use assembly lube on the main bearings to prevent damage during the initial startup. Torque the main caps to the manufacturer's specifications.
Insert the Pistons: Install the pistons and connecting rods. Be sure to align the piston rings correctly and use a ring compressor to insert the pistons into the cylinder bore. Attach the connecting rods to the crankshaft and torque the rod bolts to spec.
Install the Camshaft and Timing Components: If your engine uses a timing chain or belt, install it according to the timing marks on the camshaft and crankshaft gears. This step is crucial for ensuring the engine's valves open and close at the correct times.
Attach the Cylinder Head: Place the cylinder head gasket on the engine block, followed by the cylinder head. Torque the head bolts in the correct sequence and to the proper specifications. This ensures a good seal and prevents head gasket failure.
Install Valves, Lifters, and Pushrods: If applicable, install the engine's valves, lifters, and pushrods. Make sure they are properly aligned and that the lifters are seated correctly in their bores.
Reassemble the Valve Train: Install the rocker arms and adjust the valve lash according to the engine manual. Proper valve lash is critical for engine performance and longevity.
Reattach External Components: Begin reattaching external components like the water pump, oil pump, timing cover, oil pan, and intake manifold. Replace any gaskets and seals during this process to prevent leaks.
Reconnect the Fuel and Ignition Systems: Reinstall the fuel injectors, spark plugs, and ignition wires. Ensure all electrical connections are secure and properly routed to avoid short circuits or malfunctions.
Final Checks: Before moving on, double-check all connections, bolts, and components. Make sure nothing is left loose or unconnected.
Applying Proper Torques and Specifications
Every engine has specific torque settings for each bolt. Over-tightening can strip threads or warp components, while under-tightening can lead to leaks or parts coming loose. Use a torque wrench and follow the manufacturer's specifications closely.
Double-Checking Work for Mistakes

It's easy to miss a step or make a mistake during reassembly. Double-check your work:
Ensure all components are installed in the correct order.
Verify all bolts are torqued to spec.
Check for any leftover parts or tools in the engine bay.
Testing the Repaired Engine
With the engine reassembled, the next step is testing it to ensure everything is functioning properly.
Preparing for Initial Startup
Before starting the engine, perform a few preparatory checks:
Prime the oil system: This can be done by cranking the engine with the fuel system disabled until oil pressure is achieved.
Fill the engine with fresh oil and coolant.
Double-check all electrical connections and fuel lines.
Checking for Leaks and Unusual Noises

Once you start the engine, pay close attention to any unusual noises or leaks:
Oil Leaks: Check around the oil pan, valve covers, and front and rear seals.
Coolant Leaks: Inspect the radiator, hoses, and water pump area.
Unusual Noises: Listen for knocking, tapping, or whining sounds, which could indicate an issue with the timing components or internal parts.
Fine-Tuning and Adjusting the Engine
After the initial startup, the engine may require some adjustments:
Timing Adjustments: Use a timing light to set the ignition timing.
Idle Speed: Adjust the idle speed according to the manufacturer’s specifications.
Fuel Mixture: On carbureted engines, you may need to adjust the air-fuel mixture for optimal performance.
Common Engine Repair Mistakes to Avoid
Engine repair is complex, and mistakes can be costly. Here are some common errors to watch out for:
Misalignments and Incorrect Torques
Misaligned timing components can lead to poor engine performance or damage.
Incorrectly torqued bolts can cause leaks, parts failure, or engine damage.
Overlooking Small Parts and Connections
Small parts like washers, clips, or gaskets are easy to overlook but crucial for preventing leaks and ensuring proper function.
Electrical connections: Double-check that all sensors and connectors are properly seated.
Skipping Diagnostic Steps
Skipping steps in the diagnostic process can lead to unnecessary repairs or missed issues. Always perform thorough diagnostics before and after repairs.
Maintaining Your Engine After Repair
Proper maintenance is key to ensuring the longevity of your newly repaired engine.
Importance of Regular Maintenance
Regular maintenance, such as oil changes, air filter replacements, and coolant checks, is essential to keep your engine running smoothly and prevent future problems.

Tips for Extending Engine Life
Use high-quality oil and filters.
Avoid hard driving until the engine is fully warmed up.
Regularly check and maintain fluid levels.
When to Seek Professional Help
While DIY repairs can save money, some issues are best left to professionals, especially if you encounter complex problems or lack the necessary tools and expertise.
Dealing with Advanced Engine Repairs
Some engine repairs are too complex for the average DIYer. Here's when to consider professional help:
Understanding When It’s Beyond DIY
Extensive internal damage: Cracked blocks or severely worn bearings usually require professional expertise.
Advanced electrical issues: Problems with engine management systems often need specialized diagnostic tools and knowledge.
Overview of Complex Repairs: Timing Belt, Engine Rebuilds
Timing Belt Replacement: Involves precise alignment of engine components and is critical for preventing engine damage.
Engine Rebuilds: This is a time-consuming and complex task that often requires professional machining and specialized tools.
Working with a Professional Mechanic
When the repair is beyond your capabilities, working with a professional mechanic ensures that the job is done correctly and safely. They have the tools, experience, and resources to handle complex engine repairs.
Cost Considerations in Engine Repair
Engine repair costs can vary widely depending on the scope of work, parts required, and whether you do it yourself or hire a professional.
Estimating Costs for DIY vs Professional Repair
DIY Repairs: Typically cost less but require an investment in tools and time.
Professional Repairs: Can be expensive but come with the assurance of experience and often a warranty.
Budgeting for Tools, Parts, and Time
Consider the cost of any special tools or equipment you might need, as well as the cost of replacement parts. Factor in the time required, especially if the vehicle is your daily driver.
Understanding the Cost of Mistakes
Mistakes can be costly. Stripping a bolt, breaking a part, or incorrect assembly can lead to additional expenses. Always weigh the risks before starting a major repair.
Conclusion
Recap of Key Points
Engine repair is a rewarding but challenging task that requires careful planning, the right tools, and attention to detail. Whether you’re fixing a minor issue or performing a complete rebuild, following the correct procedures is crucial for success.
Encouragement for DIY Enthusiasts
For those who love working on their vehicles, engine repair can be a satisfying and cost-effective way to maintain your car. With patience and persistence, even complex repairs can be tackled with confidence.
Final Thoughts on Engine Repair
Always approach engine repair with a clear plan and the right resources. Don’t hesitate to seek professional help when needed, and remember that regular maintenance is the best way to avoid major repairs.
FAQs
How do I know if my engine needs repair?
Common signs include unusual noises, excessive smoke, loss of power, and a check engine light. Regular diagnostics can help catch issues early.
Can I repair my engine without professional help?
Basic repairs like replacing gaskets or sensors can often be done at home with the right tools. However, more complex tasks like engine rebuilds may require professional expertise.
What are the signs of a failing engine?
Signs include knocking noises, excessive oil consumption, smoke from the exhaust, and persistent overheating.
How long does it take to repair an engine?
The time required varies greatly depending on the complexity of the repair. Simple repairs might take a few hours, while a full rebuild could take several days or longer.
2 notes
·
View notes
Text
From Engine to Electronics: Proper Diagnostic Techniques for Resolving Maserati Problems

Maserati, the epitome of Italian luxury and performance, is renowned for its stylish design and high-performance capabilities. However, like any high-end vehicle, Maserati can encounter a range of issues, from engine troubles to electronic malfunctions. Proper diagnostics is crucial in maintaining the health and performance of these sophisticated machines. This article will guide you through the common problems Maserati face and the proper diagnostic techniques to resolve them.
Common Maserati Problems
1. Engine Issues
Maserati engines are marvels of engineering, but they can develop problems over time. Common engine issues include:
Misfires and Rough Idling: This can be caused by faulty spark plugs, ignition coils, or fuel injectors.
Overheating: Often due to a malfunctioning cooling system, such as a failed water pump or a clogged radiator.
Oil Leaks: These can originate from various seals and gaskets, leading to low oil levels and potential engine damage.
2. Transmission Problems
Maserati transmissions are designed for performance but can experience:
Slipping Gears: This could indicate worn-out clutch plates or issues with the transmission fluid.
Delayed Shifts: Often due to problems with the transmission control module or low fluid levels.
3. Electrical and Electronic Failures
Modern Maseratis are equipped with advanced electronics that can sometimes fail, including:
Dashboard Warning Lights: These can indicate issues ranging from simple sensor failures to serious engine problems.
Infotainment System Glitches: Problems with the touch screen, navigation, or audio system are not uncommon.
Diagnostic Techniques
1. OBD-II Scanner
The On-Board Diagnostics II (OBD-II) scanner is an essential tool for diagnosing Maserati problems. It can read error codes from the car's computer, providing insight into various issues.
How to Use: Connect the OBD-II scanner to the port located under the dashboard. Turn on the ignition and follow the scanner’s instructions to retrieve the error codes.
Interpreting Codes: Each code corresponds to a specific problem. For example, P0300 indicates a random/multiple cylinder misfire, while P0128 points to a coolant thermostat issue.
2. Visual Inspection
A thorough visual inspection can reveal obvious issues such as leaks, damaged components, or worn-out parts.
Engine Bay: Check for oil leaks, loose connections, and the condition of belts and hoses.
Undercarriage: Inspect for fluid leaks and damage to the exhaust system.
Electrical Connections: Look for corroded or loose battery terminals and wiring issues.
3. Multimeter Testing
A multimeter is useful for diagnosing electrical issues in a Maserati.
Battery Voltage: Measure the voltage across the battery terminals. A healthy battery should read around 12.6 volts when the car is off and around 14 volts when running.
Sensor Checks: Test various sensors, such as the oxygen sensor or mass airflow sensor, to ensure they are functioning correctly.
4. Compression Test
A compression test helps diagnose internal engine problems such as worn piston rings or valves.
Procedure: Remove the spark plugs and insert a compression gauge into each cylinder. Crank the engine and note the pressure readings. Low or uneven readings indicate internal engine issues.
5. Professional Diagnostic Tools
Maserati dealerships and specialized repair shops use advanced diagnostic tools that can access proprietary systems and provide more detailed information.
SD2/SD3 Diagnostic Systems: These are specialized tools used by Maserati technicians to diagnose and program vehicle systems accurately.
Diagnostic Software: Tools like Xentry or PIWIS can interface with Maserati's electronic systems for comprehensive diagnostics.
Addressing Common Issues
1. Engine Repairs
Misfires and Rough Idling: Replace faulty spark plugs, ignition coils, or fuel injectors. Regular maintenance and using high-quality fuel can prevent these issues.
Overheating: Ensure the cooling system is functioning correctly by checking the water pump, radiator, and thermostat. Flushing the coolant system periodically is also recommended.
Oil Leaks: Identify the source of the leak and replace the necessary seals or gaskets. Regularly check oil levels and change the oil according to the manufacturer's recommendations.
2. Transmission Solutions
Slipping Gears: Inspect and replace worn clutch plates and ensure the transmission fluid is at the correct level. Consider a fluid change if necessary.
Delayed Shifts: Diagnose and repair issues with the transmission control module or solenoids. Regular transmission servicing can prevent many of these problems.
3. Electrical Fixes
Dashboard Warning Lights: Use an OBD-II scanner to identify and address the underlying issue. Reset the warning lights after repairs are completed.
Infotainment System Glitches: Perform software updates and check for any loose connections or faulty components. In some cases, a complete system reset may be required.
Conclusion
Proper diagnostics are essential for maintaining the performance and reliability of your Maserati. By using the right tools and techniques, you can identify and resolve issues promptly, ensuring your luxury car continues to deliver the driving experience it was designed for. Regular maintenance and timely repairs are key to keeping your Maserati in top condition, from the engine to the sophisticated electronics.
#maserati car#maserati car diagnosis#maserati service center#maserati car maintenance#maserati car mechanic
2 notes
·
View notes
Text
Signs Your Engine Oil Pressure Transmitter Needs Replacement
n Engine Oil Pressure Transmitter is a crucial component in ensuring the smooth operation of your vehicle’s engine. It monitors the oil pressure and sends this information to the car's electronic control unit (ECU), allowing you to stay informed about the engine's health. One popular model, the 64279-004-1, is known for its reliability, but even the best parts can wear out over time. Here are some key signs that your engine oil pressure transmitter needs replacement.
1. Fluctuating Oil Pressure Gauge Readings
If you notice that your oil pressure gauge is providing erratic readings, it could be a sign that your Engine Oil Pressure Transmitter is failing. The gauge might swing wildly from high to low pressure without any apparent reason, indicating that the transmitter is sending inconsistent signals to the ECU.
2. Oil Pressure Warning Light
The oil pressure warning light on your dashboard is designed to alert you when there’s a problem with your engine’s oil pressure. If this light comes on frequently or stays illuminated, it’s a strong indication that your 64279-004-1 Engine Oil Pressure Transmitter might be malfunctioning. Ignoring this warning can lead to serious engine damage.
3. Unusual Engine Noises
A failing Engine Oil Pressure Transmitter can lead to incorrect oil pressure readings, which in turn can cause inadequate lubrication of engine components. This may result in unusual noises such as knocking, ticking, or tapping from the engine. If you hear such sounds, it’s advisable to check your oil pressure transmitter.
4. Engine Performance Issues
When the Engine Oil Pressure Transmitter isn’t working correctly, it can affect the overall performance of your engine. You might experience reduced power, poor acceleration, or even stalling. These performance issues are often linked to incorrect oil pressure readings, leading to improper engine lubrication and increased friction.
5. Oil Leaks
Sometimes, physical damage to the Engine Oil Pressure Transmitter can cause oil leaks. If you notice oil puddles under your vehicle or see oil seeping from around the transmitter, it’s a clear sign that it needs to be replaced. Oil leaks can lead to low oil levels and inadequate lubrication, posing a significant risk to your engine.
6. Fault Codes
Modern vehicles equipped with onboard diagnostics (OBD) can detect issues with components like the 64279-004-1 Engine Oil Pressure Transmitter. If your vehicle’s OBD system registers fault codes related to oil pressure, it’s essential to have the transmitter inspected and potentially replaced. These codes can be read using an OBD scanner, helping you pinpoint the issue quickly.
Conclusion
Maintaining proper oil pressure is vital for the longevity and performance of your engine. The Engine Oil Pressure Transmitter plays a critical role in monitoring and regulating this pressure. If you notice any of the signs mentioned above, it’s important to address the issue promptly. Replacing a faulty oil pressure transmitter can prevent more severe engine damage and ensure your vehicle runs smoothly. Regular maintenance and timely replacement of worn-out components are key to keeping your engine in optimal condition.
2 notes
·
View notes
Text

Take the guesswork out of your vehicle's dreaded check engine light! The AUTOPHIX 3210 Bluetooth OBD2 Enhanced Car Diagnostic Scanner can save you time, worry, and even costly repairs down the road. Read and diagnose your check engine light, understand the severity of the issue, and clear fault codes in a blink of an eye. The AutoPhix also features more functions compared to other scanners, including I/M Readiness, Battery Health Check, Freeze frame, O2 sensor test, On-Board Monitoring, Evap system test, Performance Test, Data Stream, and Diagnostic reports, a handy Google search button, and a Built-in OBD II Fault code look-up library.
Check my shopping network https://www.tripleclicks.com/tcsearch/category:7
#autotest, #automotoveelectrical,#enginetest, #enginecomputer #enginecomputertest,#bluetoothautotest,
6 notes
·
View notes
Text
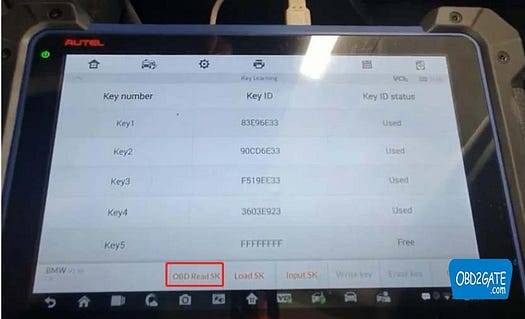
Autel IM608 Program Key for BMW CAS4 CAS4+ via OBD
Autel MaxiIM IM608 II can program BMW CAS4 and CAS4+ keys using OBD, without needing to open the ECU box. Remember, a network connection is essential during the whole process.
For instance, let’s consider BMW F30 key programming:
Important Notes:
For CAS4, the procedure for adding a key in case of all keys lost remains the same; ISN retrieval is unnecessary.
For CAS4+ all key lost scenarios, attempt to read the Engine ISN code under ISN code management. If this is not supported, explore alternative methods to acquire the ISN code.
The subsequent steps are identical to adding a key. To determine the CAS system type, access “ECU information.”
Programming Procedure:
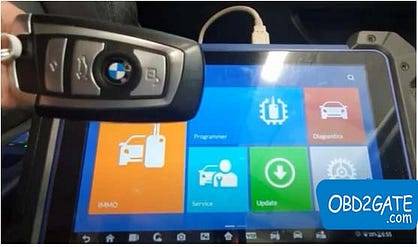
Connect IM608 II to the OBD2 port of your BMW.
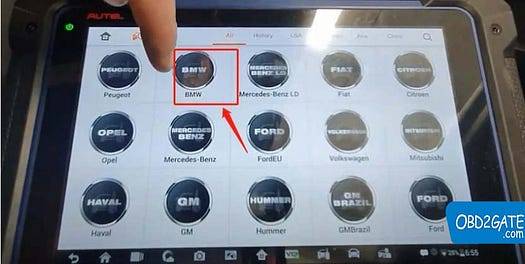
Navigate to “BMW” in the device.
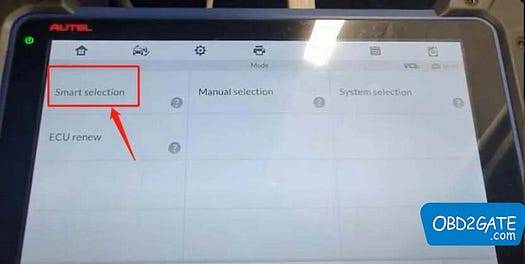
Opt for “Smart Selection.”
Choose “Mini (Europe) > Smart Mode.”
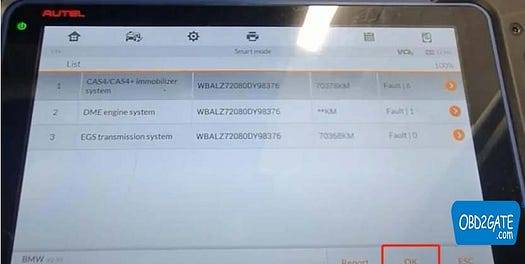
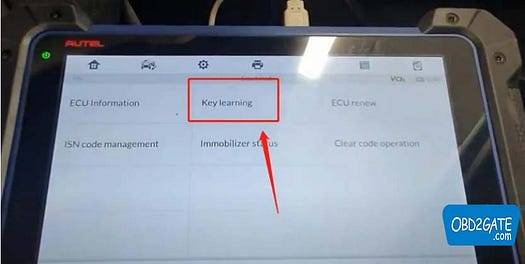
Select “Key Learning” followed by confirming vehicle information with “OK.”
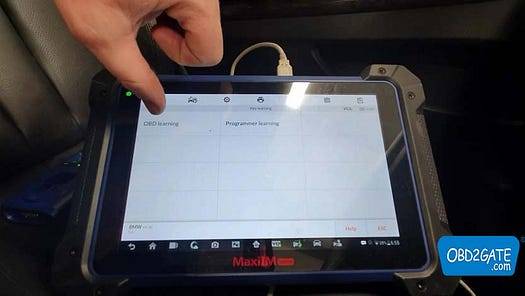
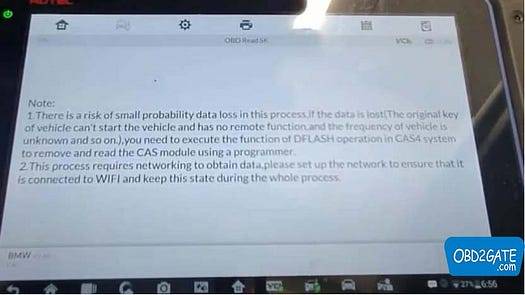
Proceed to “OBD Learning” >read the provided instructions, click ‘OK’
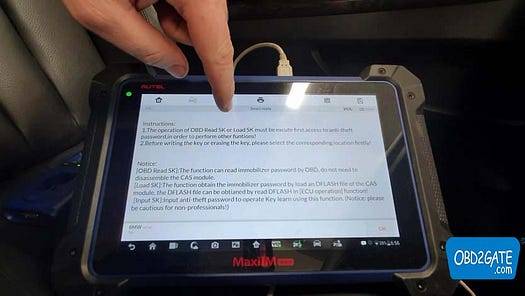
Click “OBD Read SK” on MaxiIM IM608> read notes.
Respond to the question about having a working key with “Yes” or “No.”

Position a working key as close to the start coil as possible.
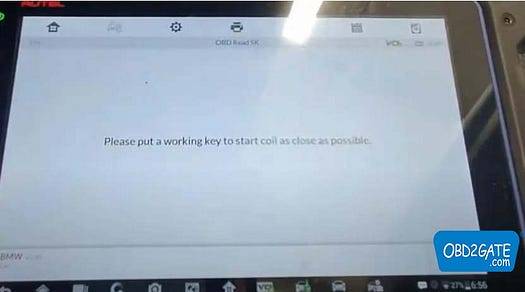
Successful reading of the password.
Pick an empty key position for key writing.
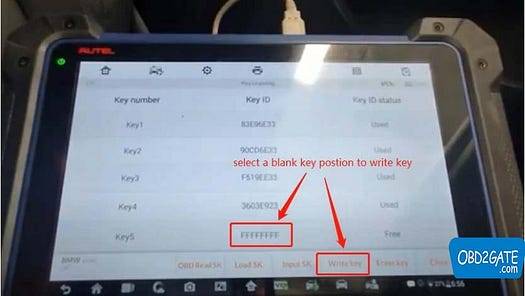
Place the new key near the starting coil. Key frequency: 868MHZ.
The key learning process consists of two steps.

Key writing is completed successfully.
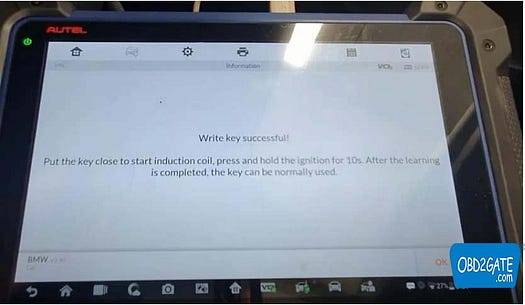
By adhering to the instructions on Autel MaxiIM IM608 II, the entire process will be effortlessly accomplished!
Check Autel im608 pro II price on OBD2GATE.com:
2 notes
·
View notes
Text
Yanhua BMW BDC2 Keys Learning Bench Platform Program BMW G Series BDC2 AKL FAQ
Yanhua Mini ACDP/ACDP2 with Module 38 can program BMW BDC2 all keys lost on bench. The
BMW BDC2 Keys Learning Bench Platform is required to work with. Here have collected some frequently asked questions for reference.

Q1: Yanhua ACDP2 support BMW BDC2 All Keys Lost now? Is it true?
A: Yes! It needs Module 38 + BDC2 Keys Learning Bench Platform.
Yanhua Module 3 + B48 Interface Board are also required for DME B48 EEPROM data backup.
Q2: Can the BDC2 Bench Platformwork with other devicesexcept the ACDP host?
A: Yes, it is compatible with other tools that support BDC2 all keys lost.
Q3: How to read a locked ECU?
A: The DME module is not locked, so no special steps are needed.
Q4: Is reading ISN required?
A: No, but you must back up the engine EEPROM data (Step 1) using Yanhua Module 3 and B48 Interface Board. This data is used for Step 6 (Write DME ISN) and Step 7 (Reset EGS EWS).

Q5: Can't read with another device? Is it necessary to have all the adapters for each version of the BMW engine to make the first step (backup coding data)?
A: Use Yanhua Module 3 and B48 interface board to read the EEPROM data of DME B48 SPC5777. You also can use other available devices to read the data.
Q6: Do I need extra modules to do Step 7 (Reset EGS EWS)?
A: Only require the Yanhua BMW BDC2 Keys Learning Bench Platform. Then reinstall BDC2 in the car and reflash via OBD after programming.
Q7: Does it also require parts from a donor vehicle the front left and right antennas? What can the antenna do? Is it necessary?

A: No.
The LF Smart Key Antenna & Remote Control Receiver are used for key functionality (intelligence & remote control) testing.
If you don’t have them, just reinstall BDC2 in the vehicle for testing.
To be continued…
Learn more:
0 notes
Text
Check Engine Light Scan | Master Tech Automotive

Seeing the check engine light come on can be a stressful experience—especially when you’re not sure what triggered it. For drivers in Cascade Highlands, quick and reliable diagnosis is essential to avoid costly repairs or breakdowns. Whether it’s a minor sensor glitch or a serious engine issue, local automotive professionals are ready to help you get back on the road with confidence.
When the Check Engine Light Cascade Highlands activates, it’s your vehicle’s way of saying, “Something’s not right.” This warning light is part of your car’s onboard diagnostic system (OBD-II) and can indicate anything from a loose gas cap to a failing catalytic converter. Ignoring it can lead to reduced fuel efficiency, engine misfires, or even long-term engine damage.
The good news? Cascade Highlands is home to a number of skilled, locally trusted auto repair shops equipped with advanced diagnostic tools. These professionals can read error codes from your car’s computer system, pinpoint the exact issue, and explain it in clear, understandable terms—no confusing jargon or unnecessary upselling.
Whether your Check Engine Light Cascade Highlands is flashing (indicating an urgent problem) or steadily glowing (signaling a non-emergency but important issue), it’s crucial to address it as soon as possible. Local mechanics in Cascade Highlands offer fast diagnostic services, often with same-day turnaround, so you don’t have to wait and wonder.
Common reasons the check engine light may come on include:
Faulty oxygen sensors
Loose or damaged gas caps
Worn spark plugs or wires
Malfunctioning catalytic converters
Ignition system issues
EVAP (evaporative emission control) leaks
In Cascade Highlands, many auto shops also offer complimentary or low-cost check engine light scans, giving you a clear picture of what’s going on without a big financial commitment. Their honest assessments and fair pricing have made them go-to choices for drivers who value both quality service and peace of mind.
So, if your Check Engine Light Cascade Highlands is on, don’t ignore it. Turn to local experts who prioritize customer care, transparency, and getting the job done right the first time. A quick diagnostic today could save you hundreds—or even thousands—tomorrow.
0 notes
Text
Rev Up Your Future: Master Mobile Car Diagnostics with Galaxy Uni
Imagine diagnosing your car’s issues with just your smartphone—a spark of innovation that’s changing the automotive world! Mobile car diagnostics is the future, and Galaxy Uni in Tehran, Iran, is your launchpad to mastering this skill. Our vibrant training program blends creativity, technology, and hands-on learning to ignite your career in automotive diagnostics. Ready to dive into this exciting journey?
The Art of Mobile Diagnostics
Mobile diagnostics is like giving your car a voice. Plug an OBD-II device into your vehicle’s diagnostic port (standard in cars post-1996), sync it with apps like Torque Pro or Car Scanner via Bluetooth or Wi-Fi, and watch your phone reveal everything—engine health, fuel efficiency, error codes, and more. From spotting a faulty sensor to tweaking performance, this tech empowers you to keep your ride in top shape.
Top OBD-II Devices to Explore
The market is buzzing with OBD-II devices, each with unique flair:
ELM327 Mini v2.1 ($3–$8): A budget gem, perfect for beginners and foreign cars post-2003, offering basic error code reading and engine monitoring.
Mobicar ($17–$33): User-friendly with multilingual support, it’s a hit for diverse vehicle models, including regional ones, with ABS and airbag diagnostics.
Launch X431 Mini ($50–$167): A pro-level tool for luxury brands like Porsche and BMW, packed with advanced diagnostic features.
OBD Tools Negar Khodro ($33–$83): Tailored for regional vehicles, with ECU configuration and actuator testing capabilities.
Choose a device that matches your car’s needs, and always opt for quality to protect your vehicle’s electronics.

Must-Have Smartphone Apps
Apps are the soul of mobile diagnostics, turning raw data into actionable insights:
Torque Pro (Android, ~$5): A fan favorite with customizable dashboards, live data like RPM, and error code clearing.
OBD Auto Doctor (Android/iOS, free with $1–$10 in-app purchases): Super intuitive, ideal for beginners, with detailed error explanations.
Car Scanner ELM OBD2 (Android/iOS, ~$6 Pro): Sleek, versatile, and updated regularly, with HUD mode for real-time display.
Diagzone (Android/iOS): Built for Launch devices, it shines in advanced diagnostics for systems like ABS and transmissions.
EOBD Facile (Android/iOS, $5–$20): Great for European cars, offering live data and detailed reports.
Free versions are great for starters, but premium features unlock deeper diagnostics, especially for professional use.
Why It’s a Game-Changer
Mobile diagnostics isn’t just tech—it’s freedom. Save on repair bills, catch issues early, and impress your friends with your car know-how. Whether you’re a gearhead or a budding mechanic, this skill lets you take control. The catch? Interpreting complex data takes expertise, which is where Galaxy Uni steps in.
Career Opportunities
The automotive industry is hungry for skilled diagnosticians. In Iran, you can earn $250–$500 monthly, with higher potential in global markets or specialized shops. Start your own mobile diagnostic service, join a repair shop, or take your skills international—Galaxy Uni’s certification makes it possible.
Tips for Success
Choose Quality Devices: Avoid cheap knock-offs to protect your car’s ECU.
Pick the Right App: Match your app to your device and vehicle for best results.
Practice Regularly: Galaxy Uni’s hands-on labs ensure you’re ready to tackle real-world diagnostics.
Conclusion
Mobile car diagnostics is your ticket to an exciting, tech-driven career. Join Galaxy Uni to master this skill and drive your future forward. Visit Galaxy Uni to enroll and start your adventure today!
0 notes
Text
So, my car's battery died. This happens sometimes. It's an old hybrid. I'm used to it.
What I'm not used to is the master caution light coming on after I've trickle-charged the battery back up on AC power, and then disappearing by the time I get my hands on an OBD port plug to find out exactly what error code it threw to make the light come on.
Like. Babe. What are you trying to tell me. Please stop scaring me. I can't afford a new car in this economy ;_; please
#i read that it's possible for the red triangle of death to be caused by a 12v that's not up to charge#but still#DON'T FUCKIN SCARE ME LIKE THAT CAR. I DON'T NEED ANOTHER REASON TO STRESS POOP#this would have to happen right as the registration comes due#pls don't do this during the inspection i beg#paz has a car
0 notes
Text
How to Fix C0561 71 Code: Complete Guide to Your Vehicle's Stability Control Problem
https://autorepairlebanontn.com/?p=3784 How to Fix C0561 71 Code: Complete Guide to Your Vehicle's Stability Control Problem Finding a C0561 71 code on your vehicle’s diagnostic system can be frustrating and concerning. This trouble code, which typically indicates an issue with your vehicle’s electronic stability control system, shouldn’t be ignored as it could affect your safety on the road. We’ve helped thousands of drivers understand and resolve this exact code without expensive dealer visits. In this comprehensive guide, we’ll break down exactly what the C0561 71 code means, its common causes, and step-by-step answers you can try yourself. Many of our readers have successfully cleared this code using our methods, potentially saving hundreds in unnecessary repair costs. Table of Contents Toggle Understanding the C0561 71 Code: What It Means for Your VehicleCommon Causes of the C0561 71 Error CodeFaulty Wheel Speed SensorsABS System MalfunctionsElectrical Connection IssuesHow to Diagnose the C0561 71 CodeUsing OBD-II ScannersVisual Inspection MethodsSteps to Fix the C0561 71 Error CodeDIY Repair OptionsWhen to Seek Professional HelpPreventing Future C0561 71 Code IssuesConclusionFrequently Asked QuestionsWhat does the C0561 71 trouble code indicate?Is it safe to drive with the C0561 71 code active?What are the common causes of the C0561 71 code?What warning signs might appear with this code?How can I diagnose the C0561 71 code myself?What are the DIY repair options for this code?When should I seek professional help for this code?How much does professional repair for C0561 71 typically cost?How can I prevent this code from occurring in the future?Are certain vehicle models more prone to the C0561 71 code? Understanding the C0561 71 Code: What It Means for Your Vehicle The C0561 71 code specifically indicates a malfunction in your vehicle’s Electronic Stability Control (ESC) system, particularly in the steering angle sensor circuit. This diagnostic trouble code appears when your car’s computer detects inconsistent or incorrect signals from the steering angle sensor. Modern vehicles rely on this sensor to determine the driver’s intended direction and adjust stability controls accordingly. When this code triggers, your dashboard typically displays warning lights such as the ESC, ABS, or traction control indicators. These illuminated symbols aren’t merely annoying dashboard decorations—they’re critical warnings that your vehicle’s stability systems aren’t functioning properly. The affected systems include traction control, anti-lock braking, and electronic stability control, all of which work together to maintain your vehicle’s stability during challenging driving conditions. The implications of driving with this code extend beyond simple mechanical concerns. Your vehicle’s ability to correct skids, prevent rollovers, and maintain traction during emergency maneuvers becomes compromised. This safety risk increases significantly when driving on wet roads, icy surfaces, or during sudden evasive actions. The National Highway Traffic Safety Administration reports that properly functioning ESC systems reduce single-vehicle crashes by approximately 30-40%. Most vehicle manufacturers categorize the C0561 71 code as a moderate to severe issue requiring prompt attention. While your car remains drivable with this code present, its safety systems aren’t operating at full capacity. The sensor’s malfunction might stem from various sources including wiring problems, sensor misalignment, or electronic control unit issues—all requiring different approaches to resolution. Common Causes of the C0561 71 Error Code The C0561 71 code primarily indicates issues with the Electronic Stability Control System and Traction Control System in GM vehicles. Understanding these causes helps pinpoint the exact problem for effective repairs. Faulty Wheel Speed Sensors Wheel speed sensors play a critical role in the vehicle’s stability control system, and their malfunction often triggers the C0561 71 code. These sensors transmit crucial speed data to the Electronic Brake Control Module (EBCM), enabling proper function of stability and traction control systems. Damaged or deteriorating sensors can’t provide accurate readings, causing the system to detect inconsistencies and generate error codes. Regular inspection of these components ensures they remain free from debris, corrosion, or physical damage that might affect their performance. ABS System Malfunctions Anti-lock Braking System (ABS) issues frequently contribute to the C0561 71 error code in GM vehicles. The ABS works closely with the traction control system, and problems with ABS sensors directly impact stability control functionality. Faulty ABS components disrupt the communication between different control modules, preventing proper system coordination. Testing the ABS system thoroughly helps identify whether it’s at the root of the error code, particularly if other braking issues are present alongside the stability control warning. Electrical Connection Issues Electrical problems represent a common trigger for the C0561 71 code, affecting how control modules receive and process data. Corroded connectors or damaged wiring harnesses interrupt the flow of information between sensors and the EBCM. These connection issues cause the system to receive incorrect or corrupted data, forcing it into a fail-safe mode. Moisture intrusion, vibration damage, and age-related deterioration all contribute to wiring problems that manifest as stability control errors. Comprehensive electrical testing identifies pinch points, shorts, or high-resistance connections that might be causing the code to appear. How to Diagnose the C0561 71 Code Diagnosing the C0561 71 code requires systematic troubleshooting to identify the root cause of the Electronic Stability Control System malfunction. This diagnostic trouble code specifically indicates the Electronic Brake Control Module (EBCM) is receiving invalid serial data from other modules in your vehicle. Using OBD-II Scanners OBD-II scanners provide the most direct method for accurately identifying the C0561 71 code and related issues. Connect your scanner to the vehicle’s OBD-II port, typically located under the dashboard on the driver’s side. After establishing connection, retrieve the stored trouble codes to confirm the C0561 71 error is present. Most modern scanners display additional information about the code, including possible causes and affected systems. Check for any accompanying trouble codes that might point to the underlying problem, such as wheel speed sensor faults or communication issues between control modules. The scanner’s live data function can also monitor real-time signals from various components to help pinpoint when and where the data transmission fails. Visual Inspection Methods Visual inspections complement electronic diagnostics by revealing physical issues that trigger the C0561 71 code. Examine all four wheel speed sensors for signs of damage, corrosion, or loose connections that might cause inaccurate speed readings to the EBCM. Verify the brake pressure is properly calibrated, as incorrect pressure can transmit faulty data to the stability control system. Carefully trace and inspect all wiring harnesses connected to the ABS and stability control systems, looking for chafed wires, corroded terminals, or damaged connectors that could interrupt signal transmission. Pay attention to dashboard warning lights such as ABS, traction control, or stability control indicators, as these illuminate when the system detects a malfunction. Testing the EBCM itself may be necessary if all other components appear intact, as internal module failures can also trigger this code. Poor ground connections often cause intermittent electronic issues, so check and clean all ground points related to the braking and stability systems. Steps to Fix the C0561 71 Error Code Resolving the C0561 71 error code requires a systematic approach to identify and repair the underlying issues in your vehicle’s Electronic Stability Control System. Several repair options are available depending on your technical expertise and the exact cause of the problem. DIY Repair Options Inspecting wheel speed sensors is the first step in addressing the C0561 71 code. Look for physical damage, corrosion, or loose connections on all sensors, replacing any that show signs of wear or damage. Check brake pressure adjustments to ensure they’re within manufacturer specifications, as improper brake pressure can trigger stability control errors. Clean any corroded connectors around the EBCM and related components using electrical contact cleaner to restore proper signal transmission. Examine the wiring harness for damaged wires, breaks, or disconnections that might interrupt data flow between modules. After completing repairs, perform a system reset by disconnecting the vehicle’s battery for 15-20 minutes, which often clears temporary electronic glitches in the control modules. When to Seek Professional Help Professional assistance becomes necessary when DIY troubleshooting fails to resolve the C0561 71 code. Certified mechanics possess comprehensive diagnostic equipment that can perform advanced code scanning beyond what consumer-grade OBD-II scanners offer. Technicians conduct specialized component testing on the EBCM, wheel speed sensors, and related systems using manufacturer-exact protocols. Many stability control issues require dealer-level programming tools to reset or reprogram control modules after repairs. Complex electrical problems involving multiple control units often demand professional diagnosis due to their integrated nature. Service centers maintain updated technical service bulletins that might identify known issues with exact vehicle models experiencing the C0561 71 code. Professional repair costs typically range from $120 to $600 depending on the required parts and labor, though this investment ensures proper resolution of potentially safety-critical systems. Preventing Future C0561 71 Code Issues Regular maintenance of your vehicle’s control modules prevents recurring C0561 71 codes. Electronic Brake Control Module (EBCM) and stability control system components require periodic inspections to detect malfunctions early. ABS sensors need consistent attention as they’re common culprits behind this error code. Clean these sensors regularly and replace them if you notice corrosion or damage. Dirty or defective sensors can’t properly transmit wheel speed data to the EBCM. Connectors throughout the braking system play a critical role in preventing code triggers. Inspect all relevant electrical connections for corrosion or damage, ensuring clean contact points for proper data transmission between modules. Your vehicle’s traction control system requires ongoing monitoring for optimal performance. Address any issues immediately, especially over-temperature conditions or continuous operation of the ABS motor which commonly trigger the C0561 71 code. Component replacement demands careful attention to procedure. When replacing or reprogramming the ECU or related components, perform all module learning steps correctly to avoid triggering this code. Several exact scenarios require preventive measures: Limit prolonged use of ABS, traction control, and vehicle stability systems during challenging driving conditions Complete proper service bleeding of the brake system to prevent hydraulic leaks Fix poor service bleed conditions that might keep the ABS motor running too long Establish a comprehensive maintenance routine focusing on brake system health, wheel speed sensors, and stability control components. Regular checkups significantly reduce the likelihood of encountering the C0561 71 error code and keep your vehicle’s safety systems functioning properly. Conclusion Addressing the C0561 71 code promptly is crucial for maintaining your vehicle’s stability control functions. While this error primarily affects the ESC system it shouldn’t be ignored even if your car seems to drive normally. We recommend starting with simple DIY diagnostics like checking wheel speed sensors and electrical connections before progressing to more complex troubleshooting. If these steps don’t resolve the issue professional help is worth the investment for your safety. Remember that preventive maintenance is your best defense against future occurrences. Regular inspection of ABS components electrical connections and brake systems will help keep your stability control system functioning properly and prevent this code from reappearing. Frequently Asked Questions What does the C0561 71 trouble code indicate? The C0561 71 code signals a problem with your vehicle’s electronic stability control (ESC) system, specifically related to the steering angle sensor circuit. It indicates that the Electronic Brake Control Module (EBCM) is receiving invalid serial data from other modules, compromising crucial safety features that prevent skids and maintain traction during emergency maneuvers. Is it safe to drive with the C0561 71 code active? While your vehicle remains drivable with this code active, it’s not operating with full safety capabilities. Your stability control, ABS, and traction control systems may be compromised or disabled. This is particularly dangerous in adverse weather conditions or emergency situations where these systems would normally help prevent accidents. What are the common causes of the C0561 71 code? Common causes include faulty wheel speed sensors, malfunctioning ABS systems, electrical connection problems (corroded connectors or damaged wiring harnesses), brake pressure calibration issues, and internal EBCM failures. In GM vehicles specifically, communication problems between control modules frequently trigger this code. What warning signs might appear with this code? When the C0561 71 code triggers, you’ll likely see warning lights on your dashboard including the ESC indicator, ABS light, or traction control warning. The stability control system may also deactivate automatically, and you might notice changes in braking performance or reduced handling in challenging driving conditions. How can I diagnose the C0561 71 code myself? Start by using an OBD-II scanner to confirm the code and check for related codes. Conduct visual inspections of wheel speed sensors, wiring harnesses, and connectors for obvious damage or corrosion. Check ground connections and brake pressure calibration. Monitor real-time signals for inconsistencies that might point to specific faulty components. What are the DIY repair options for this code? DIY repairs include inspecting and cleaning wheel speed sensors, checking brake pressure adjustments, cleaning corroded electrical connectors, and examining the wiring harness for damage. After making repairs, reset the system by disconnecting the vehicle battery for 15 minutes to clear any temporary electronic glitches. When should I seek professional help for this code? Seek professional help if your DIY troubleshooting efforts don’t resolve the issue, if specialized equipment is needed to access components, or if you’re uncomfortable working with safety-critical systems. Professional intervention is also recommended if multiple related codes appear or if the code returns after attempted repairs. How much does professional repair for C0561 71 typically cost? Professional diagnosis and repair for the C0561 71 code typically costs between $120 and $600, depending on the underlying issue. Simple fixes like sensor replacements or wiring repairs fall on the lower end, while EBCM replacement or extensive electrical system repairs will be more expensive. How can I prevent this code from occurring in the future? Prevent future occurrences by maintaining control modules regularly, cleaning ABS sensors periodically, inspecting electrical connections for corrosion, monitoring your traction control system, and following proper procedures when replacing components. Establish a maintenance routine focused on brake system health and stability control components. Are certain vehicle models more prone to the C0561 71 code? GM vehicles (Chevrolet, GMC, Buick, Cadillac) commonly experience this code due to their specific Electronic Brake Control Module design. Models with integrated stability control systems from the mid-2000s onward are particularly susceptible to communication errors between control modules that trigger this code. https://autorepairlebanontn.com/?p=3784 Absolute Auto Repair
0 notes