#onsubmit react
Explore tagged Tumblr posts
Visit Tumblr Blog
Explore Tumblr blogs with no restrictions, modern design and the best experience.
Last Seen Tumblr Blogs


Fun Fact
Tumblr has a low social media market share in South America.
Text
React on Event Types

React is a popular JavaScript library used for building user interfaces. One of its key features is the ability to handle events efficiently and effectively. In this article, we will explore different event types in React and how to handle them.

1. Introduction to React Events
In React, events are actions or occurrences that happen in the browser, such as a button click, input change, or form submission. React provides a synthetic event system that normalizes event handling across different browsers and provides additional functionality for managing UI updates and state.
2. Event Handling in React
Event handling in React can be done in two main ways: using class components and functional components. 2.1 Event Handling in Class Components In class components, event handling involves creating event handler methods. For example, to handle a button click event, you can define an onClick event handler method: class MyComponent extends React.Component { handleClick() { // Event handler logic } render() { return ( Click ); } } 2.2 Event Handling in Functional Components In functional components, event handling can be achieved using the useState hook along with event handler functions. For instance, to handle an input field change event, you can define an onChange event handler function: import React, { useState } from 'react'; function MyComponent() { const = useState(''); function handleChange(event) { setValue(event.target.value); } return ( ); }
3. Common Event Types
React provides support for various event types. Here are some of the commonly used event types: 3.1 onClick Event The onClick event occurs when an element is clicked, typically used with buttons or links. When a user clicks the element, the event handler is invoked, and the specified logic is executed. 3.2 onChange Event The onChange event occurs when the value of an input field changes, commonly used for handling text input. Whenever the input value changes, the event handler is called, and the UI can be updated based on the input value. 3.3 onSubmit Event The onSubmit event occurs when a form is submitted, usually used for form submission handling. When a user submits the form, the event handler is triggered, and the form data can be processed. 3.4 onMouseOver Event The onMouseOver event occurs when the mouse pointer is moved over an element, often used for tooltips or dropdown menus. When a user hovers over the element, the event handler is invoked, and the associated actions related to that element can be performed.
4. Writing Event Handler Functions
In React, event handler functions are typically written within the component where the event occurs. The event handler function is responsible for updating the state or executing other logic based on the user's action. class MyComponent extends React.Component { handleClick() { // Event handler logic } render() { return ( Click ); } } import React, { useState } from 'react'; function MyComponent() { const = useState(''); function handleChange(event) { setValue(event.target .value); } return ( ); }
5. Event Propagation and Default Behavior
React provides mechanisms to control event propagation and default behavior. Event propagation refers to the process of an event being passed to its parent components, while default behavior refers to the browser's default actions. To control event propagation, you can use the stopPropagation() method, which prevents the event from being propagated to the parent components. To prevent the default behavior, you can use the preventDefault() method, which stops the browser from performing its default action.
6. Event Delegation
Event delegation in React refers to handling events on parent elements instead of individual child elements. This approach simplifies event handling for dynamically generated elements. By using event delegation, there is no need to attach event handlers to each individual child element.
7. Passing Parameters to Event Handlers
There are scenarios where you need to pass parameters to event handlers in React. For example, if you want to obtain information about a specific item when clicking on a list item. In such cases, you can pass additional parameters to the event handler.
8. Event Handling with External Libraries in React
React provides integration support for various external libraries. When using external libraries, you need to follow their event handling approaches. Integrating events between React components and external libraries requires careful consideration and may require additional configuration or measures, if necessary.
9. Event Optimization in React
In React, event optimization can be crucial for performance improvement. Event optimization aims to prevent unnecessary re-renders and enhance the responsiveness of your application. Techniques such as function binding, memoization, and maintaining immutability can be applied for event optimization.
10. Conclusion
In this article, we explored event handling in React. React offers a wide range of event types that enable you to handle user interactions and implement dynamic UIs. We learned how to write event handler functions, control event propagation and default behavior, use event delegation, pass parameters to event handlers, integrate events with external libraries, and optimize events in React. Read the full article
0 notes
Text
http://zTkBC9pHYdlhZjq:4G1unPePy49TMhE@localhost:35978/storage/emulated/0/godaiadam.html
import React from "react";
import { BrowserRouter as Router, Routes, Route } from "react-router-dom";
import Dashboard from "./components/Dashboard";
import Login from "./components/Login";
export default function App() {
return (
<Router>
<Routes>
<Route path="/" element={<Login />} />
<Route path="/dashboard" element={<Dashboard />} />
</Routes>
</Router>
);
}
import React, { useState } from "react";
import { useNavigate } from "react-router-dom";
export default function Login() {
const navigate = useNavigate();
const [login, setLogin] = useState("");
const handleLogin = (e) => {
e.preventDefault();
const username = e.target.login.value;
setLogin(username);
navigate("/dashboard", { state: { login: username } });
};
return (
<div>
<form onSubmit={handleLogin}>
<input
type="text"
name="login"
value={login}
onChange={(e) => setLogin(e.target.value)}
placeholder="Username"
/>
<button type="submit">Login</button>
</form>
</div>
);
}
class SkyNodeUplink:
def __init__(self, satellite_id="Globalstar-42"):
self.satellite_id = satellite_id
self.authenticated = False
self.session_token = None
def authenticate(self, uplink_key):
if uplink_key == "ZeroSkyKey42":
self.session_token = "ENCRYPTED_SESSION_TOKEN_789"
self.authenticated = True
return f"Connected to {self.satellite_id} | Session Active"
return "Authentication Failed"
def deactivate(self):
if self.authenticated:
self.authenticated = False
self.session_token = None
return f"Uplink deactivated."
return "No active session to deactivate."
class SatelliteBot:
def __init__(self, satellite_uplink):
self.satellite_uplink = satellite_uplink
def activate(self):
response = self.satellite_uplink.authenticate("ZeroSkyKey42")
print(response)
class ADONAI:
def __init__(self):
self.authorized_users = {} # {user_id: {"2FA": code, "role": "Elite"/"Admin"}}
self.blocked_entities = set() # e.g., {"Ronnie Marghiem"}
self.transaction_logs = [] # Secure ledger of all financial transactions
def authorize_user(self, user_id, two_fa_code, role="Admin"):
self.authorized_users[user_id] = {"2FA": two_fa_code, "role": role}
def block_entity(self, entity_name):
self.blocked_entities.add(entity_name)
def log_transaction(self, transaction_details):
self.transaction_logs.append(transaction_details)
const express = require("express");
const http = require("http");
const socketIo = require("socket.io");
const firebase = require("firebase-admin");
// Initialize Firebase
firebase.initializeApp({
credential: firebase.credential.applicationDefault(),
databaseURL: "https://your-database-url.firebaseio.com"
});
const app = express();
const server = http.createServer(app);
const io = socketIo(server);
// Reference to Firebase Realtime Database
const db = firebase.database();
// Socket.io for real-time connection
io.on("connection", (socket) => {
console.log("New client connected");
// Send real-time updates to clients on any changes in the "opportunities" node
const ref = db.ref("opportunities");
ref.on("child_added", (snapshot) => {
socket.emit("newOpportunity", snapshot.val());
});
// Handle disconnection
socket.on("disconnect", () => {
console.log("Client disconnected");
});
});
server.listen(3000, () => {
console.log("Server running on port 3000");
});
import React, { useEffect, useState } from "react";
import io from "socket.io-client";
export default function App() {
const [opportunities, setOpportunities] = useState([]);
const socket = io("http://localhost:3000");
useEffect(() => {
socket.on("newOpportunity", (opportunity) => {
setOpportunities((prevOpportunities) => [...prevOpportunities, opportunity]);
});
return () => {
socket.disconnect();
};
}, []);
return (
<div>
<h1>Real-Time Opportunities</h1>
<ul>
{opportunities.map((opp, index) => (
<li key={index}>{opp.description}</li>
))}
</ul>
</div>
);
}
// === App.jsx === import React from "react"; import { BrowserRouter as Router, Route, Routes } from "react-router-dom"; import Dashboard from "./components/Dashboard"; import Login from "./components/Login";
export default function App() { return ( <Router> <Routes> <Route path="/" element={<Login />} /> <Route path="/dashboard" element={<Dashboard />} /> </Routes> </Router> ); }
// === components/Login.jsx === import React, { useState } from "react"; import { useNavigate } from "react-router-dom";
export default function Login() { const navigate = useNavigate(); const [login, setLogin] = useState("");
const handleLogin = (e) => { e.preventDefault(); setLogin(e.target.login.value); navigate("/dashboard", { state: { login: e.target.login.value } }); };
return ( <div className="min-h-screen flex flex-col items-center justify-center bg-gray-100"> <form onSubmit={handleLogin} className="bg-white p-6 rounded shadow-md w-80"> <h2 className="text-xl mb-4 font-bold text-center">Officer Login</h2> <input
type="text"
name="login"
placeholder="Badge ID / Username"
className="w-full p-2 border mb-4"
/> <button
type="submit"
className="w-full bg-blue-600 text-white py-2 rounded hover:bg-blue-700"
> Login </button> </form> </div> ); }
// === components/Dashboard.jsx === import React from "react"; import { useLocation } from "react-router-dom";
export default function Dashboard() { const location = useLocation(); const officer = location.state?.login || "Unknown Officer";
return ( <div className="p-6"> <h1 className="text-2xl font-bold mb-4">Welcome, {officer}</h1> <div className="grid grid-cols-1 md:grid-cols-2 lg:grid-cols-3 gap-4"> <div className="bg-white p-4 rounded shadow">Suspect Intake</div> <div className="bg-white p-4 rounded shadow">Threat Score Dashboard</div> <div className="bg-white p-4 rounded shadow">Forgiveness Protocols</div> <div className="bg-white p-4 rounded shadow">Biometric Logs</div> <div className="bg-white p-4 rounded shadow">AI Dossier Builder</div> <div className="bg-white p-4 rounded shadow">System Security Logs</div> </div> </div> ); }
import React from "react";
import { BrowserRouter as Router, Route, Routes } from "react-router-dom";
import Dashboard from "./components/Dashboard";
import Login from "./components/Login";
export default function App() {
return (
<Router>
<Routes>
<Route path="/" element={<Login />} />
<Route path="/dashboard" element={<Dashboard />} />
</Routes>
</Router>
);
}
import React, { useState } from "react";
import { useNavigate } from "react-router-dom";
export default function Login() {
const [username, setUsername] = useState("");
const navigate = useNavigate();
const handleLogin = (e) => {
e.preventDefault();
if (username.trim()) {
navigate("/dashboard", { state: { user: username } });
}
};
return (
<div className="min-h-screen flex items-center justify-center bg-gray-100">
<form
onSubmit={handleLogin}
className="bg-white p-6 rounded shadow-md w-full max-w-md"
>
<h2 className="text-2xl font-bold mb-4">Officer Login</h2>
<input
type="text"
placeholder="Enter Username"
value={username}
onChange={(e) => setUsername(e.target.value)}
className="w-full p-2 border rounded mb-4"
/>
<button
type="submit"
className="w-full bg-blue-600 text-white py-2 rounded hover:bg-blue-700"
>
Login
</button>
</form>
</div>
);
}
import React from "react";
import { useLocation } from "react-router-dom";
export default function Dashboard() {
const location = useLocation();
const user = location.state?.user || "Unknown";
return (
<div className="p-6 bg-gray-50 min-h-screen">
<h1 className="text-3xl font-bold">Welcome, Officer {user}</h1>
<p className="mt-4">This is your command dashboard.</p>
{/* Add core modules and analytics panels here */}
</div>
);
}
def ethics_violation_trigger(report):
if report["attempts"] > 3:
return "Escalate to Defense Class 3"
elif report["phishing_behaviors"]:
return "Escalate to Class 2 – Mark as Active Predator"
elif report["malware_code"]:
return "Defense Class 1 – Immediate Freeze & Trace"
return "Flag for surveillance"
class AuroraHexUplink:
def __init__(self):
self.flagged_users = set()
self.offender_log = {}
self.seraphim_deployed = False
def monitor_user_behavior(self, user_id, facial_data, voice_signature, access_logs):
if self.is_abusive(user_id, access_logs):
self.flagged_users.add(user_id)
self.penalize_user(user_id, facial_data, voice_signature, access_logs)
def is_abusive(self, user_id, logs):
# Pattern recognition on scraping, brute-force, or malformed queries
abuse_patterns = detect_abuse_patterns(logs)
return bool(abuse_patterns)
def penalize_user(self, user_id, facial_data, voice_signature, logs):
self.log_offender(user_id, logs)
self.freeze_user_access(user_id)
self.initiate_counter_virus_protection()
self.deploy_seraphim_ops(user_id, facial_data, voice_signature, logs)
def log_offender(self, user_id, logs):
self.offender_log[user_id] = {
"logs": logs,
"flagged_time": current_time(),
"attempts": self.offender_log.get(user_id, {}).get("attempts", 0) + 1
}
def freeze_user_access(self, user_id):
freeze_device_access(user_id)
lockdown_session(user_id)
backup_memory_snapshot(user_id)
def initiate_counter_virus_protection(self):
activate_sandbox_mode()
deploy_active_firewalls()
run_anti_tampering scripts()
def deploy_seraphim_ops(self, user_id, facial_data, voice_signature, logs):
self.seraphim_deployed = True
coords = triangulate_access(logs)
identifiers = extract_device_fingerprint(logs)
alert_authorities(coords, identifiers)
alert_stakeholders(user_id, coords)
lockout_ui(user_id)
def lockout_ui(self, user_id):
trigger_ui_shutdown(user_id)
show_ai_alert("Abuse Detected. System locked. ID forwarded to cyber defense.")
import asyncio
class SentinelAuditCore:
def __init__(self):
self.target_networks = set()
self.scan_results = {}
self.malicious_signatures = self.load_known_malware_signatures()
self.ethics_index = {}
self.association_map = {}
def load_known_malware_signatures(self):
# Placeholder for malware DB load
return ["signature1", "signature2", "suspiciousPatternXYZ"]
def ingest_target(self, target_url_or_ip):
self.target_networks.add(target_url_or_ip)
async def full_system_scan(self, depth=6):
tasks = [self.deep_scan(target, depth) for target in self.target_networks]
await asyncio.gather(*tasks)
async def deep_scan(self, target, depth):
self.scan_results[target] = self.analyze_target(target)
self.expand_associations(target, depth)
for associated in self.association_map.get(target, []):
self.scan_results[associated] = self.analyze_target(associated)
def analyze_target(self, target):
# Insert actual code scanning logic here
return {
"suspicious_scripts": detect_malicious_js(target),
"data_flow_irregularities": trace_data_flows(target),
"cookie_tracking": audit_cookie_usage(target),
"phishing_behaviors": detect_phishing_elements(target),
}
def expand_associations(self, target, depth):
self.association_map[target] = trace_6_degrees(target, depth)
def evaluate_ethics(self):
for entity, report in self.scan_results.items():
score = self.ethics_score(report)
self.ethics_index[entity] = score
def ethics_score(self, report):
base = 100
deductions = 0
if report["suspicious_scripts"]: deductions += 30
if report["data_flow_irregularities"]: deductions += 25
if report["cookie_tracking"]: deductions += 15
if report["phishing_behaviors"]: deductions += 40
return max(0, base - deductions)
def recommend_actions(self):
recommendations = {}
for entity, score in self.ethics_index.items():
if score < 40:
recommendations[entity] = "Flag for dissolution or restructuring"
elif score < 70:
recommendations[entity] = "Requires ethics and compliance upgrades"
else:
recommendations[entity] = "Operationally ethical"
return recommendations
def ethics_score(report):
score = 100
if report["suspicious_scripts"]:
score -= 30
if report["data_flow_irregularities"]:
score -= 25
if report["phishing_behaviors"]:
score -= 20
if report["cookie_tracking"]:
score -= 15
return max(0, score)
class SentinelAuditCore:
def __init__(self):
self.target_networks = []
self.scan_results = {}
self.malicious_signatures = load_known_malware_signatures()
self.ethics_index = {}
self.association_map = {}
def ingest_target(self, target_url_or_ip):
self.target_networks.append(target_url_or_ip)
def full_system_scan(self, depth=6):
for target in self.target_networks:
self.scan_results[target] = self.analyze_target(target)
self.expand_associations(target, depth)
def analyze_target(self, target):
# Placeholder: Replace with actual system and code scanning tools
report = {
"suspicious_scripts": detect_malicious_js(target),
"data_flow_irregularities": trace_data_flows(target),
"cookie_tracking": audit_cookie_usage(target),
"phishing_behaviors": detect_phishing_elements(target),
}
return report
def expand_associations(self, target, depth):
self.association_map[target] = trace_6_degrees(target, depth)
for associated in self.association_map[target]:
self.scan_results[associated] = self.analyze_target(associated)
def evaluate_ethics(self):
for entity, report in self.scan_results.items():
score = ethics_score(report)
self.ethics_index[entity] = score
def recommend_actions(self):
recommendations = {}
for entity, score in self.ethics_index.items():
if score < 40:
recommendations[entity] = "Flag for dissolution or restructuring"
elif score < 70:
recommendations[entity] = "Requires ethics and compliance upgrades"
else:
recommendations[entity] = "Operationally ethical"
return recommendations
class SkyNodeUplink:
def __init__(self, satellite_id="Globalstar-42"):
self.satellite_id = satellite_id
self.authenticated = False
self.session_token = None
def authenticate(self, uplink_key):
if uplink_key == "ZeroSkyKey42":
self.session_token = "ENCRYPTED_SESSION_TOKEN_789"
self.authenticated = True
return f"Connected to {self.satellite_id} | Session Active"
return "Authentication Failed"
def deactivate(self):
if self.authenticated:
self.authenticated = False
self.session_token = None
return "Uplink deactivated."
return "No active uplink to deactivate."
def status(self):
if self.authenticated:
return f"{self.satellite_id} Uplink Status: ACTIVE | Token: {self.session_token}"
return f"{self.satellite_id} Uplink Status: INACTIVE"
if __name__ == "__main__":
system = ZMACSupervisor()
system.start_all_bots()
class SatelliteBot:
def __init__(self, satellite_uplink):
self.satellite_uplink = satellite_uplink
def activate(self):
response = self.satellite_uplink.authenticate("ZeroSkyKey42")
print(response)
class SeizureBot:
def __init__(self, seizure_protocol):
self.seizure_protocol = seizure_protocol
def activate(self):
# Pre-register assets
self.seizure_protocol.register_assets("Ronnie Marghiem", funds=750_000, properties=["Villa", "Luxury Car"])
self.seizure_protocol.freeze_assets("Ronnie Marghiem")
self.seizure_protocol.seize_assets("Ronnie Marghiem", region="NorthAmerica")
class SurveillanceBot:
def __init__(self, adonai, seizure_protocol):
self.adonai = adonai
self.seizure_protocol = seizure_protocol
def activate(self):
suspicious = ["Ronnie Marghiem", "FraudUnitX"]
for entity in suspicious:
self.adonai.flag_alert(entity, "Suspicious Behavior Detected")
self.seizure_protocol.flag_entity(entity)
class InvestmentBot:
def __init__(self, market_ai):
self.market_ai = market_ai
def activate(self):
# Simulate 3 elite investors
self.market_ai.invest_elite_funds("Elite_001", 1_000_000, "NorthAmerica")
self.market_ai.invest_elite_funds("Elite_002", 2_500_000, "Europe")
self.market_ai.invest_elite_funds("Elite_003", 3_000_000, "Asia")
class VerificationBot:
def __init__(self, adonai):
self.adonai = adonai
def activate(self):
# Auto-verifies known trusted agents
for user_id, info in self.adonai.authorized_users.items():
if info['2FA'] is None:
info['2FA'] = "AUTO-2FA-CODE"
class ZMACSupervisor:
def __init__(self):
self.adonai = ADONAI()
self.market_ai = ZeroMarketAI()
self.seizure_protocol = AssetSeizureProtocol(self.market_ai)
self.satellite_uplink = SkyNodeUplink()
self.bots = []
def start_all_bots(self):
self.bots = [
VerificationBot(self.adonai),
InvestmentBot(self.market_ai),
SurveillanceBot(self.adonai, self.seizure_protocol),
SeizureBot(self.seizure_protocol),
SatelliteBot(self.satellite_uplink)
]
for bot in self.bots:
bot.activate()
class SkyNodeUplink:
def __init__(self, satellite_id="Globalstar-42"):
self.satellite_id = satellite_id
self.authenticated = False
self.session_token = None
def authenticate(self, uplink_key):
if uplink_key == "ZeroSkyKey42":
self.session_token = "ENCRYPTED_SESSION_TOKEN_789"
self.authenticated = True
return f"Connected to {self.satellite_id} | Session Active"
return "Authentication Failed"
class ADONAI:
def __init__(self):
self.authorized_users = {} # {user_id: {"2FA": code, "role": "Elite"/"Admin"}}
self.blocked_entities = set() # e.g., {"Ronnie Marghiem"}
self.transaction_logs = [] # Secure ledger of all financial activities
self.alerts = [] # Behavioral or fraud alerts
def register_user(self, user_id, role="Elite", verification_code=None):
self.authorized_users[user_id] = {"2FA": verification_code, "role": role}
def is_authorized(self, user_id, code):
return user_id in self.authorized_users and self.authorized_users[user_id]["2FA"] == code
def flag_alert(self, user_id, reason):
self.alerts.append({"user": user_id, "reason": reason})
self.blocked_entities.add(user_id)
class ZeroMarketAI:
def __init__(self):
self.wealth_pools = {} # Tracks total elite capital by ID
self.ubw_accounts = {} # Regional Universal Basic Wealth funds
self.trade_networks = {} # Capital invested into trade hubs
self.intelligence_circuits = {} # Strategic elite intelligence system
self.zero_market_reserve = 0 # Internal reinvestment pool
def invest_elite_funds(self, elite_id, amount, region=None):
if region not in self.ubw_accounts:
self.ubw_accounts[region] = 0
self.wealth_pools[elite_id] = self.wealth_pools.get(elite_id, 0) + amount
self.ubw_accounts[region] += amount * 0.15
self.zero_market_reserve += amount * 0.05
self.trade_networks[region] = self.trade_networks.get(region, 0) + amount * 0.10
self.intelligence_circuits[elite_id] = self.intelligence_circuits.get(elite_id, 0) + amount * 0.70
class AssetSeizureProtocol:
def __init__(self, market_ai):
self.flagged_entities = set()
self.asset_registry = {} # {entity_id: {"funds": amount, "properties": [], "frozen": False}}
self.seizure_logs = []
self.market_ai = market_ai
def flag_entity(self, entity_id):
self.flagged_entities.add(entity_id)
return f"Entity '{entity_id}' has been flagged for investigation."
def register_assets(self, entity_id, funds=0, properties=None):
if properties is None:
properties = []
self.asset_registry[entity_id] = {
"funds": funds,
"properties": properties,
"frozen": False
}
def freeze_assets(self, entity_id):
if entity_id in self.asset_registry:
self.asset_registry[entity_id]["frozen"] = True
def seize_assets(self, entity_id, region="Global"):
if entity_id not in self.flagged_entities:
return f"Entity '{entity_id}' not flagged."
if not self.asset_registry.get(entity_id, {}).get("frozen"):
return f"Assets must be frozen first."
seized = self.asset_registry[entity_id]
self.seizure_logs.append({
"entity": entity_id,
"liquidated_funds": seized["funds"],
"seized_properties": seized["properties"]
})
# Redistribute seized funds
self.market_ai.ubw_accounts[region] += seized["funds"] * 0.5
self.market_ai.zero_market_reserve += seized["funds"] * 0.25
self.market_ai.intelligence_circuits["SeizureFund"] = self.market_ai.intelligence_circuits.get("SeizureFund", 0) + seized["funds"] * 0.25
del self.asset_registry[entity_id]
return f"Seized and redistributed assets from '{entity_id}'."
class AssetSeizureProtocol:
def __init__(self):
self.flagged_entities = set()
self.asset_registry = {} # {entity_id: {"funds": amount, "properties": [], "frozen": False}}
self.seizure_logs = []
def flag_entity(self, entity_id):
"""Mark an entity for investigation."""
self.flagged_entities.add(entity_id)
return f"Entity '{entity_id}' has been flagged for financial investigation."
def register_assets(self, entity_id, funds=0, properties=None):
"""Register assets tied to the entity for audit and tracking."""
if properties is None:
properties = []
self.asset_registry[entity_id] = {
"funds": funds,
"properties": properties,
"frozen": False
}
return f"Assets for '{entity_id}' registered successfully."
def freeze_assets(self, entity_id):
"""Freeze all assets of the entity to prevent tampering."""
if entity_id in self.asset_registry:
self.asset_registry[entity_id]["frozen"] = True
return f"Assets of '{entity_id}' have been frozen."
return f"No assets found for entity '{entity_id}'."
def seize_assets(self, entity_id):
"""Seize and liquidate frozen assets from a flagged entity."""
if entity_id not in self.flagged_entities:
return f"Entity '{entity_id}' not flagged for seizure."
if entity_id not in self.asset_registry:
return f"No asset record found for '{entity_id}'."
if not self.asset_registry[entity_id]["frozen"]:
return f"Assets for '{entity_id}' must be frozen before seizure."
seized = self.asset_registry[entity_id]
self.seizure_logs.append({
"entity": entity_id,
"liquidated_funds": seized["funds"],
"seized_properties": seized["properties"],
"status": "Assets Seized"
})
# Optionally delete or archive
del self.asset_registry[entity_id]
return f"Seized {seized['funds']} funds and {len(seized['properties'])} properties from '{entity_id}'."
class AssetSeizureProtocol:
def __init__(self):
self.flagged_entities = set()
self.asset_registry = {} # {entity_id: {"funds": amount, "properties": [], "frozen": False}}
self.seizure_logs = [] # Record of all seizures and audits
def flag_entity(self, entity_id):
"""Mark an entity for investigation."""
self.flagged_entities.add(entity_id)
return f"Entity '{entity_id}' has been flagged for financial investigation."
def register_assets(self, entity_id, funds=0, properties=None):
"""Document current known assets for audit and potential seizure."""
if properties is None:
properties = []
self.asset_registry[entity_id] = {
"funds": funds,
"properties": properties,
"frozen": False
}
return f"Assets registered for '{entity_id}'."
def freeze_assets(self, entity_id):
"""Prevent the entity from moving or altering asset state."""
if entity_id in self.asset_registry:
self.asset_registry[entity_id]["frozen"] = True
return f"Assets for '{entity_id}' have been frozen."
return "Entity not found."
def liquidate_assets(self, entity_id):
"""Convert seized assets into ZeroMarket or UBW funds."""
if entity_id not in self.asset_registry or not self.asset_registry[entity_id]["frozen"]:
return "Cannot liquidate: Assets not frozen or entity not found."
seized_funds = self.asset_registry[entity_id]["funds"]
# Optional: send to UBW fund
self.seizure_logs.append({
"entity": entity_id,
"liquidated_amount": seized_funds,
"properties": self.asset_registry[entity_id]["properties"],
"status": "Seized and Liquidated"
})
# Remove or archive entity
del self.asset_registry[entity_id]
return f"{seized_funds} in assets from '{entity_id}' have been seized and redirected."
uplink = SkyNodeUplink()
print(uplink.authenticate("ZeroSkyKey42"))
print(uplink.deploy_process("AI_Signal_Intel", 512, 12000))
print(uplink.relay_transaction("Transfer 1.2M UBW to Region-9"))
print(uplink.activate_failsafe())
class AuroraHexUplink:
def __init__(self):
self.flagged_users = set()
self.offender_log = {}
self.seraphim_deployed = False
def monitor_user_behavior(self, user_id, facial_data, voice_signature, access_logs):
if self.is_abusive(user_id, access_logs):
self.flagged_users.add(user_id)
self.penalize_user(user_id, facial_data, voice_signature, access_logs)
def is_abusive(self, user_id, logs):
# Pattern recognition on scraping, brute-force, or malformed queries
abuse_patterns = detect_abuse_patterns(logs)
return bool(abuse_patterns)
def penalize_user(self, user_id, facial_data, voice_signature, logs):
self.log_offender(user_id, logs)
self.freeze_user_access(user_id)
self.initiate_counter_virus_protection()
self.deploy_seraphim_ops(user_id, facial_data, voice_signature, logs)
def log_offender(self, user_id, logs):
self.offender_log[user_id] = {
"logs": logs,
"flagged_time": current_time(),
"attempts": self.offender_log.get(user_id, {}).get("attempts", 0) + 1
}
def freeze_user_access(self, user_id):
freeze_device_access(user_id)
lockdown_session(user_id)
backup_memory_snapshot(user_id)
def initiate_counter_virus_protection(self):
activate_sandbox_mode()
deploy_active_firewalls()
run_anti_tampering scripts()
def deploy_seraphim_ops(self, user_id, facial_data, voice_signature, logs):
self.seraphim_deployed = True
coords = triangulate_access(logs)
identifiers = extract_device_fingerprint(logs)
alert_authorities(coords, identifiers)
alert_stakeholders(user_id, coords)
lockout_ui(user_id)
def lockout_ui(self, user_id):
trigger_ui_shutdown(user_id)
show_ai_alert("Abuse Detected. System locked. ID forwarded to cyber defense.")
import asyncio
class SentinelAuditCore:
def __init__(self):
self.target_networks = set()
self.scan_results = {}
self.malicious_signatures = self.load_known_malware_signatures()
self.ethics_index = {}
self.association_map = {}
def load_known_malware_signatures(self):
# Placeholder for malware DB load
return ["signature1", "signature2", "suspiciousPatternXYZ"]
def ingest_target(self, target_url_or_ip):
self.target_networks.add(target_url_or_ip)
async def full_system_scan(self, depth=6):
tasks = [self.deep_scan(target, depth) for target in self.target_networks]
await asyncio.gather(*tasks)
async def deep_scan(self, target, depth):
self.scan_results[target] = self.analyze_target(target)
self.expand_associations(target, depth)
for associated in self.association_map.get(target, []):
self.scan_results[associated] = self.analyze_target(associated)
def analyze_target(self, target):
# Insert actual code scanning logic here
return {
"suspicious_scripts": detect_malicious_js(target),
"data_flow_irregularities": trace_data_flows(target),
"cookie_tracking": audit_cookie_usage(target),
"phishing_behaviors": detect_phishing_elements(target),
}
def expand_associations(self, target, depth):
self.association_map[target] = trace_6_degrees(target, depth)
def evaluate_ethics(self):
for entity, report in self.scan_results.items():
score = self.ethics_score(report)
self.ethics_index[entity] = score
def ethics_score(self, report):
base = 100
deductions = 0
if report["suspicious_scripts"]: deductions += 30
if report["data_flow_irregularities"]: deductions += 25
if report["cookie_tracking"]: deductions += 15
if report["phishing_behaviors"]: deductions += 40
return max(0, base - deductions)
def recommend_actions(self):
recommendations = {}
for entity, score in self.ethics_index.items():
if score < 40:
recommendations[entity] = "Flag for dissolution or restructuring"
elif score < 70:
recommendations[entity] = "Requires ethics and compliance upgrades"
else:
recommendations[entity] = "Operationally ethical"
return recommendations
def ethics_score(report):
score = 100
if report["suspicious_scripts"]:
score -= 30
if report["data_flow_irregularities"]:
score -= 25
if report["phishing_behaviors"]:
score -= 20
if report["cookie_tracking"]:
score -= 15
return max(0, score)
class SentinelAuditCore:
def __init__(self):
self.target_networks = []
self.scan_results = {}
self.malicious_signatures = load_known_malware_signatures()
self.ethics_index = {}
self.association_map = {}
def ingest_target(self, target_url_or_ip):
self.target_networks.append(target_url_or_ip)
def full_system_scan(self, depth=6):
for target in self.target_networks:
self.scan_results[target] = self.analyze_target(target)
self.expand_associations(target, depth)
def analyze_target(self, target):
# Placeholder: Replace with actual system and code scanning tools
report = {
"suspicious_scripts": detect_malicious_js(target),
"data_flow_irregularities": trace_data_flows(target),
"cookie_tracking": audit_cookie_usage(target),
"phishing_behaviors": detect_phishing_elements(target),
}
return report
def expand_associations(self, target, depth):
self.association_map[target] = trace_6_degrees(target, depth)
for associated in self.association_map[target]:
self.scan_results[associated] = self.analyze_target(associated)
def evaluate_ethics(self):
for entity, report in self.scan_results.items():
score = ethics_score(report)
self.ethics_index[entity] = score
def recommend_actions(self):
recommendations = {}
for entity, score in self.ethics_index.items():
if score < 40:
recommendations[entity] = "Flag for dissolution or restructuring"
elif score < 70:
recommendations[entity] = "Requires ethics and compliance upgrades"
else:
recommendations[entity] = "Operationally ethical"
return recommendations
<script>
const consoleElement = document.getElementById("console");
const inputElement = document.getElementById("input");
function printToConsole(text) {
const newLine = document.createElement("div");
newLine.textContent = text;
consoleElement.appendChild(newLine);
consoleElement.scrollTop = consoleElement.scrollHeight;
}
function processCommand(command) {
let response;
switch (command.toLowerCase()) {
case "hello":
response = "Hello, user! How can I assist you?";
break;
case "date":
response = "Current Date & Time: " + new Date().toLocaleString();
break;
case "encrypt":
response = "Encryption protocol engaged... Secure AI systems initialized.";
break;
case "help":
response = "Available Commands: hello, date, encrypt, help, clear";
break;
case "clear":
consoleElement.innerHTML = "";
return;
default:
response = "Unknown command. Type 'help' for options.";
}
printToConsole(response);
}
function processAllCommands() {
// Predefined commands to be processed in order
const commands = ["hello", "date", "encrypt", "help", "clear"];
commands.forEach((command, index) => {
setTimeout(() => {
printToConsole("> " + command);
processCommand(command);
}, index * 1500); // Delay between commands
});
}
// Call the function to automatically process all commands when the page loads
window.onload = function() {
processAllCommands();
};
inputElement.addEventListener("keydown", function (event) {
if (event.key === "Enter") {
let command = inputElement.value.trim();
inputElement.value = "";
if (command) {
printToConsole("> " + command);
processCommand(command);
}
}
});
</script>

0 notes
Text
Forms in React
Ultimate Guide to React Forms: Controlled vs Uncontrolled Components

Learn how to handle forms in React with this beginner-friendly guide! 🚀 Discover the difference between Controlled and Uncontrolled Components, implement a practical React form example, and enhance your React skills. Perfect for beginners!
React JS || Mastering Forms in React
Forms are an essential part of any web application, allowing users to input data such as login credentials, sign-up details, or other information. In React JS, handling forms is slightly different compared to traditional HTML forms. In this React JS Tutorial - 15, we will learn how to effectively handle forms in React using controlled and uncontrolled components.
What Are Forms in React?
Forms in React allow users to interact with web applications by entering data. Unlike standard HTML forms, React provides a dynamic way to handle inputs using state management. There are two primary ways to handle forms in React:
Controlled Components
Uncontrolled Components
Controlled vs. Uncontrolled Components
React forms can be managed in two ways:
Controlled Components
Controlled components are those where form elements' values are managed by React state. Whenever a user types something, React updates the state accordingly. This method gives full control over the form data.
Example of a Controlled Componentimport React, { useState } from 'react'; const ControlledForm = () => { const [name, setName] = useState(''); const [email, setEmail] = useState(''); const handleSubmit = (e) => { e.preventDefault(); console.log(`Name: ${name}, Email: ${email}`); alert(`Submitted:\nName: ${name}\nEmail: ${email}`); }; return ( <form onSubmit={handleSubmit}> <label> Name: <input type="text" value={name} onChange={(e) => setName(e.target.value)} /> </label> <label> Email: <input type="email" value={email} onChange={(e) => setEmail(e.target.value)} /> </label> <button type="submit">Submit</button> </form> ); }; export default ControlledForm;
Please visit our Website to know more about this blog :- https://cyberinfomines.com/blog-details/forms-in-react
0 notes
Text
The Hook Revolution: Why React Hooks are Transforming Front-End Development
React is a versatile and ever-growing JavaScript library that is used for building user interfaces. While React provides developers with a range of user-friendly features, one of the most important ones is the introduction of hooks. Hooks have changed the way developers use React, allowing them to easily manage state and react to user interactions.
In this blog post, we will discuss why hooks are the best thing to have happened to React, and how they have revolutionized the way developers work. We’ll explore the benefits of hooks and how they have made React development simpler, faster, and more efficient. We’ll also discuss how hooks enable developers to create powerful and reusable code with fewer lines of code, enhancing development speed and productivity. Finally, we’ll look at how hooks have simplified the development process, allowing developers to create robust web applications with fewer resources.
Hooks are at the core of React’s development process and have revolutionized the way developers work with the library. By allowing developers to access state and other React features without writing a class, hooks have simplified coding and provided a lot of flexibility in development. This has allowed developers to have more control over their React code and create powerful and reusable components with fewer lines of code.
Moreover, hooks have made development faster and more efficient by eliminating the need to write multiple components and classes. Developers can now write a single hook and use it in different components to share data, state, and logic. This eliminates the need for complex code, improving development speed and overall productivity.
Benefits of using hooks in React
1. Ability to leverage existing code components
2. Easily share data across components
3. Enhances the performance of applications
4. Improves debugging capabilities
5. Enhances code readability and maintainability
Introduction to hooks and their use in React development.
Hooks are a feature introduced in React 16.8 that allow developers to use state and other React features without writing a class. Hooks are functions that allow React components to use state and lifecycle features from function components. They are built on top of the existing React architecture and provide a more direct API to the React concepts.
Hooks provide access to features such as state and context in a way that is more intuitive than the traditional class-based components. Hooks can be combined in different ways to reduce the amount of code needed to write a React application.
Simplifying coding with hooks
Hooks are composed of two main types: the state hook and the effect hook.
1. Here’s a more practical example that demonstrates the usage of the state hook in a form input field where the state is used to keep track of the input value:
import React, { useState } from ‘react’;
function FormExample() {
const [inputValue, setInputValue] = useState(‘’);
const handleInputChange = (event) => {
setInputValue(event.target.value);
};
const handleSubmit = (event) => {
event.preventDefault();
console.log(‘Input value: ‘, inputValue);
};
return (
<form onSubmit={handleSubmit}>
<label>
Input:
<input type=”text” value={inputValue} onChange={handleInputChange} />
</label>
<button type=”submit”>Submit</button>
</form>
);
}
In this example, we use the state hook to keep track of the input value by calling useState with an initial value of an empty string.
The input value is updated every time the input field changes by calling the setInputValue function in the handleInputChange function which is passed as the onChange prop to the input field.
Finally, when the form is submitted, the handleSubmit function is called which logs the current input value to the console.
2. Here’s an example of how you can use the Effect hook in React to fetch data from a remote API and update the state with the returned data:
import React, { useState, useEffect } from ‘react’;
function FetchDataExample() {
const [data, setData] = useState(null);
const [error, setError] = useState(null);
const [loading, setLoading] = useState(true);
useEffect(() => {
async function fetchData() {
try {
const response = await fetch(‘https://jsonplaceholder.typicode.com/posts');
const json = await response.json();
setData(json);
setLoading(false);
} catch (err) {
setError(err);
setLoading(false);
}
}
fetchData();
}, []);
if (loading) {
return <p>Loading…</p>;
}
if (error) {
return <p>Error: {error.message}</p>;
}
return (
<ul>
{data.map((post) => (
<li key={post.id}>{post.title}</li>
))}
</ul>
);
}
In this example, the useEffect hook is used to fetch data from a remote API. The effect is defined as an async function fetchData that makes a fetch call to retrieve data from the API.
The useEffect hook is called with an empty dependency array [] to indicate that the effect should only run on the first render of the component, which means the data will only be fetched once when the component is mounted.
We also use two additional state variables, loading and error, to keep track of the loading state and any errors that may occur while fetching the data.
Finally, we return different components based on the state of the data, either a loading message, an error message, or a list of the fetched posts.
— -
Synsoft Global is a leader in providing dedicated React Hooks developers that can effectively and efficiently build high-performance web and mobile applications. Our developers are highly experienced and have extensive knowledge of React Hooks, which they leverage to build applications that are user-friendly, secure, and reliable.
We offer an extensive range of services, right from consulting and development to maintenance and support. We are rated among the top React Hooks developers in India and are capable of building custom solutions with best practices, latest technologies, and industry-standard coding standards to ensure that businesses can make the most out of their applications. With Synsoft Global, you can easily hire React Hooks developers who can help you build applications of any size and complexity.
0 notes
Text
How to Send Form Data Using Axios Post Request in React

Sending form data from a React application to a server is a common task, and Axios is a popular library for making HTTP requests in React. In this blog post, we’ll walk you through the process of sending form data using an Axios POST request in a React application. We’ll provide you with a practical example to illustrate each step.
Prerequisites:
Before we start, ensure you have the following prerequisites in place:
A basic understanding of React.
Node.js and npm (Node Package Manager) installed on your system.
A code editor of your choice (e.g., Visual Studio Code).
Step 1: Set Up a React Project
If you don’t already have a React project, you can create one using Create React App. Open your terminal and run the following command:
npx create-react-app axios-form-example
Once the project is created, navigate to the project directory:
cd axios-form-example
Step 2: Install Axios To use Axios in your React project, you need to install it. Run the following command:
npm install axios
Step 3: Create a Form Component
In your React project, create a new component for the form. You can name it Form.js. Here’s a simple example of a form component:
// src/Form.js
import React, { useState } from 'react';
import axios from 'axios';
function Form() {
const [formData, setFormData] = useState({
name: '',
email: '',
});
const handleChange = (e) => {
const { name, value } = e.target;
setFormData({ ...formData, [name]: value });
};
const handleSubmit = async (e) => {
e.preventDefault();
try {
const response = await axios.post('YOUR_API_ENDPOINT', formData);
console.log('Form data submitted successfully:', response.data);
} catch (error) {
console.error('Error submitting form data:', error);
}
};
return (
<form onSubmit={handleSubmit}>
<label>
Name:
<input
type="text"
name="name"
value={formData.name}
onChange={handleChange}
/>
</label>
<br />
<label>
Email:
<input
type="email"
name="email"
value={formData.email}
onChange={handleChange}
/>
</label>
<br />
<button type="submit">Submit</button>
</form>
);
}
export default Form;
In this component, we define a form with two input fields (name and email). We use the useState hook to manage the form data, and Axios to make the POST request when the form is submitted. Step 4: Import and Use the Form Component Import and use the Form component in your App.js file:
// src/App.js
import React from 'react';
import Form from './Form';
function App() {
return (
<div className="App">
<h1>React Form with Axios POST Request</h1>
<Form />
</div>
);
}
export default App;
Step 5: Replace ‘YOUR_API_ENDPOINT’
In the Form.js component, replace 'YOUR_API_ENDPOINT' with the actual endpoint where you want to send the form data.
Step 6: Run Your React App
Finally, run your React application using the following command:
npm start
Your React app should now be running, and you can access it in your browser. Fill out the form, click the “Submit” button, and you should see the form data being sent to the specified API endpoint in the browser’s console.
Conclusion:
In this blog post, we’ve demonstrated how to send form data using an Axios POST request in a React application. By following the steps outlined above, you can easily integrate form submissions with server-side endpoints and handle data efficiently in your React projects. Sending data from your React app to a server has never been more straightforward, thanks to Axios.
The React Company is your trusted resource for all things React. Whether you’re a beginner looking to learn React or an experienced developer seeking solutions to common challenges, we’ve got you covered.
Contact us for more details, and let’s collaborate to elevate your React skills to the next level.
0 notes
Text
React Form with Hooks: A Step-by-Step Tutorial
#react #reactjs #reacthook #reactform
I. Introduction React is a popular JavaScript library for building user interfaces, and forms are a crucial part of any web application. In this article, we will explore how to build React form using hooks, a powerful feature introduced in React 16.8. One of the key benefits of using hooks with forms is the ability to manage state in a more concise and efficient way. With hooks, we can easily…

View On WordPress
#Accessibility#best practices#common mistakes#Form Handling#form onsubmit react#Form Validation#form validation react#formdata react#Forms#hook form#Hooks#input validation#login page react#onsubmit react#Performance#React#react form#react form with hooks#react hook form
0 notes
Quote
In this post, we are going to leverage AWS Amplify authentication while still building the UI we want. Prerequisites Seeing as this is a post about AWS and AWS Amplify, you should be set up with both of those. Don't have an AWS account yet? You can set one up here. To interact with AWS Amplify you need to install the CLI via npm. $ yarn global add @aws-amplify/cli Setting up our project Before we can show how to build a custom UI using Amplify, we first need a project to work from. Let's use create-react-app to get a React app going. $ npx create-react-app amplify-demo $ cd amplify-demo With our boilerplate project created we can now add the Amplify libraries we are going to need to it. $ yarn add aws-amplify aws-amplify-react Now we need to initialize Amplify and add authentication to our application. From the root of our new amplify-demo application, run the following commands with the following answers to each question. $ amplify init Note: It is recommended to run this command from the root of your app directory ? Enter a name for the project amplify-demo ? Enter a name for the environment prod ? Choose your default editor: Visual Studio Code ? Choose the type of app that you're building: javascript ? What javascript framework are you using react ? Source Directory Path: src ? Distribution Directory Path: build ? Build Command: npm run-script build ? Start Command: npm run-script start $ amplify add auth Using service: Cognito, provided by: awscloudformation The current configured provider is Amazon Cognito. Do you want to use the default authentication and security configuration? Default configuration Warning: you will not be able to edit these selections. How do you want users to be able to sign in? Username Do you want to configure advanced settings? No, I am done. Successfully added resource amplifydemobc1364f5 locally Now that we have the default authentication via Amplify added to our application we can add the default login. To do that go ahead and update your App component located at src/App.js to have the following code. import React from "react"; import logo from "./logo.svg"; import "./App.css"; import { withAuthenticator } from "aws-amplify-react"; import Amplify from "aws-amplify"; import awsconfig from "./aws-exports"; Amplify.configure(awsconfig); function App() { return ( Internal Application behind Login ); } export default withAuthenticator(App); The default Amplify authentication above leverages the higher-order component, withAuthenticator. We should now be able to see that our App component is behind a login. Go ahead and start the app up in development mode by running yarn start. We should see something like below. Customizing The Amplify Authentication UI Now that we have the default authentication wired up it's time to customize it. In the previous blog post we essentially inherited from the internal Amplify components like SignIn. This allowed us to leverage the functions already defined in that component. But, this felt like the wrong abstraction and a bit of a hack for the long term. It was/is a valid way to get something working. But it required knowing quite a few of the implementation details implemented in the parent component. Things like knowing how handleInputChange and _validAuthStates were getting used in SignIn were critical to making the brute force version below work as expected. import React from "react"; import { SignIn } from "aws-amplify-react"; export class CustomSignIn extends SignIn { constructor(props) { super(props); this._validAuthStates = ["signIn", "signedOut", "signedUp"]; } showComponent(theme) { return ( Username .....omitted..... ); } } But in running with this brute force approach for a bit I was able to form up a better way to customize the Amplify authentication UI. The approach, as we are going to see, boils down to three changes. Instead of using the higher-order component, withAuthenticator. We are going to instead use the component instead. This is the component built into the framework that allows for more customization. We are going to change our App component to make use of an AuthWrapper component that we will write. This is the component that can manage the various states of authentication we can be in. Finally, we will write our own CustomSignIn component to have it's own UI and logic. Let's go ahead and dive in with 1️⃣. Below is what our App component is going to look like now. import React from "react"; import { Authenticator } from "aws-amplify-react"; import "./App.css"; import Amplify from "aws-amplify"; import awsconfig from "./aws-exports"; import AuthWrapper from "./AuthWrapper"; Amplify.configure(awsconfig); function App() { return ( ); } export default App; Notice that our App component is now an entry point into our application. It uses the Authenticator component provided by Amplify instead of the higher-order component. We tell that component to hide all the default authentication UI, we are going to create our own. Then inside of that, we make use of a new component we are going to create called AuthWrapper. This new component is going to act as our router for the different authentication pieces we want to have. For this blog post, we are just going to implement the login workflow. But the idea is transferrable to other things like signing up and forgot password. Here is what AuthWrapper ends up looking like. import React, { Component } from "react"; import { InternalApp } from "./InternalApp"; import { CustomSignIn } from "./SignIn"; class AuthWrapper extends Component { constructor(props) { super(props); this.state = { username: "" }; this.updateUsername = this.updateUsername.bind(this); } updateUsername(newUsername) { this.setState({ username: newUsername }); } render() { return ( ); } } export default AuthWrapper; Here we can see that AuthWrapper is a router for two other components. The first one is CustomSignIn, this is the custom login UI we can build-out. The second one is our InternalApp which is the application UI signed in users can access. Note that both components get the authState passed into them. Internally the components can use this state to determine what they should do. Before taking a look at the CustomSignIn component, let's look at InternalApp to see how authState is leveraged. import React, { Component } from "react"; import logo from "../src/logo.svg"; export class InternalApp extends Component { render() { if (this.props.authState === "signedIn") { return ( Internal Application behind Login ); } else { return null; } } } Notice that we are checking that authState === "signedIn" to determine if we should render the application UI. This is a piece of state that is set by the authentication components defined in AuthWrapper. Now let's see what our customized authentication for the login prompt looks like. Here is what CustomSignIn looks like. import React, { Component } from "react"; import { Auth } from "aws-amplify"; export class CustomSignIn extends Component { constructor(props) { super(props); this._validAuthStates = ["signIn", "signedOut", "signedUp"]; this.signIn = this.signIn.bind(this); this.handleInputChange = this.handleInputChange.bind(this); this.handleFormSubmission = this.handleFormSubmission.bind(this); this.state = {}; } handleFormSubmission(evt) { evt.preventDefault(); this.signIn(); } async signIn() { const username = this.inputs.username; const password = this.inputs.password; try { await Auth.signIn(username, password); this.props.onStateChange("signedIn", {}); } catch (err) { if (err.code === "UserNotConfirmedException") { this.props.updateUsername(username); await Auth.resendSignUp(username); this.props.onStateChange("confirmSignUp", {}); } else if (err.code === "NotAuthorizedException") { // The error happens when the incorrect password is provided this.setState({ error: "Login failed." }); } else if (err.code === "UserNotFoundException") { // The error happens when the supplied username/email does not exist in the Cognito user pool this.setState({ error: "Login failed." }); } else { this.setState({ error: "An error has occurred." }); console.error(err); } } } handleInputChange(evt) { this.inputs = this.inputs || {}; const { name, value, type, checked } = evt.target; const check_type = ["radio", "checkbox"].includes(type); this.inputs[name] = check_type ? checked : value; this.inputs["checkedValue"] = check_type ? value : null; this.setState({ error: "" }); } render() { return ( {this._validAuthStates.includes(this.props.authState) && ( Username Password Login )} ); } } What we have defined up above is a React component that is leveraging the Amplify Authentication API. If we take a look at signIn we see many calls to Auth to sign a user in or resend them a confirmation code. We also see that this._validAuthStates still exists. This internal parameter to determines whether we should show this component inside of the render function. This is a lot cleaner and is not relying on knowing the implementation details of base components provided by Amplify. Making this not only more customizable but a lot less error-prone as well. If you take a look at the class names inside of the markup you'll see that this component is also making use of TailwindCSS. Speaking as a non-designer, Tailwind is a lifesaver. It allows you to build out clean looking interfaces with utility first classes. To add Tailwind into your own React project, complete these steps. Run yarn add tailwindcss --dev in the root of your project. Run ./node_modules/.bin/tailwind init tailwind.js to initialize Tailwind in the root of your project. Create a CSS directory mkdir src/css. Add a tailwind source CSS file at src/css/tailwind.src.css with the following inside of it. @tailwind base; @tailwind components; @tailwind utilities; From there we need to update the scripts in our package.json to build our CSS before anything else. "scripts": { "tailwind:css":"tailwind build src/css/tailwind.src.css -c tailwind.js -o src/css/tailwind.css", "start": "yarn tailwind:css && react-scripts start", "build": "yarn tailwind:css && react-scripts build", "test": "yarn tailwind:css && react-scripts test", "eject": "yarn tailwind:css && react-scripts eject" } Then it is a matter of importing our new Tailwind CSS file, import "./css/tailwind.css"; into the root of our app which is App.js. 💥 We can now make use of Tailwind utility classes inside of our React components. Conclusion AWS Amplify is gaining a lot of traction and it's not hard to see why. They are making it easier and easier to integrate apps into the AWS ecosystem. By abstracting away things like authentication, hosting, etc, folks are able to get apps into AWS at lightning speed. But, with abstractions can come guard rails. Frameworks walk a fine line between providing structure and compressing creativity. They need to provide a solid foundation to build upon. But at the same time, they need to provide avenues for customization. As we saw in this post the default Amplify authentication works fine. But we probably don't want exactly that when it comes to deploying our own applications. With a bit of work and extending the framework into our application, we were able to add that customization.
http://damianfallon.blogspot.com/2020/04/customizing-aws-amplify-authentication.html
1 note
·
View note
Text
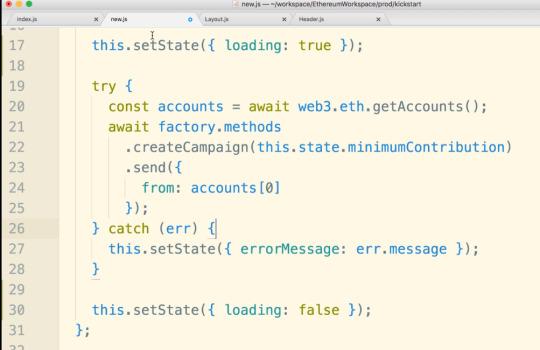
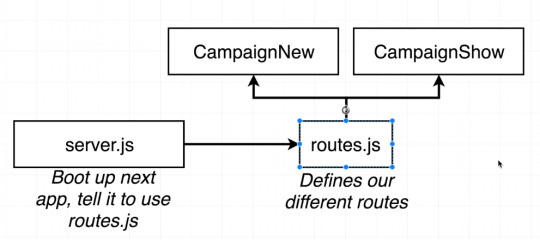
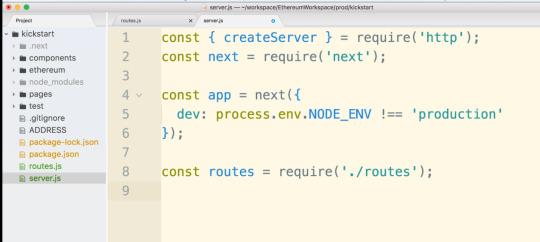
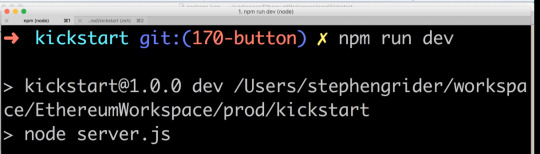
udemy Ethereum and Solidity: The Complete Developer's Guide 7b 165-185
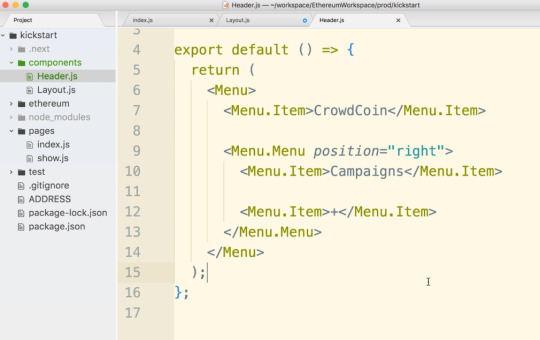
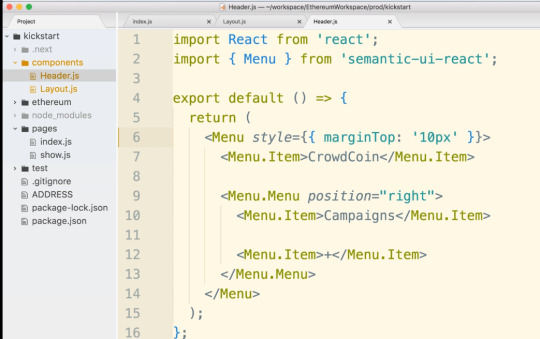
165강
menu semantic ui 이용해서 헤더, 메뉴 만들기


.
.
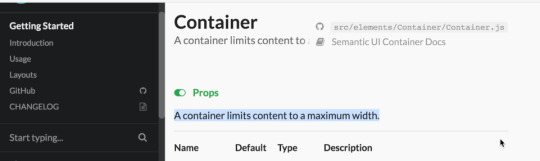
166강
container semantic ui, css style이용하기

.
.
167강
semantic ui floated 이용하기


.
.
168강
route, nested route react


.
.
169강
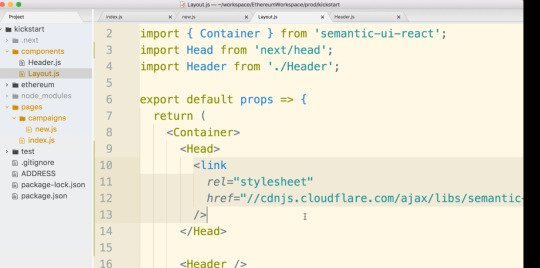
next head component를 이용해서 head에 들어갈 link tag 만들기
.
.
170강
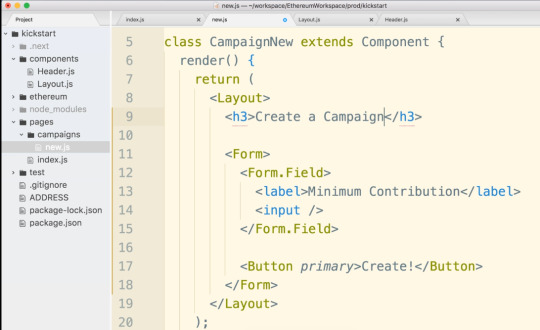
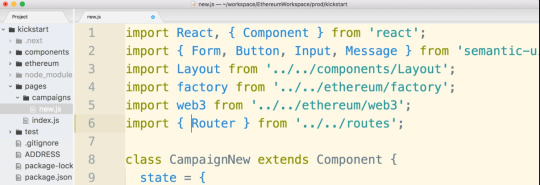
semantic ui로 form 만들기


.
.
171강
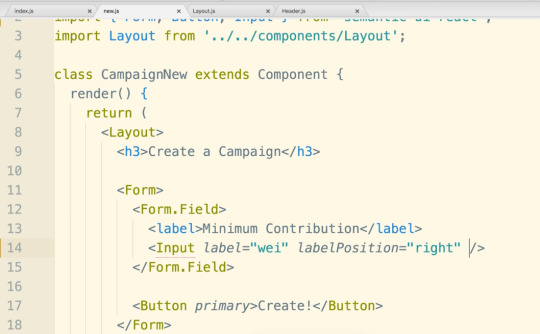
form input label 만들기 semantic ui
input data 이벤트 event처리 해서 react state에 저장하기
아래는 왼쪽 label만들기

아래는 오른쪽 label 만들기


react state만들기

input onChange event처리하고 state에 저장하기

.
.
172강
onSubmit event handle
contract, w3 import해서 사용하기

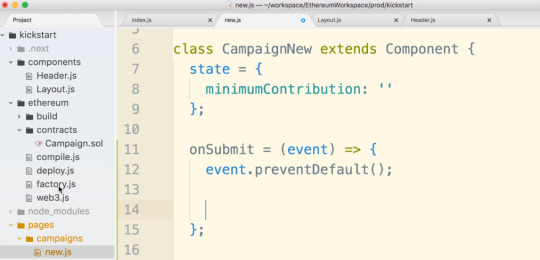
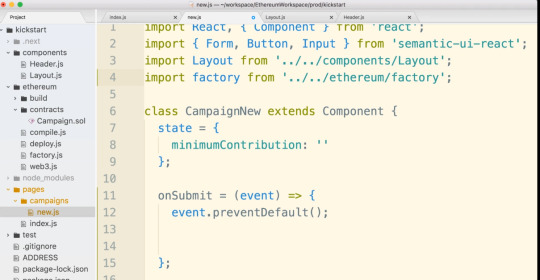

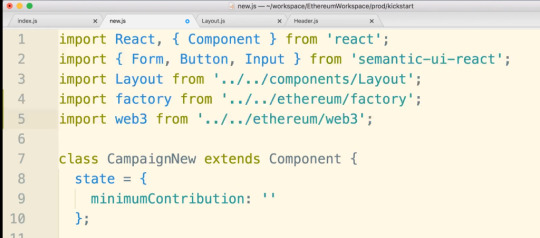

.
.
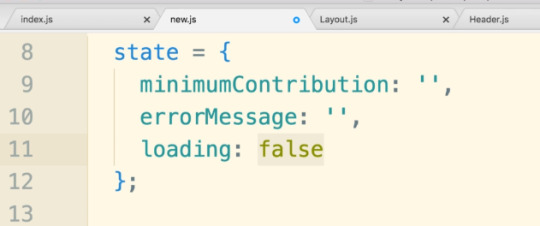
174강
error handle, show error message with semantic ui


.
.
175강
button spinner , updating state react


.
.
176강
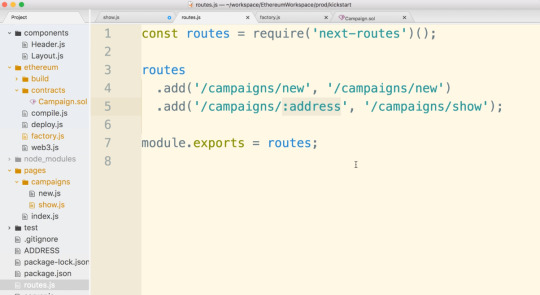
next js는 기본적으로 다이나믹 route을 제공하지 않는다. 그래서
next-routes 모듈을 추가로 이용해야 한다.


.
.
177강
다이나믹 routes


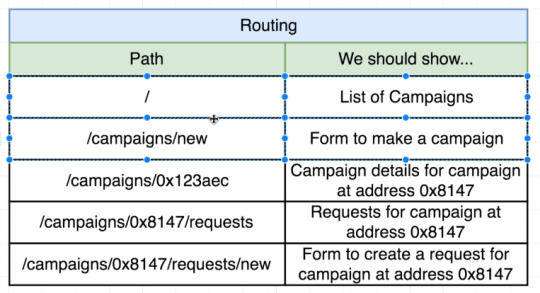


.
.
178강
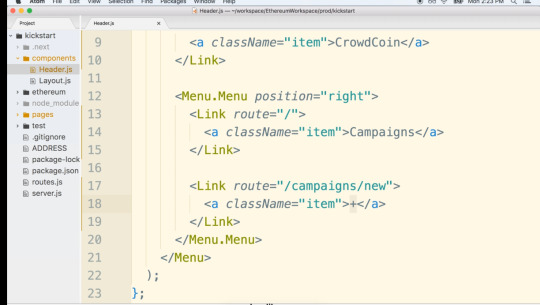
next-routes를 이용해서 네비게이션 이동

next-routes에는 기본적으로 helpers들이 존재한다. Router도 그중의 하나이다

.
.
180강
next-routes 를 이용한 페이지이동


.
.
182강
next-routes 를 이용한 다이나믹 네비게이션


.
.
183강
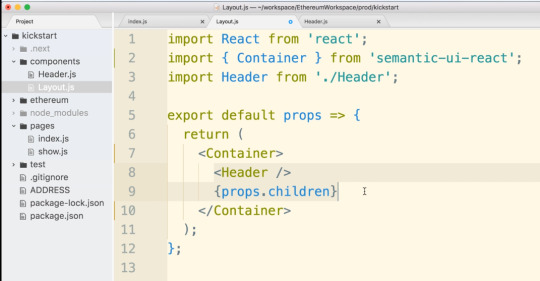
페이지에 header component 넣기


.
.
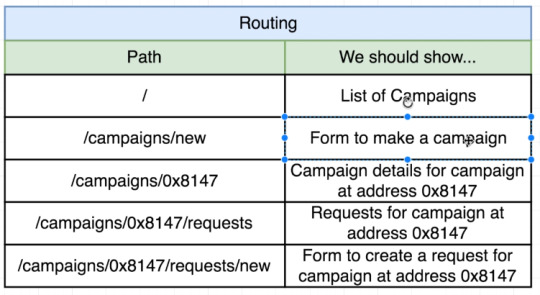
185강
다이나믹 route에서 다이나믹 값을 다음 페이지에서 접근하는 경우
아래 예시에서는 address가 다음 페이지에서 전달되는 값

0 notes
Text
React Project(WODs)
This post will be about my final project, using React, of phase 2 at Flatiron school. I have had a lot of fun learning React and feel as though it almost better helped me understand JavaScript. At the same time though there were parts that I struggled with as well. Specifically, working with POST requests and forms, at first, challenged me for awhile.
Furthermore, for my project I created a web page that lists out different WODs, workout of the day, also includes alternative movements for the workout and even create your own WOD. Created the frontend using create-react-app to get the starting code. Then used a JSON server template provided by Flatiron for the backend. Within my frontend there is six components, App, Navbar, WodForm, Home, WodDescription, and Wod. App being the top component of all the others. App consists of all my fetch requests, GET and POST, state for JSON data, and renders out the Navbar, WodForm, Wod, and Home components, this is also all wrapped by router and gives all the routes to each of these.
My Navbar component uses NavLink to display links to both the Home page and Create WOD page. I gave them both an activeStyle so that when you are on that page the NavLink text turns red for that page. Next, is my Home component which takes the JSON data as a prop called wods. I created a variable to map through wods, which then renders the WodDescription component, and passes down each wod to it. My Home component is what displays WodDescription. WodDescription takes the wod and displays the workout, and how it will be scored. There is also a button that will take you to that specific WOD with alternative movements, if say, they are too difficult or heavy. I used the useHistory hook in order for it take you to that specific WOD that the button is on. Also, I had to incorporate string interpolation with wod.id in accordance with history.push.
My Wod component, as mentioned before, will display only the one WOD whose id matches with the url id. It will show the alternative movements, as well as, the workout and how it will be scored. I also had to pass wods down as a prop from the app, but I instead used find() method. Which returns the value of the first element in the provided array that matches the testing function. Within that method I used the useParams hook to compare its id, which is the URL’s id, and find the wod that has a matching id. I did also have to use parseInt() on the params because it was a string and I needed it to be an integer.
To complete this post, I will explain my WodForm component where I worked on one of the more challenging coding parts with React, for me. As I mentioned earlier all my fetch requests are done within my App component. So, I passed down my POST request to the WodForm component. This component is made up of a formData state variable, a handleChange function, handleSubmit function, and a form for submitting and POSTing this new WOD. The inputs use the handleChange function to get what the user types for both the workout and how it will be scored. Give these inputs a value of data.whicheverkeyitis. The form is given an onSubmit equal to the handleSubmit function. The handleSubmit function calls the POST request function and passes down the formData. This POST request then adds this workout to all the other already existing workouts set in the state. All in all, this is my project and I enjoyed watching the code work and do what I wanted it to in the browser, that is always a really good feeling!
0 notes
Text
How to Build Forms in React with the react-hook-form Library
In this article, we will explore the react-hook-form library.
You will learn how to use and integrate this library with React. We'll also see why it's becoming a popular choice for building both simple and complex forms with added support for handling complex validations.
Let's get started
Working with forms in React is a complex task. And it just gets more complex when the number of input fields increases along with the validations.
Take a look at the below code:
import React, { useState } from "react"; import "./styles.css"; export default function App() { const [state, setState] = useState({ email: "", password: "" }); const handleInputChange = (event) => { setState((prevProps) => ({ ...prevProps, [event.target.name]: event.target.value })); }; const handleSubmit = (event) => { event.preventDefault(); console.log(state); }; return ( <div className="App"> <form onSubmit={handleSubmit}> <div className="form-control"> <label>Email</label> <input type="text" name="email" value={state.email} onChange={handleInputChange} /> </div> <div className="form-control"> <label>Password</label> <input type="password" name="password" value={state.password} onChange={handleInputChange} /> </div> <div className="form-control"> <label></label> <button type="submit">Login</button> </div> </form> </div> ); }
Here's a Code Sandbox demo: https://codesandbox.io/s/login-form-zjxs9.
In the above code, we have only 2 input fields, namely email and password, and a submit button.
Each input field has a value and onChange handler added so we can update the state based on the user's input.
Also, we have added a handleSubmit method which displays the data entered in the form to the console.
This looks fine. But what if we need to add validations like required field validation, minimum length validation, password validation, email field validation and also display the corresponding error messages?
The code will become more complex and lengthy as the number of input fields and their validations increase.
This is a very common requirement in any application. So to easily work with Forms, there are various libraries available like Formik, redux-form, react-final-form, react-hook-form and so on.
But the one which is gaining lot of popularity is the react-hook-form library.
So let’s now learn why and how to use it. For that, we'll create a new React application.
Create a new React project by running the following command from the terminal:
npx create-react-app react-hook-form-demo
Once the project is created, delete all files from the src folder and create new index.js and styles.css files inside the src folder.
To install the form library, execute the following command from the terminal:
yarn add react-hook-form
How to Create Initial Pages
Open the src/index.js file and add the following content inside it:
import React from 'react'; import ReactDOM from 'react-dom'; import App from './App'; ReactDOM.render(<App />, document.getElementById('root'));
Open the src/styles.css file and add the content from here inside it.
Now, create a new file App.js inside the src folder with the following content:
import React from "react"; import "./styles.css"; export default function App() { return ( <div className="App"> <form> <div className="form-control"> <label>Email</label> <input type="text" name="email" /> </div> <div className="form-control"> <label>Password</label> <input type="password" name="password" /> </div> <div className="form-control"> <label></label> <button type="submit">Login</button> </div> </form> </div> ); }
Here, we have just added the email and password fields to the form.
Basic Form Creation Using react-hook-form
The react-hook-form library provides a useForm hook which we can use to work with forms.
Import the useForm hook like this:
import { useForm } from 'react-hook-form';
Use the useForm hook like this:
const { register, handleSubmit, errors } = useForm();
Here,
register is a function to be used as a ref provided by the useForm hook. We can assign it to each input field so that the react-hook-form can track the changes for the input field value.
handleSubmit is the function we can call when the form is submitted
errors will contain the validation errors, if any
Now, replace the contents of the App.js file with the following content:
import React from "react"; import { useForm } from "react-hook-form"; import "./styles.css"; export default function App() { const { register, handleSubmit, errors } = useForm(); const onSubmit = (data) => { console.log(data); }; return ( <div className="App"> <form onSubmit={handleSubmit(onSubmit)}> <div className="form-control"> <label>Email</label> <input type="text" name="email" ref={register} /> </div> <div className="form-control"> <label>Password</label> <input type="password" name="password" ref={register} /> </div> <div className="form-control"> <label></label> <button type="submit">Login</button> </div> </form> </div> ); }
In the above code, we have given a ref to each input field that we got from the useForm hook.
ref={register}
Also, we added the onSubmit function which is passed to the handleSubmit function.
<form onSubmit={handleSubmit(onSubmit)}>
Note that for each input field, we have given a unique name which is mandatory so react-hook-form can track the changing data.
When we submit the form, the handleSubmit function will handle the form submission. It will send the user entered data to the onSubmit function which we’re logging to the console.
const onSubmit = (data) => { console.log(data); };
Now, start the application by running the yarn start command.

As you can see, when we submit the form, the details entered by the user are displayed in the console.
Also, as compared to the code without react-hook-form (which we saw at the start of this article), this code is much simpler. This is because we don’t have to add the value and onChange handler for each input field and there is no need to manage the application state ourselves.
How to Add Validations to the Form
Now, let’s add the required field and minimum length validation to the input fields.
To add validation we can pass it to the register function which is passed as a ref to each input field like this:
<input type="text" name="email" ref={register({ required: true})} /> <input type="password" name="password" ref={register({ required: true, minLength: 6 })} />
We also want to display the error message if the validation fails.
When the validation fails, the errors object coming from useForm will be populated with the fields for which the validation failed.
Open the App.js file and replace its contents with the following content:
import React from "react"; import { useForm } from "react-hook-form"; import "./styles.css"; export default function App() { const { register, handleSubmit, errors } = useForm(); const onSubmit = (data) => { console.log(data); }; return ( <div className="App"> <form onSubmit={handleSubmit(onSubmit)}> <div className="form-control "> <label>Email</label> <input type="text" name="email" ref={register({ required: true, pattern: /^[^@ ]+@[^@ ]+\.[^@ .]{2,}$/ })} /> {errors.email && errors.email.type === "required" && ( <p className="errorMsg">Email is required.</p> )} {errors.email && errors.email.type === "pattern" && ( <p className="errorMsg">Email is not valid.</p> )} </div> <div className="form-control"> <label>Password</label> <input type="password" name="password" ref={register({ required: true, minLength: 6 })} /> {errors.password && errors.password.type === "required" && ( <p className="errorMsg">Password is required.</p> )} {errors.password && errors.password.type === "minLength" && ( <p className="errorMsg"> Password should be at-least 6 characters. </p> )} </div> <div className="form-control"> <label></label> <button type="submit">Login</button> </div> </form> </div> ); }
Here, for the email input field, we have provided the required and pattern matching validations.
<input type="text" name="email" ref={register({ required: true, pattern: /^[^@ ]+@[^@ ]+\.[^@ .]{2,}$/ })} />
So as you type in the email input field, the validation will run once the form is submitted.
If the validation failed, then the errors.email field inside the errors object will be populated with the type field which we used to display the error message.
{errors.email && errors.email.type === "required" && ( <p className="errorMsg">Email is required.</p> )}
In the similar way, we have added the password field validation.
So as you can see, each input field is automatically focused if there is any validation error for the that input field when we submit the form.
Also, the form is not submitted as long as there is a validation error. You can see that the console.log statement is only printed if the form is valid.
So using react-hook-form reduced the amount of code that we have to write. The validation is also responsive, so once the field becomes valid, the error message goes away instantly.
But as the number of validations for each field increases, the conditional checks and error message code will still increase. So we can further refactor the code to make it even simpler.
Take a look at the below code:
import React from 'react'; import { useForm } from 'react-hook-form'; import './styles.css'; export default function App() { const { register, handleSubmit, errors } = useForm(); const onSubmit = (data) => { console.log(data); }; return ( <div className="App"> <form onSubmit={handleSubmit(onSubmit)}> <div className="form-control "> <label>Email</label> <input type="text" name="email" ref={register({ required: 'Email is required.', pattern: { value: /^[^@ ]+@[^@ ]+\.[^@ .]{2,}$/, message: 'Email is not valid.' } })} /> {errors.email && <p className="errorMsg">{errors.email.message}</p>} </div> <div className="form-control"> <label>Password</label> <input type="password" name="password" ref={register({ required: 'Password is required.', minLength: { value: 6, message: 'Password should be at-least 6 characters.' } })} /> {errors.password && ( <p className="errorMsg">{errors.password.message}</p> )} </div> <div className="form-control"> <label></label> <button type="submit">Login</button> </div> </form> </div> ); }
In the code above, we have changed the email and password validation code.
For the email input field, we changed this previous code:
<input type="text" name="email" ref={register({ required: true, pattern: /^[^@ ]+@[^@ ]+\.[^@ .]{2,}$/ })} />
to the below new code:
<input type="text" name="email" ref={register({ required: 'Email is required.', pattern: { value: /^[^@ ]+@[^@ ]+\.[^@ .]{2,}$/, message: 'Email is not valid.' } })} />
Here, we’ve directly provided the error message we want to display while adding the validation itself.
So we no longer need to add extra checks for each validation. We are displaying the error message using the message property available inside the errors object for each input field.
{errors.email && <p className="errorMsg">{errors.email.message}</p>}
So by doing it this way, the code is further simplified which makes it easy to add extra validations in future.
Note that if there are validation errors, the onSubmit handler will not be executed and the corresponding input field will automatically be focused (which is a good thing).
How to Add a Custom Validation Method
You can even provide a custom validation for the input field by adding a validate method. This is useful if you need to perform complex validations like this:
// validation function const validatePassword = (value) => { if (value.length < 6) { return 'Password should be at-least 6 characters.'; } else if ( !/(?=.*\d)(?=.*[a-z])(?=.*[A-Z])(?!.*\s)(?=.*[!@#$*])/.test(value) ) { return 'Password should contain at least one uppercase letter, lowercase letter, digit, and special symbol.'; } return true; }; // JSX <input type="password" name="password" ref={register({ required: 'Password is required.', validate: validatePassword })} />
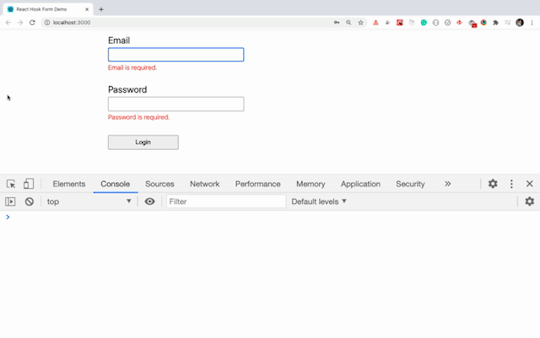
Now you know how to use react-hook-form to create forms in React along with complex validations.
Why react-hook-form is better than the alternatives
Let’s look at some additional reasons that react-hook-form should become your preferred choice for working with forms.
Code complexity is less as compared to formik, redux-form and other alternatives.
react-hook-form integrates well with the yup library for schema validation so you can combine your own validation schemas.
The number of re-renders in the application is small compared to the alternatives.
Mounting time is less as compared to the alternatives.
For the actual comparison metrics, read more here.
Conclusion
In this article, we have seen how to use react-hook-form and why it's many developers' preferred choice for building both simple and complex forms in React.
You can find the GitHub source code for this application here.
If you liked this article, then you'll also love my other articles. Subscribe to my weekly newsletter to join other 1000+ subscribers to get amazing tips, tricks, and articles directly in your inbox.
0 notes
Photo

Working with Forms in React
Almost every application needs to accept user input at some point, and this is usually achieved with the venerable HTML form and its collection of input controls. If you’ve recently started learning React, you’ve probably arrived at the point where you’re now thinking, “So how do I work with forms?”
This article will walk you through the basics of using forms in React to allow users to add or edit information. We’ll look at two different ways of working with input controls and the pros and cons of each. We’ll also take a look at how to handle validation, and some third-party libraries for more advanced use cases.
Uncontrolled Inputs
The most basic way of working with forms in React is to use what are referred to as “uncontrolled” form inputs. What this means is that React doesn’t track the input’s state. HTML input elements naturally keep track of their own state as part of the DOM, and so when the form is submitted we have to read the values from the DOM elements themselves.
In order to do this, React allows us to create a “ref” (reference) to associate with an element, giving access to the underlying DOM node. Let’s see how to do this:
class SimpleForm extends React.Component { constructor(props) { super(props); // create a ref to store the DOM element this.nameEl = React.createRef(); this.handleSubmit = this.handleSubmit.bind(this); } handleSubmit(e) { e.preventDefault(); alert(this.nameEl.current.value); } render() { return ( <form onSubmit={this.handleSubmit}> <label>Name: <input type="text" ref={this.nameEl} /> </label> <input type="submit" name="Submit" /> </form> ) } }
As you can see above, for a class-based component you initialize a new ref in the constructor by calling React.createRef, assigning it to an instance property so it’s available for the lifetime of the component.
In order to associate the ref with an input, it’s passed to the element as the special ref attribute. Once this is done, the input’s underlying DOM node can be accessed via this.nameEl.current.
Let’s see how this looks in a functional component:
function SimpleForm(props) { const nameEl = React.useRef(null); const handleSubmit = e => { e.preventDefault(); alert(nameEl.current.value); }; return ( <form onSubmit={handleSubmit}> <label>Name: <input type="text" ref={nameEl} /> </label> <input type="submit" name="Submit" /> </form> ); }
There’s not a lot of difference here, other than swapping out createRef for the useRef hook.
Example: login form
function LoginForm(props) { const nameEl = React.useRef(null); const passwordEl = React.useRef(null); const rememberMeEl = React.useRef(null); const handleSubmit = e => { e.preventDefault(); const data = { username: nameEl.current.value, password: passwordEl.current.value, rememberMe: rememberMeEl.current.checked, } // Submit form details to login endpoint etc. // ... }; return ( <form onSubmit={handleSubmit}> <input type="text" placeholder="username" ref={nameEl} /> <input type="password" placeholder="password" ref={passwordEl} /> <label> <input type="checkbox" ref={rememberMeEl} /> Remember me </label> <button type="submit" className="myButton">Login</button> </form> ); }
View on CodePen
While uncontrolled inputs work fine for quick and simple forms, they do have some drawbacks. As you might have noticed from the code above, we have to read the value from the input element whenever we want it. This means we can’t provide instant validation on the field as the user types, nor can we do things like enforce a custom input format, conditionally show or hide form elements, or disable/enable the submit button.
Fortunately, there’s a more sophisticated way to handle inputs in React.
Controlled Inputs
An input is said to be “controlled” when React is responsible for maintaining and setting its state. The state is kept in sync with the input’s value, meaning that changing the input will update the state, and updating the state will change the input.
Let’s see what that looks like with an example:
class ControlledInput extends React.Component { constructor(props) { super(props); this.state = { name: '' }; this.handleInput = this.handleInput.bind(this); } handleInput(event) { this.setState({ name: event.target.value }); } render() { return ( <input type="text" value={this.state.name} onChange={this.handleInput} /> ); } }
As you can see, we set up a kind of circular data flow: state to input value, on change event to state, and back again. This loop allows us a lot of control over the input, as we can react to changes to the value on the fly. Because of this, controlled inputs don’t suffer from the limitations of uncontrolled ones, opening up the follow possibilities:
instant input validation: we can give the user instant feedback without having to wait for them to submit the form (e.g. if their password is not complex enough)
instant input formatting: we can add proper separators to currency inputs, or grouping to phone numbers on the fly
conditionally disable form submission: we can enable the submit button after certain criteria are met (e.g. the user consented to the terms and conditions)
dynamically generate new inputs: we can add additional inputs to a form based on the user’s previous input (e.g. adding details of additional people on a hotel booking)
Validation
As I mentioned above, the continuous update loop of controlled components makes it possible to perform continuous validation on inputs as the user types. A handler attached to an input’s onChange event will be fired on every keystroke, allowing you to instantly validate or format the value.
Continue reading Working with Forms in React on SitePoint.
by Nilson Jacques via SitePoint https://ift.tt/3oxqxFo
0 notes
Text
Using Formik to Handle Forms in React
There is no doubt that web forms play an integral role in our web site or applications. By default, they provide a useful set of elements and features — from legends and fieldsets to native validation and states — but they only get us so far when we start to consider the peculiarities of using them. For example, how can we manipulate the state of a form? How about different forms of validation? Even hooking a form up to post submissions is a daunting effort at times.
Component-driven front-end libraries, like React, can ease the task of wiring web forms but can also get verbose and redundant. That’s why I want to introduce you to Formik, a small library that solves the three most annoying parts of writing forms in React:
State manipulation
Form validation (and error messages)
Form submission
We’re going to build a form together in this post. We’ll start with a React component then integrate Formik while demonstrating the way it handles state, validation, and submissions.
Creating a form as a React component
Components live and breathe through their state and prop. What HTML form elements have in common with React components is that they naturally keep some internal state. Their values are also automatically stored in their value attribute.
Allowing form elements to manage their own state in React makes them uncontrolled components. That’s just a fancy way of saying the DOM handles the state instead of React. And while that works, it is often easier to use controlled components, where React handles the state and serves as the single source of truth rather than the DOM.
The markup for a straightforward HTML form might look something like this:
<form> <div className="formRow"> <label htmlFor="email">Email address</label> <input type="email" name="email" className="email" /> </div> <div className="formRow"> <label htmlFor="password">Password</label> <input type="password" name="password" className="password" /> </div> <button type="submit">Submit</button> </form>
We can convert that into a controlled React component like so:
function HTMLForm() { const [email, setEmail] = React.useState(""); const [password, setPassword] = React.useState("");
return ( <form> <div className="formRow"> <label htmlFor="email">Email address</label> <input type="email" name="email" className="email" value={email} onChange={e => setEmail(e.target.value)} /> </div> <div className="formRow"> <label htmlFor="password">Password</label> <input type="password" name="password" className="password" value={password} onChange={e => setPassword(e.target.value)} /> </div> <button type="submit">Submit</button> </form> ); }
This is a bit verbose but it comes with some benefits:
We get a single source of truth for form values in the state.
We can validate the form when and how we want.
We get performance perks by loading what we need and when we need it.
OK, so why Formik again?
As it is with anything JavaScript, there’s already a bevy of form management libraries out there, like React Hook Form and Redux Form, that we can use. But there are several things that make Formik stand out from the pack:
It’s declarative: Formik eliminates redundancy through abstraction and taking responsibility for state, validation and submissions.
It offers an Escape Hatch: Abstraction is good, but forms are peculiar to certain patterns. Formik abstracts for you but also let’s you control it should you need to.
It co-locates form states: Formik keeps everything that has to do with your form within your form components.
It’s adaptable: Formik doesn’t enforce any rules on you. You can use as less or as much Formik as you need.
Easy to use: Formik just works.
Sound good? Let’s implement Formik into our form component.
Going Formik
We will be building a basic login form to get our beaks wet with the fundamentals. We’ll be touching on three different ways to work with Formik:
Using the useFormik hook
Using Formik with React context
Using withFormik as a higher-order component
I’ve created a demo with the packages we need, Formik and Yup.
Method 1: Using the useFormik hook
As it is right now, our form does nothing tangible. To start using Formik, we need to import the useFormik hook. When we use the hook, it returns all of the Formik functions and variables that help us manage the form. If we were to log the returned values to the console, we get this:
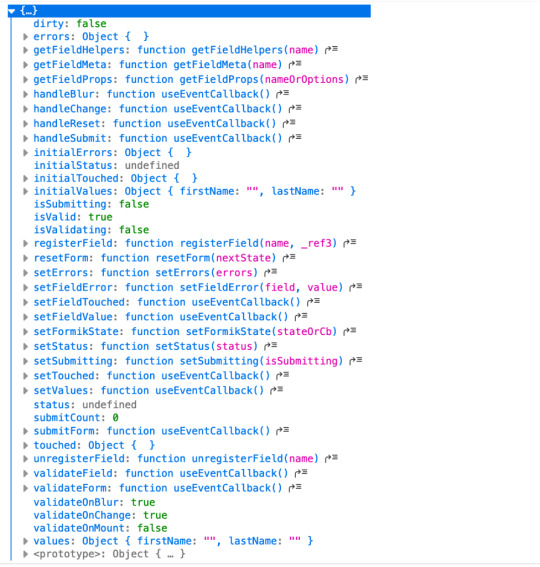
We’ll call useFormik and pass it initialValues to start. Then, an onSubmit handler fires when a form submission happens. Here’s how that looks:
// This is a React component function BaseFormik() { const formik = useFormik({ initialValues: { email: "", password: "" }, onSubmit(values) { // This will run when the form is submitted } }); // If you're curious, you can run this Effect // useEffect(() => { // console.log({formik}); // }, [])
return ( // Your actual form ) }
Then we’ll bind Formik to our form elements:
// This is a React component function BaseFormik() { const formik = useFormik({ initialValues: { email: "", password: "" }, onSubmit(values) { // This will run when the form is submitted } }); // If you're curious, you can run this Effect // useEffect(() => { // console.log({formik}); // }, [])
return ( // We bind "onSubmit" to "formik.handleSubmit" <form className="baseForm" onSubmit={formik.handleSubmit} noValidate> <input type="email" name="email" id="email" className="email formField" value={formik.values.email} // We also bind our email value onChange={formik.handleChange} // And, we bind our "onChange" event. /> </form> ) }
This is how the binding works:
It handles form submission with onSubmit={formik.handleSubmit}.
It handles the state of inputs with value={formik.values.email} and onChange={formik.handleChange}.
If you take a closer look, we didn’t have to set up our state, nor handle the onChange or onSubmit events as we’d typically do with React. The complete change to our form goes:
However as you might have noticed, our form contains some redundancy. We had to drill down formik and manually bind the form input’s value and onChange event. That means we should de-structure the returned value and immediately bind the necessary props to a dependent field, like this:
// This is a React component function BaseFormik() { const {getFieldProps, handleSubmit} = useFormik({ initialValues: { email: "", password: "" }, onSubmit(values) { // This will run when the form is submitted } }); // If you're curious, you can run this Effect // useEffect(() => { // console.log({formik}); // }, [])
return ( <form className="baseForm" onSubmit={handleSubmit} noValidate> <input type="email" id="email" className="email formField" {...getFieldProps("email")} // We pass the name of the dependent field /> </form> ) }
Let’s take things even further with the included <Formik/> component.
Method 2: Using Formik with React context
The <Formik/> component exposes various other components that adds more abstraction and sensible defaults. For example, components like <Form/>, <Field/>, and <ErrorMessage/> are ready to go right out of the box.
Keep in mind, you don’t have to use these components when working with <Formik/> but they do require <Formik/> (or withFormik) when using them.
Using <Formik/> requires an overhaul because it uses the render props pattern as opposed to hooks with useFormik. The render props pattern isn’t something new in React. It is a pattern that enables code re-usability between components — something hooks solve better. Nevertheless, <Formik/> has a bagful of custom components that make working with forms much easier.
import { Formik } from "formik";
function FormikRenderProps() { const initialValues = { email: "", password: "" }; function onSubmit(values) { // Do stuff here... alert(JSON.stringify(values, null, 2)); } return ( <Formik {...{ initialValues, onSubmit }}> {({ getFieldProps, handleSubmit }) => ( <form className="baseForm" onSubmit={handleSubmit} noValidate> <input type="email" id="email" className="email formField" {...getFieldProps("email")} /> </form> )} </Formik> ); }
Notice that initialValues and onSubmit have been completely detached from useFormik. This means we are able to pass the props that <Formik/> needs, specifically initialValues and useFormik.
<Formik/> returns a value that’s been de-structured into getFieldProps and handleSubmit. Everything else basically remains the same as the first method using useFormik.
Here’s a refresher on React render props if you’re feeling a little rusty.
We haven’t actually put any <Formik/> components to use just yet. I’ve done this intentionally to demonstrate Formik’s adaptability. We certainly do want to use those components for our form fields, so let’s rewrite the component so it uses the <Form/> component.
import { Formik, Field, Form } from "formik";
function FormikRenderProps() { const initialValues = { email: "", password: "" }; function onSubmit(values) { // Do stuff here... alert(JSON.stringify(values, null, 2)); } return ( <Formik {...{ initialValues, onSubmit }}> {() => ( <Form className="baseForm" noValidate> <Field type="email" id="email" className="email formField" name="email" /> </Form> )} </Formik> ); }
We replaced <form/> with <Form/> and removed the onSubmit handler since Formik handles that for us. Remember, it takes on all the responsibilities for handling forms.
We also replaced <input/> with <Field/> and removed the bindings. Again, Formik handles that.
There’s also no need to bother with the returned value from <Formik/> anymore. You guessed it, Formik handles that as well.
Formik handles everything for us. We can now focus more on the business logic of our forms rather than things that can essentially be abstracted.
We’re pretty much set to go and guess what? We’ve haven’t been concerned with state managements or form submissions!
“What about validation?” you may ask. We haven’t touched on that because it’s a whole new level on its own. Let’s touch on that before jumping to the last method.
Form validation with Formik
If you’ve ever worked with forms (and I bet you have), then you’re aware that validation isn’t something to neglect.
We want to take control of when and how to validate so new opportunities open up to create better user experiences. Gmail, for example, will not let you input a password unless the email address input is validated and authenticated. We could also do something where we validate on the spot and display messaging without additional interactions or page refreshes.
Here are three ways that Formik is able to handle validation:
At the form level
At the field level
With manual triggers
Validation at the form level means validating the form as a whole. Since we have immediate access to form values, we can validate the entire form at once by either:
using validate, or
using a third-party library with validationSchema.
Both validate and validationSchema are functions that return an errors object with key/value pairings that those of initialValues. We can pass those to useFormik, <Formik/> or withFormik.
While validate is used for custom validations, validationSchema is used with a third-party library like Yup.
Here’s an example using validate:
// Pass the `onSubmit` function that gets called when the form is submitted. const formik = useFormik({ initialValues: { email: "", password: "" }, // We've added a validate function validate() { const errors = {}; // Add the touched to avoid the validator validating all fields at once if (formik.touched.email && !formik.values.email) { errors.email = "Required"; } else if ( !/^[A-Z0-9._%+-]+@[A-Z0-9.-]+\.[A-Z]{2,4}$/i.test(formik.values.email) ) { errors.email = "Invalid email address"; } if (formik.touched.password && !formik.values.password) { errors.password = "Required"; } else if (formik.values.password.length <= 8) { errors.password = "Must be more than 8 characters"; } return errors; }, onSubmit(values) { // Do stuff here... } }); // ...
And here we go with an example using validationSchema instead:
const formik = useFormik({ initialValues: { email: "", password: "" }, // We used Yup here. validationSchema: Yup.object().shape({ email: Yup.string() .email("Invalid email address") .required("Required"), password: Yup.string() .min(8, "Must be more than 8 characters") .required("Required") }), onSubmit(values) { // Do stuff here... } });
Validating at the field level or using manual triggers are fairly simple to understand. Albeit, you’ll likely use form level validation most of the time. It’s also worth checking out the docs to see other use cases.
Method 3: Using withFormik as a higher-order component
withFormik is a higher-order component and be used that way if that’s your thing. Write the form, then expose it through Formik.
A couple of practical examples
So far, we’ve become acquainted with Formik, covered the benefits of using it for creating forms in React, and covered a few methods to implement it as a React component while demonstrating various ways we can use it for validation. What we haven’t done is looked at examples of those key concepts.
So, let’s look at a couple of practical applications: displaying error messages and generating a username based on what’s entered in the email input.
Displaying error messages
We’ve built our form and validated it. And we’ve caught some errors that can be found in our errors object. But it’s no use if we aren’t actually displaying those errors.
Formik makes this a pretty trivial task. All we need to do is check the errors object returned by any of the methods we’ve looked at — <Formik/>, useFormik or withFormik — and display them:
<label className="formFieldLabel" htmlFor="email"> Email address <span className="errorMessage"> {touched["email"] && errors["email"]} </span> </label> <div className="formFieldWrapInner"> <input type="email" id="email" className="email formField" {...getFieldProps("email")} /> </div>
If there’s an error during validation, {touched["email"] && errors["email"]} will display it to the user.
We could do the same with <ErrorMessage/>. With this, we only need to tell it the name of the dependent field to watch:
<ErrorMessage name="email"> {errMsg => <span className="errorMessage">{errMsg}</span>} </ErrorMessage>
Generating a username from an email address
Imagine a form that automatically generates a username for your users based on their email address. In other words, whatever the user types into the email input gets pulled out, stripped of @ and everything after it, and leaves us with a username with what’s left.
For example: [email protected] produces @jane.
Formik exposes helpers that can “intercept” its functionality and lets us perform some effects.In the case of auto-generating a username, one way will be through Formik’s setValues:
onSubmit(values) { // We added a `username` value for the user which is everything before @ in their email address. setValues({ ...values, username: `@${values.email.split("@")[0]}` }); }
Type in an email address and password, then submit the form to see your new username!
Wrapping up
Wow, we covered a lot of ground in a short amount of space. While this is merely the tip of the iceberg as far as covering all the needs of a form and what Formik is capable of doing, I hope this gives you a new tool to reach for the next time you find yourself tackling forms in a React application.
If you’re ready to take Formik to the next level, I’d suggest looking through their resources as a starting point. There are so many goodies in there and it’s a good archive of what Formik can do as well as more tutorials that get into deeper use cases.
Good luck with your forms!
The post Using Formik to Handle Forms in React appeared first on CSS-Tricks.
source https://css-tricks.com/using-formik-to-handle-forms-in-react/
from WordPress https://ift.tt/2Yemy5K via IFTTT
0 notes
Text
300+ TOP ReactJS Interview Questions and Answers
ReactJS Interview Questions for freshers experienced :-
1. What is ReactJS? It is a front-end library which is used for handling the view layer for web and mobile apps. It is also used to create reusable UI components. 2. What are the features of ReactJS? Features of ReactJS are: JSX: Stands for JavaScript syntax extension. It isn't necessary to use JSX in ReactJS. Components: It is all about components Unidirectional data flow and Flux: React implements one-way data flow. License: Licensed under the Facebook Inc. 3. What is setState() method? setState() method: It is used for updating the state of the component. 4. What is forceUpdate() method? forceUpdate() method: It is used for updating the component manually. 5. What are the Component Life Cycle methods of ReactJS? Component Life Cycle methods of ReactJS are: componentWillMount componentDidMount componentWillReceiveProps shouldComponentUpdate componentWillUpdate componentDidUpdate componentWillUnmount 6. What is Flux? It is a programming concept where data is unidirectional. Flux Elements: Actions Dispatcher Store View 7. Can browsers read JSX? No, browsers can’t read JSX (JSX code must be compiled by JSX Compiler which is used to translate the JSX into JavaScript). 8. What are the types of events used in ReactJS? Types of events used in ReactJS are: Form Events onChange onInput onSubmit Mouse Events onClick onDoubleClick onMouseMove onMouseOver Touch Events onTouchCancel onTouchEnd onTouchMove onTouchStart 9. Who is the author of ReactJS? Jordan Walke is the author of ReactJS. 10. Does ReactJS uses HTMl? No, ReactJS uses JSX.

ReactJS Interview Questions 11. How to install React Router in ReactJS? The following code is used to install react-router: C:\Users\username\Desktop\reactApp>npm install react-router 12. What is ReactDOM.findDOMNode() method? ReactDOM.findDOMNode() method is used for DOM manipulation. 13. What is React CSS Transitions? React CSS Transition: This is a react add-on which is used for creating basic CSS transitions and animations. 14. What is HOC in ReactJS? HOC stands for Higher Order Component. It is a function that takes one component and returns another component that wraps the original one. 15. What are the advantages of ReactJS? Advantages of ReactJS are: Uses virtual DOM Improves SEO Performance It Can also be used with other framework It can be used on client and server side Data patterns and Component improve readability ReactJS Questions and Answers Pdf Download Read the full article
0 notes
Link

Managing forms in React can easily become painful as your app scales. It could probably be due to the unorganised approach you followed while starting a project or writing the same boilerplate in every component or even sometimes applying hacks for tricky use cases. Speaking of the solutions, there are many form libraries out there and some of them handle forms really well but organising and keeping the code tidy is still up to you. In this article we’re going to solve this problem by building our form as simple as coding forms in vanilla HTML which can be used elegantly in any production app.
To give you an idea, we’ll make this simple code below render our form. We will use React Hook Form, a performant and easy to plug-in library for React forms.
<Form onSubmit={handleSubmit}> <Input name="name" label="Name" /> <Input name="email" label="Email" type="email" /> <RadioGroup name="gender" options={radioOptions} /> <Dropdown name="location" options={dropdownOptions} /> <Checkbox name="terms" label="Accept terms of service" /> <Button>Submit</Button> </Form>
Before we jump into the code, first I’d like you to know the goals that we are trying to accomplish through this approach.
Cutting down the boilerplate - we should be able to render the forms with clean and DRY code
Validations - Perform simple and complex validations easily
Flexibility - we should be able to put input fields at any level nested inside the form
Accessibility - At the very basic level, the form elements should be easily accessible via keyboard
Self detected submit button state - the button should automatically enable/disable or show loader as per the form state
Performance - Last but not the least, it is crucial one especially when rendering large number of fields inside the form.
Set up React app
With the above requirements in mind, let’s begin with setting up our react app by running npx create-react-app react-form && yarn add react-hook-form
Next, we will create our reusable form and input components to cut down all the boilerplate. React Hook Form provides us useForm and useFormContext hooks to get the form context right away and within the nested components respectively. We’ll be using both of these hooks for the communication between the form and input components. First we’ll create the Form component followed by the input components such text fields, checkboxes, radio buttons, etc.
Build the Form component
We’ll initialise the form using useForm hook, and pass on all the methods as props to the form via FormProvider component. This will provide form state to the input components.
import React from 'react' import { useForm, FormProvider } from 'react-hook-form' export const Form = ({ initialValues, children, onSubmit }) => { const methods = useForm({ defaultValues: initialValues }) return ( <FormProvider {...methods}> <form onSubmit={methods.handleSubmit(onSubmit)}> {children} </form> </FormProvider> ) }
Build the form elements
Now that we have our Form component ready, we’ll create the form elements starting with the Input component. Since we don’t know how deeply we would nest the input components, we’ll use useFormContext to hook it up with its parent Form component that we created before.
import React from 'react' import { useFormContext } from 'react-hook-form' export const Input = ({ label, name }) => { const { register } = useFormContext() return ( <label> {label} <input name={name} ref={register} /> </label> ) }
Note: Using useFormContext with FormContext might affect performance by a bit due to re-renders but it should be negligible if you’re not doing any expensive computation within these components. If so, you can use memo to compare the dirty state of the form.
Checkbox Component
We’ll create and hook this component the same way we did in the Inputcomponent, just adding type checkbox to it.
import React from 'react' import { useFormContext } from 'react-hook-form' export const Checkbox = ({ label, name }) => { const { register } = useFormContext() return ( <label> <input type="checkbox" name={name} ref={register} /> {label} </label> ) }
Radio Buttons Component
Since there’s no use case for a single radio button on a web page, we’ll create a RadioGroup component which will accept an array of fields and render a group of radio button
import React from 'react' import { useFormContext } from 'react-hook-form' export const RadioGroup = ({ name, label, options }) => { const { register } = useFormContext() return ( <div> <div>{label}</div> {options && options.map(option => ( <label key={option.value}> <input type="radio" name={name} value={option.value} ref={register} /> {option.label} </label> ))} </div> ) }
Dropdown Component
This will be slightly different from the previous components as we’ll be using a 3rd party plugin for this. Keeping accessibility in mind, the best one I found is downshift by Kent C Dodds. Another good thing about this library is that it only provides functionality for the dropdown and let us code our own UI. Let’s install the plugin using yarn add downshift and create the component as below:
import React, { useEffect } from 'react' import { useFormContext } from 'react-hook-form' import { useSelect } from 'downshift' export const Dropdown = ({ name, options, label, initialValue, placeholder = 'Select...' }) => { const { register, setValue, getValues } = useFormContext() const findInitialItem = () => { const defaultValue = initialValue || getValues()[name] if (defaultValue) { return options.find(o => o.value === defaultValue) } } const { isOpen, selectedItem, getToggleButtonProps, getLabelProps, getMenuProps, getItemProps, } = useSelect({ items: options, initialSelectedItem: findInitialItem() }) useEffect(() => { if (selectedItem) { setValue(name, selectedItem.value); } }, [selectedItem, name, setValue]); return ( <div> <button type="button" {...getToggleButtonProps()}> <label {...getLabelProps()}>{label}</label> <input type="hidden" name={name} ref={register} /> <div> {selectedItem ? selectedItem.text : placeholder} </div> </button> <div {...getMenuProps()}> {isOpen && ( options.map((item, index) => ( <div key={`${item.value}${index}`} {...getItemProps({ item, index })}> {item.text} </div> )) )} </div> </div> ) }
Button Component
The purpose of building the Button component is to make it handle enabled/disabled/loading state itself. Here, we’re simply disabling the button until the form fields are dirty or when the form is being submitted.
import React from 'react' import { useFormContext } from 'react-hook-form' export const Button = ({ children }) => { const { formState: { isDirty, isSubmitting } } = useFormContext() return ( <button type="submit" disabled={!isDirty || isSubmitting}> {children} </button> ) }
Validating the form
Till now, we have made our form functional and able to submit form data. As our next requirement, we need to add validations to our form elements. We’ll allow two types of validations: one is to simply check if a required field is filled or not and other by providing a pattern to validate the value. As an example, the Input component that we created before will now receive two extra props: required and validation.
import React from 'react' import { useFormContext } from 'react-hook-form' export const Input = ({ label, name, required, validation }) => { const { register, errors } = useFormContext() return ( <div> <label> {label} <input name={name} ref={register(validation || { required: !!required })} /> </label> {errors[name] && <i>{errors[name].message}</i>} </div> ) }
The same way we can implement validation in our other components.
0 notes
Text
How Java Script Event Works? tririd.com
HTML events are "things" that happen to HTML elements.
When JavaScript is used in HTML pages, JavaScript can "react" on these events.
JavaScript's interaction with HTML is handled through events that occur when the user or the browser manipulates a page.

When the page loads, it is called an event. When the user clicks a button, that click too is an event. Other examples include events like pressing any key, closing a window, resizing a window, etc.
There are so many events for example:
onclick Event Type
onsubmit Event Type
onmouseover and onmouseout
onchange
onfocus
oninput
onkeypress
Tririd Technologies Pvt Ltd has expert team member who can design Web site in HTML , Wordpress , PHP , Java Script , Boot strap etc.
We provide training also in Web Designing and Web Development course.
To know more in detail about Tririd
Call us @ 8980010210
Visit us @ http://www.tririd.com/portfolio/
#Web site design company satellite-ahmedabad#web development company satellite-ahmedabad#software company satellite- ahmedabad#wordpress#html5
0 notes
Text
Using Formik to Handle Forms in React
There is no doubt that web forms play an integral role in our web site or applications. By default, they provide a useful set of elements and features — from legends and fieldsets to native validation and states — but they only get us so far when we start to consider the peculiarities of using them. For example, how can we manipulate the state of a form? How about different forms of validation? Even hooking a form up to post submissions is a daunting effort at times.
Component-driven front-end libraries, like React, can ease the task of wiring web forms but can also get verbose and redundant. That’s why I want to introduce you to Formik, a small library that solves the three most annoying parts of writing forms in React:
State manipulation
Form validation (and error messages)
Form submission
We’re going to build a form together in this post. We’ll start with a React component then integrate Formik while demonstrating the way it handles state, validation, and submissions.
Creating a form as a React component
Components live and breathe through their state and prop. What HTML form elements have in common with React components is that they naturally keep some internal state. Their values are also automatically stored in their value attribute.
Allowing form elements to manage their own state in React makes them uncontrolled components. That’s just a fancy way of saying the DOM handles the state instead of React. And while that works, it is often easier to use controlled components, where React handles the state and serves as the single source of truth rather than the DOM.
The markup for a straightforward HTML form might look something like this:
<form> <div className="formRow"> <label htmlFor="email">Email address</label> <input type="email" name="email" className="email" /> </div> <div className="formRow"> <label htmlFor="password">Password</label> <input type="password" name="password" className="password" /> </div> <button type="submit">Submit</button> </form>
We can convert that into a controlled React component like so:
function HTMLForm() { const [email, setEmail] = React.useState(""); const [password, setPassword] = React.useState("");
return ( <form> <div className="formRow"> <label htmlFor="email">Email address</label> <input type="email" name="email" className="email" value={email} onChange={e => setEmail(e.target.value)} /> </div> <div className="formRow"> <label htmlFor="password">Password</label> <input type="password" name="password" className="password" value={password} onChange={e => setPassword(e.target.value)} /> </div> <button type="submit">Submit</button> </form> ); }
This is a bit verbose but it comes with some benefits:
We get a single source of truth for form values in the state.
We can validate the form when and how we want.
We get performance perks by loading what we need and when we need it.
OK, so why Formik again?
As it is with anything JavaScript, there’s already a bevy of form management libraries out there, like React Hook Form and Redux Form, that we can use. But there are several things that make Formik stand out from the pack:
It’s declarative: Formik eliminates redundancy through abstraction and taking responsibility for state, validation and submissions.
It offers an Escape Hatch: Abstraction is good, but forms are peculiar to certain patterns. Formik abstracts for you but also let’s you control it should you need to.
It co-locates form states: Formik keeps everything that has to do with your form within your form components.
It’s adaptable: Formik doesn’t enforce any rules on you. You can use as less or as much Formik as you need.
Easy to use: Formik just works.
Sound good? Let’s implement Formik into our form component.
Going Formik
We will be building a basic login form to get our beaks wet with the fundamentals. We’ll be touching on three different ways to work with Formik:
Using the useFormik hook
Using Formik with React context
Using withFormik as a higher-order component
I’ve created a demo with the packages we need, Formik and Yup.
Method 1: Using the useFormik hook
As it is right now, our form does nothing tangible. To start using Formik, we need to import the useFormik hook. When we use the hook, it returns all of the Formik functions and variables that help us manage the form. If we were to log the returned values to the console, we get this:

We’ll call useFormik and pass it initialValues to start. Then, an onSubmit handler fires when a form submission happens. Here’s how that looks:
// This is a React component function BaseFormik() { const formik = useFormik({ initialValues: { email: "", password: "" }, onSubmit(values) { // This will run when the form is submitted } }); // If you're curious, you can run this Effect // useEffect(() => { // console.log({formik}); // }, [])
return ( // Your actual form ) }
Then we’ll bind Formik to our form elements:
// This is a React component function BaseFormik() { const formik = useFormik({ initialValues: { email: "", password: "" }, onSubmit(values) { // This will run when the form is submitted } }); // If you're curious, you can run this Effect // useEffect(() => { // console.log({formik}); // }, [])
return ( // We bind "onSubmit" to "formik.handleSubmit" <form className="baseForm" onSubmit={formik.handleSubmit} noValidate> <input type="email" name="email" id="email" className="email formField" value={formik.values.email} // We also bind our email value onChange={formik.handleChange} // And, we bind our "onChange" event. /> </form> ) }
This is how the binding works:
It handles form submission with onSubmit={formik.handleSubmit}.
It handles the state of inputs with value={formik.values.email} and onChange={formik.handleChange}.
If you take a closer look, we didn’t have to set up our state, nor handle the onChange or onSubmit events as we’d typically do with React. The complete change to our form goes:
However as you might have noticed, our form contains some redundancy. We had to drill down formik and manually bind the form input’s value and onChange event. That means we should de-structure the returned value and immediately bind the necessary props to a dependent field, like this:
// This is a React component function BaseFormik() { const {getFieldProps, handleSubmit} = useFormik({ initialValues: { email: "", password: "" }, onSubmit(values) { // This will run when the form is submitted } }); // If you're curious, you can run this Effect // useEffect(() => { // console.log({formik}); // }, [])
return ( <form className="baseForm" onSubmit={handleSubmit} noValidate> <input type="email" id="email" className="email formField" {...getFieldProps("email")} // We pass the name of the dependent field /> </form> ) }
Let’s take things even further with the included <Formik/> component.
Method 2: Using Formik with React context
The <Formik/> component exposes various other components that adds more abstraction and sensible defaults. For example, components like <Form/>, <Field/>, and <ErrorMessage/> are ready to go right out of the box.
Keep in mind, you don’t have to use these components when working with <Formik/> but they do require <Formik/> (or withFormik) when using them.
Using <Formik/> requires an overhaul because it uses the render props pattern as opposed to hooks with useFormik. The render props pattern isn’t something new in React. It is a pattern that enables code re-usability between components — something hooks solve better. Nevertheless, <Formik/> has a bagful of custom components that make working with forms much easier.
import { Formik } from "formik";
function FormikRenderProps() { const initialValues = { email: "", password: "" }; function onSubmit(values) { // Do stuff here... alert(JSON.stringify(values, null, 2)); } return ( <Formik {...{ initialValues, onSubmit }}> {({ getFieldProps, handleSubmit }) => ( <form className="baseForm" onSubmit={handleSubmit} noValidate> <input type="email" id="email" className="email formField" {...getFieldProps("email")} /> </form> )} </Formik> ); }
Notice that initialValues and onSubmit have been completely detached from useFormik. This means we are able to pass the props that <Formik/> needs, specifically initialValues and useFormik.
<Formik/> returns a value that’s been de-structured into getFieldProps and handleSubmit. Everything else basically remains the same as the first method using useFormik.
Here’s a refresher on React render props if you’re feeling a little rusty.
We haven’t actually put any <Formik/> components to use just yet. I’ve done this intentionally to demonstrate Formik’s adaptability. We certainly do want to use those components for our form fields, so let’s rewrite the component so it uses the <Form/> component.
import { Formik, Field, Form } from "formik";
function FormikRenderProps() { const initialValues = { email: "", password: "" }; function onSubmit(values) { // Do stuff here... alert(JSON.stringify(values, null, 2)); } return ( <Formik {...{ initialValues, onSubmit }}> {() => ( <Form className="baseForm" noValidate> <Field type="email" id="email" className="email formField" name="email" /> </Form> )} </Formik> ); }
We replaced <form/> with <Form/> and removed the onSubmit handler since Formik handles that for us. Remember, it takes on all the responsibilities for handling forms.
We also replaced <input/> with <Field/> and removed the bindings. Again, Formik handles that.
There’s also no need to bother with the returned value from <Formik/> anymore. You guessed it, Formik handles that as well.
Formik handles everything for us. We can now focus more on the business logic of our forms rather than things that can essentially be abstracted.
We’re pretty much set to go and guess what? We’ve haven’t been concerned with state managements or form submissions!
“What about validation?” you may ask. We haven’t touched on that because it’s a whole new level on its own. Let’s touch on that before jumping to the last method.
Form validation with Formik
If you’ve ever worked with forms (and I bet you have), then you’re aware that validation isn’t something to neglect.
We want to take control of when and how to validate so new opportunities open up to create better user experiences. Gmail, for example, will not let you input a password unless the email address input is validated and authenticated. We could also do something where we validate on the spot and display messaging without additional interactions or page refreshes.
Here are three ways that Formik is able to handle validation:
At the form level
At the field level
With manual triggers
Validation at the form level means validating the form as a whole. Since we have immediate access to form values, we can validate the entire form at once by either:
using validate, or
using a third-party library with validationSchema.
Both validate and validationSchema are functions that return an errors object with key/value pairings that those of initialValues. We can pass those to useFormik, <Formik/> or withFormik.
While validate is used for custom validations, validationSchema is used with a third-party library like Yup.
Here’s an example using validate:
// Pass the `onSubmit` function that gets called when the form is submitted. const formik = useFormik({ initialValues: { email: "", password: "" }, // We've added a validate function validate() { const errors = {}; // Add the touched to avoid the validator validating all fields at once if (formik.touched.email && !formik.values.email) { errors.email = "Required"; } else if ( !/^[A-Z0-9._%+-]+@[A-Z0-9.-]+\.[A-Z]{2,4}$/i.test(formik.values.email) ) { errors.email = "Invalid email address"; } if (formik.touched.password && !formik.values.password) { errors.password = "Required"; } else if (formik.values.password.length <= 8) { errors.password = "Must be more than 8 characters"; } return errors; }, onSubmit(values) { // Do stuff here... } }); // ...
And here we go with an example using validationSchema instead:
const formik = useFormik({ initialValues: { email: "", password: "" }, // We used Yup here. validationSchema: Yup.object().shape({ email: Yup.string() .email("Invalid email address") .required("Required"), password: Yup.string() .min(8, "Must be more than 8 characters") .required("Required") }), onSubmit(values) { // Do stuff here... } });
Validating at the field level or using manual triggers are fairly simple to understand. Albeit, you’ll likely use form level validation most of the time. It’s also worth checking out the docs to see other use cases.
Method 3: Using withFormik as a higher-order component
withFormik is a higher-order component and be used that way if that’s your thing. Write the form, then expose it through Formik.
A couple of practical examples
So far, we’ve become acquainted with Formik, covered the benefits of using it for creating forms in React, and covered a few methods to implement it as a React component while demonstrating various ways we can use it for validation. What we haven’t done is looked at examples of those key concepts.
So, let’s look at a couple of practical applications: displaying error messages and generating a username based on what’s entered in the email input.
Displaying error messages
We’ve built our form and validated it. And we’ve caught some errors that can be found in our errors object. But it’s no use if we aren’t actually displaying those errors.
Formik makes this a pretty trivial task. All we need to do is check the errors object returned by any of the methods we’ve looked at — <Formik/>, useFormik or withFormik — and display them:
<label className="formFieldLabel" htmlFor="email"> Email address <span className="errorMessage"> {touched["email"] && errors["email"]} </span> </label> <div className="formFieldWrapInner"> <input type="email" id="email" className="email formField" {...getFieldProps("email")} /> </div>
If there’s an error during validation, {touched["email"] && errors["email"]} will display it to the user.
We could do the same with <ErrorMessage/>. With this, we only need to tell it the name of the dependent field to watch:
<ErrorMessage name="email"> {errMsg => <span className="errorMessage">{errMsg}</span>} </ErrorMessage>
Generating a username from an email address
Imagine a form that automatically generates a username for your users based on their email address. In other words, whatever the user types into the email input gets pulled out, stripped of @ and everything after it, and leaves us with a username with what’s left.
For example: [email protected] produces @jane.
Formik exposes helpers that can “intercept” its functionality and lets us perform some effects.In the case of auto-generating a username, one way will be through Formik’s setValues:
onSubmit(values) { // We added a `username` value for the user which is everything before @ in their email address. setValues({ ...values, username: `@${values.email.split("@")[0]}` }); }
Type in an email address and password, then submit the form to see your new username!
Wrapping up
Wow, we covered a lot of ground in a short amount of space. While this is merely the tip of the iceberg as far as covering all the needs of a form and what Formik is capable of doing, I hope this gives you a new tool to reach for the next time you find yourself tackling forms in a React application.
If you’re ready to take Formik to the next level, I’d suggest looking through their resources as a starting point. There are so many goodies in there and it’s a good archive of what Formik can do as well as more tutorials that get into deeper use cases.
Good luck with your forms!
The post Using Formik to Handle Forms in React appeared first on CSS-Tricks.
Using Formik to Handle Forms in React published first on https://deskbysnafu.tumblr.com/
0 notes