#openelec
Explore tagged Tumblr posts
Visit Tumblr Blog
Explore Tumblr blogs with no restrictions, modern design and the best experience.
Last Seen Tumblr Blogs


Fun Fact
BuzzFeed published a report claiming that Tumblr was utilized as a distribution channel for Russian agents to influence American voting habits during the 2016 presidential election in Feb 2018.
Text
LibreELEC 11.0.4
De ontwikkelaars achter het Libre Embedded Linux Entertainment Center hebben versie 11.0.4 uitgebracht. LibreELEC is ontstaan nadat een groot aantal ontwikkelaars bij OpenELEC wegens onenigheid vertrokken zijn en voor zichzelf zijn begonnen. Deze Linux-distributie is gebaseerd op Kodi en kan een computer tot een volwaardige htpc omtoveren. Ook kan het op een Raspberry Pi of een aparte mediaspeler worden geïnstalleerd. In LibreELEC versie 11 wordt onder meer de overstap naar Kodi versie 20 gemaakt en is er ondersteuning voor add-ons in de Google Chrome-browser. Verder worden enkele oudere Amlogic-modellen, waarvoor de ondersteuning was komen te vervallen, weer ondersteund. De releasenotes voor deze uitgave kunnen hieronder worden gevonden. LibreELEC (Nexus) 11.0.4 http://dlvr.it/T0bGWN
0 notes
Text
Os melhores sistemas operacionais para Raspberry Pi!
Raspberry Pi continua sendo um dos computadores mais baratos que existe, no entanto, muita gente desconhece as opções de sistemas operacionais para o Raspberry Pi. Assim, hoje vamos apresentar a você 23 sistemas operacionais para você instalar no seu pequeno computador.
Queremos ressaltar que nem todos os sistemas abaixo são Linux, você verá que as possibilidade são muitas, mas vale muito…
View On WordPress
#Arch Linux#ARM#Kali Linux#Kodi#Linux#OpenELEC#Raspberry Pi#Raspbian#Sistemas Operacionais#Ubuntu Mate#Ubuntu Mate 16.04
0 notes
Photo

"There is only one Lord of the Ring, only one who can bend it to his will, and he does not share power."
6 notes
·
View notes
Text
How to Install Ares Wizard Kodi
How to Install Ares Wizard Kodi
How to Install Ares Wizard Kodi By Get Smart Media Worldwide, Aug 10, 2016
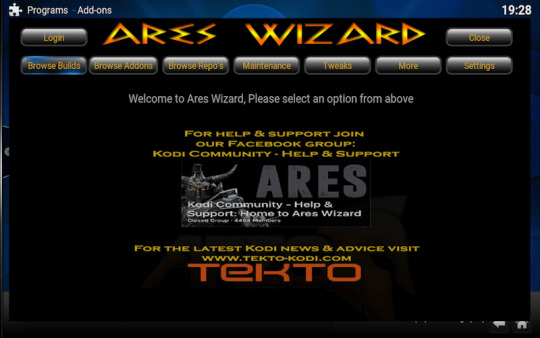
To Install Ares Wizard Jarvis:
Open Kodi
Select SYSTEM > File Manager
Select Add Source
Select None
Type the following EXACTLY http://ares-repo.eu and select Done
Highlight the box underneath Enter a name for this media Source, type ares and select OK
Go back to your Home Screen
Select SYSTEM
Select Add-Ons
Select Ins…
View On WordPress
#android#apple#ares#cable#download#how to#install#ios#linux#mac#openelec#pirate#repo#repository#vpn#windows#xbmc#zip file
0 notes
Text
Download openelec for raspberry pi 2

Download openelec for raspberry pi 2 1080p#
Download openelec for raspberry pi 2 update#
Download openelec for raspberry pi 2 windows 7#
Download openelec for raspberry pi 2 tv#
option, I followed through the video calibration wizard to fix my cropped display: I navigated to SYSTEM -> Settings -> System -> Video output -> Video calibration.:Īfter choosing the Video calibration. Thankfully, OpenELEC gives me the option to calibrate my display dimensions.
Download openelec for raspberry pi 2 tv#
Somehow, my Panasonic VIREA TV was not able to show OpenELEC screen correctly a large margin was being cropped out of the display area. Calibrating the video display on my Panasonic VIERA TV Once the transfer had completed, I rebooted my Raspberry Pi 2 TV Box to get it to perform the update. Scp /Download/OpenELEC-RPi2.arm-6.0.3.tar prompted for the password, I entered openelec. To do so, I entered the following command in my MacBook terminal: To perform the update, I would need to send OpenELEC-RPi2.arm-6.0.3.tar into my Raspberry Pi 2 /storage/.update directory. I downloaded OpenELEC-RPi2.arm-6.0.3.tar onto my MacBook.Įarlier at the configuration screen on the wireless network settings, I was shown the IP address that my router had given my Raspberry Pi 2.
Download openelec for raspberry pi 2 update#
Since there was an update file at the OpenELEC download page for Raspberry Pi 2 builds, I went ahead to update the OpenELEC image with that update file. Updating OpenELEC image with the update fileĪfter running the initial configurations, I would have a SSH server running on my Raspberry Pi 2 TV box to receive files from my MacBook. Whether to turn on SSH and Samba server, which I chose to do so.It then rebooted itself and showed a configuration wizard where it asked my input for: When the OpenELEC Mediacenter image started running for the first time, it performed a repartition to use all the available disk space on the microSD card. After that, I turned on my Raspberry Pi 2. I first turned on my Panasonic TV and configured it to get the video input from the HDMI port that my Raspberry Pi 2 was connected to. I then connected my Raspberry Pi 2 to my Panasonic VIERA TV via the HDMI cable, and the Asus USB-N10 Nano USB Adapter into one of the USB ports on my Raspberry Pi 2. Booting into OpenELEC 6.0.3 on my Raspberry Pi 2Īfter the Win32 Disk Imager completed writing the OpenELEC 6.0.3 image onto my Samsung Micro SDHC card, I pushed the Samsung Micro SDHC card into the microSD card slot on my Raspberry Pi 2. I then used Win32 Disk Imager to write OpenELEC-RPi2.arm-6.0.3.img into the Samsung Micro SDHC card via the SD card drive on my laptop.
Download openelec for raspberry pi 2 windows 7#
From that page, I downloaded OpenELEC-RPi2.arm-6.0.3.img.gz onto my Windows 7 machine.įrom OpenELEC-RPi2.arm-6.0.3.img.gz, I extracted out OpenELEC-RPi2.arm-6.0.3.img with 7-zip. To do so, I visited the OpenELEC Mediacenter download page for Raspberry Pi 2 builds. Getting a copy of the OpenELEC Mediacenter imageĪfter I got the hardware ready on my desk, I proceeded to download a copy of the OpenELEC Mediacenter image for my Raspberry Pi 2.
Download openelec for raspberry pi 2 1080p#
A GE 3' High Speed HD 3D 4k 1080p HDMI Cable.
A Samsung 16GB Class 6 Micro SDHC up to 24MB/s with Adapter.
A Raspberry Pi Model B+ Case Enclosure (Clear).
I used the following hardware to realise my Raspberry Pi 2 TV Box: Getting the hardware that I need for my Raspberry Pi 2 TV Box This post documents the steps that I took to build my Raspberry Pi 2 TV Box with an OpenELEC Mediacenter image. Since my wife had been yearning for a TV box to watch her favourite videos on our TV, I decided to convert my Raspberry Pi 2 into a TV box. The steps that I took to build my Raspberry Pi 2 TV box via the OpenELEC Mediacenter imageĪfter I got my new Raspberry Pi 3 to incubate my new WordPress website, I freed up my Raspberry Pi 2 for other things.
0 notes
Text
Download openelec for raspberry pi zero 1.3v

DOWNLOAD OPENELEC FOR RASPBERRY PI ZERO 1.3V BLUETOOTH
DOWNLOAD OPENELEC FOR RASPBERRY PI ZERO 1.3V SERIES
Video/Audio Out via 4-pole 3.5mm connector, HDMI, CSI camera, or Raw LCD (DSI).4 x USB2.0 Ports with up to 1.2A output.Broadcom BCM2837 64bit ARM Cortex-A53 Quad Core Processor SoC running 1.2GHz.At launch, we are using the same 32-bit Raspbian userland that we use on other Raspberry Pi devices over the next few months we will investigate whether there is value in moving to 64-bit mode. You’ll need a recent NOOBS or Raspbian image from our downloads page. This time round, we’re recommending a 2.5A adapter if you want to connect power-hungry USB devices to the Raspberry Pi.
DOWNLOAD OPENELEC FOR RASPBERRY PI ZERO 1.3V BLUETOOTH
Phil Elwell developed the wireless LAN and Bluetooth software.Īll of the connectors are in the same place and have the same functionality, and the board can still be run from a 5V micro-USB power adapter. Roger Thornton ran the extensive (and expensive) wireless conformance campaign, allowing us to launch in almost all countries simultaneously. He was able to fit the wireless functionality into very nearly the same form-factor as the Raspberry Pi 1 Model B+ and Raspberry Pi 2 Model B the only change is to the position of the LEDs, which have moved to the other side of the SD card socket to make room for the antenna.
DOWNLOAD OPENELEC FOR RASPBERRY PI ZERO 1.3V SERIES
James Adams spent the second half of 2015 designing a series of prototypes, incorporating BCM2837 alongside the BCM43438 wireless “combo” chip. Combining a 33% increase in clock speed with various architectural enhancements, this provides a 50-60% increase in performance in 32-bit mode versus Raspberry Pi 2, or roughly a factor of ten over the original Raspberry Pi. The 900MHz 32-bit quad-core ARM Cortex-A7 CPU complex has been replaced by a custom-hardened 1.2GHz 64-bit quad-core ARM Cortex-A53. This retains the same basic architecture as its predecessors BCM2835 and BCM2836, so all those projects and tutorials which rely on the precise details of the Raspberry Pi hardware will continue to work. Micro SD port for loading your operating system and storing dataįor Raspberry Pi 3, Broadcom have supported us with a new SoC, BCM2837.DSI display port for connecting a Raspberry Pi touchscreen display.CSI camera port for connecting a Raspberry Pi camera.4 Pole stereo output and composite video port.BCM43143 WiFi and Bluetooth Low Energy (BLE) on board.Quad Core 1.2GHz Broadcom BCM2837 64bit CPU.
0 notes
Text
A home theater PC (HTPC) is a PC that is mainly used as an entertainment system, especially a home theater system. It is normally connected to a television, and often an additional audio system.
OpenELEC, a Linux distribution that incorporates the media center software Kodi, is an OS tuned specifically for an HTPC. Having been built from the ground up adhering to the JeOS principle, the OS is very lightweight and very suitable for the confined usage range of an HTPC.
There are also special editions of Linux distributions that include the MythTV media center software, such as Mythbuntu, a special edition of Ubuntu.
1 note
·
View note
Text
中國最佳VPN服務:
以下是我們推薦的中國最佳VPN服務清單:根據我們對中國VPN的最新測試,
以下是適用於中國的最佳VPN:
1. PureVPN
中國最佳VPN:PureVPN徽標
優點:
低價 最多允許5個同時連接 穩定的連接和良好的速度。
缺點:
偶爾在中國被封鎖。如果發生這種情況,需要聯繫客戶支持以獲取特殊的連接方法。
推薦理由:
可靠的連接,快速的速度,為中國提供了優化的連接方法和服務器。
PureVPN的功能:
PureVPN是否可以在中國使用:是的。 PureVPN是否已在中國完全封鎖?:否。 PureVPN是否有任何數據帶寬限製或速度限制? :沒有 支持的平台:適用於台式計算機(Windows,Mac,Linux,Chromebook),平板電腦(iPad,Android平板電腦),手機(iPhone,Android手機),路由器,Apple TV,Android TV,Amazon TV,Amazon FireTV,Kodi的免費VPN軟件和應用等。也可以手動配置。 服務器位置:180多個位置,140多個國家/地區。 允許同時連接:5個設備,具有1個訂閱。 VPN速度:從中國使用時(連接到最佳服務器位置時)非常快。傳輸YouTube視頻沒有問題(如果您的ISP提供了不錯的速度)。 客戶支持:提供24/7實時聊天。還提供電子郵件支持和支持票證系統。 PureVPN的價格,免費試用和付款:
PureVPN是著名的VPN提供商。對於中國VPN用戶,它有兩個優點:
1)它的價格低於許多其他VPN提供商,但具有豐富的VPN功能。
2)PureVPN在中國也有VPN服務器,可用於中國以外的VPN用戶獲得中國IP,以便訪問僅中國內容。在中國使用PureVPN時,可以選擇其“針對中國優化”模式來訪問針對中國VPN用戶優化的VPN服務器。請注意:如果VPN嚴重阻塞,如果您在使用其軟件或應用程序連接PureVPN時遇到問題,則應聯繫PureVPN的客戶支持(他們的網站上有一個實時聊天框),並且客戶支持可能會提供其他方法為您建立聯繫。
在中國使用PureVPN的提示:
在桌面軟件中使用“專用IP”模式,然後選擇“ L2TP”協議。登錄PureVPN的網站,然後查看PureVPN的VPN服務器地址列表(在“服務器位置”下)。在更靠近中國(例如台灣)的位置選擇支持L2TP協議的服務器。在軟件的“專用IP模式”界面中輸入服務器地址並建立連接。 如果您的PureVPN在中國停止工作,請立即與PureVPN的在線支持聯繫,以獲取有關在中國再次使用VPN的最新提示和解決方案。
2 VyprVPN
中國最佳VPN:VyprVPN徽標
優點:
連接穩定,速度快 擁有Chameleon技術可避免中國的VPN阻塞 支持中文並接受支付寶付款 Mac和Android應用程序支持每個應用程序的連接。 輕鬆獲得客戶服務
缺點:
每月計劃有點貴(他們的年度計劃更好)。 在中國推薦VyprVPN的原因:
連接可靠,速度快。提供Chameleon技術來戰勝中國的VPN封鎖。
VyprVPN的功能:
VyprVPN是否在中國運作:是的。 VyprVPN是否已在中國完全封鎖?:否。 VyprVPN是否有任何數據帶寬限製或速度限制? :沒有 支持的平台:適用於台式計算機(Windows,Mac),平板電腦(iPad,Android平板電腦),手機(iPhone,Android手機),路由器,Apple TV,Android TV,OpenELEC / Kodi等的免費VPN軟件和應用程序。手動配置為也有可能。 服務器位置:超過60個國家/地區的700多個位置。 允許同時連接:5個設備。 VPN速度:從中國使用時(連接到最佳服務器位置時)非常快。傳輸YouTube視頻沒有問題(如果您的ISP提供了不錯的速度)。 客戶支持:提供24/7實時聊天。還提供電子郵件支持和支持票證系統。 VyprVPN的價格,免費試用和付款:
VyprVPN是一項眾所周知的VPN服務,其技術非常強大。其VPN服務快速,可靠並且在中國運作良好。為了繞過中國的VPN封鎖,VyprVPN提供了一種稱為Chameleon VPN的特殊VPN協議,該協議專門用於避免由防火牆防火牆阻止的VPN。 VyprVPN prov
1 note
·
View note
Photo

LibreELEC: La forma más eficiente de instalar Kodi en un Raspberry Pi Una distro Linux hecha a medida Nota Completa >> LibreELEC: La forma más eficiente de instalar Kodi en un Raspberry Pi
0 notes
Text
Update HTPC OpenElec kodi 16.1 to OpenElec Kodi 17.1 - How to 101 Video
Update HTPC OpenElec kodi 16.1 to OpenElec Kodi 17.1 – How to 101 Video
Here is how you can update your HTPC Box OpenElec Kodi 16.1 to Latest OpenElec 8.0 Kodi 17.1 in very few steps.
You Need to download this file for update
http://bit.ly/2nEus7A
How to enable 3rd party add-ons https://youtu.be/9Mv0LY-vExY
How to install Indigo from TV add-ons https://youtu.be/9nIfvNp5_Tc ( No more )
View On WordPress
0 notes
Text
OpenELEC 8.0.4 Kodi-focused Linux distro now available for PC, Raspberry Pi, WeTek, and more by https://is.gd/LB6phO
If you are looking for a dedicated media box for your living room or bedroom, the first thing you should consider is Kodi. This is a media center software package that delivers a very focused consumption experience. …OpenELEC…… can run on traditional PC hardware, but also Raspberry Pi, and, my favorite — WeTek boxes. Today, version 8.0.4 achieves stable release. It is a fairly ho-hum update,…
View On WordPress
#internet#Kodi#Linux#Linux Distros#media center#Media player#multimedia#Openelec#portable media center#Raspberry#Tech#Technology#wetek
0 notes
Photo

#raspberrypi3 #work #raspian #openelec #better
0 notes
Photo

#raspberry 🍇 #raspberrypi #rpi #raspberrypi2 #raspberrypi3 #raspberrypizero #raspberrypizerow @sammteknoloji ile 🇹🇷 @raspberrypifoundation 🍇 #raspbian #pardusarm 🐯 #androidthings 💻 #windowsiot #openelec #kodi etc. 😊 (Kayseri, Turkey)
#openelec#raspbian#windowsiot#raspberrypi2#raspberry#pardusarm#raspberrypizerow#kodi#raspberrypizero#raspberrypi3#raspberrypi#androidthings#rpi
0 notes
Text
Kodi 17.3 download for windows 10 64 bit

KODI 17.3 DOWNLOAD FOR WINDOWS 10 64 BIT HOW TO
KODI 17.3 DOWNLOAD FOR WINDOWS 10 64 BIT MAC OS
KODI 17.3 DOWNLOAD FOR WINDOWS 10 64 BIT APK
KODI 17.3 DOWNLOAD FOR WINDOWS 10 64 BIT INSTALL
KODI 17.3 DOWNLOAD FOR WINDOWS 10 64 BIT 64 BIT
KODI 17.3 DOWNLOAD FOR WINDOWS 10 64 BIT 64 BIT
With this tool, you can easily create on Windows your own autorun file to open Kodi and enjoy all the functions and features of one of the best media centers out there. Kodi Film Songs freeload Kodi 64-bit Download Download Kodi On Iphone 10 Download Mashup For Kodi 2015 Mobdro For Kodi 17.6 Download Exodus Wont Download Kodi 17 Download Kodi 17.1 In Windows Kodi Download Italiano Windows 10 Kodi Download For 64 Bit Download Kodi 17.
Cualquier HTPC x86 (64 bits) with Intel, AMD or NVIDIA GPU.
KODI 17.3 DOWNLOAD FOR WINDOWS 10 64 BIT INSTALL
This app is one of the most popular Video apps worldwide Install Kodi latest full setup on your PC/laptop Safe and Secure. This is the list of devices that LibreELEC is compatible with: Kodi 18 64 Bit Download And Install Kodi 18 64 Bit Download Will Start Jump to: Key Features of Kodi Media Player Download and Install Kodi 18.2 on Windows 10 Whats New on Kodi 18. Kodi app for Windows 10 Download Kodi for Windows 10/8/7 64-bit/32-bit. With this tool you can download from Malavida, you yourself can create a USB stick or an SD card with the version of the operating system that you need depending on your device. Make the most of an operating system focused on multimedia playbackįor the development of this operating system, its creators took into account the possibility to use it on embedded devices of the likes of Raspberry Pi and its subsequent versions 2 and 3. Follow the prompts as you would with any other software installation. In any case, the best thing you can do is download the image and burn it onto a LIVE CD, DVD or USB device.LibreELEC is an operating system based on OpenELEC, the Linux distribution that in turn is based on Kodi and is aimed at playing multimedia contents without consuming too many resources, by running it straight from a flash memory unit. Use the following commands in your Linux/Ubuntu terminal to install Kodi 18.3. That means that, although it's not the most recommendable method, you can run it using a virtual machine of the likes of VirtualBox. The installation file, that offers us 32 and 64-bit versions, comes along in ISO format.
At least 8 GB of free space on your hard drive.
ATI, NVIDIA or Intel video card with OPENGL 2.0 support.
KODI 17.3 DOWNLOAD FOR WINDOWS 10 64 BIT MAC OS
XBMC is a cross-platform and open source software (GPL) available for Linux, Mac OS X, Windows and the Xbox game-console. Its graphical user interface (GUI) allows the user to easily browse and view videos, photos, podcasts, and music from a harddrive, optical disc, local network, and the internet using only a few buttons. Kodi (64-bit) is a media player jukebox and entertainment hub for all your digital media. It should instead have been named 'Kodi for Windows 64-bit is almost here', or 'Kodi for Windows 64-bit alpha builds available for testing' or something like that. That's the reason why it's a great way of turning an old computer into a device to watch movies downloaded from the Internet or on a CD or DVD on our computer screen or TV set. It uses a 10-foot user interface designed to be a media player for the living-room, using a remote control as the primary input device. (, 15:38) RockerC Wrote: So comes down to a bad choice of title for that news-post IMHO. This distribution is really a Linux version fully focused on running Kodi and all its features, aiming all its resources at running the app and not at other unnecessary functions.Īll your computer's resources will be focused on playing multimedia files.
KODI 17.3 DOWNLOAD FOR WINDOWS 10 64 BIT APK
Kodi, previously known as XBMC, is one of the best multimedia centers that we can download to different platforms (also for iOS and in APK format for Android), that offers us a wide range of options and possibilities to play multimedia files. Focused on the Kodi application, it intends to offer us a method to turn our computer into a media center without any further complications. Ubuntu is one of the easiest-to-use distros that has brought this operating system closer to many users, and this Kodibuntu is based on the latter. Easily turn your computer into a media center
KODI 17.3 DOWNLOAD FOR WINDOWS 10 64 BIT HOW TO
any suggestions on how to install 64 bit ver 17. The Steps are very simple and easy to follow to get kodi on Windows 10. Download and install Kodi for Windows 10/8/7 with the help of this article. if I install the 64 bit it installs ver 18 and works but I want to install ver 17.5. How to Install Kodi on Windows 8.1 Now, if you are using Windows 8.1 on your device, you can install Kodi using anyone of the three methods: Download the software from Kodi’s official website. That's obviously possible thanks to its open-source nature that allows any particular user or company to carry out its own developments. When i install the (x86) version when i start kodi o get a message windows stop working. Kodi (formerly known as XBMC) is an award-winning free and open source (GPL) software media player and entertainment hub that can be installed on Linux, OSX, Windows. One of the greatest advantages of Linux regarding Windows or macOS is the possibility to develop distributions focused on a specific use of our PC. A new version Kodi 17.6 freeload on.
0 notes
Text
Flirc sticker

Flirc sticker mac os#
Flirc sticker install#
Flirc sticker manual#
The first few lines should already exist in you fstab file. # swap was on /dev/sda5 during installation # that works even if disks are added and removed. # device this may be used with UUID= as a more robust way to name devices # Use 'blkid' to print the universally unique identifier for a # /etc/fstab: static file system information.
Flirc sticker mac os#
Also, as you can see, my external hard drive is formatted using HFS+ which is the best file system to use between Mac OS and Linux. The third entry is labeled "Externe Daten" which is the partition I want to mount. To set a fixed mounting point, I first ran the command blkid: to find out which UUID my external hard drive has. However, the mounting point is not always the same which is a bit impractical if you want to share it. If you plug an external hard drive into the NUC, XBMCbuntu will automatically mount it. In the next step, I wanted to share the hard drive that is connected to the NUC in my network using Samba. Some of my favorite plugins are YouTube, Vimeo, TED, arte, Canal+, SoundCloud and TuneIn Radio. I don't really like the default interface design and chose to use the Xperience1080 design which looks a bit like Xbox's home screen.Īlso, I installed some plugins to extend the functionality of XBMC. After that, XBMC would start without any problems. I found the solution on Intel's Community page to be the best and it worked for me. This seems to be a common issue and luckily there's a solution. However, when I rebooted after the installation, I got stuck with a black screen and a frozen mouse cursor. Installing XBMCbuntu is straight-forward and took about 30 Minutes as my USB thumb drive is not that fast. The NUC doesn't have a disk drive, so I downloaded UNetbootin to copy the image of XBMCbuntu to a USB thumb drive.
Flirc sticker install#
As I will use the NUC as a media center PC, I chose to install XBMCbuntu, a linux distribution that is optimized for running XBMC, but unlike other OSes like OpenElec still provides enough flexibility so that I can install other services to run in the background. One thing that's missing though is the operating system. After then putting the cover back on, you have a fully working PC. Next, I took the SSD, put it into the next slot and fixed it using one of the screws.Īs I will connect the NUC to my network using LAN, I didn't include a WiFi card, so I could skip that step. After that, you can start by taking the RAM and pushing it in the predestined slot. First, you remove the bottom cover to get access to the internal components. Installing the additional components, in my case the SSD and RAM is easy and takes just a few minutes.
Flirc sticker manual#
I chose to order the NUC together with a 60 GB Kingston SSD and 4 GB of RAM which is more than enough to run XBMC, the media center software I will use, smoothly.Īfter opening the NUC's box, you'll see the NUC itself, as well as a VESA mount to mount it to the back of a PC display, a pack of screws, a manual and an Intel Celeron sticker. The NUC, or Next Unit of Computing, is a small barebones-computer for about $150 that can be upgraded with an SSD, up to 16 GB of RAM and a WiFi card, if you need one. but I can't see it being too difficult putting a fan in there, and it does have air vents on bottom and top.After some waiting time, the Intel NUC finally arrived. but that might be more then you want to spend.īut I have been shucking my retropie over to friends houses, and sadly, the whiz bang reaction normally comes from the case presentation (or at least plays a large role!). on another thread about the old skool, a gentlemen posted a good one for around 23$. and can't be beat for the "showing other people" factor.īut if I was really worried about it, and was buying a new case, I would probably get one with a fan in addition for a few dollars more. going to get either some heatsinks or put a little fan in there probably. I stress tested it for a couple days with no problems, heavy play, always on, and didn't run into overheating problems, but I could see that happening in the future perhaps. (I received a defective case at first, and they helped me out way beyond the call of duty ((which I will post about, been one of those weekends)) ). I got the OldSkook case, and the company/people over there could not have been nicer.
0 notes
Text
Install Openelec with Kodi on a Raspberry Pi via Windows
Install Openelec with Kodi on a Raspberry Pi via Windows

View On WordPress
0 notes