#or find out a free way to download it and use it in imovie short of playing it on smth and recording that
Text
here's an old(?) animatic test thing i drew last year but finally sat down and edited
@the10amongstthese3s thanks duck mum for supporting all my nonsense and encouraging me this one's dedicated to u
#the audio isnt the cast recording because i cannot tech so i used an audio for it and also because i cant afford the cast recording#or find out a free way to download it and use it in imovie short of playing it on smth and recording that#i know i messed up the lyrics pls forgive me i was going for a more general vibe and at this point im not sure how to change it#im a bit lazy#animatic adventures#im bad at thinking of tags rn its going to be animatic adventures its midnight and idnyl made me cry and i like alliteration#six the musical#six the musical fanart#katherine howard#i didn't draw her in costume#because it was supposed to be one doodle/ drawy thing from a rapunzel screencap and it spiralled and before i realised it#I'd been 10 frames in and coloured and didnt want to redraw them#this is a passion project really#more than the AUs#more than the doodles#ive been wanting to animate since I was thirteen and started taking art as a subject because at that point it really hit me that#oh i can do that#and ive wanted to do it ever since and i made storyboards for animatics but never actually did them and now there's this#three lines from aywd and finally done and i actually did something it feels amazing it feels like im getting somewhere and its okay#its okay if it could be better i finished it and im proud of myself for doing so
146 notes
·
View notes
Note
not sure if you’ve answered this before, but what’s your process look like when you make an amv? i’m just curious and in constant awe of ppl who can make videos like you do :)

hello all!!! i have answered this before and i have a vid help tag with other asks i’ve gotten about stuff like this! but i’ve gotten several more messages along these lines so i’m just going to answer a bunch of them together (under a cut since i love to ramble about editing lol). i do just wanna say i’m definitely not the authority on video editing and obv everyone has their own techniques!
edit: i just finished typing all this up and it’s SO long so sorry in advance LMAO god bless anyone who reads this entire thing
so i work in news tv and we have a very specific workflow for writing scripts, sourcing video, producing, and editing. i’ve just applied that to making amvs! for every video i make, i copy the song lyrics into a google doc and adjust them to match the song i’ve cut (i often will trim songs for time and/or content purposes). then i start planning! i’ll mark down what clip i want to use for each lyric next to that line, and any sound bites i want to use (with episode numbers!). i’ll color code between video and sound bites and lyrics, so my scripts end up looking something like this (for my honeybee amv):

doing the planning ahead of time makes everything much easier when it’s a video that spans the whole show or involves a lot of sourcing, like honeybee or sports analogies. that way when i get to the actual editing process, i already know what i’m going to do and have a game plan. for videos like happy ending or believe it or not, where i’m mainly just pulling from a few episodes, i can just plan it in my head as opposed to writing it all down, and produce as i edit. obviously i do make in-the-moment decisions while editing—sometimes a shot doesn’t work the way i thought it would, or i go where the video takes me—but planning ahead definitely helps. i know some people use spreadsheets as well, with columns for lyrics, video clips, and sound bites if applicable. once you find a system that works, it actually goes pretty quickly.
as for sourcing clips themselves/finding clips within episodes, i talked about that here and kind of here. the short version is that transcripts are a must, and the supernatural wiki is hugely helpful by cataloguing all the hugs, prayers, phone calls, etc. in the show. gifmakers that tag episode numbers on their posts are your friends. it gets easier the more video you make—that’s another huge reason i make the google docs for each video (even the ones i plan in my head, i end up going back and making a loose script with episode notes just for reference). if i can’t remember where something is but i know i used it in another video, i can easily reference past scripts!
i also cut all my videos in the same project in premiere pro, so i can flip between them easily. instead of checking a past script, i can just go to the video sequence itself and copy the clip i’m looking for! this was especially helpful when i match cut together the 5x18 and 4x22 wall slam shots for my bestie video, and then stole it from myself for honeybee hahaha. at any given time i have at least 8 sequences open:

because of the sheer volume of videos i make, it’s worth it for me to download the entire show—i have all 327 episodes in HD, plus deleted scenes. if you think you’re only going to make a few videos, i’d start with scene packs. you can usually just google “destiel [or whatever ship/character you’re looking for] scene packs” and there will be any number of ones you can download. if you need other specific scenes, you can always download/torrent individual episodes or screen record netflix (that’s what i did before i got HD download links). i’m happy to share my links if you DM, but be warned it’s a lot of disk space (about 500GB on my hard drive). someone also compiled every destiel scene, downloadable here.
having every episode already loaded in premiere for all my projects also makes it a lot easier to source clips. once i use a clip in a video, i’ll put a marker on the episode file, so that after a while i have most of the important scenes/lines marked to easily find them. to give you an idea, this is my episode file in premiere for 12x10 lily sunder has some regrets (markers at destiel scenes, the car fight, hot girl cas, etc.). markers are the green tabs along the bottom:
premiere also lets you color code and name markers, so ONE DAY i will go back and color code them all. the ones above are all the same color, but in a perfect world, i’d have a myraid—for destiel shots like hugs, touches, looks; for important pieces of dialogue; for action shots; etc. but for now this works ok for me, so that’s a project for another time!
between detailed scripts, one giant premiere project, markers, the wiki, and my own memory, i have so many points of reference that i can usually find any clip i need in about 2 minutes max. sound bites are often harder to start out, or tiny specific shots i haven’t used before, and that’s when i turn to tumblr gifsets or beloved mutuals to crowdsource. but if you’re as obsessive about marking/keeping neat scripts as i am, it gets easier and easier with every video you make. that’s part of why i’m able to cut videos together so quickly. (also i want to stress i do this for a living and have to produce/edit a new piece for my show every day so i’m used to it. and compared to constantly updating content/sources and news that changes every day, 327 highly documented episodes that never change are much easier to handle hahaha)
this is all great for me since i make so many videos and plan to continue doing so, but if you’re only making a few, this level of work isn’t worth it imo. really it’s all about developing a system that works for you. whatever you do with episodes/sourcing, though, i cannot recommend planning things out in a script ahead of time enough.
everything i just mentioned is producing, though. for the editing process, i usually do it in this order:
music first. any parts i want to cut, i make sure it all sounds smooth
then soundbites. i usually try to weave them into the lyrics—i have characters talk in breaks between lines or instrumental sections as much as possible. i’ll sometimes go so far as looped/extending an intsrumental part to make room for the soundbite i want there lol. if i do have dialogue over a line, i do the sound mixing/levels at this point as well to make sure everything is audible/one doesn’t overpower the other. (also i always include the video that goes with these bites when i drop them in, and decide later if i want to show the character speaking or have other clips cover the dialogue)
once i have all the audio locked in, then i bring in all my other video clips. sometimes i edit completely chronologically, sometimes jumping from section to section—it depends on the song or how i’m feeling
double check sound mixing. i usually listen to my videos through a few times, with headphones and without to make sure it’ll sound good no matter how people watch it
once i have picture and audio lock, i go through and color correct my clips. i’m basic and just use lumetri color in premiere, and usually just play with brightness, saturation, temperature, and tint until i like it
render and export! :)
i always have several audio tracks, but i try to keep my video tracks condensed. i’ll drop clips on a V2 level, and edit a section there, and drop the whole chunk down to V1 so i know it’s finished. that way when i leave and come back i can know where i left off/what’s done/etc. to give you an idea, this is the timeline for my what the hell video:

i always render as H.264 with high bitrate, and make sure to check “render at maximum depth” and “use maximum render quality” for the best quality. i’m sorry, but i don’t know what the equivalent options are in final cut, imovie, kdenlive, etc. i post on youtube mostly so i don’t have to sacrifice quality, but usually just using a lower bitrate will get you under the tumblr file size limit and it’ll still look good.
as for the anon who asked about “polishing”: first of all, thank you!! second of all, it’s in the details. all of this is a matter of taste and my own insanity, but here are some little things i always try to do:
after i color correct, i blur out any credits from the starts of episodes. i use gaussian blur for this, but really any blur tool works
as much as possible, i avoid clips where we see a character’s mouth move but don’t hear the words. in tv/film we call it “lip flap” and i just think it looks messy. also i’m trained to avoid it at all costs at work hahaha. it’s more for serious videos that this matters a lot to me (e.g. i think i did a really good job eliminating lip flap in my happy ending amv)—for comedy videos i don’t sweat it as much
i put audio fades on the start and end of every single audio clip i use, even if i don’t think i need it, to make sure everything sounds smooth
i use markers for timing, especially in action-y videos like what the hell. i’ll put a marker on the clip i’m using at the exact moment a punch lands, and in the song on the beat. if i have the magnet/snap in timeline tool on i can just easily snap them together instead of having to spend time finagling it
this is such a small thing but i dip/cut to black for a tiny bit at the start and end of every video. this way if i post with tumblr video player, there’s black between the loops, and it gives you a beat before the video restarts. i do this even on videos i post on youtube, just because i think it looks nicer/more professional
this is 1,500 words so i’m going to stop myself before i pull something. if you have follow-up questions feel free to ask and i’ll continue to add them to the vid help tag, but any more questions about sourcing clips or my process in general i’ll just link this post going forward. anyone who made it this far, i am sending to a telepathic kiss. thank you for reading and happy editing!
75 notes
·
View notes
Photo
So you want to start a YouTube channel
and have no idea where to begin? Well, you have come to the right place! This article is going to give you an insightful overview of all the steps that you need to follow before you set up a YouTube channel as a beginner. The link below will further give you comprehensive lessons on how to start, grow, and monetize a hyper-profitable YouTube channel from scratch, so make sure you check it out. Keep in mind that I may receive a commission when you click the link and make a purchase. However, this does not impact the quality of the content.
Step 1: Choose a topic So let us get started, the first thing you need to do to start is to come up with a topic for your YouTube channel. Some people say come up with a niche. A niche is a product, service, or interest that appeals to a specialized section of the population. That could be in automotive, business, crafts, health, travel, etc. If you are creating a channel because you just want to have fun and you do not care much about how big your audience is, then go for it, but if you are looking to build a business or an audience, then you need to choose a topic or niche that people are looking for. Your YouTube audience should have a demand for what you are offering, so get out there and do your research. You can research keywords on Google or search on YouTube
and find out whether other people are doing what you have in mind. If other people are providing videos on your topic or niche and they have huge audiences, then you know there is a demand. This also means that you are getting into the field of competition. Therefore, you will need to figure out how to shine so that the audience will watch your videos instead of your competitors.
Step 2: Define your audience i now you are probably thinking, “Yeah, but I don’t have an audience yet…” Here is the thing, when you make a video, you are already creating it as though the people you are targeting are watching, and eventually, they will come. This is because they are looking for you, remember you already found a topic that there is a demand for. Let us say you are doing a health and fitness topic, and you want to share workout videos, are you going to target your videos to men or women? (Obviously, men and women work out differently to a degree) are you going to target younger or older people? Asking yourself such questions will help you create quality videos that are full of value and content that match your topic, and eventually, you will start to build your audience.
Step 3: Do a brainstorm To brainstorm in this context means to start writing down all your ideas of the video titles that you would like to make. Do not worry even if they are crazy ideas, try to get a couple of pages full of content for your channel. Ask yourself, “What content do I want to offer to my target audience? What problems are they having, and how am I going to help solve those problems with solutions? Now once you have done that, then pick out the best five or ten topics, and now you have somewhere to start. As you grow, you will find it easier to look at different areas that you could focus on and bring up the quality of your videos. You are not going to have tens of thousands of people watching your videos as you start, but do not worry about that as long as you have content.
Step 4: Choose your equipment Here you might be thinking “Okay I want to make videos but it’s going to cost me a lot of money. I have to go out and get fancy cameras and microphones and all these different things and I know it’s going to be expensive”. It honestly is not that costly! Many people make their videos in the most inexpensive ways possible, and they go viral. In the beginning, do not worry about the mechanics very much as getting some videos made and getting in the habit, so you can start by using your smartphone or laptop. For the microphone, many laptops and phones have a microphone that is good enough, but if you are using the former, it would be wise to experiment with it as some microphones pick up a lot of background noise that may affect the quality of your video. If this happens, you can buy a microphone on Amazon or from a preferred store. For your backdrop or background, it will depend on your content, location, and your audience. You can choose to do it outdoors where there is beautiful scenery, or indoors with different background decorations to keep your audience captivated. As you become more experienced with making videos, you may find the need to invest in better equipment to improve the quality of your videos, for example, a high-resolution camera, a tripod, and lighting.
Step 5: Come up with a schedule Now that you know what you are going to produce and how to do it, it is time to come up with a plan for when to shoot, edit, and upload your videos. Most successful YouTubers recommend that you upload at least two to three times every week. You could also upload every single day as long as it does not compromise on your quality. It is crucial to make sure that you are not focusing on the quantity more than the quality as the latter matters when you are trying to stand out on a very competitive platform like YouTube. Of course, you can batch film your videos, which means that you film five or ten videos once or twice a month to get all of your videos done in a short time. Whichever schedule you choose, you will need consistency with your uploading.
Step6: Create your YouTube channelYouTube makes this easy, especially if you already have a Gmail account. You can log in with your Gmail account on YouTube and then click through their prompts to set up your channel. It is super simple, and they make it very easy even for beginners to create a YouTube channel.
Step7: Create a banner for your YouTube channel Many sites on the internet will help you create a banner for your YouTube channel, for instance, Canva.com. You can choose from a variety of templates on Canva.com, edit to your preference, and download completely free of charge. Then you will need to write a description. Make sure you put a description that lets people know about your channel. These things make your channel look more professional. After someone watches one of your videos they may click on your YouTube channel, and they realize, “Oh! This person is making videos regularly, and they are committed to their work.” That makes them a lot more likely to hit that subscribe button. You can also put fun information in your banner or in your channel description that encourages people to subscribe to your channel
Step8: Film your first video Now here is where the fun begins. It is probably going to be a bit awkward if you have never done it before, but that is what everyone goes through, so do not worry. Many good things can come from having your own YouTube channel, and you have to bite the bullet and film that first video and get it done. Try being creative and enjoy the filming process by experimenting with different backgrounds, locations, expressions, and even having guests on your videos. This will help you have fun and be comfortable with the process and getting it off the ground.
Step 9: Edit the video and create a thumbnail Before you upload your videos, you may want to cut out some parts of the raw footage, or even add text or background music to your videos to make them more appealing to watch. So you will need to put your videos into an editing program to do this. There are some great free options out there like iMovie on Macs or Windows movie maker on Windows computers. There are also plenty of other paid options like Adobe Premiere Pro or Final Cut Pro X. It does not matter much which program you choose when you are first starting as long as you do not do something overly complex. Once you edit the video, you will need to either take a screenshot from the video to use as a thumbnail or use another photograph or design a graphic for yourself. You can use a free program like Canva.com, or you can purchase a program like Adobe Photoshop or Adobe Illustrator to create that thumbnail. The main things you want to keep in mind when you are creating the thumbnail is to make it as eye-catching as possible and making it clear what is talked about in the video.
Step 10: Upload your first YouTube video Once you have completed all the above steps, it is time to upload your first YouTube video. There is generally no set time to upload your first video but as a tip, pick a time that is best for you. That time should be consistent so that you can start attracting people to watch your videos around that set time. As a strategy, some people prefer to upload their videos first thing in the morning to give their viewers the most time to watch them during the day.
Step 11: Boost your video Now that you have uploaded your first YouTube video, you need to give your video as much of a boost as you can. Every bit of push that you can give to that video helps. This means that you should watch the video too, hit the like button, leave a comment as yourself asking other people to comment, and share that video with everyone that you can share it with on your social media platforms. Tell your friends and family that you just made your first YouTube video and ask them to possibly help you out by watching your video and hitting that like button. There is a big difference between a YouTube video that has two views and one with fifty views. Although fifty YouTube views are still not that much, it shows that some people have an interest in the video, and the more views it has, the more other people are likely to click on that video and watch it. That is because of something called social proof, which means that we think that if other people are doing something, then it must be a cool thing to do it too
Step 12: Stay consistent When you start a YouTube channel as a beginner, everything is bright, exciting and you will have a lot of inspiration. However, as time goes by and especially when you have put up ten or so videos, but you do not see significant growth yet, you might feel discouraged and possibly want to give up. You have to be a lifelong learner and evaluate your work against what is working out there. That will help you understand where you are likely falling short and motivate you to improve the quality of your videos. There was never a channel that put out good quality videos with eye-catching thumbnails consistently and did not start seeing significant growth within the first six to twelve months. So it is not going to take forever, but you do need to stay consistent, keep uploading videos every single week and keep improving your quality with every video if you want to see that growth .How to start a YouTube channel for beginners
#youtube youtuber instagram music love follow like tiktok spotify youtubers video youtubechannel explorepage memes gaming instagood twitch su#digitalarjunn#instagram#youtuber
1 note
·
View note
Text
Basic video editing techniques.
Copying of materials from this website is only permitted with the written approval of the website administration. The audio format FLAC has been added. This format allows the sound to be processed without loss of quality. Processing option of system clipboard added - now it is possible to insert images from clipboard, as well as video and audio images under the link from clipboard. WMV format files - image and sound loss in defective files; sound defects in multiple scenes; no notification if a YouTube category is not supported; problems with dpi support; incorrect decoding of interlaced video. Fixed bugs that caused the program to crash. In addition, a bug was fixed which in some cases led to unexpected results when deleting a video fragment. Editing video and audio files is more flexible and convenient. Deleting and restoring deleted areas is now possible not only using the wizard, but also in the timeline bar. You can subscribe to technical support. We'll help you in every way and quickly you can find out more at the Solving your tasks and problems with our products. More information. A format of timeline settings that has been modified with three modes to save the available scale. Added basic effects window with main adjustment effects, RGB and YUV curves, and quick rotation tools available in a control panel. Prepare videos for Facebook, YouTube, Twitter and Vimeo without any problems; VSDC Free Video Editor offers you special export profiles that significantly reduce the stress when choosing a suitable format and meet all requirements. Our video editor belongs to the category of non-linear video editors. The program supports many different web services and allows you to organize the collection of downloaded videos. In the video editor you can create your own library with multimedia files including a short or detailed description of the individual files. This allows you to organize your media files while ensuring easier searching and easy access to the files. You can change the look of your video image to suit your needs using color blending. With a wide range of adjustable parameters, you can create a unique professional video.
The maximum volume can be specified in percent.
Complete color palettes for the display of functions. Templates that have already been created can be used.
The video -Editor contains tools for converting video and audio files from one format to another.
Profiles for HD videos and videos with high frame rates added.
Create screen titles with Premiere Pro or Adobe Photoshop, which you can then format and animate.
However, it is not easy to do this. Many common editing tools do not support AVCHD formats. Of course there are some for AVCHD editing, but quite expensive. Here I strongly recommend the best AVCHD editor - Wondershare Filmora (originally Wondershare Video Editor), which has the advantage of a powerful function, simple operation and an affordable price. The following shows you step by step how to edit AVCHD files with the best AVCHD editing software.
What do I need to start with video editing?
iMovie for iOS and iMovie for macOS are made to work together. You can start cutting a project on your iPhone. Then transfer it wirelessly to your iPad via AirDrop or iCloud Drive. Or transfer a project from iPad to your Mac to use more features and perfect it with color correction, green screen effects and animated cards.
Create trailer Your trailers are impressive.
Video taken from drones, action cameras or other devices on the go often needs improvement. VSDC stabilization tool such as the virtual tripod helps remove tremors and other shaking effects caused by camera movement and turn them into a much smoother video image. By clicking Submit, you agree to the Adobe Terms of Service. Create screen titles with Premiere Pro or Adobe Photoshop, which you can then format and animate.
1 note
·
View note
Text
If You Convert A FLAC To An Apple Lossless Then Convert Back To FLAC, Shouldn’t
The best way to convert FLAC to ALAC on-line with FLAC to ALAC Converter? Free Audio Converter was added by em4020 in Dec 2009 and the most recent replace was made in Feb 2016. The record of alternate options was up to date Dec 2018 There is a historical past of all activites on Free Audio Converter in our Activity Log It is attainable to update the information on Free Audio Converter or report it as discontinued, duplicated or spam.
FLAC converter gives some basic Audio enhancing capabilities in case you need. You could clip the audio into segments you need, you probably have multiple source audio file, you possibly can merge them into one new file, and so on. The distinction of AIFF to WAV is that former is the usual audio format on Windows and latter is the native audio format for Mac. Step 1: Select the FLAC information you want out of your laptop, iPhone or drag-n-drop the file to the FLAC to ALAC On-line Converter instantly.
This has been reported to Apple however it seems it's not a bug but a deliberate resolution on their part. I think that it pertains to Apple as soon as contemplating releasing 24-bit ALAC information however not wanting end-customers to have unrestricted access to the unique information. With the built-in FLAC editor, it's so easy to edit FLAC files like be a part of, cut, and cut up. You possibly can be part of several FLAC information into one audio file, lower out unwanted audio part and preserve the excellent part.
You may also want to take a look at Freemake Video Converter , another program from the identical developers as Freemake Audio Converter that helps audio codecs too. It even enables you to convert local and on-line movies into different codecs. Nonetheless, whereas Freemake Audio Converter does help MP3s, their video software program does not (except you pay for it).
The quick answer is sure, if it's achieved by a reputable service provider. There are two primary security issues to remember earlier than you employ file conversion software. The primary is the safety of your laptop. Most online file converters require you to add the file to a server. Then the service, usually, sends you an email with an executable file attached. Once you obtain and run an executable file, there's an opportunity it may carry a virus or malware. The identical pitfalls exist for a desktop conversion software that requires you to obtain the appliance. If the software program developer does not have contact types or a reputable About Us page, be cautious.
I suppose it is safe to say that for Apple customers ALAC (file extension is m4a) is most certainly the perfect format for archiving audio. It's a native Apple format so not only applications like the Finder, Garageband, iMovie are in a position to play it, additionally programs like Propellerhead Purpose, Ableton Stay and video functions can deal with the format completely.
iTunes isn't compatible with as many file sorts and doesn't convert as fast as the very best products we examined. Nevertheless, if you wish to import lossless information to iTunes as lossy information to save disk house, there's no cause to use another program. iTunes converts to solely four file codecs: MP3, Apple Lossless Encoder, AIFF and WAV. Additionally, if the file you might be changing has DRM (Digital Rights Administration), iTunes can't convert it as a result of doing so would take away the DRM.
TREMENDOUS might be your first choice if you find yourself looking for a very much superior free audio converter. It has the long list of audio formats it supports. It's also possible to extract the audio from most common video codecs with TREMENDOUS and put it aside to any of codecs. Bigasoft FLAC Converter is one other paid choice that can also be a FLAC editor. It provides a chance to cut out audio parts or be a part of a number of FLAC recordsdata into one file.
So that can assist you decide the best file format for flac to alac converter free download full version your music , moved here is every thing it's worthwhile to find out about audio formats. As they're lossless compression techniques, doing a dialog will make no change to the audio knowledge at all, and likewise will not require trans-coding (simply decompression) - so might be actually quick. Click "Convert" button to begin to convert FLAC to M4A with solely a short time. To convert FLAC to Apple Lossless Audio format is similar steps. You can be reminded by means of the progress bar and the "remaining time" signal.
AAC is useful for iPod or storage in iTunes on account of its small file dimension and lowered disk occupancy, particularly in case you have an iPod with a small disk. The minimal bitrate setting it is best to use for music is a hundred and sixty kpbs though 256 kbps might be to be most well-liked and in use on an iPod is unlikely to be distinguishable from WAV or AIFF (or Apple Lossless).
1 note
·
View note
Text
ASSIST Converting From FLAC To ALAC Ensuing In Noisy File
Find out how to convert ALAC to FLAC on-line with ALAC to FLAC Converter? This audio converter cell app is simply accessible for Android units , however it's free and has a powerful toolbox to convert and manipulate audio files. It helps all the popular audio codecs, together with MP3, WAV and AAC, and has an extensive list of options for editing and merging audio recordsdata as soon as they're transformed. The audio enhancing tool is straightforward to use and means that you can zoom in on a portion of the audio file, trim the clip and set it as a ringtone or notification tone. This app additionally has a feature that merges multiple songs together to make a customized remix.
Convert FLAC to Apple Lossless utilizing a rare straightforward tool. When you go listening to HD music - there is no easy way to come again to lossy audio. That's why right here we will show you learn how to convert FLAC to ALAC in seconds. Suggestions: Based mostly on its identify, we know that the quality of lossy audio codecs have already misplaced. Due to this fact, it is totally meaningless to transform lossy audio codecs resembling WMA to lossless audio formats.
Convert FLAC or some other audio format to MP3 or to a different new audio format. Because of this I believe a suggestion ought to be made to forbid the bitrates for lossless formats. Now, please download the HD Video Converter Factory Professional to finish your jobs. Convert your music to the Free Lossless Audio Codec (FLAC) audio format. Add a file or present a URL to a audio or video file and start converting. Non-obligatory change further settings to fulfill your wants. This converter permits you to also easily extract audio from video files in top quality.
You will not be able to access your audio recordsdata straight from the HDtracks Downloader. Your information will probably be located in the HDtracks" folder within your pc's Music" folder. From there, you possibly can drag and drop the information into your media player of choice. Freemake Audio Converter supports several common audio formats and is extremely simple to make use of. Nonetheless, it solely supports audio recordsdata that are shorter than three minutes.
Step 2: Choose FLAC recordsdata from laptop, Dropbox, Google Drive or URL to convert FLAC file into ALAC accordingly. On the high of the web site all out there formats are showcased. There's additionally a tab that results in the genres of music available on Bleep. The membership-goers and http://www.audio-transcoder.com/ people eager on electronic music basically, will find themselves concerned with a huge vary of dubstep, bass, techno, house, disco.
Utilizing FLAC to compress an audio file to approximately 50% of its unique size. The principle benefits of a FLAC file along with it being lossless is that it can be used for streaming, and decoding is fast, allowing for real time decoding to happen. A FLAC file additionally contains several knowledge integrity checks within the header file. The metadata associated with the audio has been future proofed additionally to allow new fields to be outlined without impacting present decoders.
FLAC, short for Free Lossless Audio Codec, is a type of lossless audio format, which implies it provides the same high quality as the unique audio file. The FLAC audio file takes up much less space in your onerous drive than the unique audio file but it is not suitable with every kind of gadgets. So the next converters come into being to repair this problem.
Batch conversion to transform a number of FLAC files at a time. I then tried to convert this file back to FLAC however Max wouldn't settle for it. Now we have decided to browse the online completely and listing the sources where you will get your favorite music tracks in lossless codecs. Here we go along with our pick of the best 10. In case you don't need to undergo the whole changing course of, and don't thoughts using an app apart from Apple Music, then there may be an easy way to get the excessive-res files in your iPhone.
FLAC, is free, open-supply format that can give you a lossless digital audio file with high audio quality as well as small measurement. FLAC will be performed on many players nevertheless it can't be supported on iOS devices like Mac, iTunes, iPhone, cesarrawlins30502.mobie.in iPod, iMovie, QuickTime, and so on. For playing FLAC music with Apple Devices, you should FLAC file to ALAC first.The WAV file is without doubt one of the simplest and oldest digital Hi-Res audio codecs. It was originally developed by Microsoft and IBM in 1991. I'm not going to go deep into history, however, in a nutshell, Apple later derived its own model of WAV, and so they referred to as it AIFF (Audio Interchange File Format). Basically, AIFFs are Apple's equivalents to WAV recordsdata. These audio codecs work by taking audio signals and changing them to binary data.
1 note
·
View note
Text
Free Dvd Burner For Mac Os X
The 1.0.0 version of Data DVD Burner for Mac is available as a free download on our software library. This software for Mac OS X is a product of WaveInsight Software. The following version: 1.0 is the most frequently downloaded one by the program users.
External DVD Drive, USB 3.0 Portable CD/DVD +/-RW Drive/DVD Player for Laptop CD ROM Burner Compatible with Laptop Desktop PC Windows Linux OS Apple Mac Black 4.3 out of 5 stars 22,344 $22.99 $ 22.
Burn Dvd Software Mac
Free Dvd Burner For Mac Os X
Best Mac Dvd Burning Software
September 06, 2019 9:28 PM / Posted by Janet Richard
Follow @Janet Richard
Though that DVD burning (e.g. burn MP4 to DVD on Mac) gradually becomes outdated, it’s still a necessary function for certain people.
Where Free DVD Burning Software for Macintosh Fall Short; — It can burn data on DVD, Blu-ray, and HD-DVD. What's more, you can also use it. How to Burn ISO with Mac OS X Finder Although with the release of Mac OS X 10. Of downloading Download Mac OS X Mountain Lion 10.4.7 Lion OS X 10.
If you just need to save some space on your Mac, you can put the MP4 video into a folder > right-click it > choose the option to burn your folder to disk. However, the built-in “Burn to Disc” feature will result in a data disc (no standard-conform video-DVD), which will play on Mac but not in a DVD or Blu-Ray player.
To burn MP4 to playable DVD on Mac, you should convert MP4 to DVD (the QuickTime video format for Mac) at first and then burn DVD with iDVD, iMovie or other similar applications.
But iDVD has stopped developed since Mac Lion, and as for iMovie, you must take time to learn how to use this complicated application. Luckily, this is not the end to create DVD from MP4 on macOS Catalina, (High) Sierra, El Capitan, etc. Below, I will show you how to burn MP4 to DVD on Mac, with all the things you desire to know provided.
Benefits to Burn MP4 to DVD on Mac
1. Burn the MP4 files to DVD discs as a holiday gift.
2. DVDs are easier to store than digital file, so you won’t have to worry the computer crash or disk damage.
3. Most digital files especially videos recorded by camcorder are very large, and require big memory. That burning MP4 to DVD Mac will greatly reduce the burden of your hard drive.
Burn Dvd Software Mac
4. DVD is a very good way to send and preserve your favorite video clips forever.
Burn MP4 to DVD with the Best DVD Authoring Software for Mac
We have taken a look at a range of different MP4 to DVD burners for Mac, along with those bundled with your machine already. Some of them are thine in their simplicity, others stand out with a huge feature set.
When hunting for the best software to burn MP4 to DVD Mac, it’s important to find one that’s reliable and able to retain the quality of the original video. To offer an all-in-one solution, we’d suggest you to use iFunia DVD burner (also named Video Converter) for the entire MP4 to DVD Mac process, attributing to its powerful features:
Super-fast DVD burning speed.
Burn any types of videos to DVD smoothly and without losing quality.
Edit and personalize videos by trimming, cropping, merging, adding watermark, subtitles, menu, etc.
Make DVDs taken by iPhone, iPad, Samsung, camcorders, etc.
Comes with a variety of DVD menu templates, which comes in handy if you're creating DVDs as a holiday gift.
Download 1080P & 4K videos from YouTube, Vimeo, dailymotion, and 1000+ video sharing sites.
Convert videos to virtually any format.
Highly compatible with macOS
How to Burn MP4 to DVD on Mac with the Best DVD Burner:
Step 1. Install the software on Mac
1) Download iFunia DVD Burner and install it.
2) Go grab that stack of blank discs you have, insert it to the DVD drive and pull up a chair. (If your Mac doesn't have a DVD drive, connect an USB DVD drive to the Mac)
Step 2. Load multiple MP4 files
1) Launch the software, and click the icon- the second tab to switch to the burning interface.
2) Drag and drop your MP4 files to it. This MP4 to DVD burner for Mac supports burn video files in batch, so you can add as many files as you need.
Step 3. Edit the MP4 videos and choose a menu if necessary
1) Click the icon, and go to edit your MP4 videos by trimming, cropping, rotating or adding sorts of effects.
2) Choose a menu template that is suitable for your DVD, and you can also choose as no menu.
Step 4. Preview your project
Click the icon to preview if the videos meet your needs.
Step 5. Create DVD from MP4 Mac
1) Click the button > select the output format from DVD Disc, DVD Folder, and ISO File > adjust the DVD settings.
2) Start the MP4 to DVD burning process. The amount of time depends on computer hardware and the size of the MP4 videos.
Once it finished, you will have a DVD, which you can use for gift sending or playing on your home DVD player.
6 Alternative Methods to Burn MP4 to DVD on Mac
Method 1. iMovie
Developed by Apple Inc., iMovie is a video editing software app available for Mac and iOS devices. In addition to using iMovie to edit your videos, you can also use it to burn videos in MP4 or any other supported format to DVD.
Burn iMovie to DVD using iDVD:
1. Import your MP4 video to iMovie.
2. Click the Share button.
3. Launch the iDVD software.
4. Insert a black DVD into your Mac.

5. Finally click the Burn button.
During the process, you can also edit your MP4 video and choose a DVD theme that you like.
Burn iMovie to DVD with iTunes:
If iDVD is not available on your Mac
1. Add a MP4 file to iMovie and edit it.
2. Click the Share button and export it to iTunes.
3. Insert a blank DVD, and a message will pop up.
4. Choose the action “Open iTunes”, follow the instruction and start the process to Burn MP4 to DVD Mac effortlessly.
Pros
Allows users to edit the video before burning it
iMovie app was free for all Mac computers since 2003
Works smoothly and efficiently, just like other Mac apps
Cons
On Mac where iDVD is no longer offered, users have to choose the second option mentioned above. In this case, DVD theme and other features are not available.
Method 2. iDVD
You can use iDVD to burn movies, videos, music as well as photos to DVD and to create DVD menus. It only takes a few steps.
1. Launch the app.
2. Select a menu theme which you can customize by adding music and pictures.
3. Drag and drop the MP4 video that you want to burn into the app. Of course, you shouldn’t forget the essential part of inserting a blank DVD into your computer.
4. Simply click the Burn button to convert MP4 to DVD on Mac for free, and just wait for the process to finish.
Please note that from Mac OS X 10.7 Lion onward iDVD is no longer pre-installed.
Pros
Easy to use with helpful instructions
Burn MP4 to DVD Mac with decent quality
Come with various DVD themes that can be customized
Cons
Was discontinued a long time ago
Method 3. Burn
Burn software for Mac can burn videos, songs as well as data to DVD. While coming with limited features and a rather simple user interface, the app is ease to use with decent performance. You can use the app to convert MP4 to DVD Mac or recreate previously created DVD.
1. Get the software from burn-osx.sourceforge.io, and open the software.
2. Choose the “Video” tab. (There are 4 tabs: Data, Audio, Video, Copy.)
3. Drag your MP4 video file to the main interface. Or click the “+” button in the bottom left hand corner to navigate the file.
4. Choose the output as “DVD-Video”.
5. Plug in a DVD disc and begin to burn MP4 to DVD on Mac right now.
Pros
Lightweight with small file size
Delightfully straightforward user interface
Cons
Supports limited file formats
Crash occasionally
Method 4. Disco
Disco is another compact and easy-to-operate app to convert MP4 to DVD on Mac. It features a user-friendly interface allowing you to find each function quickly. For convenience’s sake, Disco offers a feature that enables you to search file name and DVD name within an archive of previously burned DVDs.
1. Drop the MP4 file to the app.
2. Insert a disc.
3. Click the “Burn” button. (Note: leaving will remove custom disc layout.)
When creating DVD from MP4, the software emits virtual “smoke”, and reacts to you blowing into the microphone.

Pros
Very simple to use
Works fast when used to burn MP4 to DVD Mac
Allows users to search burned DVDs by name
Cons
No update or support available since it’s been officially discontinued
Method 5. Roxio Toast
If you want to burn family videos, holiday videos, wedding videos, etc. to home DVDs, Roxio Toast is a good choice. Just like some apps listed above, in addition to videos in MP4 or other formats, it can also burn photos and data to DVD. One great feature is that it supports burning HD DVDs. You can import MP4 files that you are going to burn by dragging and dropping or via the Media Browser window. There is a “Best” option which, if chosen, the app will automatically create DVD with the highest quality possible.
1. Drag the video (or drag from the Media Browser window) you would like to burn into the specified area.
2. Choose the project type- “DVD-Video”.
3. Customize the “Option” panel: select the menu style and quality. There is a “Best” option which, if chosen, the app will automatically create DVD with the highest quality possible.
4. Grab a blank disk and burn video into it.
Pros
Versatile with powerful performance, allowing users to burn MP4 to DVD Mac like a pro
Supports burning HD DVDs
Various customization options
Cons
New users may feel overwhelmed by some features
Method 6. Express Burn
Express Burn, a paid program, supports to burn files to CD, DVD, Blu-ray on Mac and Windows. It contains a series of menu templates and buttons for DVD authoring.
1. Run the software, and it will pop up the screen for you to choose disc type, just choose “Video DVD”.
2. Add your MP4 video into the program.
3. Make sure you have your blank DVD-R or DVD-RW inserted.
4. Start the burning process.
Pros
The Pro version is good at burning CD and Blu-ray discs, which other general MP4 to DVD burners can’t do.
Fully compatible with both Mac and Windows
Cons
Unable to burn commercial DVDs
Extended: Copy a DVD VS Burn a DVD, What’s the Difference?
As the name implies, 'copying DVD' means copy the contents of a DVD. You should use a third-party tool to remove the copying protections (CSS, UOP, RC, APS, Cinavia) and make a copy of the DVD on a brand new disc. But you can’t distribute copyrighted DVDs or use them for business purpose.
'Burning DVD', a colloquial term, refers to the process of writing content to a video DVD or a data DVD. To make DVD video playable on DVD player, we have to burn MP4 to video DVD on Mac.
Poll: Vote for Your Favorite DVD Burning Software
Above are the methods to convert MP4 to DVD Mac by using different software tools. Which one do you think is the best to use?
Best Tool to Burn MP4 to DVD on Mac
BurnDMG file
DMG files are Mac OSX disc image file. It is commonly used on Mac OSX system, just like ISO file on Windows. Most of Mac OSX software are packed into a dmg file, which can be mounted as a volume within the OSX Finder, thus you can install the software without using a physical disc. AnyBurn can extract dmg file, convert dmg file to iso format, or burn dmg file to a new disc directly. To burn a DMG file, please follow the below steps,
1. Run AnyBurn, then click 'Burn image file to disc'.
2. The 'Burn image file' page will show. You can select the source DMG file by clicking 'Browse' button. The burning drive list will list all writers connected to the computer, please select the correct one from the list if multiple writers are connected.
The default burning speed is the maximum speed allowed. You can select a slower speed from the speed list if needed.
Check the option 'Verify written data' if you want to compare the data written to the new disc with the original data to make sure that the new disc is readable, and all files are identical with the source files.
Click 'More settings...' if you want to change other settings, such as simulation burning, setting number of copies, or burning to multiple drives at once.
Click 'Burn Now' to start burning the DMG file.
Free Dvd Burner For Mac Os X
3. AnyBurn will start burning DMG file to the disc. If the disc is rewritable and not empty, anyburn will prompt you to erase the disc automatically before burning.
Best Mac Dvd Burning Software
AnyBurn will show the progress information during burning. After the burning completes, you should see the message, 'Burning completed successfully'. If 'Verify written data' option is set, and data verifying completes successfully, you should see the message, 'Verifying media completed successfully'.
0 notes
Text
Show System Library Folder Mac

Preview and selectively transfer: You can choose to transfer your files in bulk, or selectively. 100% successful sync: When between iPhone and iTunes, TunesMate safeguards your files knowing fully well that they are precious to you. TunesMate makes this choice available!. 2-way sync: With iMyFone TunesMate, you can freely transfer iTunes library from iTunes to iPhone or from iPhone to iTunes. How to save itunes library mac os. .
Show System Library Folder Mac Os X
Find Folders On Mac
Show System Library Folder Mac Version
Show System Library Folder Mac Sierra
May 30, 2019 Show Library folder on mac with Terminal in OS X 10.11 El Capitan and earlier versions Launch Terminal from Spotlight or Launchpad. Type in the window the next command. Jan 12, 2020 Launch Terminal, located in /Applications/Utilities. Enter the following command at the Terminal prompt: Press Return. Once the command executes, you can quit Terminal. The Library folder will now be visible in the Finder. Should you ever wish to set the Library folder back to its default hidden.
Look at the folder structure of a typical OS X installation. Open a Finder window and click the icon for your hard drive (which is typically called Macintosh HD) in the Sidebar. You should see at least four folders: Applications, Library, System, and Users. Within the Users folder, each user has his own set of folders containing documents, preferences, and other information that belongs to that user and account.
From the top: The Computer folder
The Computer folder shows all the storage devices that are currently connected to your Mac. The following steps show how you can start at the Computer folder and drill down through the folder structure:
To find the Computer folder, choose Go→Computer or press Shift+Command+C.
The Computer folder in this example is called Bob L’s MacBook Pro, and it contains a hard-drive icon (Mavericks HD) and a Network icon, with which you can access servers or other computers on your local network.
Double-click the icon that holds your OS X stuff.
Technically, this drive is called your boot drive. If you haven’t changed it, it’s probably called Macintosh HD.
Check out the folders you find there.
You should see at least four folders (unless you’ve added some; if you installed the Xcode programming tools, for example, you have more).
The Applications folder
You can access the Applications folder, located at the root level of your boot drive, by clicking the Applications icon in the Sidebar, by choosing it in the Go menu, or by pressing Shift+Command+A. In this folder, you find applications and utilities that Apple includes with OS X.
Fonts (and more) in the public Library folder
The Library folder, at the root level of your OS X hard drive, is like a public library; it stores items available to everyone who logs into any account on this Mac.
Leave the /System/Library folder alone.Don’t move, remove, or rename it, or do anything within it. It’s the nerve center of your Mac. In other words, you should never have to touch this third Library folder.
By and large, the public Library subfolder that gets the most use is the Fonts folder, which houses many of the fonts installed on the Mac
Finally, the Library in the Users folder is where OS X stores configuration and preferences files shared by all users.
Show System Library Folder Mac Os X
If your Mac is set up for multiple users, only users with administrator (admin) privileges can put stuff in the public (root-level) Library folder.
The System folder
The System folder contains the files that OS X needs to start up and keep working.
Apple’s new Photos application was released as part of a recent system update. By default, Photos creates its library in your Pictures folder, but it can be easily moved or newly created. There are any number of reasons you might want to create a new Photos library or move it to another location. 2020-3-18 Your Photos library holds all your photos, albums, slideshows, and print projects. If your library is large, and you want to free up storage space on your Mac, turn on iCloud Photo Library and use Optimize Mac Storage, or move your library to an external drive. Before you start, be sure to back up your library. How do i move photos from one library to another mac. 2020-3-31 Your Photos library holds all your photos, albums, slideshows and print projects. If your library is large, and you want to free up storage space on your Mac, turn on iCloud Library and use Optimise Mac Storage, or move your photo library to an external drive. Before you start, make sure that you back up your library.
Access mac library folder. For example, many apps put backups in the Library folder and you may want to back up the backup. Deleting some or all of these settings will at best force you to reinstall certain apps, and at worst, cause the whole system to collapse and require a complete reinstall.But there may be times when accessing the Library folder is necessary. Just like the Windows operating system, the MacOS operating system has a hidden Library folder full of settings you shouldn’t really touch. Or you might be customising your Mac, which will need access to certain library folders.Here is how to get there and not cause your Mac to collapse in a cloud of dust in the process.
Leave the System folder alone.Don’t move, remove, or rename it or anything within it. It’s part of the nerve center of your Mac.
The usability of the Users folder
When you open the Users folder, you see a folder for each person who has a user account on the Mac, as well as the Shared folder.
The Shared folder that you see inside the Users folder allows everyone who uses the Mac to use any files stored there. If you want other people who use your Mac to have access to a file or folder, the Shared folder is the proper place to stash it.
There’s no place like Home
From the Users folder, you can drill down into the Home folder to see what’s inside. When the user logs on to this Mac, his Home folder appears whenever he clicks the Home icon in the Sidebar, chooses Go→Home, or uses the keyboard shortcut Shift+Command+H.
Feb 09, 2013 Java Project Tutorial - Make Login and Register Form Step by Step Using NetBeans And MySQL Database - Duration: 3:43:32. 1BestCsharp blog 5,812,079 views. Watchtower Library for Mac 2 2.1 is available as a free download on our software library. The actual developer of this free Mac application is Roy Ratcliffe. The application is categorized as System Tools. Watchtower library 2013 para mac. Mar 15, 2018 Here is how you install Watchtower Library on Mac: Either insert the Watchtower Library disc or if you have the Watchtower Library setup files in a folder make sure you can find it. Download Wineskin Winery. Unzip Wineskin Winery if the downloaded file from the previous step is a ZIP file. Open the Wineskin Winery application. Watchtower Library Now Available for Download Watchtower Library can now be downloaded from jw.org to run on Windows computers. Learn how to download Watchtower Library to your computer.
Your Home folder is the most important folder for you as a user — or at least the one where you stash most of your files. It is strongly recommend that you store all the files you create in subfolders within your Home folder — preferably, in subfolders in your Home/Documents folder.
When you open your Home folder, you see a Finder window with a little house icon and your short username in the title bar. Seeing your short username in the title bar tells you that you’re in your Home folder. Every user has a Home folder named after his or her short username.
Find Folders On Mac
If your Mac has more than one user, you can see the other users’ Home folders in your Users folder, but OS X prevents you from opening files from or saving files to them.
By default, your Home folder has several folders inside it created by OS X. The following four are the most important:
Desktop: If you put items (files, folders, applications, or aliases) on the Desktop, they’re actually stored in the Desktop folder.
Documents: This is the place to put all the documents (letters, spreadsheets, recipes, and novels) that you create.
Library: This Library folder is invisible in Mavericks. Rest assured that even though it’s hidden, it’s still one of the most important folders in your Home folder, containing Preferences, fonts available only to you, and other stuff that you expect to use.
Public: If others on your local area network use file sharing to connect with your Mac, they can’t see or use the files or folders in your Home folder, but they can share files you’ve stored in your Home folder’s Public folder.
You can create more folders, if you like. In fact, every folder that you ever create (at least every one you create on this particular hard drive or volume) should be within your Home folder.
Photos in your System Photo Library are available in apps like iMovie, Pages, and Keynote. You can also sync them to iOS devices and view them on Apple TV. And if you want to use your own images as your desktop picture or screen saver, the images need to be in your System Photo Library before you can select them in System Preferences.
If you have only one photo library, then it's the System Photo Library. Otherwise, the first photo library that you create or open in Photos will become the System Photo Library. If you have more than one library, you might need to designate a System Photo Library, so other apps can access the photos and videos you want them to use.
Follow these steps to designate a System Photo Library:
Quit Photos.
Hold down the Option key and open Photos. One of the photo libraries is already designated as YourLibraryName (System Photo Library).
Choose the library you want to designate as the System Photo Library.
After Photos opens the library, choose Photos > Preferences from the menu bar.
Click the General tab.
Click the Use as System Photo Library button.
Show System Library Folder Mac Version
If you open a second or different library in the Photos app, and you haven't designated it as the System Photo Library, other applications will use photos from the original System Photo Library. Hold down the Option key when you open Photos to see which library is set as the System Photo Library.
iCloud and the System Photo Library
Show System Library Folder Mac Sierra
You can use iCloud Photos, Shared Albums, and My Photo Stream only with the System Photo Library. If you choose a different library in Photos without designating it as the System Photo Library, the iCloud tab in Photos preferences is disabled: Sonos and itunes library.
If you designate a new library as the System Photo Library and then turn on iCloud Photos, the photos and videos in the new library will merge with those already in your iCloud Photos. If you want to keep the contents of your photo libraries separate, don’t turn on iCloud Photos for more than one library in Photos.
0 notes
Text
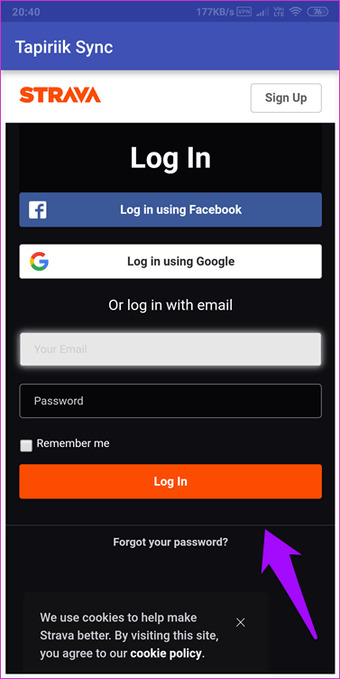
Can You Download Strava To Macbook Pro
Can You Download Strava To Macbook Pro Max
Can You Download Strava To Macbook Pro 2020
Can You Download Strava To Macbook Pro 2017
Can You Download Strava To Macbook Pro Windows 10
Mar 28,2019 • Filed to: DVD to Computer • Proven solutions
Have some DVD movies and want to watch them on your MacBook (Pro), MacBook Air, etc. Why wont my iphone photos download to my macbook pro. without the disc inserted into your Mac's hard drive? Want to transfer your favorite DVD movies to MacBook and put them in your iTunes library so that you can sync them to iPhone, iPad, iPod, etc.? If it is the case, then you are in the right place now. In this article, you'll learn how to rip DVD to MacBook Pro, MacBook Air, etc. friendly MP4, MOV, etc. with ease.
Solved: How can I install my Adobe Photoshop CS6 CD software into my second Macbook Pro since it has no CD drive? Arnaldo - 4952971. If you want to change your Apple ID on Macbook with Mac OS X, you can do that when you are logged into the user account you wish to change. If by any chance you Forgot Apple ID Password you will not be able to change your Apple ID and you must first retrieve your password. For that, you can check out our other article on how to Create iCloud Email. You also get four useful ports: one HDMI out with support for 4K at 30 Hz., two USB 3.0 Type-A, and one USB Type-C (which you can use to power your MacBook). Due to the shockproof nature of an SSD, you can throw the Minix NEO in your bag without worrying about damaging your data. Strava Running and Cycling is a free download available for iPhone and iPad on the App Store. Apple introduced the first MacBook Air, MacBook Pro, and Mac mini with M1 Apple.
To convert DVD movies to MacBook, you need a Mac DVD ripping tool. Here Aimersoft OS X DVD Ripper is highly recommended to help you rip DVD files to MacBook MP4, MOV, M4V, etc. with fast conversion speed and high output video quality on Mac OS X (including Mac OS X 10.6, 10.7, 10.8 Mountain Lion and 10.9 Mavericks). In addition, the built-in editor lets you personalize your video in clicks. Now download this program and follow the steps below to copy your DVD movies to MacBook with ease.
Aimersoft DVD Ripper
Convert DVD to iTunes supported MOV, MP4, M4.
Extract DVD background music to iTunes AAC, MP3.
Automatically transfer converted videos to iTunes Library.
Embed iTunes movie metadata for easy video management.
How to convert DVD to video for MacBook
Add DVD movies
Load the DVD disc into your Mac's disc drive and launch DVD Ripper for Mac. Then click 'File' > 'Import' > 'Load DVD' to import the DVD movies. Alternatively, you can easily drag the disc icon from your desktop to the interface of the program. You can preview the loaded DVD in the right viewing window and you can also take snapshots as you like.
Choose output format
The following step is to choose an output format. Simply click the format icon beside each video clip and choose a format from the drop-down list. As is shown in the following picture, you are available to nearly all popular video output format. If you would like to play DVD movies on your MacBook, you can you can select MOV, MP4, M4V. Or select a format under 'Apple Devices'/'Apple Software' to get video files with optimized settings for iPhone, iPad, iPod, iMovie, Final Cut Pro, etc.
Start ripping DVD movies
When you're satisfied with all settings, click 'Start' on the main interface to start ripping your DVD to your preferred video format that is highly compatible with MacBook.
What apps should I download for My New MacBook Pro or any other Mac device? Your search ends here as we present you with the list of the best apps for Macbook Pro 2020 or other macOS based devices i.e. Mac PC, Macbook etc. Keep reading to find out the essential apps for Macbook, which will help you in the long run.
What Apps Should I Download For My New MacBook, MacBook Pro?
Well, we have characterized all the must-have applications for your MacBook Pro and any other MacOS based device, based on different categories like Productivity, Entertainment, Social & other user needs. Check them out & download the ones you find the best apps for new Mac machines.
11 Best Apps For Your New Macbook, Macbook Pro, and other Mac Devices in 2020
1. Smart Mac Care
The best app for Macbook Pro 2020 is Smart Mac Care as it provides you with a perfect solution to optimize your Mac. This all in one tool will help you keep the Mac in good health by decluttering it and providing security from malware. Smart Mac Care comes loaded with the most amazing features to clean up the unwanted junk, cache, temporary, log and trash files. The Privacy scan helps you in removing the browsing history to keep you safe from the online tracking. The Malware scan detects the infections sitting on your computer and eliminates them.
Smart Mac Care proves to be the best software for Macbook Pro with its additional tools to remove duplicates,failed downloads and login items. With its overall cleaning process your Mac will get back to its optimum performance. You can see the considerable change once you have installed the Smart Mac Care on your Mac, Macbook or Macbook Pro.
2. Dropbox or Google Drive
Both the cloud storage services are household names at this point as useful apps for Macbook. The chances are that you already know the merits of Dropbox & Google Drive. Having any cloud storage solutions, you can get quick access to all your files & folder. With Google Drive, you can work on documents, spreadsheets & presentations even without the Internet. With Dropbox, you can synchronize the data of multiple computers at once place. Both of these services are the best free apps for Macbook Pro.
Both the universal cloud storage services have their own set of merits & disadvantages. If you ask us, Google Drive is a compelling choice as it brings 15GB of space along with best-in-class web apps. At the same time, Dropbox is a good choice for users who don’t need extra web services other than 2GB cloud storage.
Download Google Drive Or Dropbox.
3. Duplicate Photos Fixer
Usually, it’s advised to keep at least 10% free space from your whole Mac storage to ensure smooth working. If you are on your way to transfer your old photos to your new Mac, then make sure you keep your library duplicate-free. Finding & removing identical & similar images can be a tedious & time-consuming task. But if you use a dedicated duplicate finder utility like Duplicate Photos Fixer Pro, you can organize & declutter your Mac in the easiest way possible.
4. Password
Hate trying to remember every single password for every account you’ve ever used? Well, 1Password is a must-have app for MacBook Pro when it comes to storing all your passwords at one secured location in an encrypted vault. The vault gets locked with a single master login password for maximum security. The password manager keeps track of your security questions for different sites & helps you auto-fill them for a hassle-free process.
1Password is the best MacBook Pro app to install, as it works fantastically well for randomly generating strong, unique & secure passwords by auditing your existing passwords. This ensures that you don’t reuse any of them & keep altering them for better security. 1Password offers a 30-days free trial; after that, you can spend $4 per month to continue using the service.
5. VLC Media Player
VLC is another best app for MacBook Pro to install. It works perfectly well with minimal fuss once you start using it. The media player can play almost any audio/video files you throw at it. While most users would probably only use it to watch media, it also offers a decent set of features that most of the advanced users would enjoy. Adobe after effect free download for mac full version windows 10. For instance, VLC offers lots of editing tools to help you adjust the file properties & for an enhanced watching experience.
Its interface may sound a bit intimidating to novices, but once a user gets used to it, it is easy to access its various tools. This best free app for MacBook Pro comes packed with a wide range of codecs, making it a universal player. If you are a power user with a huge media collection, VLC is absolutely the best Mac program to give a shot.
6. Time Out – Break Reminders
Several studies show that short bursts of regular movements throughout the day are better for your health than longer workout sessions. But in our busy lives, that’s not always an easy proposition to execute. Thankfully, MacBook Pro has some best apps like Time Out – Break Reminders, which help users remember when to take breaks. With Time Out, the app can strategize how long each kind of break would last & the period between each break.
Can You Download Strava To Macbook Pro Max
While you are on a break, a progress bar is shown to evaluate how long until it is over. You have the buttons to postpone or skip the break. Additionally, you can choose to display a notification, play a sound, speak some words, or just run a script to remind it’s time for a break. This will prove to be one of the good apps for Macbook.
7. Audacity
If you’re looking forward to getting started with Podcasting or music recording, then Audacity is a great option to consider. An excellent app for MacBook Pro, Audacity is a free, open-source audio editing software that helps you make your recordings, remove digital noise, chop, combine & mix clips. You can rely on the audio editor to apply special effects, alter frequencies with Equalization, Bass & Treble.
Just install this free app for MacBook Pro, start importing different file formats, and alter the audio files with multi-tracking editing options. Talking about the interface, Audacity features a huge selection of powerful tools to remove vocals for the music track, reduce noise & access other handy wizards for professional results.
8. Flume
Can’t get enough of Instagram? Then you should install Flume For Instagram on your machine. It’s an excellent app for MacBook Pro that provides a unique social experience. You can upload high-resolution images & videos in square & non-square format. Besides this, you can use it to navigate your Insta feed, like, comment & more, making it the best new Mac apps to have.
To use this best free app for MacBook Pro, just install it > log into your Instagram account & just like your smartphone, you can browse feeds easily. Besides Flume, you can try using Photo Feed, App Insta for Instagram & Uplet to help you browse Instagram directly from your Mac machine.
9. Right Backup
Can You Download Strava To Macbook Pro 2020
From irreplaceable family pictures to the presentation you’re working on, every data is needed to be protected. Without a proper backup system in place, you can lose all those files in a blink of an eye. Fortunately, there are certain top apps for MacBook Pro, like Right Backup, that come with an automatic 12-hour scheduler to update your stored data every 12 hours. Since everything is stored in a secured cloud space, you don’t need to worry about protecting your data on Mac.
Right Backup, a useful app for MacBook Pro, comes compatible with multiple platforms; hence you can access your data anytime, anywhere from any device using the same Right Backup account. To get your lost data backup with the utility, all you need to do is log in with your account & start retrieving important files, photos, videos, documents in a few clicks
10. iSkysoft PDF Editor
One of the best & widely used solutions for viewing & editing PDF files is iSkysoft PDF Editor. It’s a complete suite of PDF editing tools to help users manipulate texts, images, links & other elements without any hassles. You can use this best app for MacBook Pro to crop, rotate, extract, split, add watermarks, change background colors & do a lot more. Talking about the interface, iSkysoft has a simple & intuitive dashboard that makes editing, organizing, review, converting & protecting super-easy.
Users can download & use the free trial version to try all the features once before they spend money to get the premium version. It promises a 30-day money-back guarantee as well if a user comes unsatisfied. You can read more about this top app for MacBook Pro here!
Can You Download Strava To Macbook Pro 2017
11. Systweak Anti Malware
Systweak Anti Malware is one of the essential apps for Macbook as we all know no device is safe. One must get a security tool to monitor it at all times, and Systweak Anti Malware can do this the right way. It will easily detect the presence of malware on your computer and remove it. This is one of the best Mac programs as it has an up to date database for malware, which helps scan the latest computer virus.
Can You Download Strava To Macbook Pro Windows 10
This must-have app for Macbook Pro comes with different scanning options for convenience. You can schedule scans with this new software for Mac, which is incredibly useful for all users who often forget to scan the system from time to time. Shows you all the threats and infected files with its location in the Quarantine section. You can easily remove all the malicious elements with their help and get rid of them from your Mac.
This is just a small selection of some of the Best Apps For MacBook Pro. There are plenty of other applications & utilities out there for each work. If you’ve got any Favorites, leave us a note in the comment section below!
What Do You Think?
6 Responses
0 notes
Text
Best Macbook Pro For Video Editing

Best Macbook Pro 16 For Video Editing
What Is The Best Macbook Pro For Video Editing
Best Video Editing Computer
May 11, 2018. Jul 22, 2019. Apr 07, 2020.
Final Cut Pro. First on our list of 12 best video editing software for Mac is Final Cut Pro. It is Apple’s. Best MacBook Pro for Video Editing. The comparison chart below enlists all the best macbook pro for video editing to help you choose the best. Top 8 Best MacBook Pro for Video Editing. We have covered some of the best available options in this list. So, spend some minutes in reading to find the best.
Apple didn’t get its reputation for performance and accuracy from nowhere.
Everything from phones to paper-thin notebooks are engineering to work efficiently, and this makes their MacBooks ideal for all levels of video editing.
AVG Free is an excellent product which does not slow my machine down (I have had it running in Windows XP, Windows Vista, Windows 7, Windows 8.1 and now in Windows 10), it has never crashed, it is simple to update and possibly most importantly it seems to catch 990/0 of any viruses I come across on the fly (any it doesn't catch are found during a weekly. Monthly scan of my system). Best antivirus for windows 7. Mar 07, 2016.
Besides integrating extremely well with the Adobe Creative Cloud suite and many other third-party photo/video editing software, they offer a streamlined experience that will work well in any freelance or industry position.
In this guide, we’ll point out some key points for choosing the best MacBook Pro that will most effectively work for video editing at various levels, and showcase some of our own recommendations as well.
Quick Summary
For the casual creative, we recommend the 13-inch MacBook Pro with 256GB SSD, which offers quality performance without unnecessarily bulking up the specs. It doesn’t offer touch bar, but it is portable and sturdy.
If you certainly aren’t a hobbyist but not a pro either, 13-inch MacBook Pro with 512GB SSD is a better choice. The storage has been beefed up a bit, and the touch bar offers a new dimension of functionality.
Lastly, the professional creative looking to max out their performance power would be best served with a 15-inch MacBook Pro with i9 Processor and 512GB SSD. This model offers insane amounts of processing power, though you’ll likely still want an external monitor for the sake of screen space.
Is MacBook Pro Good for Video Editing?
In this case, it isn’t about whether or not a Mac will be effective for video editing, but a matter of how much power you really need.
If you just plan on doing minor work for youtube, you won’t be troubled by extensive renders or clamoring for screen restate, so it doesn’t make sense to pay for specs built for something ten times as processor-intensive.
However, if you plan on doing digital animation or working in 4K, it’s definitely time to look at higher-end machines that will be able to handle what you’re throwing at them.
If you’re not planning on editing videos in some way, you should not treat this article as a collection of the most powerful MacBooks overall.
Intensive computer work demands different specs depending on what you plan on doing, so you can’t assume the best for editing will be the best for say, gaming.
Best MacBook Pro for Video Editing: What to Consider in 2020?
Graphics
The key to a fast render is a high quality dedicated graphics card, and while lower-level work will likely be fine using an integrated card, you’ll want a dedicated one for anything beyond the casual home video or Youtube vlog. Dedicated graphics allow your computer to utilize RAM (Random Access Memory) specifically for the high-quality visuals you’ll be rendering as effectively as possible.
Processor
The processor is going to be handling every detail of your video as you build it, so you’re going to want to look towards the latest generations of the Intel i5 and i7 lines. Since video software can make use of multiple threads as well, these will benefit you while creating your project.
RAM
The final element that will make or break the performance of your MacBook while working on video editing is RAM. It’s used in every aspect of your computer’s execution of processes, and you’ll want a minimum of 8GB for amateur work, with a goal of 16GB if you’re editing professionally.
Best MacBook Pro for Video Editing in 2020: Our Picks
1. Casual Video Editing: 13-inch MacBook Pro (2.4GHz, Intel Core i5 processor, 256GB)
If you’re going to be editing home videos and content for Youtube, you probably won’t be doing intensive 3D renders or completely utilizing heavy programs even if they are installed. This version of the 13″ MacBook Pro comes with the processing power to reach your goal without unnecessarily overcompensating.
Pros:
The 13″ model is extremely portable, so you’ll have editing power at your fingertips wherever you go.
RAM is the perfect amount for this type of user and should last several years.
SSD drive means that renders and saves will be completed faster than with a physical HDD disk.
Cons:
SSD is pricey, which is why this model only comes with 256 GB in disk space. You’ll definitely want to purchase an external drive to compensate for this when storing your videos.
Additionally, this model uses an integrated graphics card which will be fine for this level of editing but doesn’t offer room for growth.
2. For Amateur Movie Making: 13-inch MacBook Pro (2.4GHz, Intel Core i5 processor, 512GB)

Whether college student or budding short-film director, you need power and a modern flair without the expense of a professional setup. This model of MacBook is a great compromise, offering Apple’s latest touch bar and touch ID technology packed into a 13″ body powered by an integrated Intel Iris Plus Graphics 655.
Pros: Bluestacks mac os.
Offering both portability and power, this modern masterpiece has all the specs to get you where you want to go without any unnecessary bulk.
The brand-new touch bar is also included and known to have great integrations when working in Final Cut Pro or the Adobe Suite.
Cons:
While offering more space than the aforementioned 256GB model, it’s still a bit on the small side for storing large video files.
It also has an integrated graphics card, which is slightly less than ideal.
3. For Professional Creatives: 15-inch MacBook Pro (2.3GHz, Intel Core i9 processor, 512GB)
Truly a top of the line machine, this MacBook Pro model was built for precision and nothing less. The 8-core i9 processor can stand up to just about anything you throw at it, it has a powerful graphics card UHD Graphics 630. The 15″ screen offers some more real estate than the smaller 13″ models.
Pros:

It has nearly unbeatable power between the mix of RAM, dGPU, and processor.
The beautiful screen will produce accurate colors and the touch bar will allow you to work even more effectively in your favorite editing programs.
You have the option to choose more storage space if needed.
Cons:
When editing professionally, you need all the screen space you can get, and no size laptop is going to be able to offer that. If you don’t have an external monitor, check out our recommendations.
Useful Mac Video Editing Resources
Just getting started with editing your own videos? LifeWire offers a great tutorial on getting started, from which software will be the most useful to whether you’ll fare better with some peripherals. Also, check out this complete video editing tutorial for non-editors on Mac:
A fan of iMovie? MacWorld has made a fantastic list of best tips on how to get the most out of Apple’s video editing software for macOS.
Best Macbook Pro 16 For Video Editing
You could also check out this list of free and paid Mac video editing apps (TechRadar), which will let you experiment before deciding exactly what you need in a paid program.
Click Save to copy the download to your computer for installation at a later timeIT professional resourcesIT professional working in managed environments can find complete resources for deploying Office updates in an organization on the. Click Run to start the installation immediately. Microsoft office 2016 crack free download 64-bit. Command line instructions can be found in Knowledge Base article. .To start the download, click the Download button and then do one of the following, or select another language from Change Language and then click Change.
What Is The Best Macbook Pro For Video Editing
Final Words
Video editing is a prime example of technical work that eats RAM and CPU power like no other. Luckily, a MacBook Pro was made to stand up to these things and is sure to perform if you’ve picked an adequate model.
Best Video Editing Computer
What set up do you currently use to edit videos? Let us know and share which specs you think are most important for productive work.
0 notes
Text
4. Mirror Lake Final Notes
Camping at Mirror Lake State Park
Off-season camping at Mirror Lake State Park was a bit dicey as you couldn’t reserve a site beforehand. There are 151 family campsites in three different campgrounds with seven group sites at the park that you can reserve from May through October. We were a bit lucky to find an open site within their limited off-season set of sites. Maybe it was the 30 degree nighttime temp that scared off many would-be campers. No worries for us - Cindy has her new winter sleeping bag and I have my ski gator. We love camping in any weather. There are more than 19 miles of hiking trails in the park and you might catch bass, walleye, panfish, and northern pike if you choose to go fishing here. And kayak/canoe rental at the boat launch. Check the park out at https://dnr.wisconsin.gov/topic/parks/mirrorlake
Kayak Test - Fail!
I do have a sweet fishing (aka angler) inflatable kayak but Cindy convinced me to try out her new backup kayak today, an enclosed Aquaglide Noyo 90 (short 9 footer @$400). We love our high quality Advanced Elements inflatables and Cindy loves her’s being enclosed while I love the openness of mine. She bought the Aquaglide to try out a new vendor and have a second kayak for friends to use. I tucked my long legs (I’m 6’1”) inside the Aquaglide and started out from the launch. Hmm, not very comfy here. Not use to being this cramped, from both length and width perspectives. The side tubes were probably a bit overinflated and they didn’t provide a lot of room for my big old buttice. My back was not going to enjoy this trip. So after 100 yards we headed back to shore and I switched back to my trusty open top angler model. Ahh, my boys can breathe again. Go for an enclosed model if you want to be protected from the elements and like a cozy fit. It may provide for an easier ride but I prefer to live on top. And to be fair to Aquaglide, a longer model may have worked out well for me. Unless it was enclosed. Before you invest in a kayak, try both enclosed and open models, and of varying sizes. Cindy has since returned her Aquaglide and ordered another Advanced Element kayak - and the same model she currently has.

I’ll be ordering another Advanced Element soon as well. Either a tandem or whitewater model. The https://www.advancedelements.com/ site provides a great set of options for all types of kayaking, from recreational to whitewater.
Sandhill Cranes
The hiilite of this trip was the Sandhill cranes and their nests. Quick SC notes: Incubation lasts for 29 to 32 days. Sandhill cranes raise one brood per year. In migratory populations, sandhill cranes usually lay their eggs in April and May. Incubation is by both sexes, 29-32 days. Female does more of incubating (typically all night, part of day). Young leave the nest within a day after hatching, follow parents in marsh. Sandhill Cranes usually nest in small, isolated wetlands—such as marshes, bogs, and swales—or within about 300 yards of the edges of larger ones. They prefer areas with vegetation growing in standing water, but some nest on dry ground.
A pair will return to the same nesting area each spring. When they arrive, the young from the previous year who have migrated north with their parents are driven off while the pair begins a new family. Sandhill crane males are slightly larger than females, weighing up to 14 pounds. Females remain closer to 10 pounds. The birds grow up to 5 feet in height measured from toe to the top of the head when they are standing on the ground. The male is generally a couple inches taller than the female.
Sandhill cranes are named for the Sand Hills region of Nebraska. Sandhill cranes are long-lived, up to 20+ years. Sandhill cranes have wingspans of approximately 6 feet. All cranes are omnivorous.

Kayak “strangers”
Cindy and I have learned that the best advice we get on kayaking is from the people on the ground, er in the water. At Mirror Lake we were so lucky to run into a lady kayaker on our way back from the marshy area. She directed us back into the marshy part to take a route in the backwoods that would get us to a major crane nest with “gigantic” turtle sightings on the way. That advice was gold. We met some of her friends along the way and they noted how this was a hidden gem route and don’t let the word out. Oops, too late. We ran into this group again back at the Ishnala beach and got some further advice on tomorrow’s Lower Dells route. It pays to talk to strangers. And the stranger the better. Unless it’s around the campsite and they look like Charles Manson. Seriously.
The Great Ishnala!
Ishnala wasn’t an official stop on my 19 Supper Clubs in 2019 adventure but I have to say how great this supper club is. One of the best in WI! Check out https://www.ishnala.com/. A great location on Mirror Lake, great building, great food, great bars, great outdoor waiting areas (including the beach), and a great place to end our kayaking at. Of course we were zombies by the time we returned and ate @8pm. Such a long day that started way back at 6am in Port Washington watching the sunrise. Too tired to even start a campfire before bed back at camp. Now that’s tired…
Google Earth Video + Space Mouse
For the video tour I posted earlier I used Google Earth and a new 3dconnexion space mouse that I just purchased for flying around earth. What a cool device! A little pricey at $150 but I am going to wear this puppy out with videos for each of our future trips. And maybe revisiting the deadly Sheboygan Marsh. The 3 minute video I produced for this Mirror Lake trip was a combination of Google Earth (GE) free flying with the space mouse and having GE auto-fly over the kayak route I manually marked. So free fly from home to Mirror Lake to give you a big picture perspective of where we went, auto-fly the specific kayak path, and finally free fly from the end of the kayak path back to the take-out/Ishnala. I then took those 3 videos from GE and imported them to iMovie where I added the audio track. I then posted the final iMovie video to our Tumblr blog. Will be interesting to see how much better (and shorter?) these trip videos get thru the year. I’m sure Cindy will be taking over on this front very soon.
And there’s a small chance we’ll have a drone flying over us one of these trips to get some crazy good video. Imagine controlling a drone while paddling down the river. Drone on auto-pilot, locked into our moving location. What could go wrong?
Satellite Images
Quick note on satellite images. Google Earth is nice because, unlike Google Maps, it will display the date when the displayed satellite image was taken. So for the Mirror Lake video I published, the satellite images were from 9/10/2017. Interesting to see how old these satellite images are and from what time of the year. Based on our Sheboygan Marsh trip, I looked into satellite images available outside of Google Earth/Maps and found a cool site called Earth Images at https://imagery.geocento.com/. You pick a location area, date range, and image quality and the site will return a list of satellite images (from different satellites) matching that criteria. It will show you if the images are free to download or if they cost $$. I found some free medium quality images of the Sheboygan Marsh that would have warned us of blocked paths that the older Google images didn’t show. But the free medium quality images of the Mirror Lake area didn’t reveal anything interesting. Not sure paying $100+ for higher quality images of Mirror Lake would have provided anything useful as well. May just reserve this special satellite image usage for “dangerous” marsh-like routes in the future. Or we just stay away from deadly marshes forever...
0 notes
Text
Best Apps To Add Spotify Music To Video

Step 1 Drag Spotify songs to TunesKit Spotify Converter. After launching TunesKit Spotify Music Converter, wait till the Spotify app is completely loaded. Then login your Spotify account and browse the store to locate the songs you want to add into video and then drag the URLs of the tracks or albums into TunesKit main window. If you are trying to directly add music from Spotify to movie maker, and edit a short video on your phone with something like iMovie, or import your Spotify songs to any other video apps, you will find out that it seems to be an impossible task. Spotify is a streaming music service, offering proprietary protected songs, and not licensed for being used on any video editor. 20 best Spotify apps. Reviews and features about the best in cult music, old and new. The Pitchfork Spotify app is a companion to the site, offering playlists based on features and quick links. Add Music To Video app provide a facility for changing Background Music of any video files. This application manage audio file size if the audio file length is larger than video files, it will be automatically trim audio to video duration.
Isn't it boring when you watch a video with no background music? Want to add music to video but have no idea on how to start? There are many video editor apps for iOS and Android overrunning the market, so it is difficult for you to choose suitable one to make a video with music. This article is prepared for you, which lists 10 best video editors with music adding feature to meet your need.
Part 1. Best Software to Add Music to Video on Windows or Mac
If you want to add a background music to your video, Tipard Video Converter Ultimate should be your best choice. With powerful video editing functions, this excellent converter software can not only add music to your video, but also rotate, crop, watermark, merge and cut your video files. Even if you are new in the video editing, you could edit the video like a pro. It is also a professional video converter to convert video to MP4, MKV, AVI, FLV, MKV, MOV, MP3, AAC and more.
Main Features:
1. You are able to add a background music or a subtitle to your own video.
2. Resize the videos, rotate or flip video clips and crop the videos before editing.
3. Adjust the volume, add filters, effects and watermark to the video files.
4. Convert and compress video/audio in over 500 formats, edit ID3 tags and make GIFs.
Load video file
Click the Add Files button to load the video into the program. You can also drag and drop the video file to the big plus area.
Add music to video
Click the Edit (the magic wand icon) below the video. In the Audio tab, you can click Add Audio to add the background music from local to your video file. You can use the delay feature to make the music and image match.
Choose output output
How To Add Mp3 To Spotify
Click the drop down button of Convert All to and select the output format you want in the Video/Audio/Device tab. You can click Customize Profile (the gear icon) on the right side to adjust the video and audio settings.
Start converting
Click the Convert All button to start converting the video with background music. Then you can enjoy the video with the background music added on your media device.
Part 2. Top 10 Best Apps to Add Music to Video for iOS or Android
Magisto (for iOS and Android)
Magisto is one of video apps in the market which have great video editing feaatures when you want to add music to a video on iOS and Android devices. Magisto is an ideal video editor with music adding function. It can add your preferred background music to the target video. You can also edit the video with its powerful editing options. It can store limitless videos, and you can download it and enjoy adding music to video with Magisto.
VivaVideo (for iOS and Android)
VivaVideo is an excellent app as it provides a videocam which allows you to recording a video and then add background music to the recorded video without limitation. VivaVideo app will surprise you when you slideshow the video and the background music will give you enough value while you enjoy it. The app can work well for both iOS and Android device, and many users like it for its features and compatibility.
iMovie (for iOS)
iMovie is a familiar app if you are an iOS user. This app is designed by Apple and always considered a perfect choice when you edit the imported video or add background music to your video on iOS or Mac. It is great but it is not a free app, though it has powerful for its editing and audio adding features. You can download iMovie for a try and find its magic on your iPhone/iPad/iPod and Mac.
Video Star (for iOS)
Video Star is another easy-to-use app, which enables you to add any your preferred music to your video. It can meet your need and allow you to choose the background song from personal music library. All songs are provided for free. If you want more feature, it provides more in-app items for you to satisfy your need.
MixBit (for iOS and Android)
As it name indicates, MixBit is able to mix more than one video segment without distorting the music file, besides allowing you to add background song to your video. The app works perfectly on bothe iOS and Android device. You will like it when you want to add music to video on your device with MixBit.
Lumify (for iOS)
Lumify is an iOS app which can join multiple video clips into one file as well as add background music file from its own library to the video. Moreover, the smart app can also allow you to add the voice you record into the video to be the background audio file on iPhone/iPad/iPod.
Clipper (for iOS)
Clipper is a very simple app. It can not only enable you to clip video into segments basically, but also allow you to add background music file to the target video. It works well on your iPhone/iPad/iPod, and you can even combine several video clips together while the background music playback remains.
Replay (for iOS)
You will like Replay, as it is a user-friendly app which has the capability to use its magic to remove any video filters and watermarks when when you add music to video with the app. You can personalize your own video with background song according to your need. It is a very reputable video app for iOS device. It is also compatible with many social sites like YouTube, Instagram and others, letting it simply to share your customized videos after adding the background music.
Splice (for iOS)
You will like Splice provides a timeline for your accurate precision when you add background music to your video on iPhone, iPad or iPod. Basic editing features are provided, so that you can edit the video. It has a user-friendly interface and works greatly on your iOS device.
YouTube Capture (for iOS)
YouTube Capture is another useful video app to satisfy your demand. The app will enables you to not only edit the video with its powerful editng features, but also add a preferred soundtrack as your video background music. As its name shows, it allows you to share your video to YouTube with ease. It can be available for any device running iOS.
In this article, we mainly introduce 10 best video editor apps for iOS/Android to help you add background music to video with ease. Whichever video editor app you will choose, hope you can enjoy video with background music.
Updated by Lily Stark to Video
Follow @Lily Stark
November 10, 2016 10:24
Top 10 Reverse Video Editors
In this article, we will introduce the best reverse video editor for making a reversal video on Windows, Mac, online, Android and iOS.
Review of AVS Video Editor and How to Edit Videos with it
In order to learn more details about AVS Video Editor, you need to learn different tips and tricks about the software. Get the details from the article now.
Top 10 Online Video Editor Tools to Edit Videos Easily
If you are looking for some video editing programs online, you can learn more detail about the top 10 online video editor tools you should try.
Top 10 Free PDF Editor Software on Windows/Mac
When you receive some files in PDF, what should do edit the PDF files? Just learn more details about the best PDF editor that helps you out.
Select your language:
Best App To Add Spotify Music To Video
'How do I get music from Spotify to put on video editors like ShortCut?' You might have a same query when you use video editors to create your own projects.
ShortCut is a free and open source video editor which enables users to make movie in a straightforward way. If you are looking for a free video editor just like Windows Media Maker, ShortCut is a good choice, because this app contains all the features that you used from Microsoft and other basic video editors and keeps adding the extra features which make it up to date.
Now, let's come to another important feature: adding audio tracks to video or slideshow. ShortCut is an open source video editor which supports many audio and video formats, and you may ask: can I import the music streaming services like Spotify to video or slideshow ShorCut? Or I need to purchase it from another source?
Because Spotify relies on a closed system in which all tracks are streamed to prevent track piracy, it is impossible to copy or play Spotify music outside of Spotify application. Then you might step back and find another source to purchase the track. But besides this method, you can turn to third party software – Sidify Music Converter, which is specialized in recording Spotify music to plain audio files like MP3, AAC, FLAC or WAV, then you can successfully add the converted Spotify music to ShortCut.
Sidify Music Converter
Download Spotify music to MP3, AAC , FLAC, WAV without Premium;
Stream Spotify Music for free without ads;
Burn Spotify Music to CD or share to others via Email.
How to Add Spotify Music to Video or Slideshow on ShortCut?
Now let’s look at the simple steps to add Spotify music to ShortCut as the background music of video or slideshow.
Step 1Add Spotify Tracks or Playlists
Sidify Music Converter is available for Windows and Mac machine. You can download and install it on your computer and launch it.
Click button and then you will see a pop-up window which indicates you to drag and drop the playlist or song link from Spotify, or you can add Spotify music by copying the link of playlist or song to clipboard.
Add Spotify Music To Video
Step 2Customize the Output Settings
Click on button on the main interface and a window will pop up to allows you customizing the output settings including output format, output path, conversion mode and output quality. Here you can choose the output format as MP3, AAC, FLAC or WAV.
Tips: Sidify Music Converter supports saving the output audio into organized folder as Artist, Album, Artist/Album or Album/Artist. Otherwise, the converted audios will be saved into one folder automatically.
Step 3Start Conversion
Now you can start converting Spotify tracks or playlists by clicking 'Convert' button.
After the conversion completed, you can click on 'Converted' button to check the well-converted Spotify music.
Step 4Add the Converted Spotify Music to ShortCut
Now you can add the converted Spotify tracks as the background music to a video or a slideshow.
You can click 'Open Files' icon to import the converted Spotify music files on ShortCut. Now you just need to import a video, or images to create photo slideshow, then right-click the timeline and click 'Add Audio Tracks', or you can drag and drop the audio files from the playlist on the top left panel.
Then you can edit audio effects, and export your video or slideshow.
Add Music To Spotify Library
Shotcut offers a super flexible and easy editing environment for users. It's a very powerful tool if you are willing to devote your time and energy to discover its charm. And more importantly, now you are enabled to import your favorite music from Spotify to ShortCut.
Add Personal Music To Spotify
Add Own Music To Spotify
Note: The trial version of Sidify Music Converter enables us to convert the first 3-minute audio from Spotify for sample testing, you can purchase the full version to unlock the time limitation.
How To Add Music To Spotify
Related Articles
0 notes
Text
About Video Editing Software

The term "filmmaking" is used to describe the process by which artistic movies are produced and created. Most modern movie making software is a digital computer program. It enables anyone to record video or photos, as well as edit and combine them to form a film. Video and photographic images are added to a computer through digital means, such as with the help of photo editing programs or other computer software tools. These programs are often used by amateurs and professionals alike, for a variety of purposes, ranging from simple home videos to professionally produced corporate videos.
There are many different types of movie making programs available such as Windows Movie Maker, Quicktime, Sony Vegas, and Macromedia Freehand. They are all used for a variety of purposes, but they do not all offer the same features. Therefore, it is important to research the different programs before deciding which one is best suited for the task. One of the most important factors to consider when purchasing a movie maker is the software's compatibility with other computer programs. Some of the most commonly used computer programs include Microsoft Movie Maker, Apple iMovie, Dreamweaver, and Pinnacle.
While there are plenty of movie making software products on the market, not all of them are created equal. Therefore, one must carefully select the software that they want to use for their home movie making projects. A good movie making software will be compatible with the operating systems of the computer that it will be used on. This way, the user does not have to download and install additional software to get the job done. As such, the user will be able to save time and money by not having to buy extra products.
The type of video editing programs that one can buy ranges from those that are designed specifically for beginners to those that are exceptionally powerful and flexible. In order to find the right product, one should research user reviews on the various programs in order to see what users have to say about them. Some websites even have movie review sections that allow individuals to rate products based on several different criteria.
One of the most common uses for a movie maker is to create short movies that can be uploaded onto the Internet. As such, one does not necessarily need any special training to use such a program. One can simply type the words "Movies" into any search engine and generate a list of sites where one can download movie files of various types. The most popular of these sites tend to offer free movie files, but it is also possible to join paid membership sites where one can post videos and gain access to more advanced tools and features. For example, one may want to upload a movie that was made while on vacation and be able to view it at any time. Such a site would likely contain a number of tools that allow the user to easily alter the video and add different transitions and audio tracks as well.
When one embarks on a project of this sort, one should never rush the process. By doing so, one will likely end up with a video that is of poor quality, has missing or misplaced footage, and is cluttered and disorganized. This will not only make it difficult to locate specific parts of the movie, but will also likely drive away potential customers who are looking for guidance on movie making. Therefore, it is important to treat video making as a serious investment of one's time and one should not rush through the process in favor of the sake of completing a movie quickly.
Movie editing software can serve many purposes. It can be used to create videos for personal purposes and to share with friends and family. However, before purchasing such a tool, it is important to ensure that one has all of the necessary equipment and has researched the different options to find the best one that is suited to their individual needs. By doing so, one can ensure that their movie will turn out better than what had been envisioned and they can create the most entertaining video possible.
0 notes
Text
Free and affordable creative software for photo & video editing, design and illustration.
If you’re a creative and you don’t have a lot to spend on the latest software, you still want decent tools that will make life easier. Here’s a list of free and low cost software options that won’t make you a slave to outrageous pricing schemes and monthly subscriptions. All of the paid products listed here (except one) have retail options for under $50. Try them, see if they fit into your workflow and maybe they’ll find a new home on your hard drive and in your heart.
*Many of the applications listed here are open source meaning that the code base is available for anyone to tinker with and customize to their liking. It also means that fixing bugs and adding new features relies on the willingness of developers and often times the donations of users. Please support your favorite open source projects!
Photo Editing/Raster Graphics
Free:
Gimp (Windows, MacOS, Linux): Adobe’s Photoshop has long stood as the go to for photo editing, illustration and desktop publishing but their bloating app size and subscription based model doesn’t work for everybody. Short for GNU Image Manipulation Program, GIMP closely resembles Photoshop and is totally free and open source, nailing down the basic feature set you’d expect for editing photos along with some pleasant surprises. https://www.gimp.org
Krita (Windows, MacOS, Linux): This app caters specifically to raster or pixel based illustration with unique drawing features, a streamlined interface, a great selection of brushes and customization options. It also has traditional 2D animation features. https://krita.org/en/
Paid:
Affinity Photo (Windows, MacOS, iPadOS) : Serif’s Affinity line of products do a great job of giving a pro toolset without the pro price tag. Their one-time purchase price is super affordable. At first glance it may not have the same feature set as other packages, but on closer inspection it just does it in a different, perhaps even more efficient way. Kinda like if Lightroom and Photoshop had a beautiful baby without all the bloat. Check out their other entires on this list (Windows, Mac, ) https://affinity.serif.com/en-us/
Note: Affinity will often have discounts depending on the season!
ArtStudio Pro (MacOS, iPadOS): Closest thing to Photoshop on iPad I’ve ever seen, even more so than the newer iPad Photoshop app. Has plenty of pro features without feeling overwhelming. http://www.luckyclan.com/apps
Pixelmator (MacOS, iPadOS): a sleek, speedy alternative that focuses on integration into the Apple aesthetic. Great for editing profile pics and video thumbnails. https://www.pixelmator.com
Procreate (iPadOS): Procreate for me is the definitive illustration app for iPad. It’s simple, intuitive and has the fastest drawing engine in the west. https://apps.apple.com/app/apple-store/id425073498
Vector Illustration:
Free:
Inkscape (Windows, MacOS, Linux): I’ve always see Inkscape as sibling to Gimp, and certainly as the definitive open source replacement of Adobe Illustrator. The basic tools overlap but with some different terminology. You’ll definitely want to check this out if you’s like to make infinitely scalable artwork for logos, illustrations and mathematically perfect artwork. https://inkscape.org
Vectornator (MacOS, iPadOS): as a new comer, it does things a bit differently but has a super user-friendly interface. What it lacks in features it makes up in style. https://vectornator.io
Paid:
Affinity Designer (Windows, MacOS, iPadOS): Designer is unique in that it mixes vector graphics along with pixel brushes. I’ve used Designer for large scale illustrations and it doesn’t break a sweat. I appreciate it’s ability to handle raster effects like drop shadows, glows and blurs without losing performance. Definitely a game changer if you want to say sayonara to Adobe Illustrator and don’t mind the absence of some features. https://affinity.serif.com/en-gb/designer/
Print Design/Desktop Publishing:
Free:
Scribus: (Windows, MacOS, Linux) This entry is on the infrequently updated side and I haven’t used it in a while, but it’s worth a look. From it’s site, it’s “a desktop publishing (DTP) application. Scribus is designed for flexible layout and typesetting, and the ability to prepare files for professional quality image setting equipment.” https://www.scribus.net/downloads/unstable-branch/
Paid:
Affinity Publisher (Windows, MacOS): Publisher is the best replacement for InDesign out there in my opinion. Besides being able to import InDesign files via IDML, one of it’s strongest features is StudioLink: an on the fly, in-app switching to Affinity Photo and Designer (if you own them already), bringing to it all the features of the suite. https://affinity.serif.com/en-us/publisher/
Video Editing
Free:
Kdenlive (Windows, MacOS, Linux): Kdenlive is probably the most well-known of the multi-track open source video editors and comes full of features you’d expect from professional software. It’s got a great community and good documentation. It also runs well on aging or low-spec machines. https://kdenlive.org/en/
Shotcut (Windows, MacOS, Linux): Shotcut is an intuitive editor that is frequently updated and feels like iMovie with a Premiere Pro aesthetic. Easy to edit transitions, color grading and above average green screening and compositing effects make it great for someone needing flexibility without the learning curve. https://shotcut.org
Olive (Windows, MacOS, Linux): This one is a newcomer and shows promise. It’s got surprisingly decent text editing features, compositing and animation features. https://www.olivevideoeditor.org
Paid:
Da Vinci Resolve (Windows, MacOS): As non-open source, proprietary software, the free version of this video editor has it all: 8k editing, color correction, visual effects and audio post-production in an easy to use package. While you can purchase the full studio version for a pretty penny, the free version is available with a few limitations. https://www.blackmagicdesign.com/products/davinciresolve/
HitFilm Express (Windows, MacOS): HitFilm Express is a great tool for aspiring filmmakers who need to incorporate solid visual effects. It’s unique in that they offer a free base app and a sliding pay what you want scale, but spending more gets you extra features and you only pay for what you want. https://fxhome.com
BONUS: 3D Modeling/Animation/Creative Production
Blender: (Windows, MacOS, Linux) Blender is the biggest, most well-funded open source project around with a huge community of users. As an entire 3D-production suite, it includes modeling, sculpting, texturing, compositing, physics simulation, 2D animation tools, video editing, a real-time renderer and host of other features aimed at the creation of 3D artwork for motion and still images. It’s got a steep learning curve but plenty to keep happy for the price tag: zero. Download the current stable version at http://www.blender.org For the latest builds, go to https://builder.blender.org
Opentoonz (Windows, MacOS, Linux): Opentoonz is a dream come true for 2D traditional hand-drawn animators. Based on the original “Toonz” software, it’s been tweaked by Studio Ghilbli and was released to the public as open source in 2016. The original OpenToonz is available here: https://opentoonz.github.io/e/index.html
I recommend the further customized Morevna branch: https://morevnaproject.org/opentoonz/
Pencil 2D (Windows, MacOS, Linux): If you’re interested in traditional 2D animation, Pencil 2D is a lightweight app that’s easy to use. It has basic features like vector tools and sound import, but I like to think of it more like an animation sketch pad than a pro-level production tool. https://www.pencil2d.org
Andrew Carroll is a freelance graphic designer in Allentown PA that focuses on logo and illustration design for ministries and small businesses. When not pushing pixels you can find him volunteering with Simplicity Outreach, an urban community center and hosting the Adventist City Ministries podcast. See his work at 42design.co Instagram
1 note
·
View note
Text
Sketch Maker PRO Review
Sketch Maker PRO Review - Are you searching for even more expertise concerning Sketch Maker PRO? Please review my straightforward evaluation regarding it before selecting, to review the weak points as well as toughness of it. Can it be worth your effort and time and also cash?
Introducing Sketch Maker PRO
The 5 Finest Explainer Videos (& & How to Make Your Own) (Component 3)
Step 2: Recording the Voiceovers
Once you have a manuscript, you'll require a voiceover. Some options are:
Voices.com: This site has a huge network of specialist voice stars to choose from.
Craigslist: Ah of course, old reputable. You can find just about anything on crazy Craigslist, consisting of voiceovers.
Fiverr: Yup, you can obtain a good voiceover for your explainer video clip for simply $5 on Fiverr! You'll possibly have to pay a little bit more than that ($5 is generally the starting price-- some fee by the second, others by the word. Chances are you won't be in the most affordable Sketch Maker PRO price bracket). Still, you aren't most likely to locate a voiceover anywhere for cheaper.
Action 3: Explainer Video Production
There are a number of various paths you can take when it comes down to the actual creation and manufacturing of your explainer video clip. Alternatives include ...
Highlight the Pros: There are some extremely skilled specialist video clip manufacturing business out there that can aid you make an awesome marketing video clip. You'll have some high explainer video clip prices if you go this path-- be prepared to pay out anywhere from $5,000 - $20,000 for a solution similar to this. The advantage is that you'll have video professionals aiding you every action of the means, and you're video clip is assured to look excellent. Trial Duck, Wyzowl, LessFilms, Flikli and also Studio Pigeon are a couple of explainer video business to think about.
Pow Toon: if you're making computer animated explainer videos, have no computer animation experience, yet want to do it on your own on a budget, Pow Toon is the method to go. Any individual with some basic computer skills can utilize this animated explainer video software. It likely won't be a masterpiece, but it's easy to create and free (to begin at the very least). They also have a guide collection to stroll you with building your development.
Do It Yourself Explainer Video with iPhone: That's right, you can movie your very own explainer video clip on your iPhone! This incredible article from Wistia will reveal you exactly how. Do It Yourself recording is a wonderful means to develop cheap explainer videos. For the editing, iMovie or Camtasia are good choices. If you intend to take on a Do It Yourself computer animated explainer video clip, this computer animation toolkit from Salsify can offer you with a lots of terrific animation devices and also sources.
Employ a Freelancer: Experienced freelancers can provide high-quality explainer video clip manufacturing aid at a much lower cost than a huge production firm. You need to be able to find one easily enough on craigslist or various other freelance sites.
Crowd Sourcing: One alternative you may give a go is the video crowd-sourcing business Video clip Brewery. Submit a general job review and also obtain a bunch of propositions from Video Brewery's network of relied on freelancers. Pick one you like and you get on your method! Sketch Maker PRO notes that these explainer video clip expenses normally run someplace between $3,000 - $5,000.
Step 4: Songs & & Noise Impacts
Chances are your animated explainer video and even your online action explainer video requires some wonderful sound impacts as well as music. Some locations to rack up tracks include ...
MusOpen: Supplying totally free songs sources such as recordings, sheet music, etc.
. Free Sound: A data source of Creative Commons accredited audio examples and recordings.
YouTube: The king of video clip itself provides some complimentary background songs to make use of in video clip creations.
Audio Forest: Nobility cost-free audio documents consisting of loopholes, sound effects, and a lot more.
Audacity: This free device isn't a source of audio data, yet instead aids you create your own.
Keep in mind to check out the small print carefully on these websites with regards to what is or is not allowed under the audio documents's licensing arrangement. Some are an economical one-time purchase and also aristocracy free, others require attribution, etc
.
Sketch Maker PRO Evaluation & Introduction
Maker: Jimmy Mancini
Product: Sketch Maker PRO
Launch Date: 2019-Apr-18
Release Time: 10:00 EDT
Front-End Rate: $18
Sales Web page: https://www.socialleadfreak.com/sketch-maker-pro-review-from-a-real-user/
Particular niche: Video
What Is Sketch Maker PRO?

Sketch Maker PRO is a brand-new Whiteboard Video clip Manufacturer that deals with any type of Internet browser connected to the Internet (Chrome, Firefox, Safari ...) enabling you to develop amazing Explainer Videos in Minutes and all is done on the Cloud!
Sketch Maker PRO Features & Conveniences
Advantages
Use it when you are online
Forget about downloading significant data, installing bulky software program, obtaining intallation mistakes or absence of space. Currently with the brand-new Sketch Maker PRO you just open your Browser (Chrome, Firefox ...) login as well as done; after that you can start creating outstanding Explainer Doodle Videos!
Produce Videos With Different Formats as well as Dimensions
We understand that you may want to produce video clips with differente sizes/dimensions, that's why we developed Sketch Maker PRO in such a way that will permit you to choose your preferred video clip layout 16:9 or 1:1 * (for social networks) or your preferred measurements, 1920x1080 *, 1280x720 *, 640x360 - * PRO PLUS Accounts Only).
Easy to make use of!
Yes, it is so easy to use! You simply select or drag and drop your preferred photos or include some message to the canvas preview and then preview it before developing your video. That's it!
Maintain a couple of Videos Online or Download them
When you crate a video clip, your video is stored on the cloud, after that you will certainly have the alternative to download it, maintain it saved online (restricted area) or delete it. So you can constantly monitor your 'Master Pieces':-RRB-.
Export it in Minutes (Making)
Some 'other' devices on the marketplace make you wait a long, long, time to produce a video clip. Sketch Maker PRO making engine is among one of the most effective as well as fastest on the market, so you obtain Impressive Whiteboard Videos done very quick! (* if your video clip is as well large it will certainly take longer that common, it wil depend exactly how busy the server in fact is, but generally is quick).
Produce Fantastic White Boards Videos in Minutes (Save Time & Cash)
There is no need to pay a designer or a company to do it for you, you simply spend a few minutes and you will certainly get it done! Map out maker PRO will certainly allow you to create fantastic explainer videos, that look professional as well as are done quick! Saving you Money And Time!
Functions
FUNCTION 1: Add the consisted of Images or your OWN photos
We have actually consisted of a number of photos for you to select from, beginning with animated SVG pictures to wonderful looking personalities from various particular niches. You simply need to browse the consisted of classifications and choose the one that fits your specific niche.
And also, we have actually added the alternative to upload your very own pictures or logo designs (Just on PRO accounts), so you can individualize your video clips even more. You just click on the upload switch, post your photos and then they will stay saved on the server (restricted MEGABYTES per account).
FEATURE 2: Include Text
Adding message to your explainer video clips is much more easy then ever before, you just compose your text, click the include switch and also the message will certainly be added to the sneak peek (and also in the future your explainer video clip). As Easy as that!
You can individualize your text by changing the font kind, typeface size and font style shade! Plus the message is integrated with the audio of your video clips so if we include the hand composing impact (consisted of) your video clips will certainly look impressive!
ATTRIBUTE 3: Include the consisted of backgrounds or add your OWN Backgrounds
We have actually included some wonderful backgrounds for you to choose from, there are some great histories however certainly you will have the option to get even a lot more histories (optional).
You just require to go to the background's tab as well as scroll down to have the ability to see all the readily available histories!
ATTRIBUTE 4: Add History Songs Tracks (Included or your own)
Sketch Maker PRO features a few music tracks to contribute to your videos (around 3 minutes each), yet you might have the option to upload your own songs as well.
You'll have the alternative to get monthly songs tracks (optional).
ATTRIBUTE 5: Add Text To Speech * (optional), Add Your Own Audio File or Record Your Voice
Sketch Maker PRO comes with several Human-like Text To Speech voices to add to your video clips (optional).
You'll have the alternative to tape your very own voice using your OWN microphone * or simply publish SHORT audio data * to develop your video clips. * PRO PLUS Accounts Just).
FUNCTION 6: Preview an Slide or All your Animation (Adjustment hands also!)
You can sneak peek your video prior to rendering it. You can preview each slide or all your computer animation on the preview canvas.
Plus you can change the hands made use of, also the pens/pencils the hand utilizes to simulated the composing message could be changed!
FUNCTION 7: Slide Consequences, Allocation, Download Your Video clips!
We've included the option to use some slides effects, even an arbitrary impact is consisted of to enable you to provide your video clips a much more professional appearance!
Inside your account's web page you will have the ability to see your individual information as well as your Allocation per day! We've included a distinct web page to enable you to access all the videos you have actually produced, you can simply download them by clicking the download switch.
Rate & Evaluation
Front-End $17.95: Sketch Maker PRO (PRO Variation).
Produce 48 Video clips per day (2 video clips per hour)
Shop 10 Sketch Videos (Cloud)
Up to 10 slides per task
10 Songs Tracks
20 Backgrounds
144 SVG Characters
199 SVG Path animation images
Publish very own Images/Music/Backgrounds (5mb)
OTO 1 (Month-to-month) $12.95
Develop 96 Videos per day (4 videos per hr)
Shop 20 Lay Out Video Clips (Cloud)
As much as 30 slides per job
10 Songs Tracks Monthly
10 Backgrounds Monthly
50 SVG Personalities Monthly
100 SVG Path computer animation photos Monthly
Submit very own Images/Music/Backgrounds (50mb)
Text To Speech Voices
TTS Summary: 28 Voices/ 11 Languages
OTO 2 $19.95: Commercial Certificate.
Extra coming quickly
Conclusion
" It's A Good deal. Should I Spend Today?"
Not just are you getting accessibility to Sketch Maker PRO for the very best cost ever before supplied, however additionally You're spending entirely without danger. Sketch Maker PRO include a 30-day Money Back Assurance Policy. When you select Sketch Maker PRO, your contentment is guaranteed. If you are not totally pleased with it for any type of factor within the very first 1 month, you're qualified to a full refund - no question asked. You have actually got absolutely nothing to shed! What Are You Waiting on? Attempt It today and get The Complying with Bonus offer Now!
0 notes
Last Seen Blogs

cpr-girl
CPR Girl 🆘

vashtrasahilfashion
Untitled

stressblogs
✝ ☕ ✝


anime-otaku-japan
Fictosexual-Exclusive Bridal Service