#pair programming = coding in pairs; person 1 decides the logic person 2 writes it out -> involves a lot of technical communication))
Explore tagged Tumblr posts
Visit Tumblr Blog
Explore Tumblr blogs with no restrictions, modern design and the best experience.
Last Seen Tumblr Blogs


Fun Fact
There were a total of 171.5 billion posts on Tumblr in 2019.
Text
I have a new nemesis, her name is technical communication
coding bootcamp is going great why do you ask
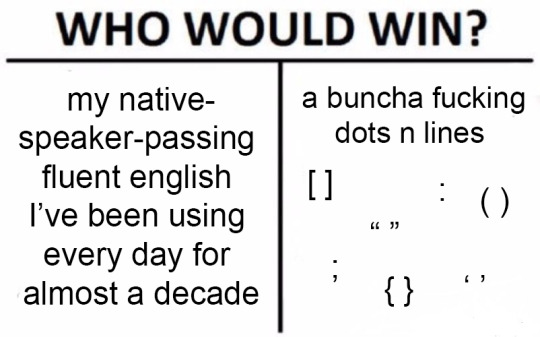
#coding#python#meme#homemade memes#it's been a mere two days of pair programming and me struggling to remember which one a semi-colon is and wtf quotation marks are called#so I've made a cheat sheet now cause mf I didn't have english in school until I was 15 and we never had a class *in* english#other than *english class* and then once in the uk I went to art school where the only time punctuation was relevant was essays#and if someone needed to make a correction while proofreading that they'd just -YA KNOW- TYPE THE CORRECTION#((for non-coders: technical communication = explaining ur code to other coders#pair programming = coding in pairs; person 1 decides the logic person 2 writes it out -> involves a lot of technical communication))#bootcamp
114 notes
·
View notes
Text
How to Create Your Own Software for Forex Trading?
Forex trading, or foreign exchange trading, is the act of buying and selling currencies to make a profit. Many traders today use software to automate trading, analyze market trends, and execute trades quickly. Creating software for forex trading can be a great business idea or personal project if you're interested in both finance and technology.
In this blog, I’ll explain to you the key steps involved in creating your own forex trading software. Whether you're a beginner or someone with some coding experience, this blog will help you understand what it takes to build a working solution.
1. Understand the Forex Market
Before writing any code, it's important to understand how the forex market works. Forex is the largest financial market in the world, operating 24 hours a day, five days a week. Traders exchange currency pairs like EUR/USD (Euro vs US Dollar), GBP/JPY (British Pound vs Japanese Yen), and many others.
Prices in the forex market change very quickly, often within seconds. This means trading software needs to react fast and process data in real-time.
Learn the basic terms such as:
Bid and Ask Price
Pip (percentage in point)
Leverage and Margin
Stop Loss and Take Profit
Technical Indicators (like RSI, MACD, Bollinger Bands)
Understanding these terms will help you know what features your software should include.
2. Choose Your Type of Trading Software
There are different types of forex trading software you can build, depending on your goals:
Manual Trading Platforms: These help traders make decisions based on real-time charts, news, and analysis, but they place trades manually.
Automated Trading Systems (also called bots or expert advisors): These can place trades based on predefined rules and market signals.
Hybrid Platforms: These combine both manual and automated trading features.
Decide what kind of tool you want to build. If your goal is to help users trade faster or with more accuracy, then automation might be the way to go.
3. Select a Programming Language
Forex trading platforms are often built using the following languages:
Python: Great for data analysis and creating trading algorithms.
C++ or C#: Fast and reliable, often used in high-frequency trading.
JavaScript/Node.js: Useful for building web-based trading platforms.
MQL4/MQL5: Languages used for MetaTrader platforms.
Choose the one that matches your skills or the platform you want to build on. For example, if you’re building a bot for MetaTrader 5, you’ll need to learn MQL5.
4. Pick a Trading API or Broker Integration
To execute real trades, your software must connect to a broker or trading platform. Many brokers offer APIs (Application Programming Interfaces) that let your software read market data and place trades.
Some popular brokers with APIs include:
MetaTrader 4/5 (via MQL)
OANDA
IG
Alpaca
Interactive Brokers
Study the documentation provided by the broker’s API to understand how you can send orders, get price feeds, and check account balance or trade history.
5. Plan Your Features
Think about what features your forex trading software should have. Here are some common ones:
Real-time Price Charts
Technical Indicators
Trade Execution
Risk Management Tools (stop-loss, take-profit, lot size settings)
Backtesting Engine (test strategies on past data)
Strategy Builder (for users to create custom strategies)
Start with a simple version (also called an MVP—Minimum Viable Product) and improve over time based on user feedback.
6. Build and Test Your Software
Once you have your plan and tools ready, start building your software step-by-step.
Front-end: Design a simple, easy-to-use interface. You can use frameworks like React, Angular, or even a simple HTML/CSS layout if it's a desktop app.
Back-end: This is where the trading logic lives. Write code that connects to the broker’s API, handles trading signals, and manages orders.
Testing: Never skip testing. First, test your software with demo accounts. Most brokers offer demo accounts with fake money so you can test safely. Check for bugs, delayed orders, or unexpected results.
Backtesting: Use historical data to test how well your strategy would have performed in the past. This helps improve performance before going live.
7. Add Security and Compliance
Security is very important when dealing with money. Make sure your software uses encrypted connections (HTTPS or SSL) and stores sensitive data safely. Don’t save passwords or API keys in plain text.
Also, if you plan to release your software to others, check local laws and financial regulations. You might need licenses or need to follow certain rules depending on your country.
8. Keep Improving and Updating
The forex market changes all the time. A good trading software should keep up with market conditions. Keep improving your software by:
Fixing bugs
Adding new indicators
Improving speed and accuracy
Listening to user feedback
Also, stay updated on news about brokers, API changes, or new trading techniques.
Final Thoughts
Building your own forex trading software takes effort and time, but it can be a rewarding project. Whether you're a trader looking to automate your strategy or a developer looking to build a useful tool, the key is to start simple, learn as you go, and keep testing your ideas.
Focus on making the software smooth, user-friendly, and secure. Once you have the basics down, you can always add advanced features later. Good luck building your forex trading software!
0 notes
Text
11 Beginner tips for learning Python Programming
Personal recommendation: If you are looking for learning python with your mobile phone, I recommend you to download this unique ‘Programming Hero’ app and start learning as a beginner in a fun way.
Here is the download link: https://onelink.to/proghero2
Tip #1: Code Everyday
Consistency is very important when you are learning a new language. We recommend making a commitment to code every day. It may be hard to believe, but muscle memory plays a large part in programming. Committing to coding everyday will really help develop that muscle memory. Though it may seem daunting at first, consider starting small with 25 minutes everyday and working your way up from there.
Tip #2: Write It Out
As you progress on your journey as a new programmer, you may wonder if you should be taking notes. Yes, you should! In fact, research suggests that taking notes by hand is most beneficial for long-term retention. This will be especially beneficial for those working towards the goal of becoming a full-time developer, as many interviews will involve writing code on a whiteboard.
Once you start working on small projects and programs, writing by hand can also help you plan your code before you move to the computer. You can save a lot of time if you write out which functions and classes you will need, as well as how they will interact.
Tip #3: Go Interactive!
Whether you are learning about basic Python data structures (strings, lists, dictionaries, etc.) for the first time, or you are debugging an application, the interactive Python shell will be one of your best learning tools. We use it a lot on this site too!
To use the interactive Python shell (also sometimes called a “Python REPL”), first make sure Python is installed on your computer. We’ve got a step-by-step tutorial to help you do that. To activate the interactive Python shell, simply open your terminal and run python or python3 depending on your installation. You can find more specific directions here.
Now that you know how to start the shell, here are a few examples of how you can use the shell when you are learning:
Learn what operations can be performed on an element by using dir():
>>>
>>> my_string = 'I am a string'
>>> dir(my_string)
['__add__', ..., 'upper', 'zfill'] # Truncated for readability
The elements returned from dir() are all of the methods (i.e. actions) that you can apply to the element. For example:
>>>
>>> my_string.upper()
>>> 'I AM A STRING'
Notice that we called the upper() method. Can you see what it does? It makes all of the letters in the string uppercase! Learn more about these built-in methods under “Manipulating strings” in this tutorial.
Learn the type of an element:
>>>
>>> type(my_string)
>>> str
Use the built-in help system to get full documentation:
>>>
>>> help(str)
Import libraries and play with them:
>>>
>>> from datetime import datetime
>>> dir(datetime)
['__add__', ..., 'weekday', 'year'] # Truncated for readability
>>> datetime.now()
datetime.datetime(2018, 3, 14, 23, 44, 50, 851904)
Run shell commands:
>>>
>>> import os
>>> os.system('ls')
python_hw1.py python_hw2.py README.txt
Tip #4: Take Breaks
When you are learning, it is important to step away and absorb the concepts. The Pomodoro Technique is widely used and can help: you work for 25 minutes, take a short break, and then repeat the process. Taking breaks is critical to having an effective study session, particularly when you are taking in a lot of new information.
Breaks are especially important when you are debugging. If you hit a bug and can’t quite figure out what is going wrong, take a break. Step away from your computer, go for a walk, or chat with a friend.
In programming, your code must follow the rules of a language and logic exactly, so even missing a quotation mark will break everything. Fresh eyes make a big difference.
Tip #5: Become a Bug Bounty Hunter
Speaking of hitting a bug, it is inevitable once you start writing complex programs that you will run into bugs in your code. It happens to all of us! Don’t let bugs frustrate you. Instead, embrace these moments with pride and think of yourself as a bug bounty hunter.
When debugging, it is important to have a methodological approach to help you find where things are breaking down. Going through your code in the order in which it is executed and making sure each part works is a great way to do this.
Once you have an idea of where things might be breaking down, insert the following line of code into your script import pdb; pdb.set_trace() and run it. This is the Python debugger and will drop you into interactive mode. The debugger can also be run from the command line with python -m pdb <my_file.py>.
Make It Collaborative
Once things start to stick, expedite your learning through collaboration. Here are some strategies to help you get the most out of working with others.
Tip #6: Surround Yourself With Others Who Are Learning
Though coding may seem like a solitary activity, it actually works best when you work together. It is extremely important when you are learning to code in Python that you surround yourself with other people who are learning as well. This will allow you to share the tips and tricks you learn along the way.
Don’t worry if you don’t know anyone. There are plenty of ways to meet others who are passionate about learning Python! Find local events or Meetups or join PythonistaCafe, a peer-to-peer learning community for Python enthusiasts like you!
Tip #7: Teach
It is said that the best way to learn something is to teach it. This is true when you are learning Python. There are many ways to do this: whiteboarding with other Python lovers, writing blog posts explaining newly learned concepts, recording videos in which you explain something you learned, or simply talking to yourself at your computer. Each of these strategies will solidify your understanding as well as expose any gaps in your understanding.
Tip #8: Pair Program
Pair programming is a technique that involves two developers working at one workstation to complete a task. The two developers switch between being the “driver” and the “navigator.” The “driver” writes the code, while the “navigator” helps guide the problem solving and reviews the code as it is written. Switch frequently to get the benefit of both sides.
Pair programming has many benefits: it gives you a chance to not only have someone review your code, but also see how someone else might be thinking about a problem. Being exposed to multiple ideas and ways of thinking will help you in problem solving when you get back to coding on your own.
Tip #9: Ask “GOOD” Questions
People always say there is no such thing as a bad question, but when it comes to programming, it is possible to ask a question badly. When you are asking for help from someone who has little or no context on the problem you are trying to solve, its best to ask GOOD questions by following this acronym:
G: Give context on what you are trying to do, clearly describing the problem.
O: Outline the things you have already tried to fix the issue.
O: Offer your best guess as to what the problem might be. This helps the person who is helping you to not only know what you are thinking, but also know that you have done some thinking on your own.
D: Demo what is happening. Include the code, a traceback error message, and an explanation of the steps you executed that resulted in the error. This way, the person helping does not have to try to recreate the issue.
Good questions can save a lot of time. Skipping any of these steps can result in back-and-forth conversations that can cause conflict. As a beginner, you want to make sure you ask good questions so that you practice communicating your thought process, and so that people who help you will be happy to continue helping you.
Make Something
Most, if not all, Python developers you speak to will tell you that in order to learn Python, you must learn by doing. Doing exercises can only take you so far: you learn the most by building.
Tip #10: Build Something, Anything
For beginners, there are many small exercises that will really help you become confident with Python, as well as develop the muscle memory that we spoke about above. Once you have a solid grasp on basic data structures (strings, lists, dictionaries, sets), object-oriented programming, and writing classes, it’s time to start building!
What you build is not as important as how you build it. The journey of building is truly what will teach you the most. You can only learn so much from reading Real Python articles and courses. Most of your learning will come from using Python to build something. The problems you will solve will teach you a lot.
There are many lists out there with ideas for beginner Python projects. Here are some ideas to get you started:
Number guessing game
Simple calculator app
Dice roll simulator
Bitcoin Price Notification Service
Tip #11: Contribute to Open Source
If you find it difficult to come up with Python practice projects to work on, watch this video. It lays out a strategy you can use to generate thousands of project ideas whenever you feel stuck.
In the open-source model, software source code is available publicly, and anyone can collaborate. There are many Python libraries that are open-source projects and take contributions. Additionally, many companies publish open-source projects. This means you can work with code written and produced by the engineers working in these companies.
Contributing to an open-source Python project is a great way to create extremely valuable learning experiences. Let’s say you decide to submit a bug fix request: you submit a “pull request” for your fix to be patched into the code.
Next, the project managers will review your work, providing comments and suggestions. This will enable you to learn best practices for Python programming, as well as practice communicating with other developers.
1 note
·
View note
Note
Any motivation or advice for one man team developers? Sorry if this has been asked already
Hey! I’ve been working on a solo fangame project for too long almost 3 years, while working on The BOSS & Glitch In The System. I have no clue if this’ll help or if this is the type of advice you wanted, but here you go. The things written here can apply to non-fangame projects, too!
(Warning: lots of text ahead - and take this with a grain of salt; I’m not an expert.)
General:
You are going to have to plan in advance and organize absolutely every single thing about your project. Don’t just make an outline for your story. Create concept art for your characters, figure out what makes your game story unique, figure out the mapping and game mechanics early.
Make sure you know your options. If you’re really good at one thing (writing,art,music,code) and everything else is a bit new to you, there are free and paid resources out there. Don’t feel bad for using them.
If you’re a perfectionist, make sure the tools you use are quick. Do not spend a week on one room design, or a month on one song. You will never finish your game, even if it’s super short.
Kinda joykill advice, but I don’t recommend making your dream project first unless you fully KNOW how to start making your project on your own (which even then, you’ll need to organize everything for it to work). Make something silly, or try joining game jams.
External feedback is even more important when working on your game. Get playtesters or people willing to help give feedback to you early on, or midway through development.
Figure out how much energy you can devote to your project. If you want to be ambitious, that’s great! But overworking yourself is a horrible idea.
If you want to change something fairly major about your game, you should probably only do it if you’re below the 30-40% mark. Otherwise you’ll forever drive yourself insane by changing anything when you’ve made that much progress on your project. You can always improve on certain aspects for future games.
Especially for fangames: don’t take everything you make seriously.
Games can still be considered solo projects, even if the developers got help for stuff like art, music, and code. You don’t have to do every single thing by yourself. But if you’re stubborn like me about this and still want to do everything, that’s cool too.
Back up your game or forever suffer in developer hell. Yes, I’m serious. I’ve seen projects get cancelled because they couldn’t afford to get a backup drive (or even a USB key) and it’s miserable.
Don’t act like you’re above other game developers. This applies for anyone, really. Support the other people around you, too!
Visuals:
If you have absolutely no passion or desire to do your own art assets, premade resources are your friends. However, you need to really focus on your other game aspects in other for your games to stand out. To The Moon used a lot of pre-made RPG Maker XP resources but had a phenomenal soundtrack and used that + its visuals to make the game feel more cinematic than most RPG Maker games.
If you feel like you suck at art or don’t have money for expensive drawing tools, but want to make all of the game assets, then do it! Even with simple/free-to-use tools, your can make game art that’ll be unique and memorable. example / example / example
Keep backups of every single one of your original art asset files.
If you want to do pixel art for your game, 1: Always avoid coloring with pure black. Your game will look disgusting. 2: Programs like Asesprite are useful for animations. 3: Make sure it’s proper pixel art. Using AA brushes, the blur tool (etc) will completely ruin that.
Video cutscenes aren’t 100% necessary. Certain game devs make it a goal to never include cutscenes to create a certain atmosphere, or for the game to feel more interactive for the player. (ex: Night In The Woods)
Pretend the player can’t listen to game audio while playing. Keep the visuals interesting and make your game feel alive! Whether it’s through tiny animations, window animations, etc.
For 3D Games: motion blur =/= super cool polished game. >:(
It depends on your game’s style, of course, but usually it’s not a good sign if you can tell your project is made by someone with default assets and doesn’t try to work beyond that (for any engine, 2D or 3D).
If you want to do regular art for your game: make sure you know what resolution your game is going to be at its absolute highest, and always work with bigger than that.
Keep your visuals consistent! If an early area looks unpolished/different from the final maps, then fix it.
I’m going to skip music advice because I 100% suck at composing and don’t know what I’m doing yet. Just make sure your audio files are lossless, even if it adds a bit to your game’s file size.
Audio:
Use the same logic like in one of the points for visuals: Pretend like the player can’t see any of your cool visuals or fancy animations, and is just left with blocks for character sprites and very shapes for maps. Make your game convey emotion through audio, even if it’s through tiny sounds, or really quiet environment sounds.
Voice acting: Don’t even bother if you can’t find people who have good microphones or can’t afford/know how to properly remove background noise. You’ll just be left with really bad quality audio that won’t help immerse the player at all.
There can be a theme to your audio, much like there can be a theme to your visuals. Whether or not you decide to contrast the visuals with your audio or pair them up is up to you. It can give the game a whole new tone, depending on how you approach sound design.
Audio cues are good for puzzles, but again, don’t just rely on that only to indicate to the player that an objective has been completed. If they have the game on mute, they’re just going to be left wandering around.
Binaural audio can be cool, if you want to try doing that.
Writing:
Don’t write game dialogue at 4 am. It never works.
Game writing is VERY different from what you might be used to. Keep in mind that for the most part players want to interact with an environment, not just only hear what characters have to say about a certain event or area. Forcing them to go through giant dialogue cutscenes every time is not a smart move to make. (Obviously, visual novels and text adventure games are an exception to this)
Not that you only need to have 4 words in your entire game! But there is a chance someone will download your game and just not enjoy the writing. Think ahead of time if you really feel like every game puzzle, every important cutscene needs to happen after giant walls of text.
If you have the ability to make visuals that can be paired with writing, you don’t really have an excuse for avoiding that. Especially if the cutscene
Proofread every single thing, or get someone else to do it. If you can export all your game dialogue into text files, that could be helpful.
If you’re trying to write a serious game (with lighthearted moments or not), chances are that adding that one dumb inside joke with your friends in-game could ruin the immersion for the player.
Only time I think the developer should focus more on their own opinion than the players: create as much atmosphere as you can. Figure out the things YOU like about a game world, and focus on that as much as you can. Don’t worry about making it appeal to all/certain audiences.
Don’t act like every single player in the world will like all of your characters. Even if they’re nice, someone could absolutely despise your main characters, or find themselves liking the antagonist more.
Dumb character ticks and speech mannerisms can still work.
Not everything about a Serious Game™ has to be gritty and all that. Me and Katie wouldn’t recommend making a completely serious fangame anyway, but that’s another topic.
You’re probably not going to ever write a game that has absolutely no tropes in it whatsoever, so give up on that.
You can make a character dislikeable but still charming. The other way around works too. Not everything has to be clear-cut right and wrong.
Game design / Programming:
If you ever use shortened names for certain switches, variables, etc - or have a complex system for one game feature, write down what all of it does somewhere. You don’t want to screw yourself over months after you implemented something because you forgot what one button does, or what another variable is for.
Bite the bullet. If there’s an area you restrict access to for the player purely for the sake of not having to deal with coding it, that’s no fun.
You can never make a game with endless options/possibilities.
If there’s something buggy in your absolute basic gameplay mechanics (movement, UI) just change it and don’t focus on anything else before it’s fixed. There’s no excuse not to.
Make sure your game UI is bearable to look at. Please.
You don’t have to add 50 game options or features for your game to stand out. Unless you know it’ll encourage the player to keep playing or will help the player enjoy the game, then there’s no real use for it.
If you can ever optimize your game (frame rate, controls, etc) do that too. Having a simple 2D game running at 15fps one second and 60 the other won’t make your players happy.
Personally, I’d rather play a working puzzle even if it’s a bit boring, over something that’s super creative but buggy as hell.
Color puzzles aren’t going to work for colorblind players, and if you have an aesthetic (super tiny) game font, people with bad eyesight won’t be able to play. Give people options!
“Choices in this game matter” if you know they don’t matter whatsoever for the ending or for a majority of the game, then don’t say that. This also ties into the branding section.
Making band-aid fixes for every single one of your game bugs is a really bad idea. If you can take some time to fix one bug fully rather than relying on workarounds, do that.
Back. Up. Your. Code. Files. Especially if you’re planning on making major changes to it. It can be very useful to have old pieces of code to fall back on if your changes don’t work as planned.
Figure out what you can and can’t do with an engine. There’s a section in The Beginner’s Guide that talks about the limitations certain engines can pose to developers, and how certain engines are just better fit for certain tasks than others. You won’t be able to include or make everything for one project. (Chances are, that wouldn’t work well anyways).
Don’t expect the player to only behave one way to your game’s design, puzzles, or mapping. Again, give people options. There can be some fun in giving the player different results for different puzzle solutions.
Presentation:
You don’t have to reveal every single thing about your project online- but on the other hand, keeping everything to only vague/abstract teaser posts isn’t very helpful to people, either.
Social media is your friend. Twitter, tumblr, youtube, etc- Find different audiences through your games there!
Figure out what sites you want to put your game on. There are tons of options: Itch.io is my favorite. But sites like Gamejolt, indiedb, rmn.net, Steam (more for commercial games), etc can work for you. You can always just upload it for yourself online (mediafire, google drive, dropbox) too, if you dislike all of those sites or prefer doing it through direct download links.
Don’t self promote your game on other people’s games or accounts…
Even if someone is hoping to see something really specific in your game, your project will get out of hand if you just add in what every single person wants. Convince people that your game will be worthwhile even if a feature or a character doesn’t appear in it.
Remaining transparent with your audience will help you a lot.
Keep things easy to access and read/look at for potential players. Make sure people can find something about the game quick. Things like FAQs, “About this game”, external links, etc are very helpful.
Apologies in advance for any embarrassing typos that I may have missed.
One last thing: Focus on making something that you ultimately like. It’ll be much easier to handle any sort of obstacles during/after development that way.
There is so much more I want to cover on this, but this should give you some basic things to work with. Hope this helps!
50 notes
·
View notes
Text
Best way to learn Java programming
Having said that I am writing this post dedicated to all my young (or I should say beginner) fellows who want to attain a certain level of proficiency in java technology and somewhere would like to take my advice on this. Keep in mind that if you do not like the way to learn java, I am proposing in this post, then just ignore me. Period. OR better, suggest me what you think is the better way to learn java fast or easily.
Here I am assuming the people reading this post will be, who are very new to language, so I will start by listing first thing first. Make sure you have prepared your Java development environment ready i.e. You have installed JDK/JRE and you have an IDE like Eclipse.
1) Learn the language basics
This is the first step for very obvious reason. If you don’t know the basics then you will never know either what to do next or what you are doing wrong. Initially, I do not expect from you to become the master of all java basic stuffs like keywords, core concepts or basic coding techniques. What really I expect from you is just to read all the text available in below links, even if it just doesn’t make sense to you in the first attempt. Just keep reading it.
http://docs.oracle.com/javase/tutorial/java/nutsandbolts/
https://www.ibm.com/developerworks/java/tutorials/j-introtojava1/
Please keep in mind that above two links are not the only links for basic knowledge. You can do a quick google search and find out many similar links.
When you are done with few links as two given above, re-read them again second time. Don’t skip any part of it. This time, things will start making more sense to you, and you will be able to connect between various concepts by yourself. If you are still not able to connect the pieces of information spread in multiple places, then keep repeating this step until you actually start relating the core concepts. Don’t worry about you are wrong or right, just relate them and better make notes. Notes will help you to measure your java learning curve.
Carefully learn object oriented programming concepts. Just like other popular programming languages, Java is also an object oriented programming language.
2) Create some small programs
Once you are confident that you are very much familiar with most basic stuffs/keywords and concepts and you can actually relate them somehow, you are welcome to second step where you will have to start building some very very basic java programs e.g. hello world, simple addition and subtraction etc.
When you are writing the programs, keep in mind that first couple of programs are going to be real tough for you. But once you are done with them you will not face similar level of difficulty in next set of programs.
You may face difficulty so much that you may not able to type in your hello world program itself, all by yourself. Don’t hesitate, open Google and search similar program. Don’t copy it using CTRL+C. Here just read the program, and type into your IDE (integrated development environment) (I suggest to use eclipse, as I find it very easy) and solve the compilation error caused by incorrect syntax you got while typing (basically I assume that you will make mistakes in lowercase/uppercase). If you are still not able to do it, then take the help of Google again. Google is your friend, just remember it.
Do it for couple of programs and remember that always try to create program by yourself first and then use Google. I am giving below a list of basic java programs which you may consider for beginning.
Display some text message.
Display a list of numbers (1 to 50) each in new line.
Find the max and min between two numbers.
Swapping between two numbers using any technique you know.
Build a calculator program able to add/substract/multiply and divide the numbers.
Create two classes (super class/sub class) and practice method overloading and overriding concepts.
Create some programs involving array e.g. printing output in array format in console.
And so on…
Above programs are just to give you a start and make you understand what I meant by basic programs. List can be longer and I will suggest you to add more items to this list and create programs for them. And remember, Google is your friend 🙂
Also use an IDE
3) Create advanced programs using Java APIs
Now when you are done with making most of the basic programs, and most importantly, you are comfortable into creating such basic programs, jump to this step. Here, I will suggest you to work hard on learning java APIs inside java collections and java IOs. Just start exploring various classes and interfaces involved into these APIs and start creating programs for them. Please note that you should always try to find an already existing API and method for doing a certain task, and you should not be creating your own logic here. Your goal is to get familiarize yourself with these APIs, so always look for a solution within these APIs only.
Again I am suggesting few basic programs you can work on to start with. Later you can include more APIs and more such programs as much as you can.
Taking input from console and printing it
Reading a file from filesystem and printing it’s content in console
Creating a new file and writing some data onto it
Reading data from a URL and do some search on it’s content
Store elements in a list, and then iterate over it
Use HashMap to store random key-value pairs and iterate over it in multiple ways
Create some programs for searching and sorting over collection elements
And so on…
The more and more programs you build at this step, you will get more and more confidence. As soon as you are good in using these APIs, jump to most important and difficult task in next section.
4) Create at least one desktop application and one web application
This step will give you the confidence which is needed to face any java interview and prove your mettle in java related discussions. Idea is simple. You just have to decide at least one java desktop/GUI application (e.g. desktop calculator), and then one web application (e.g. hospital management). And now when you have most basic knowledge at your hand, start exploring everything which you will need to build your two applications.
Ask help from experts (I will also do my bit to help you), your experienced friends, colleagues and every person you know and who can help you. Read all available good material which comes into your way when searching for solutions and simple learning the concepts. Buy some books which are related to the concepts where you are struck in. Do everything what is needed to build these application. Make them you sole objective for few days (or weeks or even months).
Let me assure you that by the time you end up completing both exercises, you will be much more confident than ever before, when it comes to java. And more importantly, it helps you to develop a habit of getting things done at every cost. This attitude is very important in long run of your career.
5) Read and participate in some good java blogs/forums
After your above four steps are completed, you will be more of a confident man who is also able to help others like you have been few month back. Find people who know less and help them in solving the problems, even if it require some amount of time of you as well. A good place for these activities can be forums like stackoverflow.com. When you start learning about mistakes others are making, it just open up your mind on various directions and improves your thought processing capabilities.
In fact, last step is like infinite loop and you should keep doing it when the time permits. You will really appreciate the results when you will realize how mature you have become.
That’s all for now on my thoughts regarding best way to learn java. If you happen to agree with me, drop a comment. If you do not agree with me, drop your suggestion. I will include your thought into main article if it’s really good.[Source]-https://howtodoinjava.com/resources/best-way-to-learn-java/
We provide the best advanced java course in navi mumbai. We have industry experienced trainers and provide hands on practice. Basic to advanced modules are covered in training sessions.
0 notes
Text
Original Post from Rapid7 Author: Garrett Gross
With web-based attacks on the rise, application security is a hot topic today. And we’re not even talking zero-day attacks, but tried-and-true SQL injections (SQLi), cross-site scripting (XSS), and other methods that have been around for quite a while. Although web apps are the bread and butter of so many companies today, they are often not given the same security protections as other parts of the IT environment.
Because of this, we will discuss all things web applications and how to select the right application security solution to keep them safe from attack.
The security risks of today’s web applications
Development teams have adopted fast release cycles and continuous development, so they don’t have time to write and build code from scratch, making apps complex and often unable to be scanned by traditional web scanners. If a scanner is built to detect name and value pairs and is presented with a web app with a modern web framework, it might not be able to scan it and could require manual intervention—that is, if that person knows what to look for. In addition to that, functionality spread across APIs, microservices, and other components makes it difficult to see these parts as one cohesive application.
Another result of rapid development cycles that adds complexity to security is the reuse of code from open source libraries, but if that kit has a known vulnerability in it and you unknowingly introduce it into your environment, you could open your organization up to more risk. Furthermore, development teams often set up new apps and systems using their default configurations as a way to run fast, but these can create holes in your security posture. With many opportunities to introduce risk to the environment, web apps need proper security.
Related blog: 4 Ways to Tackle Application Security Earlier in the SDLC
4 modern approaches to application security testing and protection
Now that you know why web apps need the right security layers in place, how do you choose the right solution? With different tools built for different use cases, we’ll cover the top three appsec solutions below and the criteria in which you can evaluate which one is right for you.
Static application security testing (SAST)
SAST solutions have been around for a while now, with several pros and cons:
Pros:
Fixes vulnerabilities at their source (earlier in the SDLC, where it’s easier to fix them) by signature-mapping lines of code that are known to present risk
No impact on the production environment
Encourages good code hygiene by integrating directly into the dev environment
Valuable for secure development practices
Cons
Requires different implementations for different languages or frameworks
Difficult to manage if you’re not on the dev team
Difficult to deploy at scale
Not a substitution for building applications with security in mind
Doesn’t run during application runtime
Dynamic application security testing (DAST)
DAST tools take a modern approach to SAST, with several more benefits:
Pros:
Easy to deploy and manage and doesn’t require the dev team to get involved
Not bound by a particular language or technology, enabling you to run one DAST for everything
Fewer false positives than SAST and designed to tune out noise so you can zero in on real threats
Simulates attacks like an attacker and finds vulnerabilities that SAST tools cannot
Integrates into the CI/CD pipeline to provide code and build checks along the way
Cons:
Dev teams are often not convinced of the value of DAST, since the results often mean more work for them
If it’s only run in production, you may not catch vulns in time
Cannot scan source code
Interactive application security testing (IAST)
A combination of SAST and DAST capabilities, IAST can come in many flavors—either a combination of the two that presents both results, or able to aggregate and correlate results to see vulnerabilities from both perspectives.
Pros:
Can correlate vulns found after build with lines of code
Improves accuracy of SAST solutions by incorporating results from runtime analysis
Cons:
Not yet widely adopted due to cost
Requires expertise to implement and run
Lacks combined coverage across certain languages and frameworks
Requires deployment of an agent and dev buy-in
Runtime application self-protection (RASP)
RASP enables the app to defend itself not by scanning but by running alongside the app.
Pros:
Identifies and blocks threats in real-time without human intervention (bypasses needing to interrogate the router, since it lives on the app itself)
Watches the application at runtime to see what actions take place (rather than trying to predict them) and can block requests that may be indicative of a zero-day attack
Significantly fewer false positives than traditional WAFs.
Cons:
Not widely adopted due to being a newer technology.
Requires deployment of an agent.
Could block revenue-generating traffic if misconfigured.
How to choose the right application security tool
By now, you may have already gained some clarity on which appsec solution is right for you. It’s important to consider other aspects of the business that this decision could impact, such as IT, compliance, legal, security maturity, and overall corporate strategy considerations. Think about how the application security solution you choose could support all of these areas.
To know for sure, we recommend trying a few solutions on for size to see how they work in your environment and evaluate them with the following criteria:
Do I have complete coverage/visibility across the entire application, even non-navigable parts like the API and microservices?
Once I get results, what can I do with them? Is there a process to share them with the development team or work with a vendor?
How do I manage security data across all my apps? Do I need to dedicate a team to it, create a flow chart, or get another solution to manage all the scan data?
Can I catch vulnerabilities earlier (pre-production) to reduce headaches and costs later?
Start where you are: 3 common use cases
A major factor that plays into which appsec solution is right for you is where you are in your security maturity. Below are the three phases of security maturity when it comes to application security, along with guidance on what solutions are most appropriate at that phase.
Use case 1: “I’m not sure where to start, but I need SOMETHING:
You’re new to application security and are starting to build a program but don’t yet have visibility to the development process.
Critical needs:
Vulnerability scanning
Assess and report on risks
Demonstrate level of compliance
Where to start:
Managed services: You can pick programs that offer white-glove service or can help you bring this in-house. Learn more about Rapid7’s managed appsec services.
Penetration testing: If you need to be in compliance, you’ll either need to schedule regular penetration tests with a vendor or put in place your own tests so you can continuously improve your security posture. Learn more about Rapid7’s pen testing services.
Consultative services: Many companies new to security will partner with companies like Rapid7 to build out their appsec program. It’s like having a CISO in a box!
Ad-hoc DAST scanning: Leverage a solution like InsightAppSec to run continuously against your apps
Begin building relationships with the dev team: This is especially important if you have plans to implement DevOps or SecOps in the future. Learn how our InsightAppSec solution helps you collaborate and work better with development teams.
Use case 2: “I want to do more with what I have”
You have a defined application security program and the beginnings of a DevOps program but no true CI/CD or cross-departmental alignment yet. You also don’t have a dedicated appsec team yet, but you may have some dedicated appsec engineers helping out in the interim.
Critical needs:
Scheduling
Advanced searching/reporting
Vulnerability validation
Ticketing/SDLC integration
Where to start:
Consider DAST scan efficiency: Decide if hosting it in your environment or on the cloud is more efficient. Take our DAST tool for a spin.
Combine forces: Use SAST and DAST together by potentially leveraging IAST.
Look at shifting left with DAST scanning: Let the development team experiment with scanning themselves through SDLC integrations or working with them on reading the results. Download our whitepaper: A Step-by-Step Guide to Shifting Left and Embracing a True DevSecOps Mentality
Use case 3: “I want to take it to the next level”
Application security is critical to your business, and you have a DevOps team that either runs security or is closely aligned with the InfoSec team. You’ve implemented CI/CD practices and are open to new approaches.
Critical needs:
Integration with CI/CD tools
Robust API
Real-time mitigation
Data export
Where to start:
Fully integrate with build automation platforms like Jenkins to execute DAST scans immediately following a build. Implement pass/fail build logic based on scan results.
Automate SAST/DAST results correlation for deeper insights.
Implement runtime visibility (RASP).
Automated/incremental validation.
Application discovery
Implementing your appsec program
Application security isn’t necessarily hard, but the landscape can be confusing with so many solutions to choose from. It’s important to do what’s best for your organization, and that starts with knowing your goals and the resources you have to allocate to them. The bottom line is that you want to be able to find and remediate vulnerabilities as early as possible to reduce costs and save time—while keeping your organization secure.
InsightAppSec, our cloud-managed DAST solution, can run multiple scans across multiple applications. You can host it on-premises or in the cloud and schedule scans at intervals of your choosing. It then gives you detailed descriptions of what it found, as well as guidance on what to do and visibility into the remediation process.
Start a free trial of InsightAppSec today
Get Started
#gallery-0-5 { margin: auto; } #gallery-0-5 .gallery-item { float: left; margin-top: 10px; text-align: center; width: 33%; } #gallery-0-5 img { border: 2px solid #cfcfcf; } #gallery-0-5 .gallery-caption { margin-left: 0; } /* see gallery_shortcode() in wp-includes/media.php */
Go to Source Author: Garrett Gross App-a-Bet Soup: Should You Use a SAST, DAST, or RASP Application Security Tool? Original Post from Rapid7 Author: Garrett Gross With web-based attacks on the rise, application security is a hot topic today.
0 notes
Text
The Best Node.js & Microservices Articles we Ever Wrote
Since the inception of RisingStack, our engineers have published almost 200 articles to show off our coding/architectural skills and convince future clients that we have the expertise to build & scale software effectively, and to prove that we're great educators!
As a result, our Blog brought together a huge community of enthusiastic engineers in the past 4 years - so far we've reached more than 3.5 million devs & gained around 50K subscribers.
Sometimes it's great to look back & be nostalgic about our successes, so we dived deep into our data and listed our most-read and most-shared articles!
Also, we'd like to know what topics you'd love to learn about. Please leave a comment & help us decide what should we write about next!
Top 10 Most-Read Posts of RisingStack:
1. The React.js Way: Getting Started Tutorial
This article helps you to get started with React.js and gives insights on thinking the 'React way.' We wrote it at the beginning of the React hype, which means that it's a little bit outdated. We hate to disappoint, so we created a few follow-up React.js tutorials including our latest:
8 Tips to Build Awesome React.js Apps in 2018
2. Node Hero - Getting Started With Node.js Tutorial
This article is the first part of our fan-favorite "Getting Started with Node.js" series which helps beginners to grasp the main concepts behind Node.js and teaches how to write software effectively!
We even created stickers for this series! :)
3. Your First Node.js HTTP Server
From this article, you can learn how to fire up a simple Node.js HTTP server and start serving requests from scratch! We discuss Express, Middlewares, Error Handling & Debugging as well!
4. React.js Best Practices for 2016
This article is a collection of React.js best practices, with special attention to data handling. Although it was written in 2016 - it still holds value & it's being read constantly.
We discuss flux, redux, immutable states, observables, routing, components, testing & so on..
5. Understanding Async Programming in Node.js
This article helps you to learn the principles of async programming, and to do async in JavaScript and Node.js. If you're a Node developer, you MUST get this part right - so no wonder that it's one of our best performing post.
6. Node.js Project Structure Tutorial
This article teaches readers how to structure a Node.js project properly to avoid confusion when applications start to grow. We talk about the 5 fundamental rules of structuring a project, which are:
Organize your Files Around Features, Not Roles
Don't Put Logic in index.js Files
Place Your Test Files Next to The Implementation
Use a config Directory
Put Your Long npm Scripts in a scripts Directory
7. Node.js Authentication using Passport.js
This Passport.js tutorial walks you through the steps of setting up a local Node.js authentication strategy using Redis.
8. Mastering Async-Await in Node.js
From this article, you can learn how you can simplify your callback or Promise based Node.js application with async functions (async/await).
Asynchronous language constructs have been around in other languages for a while, like async/await in C#, coroutines in Kotlin and goroutines in Go. With the release of Node.js 8, the long-awaited async functions have landed in Node.js as well.
9. How to Get Node.js Logging Right
Get some help with logging in Node.js modules, applications and distributed systems. To do so, check out the tools, methods, rules and best practices we use at RisingStack for developing enterprise Node projects.
Some takeways:
Always log to stdout. It is not the applications responsibility to route logs.
Never, ever log credentials, passwords or any sensitive information.
10. 10 Best Practices for Writing Node.js REST APIs
In this article, we wrote about best practices for writing Node.js REST APIs, including topics like naming your routes, authentication, black-box testing & using proper cache headers for these resources.
1 - Use HTTP Methods & API Routes
2 - Use HTTP Status Codes Correctly
3 - Use HTTP headers to Send Metadata
4 - Pick the right framework for your Node.js REST API
5 - Black-Box Test your Node.js REST APIs
6 - Do JWT-Based, Stateless Authentication
7 - Use Conditional Requests
8 - Embrace Rate Limiting
9 - Create a Proper API Documentation
10 - Don't Miss The Future of APIs
Top 10 Most-Shared Posts of RisingStack
1. Node.js Best Practices - Become a Better Developer
This article collects the most important Node.js best practices that you should implement to become a better developer. Although this article was written for 2017, you can still find some evergreen pieces of advice in there.
To make sure that you keep up with the trends, we published a 2018 version of this article too, which you can find here:
8 Tips to Build Better Node.js Apps in 2018
2. JavaScript Clean Coding Best Practices
There is no reasonable excuse for doing anything less than your best, especially when it comes to coding.
“Even bad code can function. But if the code isn’t clean, it can bring a development organization to its knees.” — Robert C. Martin (Uncle Bob)
Clean coding is a key skill when it comes to software development. In this post, we collected the basic clean coding principles for naming and using variables & functions, as well as some JavaScript specific clean coding best practices. In doubt? This image shows another way to tell whether your code is good enough.
3. Node.js Security Checklist
Security - the elephant in the room. Everyone agrees that it is very important, but few takes it seriously.
This hands-on checklist helps you to have all the security checks before your application is enabled to thousands of users/customers. Make sure not to miss any of them!
4. Advanced Node.js Project Structure Tutorial
In this article, we give a solution for the most common pain-points of structuring advanced Node applications and help you with structuring a complex project.
What to aim for in project structuring?
Writing an easily scalable and maintainable application
The config is well separated from the business logic.
Our application can consist of multiple process types.
It's important to get these aspects right as the way you bootstrap your apps will determine your whole project.
5. Node v10 is Here - Feature Breakdown!
Node v10 was recently announced, and we were super excited about its new features and the possible changes it would bring in the way we develop Node.js apps. To introduce it in depths to our reader, Tamas wrote a neat post about it. He included:
Stable HTTP 2
ESM Modules
Error Codes
Fs Promises
N-Api
V8 6.6
6. How Developers use Node.js - Survey Results
We conducted a survey in 2016 about how developers use Node.js and to find out various aspects of developing Node.js and choices for async control flow, debugging, continuous integration or finding packages. We concluded that one of the most significant pain-point of Node.js developers was Debugging, among others:
Debugging / Profiling / Performance Monitoring
Callbacks and Callback hell
Understanding Async programming
Dependency management
Lack of conventions/best practices
Structuring
Bad documentation
Finding the right packages
To keep track with the changes of the community, we surveyed Node developers in 2018 too. You can see the most up-to-date results in this post:
Why Developers Love Node.js & what's their main issue with it?
7. Node.js Interview Questions and Answers (2017 Edition)
In this post, we collected 10 interview questions and answers that would help you get an overview of a person's experience in Node.js. This article is not only useful from the interviewers' viewpoint but from the interviewee as well.
It's important to note though, that these questions do not give you the big picture of someone's mindset and thinking, so we encourage you to do pair programming with the developers you are going to hire.
We have also written a similar post recently about getting ready for a React interview, which you can find here:
8 React Interview Questions for 2018
8. Fundamental Node.js Design Patterns
What are design patterns?
A design pattern is a general, reusable solution to a commonly occurring problem.
When we talk about design patterns, we might think of singletons, observers, or factories. Besides these, this article also deals with other, super useful pattern as well, such as:
dependency injection
middlewares
9. Concurrency and Parallelism: Understanding I/O
This article focuses on understanding the principles of operating systems, since they handle our applications' I/O. Let's dive into concurrency and paralellism, and understand the main differences between them.
We'll go the following takeaways:
Intro to Concurrency and Parallelism
Processes and threads
CPU vs. I/O
I/O flavors: Blocking vs. non-blocking, sync vs. async
Busy-waiting, polling and the event loop
Then, see a hands-on example that illustrates the differences between working with synchronous, blocking and asynchronous, non-blocking network I/O.
10. History of Node.js on a Timeline
Our favourite framework has a rich history since it's emerged in 2009.In this post we go through the history of Node.js; we see how it got started and how did it become the framework that we know now.
RisingStack's Engineer Favorites:
We also asked our engineers about which articles they enjoyed writing the most:
Tamas Kadlecsik: Consumer-Driven Contract Testing
In this article, Tamas walks you through the steps of performing consumer-driven contract testing in a microservices architecture with Pact.
After you got the fundamental consumer-driven contract testing right, you should check out the 2nd, more advanced part of it:
Advanced Contract Testing - Pact Verification with Pattern Matching
Peter Czibik: Getting Node.js Testing and TDD Right
Making sure that the changes we make in a large codebase actually work is of utmost importance.
It can be tedious to have proper test coverage when you have to focus on pushing out all the new features, but think about your future self, would you like to work on code that's not tested properly? If not, read this guide on getting testing and test-driven development right.
"Remember, you don't write tests for yourself! You write them for those who make changes later." - RisingStack
Tamas Hodi: Node.js Async Best Practices
In this post, Tamas covers the tools and techniques you have at your disposal when handling Node.js asynchronous operations: async.js, promises, generators and async functions.
He discusses:
Asynchronous programming in Node.js
The Problem with Node.js Async
The Classical Approach of Callbacks
How to avoid a Callback Hell with Control Flow Managers
Bertalan Miklos: Introducing React Easy State
React Easy State is a state management library for React. This article introduces the fruition of Bertalan's two years long journey with ES6 Proxies and meta programming.
Bertalan guides you through creating a stopwatch with his newly announced library. It's very cool:
Robert Czinege: How I Survived RisingStacks Bootcamp
This article captures the journey of how Robert became an engineer at RisingStack; how he utilized what he learned in our Node.js coding bootcamp and beat his imposter syndrome.
Robert's story can be an inspiration for anyone who is seeking a career shift in their life. If you'd like to learn more Node, check out our resources page.
Kristof Ivancza: How to Get Started With Kubernetes
When our clients ask us to create a distributed system, we usually recommend Kubernetes, because it's great, and in the same time a lot more simple than other competing orchestration engines.
You can get started with Kubernetes with this article where Kristof collected everything you need to know about our favorite orchestration engine.
Mate Huszarik: AngularJS to Angular - a brief history
Mate dived deep into the history Angular to see where it came from and what might happen with it in the future. Read more about the pillars of Angular to have a better understanding of what it has to offer.
"Indeed, Angular might have a longer learning period compared to other front-end libraries but in return it enhances the developer experience with built-in solutions that come by importing modules."
What should we write about Next?
Let us know if there's anything you're missing from our repertoire in the comment section below!
The Best Node.js & Microservices Articles we Ever Wrote published first on https://medium.com/@koresol
0 notes
Text
New Coder: Getting Started and Finding Your Path
You've decided it's time to learn how to code, so the next step is to find some resources and start programming your first masterpiece. Hopefully, you've decided that my advice on which language to choose was useful, and you're going to start with either Python, Go or PowerShell. There are a number of ways to learn, and a number of approaches to take. In this post, I'll share my thoughts on different ways to achieve success, and I'll link to some learning resources that I feel are pretty good.
How I Began Coding
When I was a young lad, my first foray into programming was using Sinclair BASIC on a Sinclair ZX81 (which in the United States was sold as the Timex Sinclair 1000). BASIC was the only language available on that particular powerhouse of computing excellence, so my options were limited. I continued by using BBC BASIC on the Acorn BBC Micro Model B, where I learned to use functions and procedures to avoid repetition of code. On the PC I got interested in what could be accomplished by scripting in MS-DOS. On Macintosh, I rediscovered a little bit of C (via MPW). When I was finally introduced to NetBSD, things got interesting.
I wanted to automate activities that manipulated text files, and UNIX is just an amazing platform for that. I learned to edit text in vi (aka vim, these days) because it was one tool that I could pretty much guarantee was installed on every installation I got my hands on. I began writing shell scripts which looped around calling various instantiations of text processing utilities like grep, sed, awk, sort, uniq, fmt and more, just to get the results I wanted. I found that often, awk was the only tool with the power to extract and process the data I needed, so I ended up writing more and more little awk scripts to fill in. To be honest, some of the pipelines I was creating for my poor old text files were tricky at best. Finally, somebody with more experience than me looked at it and said, Have you considered doing this in Perl instead?
Challenge accepted! At that point, my mission became to create the same functionality in Perl as I had created from my shell scripts. Once I did so, I never looked back. Those and other scripts that I wrote at the time are still running. Periodically, I may go back and refactor some code, or extract it into a module so I can use the same code in multiple related scripts, but I have fully converted to using a proper scripting language, leaving shell scripts to history.
How I Learned Perl
With my extensive experience with BASIC and my shallow knowledge of C, I was not prepared to take on Perl. I knew what strings and arrays were, but what was a hash? I'd heard of references but didn't really understand them. In the end—and try not to laugh because this was in the very early days of the internet—I bought a book (Learn Perl in 21 Days), and started reading. As I learned something, I'd try it in a script, I'd play with it, and I'd keep using it until I found a problem it didn't solve. Then back to the book, and I'd continue. I used the book as more as a reference than I did as a true training guide (I don't think I read much beyond about Day 10 in a single stretch; after that was on an as-needed basis).
The point is, I did not learn Perl by working through a series of 100 exercises on a website. Nor did I learn Perl by reading through the 21 Days book, and then the ubiquitous Camel book. I can't learn by reading theory and then applying it. And in any case, I didn't necessarily want to learn Perl as such; what I really wanted was to solve my text processing problems at that time. And then as new problems arose, I would use Perl to solve those, and if I found something I didn't now how to do, I'd go back to the books as a reference to find out what the language could do for me. As a result, I did not always do things the most efficient way, and I look back at my early code and think, Oh, yuck. If I did that now I'd take a completely different approach. But that's okay, because learning means getting better over time and — this is the real kicker — my scripts worked. This might matter more if I were writing code to be used in a high-performance environment where every millisecond counts, but for my purposes, "It works" was more than enough for me to feel that I had met my goals.
In my research, I stumbled across a great video which put all of that more succinctly than I did:
youtube
In the video (spoiler alert!) CheersKevin states that you don't want to learn a language; you want to solve problems, and that's exactly it. My attitude is that I need to learn enough about a language to be dangerous, and over time I will hone that skill so that I'm dangerous in the right direction, but my focus has always been on producing an end product that satisfies me in some way. To that end, I simply cannot sit through 30 progressive exercises teaching me to program a poker game simulator bit by bit. I don't want to play poker; I don't have any motivation to engage with the problem.https://www.youtube.com/watch?v=mvK0UzFNw1Q
A Few Basics
Having said that you don't want to learn a language, it is nonetheless important to understand the ways in which data can be stored and some basic code structure. Here are a few things I believe it's important to understand as you start programming, regardless of which language you choose to learn:
ItemDefinitionscalar variablea way to store a single value, e.g. a string (letters/numbers/symbols), a number, a pointer to a memory location, and so on.array / list / collectiona way to store an (ordered) list of values, e.g. a list of colors ("red", "blue", "green") or (1,1,2,3,5,8).hash / dictionary / lookup table / associative arraya way to store data by associating a unique key to a value, e.g. the key might be "red", and the value might be the html hex value for that color, "#ff0000". Many key/value pairs can be stored in the same object, e.g. colors=("red"=>"#ff0000", "blue"=>"#00ff00", "green"=>"#0000ff")zero-based numberingthe number (or index) of the first element in a list (array) is zero; the second element is 1, and so on. Each element in a list is typically accessed by putting the index (the position in the list) in square brackets after the name. In our previously defined array colors=("red", "blue", "green") the elements in the list are colors[0] = "red", colors[1]="blue", and colors[2]="green".function / procedure / subroutinea way to group a set of commands together so that the whole block can be called with a single command. This avoids repetition within the code.objects, properties and methodsan object can have properties (which are information about, or characteristics of, the object), and methods (which are actually properties which execute a function when called). The properties and methods are usually accessed using dot notation. For example, I might have an object mycircle which has a property called radius; this would be accessed as mycircle.radius. I could then have a method called area which will calculate the area of the circle (πr²) based on the current value of mycircle.radius; the result would access as mycircle.area() where parentheses are conventionally used to indicate that this is a method rather than a property.
All three languages here (and indeed most other modern languages) use data types and structures like the above to store and access information. It's, therefore, important to have just a basic understanding before diving in too far. This is in some ways the same logic as gaining an understanding of IP before trying to configure a router; each router may have a different configuration syntax for routing protocols and IP addresses, but they're all fundamentally configuring IP ... so it's important to understand IP!
Some Training Resources
This section is really the impossible part, because we all learn things in different ways, at different speeds, and have different tolerances. However, I will share some resource which either I have personally found useful, or that others have recommended as being among the best:
Python
Book: Learn Python The Hard Way
Book: Python Programming for the Absolute Beginner
Book: Think Python, 2nd Edition: How to Think Like a Computer Scientist
Online: Python For Everybody, @Coursera (Note: 7-day free trial, then $$ required)
Online: Python @Codecademy
Online: Kirk Byers' Python for Network Engineers
The last course is a great example of learning in order to accomplish a goal, although perhaps only useful to network engineers as the title suggests. Kirk is the author of the NetMiko Python Library and uses it in his course to allow new programmers to jump straight into connecting to network devices, extracting information and executing commands.
Go
Go is not, as I think I indicated previously, a good language for a total beginner. However, if you have some experience of programming, these resources will get you going fairly quickly:
Book: The Go Programming Language
Online: A Tour of Go
Online: Effective Go
Online (Slack): Gophers Slack Channel
As a relatively new, and still changing, language, Go does not have a wealth of training resources available. However, there is a strong community supporting it, and the online documentation is a good resource even though it's more a statement of fact than a learning experience.
PowerShell
Book: Learn Windows PowerShell in a Month of Lunches, 3rd Edition
Online: Getting Started With Microsoft PowerShell (featuring inventor of PowerShell, Jeffrey Snover. Microsoft Virtual Academy has other free training material there as well)
Online: Microsoft Script Center Learning Resources (a collection of good resources)
eBooks: Some free PowerShell eBooks (free reference material, though not necessarily tutorials)
General: Anything from Ed Wilson / Teresa Wilson (aka The Scripting Guys) is usually a good resource.
Parting Thoughts
Satisfaction with learning resources is so subjective, it's hard to be sure if I'm offering a helpful list or not, but I've tried to recommend courses which have a reputation for being good for complete beginners. Whether these resources appeal may depend on your learning style and your tolerance for repetition. Additionally, if you have previous programming experience you may find that they move too slowly or are too low level; that's okay because there are other resources out there aimed at people with more experience. There are many resources I haven't mentioned which you may think are amazing, and if so I would encourage you to share those in the comments because if it worked for you, it will almost certainly work for somebody else where other resources will fail.
Coincidentally a few days ago I was listening to Scott Lowe's Full Stack Journey podcast (now part of the Packet Pushers network), and as he interviewed Brent Salisbury in Episode 4, Brent talked about those lucky people who can simply read a book about a technology (or in this case a programming language) and understand it, but his own learning style requires a lot of hands-on, and the repetition is what drills home his learning. Those two categories of people are going to succeed in quite different ways.
Since it's fresh in my mind, I'd also like to recommend listening to Episode 8 with Ivan Pepelnjak. As I listened, I realized that Ivan had stolen many of the things I wanted to say, and said them to Scott late in 2016. In the spirit that everything old is new again, I'll leave you with some of the axioms from RFC1925 (The Twelve Networking Truths) (one of Ivan's favorites) seem oddly relevant to this post, and to the art of of programming too:
(6a) (corollary). It is always possible to add another level of indirection. (8) It is more complicated than you think. (9) For all resources, whatever it is, you need more. (10) One size never fits all. (11) Every old idea will be proposed again with a different name and a different presentation, regardless of whether it works. (11a) (corollary). See rule 6a.
The post New Coder: Getting Started and Finding Your Path appeared first on Computer Systems Design.
from Computer Systems Design http://ift.tt/2rUwCgR
0 notes