#pir sensor with arduino
Explore tagged Tumblr posts
Visit Tumblr Blog
Explore Tumblr blogs with no restrictions, modern design and the best experience.
Last Seen Tumblr Blogs


Fun Fact
In 2020, 44% of users from Denmark used Tumblr daily.
Text
Islas Sonoras
Prototipo no.1
La primera isla que salió como prototipo más allá del papel y lápiz junto al montaje en un editor de imágenes. Este prototipo fue presentado en la Feria de industrias creativas 2025. (Solo que al momento de la presentación la base se despegó y no pudo ser presentada así que se usó una caja de carton con las mismas medidas)
Uso de materiales plásticos como juguetes de diferentes tamaños y texturas en la parte superior de la obra. Aplicación interactiva con la implementación de Arduino junto a sensor PIR, parlante y DFPlayer.
Colores (Isla somática con colores cálidos, junto con los parámetros de 1704 a 1893 (A. Wallace Rimington)) esto fue seleccionado para la creación visual y sonora de la obra. Detalles de la relación color-sonido -rosa = A or B -morado = B or D -naranja = D -amarillo = E -rojo = C
Material de base Madera prensada (fue sacada de un par de parlantes de escritorio, los cuales ya no funcionaban) con un tamaño de 19,2 x 15 x 7,8 cm


2 notes
·
View notes
Text
Essential Electronic Items for IoT and Electronics Enthusiasts
Are you diving into the world of Internet of Things (IoT) and electronics? Whether you are a seasoned engineer or simply beginning out, having a stable list of essential components is key to bringing your initiatives to existence. Here’s a curated list of electronic objects that each maker and tech enthusiast ought to have of their toolkit:
1. Microcontrollers
Arduino Uno: Great for novices and versatile for diverse projects.
Raspberry Pi: Ideal for more complex duties and going for walks complete operating structures.
ESP8266/ESP32: Perfect for wireless communication and IoT projects.
2. Sensors
DHT22: For temperature and humidity readings.
PIR Sensor: Useful for movement detection.
Ultrasonic Distance Sensor: Measures distances with high accuracy.
3. Actuators
Servo Motors: For unique manage in robotics and mechanical structures.
Stepper Motors: Ideal for applications requiring particular movement.
Solenoids: Good for growing mechanical actions and locks.
4. Displays
LCD Display: Useful for showing records and debugging.
OLED Display: Compact and clean for exact photographs and texts.
5. Connectivity Modules
Bluetooth Module (HC-05/HC-06): For short-range wi-fi communication.
Wi-Fi Module (ESP8266): Connects gadgets to the internet.
GSM Module: Enables verbal exchange over mobile networks.
6. Power Supplies
Battery Packs: Various types for transportable electricity.
Voltage Regulators: Ensure solid voltage ranges in your circuits.
Power Banks: Handy for charging and powering devices on the move.
7. Prototyping Tools
Breadboards: Essential for prototyping with out soldering.
Jumper Wires: For making connections on breadboards.
Soldering Kit: For everlasting connections and circuit meeting.
eight. Additional Components
Resistors, Capacitors, and Diodes: Fundamental for circuit design and stability.
Transistors: Key for switching and amplification tasks.
Connectors and Switches: For interfacing and controlling circuits.
By preserving these objects handy, you'll be nicely-prepared to address a huge range of IoT and electronics projects. Whether you're constructing smart domestic devices, wearable tech, or computerized structures, having the right additives can make all the difference.
#IoT#Electronics#Arduino#RaspberryPi#ESP32#Sensors#Actuators#Displays#ConnectivityModules#PowerSupplies#Prototyping#Tech#DIY#Makers#Engineering#ElectronicComponents#TechProjects
2 notes
·
View notes
Text
youtube
Proximity sensing is a very common application in electronics. There are several ways to accomplish this. The most common way is by using a PIR sensor. PIR Sensor senses the change in ambient infrared radiation caused by warm bodies. I have already covered this in my Tutorial No. 5: "PIR Sensor Tutorial - With or Without Arduino". However, since PIR sensors detect movement from living objects, they can generate false alarms. These sensors are also inefficient in hot environments, as they rely on heat signatures.
The other common methods of proximity sensing involve, using reflected ultrasonic or light beams. Using these sensors, the intruding object is detected by the reflected beam back to its source. The time delay between transmission and reception is measured to calculate the distance to the object. In this tutorial, we are going to look at another method of proximity sensing using "Microwaves" and "Doppler Effect". In my hand is an inexpensive RCWL-0516 Microwave Radar Motion Sensor. The RCWL-0516 microwave sensor detects "any movement" from "any object" and does not rely on heat, making it more reliable in hot environments. I am going to use this sensor to create a Geo-fence around my house to detect motion and get notifications.
3 notes
·
View notes
Text
Building Enclosures
Title:
PIR Shield
Introduction:
For my midterm physical computing project, I used a PIR motion sensor to detect movement. The purpose of the sensor was to sense motion and trigger a response for a video game utilizing two sensors to complete the task. To protect the sensor and keep the wiring organized, I built a custom enclosure. Creating an enclosure was important not only for protecting the components from physical damage but also for improving the overall appearance and functionality of the project.
Enclosure Design:
I made the enclosure using blue acrylic in the innovation lab for visibility and sensor exposure. The enclosure includes specific openings for the PIR sensor itself, as well as for wires and USB cables connected to the Arduino. I chose this materials because they were easily available and easy to work with using basic tools, also because it held together with super glue/wood glue. The design ensures that the sensor is securely held in place while still allowing it to accurately detect motion.
Construction Process:
To build the enclosure, I first measured the size of the PIR sensor and the necessary space for wiring. I then cut out a prototype box shape from paper and carefully cut holes for the sensor, wires, and any ventilation if needed. After folding and assembling the box, I taped the edges to form a sturdy structure. After I assembled it, I used the measurements from the prototype to create clean cuts from the acrylic using the laser cutter. One of the challenges I faced was aligning the sensor opening perfectly so it would not block the sensor’s field of view. I overcame this by first testing the sensor placement on a temporary prototype, then transferring the measurements to the final enclosure. I mounted the PIR sensor inside the box by securing it near the front opening using hot glue and a support bracket made from extra cardboard. I made sure the sensor faced outward with no obstructions and enough clearance to detect motion effectively.


0 notes
Text
Arduino Projects
Arduino is a platform for open-source electronics that integrates software and hardware. Its integrated development environment (IDE) and programmable microcontroller board make coding and debugging easier. Its adaptability, affordability, and the vibrant developer community that constantly adds to its ecosystem are the main reasons for its appeal.
Beginner-Friendly Arduino Projects
The traditional "Hello World" of Arduino projects is LED blinking. By programming an LED to blink at various times, you may learn how to control it.
Temperature Monitor: Real-time temperature data are shown on a basic LCD screen using a temperature sensor.
Motion Detector: To build a simple motion-detection system, combine an Arduino board with a PIR sensor.
Components Commonly Used in Arduino Projects
Sensors include motion, light, gas, temperature, and humidity.
Actuators include relays, servos, and motors.
LED, LCD, and OLED displays.
Modules for communication: RFID, GSM, Bluetooth, and Wi-Fi.
Resources to Kickstart Your Arduino Journey
The official Arduino website offers thorough instructions and tutorials.
YouTube Channels: A wealth of detailed video lessons for all abilities.
Forums and Communities: Sites such as Reddit and Arduino.cc offer helpful assistance.
Online courses: Structured learning pathways are available on websites such as edX, Udemy, and Coursera.
Arduino projects are a prime example of ingenuity and originality, enabling people to realize their ideas. Arduino provides countless options for experimentation, learning, and development. regardless of your level of experience. For example, you can study the fundamentals or take on challenging tasks.
Explore the world of Arduino now to realize your creative potential and produce something truly remarkable. Your imagination is the only restriction!
To know more, click here.
0 notes
Text
Shelly Plus #4: PIR Sensor am AddOn

In diesem Beitrag möchte ich dir zeigen, wie du einen PIR Sensor an das Shelly Plus AddOn anschließt und das Signal zur Steuerung des Relais verwenden kannst.

Shelly Plus #4: PIR Sensor am AddOn Es gibt mit dem Shelly Motion 2 bereits eine fertige Lösung. Jedoch ist diese für mich viel zu langweilig und daher möchte ich diese Schaltung selber aufbauen und dir hier präsentieren. An das Shelly Plus AddOn kannst du viele Sensoren anschließen und auswerten, welche für Arduino & Raspberry Pi gedacht sind. Diese sind teilweise nicht so hochwertig und auch manchmal sehr kurzlebig, aber zum ein wenig Herumspielen sind diese voll okay.

Das Shelly Plus AddOn habe ich dir bereits in den nachfolgenden Beiträgen vorgestellt: - Shelly Plus #2: Shelly Plus AddOn - Shelly Plus #3: Regensensor am AddOn
Benötigte Ressourcen für dieses Projekt
Wenn du dieses kleine Beispiel nachbauen möchtest, dann benötigst du: - einen Shelly Plus 1*, - ein Shelly Plus AddOn*, - einen PIR Sensor*, - drei Breadboardkabel*, männlich-weiblich, 20 cm - eine Zuleitung für den Shelly Plus 1** Hinweis von mir: Die mit einem Sternchen (*) markierten Links sind Affiliate-Links. Wenn du über diese Links einkaufst, erhalte ich eine kleine Provision, die dazu beiträgt, diesen Blog zu unterstützen. Der Preis für dich bleibt dabei unverändert. Vielen Dank für deine Unterstützung! ** Die Zuleitung für den Shelly bekommst du im örtlichen Baumarkt als Meterware und ebenso einen passenden Stecker. Ich empfehle dir noch zusätzlich 3 Aderendhülsen aufzusetzen, damit die feinen Adern von den Schraubklemmen nicht zerquetscht werden.
Aufbau der Schaltung
Durch den Shelly AddOn ist der Aufbau der Schaltung recht easy, denn dieser ist auf dem Gehäuse sehr gut beschrieben.


Den PIR Sensor gibt es in (mir bisher bekannten) zwei Varianten, beiden ist jedoch gleich das diese über 5 V betrieben werden und einen digitalen Ausgang haben.

PIR Sensoren im Vergleich Ich verwende in diesem Beitrag den PIR Sensor HC-SR501*. Dieser Sensor verfügt über zwei kleine Drehpotentiometer, an welchen man die Empfindlichkeit regeln kann.


Anschluss des PIR Sensors an das Shelly Plus AddOn
Wie erwähnt und auf den Bildern zu sehen besitzt der PIR Sensor 3 Pins, VCC, OUT& GND. Welche wie folgt an das Shelly Plus AddOn angeschlossen werden.

PIR Sensor HC-SR501 am Shelly Plus AddOn Im nachfolgenden YouTube-Video zeige ich dir kurz, wie du diesen anschließen und in der Shelly App einrichten kannst. https://youtu.be/yO2VfprW0N4 Im letzten Beitrag zum Regensensor Modul habe ich bereits zwei Szenen erstellt, welche mit einem digitalen Signal 0/1 oder HIGH/LOW arbeitet und somit für diesen Beitrag wiederverwendet werden können. Wenn wir eine Lampe damit steuern möchten, können wir zusätzlich noch eine Verzögerung einbauen, sodass wir zum Verlassen des Bereiches noch etwas mehr Licht & Zeit haben. Read the full article
0 notes
Text
A Passive Infrared (PIR) sensor detects infrared radiation emitted by objects, especially humans. The sensor outputs a digital signal (HIGH or LOW) depending on whether it senses motion. It’s called "passive" because it doesn’t emit any energy; it just senses the infrared rays from the surrounding environment.
How PIR Sensors Work:
The PIR sensor consists of two key components:
Pyroelectric sensor: Detects infrared radiation.
Fresnel lens: Focuses the IR signals on the pyroelectric sensor. When a warm body (like a human) moves across the sensor’s field of view, the infrared radiation changes, and the sensor detects this change, sending a HIGH signal.
Components Required:
Arduino (e.g., Uno, Nano, or Mega)
PIR Sensor
Jumper Wires
Breadboard
LED (for visual feedback)
220Ω Resistor (for the LED)
Circuit Diagram:
sql
Copy code
[Insert a simple diagram showing the connections between Arduino, PIR sensor, and LED]
Connections:
Connect the VCC pin of the PIR sensor to the 5V pin of the Arduino.
Connect the GND pin of the PIR sensor to GND on the Arduino.
Connect the OUT pin of the PIR sensor to digital pin D2 on the Arduino.
Optionally, connect an LED to pin D13 (with a 220Ω resistor for safety) to provide a visual indicator when motion is detected.
Arduino Code:
Now that you have connected the PIR sensor, let’s upload some code to the Arduino. The following code reads the PIR sensor’s output and lights up an LED when motion is detected.
cpp
Copy code
// PIR Sensor Pin Definitions
int pirPin = 2; // Connect the PIR sensor output pin to D2
int ledPin = 13; // LED pin (optional for motion indication)
void setup() {
pinMode(pirPin, INPUT); // PIR sensor as input
pinMode(ledPin, OUTPUT); // LED as output (optional)
Serial.begin(9600); // Initialize Serial Monitor
}
void loop() {
int pirState = digitalRead(pirPin); // Read PIR sensor's output
if (pirState == HIGH) { // Motion detected
digitalWrite(ledPin, HIGH); // Turn on LED
Serial.println("Motion detected!");
} else { // No motion
digitalWrite(ledPin, LOW); // Turn off LED
Serial.println("No motion");
}
delay(1000); // 1 second delay between readings
}
Explaining the Code:
pinMode(): Defines whether the pin is an input or output.
digitalRead(): Reads the PIR sensor output (HIGH or LOW).
digitalWrite(): Controls the LED based on sensor output.
Serial.begin(): Starts serial communication for debugging.
When the PIR sensor detects motion, the pirState variable becomes HIGH, turning on the LED and printing "Motion detected!" to the serial monitor.
Testing the Setup:
Connect your Arduino to your computer and upload the code.
Open the Serial Monitor from the Arduino IDE (Tools > Serial Monitor).
Wave your hand in front of the PIR sensor to test if it detects motion.
If motion is detected, the LED will light up and the message will appear in the Serial Monitor.
Adjusting the PIR Sensor Sensitivity:
Most PIR sensors come with two potentiometers for adjusting sensitivity and delay time. Sensitivity determines the range of detection, and delay time sets how long the output remains HIGH after motion is detected.
Sensitivity Potentiometer: Rotate to increase or decrease detection range.
Delay Time Potentiometer: Adjust how long the PIR sensor output stays HIGH after motion.
Applications of PIR Sensors:
Home Security Systems: Detect intruders and trigger alarms or cameras.
Smart Lighting: Automatically turn lights on when someone enters a room.
Automatic Door Openers: Use PIR sensors to detect approaching people and open doors.
Energy-Efficient Devices: Turn off appliances or lights when no motion is detected, reducing power consumption.
Troubleshooting:
False Positives: If the sensor triggers without motion, reduce the sensitivity or place the sensor in a more controlled environment.
No Motion Detection: Double-check the wiring and ensure that the sensor is properly powered and connected to the correct pins.
Conclusion:
You have successfully interfaced a PIR sensor with an Arduino to create a basic motion detection system. This simple project can be expanded into various applications like security alarms, smart home systems, and automation projects.
By following this blog, beginners will get a solid foundation in interfacing a PIR sensor with an Arduino. Advanced users can add features like buzzer alarms, wireless communication, or integra
ChatGPT can make mist
0 notes
Text
Motion-Sensor Automatic Door Opener Using Arduino UNO
Introduction to Motion-Sensor Automatic Door Opener The Motion-Sensor Automatic Door Opener is a highly innovative and practical project that combines automation with convenience. Using an Arduino UNO as the main microcontroller, this project leverages a PIR motion sensor to detect movement and triggers a servo motor to open a door automatically. This project is not only ideal for school-level…
0 notes
Text
Jual Mikrokontroller Arduino dan Perangkat Pendukungnya
Kami menjual berbagai macam arduino berikut semua sensor, aktuator dan motor – motornya. Sensor suhu kelembaban, sensor berat, sensor jarak, sensor kesuburuan tanah, sensor cahaya, sensor air, PIR, sensor inframerah, sensor gas / udara, sensor ultrasonik, sensor suara, sensor proximity, sensor barometer, sensor alkohol, sensor sentuh, sensor suara.Juga menyediakan remote control infrared atau…
#arduino mojokerto#jual arduino#mikrokontroller#peralatan arduino#sensor air#sensor arduino#sensor gerak#sensor timbangan
0 notes
Video
youtube
Industrial IoT Sensors & Industrial Sensor's Monitoring | IIoT - Industrial Internet of Things Monitoring Of Sensor'S Data on Android App | Industrial IoT | Industrial Internet of Things | Industrial IoT | IIoT - Industrial Internet of Things Monitoring Of Sensor'S Data on Android App SMS / E-MAIL Alerts | IIoT - Industrial Internet of Things Monitoring Of Temperature | GAS | FIRE | LDR | PIR and Android App SMS/E-MAIL Alerts, *********************************************************** If You Want To Purchase the Full Working Project KIT Mail Us: [email protected] Title Name Along With You-Tube Video Link We are Located at Telangana, Hyderabad, Boduppal. Project Changes also Made according to Student Requirements http://svsembedded.com/ https://www.svskits.in/ http://svsembedded.in/ http://www.svskit.com/ M1: +91 9491535690 M2: +91 7842358459 We Will Send Working Model Project KIT through DTDC / DHL / Blue Dart / First Flight Courier Service We Will Provide Project Soft Data through Google Drive 1. Project Abstract / Synopsis 2. Project Related Datasheets of Each Component 3. Project Sample Report / Documentation 4. Project Kit Circuit / Schematic Diagram 5. Project Kit Working Software Code 6. Project Related Software Compilers 7. Project Related Sample PPT’s 8. Project Kit Photos 9. Project Kit Working Video links Latest Projects with Year Wise YouTube video Links 157 Projects https://svsembedded.com/ieee_2022.php 135 Projects https://svsembedded.com/ieee_2021.php 151 Projects https://svsembedded.com/ieee_2020.php 103 Projects https://svsembedded.com/ieee_2019.php 61 Projects https://svsembedded.com/ieee_2018.php 171 Projects https://svsembedded.com/ieee_2017.php 170 Projects https://svsembedded.com/ieee_2016.php 67 Projects https://svsembedded.com/ieee_2015.php 55 Projects https://svsembedded.com/ieee_2014.php 43 Projects https://svsembedded.com/ieee_2013.php 1100+ Projects https://www.svskit.com/2022/02/900-pr... *********************************************************** IIoT is the Industrial Internet of Things. It is the application of IoT to the manufacturing industry, 1. iot based industrial monitoring and fault detection system, 2. IOT based Industrial fault monitoring system using Arduino, 3. IoT Based Industrial Parameters Monitoring, 4. INDUSTRIAL MACHINE CONTROL AND MONITORING, 5. 6 examples of Industrial IoT monitoring solutions, 6. Internet of Things for Industrial Monitoring and Control, 7. IoT Based Industrial Level Sensor Data Acquisition & Monitoring, 8. Monitoring System In Industry Using IoT - IEEE Conference, 9. Monitoring Industries Using IoT - Arduino Project Hub, 10. IoT Based Industrial Equipment Controlling and Parameter, 11. iot based industrial fault monitoring system using Arduino, 12. industrial fault monitoring system project report, 13. iot industry protection system using arduino project report, 14. iot industry protection system arduino pdf, 15. iot industry protection system arduino ppt, 16. iot based industrial automation using Arduino, 17. industrial monitoring system project, 18. iot based industrial automation project report, 19. IoT Based Intelligent Industry Monitoring System - IEEE Xplore, 20. Industrial Safety Parameters Monitoring in IOT Environment, 21. IoT Based Industrial Production Monitoring System, 22. IoT Based Intelligent Industry Monitoring System, 23. an iot based smart industry monitoring system by using , 24. Industrial Process Monitoring Using IoT - XiLiR Projects, 25. Smart Sensor Network based Industrial Parameters, 26. Iot BASED SMART INDUSTRY POLLUTION MONITORING, 27. A Smart Industrial Pollution Monitoring System using IoT, 28. Water Quality Monitoring System Based on IOT – Research, 29. IOT BASED INDUSTRIAL POLLUTION MONITORING SYSTEM, 30. Methodology for Monitoring Manufacturing Environment, 31. Health Monitoring System Using IoT | SpringerLink, 32. Industrial Automation using Internet of Things (IOT), 33. Industrial Environment Monitoring System using Lora, 34. Top 15 Sensor Types Used By IoT Application Development, 35. IOT Based Industrial Parameter Monitoring System – Pramana, 36. IOT Industry Protection System Project Using Arduino, 37. Water Quality Monitoring System using IoT – IJERT, 38. Iot based Industrial Sensor Monitoring and Alerting System, 39. iot based industrial automation system using arduino uno – ijartet, 40. Top 10 IoT Sensor Types & How They're Being, 41. Automated Monitoring of Industrial Loads Using Iot , 42. sensor network for environment monitoring system using iot, 43. raspberry pi and iot based industrial automation, 44. Wireless Monitoring of Industrial Drives Using Internet of Things (IOT), 45. Industrial Process Monitoring System Using Esp32, 46. A Survey on Implementation of Security System Using IoT,
0 notes
Video
tumblr
How to use PIR Motion Detector Sensor with Arduino With Code and Proteus
1 note
·
View note
Photo

Automatic Light Turn On Off System
by Snehal Jose | Sneha Haridas | Sivaprasad V B | Sonia Shaju "Automatic Light Turn On/Off System"
Published in International Journal of Trend in Scientific Research and Development (ijtsrd), ISSN: 2456-6470, Volume-3 | Issue-4 , June 2019,
URL: https://www.ijtsrd.com/papers/ijtsrd23495.pdf
Paper URL: https://www.ijtsrd.com/engineering/computer-engineering/23495/automatic-light-turn-onoff-system/snehal-jose
international journals in engineering, engineering journal, paper publication for engineering,
This project focus on a real time situation where we are wasting the electricity. Because of our carelessness the usage of current is increasing day by day. We are living in an era where so many peoples do not getting electricity properly. Electrical power is now the backbone of modern industrial society. Electricity is at the heart of many modern technologies, being used for electric power where electric current is used to energize equipment, electronics which deals with electrical circuits that involve active electrical components such as vacuum tubes, transistors, diodes and integrated circuits and associated passive interconnection technologies. In order to avoid the lack of electricity due to our carelessness we are implementing the new system that is known as AUTOMATIC TURN ON OFF SYSTEM. In this project, we are detecting the motion of a person or anything and turn off the electronic equipment's if there is no person. By this we can save the electricity.
0 notes
Text
Midterm Project: The Video Game Controller
Introduction: The game initially was supposed to be a game where the objective is to catch water in a bucket for a town experiencing a drought
Sensor Rationale: My sensor was the PIR motion sensor, the rationale was to resemble a VR game where the user would be controlling the direction of the bucket depending on which sensor they activated
Controller Design & Construction: To set up two PIR motion sensors with my Arduino and breadboard, I started by gathering everything I needed: an Arduino board, two PIR sensors (like the HC-SR501), a breadboard, and some jumper wires. Each PIR sensor has three pins (VCC for power, GND for ground, and OUT for the signal). Since the sensor pins are small and not ideal for directly plugging into a breadboard, I decided to solder jumper wires directly to the pins. I soldered one wire to each pin and then I plugged them into the breadboard . I connected both VCC wires to the 5V pin on the Arduino and both GND wires to the Arduino’s GND pin. Then, I connected the OUT wire from the first PIR sensor to digital pin 7 and the OUT wire from the second sensor to digital pin 4.
Arduino Code :
const int pirPin1 = 5; // First PIR sensor connected to pin 7
const int pirPin2 = 4; // Second PIR sensor connected to pin 8
int pirState1 = LOW; // State of PIR sensor 1
int pirState2 = LOW; // State of PIR sensor 2
int lastPirState1 = LOW; // Last state of PIR sensor 1
int lastPirState2 = LOW; // Last state of PIR sensor 2
void setup() {
pinMode(pirPin1, INPUT); // Set PIR sensor 1 pin as input
pinMode(pirPin2, INPUT); // Set PIR sensor 2 pin as input
Serial.begin(9600); // Start serial communication at 9600 baud rate
}
void loop() {
pirState1 = digitalRead(pirPin1); // Read state of PIR sensor 1
pirState2 = digitalRead(pirPin2); // Read state of PIR sensor 2
Serial.print(pirState1);
Serial.print (",");
Serial.println(pirState2);
// Save the current state as the last state for the next loop
lastPirState1 = pirState1;
lastPirState2 = pirState2;
// Delay between readings to stabilize sensor input
}
P5.js Game Code (Well-Commented):
let serial; let latestData = "waiting for data"; // To hold the PIR sensor data
// Game variables let basketX, basketY, basketWidth, basketHeight; let fallingRaindrops = []; let score = 0;
let cloudPositions = []; // Store cloud positions for moving clouds
let targetX = 0; // Target x position for sensor 1 (smooth movement) let targetSpeed1 = 0.1; // Smooth speed for sensor 1 (change this value for more smoothness) let targetSpeed2 = 2; // Slower speed for sensor 2 (change this value for slower movement)
function setup() { createCanvas(windowWidth, windowHeight);
// Initialize the serial object for Arduino serial = new p5.SerialPort();
// List all available serial ports serial.list();
// Open the serial port (replace 'COM5' with your correct port) serial.open('COM5');
// Register event handlers for serial communication serial.on('connected', serverConnected); serial.on('list', gotList); serial.on('data', gotData); serial.on('error', gotError); serial.on('open', gotOpen); serial.on('close', gotClose);
// Set initial values for the basket (bucket) basketX = width / 2; basketY = height - 50; basketWidth = 100; basketHeight = 40;
// Initial raindrop setup setInterval(generateRaindrop, 1000); // Add a new raindrop every second
// Initialize cloud positions for (let i = 0; i < 5; i++) { cloudPositions.push({ x: random(width), y: random(height / 2), // Clouds stay at the top part of the screen speed: random(0.5, 1.5) }); } }
function serverConnected() { print("Connected to Server"); }
function gotList(thelist) { print("List of Serial Ports:"); for (let i = 0; i < thelist.length; i++) { print(i + " " + thelist[i]); } }
function gotOpen() { print("Serial Port is Open"); }
function gotClose() { print("Serial Port is Closed"); latestData = "Serial Port is Closed"; }
function gotError(theerror) { print(theerror); }
function gotData() { let currentString = serial.readLine(); // Read incoming data from the serial port if (currentString) { currentString = currentString.trim(); // Trim the string properly if (currentString) { console.log("Received data:", currentString); // Debug: show received data latestData = currentString; // Update the latest data received ("0,0", "1,0", "0,1", "1,1") } } }
function draw() { // Draw the background as a cloudy town drawCloudyTownBackground();
// Draw the bucket (using a rounded rectangle and an ellipse for the base) fill(255, 0, 0); noStroke();
// Draw the bottom of the bucket as a half ellipse arc(basketX + basketWidth / 2, basketY + basketHeight / 2, basketWidth, basketHeight, 0, PI, CHORD);
// Draw the top of the bucket as a rectangle (body) rect(basketX, basketY - basketHeight / 2, basketWidth, basketHeight / 2);
// Update basket movement based on PIR sensor input updateMovement();
// Draw and update raindrops for (let i = fallingRaindrops.length - 1; i >= 0; i--) { let raindrop = fallingRaindrops[i]; fill(0, 0, 255); // Draw the raindrop as an ellipse with more vertical elongation ellipse(raindrop.x, raindrop.y, raindrop.sizeX, raindrop.sizeY); raindrop.y += raindrop.speed; // Make the raindrop fall// Check if the raindrop hits the bucket if (raindrop.y + raindrop.sizeY / 2 >= basketY && raindrop.x > basketX && raindrop.x < basketX + basketWidth) { score++; // Increment score when a raindrop is caught fallingRaindrops.splice(i, 1); // Remove the raindrop after it is caught } // If the raindrop falls out of the screen, remove it if (raindrop.y > height) { fallingRaindrops.splice(i, 1); }
}
// Display score fill(0); textSize(24); text("Score: " + score, 10, 30); }
// Function to update movement based on PIR sensor data function updateMovement() { if (latestData) { // Parse the latest data to get pirState1 and pirState2 let states = latestData.split(","); if (states.length < 2) return; // Ensure there are two elements in the arraylet pirState1 = int(states[0].trim()); // First PIR sensor state let pirState2 = int(states[1].trim()); // Second PIR sensor state // Debugging output to confirm sensor values console.log("1", pirState1, "2", pirState2); // Update basket movement based on sensor states if (pirState1 === 1) { // Move basket to the right if motion is detected on sensor 1 basketX += 10; } if (pirState2 === 1) { // Move basket to the left if motion is detected on sensor 2 basketX -= 10; } // Prevent the basket from moving off the canvas basketX = constrain(basketX, 0, width - basketWidth);
} }
// Function to generate a falling raindrop at a random x position function generateRaindrop() { let raindrop = { x: random(width), y: 0, // Start from the top sizeX: random(10, 15), // Random width for raindrop sizeY: random(20, 40), // Random height for raindrop (more elongated) speed: random(3, 6) // Falling speed }; fallingRaindrops.push(raindrop); }
// Function to draw a cloudy town background function drawCloudyTownBackground() { // Draw sky background(135, 206, 235); // Light blue sky color
// Draw the clouds for (let i = 0; i < cloudPositions.length; i++) { let cloud = cloudPositions[i]; fill(255, 255, 255, 180); // White, semi-transparent clouds noStroke(); ellipse(cloud.x, cloud.y, 200, 80); // Big cloud ellipse(cloud.x + 60, cloud.y - 20, 150, 60); // Smaller cloud part ellipse(cloud.x - 60, cloud.y - 20, 150, 60); // Smaller cloud part cloud.x += cloud.speed; // Move the cloud// If the cloud goes off the screen, reset its position if (cloud.x > width + 100) { cloud.x = -100; }
}
// Draw the city skyline (simple buildings) fill(50, 50, 50); // Dark gray for buildings rect(0, height - 150, 100, 150); // Building 1 rect(150, height - 200, 80, 200); // Building 2 rect(250, height - 180, 100, 180); // Building 3 rect(400, height - 250, 120, 250); // Building 4 rect(550, height - 160, 90, 160); // Building 5 }
Communication Protocol Details: This p5.js code connects to an Arduino using a serial port to receive live data, like numbers from sensors. It uses the p5.SerialPort() library to open the connection (on COM5) and listen for different events, like when the connection is opened, closed, or when new data arrives. When the Arduino sends data, the program reads it as a line of text, removes any extra spaces, and splits the text into two values using a comma. These values are saved as value0 and value1, which can be used in the draw() function to control what’s shown on the screen—like the position or behavior of shapes. This setup lets the webpage respond to what the Arduino senses in real time.
User Instructions: Each motion sensor determines if the bucket moves left, right, or remains stagnant. Using the left sensor, move your hand in front of it to move the bucket to the left. Using the right sensor, move your hand in front of it to move the bucket to the right. If both sensors are activated at the same time, the bucket will stay in the place it is in until one sensor halts detection.
Challenges & Solutions: Challenges included setting up the sensor and activating it. The PIR motion sensors are sensitive so trying to get them to turn off and on was a difficult task. However, I managed to tweak the settings to make the time and sensitivity low. However, that also made the sensor delayed, resulting in the reaction time glitchy in the game.
Future Enhancements: Soldering from the beginning and making sure my code is as simple as possible would help me in the future. I think also changing the game could make more sense for the sensor.
Conclusion: I learned a lot in the end, and even used AI to help me with code and wiring. Next time, I hope to use my skills to develop more complex code for p5.js and Arduino so the sensor can be used for a variety of games.
Link to video game:
0 notes
Text
Arduino Projects
Arduino is an open-source electronics platform that allows users to create automated and interactive projects by combining hardware and software. The Arduino IDE (Integrated Development Environment) is used to program the microcontroller boards, which are the foundation of Arduino and include the Arduino Uno, Mega, and Nano. The platform allows users to design projects that range from basic LED flashing to intricate IoT systems thanks to its extensive selection of sensors, actuators, and modules.
Why Choose Arduino for Your Projects?
User-Friendly
Open-Source Ecosystem
Affordability
Versatility
Top Arduino Project Ideas to Inspire You
Automation System for Smart Homes
Use an Arduino to automate your house by utilizing a smartphone app to control appliances, fans, and lights. To build a completely automated home, combine an Arduino with sensors such as temperature or motion sensors.
The weather station
Construct a personal weather station that can track air pressure, temperature, and humidity. For real-time monitoring, use sensors like the DHT11 or BMP180 and send data to the cloud or show it on an LCD.
Robot That Follows Lines
Using an Arduino board, two infrared sensors, and motors, build a robot that follows a line. It's an excellent project for studying control systems and robotics.
Automatic Watering System for Plants
Create a system that automatically waters plants when the soil gets dry by combining an Arduino board with a soil moisture sensor. Perfect for busy plant enthusiasts!
Intelligent Security System
Create a security system that detects invasions and notifies your phone via PIR motion sensors, cameras, and GSM modules.
Game Controller Powered by Arduino
Create a unique game controller with an Arduino board, joysticks, and buttons. For a more engaging experience, add haptic feedback to further improve it.
IoT Energy Tracker
Use sensors to monitor the energy use of your house, and an online dashboard will show the data in real time. For real-world uses, this project combines Arduino and IoT technology.
An avenue for technological discovery and creativity is provided by Arduino projects. Arduino is the ideal platform to start learning electronics and coding, automating your environment, or building robots. Accept the limitless potential, try out concepts, and join the rapidly expanding maker community. Your creativity is the only restriction while using Arduino!
To know more, click here.
0 notes
Text
Final Project Proposal
A Summary of Your Project
My project is going to be an interactive, visual recreation of a koi pond. It would ultimately be something which is zen and feels somewhat meditative. It would have elements such as moving fish and fading lights around the pond.
Vision Statement, Purpose of Your Project
I initially wanted to make this as a response to my memories of koi ponds specifically throughout my childhood. However, the overarching theme/purpose of the project is simply to create something that feels calming when in the presence of the mini installation. I think koi ponds in general are really calming and meditative, I would like to try and recreate this feeling using slight interactive elements and artistic design. I wonder if a similar feeling can be recreated in a room.
Ideal Audience / Venue I intend for this project (or some version of this project) to be placed in a dark room with a single warm light which shines upon it. I choose warm light, as this is often associated with a more meditative ambience. In terms of audience, I don’t think I am aiming this towards a specific group of people. I think if it’s executed well, it can be enjoyed by a wide range of people.
Background/Concept/Story
I initially started with thinking about something that stood out to me in my childhood memories. For some reason, koi ponds came up a lot - my childhood home had one and I liked to spend most of my time there with my dog at the time. I also realised it was something that brought a lot of peace to the home. This project is important to me because it feels personal and takes me back to that time.
Project Description
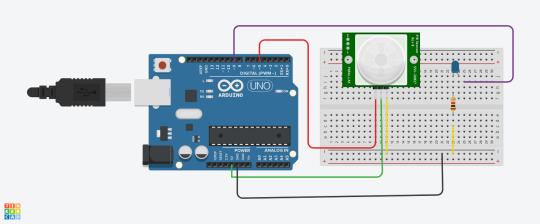
The audience would walk into the dark room to see a single project on a black table. As the audience gets closer to the table, the lights around the pond would turn on. As the audience gets even closer, they will see that the fish inside are moving. The fish will move with servo motors that rotate when motion is detected by a PIR motion sensor. The pond itself will be made of multiple different materials -- see drawings. I would love to incorporate sound in this if it's possible as well.
How is Your Project Different?
I haven’t really seen anything super similar before - I tried to research artists and designers who may have done installations which relate, however I didn’t have much luck. I think I was mostly inspired by architectural model-style projects and just added elements of interaction.
BOM

Drawings

^ layers of clear plastic sheets - different elements will be placed in between the sheets to make it look more “3D”
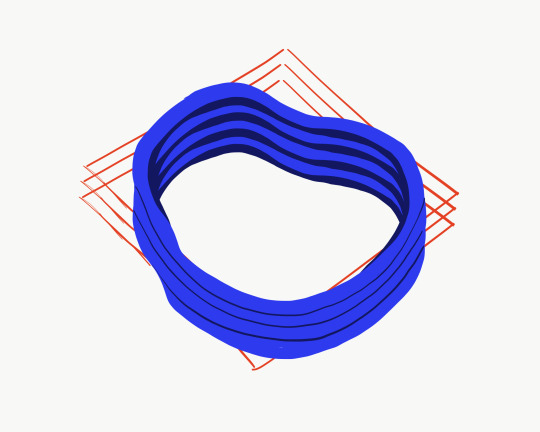
^ visual of how the exterior/circumference of the pond will work - 4 (?) laser cut pieces of wood stacked on top of each other. the layers of plastic will be placed between these layers and trimmed to size
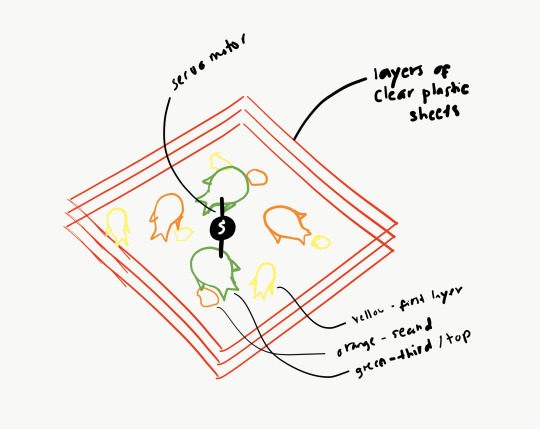
^ servo motor is in the middle (have to figure out how to trim the sheet to make it fit perfectly)

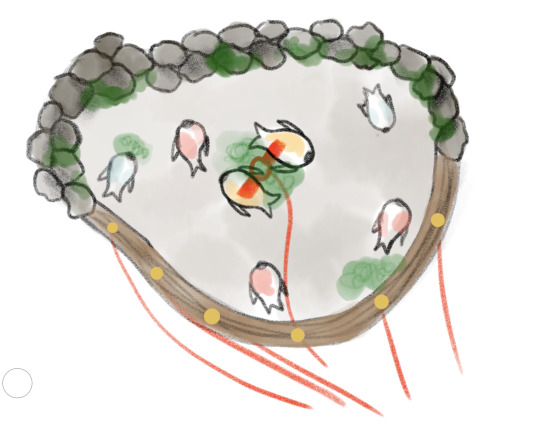
top view example - rocks/pebbles + greens will be added for decoration.
orange dots on the edge represents LEDs
servo motor + LEDS connected to Arduino and triggered by PIR motion sensor.
1 note
·
View note
Photo

PIR HC-SR501 Housing by Bubblebyte on #thingiverse. It's a cute beautiful box for the most common PIR sensor ever. I've printed using red PLA, layer 0.1mm, nozzle 0.35. When you download the file there are 3 designs : two that has the sensor at 45 degrees like this and one which have te sensor straight at 90 degree. The sensor remains attached in it without glue or screws. It's very beautiful and useful, very well engineered. It's a must-have for IOT-based projects and smart home features. . . . . . . . . #3dprinting #3dmodel #3dprinter #3dprint #3ddesign #maker #making #maker #tinkering #smarthome #iot #nodemcu #arduino #electronic #engineering #pir #sensor #alarm #homeautomation #automation https://www.instagram.com/p/Bs7QFY5Hdd2/?utm_source=ig_tumblr_share&igshid=1d6kqrz4vgcnn
#thingiverse#3dprinting#3dmodel#3dprinter#3dprint#3ddesign#maker#making#tinkering#smarthome#iot#nodemcu#arduino#electronic#engineering#pir#sensor#alarm#homeautomation#automation
0 notes