#arduino tutorial
Explore tagged Tumblr posts
Visit Tumblr Blog
Explore Tumblr blogs with no restrictions, modern design and the best experience.
Last Seen Tumblr Blogs


Fun Fact
Hackers stole 65M passwords from Tumblr in 2013.
Text
youtube
Proximity sensing is a very common application in electronics. There are several ways to accomplish this. The most common way is by using a PIR sensor. PIR Sensor senses the change in ambient infrared radiation caused by warm bodies. I have already covered this in my Tutorial No. 5: "PIR Sensor Tutorial - With or Without Arduino". However, since PIR sensors detect movement from living objects, they can generate false alarms. These sensors are also inefficient in hot environments, as they rely on heat signatures.
The other common methods of proximity sensing involve, using reflected ultrasonic or light beams. Using these sensors, the intruding object is detected by the reflected beam back to its source. The time delay between transmission and reception is measured to calculate the distance to the object. In this tutorial, we are going to look at another method of proximity sensing using "Microwaves" and "Doppler Effect". In my hand is an inexpensive RCWL-0516 Microwave Radar Motion Sensor. The RCWL-0516 microwave sensor detects "any movement" from "any object" and does not rely on heat, making it more reliable in hot environments. I am going to use this sensor to create a Geo-fence around my house to detect motion and get notifications.
3 notes
·
View notes
Video
youtube
DIY Temperature Controller for Molding Systems | Arduino Tutorial
#youtube#DIY#Arduino Tutorial#Temperature Controller#Molding Systems#Injection Molding#Arduino Nano#Membrane Keypad#LCD#Relay Module#Max6675 Module#Thermocouple#Plastic Molding#Electronics Tutorial#Maker Community#Plastic Injection Molding#Arduino#Hot Nozzle#Molding Process#MAX6675#LCD Display
1 note
·
View note
Text
Learn to Make the Drone through Arduino Uno Yourself || Chapter#1
Learn to Make the Drone through Arduino Uno Yourself || Chapter#1 #code #learn #homemade #drone
To make the Drone you may Understand the Basics of Arduino Drone coding is written in C++ Language which is not much hard but to understand and write the Code yourself. You must understand the basics of arduino code and electronics Components. Here is your the first chapter and begin of our Drone programme If you want to learn the C++ more deeply you may prefer to my C++ Programme Here You…

View On WordPress
#arduino tutorial#coding#dailyprompt#dailyprompt-1996#dailyprompt-2000#Drone#earn#free course#Home#homemadedrone#learn#learn and earn#learn to code
1 note
·
View note
Text
youtube
Euclidean Patch Notes with Omri Cohen & A RYTH MATIK
#synth#synthesizer#modular#tutorial#omricohen#euclidean#arduino#arythmatik#ryth#matik#rhythm#sequencer#modulove#Youtube
0 notes
Text
AI Coding Tutorials
By automating processes and resolving challenging issues, artificial intelligence (AI) is transforming a number of industries. For prospective developers, AI coding tutorials offer a great starting point.
Key Topics in AI Tutorials
Programming Languages
Machine Learning (ML)
Deep Learning
Natural Language Processing (NLP)
Computer Vision
AI Ethics
Best Platforms for AI Tutorials
Coursera: classes at the university level.
edX: AI subjects, both free and paid.
Udemy: Project-based learning at an affordable price.
Kaggle: Real-world datasets and interactive tutorials.
YouTube: Free resources from freeCodeCamp and other channels.
Fast.ai: Deep learning made useful for programmers.
Tips for Success
Start with the fundamentals: Acquire knowledge of Python and related concepts.
Practice Projects: Create recommendation engines, chatbots, etc.
Join Communities: Participate in discussion boards such as r/MachineLearning.
Keep abreast of developments in AI research.
AI coding lessons are the first step in becoming proficient with this crucial technology. To create a fulfilling and influential career in AI development, get started right away.
To know more, click here.
0 notes
Text
youtube
Simple beginners guide how to build create WebHID API Electron JS Desktop App for windows 10 & windows 11. Electron webhid api Desktop App html js Script: https://bit.ly/4egIyAw or https://drive.google.com/file/d/1euT1JxtpOgdZwVpA5C1nXOZRZ7bnbsoa/ Electron JS Desktop App Project Tutorial for Beginners: WebHID API Example w/ Source Code
#tutorials#how to#programming#arduino#esp32-s2#esp32#WebHID API#Desktop App#Electron#Electron JS#Source Code#Project Tutorial for Beginners#windows 10#windows 11#Youtube
0 notes
Text
Zeitmessung per Funk: DCF77-Empfangsmodul mit Arduino

Mit einem DCF77-Empfangsmodul lassen sich exakte Zeitdaten von einem Funksender wie dem DCF77 empfangen. Diese präzisen Zeitsignale sind ideal für Projekte mit einem Arduino, bei denen eine genaue Uhrzeit erforderlich ist, etwa für zeitgesteuerte Schaltungen oder Datenerfassungssysteme. Das DCF77-Signal wird von der Physikalisch-Technischen Bundesanstalt (PTB) über eine Sendeanlage in Mainflingen ausgestrahlt und stellt eine zuverlässige Quelle für die Mitteleuropäische Zeit (MEZ) sowie die mitteleuropäische Sommerzeit (MESZ) dar. https://www.youtube.com/watch?v=JARqWmHE6Kc&t In diesem Beitrag zeige ich dir, wie du ein DCF77-Empfangsmodul mit dem Arduino verbindest, die empfangenen Daten dekodierst und für dein Projekt weiterverarbeitest. Statt vorgefertigte Bibliotheken zu verwenden, biete ich dir einen einfachen Code, den du direkt in dein eigenes Projekt einfügen kannst. Dadurch behältst du die volle Kontrolle über die Signalverarbeitung und kannst die Daten flexibel an deine spezifischen Anforderungen anpassen. Dieses Projekt eignet sich sowohl für Einsteiger als auch für Fortgeschrittene, die präzise Zeitsteuerungen oder Datenerfassungen umsetzen möchten.
Wozu dient das DCF77-Empfangsmodul?
Das DCF77-Empfangsmodul dient dazu, über Funk genaue Zeit- und Datumsinformationen zu empfangen, die von der DCF77-Sendeanlage ausgestrahlt werden. Diese Informationen werden mit einer hohen Genauigkeit über eine Langwelle (77,5 kHz) gesendet und sind besonders nützlich für Anwendungen, bei denen eine präzise Zeit erforderlich ist, wie etwa bei Funkuhren, Zeiterfassungssystemen oder zeitgesteuerten Schaltungen. In Arduino-Projekten ermöglicht das DCF77-Modul, die empfangenen Zeitdaten in Echtzeit zu verarbeiten, ohne auf externe Zeitserver oder manuelle Einstellungen angewiesen zu sein. Dadurch wird es zu einer idealen Komponente für Automatisierungen, bei denen eine verlässliche Zeitsynchronisierung entscheidend ist. Sender DCF77 in Mainflingen Der Sender DCF77 überträgt die Daten dabei mit einer Frequenz von 77.5kHz und einer Leistung von 50kW.

DCF77 Zeitzeichensender bei Mainflingen (Frankfurt am Main) Zu diesem Sender gibt es einen Ausführlichen Wikipedia Artikel, welchen ich hier nun gerne verlinken möchte: Seite „DCF77“. In: Wikipedia, Die freie Enzyklopädie. Bearbeitungsstand: 6. September 2019, 12:10 UTC. URL: https://de.wikipedia.org/w/index.php?title=DCF77&oldid=192027822 (Abgerufen: 13. September 2019, 19:15 UTC)
Technische Daten vom DCF77 Empfangsmodul
- Betriebsspannung: min. 1,2V - max. 3,3V - Stromaufnahme: - Empfangsfrequenz: min. 40 kHz, max. 100 kHz - Arbeitstemperatur: -40 °C bis +85 °C - Lagertemperatur: -55 °C bis +85 °C - einen - ein - ein - eine - ein - diverse - 10 cm, männlich - weiblich, - 10 cm, männlich - männlich 1500) { bufCounter = 0; currentBuf = 0; } } else { if (dur > 150) { currentBuf |= ((unsigned long long)1 > 50) & 0xFF; byte dcf77Month = (currentBuf >> 45) & 0x1F; byte dcf77DayOfWeek = (currentBuf >> 42) & 0x07; byte dcf77DayOfMonth = (currentBuf >> 36) & 0x3F; byte dcf77Hour = (currentBuf >> 29) & 0x3F; byte dcf77Minute = (currentBuf >> 21) & 0x7F; int jahr = rawByteToInt(dcf77Year); int monat = rawByteToInt(dcf77Month); int tag = rawByteToInt(dcf77DayOfMonth); int wochentag = rawByteToInt(dcf77DayOfWeek); int stunde = rawByteToInt(dcf77Hour); int minute = rawByteToInt(dcf77Minute); if (jahr > 0 && monat > 0) { zeit.isValid = true; zeit.jahr = jahr + 2000; zeit.monat = monat; zeit.tag = tag; zeit.wochentagInt = wochentag; zeit.wochentagStr = (wochentag > 0) ? wochentage : ""; zeit.stunde = stunde; zeit.minute = minute; } else { zeit.isValid = false; } return zeit; } Schritt 7 - Hilfsfunktion zur Konvertierung von BCD nach Dezimal Die Funktion unsigned int rawByteToInt(byte raw) wandelt ein einzelnes Byte, das im binär kodierten Dezimalformat (BCD) vorliegt, in eine dezimale Zahl um. Bei BCD werden die oberen 4 Bits des Bytes als Zehnerstelle und die unteren 4 Bits als Einerstelle interpretiert. Die Funktionsweise im Detail: - Mit raw >> 4 werden die oberen 4 Bits des Bytes nach rechts verschoben, sodass die Zehnerstelle isoliert wird. - raw & 0x0F maskiert die oberen 4 Bits und behält nur die unteren 4 Bits, die die Einerstelle darstellen. - Schließlich wird das Ergebnis als Dezimalzahl berechnet, indem die Zehnerstelle mit 10 multipliziert und die Einerstelle dazuaddiert wird. So ergibt sich aus einem BCD-Wert wie 0x25 (Zehnerstelle 2, Einerstelle 5) die Dezimalzahl 25. unsigned int rawByteToInt(byte raw) { return ((raw >> 4) * 10 + (raw & 0x0F)); } Read the full article
0 notes
Video
youtube
encendido de led con un solo boton en arduino uno y simulacion
0 notes
Text
A4988 Pinout: A Comprehensive Guide
Discover the functionality and versatility of the Stepper Motor Driver Module A4988 Pinout, a crucial component in the world of robotics and automation. Let’s delve into the key details, with a specific focus on the A4988 pinout for a clearer understanding.
Stepper Motor Driver Module A4988
The A4988 is a stepper motor driver module that plays a pivotal role in controlling the precise movements of stepper motors. Whether you’re working on a 3D printer, CNC machine, or any other project requiring accurate motor control, the A4988 is a go-to choice.
A4988 Pinout Configuration
Understanding the A4988 pinout configuration is essential for effectively integrating the A4988 into your projects. Here’s a breakdown of the key pins:
MS1, MS2, MS3 (Microstep Resolution): These pins determine the microstep resolution, allowing you to set the stepping mode for the stepper motor. Configuring these pins enables fine-tuning of motor movement.
VMOT (Motor Power Supply Voltage): Connect this pin to the motor power supply voltage (typically 8V to 35V) to ensure the proper functioning of the stepper motor.
GND (Ground): Establish the ground connection by linking this pin to the ground of your power supply or microcontroller.
VDD (Logic Power Supply Voltage): Provide the logic power supply voltage (typically 3V to 5.5V) to this pin to power the internal logic circuitry of the A4988.
DIR (Direction Input): Control the direction of the stepper motor by connecting this pin to a digital output on your microcontroller.
STEP (Step Input): Trigger individual steps of the stepper motor by connecting this pin to another digital output on your microcontroller.
RESET (Reset Input): This pin resets the internal translator circuit, and it is optional to use.
SLEEP (Sleep Input): Putting the A4988 into sleep mode is achieved by connecting this pin to a digital high signal.
Read More: A4988 Pinout
#A4988#stepper-motor#microcontroller#Arduino#Raspberry-Pi#electronics#pinout#wiring#tutorial#DIY#project#hardware#software#programming#electronics-projects#microcontroller-projects#Arduino-projects#Raspberry-Pi-projects#open-source#maker#fabrication#prototyping#engineering#technology#innovation#learning#education
0 notes
Video
youtube
Controlling Plastic Injection Machine Nozzle Movement with a Digital Las...
#youtube#Plastic Injection Machine#Nozzle Movement#Digital Laser Ruler#Arduino Project#Wemos D1 Mini#Stepper Motor#3D Printing#Industrial Automation#DIY Electronics#Tutorial#Arduino#Digital Control#Laser Ruler#DIY#VL53L0X#ULN2003#Maker Community
6 notes
·
View notes
Note
What's the thing that's probably wrong with this very cheap robot arm? I know the good ones start at like $10k so presumably it's something. https://www.amazon.com/LewanSoul-Robotic-Arduino-Software-Tutorial/dp/B074T6DPKX?source=ps-sl-shoppingads-lpcontext&ref_=fplfs&psc=1&smid=A1K1UK7O5KP6WQ&gQT=1
(clickable link) looks like your average cheap servo arm -- lots of pinch points and low weight capacity, but the real problem is the precision, or lack thereof. there's gonna be a lot of slop and backlash, which makes the already tricky project of manipulation basically impossible for anything more difficult than Brightly Colored Foam Cubes. fortunately the natural habitat of this type of arm is, like, "learn to robotics!" school projects where Brightly Colored Foam Cubes are the only kind of object in existence. (but keep in mind that i'm no big city mechanical engineer or anything.)
#the trashcan speaks#technoholic robotronic#i guess this is an 'answering robotics asks' type of evening
20 notes
·
View notes
Text
Formal Complaint: Unacknowledged and Uncollected Correspondence to Minister Ben Carroll MP Regarding Operation Dunham – Public Interest Matter

Email to OVIC
Subject: Formal Complaint: Unacknowledged and Uncollected Correspondence to Minister Ben Carroll MP Regarding Operation Dunham – Public Interest Matter
Dear Office of the Victorian Information Commissioner (OVIC),
I am writing to raise a formal complaint regarding the refusal or failure of Minister Ben Carroll MP (Minister for Education, Victoria) to acknowledge or collect a recorded international letter (Royal Mail tracking no. LE832463616GB) containing urgent public interest material concerning Operation Dunham and related safeguarding and transparency matters.
This letter:
Was sent via Royal Mail international recorded delivery, with proof of arrival in Australia.
Has not been collected, and no acknowledgement has been received from Minister Carroll's office.
Timeline: Timeline: Dunkley, Blair, and Clinton – Development of the Child Services System – thestealingofemily.co.uk
Reasons for Oblique Intent : Crisis management CRM – thestealingofemily.co.uk
Its contents are publicly documented here: https://thestealingofemily.co.uk/2025/05/27/introduction-to-correspondence-with-the-minister-for-education-victoria-australia/
This apparent avoidance of correspondence, especially one involving matters that may fall under IBAC and public sector transparency, raises questions about:
The record-keeping obligations of the Minister’s office under the Public Records Act 1973 (Vic),
Potential breaches of the FOI Act 1982 (Vic), and
The public interest test for disclosure under OVIC’s jurisdiction.
I request that your office:
Investigate whether any records exist relating to the handling, logging, or refusal of the above correspondence.
Confirm whether the Minister’s office has acted in accordance with its duties regarding incoming public interest communications.
Review whether any FOI-relevant documentation or recordings (including Operation Dunham material) are being improperly withheld.
I am prepared to submit additional documentation or lodge a formal FOI complaint if required.
Kind regards,
Martin Newbold


Source: Formal Complaint: Unacknowledged and Uncollected Correspondence to Minister Ben Carroll MP Regarding Operation Dunham – Public Interest Matter
1 note
·
View note
Text

Tutorial: The Arduino Mega as SD2IEC (German)
37 notes
·
View notes
Text
The first test for our WLED board codename "Sparkle Motion" 🌈💖💡 … 🐇⏳🌌
We got our WLED-friend PCBs today, and we only made one mistake: the wrong resistor on the 3.3V feedback line. Now that it's fixed, the board seems to work great with the latest version of WLED
We are checking all 4 signal outputs with this handy 256-LED grid that sits on our desk. Next, we will test the onboard IR receiver, USB PD, I2S microphone, extra I/O pins, and I2C. We'll also do an Arduino IDE board definition in case folks want to use it as a generic ESP32-to-LED-driver board. We're calling the board "Sparkle Motion" for now, but if you have other naming ideas, let us know - if we pick your name, you get a free board
Sign up, coming soon.
#wled#sparklemotion#leddriver#esp32#electronics#pcbs#arduino#makerprojects#openhardware#opensource#coding#leds#hardwaredesign#innovation#techgeeks#smartlighting#microcontrollers#hardwareengineering#esp32projects#ledmatrix#diyhardware#iotprojects#arduinoide#hardwaretesting#ledtechnology#techmakers#electronicscommunity#prototyping#hardwarehacking#adventuresintech
17 notes
·
View notes
Text
AI Coding Tutorials
Artificial Intelligence (AI) has quickly transformed a number of industries, altering how people use technology, how businesses function, and how issues are resolved. Learning AI code is a crucial first step for aspiring developers who want to remain competitive in the ever-changing IT industry. AI coding lessons give students a methodical way to learn these important abilities.
Key Concepts in AI Coding
The capacity of machines to learn from data and generate predictions or judgments is known as machine learning, or ML.
Deep Learning: A branch of machine learning that processes data and simulates human decision-making using neural networks.
The ability of machines to comprehend, interpret, and react to human language is known as natural language processing, or NLP.
Making it possible for machines to comprehend and evaluate visual information, such as pictures and films, is known as computer vision.
Data preprocessing is the process of cleaning and getting raw data ready for training and analysis.
Best AI Coding Tutorials for Beginners
Google’s Machine Learning Crash Course (MLCC)
Coursera’s AI for Everyone by Andrew Ng
edX’s Python for Data Science and Machine Learning
Tips for Successful Learning
Establish Specific Objectives: Clearly state your objectives for using AI code, whether they be creating an AI application, analyzing data, or creating a chatbot.
Practice Often: Practical experience is essential. Take on little tasks to help you remember what you've learned.
Join Communities: To exchange information and get advice, participate in online AI communities on sites like GitHub, Kaggle, or Reddit.
Keep Up: The field of AI is always changing. To stay informed, read news articles, research papers, and industry blogs.
Tutorials on AI coding provide access to countless opportunities in the computer industry. Gaining proficiency in AI will help you not only acquire a new talent but also get ready for a time when technology will continue to change the planet. With the correct lessons and commitment, you may succeed whether your goal is to advance your profession, solve practical issues, or just learn more about the exciting field of artificial intelligence.
To know more, click here.
0 notes
Text
youtube
how to create custom USB HID Device w/ USB HID Vendor Feature report for WEMOS Lolin S2 Mini WebHID API Live Demo Example data exchange (USB Host - USB Client): https://webhidvendor.blogspot.com/ WEMOS Lolin S2 Mini Custom USB HID - WebHID API Live Demo Example Web Interface ESP32 Arduino Core
#WEMOS#programming#how to#arduino#esp32-s2#tutorials#esp32#WebHID API#WebHID API Live Demo#Lolin S2 Mini#Custom USB HID#Vendor Feature report#Youtube
0 notes
Text
Formal Complaint: Unacknowledged and Uncollected Correspondence to Minister Ben Carroll MP Regarding Operation Dunham – Public Interest Matter
Email to OVIC
Subject: Formal Complaint: Unacknowledged and Uncollected Correspondence to Minister Ben Carroll MP Regarding Operation Dunham – Public Interest Matter
Dear Office of the Victorian Information Commissioner (OVIC),
I am writing to raise a formal complaint regarding the refusal or failure of Minister Ben Carroll MP (Minister for Education, Victoria) to acknowledge or collect a recorded international letter (Royal Mail tracking no. LE832463616GB) containing urgent public interest material concerning Operation Dunham and related safeguarding and transparency matters.
This letter:
Was sent via Royal Mail international recorded delivery, with proof of arrival in Australia.
Has not been collected, and no acknowledgement has been received from Minister Carroll's office.
Timeline: Timeline: Dunkley, Blair, and Clinton – Development of the Child Services System – thestealingofemily.co.uk
Reasons for Oblique Intent : Crisis management CRM – thestealingofemily.co.uk
Its contents are publicly documented here: https://thestealingofemily.co.uk/2025/05/27/introduction-to-correspondence-with-the-minister-for-education-victoria-australia/
This apparent avoidance of correspondence, especially one involving matters that may fall under IBAC and public sector transparency, raises questions about:
The record-keeping obligations of the Minister’s office under the Public Records Act 1973 (Vic),
Potential breaches of the FOI Act 1982 (Vic), and
The public interest test for disclosure under OVIC’s jurisdiction.
I request that your office:
Investigate whether any records exist relating to the handling, logging, or refusal of the above correspondence.
Confirm whether the Minister’s office has acted in accordance with its duties regarding incoming public interest communications.
Review whether any FOI-relevant documentation or recordings (including Operation Dunham material) are being improperly withheld.
I am prepared to submit additional documentation or lodge a formal FOI complaint if required.
Kind regards,
Martin Newbold
Source: Formal Complaint: Unacknowledged and Uncollected Correspondence to Minister Ben Carroll MP Regarding Operation Dunham – Public Interest Matter
1 note
·
View note
Text
For the past several months I've been working (and am still working on) a cosplay of my OC George Jackdaw. George is a corvid bard, a jackdaw in fact, who didn't have a last name so it'll just put down it's species instead.
I'm using mostly @rah-bop 's tutorials (bless you and your tutorials on Rue) and a pattern from Etsy for the head. Here's some progress pictures, because I'm nowhere near finished:

The mask is an EVA foam base from an etsy pattern for a corvid skull. I'm still racking my brain on how to add the eyes in there with me still being able to see.
Speaking of which, here's a little clip from my Twitch stream(same handle as here) that shows my prototype of animatronic eyes with an Arduino Nano Every. I've since changed the eyelid base from foam to 2mm aluminium wire.
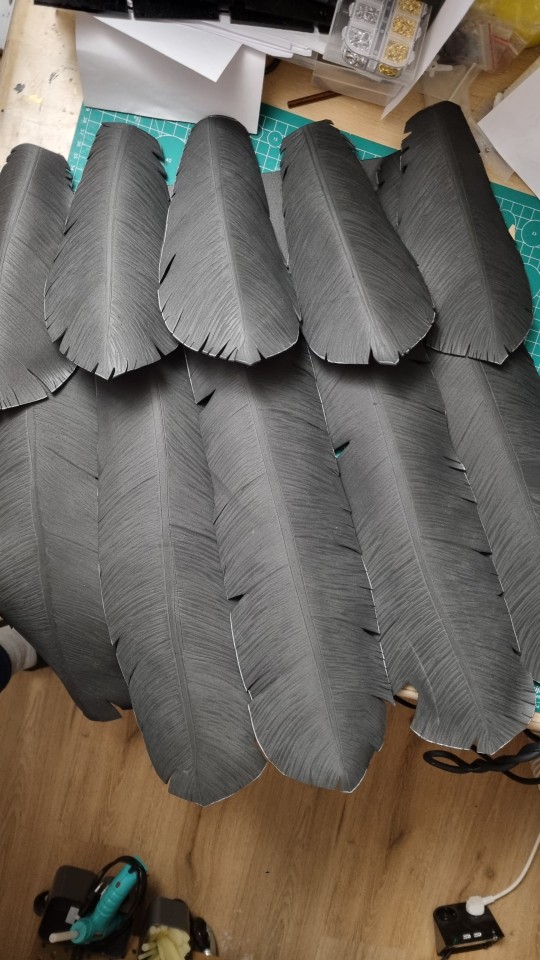
And some tail feathers that I added metal wire to for support (not pictured). I added flexbond primer today (also not pictured because I've been too busy) and sadly it covered a lot of the lines I scored in for detail, so I'll need to figure out a way to fix that. Or not.
7 notes
·
View notes