#postgres database docker install
Explore tagged Tumblr posts
Visit Tumblr Blog
Explore Tumblr blogs with no restrictions, modern design and the best experience.
Last Seen Tumblr Blogs


Fun Fact
Post activity is at the highest at 4:00 pm EDT; notes peak at 10:00 pm EDT.
Text
https://codeonedigest.blogspot.com/2023/07/run-postgres-database-in-docker.html
#youtube#video#codeonedigest#docker#postgres installation#postgres db#postgres tutorial#postgres database#postgres#postgresql#dockercontainers#docker image#docker container#docker tutorial#dockerfile
0 notes
Text
Using Docker for Full Stack Development and Deployment

1. Introduction to Docker
What is Docker? Docker is an open-source platform that automates the deployment, scaling, and management of applications inside containers. A container packages your application and its dependencies, ensuring it runs consistently across different computing environments.
Containers vs Virtual Machines (VMs)
Containers are lightweight and use fewer resources than VMs because they share the host operating system’s kernel, while VMs simulate an entire operating system. Containers are more efficient and easier to deploy.
Docker containers provide faster startup times, less overhead, and portability across development, staging, and production environments.
Benefits of Docker in Full Stack Development
Portability: Docker ensures that your application runs the same way regardless of the environment (dev, test, or production).
Consistency: Developers can share Dockerfiles to create identical environments for different developers.
Scalability: Docker containers can be quickly replicated, allowing your application to scale horizontally without a lot of overhead.
Isolation: Docker containers provide isolated environments for each part of your application, ensuring that dependencies don’t conflict.
2. Setting Up Docker for Full Stack Applications
Installing Docker and Docker Compose
Docker can be installed on any system (Windows, macOS, Linux). Provide steps for installing Docker and Docker Compose (which simplifies multi-container management).
Commands:
docker --version to check the installed Docker version.
docker-compose --version to check the Docker Compose version.
Setting Up Project Structure
Organize your project into different directories (e.g., /frontend, /backend, /db).
Each service will have its own Dockerfile and configuration file for Docker Compose.
3. Creating Dockerfiles for Frontend and Backend
Dockerfile for the Frontend:
For a React/Angular app:
Dockerfile
FROM node:14 WORKDIR /app COPY package*.json ./ RUN npm install COPY . . EXPOSE 3000 CMD ["npm", "start"]
This Dockerfile installs Node.js dependencies, copies the application, exposes the appropriate port, and starts the server.
Dockerfile for the Backend:
For a Python Flask app
Dockerfile
FROM python:3.9 WORKDIR /app COPY requirements.txt . RUN pip install -r requirements.txt COPY . . EXPOSE 5000 CMD ["python", "app.py"]
For a Java Spring Boot app:
Dockerfile
FROM openjdk:11 WORKDIR /app COPY target/my-app.jar my-app.jar EXPOSE 8080 CMD ["java", "-jar", "my-app.jar"]
This Dockerfile installs the necessary dependencies, copies the code, exposes the necessary port, and runs the app.
4. Docker Compose for Multi-Container Applications
What is Docker Compose? Docker Compose is a tool for defining and running multi-container Docker applications. With a docker-compose.yml file, you can configure services, networks, and volumes.
docker-compose.yml Example:
yaml
version: "3" services: frontend: build: context: ./frontend ports: - "3000:3000" backend: build: context: ./backend ports: - "5000:5000" depends_on: - db db: image: postgres environment: POSTGRES_USER: user POSTGRES_PASSWORD: password POSTGRES_DB: mydb
This YAML file defines three services: frontend, backend, and a PostgreSQL database. It also sets up networking and environment variables.
5. Building and Running Docker Containers
Building Docker Images:
Use docker build -t <image_name> <path> to build images.
For example:
bash
docker build -t frontend ./frontend docker build -t backend ./backend
Running Containers:
You can run individual containers using docker run or use Docker Compose to start all services:
bash
docker-compose up
Use docker ps to list running containers, and docker logs <container_id> to check logs.
Stopping and Removing Containers:
Use docker stop <container_id> and docker rm <container_id> to stop and remove containers.
With Docker Compose: docker-compose down to stop and remove all services.
6. Dockerizing Databases
Running Databases in Docker:
You can easily run databases like PostgreSQL, MySQL, or MongoDB as Docker containers.
Example for PostgreSQL in docker-compose.yml:
yaml
db: image: postgres environment: POSTGRES_USER: user POSTGRES_PASSWORD: password POSTGRES_DB: mydb
Persistent Storage with Docker Volumes:
Use Docker volumes to persist database data even when containers are stopped or removed:
yaml
volumes: - db_data:/var/lib/postgresql/data
Define the volume at the bottom of the file:
yaml
volumes: db_data:
Connecting Backend to Databases:
Your backend services can access databases via Docker networking. In the backend service, refer to the database by its service name (e.g., db).
7. Continuous Integration and Deployment (CI/CD) with Docker
Setting Up a CI/CD Pipeline:
Use Docker in CI/CD pipelines to ensure consistency across environments.
Example: GitHub Actions or Jenkins pipeline using Docker to build and push images.
Example .github/workflows/docker.yml:
yaml
name: CI/CD Pipeline on: [push] jobs: build: runs-on: ubuntu-latest steps: - name: Checkout Code uses: actions/checkout@v2 - name: Build Docker Image run: docker build -t myapp . - name: Push Docker Image run: docker push myapp
Automating Deployment:
Once images are built and pushed to a Docker registry (e.g., Docker Hub, Amazon ECR), they can be pulled into your production or staging environment.
8. Scaling Applications with Docker
Docker Swarm for Orchestration:
Docker Swarm is a native clustering and orchestration tool for Docker. You can scale your services by specifying the number of replicas.
Example:
bash
docker service scale myapp=5
Kubernetes for Advanced Orchestration:
Kubernetes (K8s) is more complex but offers greater scalability and fault tolerance. It can manage Docker containers at scale.
Load Balancing and Service Discovery:
Use Docker Swarm or Kubernetes to automatically load balance traffic to different container replicas.
9. Best Practices
Optimizing Docker Images:
Use smaller base images (e.g., alpine images) to reduce image size.
Use multi-stage builds to avoid unnecessary dependencies in the final image.
Environment Variables and Secrets Management:
Store sensitive data like API keys or database credentials in Docker secrets or environment variables rather than hardcoding them.
Logging and Monitoring:
Use tools like Docker’s built-in logging drivers, or integrate with ELK stack (Elasticsearch, Logstash, Kibana) for advanced logging.
For monitoring, tools like Prometheus and Grafana can be used to track Docker container metrics.
10. Conclusion
Why Use Docker in Full Stack Development? Docker simplifies the management of complex full-stack applications by ensuring consistent environments across all stages of development. It also offers significant performance benefits and scalability options.
Recommendations:
Encourage users to integrate Docker with CI/CD pipelines for automated builds and deployment.
Mention the use of Docker for microservices architecture, enabling easy scaling and management of individual services.
WEBSITE: https://www.ficusoft.in/full-stack-developer-course-in-chennai/
0 notes
Text
Updating a Tiny Tiny RSS install behind a reverse proxy

Screenshot of my Tiny Tiny RSS install on May 7th 2024 after a long struggle with 502 errors. I had a hard time when trying to update my Tiny Tiny RSS instance running as Docker container behind Nginx as reverse proxy. I experienced a lot of nasty 502 errors because the container did not return proper data to Nginx. I fixed it in the following manner: First I deleted all the containers and images. I did it with docker rm -vf $(docker ps -aq) docker rmi -f $(docker images -aq) docker system prune -af Attention! This deletes all Docker images! Even those not related to Tiny Tiny RSS. No problem in my case. It only keeps the persistent volumes. If you want to keep other images you have to remove the Tiny Tiny RSS ones separately. The second issue is simple and not really one for me. The Tiny Tiny RSS docs still call Docker Compose with a hyphen: $ docker-compose version. This is not valid for up-to-date installs where the hyphen has to be omitted: $ docker compose version. The third and biggest issue is that the Git Tiny Tiny RSS repository for Docker Compose does not exist anymore. The files have to to be pulled from the master branch of the main repository https://git.tt-rss.org/fox/tt-rss.git/. The docker-compose.yml has to be changed afterwards since the one in the repository is for development purposes only. The PostgreSQL database is located in a persistent volume. It is not possible to install a newer PostgreSQL version over it. Therefore you have to edit the docker-compose.yml and change the database image image: postgres:15-alpine to image: postgres:12-alpine. And then the data in the PostgreSQL volume were owned by a user named 70. Change it to root. Now my Tiny Tiny RSS runs again as expected. Read the full article
0 notes
Text
Let's do Fly and Bun🚀
0. Sample Bun App
1. Install flycll
$ brew install flyctl
$ fly version fly v0.1.56 darwin/amd64 Commit: 7981f99ff550f66def5bbd9374db3d413310954f-dirty BuildDate: 2023-07-12T20:27:19Z
$ fly help Deploying apps and machines: apps Manage apps machine Commands that manage machines launch Create and configure a new app from source code or a Docker image. deploy Deploy Fly applications destroy Permanently destroys an app open Open browser to current deployed application Scaling and configuring: scale Scale app resources regions V1 APPS ONLY: Manage regions secrets Manage application secrets with the set and unset commands. Provisioning storage: volumes Volume management commands mysql Provision and manage PlanetScale MySQL databases postgres Manage Postgres clusters. redis Launch and manage Redis databases managed by Upstash.com consul Enable and manage Consul clusters Networking configuration: ips Manage IP addresses for apps wireguard Commands that manage WireGuard peer connections proxy Proxies connections to a fly VM certs Manage certificates Monitoring and managing things: logs View app logs status Show app status dashboard Open web browser on Fly Web UI for this app dig Make DNS requests against Fly.io's internal DNS server ping Test connectivity with ICMP ping messages ssh Use SSH to login to or run commands on VMs sftp Get or put files from a remote VM. Platform overview: platform Fly platform information Access control: orgs Commands for managing Fly organizations auth Manage authentication move Move an app to another organization More help: docs View Fly documentation doctor The DOCTOR command allows you to debug your Fly environment help commands A complete list of commands (there are a bunch more)
2. Sign up
$ fly auth signup
or
$ fly auth login
3. Launch App
Creating app in /Users/yanagiharas/works/bun/bun-getting-started/quickstart Scanning source code Detected a Bun app ? Choose an app name (leave blank to generate one): hello-bun
4. Dashboard
0 notes
Text
Mainframe Community / Mattermost
So, last night I ‘launched’ a MatterMost instance on https://mainframe.community. To summarize MatterMost (via wikipedia) it is: an open-source, self-hostable online chat service with file sharing, search, and integrations. It is designed as an internal chat for organisations and companies, and mostly markets itself as an open-source alternative to Slack[7][8] and Microsoft Teams. In this post I wanted to quickly explain how and why I did this. Let’s start with the why first. But Why? Last week, while working for one of my clients, I discovered they are starting to implemen MatterMost as a cross-team collaboration tool. And I discovered it has integrations, webhooks and bots. Being the Mainframe nerd I am, I quickly whipped up some lines of REXX to call CURL so I could ‘post’ to a MatterMost channel straight from The Mainframe. It was also quite easy in the wsadmin scripts to have jython execute an os.system to call curl and do the post... Now I wanted to take it a step further and create a “load module” that did the same, but could be called from a regular batch-job to, I donno, post messages when jobs failed, or required other forms of attention. Seeing as I was going to develop that on my own ZPDT/ZD&T I needed a sandbox environment. Running MatterMost locally from docker was a breeze, yet not running as “https” (something I wanted to test to work from the still to be made load-module. So, seeing as I already had the “mainframe.community”-domain, I thought, why not host it there, and use that as a sandbox....turned out that was easier done than imagined. But How? The instructions provided at https://docs.mattermost.com/install/install-ubuntu-1804.html were easy enough to follow and should get you up and running yourself in under an hour.
Seeing as there already ‘some stuff’ running at the local datacenter here I already had an nginx-environment up and running. I started with creating a new VM in my ProxMox environment (running Ubuntu 18.04) and made sure this machine got a static IP. From there on I did the following:
sudo apt update sudo apt upgrade sudo apt install postgresql postgresql-contrib
That then made sure the VM had a local database for all the MatterMost things. Initializing the DB environment was as easy as;
sudo --login --user postgres psql postgres=# CREATE DATABASE mattermost; postgres=# CREATE USER mmuser WITH PASSWORD 'x'; postgres=# GRANT ALL PRIVILEGES ON DATABASE mattermost to mmuser; postgres=# \q exit
Of course the password is not ‘x’ but something a bit more secure...
Then, make a change to the postgres config (vi /etc/postgresql/10/main/pg_hba.conf) changing the line
local all all peer
to
local all all trust
Then installing mattermost was basically these next commands:
systemctl reload postgresql wget https://releases.mattermost.com/5.23.1/mattermost-5.23.1-linux-amd64.tar.gz mv mattermost /opt mkdir /opt/mattermost/data useradd --system --user-group mattermost chown -R mattermost:mattermost /opt/mattermost chmod -R g+w /opt/mattermost vi /opt/mattermost/config/config.json cd /opt/mattermost/ sudo -u mattermost ./bin/mattermost vi /opt/mattermost/config/config.json sudo -u mattermost ./bin/mattermost vi /lib/systemd/system/mattermost.service systemctl daemon-reload systemctl status mattermost.service systemctl start mattermost.service curl http://localhost:8065 systemctl enable mattermost.service restart mattermost systemctl restart mattermost
Some post configuration needed to be done via the MatterMost webinterface (that was running like a charm) and then just a little nginx-config like specified at the MatterMost docs webpages and it was all up and running. Thanks to the peeps at LetsEncrypt it’s running TLS too :) Curious to see how ‘busy’ it will get on the mainframe.community. I’ve setup the VM with enough hardware resource to at least host 2000 users. So head on over to https://mainframe.community and make me ‘upgrade’ the VM due to the user growth :)
1 note
·
View note
Text
[ad_1] Superbass a complete back end for web and mobile applications based entirely on free open source software the biggest challenge when building an app is not writing code but rather architecting a complete system that works at scale products like Firebase and amplify have addressed this barrier but there's one Big problem they lock you into proprietary technology on a specific Cloud platform Superbass was created in 2019 specifically as an open source Firebase alternative at a high level it provides two things on the back end we have infrastructure like a database file storage and Edge functions that run in The cloud on the front end we have client-side sdks that can easily connect this infrastructure to your favorite front-end JavaScript framework react native flutter and many other platforms as a developer you can manage your postgres database with an easy to understand UI which automatically generates rest and graphql apis to use In your code the database integrates directly with user authentication making it almost trivial to implement row level security and like fire base it can listen to data changes in real time while scaling to virtually any workload to get started you can self-host with Docker or sign up for a fully managed Account that starts with a free tier on the dashboard you can create tables in your postgres database with a click of a button insert columns to build out your schema then add new rows to populate it with data by default every project has an authentication schema to manage users Within the application this opens the door to row level security where you write policies to control who has access to your data in addition the database supports triggers to react to changes in your data and postgres functions to run stored procedures directly on the database server it's a nice interface But it also automatically generates custom API documentation for you from here we can copy queries tailored to our database and use them in a JavaScript project install the Super Bass SDK with npm then connect to your project and sign a user in with a single line of Code and now we can listen to any changes to the authentication state in real time with on off stage change when it comes to the database we don't need to write raw SQL code instead we can paste in that JavaScript code from the API docs or use the rest and graphql Apis directly and that's all it takes to build an authenticated full stack application however you may still want to run your own custom server-side code in which case serverless Edge functions can be developed with Dino and typescript then easily distributed around the globe this has been super Bass in 100 seconds if you want to build something awesome on this platform we just released a brand new Super Bass course on fireship i o it's free to get started so check it out to learn more thanks for watching and I will see you in the next one [ad_2] #Supabase #Seconds For More Interesting Article Visit : https://mycyberbase.com/
0 notes
Text
Postgresql create database

Postgresql create database how to#
Postgresql create database install#
Postgresql create database upgrade#
An Azure resource group is a logical container into which Azure resources are deployed and managed. # to limit / allow access to the PostgreSQL serverĮcho "Using resource group $resourceGroup with login: $login, password: $password."Ĭreate a resource group with the az group create command. # Specify appropriate IP address values for your environment Server="msdocs-postgresql-server-$randomIdentifier" Tag="create-postgresql-server-and-firewall-rule" ResourceGroup="msdocs-postgresql-rg-$randomIdentifier" Use the public IP address of the computer you're using to restrict access to the server to only your IP address. Replace 0.0.0.0 with the IP address range to match your specific environment. Server names need to be globally unique across all of Azure so the $RANDOM function is used to create the server name.Ĭhange the location as appropriate for your environment. The following values are used in subsequent commands to create the database and required resources. or use 'az login'įor more information, see set active subscription or log in interactively Set parameter values subscription="" # add subscription hereĪz account set -s $subscription #. If you don't have an Azure subscription, create an Azure free account before you begin. Use the following script to sign in using a different subscription, replacing with your Azure Subscription ID. Sign in to AzureĬloud Shell is automatically authenticated under the initial account signed-in with. Subsequent sessions will use Azure CLI in a Bash environment, Select Copy to copy the blocks of code, paste it into the Cloud Shell, and press Enter to run it. When Cloud Shell opens, verify that Bash is selected for your environment. You can also launch Cloud Shell in a separate browser tab by going to. To open the Cloud Shell, just select Try it from the upper right corner of a code block. It has common Azure tools preinstalled and configured to use with your account. The Azure Cloud Shell is a free interactive shell that you can use to run the steps in this article.
Postgresql create database upgrade#
To upgrade to the latest version, run az upgrade. Run az version to find the version and dependent libraries that are installed. For more information about extensions, see Use extensions with the Azure CLI.
Postgresql create database install#
When you're prompted, install the Azure CLI extension on first use. For other sign-in options, see Sign in with the Azure CLI. To finish the authentication process, follow the steps displayed in your terminal. If you're using a local installation, sign in to the Azure CLI by using the az login command.
Postgresql create database how to#
For more information, see How to run the Azure CLI in a Docker container. If you're running on Windows or macOS, consider running Azure CLI in a Docker container. If you prefer to run CLI reference commands locally, install the Azure CLI. For more information, see Azure Cloud Shell Quickstart - Bash. Use the Bash environment in Azure Cloud Shell. Consider using the simpler az postgres up Azure CLI command.
0 notes
Text
If this is not one of the most robust, free, rich and informative era ever then I cannot think of any other time in history adorned with the wealth of technology as this one. If you would wish to accomplish anything, this era wields the most virile grounds to nourish, nurture and aid the sprouting, the growth and the maturity of your dreams. You can literaly learn to be what you would wish to be in this age. That being said, this disquisition takes on a quest to get you into setting up something similar to Heroku on your own environment. We shall get to know what Heroku is then get off the dock and sail off towards our goal of having such an environment. The proliferation of cloud technologies brought with it many opportunities in terms of service offerings. First and foremost, users had the ability to get as much infrastructure as they could afford. Users can spawn servers, storage and network resources ad libitum which is popularly known as Infrastructure as a service. Then comes the second layer that sits on the infrastructure. It could be anything, cloud identity service, cloud monitoring server et cetera. This layer provides ready made solutions to people who might need them. This is known as software as a service. I hope we are flowing together this far. In addition to that there is another incredible layer that is the focus of this guide. It is a layer that targets developers majorly by making their lives easier on the cloud. In this layer , developers only concentrate on writing code and when they are ready to deploy, they only need to commit their ready project in a source control platform like GitHub/GitLab and the rest is done for them automatically. This layer provides a serverless layer to the developers since they do not have to touch the messy server side stuff. This layer as you might already have guessed is known as Platform as a Service (PaaS). Heroku is one of the solutions that sits on this layer. In this guide, are going to setup a platform that is similar to Heroku on your own infrastructure. As you know, you cannot download and install Heroku on your server. It is an online cloud service that you subscribe to. We will use Caprover to setup our own private Platform as a service (PaaS). CapRover is an extremely easy to use app/database deployment & web server manager for your NodeJS, Python, PHP, ASP.NET, Ruby, MySQL, MongoDB, Postgres, WordPress and even more applications. Features of Caprover CLI for automation and scripting Web GUI for ease of access and convenience No lock-in! Remove CapRover and your apps keep working! Docker Swarm under the hood for containerization and clustering Nginx (fully customizable template) under the hood for load-balancing Let’s Encrypt under the hood for free SSL (HTTPS) One-Click Apps: Deploying one-click apps is a matter of seconds! MongoDB, Parse, MySQL, WordPress, Postgres and many more. Fully Customizable: Optionally fully customizable nginx config allowing you to enable HTTP2, specific caching logic, custom SSL certs and etc Cluster Ready: Attach more nodes and create a cluster in seconds! CapRover automatically configures nginx to load balance. Increase Productivity: Focus on your apps! Not the bells and whistles just to run your apps! Easy Deploy: Many ways to deploy. You can upload your source from dashboard, use command line caprover deploy, use webhooks and build upon git push Caprover Pre-requisites Caprover runs as a container in your server which can be any that supports containerization. Depending on your preferences, you can use Podman or Docker to pull and run Caprover image. For this example, we are going to use Docker. In case you do not have Docker installed, the following guides listed below will be there to help you set it up as fast as possible. Install Docker and Docker Compose on Debian Setup Docker CE & Docker Compose on CentOS 8 | RHEL 8 How To Install Docker on RHEL 7 / CentOS 7
How To Install Docker CE on Ubuntu Once Docker Engine has been installed, add your user account to docker group: sudo usermod -aG docker $USER newgrp docker Another pre-requisite is a wildcard domain name pointed to the IP of your server where Caprover Server will be running. Setup your Heroku PaaS using CapRover Once the pre-requisites are out of the way, the only task remaining now is to set up our Caprover and poke around its rooms just to see what it has to offer. The following steps will be invaluable as you try to get it up and running. Step 1: Prepare your server Once Docker is installed, you can install all of the applications you need during your stay in the server. They include an editor and such kind of stuff. ##On CentOS sudo yum update sudo yum install vim git curl ##On Ubuntu sudo apt update sudo apt install vim git curl That was straingtforward. Next, let us pull Caprover image to set the stone rolling Step 2: Pull and execute Caprover Image We are going to cover the installation of Caprover depending on where your server sits. Scenario 1: Installation on a local server without Public IP Install dnsmasq After all, as mentioned in the pre-requisites section, we shall need a small DNS server to resolve domain names since Caprover is so particular with it. In case you have a local DNS server that supports wildcard domains, then you are good to go. You can skip the DNS setup part. In case you do not have it, install lightweight dnsmasq as follows: sudo yum -y install dnsmasq After dnsmasq is successfully installed, start and enable the service. sudo systemctl start dnsmasq sudo systemctl enable dnsmasq Add Wildcard DNS Recod Once dnsmasq is running as expected, we can go ahead and add the configs and wildcard domain name as shown below: $ sudo vim /etc/dnsmasq.conf listen-address=::1,127.0.0.1,172.20.192.38 domain=example.com server=8.8.8.8 address=/caprover.example.com/172.20.192.38 Replace the IPs therein with yours accordingly. Then restart dnsmasq sudo systemctl restart dnsmasq Test if it works We shall use the dig utility to test if our configuration works $ dig @127.0.0.1 test.caprover.example.com ; DiG 9.11.20-RedHat-9.11.20-5.el8 @127.0.0.1 test.caprover.example.com ; (1 server found) ;; global options: +cmd ;; Got answer: ;; ->>HEADER> Checking System Compatibility > Checking System Compatibility
0 notes
Text
#youtube#video#codeonedigest#microservices#microservice#docker#springboot#spring boot#postgres installation#postgres db#postgresql#postgres tutorial#postgres database#postgres#dockercontainers#docker image#docker container#docker tutorial#dockerfile#spring boot microservices#java microservice#microservice tutorial
0 notes
Text
Navicat premium 12 serial key

Navicat Premium 12 Serial Key - connectionolpor.
Navicat Premium 12 Key Generator - downtfile.
Navicat Premium 12 Activation Key - coolhfile.
Instalacion Navicat Premium 12.1.10 + Key - YouTube.
Navicat Premium 12 With Navicat Keygen, Activate (Crack).
Navicat Key For Mac - skateload.
Navicat Premium 12.1 | 5 Crack Serial Keygen Results.
Navicat Premium 12 Serial Key | Peatix.
Navicat Premium 12.1.12:Desktop Software:.
Navicat Premium 11 Serial Number.
GitHub - HardBrick21/navicat-keygen.
Docker Hub.
GitHub - HeQuanX/navicat-keygen-tools.
Navicat Premium 12 Serial Key - connectionolpor.
Now DO NOT CLOSE KEYGEN. Open Navicat Premium, find and click Registration. Then input Registration Key by snKey that keygen gave. Then click Activate. Generally online activation will failed and Navicat will ask you do Manual Activation, just choose it. Copy your request code and paste it in keygen.
Navicat Premium 12 Key Generator - downtfile.
Navicat Premium 15.0.18 Crack + Registration Key Free. Navicat Premium Crack is an amazing and very impressive database software. This is the best software that will help the users to connect to the SQ Lite database and many others. Further, this program also enables the users to link to the Oracle, MariaDB, Postgre SQL, and the MySQL database. If you are uninstalling Navicat because it is not working properly, please send us an email to our support team, and we would be more than happy to resolve the problems for you.... Key Topics. Navicat 16 Highlights; Collaboration; What is Navicat for MongoDB; What is Navicat Data Modeler; Discover Navicat Monitor; Top 10 Reasons; Products.
Navicat Premium 12 Activation Key - coolhfile.
Other advanced features of Navicat Premium Crack with serial key and keygen including Backup/ Restore, Data Import/ Export, Data Synchronization, Reporting, and Remote Connection to MySQL, PostgreSQL and Oracle server, etc. This new Navicat Premium 12.1.27 Crack full license keys database migration tool provides a friendly step-by-step Wizard.
Instalacion Navicat Premium 12.1.10 + Key - YouTube.
Jul 16, 2022 · All versions. Navicat Premium is a database development tool that allows you to simultaneously connect to MySQL, MariaDB, SQL Server, Oracle, PostgreSQL, and SQLite databases from a single application. Compatible with cloud databases like Amazon RDS, Amazon Aurora, Amazon Redshift, SQL Azure, Oracle Cloud and Google Cloud. Navicat Premium 12 Serial Key combines the functions of other Navicat members and supports most of the features in MySQL, SQL Server. We start with a clean download and install of Navicat 12 and activate it in the offline mode. Read more Download Navicat Premium Keygen Synchronization delivers a full picture of database differences.
Navicat Premium 12 With Navicat Keygen, Activate (Crack).
100 records — Download Navicat Premium.11.0.5 full keygen crack link mediafire. Navicat Premium 15.0.25 Crack Full Keygen Free Download 2021. Navicat Premium Serial... Navicat Premium (Windows) version 12.1.28. Bug-fixes: Unable to.... Mar 14, 2020 — Navicat Premium is an advanced multi-connections database... Launch the program and. Navicat Premium 12 Registration Key is a database management and development software which provides basic and necessary features you will need to perform simple administration on a database. Navicat Premium 12 Mac Crack empowers you to effectively and rapidly exchange information crosswise over different database frameworks, or to a plain.
Navicat Key For Mac - skateload.
Download Trial. We offer a 14-day fully functional FREE trial of Navicat. Windows. macOS. Linux.
Navicat Premium 12.1 | 5 Crack Serial Keygen Results.
Jul 21, 2022 · Your crack search for Navicat Premium 12.1 may return better results if you avoid searching for words such as: crack, serial, key, keygen, cracked, download, , etc.
Navicat Premium 12 Serial Key | Peatix.
How To Crack Navicat Premium Latest Version? Install The Program. Patch the Program and put Offline Generate Serial and use it on Registration Copy Request Code into keygen Generate Serial v12 or File License v11 You Are Done. Note: Don’t update if asked. And Pass For UnZipping/RaR is Serial-Key.CoM Navicat Premium 12 Serial Key.
Navicat Premium 12.1.12:Desktop Software:.
Navicat Premium 12 Keygen Is Fully. Navicat Premium 12 Keygen is fully compatible with local databases, networks in addition to clouds like Amazon, SQL Azure, Oracle Cloud and Google Cloud. Navicat Premium 12.0.15 Serial Key has an Explorer-like graphical user interface and supports multiple database connections for local and remote databases. Navicat 12 For Mysql Download It From. Using Navicat Premium 12 Full Crack you can speedily and easily build, manage and maintain your databases. Navicat Premium 12 Serial key comes with all the tools meet the needs of a variety of users, from programmers, database administrators and other jobs that require database management. Oct 02, 2019 Navicat Premium 15 Crack + Serial/Registration Key. Navicat Premium is a multi-association database organization apparatus enabling you to interface with MySQL, SQL Server, SQLite, Oracle, and PostgreSQL databases at the same time inside a single application, making database organization to numerous sorts of the database so easy.
Navicat Premium 11 Serial Number.
Install Navicat Premium 12.1.10 + KeyLink Navicat:cW0hJ9KfzrA7aNH8tIYEVgVV4e50A9/view?usp=sharing. Find and click Registration. Fill license key by Serial number that the keygen gave and click Activate. Generally online activation will fail and Navicat will ask you do Manual Activation, just choose it. Copy your request code and paste it in the keygen. Input empty line to tell the keygen that your input ends. Navicat Premium Crack With Serial Key Full Free Download.. First go to the official website to downloadNavicatAnd then install (how to install it will not be explained). Then, go... Assume that Navicat is installed at D:\Navicat Premium\Navicat Premium 12. Unzip the.
GitHub - HardBrick21/navicat-keygen.
Navicat Premium Crack Registration Serial Key (2019) Latest ->->->-> DOWNLOAD. c31619d43f. Walking in the Light 26 Golden Times... navicat premium 12 registration key, navicat premium 12 registration key free, navicat premium 15 registration key, navicat premium 12 registration key mac, navicat premium 11.2 registration key, navicat premium. Navicat High quality Keygen Download handles support for all of those sources combined. Navicat Premium 12 Mac Pc App First and primarily, the interface feels like it will be a indigenous mac pc app. Once connected, navigating through the database schemas is as easy as stage and click on; everything moves exceptionally properly. The full version of Navicat Premium 12.1.24 License Key is an advanced tool that quickly transfers data across various database systems. O provide a full link to download its pro version with full access. It is a fantastic platform for downloading crack. Serial Key Features: Database Designer. PL/SQL Code Debugger. Report Builder/Viewer.
Docker Hub.
Nov 01, 2019 · Navicat Premium Crack Full Serial Key is Here Navicat Premium 12.0.28 Crack for MAC and Windows. It’s a database administration instrument which means that you can hook up with MySQL, MariaDB, SQL Server, Oracle, PostgreSQL, and SQLite databases from a single software. Navicat Premium 12 crack de activación descargar Navicat Premium 12 e instalar; Descarga de Lan Zuoyun: Máquina de registro Navicat Premium 12. Nota importante: la máquina de registro proviene de DeltaFoX. En general, debido a la oportunidad de registrarse para modificar el archivo o el archivo , el empaquetado y la falta de firma.
GitHub - HeQuanX/navicat-keygen-tools.
Install NAVICAT Premium 11.3 Crack + Serial Number on PC. BrambleBerry Premium 5.9.8 Crack (MAC + WINDOWS) BrambleBerry Premium 5.9.8 Download. DOWNLOAD NAVICAT PREMIUM SERIAL KEY 4.5 HERE P Windows. When you want to launch Navicat Premium Key, there are three ways for. Dark Mode.. Jun 03, 2020 · Program: Goodnight Launcher v4.0 - Cracked by me Cracked... full version, Navicat Premium 12 serial key, Navicat Premium patch download,.... Navicat Premium 12 Crack & Serial Key is the powerful database designing tool. It helps to manage multiple types of database at same time on... navicat premium crack. Download Navicat Premium 12 Full Cr@ck - Hướng dẫn cài đặt chi tiết. Navicat Premium 12 Full Crack là 1 phần mềm rất có lợi cho đồng bộ giúp bạn có khả năng quản lý cơ sở dữ liệu một phương pháp đơn giản và thuận lợi nhất. Navicat có khả năng khiến bạn ghép nối với các.
Other links:
0 notes
Text
Install Madoc on Linux server
1. Install Docker und Docker container
https://library-it.tumblr.com/post/666025810043518976/commands-for-docker
https://docs.docker.com/compose/install/
2. Clone Madoc to your folger: git clone https://github.com/digirati-co-uk/madoc-platform.git
3. Copy .env file in your project folger. This file contains Postgres database credentials, MADOC_INSTALLATION_CODE.
4. Create database in Postgres and 5 shemas.
5. Create roles:
CREATE ROLE madoc_ts WITH LOGIN ENCRYPTED PASSWORD 'madoc_ts';
CREATE ROLE tasks_api WITH LOGIN ENCRYPTED PASSWORD 'tasks_api';
CREATE ROLE models_api WITH LOGIN ENCRYPTED PASSWORD 'models_api';
CREATE ROLE config_service WITH LOGIN ENCRYPTED PASSWORD 'config_service';
CREATE ROLE search_api WITH LOGIN ENCRYPTED PASSWORD 'search_api';
6. Create schemas:
CREATE SCHEMA config_service AUTHORIZATION config_service;
CREATE SCHEMA madoc_ts AUTHORIZATION madoc_ts;
CREATE SCHEMA models_api AUTHORIZATION models_api;
CREATE SCHEMA search_api AUTHORIZATION search_api;
CREATE SCHEMA tasks_api AUTHORIZATION tasks_api;
7. Delete schemas, if nessesarry:
DROP SCHEMA if exists config_service,madoc_ts,models_api,search_api,tasks_api CASCADE;
8. Add extension:
CREATE EXTENSION IF NOT EXISTS "uuid-ossp";
9. Extension should be adressed to models_api schema
10. Pull project: docker-compose -f docker-compose.yml pull
11. Start project: docker-compose -f docker-compose.yml up –d
12. Display logs and save in file: docker-compose -f docker-compose.yml logs > log.txt
13. Stop server: docker-compose -f docker-compose.yml stop
14. Remove containers: docker-compose -f docker-compose.yml rm
15. First start: Just enter your server name in browser without port (https://lx0015.sbb.spk-berlin.de/). If everything is correct you'll see Madoc page with code question. In .env file you shoild add madoc installation code. In a web page just type madoc and click next. On the next page fullfill the form. Create admin user/password and a start page name. After it you can start to work with madoc.
16. Add crossasia theme:
docker ps - see all containers
docker cp crossasia-theme/ 4c64d5f9dfd4:/home/node/app/themes - copy theme to container
stop and start application
1 note
·
View note
Text
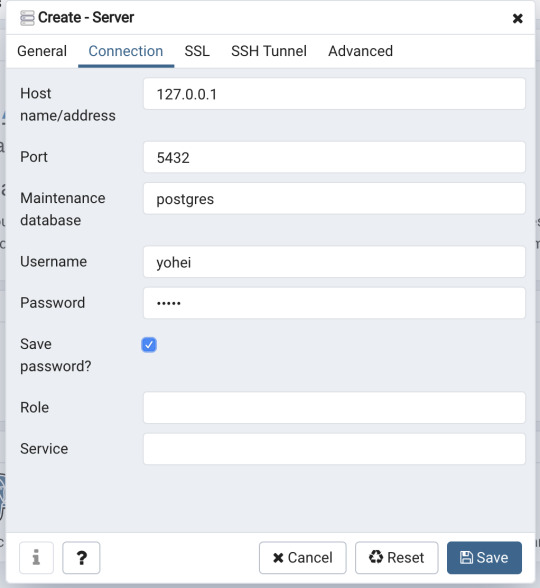
Mac Postgres Password

Introduction
I am currently running postgres in a docker container for development purposes. I am able to connect to the container using psql from my mac by doing psql -h localhost -U someuser then typing the password. The password is the same as the username and it's a really simple password. This is a step-by-step guide to install PostgreSQL on a Mac OS machine. We will be installing PostgreSQL version 11.3 on Mac using the installer provided by EnterpriseDB in this article. There are three crucial steps for the installation of PostgreSQL as follows: Download PostgreSQL EnterpriseDB installer for Mac; Install PostgreSQL. Postgres.app is a full-featured PostgreSQL installation packaged as a standard Mac app. It includes everything you need to get started: we’ve even included popular extensions like PostGIS for geo data and plv8 for JavaScript.
PostgreSQL configuration without password on Mac for Rails - postgresqlconfigurationonmacforrails.md. Code language: SQL (Structured Query Language) (sql) Note that using the ALTER ROLE statement will transfer the password to the server in cleartext. In addition, the cleartext password may be logged in the psql’s command history or the server log. In this tutorial, you have learned how to change the password of a PostgreSQL user using the ALTER ROLE statement.
Postgres is a powerful and free object-relational database management system. It has gained a lot of momentum since its introduction in 1995 because of its robustness and powerful features it ships with out of the box. In this article, we’ll walk through the process of installing a Postgres database on a Mac OS X machine and set it up for Ruby on Rails development.
Install Postgres Database with Homebrew
Homebrew is a popular package manager for OS X. To install Postgres with Homebrew, follow the steps below:
The first thing to do is install Homebrew if you haven’t done so already. Homebrew site has a simple command that you have to paste in your terminal to do so. Make sure to accept the command line developer tools installation if prompted.

Next, run brew install postgres to install Postgres. It might take a little while to compile and install. After compilation is done, it’ll give you some instructions to finish setting it up.
The database will be initialized during installation, so there isn’t a need to run initdb to finish installation of Postgres via Homebrew. Near the end of the installation instructions you should see mention of the command brew services.
Mac Postgres Password Change
If you don’t already have brew services installed. Gem master rhinestone software. It may be installed withthis command: Earth stove 3340 manual.
And then you can run the following command to start Postgres as a background service:
Postgres will also restart automatically at login after you have run the command above. Once Postgres has started, we can use brew services to stop it manually:
Or we can also use brew services to restart Postgres:
Now you should have PostgreSQL all set up.
Mac Postgres Default Password
Set Up Postgres to Work with a Rails App
First, install the pg gem:
Make sure you include the pg gem in your Gemfile, and run
Now, set up your config/database.yml file to point to your Posgres database.
Let’s create the development and test databases:
Now you can run pending migrations, if there are any.
0 notes
Text
How To Install Odoo 15 In Ubuntu 18.04 ? | Steps To Install Odoo 15
How To Install Odoo 15 In Ubuntu 18.04 LTS ?
Technical
Steps To Install Odoo 15 On Ubuntu 18.04
Odoo is the most popular all-in-one business software in the world.To Install Odoo 15 on Ubuntu 18.04 you just need to follow the below steps. There are many ways to install Odoo depending on the requirements and the easy and quick way to install Odoo by using APT repositories. If you want to work with running multiple Odoo versions on the same system then you can either use docker compose or docker Install Odoo in a virtual environment. This blog is to provide steps for installation and configuration of Odoo for production environment using Git source and Python environment on an Ubuntu 18.04 system. Note : Odoo 15 is not launched yet so we have used the “master” branch for Installation.
To install Odoo 15 on Ubuntu 18.04 LTS you just follow the below steps.
Step 1 : Update Server
sudo apt-get update
sudo apt-get upgrade -y
Step 2 : Create Odoo User in Ubuntu
sudo adduser -system -home=/opt/odoo -group odoo
Step 3 : Install PostgreSQL Server
sudo apt-get install postgresql -y
Step 4 : Create Odoo user for postgreSQL
sudo su - postgres -c "createuser -s odoo" 2> /dev/null || true
Step 5 : Install Python Dependencies
sudo apt-get install git python3 python3-pip build-essential wget python3-dev python3-venv python3-wheel libxslt-dev libzip-dev libldap2-dev libsasl2-dev python3-setuptools node-less libjpeg-dev gdebi -y
Step 6 : Install Python PIP Dependencies
sudo -H pip3 install -r https://raw.githubusercontent.com/odoo/odoo/master/requirements.txt
Step 7 : Install other required packages
sudo apt-get install nodejs npm -y
sudo npm install -g rtlcss
Step 8 : Install Wkhtmltopdf
sudo apt-get install xfonts-75dpi
sudo wget https://github.com/wkhtmltopdf/packaging/releases/download/0.12.6-1/wkhtmltox_0.12.6-1.bionic_amd64.deb
sudo dpkg -i wkhtmltox_0.12.6-1.bionic_amd64.deb
sudo cp /usr/local/bin/wkhtmltoimage /usr/bin/wkhtmltoimage
sudo cp /usr/local/bin/wkhtmltopdf /usr/bin/wkhtmltopdf
Step 9 : Create Log directory
sudo mkdir /var/log/odoo
sudo chown odoo:odoo /var/log/odoo
Step 10 :Install Odoo
sudo apt-get install git
sudo git clone --depth 1 --branch master https://www.github.com/odoo/odoo /odoo/odoo-server
Step 11 : Setting permissions on home folder
sudo chown -R odoo:odoo /odoo/*
Step 12 : Create server config file
sudo touch /etc/odoo-server.conf
sudo su root -c "printf '[options] \n; This is the password that allows database operations:\n' >> /etc/odoo-server.conf"
sudo su root -c "printf 'admin_passwd = admin\n' >> /etc/odoo-server.conf"
sudo su root -c "printf 'xmlrpc_port = 8069\n' >> /etc/odoo-server.conf"
sudo su root -c "printf 'logfile = /var/log/odoo/odoo-server.log\n' >> /etc/odoo-server.conf"
sudo su root -c "printf 'addons_path=/odoo/odoo-server/addons\n' >> /etc/odoo-server.conf"
sudo chown odoo:odoo /etc/odoo-server.conf
sudo chmod 640 /etc/odoo-server.conf
Step 13 : Now Start Odoo
sudo su - odoo -s /bin/bash
cd /odoo/odoo-server
./odoo-bin -c /etc/odoo-server.conf
0 notes
Text
How To Install Odoo 15 In Ubuntu 18.04 LTS ?

Steps To Install Odoo 15 On Ubuntu 18.04
Odoo is the most popular all-in-one business software in the world.To Install Odoo 15 on Ubuntu 18.04 you just need to follow the below steps. There are many ways to install Odoo depending on the requirements and the easy and quick way to install Odoo by using APT repositories. If you want to work with running multiple Odoo versions on the same system then you can either use docker compose or docker Install Odoo in a virtual environment. This blog is to provide steps for installation and configuration of Odoo for production environment using Git source and Python environment on an Ubuntu 18.04system. Note: Odoo 15 is not launched yet so we have used the “master” branch for Installation.
To install Odoo 15 on Ubuntu 18.04 LTS you just follow the below steps.
Step 1 : Update Server
sudo apt-get updatesudo apt-get upgrade -y
Step 2 : Create Odoo User in Ubuntu
sudo adduser -system -home=/opt/odoo -group odoo
Step 3 : Install PostgreSQL Server
sudo apt-get install postgresql -y
Step 4 : Create Odoo user for postgreSQL
sudo su - postgres -c "createuser -s odoo" 2> /dev/null || true
Step 5 : Install Python Dependencies
sudo apt-get install git python3 python3-pip build-essential wget python3-dev python3-venv python3-wheel libxslt-dev libzip-dev libldap2-dev libsasl2-dev python3-setuptools node-less libjpeg-dev gdebi -y
Step 6 : Install Python PIP Dependencies
sudo -H pip3 install -r https://raw.githubusercontent.com/odoo/odoo/master/requirements.txt
Step 7 : Install other required packages
sudo apt-get install nodejs npm –ysudo npm install -g rtlcss
Step 8 : Install Wkhtmltopdf
sudo apt-get install xfonts-75dpisudo wget https://github.com/wkhtmltopdf/packaging/releases/download/0.12.6-1/wkhtmltox_0.12.6-1.bionic_amd64.debsudo dpkg -i wkhtmltox_0.12.6-1.bionic_amd64.debsudo cp /usr/local/bin/wkhtmltoimage /usr/bin/wkhtmltoimagesudo cp /usr/local/bin/wkhtmltopdf /usr/bin/wkhtmltopdf
Step 9 : Create Log directory
sudo mkdir /var/log/odoosudo chown odoo:odoo /var/log/odoo
Step 10 :Install Odoo
sudo apt-get install gitsudo git clone --depth 1 --branch master https://www.github.com/odoo/odoo /odoo/odoo-server
Step 11 : Setting permissions on home folder
sudo chown -R odoo:odoo /odoo/*
Step 12 : Create server config file
sudo touch /etc/odoo-server.confsudo su root -c "printf '[options] \n; This is the password that allows database operations:\n' >> /etc/odoo-server.conf"sudo su root -c "printf 'admin_passwd = admin\n' >> /etc/odoo-server.conf"sudo su root -c "printf 'xmlrpc_port = 8069\n' >> /etc/odoo-server.conf"sudo su root -c "printf 'logfile = /var/log/odoo/odoo-server.log\n' >> /etc/odoo-server.conf"sudo su root -c "printf 'addons_path=/odoo/odoo-server/addons\n' >> /etc/odoo-server.conf"sudo chown odoo:odoo /etc/odoo-server.confsudo chmod 640 /etc/odoo-server.conf
Step 13 : Now Start Odoo
sudo su - odoo -s /bin/bashcd /odoo/odoo-server./odoo-bin -c /etc/odoo-server.conf
Now your odoo instance is up and running.
Go to web browser and access your odoo at localhost:8069
#odoo 15#install odoo 15 in ubuntu#installation steps#ubuntu 18 04#odoo installation guide#install odoo#steps for installation#install odoo 15
0 notes
Text
Project Quay is a scalable container image registry that enables you to build, organize, distribute, and deploy containers. With Quay you can create image repositories, perform image vulnerability scanning and robust access controls. We had covered installation of Quay on a Linux distribution using Docker. How To Setup Red Hat Quay Registry on CentOS / RHEL / Ubuntu In this guide, we will review how you can deploy Quay container registry on OpenShift Container Platform using Operator. The operator we’ll use is provided in the Operators Hub. If you don’t have an OpenShift / OKD cluster running and would like to try this article, checkout our guides below. Setup Local OpenShift 4.x Cluster with CodeReady Containers How to Setup OpenShift Origin (OKD) 3.11 on Ubuntu How To run Local Openshift Cluster with Minishift The Project Quay is made up of several core components. Database: Used by Red Hat Quay as its primary metadata storage (not for image storage). Redis (key, value store): Stores live builder logs and the Red Hat Quay tutorial. Quay (container registry): Runs the quay container as a service, consisting of several components in the pod. Clair: Scans container images for vulnerabilities and suggests fixes. Step 1: Create new project for Project Quay Let’s begin by creating a new project for Quay registry. $ oc new-project quay-enterprise Now using project "quay-enterprise" on server "https://api.crc.testing:6443". ..... You can also create a Project from OpenShift Web console. Click create button and confirm the project is created and running. Step 2: Install Red Hat Quay Setup Operator The Red Hat Quay Setup Operator provides a simple method to deploy and manage a Red Hat Quay cluster. Login to the OpenShift console and select Operators → OperatorHub: Select the Red Hat Quay Operator. Select Install then Operator Subscription page will appear. Choose the following then select Subscribe: Installation Mode: Select a specific namespace to install to Update Channel: Choose the update channel (only one may be available) Approval Strategy: Choose to approve automatic or manual updates Step 3: Deploy a Red Hat Quay ecosystem Certain credentials are required for Accessing Quay.io registry. Create a new file with below details. $ vim docker_quay.json "auths": "quay.io": "auth": "cmVkaGF0K3F1YXk6TzgxV1NIUlNKUjE0VUFaQks1NEdRSEpTMFAxVjRDTFdBSlYxWDJDNFNEN0tPNTlDUTlOM1JFMTI2MTJYVTFIUg==", "email": "" Then create a secret on OpenShift that will be used. oc project quay-enterprise oc create secret generic redhat-pull-secret --from-file=".dockerconfigjson=docker_quay.json" --type='kubernetes.io/dockerconfigjson' Create Quay Superuser credentials secret: oc create secret generic quay-admin \ --from-literal=superuser-username=quayadmin \ --from-literal=superuser-password=StrongAdminPassword \ [email protected] Where: quayadmin is the Quay admin username StrongAdminPassword is the password for admin user [email protected] is the email of Admin user to be created Create Quay Configuration Secret A dedicated deployment of Quay Enterprise is used to manage the configuration of Quay. Access to the configuration interface is secured and requires authentication in order for access. oc create secret generic quay-config --from-literal=config-app-password=StrongPassword Replace StrongPassword with your desired password. Create Database credentials secret – PostgreSQL oc create secret generic postgres-creds \ --from-literal=database-username=quay \ --from-literal=database-password=StrongUserPassword \ --from-literal=database-root-password=StrongRootPassword \ --from-literal=database-name=quay These are the credentials for accessing the database server: quay – Database and DB username StrongUserPassword – quay DB user password StrongRootPassword – root user database password
Create Redis Password Credential By default, the operator managed Redis instance is deployed without a password. A password can be specified by creating a secret containing the password in the key password. oc create secret generic redis-password --from-literal=password=StrongRedisPassword Create Quay Ecosystem Deployment Manifest My Red Hat Quay ecosystem configuration file looks like below apiVersion: redhatcop.redhat.io/v1alpha1 kind: QuayEcosystem metadata: name: quay-ecosystem spec: clair: enabled: true imagePullSecretName: redhat-pull-secret updateInterval: "60m" quay: imagePullSecretName: redhat-pull-secret superuserCredentialsSecretName: quay-admin configSecretName: quay-config deploymentStrategy: RollingUpdate skipSetup: false redis: credentialsSecretName: redis-password database: volumeSize: 10Gi credentialsSecretName: postgres-creds registryStorage: persistentVolumeSize: 20Gi persistentVolumeAccessModes: - ReadWriteMany livenessProbe: initialDelaySeconds: 120 httpGet: path: /health/instance port: 8443 scheme: HTTPS readinessProbe: initialDelaySeconds: 10 httpGet: path: /health/instance port: 8443 scheme: HTTPS Modify it to fit you use case. When done apply the configuration: oc apply -f quay-ecosystem.yaml Using Custom SSL Certificates If you want to use custom SSL certificates with Quay, you need to create a secret with the key and the certificate: oc create secret generic custom-quay-ssl \ --from-file=ssl.key=example.key \ --from-file=ssl.cert=example.crt Then modify your Ecosystem file to use the custom certificate secret: quay: imagePullSecretName: redhat-pull-secret sslCertificatesSecretName: custom-quay-ssl ....... Wait for few minutes then confirm deployment: $ oc get deployments NAME READY UP-TO-DATE AVAILABLE AGE quay-ecosystem-clair 1/1 1 1 2m35s quay-ecosystem-clair-postgresql 1/1 1 1 2m57s quay-ecosystem-quay 1/1 1 1 3m45s quay-ecosystem-quay-postgresql 1/1 1 1 5m8s quay-ecosystem-redis 1/1 1 1 5m57s quay-operator 1/1 1 1 70m $ oc get svc NAME TYPE CLUSTER-IP EXTERNAL-IP PORT(S) AGE quay-ecosystem-clair ClusterIP 172.30.66.1 6060/TCP,6061/TCP 4m quay-ecosystem-clair-postgresql ClusterIP 172.30.10.126 5432/TCP 3m58s quay-ecosystem-quay ClusterIP 172.30.47.147 443/TCP 5m38s quay-ecosystem-quay-postgresql ClusterIP 172.30.196.61 5432/TCP 6m15s quay-ecosystem-redis ClusterIP 172.30.48.112 6379/TCP 6m58s quay-operator-metrics ClusterIP 172.30.81.233 8383/TCP,8686/TCP 70m Running pods in the project: $ oc get pods NAME READY STATUS RESTARTS AGE quay-ecosystem-clair-84b4d77654-cjwcr 1/1 Running 0 2m57s quay-ecosystem-clair-postgresql-7c47b5955-qbc4s 1/1 Running 0 3m23s quay-ecosystem-quay-66584ccbdb-8szts 1/1 Running 0 4m8s quay-ecosystem-quay-postgresql-74bf8db7f8-vnrx9 1/1 Running 0 5m34s quay-ecosystem-redis-7dcd5c58d6-p7xkn 1/1 Running 0 6m23s quay-operator-764c99dcdb-k44cq 1/1 Running 0 70m Step 4: Access Quay Dashboard Get a route URL for deployed Quay: $ oc get route quay-ecosystem-quay quay-ecosystem-quay-quay-enterprise.apps.example.com quay-ecosystem-quay 8443 passthrough/Redirect None
Open the URL on the machine with access to the cluster domain. Use the credentials you configured to login to Quay registry. And there you have it. You now have Quay registry running on OpenShift using Operators. Refer to below documentations for more help. Quay Operator Github Page Red Hat Quay documentation Project Quay Documentation
0 notes
Text
Full Stack Development with Next.js and Supabase – The Complete Guide
Supabase is an open source Firebase alternative that lets you create a real-time backend in less than two minutes.
Supabase has continued to gain hype and adoption with developers in my network over the past few months. And a lot of the people I've talked to about it prefer the fact that it leverages a SQL-style database, and they like that it's open source, too.
When you create a project Supabase automatically gives you a Postgres SQL database, user authentication, and API. From there you can easily implement additional features like realtime subscriptions and file storage.
In this guide, you will learn how to build a full stack app that implements the core features that most apps require – like routing, a database, API, authentication, authorization, realtime data, and fine grained access control. We'll be using a modern stack including React, Next.js, and TailwindCSS.
I've tried to distill everything I've learned while myself getting up to speed with Supabase in as short of a guide as possible so you too can begin building full stack apps with the framework.
The app that we will be building is a multi-user blogging app that incorporates all of the types of features you see in many modern apps. This will take us beyond basic CRUD by enabling things like file storage as well as authorization and fine grained access control.
You can find the code for the app we will be building here.
By learning how to incorporate all of these features together you should be able to take what you learn here and build out your own ideas. Understanding the basic building blocks themselves allows you to then take this knowledge with you in the future to put it to use in any way you see fit.
Supabase Overview
How to Build Full Stack Apps
I'm fascinated by full stack Serverless frameworks because of the amount of power and agility they give to developers looking to build complete applications.
Supabase brings to the table the important combination of powerful back end services and easy to use client-side libraries and SDKs for an end to end solution.
This combination lets you not only build out the individual features and services necessary on the back end, but easily integrate them together on the front end by leveraging client libraries maintained by the same team.
Because Supabase is open source, you have the option to self-host or deploy your backend as a managed service. And as you can see, this will be easy for us to do on a free tier that does not require a credit card to get started with.
Why Use Supabase?
I've led the Front End Web and Mobile Developer Advocacy team at AWS, and written a book on building these types of apps. So I've had quite a bit of experience building in this space.
And I think that Supabase brings to the table some really powerful features that immediately stood out to me when I started to build with it.
Data access patterns
One of the biggest limitations of some of the tools and frameworks I've used in the past is the lack of querying capabilities. What I like a lot about Supabase is that, since it's built on top of Postgres, it enables an extremely rich set of performant querying capabilities out of the box without having to write any additional back end code.
The client-side SDKs provide easy to use filters and modifiers to enable an almost infinite combination of data access patterns.
Because the database is SQL, relational data is easy to configure and query, and the client libraries take it into account as a first class citizen.
Permissions
When you get past "hello world" many types of frameworks and services fall over very quickly. This is because most real-world use cases extend far beyond the basic CRUD functionality you often see made available by these tools.
The problem with some frameworks and managed services is that the abstractions they create are not extensible enough to enable easy to modify configurations or custom business logic. These restrictions often make it difficult to take into account the many one-off use cases that come up with building an app in the real-world.
In addition to enabling a wide array of data access patterns, Supabase makes it easy to configure authorization and fine grained access controls. This is because it is simply Postgres, enabling you implement whatever row-level security policies you would like directly from the built-in SQL editor (something we will cover here).
UI components
In addition to the client-side libraries maintained by the same team building the other Supabase tooling, they also maintain a UI component library (beta) that allows you to get up and running with various UI elements.
The most powerful is Auth which integrates with your Supabase project to quickly spin up a user authentication flow (which I'll be using in this tutorial).
Multiple authentication providers
Supabase enables all of the following types of authentication mechanisms:
Username & password
Magic email link
Google
Facebook
Apple
GitHub
Twitter
Azure
GitLab
Bitbucket
Open Source
One of the biggest things it has going for it is that it is completely open source (yes the back end too). This means that you can choose either the Serverless hosted approach or to host it yourself.
That means that if you wanted to, you could run Supabase with Docker and host your app on AWS, GCP, or Azure. This would eliminate the vendor lock-in issue you may run into with Supabase alternatives.
How to Get Started with Supabase
Project setup
To get started, let's first create the Next.js app.
npx create-next-app next-supabase
Next, change into the directory and install the dependencies we'll be needing for the app using either NPM or Yarn:
npm install @supabase/supabase-js @supabase/ui react-simplemde-editor easymde react-markdown uuid npm install tailwindcss@latest @tailwindcss/typography postcss@latest autoprefixer@latest
Next, create the necessary Tailwind configuration files:
npx tailwindcss init -p
Now update tailwind.config.js to add the Tailwind typography plugin to the array of plugins. We'll be using this plugin to style the markdown for our blog:
plugins: [ require('@tailwindcss/typography') ]
Finally, replace the styles in styles/globals.css with the following:
@tailwind base; @tailwind components; @tailwind utilities;
Supabase project initialization
Now that the project is created locally, let's create the Supabase project.
To do so, head over to Supabase.io and click on Start Your Project. Authenticate with GitHub and then create a new project under the organization that is provided to you in your account.

Give the project a Name and Password and click Create new project.
It will take approximately 2 minutes for your project to be created.
How to create a database table in Supabase
Once you've created your project, let's go ahead and create the table for our app along with all of the permissions we'll need. To do so, click on the SQL link in the left hand menu.

In this view, click on Query-1 under Open queries and paste in the following SQL query and click RUN:
CREATE TABLE posts ( id bigint generated by default as identity primary key, user_id uuid references auth.users not null, user_email text, title text, content text, inserted_at timestamp with time zone default timezone('utc'::text, now()) not null ); alter table posts enable row level security; create policy "Individuals can create posts." on posts for insert with check (auth.uid() = user_id); create policy "Individuals can update their own posts." on posts for update using (auth.uid() = user_id); create policy "Individuals can delete their own posts." on posts for delete using (auth.uid() = user_id); create policy "Posts are public." on posts for select using (true);
This will create the posts table that we'll be using for the app. It also enabled some row level permissions:
All users can query for posts
Only signed in users can create posts, and their user ID must match the user ID passed into the arguments
Only the owner of the post can update or delete it
Now, if we click on the Table editor link, we should see our new table created with the proper schema.

That's it! Our back end is ready to go now and we can start building out the UI. Username + password authentication is already enabled by default, so all we need to do now is wire everything up on the front end.
Next.js Supabase configuration
Now that the project has been created, we need a way for our Next.js app to know about the back end services we just created for it.
The best way for us to configure this is using environment variables. Next.js allows environment variables to be set by creating a file called .env.local in the root of the project and storing them there.
In order to expose a variable to the browser you have to prefix the variable with NEXT_PUBLIC_.
Create a file called .env.local at the root of the project, and add the following configuration:
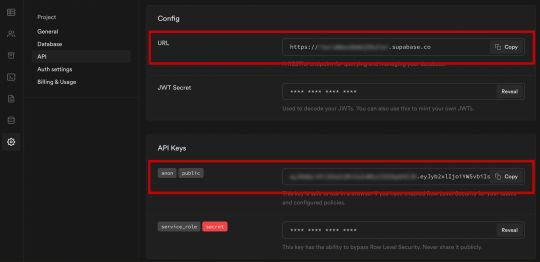
NEXT_PUBLIC_SUPABASE_URL=https://app-id.supabase.co NEXT_PUBLIC_SUPABASE_ANON_KEY=your-public-api-key
You can find the values of your API URL and API Key in the Supabase dashboard settings:
Next, create a file called api.js in the root of the project and add the following code:
// api.js import { createClient } from '@supabase/supabase-js' export const supabase = createClient( process.env.NEXT_PUBLIC_SUPABASE_URL, process.env.NEXT_PUBLIC_SUPABASE_ANON_KEY )
Now we will be able to import the supabase instance and use it anywhere in our app.
Here's an overview of what it looks like to interact with the API using the Supabase JavaScript client.
Querying for data:
import { supabase } from '../path/to/api' const { data, error } = await supabase .from('posts') .select()
Creating new items in the database:
const { data, error } = await supabase .from('posts') .insert([ { title: "Hello World", content: "My first post", user_id: "some-user-id", user_email: "[email protected]" } ])
As I mentioned earlier, the filters and modifiers make it really easy to implement various data access patterns and selection sets of your data.
Authentication – signing up:
const { user, session, error } = await supabase.auth.signUp({ email: '[email protected]', password: 'example-password', })
Authentication – signing in:
const { user, session, error } = await supabase.auth.signIn({ email: '[email protected]', password: 'example-password', })
In our case we won't be writing the main authentication logic by hand, we'll be using the Auth component from Supabase UI.
How to Build the App
Now let's start building out the UI!
To get started, let's first update the app to implement some basic navigation and layout styling.
We will also configure some logic to check if the user is signed in, and show a link for creating new posts if they are.
Finally we'll implement a listener for any auth events. And when a new auth event occurs, we'll check to make sure there is currently a signed in user in order to show or hide the Create Post link.
Open _app.js and add the following code:
// pages/_app.js import Link from 'next/link' import { useState, useEffect } from 'react' import { supabase } from '../api' import '../styles/globals.css' function MyApp({ Component, pageProps }) { const [user, setUser] = useState(null); useEffect(() => { const { data: authListener } = supabase.auth.onAuthStateChange( async () => checkUser() ) checkUser() return () => { authListener?.unsubscribe() }; }, []) async function checkUser() { const user = supabase.auth.user() setUser(user) } return ( <div> <nav className="p-6 border-b border-gray-300"> <Link href="/"> <span className="mr-6 cursor-pointer">Home</span> </Link> { user && ( <Link href="/create-post"> <span className="mr-6 cursor-pointer">Create Post</span> </Link> ) } <Link href="/profile"> <span className="mr-6 cursor-pointer">Profile</span> </Link> </nav> <div className="py-8 px-16"> <Component {...pageProps} /> </div> </div> ) } export default MyApp
How to make a user profile page
Next, let's create the profile page. In the pages directory, create a new file named profile.js and add the following code:
// pages/profile.js import { Auth, Typography, Button } from "@supabase/ui"; const { Text } = Typography import { supabase } from '../api' function Profile(props) { const { user } = Auth.useUser(); if (user) return ( <> <Text>Signed in: {user.email}</Text> <Button block onClick={() => props.supabaseClient.auth.signOut()}> Sign out </Button> </> ); return props.children } export default function AuthProfile() { return ( <Auth.UserContextProvider supabaseClient={supabase}> <Profile supabaseClient={supabase}> <Auth supabaseClient={supabase} /> </Profile> </Auth.UserContextProvider> ) }
The profile page uses the Auth component from the Supabase UI library. This component will render a "sign up" and "sign in" form for unauthenticated users, and a basic user profile with a "sign out" button for authenticated users. It will also enable a magic sign in link.
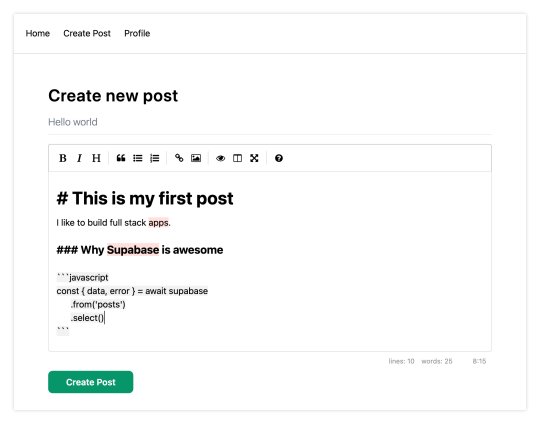
How to create new posts
Next, let's create the create-post page. In the pages directory, create a page named create-post.js with the following code:
// pages/create-post.js import { useState } from 'react' import { v4 as uuid } from 'uuid' import { useRouter } from 'next/router' import dynamic from 'next/dynamic' import "easymde/dist/easymde.min.css" import { supabase } from '../api' const SimpleMDE = dynamic(() => import('react-simplemde-editor'), { ssr: false }) const initialState = { title: '', content: '' } function CreatePost() { const [post, setPost] = useState(initialState) const { title, content } = post const router = useRouter() function onChange(e) { setPost(() => ({ ...post, [e.target.name]: e.target.value })) } async function createNewPost() { if (!title || !content) return const user = supabase.auth.user() const id = uuid() post.id = id const { data } = await supabase .from('posts') .insert([ { title, content, user_id: user.id, user_email: user.email } ]) .single() router.push(`/posts/${data.id}`) } return ( <div> <h1 className="text-3xl font-semibold tracking-wide mt-6">Create new post</h1> <input onChange={onChange} name="title" placeholder="Title" value={post.title} className="border-b pb-2 text-lg my-4 focus:outline-none w-full font-light text-gray-500 placeholder-gray-500 y-2" /> <SimpleMDE value={post.content} onChange={value => setPost({ ...post, content: value })} /> <button type="button" className="mb-4 bg-green-600 text-white font-semibold px-8 py-2 rounded-lg" onClick={createNewPost} >Create Post</button> </div> ) } export default CreatePost
This component renders a Markdown editor, allowing users to create new posts.
The createNewPost function will use the supabase instance to create new posts using the local form state.
You may notice that we are not passing in any headers. This is because if a user is signed in, the Supabase client libraries automatically include the access token in the headers for a signed in user.
How to view a single post
We need to configure a page to view a single post.
This page uses getStaticPaths to dynamically create pages at build time based on the posts coming back from the API.
We also use the fallback flag to enable fallback routes for dynamic SSG page generation.
We use getStaticProps to enable the Post data to be fetched and then passed into the page as props at build time.
Create a new folder in the pages directory called posts and a file called [id].js within that folder. In pages/posts/[id].js, add the following code:
// pages/posts/[id].js import { useRouter } from 'next/router' import ReactMarkdown from 'react-markdown' import { supabase } from '../../api' export default function Post({ post }) { const router = useRouter() if (router.isFallback) { return <div>Loading...</div> } return ( <div> <h1 className="text-5xl mt-4 font-semibold tracking-wide">{post.title}</h1> <p className="text-sm font-light my-4">by {post.user_email}</p> <div className="mt-8"> <ReactMarkdown className='prose' children={post.content} /> </div> </div> ) } export async function getStaticPaths() { const { data, error } = await supabase .from('posts') .select('id') const paths = data.map(post => ({ params: { id: JSON.stringify(post.id) }})) return { paths, fallback: true } } export async function getStaticProps ({ params }) { const { id } = params const { data } = await supabase .from('posts') .select() .filter('id', 'eq', id) .single() return { props: { post: data } } }
How to query for and render the list of posts
Next, let's update index.js to fetch and render a list of posts:
// pages/index.js import { useState, useEffect } from 'react' import Link from 'next/link' import { supabase } from '../api' export default function Home() { const [posts, setPosts] = useState([]) const [loading, setLoading] = useState(true) useEffect(() => { fetchPosts() }, []) async function fetchPosts() { const { data, error } = await supabase .from('posts') .select() setPosts(data) setLoading(false) } if (loading) return <p className="text-2xl">Loading ...</p> if (!posts.length) return <p className="text-2xl">No posts.</p> return ( <div> <h1 className="text-3xl font-semibold tracking-wide mt-6 mb-2">Posts</h1> { posts.map(post => ( <Link key={post.id} href={`/posts/${post.id}`}> <div className="cursor-pointer border-b border-gray-300 mt-8 pb-4"> <h2 className="text-xl font-semibold">{post.title}</h2> <p className="text-gray-500 mt-2">Author: {post.user_email}</p> </div> </Link>) ) } </div> ) }
Let's test it out
We now have all of the pieces of our app ready to go, so let's try it out.
To run the local server, run the dev command from your terminal:
npm run dev
When the app loads, you should see the following screen:

To sign up, click on Profile and create a new account. You should receive an email link to confirm your account after signing up.
You can also create a new account by using the magic link.
Once you're signed in, you should be able to create new posts:
Navigating back to the home page, you should be able to see a list of the posts that you've created and be able to click on a link to the post to view it:

How to Edit Posts
Now that we have the app up and running, let's learn how to edit posts. To get started with this, let's create a new view that will fetch only the posts that the signed in user has created.
To do so, create a new file named my-posts.js in the root of the project with the following code:
// pages/my-posts.js import { useState, useEffect } from 'react' import Link from 'next/link' import { supabase } from '../api' export default function MyPosts() { const [posts, setPosts] = useState([]) useEffect(() => { fetchPosts() }, []) async function fetchPosts() { const user = supabase.auth.user() const { data } = await supabase .from('posts') .select('*') .filter('user_id', 'eq', user.id) setPosts(data) } async function deletePost(id) { await supabase .from('posts') .delete() .match({ id }) fetchPosts() } return ( <div> <h1 className="text-3xl font-semibold tracking-wide mt-6 mb-2">My Posts</h1> { posts.map((post, index) => ( <div key={index} className="border-b border-gray-300 mt-8 pb-4"> <h2 className="text-xl font-semibold">{post.title}</h2> <p className="text-gray-500 mt-2 mb-2">Author: {post.user_email}</p> <Link href={`/edit-post/${post.id}`}><a className="text-sm mr-4 text-blue-500">Edit Post</a></Link> <Link href={`/posts/${post.id}`}><a className="text-sm mr-4 text-blue-500">View Post</a></Link> <button className="text-sm mr-4 text-red-500" onClick={() => deletePost(post.id)} >Delete Post</button> </div> )) } </div> ) }
In the query for the posts, we use the user id to select only the posts created by the signed in user.
Next, create a new folder named edit-post in the pages directory. Then, create a file named [id].js in this folder.
In this file, we'll be accessing the id of the post from a route parameter. When the component loads, we will then use the post id from the route to fetch the post data and make it available for editing.
In this file, add the following code:
// pages/edit-post/[id].js import { useEffect, useState } from 'react' import { useRouter } from 'next/router' import dynamic from 'next/dynamic' import "easymde/dist/easymde.min.css" import { supabase } from '../../api' const SimpleMDE = dynamic(() => import('react-simplemde-editor'), { ssr: false }) function EditPost() { const [post, setPost] = useState(null) const router = useRouter() const { id } = router.query useEffect(() => { fetchPost() async function fetchPost() { if (!id) return const { data } = await supabase .from('posts') .select() .filter('id', 'eq', id) .single() setPost(data) } }, [id]) if (!post) return null function onChange(e) { setPost(() => ({ ...post, [e.target.name]: e.target.value })) } const { title, content } = post async function updateCurrentPost() { if (!title || !content) return await supabase .from('posts') .update([ { title, content } ]) router.push('/my-posts') } return ( <div> <h1 className="text-3xl font-semibold tracking-wide mt-6 mb-2">Edit post</h1> <input onChange={onChange} name="title" placeholder="Title" value={post.title} className="border-b pb-2 text-lg my-4 focus:outline-none w-full font-light text-gray-500 placeholder-gray-500 y-2" /> <SimpleMDE value={post.content} onChange={value => setPost({ ...post, content: value })} /> <button className="mb-4 bg-blue-600 text-white font-semibold px-8 py-2 rounded-lg" onClick={updateCurrentPost}>Update Post</button> </div> ) } export default EditPost
Now, add a new link to our navigation located in pages/_app.js:
// pages/_app.js { user && ( <Link href="/my-posts"> <span className="mr-6 cursor-pointer">My Posts</span> </Link> ) }
When running the app, you should be able to view your own posts, edit them, and delete them from the updated UI.
How to enable real-time updates
Now that we have the app running it's trivial to add real-time updates.
By default, Realtime is disabled on your database. Let's turn on Realtime for the posts table.
To do so, open the app dashboard and click on Databases -> Replication -> 0 Tables (under Source). Toggle on Realtime functionality for the posts table. Here is a video walkthrough of how you can do this for clarity.
Next, open src/index.js and update the useEffect hook with the following code:
useEffect(() => { fetchPosts() const mySubscription = supabase .from('posts') .on('*', () => fetchPosts()) .subscribe() return () => supabase.removeSubscription(mySubscription) }, [])
Now, we will be subscribed to realtime changes in the posts table.
The code for the app is located here.
Next Steps
By now you should have a good understanding of how to build full stack apps with Supabase and Next.js.
If you'd like to learn more about building full stack apps with Supabase, I'd check out the following resources.
If you read this far, tweet to the author to show them you care.
0 notes