#pre_get_posts
Explore tagged Tumblr posts
Visit Tumblr Blog
Explore Tumblr blogs with no restrictions, modern design and the best experience.
Last Seen Tumblr Blogs


Fun Fact
Tumblr has a low social media market share in South America.
Text
Transforming WordPress: A Deep Dive into Plugin Features
Introduction:
WordPress is one of the most popular content management systems globally, powering millions of websites across various industries. One of the reasons for its popularity is its flexibility and extensibility through plugins. WordPress plugins allow developers to add custom functionality and features to websites without altering the core codebase. In this blog post, we will delve into advanced features of WordPress plugin development: hooks, filters, and actions. Understanding these concepts is crucial for developers looking to create powerful and customizable plugins for WordPress.
1. Understanding Hooks:
Hooks are essential elements in WordPress plugin development that enable developers to interact with and modify WordPress core functionality. Hooks can be categorized into two types: action hooks and filter hooks.
Action Hooks: Action hooks allow developers to execute custom code at specific points in the WordPress execution process. For example, developers can use action hooks to add custom functionality when a post is published, a user logs in, or a plugin is activated. Action hooks are denoted by functions like `do_action()` and `add_action()`.
Filter Hooks: Filter hooks, on the other hand, allow developers to modify data before it is displayed or processed by WordPress. Filters are commonly used to alter content, modify query results, or change the behavior of specific functions. Filter hooks are denoted by functions like `apply_filters()` and `add_filter()`.
2. Leveraging Action Hooks:
Action hooks provide developers with the ability to extend WordPress functionality by executing custom code at specific points in the execution process. Understanding how to leverage action hooks effectively is crucial for creating dynamic and interactive plugins.
Examples of Action Hooks:
`init`: This action hook is triggered after WordPress has finished loading but before any headers are sent. It is commonly used to initialize plugin functionality.
`wp_enqueue_scripts`: This action hook is used to enqueue scripts and stylesheets on the front end of the website.
`admin_init`: This action hook is triggered before any other administration page loads. It is commonly used to initialize plugin settings and options.
Creating Custom Actions:
Developers can create custom action hooks within their plugins to allow other developers to extend or modify plugin functionality. This enables greater flexibility and interoperability between plugins.
3. Harnessing the Power of Filter Hooks:
Filter hooks empower developers to modify data before it is displayed or processed by WordPress. Filters are instrumental in customizing content, altering query results, and finetuning various aspects of WordPress functionality.
Examples of Filter Hooks:
`the_content`: This filter hook allows developers to modify the content of posts or pages before it is displayed on the front end.
`the_title`: This filter hook enables developers to modify the title of posts or pages before it is displayed.
`pre_get_posts`: This filter hook allows developers to modify the parameters of the main query before it is executed.
Creating Custom Filters:
Just like action hooks, developers can create custom filter hooks within their plugins to enable other developers to customize plugin behavior. Custom filters enhance plugin extensibility and interoperability.
4. Best Practices for Using Hooks, Filters, and Actions:
While hooks, filters, and actions provide developers with powerful tools for extending and customizing WordPress functionality, it's essential to follow best practices to ensure efficient and maintainable code.
Documenting Hooks: Proper documentation of action and filter hooks within plugins is crucial for other developers to understand how to extend plugin functionality.
Providing Clear Hooks: When creating custom action and filter hooks, developers should ensure that the hook names are descriptive and indicative of their purpose.
Avoiding Overuse: Using too many hooks, filters, and actions can lead to code clutter and decreased performance. Developers should strive to strike a balance and only use hooks where necessary.
Testing Compatibility: Plugins should be thoroughly tested to ensure compatibility with different WordPress configurations and environments, especially when utilizing hooks, filters, and actions extensively.
Conclusion:
Hooks, filters, and actions are indispensable features in WordPress plugin development, providing developers with the flexibility and extensibility needed to create powerful and customizable plugins. By understanding how to leverage these advanced features effectively and following best practices, developers can create plugins that enhance WordPress websites with tailored functionality and seamless user experiences. Mastering hooks, filters, and actions unlocks a world of possibilities for WordPress plugin developers, enabling them to build plugins that cater to the diverse needs of website owners and users alike.
0 notes
Text
0 notes
Link
Do you want to change the order of WordPress posts on the blog page of the website? Then you are in the right place to learn this functionality and change the order of posts.
So, in this article, I will show you how you can change the order of the posts by custom field.
You can use the pre_get_posts action hook.
function pre_custom_post_order_sort( $query ){ if ( is_home() && $query->is_main_query() ){ $query->set( 'orderby', 'meta_value' ); $query->set( 'meta_key', 'post_order' ); $query->set( 'order' , 'ASC' ); } } add_action( 'pre_get_posts' , 'pre_custom_post_order_sort' );
With the above function you can modify your post query before displaying the posts at frontend.
Check the original article here
#wordpress#posts#reorder#sorting#sort#customfield#blogging#your blog coach#pre_get_posts#action/hook#yourblogcoach#coding lover
0 notes
Text
Como excluir as páginas do resultado de busca ?
Uma maneira de se excluir as páginas do resultado de busca é usar o plugin Simply-Exclude plugin.
Entretanto, como sou adepto da filosofia “Quanto menos plugins melhor”, outra solução interessante é adicionar um filtro excluindo assim todo o restante.
Aparência > Editor de Temas > Funções do tema (functions.php) cole a seguinte linha:
// Remove pages from search function mySearchPostsFilter($query){ if ( !is_admin() && $query->is_main_query() ) { if ($query->is_search){ $query->set('post_type','post'); } } return $query; } add_filter('pre_get_posts','mySearchPostsFilter');
deve ficar assim:
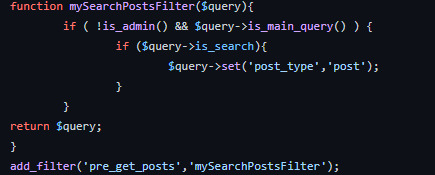
Fonte codigo para copiar.
Com isso você deixará claro que apenas postagens devem ser exibidas na busca, excluindo as páginas e eliminando a necessidade de colocar os ids de cada categoria do blog.
0 notes
Text
How to Include Custom Post Types in WordPress Search Results
The WordPress default search doesn’t include a custom post type in search results.so if you need to include a custom post type you can modify the query with pre_get_posts in just one minute using this code snippet. Steps to include custom post types: Open the WordPress admin panel then go to Appearance > Theme Editor […]
The post How to Include Custom Post Types in WordPress Search Results appeared first on Zytheme.
, https://zytheme.com/?p=7093
0 notes
Text
WordPress で固定ページにカテゴリをつける
固定ページにもカテゴリーを付けて「カテゴリーアーカイブ」(カテゴリー記事一覧)に表示させたいっていうお話し。
固定ページにカテゴリーをつけるコード
ググったらすぐいろいろ出てきたけど、それらをまとめて…試したコードがこちらです。
add_action('init','set_category_pages'); function set_category_pages() { register_taxonomy_for_object_type('category', 'page'); } // カテゴリーの記事一覧に出したくない場合は下記は不要 add_action( 'pre_get_posts', 'set_category_archive_pages' ); function set_category_archive_pages( $query ) { if (…
View On WordPress
0 notes
Text
How to use WP_query(), query_posts() and pre_get_posts in Wordpress Programming
How to use WP_query(), query_posts() and pre_get_posts in WordPress Programming
How to use WP_query(), query_posts() and pre_get_posts in WordPress Programming
There are legitimate scenarios for using query_posts($query), for example:
You want to display a list of posts or custom-post-type posts on a page (using a page template)
You want to make pagination of those posts work
Now why would you want to display it on a page instead of using an archive template?
It’s more…
View On WordPress
0 notes
Text
4 Easy Ways to Re-Order Blog Posts in WordPress (Step by Step)
Do you want to change the order of your blog posts in WordPress?
By default, WordPress displays your blog posts in reverse chronological order (newer posts first), but sometimes you may need to move specific posts up or down.
While it may feel like there is no way to do this in WordPress, you’ll be surprised to learn how easily you can change post order using multiple ways.
In this article, we will show you 4 different ways to re-order blog posts in WordPress. You can pick a solution that looks easier and fits your needs.
Why Re-order Blog Posts in WordPress?
If you are just starting a blog, then you will not need to re-order your blog posts right away. However as your content grows, you may want to explore different ways to promote content across your website.
One of them is to make specific posts more prominently displayed on the front page, blog page, recent posts, or archive pages.
Now the problem is that WordPress normally displays your blog posts in a reverse chronological order. There is no option to simply just move a post up and down.
Does this mean you cannot bring your older articles to the front page? Or remove a newer article from the recent posts?
No, not at all.
There are multiple workarounds that let you do just that. Depending on your needs, you can choose the method that suits your requirements.
Let’s take a look at some of the ways you can easily re-order blog posts on your WordPress site.
1. Change Post’s Published Date
This is the easiest method and allows you to re-order posts using the built-in WordPress functionality.
As you know that WordPress displays posts based on their publish date in reverse chronological order (newer posts first). Changing a post’s publish date will also change where it appears in the list.
For example, if you wanted to bring an older post up, you would have to change its date to be newer. Similarly if you wanted to move a post down, then you can change its date to be older.
Simply edit the post you want to reorder and on the post edit screen click on the publish date under the Document panel.
This will bring up a date and time popup where you can change the post’s published date and time. After you have changed the date/time, click on the ‘Update’ button to save your changes.
You need to select a date relevant to other posts.
For example, if you wanted to display an older post before another post that was published on 8 March, then you need to change the post’s publish date to 9 March.
2. Use Post Types Order Plugin (Drag and Drop Option)
If you want to re-order posts but don’t want to change their publish dates, then this method is for you.
First, you need to install and activate the Post Types Order plugin. For more details, see our step by step guide on how to install a WordPress plugin.
Upon activation, you need to visit Settings » Post Types Order page to change plugin’s settings.
From here, you need to select the post types where you want to enable the plugin. After that, simply click on the ‘Save settings’ button to store your changes.
Now you can just go to Posts » All Posts page and simply drag and drop posts to re-order them.
3. Use Sticky Posts Feature in WordPress
Many users just want to reorder blog posts to highlight a blog post as featured content. WordPress comes with a default feature to achieve that, and it’s called Sticky posts.
Sticky posts feature allows you to highlight a post on top of all other posts on your blog page.
Simply edit the blog post that you want to pin to the top. On the post edit screen, check the box next to ‘Stick to the Front Page’ option under ‘Document’ panel.
After that, click on the ‘Update’ button to save your changes.
You can now visit your website, and you will see the selected post pinned to the top. Depending on your theme, your sticky post will be highlighted differently.
4. Modify WordPress Query using Code (Advanced)
This method requires you to add code to your WordPress site. If you haven’t done this before, then see our guide on how to copy and paste the code in WordPress.
If you are an advanced user and want to customize the post order, then you can modify the default WordPress query.
For example, take a look at this code snippet. It allows you to display posts in chronological order (older posts first).
//function to modify default WordPress query function wpb_custom_query( $query ) { // Make sure we only modify the main query on the homepage if( $query->is_main_query() && ! is_admin() && $query->is_home() ) { // Set parameters to modify the query $query->set( 'orderby', 'date' ); $query->set( 'order', 'DESC' ); } } // Hook our custom query function to the pre_get_posts add_action( 'pre_get_posts', 'wpb_custom_query' );
This code simply modifies the orderby and order parameters in the default WordPress query.
However, this code may sometimes not work as expected due to some plugins or theme already modifying the default query. To fix that, you can use the supress_filters parameter like this:
//function to modify default WordPress query function wpb_custom_query( $query ) { // Make sure we only modify the main query on the homepage if( $query->is_main_query() && ! is_admin() && $query->is_home() ) { // Set parameters to modify the query $query->set( 'orderby', 'date' ); $query->set( 'order', 'DESC' ); $query->set( 'suppress_filters', 'true' ); } } // Hook our custom query function to the pre_get_posts add_action( 'pre_get_posts', 'wpb_custom_query' );
The oderby parameter comes with many options. See the full list of options on the WP Query codex page.
We hope this article helped you learn easy ways to re-order blog posts in WordPress. You may also want to see our ultimate list of most wanted WordPress tips and tricks that you can use on your blog.
If you liked this article, then please subscribe to our YouTube Channel for WordPress video tutorials. You can also find us on Twitter and Facebook.
The post 4 Easy Ways to Re-Order Blog Posts in WordPress (Step by Step) appeared first on WPBeginner.
😉SiliconWebX | 🌐WPBeginner
0 notes
Link
Do you have a woocommerce store and want to customize the shop page? Then check this post to hide specific products from the shop page. You can also make this query condition for the search page.
We will make an add_filter and add_action hook to customize the existing query for products and will add our own query with conditions applied on specific products.
We will use the woocommerce_product_query_meta_query and pre_get_posts hook to modify the product query. So it will return the result based on our custom query conditions.
See the below code for the shop page:
add_filter( 'woocommerce_product_query_meta_query', 'hide_out_of_stock_products_from_shop', 10, 2 );
function hide_out_of_stock_products_from_shop( $meta_query, $query ) {
if( ! is_shop() || is_admin() || is_search() ) return $meta_query;
$meta_query[] = array( 'key' => '_stock_status', 'value' => 'outofstock', 'compare' => '!=' ); return $meta_query;
}
#wordpress#woocommerce#store#Ecommerce#free#tutorial#woocommerce store#shop page#search page#woocommerce shop#cart#checkout#wordpress tutorials#best#newpost#tumblr#tumblog#blog#yourblogcoach#code#coding#learncoding#programming#coder#love
1 note
·
View note
Text
WP-Add Categories to WordPress Pages
Want to add categories and tags to pages in WordPress? By default, they are only available for posts. Mainly, because pages are supposed to be static standalone content (see difference between posts and pages in WordPress).
If you want to add categories and tags, then simply add this code to your theme’s functions.php file or a site-specific plugin.
123456789101112131415
// add tag and category support to pages
function
tags_categories_support_all() {
register_taxonomy_for_object_type(
'post_tag'
,
'page'
);
register_taxonomy_for_object_type(
'category'
,
'page'
);
}
// ensure all tags and categories are included in queries
function
tags_categories_support_query(
$wp_query
) {
if
(
$wp_query
->get(
'tag'
))
$wp_query
->set(
'post_type'
,
'any'
);
if
(
$wp_query
->get(
'category_name'
))
$wp_query
->set(
'post_type'
,
'any'
);
}
// tag and category hooks
add_action(
'init'
,
'tags_categories_support_all'
);
add_action(
'pre_get_posts'
,
'tags_categories_support_query'
);
0 notes
Text
שינוי מספר הפוסטים המופיעים בעמודי ארכיון של CPT
שינוי מספר הפוסטים בעמוד ארכיון של סוג תוכן מותאם (CPT).
על מנת לשנות את מספר הפוסטים המופיעים בעמודי הארכיון של סוג תוכן מותאם כלשהו, ניתן להשתמש בפעולה pre_get_posts שאולי אתם כבר מכירים.
כברירת מחדל, מספר הפוסטים שיופיעו הוא מה שנקבע בהגדרות המופיעות בלוח הבקרה של וורדפרס תחת הגדרות > קריאה תחת האפשרות בעמוד הראשי ובעמודי ארכיון יוצגו לכל היותר X פוסטים. אך ייתכן ותרצו שמספר זה יהיה שונה…
View On WordPress
0 notes
Text
Debugging WordPress Core: Actions and Filters
Most WordPress developers are familiar with the concept of actions and filters. At the very heart of WordPress, these hooks allow developers to extend the functionality of WordPress in numerous ways. Whether you want to run a process when a post is saved, add a new section to the Edit User page, or modify the SQL used when querying the database, WordPress has hooks for (almost) everything. One thing I’ve noticed a lot, as a frequent user of the WordPress StackExchange, is that many developers don’t know where to start when trying to figure out which actions or hooks might be available to them. In this blog post, I want to help walk through the process of tracking down various hooks with examples of when you might want to use them and how to implement them. Actions and Filters: What’s the Difference? This is a very basic mistake I see often when helping people figure out their WordPress issues. They want to modify the Query with the pre_get_posts filter, but they can’t figure out why their code isn’t modifying anything. Well, let’s take a look at a basic example that sets the post_type parameter to “page”: add_action( 'pre_get_posts', function( from ManageWP.org https://managewp.org/articles/18320/debugging-wordpress-core-actions-and-filters
0 notes
Text
WordPress Ana Sayfasından Kategori Nasıl Çıkarılır?
Birbu Dijital Reklam Ajansı
Neden Bir Kategoriyi WordPress Ana Sayfasından Hariç Tutmalıyız? WordPress, içeriği kategorilere ve etiketlere ayırmanıza olanak sağlar. Artık bazen normal blog girişlerinizin parçası olmayan yayınlar için bir kategori kullanmak isteyebilirsiniz. Varsayılan olarak, WordPress, ana sayfalardan veya arşivlerden belirli kategorilerdeki yayınları gizlemenize izin vermez. Bu, ana sayfanızda görünen istenmeyen yayınlarla sizi bırakır. Söz konusu olan, belirli bir kategoriyi WordPress ana sayfanızdan kolayca nasıl hariç tutabileceğinizi görelim. Size iki farklı yöntem göstereceğiz ve ihtiyacınıza en uygun olanı seçebilirsiniz. Eklentiyi Kullanarak WordPress’ten Bir Kategoriyi Hariç Tut Yapmanız gereken ilk şey, Ultimate Category Excluder eklentisini kurmak ve etkinleştirmektir. Eklentiyi kurmak için Eklenti kategorisinden “Yeni Ekle” bölümüne geçerek Ultimate Category Excluder aratarak bulabilirsiniz. Eğer arama bulamadıysanız, internette Ultimate Category Excluder aratarak .zip arşivi şeklinde ekleyebilirsiniz. İndirdikten sonra Eklentiler bölümünden “Yeni Ekle” kısmında en üst bölümünde bulunan Ekle kısmından .zip dosyasını seçebilirsiniz. Etkinleştirme sonrasında, Ayarlar »Kategori Hariç Tutucusu sayfasına gitmeniz gerekir. WordPress blogunuzda bulunan tüm kategorileri görüntüler. Buradan, ‘Ön sayfadan hariç tut’ sütununda bir veya birden fazla kategoriyi kontrol edebilirsiniz. İsterseniz, kategoriyi RSS yayınlarından, arşivlerden ve hatta WordPress aramasından da hariç tutabilirsiniz. Bu ayarları saklamak için Güncelleme düğmesini tıklamayı unutmayın. Artık, seçilen kategorilerdeki yayınların ön sayfadan hariç tutulduğunu görmek için web sitenizi ziyaret edebilirsiniz. WordPress Ana Sayfası Kod Kullanarak Bir Kategoriyi Hariç Tut Bu yöntem, WordPress dosyalarınıza kod eklemenizi gerektirir. Bunu daha önce yapmadıysanız, kod snippet’lerinin WordPress’te nasıl kopyalanacağı ve yapıştırılacağına ilişkin kılavuzumuza bakın. Aşağıdaki kodu temanızın functions.php dosyasına veya siteye özgü bir eklentiye eklemeniz gerekir. function exclude_category_home ($ query) return $query; } add_filter (‘pre_get_posts’, ‘exclude_category_home’); ID’nizi kategori kimliğinizle değiştirmeyi unutmayın. Bu ID ile eşleşen kategoriye ait tüm blog yayınlarını ana sayfadan gizleyecektir. Not: Kategori kimliğiyle eksi (-) işareti eklediğinizden emin olun. Birden çok kategoriyi hariç tutmak istiyorsanız, kodu aşağıdaki gibi değiştirebilirsiniz: function exclude_category_home ($...
Devamı
WordPress Ana Sayfasından Kategori Nasıl Çıkarılır? yazısı ilk önce Birbu Dijital Reklam Ajansı üzerinde ortaya çıktı.
WordPress Ana Sayfasından Kategori Nasıl Çıkarılır?
0 notes