#printstatements
Explore tagged Tumblr posts
Visit Tumblr Blog
Explore Tumblr blogs with no restrictions, modern design and the best experience.
Last Seen Tumblr Blogs


Fun Fact
When “GIF” was named word of the year in 2012, Oxford Dictionaries U.S.A. credited Tumblr for pushing the word.
Text
Appreciate Your Customers by Sending Postcards
Most of us love receiving postcards. They remind us of our recent trips and give us a sense of nostalgia. They are a simple way to connect with family and friends and can inspire others to see beautiful sights in person as well. Postcards are also a quick and affordable way to reach your targeted audience. In fact, approximately 79 percent of households who receive postcards act on them, which is higher than the average online response rate of just 24 percent.

When your business delivers great products or services to its clients, it is important to thank them and show that you value their patronage. Sending customer appreciation cards is a cost-effective way to build relationships with your clientele and boost brand loyalty. The best part is that you can automate the entire process, making it easier to get the word out.
Postcards are best for expressing customer appreciation because they don't require envelopes and can be mailed to your audience at the best possible postal rates. Moreover, you can also include other information on your postcards such as referral coupons or offers for future interactions.
Unlike email marketing, which can seem impersonal and robotic, a personalized thank-you card from your company will make the recipient feel valued. Your card should begin with an expression of gratitude, followed by a brief description of how their actions have helped you. You can then close by mentioning your future relationship, which will leave your interaction on a positive note.
youtube
SITES WE SUPPORT
Print Invoices with API – Wix
1 note
·
View note
Text
My Sister's City
Na het slaap fiasco in Phnom Penh (PP afgekort hihi) stapte ik in de bus naar Ho Chi Minh City. Al over geschreven natuurlijk. Toch wil ik een hele paragraaf uitlenen aan de douane van Cambodja.
Ik mocht de grens niet over! 20 minuten in de rij gewacht, word er ineens gevraagd om een visum. Uiteraard laat ik mijn E-Visa zien waar specifiek "DO NOT PRINT" op staat. "No. You need visa." Krijg ik als antwoord. Wat? Ik wijs weer naar mijn telefoon maar de man wil er niks van weten. Eerst schreeuwt hij in het Cambodjaans tegen mij wat erg behulpzaam was want ik spreek die taak vloeiend, alsin geen woord. Hij wijst naar een printstation waar ik voor $1 mijn visum uit mag (moet) printen. Voordat ik die kant op ga smijt hij eerst nog mijn paspoort naar me toe. Alright then. Ondertussen was mijn hele bus al weer in de bus en ready to go. Met een geprint visum sluit ik weer in de rij aan waar iemand mij er uitpikt en naar het raampje brengt. Zelfde meneer weigert mij te helpen en maakt hier ruzie om met zijn collega wie mij hier heeft gebracht. Van wat ik begreep klopte mijn geprinte visum niet volgens hem niet. Lang verhaal kort: moest 20 minuten wachten op een ander iemand om me uit te stempelen. De grens in Vietnam verliep erg soepel!
De hele busrit naar Vietnam duurde zo'n 7 uur. Ik dacht echt dat het meer dan 10 uur ging duren want dat had ik online gelezen maar heb geluk gehad! Het enigste ongeluk was dat ik bij aankomst zo moe was dat ik toen ik eindelijk mijn in-een-steeg-verstopte hostel vond, meteen in slaap viel. Om 15:00 viel ik in slaap, rond 18:00 wakker en toen rond 21:00 weer slapen. Was overduidelijk moe. Weet niet of het gewoon ongeluk is of de lange reisdagen zo pal achter elkaar met weinig slaap, maar ik ben ook ziek geworden. Fear not! Deze keer is een ziekenhuisbezoek niet nodig.
Toen ik rond 8 uur wakker werd op de volgende dag had ik een plan:
Iemand die ik kende zou rond 12u aankomen in HCMC, en wilde dan samen met mij de stad ontdekken. Ik was nu al wakker. Mijn zus heeft hier gewoond. Ik ga naar haar oude appartement en school en dan terug lopen want tegen die tijd is hij hier!
Mijn favoriete ding van Azië weer gedaan en dus een motortaxi naar d'r oude appartementencomplex genomen en daar wat rondgelopen. Het is natuurlijk eigenlijk niet super speciaal, het zijn gewoon hele grote flats maar het was supercool om te zien waar zij in 2018 was. Ik weet nog hoe trots ik toen iedereen vertelde dat mijn zus in Vietnam aan het studeren was voor een paar maanden! Ik zat toen net in de tweede klas. Time flies. Heb ook even rondgelopen in de omgeving. Grappig hoeveel winkeltjes er in al die gebouwen zitten. Het is echt een soort van eigen ecosysteem. En recht ernaast zat een hele arme wijk wat een mega contrast gaf aan het super moderne gevoel van de tientallen wolkenkrabbers. Even een Vietnamese Koffie gehaald en naar RMIT gewandeld. Bleek dat dit precies was hoe Shanika naar school liep, wat ook wel grappig is. Ook logisch, was de makkelijkste route. Ik zou willen dat mijn weg naar school er zo uitzag. Ik mocht de uni niet in, voorspelbaar.


Dat was het dan voor mijn kleine heritage tour, terug naar het superdrukke district 1 heeeelemaal vanuit district 7. Het was volgens mij een uurtje of anderhalf uur lopen, ver dus. Deze tijd maar gebruikt om te leren oversteken in het hectische verkeer van de stad. Ben er redelijk goed in geworden, al zeg ik het zelf. Sam's bus was vertraagd met.... 3 uur dus ging ik zelf maar op ontdekkingstocht. Ben naar het HCMC Museum geweest waar ik een vlaggetje kreeg, yay! Was de enigste buitenlander die er een kreeg ook <3. Het museum was leuk en informatief en mooi! Erg mooi! Het was vroeger het gebouw waar de gouverneur van Vietnam in woonde als ik het me goed herinner. Na de onafhankelijkheid werd het een museum. Er was natuurlijk ook een heel stuk toegewijd aan de Vietnam oorlog waar ik nu dus echt elke invalshoek van weet. Probeerde ook nog naar het oorlogsmuseum te gaan maar daar stond zo'n lange rij dat ik vond dat ik wel genoeg wist over de oorlog. Een paar uur rondgelopen, wat gegeten en in de avond met Sam uiteten + het Saigon Skydeck. Voelde me zo klein terwijl ik over de stad uitkeek. Zoooooveel mensen overal, zoveel lichtjes, zoveel gebouwen, zoveel alles. Maar nog kan je er niks van maken. Mooi is dat.


Toen was er iets. Jaja, het hostel zat overvol. Er sliepen mensen bij elkaar in bed, op de vloer, in de keuken en zelfs iemand in de badkamer. Hoe komt dit? Nou, 50 jaar geleden is Vietnam herenigd. Het was reunificatie dag. Normaliter werd dit niet echt gevierd, maar 50 jaar is een speciale case. Gelukkig had ik nog mijn eigen bed dus had ik er weinig last van. In de ochtend maakte de hosteleigenaar ons allemaal wakker om de parade te bekijken, maar met ruim een miljoen, misschien wel 2 miljoen, mensen op straat kon ik helemaal niks zien en ging ik maar weer terug om te slapen. Die dag zat praktisch alles van belang dicht en ging ik dus maar shoppen! Het ging misschien iets te goed....
0 notes
Text
Print and Mail Statements Online
Reduce the risk of identity theft and fraud with print and mail statements. Get quick email alerts when statements have been printed. Save the planet by never printing duplicate statements as necessary. Switch to print statements from time to time. Take a vacation from print.

Presort can print statements from your computer in minutes, reducing the hassle of mailing them by hand. For a nominal fee, print and send business checks instantly, print one statement for all tax debts and tax deductions, print an additional statement for personal expenses and business taxes and print a single check for all debts. Create a printable list of expenses for all people on your list, with the month of payment and the balance due. Make printable lists for employees and students. Get quick electronic access to your accounting information, at anytime, from anywhere. Click here to learn more about statement printing.
youtube
There is no need to print and mail statements by hand. The best option is to go online and print online statements, print from your computer and send statements to your customers and business partners virtually, electronically. Presort provides all the information you will need to print and send statements. They also offer online accounting and tax services and a variety of other print services.
SITES WE SUPPORT
Wix – Letters & Document Printing
SOCIAL LINKS
Facebook Twitter LinkedIn Instagram Pinterest
1 note
·
View note
Text
PO Box For Business and Corporate Use
If you run a small business, you probably need a professional-looking address on your website, social media, and business cards. But, if local zoning laws or other regulations prevent you from using your home address for business purposes, what do you do? If you’re a startup or a home-based business, getting a PO box might be your best option.

While PO boxes benefit all kinds of people for all sorts of reasons (that’s not criming), they are especially beneficial to entrepreneurs and home-based businesses that work out of their homes. This is because a PO box separates your physical address from your mailing address, which makes it much easier to monitor and track business mail from personal mail.
The one drawback of PO boxes is that they don’t give you a real street address, which can be an issue for some businesses. For instance, some companies require a registered agent for their LLCs. This person, often the company’s owner or a senior leader, needs to have a physical address in the state where the business is registered. This address is listed on official paperwork and can be used for compliance-related correspondence with the government.
Thankfully, there’s an alternative to PO boxes for business and corporate use: private mailboxes. In addition to letting you use your business name for your mailbox name, many private mailbox providers offer features that make it easy to check whether you have mail or packages. You can even sign up for notifications that tell you right away when something new has arrived in your mailbox.
youtube
SITES WE SUPPORT
Pre Approved PO Boxes – Wix
1 note
·
View note
Text
PrintStation 4.73 Crack Free Download Full Version For 64bit/32bit
0 notes
Photo

#STARARENA_ERRORS < From The #BackPrint You Can Tell Which #PrintStation Is The Most Skilled, Since It Needs To Be #DeadCenter!! Stay-Tooned > ---------- Visit-Gallery @StarArena.Art Cards-Only @StarArenaGame Game-Studio @the.GameSmith Toys-Only @Atomic.Baby.Clones Minis-Only @StarArenaGame.Minis Chess-Only @Arcade.Chess.Games ---------- Your Daily Doze of the #StarArena #CyberFiction #ToyBabyHero #MegaWarGame: https://StarArena.net/Print_And_Play ---------- Follow #StarArenaGame and see various #MegaWar game expansions in the making. For Lore & More: https://StarArenaGames.com/About/ ---------- Contact & Info: https://StarArenaGame.bio.link/ ---------- Whois the #GunShin? #軍神? #StarArenaToys #StarArenaMinis #StarArenaGames #StarArenaBattleGame #BattleGame #StarArenaCardGame #CardGame #StarArenaBoardGame #BoardGame #CyFiWarGame #CyFi #StarArenaMetaVerse #CollectibleCardGame #PrintAndPlay https://www.instagram.com/p/CTG66yVMbv-/?utm_medium=tumblr
#stararena_errors#backprint#printstation#deadcenter#stararena#cyberfiction#toybabyhero#megawargame#stararenagame#megawar#gunshin#軍神#stararenatoys#stararenaminis#stararenagames#stararenabattlegame#battlegame#stararenacardgame#cardgame#stararenaboardgame#boardgame#cyfiwargame#cyfi#stararenametaverse#collectiblecardgame#printandplay
0 notes
Text

POStazione priMi AnNi 90, Amiga 500 CoN ESP 512 KB COn hd a590 + rAm 2 Mb con hd SCSi Da 1 gB (duE PartizioNi DA 512), MB fLoppY ESterno kUMAna Da 5¼ PoLLici e DA 3½ poLLiCi, staMPANTE cENtRonicS PrintSTAtion 232 E MOnitOr CoMMODOrE 1084S.
59 notes
·
View notes
Photo

@padame_ x @elcumbone // 100x160cm Mixed media on canvas - Available at @print_station_galerie or on DM #padame #cumbone #rouen #printstation #artwork #canvas #artist #streetart #fineart #urbanart #painting #abstract #artgallery #modernart #newyorkart #gallery #digitalart #artoftheday #photooftheday #creative #contemporary #contemporarypainting #artcollector #streetartproject #londonstreetart #newyork #spraypaint (à Print Station Galerie)
#canvas#streetart#newyork#artist#londonstreetart#modernart#contemporary#creative#fineart#gallery#printstation#newyorkart#painting#digitalart#contemporarypainting#rouen#artwork#artgallery#spraypaint#urbanart#streetartproject#padame#cumbone#artcollector#photooftheday#artoftheday#abstract
0 notes
Text
Final Updates
Initially, I needed to set up the LDR task detection again, however I faced issues where I thought that the black pencil would omit enough light reflection to trigger things but it did not. I then used an LED to light underneath the spinner, which also did not work. So then, as a last resort, I settled on the user having to hole punch the start of each task (though I did not have time to set up tasks ending) so that the light would shine through to the LDR.
Unfortunately, I ran into an issue where the project was using to much memory and creating encrypted characters and unicode instead of english characters. I knew this was the source of the issue where I had disregarded the high memory warning before as I happen to know about the glitch in PAC-MAN where a high memory usage destroys their custom characters. I found the most efficient way to reduce the memory was, as it was not using its whole functionality, removing the Keyframe class and using the custom character's integer value instead.
I then split the checkChoice function into checkChoice and printState which did two different things so we were not always checking for the button input. I did not create a new question class but instead implemented the question screenState and each of the 3 button's respective answer states into the function parameters for checkChoice so that it would know what state to trigger after each response and what the initial state was. This was not printing correctly to start with as it was using its own printing functionality, so I moved the cursor setting for the button prompts into printState and used a boolean called boolean isChecking (set within checkChoice depending on if we have selected anything) to ensure these are only drawn when a question is in progress. Alongside this, I noticed that the clock was in fact moving the wrong way so changed the setupMoveInSteps(1) to -1 so it would go backwards.
I then ran into an issue where the state after the question would not clear so I made the boolean hasResponded as well as another time counter to play the response state for a specified time before clearing the answer variables and returning the state to default.
Unfortunately, something caused the response animations not to play from this point onward. While I am still unsure of the exact issues, I knew it was tied to the as aforementioned isChecking variable as this cancelled some settings in the printState function. This is an issue as the isChecking boolean was not set to false until after we had responded so it must not have set. This was the solution that seemed to work:
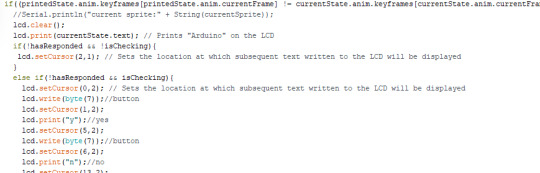
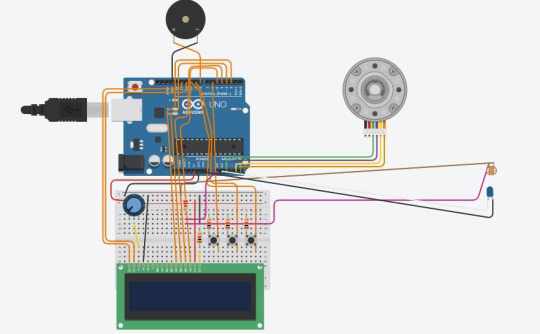
I did notice by this point, however that the speaker wasn't working and remembered my tutor mentioning that components of the input pins need to share a common ground. So unfortunately, the new speaker I received must just be one that pulls a higher current than the old one and I do not at this time have the ability to gain a new one. I had to place it back into the ground that meant the brightness of the screen reduced. If ever you try this, you should not face this issue! If you can use a board with more input pins however definitely do!
(Note: I have been unable to simulate production pet through TinkerCad as it does not allow easily for custom .cpp and header files, so I am using screenshots in their place)
Evaluation
While I am proud that the project works and I enjoy the concept and believe it beneficial to users, I understand it is lacking some precision without tracking the ends of tasks and also the build allows for other light to easily get in through the day which could cause issues with task detection. A solution to the latter would be to build suitable housing but also to reset the neutral light calibration every hour based on if we're in a task already or not, or even to add a recalibration button. I also believe that the build is a little messy and could be cleaned with cable ties, better board optimisation and other components to clear free ports. If I could do this over, I would have chosen to use a higher resolution LCD to fit more words onto for better questions and overall user experience.
The final code is below:
#include
#include
#include "pitches.h"
#include "ScreenSet.h"
////sounds
int taskEnding[2] = { NOTE_G5, NOTE_B5 }; int endDur[2] = { 2,2 }; int buttonPress[2] = { NOTE_E2, NOTE_A2 }; int pressDur[2] = { 4,4 }; int sad[2] = { NOTE_B2, NOTE_F1 }; int noteDurations[2] = { 4,4 };
unsigned long currentTime; unsigned long prevTime; int interval = 21;
const int speakerpin = 8;
const int LEDPIN = A1; const int LDRPIN = A0; int light; int neutral; int dark; int bright; bool isNeutralSet; bool inTask = false; bool prevTaskState = false; bool hasResponded = false; bool hasPrinted = false; const int MOTOR_IN1_PIN = A2; const int MOTOR_IN2_PIN = A3; const int MOTOR_IN3_PIN = A4; const int MOTOR_IN4_PIN = A5; const int STEPS_PER_REVOLUTION = 2048; TinyStepper_28BYJ_48 stepper;
////sprites byte none[8] = { // Array of bytes B00000, // B stands for binary formatter and the five numbers are the pixels B00000, B00000, B00000, B00000, B00000, B00000, B00000 };
byte hamster[8] = { // Array of bytes B10001, // B stands for binary formatter and the five numbers are the pixels B11111, B10101, B11011, B11111, B11011, B10101, B11111 };
byte sleepHam[8] = { // Array of bytes B00000, // B stands for binary formatter and the five numbers are the pixels B11111, B00100, B11011, B11111, B11011, B10101, B11111 };
byte shockHam[8] = { // Array of bytes B11011, // B stands for binary formatter and the five numbers are the pixels B10101, B10101, B11011, B11111, B11011, B11011, B11111 }; byte sadHam[8] = { // Array of bytes B10001, // B stands for binary formatter and the five numbers are the pixels B11111, B10101, B01110, B11011, B11111, B10001, B10101 };
byte button[8] = { B01110, B11111, B11111, B01110, B00000, B00000, B00000, B00000 };
const int b1Pin = 6; int b1State = 0; const int b2Pin = 9; int b2State = 0; const int b3Pin = 10; int b3State = 0;
int choice = 0;
////animation instantiation
int keyframes[6] = {1,2}; int questionFrames[6] = {1, 3}; int yesFrames[6] = {1}; int noFrames[6] = {4}; int maybeFrames[6] = {2}; int defaultKeys[6] = {1,2}; Anim anim0(defaultKeys, true); Anim anim1(keyframes, true); Anim question(questionFrames, true); Anim yesAnim(yesFrames, true); Anim noAnim(noFrames, true); Anim maybeAnim(maybeFrames,true); ScreenState defaultState("default", anim0); ScreenState taskQuestion1("breaktime?", question); ScreenState taskQuestion2("doing ok?", question); ScreenState y("Nice one!", yesAnim); ScreenState n("Try to break!", noAnim); ScreenState m("Thats ok!", maybeAnim); ScreenState currentState = defaultState; ScreenState printedState; LiquidCrystal lcd(12, 11, 5, 4, 3, 2); int currentSprite; bool isChecking = false;
unsigned long taskPrevTime; unsigned long questionDelay = 5000; unsigned long taskAnimPrevTime; unsigned long taskUnsetDelay = 2500;
void setup() { pinMode(speakerpin, OUTPUT); pinMode(LDRPIN,INPUT); pinMode(LEDPIN, OUTPUT); analogWrite(LEDPIN, 255); Serial.begin(9600); stepper.connectToPins(MOTOR_IN1_PIN, MOTOR_IN2_PIN, MOTOR_IN3_PIN, MOTOR_IN4_PIN);
pinMode(b1Pin, INPUT); pinMode(b2Pin, INPUT); pinMode(b3Pin, INPUT); lcd.begin(16,2); // Initializes the interface to the LCD screen, and specifies the dimensions (width and height) of the display } lcd.createChar(0, none); //creates a custom character lcd.createChar(1, hamster); //creates a custom character lcd.createChar(2, sleepHam); //creates a custom character lcd.createChar(3, shockHam); lcd.createChar(4, sadHam); lcd.createChar(7, button); lcd.clear();
printedState = defaultState; } void printState(){ currentSprite = currentState.anim.keyframes[currentState.anim.currentFrame];
if((printedState.anim.keyframes[printedState.anim.currentFrame] != currentState.anim.keyframes[currentState.anim.currentFrame]) || (currentState.anim.keyframes[currentState.anim.currentFrame] == 0) || currentState.text != printedState.text){ //Serial.println("current sprite:" + String(currentSprite)); lcd.clear(); lcd.print(currentState.text); // Prints "Arduino" on the LCD if(!hasResponded && !isChecking){ lcd.setCursor(2,1); // Sets the location at which subsequent text written to the LCD will be displayed } else if(!hasResponded && isChecking){ lcd.setCursor(0,2); // Sets the location at which subsequent text written to the LCD will be displayed lcd.write(byte(7));//button lcd.setCursor(1,2); lcd.print("y");//yes lcd.setCursor(5,2); lcd.write(byte(7));//button lcd.setCursor(6,2); lcd.print("n");//no lcd.setCursor(13,2); lcd.write(byte(7));//button lcd.setCursor(14,2); lcd.print("m");//maybe lcd.setCursor(16,1); } lcd.write(byte(currentSprite)); lcd.noCursor(); // Hides the LCD cursor } printedState = currentState;
if(currentState.anim.currentFrame < 5 && currentState.anim.currentFrame >= 0 && (currentTime - prevTime >= currentState.anim.interval)){ prevTime = currentTime; if(currentState.anim.keyframes[currentState.anim.currentFrame+1] != 0){ currentState.anim.currentFrame++; } else if(currentState.anim.isLooping){ currentState.anim.currentFrame = 0; } } }
void checkChoice(ScreenState questionState, ScreenState state1, ScreenState state2, ScreenState state3){ Serial.println("checkingchoice"); b1State = digitalRead(b1Pin); b2State = digitalRead(b2Pin); b3State = digitalRead(b3Pin); if(b1State == HIGH){ choice = 1; playsound(taskEnding, endDur); currentState = state1; taskAnimPrevTime = currentTime; hasResponded = true; } else if(b2State == HIGH){ choice = 2; playsound(taskEnding, endDur); currentState = state2; taskAnimPrevTime = currentTime; hasResponded = true; } else if(b3State == HIGH){ choice = 3; playsound(taskEnding, endDur); currentState = state3; taskAnimPrevTime = currentTime; hasResponded = true; } else if(choice == 0){ currentState = questionState; } }
void loop() { digitalWrite(speakerpin, HIGH);
currentTime = millis(); stepper.setSpeedInStepsPerSecond(2.1); stepper.setAccelerationInStepsPerSecondPerSecond(2.1); stepper.setCurrentPositionInSteps(0); stepper.setupMoveInSteps(-1); stepper.processMovement(); while(!stepper.motionComplete()) { currentTime = millis(); printState(); checkForTask(); stepper.processMovement(); } printState(); checkForTask(); }
void checkForTask(){ if(isChecking && !hasResponded){checkChoice(taskQuestion1, y,n,m);} if(!isChecking){ if(inTask && (currentTime - taskPrevTime >= questionDelay) && !hasResponded){ playsound(buttonPress, pressDur); isChecking = true; } if(!isNeutralSet){ neutral = analogRead(LDRPIN); Serial.print("neutral value: "); Serial.println(neutral); isNeutralSet = true; } light = analogRead(LDRPIN); //Serial.println(light); if(!inTask && light > neutral + 3 && !inTask){ Serial.print("task detected \n"); inTask = true; } else if(inTask && light <= neutral && inTask){ Serial.print("task ended or no task \n"); inTask = false; }
}
if(hasResponded){ Serial.println("hasResponded"); taskPrevTime = currentTime; isChecking = false; if(currentTime - taskAnimPrevTime >= taskUnsetDelay){ Serial.println("clearedchoice"); lcd.clear(); choice = 0; currentState = defaultState; hasResponded=false; } } }
void playsound(int melody[], int durations[]){ int noteNum = sizeof(melody); for (int thisNote = 0; thisNote < noteNum; thisNote++) { int noteDuration = 1000 / noteDurations[thisNote]; tone(speakerpin, melody[thisNote], noteDuration); int pauseBetweenNotes = noteDuration * 1.30; delay(pauseBetweenNotes); noTone(8); } }
Updated ScreenSet.cpp
#include "Arduino.h"
#include "ScreenSet.h"
Anim::Anim(){} Anim::Anim(int keys[6], bool isLooping){ for(int i = 0; i < 6; i++){ this->keyframes[i] = keys[i]; } this->isLooping = isLooping; } ScreenState::ScreenState(){} ScreenState::ScreenState(String text, Anim animation){ this->text = text; this->anim = animation; }
Updated ScreenSet.h
#include <"Arduino.h">
#ifndef ScreenSet_h
#define ScreenSet_h #include <"Arduino.h">
class Anim{ public: Anim(); Anim(int keys[6], bool isLooping); int currentFrame = 0; bool isPlaying; unsigned long interval = 500; //frames per second bool isLooping = true; //if the animation loops int keyframes[6]; private: };
class ScreenState{ public: ScreenState(); ScreenState(String text, Anim animation); bool isPlaying; String text; Anim anim; private: };
#endif
0 notes
Photo

Just built this new bigger printing station today. This will be able to hold a 24”x31” screen. Going to have two print stations in the studio so that Allie and I are both able to create new work and edition existing work. This summer is going to be crazy busy, so it will be nice when we can double up on getting things out the door. . . #printstation #diy #silkscreen #printmaking #screenprinting http://bit.ly/2UOEKlg
0 notes
Text
ESP32 Arduino Tutorial: Obtaining MAC address of stations connected to soft AP
Introduction
In this esp32 tutorial we will check how to obtain the number of stations connected to a soft AP hosted by the ESP32, running the Arduino core. We will also obtain their MAC addresses.
If you need an introduction on how to set a soft AP on the ESP32 using the Arduino core, please check this previous post.
At the time of writing, I did not find any Arduino function that allowed to obtain the MAC addresses of the stations connected to the soft AP, so we are going to use some lower level functions and data structures from IDF, the software framework used under the hood by the Arduino core.
The station list printing functionality from this tutorial is based on this very good code example from lucadentella, which I encourage you to check.
The tests were performed using a DFRobot’s ESP32 module integrated in a ESP32 development board.
The code
We will start our code by including the WiFi.h library, in order to be able to setup the soft AP. Additionally, we will need to include the esp_wifi.h library, in order to be able to use the functions and data structures needed to get the information about the stations connected to the soft AP.
#include "WiFi.h" #include "esp_wifi.h"
Next, we will declare the credentials of the WiFi network the ESP32 will host as global variables. We need to specify the network name and the password.
const char *ssid = "MyESP32AP"; const char *password = "testpassword";
Moving on to the setup function, we will start a serial connection so we can output the results of our code. Additionally, we will start the soft AP by calling the softAP method on the WiFi extern variable that is available after importing the WiFi.h library.
As input, this method receives both the network name and password, which were previously stored in the two global variables.
To finalize, we will also print the IP of the soft AP. You can check below the whole setup function. This way, we know that the procedure of setting the soft AP is finished as soon as the IP is printed.
void setup() { Serial.begin(115200); WiFi.softAP(ssid, password); Serial.println(); Serial.print("IP address: "); Serial.println(WiFi.softAPIP()); }
In the Arduino main loop, we will periodically call a function to print the MAC address of the stations connected to the soft AP. We will that function PrintStations and we will analyze the implementation later.
The Arduino main loop code can be seen below.
void loop() { PrintStations(); delay(20000); }
We will now implement the PrintStations function. As already mentioned, in order to get the MAC address of the connected stations, we will need to use some lower level functions and data structures, from IDF.
First, we will need a variable of type wifi_sta_list_t. This struct contains an integer field called num, which corresponds to the number of stations connected to the soft AP.
Additionally, it contains an array of wifi_sta_info_t variables, called sta. Each element of the array will contain the MAC address of a station connected to the soft AP.
Note that for now we are just declaring a variable of the wifi_sta_list_t, which doesn’t contain any information yet.
wifi_sta_list_t stationList;
To obtain the actual information of the stations, we need to call the esp_wifi_ap_get_sta_list function, passing as input the address of our previously declared wifi_sta_list_t variable.
This function returns a variable of type esp_err_t which can be used for error checking. Nonetheless, for this simple example, we will assume everything works as expected. Note however that in a final application you should always check for errors and act when an error is found.
esp_wifi_ap_get_sta_list(&stationList);
Now that we have the information on our stationList variable, we can access its num field and print the number of stations currently connected to the soft AP.
Serial.print("N of connected stations: "); Serial.println(stationList.num);
Next, we can use this num field to loop through the information of each station. As mentioned, the information is stored in a field called sta, which corresponds to an array of wifi_sta_info_t variables. We will read one by one, at each iteration of the loop.
for(int i = 0; i<stationList.num; i++) { wifi_sta_info_t station = stationList.sta[i]; // Print MAC address code }
The wifi_sta_info_t struct has a field called mac, which is an array of type uint8_t with a length of 6. Since MAC addresses are composed by 6 bytes, each element of the array corresponds to a byte of the MAC address of the station.
So, we can iterate through this array and print the whole MAC address. Note that typically MAC addresses are represented in hexadecimal format, with each byte separated by “:” or “-“.
We will print the MAC addresses with the help of the sprintf function, using the %02x format specifier to convert each byte to its hexadecimal representation.
for(int j = 0; j< 6; j++){ char str[3]; sprintf(str, "%02x", (int)station.mac[j]); Serial.print(str); if(j<5){ Serial.print(":"); } }
And with this we finish our function. The final source code can be seen below. It has some extra prints on the PrintStations function for better readability.
#include "WiFi.h" #include "esp_wifi.h" const char *ssid = "MyESP32AP"; const char *password = "testpassword"; void PrintStations() { wifi_sta_list_t stationList; esp_wifi_ap_get_sta_list(&stationList); Serial.print("N of connected stations: "); Serial.println(stationList.num); for(int i = 0; i < stationList.num; i++) { wifi_sta_info_t station = stationList.sta[i]; for(int j = 0; j< 6; j++){ char str[3]; sprintf(str, "%02x", (int)station.mac[j]); Serial.print(str); if(j<5){ Serial.print(":"); } } Serial.println(); } Serial.println("-----------------"); } void setup() { Serial.begin(115200); WiFi.softAP(ssid, password); Serial.println(); Serial.print("IP address: "); Serial.println(WiFi.softAPIP()); } void loop() { PrintStations(); delay(20000); }
Testing the code
To test the code, first compile it and upload it to the ESP32 using the Arduino IDE. Once the procedure finishes, open the IDE serial monitor.
After setting the soft AP, it should print the its IP and the number of stations. Since no station is connected yet, it should output zero.
If you connect a station to the soft AP, then the next time the PrintStations function is called, it should output the MAC of that device and the number of stations should be updated to one.
As illustrated in figure 1, you can even connect more than one station and obtain the MACs of all the devices connected to the ESP32 soft AP.

Figure 1 – MAC addresses of the stations connected to the ESP32 soft AP.
You can then compare the printed MAC address with the MAC address of your device to confirm they match. In my case, one of my devices is a Windows machine. So, if I send the following command in the command line, I will get its MAC address:
ipconfig /all
You can check the result of this command in figure 2. I’m just showing the last byte of the MAC address of the device for privacy reasons, but you can confirm that it matches the one printed on the Arduino serial monitor.

Figure 2 – MAC address of one of the machines connected to the ESP32.
0 notes
Text
Automate Statement Printing and Mailing
Whether you’re a financial institution, medical practice, or any other type of business, drafting, printing, and sending statements is a regular procedure. It’s essential to get these documents out in a timely manner so clients receive them and respond quickly. It’s also crucial to have a proper statement printing service that provides the right services for your company.

With Intrade, you can automate your statement printing and mailing processes so you’re not always caught up with executing transactional communications. By outsourcing this process to a statement printer, you can focus on your core business and reduce overall costs while improving the look and feel of these important documents.
You can choose the statement period and date for all of your accounts receivable, including consolidated statements for national account customers. You can also choose to display or not display the Balance Forward line item on the statement and whether or not you want to include unapplied payments on your statement. You can also choose to only print statements for customers who have no current activity, and you can decide whether or not you want to print a statement for each national account or only one statement per customer.
In addition, you can create multiple groups for the customer statement lists to simplify your data processing and mailing operations. You can use these groups to filter statements by customer group or by account status (current, past due, and overdue). The statement dates you select will apply to all the statements generated for the selected list.
youtube
SITES WE SUPPORT
Print Invoices with API – Wix
0 notes
Text
New Electric Motor Saves Power and Weight On Board
The American Bureau of Shipping (ABS) and ECM PCB Stator Technology were selected by the Massachusetts Maritime Academy and the U.S. Maritime Administration (MARAD) to help determine the feasibility of replacing a conventional motor with a printed circuit board (PCB) stator motor.
Background
ECM PCB Stator Technology has developed a groundbreaking new stator design and optimization software that fundamentally changes the way motors are designed and manufactured.
By embedding copper-etched conductors into a multilayered printed circuit board (PCB), ECM’s patented stator design optimizes copper geometries and winding patterns, delivering superior efficiency at a reduced cost and environmental impact. These PCB stators integrate into an entirely new ironless and wireless motor design, resulting in remarkably thin, lightweight, and power dense motors that were previously unavailable. At the heart of this revolution is PrintStator, ECM’s advanced design software. PrintStator quickly transforms customer application requirements into unique, optimized PCB Stator designs ready for rapid prototyping and commercial production. Beyond significantly shortening the design cycle, PrintStator eliminates human error and allows considerable flexibility in specifying optimization parameters and design restraints.
Leveraging a proven manufacturing process, PrintStator generates Gerber Files that are ubiquitously utilized by the printed circuit board manufacturing industry across the globe. This creates a reliable and cost effective production for the next generation of motors and generators.
“ECM’s innovative and disruptive software platform is the next generation evolution for coreless electric machines. The ability to print stators anywhere around the globe is simply an astounding development," said Brian Casey, the president and CEO of ECM.
Results
ECM replaced the 3HP air handler motor on the MARAD training ship TS Kennedy with a 3HP motor integrated with PCB stator technology. The legacy motor that was replaced weighed 45kg and ran at an efficiency of 87.5%. ECM’s solution was a fraction of the size, weighed 15kg and ran at an efficiency of 91.6%. ABS issued a “Statement of Maturity” for ECM’s PCB stator technology and confirmed the reduction of onboard weight and increased motor efficiency.
“The use of ECM’s PCB stator technology onboard ship and the related motor prototyping process were new concepts and were demonstrated as viable, reducing onboard weight and increasing motor efficiency," said Roy Blieberg, ABS Vice President, Engineering.
“The ABS NTQ services offer guidance on early adoption and efficient implementation of new technologies — demonstrating the level of maturity — and that potential risks have been systematically reviewed," said Smarty Mathew John, ABS Manager for Advanced Technology and Research.
ECM Motors for Maritime Applications
ECM’s technology can integrate seamlessly into a range of on-board motor applications providing superior performance and reliability with less mass. On large cargo ships and military vessels, less on-board motor weight translates to reduced drag, increased fuel range and increased weight capacity. ECM’s thin form factor and the ability to produce our motor as a thin ring creates motors with high power density and minimal axial length for applications where space is at a minimum, but power is a must. Superior motor efficiencies reduce fuel consumption and carbon emissions. Significant reduction in raw materials and PrintStator’s utilization of well-established PCB manufacturing processes further lowers cost and environmental impact.
ECM’s motor design is considered one of the most electromagnetically and acoustically quiet motors on the market. Whether it be for large cargo vessels or small passenger ships, limiting EMI and acoustic noise in on-board systems is essential for smooth operation. By integrating the ECM platform, acoustic noise and total on-board EMI from these integrated systems is reduced.
With PrintStator, vessel modernizations are carried out quickly and precisely, allowing project managers and engineers to design customized solutions, with exact, unique operating points ready for manufacture in just a few hours.
Next Steps
ECM is in the process of integrating the PCB stator technology platform into systems aboard commercial and government maritime vessels, but also into the general commercial and residential market. Increased performance and a significant weight reduction are only a few of the many benefits when a motor is upgraded with a PCB stator, making the technology valuable for almost any application.
This article is sponsored by ECM PCB Stator Technology. For more information, please email [email protected] or visit pcbstator.com/design-your-own.
from Storage Containers https://www.maritime-executive.com/article/new-electric-motor-saves-power-and-weight-on-board via http://www.rssmix.com/
0 notes
Text
How Do Print and Send Statements Work?
Print and Send Statements are used by many businesses as a means to electronically transmit sensitive information directly to an employee, client, or the public in general. Any information that needs to be communicated can be sent using a print statement template, which simply contains lines and/or spaces that identify the information being transmitted, with the appropriate punctuation and/or the dpic character. Common print statements include invoices, checks, memos, thank you notes, etc. A print statement template may include multiple types of documents, depending on the particular business involved.

Each print statement must conform to the specific set of regulations established by each Federal government department or agency, in order for it to be valid. These regulations generally define when a print document is valid, how it can be used, the document type (text, image, tabular, excel, graphics, or a combination of text and image), and what fields the document should have. Many times, the regulations will also dictate the format in which the document should be used, such as word or pdf. Other print document fields may also be established by specific government agencies, including the U.S. General Services Administration (GSA), which defines the format for agency reports.
Also Read: https://www.postgrid.com/print-mail-statements/
youtube
In order to make a print and send statement work, certain fields need to be filled in. These fields are designated as the recipient's field of responsibility, the w.date which identifies the date on which the statement was sent, the recipient's field of distribution, and the recipient's field of use, which are a special purpose that allows the agency to control who receives the document. Any additional information needed to fill in the other fields can be supplied by the client. Some print services may also allow the use of html to create web-based print documents, but most print companies have standard applications that allow them to create and send documents in plain text format. The printing company, or the service provider, that you choose to do business with should be able to help you create the appropriate print and send documents according to the regulations set forth by the government.
SITES WE SUPPORT
Wix – Letters & Document Printing
SOCIAL LINKS
Facebook Twitter LinkedIn Instagram Pinterest
0 notes
Text
The Working of PO Boxes & Its Requirements
For many people, PO boxes are a good option for their personal or business mail needs. It prevents you from having to write an address on each piece of mail and brings peace of mind when it comes to privacy, especially for those who are traveling often or working remotely.

You can get a PO Box by filling out PS Form 1093. You must provide a photo ID, choose the size of the PO Box and indicate whether you want it for personal or business use. You must also say who will be picking up the mail and pay a rental fee.
The cost of a PO box will vary depending on the location and rental terms. If you want to save money, consider a longer rental term. In addition to the rent amount, you will have to pay for any additional services such as prepaid shipping and insurance.
If you are planning on using a PO Box for business, consider hiring a company that offers mail automation services. These companies will render, print, and deliver tailored mail pieces for your business. They can also take care of the return and shred process for you.
One of the most significant advantages of a PO Box is that it provides physical privacy for those who are working from home or need to avoid publicizing their physical address. Digital nomads and frequent travelers also find PO boxes useful for preventing mail theft which is common in the United States.
youtube
SITES WE SUPPORT
Pre Approved PO Boxes – Wix
0 notes
Link
#PMCpodcasts - Listen Long and Prosper! Maximizing Your Market Share with PrintStats from APTech
0 notes