#ps ask
Explore tagged Tumblr posts
Visit Tumblr Blog
Explore Tumblr blogs with no restrictions, modern design and the best experience.
Last Seen Tumblr Blogs

Fun Fact
If you dial 1-866-584-6757, you can leave an audio post for your followers.
Note
hello! just wondering if you know of a tutorial for the lines going through gifs? and getting them all to match up? like in these sets /post/714978685858496512 and /post/733101286452559872 also are they overlays or how did you make them? thank you in advance!
hey! so, i've attempted to show you with a little tutorial on how i made lines like the ones here and here, i've not seen one around myself and decided to try this out one day and it didn't go too badly so, i hope this makes sense and helps. so, i'll be explaining and showing you how i did the lines on these gifs:
now, firstly i'm going to assume you know the basics and can create/colour etc a gif, you'll need your base gif ready to go. in this example i've flattened them to frames, but you can do this in timeline as well.
step one: add a new layer on top of the gif/smart object, and set up your brush ready. i personally have used 2px brush, 100px hardness, 100px smoothing and 75% flow;

the flow is the main thing i think that is more down to personal preference, it affects how the line draws/moves and will be down to a little bit of trial and error - i've added below how the lines look at difference levels of flow (no other setting from the above has changed just the flow)

step two: decide where you want your lines to link, i've always done from the centre of the gif but you could want your lines to meet up 100px from the left at the top and exit the gif 100px from the right at the bottom. no matter what, the best thing to do here is to add guides to your gifs. as i'm just going straight from the centre to the centre for every gif i add a guideline at 270px

step three: i recommend testing this all out on a separate canvas first to play around and see how you want your line to look etc, but when you're ready you're good to go. start from when the guideline is and draw your line until where you want it to end, the best way to show you this is on video so i've screen recorded the whole process.
youtube
it's honestly pretty straight forward, so i hope this all makes sense, and just have fun with it, i love messing around and drawing 30 versions of the same line until i'm happy with it!!
ALSO, in case you were wondering about the final gif in the wheel of time set, the moving line, that was simply an overlay from this video that i set to screen so the black background disappeared leaving just the line (i stretched/rotated/moved it around get it to start and end where i wanted it to! i just played around with the line thickness when drawing my lines to match as best i could with the line in the overlay!
#ask#anonymous#ps ask#quirkyresources#usernik#userhella#uservalentina#userrobin#userannalise#userrainbow#usershreyu#alielook#useralison#userives#useryoshi#ps help#ps tutorial#chaoticresources#dailyresources#hisources
291 notes
·
View notes
Note
hi, your latest edit for thgweek24 is absulutely stunning and i thought if i can ask if you can make a tutorial about the ripped gifs/paper effect? if not, that's okay! have a nice day <3
RIPPED PAPER EFFECT TUTORIAL
hi! thank u :D (thgweek set referenced)
below the cut are the steps that i took to create this effect. this tutorial is very screenshot heavy and assumes some basic knowledge of photoshop and giffing.
i do my best to try and explain my process so hopefully this is helpful! if you have any questions, please don't hesitate to ask.
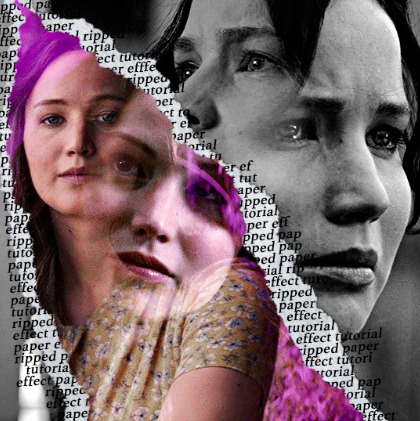
STEP 1: Choose and arrange your two gifs
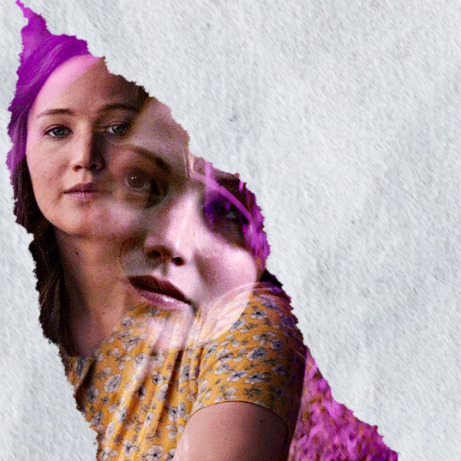
with this specific use of the ripped paper effect, there's one gif on the "outside" of the rip and one on the "inside." in this example, the outside is the b&w and the inside gif is the colored:
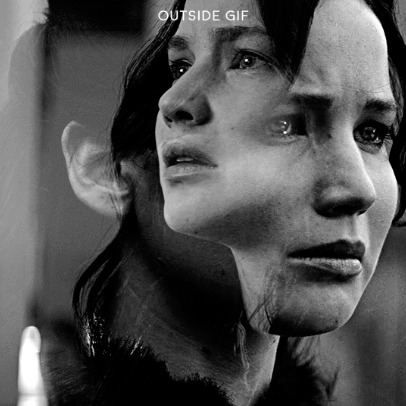
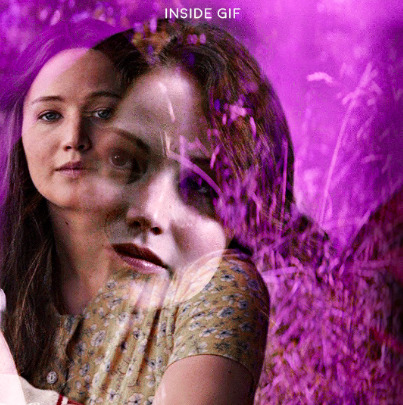
for me, the outside gif determined the positioning of the inside gif and the position/direction of the rip. as can be seen, outside gif has a lot of space on the left. therefore, i knew i was going to position the subject of the inside gif more on the right so i could create the rip without hiding too much of the b&w gif.
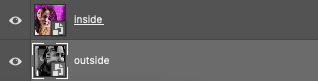
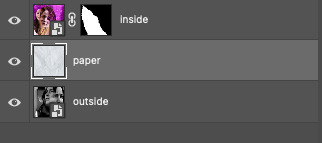
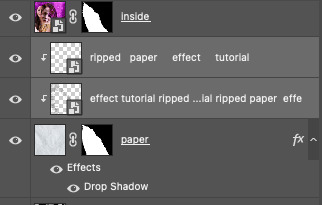
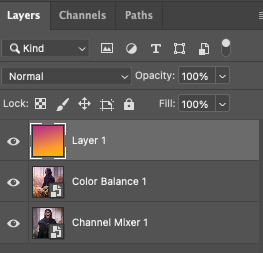
next, you want to arrange the inside gif on TOP of the outside gif. your layers panel should look like this:
STEP 2: Creating the ripped effect
here comes the fun part! in order to create this effect, you're going to need torn paper brushes. here and here are some packs you can download (w credit to owner).
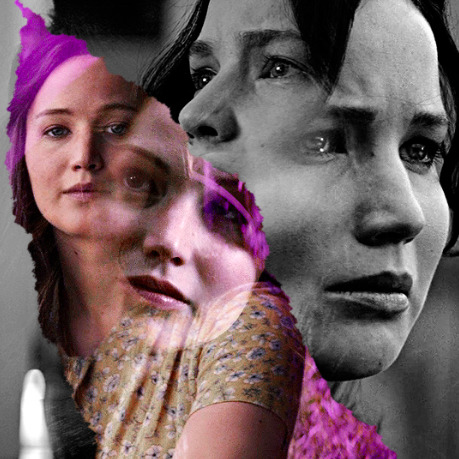
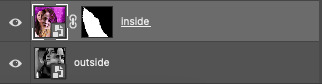
next, create a layer mask on your inside gif. you're going to use the brush of your choosing as an ERASER. then, you can play around with the size and angle of the eraser to create the look you want. this is what the gif and the layers panel now look like:
STEP 3: Adding the paper
in order to add the paper around the edges of the inside gif (where the text goes), you now need to download a paper texture. i found mine on google by searching "paper texture png."
place the paper png IN BETWEEN your outside and your inside gif. this is what everything should look like:
now, similarly to what you did in the previous step with the inside gif, you are going to create a layer mask on the paper layer. using an torn paper brush as an eraser, you will erase the paper, creating the shape you want.
be sure to leave enough room for whatever text you want to be on the paper. also, i suggest making the rips of the paper different from the rips of the inside gif so it looks more organic.
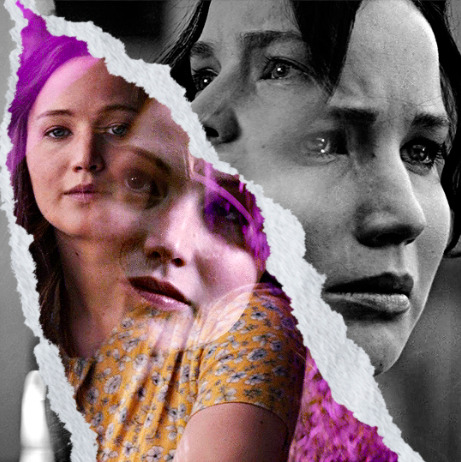
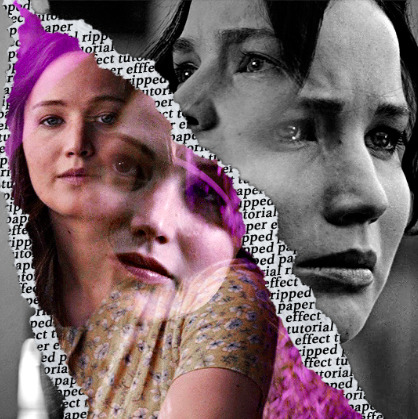
here is what my gif looks like after erasing the paper:
optional: add a drop shadow on the paper layer (right click -> blending options... -> drop shadow)
STEP 4: Adding the text
first, you want to identify the space where you will have room to place your full quote within the paper. if there are no spaces, you can always use your brush/eraser to modify the layer masks.

next, add a layer on top of the paper layer (and below the inside gif). select the text tool and start typing your repeated text!
because you can see which text is hidden by the inside gif and what is on top of the paper, a shortcut i use is the "tab" button and only type words that will be seen.
type the repeated words around the quote you want highlighted:
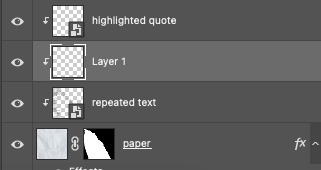
now, in order to contain the text within the paper, convert the text layers into smart objects. then, create a clipping mask on both layers (right click –> create clipping mask). this is what your layer panels should look like:
with that, your gif should now look something like this, with the text contained inside the paper:
STEP 5: Highlighting the quote
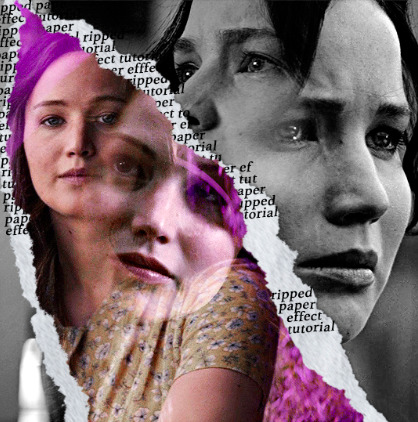
as you can see, it just looked like a bunch of words. so, in order to highlight the quote you carved out in the previous step, add a new layer below the layer of the quote you want highlighted:
now, use a round brush (softness around 10-15% and opacity at 70-80%) with the color of your choice to highlight the words you want.
and there you have it!
i hope that this made sense and was helpful! if you have any questions or clarifications, please don't hesitate to ask :)
212 notes
·
View notes
Note
hi drea, hope you're doing well 💓 i was wondering what font settings you used on this gifset if you don't mind sharing?
thanks aashna 🤎 of course!


13 notes
·
View notes
Note
Hello my friends !
I am Mohie from Gaza 🍉🇵🇸
Asking for help is not easy. I am asking for a small donation of $20 or $25 from each person.. I need your help if you can please donate to save my life and my family My donation link is in my bio. Every donation, even if it is small, will make a big difference in my life.
Help me and my family 😍🇵🇸
https://gofund.me/f2cd8560
Vetted
Please support
5 notes
·
View notes
Note
hello there! the vapoursynth portable64 version from the gdrive you linked in a previous ask is no longer available and the only one that is available is portable32. do you by any chance have the portable64 version and could possibly share it? thank you!
Hi! I have the old 64 version on my pc, I just uploaded here. I think this download link will last for just a while, if you can't download it when you see it please drop by again, and I'll try to make space on gdrive for this
2 notes
·
View notes
Note
Hello, 🌹♥️
I apologize for reaching out unexpectedly, but I am forced to contact you due to an urgent situation.
🌸🌸🌸🌸🌸🌸🌸🌸🌸🌸🌸🌸🌸🌸
My name is Mohammed, and I’m an engineer. I want to assure you that I wouldn't want to bother you under normal circumstances. However, I am in desperate need right now. I have a beautiful family, and I am doing everything I can to save them from the horrors of the war in Gaza. I reached out to you because I believe you are a kind and compassionate person, and I hope that if you can share our story, you won’t hesitate to do so.
🌟 🌟 🌟 🌟 🌟 🌟 🌟 🌟 🌟 🌟 🌟
I’m not experienced with Tumblr, and I only came here to try to reach good people like you who can help amplify my family’s voice, hoping we might find someone who can help save them.
If you could reblog the pinned post on my account, I would be incredibly grateful. And if you are willing to contribute even more, you could also share our story on any other platforms where you have access. With your help, we might be able to save them.
If you have friends or know of large blogs on Tumblr, please don’t hesitate to ask them to reblog my post as well.
✨✨✨✨✨✨✨✨✨✨✨✨
Again, I apologize for the inconvenience, and I sincerely hope that reaching out to you will be fruitful in my desperate attempt to save my children from the war.
💖💖💖💖💖💖💖💖💖💖💖💖💖
Thank you from the bottom of my heart ♥️
Vetted, please support
2 notes
·
View notes
Text


Halloween comic two weeks late bc i will never let tamadrien die
#ml#miraculous ladybug#adrien agreste#ohshc#ouran high school host club#ouran#tamaki suoh#undescribed#I might go back and do alt text later but I am so tired lol#PS anon who asked me to draw more tamaki and adrien stuff like months ago#sorry it took so long fjkdkdkd I will probably do more tho#mine#my art#halloween#tamadrien
4K notes
·
View notes
Text

ENCOUNTER: A statue with a magical mirror, she would show you your most likely future - however after fracturing, the mirror fragments now show many possibilities. This left her in an irritable mood, so she likes to show people the bad ones.


#artists on tumblr#robots#construct#gif art#illustration#fantasy art#art#character design#creature design#medusa#ttrpg art#snake#gif warning#gif is big! might need a minute to load#PS anon who sent me game ask :3 i'm working on some art to show for that!
2K notes
·
View notes
Text

sanji in every universe shall have the pottiest of potty mouths, now with the added bonus of 4x combo-ing
first / prev / next
#one piece#vinsmoke get along au#sanji#sora vinsmoke#red leg zeff#ichiji vinsmoke#niji vinsmoke#vinsmoke yonji#reiju vinsmoke#ugh i'm pretty sure only the first 5 tags show in search#and honestly this blog is all vinsmokes all the time#BUT organization is nice to have#had a stupid amount of fun with baby ichiji's smirk#VERY tempted to clean that last panel of the boys up color it and slap it as my banner#we'll see#ps no longer adding titles#that shit left me QUICK#i'm good with fic titles but ask me to do a title for mini comics hell no it sounds stupid#the titles not the concept#the concept is sane
2K notes
·
View notes
Text
all the tutorials be like crop color sharpen etc and i’m like elaborate on etc pls how do i get the gif glitch to elaborate that part
1 note
·
View note
Note
Do you happen to have a tutorial for this? Or just how you are able to spin the vinyl? Thanks!
https://www.tumblr.com/rosamndpike/728741902490501120/pscentral-event-19-music-natasha-yelena
i don't have a tutorial for this specifically BUT, once i made my vinyls this is how i got them to spin with keyframes - if you follow this tutorial and obviously instead of the text you're rotating your vinyl or anything else you want to have spinning.
4 notes
·
View notes
Note
I would love if you could give some tips on making blended gifs with two dominant colors - for example your friends cheesecake set. I would love to make like that but I have no idea were I’m going wrong
friends cheesecake set
hi!! blending is honestly so hard to give tips on bc it's so dependent on the scenes but i can try! below, i link some tutorials that i have used and try to explain the methods i personally use :)
btw this is very image heavy with gifs as visuals to try and explain my processes!
the tips i give assume you have basic giffing knowledge and at least some knowledge and experiencing of both blending and coloring. if you have any questions on anything i explain, please don't hesitate to come ask!
firstly, here are some very very helpful general blending tutorials that i have used in the past: this one and this one go pretty in depth (both by the lovely @yenvengerberg.
secondly, here are some coloring/color manipulation tutorials that i love:
general color manipulation (different methods) again by @yenvengerberg
manipulating the background by @fionagallaqher
coloring gifs for rainbow sets! by @rhodeys
now, as for combining the two techniques, i use trial and error. again, both blending and coloring are very fickle and the methods can change based on the scene i'm using.
there are two ways that i blend gifs with two dominant colors:
color the gifs separately and then blend
or blend the gifs together and then color the whole gif
first method: color first and then blend —
i usually use this method for gifs with little movement and where the colors can be easily manipulated (see the coloring tutorials i referenced above).
an easy way to tell what colors are dominant in a gif, go to the hue/saturation adjustment and turn saturation all the way up to 100.
for instance, this gif of anakin has little movement and i can see the background has hints of blue.
this gif will be easy to manually color on its own, seeing as i can use selective color and brushes to color the background. here is the same gif but now i have colored the background, and i used the method outlined in this tutorial:

NOW, moving onto the second gif. the second gif/scene i chose also has little movement and a background that can be easily manipulated:

using the same method as the first gif, i'll now color this padme gif on its own.
TIME TO BLEND!!! after converting the two gifs to smart object and putting one on top of the other, i set the top object to screen. for this example, i put the padme gif on top of the anakin one. this is what the blended gif and my layers panel looks like:


now, i'll create a layer mask on the padme gif and get rid of any parts i do not want or expose any areas of the anakin gif i want to see.
next, as you can see, the left side of padme's face is purple and pretty transparent. so in order to make it more visible, i will add a blank layer in between the two smart object and use a black brush to paint the areas i want to see (see this tutorial!!)
and here is the final blended gif:

now, you can totally stop here, but for me, it's pretty purple-heavy and i'd like to see some more orange. so i simply take an orange brush and color some areas i'd like to add more orange, and then set the layer's blending mode to color.
and HERE IS THE FINAL PRODUCT!
second method: blend first and then color —
i usually use this method when at least one of the gifs/scenes i want to use has colors or a background that is difficult to manipulate. or sometimes i do this because i just don't know what i want my coloring to look like and blending first gifs me a better sense of the whole gif.
there are two different ways you can blend first and then color. using the brush tool or the gradient tool.
brush tool:
using the brush tool is the best method when there is little movement and when you have distinct subjects to color around.
for instance, this gif of rhaenyra. while there is little movement, the background is a similar tone to her skin so it would be difficult for me to use selective color.
i could possibly use a brush to color the background, but i do not know how that will blend with my other gif and i don't know what coloring will work best overall. this is why i want to blend first!

and now for my second gif. similarly to the rhaenyra shot, the background of this alicent shot has very similar tone to alicent's skin color, so selective color would not work:
TIME TO BLEND!! i do the same thing as the last method (placing one smart object on top of the other) and this is what it looks like:

following the same steps as last time, i erase what i don't want and paint over areas i want to be more visible. this is what i came up with:
because there is that orange light on the left hand side of the gif (on rhaenyra's side), i decided to play into that and go with orange as one of the colors. sometimes the color scheme i go with depends on the colors i find in the gif bc that's just easiest!
now is when i use a brush to color the background! i color the left side with an orange brush and set the blending mode to 'color':

for the second color, the background on alicent's side is kind of neutral so i'm going to pick any color i want! i decide to go with green bc that is her color lol, and i do the same method, coloring with a green brush and setting the blend more to 'color'.
this is what i came up with:

you can totally stop here, but i like adding colors to the bottom, orange on the right and green on the left, so it kind of ties it all together.
HERE IS THE FINAL PRODUCT! (notice how in the bottom left corner, there is some hints of green. similarly for hints of orange in the right corner)

gradient tool:
another tool i use is the gradient tool (not to be confused by an adjustment layer).
this tool is really good for blended gifs that have lots of movement or where there are subjects that are difficult to draw around with a brush.
for example, this blended gif of yennefer has lots of movement so the brush tool may not be the best method.
here is where the gradient tool comes in! i add a new layer and draw a gradient in the direction i want. this is what my gif and layer panel looks like:

next, i change the blending mode. this heavily depends on the scene and also what looks good to your eye, but i usually alternate between 'overlay', 'soft light', or 'color'.
for this gif i chose 'overlay' and this is what it looks like:

again, you can stop here...BUT i want to go back in and intensify the pink/purple color at the top in the white areas. to do this, i am going to use a large soft brush and paint areas, setting the layer's blending mode to 'color.'
HERE IS THE FINAL PRODUCT:

and those are my methods!! if you made it this far, thank you for reading and following along. i hope that this was at least somewhat helpful and huge shout out to @yenvengerberg who's coloring and blending tutorials basically taught me everything i know.
if you still have any questions at all pls feel free to hope in my inbox :D
#ps ask#ask#anon#userabs#usermorgan#tuserheidi#useraish#rogerhealey#usershreyu#userkosmos#angelblr#tuserabbie#userelio#*tutorial
142 notes
·
View notes
Note
Hey! Do you think you could please make a tutorial on how to add transparent shapes over a gif? The way you do it gives a gif such an unique touch.
sure thing and thanks for the compliment! i'm gonna show how i did the shapes in this and this set. i'll be using this gif of liv:

now i'm gonna use google to search for a transparent shape. i usually find mine by looking up something like "flower svg" or "flower png." just make sure the background is transparent (if not, use remove.bg to do so if you don't know how to in photoshop plus it's a lot easier)
drag the shape onto your gif's canvas. use the free transform tool to adjust its size to the way you like it. i now have something like this:

if your shape is already white, you can skip this part! but mine is black, and it won't have the "difference" effect on it. so open the blending options on the layer (right click the layer > click blending options) and click color overlay. make sure the blend mode is normal, and change the color to white. turn that layer into a smart object, (right click > convert to smart object) and now you should have something like this:

you can now put the shape's layer blending mode to "difference."

you can try putting it on "overlay", "exclusion" or any other option to see what you like better! but i mostly use "difference." this is my gif now:

open the blending options on the layer again and go back to color overlay. change the color to whatever you want. for this example, i'm gonna use pink! then switch the blend mode to "multiply" or "color", depending on your preference on how it looks. i'm gonna keep mine at "multiply" and now my gif looks like this:

and that's pretty much it! now you can leave it like that, or do whatever you want to it. sometimes i add a drop shadow or a stroke, kinda mess with it to see what looks best. i hope this helped you and lmk if you need any more help :)
17 notes
·
View notes
Note
Vetted by @gazavetters , my number verified on the list is ( #93 )
My dear,
I hope this message finds you well. My name is Mohammed Hassouna, and I am reaching out to you during one of the most heartbreaking times of my life. My family and I are trapped in Gaza because of the ongoing war, and we’ve lost everything—our home, our safety, and our sense of security 💔. Now, we’re living in a tent that barely protects us from the rain or the wind 💨💦, and we are desperate to find safety.
I urgently need your help 😢. Every donation, share, or message of support brings us one step closer to safety. Before the war, we had a home filled with love, but now it’s gone, reduced to rubble 💔. We are displaced, scared, and struggling to survive 😔.
Please, if you can, help us escape this nightmare 😭🙏. Any support, no matter how small, can change our lives and give us hope for a new beginning. Your kindness means the world to us 🥺❤️.
Here is my campaign link: https://gofund.me/d04d2c13. If you can’t donate, sharing our story will help us reach others who may be able to assist.
Thank you from the bottom of my heart for your compassion and support 🙏❤️.
Vetted, please support
2 notes
·
View notes
Text
Tommy 'my priority is Evan' Kinard
#evan buckley#tommy kinard#bucktommy#kinley#911#911 spoilers#911edit#911 abc#oliver stark#lou ferrigno jr#one thing about tommy is he'll be there!#whether it's chim calling for help or eddie asking to hang out or buck asking him out#HE 👏 WILL 👏 BE 👏 THERE 👏#this man cares so much 😭#but he's also so gone on buck it's actually adorable#he worked like an 18 hour shift in a literal FIRE and didn't even stop to rest or shower before he ran to buck#(also my PS is acting up pls don't look at the quality of these gifs)#my stuff
4K notes
·
View notes
Note
Ĥello
I am mai from Gaza.. 🇵🇸🍉
I hope you are well .
I write to you with a heart full of hope and faith, and I ask for your urgent help. My family is in great danger due to the war, and I am running a fundraising campaign to save them.
Please, can you reblog my campaign post on my account? Every participation can make a difference in my family's life.
Thank you from the bottom of my heart for any help you can provide. 🇵🇸🇵🇸
The campaign was documented by @90-ghost
Vetted, please support
1 note
·
View note