#randint python
Explore tagged Tumblr posts
Visit Tumblr Blog
Explore Tumblr blogs with no restrictions, modern design and the best experience.
Last Seen Tumblr Blogs


Fun Fact
After the announcement of the deal with Yahoo!, there were 170K signatures of unhappy Tumblr users petitioning to prevent the sale in 2013.
Text
May not be able to do too much at the moment but by sizing up the size of the text on my screen i made some code that could, if written correctly, destroy a computer it’s run on in a matter of moments by filling the storage with useless junk text files indefinitely.
Here’s the code, I don’t recommend running it because it will probably destroy your computer:
from random import randint
while True:
file = open(f”{str(randint(0,9999999999))}.txt”,”w”)
file.write(“Filling ur computer :3”)
file.close()
Do note that there’s a good chance this will A) not work as I haven’t tested it and B) it must be run in a python program like Idle that can modify files on a computer else nothing will happen and C) the indents aren’t real and actual indents need to be added for the while loop.
Please don’t run this and if you do let me know what happens.
13 notes
·
View notes
Text
Hyperparameter Tuning in Machine Learning: Techniques and Tools

What is Hyperparameter Tuning?
Hyperparameter tuning is the process of selecting the best combination of hyperparameters for a machine learning model to improve its performance.
Unlike parameters, which are learned from the data during training (e.g., weights in neural networks), hyperparameters are set before training and control aspects of the learning process, such as the complexity of the model, the learning rate, and the number of iterations.
Effective hyperparameter tuning can make a significant difference in a model’s performance. The process involves experimenting with different hyperparameter values, training the model, and evaluating its performance to find the optimal set.
2. Common Hyperparameters in Machine Learning Different types of machine learning algorithms have different hyperparameters.
Below are examples of common hyperparameters for some popular algorithms: Linear Models (e.g., Linear Regression, Logistic Regression): Regularization strength (e.g., L1 or L2 penalties) Learning rate (for gradient descent)
Decision Trees:
Maximum depth of the tree Minimum samples required to split a node Minimum samples required at a leaf node Support Vector Machines (SVM): Kernel type (linear, polynomial, RBF) Regularization parameter © Gamma value for RBF kernel Neural Networks:
Number of layers and neurons per layer Learning rate Dropout rate (for regularization) Batch size Random Forests:
Number of trees in the forest Maximum depth of each tree Minimum samples required to split nodes Each of these hyperparameters affects how the model learns, generalizes, and fits the data.
3. Techniques for Hyperparameter Tuning
There are several techniques for hyperparameter tuning, each with its strengths and limitations:
a) Grid Search Grid search is a brute-force method for hyperparameter tuning. In grid search, you define a grid of possible hyperparameter values and systematically evaluate all combinations to find the best one.
For example, you might test various learning rates and regularization values for a logistic regression model.
Advantages:
Simple and exhaustive; covers all combinations in the search space.
Easy to implement using libraries like scikit-learn.
Disadvantages:
Computationally expensive, especially when the hyperparameter space is large. Can be time-consuming, as all combinations are evaluated regardless of their effectiveness.
Example:
python
from sklearn.model_selection import GridSearchCV from sklearn.svm import SVC param_grid = {‘C’: [0.1, 1, 10], ‘kernel’: [‘linear’, ‘rbf’]} grid_search = GridSearchCV(SVC(), param_grid, cv=5) grid_search.fit(X_train, y_train) print(“Best parameters:”, grid_search.best_params_)
b) Random Search Random search randomly selects hyperparameter combinations from a defined search space. Unlike grid search, it doesn’t evaluate all combinations but selects a subset, which can lead to quicker results, especially for large search spaces.
Advantages:
More efficient than grid search, especially when the hyperparameter space is large. Less computationally expensive and faster than grid search.
Disadvantages:
No guarantee of finding the optimal set of hyperparameters, as it only evaluates a random subset.
Example:
python
from sklearn.model_selection import RandomizedSearchCV from sklearn.ensemble import RandomForestClassifier from scipy.stats import randint param_dist = {‘n_estimators’: randint(10, 200), ‘max_depth’: randint(1, 20)} random_search = RandomizedSearchCV(RandomForestClassifier(), param_dist, n_iter=100, cv=5) random_search.fit(X_train, y_train) print(“Best parameters:”, random_search.best_params_)
c) Bayesian Optimization Bayesian optimization is a probabilistic model-based method that uses past evaluation results to guide the search for the best hyperparameters.
It builds a probabilistic model of the objective function (usually the validation score) and uses it to choose the next set of hyperparameters to evaluate.
Advantages:
More efficient than grid search and random search, especially for expensive-to-evaluate functions.
Can converge to an optimal solution faster with fewer evaluations.
Disadvantages: Requires specialized libraries (e.g., GaussianProcessRegressor from scikit-learn).
Computational overhead to build the probabilistic model. d) Genetic Algorithms Genetic algorithms use principles of natural selection (like mutation, crossover, and selection) to explore the hyperparameter search space.
These algorithms work by generating a population of candidate solutions (hyperparameter combinations) and evolving them over several generations to find the optimal solution.
Advantages: Can handle complex search spaces.
Effective in exploring both continuous and discrete hyperparameter spaces.
Disadvantages: Computationally intensive. Requires careful tuning of genetic algorithm parameters.
4. Tools for Hyperparameter Tuning
There are several tools and libraries that simplify the hyperparameter tuning process:
a) Scikit-learn Scikit-learn provides easy-to-use implementations for grid search (GridSearchCV) and random search (RandomizedSearchCV).
It also offers tools for cross-validation to ensure that hyperparameter tuning results are reliable.
b) Optuna Optuna is an open-source hyperparameter optimization framework that offers features like automatic pruning of unpromising trials and parallelization.
It supports various optimization algorithms, including Bayesian optimization.
c) Hyperopt Hyperopt is another Python library for optimizing hyperparameters using Bayesian optimization and random search. It supports parallelization and can be used with a variety of machine learning frameworks.
d) Ray Tune Ray Tune is a scalable hyperparameter tuning framework built on Ray, which provides efficient support for distributed hyperparameter optimization, including advanced search algorithms like Hyperband.
e) Keras Tuner For deep learning models, Keras Tuner is a library specifically designed for tuning hyperparameters of Keras models.
It integrates seamlessly with TensorFlow and supports methods like random search, Hyperband, and Bayesian optimization.
5. Best Practices for Hyperparameter Tuning To make the process more efficient and effective, here are some best practices:
Use cross-validation:
This ensures that your hyperparameter tuning results are reliable and not overfitted to a single train-test split.
Start simple:
Begin with a smaller, manageable search space and progressively increase complexity if necessary.
Parallelization:
Tools like Ray Tune and Optuna allow you to run multiple hyperparameter tuning jobs in parallel, speeding up the process.
Monitor performance:
Keep track of how different hyperparameter sets affect model performance, and use visualization tools to analyze the results.
6. Conclusion Hyperparameter tuning is a crucial part of machine learning model optimization.
Whether you’re working with a simple linear model or a complex deep learning architecture, finding the right hyperparameters can significantly improve model performance.
By leveraging techniques like grid search, random search, and Bayesian optimization, along with powerful tools like scikit-learn, Optuna, and Keras Tuner, you can efficiently find the best set of hyperparameters for your model.
WEBSITE: https://www.ficusoft.in/data-science-course-in-chennai/
0 notes
Text
youtube
!! Numpy Random Module !!
#Shiva#python tutorials#data analytics tutorials#numpy tutorials#numpy random#random module in numpy python#random function numpy#python randint function#python randn function#python numpy random choice function#python numpy random uniform function#how to create random array in numpy python#random number generator#python array numpy#generate a random number#rand number#random function#randint python#numpy for machine learning#numpy data science#python numpy#Youtube
0 notes
Note
Hey!! Thanks for your time. So I was wondering how I would write the code for something where I want the chances of success to be based on a percentage. I'm trying to implement lottery tickets, and I need it to have a 0.09% chance of success. And also, how would I make it so you get a different response for each outcome? Like if you failed to get one, I want your buddy to say "aw that's too bad, maybe next time!" And if not I want everyone to freak out, plus the earnings to be added. Thank you!!
I return from the void now that everyone is migrating back from the land of the South African Muskrat! Yours is a rather involved answer to see all of it below the cut
The answer to your question, at least the percentage part, is a matter of the randint() function in the Python library. In this case, you want something to happen only 1 in so many times. For example, 1 in 10 is a 10% chance. To simulate this in code, you can have the interpreter pick a random(note this isn’t true randomness, but it’s good enough for a video game we aren’t making a cyber security system!) number between 1 and 10. If it comes out to one number and one number only, then you pass the check. This makes it a 10% chance, just like if you rolled a 10 sided die.
For your .09% chance(very rare!), it would be 1 in ~1,100 chance.(.090909...%). So if you have Python pick a number between 1 and 1,100 and check to see if it’s one specific number, then you’ll have your lottery win.
The easiest way to implement this in game is to record the results of the 1 in 1,100 chance inside a function wrapper so that you can call it multiple times and they can check lots of tickets.
init python: def Lottery_Ticket(): ticket_num = renpy.random.randint(1, 1100) return ticket_num
In order to use the randint() function from the random library, you just need to invoke it! It’s a part of Renpy’s library. So you’d type renpy.random.randint(1,1100) like above. :)
Once that is done in your game code itself you’ll put the logic for the winning number. Let’s say it’s 42, for meme reasons.
You could write in your game file:
label check_ticket: $ ticket = Lottery_Ticket() if ticket == 42: jump you_win else: jump you_lose
This simple logic sets the ticket equal to the result of the Lottery_Ticket function. It then checks if the number is exactly the winning number you chose. If so, it takes you to the winning section of your game code, if not, it falls through and says you lose.
Every time they buy a ticket, you can send them to this label, it will re-run the Lottery_Ticket function anew, picking a new random number, and see if they won.
Under your winning code, since you asked, this is where you’d put your characters reacting positively! Note the thing in brackets is the player character’s name as a variable being interpolated by the engine. If you let the player pick their own name, that’s how you’d get it into the script. If they have a set name, just type that instead.
label you_win: e “Oh my God! [PC_Name] you did it! e “It’s like a dream come true!” $ Inv.add(lottery_winnings) $ renpy.notify(”You added“ + str(lottery_winnings) + “ to your wallet!”)
As you see, I’m using to functions. One that comes with Ren’Py calls in the notify screen context through the function. It needs to be a string inside which is why I’ve turned the int representing the lottery winnings into a string here.(This assumes you have a variable called “lottery_winnings” that has a specific integer value! Please initialize one before the start of your game!) (example: $ lottery_winnings = 10000)
The second is me assuming that you have an Inventory class instance with a method called “add” that can add money into a wallet variable. To make something like that:
init python: class Inventory(python_object): def__init__(self, wallet = 0): self.wallet = wallet self.pocket = [] def add(num): self.wallet += num return self.wallet
Then you just need an instance of it:$ Inv = Inventory() (I wrote it with defaults, so you don’t need to pass any arguments to the instance when you make it, though you are welcome to pass an INTEGER to it when you instantiate it so that your character starts with a certain amount of money. :D )
Then you can call the method on the variable to add the earnings to their wallet. :)
There’s also an empty pockets list inside of the inventory you can use to store the string names of objects they also own. For something like that:
$ Inv.pocket.append(”apple”)
This will add a string called “apple” to the pocket list inside the inventory. Which you can use to check if they “own” an object by checking if it is in the list.
if ‘apple’ in Inv.pocket: .......
But that’s more detail for another time.
You need to put the class in an init python block before the game starts so that you can make an instance of it to manipulate later.
For not winning, just have the ‘you_lose’ label have the dialogue you wanted.
label you_lose: e “Aw, that’s too bad. Maybe next time!”
And then continue on with the rest of the game.
I hope everything here is clear and this helps. I know this ask came in ages ago, but I still think answering it will help Ren’Py users in the now. Remember: If your code won’t compile, and you don’t what to do; who you gonna call? The Ren’Py Help Desk!
#RenPy#Ren'Py#thehelpdesk#Renpyhelpdesk#keyword: python#keyword: init python#Python#Python Classes#Inventory Code#function: renpy.notify()#function: renpy.random.randint()#keyword: jump#keyword: label
14 notes
·
View notes
Photo

Randomness of Python's random.randint
by wenhao232
10 notes
·
View notes
Text
Jokenpo in python

from random import randint #importing library #Stone Paper Scissors items = ['stone',' paper',' scissors '] #Computer will choose from the items pc = randint(0,2) player = int() #Player (You) will choose from the items while player != 0 or player != 1 or player != 2: player = int(input(''' [0] Stone [1] Paper [2] Scissors Choice: ''')) if player == 0 or player == 1 or player == 2: break print() print(f'You chose {items[player]}') print() print(f'Pc chose {items[pc]}') print() #Game Conditions - Win or Lose for the Computer # If computer chooses Stone if pc == 0: if player == 2: print('Computer won!') elif player == 1: print('You won!') elif player == 0: print('Draw in the game') # If computer chooses Paper if pc == 1: if player == 0: print('Computer won!') elif player == 2: print('You won!') elif player == 1: print('Draw in the game') # If computer chooses Scissors if pc == 2: if player == 1: print('Computer won!') elif player == 0: print('You won!') elif player == 2: print('Draw in the game')
10 notes
·
View notes
Text
Python Örnekleri:Rastgele Şifre Oluşturan Program
Python Öğrenmeye Başladım
Sebebim ise kullanım alanının çok geniş olması. Halihazırda, yapay zeka'dan tutun da oyunlara ve web uygulamaları geliştirmeye kadar çok geniş bir kullanım ortamı var. Beni çeken kısmı ise bir şeyleri otomasyona döküp o işe ayıracağım süreyi acayip kısaltması. İlerleyen günlerde python örnekleri ile otomasyonlara ve çeşitli uygulamalar ile internet ortamında bir işe ayıracağımız süreyi optimize ederek zamandan tasarruf edeceğiz. Gelişmelerimi paylaşmaya devam edeceğim. Benim ihtiyacım olan şey muhtemelen diğer insanlarında aradığı bir şeydir. Bu yüzden geliştirdiğim ve paylaşmaya değer bulduğum şeyleri paylaşacağım. Özellikle botlar ve otomasyonlar için planlarım var.
Python'u Övelim
Python çok güçlü ve işlevsel bir programlama dili. Bunun yanında ise kolay okunur, yazılır ve anlaşılabilir. Öğrenirken zorluk çekmeyeceğiniz güzel bir dildir. Dolayısıyla programlamaya başlayacaklara genelde python ile başlamaları önerilmekte. Python'un en iyi yanlarından biride C programlama dili ile birlikte çalışabiliyor oluşu bu bakımdan geniş bir kullanım alanına sahip. Gelişmelerimi paylaşmaya devam edeceğim. Python ile örnek bir rastgele şifre oluşturma programı nasıl yapılır ve yaptığım programın kodlarını aşağıda görebilirsiniz. Rastgele şifre oluşturma mantığı Öncelikle harfleri, özel karakterleri ve sayıları alıyoruz. Bunları rastgele bir şekilde normal bir şifre uzunluğunda 8 ile 16 karakter olarak rastgele bir araya getiriyoruz. #Python Kodu import string from random import * harfler = string.ascii_letters sayilar = string.digits semboller = string.punctuation karakterler = harfler+sayilar+semboller min_uzunluk = 8 max_uzunluk = 16 sifre = "".join(choice(karakterler) for x in range(randint(min_uzunluk, max_uzunluk))) print(sifre) Programın çalıştırılması sonucu oluşturulan birkaç şifre örneği; W(4q67)=7[.V. FKL#Zz^zilR.qL IZoI"L!u` 7Qe^(97vq/tq3xe:
Gelecek Planım: Python Örnekleri Nasıl Olacak
Öğrenmeye başladığım kısmı okudunuz. Bu yüzden aklımdaki birkaç örnek uygulamadan bahsedeceğim, hali hazırda yapmış olduğum bir uygulama var. Resim boyutlarını küçültmek için resimleri webP formatına dönüştüren bir uygulama yaptım. Çünkü blogta kullandığım resimlerin boyutunu küçültmek ve siteyi hızlandırmak için geliştirdim. Yakın zamanda onuda paylaşacağım. Sonuç olarak, ücretsiz bir eklenti bulamadığım, bulduklarımında limitli kullanım imkanı sunması sebebiyle kendim yaptım. Şu an için web otomasyonu gibi bir fikrim var yazdığım yazıları youtube videosuna dönüştürüp otomatik olarak platformlarda paylaşacak türden bir otomasyon. Bir diğer fikrim ise sosyal medya otomasyonları otomatik olarak post üretip paylaşacak şekilde programlamayı düşünüyorum. İlerleyen günlerde göreceğiz ben çok heyecanlıyım. Read the full article
0 notes
Text
Python while loop

#Python while loop code
Take a minute to explain this syntax aloud to yourself or a colleague before reading the discussion below.
#Python while loop code
How does the syntax of the print(“Player ”+str(player)+“ guess?”) line of code work? What is each part of this statement doing? What numbers do you expect to see most often for c? Why? What do they represent?.What do you think the maximum value will be? What does it represent in this context?.What do you think the minimum value of c will be? What does this represent in this context?.This is a great place to make some predictions: Then, what gets printed? The value of one of the numbers? No, c, which represents how many numbers we needed to randomly calculate before we got two in a row that were the same. The program will continue to run through this loop of finding a new random number ( n), adding 1 to the count variable to keep track of how many numbers we’ve found, comparing the new number ( n) to the previous number ( t), and then exiting the loop if these values are the same or��storing the new number to the previous number variable and continuing the process. (Since the conditional for this While loop is True, it will keep running until it encounters a break command.) So, what happens after the else command executes and the value of n gets saved in t? Well, we’re at the end of our loop, so the loop will circle back to its beginning. Why? So, that we can go on to find another, new number (our third number), store this to n, and then compare it to the number we found most recently (now stored in t). Now, t no longer represents the first number we found - it represents the second number we found. In this case, the value that was stored in n (in other words, the most recent random number we found) will be stored into variable t. If t and n don’t have the same value ( what are the chances?), then the program will skip down to the criteria in the else command. If this happens, the command within the If block will run - specifically, the break command will make the program exit the While loop and move on to the print command. If they are the same, that means that the program generated two consecutive numbers that are the same. Why? The program is checking to see if n (the new number) is the same as t (the previous number). Next, the program checks to see if t and n have the same value. Now c has a value of 2, representing that we have found 2 numbers so far. Also, the value of c is increased by one to show that a new number has been randomly determined. Within the loop, a new variable n is created and it’s assigned a random number from 1–6. Next, a Do While loop (modeled using a While loop with a condition of True) kicks in. c will be used as a count variable in this program to keep track of how many numbers are generated before two consecutive values are the same. This program starts by assigning a random number from 1–6 to variable t and storing the value of 1 to variable c. Explain it aloud to yourself or a colleague, then read through a sample description below. How does the do_while_loop.py program at the bottom of page 1 work? This program may not be intuitive. Tech tip: The break command can be typed in via the TI-Nspire™ keyboard. TI-Nspire™ keyboard or from Menu > Random. Tech tip: randint() can be entered via the So, randint(1,6) will return a random integer from the set. Quick refresher: How does the randint(1,6) syntax work?Īnswer: In Python, randint(a,b) returns a random integer within the inclusive range from a to b (meaning including a and b). Start by working through that activity, then read through the following discussion of main ideas from the activity. A great introduction to this loop structure can be found in Unit 4, Activity 3.
0 notes
Text
Modules in Python
People have built tools in Python that are not included automatically when you install it. Python allows us to package code into files (or sets of files) called modules.
A module is a collection of Python declarations intended broadly to be used as a tool. Modules are also called libraries or packages. A package is really a directory that holds a collection of modules.
To use a module in a file:

Often a library will include a lot of code that you don’t need that may slow down the program or conflict with existing code. Therefore, only import what you need.
One common library that comes as part of the Python Standard Library is datetime. In this case, datetime is the name of the libary and the object you import.

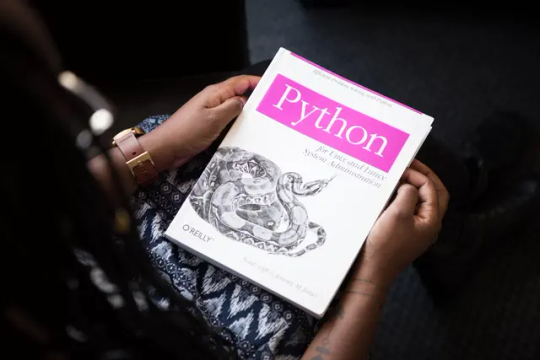
There are hundres of modules that you can use. Another one of the most commonly used modules is random which allows you to generate numbers or select items at random.
If using more than one piece of the module’s functionality, use:

Two common random functions are:
random.choice() takes a list as an argument and returns a number from the list
random.randint() takes two numbers as arguments and generates a random number between the two numbers you passed in

NOTE when we want to invoke the .randint() function, we call random.randint()
This is a default behaviour where Python offers a namespace for the module. A namespace isolates the functions, classes and variables defined in the module from the code in the file doing the importing. Your local namespace is where your code is run.
Python defaults to naming the namespace after the module being imported, but sometimes this name may be ambiguous of long. It could also conflict with an object you have defined in your local namespace.
This name can be altered by aliasing using as as a keyword.

Aliasing is most often done if the name of the library is long and typing it is laborious.
You might also occasionally encounter import *. * is known as a wildcard and matches everything and anything. This is dangerous because it could pollute our local namespace. Pollution occurs when the same name could apply to two possible things.
Another library is matplotlib which allows you to plot your Python code in 2D.
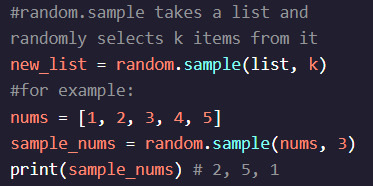
random.sample() is a random function that takes a range and a number as arguments and returns the specified number of random numbers from that range.


If you use Python’s built-in floating-point arithmetic to calculate a sum, it produces a weirdly formatted number.
Knowing that rounding errors occur in floating-point arithmetic, you want to use a data type that performs decimal arithmetic more accurately.

We use the decimal module’s Decimal data type to add. Because we used the Decimal type the math acts more as expected.
Usually, modules provide functions or data types that we can then use to solve a general problem, allowing us more time to focus on the software we are building to solve a more specific problem.
NOTE: Make sure to use quotes around the floats. Each number will need to be converted with Decimal BEFORE performing the operations.
If a variable is defined inside a function, it will not be accessible outside a function. Scope also applies to classes and to the files you are working within.
Even files inside the same directory do not have access to each other’s variables, functions, classes or any other code.
Files are actually modules, so you can give a file access to another file’s content using import.

0 notes
Video
youtube
numpy > numpy rand and randint routines in python 11 | 2018-12-28T10:27:54.000Z
1 note
·
View note
Text
Python online ausführen?
Python ist eine tolle Programmiersprache mit der man ao allerlei Dinge tun kann. Und es gibt auch die Möglichkeit den Code online zu testen!
Wenn euch mal ein Freund/in bittet ein kleines Programm zu schreiben um bspw. Zufallszahlen zu generieren, er aber keine Python IDE installiert hat oder installieren kann um das Programm auszuführen, dann gibt es eine ganz einfache Möglichkeit ihm/ihr dennoch zu helfen. Nehmen wir eimal ein Beispiel. Warum auch immer benötig jemand einen Zufallsgenerator, der jeweils eine Zeile mit vier Zahlen generiert. Diese sollen im Bereich 20 bis 100 liegen und jeweils in der Summe 300 ergeben. Warum auch immer man sowas braucht.
Im Prinzip gibt es dazu einen ganz einfachen und nachvollziehbaren Code in Python. Den schreibt man dann in seiner Python IDE, wie bspw. Thonny IDE. Man importiert erstmal die bereiche aus der bibliothek, welche man für diese berechnungen benötigt.
from random import * import sys
Dann kommt die eigentliche Berechnung bzw. die Funktion random. Random generiert Zufallszahlen. Das lassen wir in einer "while True" Schleife laufen.
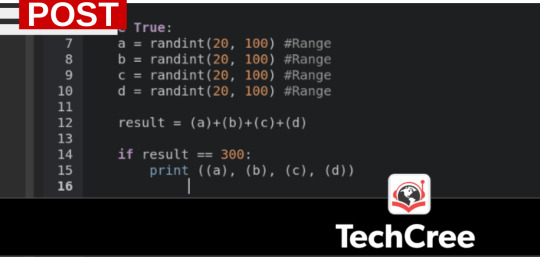
while True: a = randint(20, 100) #Range b = randint(20, 100) #Range c = randint(20, 100) #Range d = randint(20, 100) #Range
Damit haben wir also 4 Zahlen erzeugt die zwischen 20 und 100 liegen und diesen jeweils die Variable a, b, c, d zugeordnet.
Die addieren wir nun zusammen:
result = (a)+(b)+(c)+(d)
Wir bekommen nun aber zahlreiche Zahlen die bis zu diesem Punkt in Summe noch nicht 300 ergeben. Da uns aber nur diese Zahlen interessieren geben wir über die print-Funktion nur die Zahlen aus die wir brauchen und zwar mit einem If= Befehl.
if result == 300: print ((a), (b), (c), (d))
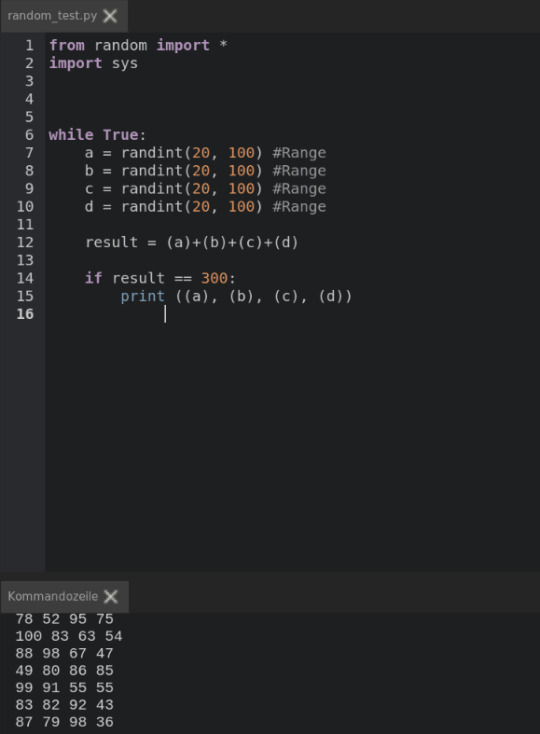
Wir bekommen also nun fortlaufend Zahlenreihen die unseren Anforderungen entsprechen. Das ist natürlich nur ein Beispiel und eventuell kann man es auch besser lösen, denn es werden dabei viele Zahlen im "Hintergrund" produziert, wie wir nicht benötigen, ergo nicht angezeigt bekommen. Der komplette Code lautet also dann wie folgt:
from random import * import sys
while True: a = randint(20, 100) #Range b = randint(20, 100) #Range c = randint(20, 100) #Range d = randint(20, 100) #Range
result = (a)+(b)+(c)+(d) if result == 300: print ((a), (b), (c), (d))
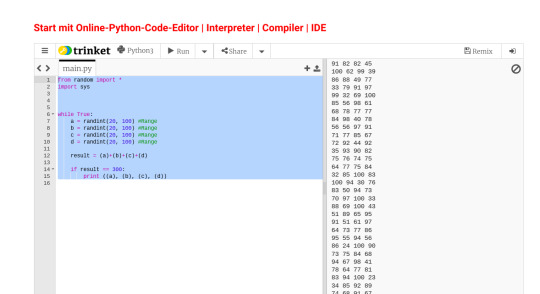
nun gibt es die Möglichkeit auch auf Online IDE bzw. Online Interprter zuzugreifen und den Python Code dort laufen zu lassen: Online Python könnt ihr hier ausführen! dabei darf man aber von dieser Lösung nicht zuviel erwarten. Python kann zahllose Bibliotheken zur Verfügung stellen, welche ihr in einer lokal installierten IDE, wie bspw. Thonny IDE installieren könnt. Sogenannte Plugins. Online IDE 's können das so nicht unbedingt. Aber so ein einfaches Skript, wie in dem Beispiel läuft sicherlich.
Diesen und andere Beispiele findet Ihr übrigens auf meiner GitHub Seite: https://github.com/techcree - kopiert euch gerne den Code und spielt damit! Viel Spaß!
0 notes
Text
EECS 1015: LAB #9 – Revisiting the MinMaxList (Importing classes and improving efficiency) Assigned: Solved
EECS 1015: LAB #9 – Revisiting the MinMaxList (Importing classes and improving efficiency) Assigned: Solved
LAB 9 – TASK/ Lab 9 – Improving MinMaxList efficiency STARTING CODE – main.py [https://trinket.io/python/44a3131856] from MinMaxList import MinMaxList # Import MinMaxList from separate file from random import randint # Main function is given. def main(): aList = MinMaxList([10, 11, 99, 1, 34, 88]) print(“–Insert Item–“) for i in range(30): x = randint(1,…

View On WordPress
0 notes
Text
Create a list of five random numbers. Use randint, don't hardcode. Demonstrate your algorithm finding each of the numbers
Create a list of five random numbers. Use randint, don’t hardcode. Demonstrate your algorithm finding each of the numbers
Sequential Search Algorithm Python Programming Objectives ---------- * sequential search - design, analyze, implement, test, time * continue practicing previously learned skills: algorithm analysis, graphing with theoretical prediction curves Implementation -------------- Write a function named sequential_search. It must have two parameters, a list to search and a value to search for. It must…
View On WordPress
0 notes
Text
Raspberry PI Pico #9 – kleines Spiel "Pixel Chaser"

Wie du das kleine Spiel "Pixel Chaser" für den Raspberry PI Pico programmierst, möchte ich dir in diesem Beitrag zeigen. https://youtu.be/_14BAZOlBg0
Was ist Pixel Chaser?
Das Spiel "Pixel Chaser" funktioniert recht einfach. Du musst lediglich eine Taste betätigen, wenn zwei NeoPixel übereinander liegen. Die Schwierigkeit dabei liegt daran dass, der eine Pixel feststeht und der andere sich im Kreis dreht.
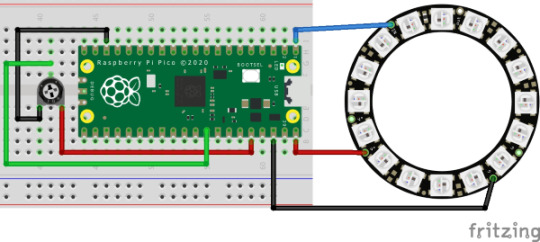
Aufbau der Schaltung
Für den Aufbau der Schaltung benötigst du: - Raspberry PI Pico,- USB Datenkabel - ein 8bit NeoPixel Ring (besser noch ein 16bit oder 24bit) - ein Piezo Buzzer, - ein Taster für die Printmontage inkl. Kappe, - ein 10 kOhm Widerstand, - diverse Breadboardkabel - ein 170 Pin Breadboard Achtung! Der Raspberry PI Pico kann nur maximal 30 NeoPixel gleichzeitig betreiben, d.h. alle NeoPixel sind aktiviert. Wenn du mehr als 30 an einem Pi Pico steuern möchtest, so musst du eine externe 5V Stromquelle einbinden. Das kannst du zbsp. mit einem Power Shield für die 400 bzw. 720 Pin Breadboards erledigen.

Power Shield für ein 400 / 720 Pin Breadboard Das Modul "Power Supply for Breadboards" kann 3,3V und 5V liefern, welches mit einem Jumper gesetzt werden kann. Wenn du dieses Modul in deine Schaltung integrierst, dann musst du zusätzlich noch den Minus-Pol des Power Supply Moduls mit einem GND des Raspberry PI Pico verbinden! Anschluss des NeoPixel Ring Zunächst widmen wir uns dem Pixel Ring, dieser verfügt auf der Rückseite über 3 Lötpunkte an welche Breadboardkabel angelötet werden können.

12bit NeoPixel Ring Ansicht vorne

12bit NeoPixel Ring Ansicht hinten

Breadboardkabel am 12bit NeoPixel Ring ABER diese Kabel sind recht dünn und daher reißen diese bei mehrmaliger Bewegung recht schnell ab. Da an diesem Pixel Ring ein NeoPixel defekt ist, habe ich mir schnell ein neuen, etwas größeren Ring (16bit = 16 NeoPixel) bei Roboter-Bausatz.de für knapp 7 € inkl. Versandkosten bestellt.

Anschluss eines NeoPixel Rings Dieser NeoPixel Ring hat vier Pins. BeschriftungBeschreibungDIdigital IN5VVersorgungsspannungGNDMinus-PolDOdigital OUT Über den DO Pin kann ein oder mehrere NeoPixel Ringe kaskadierend angeschlossen werden. Schaltbild

Schaltung - Raspberry PI Pico "Pixel Chaser"
Programmieren in CircuitPython
Für die Programmierung des NeoPixel Rings für den Raspberry PI Pico gibt es diverse Bibliotheken. Jedoch habe ich mit der Adafruit Bibliothek deutlichen erfolg gehabt. Diese Bibliothek findest du als Download unter https://circuitpython.org/libraries bzw. zum direkten Download der knapp 4 MB großen ZIP Datei. Der Download hat mit meiner 100MBit Leitung knapp 4 Minuten gedauert, also bitte etwas Zeit beim Download mitbringen. Download & kopieren der NeoPixel Bibliothek Wenn die knapp 4 MB große ZIP Datei heruntergeladen und entpackt wurde, muss die Datei "neopixel.mpy" nach X:CIRCUPYlib kopiert werden.
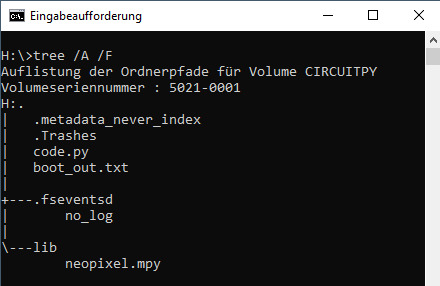
Inhalt vom Laufwerk "CIRCUITPY" Erstellen des Programmes im MU Editor Für die Programmierung nutze ich die kostenfreie, kleine IDE "MU Editor" welche du von der Seite https://codewith.mu/en/download herunterladen kannst. Diesen Editor bekommst du für Microsoft Windows, MacOS sowie als Python Package (für Linux).

Editor Mu - wählen des Modus Programmieren des Spieles "Pixel Chaser" in X Schritten Wie du das Spiel "Pixel Chaser" programmierst, möchte ich dir in x einfachen Schritten zeigen. Schritt 1 - steuern eines NeoPixel Rings Im ersten Schritt wollen wir einen NeoPixel Ring ansteuern. Im Detail heißt dass, das wir zunächst einmal prüfen, wie wir die einzelnen Pixel eines NeoPixel Rings ansteuern können. # importieren der Funktion sleep aus dem Modul time from time import sleep # Modul "board" für die Ansteuerung der GPIOs import board # Modul zum Ansteuern eines NeoPixel import neopixel #Anzahl der verfügbaren NeoPixel numPixels = 12 #initialisieren der NeoPixel am GPO0 und der Anzahl "numPixels" pixels = neopixel.NeoPixel(board.GP0, numPixels) #Helligkeit auf 50% setzen pixels.brightness = 0.5 #Endlosschleife while True: #von 0 bis Anzahl "numPixels" mache... for pixel in range(num_pixels): #NeoPixel an Position "pixel" in die Farbe grün färben pixels = (0, 255, 0) #eine Pause von 0,03 Sekunden sleep(0.03) #NeoPixel an Position "pixel" in die Farbe schwarz färben #quasi den Pixel deaktivieren pixels = (0, 0, 0) steuern der Geschwindigkeit mit einem Drehpotentiometer Die Geschwindigkeit des Umschaltens steuern wir im Code mit einer kleinen Pause, in diesem Fall sind es 0,03 Sekunden. Wir können diese Pause auch über einen 50 kOhm Drehpotentiometer manipulieren.
Aufbau der Schaltung "Drehpotentiometer am Raspberry PI Pico" Quellcode # importieren der Funktion sleep aus dem Modul time from time import sleep # Modul "board" für die Ansteuerung der GPIOs import board # Modul zum Ansteuern eines NeoPixel import neopixel from analogio import AnalogIn #Anzahl der verfügbaren NeoPixel numPixels = 12 #initialisieren der NeoPixel am GPO0 und der Anzahl "numPixels" pixels = neopixel.NeoPixel(board.GP0, numPixels) #Helligkeit auf 50% setzen pixels.brightness = 0.5 poti = AnalogIn(board.GP27) #Funktion zum Mappen eines Werte zu einer Range #https://stackoverflow.com/questions/1969240/mapping-a-range-of-values-to-another def translate(value, leftMin, leftMax, rightMin, rightMax): leftSpan = leftMax - leftMin rightSpan = rightMax - rightMin valueScaled = float(value - leftMin) / float(leftSpan) return rightMin + (valueScaled * rightSpan) #berechnen eines Wertes für die Pause def pauseValue(): value = poti.value return translate(value, 0,65520, 0,5) #Endlosschleife while True: #von 0 bis Anzahl "numPixels" mache... for pixel in range(numPixels): #NeoPixel an Position "pixel" in die Farbe grün färben pixels = (0, 255, 0) #eine Pause von 0,03 Sekunden sleep(pauseValue()) #NeoPixel an Position "pixel" in die Farbe schwarz färben #quasi den Pixel deaktivieren pixels = (0, 0, 0) Video Über diesen Drehpotentiometer können wir nun den Schwierigkeitsgrad des Spieles einstellen. Oder wir lassen diesen vom Mikrocontroller einstellen. Beide Varianten sind möglich. Schritt 2 - einbau des Tasters Wie du einen Taster an einem Raspberry PI Pico anschließt und auslesen kannst, habe ich dir bereits im Beitrag Raspberry PI Pico #4 – Taster mit PullDown & PullUp abfragen ausführlich erläutert. # Modul "board" für die Ansteuerung der GPIOs import board # Modul um den Status eines Buttons einzulegen import digitalio # Taster am GPIO1 angeschlossen button = digitalio.DigitalInOut(board.GP1) button.direction = digitalio.Direction.INPUT Schritt 3 - Piezo Buzzer für die Ausgabe eines Tones Damit wir eine akustische Rückmeldung haben, ob wir gewonnen oder verloren haben, bauen wir nun einen Piezo Buzzer ein. import time import board import pulseio tones = buzzer = pulseio.PWMOut(board.GP2, variable_frequency=True) buzzer.frequency = tones buzzer.duty_cycle = 2**15 while True: buzzer.frequency = tones time.sleep(0.5) buzzer.frequency = tones time.sleep(0.5)
fertiges Spiel "Pixel Chaser"
Hier nun der fertige Code. # Modul für den Import einer Funktion zum einlegen einen Pause im Code from time import sleep # Modul "board" für die Ansteuerung der GPIOs import board # Modul um den Status eines Buttons einzulegen import digitalio # Modul zum Ansteuern eines NeoPixel import neopixel # Modul um eine Zufallszah lzu generieren from random import randint # Modul um ein PWM Signal zu erzeugen (wird für den Piezo Buzzer benötigt) import pulseio # Taster am GPIO1 angeschlossen button = digitalio.DigitalInOut(board.GP1) button.direction = digitalio.Direction.INPUT # initialisieren des Piezo Buzzers am GPIO2 Pin buzzer = pulseio.PWMOut(board.GP2, variable_frequency=True) # zunächst die Frequenz auf 1 und die Wellenlänge auf 0 buzzer.frequency = 1 buzzer.duty_cycle = 0 # Anzahl der verfügbaren NeoPixel numPixels = 16 # aktiver Pixel activePixel = -1 # initialisieren der NeoPixel am GPO0 und der Anzahl "numPixels" pixels = neopixel.NeoPixel(board.GP0, numPixels) # Helligkeit auf 10% setzen pixels.brightness = 0.1 # Töne welche wiedergegeben werden sollen tone = # erzeugen einer Zufallszahl & aktivieren des Pixels # dieser aktivierte Pixel wird in der globalen Variable # activePixel gespeichert def activateRandomPixel(): global activePixel activePixel = randint(0, numPixels-1) pixels = (255, 0, 0) # löscht alle aktiven NeoPixel def clearPixels(): for pixel in range(numPixels): pixels = (0, 0, 0) # deaktivieren des Piezo Buzzers def turnPiezoBuzzerOff(): buzzer.duty_cycle = 0 # aktivieren des Piezo Buzzers def turnPiezoBuzzerOn(): buzzer.duty_cycle = 2**15 activateRandomPixel() # Endlosschleife while True: # von 0 bis Anzahl "numPixels" mache... for pixel in range(numPixels): # wenn der aktive Pixel nicht der gleiche aus der Schleife ist, # dann mache... if pixel != activePixel: # NeoPixel an Position "pixel" in die Farbe grün färben pixels = (0, 255, 0) # eine Pause von 0,03 Sekunden sleep(0.25) # NeoPixel an Position "pixel" in die Farbe schwarz färben # quasi den Pixel deaktivieren pixels = (0, 0, 0) # Wenn der Button gedrückt ist, dann... if not button.value: # aktivieren des Piezo Buzzers turnPiezoBuzzerOn() # ausgeben der Pixel auf der Console print(activePixel, pixel, sep="|") # Wenn der aktive Pixel gleich der Pixel aus der # Schleife ist, dann... if (activePixel-1) == pixel: # ausgeben der Zeichenkette "gewonnen" print("gewonnen") # ausgeben eines Tones buzzer.frequency = tone # eine kleine Pause sleep(0.1) buzzer.frequency = tone sleep(0.1) buzzer.frequency = 1 # löschen aller Pixel clearPixels() # ermitteln eines neuen Pixels welcher gesucht werden soll activateRandomPixel() else: # Wenn die beiden Pixel nicht übereinander liegen dann... buzzer.frequency = tone sleep(0.25) buzzer.frequency = 1 # deaktivieren des Piezo Buzzers turnPiezoBuzzerOff() Read the full article
0 notes
Text
MySQL: Deleting data
Completing the data lifecycle is often harder than originally expected: Deleting data can cost sometimes way more than inserting it in the first place. MySQL Partitions can offer a way out. We have an earlier post on the subject. A sample table, and a problem statement Let’s define a kind of log table, to which data is added with an auto_increment id value and some data. #! /usr/bin/env python3 from time import sleep from random import randint from multiprocessing import Process import click import MySQLdb import MySQLdb.cursors db_config = dict( host="localhost", user="kris", passwd="geheim", db="kris", cursorclass=MySQLdb.cursors.DictCursor, ) @click.group(help="Load and delete data using partitions") def sql(): pass @sql.command() def setup_tables(): sql_setup = [ "drop table if exists data", """ create table data ( id integer not null primary key auto_increment, d varchar(64) not null, e varchar(64) not null )""", "alter table data partition by range (id) ( partition p1 values less than (10000))", "insert into data (id, d, e) values ( 1, 'keks', 'keks' )", "commit", ] db = MySQLdb.connect(**db_config) for cmd in sql_setup: try: c = db.cursor() c.execute(cmd) except MySQLdb.OperationalError as e: click.echo(f"setup_tables: failed {e} with {cmd}.") sql()This is our basic Python framework for experimentation, using the click framework, and a command setup-tables. This command will run a number of SQL statements to initialize our log table named data. The log table has three columns: id, an auto_increment counter, and two columns d and e, each containing 64 characters of data. To get things started, we add an initial partition, containing all id-values below 10.000 and an initial row. If we were to add data to this table in a loop, we would increment our id-counter, and with InnoDB being what it is, all new rows will be added at the end of the table: We remember from ALTER TABLE for UUID that the physical order of any InnoDB table is by primary key - our id-counter. Now, if we were to expire old data, we would start to delete rows with the lowest id-values, so we would delete rows from the beginning of the table, or the left hand side of the B+-Tree. To keep the tree balanced, MySQL would have to execute balancing operations, which will be expensive, because rows are being shuffeled around in the tree. New data is added to the right hand side of the B+-Tree, while old data is being deleted at the left hand side. To keep the tree balanced, data is reshuffled, which is an expensive operation. Instead, we are defining partitions. In our case, we are using the simplest definition possible: A PARTITION BY RANGE on the primary key column. We are making bins of 10.000 rows each, because that is convenient for our demonstration here. Three processes We will be using the Python multiprocessing module to have three processes, an inserter(), a partitioner() and a dropper(). All of them are endless loops. The inserter will insert random new data rows into the table as fast as possible. The partitioner will make sure that we always have a sufficient number of empty new partitions for the inserter to continue. The dropper will limit the number of partitions with data by throwing the oldest partition away. We will have small piece of code that starts our processes: @sql.command() def start_processing(): proc_partition = Process(target=partitioner) proc_partition.start() proc_drop = Process(target=dropper) proc_drop.start() proc_insert = Process(target=inserter) proc_insert.start()The Inserter The Inserter is an endless loop that generates two random 64 character strings and inserts a new row into the database. Every 10 rows, we commit, every 1000 rows we print a message. def inserter(): counter = 0 step = 10 cmd = "insert into data (id, d, e) values( NULL, %(d)s, %(e)s )" db = MySQLdb.connect(**db_config) c = db.cursor() while True: data = { "d": "".join([chr(randint(97, 97 + 26)) for x in range(64)]), "e": "".join([chr(randint(97, 97 + 26)) for x in range(64)]), } c.execute(cmd, data) counter += 1 if counter % step == 0: db.commit() if counter % 1000 == 0: print(f"counter = {counter}")Without the other two threads, the inserter will generate 10.000 rows and then stop, because there is no MAXVALUE clause. The Partitioner The Partitioner is an endless loop that runs an ANALYZE TABLE data command to refresh the statistics, and then queries INFORMATION_SCHEMA.PARTITIONS for the five partitions with the highest PARTITION_ORDINAL_POSITION. If there are fewer than 5 partitions in total, we generate new partitions no matter what. If there are not at least 5 partitions with no rows int them, we create new partitions. If we did nothing, we wait for 1/10th of a second and then check again. The new partition gets a range expression with a limit 10.000 values higher than the highest one found, and the partition name is derived from the limit by dividing by 10.000. In code: def create_partition(db, next_name, next_limit): cmd = f"alter table data add partition ( partition {next_name} values less than ( {next_limit}))" print(f"cmd = {cmd}") c = db.cursor() c.execute(cmd)This will simply format and run an ALTER TABLE statement to add a new partition to the existing table. And the checking loop: def partitioner(): db = MySQLdb.connect(**db_config) c = db.cursor() while True: # force stats refresh c.execute("analyze table kris.data") # find the five highest partitions cmd = """select partition_name, partition_ordinal_position, partition_description, table_rows from information_schema.partitions where table_schema = "kris" and table_name = "data" order by partition_ordinal_position desc limit 5 """ c.execute(cmd) rows = c.fetchall() next_limit = int(rows[0]["PARTITION_DESCRIPTION"]) + 10000 next_name = "p" + str(int(next_limit / 10000)) if len(rows) < 5: print(f"create {next_name} reason: not enough partitions") create_partition(db, next_name, next_limit) continue sum = 0 for row in rows: sum += int(row["TABLE_ROWS"]) if sum > 0: print(f"create {next_name} reason: not enough empty partitions") create_partition(db, next_name, next_limit) continue sleep(0.1)This code is mostly a long SELECT on the INFORMATION_SCHEMA.PARTITIONS table, and then two quick checks to see if we need to make more partitions. The Dropper The Dropper structurally mirrors the Partitioner: We have a tiny function to create the actual ALTER TABLE data DROP PARTITION statement: def drop_partition(db, partition_name): cmd = f"alter table data drop partition {partition_name}" c = db.cursor() print(f"cmd = {cmd}") c.execute(cmd)And we have an endless loop that basically runs a SELECT on INFORMATION_SCHEMA.PARTITIONS and checks the number of partitions that have a non-zero number of TABLE_ROWS. If it is too many, we drop the one with the lowest number (“the first one found”, using an appropriate sort order in our SQL). def dropper(): db = MySQLdb.connect(**db_config) c = db.cursor() while True: # force stats refresh c.execute("analyze table kris.data") # cmd = """ select partition_name, partition_ordinal_position, partition_description, table_rows from information_schema.partitions where table_schema = "kris" and table_name = "data" and table_rows > 0 order by partition_ordinal_position asc """ c.execute(cmd) rows = c.fetchall() if len(rows) >= 10: partition_name = rows[0]["PARTITION_NAME"] print(f"drop {partition_name} reason: too many partitions with data") drop_partition(db, partition_name) continue sleep(0.1)A test run In our test run, we see immediately after startup how the five spare partitions are being created. $ ./partitions.py setup-tables $ ./partitions.py start-processing create p2 reason: not enough partitions cmd = alter table data add partition ( partition p2 values less than ( 20000)) create p3 reason: not enough partitions cmd = alter table data add partition ( partition p3 values less than ( 30000)) create p4 reason: not enough partitions cmd = alter table data add partition ( partition p4 values less than ( 40000)) create p5 reason: not enough partitions cmd = alter table data add partition ( partition p5 values less than ( 50000)) create p6 reason: not enough empty partitions cmd = alter table data add partition ( partition p6 values less than ( 60000)) counter = 1000 counter = 2000 counter = 3000 ...Once we cross the threshold of p1, the number of empty partitions is no longer low enough and another one is being created: ... counter = 9000 counter = 10000 create p7 reason: not enough empty partitions cmd = alter table data add partition ( partition p7 values less than ( 70000)) counter = 11000 ...This continues for a while, until we have a sufficient number of data partitions so that we begin dropping, too: ... counter = 90000 create p15 reason: not enough empty partitions cmd = alter table data add partition ( partition p15 values less than ( 150000)) drop p1 reason: too many partitions with data cmd = alter table data drop partition p1 counter = 91000 counter = 92000 ...Now the system reaches a stable state and will add and drop partitions in sync with the Inserter. From inside SQL we can see the number of rows in the table rise, and then suddenly drop by 10.000 as we drop a partition. kris@localhost [kris]> select count(*) from data; +----------+ | count(*) | +----------+ | 89872 | +----------+ 1 row in set (0.00 sec) kris@localhost [kris]> select count(*) from data; +----------+ | count(*) | +----------+ | 90122 | +----------+ 1 row in set (0.02 sec) kris@localhost [kris]> select count(*) from data; +----------+ | count(*) | +----------+ | 80362 | +----------+ 1 row in set (0.01 sec)The complete example is available on github.com. https://isotopp.github.io/2020/09/24/mysql-deleting-data.html
0 notes
Text
PYTHON: Rock, Paper, Scissors game
Was checking out Code Club Projects today to see what else I could do on Python and it suggested games like ‘Rock, Paper, Scissors’. I’m still nowhere near a pro in Python programming but I can say that I’m getting the hang of using ‘if’ and ‘else’ statements. However, I will say that, judging from the code I wrote below, I might have gone a little overboard with it. Almost to the point that I’ve literally spammed lines 24 to 35 with about six ‘if’ conditional statements hmm...
To improve:
Find a way to shorten the code (especially in lines 24-35) where it seems the task can be repeated in some loop? i.e. setting the conditions for the winner/loser in the game
I should also mention that lines 30-35 in particular do not work as the ‘YOU LOST! :(’ text gets printed instead of ‘YOU TIED!’ even when the player and computer are tied. Please help if you know why!
1 from random import randint 2 3 print("Let's play Rock, Paper, Scissors!") 4 5 player = input('Rock (r), Paper (p), or Scissors (s)? ') 6 7 if player == 'r': 8 print('You chose rock \n') 9 if player == 'p': 10 print('You chose paper \n') 11 else: 12 print('You chose scissors \n') 13 14 print('Computer chose...') 15 chosen = randint(1, 3) 16 17 if chosen == 1: 18 print('Rock \n') 19 if chosen == 2: 20 print('Paper \n') 21 else: 22 print('Scissors \n') 23 24 if player == 'r' and chosen == 3: 25 print('YOU WON! :)') 26 if player == 'p' and chosen == 1: 27 print('YOU WON! :)') 28 if player == 's' and chosen == 2: 29 print('YOU WON! :)') 30 if player == 'r' and chosen == 1: 31 print('YOU TIED!') 32 if player == 's' and chosen == 3: 33 print('YOU TIED!') 34 if player == 'p' and chosen == 2: 35 print('YOU TIED!') 36 else: 37 print('YOU LOST! :(')
0 notes