#regency sewing
Text


Regency dress progress!!! Satin silk is horrible to work with I hope it burns (it won't be quick because it's real)
#how do i afford silk????#it's the same price as shitty cotton in the uk#this was 360/y#regency sewing
9 notes
·
View notes
Text
Making a Regency Soft-Crown Bonnet
April 22, 2021
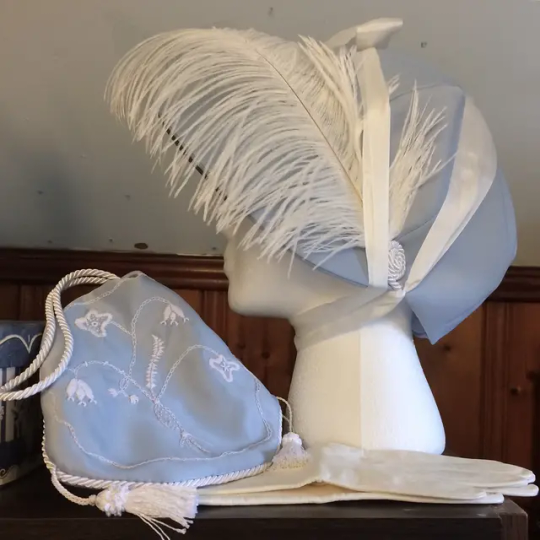
[Image ID: A blue soft-crown bonnet with white ribbon and a white feather displayed in profile on a foam mannequin head. A blue and white drawstring reticule and a pair of white leather gloves are displayed next to it.]
With the underthings and classic white dress for my Regency wardrobe done, I can focus on expanding my wardrobe with accessories! Several years ago I bought maybe a yard or so of a silk-like polyester in a lovely shade of blue. I've already made an embroidered Regency reticule out of it, so I decided to make a matching bonnet!
I opted to get the Zenobia Regency bonnet pattern and kit from Timely Tresses, since this is my first foray into millinery, and chose brim 1 with the 8-piece crown. The kit comes with everything you need to make the bonnet except for thread, fashion fabric, and trim.
I started by prepping the brim as the instructions say - cutting the brim out of buckram, attaching the millinery wire to the brim, and then covering the edge with crinoline tape. Attaching the wire was a bit of a struggle! The edges of the buckram kept catching on my sleeves and the wire was jumping all over the place. Thankfully that was the hardest part of the whole process.
I decided to interline both sides of the brim with the netting that came with the kit by using a running stitch to attach the net to one side at a time.
Binder clips came in handy on this project! Buckram is stiff and hard to pin into, so I used the clips to "pin" the crinoline tape in place, then the netting, and later the brim fashion fabric, which I'll get to in a moment.
The brim then gets traced onto the brim fabric and cut out with a half-inch seam allowance, which I sort of eyeballed. The outer edge of the brim gets sewn together, then you turn it inside out (and you should probably press it, but I didn't) and put the brim inside. I used the binder clips again to hold the fabric in place securely so I could baste the inner edge of the brim closed tightly.
With the brim prep done, I cut out the crown pieces from my fashion fabric and the linen lining from the kit. I chose the 8-piece crown, so I pinned two pieces together, sewed those four "pairs" together, then sewed two pairs together which left me with halves that could be sewn together. A complicated explanation of a simple process.
Those seams then get pressed open and you can sew in the center circle. That took a bit of fiddling, but I got it done and pressed the seam. Then the seam allowance at the outer edge of the crown (on both the outer and lining fabric) is supposed to be pressed in but I didn't do that. After that you can insert the lining. The instructions say to use a slip stitch but I decided on a whip stitch instead and found that the curved millinery needle included in the kit helped with stitching into the brim fabric without having to warp the buckram and wire in the brim.
I actually added a step before I attached the lining! I had some leftovers of the white cord I used on the embroidered reticule that perfectly well along the seam of the brim and crown, so I attached that before the lining so I could hide my stitches and the ends of the cord. The cord was actually a few inches too long, so I coiled it up at one end and am using it to hold the feather in place and hide the end of the feather.
Once I went back and attached the lining I could finish the decorating. I had two yards of 1" wide white silk ribbon that I had left over from the straps of my 1920s combinations. Based on some fashion plates (like these from May 1800, September 1800, 1801, 1803, 1804, 1808, September 1808) I decided to attach the ribbon toward the back of the bonnet, tack it down at the ends of the brim, and leave the ends loose to tie either below the chin or wrapped back up to tie on top of the head.
And then I was done!
Making a bonnet was way easier than I expected and I'm in love with the results! I do wish the pattern instructions had included more tips (like when to use the curved needle or how best to attach the circle in the crown), but I was able to figure it out. There weren't really any new skills needed for this, any difficulty just came from how fiddly some steps were.
But if you give a girl a matching bonnet and reticule, she might want a bodice to go with it, so stay tuned ;)
Stay warm. Stay safe. Stay healthy.
2 notes
·
View notes
Text
i sewed this regency shirt entirely by hand (including dorset buttons) in 44 hours and 24 seconds so you could watch me frolic in it for 42 seconds
#sewing#regency#are there sewing people on tumblr#trans#nonbinary#dorset buttons#if the sewing room looks familiar it probably is exactly what you think it is
917 notes
·
View notes
Photo
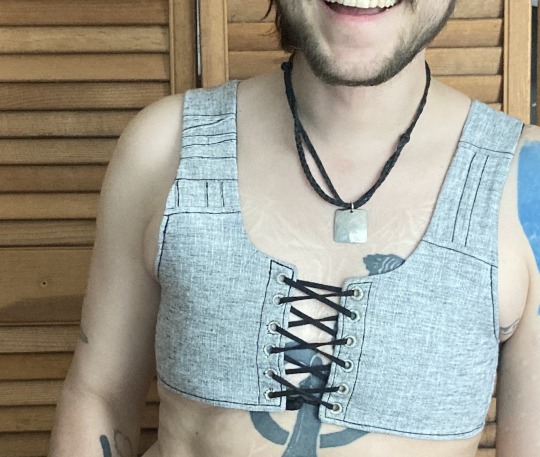
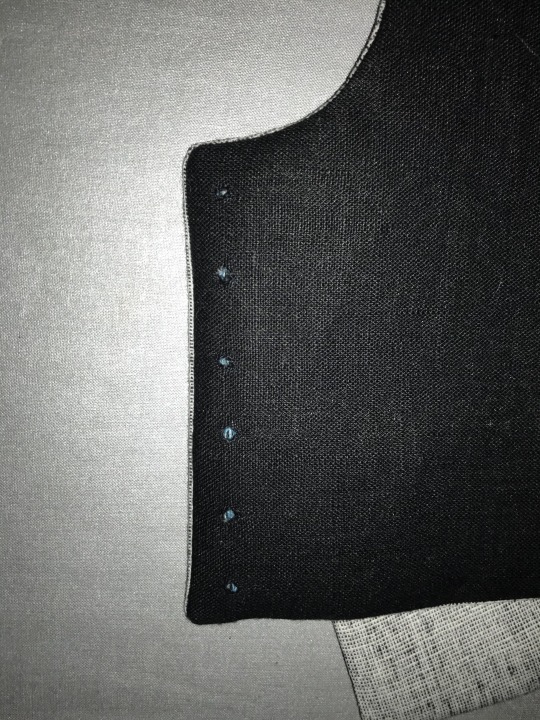
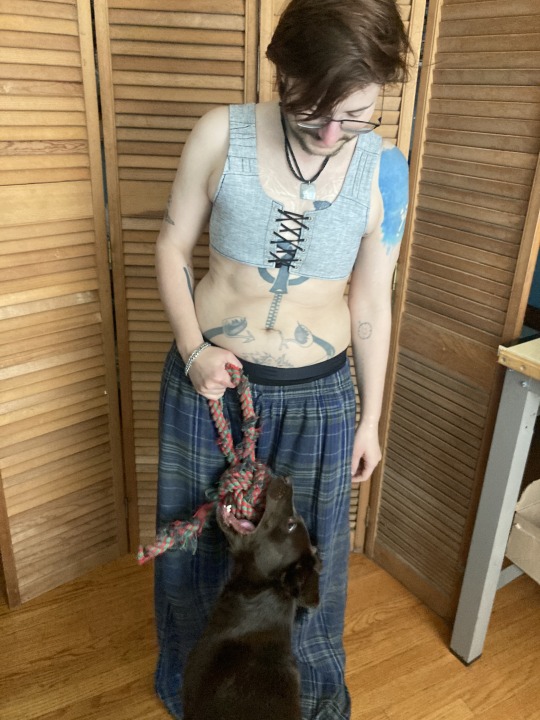
summer binder picture tutorial
this is the third binder ive made for myself recently and the first one i’m writing up. it’s designed to do a few things: 1) allow me to put it on by myself without dislocating my shoulders 2) allow me to breathe well enough to partake in normal activity 3) be cool enough to wear throughout a muggy 90-100F summer 4) not constrict my ribs in a way that aggravates my lack of connective tissue and causes intense pain.
this has become necessary even though i had top surgery many years ago, because when i had it i was extremely skinny and since then i’ve increased in size by about 50%. this has been really fucking good for my health in every single way* except that when my chest is squishy or moves at all it’s So Goddamn Triggering for me. but also since ive had top surgery ive developed and/or been made away of a plethora of chronic conditions that make every single commercially available binding option medically impossible. unbound, my chest is pretty much what you’d expect for a chubby cis guy but venturing out into the world in just a tshirt no longer works for me
*anyone who badmouths weight gain or fat bodies in the notes WILL be blocked
under the cut are a bunch of process pictures and explanations of what they all mean:
first i’ll give you a look at the pieces and measurements:
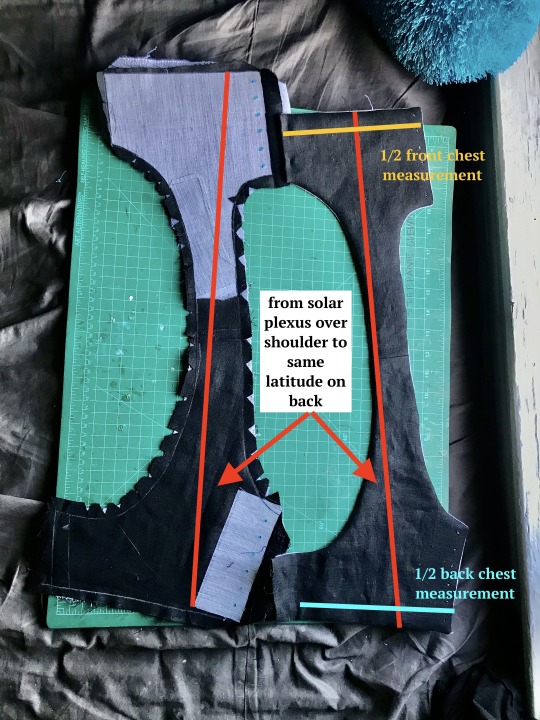
most of the seams are sewn in this picture and one half is turned inside out, allowing you to see both the finished dimensions (right) and the placement of the fusible horsehair canvas that gives this lil scrap of linen any structure at all (left)
to get your chest measurement, you’re gonna have to do some math:
first measure above and below what you want to bind. average these numbers. mine are something like 32 and 34, which average to 33. subtract a few inches--this is to allow the air movement between the laces at center front and back, critical in the summertime. i deleted 3 inches bc i like that number but you can go bigger if you want. the more inches you subtract here, the more youll be able to ratchet all your chest material down later, but at the same time you need to leave enough fabric for a sturdy garment. let’s say a range of 2-6 inches/5-15cm. by taking your measurements this way, you’re essentially measuring the chest you would like to have. that + the horsehair canvas work together to compress any squishy tissue/force anything that doesnt compress up and to the outside (basically into the armpit/lower shoulder--the chest might stick out but it will give a very puffed chest captain america pectoral silhouette)
you can also see how ive clipped my curves and pre-drilled my lacing holes. i used the marlin spike on my knife to open up the holes on the interfacing side, mainly as a way of marking them. this worked well bc the interfacing’s glue kept the linen from raveling
this is the same stage but looking at the non-interfaced grey linen/cotton blend (the black is some 100% linen from my cabbage stash). you can see ive broken the solar-plexus-to-back measurement up into a bunch of pieces to save on fabric but that’s not necessary. my original pattern was just two pieces (front and back) and chopping the straps into thirds on both sides was aesthetic
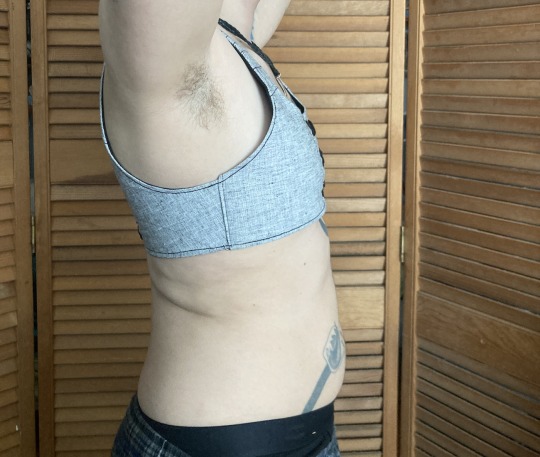
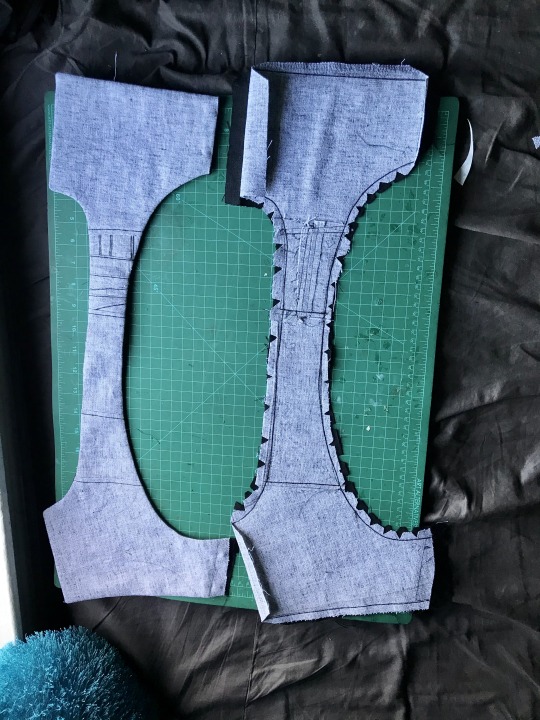
in the following picture you can really see how this is really just overgrown regency stays:
i thought about doing side lacing but didn’t think that would be comfortable for me. on the front, the side seam allowance was pressed inwards before turning to create a finished looking slot. on the back the side seam is left unfinished with an extra wide seam allowance, and is inserted into that slot.
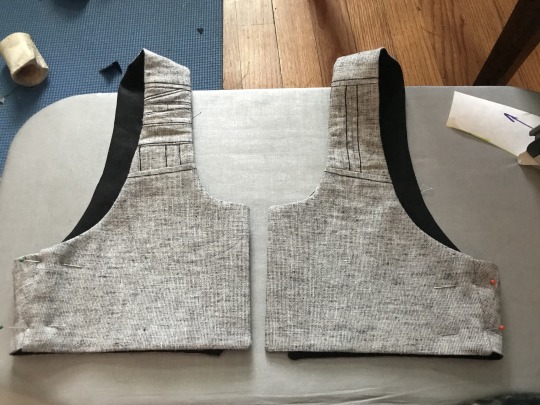
here’s a closeup on it pinned in place (you can adjust the angle of the side seam and the fit during this pinning stage):
that side seam was just topstitched in place once i had the fit how i liked it, and the armhole was reinforced with more topstitching
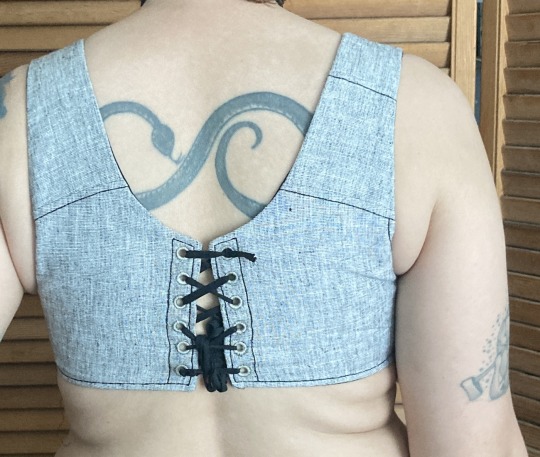
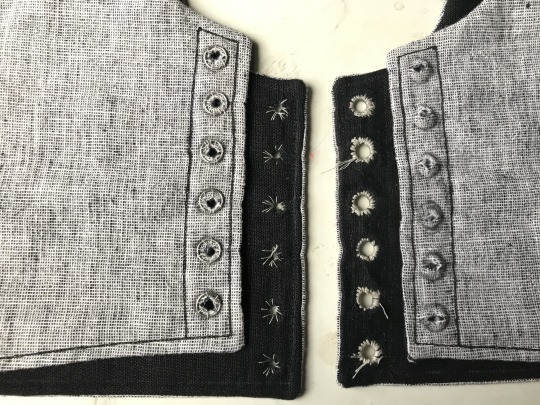
alright, time for eyelets: first, you can see how well the marking worked:
next, two rows of basted eyelets (left), one row of eyelets sewn with a doubled and waxed cotton thread (center right), and one row of eyelets opened and stainless steel rings placed (right).
next time i’m going to mark the eyelets same as i did above, but do this step differently--i’ll mark and baste the steel rings in place BEFORE widening the eyelets. this is bc i had a lot of problems keeping the eyelets on center
eyelets half done on this one! on the left are eyelets sewn with doubled and waxed cotton thread and on the right eyelets sewn with quadrupled and waxed thread. the center is basting again. i was able to force the holes back in line while sewing the eyelets but it was kinda annoying. adding a second picture that doesnt have great focus but hopefully shows how that process worked and shows the spike clearly
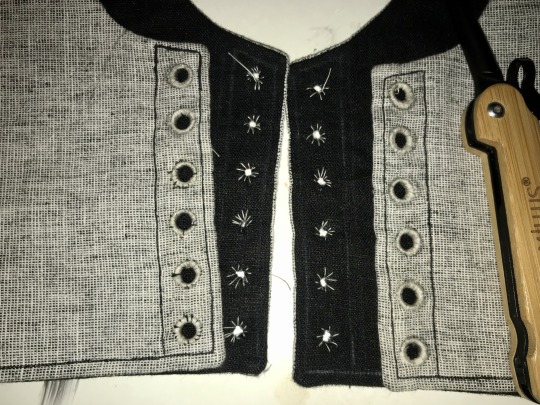

i ended up using this white cotton thread because it’s stronger than my black cotton thread (which the rest of it is sewn with). [eta: after this was first posted, i pressed the whole thing heavily, which effectively de-waxed the thread, and i dyed the whole thing a medium charcoal grey, the thread blends in perfectly on the lighter side and isn’t such a sore thumb on the darker side]
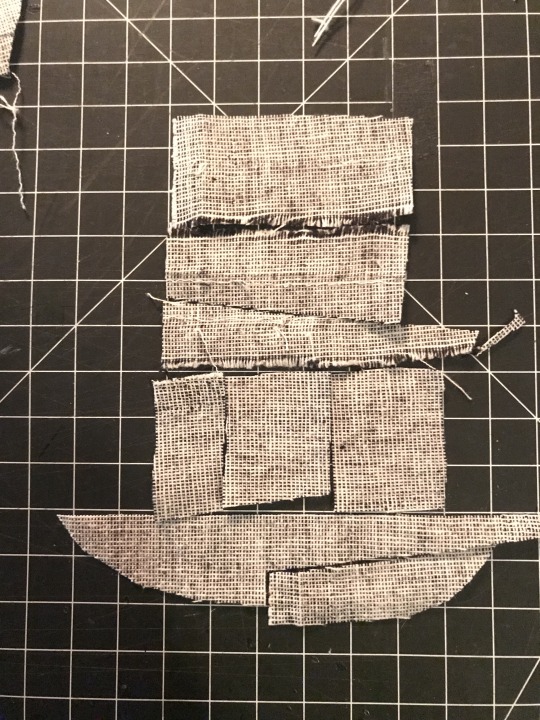
bonus: the piecing layout for that little piece of strap. the whole light gray half of the binder was made from 1/2 of one of the legs i cut off some linen suit pants to make slutty camping shorts last year and i really really didn’t want to break into any of the other three halves for this garment--i have Plans for it
overall the fit of this is incredible. it DOESNT hurt my ribs which every zip-up garment ive been able to find (and it is difficult) does due to really thick elastic at the base. it doesnt aggravate my sensory issues with the synthetic fibers that every commercial option is made of. i can walk up a hill or stairs, or go to pt, without getting too out of breath. i can eat with it tight, or loosen the front easily and without taking it off to make eating easier and less nausea-inducing. it is reversible!
best of all the lacing at the back gives the garment enough movement for me to get it on without dislocating, and the interfacing and steel rings give it structure once it’s on. the shaping comes only from fusible horsehair linen canvas and stainless steel rings like youd use for chainmail, there’s no boning at all, which makes it very quick to sew (except the eyelets, but metal grommets would be sturdy and quick provided theyre of good quality)
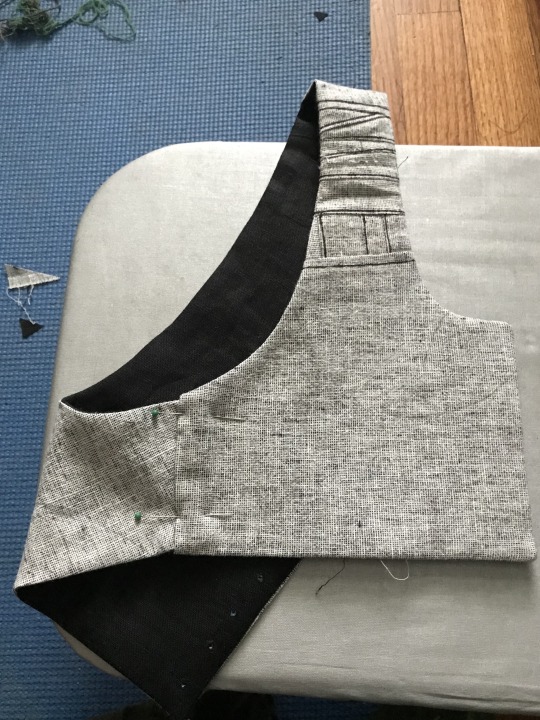
there’s a small amount of gaping on the outside of the shoulder strap, which i plan on fixing with a tiny tiny dart in the armpit, i want to add pockets to tuck the laces into, and i need a better lace for the back, but it’s completely wearable in time for the 90 weather next week which is all i wanted. i’ll do a reblog when it’s perfectly finished with an update on the fit but for now it is done enough
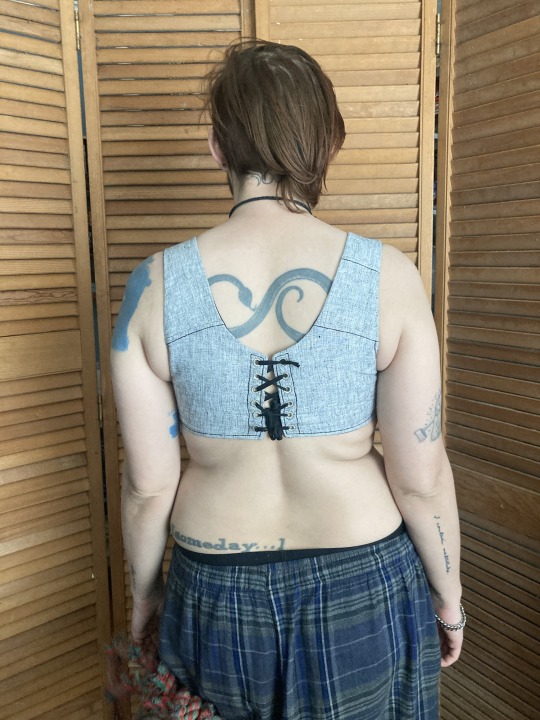
the little ridge where it doesnt lay flat against the shoulder is most visible with just a single t shirt over it. with a flannel or a sweater, it disappears, and by itself, it’s hidden in movement
eta: after dyeing this, i relaced it a bit looser in the back and that gape mainly disappeared. ive decided to leave it in instead of smoothing it with a dart because the loose fabric gives space for my chest to expand when breathing and shapes my silhouette in a way that emphasizes my shoulders
#sewing#trans#trans man#binding#body shaping#cotton#disability accommodations#physical#sensory#eyelets#fusible interfacing#historical fashion#regency#horsehair canvas#lacing#linen#lining#new build#drafted pattern#picture tutorial#piecing is contemporary too#stainless steel#stashbusting#stays#structured garment#treadle machine
1K notes
·
View notes
Text

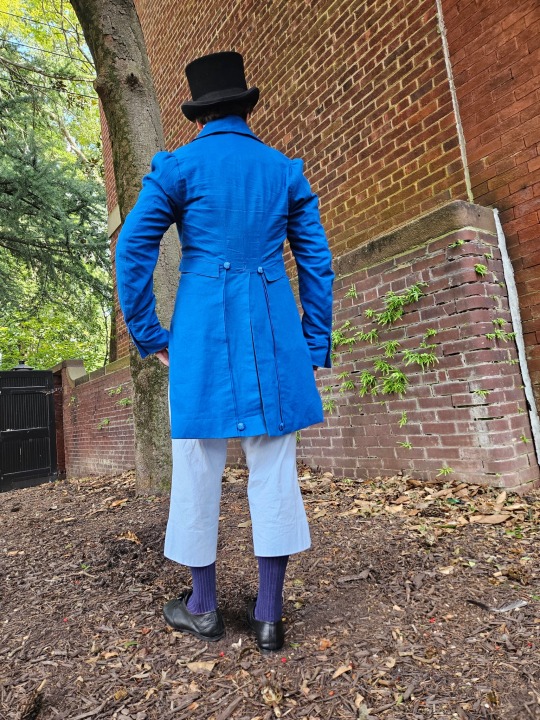
I spent quite a long time on this tailcoat and have gotten very busy without time to work on other projects, so I will dedicate a post to it.
Firstly big thank you to @vinceaddams for his deaths head button video which I used to make mine as well as links for making buckram!
Deaths head buttons weren’t really as popular any more by the regency period, but they still had Thread wrapped buttons for coats as well as one vest example I found for.


I made the buckram from scratch using linen I got at a second hand store and glue.
Decorative interior stitching was based directly off an 1830s tailcoat at the MET.


I used silk thread for all of the visible stitches, and it was like butter to hand-sew with. 100m/110 yds was more than enough for that as well.
(You can see the mutton chops I did :] )
#historical fashion#regency#1820s’ men’s fashion#menswear#regency men’s fashion#sewing#my post#fashion#regency fashion
434 notes
·
View notes
Text

Me-made ballgown for The Lafayette Ball in Fayetteville, NC this weekend. What a fun time!
#regency#regency fashion#me made#historical costuming#historical fashion#fashion history#sewing#jane austen#Lafayette ball#regency ball#ball gown#English country dancing
184 notes
·
View notes
Text
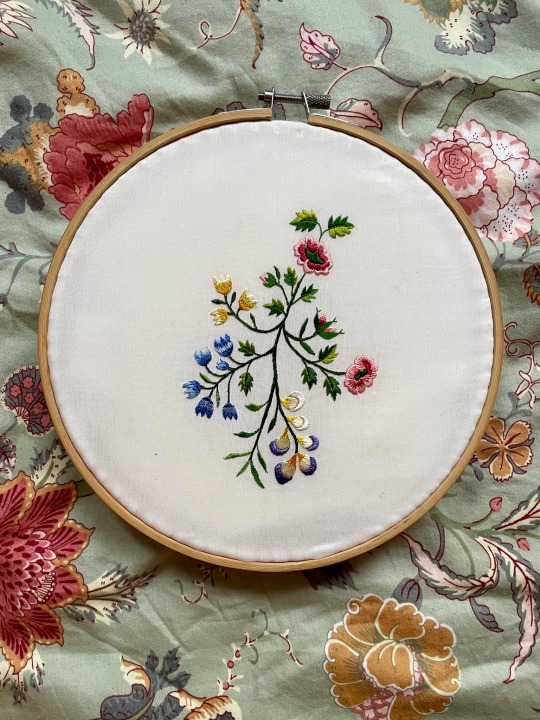

finished the second silk sampler (so fourth overall) for my Emma (2020) embroidered proposal gown!! time to actually make the dress
#embroidery#Emma 2020#emma woodhouse#my work#emma wip#wip#sewing#regency#historical fashion#historical costuming#regency fashion#historical sewing
90 notes
·
View notes
Text


I rarely post my face but I finished my costume just in time for the Halloween show and I'm too damn proud of it
Also @thejawsoffate did a brilliant job on my makeup she's the best
#foxy speaks#powerwolf#it me#The biggest part of this was hand-sewing this regency-era shirt tbh but the painting also took a while
58 notes
·
View notes
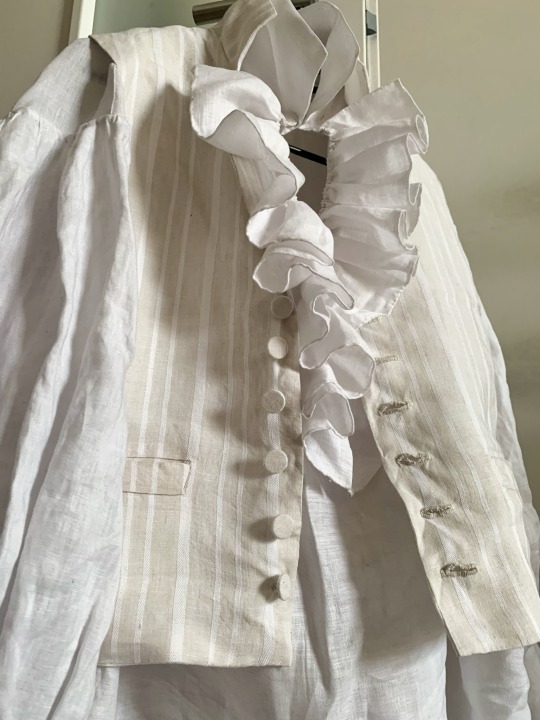
Text
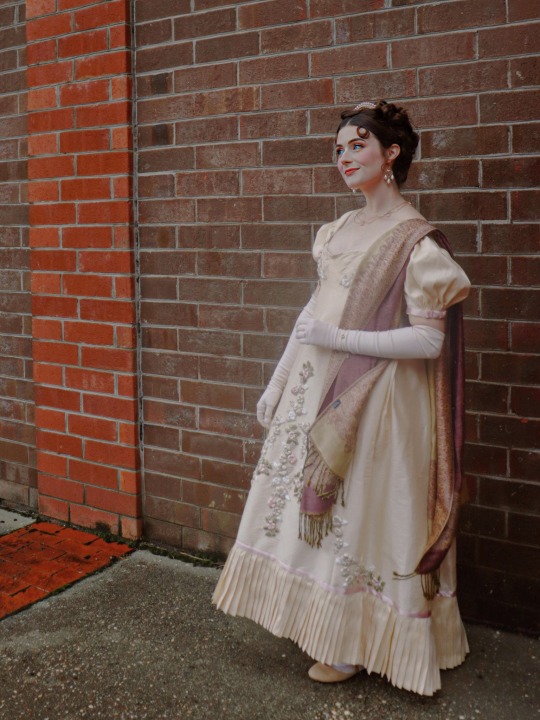
Another dress-up time here!
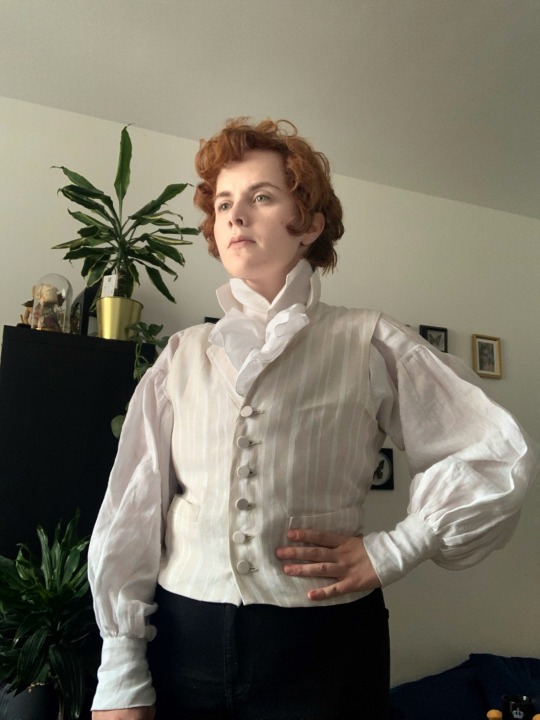
Time to show you something actually historically accurate. The waistcoat and the shirt for my regency ensemble are done!

Someone nominate me for the @napoleonic-sexyman-tournament /j
#my sewing#historical fashion#regency fashion#historical sewing#historically accurate#napoleonic#Napoleonic era#regency era
33 notes
·
View notes
Text


kind of disheveled remains of yesterday’s regency tea party outfit
#ft. the period accurate shirt#I thought about making a cravat but never got around to it#so that + no coat meant i was a little scandalously underdressed but ah well. what can one do#historical fashion#my sewing#regency fashion
34 notes
·
View notes
Text
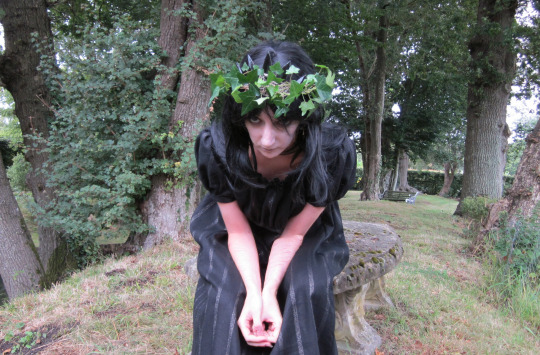

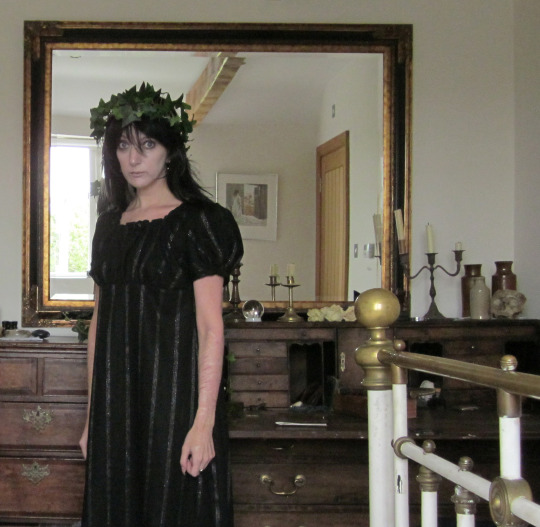

Moss Oak Arabella from Jonathan Strange and Mr Norrell. (I'm not a huge fan of Regency dresses, but I thought I'd sew one anyway and wander around looking tragic and fae. I still don't like the Regency silhouette, but the dresses are very comfortable and cool in summer.)
37 notes
·
View notes
Text
The Good, The Bad, The Short Stays
February 13, 2019

[Image ID: a flat photo of Regency-esque short stays made of unbleached muslin]
I started my Regency fashion journey back in the summer of 2017 and I… have not made it very far. All I have right now are a chemise that I can’t get over my shoulders (whoops!) and a set of nice looking short stays with some dark secrets. I’m disappointed with my progress - it’s hard not to be - but I’m trying my best to look at this as a learning experience. So, without further ado, let’s dig into my stays!
These are the designs and pattern pieces I started with. I drafted the pattern myself, which was a first for me, and the pattern turned out surprisingly well! The finished product even fits well!
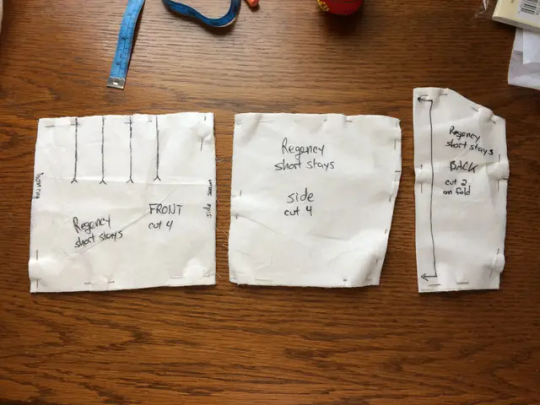
[Image ID: three mostly rectangular sewing pattern pieces labeled, from right to left, "front", "side", and "back"]
In the original designs, I had planned to have boning on either side of the center front lacing. I was forced to scrap that, as my chest just isn’t that wide. I also changed the number of gussets in each cup to four, instead of three, and made each gusset the same shape. They seem to work fine, but I’d be curious to see if shaping them would make much of a difference.
The gussets did not turn out well at all. I had never sewn gussets before, and didn’t bother doing any research before I jumped into them. I admit I still haven’t read up on gussets, but I suspect that part of the problem was that I had mis-measured the gussets and made the seam allowances too small, so when I folded in the seam allowances for the front panels and sewed them down, the gussets didn’t catch in some places. To remedy this, I hand sewed them using what could, on a technicality, be called a whip stitch, I think. The quality of my stitching isn’t very consistent, but it is very nice to run my fingers along in some places, and it serves to reinforce the seams there, which is probably a good thing.
The eyelets were also a first for me, and most of them turned out very nicely! There are 14 eyelets total, all hand-bound, with metal jump rings inside them for reinforcement. You can definitely tell which eyelets were my first if you look closely, but I’m very happy with how they turned out!
The body of the stays is just two layers of unbleached muslin. Something sturdier would have been better. The edges are bound in off-white bias tape, which seems to have worked well enough. The boning is heavy-duty zip ties, a carry-over from my cosplay days. The boning at both sides of the center front, where a busk should be, is actually just a wooden dowel. Doubling up the zip ties wasn’t giving me the support I needed for the bust (lift and separate!), so I had to find an alternative. Obviously, neither zip ties nor wooden dowels (or the jump rings in the eyelets) are ideal or washable, but they do, technically, get the job done.
Each cup has a drawstring at the top for adjustability. The shoulder straps tie to the front, also for adjustability. I ordered the cord I used for those and the front lacing from Wm Booth Draper. I had never heard of them before, but they seemed to be well-established and had lots of good reviews on their Facebook page, so I took the chance and was not let down!
To finish off, since this has gotten to be a lot longer than I meant it to, I’m not completely happy about how these turned out, but they fit and have been a very good learning opportunity for me, so I am content. I do plan on remaking them in the future, but that might be very far into the future, at this rate.
Stay warm, stay safe, stay dry.
#wnn projects#regency era#regency wardrobe#regency sewing#regency stays#regency corset#regency short stays
2 notes
·
View notes
Text


He’s just so handsome 😍
24 notes
·
View notes
Text
Starting a *regency* project!!!!
I'll be attending a regency inspired ball in June, so I've been planning out a full regency outfit to make specially for the event. I've never done regency before (I'll even admit that I never liked the look of it, but it is growing on me...), so I've had to do some research for this project.
This is what I have planned:
- A chemise/shift I made previously
- Short stays
- Petticoat (with straps/suspenders to stop it slipping down to my waist)
- Dress (green with gold embroidery and beading)
- Potentially an open robe/overdress (ive seen these on some fashion playes for ball gown, and it may be a good way to have a train without ppreventing me from re-wearing the dress day to day. It would be gold, with a train, crossing under the bust at the front)
- A gold ring I already own, and a green ribbon around my neck, potentially some more gold jewellery
- Black leather boots
- Stockings that I made previously
- Reticule (Potentially sewn, or I've come across a crochet pattern...?)
I've decided to document this project here so that I can look back on it and see the progress I've made. (If someone other than me actually sees this, then I encourage you to try some historical clothing, I wear it day to day and love it!!!)
16 notes
·
View notes
Text


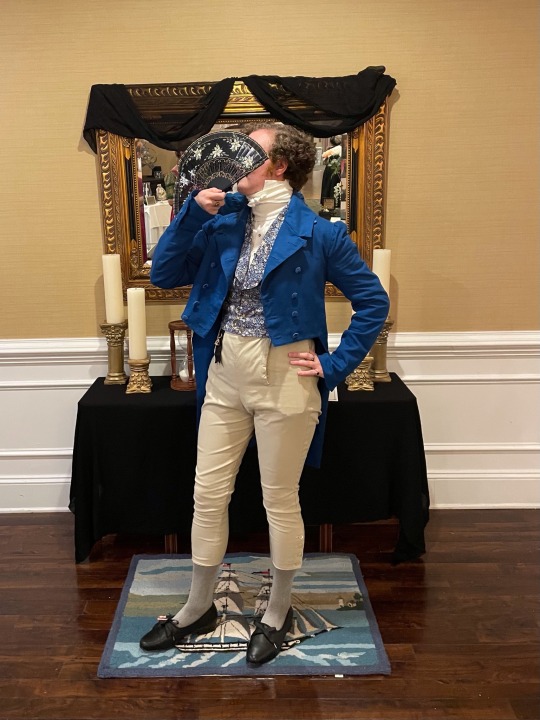
A happy new year to all!
New breeches and a new waistcoat I made. The waistcoat I’m particularly proud of as I drafted it from an original 1820s tailoring book. The fabric is a reproduction 1840-1860 print. I’m still tweaking how I construct breeches.
#historical fashion#regency#1820s’ men’s fashion#menswear#regency fashion#my post#sewing#fashion#miwackulous tye monday
122 notes
·
View notes
Text

My regency/empire shirt is done. Completely handsewn. 100% linen, 100% floofy.
One day I might get to my planned Jonah Magnus cosplay
23 notes
·
View notes
Last Seen Blogs

venustocaligo
Under the twinkle of a fading star.

greypentachoron
I can't believe it's not HUMAN!!

tockamybeloved
Тread Softly, My Heart is Broken
werewolves-and-sheepdogs
La Lune-atic

hokahokaseat
*Unlimited Times*