#removing the tinted glass sticker car window
Text
نحوه کندن برچسب شیشه دودی از شیشه عقب چگونه است؟ در این مقاله به بررسی 0 تا 100 کندن دودی از شیشه ماشین می پردازیم
0 notes
Text
1970 Chrysler 300 Hurst
One of the great unknowns about the 1970 Chrysler 300 Hurst is exactly how many cars were built. Estimates put the total as low as 485, and as high as 502 cars. Regardless of what the figure actually is, the car itself is a pretty special piece of machinery.
The 300 Hurst is a giant of a car at 19′ in length. All of the Hursts rolled off the production line finished in Spinnaker White. The cars were then shipped to the Hurst factory in Warminster, Pennsylvania, where a substantial transformation was performed. The first change to be made was the removal of the standard Chrysler steel hood skin, which was replaced with a fiberglass unit. This featured a decorative hood scoop and the obligatory set of recessed hood locks. The deck lid was also removed, and once again, a fiberglass replacement, complete with a spoiler integrated with the rear quarter panels, was also installed. The White paintwork was complimented by the addition of Satin Tan highlights and contrasting pinstripes, and the wheels were adorned with the same Satin Tan color in the centers. This Hurst is a clean car, with a small area of rust visible in the lower section of the driver’s side front fender, and surface corrosion present on the car’s underside. The Spinnaker White paint appears to be in good condition, but there has been some deterioration of the Satin Tan paint on both the hood and the deck lid. The exterior trim and chrome all look good, while the tinted glass is close to perfect.
The 300 Hurst was a premium car at a premium price, so naturally, it required a premium interior. In this case, seat upholstery was available in a single type and color. Continuing the exterior theme, the color is Saddle Tan, and the material is leather. The plush front seats are not standard 300 items but have been pilfered from the Imperial parts bin. While the original intention was for a Hurst shifter to be part of the interior features, this is something that never eventuated. The interior of this Hurst is close to perfect, with a single discolored spot on the dash pad being the most obvious fault. The rest of it presents in virtually as-new condition, and as befits a luxury car, it is loaded with luxury touches. These include air conditioning, power windows, six-way power seats, cruise control, a remote trunk release, and I think that there also might be an 8-track player hanging under the dash.
The 300 Hurst was the biggest of the muscle cars, and as such, it needed a big motor to get it moving. In this case, it is the TNT 440 engine, pumping out 375hp. The Hurst also features a 727 TorqueFlite transmission, a 3.23 rear end, power steering, power brakes, heavy-duty rear springs and front torsion bars, and sway bars. The exhaust was a full dual system, ending in quad tips. This Hurst hasn’t seen a lot of recent use, and documentation confirms that between 1986 and 2019, it managed to accumulate a grand total of 20 miles! Since being removed from its climate-controlled storage, it has undergone a meticulous mechanical check and recommissioning, and it is now said to run and drive perfectly. The owner does suggest that while the tires look good, they are pretty olds, and replacing them might be a good idea. He also says that the Hurst may need mufflers fairly soon. The car does come with a fair collection of documentation, including the original Build Sheet and Window Sticker, a pristine Certi-Card, Owner’s Manual, as well as dealer paperwork and other assorted items.
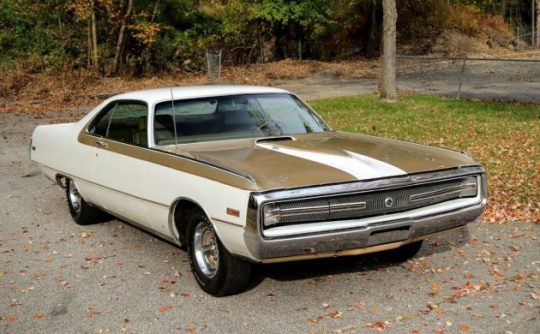
While there has always been some question surrounding the build totals for the 1970 300 Hurst, one thing is certain, and that is that there are less than 300 cars in existence today. Pristine examples can fetch sums in excess of $30,000, and even a rough example in need of restoration can still sell for anywhere around $13,000. This one doesn’t need a major restoration, but it does require some cosmetic work. I’m not sure where bidding is eventually going to go with this one, but I would suspect that it will be somewhere around the low to mid $20,000 mark. Even at that price, it probably wouldn’t be a bad buy.
#Chrysler 300 Hurst#chrysler 300#chrysler#car#cars#muscle car#american muscle#mopar#moparperformance#moparnation#moparworld
166 notes
·
View notes
Text
Pointless Story
Yesterday, I was getting out of my car at my local dispensary (I am privileged to live- for now- in a place where this is normal) when I saw a new sticker on a sign pole that said, “Social Work is a Scam”.
I was like, “oh fuck no, i have had my life saved and then seen hundreds of lives saved by social workers and social support programs. The system is a fucking scam, boys.” so I was very focused on walking over to remove that sticker before walking in to pick up my online order.
I will preface this next section with the fact that I love dogs. All dogs. I work in a veterinary hospital, I am a positive reinforcement-only pet trainer and I believe from the pit of my being that every animal can be rehabilitated from any severe behavior issue, given the right environment.
I will also say that I am deadset against leaving your dog in a car with the windows all the way up from March until October anywhere in the northern hemisphere and because of this, I don’t blame this animal for its reaction. Anyway-
So I’m getting out of my car, super focused on the sticker, and I look over at the car next to me and it’s got tinted windows but I can tell that there are no human bodies there. I look back to the sticker, probably mumbling about misguided youth, and as i am turning around to shit the door, I am made aware that I am not, in fact, alone.
I hear the small angry ball of fur before I see it, and it sounds like a fucking xenomorph scratching and snarling desperately at the glass from the passenger backseat that I had previously clocked as empty. At first, it was just a white blur, and it took me a moment to understand what was happening.
In that moment before realizing what it was, I am known to startle dramatically and easily when distracted, occasionally, and this is what happened now.
I screamed loudly like a small child and jumped back, slamming against my car. I laughed at myself and removed the offending sticker, then went in.
The guy that let me in and checked my ID had a look of concern on his face. He knows me, we always chat when I come in. “You good??”
I realized then that they have cameras posted around the store and parking lot and they saw the whole thing. I had to explain to him that I was just startled nearly to death by a goddamn chihuahua. All the staff laughed at me. I laughed with them, of course, and once again had to reassure him that I was totally fine. It’s hilarious seeing a grown ass man screaming because a chihuahua scared them through the glass. The owners quietly shrunk and left quickly. I got in my car and laughed and laughed. Fucking chihuahua.
3 notes
·
View notes
Text
Window Tint in Hamilton | Dr. Tint& Wrap
Window tint in Hamilton is a popular service that provides many benefits for car owners, such as reducing heat, glare, and UV rays, enhancing privacy and security, and improving the appearance of the vehicle. Several reputable tinting companies in Hamilton offer high-quality products, professional installation, and a lifetime warranty.
What are the benefits of window tinting for cars, homes, and businesses?
Window tinting is a process of applying a thin layer of film to the glass windows of cars, homes, and businesses. Some of the benefits of window tinting are:
It reduces the fading of the interior materials and fabrics caused by UV light
It blocks up to 99% of harmful UV rays, which can cause skin cancer and other health problems
It lowers the solar heat gain, which can improve the comfort and energy efficiency of the building or vehicle
It prevents the glass from shattering and scattering in case of an accident, earthquake, or burglary, which can enhance the safety and security of the occupants
It increases the privacy and aesthetics of the window, as it can come in different colours, shades, and patterns
how to window tint cars?
Car window tinting reduces the amount of visible light and heat entering the vehicle. Window tinting can offer benefits such as enhancing privacy, comfort, and aesthetics, but it also has some legal restrictions in India. Here are some basic steps on how to tint car windows:
Prepare the windows by cleaning them thoroughly with soapy water and a razor blade. Remove any stickers, adhesives, or obstructions from the windows. Dry the windows with a clean rag or a squeegee.
Cut and measure the tint film by placing it over the outside of the window and lining up the top edge of the tint with the top edge of the window. Use a utility knife or a razor blade to cut the film slightly larger than the window. Mark the film with a marker to indicate where the edges of the window are.
Adhere to the tint film by peeling off the protective layer from the film and spraying the adhesive side with soapy water. Place the film on the inside of the window and slide it into position. Use a squeegee or a credit card to smooth out any air bubbles or wrinkles. Trim the excess film with a knife or a blade. Repeat the process for the other windows.
which window film is the best?
There is no definitive answer to which window film is the best, as different films may have different features, benefits, and drawbacks depending on your needs and preferences.
The level of privacy and light control you want. Some films are more transparent and allow more natural light to enter, while others are more opaque and block more light and visibility.
The type of installation and removal you prefer. Most films use a static-cling method, which means they adhere to the glass without any adhesive and can be easily removed and repositioned.
The style and design of the film. Window films come in various colours, patterns, and textures, which can affect the appearance and ambience of your room.
The energy efficiency and UV protection of the film. Window films can help reduce the heat gain and loss through the glass, which can lower your cooling and heating costs and improve your comfort. They can also block up to 99% of harmful UV rays, which can cause fading and damage to your furnishings and skin.
Are window film removable?
Yes, window film is removable, but the ease of removal may depend on the type of film and the installation method. Most window films use a static-cling method, which means they adhere to the glass without any adhesive and can be easily removed and repositioned.

0 notes
Text
The Ultimate Guide to The Various Film for Conservatory Roof

Are you worried about your conservatory getting too hot? Conservatory window films can be used to reduce heat and glare. They also protect furnishings from UV light. It is stylish, and economical and allows you to still enjoy the view through it.
Our film is much easier to maintain than conservatory blinds. Our solar film can be ordered by the meter or cut to your specific measurements.
Conservatory Window Film - Stylish, efficient, and affordable
Films are cheaper than blinds
It's easy to clean
Let's see what you can do
Per meter or cut to size
You can make your conservatory more comfortable by applying conservatory reflective film. This will reduce the amount of natural light entering the room and trap heat.
Film for conservatory roof is the best option as it provides a large area of glazed space directly facing the sun. We recommend darkening the conservatory roof film if your room faces south. As long as it is made from toughened glass, we do not recommend using a dark tint. You can use a medium-grade film that is compatible with all types of glass if you are unsure.
After you have dealt with the roof, you should also consider the windows and doors in the room. For windows that are exposed to direct sunlight for prolonged periods, choose darker films. As a rule of thumb, East facing windows will receive the sun early in the morning, South facing windows most of the day, and West facing windows the sun late in the afternoon.
The evening.
Glass compatibility
Conservatory glass roof film is usually made from double-glazed units that come with toughened glasses. All of our films, including darker ones, are compatible with toughened glass. It is important to check the makeup on any older glass constructions. Please use medium-grade film if in doubt.
Polycarbonate roofs
Choose from our polycarbonate roofing films, which have been specifically formulated for this material. The films can't be removed once they have been applied.
Apply Your Film
A tinted film for conservatory roof, a self-adhesive material that can be applied with a soapy solution and a squeegee to eliminate bubbles, is made from a soapy water solution. This type of work is best done by two people. Access equipment will be needed to reach the roof's underside. Apply the film only on cool days as it can dry too fast.
Solar Control Film
This is a great way to insulate a conservatory. This simple but extremely effective solar control material will let you spend more time in your conservatory without spending a lot. It's our favorite insulation material. The large stickers make it easy to not compromise on any aspect to get the desired results.
Conservatory window film works to control heat and sun rays. Window film gives you the option to keep your conservatory's sunny feel while maintaining a comfortable temperature. This is the most popular option, as it preserves the garden atmosphere of your conservatory while increasing your heat efficiency.
Glass film pros
It can lower solar heat, making the temperature more comfortable throughout the year -- especially during summer
Solar control film can be used for polycarbonate and glass. Please refer to our roof type guide, if you aren't sure.
Conservatory window film reduces sunlight entering the room. This is useful if you are trying to focus on a computer or TV screen.
You can reduce the sun's glare by minimizing its intensity. This can help to prevent fading and discoloration of furniture and photos over time.
Conservatory roof film can be more cost-effective than a new, solid roof. This is the best option if you want to reduce heat and glare while keeping overall costs down.
Different films have different benefits. Some conservatory window films block more sunlight than heat, while others block more light.
Are you looking for "conservatory roof film installers near me"? then contact us. We at Tinting Express Limited offer window film, car wrapping, window privacy screens, and many other services to residential, commercial, and automotive industries.
Tinting Express Limited
01271 320181
Unit 17, Taw Mill Business Park, Howard Avenue, Barnstaple, Devon EX32 8QA United Kingdom
#Film for conservatory roof#Conservatory glass roof film#tinted film for conservatory roof#conservatory roof film installers near me#window film#window tint#Tinting Express Limited
0 notes
Text
I’m A Killer, Didn’t You Know?
Warnings: Minor Character Death, Injury, Blood, Gore, Cursing
Characters: Dare, Pokey, Ara, Oridon Proctor, Magnus Prosper, Bullhead
~~~~~~~~~~~~~~~~~~~~~~~~~~~~~~~~~~~~~~
Running and flying got stale, and got stale fast. Who knew flying could get stale? But Dare had achieved the impressive feat.
Besides, it never hurt to show off her motorbike on the streets, and tonight, there was a race. Just what she needed.
Helmet over her head, her features were hidden, but those who knew her knew her, disguise and all. She could easily give herself away visually.
Such as when the family-stickered minivan rolled down its windows and the family greeted her at a red light, chatting while the eternal red light refused to change.
How’s the family, and How’s the job?
“You won the game? That’s great!” Dare grinned. When the light changed, Dare waved and sped off, all the way downtown and towards where the bustling city met silent, empty streets. It wasn’t as fun as weaving around cars, but they couldn’t risk the cops showing up too fast. Unlike last time...
“Hey, Dare!” It was one of the other racers, prepping his bike. The thing was old with mismatched parts, but it ran, and ran fast.
“Pokey! How’s my guy doing?” She went for their usual greeting, but was stopped with an outstretched hand.
“I’m covered in oil, don’t get that over your pretty little face.”
Dare scoffed, rolling her eyes.
“Pretty little- Says Mr. Baby-Doll Eyes.”
They returned smiles. Pokey did have those lashes that could make any lash obsessed lad or lass envious.
“Hey, you haven’t met the newcomer, have you?”
“Newcomer?”
“The one behind you,” said a feminine voice behind her. Dare turned around immediately, bristling at the sudden closeness and stepped back before calming down slightly.
The woman was taller (though that wasn’t anything new with how small Dare was in comparison to anyone), but she was taller than average on a male height scale. Slim with muscles that were so subtly defined by the skinsuit, with padded areas that protected against the heat from the motorcycle’s engine. Her gloves matched her skinsuit, and looked soft but grippy on the bottoms. Her helmet was on, though, so Dare couldn’t see past the tinted glass.
“Sneak up on people much?” Dare quipped, but extended her hand nonetheless. “Dare.”
The woman shook the other’s hand, a playful tone in her voice. “We’re using our nicknames? Alright, I’m Streamline.”
Pokey must have motioned to Dare, or maybe it was Dare’s sudden unamused and annoyed look that made Streamline think again.
“Wait, is that your actual name?”
“Well, my name’s Pokey, so...” Pokey commented from behind his bike.
“Yeah. Chose it myself.”
“Right. Okay, I’m Ara.”
“Alright, Ara. First time? Don’t think I’ve seen you around these races.”
Ara chuckled, hands on her hips.
“You could say that. Took the plunge and decided to try it out.”
“Nice! Word of advice, avoid Bullhead.”
“Bullhead?”
“That lovely gentleman chewing tobacco like nobody’s business.”
Ara turned around just in time to see a broad man spitting into the sidewalk.
“How lovely. Does he play dirty?”
“Does he? Pokey, enlighten our friend.”
Pokey looked up, unimpressed.
“The fucker threw me off balance and made me crash into a parked car.”
“So stay away from him, got it.”
It was about another half hour of chitchat before the racers were in position, waiting for the flag man to mark the start.
Smart, thought Dare, at least he knows not to use a flare.”
The flag was waved, the motors roared, and off they were. It was a large path, full of bridges and inclines but devoid of cars, which was good! Less obstacles, but also, less fun for Dare’s taste. There was something about bobbing and weaving between cars, lanes... the adrenaline.
“Keep your head in the race, pipsqueak!” Oh, God. Bullhead.
He had no helmet on today. His bike was squareish, wide, and strong, but it also lagged behind, which was good. Unfortunately, his turns were fast, and Dare just barely avoided being mowed down by him.
“Fuck off, Bullhead! That’s foul play!”
“Like you believe in any fair play, bitch!”
Dare snarled, but kept focused on her turns and the path. The racers were getting uncomfortably close on a narrow bridge, and Dare could hear the river below. She knew this place, and a memory resurfacing was the last thing she needed.
Then, she heard a panicked scream. She turned just in time to see Bullhead mowing down racers left and right - that cunt.
“Pokey, Ara, look out!”
Bullhead mowed down Pokey first, who slammed into Ara, sending them tumbling towards the railing.
Bullhead was just mowing down racers left and right, and another bulk motorbike went down, slamming both driver and machine right into the duo - and breaking the flimsy barrier, sending them down.
It was just Dare and Bullhead.
“Guys!” Dare shrieked, slamming on the brakes.
Bullhead was still ahead. That was a big drop...
“Better catch up if you wanna win!” Bullhead...
“Fuck you,” Dare howled after him before she slammed her helmet down and took to the air immediately, diving down and slamming into the three racers, sending them into land, although not without cutting themselves on sharp rocks on the shore.
Dare felt the sting on her arm, but ignored it.
“Everyone okay?”
“What the fuck,” Ara heaved, shaking her head. “That motherfucker!”
“We’re good,” Pokey panted. “Dare?”
“I’m going to kill him.” It was that tone that she used that made Pokey know she was not kidding.
“Not worth it,” Ara said. “Let it go.”
Dare said nothing, but instead took flight again, picking up more and more speed until everything was a blur and she was relying on hearing alone to maneuver.
The engine. The cackling. The stench of tobacco...
“Buuuuullllhead!”
A crash. A roar. A brilliant fire, and two bodies rolling down the slope. The bridge led into wooded areas and slopes and inclines, and like the river bank, this slope was full of sharp stones, jutting roots and branches, and a hard landing with Dare on top of the man.
Rage brought forth a much more dangerous girl - stronger, more determined - and little hands wrapped around the thick neck. Where her fingers couldn’t connect, they dug and dug, fangs glinting in the moonlight.
“You pathetic, shit-for-brains, cunt!”
Thick, dirty fingers dug into Dare’s gash in her arm, causing her to falter for a moment, yelping as he turned the tables. One quick move and her neck would be snapped.
Immediately, sharp claws scratched at his face, at his arms, anywhere she could reach. She dug her thumbs into his eyes and he fell back with a roar, where Dare took her opportunity to leap forward and crunch into his neck.
Blood spewed out and bathed her in the red liquid, but she wouldn’t budge. She bit deeper and deeper, thumbs still in his eyes, her enraged strength ripping deeper until she broke his skull.
His face was split, his neck chewed out. For salt on the wound, Dare crunched even further until the head was entirely severed.
“Fuck... Fuck you.” Dare panted, heaving a final sigh, then looking at herself. The lights in her skinsuit were dimmed by blood. Blood that was everywhere...
“Dare!”
Dare tensed up. Pokey. Slowly, she turned around, not missing the subtle gag that came from Pokey, and the tense, stiff posture of Ara. The rider that had crashed into them removed her helmet and threw up then and there.
“Dare... What the fuck did you do?”
“What I had to.”
“You’re a fucking murderer,” Ara yelled.
“So was he. Or at least...” Dare looked down and snarled, kicking the severed head away. “He tried to be.”
“I won’t put it past you to tell the cops. But I won’t hurt you, if that’s what you’re so afraid of.”
Before anyone could stop her, Dare was flying again, back to her motorbike, leaving behind the three.
Ara looked at Pokey, took off her helmet, and ran her hands through her hair.
“Oridon and Magnus are not gonna be happy.”
#Dare#Ara#Pokey#Bullhead#OC#OC Writing#Minor character death#Gore#Blood#Cursing#Swearing#Scribbles scribbles#Scribbles OCs
2 notes
·
View notes
Text
The Benefits of Vehicle Window Tinting
Adding a Vehicle Window Tinting Campbelltown to your car can prevent a multitude of problems. While standard car windows do protect against ultraviolet rays, they are not sufficient enough to fully block them. A tinted window can block up to 99% of UV rays, protecting your car's interior from damage and premature aging. In addition, window film is effective at preventing 99% of sun's harmful rays from entering your car.
To apply window tint to a vehicle window, you need to prepare the window by washing it thoroughly. A good tip is to use a spray bottle and prepare water beforehand. Use soapy water to prevent the tint from sticking and ripping. Remember to leave an extra inch of film on each side of the window. You can also use a fingertip to wipe off any dirt that might be stuck to the glass. After you have finished washing your window, you can apply the tint to the rest of the car.
The benefits of window tinting extend beyond aesthetic benefits. It improves vehicle security, as it makes your car more difficult to rob by breaking glass. Vehicle window tinting also protects your car's interior, your skin, and its image. By limiting the amount of light that reaches your interior, it keeps the heat inside your car and reduces the risk of a vehicle crash. It also protects your car's interior from the harsh rays of the sun.
Adding window tint to your car can make it safer for drivers, reducing the heat inside and preventing shattered glass. It can even make it more comfortable to drive, thanks to its anti-glare properties. And because window tints are scratch-resistant, they won't fade. And you'll enjoy more peace of mind knowing your car is protected against the harsh effects of the sun. Its impact on the environment is significant.
While window tinting is not required by law, it can make a difference in how much light gets in. Vehicle window tinting in New York is regulated differently from state to state, so it's best to check the laws in your area. The amount of light that can pass through each window is known as VLT, and each state has its own set of laws regarding the tint's percentage. For this reason, tinting your windows in New York is legal as long as they don't obstruct your view.
If you're in the market for a new tint for your car, you might want to consider visiting a professional auto body shop and discussing your options. Ask the staff about their favorite tinting brands, and remember that quality and performance are paramount. Don't skimp on window tinting, and you'll be happy with the results. When you've made your decision, you can choose a dealer or a professional automotive window tinting shop.
Adding window tint to your vehicle can improve your company's efficiency. Even a small improvement in the efficiency of a single driver's driving can add up to hundreds of thousands of dollars. And when multiplied by the number of vehicles in your fleet, it's easy to see how tinting can make an impact on your business's statistics. If you're in a tight budget, window tinting is an excellent option.

Besides the aesthetic benefits, tinting also helps protect your car against UV rays. The percentage of light that is transmitted through the window is called visible light transmission percentage (VLT%). The darkest tint is 4%, which is the lowest recommended amount for vehicle window tinting. It will also lower your insurance premiums. If you choose to have window tinting done, it's important to check the state regulations carefully. In some states, the laws are quite strict and require that tints be installed on windows in certain locations.
A professional detailer will thoroughly clean your car before applying window film. While this might leave a little dust on your windows, it's not harmful to your window decorations. If you are not sure whether to remove your window decorations yourself, you can also clean the windows yourself. Using a soap and water solution or a razor blade, you should carefully remove any stickers or decals from the top portion of the window. Then, use a lint-free rag to wipe down the interior window surfaces.
0 notes
Text
Vinyl Van Decals Toronto | Vehicle Decals and Lettering Toronto

What could be a more efficient way to market your business than with Van Decals Toronto? It's a great tool for corporate marketing. The exterior of commercial trucks has plenty of room for marketing. The more surface area there is to experiment with different ad design alternatives, the bigger the vehicle. Vinyl Wrap Toronto offers full and partial wraps, vehicle graphics, decals, and personalised vinyl lettering.
Vehicle decals and lettering are simple to put to a car's windows, sides, and top. Dark-colored stickers are difficult to see through tinted windows, so light-colored decals are frequently put to windows to ensure maximum visibility. The wiper function is unaffected when decals are applied appropriately to the glass surface of the windows.
Vinyl Wrap Toronto exclusively uses name-brand, premium vinyl for its Van Decals Toronto. We don't use regular sign vinyl since it degrades too soon. Our decals keep up well in adverse climates and stick to surfaces nicely. If needed, van decals may be removed without damaging the original paint of your vehicle. The entire outside of a van may be decal-ed in about an hour. As a result, you may anticipate speedy response times.
Before applying custom-designed vehicle decals and lettering, we ensure that they are accurately cut and shaped to match the requirements of the vehicle. Customer retention can be greatly aided by inexpensive choices like decals and lettering. As a result, before applying a design for your car, think about how it will affect the standing of your company.
If you are seeking the most striking van decals Toronto for your fleet of commercial vans, get in touch with Vinyl Wrap Toronto right away. Depending on your requirements, we may create one-of-a-kind decals and writing for your car or any other object. For a free quote, call 416-822-3232 right away!
0 notes
Text
Car Window Tinting Service- Glass Tint Shop Glendora Ca
Absolutely nothing shoots down the look of an or else gorgeous vehicle like a crappy window tint install. Even worse still is aiming to translucent that ruinously negative streak of bubbles in between the car window as well as the clear purple film that as soon as qualified as color. As you can see above, my old Mustang dealt with this embarrassing condition.
After years of going without window tint, watching temperature levels in my automobile rise previous 130 degrees this summer season was a strong pointer of how important it can be. I had actually essentially neglected just what it resembled to drive in the summer season and not sweat, so I went to the tinting pros to have my cars and truck done.
To tell if an auto has a top quality tint, see just how close the movie concerns the home window side, and also make note of how regular and also clean the line is. A superior installer uses digital layouts that pre-cut the film as long as possible, causing a line that's close to the edge of the home window pane as well as doesn't waver. In contrast to my bad old Mustang, above, where there's a considerable void as well as it looks well-rounded shitty.
Just one person can effectively get away with purple windows , however you 'd never understand it offered the significant variety of cars on the road with color that has transformed purple with age. It's an apparent sign that the film is of one of the most fundamental top quality feasible, a vinyl sheet with dyes that fade gradually.
See to it you look into exactly how clear your sight is. Obviously huge bubbles are a no-brainer warning, however even really, very small bubbles cause distortion. A good color installer will reduce the danger of bubbles, however if you have actually made use of a low-quality tint, they can develop as early as 6 months in the future as the sticky starts to damage down prematurely.
The little dots you see at the edge of numerous automobile windows are 3D, and the distinctive surface makes tinting extremely hard. Typically you'll see movie that sticks to some places however not others, and the outcome is a horrendous zig-zagging line.
A better, but far more time-intensive (read: $$$) remedy is for the installer to make the effort to sand the dots down. For a vehicle that's currently been tinted, just what you intend to see is an unbelievably regular line that goes right to the edge of the dot matrix.
Similar to the dot matrix, your back home window's defroster is 3D. Any type of excess space where the color is firmly fastened to the home window will come to be a superb starting point for bubbles to form as well as expand gradually. You want to make sure the tint is pushed as securely against the defroster as possible.
Don't automatically assume that a dark color has the most effective heat-blocking residential or commercial properties.
Some dark metallic colors will certainly hinder your cell function.
A lot of films are made with metallic elements-- believe silver or gold, like an '80s limo-- to assist mirror light (and thus heat) far from the vehicle. It's actually extremely effective as well as for years it was the (no pun intended) gold requirement however be alerted: it does tend to disrupt points like cellphone and radio reception.
It's legal to put an extremely (practically clear) light tint on the windshield-- yet not in every state, so understand your regulations. If it's lawful where you live, certainly do it. The windscreen is the largest window on your cars and truck-- if you tint everything else but leave the windshield bare, it kinda beats the objective. This is where those really top notch tints that don't need to be as dark come into play.
A great deal of installers will certainly eliminate areas of the movie on the windscreen for points like your evaluation or registration stickers, so that you could remove them when the moment comes without harming the film. That's unneeded, as well as leads to an unsightly line at the edge of the film. An excellent mount will include positioning those stickers on a clear movie that basically converts them to static-cling decals.
Worse still is trying to see via that ruinously poor streak of bubbles between the home window as well as the clear purplish movie that once certified as color. To tell if an auto has a high quality tint, see exactly how close the movie comes to the home window edge, as well as take note of exactly how constant and tidy the line is. A great tint installer will reduce the risk of bubbles, however if you have actually utilized a low-quality tint, they could create as very early as six months down the roadway as the sticky starts to break down too soon.
The little dots you see at the edge of many auto home windows are 3D, as well as the distinctive surface area makes tinting exceedingly tough. The windshield is the biggest home window on your automobile-- if you tint everything else but leave the windshield bare, it kinda defeats the purpose.
Car Window Tinting Service- Glass Tint Shop Glendora Ca
1 note
·
View note
Link
Best Automotive Windshield Decal Installation Service and Cost in Austin TX |Mobile Auto Truck Repair Austin
More Information is at: https://mobileautotruckrepairaustintx.com/automotive-windshield-decal-installation-near-me/
Automotive Windshield Decal Installation near Austin TX: Are you looking for the BestAutomotive Windshield Decal Installation Service near Austin TX ?Mobile Auto Truck Repair Austin, we believe that it’s vital to stay on top of current trends in the vehicle wraps business. That’s why we’re constantly learning, evolving, and creating better ways to serve our customers. Cost? Free estimates! Send us a message or call us today. Best Automotive Windshield Decal Installation Service around Austin TX. We serve Austin TXand other areas. Get a Free Quote Now!
BEST AUTOMOTIVE WINDSHIELD DECAL INSTALLATION SERVICE IN AUSTIN TX
AUSTINAUTOMOTIVE WINDSHIELD DECAL INSTALLATION
Welcome to Mobile Auto Truck Repair Austin Professional Vehicle Wrap Installation Services
Automotive Windshield Decal Installation near Austin TX:
Mobile Auto Truck Repair Austin is aAustin TX company that specializes in large and small format vinyl graphic removal and installation. We can install full or partial wraps on cars, trucks, buses, trailers, trains, floors, walls, windows, and more!
Our customers benefit from our high-quality, cost-effective work delivered on time and on budget.
We’ve been in the business for over a decade, and have had the privilege of working with more than 50 different graphic printing companies located all over the Austin TX. We attribute our success to excellent customer service and a passionate approach to our work.
At Mobile Auto Truck Repair Austin, we believe that it’s vital to stay on top of current trends in the vehicle wraps business. That’s why we’re constantly learning, evolving, and creating better ways to serve our customers. So, whatever your project, give us a call. If you want to save time and cut down on hassle, we’ll even come to you and install your vehicle wraps or decals on site.
Services Overview
● Professional decal installation
● Professional decal removal services
● Bus wraps
● Car wraps
● Fleets re-branding
● Truck graphics
● Trailers
● Vans
● Paint less color change on Cars using self-adhesivevinyl’s
● Canopies
● Window graphics installation
● Nationwide service
● Professional decal installation
● Professional decal removal
● Car and Van wraps
● Truck wraps
● Fleets re-branding
● Vinyl installation on trailers
● Scotch Gard paint protection film
● 3M carbon fiber
● Black matte installation
● Paint less color change
● Nationwide service, free estimates
● Retail graphics Installation
Clean the surface before installing car decals
Educate customers on applying car decals. They should first clean the area where they want to apply the decal. If you apply the decal or sticker on a dirty surface, it will pick that dirt and grime up. So make sure the area is clean where you want to put your sticker or decal.
You can use soap or rubbing alcohol and water to clean the area. Glass cleaning products should not be used because many will leave a residue behind and will prevent the decal from adhering.
Decide on the location for the car decal
Before installation of car decals, customers should be certain about the location. Various options include the bumper, windows and other interior and exterior surfaces to give a stunning look to your customers’ car. Tires are another place to put decals which make the car look more attractive. To add a more personal touch and to give a modern look to your customers’ cars, install new tires and top them off with personalized decals.
When you have an idea about the area, stick it to the car with electrical tape so you can step back and see how it looks. You can move the position if you do not like it. Once you have an exact place, you can install the decal.
Peel the backing film away from the decal carefully
Peel the paper backing off the sticker. During this process, make sure not to touch the back of the decal because it could leave the dirt on your decal’s backside.
Position the graphic precisely
Place one side of the decal down and smooth it out to the other side until the decal is fully placed. It is important to remember not to remove the backing fully. Remove one-third of the backing and start to apply one-third of the decal to the area. Then slowly pull more of the backing until you have fully installed the decal.
What are Car Decals?
Car decals (also referred to as car stickers or car graphics) are images, graphics, or lettering printed onto or cut out of self-adhesive vinyl material and then placed on any type of vehicle. Car decals include car & truck lettering, clear vinyl decals, opaque vinyl decals, perforated decals, and high adhesive decals. They are mainly used to advertise business names, logos, products, and contact information. They may also be used to show off your favorite logo, team, band, etc.
Common Uses: For outdoor use on windows, doors, fronts, or backs of any vehicle. This includes cars (automobiles), trucks, commercial vans, tractors, race cars, buses, jeeps, motorcycles, dirt bikes, ATVs, UTVs, off-road vehicles, RVs, and any other vehicle.
Installation: All of our vehicle decals are very easy to install. You can find step-by-step installation instructions for each product on its respective product page. Select Learn More on one of the products listed above to see the product-specific installation instructions.
Care: Regularly wash your vehicle decal with a damp, non-abrasive rag. This will remove dirt and grime from the decal and help maintain its quality and lifespan. Avoid using power washers or high-power car washes. All decals are safe to use on areas of a window with windshield wipers.
How To Install Windshield Banner
Automotive Windshield Decal Installation near Austin TX:
1.) Prep the car for install
First thing you will want to do is prepare the glass for install. Clean the windshield of all debris to be sure nothing ends up getting stuck under the vinyl material. Using a glass cleaner and your microfiber towel, thoroughly clean any dirt or dust from the windshield. Even the smallest speck of dust will show through the vinyl and look some-what like an air bubble.
2.) Find the center point
Before you place the material on the car you will want to find the center point of your windshield. For most vehicles the rear view mirror is placed in the center point of the windshield, but every vehicle is different. First measure the placement of the factory markings just to be sure they are in fact the center. Place your logo decal (with backing still on) on the window to decide how low you'd like the logo to be placed. In this example I chose to place the banner at the AS1 line printed on the glass. Depending on the size of the window and personal preference you may want more or less banner showing than what's in this example. Some vehicles will have small lines and arrows printed on the glass showing where window tint or banners should not exceed on the windshield. For this 2007 350z it was 6.75 inches from the top seal. That's about how deep I'd like the banner to go down the windshield.
Find the center and the drop distance and mark it with tape in a perpendicular shape so you have a horizontal and vertical line of reference.
Take a second to study the seal of the window, picturing where you will place the blade before you lay material over it and can no longer see the seal itself.
3.) Measure Twice Cut Once
Next, you will want to go ahead and lay the banner (with paper backing still applied) on the windshield to start eyeing up the position of the banner. Do your best to have the same amount of excess material on both sides. It does not have to be perfect as these banners are meant to be a one size fits most so you should have plenty of excess material protruding past the window seals on both sides.
Once the measurements match up on both sides, use some tape to fully secure the banner in place to ensure the wind or any other disturbance doesn't affect the placement.
4.) Place Half of the Banner on the Glass
Your banner should have a precut line on the back of the backing paper. If you see a slight indentation on the banner itself from the pre-cut line you will not see this line once the banner is applied and have time to settle on the glass. With one half of your banner fully secured, lift the other side off of the windshield and remove the paper backing. Slowly peel the paper back ensuring that the vinyl material does not fold over on itself, if it does slowly peel the material apart from itself.
Once the paper has been removed start laying the banner down from center point making your way to the edge of the glass. Along the way use a squeegee (wrapped in a microfiber towel) to maintain a straight vertical line while moving horizontally towards the edge of the glass.
Take your time with this portion, patience is key. This material is surprisingly forgiving so if you start to see a major crease forming simply lift the material off the glass and re-squeegee that portion until the even vertical line is retained. Many of the air bubbles will squeeze out as you make more passes across the glass. This material has tiny air holes throughout so as long as the crease is not folded over itself the air bubbles will squeeze out.
Move the squeegee in a vertical direction once the banner is laid across the window, pushing towards the top seal and bottom of the banner creating as tight of a seal of the material to the window seal as possible. This will make cutting the excess off much easier later. Make your way towards the corner of the windshield and do your best to push as much air out at the corners.
5.) Repeat on the Opposite side
This side will be slightly easier as the banner is less likely to move since the line has already been established by the first half. Start from the center again and make your way towards the side of the windshield, maintaining a vertical line along the way.
Once both sides are laid down look at the banner from all angles to ensure all of the air bubbles have been pressed out. if you come across one that you can't seem to get out don't be afraid to lift the material back off the glass and re-squeegee from that point. Depending on the color ordered the material may be slightly thinner and more susceptible to stretching which will alter the line established by the placement of the first half. Be careful not to pull on the material too much.
Run the squeegee around the entire perimeter of the banner to ensure a tight fit up against the window seal.
6.) Remove the Excess Material
Razor blades will not cut or scratch glass so you will be able to run the blade directly on the glass to remove excess material. You want to find out where your seal meets the glass and do your best to either run the blade slightly under the seal or lightly press against the glass where the seal meets ensuring your aren't damaging the seal of your window. Typically a faster more steady cut leads to a smother, less jagged line. Moving too slowly may lead to a more rough cut line.
Depending on the vehicle you may have a more defined seal or window line, some windows even have a small gutter between the glass and seal that makes running the blade against the glass even easier.
7.) Place the Logo Decal on the Banner
The final step is to place the included logo decal on the banner. You should have received two logo decals in your order so you have a backup if you misplace the first one or you have the option to layer them or even try one logo out and swap it out for another.
The placement of the sticker is very similar to the banner.
Use the center tape left on your windshield to center the logo on the banner. Tape the logo in place and take a few measurements of the decal to ensure it's centered.
Fold the logo back just like you did the banner and remove the paper backing off of one half, taking the transfer tape and colored decal with you. If the logo wont come off of the paper backing with the transfer tape, lay the logo back onto the paper and re-squeegee the logo and transfer tape. Apply pressure to ensure the tape has bonded to the logo material. Squeegee from the center towards the edge of the window. Remove as many air bubbles from the transfer tape as possible. Repeat for the other side.
Once the transfer tape is removed remove any leftover painters tape and take a step back to make sure you are happy with your logo choice and placement, if you aren't trying again with the second one in your shipment :)
Need help applying your new large window sticker? Don’t worry we have step by step instructions on how to help you get perfect fit!
We also offer application tools at a low price to help remove any air bubbles while protecting the quality of your sicker.
If you need help applying any other types of stickers we also have guides for Small Stickers or Decals, Large Transfer Stickers, Large Die-Cut Stickers, Transfer Sticker Preparation and Family Stickers. We are also available through live chat, phone and email to answer any of your sticker and decal questions.
TIPS
Automotive Windshield Decal Installation near Austin TX: Have you ever turned a perfectly attractive sticker into a twisted clump or a wrinkled eyesore? Here are some tips and tricks that will help you apply your stickers with ease every time!
Start With A Clean Surface
Pre-wash the area where you’ll be applying the sticker using either soap and water or a mixture of rubbing alcohol (70% isopropyl alcohol) and water—we recommend a 50 / 50 water / alcohol solution. After cleaning with soapy water, rinse thoroughly with water until no soap or residue remains. Do not use window-cleaning products. They may leave a residue behind, making your sticker cling less effectively.
Apply When Temperatures Are Moderate
For the best results, install your stickers in a shaded area away from direct sunlight. When possible, you should apply stickers when the temperature is above 50F and below 90F.
Use Masking Tape
Masking tape can help ensure that your sticker is positioned exactly where you want it. Leaving the white backing paper in place and facing the surface you’re applying it to, position the sticker where you want it to go. Place a piece of masking tape along the top edge of the sticker—this fixes it in the proper location. Then, lift the sticker as if it’s on a hinge, and peel off the backing paper. While holding onto the bottom edge, slowly lower the sticker, using the thumb of your other hand to press from the center out and gradually working your way from top to bottom.
Use The Wet Method
You can apply most smaller decals without using water, but for large and very large stickers, this trick is a life-saver. After cleaning your surface area, wet the area again using a spray bottle and a solution of about 5% soap / 95% water. Apply the sticker while the area is still wet. This will keep it from adhering immediately and give you time to reposition if necessary. It also enables you to remove any bubbles using a squeegee or a plastic card. The soapy water will dry in a few minutes and leave your sticker firmly affixed.
Tend To The Transfer Tape
Many of our stickers come with three layers:
1) transfer tape, the clear top layer that clings to the non-adhesive side of the sticker and holds the sticker together;
2) the sticker, the middle layer;
3) backing paper, the bottom layer of white paper that clings to the adhesive side of the sticker.
Before applying these types of stickers, it’s important to make sure the sticker and transfer tape are pressed firmly together. To do so, apply pressure evenly across the transfer tape with a squeegee or a plastic card. This will ensure that the sticker doesn’t come up with the backing paper during installation.
Also, once you’ve applied your sticker, be sure to leave the transfer tape in place for at least 3 hours and up to 24 hours before gently removing it. Mobile Auto Truck Repair Austin,In very cold winter months, you may need to leave the transfer tape on even longer. To speed up the process when it’s cold out, you can warm the application surface using a blow dryer on low heat.
COST
How much does it cost to get decals on a car?
Automotive Windshield Decal Installation near Austin TX: What Vehicle Decals Cost. A simple car decal option which includes a company logo, website and phone number can range from $200 to $400 depending on the size of the decals. More complex decal graphics can cost $500+ as seen in the image to the right.
FREQUENTLY ASKED QUESTIONS
What's included with Automotive Decal Application?
● Thorough cleaning of area
● Installing one customer-supplied automotive decal
● Removing air bubbles from underneath decal
Why should I hire a pro to apply my automotive decals?
Allowing a professional to apply your decals for you saves you time, and frees you from the hassle of interpreting unclear application instructions or keeping track of stray parts and hardware. A pro will have the right tools and experience to do the application quickly, correctly, and safely the first time.
Can I put a decal on my windshield?
Stickers can be placed on the windshield if the stickers are 4 square inches or less and placed on the bottom of the passenger's side of the windshield.
Are cars the only things I can apply the stickers to?
Absolutely not! You can apply our stickers to any smooth surface. Some great places are: cars, trucks, boats, r.v.'s, motorcycles, skateboards, bicycles, helmets, laptops and much more!
How long does it take to get the stickers?
All of our stickers are custom made, so most orders are processed and shipped within 5-7 business days. Production time for bulk orders is based on the quantity ordered. If you live outside the Austin TX please allow 2 to 6 weeks for delivery, depending on customs and your chosen shipping method.
Can I peel the sticker off and use it again?
No, once you've applied the sticker you cannot use it again. Once the sticker is removed you will have to throw it away.
What Is A Decal or Sticker?
It is a common misconception that decals are for your car and stickers are for everything else. Actually, there is no difference between a sticker and a decal! Whether you call them stickers or decals depends on where you're from. Many people on the east coast prefer decals, while the west coast calls them stickers. Another reason for confusion could be the difference between transfer stickers and printed stickers.
Here are some examples of transfer and printed stickers, and the differences between them:
1. Transfer Stickers
Transfer stickers and decals are cut out of a solid color vinyl roll with a plotter and have no background.
Transfer stickers come with three essential parts. There is the paper backing, the decal and then transfer tape. The transfer tape adheres to all the pieces of your sticker or decal no matter how small they are so you can apply it as one piece. The decals below are shown in red, green, black and pink. We offer 40 colors of vinyl to choose from!
2. Printed Stickers
Printed Decals and stickers are made using a high-resolution digital printer and ecofriendly, non-toxic solvent inks. The inks are applied using a heating technology which allows them to adhere to the vinyl and last for years. Printed decals can have an endless amount of colors and are perfect for multicolored designs and photographs.
These stickers can be cut out in any variety of sizes and shapes to meet any personal or business need.
Call For Us:
● Automotive Windshield Decal Installation Service Near Austin TX
● How To Apply Windshield Decal
● Windshield Decals
● Custom Windshield Banner
● Premium Auto Styling Banner Install
● Vinyl Windshield Banner
● How To Make A Windshield Banner
● Grimm speed Windshield Banner
● Black Windshield Banner Austin TX
● Vehicle Graphics Pricing
● Vinyl Decal Installation Cost
● Vinyl Sign Pricing Calculator
● Vinyl Decal Pricing Chart Pdf
● Vinyl Decal Pricing Chart
● Car Decals Near Me
● How To Price Stickers
● Vinyl Calculator Excel Austin TX
BEST AUTOMOTIVE WINDSHIELD DECAL INSTALLATION SERVICE IN AUSTIN TX
MOBILE AUTO TRUCK REPAIR AUSTIN
REQUEST MORE INFORMATION. CONTACT US NOW!
Contact Details
Mobile Auto Truck Repair Austin
Best Mobile Mechanic & Mobile Auto Truck Repair in Austin Texas
Call US: (512) 649-5322
Location: Texas, Austin
Monday-Sunday 24 Hours
www.mobileautotruckrepairaustintx.com
Zip Codes in Austin, Texas:
76527 (Florence) 76530 (Granger) 76537 (Jarrell) 76573 (Schwertner) 76574 (Taylor) 76578 (Thrall)
78602 (Bastrop) 78610 (Buda) 78612 (Cedar Creek) 78613 (Cedar Park) 78615 (Coupland) 78616 (Dale)
78617 (Del Valle) 78619 (Driftwood) 78620 (Dripping Springs) 78621 (Elgin) 78622 (Fentress) 78626
(Georgetown) 78628 (Georgetown) 78633 (Georgetown) 78634 (Hutto) 78640 (Kyle) 78641 (Leander)
78642 (Liberty Hill) 78644 (Lockhart) 78645 (Lago Vista) 78648 (Luling) 78650 (Mc Dade) 78652
(Manchaca) 78653 (Manor) 78655 (Martindale) 78656 (Maxwell) 78659 (Paige) 78660 (Pflugerville)
78661 (Prairie Lea) 78662 (Red Rock) 78664 (Round Rock) 78665 (Round Rock) 78666 (San Marcos)
78669 (Spicewood) 78676 (Wimberley) 78681 (Round Rock) 78701 | 78702 | 78703 | 78704 | 78705 |
78712 | 78717 | 78719 | 78721 | 78722 | 78723 | 78724 | 78725 (Hornsby Bend) 78726 | 78727 |
78728 (Wells Branch) 78729 (Jollyville) 78730 | 78731 | 78732 | 78733 | 78734 (Lakeway) 78735 |
78736 | 78737 | 78738 (Bee Cave) 78739 | 78741 | 78742 | 78744 | 78745 | 78746 | 78747 | 78748 |
78749 | 78750 | 78751 | 78752 | 78753 | 78754 | 78756 | 78757 | 78758 | 78759 | 78953 (Rosanky)
78957 (Smithville)
#Roadsideassistance. #Emergencyroadsideassistance #CommercialTowing
#Carlockouts #HeavyTransportation #Flatbedtowservice
0 notes
Link
Best Automotive Windshield Decal Installation Service and Cost in McAllen TX |Mobile Mechanics Of McAllen
More information is at:
http://24hourmobileautorepairmcallen.org/automotive-windshield-decal-installation-near-me/
Are you looking for the BestAutomotive Windshield Decal Installation Service near McAllen TX ?Mobile Mechanics Of McAllen, we believe that it’s vital to stay on top of current trends in the vehicle wraps business. That’s why we’re constantly learning, evolving, and creating better ways to serve our customers. Cost? Free estimates! Send us a message or call us today. Best Automotive Windshield Decal Installation Service around McAllen TX. We serve McAllen TXand other areas. Get a Free Quote Now!
BEST AUTOMOTIVE WINDSHIELD DECAL INSTALLATION SERVICE IN MCALLEN TX
MCALLENAUTOMOTIVE WINDSHIELD DECAL INSTALLATION
Welcome to Mobile Mechanics Of McAllen Professional Vehicle Wrap Installation Services
Automotive Windshield Decal Installation near McAllen TX:
Mobile Mechanics Of McAllen is a McAllen TX company that specializes in large and small format vinyl graphic removal and installation. We can install full or partial wraps on cars, trucks, buses, trailers, trains, floors, walls, windows, and more!
Our customers benefit from our high-quality, cost-effective work delivered on time and on budget.
We’ve been in the business for over a decade, and have had the privilege of working with more than 50 different graphic printing companies located all over the McAllen TX. We attribute our success to excellent customer service and a passionate approach to our work.
At Mobile Mechanics Of McAllen, we believe that it’s vital to stay on top of current trends in the vehicle wraps business. That’s why we’re constantly learning, evolving, and creating better ways to serve our customers. So, whatever your project, give us a call. If you want to save time and cut down on hassle, we’ll even come to you and install your vehicle wraps or decals on site.
Services Overview
● Professional decal installation
● Professional decal removal services
● Bus wraps
● Car wraps
● Fleets re-branding
● Truck graphics
● Trailers
● Vans
● Paint less color change on Cars using self-adhesivevinyl’s
● Canopies
● Window graphics installation
● Nationwide service
● Professional decal installation
● Professional decal removal
● Car and Van wraps
● Truck wraps
● Fleets re-branding
● Vinyl installation on trailers
● Scotch Gard paint protection film
● 3M carbon fiber
● Black matte installation
● Paint less color change
● Nationwide service, free estimates
● Retail graphics Installation
Clean the surface before installing car decals
Educate customers on applying car decals. They should first clean the area where they want to apply the decal. If you apply the decal or sticker on a dirty surface, it will pick that dirt and grime up. So make sure the area is clean where you want to put your sticker or decal.
You can use soap or rubbing alcohol and water to clean the area. Glass cleaning products should not be used because many will leave a residue behind and will prevent the decal from adhering.
Decide on the location for the car decal
Before installation of car decals, customers should be certain about the location. Various options include the bumper, windows and other interior and exterior surfaces to give a stunning look to your customers’ car. Tires are another place to put decals which make the car look more attractive. To add a more personal touch and to give a modern look to your customers’ cars, install new tires and top them off with personalized decals.
When you have an idea about the area, stick it to the car with electrical tape so you can step back and see how it looks. You can move the position if you do not like it. Once you have an exact place, you can install the decal.
Peel the backing film away from the decal carefully
Peel the paper backing off the sticker. During this process, make sure not to touch the back of the decal because it could leave the dirt on your decal’s backside.
Position the graphic precisely
Place one side of the decal down and smooth it out to the other side until the decal is fully placed. It is important to remember not to remove the backing fully. Remove one-third of the backing and start to apply one-third of the decal to the area. Then slowly pull more of the backing until you have fully installed the decal.
What are Car Decals?
Car decals (also referred to as car stickers or car graphics) are images, graphics, or lettering printed onto or cut out of self-adhesive vinyl material and then placed on any type of vehicle. Car decals include car & truck lettering, clear vinyl decals, opaque vinyl decals, perforated decals, and high adhesive decals. They are mainly used to advertise business names, logos, products, and contact information. They may also be used to show off your favorite logo, team, band, etc.
Common Uses: For outdoor use on windows, doors, fronts, or backs of any vehicle. This includes cars (automobiles), trucks, commercial vans, tractors, race cars, buses, jeeps, motorcycles, dirt bikes, ATVs, UTVs, off-road vehicles, RVs, and any other vehicle.
Installation: All of our vehicle decals are very easy to install. You can find step-by-step installation instructions for each product on its respective product page. Select Learn More on one of the products listed above to see the product-specific installation instructions.
Care: Regularly wash your vehicle decal with a damp, non-abrasive rag. This will remove dirt and grime from the decal and help maintain its quality and lifespan. Avoid using power washers or high-power car washes. All decals are safe to use on areas of a window with windshield wipers.
How To Install Windshield Banner
Automotive Windshield Decal Installation near McAllen TX:
1.) Prep the car for install
First thing you will want to do is prepare the glass for install. Clean the windshield of all debris to be sure nothing ends up getting stuck under the vinyl material. Using a glass cleaner and your microfiber towel, thoroughly clean any dirt or dust from the windshield. Even the smallest speck of dust will show through the vinyl and look some-what like an air bubble.
2.) Find the center point
Before you place the material on the car you will want to find the center point of your windshield. For most vehicles the rear view mirror is placed in the center point of the windshield, but every vehicle is different. First measure the placement of the factory markings just to be sure they are in fact the center. Place your logo decal (with backing still on) on the window to decide how low you'd like the logo to be placed. In this example I chose to place the banner at the AS1 line printed on the glass. Depending on the size of the window and personal preference you may want more or less banner showing than what's in this example. Some vehicles will have small lines and arrows printed on the glass showing where window tint or banners should not exceed on the windshield. For this 2007 350z it was 6.75 inches from the top seal. That's about how deep I'd like the banner to go down the windshield.
Find the center and the drop distance and mark it with tape in a perpendicular shape so you have a horizontal and vertical line of reference.
Take a second to study the seal of the window, picturing where you will place the blade before you lay material over it and can no longer see the seal itself.
3.) Measure Twice Cut Once
Next, you will want to go ahead and lay the banner (with paper backing still applied) on the windshield to start eyeing up the position of the banner. Do your best to have the same amount of excess material on both sides. It does not have to be perfect as these banners are meant to be a one size fits most so you should have plenty of excess material protruding past the window seals on both sides.
Once the measurements match up on both sides, use some tape to fully secure the banner in place to ensure the wind or any other disturbance doesn't affect the placement.
4.) Place Half of the Banner on the Glass
Your banner should have a precut line on the back of the backing paper. If you see a slight indentation on the banner itself from the pre-cut line you will not see this line once the banner is applied and have time to settle on the glass. With one half of your banner fully secured, lift the other side off of the windshield and remove the paper backing. Slowly peel the paper back ensuring that the vinyl material does not fold over on itself, if it does slowly peel the material apart from itself.
Once the paper has been removed start laying the banner down from center point making your way to the edge of the glass. Along the way use a squeegee (wrapped in a microfiber towel) to maintain a straight vertical line while moving horizontally towards the edge of the glass.
Take your time with this portion, patience is key. This material is surprisingly forgiving so if you start to see a major crease forming simply lift the material off the glass and re-squeegee that portion until the even vertical line is retained. Many of the air bubbles will squeeze out as you make more passes across the glass. This material has tiny air holes throughout so as long as the crease is not folded over itself the air bubbles will squeeze out.
Move the squeegee in a vertical direction once the banner is laid across the window, pushing towards the top seal and bottom of the banner creating as tight of a seal of the material to the window seal as possible. This will make cutting the excess off much easier later. Make your way towards the corner of the windshield and do your best to push as much air out at the corners.
5.) Repeat on the Opposite side
This side will be slightly easier as the banner is less likely to move since the line has already been established by the first half. Start from the center again and make your way towards the side of the windshield, maintaining a vertical line along the way.
Once both sides are laid down look at the banner from all angles to ensure all of the air bubbles have been pressed out. if you come across one that you can't seem to get out don't be afraid to lift the material back off the glass and re-squeegee from that point. Depending on the color ordered the material may be slightly thinner and more susceptible to stretching which will alter the line established by the placement of the first half. Be careful not to pull on the material too much.
Run the squeegee around the entire perimeter of the banner to ensure a tight fit up against the window seal.
6.) Remove the Excess Material
Razor blades will not cut or scratch glass so you will be able to run the blade directly on the glass to remove excess material. You want to find out where your seal meets the glass and do your best to either run the blade slightly under the seal or lightly press against the glass where the seal meets ensuring your aren't damaging the seal of your window. Typically a faster more steady cut leads to a smother, less jagged line. Moving too slowly may lead to a more rough cut line.
Depending on the vehicle you may have a more defined seal or window line, some windows even have a small gutter between the glass and seal that makes running the blade against the glass even easier.
7.) Place the Logo Decal on the Banner
The final step is to place the included logo decal on the banner. You should have received two logo decals in your order so you have a backup if you misplace the first one or you have the option to layer them or even try one logo out and swap it out for another.
The placement of the sticker is very similar to the banner.
Use the center tape left on your windshield to center the logo on the banner. Tape the logo in place and take a few measurements of the decal to ensure it's centered.
Fold the logo back just like you did the banner and remove the paper backing off of one half, taking the transfer tape and colored decal with you. If the logo wont come off of the paper backing with the transfer tape, lay the logo back onto the paper and re-squeegee the logo and transfer tape. Apply pressure to ensure the tape has bonded to the logo material. Squeegee from the center towards the edge of the window. Remove as many air bubbles from the transfer tape as possible. Repeat for the other side.
Once the transfer tape is removed remove any leftover painters tape and take a step back to make sure you are happy with your logo choice and placement, if you aren't trying again with the second one in your shipment :)
Need help applying your new large window sticker? Don’t worry we have step by step instructions on how to help you get perfect fit!
We also offer application tools at a low price to help remove any air bubbles while protecting the quality of your sicker.
If you need help applying any other types of stickers we also have guides for Small Stickers or Decals, Large Transfer Stickers, Large Die-Cut Stickers, Transfer Sticker Preparation and Family Stickers. We are also available through live chat, phone and email to answer any of your sticker and decal questions.
TIPS
Automotive Windshield Decal Installation near McAllen TX: Have you ever turned a perfectly attractive sticker into a twisted clump or a wrinkled eyesore? Here are some tips and tricks that will help you apply your stickers with ease every time!
Start With A Clean Surface
Pre-wash the area where you’ll be applying the sticker using either soap and water or a mixture of rubbing alcohol (70% isopropyl alcohol) and water—we recommend a 50 / 50 water / alcohol solution. After cleaning with soapy water, rinse thoroughly with water until no soap or residue remains. Do not use window-cleaning products. They may leave a residue behind, making your sticker cling less effectively.
Apply When Temperatures Are Moderate
For the best results, install your stickers in a shaded area away from direct sunlight. When possible, you should apply stickers when the temperature is above 50F and below 90F.
Use Masking Tape
Masking tape can help ensure that your sticker is positioned exactly where you want it. Leaving the white backing paper in place and facing the surface you’re applying it to, position the sticker where you want it to go. Place a piece of masking tape along the top edge of the sticker—this fixes it in the proper location. Then, lift the sticker as if it’s on a hinge, and peel off the backing paper. While holding onto the bottom edge, slowly lower the sticker, using the thumb of your other hand to press from the center out and gradually working your way from top to bottom.
Use The Wet Method
You can apply most smaller decals without using water, but for large and very large stickers, this trick is a life-saver. After cleaning your surface area, wet the area again using a spray bottle and a solution of about 5% soap / 95% water. Apply the sticker while the area is still wet. This will keep it from adhering immediately and give you time to reposition if necessary. It also enables you to remove any bubbles using a squeegee or a plastic card. The soapy water will dry in a few minutes and leave your sticker firmly affixed.
Tend To The Transfer Tape
Many of our stickers come with three layers:
1) transfer tape, the clear top layer that clings to the non-adhesive side of the sticker and holds the sticker together;
2) the sticker, the middle layer;
3) backing paper, the bottom layer of white paper that clings to the adhesive side of the sticker.
Before applying these types of stickers, it’s important to make sure the sticker and transfer tape are pressed firmly together. To do so, apply pressure evenly across the transfer tape with a squeegee or a plastic card. This will ensure that the sticker doesn’t come up with the backing paper during installation.
Also, once you’ve applied your sticker, be sure to leave the transfer tape in place for at least 3 hours and up to 24 hours before gently removing it. Mobile Mechanics Of McAllen, In very cold winter months, you may need to leave the transfer tape on even longer. To speed up the process when it’s cold out, you can warm the application surface using a blow dryer on low heat.
COST
How much does it cost to get decals on a car?
Automotive Windshield Decal Installation near McAllen TX: What Vehicle Decals Cost. A simple car decal option which includes a company logo, website and phone number can range from $200 to $400 depending on the size of the decals. More complex decal graphics can cost $500+ as seen in the image to the right.
FREQUENTLY ASKED QUESTIONS
What's included with Automotive Decal Application?
● Thorough cleaning of area
● Installing one customer-supplied automotive decal
● Removing air bubbles from underneath decal
Why should I hire a pro to apply my automotive decals?
Allowing a professional to apply your decals for you saves you time, and frees you from the hassle of interpreting unclear application instructions or keeping track of stray parts and hardware. A pro will have the right tools and experience to do the application quickly, correctly, and safely the first time.
Can I put a decal on my windshield?
Stickers can be placed on the windshield if the stickers are 4 square inches or less and placed on the bottom of the passenger's side of the windshield.
Are cars the only things I can apply the stickers to?
Absolutely not! You can apply our stickers to any smooth surface. Some great places are: cars, trucks, boats, r.v.'s, motorcycles, skateboards, bicycles, helmets, laptops and much more!
How long does it take to get the stickers?
All of our stickers are custom made, so most orders are processed and shipped within 5-7 business days. Production time for bulk orders is based on the quantity ordered. If you live outside the McAllen TX please allow 2 to 6 weeks for delivery, depending on customs and your chosen shipping method.
Can I peel the sticker off and use it again?
No, once you've applied the sticker you cannot use it again. Once the sticker is removed you will have to throw it away.
What Is A Decal or Sticker?
It is a common misconception that decals are for your car and stickers are for everything else. Actually, there is no difference between a sticker and a decal! Whether you call them stickers or decals depends on where you're from. Many people on the east coast prefer decals, while the west coast calls them stickers. Another reason for confusion could be the difference between transfer stickers and printed stickers.
Here are some examples of transfer and printed stickers, and the differences between them:
1. Transfer Stickers
Transfer stickers and decals are cut out of a solid color vinyl roll with a plotter and have no background.
Transfer stickers come with three essential parts. There is the paper backing, the decal and then transfer tape. The transfer tape adheres to all the pieces of your sticker or decal no matter how small they are so you can apply it as one piece. The decals below are shown in red, green, black and pink. We offer 40 colors of vinyl to choose from!
2. Printed Stickers
Printed Decals and stickers are made using a high-resolution digital printer and ecofriendly, non-toxic solvent inks. The inks are applied using a heating technology which allows them to adhere to the vinyl and last for years. Printed decals can have an endless amount of colors and are perfect for multicolored designs and photographs.
These stickers can be cut out in any variety of sizes and shapes to meet any personal or business need.
Call For Us:
● Automotive Windshield Decal Installation Service Near McAllen TX
● How To Apply Windshield Decal
● Windshield Decals
● Custom Windshield Banner
● Premium Auto Styling Banner Install
● Vinyl Windshield Banner
● How To Make A Windshield Banner
● Grimm speed Windshield Banner
● Black Windshield Banner McAllen TX
● Vehicle Graphics Pricing
● Vinyl Decal Installation Cost
● Vinyl Sign Pricing Calculator
● Vinyl Decal Pricing Chart Pdf
● Vinyl Decal Pricing Chart
● Car Decals Near Me
● How To Price Stickers
● Vinyl Calculator Excel McAllen TX
BEST AUTOMOTIVE WINDSHIELD DECAL INSTALLATION SERVICE IN MCALLEN TX
MOBILE MECHANICS OF MCALLEN
REQUEST MORE INFORMATION. CONTACT US NOW!
CONTACT US:
Mobile Mechanics of McAllen
24-hour mobile mechanic roadside assistance services in McAllen, TX!
CALL (956) 278-8017 MOBILE MECHANIC
CALL (956) 278-8258 MOBILE AUTO MECHANIC
CALL (956) 278-8619 MOBILE TRUCK MECHANIC
CALL (956) 587-3435 TOWING & RAODSIDE ASSISTANCE
WEBISTE:
www.24hourmobileautorepairmcallen.org
http://www.mobilemechanicmcallentx.com/
SERVICE AREA:
33 Cities within 30 miles of McAllen, TX
Alamo, TX | Combes, TX | Delmita, TX | Donna, TX | Edcouch, TX | Edinburg, TX | Elsa, TX | Garciasville, TX | Grulla, TX | Hargill, TX | Harlingen, TX | Hidalgo, TX | La Blanca, TX | La Feria, TX | La Joya, TX | La Villa, TX | Lasara, TX | Linn, TX | Los Ebanos, TX | Los Indios, TX | Lyford, TX | Mercedes, TX | Mission, TX | Penitas, TX | Pharr, TX | Progreso, TX | Raymondville, TX | Rio Grande City, TX | San Juan, TX | Santa Maria, TX | Santa Rosa, TX | Sullivan City, TX | Weslaco, TX
Starr County | Hidalgo County | Willacy County | Cameron County | 78504 | 78539 | 78540 | 78541 | 78542 | 78501 | 78503| 78505 | 78557 | 88540 |78502 | 78504 | 78539 | 78572
#mobilemechanic #CarDoorHandleReplacement #CarLightAssemblyInstallation
#FuelFilterReplacement #HeadlightReplacement #MirrorReplacement
#BatteryChangeService #BicycleServices #BikeTrainerAssemblyAndSetup
#roadsideassitance
#towing
Mobiletruckmechanic
#mobileautorepair
#McAllen
#texas
0 notes
Link
Best Automotive Windshield Decal Installation Service and Cost in Omaha NE |Mobile Mechanics of Omaha
More information is at: http://24hourautotruckrepairomaha.org/automotive-windshield-decal-installation-near-me/
Automotive Windshield Decal Installation near Omaha NE: Are you looking for the Best Automotive Windshield Decal Installation Service near Omaha NE ? Mobile Mechanics of Omaha, we believe that it’s vital to stay on top of current trends in the vehicle wraps business. That’s why we’re constantly learning, evolving, and creating better ways to serve our customers. Cost? Free estimates! Send us a message or call us today. Best Automotive Windshield Decal Installation Service around Omaha NE. We serve Omaha NE and other areas. Get a Free Quote Now!
BEST AUTOMOTIVE WINDSHIELD DECAL INSTALLATION SERVICE IN OMAHA NE
OMAHA AUTOMOTIVE WINDSHIELD DECAL INSTALLATION
Welcome to Mobile Mechanics of Omaha Professional Vehicle Wrap Installation Services
Automotive Windshield Decal Installation near Omaha NE:
Mobile Mechanics of Omaha is a Omaha NE company that specializes in large and small format vinyl graphic removal and installation. We can install full or partial wraps on cars, trucks, buses, trailers, trains, floors, walls, windows, and more!
Our customers benefit from our high-quality, cost-effective work delivered on time and on budget.
We’ve been in the business for over a decade, and have had the privilege of working with more than 50 different graphic printing companies located all over the Omaha NE. We attribute our success to excellent customer service and a passionate approach to our work.
At Mobile Mechanics of Omaha, we believe that it’s vital to stay on top of current trends in the vehicle wraps business. That’s why we’re constantly learning, evolving, and creating better ways to serve our customers. So, whatever your project, give us a call. If you want to save time and cut down on hassle, we’ll even come to you and install your vehicle wraps or decals on site.
Services Overview
● Professional decal installation
● Professional decal removal services
● Bus wraps
● Car wraps
● Fleets re-branding
● Truck graphics
● Trailers
● Vans
● Paint less color change on Cars using self-adhesive vinyl’s
● Canopies
● Window graphics installation
● Nationwide service
● Professional decal installation
● Professional decal removal
● Car and Van wraps
● Truck wraps
● Fleets re-branding
● Vinyl installation on trailers
● Scotch Gard paint protection film
● 3M carbon fiber
● Black matte installation
● Paint less color change
● Nationwide service, free estimates
● Retail graphics Installation
Clean the surface before installing car decals
Educate customers on applying car decals. They should first clean the area where they want to apply the decal. If you apply the decal or sticker on a dirty surface, it will pick that dirt and grime up. So make sure the area is clean where you want to put your sticker or decal.
You can use soap or rubbing alcohol and water to clean the area. Glass cleaning products should not be used because many will leave a residue behind and will prevent the decal from adhering.
Decide on the location for the car decal
Before installation of car decals, customers should be certain about the location. Various options include the bumper, windows and other interior and exterior surfaces to give a stunning look to your customers’ car. Tires are another place to put decals which make the car look more attractive. To add a more personal touch and to give a modern look to your customers’ cars, install new tires and top them off with personalized decals.
When you have an idea about the area, stick it to the car with electrical tape so you can step back and see how it looks. You can move the position if you do not like it. Once you have an exact place, you can install the decal.
Peel the backing film away from the decal carefully
Peel the paper backing off the sticker. During this process, make sure not to touch the back of the decal because it could leave the dirt on your decal’s backside.
Position the graphic precisely
Place one side of the decal down and smooth it out to the other side until the decal is fully placed. It is important to remember not to remove the backing fully. Remove one-third of the backing and start to apply one-third of the decal to the area. Then slowly pull more of the backing until you have fully installed the decal.
What are Car Decals?
Car decals (also referred to as car stickers or car graphics) are images, graphics, or lettering printed onto or cut out of self-adhesive vinyl material and then placed on any type of vehicle. Car decals include car & truck lettering, clear vinyl decals, opaque vinyl decals, perforated decals, and high adhesive decals. They are mainly used to advertise business names, logos, products, and contact information. They may also be used to show off your favorite logo, team, band, etc.
Common Uses: For outdoor use on windows, doors, fronts, or backs of any vehicle. This includes cars (automobiles), trucks, commercial vans, tractors, race cars, buses, jeeps, motorcycles, dirt bikes, ATVs, UTVs, off-road vehicles, RVs, and any other vehicle.
Installation: All of our vehicle decals are very easy to install. You can find step-by-step installation instructions for each product on its respective product page. Select Learn More on one of the products listed above to see the product-specific installation instructions.
Care: Regularly wash your vehicle decal with a damp, non-abrasive rag. This will remove dirt and grime from the decal and help maintain its quality and lifespan. Avoid using power washers or high-power car washes. All decals are safe to use on areas of a window with windshield wipers.
How To Install Windshield Banner
Automotive Windshield Decal Installation near Omaha NE:
1.) Prep the car for install
First thing you will want to do is prepare the glass for install. Clean the windshield of all debris to be sure nothing ends up getting stuck under the vinyl material. Using a glass cleaner and your microfiber towel, thoroughly clean any dirt or dust from the windshield. Even the smallest speck of dust will show through the vinyl and look some-what like an air bubble.
2.) Find the center point
Before you place the material on the car you will want to find the center point of your windshield. For most vehicles the rear view mirror is placed in the center point of the windshield, but every vehicle is different. First measure the placement of the factory markings just to be sure they are in fact the center. Place your logo decal (with backing still on) on the window to decide how low you'd like the logo to be placed. In this example I chose to place the banner at the AS1 line printed on the glass. Depending on the size of the window and personal preference you may want more or less banner showing than what's in this example. Some vehicles will have small lines and arrows printed on the glass showing where window tint or banners should not exceed on the windshield. For this 2007 350z it was 6.75 inches from the top seal. That's about how deep I'd like the banner to go down the windshield.
Find the center and the drop distance and mark it with tape in a perpendicular shape so you have a horizontal and vertical line of reference.
Take a second to study the seal of the window, picturing where you will place the blade before you lay material over it and can no longer see the seal itself.
3.) Measure Twice Cut Once
Next, you will want to go ahead and lay the banner (with paper backing still applied) on the windshield to start eyeing up the position of the banner. Do your best to have the same amount of excess material on both sides. It does not have to be perfect as these banners are meant to be a one size fits most so you should have plenty of excess material protruding past the window seals on both sides.
Once the measurements match up on both sides, use some tape to fully secure the banner in place to ensure the wind or any other disturbance doesn't affect the placement.
4.) Place Half of the Banner on the Glass
Your banner should have a precut line on the back of the backing paper. If you see a slight indentation on the banner itself from the pre-cut line you will not see this line once the banner is applied and have time to settle on the glass. With one half of your banner fully secured, lift the other side off of the windshield and remove the paper backing. Slowly peel the paper back ensuring that the vinyl material does not fold over on itself, if it does slowly peel the material apart from itself.
Once the paper has been removed start laying the banner down from center point making your way to the edge of the glass. Along the way use a squeegee (wrapped in a microfiber towel) to maintain a straight vertical line while moving horizontally towards the edge of the glass.
Take your time with this portion, patience is key. This material is surprisingly forgiving so if you start to see a major crease forming simply lift the material off the glass and re-squeegee that portion until the even vertical line is retained. Many of the air bubbles will squeeze out as you make more passes across the glass. This material has tiny air holes throughout so as long as the crease is not folded over itself the air bubbles will squeeze out.
Move the squeegee in a vertical direction once the banner is laid across the window, pushing towards the top seal and bottom of the banner creating as tight of a seal of the material to the window seal as possible. This will make cutting the excess off much easier later. Make your way towards the corner of the windshield and do your best to push as much air out at the corners.
5.) Repeat on the Opposite side
This side will be slightly easier as the banner is less likely to move since the line has already been established by the first half. Start from the center again and make your way towards the side of the windshield, maintaining a vertical line along the way.
Once both sides are laid down look at the banner from all angles to ensure all of the air bubbles have been pressed out. if you come across one that you can't seem to get out don't be afraid to lift the material back off the glass and re-squeegee from that point. Depending on the color ordered the material may be slightly thinner and more susceptible to stretching which will alter the line established by the placement of the first half. Be careful not to pull on the material too much.
Run the squeegee around the entire perimeter of the banner to ensure a tight fit up against the window seal.
6.) Remove the Excess Material
Razor blades will not cut or scratch glass so you will be able to run the blade directly on the glass to remove excess material. You want to find out where your seal meets the glass and do your best to either run the blade slightly under the seal or lightly press against the glass where the seal meets ensuring your aren't damaging the seal of your window. Typically a faster more steady cut leads to a smother, less jagged line. Moving too slowly may lead to a more rough cut line.
Depending on the vehicle you may have a more defined seal or window line, some windows even have a small gutter between the glass and seal that makes running the blade against the glass even easier.
7.) Place the Logo Decal on the Banner
The final step is to place the included logo decal on the banner. You should have received two logo decals in your order so you have a backup if you misplace the first one or you have the option to layer them or even try one logo out and swap it out for another.
The placement of the sticker is very similar to the banner.
Use the center tape left on your windshield to center the logo on the banner. Tape the logo in place and take a few measurements of the decal to ensure it's centered.
Fold the logo back just like you did the banner and remove the paper backing off of one half, taking the transfer tape and colored decal with you. If the logo wont come off of the paper backing with the transfer tape, lay the logo back onto the paper and re-squeegee the logo and transfer tape. Apply pressure to ensure the tape has bonded to the logo material. Squeegee from the center towards the edge of the window. Remove as many air bubbles from the transfer tape as possible. Repeat for the other side.
Once the transfer tape is removed remove any leftover painters tape and take a step back to make sure you are happy with your logo choice and placement, if you aren't trying again with the second one in your shipment :)
Need help applying your new large window sticker? Don’t worry we have step by step instructions on how to help you get perfect fit!
We also offer application tools at a low price to help remove any air bubbles while protecting the quality of your sicker.
If you need help applying any other types of stickers we also have guides for Small Stickers or Decals, Large Transfer Stickers, Large Die-Cut Stickers, Transfer Sticker Preparation and Family Stickers. We are also available through live chat, phone and email to answer any of your sticker and decal questions.
TIPS
Automotive Windshield Decal Installation near Omaha NE: Have you ever turned a perfectly attractive sticker into a twisted clump or a wrinkled eyesore? Here are some tips and tricks that will help you apply your stickers with ease every time!
Start With A Clean Surface
Pre-wash the area where you’ll be applying the sticker using either soap and water or a mixture of rubbing alcohol (70% isopropyl alcohol) and water—we recommend a 50 / 50 water / alcohol solution. After cleaning with soapy water, rinse thoroughly with water until no soap or residue remains. Do not use window-cleaning products. They may leave a residue behind, making your sticker cling less effectively.
Apply When Temperatures Are Moderate
For the best results, install your stickers in a shaded area away from direct sunlight. When possible, you should apply stickers when the temperature is above 50F and below 90F.
Use Masking Tape
Masking tape can help ensure that your sticker is positioned exactly where you want it. Leaving the white backing paper in place and facing the surface you’re applying it to, position the sticker where you want it to go. Place a piece of masking tape along the top edge of the sticker—this fixes it in the proper location. Then, lift the sticker as if it’s on a hinge, and peel off the backing paper. While holding onto the bottom edge, slowly lower the sticker, using the thumb of your other hand to press from the center out and gradually working your way from top to bottom.
Use The Wet Method
You can apply most smaller decals without using water, but for large and very large stickers, this trick is a life-saver. After cleaning your surface area, wet the area again using a spray bottle and a solution of about 5% soap / 95% water. Apply the sticker while the area is still wet. This will keep it from adhering immediately and give you time to reposition if necessary. It also enables you to remove any bubbles using a squeegee or a plastic card. The soapy water will dry in a few minutes and leave your sticker firmly affixed.
Tend To The Transfer Tape
Many of our stickers come with three layers:
1) transfer tape, the clear top layer that clings to the non-adhesive side of the sticker and holds the sticker together;
2) the sticker, the middle layer;
3) backing paper, the bottom layer of white paper that clings to the adhesive side of the sticker.
Before applying these types of stickers, it’s important to make sure the sticker and transfer tape are pressed firmly together. To do so, apply pressure evenly across the transfer tape with a squeegee or a plastic card. This will ensure that the sticker doesn’t come up with the backing paper during installation.
Also, once you’ve applied your sticker, be sure to leave the transfer tape in place for at least 3 hours and up to 24 hours before gently removing it. Mobile Mechanics of Omaha, In very cold winter months, you may need to leave the transfer tape on even longer. To speed up the process when it’s cold out, you can warm the application surface using a blow dryer on low heat.
COST
How much does it cost to get decals on a car?
Automotive Windshield Decal Installation near Omaha NE: What Vehicle Decals Cost. A simple car decal option which includes a company logo, website and phone number can range from $200 to $400 depending on the size of the decals. More complex decal graphics can cost $500+ as seen in the image to the right.
FREQUENTLY ASKED QUESTIONS
What's included with Automotive Decal Application?
● Thorough cleaning of area
● Installing one customer-supplied automotive decal
● Removing air bubbles from underneath decal
Why should I hire a pro to apply my automotive decals?
Allowing a professional to apply your decals for you saves you time, and frees you from the hassle of interpreting unclear application instructions or keeping track of stray parts and hardware. A pro will have the right tools and experience to do the application quickly, correctly, and safely the first time.
Can I put a decal on my windshield?
Stickers can be placed on the windshield if the stickers are 4 square inches or less and placed on the bottom of the passenger's side of the windshield.
Are cars the only things I can apply the stickers to?
Absolutely not! You can apply our stickers to any smooth surface. Some great places are: cars, trucks, boats, r.v.'s, motorcycles, skateboards, bicycles, helmets, laptops and much more!
How long does it take to get the stickers?
All of our stickers are custom made, so most orders are processed and shipped within 5-7 business days. Production time for bulk orders is based on the quantity ordered. If you live outside the Omaha NE please allow 2 to 6 weeks for delivery, depending on customs and your chosen shipping method.
Can I peel the sticker off and use it again?
No, once you've applied the sticker you cannot use it again. Once the sticker is removed you will have to throw it away.
What Is A Decal or Sticker?
It is a common misconception that decals are for your car and stickers are for everything else. Actually, there is no difference between a sticker and a decal! Whether you call them stickers or decals depends on where you're from. Many people on the east coast prefer decals, while the west coast calls them stickers. Another reason for confusion could be the difference between transfer stickers and printed stickers.
Here are some examples of transfer and printed stickers, and the differences between them:
1. Transfer Stickers
Transfer stickers and decals are cut out of a solid color vinyl roll with a plotter and have no background.
Transfer stickers come with three essential parts. There is the paper backing, the decal and then transfer tape. The transfer tape adheres to all the pieces of your sticker or decal no matter how small they are so you can apply it as one piece. The decals below are shown in red, green, black and pink. We offer 40 colors of vinyl to choose from!
2. Printed Stickers
Printed Decals and stickers are made using a high-resolution digital printer and ecofriendly, non-toxic solvent inks. The inks are applied using a heating technology which allows them to adhere to the vinyl and last for years. Printed decals can have an endless amount of colors and are perfect for multicolored designs and photographs.
These stickers can be cut out in any variety of sizes and shapes to meet any personal or business need.
Call For Us:
● Automotive Windshield Decal Installation Service Near Omaha NE
● How To Apply Windshield Decal
● Windshield Decals
● Custom Windshield Banner
● Premium Auto Styling Banner Install
● Vinyl Windshield Banner
● How To Make A Windshield Banner
● Grimm speed Windshield Banner
● Black Windshield Banner Omaha NE
● Vehicle Graphics Pricing
● Vinyl Decal Installation Cost
● Vinyl Sign Pricing Calculator
● Vinyl Decal Pricing Chart Pdf
● Vinyl Decal Pricing Chart
● Car Decals Near Me
● How To Price Stickers
● Vinyl Calculator Excel Omaha NE
BEST AUTOMOTIVE WINDSHIELD DECAL INSTALLATION SERVICE IN OMAHA NE
MOBILE MECHANICS OF OMAHA
REQUEST MORE INFORMATION. CONTACT US NOW!
CONTACT US:
Mobile Mechanics of Omaha
24-hour mobile mechanic roadside assistance services in Omaha NE!
CALL (531) 233-6154 MOBILE MECHANIC
CALL (402) 401 7564 TOWING SERVICE OMAHA
CALL (402) 590 8094 ROADSIDE ASSISTANCE
WEBISTE:
www.24hourautotruckrepairomaha.org
http://www.mobileautorepairomaha.com/
http://www.mobilemechanicomaha.com/
SERVICE AREA:
Communities we serve: Omaha, Carter Lake, Council Bluffs, Crescent, Bellevue, Boys Town, La Vista, Papillion, Honey Creek, Offutt A F B, Bennington, Fort Calhoun, Washington, Elkhorn, St Columbans, Underwood, Kennard, Mc Clelland, Mineola, Waterloo, Springfield, Missouri Valley, Treynor, Cedar Creek, Gretna, Blair, Valley, Neola, Pacific Junction, Plattsmouth, Silver City, Glenwood, Louisville, Yutan, Arlington, Minden, Modale, South Bend, Logan, Murray, Ashland, Mead, Persia, Memphis, Manley, Magnolia, Macedonia, Malvern, Fremont, Carson, Oakland, Herman, Murdock, Nickerson, Shelby, Weeping Water, Hastings, Mondamin, Henderson, Ithaca, Hancock, Nehawka, Tabor, Union, Greenwood, Thurman, Portsmouth, Woodbine, Colon, Wahoo, Avoca, Emerson, Winslow, Avoca, Elmwood, Little Sioux, Cedar Bluffs, Pisgah, Tekamah, Alvo, Randolph, Ames, Hooper, Panama, Craig, Waverly, Ceresco, Percival, Otoe, Imogene, Malmo, Sidney, Uehling, Walnut, Harlan, Westphalia, Eagle, Lincoln, Dunlap, Moorhead, Red Oak, Morse Bluff, Weston, Griswold, Blencoe, Earling, Davey, Dunbar, Nebraska City, North Bend, Unadilla, Elliott, Lewis, Prague, Syracuse, Marne, Scribner, Oakland, Palmyra, Pilot Grove, Walton, Riverton, Farragut, Shenandoah, Valparaiso, Lorton, Essex, Soldier, Hamburg, Defiance, Kirkman, Raymond, Dow City, Stanton, Atlantic, Decatur, Bennet, Elk Horn, Snyder, Lyons, Kimballton, Irwin, Arion, Malcolm, West Point, Panama, Roca, Dodge, Manilla, Yorktown, Northboro, Coin, Hickman, Denton, Bancroft, Aspinwall, Sprague, Clarinda, Martell, Blanchard, Manning, Beemer, College Springs, Shambaugh, Braddyville, 50022, 51432, 51446, 51447, 51454, 51455, 51501, 51502, 51503, 51510, 51520, 51521, 51523, 51525, 51526, 51527, 51528, 51529, 51530, 51531, 51532, 51533, 51534, 51535, 51536, 51537, 51540, 51541, 51542, 51543, 51544, 51545, 51546, 51548, 51549, 51550, 51551, 51552, 51553, 51554, 51555, 51556, 51557, 51558, 51559, 51560, 51561, 51562, 51563, 51564, 51565, 51566, 51570, 51571, 51572, 51573, 51575, 51576, 51577, 51578, 51579, 51591, 51593, 51601, 51602, 51603, 51630, 51631, 51632, 51636, 51637, 51638, 51639, 51640, 51645, 51647, 51648, 51649, 51650, 51651, 51652, 51653, 51654, 51656, 52648, 68002, 68003, 68004, 68005, 68007, 68008, 68009, 68010, 68015, 68016, 68017, 68018, 68019, 68020, 68022, 68023, 68025, 68026, 68028, 68029, 68031, 68033, 68034, 68037, 68038, 68040, 68041, 68042, 68044, 68045, 68046, 68048, 68050, 68056, 68057, 68058, 68059, 68061, 68063, 68064, 68065, 68066, 68068, 68069, 68070, 68072, 68073, 68101, 68102, 68103, 68104, 68105, 68106, 68107, 68108, 68109, 68110, 68111, 68112, 68113, 68114, 68116, 68117, 68118, 68119, 68120, 68122, 68123, 68124, 68127, 68128, 68130, 68131, 68132, 68133, 68134, 68135, 68136, 68137, 68138, 68139, 68142, 68144, 68145, 68147, 68152, 68154, 68155, 68157, 68164, 68172, 68175, 68176, 68178, 68179, 68180, 68181, 68182, 68183, 68197, 68198, 68304, 68307, 68317, 68336, 68339, 68346, 68347, 68349, 68366, 68372, 68382, 68402, 68403, 68404, 68407, 68409, 68410, 68413, 68417, 68418, 68419, 68428, 68430, 68438, 68446, 68454, 68455, 68461, 68462, 68463, 68501, 68502, 68503, 68504, 68505, 68506, 68507, 68508, 68509, 68510, 68512, 68514, 68516, 68517, 68520, 68521, 68522, 68523, 68524, 68526, 68527, 68528, 68529, 68531, 68532, 68542, 68583, 68588, 68621, 68633, 68648, 68649, 68664, 68716, 68788
#MobileMechanic
#RoadsideAssistance
#towingService
#omaha
#NE
#autotruckrepair
#RVRepair
0 notes
Text
Choosing the Perfect Window Tint For Your Car Windows
Car window tinting can protect your car from the harmful ultraviolet rays that normally come from the sun. Window tinting comes in a variety of tints and there are even car window tint kits that you can install on your own. The first thing you should do before deciding on which kind of tint is best for your vehicle is to consult a professional about the tint you would need. Most automotive shops have the tools and know-how to tint your windows, but they usually charge an affordable price. Alternatively, you can purchase car window tinting kits at convenience stores and even online.

Another advantage to purchasing car window tints for your car is that they come with instructions for proper application. Window tints also come in different types, such as clear lenses, dark lenses, paint by numbers, laminated, fog and haze, rear window defrost, tinted glass and clear lens reflex. Clear tints come in six different types, including fog, haze, fogged view, rain, and snow. You should buy the tints that will not only give you improved visibility, but also to prevent flying debris, sunshine, and hailstones from impacting your windshield.
There are other advantages to car window tinting films, including decreased insurance premiums due to the decreased likelihood of traffic violations due to impaired visibility caused by tinted windows. Also, tinted windows are an effective way to reduce the chance of theft or vandalism due to the ease in which the film is removed without damaging the car's interior. Lastly, the reflective quality of car window tints makes the vehicle easier to spot at night.
Because of these benefits, many car owners invest in a resistant uv film. While it can be purchased for both new and used vehicles, newer vehicles typically require some type of protective covering. Generally, the tint film for a front window is thicker than the film for a back window. The reason for this is to create a more difficult situation for a thief to break into. Most car owners prefer to use a UV film for all windows, even the ones in the rear of the vehicle.
Car window tints are available in many different colors, styles, and sizes. Car window tints can have high and low levels of tint, and you must know which tint percentages are required for your vehicle. The Department of Transportation requires that all vehicles have the following tint percentages: Low, Medium, High, and Ultra-High. To check for the recommended tint percentage for your vehicle, simply look at the sticker inside the car window sticker.
Another alternative to a film is carbon window tint film. Carbon film has been proven to be less harmful than other alternatives. Carbon window tint films are available in a variety of styles, colors, and thicknesses. When shopping for car windows, it's important to shop for products that contain high amounts of carbon or high purity.
For more information visit us on https://www.tintaus.com.au/

0 notes
Text
Goss’ Garage: Pane in the Glass
What could possibly be easier than cleaning the windows in your car? Well maybe a lot of things.
First you have to make sure that you use the right products. Use a glass cleaner that’s designed for automobiles not for household use. The reason is some of the household products they can leave a film on the windshield that causes the wipers to streak and smear. That's not safe.
All right, second thing, if you happen to have tinted windows… I know a lot of us like tinted windows either to keep the sun off or just for the look. Well tinted windows have a plastic film on the inside of the glass. That plastic film has to be treated properly. You don't use any kind of glass cleaner that has ammonia or any other harsh chemicals in it. You use a tint safe window cleaner. Anything else could damage that film, and it looks really nasty when it happens. I also use microfiber cloths because you don't want to scratch it, and these things you see on the internet about cleaning everything with wadded up newspaper and so on… that will really do a number on your window tint.
Alright, lots of us have to have parking stickers or inspection stickers and things like that. Those come off. You take them off…replace them… but they leave a residue of adhesive behind them. So what are you to do? Well you use a sticker remover or some type of solvent to dissolve the glue. Then you carefully use a razor blade, or if you can find it a plastic razor blade, to scrape the residue off and that way you won't damage the glass.
Another thing, and this is almost unheard of for most people. The windows and the doors ride up and down in channels. Those channels get dirty. They cause the window to bind and chatter as it goes up and down. Well you can prevent all of that, and sometimes cure it, by using silicone spray. Yes, it's the same as silicone spray that you use on your weather stripping. You spray it into the channel… let it run down past the glass…move the glass up and down two or three times to distribute the silicone… and that will cure lot of problems and prevent the problem from happening in the first place. So silicone spray in the window channels.
And if you have a question or comment drop me a line right here at MotorWeek.
from MotorWeek Entries https://ift.tt/2T47Ji0
via IFTTT
0 notes
Text
Cops and Robbers
I drew a comic of the joke at the end and had to write what lead up to it.
Styliani bites his lip absently as he fiddles with his lockpick. Beside him Kita is scanning the street. It’s a low traffic area in the day, after nightfall there’s no one, but caution is never a bad idea. Finally the lock clicks open and he can twist the nob. He slips in, followed by Kita, who closes the door behind them. If their research is right then the shop’s owner is out of town for the week, leaving his wares blissfully unguarded. A week away is no doubt bad for business, then again neither is leaving a door locked with no security system. Of all the heists they’ve run, this is by far the easiest. Get through a residential style locked door, maybe two if the back room is locked as well, and crack into an old safe.
Once inside Kita runs around, taking inventory. The store’s layout is simple, an open room with a circular counter in the middle, and freestanding display cases of necklaces and bracelets in line with 3 of the walls. The back wall has a couple doors, two labeled as restrooms, and one that is labeled as ‘Employees Only’. Kita trots up to the countertop, scanning over the rings. They all sparkle gently in the low light. “Hey Sty,” he calls out, “I want this one!”
Styliani approaches, looking through the glass. It’s a decently simple ring with a faint purple tint to it. He grins, opening his bag to remove a glass cutter. “Your wish is my command darling.” Cutting the glass is easy, the tool is well maintained and Styliani is well practiced in the use of it. He reaches through the hole and grabs the ring his partner wants. Styliani turns to Kita, who’s grinning excitedly and eagerly takes it.
Kita holds it up, grabbing a flashlight and flicking it on to inspect it. The added light makes it glimmer and shine like a star. He grins, lowering the flashlight. “Sty,” he starts, getting his partner’s attention again. When Styliani turns to him again Kita kneels on the floor, holding the ring out with a silly grin on his face, “Marry me?”
A laugh escapes Styliani’s lips. He grabs Kita’s hand and pulls him up, immediately pressing a kiss to his lips. It’s not quite soft and sweet, but not hungry and aggressive, just as their partnership is. They pull apart, both grinning at each other. “You know my answer to that,” Styliani says, moving away. They do have an objective after all.
Kita sighs, rolling his eyes and slipping the ring onto his own finger. “Not as long as Nijoh’ir’s around,” he responds, halfheartedly joking. Kita’s about to get to work on his half of the job when he glances out the window and a car catches his eye. It’s solid black with tinted windows. For a part of town that should be empty, that certainly looks like a cop trying to keep a low profile. He refocuses inside the store, quickly noticing now the cameras in all corners of the store. “Shit. Sty! We gotta get out!” he yells, running to the back room.
There’s tools spread out on the floor, and Styliani is fiddling with the safe. Apparently it’s a bit more complicated than they expected if he’s making use of his full toolkit. He looks up from what he’s doing, “What’s wrong?” Kita’s usual excitement and relaxed nature is gone, so Styliani can guess. Cops. Guess the shop owner was smart enough to add a security system with the new safe.
The blonde looks between Styliani and the window, watching for a moment. “Cops. Looks like we got got this time,” he explains. As he’s speaking two car doors open and Kita sees a redhead cop and a much taller black haired cop. “Oh fuck,” he mutters. It’s not their first encounter with these two, and Kita doubts it will be their last. Styliani is enamoured with Nijoh’ir, and Kita doesn’t really understand why. Sure, he’s attractive. Frankly both of the cops are. But trying to sleep with either is a poor choice.
It wasn’t as if Kita merely stood there for a long time, Nijoh’ir’s and Amasar are not even to the door yet, but he’s ripped from his thoughts when Styliani shouts in excitement. His gaze flicks down, watching Styliani open the safe and shove the gems into a bag. Once it’s full the bag is being thrust out to him. “Take it and hide. I’ll distract them so you can get out when we’re gone.”
“Getting yourself caught is a bad plan Sty,” Kita argues, watching the window. The cops are crossing the street now, guns drawn. He stows the bag of gems in his backpack and looks at Styliani. “You just want to see Nijoh’ir don’t you?”
Styliani smirks, “You know me so well darling.” He gathers the last of his tools and stands up, holding a hand up to caress Kita’s face. “I trust you to come save me. Now hide,” he says, slinging his bag of tools over his shoulder and walking out to the front of the store. He closes the door, locking it as he does. He kneels down, grabbing his lockpick again and putting it to the doorknob. Just as he plans, the front door slams open, two flashlights scan the room and land on him.
“Drop what you’re doing and put your hands in the air!” A voice commands. Nijoh’ir. Stylinai recognizes his voice in an instant. If it’s him and Amasar, then there’s no way Styliani is actually in trouble.
As ordered he drops the lockpick and raises his hands. The tools clatter to the ground with a soft clink-clink. “Looks like ya caught me Sun,” he comments, grinning even with his back turned.
The cops approach slowly, one on either side of the counter. Nijoh’ir pauses by the open countertop. “Sty, where’s the ring?” he asks. Since he spoke, and since moving closer, Nijoh’ir recognizes the criminal just as easily. Neither cop is on high alert anymore, Nijoh’ir even going so far as to holster his gun. Amasar shoots him a curious look, but doesn’t vocalize any question.
Slowly Styliani stands up, hands latched together behind his head. He turns to look at Nijoh’ir, a shit eating grin on his face. “Would you believe I wasn’t the first one here?” he asks.
Nijoh’ir picks up the glass cutter, “Did they steal your tools first?” he asks. Styliani can’t argue against the tool being his. Not many burglars put cat stickers on their tools, and sadly both of these cops know that too well.
With a resigned sigh Styliani admits to it, “Fine, yes, that’s mine. I don’t have the rink though. Kita took it and ran, he’s long gone now.” Only half of that is true, but hopefully they’ll believe it. It wouldn’t be the first time the boys have split up on a job, and the did come in to find Styliani trying to get into the back room. All appearances show he’s telling the truth. Ring and Kita are both nowhere to be seen, and the back room locked as if untouched.
Amasar sighs quietly, finally lowering his gun. If Styliani is the only one to deal with they’re in no danger. The boy is more likely to kiss them than try to kill them. He can’t even remember a time the criminal carried a weapon. “You know you can’t escape right? We’re taking you back to the station,” he says.
Styliani’s gaze flicks from Nijoh’ir to Amasar. “I know. You think I’m opposed to being in a locked room with two attractive men?” he asks, wiggling his eyebrows at the cop. Being locked in a room with these two sounds amazing, and is his goal actually.
There’s a laugh from Nijoh’ir, “Ever the flirt aren’t you Sty?” he asks. He’s walking over, smiling lightly. “Put your hands down I trust you,” he adds. Styliani stretches his shoulders for a moment before dropping them by his side. “You sure you’d be okay with the audience we’d have? That mirror has people on the other side y’know?” Nijoh’ir asks.
He laughs lightly, wrapping his arms around Nijoh’ir the moment he’s within reach, “There’s also the camera that’s always pointed at me. We could put on a lovely show. I’m sure Chief Fray would love to see what interrogation methods his top cops are using,” Styliani teases. He knows they’d never let their chief see… unless he’s into that. But it’s not something they’ve discussed, so he doubts it.
Both cops laugh, and maybe blush. The darkness makes it hard to see how exactly they react. Nijoh’ir raises his hands to rest on Styliani’s arms. “You’re a damn tease, and we gotta take you back to the station now,” he says, gripping Styliani’s arms and pulling them off him. Styliani pouts, but doesn’t fight back. Nijoh’ir easily handcuffs Styliani’s hands behind him. He directs Styliani towards the door while Amasar finishes inspecting the shop. There’s not much point in telling Styliani his rights with how many times he’s been arrested, but Nijoh’ir does it anyways, out of habit if nothing else. “You have the right to remain silent, anything you say can and will be held against you-”
“Nijoh’ir Jesyho.” Styliani is looking over his shoulder, a smirk clear across his face as he looks at Nijoh’ir. Amasar is laughing behind them, and Nijoh’ir can’t help but run a hand over his face.
Amasar cuts in, giving Nijoh’ir a moment to gather himself, “In the court of law Sty.” The response he gets is wiggled eyebrows but no comment. He should know better, Styliani’s already expressed he’s more than okay with an audience.
Finally Nijoh’ir puts his hand back on Styliani’s shoulder and pushes him out the door, “Sty… just get in the car.”
0 notes
Text
Window Tinting in Spain – The rules... has been published at http://www.theleader.info/2019/05/15/window-tinting-in-spain-the-rules/
New Post has been published on http://www.theleader.info/2019/05/15/window-tinting-in-spain-the-rules/
Window Tinting in Spain – The rules...
In Spain, you are allowed to have some of your car´s windows tinted, but there are rules. Car window tinting is a great way of cooling down the inside of the vehicle, especially during the summer months, and can also add a certain amount of privacy to the vehicle. The process can also add an extra level of security in the event of the glass breaking, and can protect you and your vehicle´s occupants from harmful UV rays. Tinted windows are created by the application of dark sheets that are glued onto the original glass of the vehicle. However, this is not just something that you can do yourself, as there are serious consequences in getting it wrong. Firstly, we need to know that not all the windows are allowed to be tinted. In fact, it is not permitted to have the front windows tinted in any way, and both the vehicle´s windscreen and side windows at the front must remain clean as per the manufacturer’s specification. This same rule applies to stick on sunshades. You must not affix anything to the front windows, other than the small stickers defined by law, the ITV, Eco and “car share” stickers on the windscreen, for example. You are allowed to have your rear door windows or the back windows if your vehicle doesn´t have doors, and the rear window of the vehicle tinted. The tinting must be of an approved type, and the opacity must fall within specified requirements, but we don´t need to worry about these as only approved tints can be used and fitted by an approved installer. The installer must provide you with a certificate provided by the manufacturer of the laminate that must be completed by the installer. This certificate must then accompany your vehicle´s documents. Once you have your windows tinted it is important to monitor them for any faults. If the laminate starts to bubble or peel, then it is no longer acceptable and must be removed or replaced. This is because these flaws will reduce visibility which must always be maintained around the vehicle.
0 notes
Last Seen Blogs

ditaenjoy
Tanpa judul

mauhayqueen98-blog
Engl 2053

siberianstate-blog
Untitled

nelsonb0791
Nelson Manuel Báez Navarro.

aishathetaurus
Untitled