#rollup.js
Explore tagged Tumblr posts
Visit Tumblr Blog
Explore Tumblr blogs with no restrictions, modern design and the best experience.
Last Seen Tumblr Blogs


Fun Fact
The average Tumblr user visits about 67 pages every month.
Text
Create Draggable Web Components with TypeScript - Drag-easy-components
Drag-easy-components is a TypeScript library that adds draggable functionality to HTML elements. Built with Rollup.js, this library weighs under 5KB and requires no external dependencies. Initialize draggable behavior in two lines of code. You can use it to build interactive interfaces, custom design tools, or anything where users need to move things around on the screen. Think of dashboards…
2 notes
·
View notes
Photo

Rollup.js 1.0: A Module Bundler for JavaScript - https://t.co/J2T9JVNzlK
1 note
·
View note
Photo

@JavaScriptDaily : Rollup.js 1.0: A Module Bundler for JavaScript - https://t.co/J2T9JVNzlK
1 note
·
View note
Photo

Getting Started with the Rollup.js JS Bundler: https://t.co/ubW4ic40wN (Built around a series of easy to understand examples.)
0 notes
Text
0 notes
Text
How to Use Tailwind on a Svelte Site
Let’s spin up a basic Svelte site and integrate Tailwind into it for styling. One advantage of working with Tailwind is that there isn’t any context switching going back and forth between HTML and CSS, since you’re applying styles as classes right on the HTML. It’s all the in same file in Svelte anyway, but still, this way you don’t even need a <style> section in your .svelte files.
If you are a Svelte developer or enthusiast, and you’d like to use Tailwind CSS in your Svelte app, this article looks at the easiest, most-straightforward way to install tailwind in your app and hit the ground running in creating a unique, modern UI for your app.
If you like to just see a working example, here’s a working GitHub repo.
Why Svelte?
Performance-wise, Svelte is widely considered to be one of the top JavaScript frameworks on the market right now. Created by Rich Harris in 2016, it has been growing rapidly and becoming popular in the developer community. This is mainly because, while very similar to React (and Vue), Svelte is much faster. When you create an app with React, the final code at build time is a mixture of React and vanilla JavaScript. But browsers only understand vanilla JavaScript. So when a user loads your app in a browser (at runtime), the browser has to download React’s library to help generate the app’s UI. This slows down the process of loading the app significantly. How’s Svelte different? It comes with a compiler that compiles all your app code into vanilla JavaScript at build time. No Svelte code makes it into the final bundle. In this instance, when a user loads your app, their browser downloads only vanilla JavaScript files, which are lighter. No framework UI library is needed. This significantly speeds up the process of loading your app. For this reason, Svelte applications are usually very small and lightning fast. The only downside Svelte currently faces is that since it’s still new and doesn’t have the kind of ecosystem and community backing that more established frameworks like React enjoy.
Why Tailwind?
Tailwind CSS is a CSS framework. It’s somewhat similar to popular frameworks, like Bootstrap and Materialize, in that you apply classes to elements and it styles them. But it is also atomic CSS in that one class name does one thing. While Tailwind does have Tailwind UI for pre-built componentry, generally you customize Tailwind to look how you want it to look, so there is less risk of “looking like a Bootstrap site” (or whatever other framework that is less commonly customized). For example, rather than give you a generic header component that comes with some default font sizes, margins, paddings, and other styling, Tailwind provides you with utility classes for different font sizes, margins, and paddings. You can pick the specific ones you want and create a unique looking header with them. Tailwind has other advantages as well:
It saves you the time and stress of writing custom CSS yourself. With Tailwind, you get thousands of out-of-the-box CSS classes that you just need to apply to your HTML elements.
One thing most users of Tailwind appreciate is the naming convention of the utility classes. The names are simple and they do a good job of telling you what their functions are. For example, text-sm gives your text a small font size**.** This is a breath of fresh air for people that struggle with naming custom CSS classes.
By utilizing a mobile-first approach, responsiveness is at the heart of Tailwind’s design. Making use of the sm, md, and lg prefixes to specify breakpoints, you can control the way styles are rendered across different screen sizes. For example, if you use the md prefix on a style, that style will only be applied to medium-sized screens and larger. Small screens will not be affected.
It prioritizes making your application lightweight by making PurgeCSS easy to set up in your app. PurgeCSS is a tool that runs through your application and optimizes it by removing all unused CSS classes, significantly reducing the size of your style file. We’ll use PurgeCSS in our practice project.
All this said Tailwind might not be your cup of tea. Some people believe that adding lots of CSS classes to your HTML elements makes your HTML code difficult to read. Some developers even think it’s bad practice and makes your code ugly. It’s worth noting that this problem can easily be solved by abstracting many classes into one using the @apply directive, and applying that one class to your HTML, instead of the many. Tailwind might also not be for you if you are someone who prefers ready-made components to avoid stress and save time, or you are working on a project with a short deadline.
Step 1: Scaffold a new Svelte site
Svelte provides us with a starter template we can use. You can get it by either cloning the Svelte GitHub repo, or by using degit. Using degit provides us with certain advantages, like helping us make a copy of the starter template repository without downloading its entire Git history (unlike git clone). This makes the process faster. Note that degit requires Node 8 and above.
Run the following command to clone the starter app template with degit:
npx degit sveltejs/template project-name
Navigate into the directory of the starter project so we can start making changes to it:
cd project-name
The template is mostly empty right now, so we’ll need to install some required npm packages:
npm install
Now that you have your Svelte app ready, you can proceed to combining it with Tailwind CSS to create a fast, light, unique web app.
Step 2: Adding Tailwind CSS
Let’s proceed to adding Tailwind CSS to our Svelte app, along with some dev dependencies that will help with its setup.
npm install tailwindcss@npm:@tailwindcss/postcss7-compat postcss@^7 autoprefixer@^9 # or yarn add tailwindcss@npm:@tailwindcss/postcss7-compat postcss@^7 autoprefixer@^9
The three tools we are downloading with the command above:
Tailwind
PostCSS
Autoprefixer
PostCSS is a tool that uses JavaScript to transform and improve CSS. It comes with a bunch of plugins that perform different functions like polyfilling future CSS features, highlighting errors in your CSS code, controlling the scope of CSS class names, etc.
Autoprefixer is a PostCSS plugin that goes through your code adding vendor prefixes to your CSS rules (Tailwind does not do this automatically), using caniuse as reference. While browsers are choosing to not use prefixing on CSS properties the way they had in years past, some older browsers still rely on them. Autoprefixer helps with that backwards compatibility, while also supporting future compatibility for browsers that might apply a prefix to a property prior to it becoming a standard.
For now, Svelte works with an older version of PostCSS. Its latest version, PostCSS 8, was released September 2020. So, to avoid getting any version-related errors, our command above specifies PostCSS 7 instead of 8. A PostCSS 7 compatibility build of Tailwind is made available under the compat channel on npm.
Step 3: Configuring Tailwind
Now that we have Tailwind installed, let’s create the configuration file needed and do the necessary setup. In the root directory of your project, run this to create a tailwind.config.js file:
npx tailwindcss init tailwind.config.js
Being a highly customizable framework, Tailwind allows us to easily override its default configurations with custom configurations inside this tailwind.config.js file. This is where we can easily customize things like spacing, colors, fonts, etc.
The tailwind.config.js file is provided to prevent ‘fighting the framework’ which is common with other CSS libraries. Rather than struggling to reverse the effect of certain classes, you come here and specify what you want. It’s in this file that we also define the PostCSS plugins used in the project.
The file comes with some default code. Open it in your text editor and add this compatibility code to it:
future: { purgeLayersByDefault: true, removeDeprecatedGapUtilities: true, },
Tailwind 2.0 (the latest version), all layers (e.g., base, components, and utilities) are purged by default. In previous versions, however, just the utilities layer is purged. We can manually configure Tailwind to purge all layers by setting the purgeLayersByDefault flag to true.
Tailwind 2.0 also removes some gap utilities, replacing them with new ones. We can manually remove them from our code by setting removeDeprecatedGapUtilities to true.
These will help you handle deprecations and breaking changes from future updates.
PurgeCSS
The several thousand utility classes that come with Tailwind are added to your project by default. So, even if you don’t use a single Tailwind class in your HTML, your project still carries the entire library, making it rather bulky. We’ll want our files to be as small as possible in production, so we can use purge to remove all of the unused utility classes from our project before pushing the code to production.
Since this is mainly a production problem, we specify that purge should only be enabled in production.
purge: { content: [ "./src/**/*.svelte", ], enabled: production // disable purge in dev },
Now, your tailwind.config.js should look like this:
const production = !process.env.ROLLUP_WATCH; module.exports = { future: { purgeLayersByDefault: true, removeDeprecatedGapUtilities: true, }, plugins: [ ], purge: { content: [ "./src/**/*.svelte", ], enabled: production // disable purge in dev }, };
Rollup.js
Our Svelte app uses Rollup.js, a JavaScript module bundler made by Rich Harris, the creator of Svelte, that is used for compiling multiple source files into one single bundle (similar to webpack). In our app, Rollup performs its function inside a configuration file called rollup.config.js.
With Rollup, We can freely break our project up into small, individual files to make development easier. Rollup also helps to lint, prettify, and syntax-check our source code during bundling.
Step 4: Making Tailwind compatible with Svelte
Navigate to rollup.config.js and import the sveltePreprocess package. This package helps us handle all the CSS processing required with PostCSS and Tailwind.
import sveltePreprocess from "svelte-preprocess";
Under plugins, add sveltePreprocess and require Tailwind and Autoprefixer, as Autoprefixer will be processing the CSS generated by these tools.
preprocess: sveltePreprocess({ sourceMap: !production, postcss: { plugins: [ require("tailwindcss"), require("autoprefixer"), ], }, }),
Since PostCSS is an external tool with a syntax that’s different from Svelte’s framework, we need a preprocessor to process it and make it compatible with our Svelte code. That’s where the sveltePreprocess package comes in. It provides support for PostCSS and its plugins. We specify to the sveltePreprocess package that we are going to require two external plugins from PostCSS, Tailwind and Autoprefixer. sveltePreprocess runs the foreign code from these two plugins through Babel and converts them to code supported by the Svelte compiler (ES6+). Rollup eventually bundles all of the code together.
The next step is to inject Tailwind’s styles into our app using the @tailwind directive. You can think of @tailwind loosely as a function that helps import and access the files containing Tailwind’s styles. We need to import three sets of styles.
The first set of styles is @tailwind base. This injects Tailwind’s base styles—mostly pulled straight from Normalize.css—into our CSS. Think of the styles you commonly see at the top of stylesheets. Tailwind calls these Preflight styles. They are provided to help solve cross-browser inconsistencies. In other words, they remove all the styles that come with different browsers, ensuring that only the styles you employ are rendered. Preflight helps remove default margins, make headings and lists unstyled by default, and a host of other things. Here’s a complete reference of all the Preflight styles.
The second set of styles is @tailwind components. While Tailwind is a utility-first library created to prevent generic designs, it’s almost impossible to not reuse some designs (or components) when working on a large project. Think about it. The fact that you want a unique-looking website doesn’t mean that all the buttons on a page should be designed differently from each other. You’ll likely use a button style throughout the app.
Follow this thought process. We avoid frameworks, like Bootstrap, to prevent using the same kind of button that everyone else uses. Instead, we use Tailwind to create our own unique button. Great! But we might want to use this nice-looking button we just created on different pages. In this case, it should become a component. Same goes for forms, cards, badges etc.
All the components you create will eventually be injected into the position that @tailwind components occupies. Unlike other frameworks, Tailwind doesn’t come with lots of predefined components, but there are a few. If you aren’t creating components and plan to only use the utility styles, then there’s no need to add this directive.
And, lastly, there’s @tailwind utilities. Tailwind’s utility classes are injected here, along with the ones you create.
Step 5: Injecting Tailwind Styles into Your Site
It’s best to inject all of the above into a high-level component so they’re accessible on every page. You can inject them in the App.svelte file:
<style global lang="postcss"> @tailwind base; @tailwind components; @tailwind utilities; </style>
Now that we have Tailwind set up in, let’s create a website header to see how tailwind works with Svelte. We’ll create it in App.svelte, inside the main tag.

Step 6: Creating A Website Header
Starting with some basic markup:
<nav> <div> <div> <a href="#">APP LOGO</a> <!-- Menus --> <div> <ul> <li> <a href="#">About</a> </li> <li> <a href="#">Services</a> </li> <li> <a href="#">Blog</a> </li> <li> <a href="#">Contact</a> </li> </ul> </div> </div> </div> </nav>
This is the header HTML without any Tailwind CSS styling. Pretty standard stuff. We’ll wind up moving the “APP LOGO” to the left side, and the four navigation links on the right side of it.

Now let’s add some Tailwind CSS to it:
<nav class="bg-blue-900 shadow-lg"> <div class="container mx-auto"> <div class="sm:flex"> <a href="#" class="text-white text-3xl font-bold p-3">APP LOGO</a> <!-- Menus --> <div class="ml-55 mt-4"> <ul class="text-white sm:self-center text-xl"> <li class="sm:inline-block"> <a href="#" class="p-3 hover:text-red-900">About</a> </li> <li class="sm:inline-block"> <a href="#" class="p-3 hover:text-red-900">Services</a> </li> <li class="sm:inline-block"> <a href="#" class="p-3 hover:text-red-900">Blog</a> </li> <li class="sm:inline-block"> <a href="#" class="p-3 hover:text-red-900">Contact</a> </li> </ul> </div> </div> </div> </nav>
OK, let’s break down all those classes we just added to the HTML. First, let’s look at the <nav> element:
<nav class="bg-blue-900 shadow-lg">
We apply the class bg-blue-900 gives our header a blue background with a shade of 900, which is dark. The class shadow-lg class applies a large outer box shadow. The shadow effect this class creates will be 0px at the top, 10px on the right, 15px at the bottom, and -3px on the left.
Next is the first div, our container for the logo and navigation links:
<div class="container mx-auto">
To center it and our navigation links, we use the mx-auto class. It’s equivalent to margin: auto, horizontally centering an element within its container.
Onto the next div:
<div class="sm:flex">
By default, a div is a block-level element. We use the sm:flex class to make our header a block-level flex container, so as to make its children responsive (to enable them shrink and expand easily). We use the sm prefix to ensure that the style is applied to all screen sizes (small and above).
Alright, the logo:
<a href="#" class="text-white text-3xl font-bold p-3">APP LOGO</a>
The text-white class, true to its name, make the text of the logo white. The text-3xl class sets the font size of our logo (which is configured to 1.875rem)and its line height (configured to 2.25rem). From there, p-3 sets a padding of 0.75rem on all sides of the logo.
That takes us to:
<div class="ml-55 mt-4">
We’re giving the navigation links a left margin of 55% to move them to the right. However, there’s no Tailwind class for this, so we’ve created a custom style called ml-55, a name that’s totally made up but stands for “margin-left 55%.”
It’s one thing to name a custom class. We also have to add it to our style tags:
.ml-55 { margin-left: 55%; }
There’s one more class in there: mt-4. Can you guess what it does? If you guessed that it seta a top margin, then you are correct! In this case, it’s configured to 1rem for our navigation links.
Next up, the navigation links are wrapped in an unordered list tag that contains a few classes:
<ul class="text-white sm:self-center text-xl">
We’re using the text-white class again, followed by sm:self-center to center the list—again, we use the sm prefix to ensure that the style is applied to all screen sizes (small and above). Then there’s text-xl which is the extra-large configured font size.
For each list item:
<li class="sm:inline-block">
The sm:inline-block class sets each list item as an inline block-level element, bringing them side-by-side.
And, lastly, the link inside each list item:
<a href="#" class="p-3 hover:text-red-900">
We use the utility class hover:text-red-900 to make each red on hover.
Let’s run our app in the command line:
npm run dev
This is what we should get:

And that is how we used Tailwind CSS with Svelte in six little steps!
Conclusion
My hope is that you now know how to integrate Tailwind CSS into our Svelte app and configure it. We covered some pretty basic styling, but there’s always more to learn! Here’s an idea: Try improving the project we worked on by adding a sign-up form and a footer to the page. Tailwind provides comprehensive documentation on all its utility classes. Go through it and familiarize yourself with the classes.
Do you learn better with video? Here are a couple of excellent videos that also go into the process of integrating Tailwind CSS with Svelte.
youtube
youtube
The post How to Use Tailwind on a Svelte Site appeared first on CSS-Tricks.
You can support CSS-Tricks by being an MVP Supporter.
How to Use Tailwind on a Svelte Site published first on https://deskbysnafu.tumblr.com/
0 notes
Link
Every time you start a JavaScript project probably you follow most of these common steps:
Setup you the project with a package manager like npm or Yarn
Add a bundler that could be webpack, rollup.js, or any other. As alternative you can use a more aged task runner like Grunt or Gulp, or even a mix of them.
Develop your source code
build your project (this simply means generate the final JS code)
and finally... see the result on a web page
But…
There is another important step that is missing and happens behind-the-scenes...
have you ever wonder what happens inside the browser since when the JavaScript file is received to its execution?
Javascript Engine
The first and most important character in this story is the JavaScript Engine.
But, what is it?
JavaScript Engine is the program that take the JavaScript code and execute it.
Note
Saying “execute it” it’s not exactly what happens. We usually think at JavaScript as an interpreted language rather than a compiled language. That was true in the past but nowadays things are more complicated and deserve a deeper explanation. For now we can say that:
Javascript Engine compiles the code line-by-line just before it is being executed and we call it just-in-time compilation
Now, if you want to understand JS engine behaviour you need to start thinking like a JavaScript Engine.
Suppose that you web page contains only this simple script:
const jedi = "Luke"; let jediList = ["Luke", "yoda", "Obi-Wan"]; const defaultJediList = ["Luke", "yoda", "Obi-Wan"]; const message = "Use the force"; function useTheForce(character) { const otherJediList = ["Mace Windu", "Kit Fisto"]; let jediList = [ ...defaultJediList, ...otherJediList ]; if (jediList.includes(character)) { console.log("%s %s !", message, character); // => "Use the force Luke!" } }
Execution context
If you were a JS Engine the first thing you do is to prepare a comfortable environment to host the incoming code. This environment is named execution Context (EC) and we can simply define it as
the environment where JavaScript code is executed
To make this concept more pragmatic we can say that it contains all the information necessary for code execution, this includes the this reference, and all the variables, objects and functions definitions).
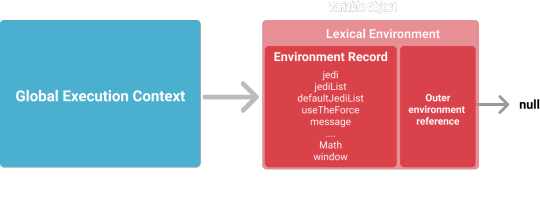
Now, what happens at page loading is that a default EC is created with the name of Global execution context.
It contains all the the built-in variables and functions of the language like the properties Math, String, console , or window (that is a reference itself to the Global Object).
Back to our code, and remember to think like a JS Engine. How would you read the above script?
As we already know, the answer is line by line, top to bottom.
**Line 1** - Engine: I see a constant declaration, I store it **Line 2 **- Engine: I see a variable declaration, I store it **Line 3 **- Engine: I see a constant declaration, I store it **Line 4 **- Engine: I see a variable declaration, I store it **Line 6 **- Engine: I see a function declaration, I store it
At the end what happened is that some declarations are stored in the global memory, no code execution happens. Anyway, there is a new character in our story I would like to introduce…
Lexical Environment
When we speak about storing variable and function declarations I mean saving somewhere the association of identifiers to their values. This place is a component called Lexical Environment and it’s managed following the lexical nesting structure of the code.
More or less the behaviour is this:
every time a scope is found a new Lexical Environment is created
for each Lexical Environment there is an Environment Record that maintains the list of identifier bindings found in the current scope
An outer environment reference maintains a link to the external Lexical Environment (or scope).
In our code we have only the global scope, its lexical environment contains the four variable and the function declaration.
Note that for the outer environment reference is null as it doesn’t have any parent scope.
Call stack
Our script is interesting: very clean and dry. Now I gonna make the things more complicated by adding a function call (Oh my God, now it’s very tricky! 😱😱)
const jedi = "Luke"; let jediList = ["Luke", "yoda", "Obi-Wan"]; const defaultJediList = ["Luke", "yoda", "Obi-Wan"]; const message = "Use the force"; function useTheForce(character) { const otherJediList = ["Mace Windu", "Kit Fisto"]; let jediList = [ ...defaultJediList, ...otherJediList ]; if (jediList.includes(character)) { console.log("%s %s !", message, character); // => "Use the force Luke!" } } useTheForce(jedi);
What happens when you read the last line? (remember you are the Engine)
The function call cause the creation of a brand new EC, a local execution context. Remember that JavaScript is single thread so we can only execute one thing at time: the global EC will be frozen and execution pass to the new one. To manage the code execution among different contexts we need a data structure with the list of all existing ones.
This structure is the call stack, as the name suggests, it’s a simple LIFO stack (Last In First Out).
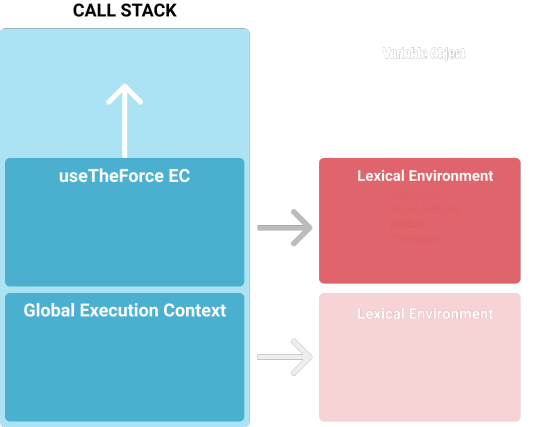
Think about it as a layer cake: the base layer is the Global execution context (inserted by default in this structure), every time there is a function call you need to add a new layer on top of the existing one (Local execution context), when function execution is completed you need to “eat” the layer of cake on top to go on with the code execution on the layer (or EC) below. That means delete the EC on the top and free memory used for its data structures.
Local execution context
What we know now is that
Every time a function call happens the Engine creates a new execution context
This action includes two phase:
creation
execution
creation
In this phase JS engine perform the following action:
create the Lexical Environment. Like global EC it contains all the variables, and function declarations defined inside the function but it also the formal parameters and the arguments object.
create the Variable Environment. This is basically a copy of the Lexical Environment with some differences. For the scope of this article you should only know that it exists.
determines the value of this
Note that Lexical Environment is created every time a new scope (like if, for statement etc… are encountered).
execution
This is very straightforward and means only execute the code.
Now we need slow down a little and explain better how variable values are provided.
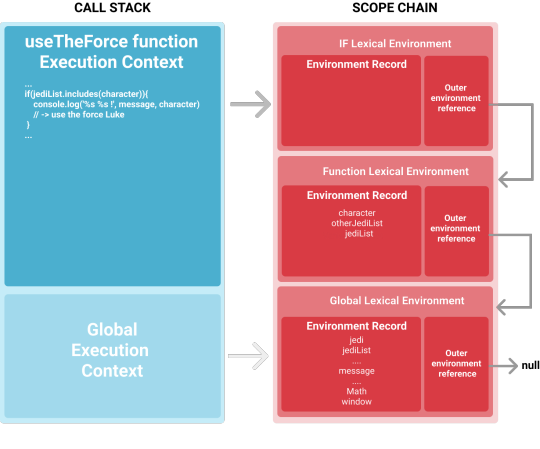
Scope chain
Let’s start with a definition:
Scope chain is the stack of lexical environments active for the current code. The sequence is defined by the outer environment reference that connect each element with its parent.
The scope chain is very important because is the key for identifier resolution and we can define it as:
the process that returns the value of a variable by looking up the scope chain.
Everything start from the most immediate lexical environment looking for a match and if it’s not found we need to proceed to the next one in the chain til the global scope. If no match is found, a ReferenceError is thrown.
Considers the piece of our code inside the if statement:
... if (jediList.includes(character)) { console.log("%s %s !", message, character); // => "Use the force Luke!" } ...
It generates a scope and therefore a brand new Lexical environment is chained.
In this two lines of code we have the two variable character and message. For both the identifier resolution start from the IF Lexical Environment, as the environment record doesn’t contains any item the search moves to the parent where a match is found for character and so the value “‘Luke’” is associated. For the message identifier we need to make another step and move to the Global Lexical Environment where we have a match.
Conclusion
Now you can ask yourself if this article is useful, to be honest I can say that you can ignore at all what you have learned in the last five minutes, probably your code will be good enough and everybody will be happy of your work. But if you want to understand JavaScript deeply this is the right direction to follow.
Think about a car: you can drive it without any knowledge about how the instructions you give to the steering wheel, accelerator or brake will be transformed into movements of the vehicle. But if you wish to get the best performance you need to open the hood, take al look at the engine and understand how gears work together.
Now you know
what is it the Javascript Engine and the Execution Context
how and when an execution context is created
how declarations are managed
how variable values are resolved thanks to scope chain
That’s all folks!
0 notes
Link
Just a few weeks ago we announced that we open sourced Lightning Web Components – which is a core UI technology for building applications on the Lightning Platform. Now developers can leverage the same framework plus their gained skills for building performant and reusable web applications on Salesforce and other platforms. This blog post will give you an overview of the major differences that you will discover between building Lightning Web Components (LWC) on Lightning Platform compared to their open source version. Tooling The first notable difference is tooling. For developing on Lightning Platform you’d use something like the Salesforce Extensions for Visual Studio Code for building Lightning web components and Salesforce CLI for deploying them to an org. In the future, there will also be cool enhancements like LWC Local Development (register here for a recording of our preview webinar). Building with LWC Open Source is different. First, there is no official IDE support. So while you can pick and choose your IDE, you won’t get things like code completion, automated imports, and so forth for LWC (besides the standard JavaScript and HTML features that an IDE offers). This can be a bit more time consuming when you start, so keep the LWC Open Source documentation site bookmarked. At the same time you can use the same general purpose tools like Prettier, ESLint, or Jest. Second, you can choose your tooling. You can decide to build your own toolchain, for example using custom webpack or rollup.js based projects to build and compile your LWC projects. Or you can use lwc-create-app, which is an open source tool that bundles common development activities like project local development, creating production builds, unit testing and more, into the single npm dependency lwc-services. It follows (mostly) the pattern of other popular UI framework tools like Vue CLI or create-react-app, so if you’ve developed with those frameworks, you’ll be familiar with the experience. To get started is simple: you must have node 10.x (the current LTS version) installed on your computer. Then run this command: npx lwc-create-app your-app-name After the guided wizard experience you’ll have a complete project scaffolding, where you can directly start the exploration by running npm run watch. When you look at our LWC Recipes OSS sample application you’ll see the different pre-defined scripts and more. It’s a fast start, so give it a try! Pre-build UI components Another notable difference between building Lightning web components on the Lightning Platform or on Open Source is the availability of Base Lightning Components. These pre-build components are not available on Open Source. The simple reason behind this is that LWC represents the core technology to build Lightning Web Components. And Base Lightning Components are Lightning web components that are built using LWC, with some special flavor related to leverage certain specific functionality of running on Lightning Platform. They are not part of the core framework. However, using LWC Open Source in combination with the CSS (framework) of your choice makes it really easy to build your own UI components. We did that here here with the ui modules in LWC Recipes OSS. Depending on your CSS needs you’ll have to make decisions about Shadow DOM, which you can read more about below. Data access On the Lightning Platform it is relatively simple to access data — you either use Apex or pre-defined Lightning Data Service methods to access data within your Salesforce org. It is different for LWC Open Source. LWC is a UI framework and doesn’t come with any data connectors. You have to define yourself how you want to access data from whatever API that you want. For connecting to APIs you can pick and choose what you need — from standard XHR requests to using the Fetch API (like we did here in LWC Recipes OSS) or any of your preferred npm packages that does that for you. This also means that you will have to handle all the things like authentication, authorization etc. on your own, as you would have to do with other UI frameworks. What is different compared to other UI frameworks (and also to the Lightning Platform) is that you can leverage the @wire decorator to build your own declarative data access. This is super useful when you want to hide the complexity of data access by using a simple decorator, and at the same time, make use of the caching capabilities of the wire-service. The package on GitHub also contains a playground with several examples on how to build your own implementation (and a rollup.js config if you don’t use lwc-services, but want to run your own project setup). Shadow DOM When you look at the different specifications that make up a “web component”, two may stand out: Custom Elements and DOM. Custom Elements, which is the ability to have your own HTML tags like rendered, is essentially the same on Lightning Platform and Open Source. The difference is that you can run your own namespace on LWC Open Source (we used three namespaces in the Recipes sample app). A more significant difference is there when it comes to the DOM — more specifically, the Shadow DOM definition. On the Lightning Platform, we use a synthetic version of Shadow DOM. This creates a virtual DOM just like React does. A virtual DOM represents an in-memory representation of the DOM, which allows us to patch the DOM behavior. This is because we have to support many old browser versions that don’t fully support native Shadow DOM. While the synthetic version behaves the similarly as the native version, you’ll notice two differences: in your browser markup you don’t see the shadow-root tag on Lightning Platform, while on the Open Source version you’ll see it. hello recipe on LWC OSS hello recipe on Lightning Platform The other difference is that because native Shadow DOM is enabled out-of-the-box for Open Source, you can’t just use a global stylesheet that then allows to cascade styles across inheriting Lightning web components. Everything is truly encapsulated, which is one of the huge benefits. You will have to rethink your CSS strategy when it comes to building Lightning web components, or if you want to reuse components that you built and styled on Lightning Platform. On the other side, you can choose with LWC Open Source to use synthetic shadow as an easier way to interoperate with existing UI if needed. Debugging This is closely related to tooling. If you follow the Salesforce Developer blog, you likely read my post about how to debug your Lightning web components. The same techniques apply to LWC Open Source, with some minor differences. Within a Salesforce org, you can switch between the minified version of your LWC code and a non-minified version by enabling debug mode. For LWC Open Source, it all depends with which parameters you build your code. Using lwc-services this is determined by the mode flag (or a custom webpack config). In watch mode, for local development, you’ll see the code as is. If you create a webpack production build, everything is minified. LWC code in webpack development build What’s also different (but at the same time similar) is the location of your LWC code in the Resources view. Typical for webpack, your local code is accessible (only in watch mode) based on your project structure. In a production build, everything is bundled up into dedicated app.js files, based on webpacks heuristics. Source code in webpack production build And now? You now learned about the main notable differences that you should be aware of if you develop LWC Open Source, and/or if you also develop on Lightning Platform. There are many things to explore for the Open Source version, like how to build your own custom wire adapters, how to share code between LWC projects, how to securely access APIs and so on. We’ll cover some of these topics — and more — in upcoming blog posts. For now, head to lwc.dev and create your first app using lwc-create-app (soon to be renamed to create-lwc-app, with some cool enhancements). Then clone the LWC Recipes OSS repo and play with the different recipes. And if you’re deep into JavaScript (or want to be), check out the source code of the LWC framework itself! About the author René Winkelmeyer works as Principal Developer Evangelist at Salesforce. He focuses on enterprise integrations, Lightning, and all the other cool stuff that you can do with the Salesforce Platform. You can follow him on Twitter @muenzpraeger.
0 notes
Photo

Rollup.js 1.0: A Module Bundler for JavaScript - https://t.co/J2T9JVNzlK
0 notes
Photo

Top Frameworks and Topics to Learn in 2019, Electron 4.0, and AVA 1.0
#418 — January 4, 2019
Read on the Web
JavaScript Weekly
RunJS: A JavaScript 'Scratchpad' Tool for macOS — Write and run JavaScript instantly. Useful for learning, experimenting, or perhaps even creating screencasts, tweets, or similar educational content.
Luke Haas
FBT: An Internationalization Framework from Facebook — Facebook has open sourced an internationalization framework that they’ve used internally till now. The goal is to be ‘both powerful and intuitive’. GitHub repo. Or see example usage code.
Facebook
Top JavaScript Frameworks and Topics to Learn in 2019 — We see a lot of ‘top X’ posts when editing JavaScript Weekly but this annual review of the JavaScript tech ecosystem by none other than Eric Elliott is always a crowd pleaser.
Eric Elliott
Make Magic with Creative Coding in Canvas & WebGL 🎩✨ — Use JavaScript to create generative art, interactive animations, 3D graphics with ThreeJS, and custom shaders in GLSL. ✨You'll learn the fundamentals for creative coding jobs like games, advertising, AR/VR and installation artwork!
Frontend Masters sponsor
Electron 4.0 Released — Electron is a popular project from GitHub that’s heavily used to create desktop apps with modern Web technologies. 4.0 introduces some new features but notably bumps up the underlying dependencies to Chromium 69, Node 10.11, and V8 6.9.
Michelle Tilley
Artificial Intelligence in JS with TensorFlow.js — A brief, high level explanation of one of the problems a system like TensorFlow.js can solve: the recognition of written numbers. (Note: This is one of the always great JavaScript January series that runs each year.)
Seth Juarez
What Happened with Node.js in 2018 — This week’s Node Weekly was dedicated to a month by month runthrough of the biggest things that happened in the world of Node.js. We also did a best frontend links of 2018 in Frontend Focus.
Node Weekly
💻 Jobs
JavaScript Developer at X-Team (Remote) — Join the most energizing community for developers. Work from anywhere with the world's leading brands.
X-Team
Find A Job Through Vettery — Vettery matches top tech talent with growing companies. Create your profile to get started.
Vettery
📘 Tutorials and Opinions
Fancy Function Parameters — The process behind making an opaque function call easier to understand using objects and optional arguments.
Jake Dohm
Creating and Filling Arrays of Arbitrary Lengths in JavaScript
Dr. Axel Rauschmayer
Creating a Reusable Accordion Component That Works Anywhere — How to make a web component using Angular Elements which can now be used with any or no framework.
Priyesh Patel
Read Now: the Ultimate Guide to Npm — Everything you need to know to know to use the npm CLI, from basic building blocks to time-saving tips and tricks.
NodeSource sponsor
Running Node.js 11 on AWS Lambda — With Lambda’s new Layers feature and custom runtimes you can now build your own custom artifacts, enabling you to share and manage common code between serverless functions.
Adnan Rahic
The Chronicles of JavaScript Objects — A back to basics tour of what objects are in JavaScript and how they behave.
Arfat Salman
Create Your First Custom Angular CLI Schematic with Nx — Nx is a toolkit for people building enterprise-grade Angular apps.
Sam Julien
Storing and Using the Last Known Route in Vue — How to keep a reference to the last known route a user visited in Vue. Also a good excuse to check out the all-new CSS Tricks redesign!
Mateusz Rybczonek
The Developer’s Guide to Not Losing the Metrics You Need
InfluxData sponsor
How Airbnb is Moving 10x Faster at Scale with GraphQL and Apollo
Adam Neary
Reluctant Gatekeeping: The Problem With 'Full Stack' — Thoughts I think a lot of us may have had but hadn’t put into words yet.
Heydon Pickering
🔧 Code and Tools
AVA 1.0: A Powerful Test Runner for Node — AVA is a test runner with a concise API, detailed error output, and process isolation that let you write tests more effectively. You may find the README more useful than these release notes if you aren’t familiar with it yet though.
Mark Wubben and Sindre Sorhus
Take the Pain Out of Acceptance Testing with Gauge by Thoughtworks
Gauge sponsor
Rollup.js 1.0: A Module Bundler for JavaScript
Low.js: A Node Port for Embedded Devices — Has far lower system requirements than standard Node and can now be flashed on to ESP32-WROVER boards. Here’s how.
neonious GmbH
string-similarity: Finds Degree of Similarity Between Two Strings — Uses the Sørensen–Dice coefficient which is better than Levenshtein distance for many use cases.
Akash K
Magic Grid: A Simple Library for Dynamic Grid Layouts — This has a slightly different use case than CSS Grids may be useful for as explained in this article
Emmanuel Olaojo
Brain.js: A Neural Network Library — If you’re looking for an excuse to play with neural networks, there’s an interactive 19 part course on using Brain.js to do just that.
Robert Plummer
🗓 Upcoming JavaScript Events
JS Kongress 2019 (March 11-12 in Munich, Germany)
VueConf US 2019 (March 25-27 in Tampa, FL) — Great speaker roster including Evan You (creator of Vue.js), Sarah Drasner and Gregg Pollack.
JSHeroes 2019 (April 11-12 in Romania) — Two days of conference talks and workshops.
JSConf EU (June 1-2 in Berlin, Germany) — Tickets that include diversity support are currently still available.
by via JavaScript Weekly http://bit.ly/2LRPDMb
0 notes
Text
자바스크립트 모듈 제공을 위한 AMD, CommonJS 그리고 RequireJS 소개

자바스크립트는 편리한 언어이다.
필자는 자바스크립트의 유연함과 고차함수, 익명함수 사용의 편리함과 직관적은
정말이지 엄청난 매력을 가지고 있다고 생각한다.
이번 포스팅에는 자바스크립트가 모듈을 제공하기 위해서
AMD, CommonJS를 알아보고 RequireJS에 대해서도 소개하고자 한다.
서론
필자는 오픈소스를 자주 사용한다.
그리고 오픈소스 기여도 자주 하는편이라고 생각된다.

오픈소스 참여를 할 때, 깃허브를 많이 사용하는데
여러분도 이 고양문어(옥토캣)을 많이 보셨을 거라 생각한다.
필자가 기여하는 프로젝트 중에
달력 컴포넌트를 만들어주는 자바스크립트 프로젝트가 있다.

이 곳에서 해당 프로젝트를 확인 할 수 있다.
이 코딱지 만한 프로젝트도 점점 사용자들이 이용해주면서
기능을 확장하고 있는데
최근에 AMD, CommonJS 지원 작업을 한 적이 있는데
작업을 진행하면서 발생한 크고작은 이슈에서 얻은 경험을 공유하고자 한다.
시작하기 앞서 이 글을 읽어보면 좋을 것 같다. (4년도 더 된 글이다..)
배경

자바스크립트는 파이썬, 루비, 다른 스크립트 언어 계열과 차이점이 존재한다.
바로 모듈 사용의 표준이 존재하지 않다는 것이다. (ECMA5 기준)
https://gist.github.com/KennethanCeyer/6d6ba68b76354398f770b1e0adc0b8e2
파이썬 모듈 사용
https://gist.github.com/KennethanCeyer/7d02f92ba85c16533668bfe6cdd6e4a5
루비 모듈 사용
Node.js를 사용하고 있는 개발자들은 module.exports를 통해 모듈을 정의하고
require() 함수를 통해 정의한 모듈을 불러와 사용하고 있다.
이곳을 통해 Node.js에서 모듈을 어떤식으로 사용하는 지 알 수 있다.
이러한 방식을 CommonJS로 불린다.
https://gist.github.com/KennethanCeyer/d4848af11711a3ab3f65653449b32c43
Node.js 모듈 형태를 보면 다른언어에 비해 모듈제공이 조금 차이가 있다.
module.exports와 exports 두개를 사용하는데
이런 제공방식은 혼동을 초래하기도 한다.
필자는 그래도 Node.js의 모듈 형식에 대해서 크게 불만을 가지고 있지 않다.
문제는 프론트엔드에서는 이런 모듈 제공방식이 없었다는 것이다!!
https://gist.github.com/KennethanCeyer/609879cb173368093316eb7de667f54b
그나마 비슷하게 모듈 제공방식을 따라해봤다.
프론트엔드에서 사용하는 자바스크립트는 DOM 오브젝트를 사용하고 있다.
전역 오브젝트인 window를 사용하면 다른 자바스크립트 파일에 리소스를 전달 할 수 있다.
하지만 이것도 사용하는 HTML에서 불러오는 모듈 파일을 먼저 로드해야
문제가 없이 작동된다.
즉 대상 모듈이 존재 할 수도, 존재하지 않을 수도 있는 상태가 벌어진다. (으아아악!)
하지만 프론트엔드에서 사용하는 프로젝트도 규모 커지면 커질수록
모듈의 필요성은 커져갔고
그렇게 AMD 방식과 CommonJS 방식 두개의 모듈 정의 규칙이 ���기게 되었다.
사실 두개 말고도 ES2016, ES6, System.register 등등의 모듈제공 방식도 있지만
여러분의 정신건강을 위해 비밀로한다... (이미 비밀이 아니잖아!!)
AMD
AMD는 Asynchronous Module Definition (비동기 모듈 정의) 규칙이다.
https://github.com/amdjs/amdjs-api/wiki/AMD에서 자세한 내용을 확인 할 수 있다.
https://gist.github.com/KennethanCeyer/3c78f7c18c3519355509e2174103d633
AMD의 규칙을 이용해서 정의해봤다.
브라우저에서 모듈을 정의하고 불러오는 기능을 사용하기 위해서는
AMD의 규칙을 따르는 도구를 사용해야 하는데,
위의 코드에서는 RequireJS를 사용했다.
(RequireJS에 대한 설명은 http://requirejs.org/에서 확인 할 수 있다.)

위 사진에서 math.js는 main.js의 require 함수에 의해 동적으로 로딩되었다.
AMD 관련한 글 중에
AMD is Not the Answer(AMD는 해답이 아니다.)라는 글이 있다.
여기서는 AMD의 정의구조와 HTTP 동적 로딩을 비판하고 있는데 관심있는 분들은
한번 읽어보시길 바란다.
필자는 이렇게 생각한다.
AMD와 CommonJS 둘 모두 프론트엔드 브라우저에서 동적 로딩을 할 경우
페이지가 열리기 전까지 수많은 JS를 사용자가 페이지를 열어볼 때 불러오므로
부하가 발생하게 된다. (캐시를 해도 느린건 마찬가지)
여러분이 생각하는 1~20개의 자바스크립트 파일 로딩이 아니다.
몇 백개의 자바스크립트를 매 사용자가 페이지를 전환할 때마다 불러 온다고 생각해보자...

AMD, CommonJS 모두 비동기 통신을 통해 파일을 동적으로 불러오는 경우
성능의 이슈가 있기 때문에
보통 프로덕션 서버로 배포 할 때 번들링(Bundling) 작업을 진행하게 된다.
번들링은 이후 섹션에서 자세히 설명하도록 하겠다.
아까전에 얘기했던 오픈소스 프로젝트 PIGNOSE Calendar는
AMD 스타일로 모듈을 정의한다.
소스코드를 통해 확인이 가능하다.
그렇다고 RequireJS를 사용하지 않는 프로젝트에서
해당 프로젝트 소스를 불러와도 (이를테면 <script> 태그를 통해 로딩 시)
소스는 문제없이 작동해야한다.
AMD는 define 함수와 require 함수를 통해 모듈 정의와 로딩을 진행하는데
이 두가지 함수 모두 브라우저에서 인식 할 수 있는 함수가 아니다.
따라서 아까 우리는 require.js 스크립트를 추가적으로 불러와
브라우저에서도 모듈 정의와 로딩이 동작하도록 했다.
하지만 라이브러리에서 require.js 파일을 의존하여
같이 빌트-인 하기에는 require.js 소스코드 용량이 크다.. (18KB)
RequireJS 측에서는 이렇게 AMD를 사용하지만 라이브러리 형태로 제공해야하는
프로젝트를 위하여 RequireJS의 미니마이즈 버전인 Almond(아몬드)를 제공한다.
아몬드의 설명에 따르면 gzip과 클로저 컴파일러를 이용할 때 약 1킬로바이트의 용량이 된다고 한다.
필자는 RequireJS를 번들링 하기 위해 Grunt Task(그런트 테스크)를 사용하는데
그런트 RequireJS 테스트 설명을 보면
almond 빌트 인이 명시되어있다.
여러가지 유명 자바스크립트 라이브러리를 살펴봐도
대부분 아몬드를 빌트인 하여 제공하고 있다.
CommonJS
아까 설명한 것과 같이 Node.js 진영에서는 CommonJS를 기본으로 사용하고 있다.
그 외에도 tsconfig에서 commonjs로 모듈을 정의해도 CommonJS로 정의가 된다.
CommonJS 제공이 중요한 이유가
당연하게도 Node.js에서 모듈을 불러오는 기본 스타일이 CommonJS이기 때문에
프론트엔드 라이브러리일지라도 Node.js 코드를 통해 유닛 테스팅을 하는 경우
혹은 moment, underscore처럼 Node.js에서도 사용 가능해야하는 라이브러리 일 경우
CommonJS 모듈 형태도 제공해야 한다. (맙소사, 저 울어도 되요?)
번들링
번들링을 쉽게 설명하자면
여태까지 여러분이 모듈들을 싸질러놓은 똥을 하나의 단일 파일로 취합하는 과정이다.
앞서 말씀드린 모듈 타입(AMD, CommonJS, ES2015, ES6 etc)을
분석하고 거기서 불러오는 파일을 파악하여
하나로 모아주는 번들러(Bundler)가 필요한데.

많이 사용하는 번들러 종류는 아래와 같다.
Webpack
Rollup.js
Jspm
Browserify
Grunt와 Gulp와 같은 빌드테스크 도구에서도 플러그인을 연결하여
번들링을 진행 할 수 있다.
PIGNOSE Calendar는 앞서 말했듯 Grunt를 사용하여
RequireJS를 번들링하고 Almond를 묶어서
<script> 태그를 통해 불러오더라도 문제없이 작동한다.
번들러의 선택은 여러분의 자유지만
여러분의 정신건강 상 웹팩(Webpack) 번들러를 사용하시기를 권장드린다.
필자는 AngularJS 2 AOT 를 사용할 때 그곳에 명시된 롤업JS(Rollup.js)를 사용했으나
무수한 경고(Warning)이 표시되었고
AngularJS2에서는 무슨일에선지 그것을 무시하는 코드를 넣어 공식페이지에 공개했다.
그 때문에 필자는 웹팩(Webpack) 버전 2로 교체하고 잘 쓰고 있다.
참고로 Webpack 1에서는 AngularJS AOT를 번들링 할 때 Uglify에서 에러가 발생한다.
아무도 해결방법을 공유안해서 필자가 직접 했다고 한다.
혹시 같은 문제를 겪는 분은 이 링크를 살펴보시길 바란다.
AngularJS 2 AOT를 적용하시고자 하신다면 Webpack 2를 사용하시는 게 정신건강에 좋다.
배포
좀 전에 얘기드린바와같이
우리의 아름다운 자바스크립트 프론트엔드 환경에서는
제공하는 라이브러리를 어떤식으로 호출 할지 모른다.
require([``], function(module) {})로 사용 할 수도 있고. (AMD)
var module = require(``)로 사용 할 수도 있다. (CommonJS)
심지어 import { module } from ``; 형태로 사용 할 수도 있다. (ES6)
우리는 이런 모듈 방식을 모두 제공하는 팩토리 형태를 만들어야 한다.
심지어 이 팩토리 표현에 대해서는 마땅한 표준도 없다.
(세상에 마상에)
표준은 아니지만 UMD라는 친구가 있는데
Universal Module Definition의 약자이다.
여기서 제공하는 템플릿이 그래도 많이 사용되고 있는 듯 보인다.

힘내세요 프론트엔드 라이브러리/프레임워크 개발자 여러분..
피토하셔도 이해합니다..
이 글을 읽어보자
글의 제목은
It's Not Hard: Making Your Library Support AMD and CommonJS
(여러분의 라이브러리가 AMD와 CommonJS를 지원하는 것은 결코 어렵지 않습니다.)
인데 이 글의 분량이 어느정도인지 파악이 되는가?
여러분은 고작 다른언어에서는 기본적으로 제공하는 모듈 지원을 위해
이 정도의 글을 더 읽어야한다.
(모듈 지원도아니다, 지원하고 있는 모듈 외에 모듈 정의 호환 지원이다.)
본론으로 돌아와서,
앞서 말했던 PIGNOSE Calendar 플러그인은 AMD 모듈을 사용하고 있지만
CommonJS, Plaintype(<script>를 통해서 불러오는 경우)를 지원해야 했다.
이를 위해 하나의 Factory를 정의하게 되는데
기초 원리는 간단하다.
우선 아래 코드를 먼저 살펴보자.
https://gist.github.com/KennethanCeyer/19402abf4901a833052319ece54119d4
자바스크립트를 조금 공부하신분은 IIFE에 대해서 들어보셨을 것이다.
IIFE는 Immediate Invoked Function Expression의 약자로 즉시 함수 호출 표현식이다.
이걸 왜 사용하는지는 이곳에서 자세히 살펴보실 수 있다.
이것을 사용하는 주요 이유는 전역 함수와 지역 함수 구분을 위한 클로저 정의를 위해 사용한다.
아까 보여드린 Factory에서도 IIFE 형태의 호출 표현식을 사용하는데
root, factory 매개변수를 IIFE 형태로 전달한다.
root는 this가 전달되며 factory는 모듈로 제공될 함수가 전달된다.
IIFE에서는 각 모듈을 사용하는지 검사 한후 factory를 호출하게 된다.
PIGNOSE Calendar는 module.export (CommonJS) 형태에서
Mocha를 통한 Unit Test를 제공해야 하기 때문에
각종 의존라이브러리를 추가하여 부르게 된다.
그리고 Node.js 환경에서는 window, document가 존재하지 않기 때문에
window와 document를 jsdom을 통해 Mocking 하고있다.
결론
결론적으로 아직 자바스크립트의 모듈링 표준은 걸음마 단계이다.
아직 ECMA 6가 모든 브라우저에서 채택되지 않았기 때문에 (채택상태 보기)
과도기적인 면모를 보인다.
ECMA 6가 AMD와 CommonJS 스타일을 사용하지 않기 때문에
나중에는 AMD와 CommonJS 모두가 버려지는 아름다운 현상이 일어나진 않을지..

이곳에서 RequireJS를 지원하는 Grunt 설정을 볼 수 있다.
PIGNOSE Calendar는 모듈 호환을 제공하고 브라우저에서도 정상 동작한다.
이곳에서 확인해보자

여러분도 자바스크립트 모듈을 사용하고
빈틈 없는 멋진 개발자가 되보자.
(모듈 모르는 뇌 삽니다.)
#개발#commonjs#requirejs#amd#es2015#es6#import#exports#module#almond#factory#webpack#rollupjs#angularjs#angularjs2#ahead of time#aot#bundler#frontend
2 notes
·
View notes
Text
SPlayer: Supercharged HTML5 Music Player (Media)
Overview
SPlayer – Supercharged HTML5 Music Player.
SPlayer is pushing HTML5 to the limit, it’s the most advanced and feature-rich JavaScript Audio library, making it the first HTML5 Music Player of its kind.
SPlayer is the jQuery of Music. It’s the Write Less, Play More Library. It helps you build fully-fledged all-in-one music players and music web apps supercharged with desktop-like features, such as Dual Audio Engine, Gapless Playback, Database-based, Data API, Tracks/Streams/Albums/Artists/Genres/Playlists/Collections, Radio Support, Automation, Spotify-inspired mechanism, Dual Metadata Engine, Embedded Metadata Parser, Internet Metadata Fetcher using lastFM API, Offline Storage, Offline Music, Import/Export, JSON Support, Google-like Algorithm-based Search, Social Media Share, URL Code Reader, History, Queue, Last Session, Backup, Restore, jQuery-like API, Plugins Support, Events, Multi-threading and many many more, 90+ features. It comes with a free UI Plugin, which’s a colorful, jaw-dropping, intelligent Groove-like interface for SPlayer API, and can be launched with one call. It’s highly configurable, yet It’s simplified and very easy to use, and you don’t have to configure anything. Everything is auto and smart by default. That’s the beauty of it.
SPlayer is, without doubt, the most advanced JavaScript library for building Web Music Players on the planet.
You can head to our website to read more: SPlayer
Why use SPlayer?
Over time web technologies have evolved to give web developers the ability to create new generations of useful and incredible web experiences. Today’s web is a result of the ongoing efforts of many web developers that helps define these web technologies.
HTML5 is now widely supported by most web browsers, yet most audio libraries are still limited to playing and pausing audio, and some supports playlists, but they provide no more than this.
The reasons to use it are its unique features, powerful capability and tricks. It has many use cases. Everything you need to build better music players, all in one library. And not just that, It makes playing music on the web much simpler with an easy-to-use API. Most of its features never existed in a JavaScript audio library before, and some of its features, such as algorithm-based search, don’t even exist in Spotify and iTunes, which makes it incomparable to any JavaScript audio library. It goes head to head with professional PHP music scripts and desktop music programs.
It supports more than 10,000 songs, and It provides a great user experience with its incredible unique automation; you can just add tracks, and you automatically get all their artists, albums and genres added to the database without doing anything.
SPlayer does even provide solutions for time-consuming jobs, such as adding folder full of songs on your server without copying each song link.
If you have bought and used sPlayer v1 before, you should know that this is not an update or even an upgrade. This is completely a new product. SPlayer 2 doesn’t even share one line of code with sPlayer.
Features
Architecture Features
Pure HTML5: Taking advantage of HTML5 power and speed. No Flash, no PHP, just pure HTML5.
The Most Advanced Player: Without doubt, SPlayer is the most advanced HTML5 JavaScript audio player for the Web. Its architecture, mechanism, database, selector, API, events, dual HTML5 audio player, offline storage, and its metadata parser and fetcher are just marvelous.
High Performance: Pure Vanilla JavaScript, memory-efficient, performance-focused, under pressure tested and garbage-collector-friendly code.
HTML5 Desktop App Ready: Build powerful HTML5 music desktop apps and web apps with SPlayer using Electron.io (Atom-shell) or NW.io (Node-webkit).
ES6 module system: ES6-friendly future-proof library. It uses rollup.js, next-generation module bundler, because it includes the bare minimum, it results in lighter and faster build.
Extensible and Pluggable: Well-organized and splitted modules. If you’re a developer, you can build your own custom SPlayer, take some of its features and add it to your project. Not just that, you can add your own custom methods to SPlayer as well, then build your own flavored version.
Plugins Support: You can easily write your own plugins for it. If you understand how jQuery works, you already understand how SPlayer works.
Highly Configurable: You can disable and enable most of its features.
jQuery-like API: Marvelous sync easy-to-use jQuery-like API to manipulate your data, and control the beast.
Event-driven: It has an internal async task manager. So some activities, such as metadata parsing and fetching, don’t block I/O and are returned when ready via an event.
Multi-threading: If the browser is fancy, SPlayer uses Web Worker that runs in the background to take some of its activities to speed up the process. This feature is smart and simply amazing.
Feature-detection Tests: It runs browser feature-detection tests to determine if SPlayer is fully supported, partially supported or not.
Database Features
Object-oriented: Client-side Object-oriented JavaScript database support over 10,000 songs.
Structured data: tracks, streams, albums, artists, genres, playlists, collections, history, queue, storage and more. They are called dataObjects. Each dataObject has its own unique feature, its own thing. For example, you can’t add genres to a playlist, but you can add genres to a collection.
Tracks: SPlayer plays tracks, you can add as many as possible, you can add 10,000+, it organizes them, and it gets their metadata, duration, etc..
Streams/Radio: SPlayer supports live streams as well. And it does support Continuous Play. But it doesn’t fetch their metadata. If you’re a developer, you can create your own custom plugin to fetch metadata from your stream provider. SPlayer Team might develop SHOUTcast Metadata Plugin for SPlayer in the future.
Artists: Music artists with their images, wiki and albums, and more.
Albums: Albums with their images, wiki, release data, and more.
Genres: Database has a special place for music genres. Can be bound to tracks, streams, albums, artists, and others. It has your songs genres, albums genres, and artists genres.
Playlists: Create your own track and stream playlists.
Collections: You can create your own Music folders (Collections) for your music, not just playlists.
Selector API: The database, where the tracks, albums, and others are inserted, is easily accessible in various ways. SPlayer has jQuery-like Selector to help you directly access and select dataObjects using unique id, or using name or src. You can even select dataObject by using custom prop.
Data API: jQuery-like methods and instance prototypes for SPlayer Selector to manipulate and access database, such as get, each, has, move, remove, children, search, filter, sort and many more.
Unique ID: It generates fast unique hash ID based on src, name and other data for each dataObject, or you can set your custom unique ID.
Spotify-inspired: Database mechanism is Spotify-inspired.
Automation: The feature that was many people dreaming of. You can just add 100 tracks, and it automatically gets all their artists, albums, and organize them just like iTunes.
Protected: Database prevents duplicated entries, such as adding the same track, but it can be forced by setting your own unique ID.
Attachments: You can set anything inside all dataObjects. That means you can add your own custom metadata.
Events: It triggers events on changes, so you can monitor database changes, or build event-driven web apps just like SPlayer UI.
Backup and Restore: You can backup dataObjects, and set them back later. Import and Export functionality is supported. You can even download them as JSON files.
Audio Features
HTML5 Audio: Goodbye Flash! It doesn’t use deprecated old Flash, it uses hardware-accelerated HTML5.
Dual Audio Engine: Internally SPlayer uses two HTML5 Audio engine smartly bound to one audio channel. You can cache/preload song before being loaded or you can preload two songs at the same time. That means you can preload the next song when the current song is fully buffered to provide a gapless playback. You also have direct access to both of the audio engines and their events. SPlayer is one of a kind.
Multiple Audio Formats: MP3, OGG, OGA, AAC, M4A and MP4. (audio/mpeg, audio/mp3, audio/ogg, audio/x-m4a, audio/m4a, audio/x-mp4, audio/mp4, audio/mp4a, audio/x-aac, audio/aac, audio/aacp.)
Multiple Sources: It detects the supported audio types and provides fallback, so you can add MP3 and M4A or MP3 and OGG files for wider browser support if you wish.
Real Codec Support: It doesn’t just count on native codec support tests, It does real audio tests for more accurate audio codec support results to prevent false positives and false negatives.
Real Attributes Support: It doesn’t just count on native audio attributes support, It does real audio attributes, such as preload and autoplay, tests for more accurate support results to prevent false positives and false negatives.
Gapless Playback: Thanks to Dual Audio Engine mechanism, you can easily create gapless playback and gapless loop.
Self-cleaning Mechanism: SPlayer Audio Player keeps itself clean. It frees cache and releases the previous played audio files from memory.
More Control: Native web audio controls aren’t enough, so we added more such as stop, unload, replay, remaining time, and more.
Events and States Features
Native Audio Events: All native audio events can be monitored; progress, playing, canplay, error and more.
Extra Audio Events: It provides extra audio events, such as availabilitychange and more.
Dual Audio Engine Events: It provides events for both the active Audio engine and the background Audio engine, such as empited, durationchange, canplaythrough and more.
Window Events: offline, online and close events
Database Changes Events: Monitor database changes in realtime, such as add, set and remove.
Custom Events: Create and trigger your own events.
States: Check for SPlayer states, such as playing, stopped. And you can easily toggle them as well.
API Features
Sync jQuery-like API: The API is inspired by jQuery. It’s powerful, fast, and very easy to use.
Useful: Provides many useful methods: such as has, not, move, first, last, children and many more.
Expandable: You can easily add your own methods as well. Just like jQuery.
Search Features
Fast Search: Search in database in dataObjects props using String.indexOf or algorithm.
Algorithm-based: Not simple fuzzy search but Google-like algorithm-based smart search for data. It’s incredible, it can’t be defeated by typos and misspellings.
Advanced: It’s very advanced. It searchs even in relations too, so when you search for “Katy Perry” term in tracks in database, you automatically get all tracks by Katy Perry. It just understands you.
Share Features
Facebook: It uses Facebook Dialog Feed API.
Twitter: It uses Twitter Web Intents API.
Urlizer: You can generate unique URL for each dataObject (tracks, streams, etc ..), and can be read back using SPlayer Urlizer. That means you can communicate with SPlayer using URL parameters, whether URL query string parameters or hash parameters with Browser History API. URL parameters are SPlayer Code. You can select track, load it and then play it at a specific time, it’s similar to YouTube share, but SPlayer Urlizer is more powerful, since it can read SPlayer methods, prototypes and plugins. This enables incredible sharing experience.
Storage Features
Uses fridge.js: SPlayer storage uses fridge.js, the world’s lightest multi-backend web storage library on the planet. Made by us.
Multi-backend: Cross-browser: IndexedDB, WebSQL, and localStorage.
Stores Anything: It stores a very wide range of data types. It works offline and online. To read more about fridge.js, click here.
Metadata Features
Embedded Metadata Parser: SPlayer can automatically parse your tracks, and get all their embedded metadata. It supports MP3, M4A, MP4, AAC. It doesn’t support OGG/OGA yet. It gets the title, artists, albums, genres, release data, wiki, no, comments, and embedded images. The Embedded Metadata Engine is very advanced, smart, fast and memory-efficient. We don’t just say these words, we really mean them.
Internet Metadata Fetcher: It fetches metadata from lastFM database, the world’s largest online music catalogue, for tracks, albums and artists. It gets titles, wiki, release data, genres, images, artist names, album names with their images in all sizes as well.
Extra Metadata: It checks for tracks online availability and caches duration. It has its own events, so you get notified when a track goes back online or goes offline when you load it. Yes you read that right. If you load a track, and it was temporary offline, SPlayer triggers an event.
Async Task Manager: Metadata parser and fetcher don’t block I/O. SPlayer uses internal async task manager to organize its async tasks and to provide a great user experience. It has high priority and normal priority mechanism, so you can process some songs sooner; If you want an example, go and open SPlayer UI Plugin, and import folder full of songs, then go to songs tab and scroll down fast to bottom, you will notice that the currently viewed songs are being processed sooner than expected, that’s because UI Plugin tells SPlayer to set the currently viewed songs to high priority. It’s magnificent.
Smart Dual Mechanism: SPlayer doesn’t just have embedded metadata parser and internet metadata fetcher. These two smarlty work together. There are also options where you can control how these behave.
Multithreading Features
Web Worker: Uses Web Worker technology. It’s auto or it can be disabled or enabled. It’s used to run metadata parser in the background to prevent affecting the performance of the page.
Internal Thread: Launches a separate worker thread internally without loading another file and without code duplications. Only top 1% developers can pull this off.
Auto Mechanism: Metadata parser could run on both the main thread and the worker thread. SPlayer decides to which thread the track should be sent based on its src type. For instance, if a track src is link, the src will be sent to the worker thread to be parsed. If src is Blob/File object then it will be parsed on the main thread for better performance.
Feature-detection Tests: Runs feature-detection tests for web worker to prevent errors. It degrades gracefully when no browser support.
Session and Restore Features
Last Session: Stores last session: the loaded track, playlist, time, volume, paused, playing, stopped, rate and more. So you could restore them later if you want.
Restore: It stores last session on window close, and restore it back on SPlayer ready.
Custom Data: Restore and save session whenever you want by calling its API. It supports storing custom data.
History and Queue Features
History: Your recent plays are all tracked. And of course, you are in control, you can limit or disable history whenever you want.
Queue: SPlayer doesn’t just play tracks randomly without some kind of system. SPlayer has advanced Play Queue, where your next, shuffle, prev are all known. SPlayer does even count how many times you loaded and played them, and when the last time you loaded them.
Import and Export Features
Direct Insert: You can directly insert dataObjects into database.
JSON Import/Export: You can import/export JSON dataObjects or JSON Inputs. It supports JSON, Blob, URLs, Arrays.
Special: This is where SPlayer is special, you can entirely export your database to JSON file, or string. Let’s say you added 300 tracks, they will take a few minutes to be processed and finished, after you do that, you export them to JSON file, and import this file again on load to prevent reprocessing the tracks. It’s a time-saving feature. This means that your users don’t have to process the songs to get metadata everytime they open your web player. The SPlayer UI Demo itself uses JSON Import. Read Pro-tips in docs in the package for more info.
Offline Features
Offline Music: You can let SPlayer store music client-side, so the user can play them offline.
Cached Music: You can cache tracks in the browser before being played (Convert to Blob or preload them in the background audio engine).
Offline Images: You can make artist, album and track images go offline as well. It gets converted to Blob or you can store them in the offline storage with one simple call.
Other Features
Download Music: All tracks can be downloaded using one simple call.
Easy Add: SPlayer made adding music as easy as possible. Just links are enough. However, this still time-consuming for some, because you have to manually copy each song link, which’s very boring and annoying. But in SPlayer, it can be done within a minute, so if you have a folder full of songs, lets say 1000 songs, in your server, you can easily add them by using a trick. For more please read Pro-tips in docs in the package.
18 Months of Hard Work: It tooks us year and a half to built this piece of art. It’s a well-thought-out mechanism.
UI
UI Plugin Overview
SPlayer UI Plugin is a colorful, jaw-dropping, intelligent Groove-like interface for SPlayer API. It’s an event-driven music player, built with jQuery, powered by SPlayer, and can be launched with one call.
Note: There is more than meets the eye, SPlayer UI doesn’t use all SPlayer features. JaguarScript will work on that later. You can add collections, show genres, show albums, tracks and artists wiki, store music offline, store your imported files, cache the next songs before being played, advanced radio integration, show dynamic recommendation, show music homepage customized for viewer. Yes you read that right. You can show recommendations and customize homepage based on recent plays, related songs based on the latest played songs, recommended albums based on played albums, playing count, and many more.
UI Features
Free Plugin: UI Plugin comes free with SPlayer. It’s a complete jQuery music player powered by SPlayer.
Interface for SPlayer API: Most of SPlayer APIs are bound to SPlayer UI Plugin. It’s an event-driven interface for SPlayer API. That means if you add tracks using SPlayer API, you get to see them on SPlayer UI. That’s how it works!
Groove-like Design: Colorful, jaw-dropping and intelligent design, and hugely inspired by Microsoft’s Windows 10 Groove.
Colorful: UI Plugin has dark and light themes, and dynamic colors based on images. Just like Groove.
Ultra Responsive: Modern web resposnive design for desktops, laptops, tablets, phones, and small phones.
Intelligent UX: The buttons, the menu, the bar, the layers. Everything is connected. It has app-like structure.
Fast and memory-efficient: Thanks to its app-like structure and its Virtual Scroll mechanism that’s powered by VScroll.js. The UI isn’t just beautiful, but it’s fast and memory-efficient too. It does smartly interact with SPlayer database. The UI renders just enough amount of tracks/albums/artists/etc to fill the viewport. That’s how Facebook and Twitter display and render their timelines.
Customizable: It has many options where you can control design, container ( You can insert it anywhere you want, you can use SPlayer UI as a widget, not just full screen), theme, colors, tabs, pages, sort, settings, share, search, download and more.
Simple API: The UI has its own API, where you can open an album, an artist or tabs, you can go back or destroy it by just calling simple API.
Demo
Here are many SPlayer UI demos. However, you can also control container, not just style and design, that means you can run SPlayer UI as a widget in your website, not just full screen. Also the UI isn’t just pretty, don’t forget to right click on songs, hover on artists and albums, and scroll on volume slider.
Note: the SPlayer JavaScript files that’s being used to demonstrate this has been modifed and encrypted for demo purposes, so the demo is slower and bigger than the original untouched SPlayer JavaScript files.
SPlayer UI – Light Theme – Demo 1
SPlayer UI – Light Theme – Demo 2
SPlayer UI – Light Theme – Demo 3
SPlayer UI – Light Theme – Demo 4
SPlayer UI – Light Theme – Demo 5
SPlayer UI – Light Theme – Demo 6
SPlayer UI – Dark Theme – Demo 1
SPlayer UI – Dark Theme – Demo 2
SPlayer UI – Dark Theme – Demo 3
SPlayer UI – Dark Theme – Demo 4
SPlayer UI – Dark Theme – Demo 5
SPlayer UI – Dark Theme – Demo 6
Supported Audio Formats
Audio Containers/Extensions: MP3, OGG, OGA, AAC, M4A and MP4
Audio Codecs: audio/mpeg, audio/mp3, audio/ogg, audio/x-m4a, audio/m4a, audio/x-mp4, audio/mp4, audio/mp4a, audio/x-aac, audio/aac, audio/aacp
Supported Src Inputs
Links
Files/Blobs
Base64
Supported JSON Inputs
Strings
Files/Blobs
URLs
Visit Product Page
SPlayer: Supercharged HTML5 Music Player
Documentation
Full documentation contains Installation, Usage, Audio Formats, Src Inputs, JSON Inputs, dataObjects, API Handy Guide, API Documentation, Selector, Events, States, Plugins, UI Plugin, Performance, Notes and Pro-tips, and Browser Support are included in the package.
Browser Support
Google Chrome (8+), Mozilla Firefox (4+), Apple Safari (6+), Opera (15+), Microsoft Edge (all), Internet Explorer (10+) and others.
If you want to support older browsers, it could work, but not all SPlayer features.
FAQ
Is this the successor of sPlayer? Yes. This is the long-awaited all-new SPlayer 2, but SPlayer is totally revamped, it doesn’t even share one line of code with sPlayer.
Can I upgrade from sPlayer to SPlayer for free? No. This is completely a new product. You need a new licence.
Is there an upgrade guide from sPlayer to SPlayer? No. Everything has changed.
Does it automatically fetch stream metadata? No. There are many stream providers, such as SHOUTcast and Icecast, each has different metadata API. But SPlayer could still play them and you could still write metadata for them, organize them, add images, add them to playlists, collections, albums, etc… If you’re a developer, you can easily write your own stream plugin for it.
Is it easy-to-use? Yes.
Does it support Videos? No. but if you’re a developer, you can create a video plugin for it. JaguarScript might create an official video plugin for SPlayer in the future.
SPlayer file size? 100k minified. However, It allows you to create custom builds containing only the modules you need, in case file size is an issue.
from CodeCanyon new items http://ift.tt/2unmulm via IFTTT https://goo.gl/zxKHwc
0 notes
Photo

Rollup.js 1.0: A Module Bundler for JavaScript - https://t.co/J2T9JVNzlK
0 notes
Photo

Rollup.js 1.0: A Module Bundler for JavaScript - https://t.co/J2T9JVNzlK
0 notes
Photo

Rollup.js 1.0: A Module Bundler for JavaScript - https://t.co/J2T9JVNzlK #node #nodejs #angular #angularjs #javascript #react
0 notes
Photo

Rollup.js 1.0: A Module Bundler for JavaScript - https://t.co/J2T9JVNzlK #angular #angularjs #javascript #node #react
0 notes