#run SQL Statements from a Text File
Explore tagged Tumblr posts
Visit Tumblr Blog
Explore Tumblr blogs with no restrictions, modern design and the best experience.
Last Seen Tumblr Blogs


Fun Fact
Tumblr has been providing a Korean-language service since 2013.
Text
Complete PHP Tutorial: Learn PHP from Scratch in 7 Days
Are you looking to learn backend web development and build dynamic websites with real functionality? You’re in the right place. Welcome to the Complete PHP Tutorial: Learn PHP from Scratch in 7 Days — a practical, beginner-friendly guide designed to help you master the fundamentals of PHP in just one week.
PHP, or Hypertext Preprocessor, is one of the most widely used server-side scripting languages on the web. It powers everything from small blogs to large-scale websites like Facebook and WordPress. Learning PHP opens up the door to back-end development, content management systems, and full-stack programming. Whether you're a complete beginner or have some experience with HTML/CSS, this tutorial is structured to help you learn PHP step by step with real-world examples.
Why Learn PHP?
Before diving into the tutorial, let’s understand why PHP is still relevant and worth learning in 2025:
Beginner-friendly: Easy syntax and wide support.
Open-source: Free to use with strong community support.
Cross-platform: Runs on Windows, macOS, Linux, and integrates with most servers.
Database integration: Works seamlessly with MySQL and other databases.
In-demand: Still heavily used in CMS platforms like WordPress, Joomla, and Drupal.
If you want to build contact forms, login systems, e-commerce platforms, or data-driven applications, PHP is a great place to start.
Day-by-Day Breakdown: Learn PHP from Scratch in 7 Days
Day 1: Introduction to PHP & Setup
Start by setting up your environment:
Install XAMPP or MAMP to create a local server.
Create your first .php file.
Learn how to embed PHP inside HTML.
Example:
<?php echo "Hello, PHP!"; ?>
What you’ll learn:
How PHP works on the server
Running PHP in your browser
Basic syntax and echo statement
Day 2: Variables, Data Types & Constants
Dive into PHP variables and data types:
$name = "John"; $age = 25; $is_student = true;
Key concepts:
Variable declaration and naming
Data types: String, Integer, Float, Boolean, Array
Constants and predefined variables ($_SERVER, $_GET, $_POST)
Day 3: Operators, Conditions & Control Flow
Learn how to make decisions in PHP:
if ($age > 18) { echo "You are an adult."; } else { echo "You are underage."; }
Topics covered:
Arithmetic, comparison, and logical operators
If-else, switch-case
Nesting conditions and best practices
Day 4: Loops and Arrays
Understand loops to perform repetitive tasks:
$fruits = ["Apple", "Banana", "Cherry"]; foreach ($fruits as $fruit) { echo $fruit. "<br>"; }
Learn about:
for, while, do...while, and foreach loops
Arrays: indexed, associative, and multidimensional
Array functions (count(), array_push(), etc.)
Day 5: Functions & Form Handling
Start writing reusable code and learn how to process user input from forms:
function greet($name) { return "Hello, $name!"; }
Skills you gain:
Defining and calling functions
Passing parameters and returning values
Handling HTML form data with $_POST and $_GET
Form validation and basic security tips
Day 6: Working with Files & Sessions
Build applications that remember users and work with files:
session_start(); $_SESSION["username"] = "admin";
Topics included:
File handling (fopen, fwrite, fread, etc.)
Reading and writing text files
Sessions and cookies
Login system basics using session variables
Day 7: PHP & MySQL – Database Connectivity
On the final day, you’ll connect PHP to a database and build a mini CRUD app:
$conn = new mysqli("localhost", "root", "", "mydatabase");
Learn how to:
Connect PHP to a MySQL database
Create and execute SQL queries
Insert, read, update, and delete (CRUD operations)
Display database data in HTML tables
Bonus Tips for Mastering PHP
Practice by building mini-projects (login form, guest book, blog)
Read official documentation at php.net
Use tools like phpMyAdmin to manage databases visually
Try MVC frameworks like Laravel or CodeIgniter once you're confident with core PHP
What You’ll Be Able to Build After This PHP Tutorial
After following this 7-day PHP tutorial, you’ll be able to:
Create dynamic web pages
Handle form submissions
Work with databases
Manage sessions and users
Understand the logic behind content management systems (CMS)
This gives you the foundation to become a full-stack developer, or even specialize in backend development using PHP and MySQL.
Final Thoughts
Learning PHP doesn’t have to be difficult or time-consuming. With the Complete PHP Tutorial: Learn PHP from Scratch in 7 Days, you’re taking a focused, structured path toward web development success. You’ll learn all the core concepts through clear explanations and hands-on examples that prepare you for real-world projects.
Whether you’re a student, freelancer, or aspiring developer, PHP remains a powerful and valuable skill to add to your web development toolkit.
So open up your code editor, start typing your first <?php ... ?> block, and begin your journey to building dynamic, powerful web applications — one day at a time.

0 notes
Text
Mastering Python 3: A Step-by-Step Guide
Python 3 is a powerful, versatile, and beginner-friendly programming language used in various fields, including web development, data science, automation, and artificial intelligence. Whether you are a complete beginner or looking to enhance your skills, following a structured learning approach will help you master Python efficiently.
Considering the kind support of Python Course in Chennai Whatever your level of experience or reason for switching from another programming language, learning Python gets much more fun.

1. Getting Started with Python Basics
Before diving into complex topics, it’s essential to understand the fundamentals of Python. Learn about Python syntax, variables, and data types such as strings, integers, lists, tuples, and dictionaries. Master control structures like if-else statements, loops (for and while), and functions to write reusable and efficient code.
2. Writing and Running Your First Programs
Hands-on practice is key to mastering Python. Start by writing simple programs such as a calculator, a to-do list, or a number guessing game. Use interactive coding platforms like Codecademy, Replit, or Jupyter Notebook to test and debug your code easily.
3. Understanding Object-Oriented Programming (OOP)
Object-Oriented Programming is essential for developing scalable applications. Learn how to create and use classes and objects. Understand key OOP principles like inheritance, encapsulation, polymorphism, and abstraction. Try building a small project using OOP concepts, such as a basic inventory system or a contact management application.
4. Diving into Intermediate Python Concepts
Once you’re comfortable with the basics, explore more advanced topics, including:
File Handling: Reading and writing files in Python.
Error Handling: Using try-except blocks to handle exceptions.
Regular Expressions: Searching and manipulating text data efficiently.
Modules and Packages: Organizing code into reusable components.
5. Working with Databases and APIs
Python is widely used for data management. Learn how to interact with:
SQL Databases like MySQL and SQLite to store structured data.
NoSQL Databases like MongoDB for flexible data storage.
APIs using the requests library to fetch and integrate external data. With the aid of Best Online Training & Placement Programs, which offer comprehensive training and job placement support to anyone looking to develop their talents, it’s easier to learn this tool and advance your career.

6. Choosing a Specialization in Python
Depending on your career goals, Python offers multiple specializations:
Web Development – Learn Django or Flask for backend development.
Data Science & Machine Learning – Work with Pandas, NumPy, Scikit-learn, and TensorFlow.
Automation & Scripting – Use Selenium, PyAutoGUI, and OpenCV.
Cybersecurity & Ethical Hacking – Explore penetration testing tools with Python.
7. Building Real-World Python Projects
Applying Python to real-world projects enhances learning and problem-solving skills. Try building:
A web scraper using BeautifulSoup.
A chatbot with AI integration.
A data visualization dashboard using Matplotlib and Seaborn.
8. Contributing to Open Source and Networking
Join the Python community by contributing to open-source projects on GitHub. Engage in discussions on platforms like Stack Overflow, Reddit, and Discord. Collaborating with others helps you learn best practices and stay updated with the latest trends.
9. Preparing for Python Certifications and Job Interviews
If you aim to use Python professionally, consider earning certifications such as:
Google IT Automation with Python.
Microsoft Certified: Python Associate.
PCEP (Certified Entry-Level Python Programmer).
Prepare for job interviews by solving Python coding challenges on LeetCode, CodeWars, and HackerRank.
10. Staying Updated and Continuous Learning
Python evolves with new libraries and frameworks. Keep learning by following Python blogs, watching tutorials, and working on new projects. Experimenting with trending technologies like AI, blockchain, and cloud computing will keep your Python skills relevant and in demand.
By following this step-by-step guide, practicing regularly, and working on real-world projects, you can progress from a beginner to an expert in Python 3 and unlock a wide range of career opportunities.
0 notes
Text
I’ll tell you what you want to do. You want to create an app that augments one of your other interests. There is no point in learning software development unless you have other hobbies or want to make money. Writing software for the sake of writing software is like writing a book about writing a book. It’s only useful for other writers, and it’s a terrible place to start when you’re learning to write.
For an example, I am about to move in with a friend, and I’m bringing my cat. Now I want to be careful about not having any poisonous house plants inside. I could just point my friend to the massive list on ASPCA’s website, but that’s not very user friendly. I could make an app with a nice fuzzy search and filtering options. I could even put in a plant recommendations tab. So that’s what I’m doing with all this damnable free time.
Maybe you don’t have a cat. Maybe you want to buy a car and drive to Manitoba, but the used car market is inavigable. You could write a web scraper that checks Craigslist for you. Write some code that’ll send you an email every day with any good finds.
Or maybe you’re maybe one of those gamers that’s always playing games. If you want to make one of those, the sky’s the limit. Just make sure you’re not rescuing a princess in your game. Nintendo already has that market cornered.
Just look around your life and think about what would marginally improve a small part of it, then learn JavaScript. JavaScript is the best language. Anyone who tells you otherwise is just trying to keep you from happiness. If it can’t be written in JavaScript… oh wait, everything can be written in JavaScript. Web apps, mobile apps, desktop apps, server apps. They’ll run like crap, but boy will they run. The modern data format most commonly used for transmitting data is called JSON, which stands for JavaScript Object Notation. That’s right, every language that runs on a server is using JavaScript’s ideas, all of them.
Pretty much all (most) programming involves getting some data, transforming that data, and then presenting that data. So how do you go from an idea to a program?
1. Ask yourself what data you’ll need for your program to run successfully. Is it some files on your computer, or will a user need to fill out a form? Learn how to access that data. Maybe start by sticking letters and numbers in a spreadsheet and making a csv file or something. Most languages have some ability to read those. Eventually you may want to learn some SQL and work with a database. Lookup SQLite for a solid beginner’s DB.
2. Transform your data. This isn’t always necessary, but often your data won’t come structured exactly how you want it. For a simple example, you may have five different pieces of an address (street, city, state, zip, country) stored separately, but you need it all as one field for your packing slip printer. Your transform would be combining all those fields into one before sending it on to the next step.
3. Present your data. Pretty much every program outputs something. For a web page your program will output the content of a web page. For a scraper, your program may output a spreadsheet, or send information to an email service.
As for learning programming itself, there are 5ish incomprehensibly simple concepts you’ll need to work with. Learn each of these, then find out where your data is coming from and where you want to put it:
1. Variables - these are where you store the data that your program will work with. Some languages will involve different Types of data (number, text, Boolean, etc.), but JavaScript doesn’t care, because it’s the best inferior language out there.
2. If/Else conditional statements - these are the scaffolding you will build your code with. For a web scraper you might say ‘if (car name equals “Corolla” and Price < $3.50) sendAlert()’.
3. While/For loops - we’ve got our if statement, but the problem is our scraper found 200 car listings to check. That’s what for loops are for. ‘For every car in list {if car equals…}’ there are a bunch of useful ways to write these.
4. Functions - think of these as a way to stick a bundle of our ifs and fors and whys into a reusable machine, and slap a label on it. Next time we want to use that code, we can just say the name on the label: checkPrices() to get all that code running. You can pass data into and get data out of functions. It makes it much easier to think about a lot of code at once when you can treat a bunch of it as just the one line.
5. Data Structures - okay, time to sum up a semester of classes… First, you’ve got objects, which are like bundles of variables stuck together. These are super important, because when you’re passing data around, you don’t have to send the make and model and color and price and… you can just send a “car” object with all that info together. Then the individual pieces can be pulled out when needed.
Then there are lists (sometimes array also means list, but sometimes it’s different). A list can hold a bunch of (usually similar) things. You can lookup any item in the list by its index. The first item is at index 0, the second at 1, and so on. Early on you should get comfortable using a for loop to look through a list.
Data structures is kind of an entire field of study on its own, but just focus on lists/arrays and objects. That’ll be what you use most of the time anyway.
Next steps would probably involve learning how to send and receive data over the internet via an http request, what a network api is and how to make one, and how to use package manager (npm for JavaScript) to download other people’s code.
In summary, your curriculum should be to pick something that isn’t coding to write some code about. Learn the fundamentals using JavaScript from YouTube, or whatever site you can find. My favorite is teamtreehouse.com, but my other favorite is literally anything that’s free. Then, instead of following the tutorials like a damned sheep, apply the stuff in the tutorials to your project.
Finally, three pieces of advice: when it’s hard and you don’t understand, and you’re demoralized and you want to give up. Remember the words of my professor when I wanted to drop out of CS in college: “before you make a decision that will ruin your life, let’s talk.” Three years later I graduated, and now I’m completely miserable, but I can code.
Second, it doesn’t matter if an app for that already exists. Those apps all suck and are probably stealing your data. You can make your app steal your data exactly how you want it to. You can even steal “inspiration” from all those other apps’ ideas.
Third, if anyone is ever pushing a specific technology as the latest and greatest, you don’t need to jump on the bandwagon. You’re smart enough to know that all languages, libraries, and technologies are good for different things and they all have their own place… at the feet of JavaScript, the only language you’ll ever need, the one to rule them all.
Best of luck
Is there anyone who can tell me how to get into coding? I don't mean vague instructions, can someone give me a step by step on how to choose a language and how to practice it regularly and how to make a routine for myself. I am just so lost on how to force myself to get to it, I just keep postponing.
11 notes
·
View notes
Text
Executing SQL Statements from a Text File
Executing SQL Statements from a Text File
Executing SQL Statements from a Text File
The mysql client typically is used interactively, like this:
shell> mysql db_name
However, it is also possible to put your SQL statements in a file and then tell mysql to read its input from that file.
To do so, create a text file text_file that contains the statements you wish to execute. Then invoke mysql as shown here:
shell> mysql db_name < text_file
View On WordPress
#command line - How can I run an SQL script in MySQL? - Stack Overflow#database name like this#Executing SQL Statements from a Text File#Executing SQL Statements from a Text File - MySQL :: Developer Zone#How can I run an SQL script in MySQL?#MySQL#mysql query from file#PASSWORD#run a mysql query#Run SQL script files#run SQL Statements from a Text File#simply login to mysql shell and the sql file as follows:#SQL query from a Text File#with user name
0 notes
Text
Which Is The Best PostgreSQL GUI? 2021 Comparison
PostgreSQL graphical user interface (GUI) tools help open source database users to manage, manipulate, and visualize their data. In this post, we discuss the top 6 GUI tools for administering your PostgreSQL hosting deployments. PostgreSQL is the fourth most popular database management system in the world, and heavily used in all sizes of applications from small to large. The traditional method to work with databases is using the command-line interface (CLI) tool, however, this interface presents a number of issues:
It requires a big learning curve to get the best out of the DBMS.
Console display may not be something of your liking, and it only gives very little information at a time.
It is difficult to browse databases and tables, check indexes, and monitor databases through the console.
Many still prefer CLIs over GUIs, but this set is ever so shrinking. I believe anyone who comes into programming after 2010 will tell you GUI tools increase their productivity over a CLI solution.
Why Use a GUI Tool?
Now that we understand the issues users face with the CLI, let’s take a look at the advantages of using a PostgreSQL GUI:
Shortcut keys make it easier to use, and much easier to learn for new users.
Offers great visualization to help you interpret your data.
You can remotely access and navigate another database server.
The window-based interface makes it much easier to manage your PostgreSQL data.
Easier access to files, features, and the operating system.
So, bottom line, GUI tools make PostgreSQL developers’ lives easier.
Top PostgreSQL GUI Tools
Today I will tell you about the 6 best PostgreSQL GUI tools. If you want a quick overview of this article, feel free to check out our infographic at the end of this post. Let’s start with the first and most popular one.
1. pgAdmin
pgAdmin is the de facto GUI tool for PostgreSQL, and the first tool anyone would use for PostgreSQL. It supports all PostgreSQL operations and features while being free and open source. pgAdmin is used by both novice and seasoned DBAs and developers for database administration.
Here are some of the top reasons why PostgreSQL users love pgAdmin:
Create, view and edit on all common PostgreSQL objects.
Offers a graphical query planning tool with color syntax highlighting.
The dashboard lets you monitor server activities such as database locks, connected sessions, and prepared transactions.
Since pgAdmin is a web application, you can deploy it on any server and access it remotely.
pgAdmin UI consists of detachable panels that you can arrange according to your likings.
Provides a procedural language debugger to help you debug your code.
pgAdmin has a portable version which can help you easily move your data between machines.
There are several cons of pgAdmin that users have generally complained about:
The UI is slow and non-intuitive compared to paid GUI tools.
pgAdmin uses too many resources.
pgAdmin can be used on Windows, Linux, and Mac OS. We listed it first as it’s the most used GUI tool for PostgreSQL, and the only native PostgreSQL GUI tool in our list. As it’s dedicated exclusively to PostgreSQL, you can expect it to update with the latest features of each version. pgAdmin can be downloaded from their official website.
pgAdmin Pricing: Free (open source)
2. DBeaver

DBeaver is a major cross-platform GUI tool for PostgreSQL that both developers and database administrators love. DBeaver is not a native GUI tool for PostgreSQL, as it supports all the popular databases like MySQL, MariaDB, Sybase, SQLite, Oracle, SQL Server, DB2, MS Access, Firebird, Teradata, Apache Hive, Phoenix, Presto, and Derby – any database which has a JDBC driver (over 80 databases!).
Here are some of the top DBeaver GUI features for PostgreSQL:
Visual Query builder helps you to construct complex SQL queries without actual knowledge of SQL.
It has one of the best editors – multiple data views are available to support a variety of user needs.
Convenient navigation among data.
In DBeaver, you can generate fake data that looks like real data allowing you to test your systems.
Full-text data search against all chosen tables/views with search results shown as filtered tables/views.
Metadata search among rows in database system tables.
Import and export data with many file formats such as CSV, HTML, XML, JSON, XLS, XLSX.
Provides advanced security for your databases by storing passwords in secured storage protected by a master password.
Automatically generated ER diagrams for a database/schema.
Enterprise Edition provides a special online support system.
One of the cons of DBeaver is it may be slow when dealing with large data sets compared to some expensive GUI tools like Navicat and DataGrip.
You can run DBeaver on Windows, Linux, and macOS, and easily connect DBeaver PostgreSQL with or without SSL. It has a free open-source edition as well an enterprise edition. You can buy the standard license for enterprise edition at $199, or by subscription at $19/month. The free version is good enough for most companies, as many of the DBeaver users will tell you the free edition is better than pgAdmin.
DBeaver Pricing
: Free community, $199 standard license
3. OmniDB
The next PostgreSQL GUI we’re going to review is OmniDB. OmniDB lets you add, edit, and manage data and all other necessary features in a unified workspace. Although OmniDB supports other database systems like MySQL, Oracle, and MariaDB, their primary target is PostgreSQL. This open source tool is mainly sponsored by 2ndQuadrant. OmniDB supports all three major platforms, namely Windows, Linux, and Mac OS X.
There are many reasons why you should use OmniDB for your Postgres developments:
You can easily configure it by adding and removing connections, and leverage encrypted connections when remote connections are necessary.
Smart SQL editor helps you to write SQL codes through autocomplete and syntax highlighting features.
Add-on support available for debugging capabilities to PostgreSQL functions and procedures.
You can monitor the dashboard from customizable charts that show real-time information about your database.
Query plan visualization helps you find bottlenecks in your SQL queries.
It allows access from multiple computers with encrypted personal information.
Developers can add and share new features via plugins.
There are a couple of cons with OmniDB:
OmniDB lacks community support in comparison to pgAdmin and DBeaver. So, you might find it difficult to learn this tool, and could feel a bit alone when you face an issue.
It doesn’t have as many features as paid GUI tools like Navicat and DataGrip.
OmniDB users have favorable opinions about it, and you can download OmniDB for PostgreSQL from here.
OmniDB Pricing: Free (open source)
4. DataGrip

DataGrip is a cross-platform integrated development environment (IDE) that supports multiple database environments. The most important thing to note about DataGrip is that it’s developed by JetBrains, one of the leading brands for developing IDEs. If you have ever used PhpStorm, IntelliJ IDEA, PyCharm, WebStorm, you won’t need an introduction on how good JetBrains IDEs are.
There are many exciting features to like in the DataGrip PostgreSQL GUI:
The context-sensitive and schema-aware auto-complete feature suggests more relevant code completions.
It has a beautiful and customizable UI along with an intelligent query console that keeps track of all your activities so you won’t lose your work. Moreover, you can easily add, remove, edit, and clone data rows with its powerful editor.
There are many ways to navigate schema between tables, views, and procedures.
It can immediately detect bugs in your code and suggest the best options to fix them.
It has an advanced refactoring process – when you rename a variable or an object, it can resolve all references automatically.
DataGrip is not just a GUI tool for PostgreSQL, but a full-featured IDE that has features like version control systems.
There are a few cons in DataGrip:
The obvious issue is that it’s not native to PostgreSQL, so it lacks PostgreSQL-specific features. For example, it is not easy to debug errors as not all are able to be shown.
Not only DataGrip, but most JetBrains IDEs have a big learning curve making it a bit overwhelming for beginner developers.
It consumes a lot of resources, like RAM, from your system.
DataGrip supports a tremendous list of database management systems, including SQL Server, MySQL, Oracle, SQLite, Azure Database, DB2, H2, MariaDB, Cassandra, HyperSQL, Apache Derby, and many more.
DataGrip supports all three major operating systems, Windows, Linux, and Mac OS. One of the downsides is that JetBrains products are comparatively costly. DataGrip has two different prices for organizations and individuals. DataGrip for Organizations will cost you $19.90/month, or $199 for the first year, $159 for the second year, and $119 for the third year onwards. The individual package will cost you $8.90/month, or $89 for the first year. You can test it out during the free 30 day trial period.
DataGrip Pricing
: $8.90/month to $199/year
5. Navicat

Navicat is an easy-to-use graphical tool that targets both beginner and experienced developers. It supports several database systems such as MySQL, PostgreSQL, and MongoDB. One of the special features of Navicat is its collaboration with cloud databases like Amazon Redshift, Amazon RDS, Amazon Aurora, Microsoft Azure, Google Cloud, Tencent Cloud, Alibaba Cloud, and Huawei Cloud.
Important features of Navicat for Postgres include:
It has a very intuitive and fast UI. You can easily create and edit SQL statements with its visual SQL builder, and the powerful code auto-completion saves you a lot of time and helps you avoid mistakes.
Navicat has a powerful data modeling tool for visualizing database structures, making changes, and designing entire schemas from scratch. You can manipulate almost any database object visually through diagrams.
Navicat can run scheduled jobs and notify you via email when the job is done running.
Navicat is capable of synchronizing different data sources and schemas.
Navicat has an add-on feature (Navicat Cloud) that offers project-based team collaboration.
It establishes secure connections through SSH tunneling and SSL ensuring every connection is secure, stable, and reliable.
You can import and export data to diverse formats like Excel, Access, CSV, and more.
Despite all the good features, there are a few cons that you need to consider before buying Navicat:
The license is locked to a single platform. You need to buy different licenses for PostgreSQL and MySQL. Considering its heavy price, this is a bit difficult for a small company or a freelancer.
It has many features that will take some time for a newbie to get going.
You can use Navicat in Windows, Linux, Mac OS, and iOS environments. The quality of Navicat is endorsed by its world-popular clients, including Apple, Oracle, Google, Microsoft, Facebook, Disney, and Adobe. Navicat comes in three editions called enterprise edition, standard edition, and non-commercial edition. Enterprise edition costs you $14.99/month up to $299 for a perpetual license, the standard edition is $9.99/month up to $199 for a perpetual license, and then the non-commercial edition costs $5.99/month up to $119 for its perpetual license. You can get full price details here, and download the Navicat trial version for 14 days from here.
Navicat Pricing
: $5.99/month up to $299/license
6. HeidiSQL
HeidiSQL is a new addition to our best PostgreSQL GUI tools list in 2021. It is a lightweight, free open source GUI that helps you manage tables, logs and users, edit data, views, procedures and scheduled events, and is continuously enhanced by the active group of contributors. HeidiSQL was initially developed for MySQL, and later added support for MS SQL Server, PostgreSQL, SQLite and MariaDB. Invented in 2002 by Ansgar Becker, HeidiSQL aims to be easy to learn and provide the simplest way to connect to a database, fire queries, and see what’s in a database.
Some of the advantages of HeidiSQL for PostgreSQL include:
Connects to multiple servers in one window.
Generates nice SQL-exports, and allows you to export from one server/database directly to another server/database.
Provides a comfortable grid to browse and edit table data, and perform bulk table edits such as move to database, change engine or ollation.
You can write queries with customizable syntax-highlighting and code-completion.
It has an active community helping to support other users and GUI improvements.
Allows you to find specific text in all tables of all databases on a single server, and optimize repair tables in a batch manner.
Provides a dialog for quick grid/data exports to Excel, HTML, JSON, PHP, even LaTeX.
There are a few cons to HeidiSQL:
Does not offer a procedural language debugger to help you debug your code.
Built for Windows, and currently only supports Windows (which is not a con for our Windors readers!)
HeidiSQL does have a lot of bugs, but the author is very attentive and active in addressing issues.
If HeidiSQL is right for you, you can download it here and follow updates on their GitHub page.
HeidiSQL Pricing: Free (open source)
Conclusion
Let’s summarize our top PostgreSQL GUI comparison. Almost everyone starts PostgreSQL with pgAdmin. It has great community support, and there are a lot of resources to help you if you face an issue. Usually, pgAdmin satisfies the needs of many developers to a great extent and thus, most developers do not look for other GUI tools. That’s why pgAdmin remains to be the most popular GUI tool.
If you are looking for an open source solution that has a better UI and visual editor, then DBeaver and OmniDB are great solutions for you. For users looking for a free lightweight GUI that supports multiple database types, HeidiSQL may be right for you. If you are looking for more features than what’s provided by an open source tool, and you’re ready to pay a good price for it, then Navicat and DataGrip are the best GUI products on the market.
Ready for some PostgreSQL automation?
See how you can get your time back with fully managed PostgreSQL hosting. Pricing starts at just $10/month.
While I believe one of these tools should surely support your requirements, there are other popular GUI tools for PostgreSQL that you might like, including Valentina Studio, Adminer, DB visualizer, and SQL workbench. I hope this article will help you decide which GUI tool suits your needs.
Which Is The Best PostgreSQL GUI? 2019 Comparison
Here are the top PostgreSQL GUI tools covered in our previous 2019 post:
pgAdmin
DBeaver
Navicat
DataGrip
OmniDB
Original source: ScaleGrid Blog
3 notes
·
View notes
Text
Sqlite For Mac Os X

Sqlite For Mac Os X El Capitan
Sqlite Viewer Mac
Sqlite Mac Os X Install
If you are looking for an SQLite Editor in the public domain under Creative Commons license or GPL (General Public License) i.e. for free commercial or non-commercial use. Then here is a shortlist of the SQLite Editor that is available on the web for free download.
SQLite is famous for its great feature zero-configuration, which means no complex setup or administration is needed. This chapter will take you through the process of setting up SQLite on Windows, Linux and Mac OS X. Install SQLite on Windows. Step 1 − Go to SQLite download page, and download precompiled binaries from Windows section. Core Data is an object graph and persistence framework provided by Apple in the macOS and iOS operating systems.It was introduced in Mac OS X 10.4 Tiger and iOS with iPhone SDK 3.0. It allows data organized by the relational entity–attribute model to be serialized into XML, binary, or SQLite stores. The data can be manipulated using higher level objects representing entities. Requirements: Free, ideally open source Browse schema, data. Run queries Bonus if updated in near real time when the file is. SQLite viewer for Mac OS X. Ask Question Asked 5 years, 10 months ago. Active 4 years, 3 months ago. Viewed 504 times 3. I need to inspect an SQLite file on Mac. Since I develop on Windows, Linux and OS X, it helps to have the same tools available on each. I also tried SQLite Admin (Windows, so irrelevant to the question anyway) for a while, but it seems unmaintained these days, and has the most annoying hotkeys of any application I've ever used - Ctrl-S clears the current query, with no hope of undo.
These software work on macOS, Windows, Linux and most of the Unix Operating systems.
SQLite is the server. The SQLite library reads and writes directly to and from the database files on disk. SQLite is used by Mac OS X software such as NetNewsWire and SpamSieve. When you download SQLite and build it on a stock Mac OS X system, the sqlite tool has a.
1. SQLiteStudio
Link : http://sqlitestudio.pl/
SQLiteStudio Database manager has the following features :
A small single executable Binary file, so there is need to install or uninstall.
Open source and free - Released under GPLv2 licence.
Good UI with SQLite3 and SQLite2 features.
Supports Windows 9x/2k/XP/2003/Vista/7, Linux, MacOS X, Solaris, FreeBSD and other Unix Systems.
Language support : English, Polish, Spanish, German, Russian, Japanese, Italian, Dutch, Chinese,
Exporting Options : SQL statements, CSV, HTML, XML, PDF, JSON, dBase
Importing Options : CSV, dBase, custom text files, regular expressions
UTF-8 support

2. Sqlite Expert
Link : http://www.sqliteexpert.com/download.html


SQLite Expert though not under public domain, but its free for commercial use and is available in two flavours.
a. Personal Edition
Sqlite For Mac Os X El Capitan
It is free for personal and commercial use but, covers only basic SQLite features.
But its a freeware and does not have an expiration date.

b. Professional Edition
It is for $59 (onetime fee, with free lifetime updates )
It covers In-depth SQLite features.
But its a freeware and does not have an expiration date.
Features :
Visual SQL Query Builder : with auto formatting, sql parsing, analysis and syntax highlighting features.
Powerful restructure capabilities : Restructure any complex table without losing data.
Import and Export data : CSV files, SQL script or SQLite. Export data to Excel via clipboard.
Data editing : using powerful in-place editors
Image editor : JPEG, PNG, BMP, GIF and ICO image formats.
Full Unicode Support.
Support for encrypted databases.
Lua and Pascal scripting support.
3. Database Browser for SQLite
Link : http://sqlitebrowser.org/
Database Browser for SQLite is a high quality, visual, open source tool to create, design, and edit database files compatible with SQLite.
Database Browser for SQLite is bi-licensed under the Mozilla Public License Version 2, as well as the GNU General Public License Version 3 or later.
You can modify or redistribute it under the conditions of these licenses.
Features :
You can Create, define, modify and delete tables
You can Create, define and delete indexes
You can Browse, edit, add and delete records
You can Search records
You can Import and export records as
You can Import and export tables from/to text, CSV, SQL dump files
You can Issue SQL queries and inspect the results
You can See Log of all SQL commands issued by the application
4. SQLite Manager for Firefox Browser
Link : https://addons.mozilla.org/en-US/firefox/addon/sqlite-manager/
This is an addon plugin for Firefox Browser,
Features :
Manage any SQLite database on your computer.
An intuitive hierarchical tree showing database objects.
Helpful dialogs to manage tables, indexes, views and triggers.
You can browse and search the tables, as well as add, edit, delete and duplicate the records.
Facility to execute any sql query.
The views can be searched too.
A dropdown menu helps with the SQL syntax thus making writing SQL easier.
Easy access to common operations through menu, toolbars, buttons and context-menu.
Export tables/views/database in csv/xml/sql format. Import from csv/xml/sql (both UTF-8 and UTF-16).
Possible to execute multiple sql statements in Execute tab.
You can save the queries.
Support for ADS on Windows
Sqlite Viewer Mac
More Posts related to Mac-OS-X,
More Posts:
Sqlite Mac Os X Install
Facebook Thanks for stopping by! We hope to see you again soon. - Facebook
Android EditText Cursor Colour appears to be white - Android
Disable EditText Cursor Android - Android
Connection Failed: 1130 PHP MySQL Error - MySQL
SharePoint Managed Metadata Hidden Taxonomy List - TaxonomyHiddenList - SharePoint
Execute .bin and .run file Ubuntu Linux - Linux
Possible outages message Google Webmaster tool - Google
Android : Remove ListView Separator/divider programmatically or using xml property - Android
Unable to edit file in Notepad++ - NotepadPlusPlus
SharePoint PowerShell Merge-SPLogFile filter by time using StartTime EndTime - SharePoint
SQLite Error: unknown command or invalid arguments: open. Enter .help for help - Android
JBoss stuck loading JBAS015899: AS 7.1.1.Final Brontes starting - Java
Android Wifi WPA2/WPA Connects and Disconnects issue - Android
Android Toolbar example with appcompat_v7 21 - Android
ERROR x86 emulation currently requires hardware acceleration. Intel HAXM is not installed on this machine - Android
1 note
·
View note
Text
How to set up command-line access to Amazon Keyspaces (for Apache Cassandra) by using the new developer toolkit Docker image
Amazon Keyspaces (for Apache Cassandra) is a scalable, highly available, and fully managed Cassandra-compatible database service. Amazon Keyspaces helps you run your Cassandra workloads more easily by using a serverless database that can scale up and down automatically in response to your actual application traffic. Because Amazon Keyspaces is serverless, there are no clusters or nodes to provision and manage. You can get started with Amazon Keyspaces with a few clicks in the console or a few changes to your existing Cassandra driver configuration. In this post, I show you how to set up command-line access to Amazon Keyspaces by using the keyspaces-toolkit Docker image. The keyspaces-toolkit Docker image contains commonly used Cassandra developer tooling. The toolkit comes with the Cassandra Query Language Shell (cqlsh) and is configured with best practices for Amazon Keyspaces. The container image is open source and also compatible with Apache Cassandra 3.x clusters. A command line interface (CLI) such as cqlsh can be useful when automating database activities. You can use cqlsh to run one-time queries and perform administrative tasks, such as modifying schemas or bulk-loading flat files. You also can use cqlsh to enable Amazon Keyspaces features, such as point-in-time recovery (PITR) backups and assign resource tags to keyspaces and tables. The following screenshot shows a cqlsh session connected to Amazon Keyspaces and the code to run a CQL create table statement. Build a Docker image To get started, download and build the Docker image so that you can run the keyspaces-toolkit in a container. A Docker image is the template for the complete and executable version of an application. It’s a way to package applications and preconfigured tools with all their dependencies. To build and run the image for this post, install the latest Docker engine and Git on the host or local environment. The following command builds the image from the source. docker build --tag amazon/keyspaces-toolkit --build-arg CLI_VERSION=latest https://github.com/aws-samples/amazon-keyspaces-toolkit.git The preceding command includes the following parameters: –tag – The name of the image in the name:tag Leaving out the tag results in latest. –build-arg CLI_VERSION – This allows you to specify the version of the base container. Docker images are composed of layers. If you’re using the AWS CLI Docker image, aligning versions significantly reduces the size and build times of the keyspaces-toolkit image. Connect to Amazon Keyspaces Now that you have a container image built and available in your local repository, you can use it to connect to Amazon Keyspaces. To use cqlsh with Amazon Keyspaces, create service-specific credentials for an existing AWS Identity and Access Management (IAM) user. The service-specific credentials enable IAM users to access Amazon Keyspaces, but not access other AWS services. The following command starts a new container running the cqlsh process. docker run --rm -ti amazon/keyspaces-toolkit cassandra.us-east-1.amazonaws.com 9142 --ssl -u "SERVICEUSERNAME" -p "SERVICEPASSWORD" The preceding command includes the following parameters: run – The Docker command to start the container from an image. It’s the equivalent to running create and start. –rm –Automatically removes the container when it exits and creates a container per session or run. -ti – Allocates a pseudo TTY (t) and keeps STDIN open (i) even if not attached (remove i when user input is not required). amazon/keyspaces-toolkit – The image name of the keyspaces-toolkit. us-east-1.amazonaws.com – The Amazon Keyspaces endpoint. 9142 – The default SSL port for Amazon Keyspaces. After connecting to Amazon Keyspaces, exit the cqlsh session and terminate the process by using the QUIT or EXIT command. Drop-in replacement Now, simplify the setup by assigning an alias (or DOSKEY for Windows) to the Docker command. The alias acts as a shortcut, enabling you to use the alias keyword instead of typing the entire command. You will use cqlsh as the alias keyword so that you can use the alias as a drop-in replacement for your existing Cassandra scripts. The alias contains the parameter –v "$(pwd)":/source, which mounts the current directory of the host. This is useful for importing and exporting data with COPY or using the cqlsh --file command to load external cqlsh scripts. alias cqlsh='docker run --rm -ti -v "$(pwd)":/source amazon/keyspaces-toolkit cassandra.us-east-1.amazonaws.com 9142 --ssl' For security reasons, don’t store the user name and password in the alias. After setting up the alias, you can create a new cqlsh session with Amazon Keyspaces by calling the alias and passing in the service-specific credentials. cqlsh -u "SERVICEUSERNAME" -p "SERVICEPASSWORD" Later in this post, I show how to use AWS Secrets Manager to avoid using plaintext credentials with cqlsh. You can use Secrets Manager to store, manage, and retrieve secrets. Create a keyspace Now that you have the container and alias set up, you can use the keyspaces-toolkit to create a keyspace by using cqlsh to run CQL statements. In Cassandra, a keyspace is the highest-order structure in the CQL schema, which represents a grouping of tables. A keyspace is commonly used to define the domain of a microservice or isolate clients in a multi-tenant strategy. Amazon Keyspaces is serverless, so you don’t have to configure clusters, hosts, or Java virtual machines to create a keyspace or table. When you create a new keyspace or table, it is associated with an AWS Account and Region. Though a traditional Cassandra cluster is limited to 200 to 500 tables, with Amazon Keyspaces the number of keyspaces and tables for an account and Region is virtually unlimited. The following command creates a new keyspace by using SingleRegionStrategy, which replicates data three times across multiple Availability Zones in a single AWS Region. Storage is billed by the raw size of a single replica, and there is no network transfer cost when replicating data across Availability Zones. Using keyspaces-toolkit, connect to Amazon Keyspaces and run the following command from within the cqlsh session. CREATE KEYSPACE amazon WITH REPLICATION = {'class': 'SingleRegionStrategy'} AND TAGS = {'domain' : 'shoppingcart' , 'app' : 'acme-commerce'}; The preceding command includes the following parameters: REPLICATION – SingleRegionStrategy replicates data three times across multiple Availability Zones. TAGS – A label that you assign to an AWS resource. For more information about using tags for access control, microservices, cost allocation, and risk management, see Tagging Best Practices. Create a table Previously, you created a keyspace without needing to define clusters or infrastructure. Now, you will add a table to your keyspace in a similar way. A Cassandra table definition looks like a traditional SQL create table statement with an additional requirement for a partition key and clustering keys. These keys determine how data in CQL rows are distributed, sorted, and uniquely accessed. Tables in Amazon Keyspaces have the following unique characteristics: Virtually no limit to table size or throughput – In Amazon Keyspaces, a table’s capacity scales up and down automatically in response to traffic. You don’t have to manage nodes or consider node density. Performance stays consistent as your tables scale up or down. Support for “wide” partitions – CQL partitions can contain a virtually unbounded number of rows without the need for additional bucketing and sharding partition keys for size. This allows you to scale partitions “wider” than the traditional Cassandra best practice of 100 MB. No compaction strategies to consider – Amazon Keyspaces doesn’t require defined compaction strategies. Because you don’t have to manage compaction strategies, you can build powerful data models without having to consider the internals of the compaction process. Performance stays consistent even as write, read, update, and delete requirements change. No repair process to manage – Amazon Keyspaces doesn’t require you to manage a background repair process for data consistency and quality. No tombstones to manage – With Amazon Keyspaces, you can delete data without the challenge of managing tombstone removal, table-level grace periods, or zombie data problems. 1 MB row quota – Amazon Keyspaces supports the Cassandra blob type, but storing large blob data greater than 1 MB results in an exception. It’s a best practice to store larger blobs across multiple rows or in Amazon Simple Storage Service (Amazon S3) object storage. Fully managed backups – PITR helps protect your Amazon Keyspaces tables from accidental write or delete operations by providing continuous backups of your table data. The following command creates a table in Amazon Keyspaces by using a cqlsh statement with customer properties specifying on-demand capacity mode, PITR enabled, and AWS resource tags. Using keyspaces-toolkit to connect to Amazon Keyspaces, run this command from within the cqlsh session. CREATE TABLE amazon.eventstore( id text, time timeuuid, event text, PRIMARY KEY(id, time)) WITH CUSTOM_PROPERTIES = { 'capacity_mode':{'throughput_mode':'PAY_PER_REQUEST'}, 'point_in_time_recovery':{'status':'enabled'} } AND TAGS = {'domain' : 'shoppingcart' , 'app' : 'acme-commerce' , 'pii': 'true'}; The preceding command includes the following parameters: capacity_mode – Amazon Keyspaces has two read/write capacity modes for processing reads and writes on your tables. The default for new tables is on-demand capacity mode (the PAY_PER_REQUEST flag). point_in_time_recovery – When you enable this parameter, you can restore an Amazon Keyspaces table to a point in time within the preceding 35 days. There is no overhead or performance impact by enabling PITR. TAGS – Allows you to organize resources, define domains, specify environments, allocate cost centers, and label security requirements. Insert rows Before inserting data, check if your table was created successfully. Amazon Keyspaces performs data definition language (DDL) operations asynchronously, such as creating and deleting tables. You also can monitor the creation status of a new resource programmatically by querying the system schema table. Also, you can use a toolkit helper for exponential backoff. Check for table creation status Cassandra provides information about the running cluster in its system tables. With Amazon Keyspaces, there are no clusters to manage, but it still provides system tables for the Amazon Keyspaces resources in an account and Region. You can use the system tables to understand the creation status of a table. The system_schema_mcs keyspace is a new system keyspace with additional content related to serverless functionality. Using keyspaces-toolkit, run the following SELECT statement from within the cqlsh session to retrieve the status of the newly created table. SELECT keyspace_name, table_name, status FROM system_schema_mcs.tables WHERE keyspace_name = 'amazon' AND table_name = 'eventstore'; The following screenshot shows an example of output for the preceding CQL SELECT statement. Insert sample data Now that you have created your table, you can use CQL statements to insert and read sample data. Amazon Keyspaces requires all write operations (insert, update, and delete) to use the LOCAL_QUORUM consistency level for durability. With reads, an application can choose between eventual consistency and strong consistency by using LOCAL_ONE or LOCAL_QUORUM consistency levels. The benefits of eventual consistency in Amazon Keyspaces are higher availability and reduced cost. See the following code. CONSISTENCY LOCAL_QUORUM; INSERT INTO amazon.eventstore(id, time, event) VALUES ('1', now(), '{eventtype:"click-cart"}'); INSERT INTO amazon.eventstore(id, time, event) VALUES ('2', now(), '{eventtype:"showcart"}'); INSERT INTO amazon.eventstore(id, time, event) VALUES ('3', now(), '{eventtype:"clickitem"}') IF NOT EXISTS; SELECT * FROM amazon.eventstore; The preceding code uses IF NOT EXISTS or lightweight transactions to perform a conditional write. With Amazon Keyspaces, there is no heavy performance penalty for using lightweight transactions. You get similar performance characteristics of standard insert, update, and delete operations. The following screenshot shows the output from running the preceding statements in a cqlsh session. The three INSERT statements added three unique rows to the table, and the SELECT statement returned all the data within the table. Export table data to your local host You now can export the data you just inserted by using the cqlsh COPY TO command. This command exports the data to the source directory, which you mounted earlier to the working directory of the Docker run when creating the alias. The following cqlsh statement exports your table data to the export.csv file located on the host machine. CONSISTENCY LOCAL_ONE; COPY amazon.eventstore(id, time, event) TO '/source/export.csv' WITH HEADER=false; The following screenshot shows the output of the preceding command from the cqlsh session. After the COPY TO command finishes, you should be able to view the export.csv from the current working directory of the host machine. For more information about tuning export and import processes when using cqlsh COPY TO, see Loading data into Amazon Keyspaces with cqlsh. Use credentials stored in Secrets Manager Previously, you used service-specific credentials to connect to Amazon Keyspaces. In the following example, I show how to use the keyspaces-toolkit helpers to store and access service-specific credentials in Secrets Manager. The helpers are a collection of scripts bundled with keyspaces-toolkit to assist with common tasks. By overriding the default entry point cqlsh, you can call the aws-sm-cqlsh.sh script, a wrapper around the cqlsh process that retrieves the Amazon Keyspaces service-specific credentials from Secrets Manager and passes them to the cqlsh process. This script allows you to avoid hard-coding the credentials in your scripts. The following diagram illustrates this architecture. Configure the container to use the host’s AWS CLI credentials The keyspaces-toolkit extends the AWS CLI Docker image, making keyspaces-toolkit extremely lightweight. Because you may already have the AWS CLI Docker image in your local repository, keyspaces-toolkit adds only an additional 10 MB layer extension to the AWS CLI. This is approximately 15 times smaller than using cqlsh from the full Apache Cassandra 3.11 distribution. The AWS CLI runs in a container and doesn’t have access to the AWS credentials stored on the container’s host. You can share credentials with the container by mounting the ~/.aws directory. Mount the host directory to the container by using the -v parameter. To validate a proper setup, the following command lists current AWS CLI named profiles. docker run --rm -ti -v ~/.aws:/root/.aws --entrypoint aws amazon/keyspaces-toolkit configure list-profiles The ~/.aws directory is a common location for the AWS CLI credentials file. If you configured the container correctly, you should see a list of profiles from the host credentials. For instructions about setting up the AWS CLI, see Step 2: Set Up the AWS CLI and AWS SDKs. Store credentials in Secrets Manager Now that you have configured the container to access the host’s AWS CLI credentials, you can use the Secrets Manager API to store the Amazon Keyspaces service-specific credentials in Secrets Manager. The secret name keyspaces-credentials in the following command is also used in subsequent steps. docker run --rm -ti -v ~/.aws:/root/.aws --entrypoint aws amazon/keyspaces-toolkit secretsmanager create-secret --name keyspaces-credentials --description "Store Amazon Keyspaces Generated Service Credentials" --secret-string "{"username":"SERVICEUSERNAME","password":"SERVICEPASSWORD","engine":"cassandra","host":"SERVICEENDPOINT","port":"9142"}" The preceding command includes the following parameters: –entrypoint – The default entry point is cqlsh, but this command uses this flag to access the AWS CLI. –name – The name used to identify the key to retrieve the secret in the future. –secret-string – Stores the service-specific credentials. Replace SERVICEUSERNAME and SERVICEPASSWORD with your credentials. Replace SERVICEENDPOINT with the service endpoint for the AWS Region. Creating and storing secrets requires CreateSecret and GetSecretValue permissions in your IAM policy. As a best practice, rotate secrets periodically when storing database credentials. Use the Secrets Manager helper script Use the Secrets Manager helper script to sign in to Amazon Keyspaces by replacing the user and password fields with the secret key from the preceding keyspaces-credentials command. docker run --rm -ti -v ~/.aws:/root/.aws --entrypoint aws-sm-cqlsh.sh amazon/keyspaces-toolkit keyspaces-credentials --ssl --execute "DESCRIBE Keyspaces" The preceding command includes the following parameters: -v – Used to mount the directory containing the host’s AWS CLI credentials file. –entrypoint – Use the helper by overriding the default entry point of cqlsh to access the Secrets Manager helper script, aws-sm-cqlsh.sh. keyspaces-credentials – The key to access the credentials stored in Secrets Manager. –execute – Runs a CQL statement. Update the alias You now can update the alias so that your scripts don’t contain plaintext passwords. You also can manage users and roles through Secrets Manager. The following code sets up a new alias by using the keyspaces-toolkit Secrets Manager helper for passing the service-specific credentials to Secrets Manager. alias cqlsh='docker run --rm -ti -v ~/.aws:/root/.aws -v "$(pwd)":/source --entrypoint aws-sm-cqlsh.sh amazon/keyspaces-toolkit keyspaces-credentials --ssl' To have the alias available in every new terminal session, add the alias definition to your .bashrc file, which is executed on every new terminal window. You can usually find this file in $HOME/.bashrc or $HOME/bash_aliases (loaded by $HOME/.bashrc). Validate the alias Now that you have updated the alias with the Secrets Manager helper, you can use cqlsh without the Docker details or credentials, as shown in the following code. cqlsh --execute "DESCRIBE TABLE amazon.eventstore;" The following screenshot shows the running of the cqlsh DESCRIBE TABLE statement by using the alias created in the previous section. In the output, you should see the table definition of the amazon.eventstore table you created in the previous step. Conclusion In this post, I showed how to get started with Amazon Keyspaces and the keyspaces-toolkit Docker image. I used Docker to build an image and run a container for a consistent and reproducible experience. I also used an alias to create a drop-in replacement for existing scripts, and used built-in helpers to integrate cqlsh with Secrets Manager to store service-specific credentials. Now you can use the keyspaces-toolkit with your Cassandra workloads. As a next step, you can store the image in Amazon Elastic Container Registry, which allows you to access the keyspaces-toolkit from CI/CD pipelines and other AWS services such as AWS Batch. Additionally, you can control the image lifecycle of the container across your organization. You can even attach policies to expiring images based on age or download count. For more information, see Pushing an image. Cheat sheet of useful commands I did not cover the following commands in this blog post, but they will be helpful when you work with cqlsh, AWS CLI, and Docker. --- Docker --- #To view the logs from the container. Helpful when debugging docker logs CONTAINERID #Exit code of the container. Helpful when debugging docker inspect createtablec --format='{{.State.ExitCode}}' --- CQL --- #Describe keyspace to view keyspace definition DESCRIBE KEYSPACE keyspace_name; #Describe table to view table definition DESCRIBE TABLE keyspace_name.table_name; #Select samples with limit to minimize output SELECT * FROM keyspace_name.table_name LIMIT 10; --- Amazon Keyspaces CQL --- #Change provisioned capacity for tables ALTER TABLE keyspace_name.table_name WITH custom_properties={'capacity_mode':{'throughput_mode': 'PROVISIONED', 'read_capacity_units': 4000, 'write_capacity_units': 3000}} ; #Describe current capacity mode for tables SELECT keyspace_name, table_name, custom_properties FROM system_schema_mcs.tables where keyspace_name = 'amazon' and table_name='eventstore'; --- Linux --- #Line count of multiple/all files in the current directory find . -type f | wc -l #Remove header from csv sed -i '1d' myData.csv About the Author Michael Raney is a Solutions Architect with Amazon Web Services. https://aws.amazon.com/blogs/database/how-to-set-up-command-line-access-to-amazon-keyspaces-for-apache-cassandra-by-using-the-new-developer-toolkit-docker-image/
1 note
·
View note
Text
Steps to Migrate Data From Microsoft SQL Server to Snowflake in Minutes

Microsoft SQL Server is flexible and versatile and is amenable to almost all SME needs and workloads. However, there are several things that Snowflake is better at and is the reason why organizations often migrate data SQL Server to Snowflake.
Knowing SQL Server
Microsoft SQL Server is a database server and its primary function is to store and retrieve data. It is an amalgamation of both the Structured Query Language (SQL) and the Relational Database Management System (RDBMS). A data center version is available for high levels of application support and scale while a lower scaled-down version caters to freeware. Applications are supported on a local area network or across the web on a single machine and a SQL Server blends easily into the full Microsoft Ecosystem.
Knowing Snowflake
Snowflake is a cloud-based Data Warehouse-as-a-Service (DWaaS) and runs on the popular cloud provider AWS. As in all other databases, it is possible to load and query structured relational data in the Snowflake tables through specific SQL data types like NUMBER, BOOLEAN, VARCHAR, TIMESTAMPS, and more. Loading data from Microsoft SQL Server to Snowflake There are quite a few steps to go through in the migration process. It can be done easily and in a few clicks only. However, if DBAs are not sure about the methodology, it is advisable to contact experts in the field. Extract data from SQL Server – The first step is to mine data from the SQL Server. For users of databases, the most preferred process is to use queries for extraction. Select statements are used to sort, filter, and limit the data while retrieving it. Microsoft SQL Server Management Studio is used to extract bulk data when exporting entire databases in CSV, text, or SQL queries formats. Internal staging is created specifically with respective SQL statements. Here, users get a great degree of flexibility when they migrate data SQL Server to Snowflake as loading is made easier by allotting file formats and other options to named stages. Image Source - https://www.bryteflow.com/
Read Full Info here - https://phelixinfosolutions.com/blog/migrate-data-from-microsoft-sql-server-to-snowflake/
Read the full article
#MicrosoftSQLServertoSnowflake#MicrosoftSQLServertoSnowflakeguide#MigrateMicrosoftSQLServertoSnowflake
1 note
·
View note
Text
Php training course
PHP Course Overview
PHP is a widely-used general-purpose scripting language that is especially suited for Web development and can be embedded into HTML.
PHP can generate the dynamic page content
PHP can create, open, read, write, and close files on the server
PHP can collect form data
PHP can send and receive cookies
PHP can add, delete, modify data in your database
PHP can restrict users to access some pages on your website
PHP can encrypt data
With PHP you are not limited to output HTML. You can output images, PDF files, and even Flash movies. You can also output any text, such as XHTML and XML.
PHP Training Course Prerequisite
HTML
CSS
Javascript
Objectives of the Course
PHP runs on different platforms (Windows, Linux, Unix, Mac OS X, etc.)
PHP is compatible with almost all servers used today (Apache, IIS, etc.)
PHP has support for a wide range of databases
PHP is free. Download it from the official PHP resource: www.php.net
PHP is easy to learn and runs efficiently on the server-side
PHP Training Course Duration
45 Working days, daily 1.30 hours
PHP Training Course Overview
An Introduction to PHP
History of PHP
Versions and Differences between them
Practicality
Power
Installation and configuring Apache and PHP
PHP Basics
Default Syntax
Styles of PHP Tags
Comments in PHP
Output functions in PHP
Datatypes in PHP
Configuration Settings
Error Types
Variables in PHP
Variable Declarations
Variable Scope
PHP’s Superglobal Variables
Variable Variables
Constants in PHP
Magic Constants
Standard Pre-defined Constants
Core Pre-defined Languages
User-defined Constants
Control Structures
Execution Control Statements
Conditional Statements
Looping Statements with Real-time Examples
Functions
Creating Functions
Passing Arguments by Value and Reference
Recursive Functions
Arrays
What is an Array?
How to create an Array
Traversing Arrays
Array Functions
Include Functions
Include, Include_once
Require, Require_once
Regular Expressions
Validating text boxes,emails,phone number,etc
Creating custom regular expressions
Object-Oriented Programming in PHP
Classes, Objects, Fields, Properties, _set(), Constants, Methods
Encapsulation
Inheritance and types
Polymorphism
Constructor and Destructor
Static Class Members, Instance of Keyword, Helper Functions
Object Cloning and Copy
Reflections
PHP with MySQL
What is MySQL
Integration with MySQL
MySQL functions
Gmail Data Grid options
SQL Injection
Uploading and downloading images in Database
Registration and Login forms with validations
Pegging, Sorting,…..
Strings and Regular Expressions
Declarations styles of String Variables
Heredoc style
String Functions
Regular Expression Syntax(POSIX)
PHP’s Regular Expression Functions(POSIX Extended)
Working with the Files and Operating System
File Functions
Open, Create and Delete files
Create Directories and Manipulate them
Information about Hard Disk
Directory Functions
Calculating File, Directory and Disk Sizes
Error and Exception Handling
Error Logging
Configuration Directives
PHP’s Exception Class
Throw New Exception
Custom Exceptions
Date and Time Functions
Authentication
HTTP Authentication
PHP Authentication
Authentication Methodologies
Cookies
Why Cookies
Types of Cookies
How to Create and Access Cookies
Sessions
Session Variables
Creating and Destroying a Session
Retrieving and Setting the Session ID
Encoding and Decoding Session Data
Auto-Login
Recently Viewed Document Index
Web Services
Why Web Services
RSS Syntax
SOAP
How to Access Web Services
XML Integration
What is XML
Create an XML file from PHP with Database records
Reading Information from XML File
MySQL Concepts
Introduction
Storage Engines
Functions
Operators
Constraints
DDL commands
DML Commands
DCL Command
TCL Commands
Views
Joins
Cursors
Indexing
Stored Procedures
Mysql with PHP Programming
Mysql with Sqlserver(Optional)
SPECIAL DELIVERY
Protocols
HTTP Headers and types
Sending Mails using PHP
Email with Attachment
File Uploading and Downloading using Headers
Implementing Chating Applications using PHP
and Ajax
SMS Gateways and sending SMS to Mobiles
Payments gateways and How to Integrate them
With Complete
MVC Architecture
DRUPAL
JOOMLA
Word Press
AJAX
CSS
JQUERY (Introduction and few plugins only)
1 note
·
View note
Text
Lectures - Week 5 (Mixed)
Vulnerabilities
One of the most fundamental concepts in security is the idea of a vulnerability - a flaw in the design of a system which can be used to compromise (or cause an unintended usage of) the system. A large majority of bugs in programming are a result of memory corruptions which can be abused to take control - the most ubiquitous example of this is the buffer overflow; the idea that you can overwrite other data alongside a variable which can change both data and control of a program. The common case is when programmers fail to validate the length of the input when reading in a string in C. Another fairly common bug relates to the overflow of unsigned integers; failing to protect against the wraparound can have unintended consequences in control flow.
‘NOP Sled’
Richard also mentioned in the 2016 lectures the idea of a NOP sled which I found quite interesting. The idea is that due to run time differences and randomisation of the stack, the address the program will jump to (from the return address) can sometimes be difficult to predict. So to make it more likely it will jump where the attack wants, he converts a large set of memory to NOP (no operation) instructions which will just skip to the next one; then finally after the “NOP sled” his code will execute.
printf(”%s Printf Vulnerabilities”);
One of the most hilarious programming vulnerabilities related to the usage of the printf function. Basically if you have an input which is accepted from the terminal and you plug this (without parsing) into a printf, an attacker could potentially feed in an input such as “%s”. (i.e. the title) Now since you haven’t specified a 2nd argument, it will just keep reading all the variables in memory until you hit a “\0″. In fact you can abuse this even further to overwrite memory with the “%n” format string - it will overwrite an integer with the number of characters written so far.
Handling Bugs
Many of the bugs we know of today are actually reported in online databases such as the National Vulnerability Database or Common Vulnerability & Exposures (CVE) Databases. There is actually lots of pretty cool examples online in these, however most of these have been actually fixed - we call them zero day vulnerabilities if the vendor hasn’t fixed them (and if they are then abused then zero day exploits).
When working in security, it’s important to understand the potential legal consequences associated with publicly releasing damaging vulnerabilities in software. This is where responsible disclosure comes in - the idea that if you find a bug you disclose it to a software vendor first and then give them a reasonable period of time to fix it first. I think I discussed an example from Google’s Project Zero Team a couple weeks ago - however just from a quick look there was a case in March where their team released the details on a flaw in the macOS’s copy-on-write (CoW) after the 90 day period for patching. (it’s important to note they gave them reasonable time to fix it)
OWASP Top 10
This was a pretty cool website we got referred to mainly regarding the top bugs relating to web security (link); I’ll give a brief overview here:
Injection - sends invalid data to get software to produce an unintended flow of control (i.e. SQL injection)
Broken authentication - logic issues in authentication mechanisms
Sensitive data exposure - leaks in privacy of sensitive customer data
XML External Entities (XXE) - parsing XML input with links to external bodies
Broken action control - improper access checks when accessing data
Security misconfigurations - using default configs, failing to patch flaws, unnecessary services & pages, as well as unprotected files
Cross-Site Scripting (XSS) - client injects Javascript into a website which is displayed to another user
Insecure deserialisation - tampering with serialization of user data
Using components with known vulnerabilities - out of date dependencies
Insufficient logging and monitoring - maintaining tabs on unusual or suspicious activity, as well as accesses to secure data
Some Common Bugs
Just a couple of the bugs that were explored in some of the 2016 lecture videos:
Signed vs unsigned integers casts - without proper checks can lead to unintended control flow
Missing parenthesis after if statement - only executes next line and not all within the indentation
Declaring array sizes wrong - buf[040] will be interpreted as base 8
Wrong comparators - accidentally programming ‘=‘ when you intended ‘==‘
A lot of the more common bugs we used to have are getting a lot easier to detect in the compilation process; GCC has a lot of checks built in. Valgrind is also a really awesome tool to make sure your not making any mistakes with memory.
WEP Vulnerability
I actually discussed this idea already in the week 1 lectures here - just for the sake of revision I will give a basic overview here. The basic idea is that WEP uses a stream cipher RC4 which XORs the message with a key; however the issue is that we know information about the structure of TCP/IP packets. Within a local network the local IPs are usually of the form A.B.C.D (i.e. 192.168.20.4 for a specific computer) where each letter represents a byte in the range 0-255. (0-255 are usually reserved and not used for computers in the network) Due to subnetting (i.e. with a subnet mask 255.255.255.0 on private network) the last byte D is usually the only one that changes - this means we effectively have 254 combinations.
Since we know where the destination address is located within the packet, an attacker can potentially record a packet and modify this last byte - they can send out all 256 possible combinations to the router (remember it’s encrypted so we can’t limit it to 254). The router will then decrypt the message and then encrypt it with the key used for communications with the attacker - and voila the system is compromised.
Hashes

Richard gave a brief overview of the basis of many of our hash functions which is the Merkle-Damgard construction. The basic idea behind it is to break the message into blocks - the size varies on the hash type and if its not a multiple of the required length then we need to apply a MD-compliant padding function. This usually occurs with Merkle-Damgard strengthening which involves encoding the length of the original message into the padding.
To start the process of hashing we utilise an initialisation vector (number specific to the algorithm) and combine it with the first message block using a certain compression function. The output of this is then combined with the 2nd message block and so forth. When we get to the end we apply a finalisation function which typically involves another compression function (sometimes the same) which will reduce the large internal state to the required hash size and provide a better mixing of the bits in the final hash sum.
Length Extension Attacks
I think after looking at the Merkle-Damgard construction it now becomes pretty obvious why using MACs of the form h(key|data) where the length of the data is known are vulnerable to length-extension attacks. All you need to be able to reverse in the above construction is the finalisation function and the extra padding (which is dependent upon the length which we’re assuming we know); then you can keep adding whatever message blocks you want to the end!
Digital Signatures
The whole idea behind these signatures is providing authentication - the simplest method of this is through asymmetric key encryption (i.e. RSA). If your given a document, you can just encrypt it with your private key - to prove to others that you indeed signed it, they can attempt to decrypt it with your public key. There is a problem with this approach however - encryption takes a lot of computation and when the documents become large it gets even worse. The answer to this is to use our newfound knowledge of hashing for data integrity - if we use a hash (’summary of the document’), we can just encrypt this with our private key as a means of signing it!
Verifying Websites
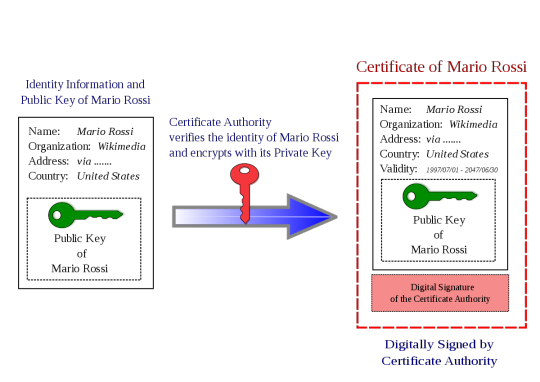
One of the hardest issues we face with the ‘interwebs’ is that it is very difficult to authenticate an entity on the other end. We’ve sort of scrambled together a solution to this for verifying websites - certificate authorities. (I could go on for ages about the problems with these being ‘single points of failure’ but alas I don’t have time)
The idea behind these bodies is that a website will register with the entity with a specific public key. The CA will then link this public key (in a “big ol’ secure database”) with the ‘identity’ of the website. To understand how it works its best to consider the example of when you access any website with HTTPS. (i.e. SSL) When you visit www.example.com, they will then provide their public key and a digital signature of key (signed by the cert authority’s private key) in the form of a X.509 certificate. The user will have access to CA’s public key as part of their browser and will then be able to verify the identity of the website. (the cert is encrypted with the CA’s private key - see above image) An attacker is unable to fake it as they don’t know the certificate authorities’ private key.
Attacking Hashed Passwords
Given there is only a limited number of potential hashes for each algorithm, there is a growing number of websites online which provide databases of plaintext and their computed hashes - these are what we refer to as hash tables. We can check a hash very quickly against all the hashes in this database - if we find a match, we either know the password or have found a collision.
Rainbow tables are a little more complex - in order to make one you need a hashing function (the same as the password) and a reduction function; the latter is used to convert the hash into text (i.e. a base64 encode and truncation). These tables are made of a number of ‘chains’ of a specified length (let’s say we choose 1,000,000) - to create a chain you start with a random seed then apply both the above functions to this seed. You then iteratively do this process another 1,000,000 times (chosen length) and store the final seed and value (only these). In order to try and determine a match to the rainbow table, you apply the same two functions to the password for the required length - however, at each step you compare the hash to the result of each of the chains in the table. If you find a match, you can reproduce the password.
Both of the attacks against password hashes described above rely on an attacker doing a large amount of work in advance, which they will hopefully be able to use in cracking many passwords in the future. (it’s basically a space-time tradeoff) An easy way we can destroy all the work they have done is through a process known as salting. Basically what you do is generate a random string which you concatenate with the password when creating a hash - you need to store this alongside the password in order to check it in future. This means an attacker can’t use pre-computed tables on your hash; they have to do all the work again for your particular salt!
Richard discussed another interesting concept called ‘key stretching’ in the lectures - it’s basically the idea that you can grab a ‘weak password hash’ and continuously hash it with a combination of the (’hash’ + ‘password’ + ‘salt’). This process of recursively hashing makes it insanely difficult for an attacker to bruteforce. This is combined with the effects of a ‘salt’ which (on its own) renders rainbow tables (’pre-computed hashes’) useless.
Signing Problems with Weak Hashes
One of the problems with using a hash which is vulnerable to second-preimage attacks is that it becomes a lot easier to sign a fake document. Consider the example of a PDF document certifying that I give you $100. If you wanted you could modify the $100 to $100,000, however this would change the resultant hash. However since it’s a PDF you could modify empty attribute fields or add whitespace such that you can modify the hash an enormous amount of times (i.e. to bruteforce the combinations). Since the hash is vulnerable to second-preimage this means that given an input x (the original signed document) we are able to find an x’ (the fake signed document) such that h(x) = h(x’).
Dr Lisa Parker (guest speaker)
I wasn’t able to make the morning lecture, although I will try and summarise my understanding of the key points from this talk:
More holistic approaches to systems improvement have better outcomes (’grassroots approach’ is just as important as targeted)
Unconscious bias is present across a wide variety of industries (i.e. judges harsher before lunch, doctors prescribing drugs for free lunch)
Codes of conduct intended to reduce corruption; pharmaceuticals try to dodge with soft bribes, advertising, funding research
Transparent reporting reduces malpractice
Enforcing checklists useful for minimising risk
OPSEC Overview (extended)
We traditionally think of OPSEC has been based in the military, however many of the principles can apply in more everyday scenarios:
Identifying critical information
Analysis of threats
Analysis of vulnerabilities
Assessment of risk
Application of appropriate OPSEC measures
A lot of the ideas behind gathering information (recon) revolve around collecting “random data”, which at first may not appear useful, however after managing to piece them together, they are. One of the quotes from Edward Snowden (I think) I found quite interesting, “In every step, in every action, in every point involved, in every point of decision, you have to stop and reflect and think, “What would be the impact if my adversary were aware of my activities?””. I think it’s quite powerful to think about this - however at the same time we don’t want to live with complete unrealistic paranoia and live as a hermit in the hills.
One of the easiest ways to improve your OPSEC is through limiting what you share online, especially with social media sites. Some of the basic tips were:
Don’t share unless you need to
Ensure it can’t be traced (unless you want people to know)
Avoid bringing attention to yourself
You can try and conceal your identity online through things like VPNs and Tor Browser. It is important that in identities you have online that you don’t provide a means to link them in any way (i.e. a common email) if you don’t want someone to be able to develop a “bigger picture” about you. For most people, I think the best advice with regards to OPSEC, is to “blend in”.
Passwords (extended)
I am really not surprised that the usage of common names, dates and pets is as common as it is with passwords. Most people just like to take the lazy approach; that is, the easiest thing for them to remember that will ‘pass the test’. Linking closely with this is the re-use of passwords for convenience - however for security this is absolutely terrible. If your password is compromised on one website and your a ‘worthy target’, then everything is compromised.
HaveIBeenPwned is actually a pretty cool website to see if you’ve been involved in a breach of security. I entered one of my emails, which is more of a ‘throwaway one’ I use for junk-ish accounts on forums and whatnot - it listed that I had been compromised on 11 different websites. I know for a fact that I didn’t use the same password on any of those; secondly for most of them I didn’t care if they got broken.
I think offline password managers are an ‘alright way’ to ensure you have good unique passwords across all the sites you use. (be cautious as they can be a ‘single point of failure’) However when it comes to a number of my passwords which I think are very important - I’ve found just randomly generating them and memorising them works pretty well. Another way is to form long illogical sentences and then morph them with capitalisation, numbers and symbols. You want to maximise the search space for an attacker - for example if your using all 96 possible characters and you have a 16-character password then a bruteforce approach would require you to check 2^105 different combinations (worst-case).
The way websites store our passwords is also important to the overall security - they definitely shouldn’t be stored in plaintext, should use a ‘secure hash function’ (i.e. not MD5) and salted. I’m pretty sure I ranted about a mobile carrier that I had experiences with earlier in my blog, that didn’t do this. This means if the passwords were ‘inevitably’ all stolen from the server, the attacker just gets the hashes, and they can’t use rainbow tables because you hashed them all. Personally, I really like the usage of multi-factor authentication combined with a good password (provided those services don’t get compromised right?). Although, you want to avoid SMS two-factor as it’s vulnerable to SIM hijacking.
4 notes
·
View notes
Text
How to Build a Web Application Using Java?
How can we create web applications with Java? According to Stack Overflow and Statista, Java is one of the most commonly used programming languages for building web applications. As most of you probably already know, Java is a high-level, object-oriented, class-based programming language. It is built with minimal dependencies. After more than two decades of release, Java is still loved by programmers.
Since Java applications are compiled in bytecode, they can run on any JVM (Java Virtual Machine) regardless of the operating system and the architecture of the computer system, thus ensuring portability. Additionally, Java provides Servlet and JSP technologies that help developers easily build and deploy web applications on the server. Like other languages, Java also has frameworks like Spring and Hibernate to simplify the web application development process.
What is a Web Application?
Software programs that can be accessed using any web browser are called Web applications. Typically, the front end of web software is created using scripting languages such as HTML, CSS, and JavaScript, which are supported by almost all web browsers. In contrast, the backend is created using any programming language such as Java, Python, Php and a database. Unlike device-based apps, there is no specific device to build internet apps; we can use any supported IDE to create web applications.
Let's look at the technical terms we need to be familiar with before developing Java web applications.
Defining Java Web Application Technologies
Before developing any web application it is necessary to set up Java, IDE for writing code, Server (Tomcat) as web container for Servlet, and Database (MySQL or Oracle) on your gadget properly.
1. Java IDE
A Java IDE is an integrated development environment for Java programming; many also provide functionality for other languages, and an IDE typically provides a code editor, compiler or interpreter, and debugger that developers access through a unified Graphical User Interface (GUI).
2. Java Servlet API
Servlets provide URL mapping and request handling functionality in your Java web applications. They are used to handle requests received from the web server, process the request, render the response, and send the response back to the web server. In Java, we use servlets to create web applications.
3. JavaServer Pages(JSP)
Java Server Pages or JSP is a technical specialty that simplifies the development of dynamic web applications. It also allows developers to simultaneously add servlet code snippets to text documents. JSP consists of static facts that can be expressed in plain text format and JSP factors that determine how a web page creates dynamic content.
4. JSP Standard Tag Library
JSTL stands for JSP Standard Tag Library. JSTL is a standard tag library that provides tags that control the behavior of JSP pages. JSTL tags can be used for iterations and control statements, internationalization, SQL, etc.
5. JavaServer Faces
JavaServer Faces or Jakarta Server Faces technology consists of a set of APIs for marking up user interface components and managing their state, and a JSP custom tag library for expressing JSF interfaces in JSP pages. Java Server Faces is designed to be flexible, taking advantage of current web and user interface standards, without restricting developers to a certain protocol, system or language.
6. JDBC API
The Java Database Connectivity (JDBC) API provides generic data access. Using the JDBC API, developers can access any source of information, from spreadsheets to relational databases and flat files. Java uses two packages java.sql and javax.sql to connect, manipulate and receive records from databases.
7. Java Persistence API
The Java Persistence API provides an object-to-relational mapping tool to help developers manage relational data in Java web applications. JPA internally defines object-relational mapping and standardizes these mapped objects using XML or annotations to map objects into database tables.
How to Create a Web Application using Java?
Before developing a web application, Java, IDE to write code (Eclipse or Netbeans), server (Tomcat) as web container for servlets and database (MySQL or Oracle) should be properly configured on your machine.
Tomcat can be configured with Eclipse to facilitate application development and deployment. In Eclipse Preferences, select Server Runtime Environments and find your Tomcat server version. For the runtime environment, specify the apache tomcat directory location and JRE information. Create a server with useful resources to access the server interface. That's it, we are ready to create and run our first servlet on the Tomcat server.
Now open the Eclipse IDE and select File > New > Dynamic Web Project. Enter the project name FirstServletProject, use the default project location, then click Next, check Generate web.xml deployment descriptor and click the Finish button.
Now to create the servlet, select File > New > Servlet and click the Finish button, this will generate the skeleton code for the servlet.
Once the servlet is created, you can add HTML using the GET method to invoke the HTTP request shown below and run the servlet. package com.journaldev.first; import java.io.I0Exception; import java.o.PrintWriter; import java.util.Date; import javax.servlet.ServletException; import javax.servlet.annotation.WebInitParam; import javax.servlet.annotation.WebServlet; import javax.servlet.http.HttpServlet; import javax.servlet.http.HttpServletRequest; import javax.servlet.http.HttpServletResponse; /** * Servlet implementation class FirstServlet */ @WebServlet (description = "My First Servlet", urlPatterns = {" /FirstServlet" , "/FirstServlet. do"), initParams = {@webInitParam(name="id" , value="") ,@webInitParam(name="name" „value= "ABC" )}) public class FirstServlet extends HttpServlet { private static final long serialVersionUID = 1L; public static final String HTML_START = " < html>< body>"; public static final String HTML_END = ""; /** * @see HttpServlet#HttpServlet) */ public FirstServlet ) { super (); // TODO Auto-generated constructor stub } /** * @see HttpServlet#doGet (HttpServletRequest request, HttpServletResponse response) */ protected void doGet(HttpServletRequest request, HttpServletResponse response) throws ServletException, IOException { PrintWriter out = response.getWriter(); Date date = new Date(); out.println(HTML_START + "< h2>Hi There!< br/>< h3>Date=" +date +"" + HTML_END) ; } /** * @see HttpServlet#doPost(HttpServletRequest request, HttpServletResponse response) */ protected void doPost(HttpServletRequest request, HttpServletResponse response) throws ServletException IOException { // TODO Auto-generated method stub } } }
Now, while running our servlet, several errors are shown because the servlet-api jar file is not added. So we will add the jar file by right clicking on the project and then going to Build Path > Set Build Path > Add External JAR option.
Although servlets are a good choice at first, they are difficult to inspect and maintain large responses containing dynamic data. It is for this reason that JSP was introduced. The JSP technology is also server-side and has the same characteristics as HTML, but it can also add dynamic content if needed. Because JSP is similar to HTML, it is easy to write and suitable for presenting data.
Using the JSP code in the code below, we get the same result as the servlet code. <%@page import="java.util.Date"%> <%@page language="java" contentType=-"text/html; charset=US-ASCIT" pageEncoding="US-ASCII"%> < br /> < html> < head> < meta http-equiv="Content-Type" content="text/html; charset=US-ASCII"> < title>Hello < body> < h2>Hi There!< br /> < h3>Date=<%= new Date() %>

In this section, I mentioned how to create web applications using Java Servlets. Java makes this possible through different frameworks like Spring and Spring Boot which help us to boost web applications easily. These frameworks limit the workload of the developer.
Why Choose Sanesquare for Web Application Development?
If you want the Best Web application for your company, you are in the correct place. Because Sanesquare Technologies provides the best services for web development, and for the following reason Sanesquare is the best choice for developing web applications.
Created the best by the experts
On time delivery
Complete Web Development Process with Support and Maintenance
In conclusion, building a web application using Java involves several steps, including setting up the development environment, defining the architecture, and choosing the appropriate framework. Java provides a rich set of libraries and frameworks that make it easy to develop web applications that are scalable, secure, and reliable. The choice of framework will depend on the specific requirements of the application and the development team's expertise. Regardless of the framework, Java web applications can be developed quickly and efficiently, making it an excellent choice for both small and large projects.
As one of the leading Web Application Development Companies in India, we can help you to develop a web application for your business. If you need more information, do not hesitate to reach out to us.
0 notes
Text
sql commands cheat sheet working MSLP%
💾 ►►► DOWNLOAD FILE 🔥🔥🔥🔥🔥 Add records to a table, but get the values from an existing table. UPDATE (WHERE). Remove all records from a table. This 3-page SQL Cheat Sheet provides you with the most commonly used SQL statements. Download the SQL cheat sheet, print it out, and stick to your desk. SQL Commands are instructions that are used by the user to communicate with the database, to perform specific tasks, functions and queries of data. With more than 2. This article will walk you through a hackable cheatsheet to get you up and running with SQL quickly. It is a language for relational database management systems. SQL is used today to store, retrieve, and manipulate data within relational databases. This query returns all data from the products table with an age value of greater than Of course, these examples demonstrate only a very small selection of what the SQL language can do. We'll learn more about it in this guide. We live in the age of Big Data, where data is used extensively to find insights and inform strategy, marketing, advertising and a plethora of other operations. Big businesses like Google, Amazon, AirBnb utilize large, relational databases as a basis of improving customer experience. Understanding SQL is a great skill to have not only for data scientists and analysts but for everyone. How do you think that you suddenly got a Youtube ad on shoes when just a few minutes ago, you were Googling your favourite shoes? SQL outlines syntax that allows you to write queries that manage relational databases. MySQL is a database system that runs on a server. Some of the more popular ones include:. For most cases, MySQL is the preferred choice for a database management system. This resource will guide you with the installation process. This resource will guide you through the installation process. With MySQL now installed on your system, I recommend that you use some sort of SQL management application to make managing your databases a much easier process. Here are some dummy databases that are available for download free of charge. Here you can find a collection of keywords used in SQL statements, a description, and where appropriate an example. Some of the more advanced keywords have their own dedicated section. Any text after these 2 characters to the end of the line will be ignored. They stretch across multiple lines until the closing characters have been found. When creating a new table or editing an existing one, you must specify the type of data that each column accepts. This allows us to search for data with sophisticated patterns rather efficiently. In relational databases, there is a concept of primary and foreign keys. In SQL tables, these are included as constraints, where a table can have a primary key, a foreign key, or both. A primary lets each record in a table be uniquely identified. You can only have one primary key per table, and you can assign this constraint to any single or combination of columns. However, this means each value within this column s needs to be unique. This means the value increases automatically as and when new records are created. You can apply a foreign key to one column or many. You use it to link 2 tables together in a relational database. Indexes are attributes that can be assigned to columns that are frequently searched against to make data retrieval a quicker and more efficient process. In SQL, a JOIN clause is used to return a result which combines data from multiple tables, based on a common column which is featured in both of them. A view is essentially an SQL results set that gets stored in the database under a label, so you can return to it later without having to rerun the query. These are especially useful when you have a costly SQL query which you might need a number of times. So instead of running it over and over to generate the same results set, you can just do it once and save it as a view. The majority of websites and applications use relational databases in some way or the other. This makes SQL extremely valuable to know as it allows you to create more complex, functional systems. Be sure to follow me on Twitter for updates on future articles. Happy learning! Part-time Compiler Warlock. If you read this far, tweet to the author to show them you care. Tweet a thanks. Learn to code for free. Get started. Search Submit your search query. Forum Donate. Jason Dsouza. A lot of it. What is SQL? Why Learn SQL? It can also be used to add and delete constraints in a table, as per the above. ALL -- Returns true if all of the subquery values meet the passed condition. ANY -- Returns true if any of the subquery values meet the given condition. AS -- Renames a table or column with an alias value which only exists for the duration of the query. CASE -- Changes query output depending on conditions. EXISTS -- Checks for the existence of any record within the subquery, returning true if one or more records are returned. FROM -- Specifies which table to select or delete data from. LIKE -- Returns true if the operand value matches a pattern. In SQL, there are 2 types of comments, single line and multiline. It can span across multiple lines. The size parameter sets the maximum string length, from 0 — with a default of 1. TEXT size -- Holds a string with a maximum length of bytes. ENUM a, b, c, etc… -- A string object that only has one value, which is chosen from a list of values which you define, up to a maximum of values. SET a, b, c, etc… -- A string object that can have 0 or more values, which is chosen from a list of values which you define, up to a maximum of 64 values. The allowed number of bits in a value is set via the size parameter, which can hold values from 1 to Here, the size parameter specifies the maximum allowed display width, which is INT size -- A medium integer with a signed range of to , and an unsigned range from 0 to BIGINT size -- A medium integer with a signed range of to , and an unsigned range from 0 to This behaviour is to make the storage of values more efficient. DOUBLE size, d -- A floating point number value where the total digits are set by the size parameter, and the number of digits after the decimal point is set by the d parameter. DECIMAL size, d -- An exact fixed point number where the total number of digits is set by the size parameters, and the total number of digits after the decimal point is set by the d parameter. SQL Operators 1. LEFT -- Starting from the left, extracts the given number of characters from a string and returns them as another. LPAD -- Left pads one string with another, to a specific length. MID -- Extracts one string from another, starting from any position. RIGHT -- Starting from the right, extracts the given number of characters from a string and returns them as another. RPAD -- Right pads one string with another, to a specific length. TRIM -- Removes trailing and leading spaces from the given string. ACOS -- Returns the arc cosine of the given number. ASIN -- Returns the arc sine of the given number. ATAN -- Returns the arc tangent of one or 2 given numbers. ATAN2 -- Returns the arc tangent of 2 given numbers. AVG -- Returns the average value of the given expression. CEIL -- Returns the closest whole number integer upwards from a given decimal point number. COS -- Returns the cosine of a given number. COT -- Returns the cotangent of a given number. DIV -- Allows you to divide integers. EXP -- Returns e to the power of the given number. LN -- Returns the natural logarithm of the given number. LOG -- Returns the natural logarithm of the given number, or the logarithm of the given number to the given base. MAX -- Returns the highest value from a set of values. MIN -- Returns the lowest value from a set of values. MOD -- Returns the remainder of the given number divided by the other given number. PI -- Returns PI. POW -- Returns the value of the given number raised to the power of the other given number. RAND -- Returns a random number. SIGN -- Returns the sign of the given number. SIN -- Returns the sine of the given number. SQRT -- Returns the square root of the given number. SUM -- Returns the value of the given set of values combined. TAN -- Returns the tangent of the given number. DATE -- Extracts the date from a datetime expression. DAY -- Returns the day for the given date. HOUR -- Returns the hour from the given date. TIME -- Returns the time from a given time or datetime. WEEK -- Returns the week number for the given date. YEAR -- Returns the year from the given date. CAST -- Converst one type into another. CONV -- Converts the given number from one numeric base system into another. IF -- If the condition is true it returns a value, otherwise it returns another value. If they are equal, NULL is returned, otherwise the first expression is returned. The table containing the foreign key is called the child key, The table containing the referenced or candidate key is called the parent table. In this instance, duplicate values are allowed. There are a number of different joins available for you to use: Inner Join Default : Returns any records which have matching values in both tables. Left Join: Returns all of the records from the first table, along with any matching records from the second table. Right Join: Returns all of the records from the second table, along with any matching records from the first. Full Join: Returns all records from both tables when there is a match. FirstName, users. Surname, products.
1 note
·
View note
Text
Mac keyboard and mouse recorder

Mac keyboard and mouse recorder license key#
Verify the digital software certificate: Right-click the program installation file, select Properties » Digital Certificates » Details » View Certificate.
Mac keyboard and mouse recorder license key#
You do not even need to trust our statement: You can lock PhraseExpress up in your firewall after license key registration.īefore you install any software, you might want to check, who you are about to trust: PhraseExpress never sends any of your text input or saved phrases anywhere. We are an established company with a track record of more than 20 years and registered in Germany, a country with one of the strictest privacy laws in the world. Licenses for Windows, macOS or iOS are separate purchases. The user can be identified by his or her user name or by the combination of user name and workgroup, or by the combination of user name, workgroup and computer name.
Client-/Server: If using PhraseExpress with a SQL/PhraseExpress Server, you need a separate license for each user connection to the server.
Portable mode: If running PhraseExpress from a USB stick, the license key is bound to the USB stick, which you can use on any number of computers.
The actual user name that PhraseExpress uses for licensing is shown in the " About PhraseExpress" window. On a Mac, the "user name" is the "Apple account name" (this is not the log in name). On Windows, the "user name" is the "Windows user name" (this is not the Microsoft account name).
Stand-alone installation: If using PhraseExpress without using a SQL/PhraseExpress server, one license can be used by one person on up to three computers on which you use the same user name.
Licensing depends on the installation variation:
0 notes
Text
Examples of transaction processing system

#EXAMPLES OF TRANSACTION PROCESSING SYSTEM SOFTWARE#
TPS is also known as transaction processing or real-time processing. TPS features include performance, reliability, and consistency. What comes under transaction processing system?Ī transaction process system (TPS) is an information processing system for business transactions that involves the collection, modification and retrieval of all transaction data. INFLEXIBILITY- TPS wants all transactions to be processed in the same way regardless of user or time.RELEVANCE – Organizations rely heavily on their TPS with failure potentially hampering business.RAPID RESPONSE- Fast performance with fast response is critical.What are the characteristics of transaction processing system?įeatures of Transaction Processing Systems Transaction processing systems also try to provide predictable response times to applications, although this is not as critical as for real-time systems. Transaction Processing System (TPS) is a type of information system that collects, stores, modifies and retrieves enterprise data transactions. How business intelligence can help to gain profit in an organization?Eliminate inefficiencies… What are transaction processing systems used for? “Annual internal data warehouse costs can be around $ 468K.” Is datawarehouse expensive?Īdding Your Costs Assuming you want to build a data warehouse that uses, on average, one terabyte of storage and 100,000 queries per month, your total annual cost for storage, software, and staff will be approximately $ 468,000.
#EXAMPLES OF TRANSACTION PROCESSING SYSTEM SOFTWARE#
KEY DIFFERENCE between OLTP and OLAP: Online Analytical Processing (OLAP) is a category of software tools that analyzes data stored in a database while online transaction processing (OLTP) supports applications that n focus on transactions in 3-tier architecture. What is difference between OLAP and OLTP? The organization, storage, cleaning and extraction of data must be carried by a central repository, a data warehouse, which is considered the basic component of business information. Is data warehousing part of business intelligence? … The tools and technologies that make BI possible take data â € “stored in files, databases, data warehouses, or even on huge data lakesâ € and run queries against that data, typically in the form of SQL. How data mining is used in business intelligence?Simply put, data mining is… What is business intelligence in data warehouse?īusiness intelligence (BI) is a process for analyzing data and gaining insights to help businesses make decisions. What are the five basic tasks of business intelligence?Ĭommon functions of business information technologies include reporting, online analytics processing, analytics, dashboard development, data mining, process mining, complex event processing, business performance management, benchmarking, text mining, predictive analytics, and prescriptive analytics. These tools make it possible to extract the insights from your data. … Examples of BI tools include data warehouses, dashboards, reports, data discovery tools, and cloud data services. What is Business Intelligence with example?īusiness intelligence literally means being smarter about your business. Make decisions that can be implemented with the aim of achieving a strategic goal. Turn it into meaningful information through analysis. The general process of business intelligence is as follows: Collect data and organize it through reporting. What are the key benefits of artificial intelligence?These are the primary benefits… What are business intelligence processes? Examples of transactions are as follows: Paying a supplier for services rendered or goods delivered. What is transaction and examples?Ī transaction is a business event that has a financial impact on an entity’s financial statements, and is recorded as an entry in its accounting records. Order processing systems are essential for many organizations. See the article : What business intelligence means. Types of Processing Systems There are a few main types of transaction processing systems, including order processing, accounting and purchasing. … What are the two types of transaction processing system? It manages the prioritization of transaction execution. Read also : How do retail stores use business intelligence. When processing transactions, work is divided into single, indivisible operations, known as transactions. Transaction processing is a computing style, typically performed by large server computers, which supports interactive applications. Examples include systems that control sales order entry, airline orders, payroll, employee records, manufacturing and shipping. This may interest you : Is indeed good for finding jobs?. Transaction processing systems include computer hardware and software that maintains a transaction-oriented application and performs the usual transactions necessary to conduct business. Business intelligence Is an example of transaction processing system?
0 notes
Text
Logtalk intellij

#LOGTALK INTELLIJ CODE#
#LOGTALK INTELLIJ WINDOWS#
In the Execute Routine window, type all the necessary parameter values, and click OK.īefore IntelliJ IDEA 2022.1, when you clicked the stop button several times, it looked like the query was terminated, but in fact the request continued its execution in the database. Right-click a stored function that you want to execute. You can execute stored procedures in PostgreSQL, Microsoft SQL Server, Oracle, and MySQL. Ī stored procedure is a set of SQL statements with an assigned name. Alternatively, to open the Parameters dialog, click the View Parameters button. To execute a parameterized statement, click the Execute button on the toolbar and enter values in the second column. If you have parameters in your statement, you must specify the values of the parameters before you execute the statement. Tags (utPLSQL): tags of tests that you want to run. Paths (utPLSQL and tSQLt): a qualified path to the testing package. tSQLt supports Microsoft SQL Server.ĭatabase (tSQLt): a name of the Microsoft SQL Server database. If a script contains schema switching, you will see a warning ( ).ĭata source (utPLSQL and tSQLt): a name of a data source. To add files, click the Add button ( ) and navigate to files that you want to run. Script files: SQL files that you want to run. Script text: script that you want to run. If you select a data source as a target, IntelliJ IDEA displays a schema in which the script will be run. Target data source / schema: databases or schemas against which you want to run your database scripts. The fields that appear in the right-hand pane display the default settings for the selected configuration type. In the Run/Debug Configuration dialog, click the Add New Configuration icon ( ) and select Database Script. With the Navigation bar visible ( View | Appearance | Navigation Bar), choose Edit Configurations from the run/debug configuration selector. Select Run | Edit Configurations from the main menu. Open the Run/Debug Configuration dialog in one of the following ways: For more information about editing you configurations, see Run/debug configurations. You can click the Recent button to select data sources that you used recently.ĭepending on your purposes, you can edit existing or create new configurations. In the Edit Configuration window, click the Add button ( ) and select data sources or schemes against which you want to run selected files. This action creates a temporary run configuration. Right-click the selection and navigate to Run (or press Ctrl+Shift+F10).
#LOGTALK INTELLIJ WINDOWS#
In the Project tool window ( View | Tool Windows | Project), select files that you want to run. In the Statements window, you can click Customize to define whether you want to see the chooser or always run the statement under the caret. Also, you can associate a session with a file by selecting Attach Session from the context menu of the file. Statements that you are going to execute are highlighted in a query editor.įor another example of running script files, see the following video at .įrom the list, you can associate a different session with the file, or remove the association between the file and the session ( Detach Session). You can switch between other entries to run another set of statements. In the Statements window, press Enter to run the selected statement. For more information about sessions, see Managing connection sessions. (Optional) If the SQL file is not connected to a data source, select or create a connection session in the list. Alternatively, open settings by pressing Ctrl+Alt+S and navigate to Tools | Database | Query Execution. To customize query execution settings, click the Сustomize link. Press Ctrl+Enter or select Execute from the context menu. IntelliJ IDEA executes only the selection. It can be a subquery or a group of statements.
#LOGTALK INTELLIJ CODE#
Open the Project tool window ( View | Tool Windows | Project) and double-click an SQL file.Ĭlick the statement that you want to execute.Īlso, you can select (highlight) the fragment of code that you want to execute. When you open a file that is larger than 20 MB, you see only first 2.5 MB of the file. In IntelliJ IDEA, you can open and run a file. Running statements and files Run statements from an open file Just type, press Ctrl+Enter, and run your code. You can use a query console in the same way as you use a terminal. The only difference is that the query console is already connected to a data source, so you can type and run your code right away. You can run a query from query consoles, scratch files, and user files.Ī database or query console does not differ from other SQL files like user files and scratches. You can run Run your code by using shortcuts, toolbar buttons and icons, a context menu, and run/debug configurations.
0 notes
Text
PHPMyAdmin is a free software tool written in PHP, intended to handle the administration of MySQL over the Web interface. phpMyAdmin supports a wide range of operations on MySQL and MariaDB. In this article we look at how you install PHPMyAdmin on Kali Linux & Debian Linux system. Most frequent database operations – (managing databases, tables, columns, relations, indexes, users, permissions, etc) can be performed via the web console, while you still have the ability to directly execute any SQL statement. Core Features of phpMyAdmin An intuitive cool web interface Support for most MySQL features Import data from CSV and SQL Export data to various formats: CSV, SQL, XML, PDF, ISO/IEC 26300 – OpenDocument Text and Spreadsheet, Word, LATEX, and others Administering multiple servers Creating PDF graphics of your database layout Creating complex queries using Query-by-example (QBE) Searching globally in a database or a subset of it Transforming stored data into any format using a set of predefined functions, like displaying BLOB-data as image or download-link The following is the procedure to follow while installing PHPMyAdmin on Kali Linux or any other Debian based system. Step 1: Update System Start by ensuring the system is updated. sudo apt update sudo apt upgrade Because of kernel updates a reboot may be required. sudo reboot Step 2: Install PHP and Apache on Kali Linux The next step is the installation of PHP, required modules and Apache Web Server. sudo apt -y update sudo apt -y install wget php php-cgi php-mysqli php-pear php-mbstring libapache2-mod-php php-common php-phpseclib php-mysql Confirm installation of PHP by checking the version: $ php --version PHP 7.4.11 (cli) (built: Oct 6 2020 10:34:39) ( NTS ) Copyright (c) The PHP Group Zend Engine v3.4.0, Copyright (c) Zend Technologies with Zend OPcache v7.4.11, Copyright (c), by Zend Technologies Step 3: Install MariaDB / MySQL database Server Since you’re using phpMyAdmin to administer MySQL or MariaDB database server you should have database server already installed. You can also reference our guides below. How To Install MariaDB on Kali Linux How To Install MySQL 8.0 on Kali Linux Once the database server is installed and running you can then proceed to install phpMyAdmin on Kali Linux and Debian system. Step 4: Install PHPMyAdmin on Kali Linux From the phpMyAdmin downloads page you should be able to check the latest release. Use wget command line tool to download the latest version of phpMyAdmin: wget https://www.phpmyadmin.net/downloads/phpMyAdmin-latest-all-languages.tar.gz Extract downloaded archive file using tar: tar xvf phpMyAdmin-latest-all-languages.tar.gz Move the folder created from extraction to /usr/share/phpmyadmin directory. rm -f phpMyAdmin-latest-all-languages.tar.gz sudo mv phpMyAdmin-*/ /usr/share/phpmyadmin Create directory for phpMyAdmin temp files. sudo mkdir -p /var/lib/phpmyadmin/tmp sudo chown -R www-data:www-data /var/lib/phpmyadmin We also need to create a directory where phpMyAdmin configuration files will be stored. sudo mkdir /etc/phpmyadmin/ Copy configuration template to the directory we just created. sudo cp /usr/share/phpmyadmin/config.sample.inc.php /usr/share/phpmyadmin/config.inc.php Edit the file /usr/share/phpmyadmin/config.inc.php and set secret passphrase: $ sudo vim /usr/share/phpmyadmin/config.inc.php $cfg['blowfish_secret'] = 'H2TxcGXxflSd8JwrXVlh6KW4s2rER63i'; Configure Temp directory by adding this line in the file. $cfg['TempDir'] = '/var/lib/phpmyadmin/tmp'; Step 5: Configure Apache web Server Create a new Apache configuration file for phpMyAdmin. sudo vim /etc/apache2/conf-enabled/phpmyadmin.conf Paste below contents to the file. Alias /phpmyadmin /usr/share/phpmyadmin Options SymLinksIfOwnerMatch DirectoryIndex index.php AddType application/x-httpd-php .php
SetHandler application/x-httpd-php php_value include_path . php_admin_value upload_tmp_dir /var/lib/phpmyadmin/tmp php_admin_value open_basedir /usr/share/phpmyadmin/:/etc/phpmyadmin/:/var/lib/phpmyadmin/:/usr/share/php/php-gettext/:/usr/share/php/php-php-gettext/:/usr/share/javascript/:/usr/share/php/tcpdf/:/usr/share/doc/phpmyadmin/:/usr/share/php/phpseclib/ php_admin_value mbstring.func_overload 0 AddType application/x-httpd-php .php SetHandler application/x-httpd-php php_value include_path . php_admin_value upload_tmp_dir /var/lib/phpmyadmin/tmp php_admin_value open_basedir /usr/share/phpmyadmin/:/etc/phpmyadmin/:/var/lib/phpmyadmin/:/usr/share/php/php-gettext/:/usr/share/php/php-php-gettext/:/usr/share/javascript/:/usr/share/php/tcpdf/:/usr/share/doc/phpmyadmin/:/usr/share/php/phpseclib/ php_admin_value mbstring.func_overload 0 # Authorize for setup AuthType Basic AuthName "phpMyAdmin Setup" AuthUserFile /etc/phpmyadmin/htpasswd.setup Require valid-user # Disallow web access to directories that don't need it Require all denied Require all denied Require all denied Restriction to specific IP addresses or network address block can be set with a configuration which looks similar to below. Require ip 127.0.0.1 192.168.10.0/24 Finally restart Apache web server to read the changes. sudo systemctl restart apache2 Confirm Apache service has been started without any error: $ systemctl status apache2 ● apache2.service - The Apache HTTP Server Loaded: loaded (/lib/systemd/system/apache2.service; disabled; vendor preset: disabled) Active: active (running) since Fri 2022-01-22 14:49:54 EST; 11min ago Docs: https://httpd.apache.org/docs/2.4/ Process: 7502 ExecStart=/usr/sbin/apachectl start (code=exited, status=0/SUCCESS) Main PID: 7513 (apache2) Tasks: 11 (limit: 2274) Memory: 57.8M CPU: 656ms CGroup: /system.slice/apache2.service ├─7513 /usr/sbin/apache2 -k start ├─7515 /usr/sbin/apache2 -k start ├─7516 /usr/sbin/apache2 -k start ├─7517 /usr/sbin/apache2 -k start ├─7518 /usr/sbin/apache2 -k start ├─7519 /usr/sbin/apache2 -k start ├─7751 /usr/sbin/apache2 -k start ├─7757 /usr/sbin/apache2 -k start ├─7758 /usr/sbin/apache2 -k start ├─7759 /usr/sbin/apache2 -k start └─7760 /usr/sbin/apache2 -k start Step 6: Open phpMyAdmin Web interface Access phpMyAdmin Web interface on http://[ServerIP|Hostname]/phpmyadmin Use your database credentials – username & password to login. The root user credentials can also be used to authenticate. phpMyAdmin dashboard is displayed upon a successful login. You can now use phpMyAdmin for all database management tasks in your software development cycle. Below are more guides we have on Kali Linux.
0 notes