#screenshot using mac
Explore tagged Tumblr posts
Visit Tumblr Blog
Explore Tumblr blogs with no restrictions, modern design and the best experience.
Last Seen Tumblr Blogs


Fun Fact
Post activity is at the highest at 4:00 pm EDT; notes peak at 10:00 pm EDT.
Text

104 notes
·
View notes
Text
So I noticed something on Punch Out Wii, Aran Ryan appears to have off white teeth. And it seems like he’s the only boxer in Punch Out Wii to have off white teeth

I know this isn’t all of the boxers but this was a collage I made to show that most of the boxers do have white teeth

I just think it’s nice to see a depiction of not completely white teeth in media
#I used a colour dropper on the screenshots I have too#and his teeth colour is different from the other boxers#so I’m very sure this was deliberate#punch out#aran ryan#super macho man#great tiger#bear hugger#don flamenco#mr. sandman#glass joe#soda popinski#piston hondo#little mac
23 notes
·
View notes
Text
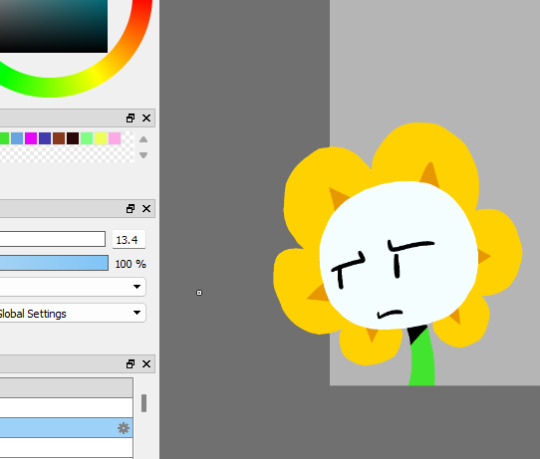
Day 198
#Kinda wish I had made this look cooler but I wasn't really sure how to do that lol#This is on Firealpaca! It's free and works on Windows and Macs#It's good! I've been using it for like six years#I didn't want to get my pen list in the screenshot because my pen names are all really stupid#Daily Flowey#Unreality#Just in case
14 notes
·
View notes
Text
every time i have to open chrome for something i can't do on firefox i feel dirty
#finally figured out how to take screenshots of streaming sites on a mac#unfortunately the cost is a sliver of my soul#(deactivate hardware acceleration doesn't get it done on firefox for mac alas but it does work on chrome)#(and on edge i imagine as a chromium browser but that would be. seriously funny.)#(make up a guy: guy who uses microsoft edge on a mac)
21 notes
·
View notes
Text

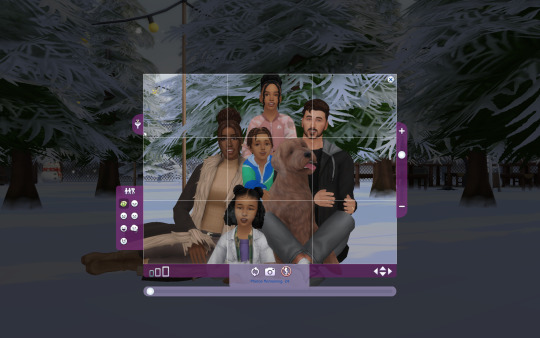
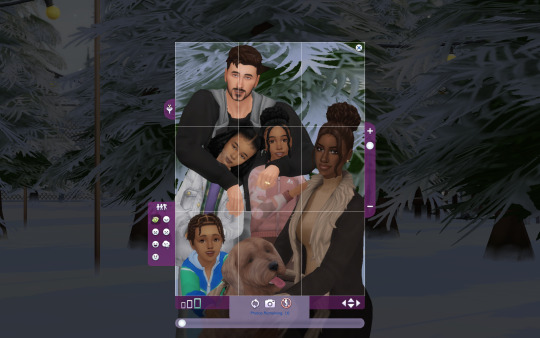

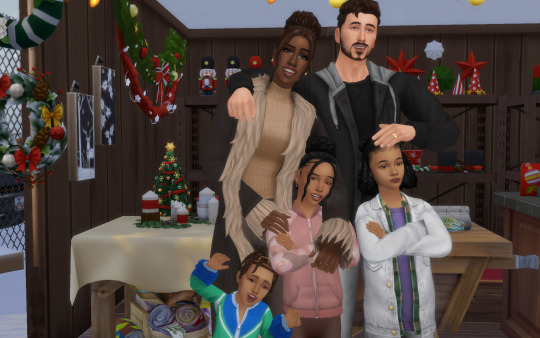

the chase-gomez-huntingtons went winterfest tree shopping <3
#ts4#ts4 simblr#simblr#ts4 gameplay#ts4 mm#ts4 mm gameplay#ts4 screenshots#the sims 4#still deciding if i wanna change monica's surname bc that family name is long asf#ignore j holding an invisible small sized toddler#wish i had a pc instead of mac to use reshade </3#monica's life
6 notes
·
View notes
Text
Well, my computer is causing me some major trust issues and now straight up can’t connect to the internet and won’t open the game so guess who has to transfer all her saves and mods over to non-gaming laptop and hope for the best 🙋🏻♀️
#tbh my mac has thus far handled gaming far better than my hp ever did#I just didn’t want to use that space for games if I could prevent it#especially not the crap ton of screenshots and CC I have#granted I did save so I could get the 900+GB for a reason…#I just hate having to go through the hassle#I am nothing if not lazy#and tired#bella.txt#🗑️
1 note
·
View note
Text
Working on a Mac has singlehandedly aged me 10 years how do people endure this
#this is not some type of windows supremacy even though i hate apple with a passion#but i have to work every day on a mac because our office has macs#ive been working on macs for over a tear so ive had time to get used to them#i cant#i hate it#i spend 9 hours a day on these bitches and ite the most infuriating device/os ive ever touched#why the hell is it taking me 5 minutes to transfer something to a usb#why is finder so trash#why the hell cant i cpick on thr icon to minimize the tab#why the hell do i have to coick on quit to actually close an app???#why isn't the you know X button the one that closes an app???????#the only thing i actually prefer over windows is screenshotting#i shed a tear every time i come back home to my shitty windows laptop#im sorry i took you for granted baby
1 note
·
View note
Text

My life's work yall 😂
#and not even everything I've ever taken either#some were lost to SD card corruption#etc etc etc#I uh don't know how to take a screenshot on Mac bc I am used to windows lmfao
1 note
·
View note
Text
plaything thru the nibelheim segment as "cloud" is so

#do they serve mac n cheese at the seventh heaven#i think i'll use that tag for commentary as well as screenshots
0 notes
Text


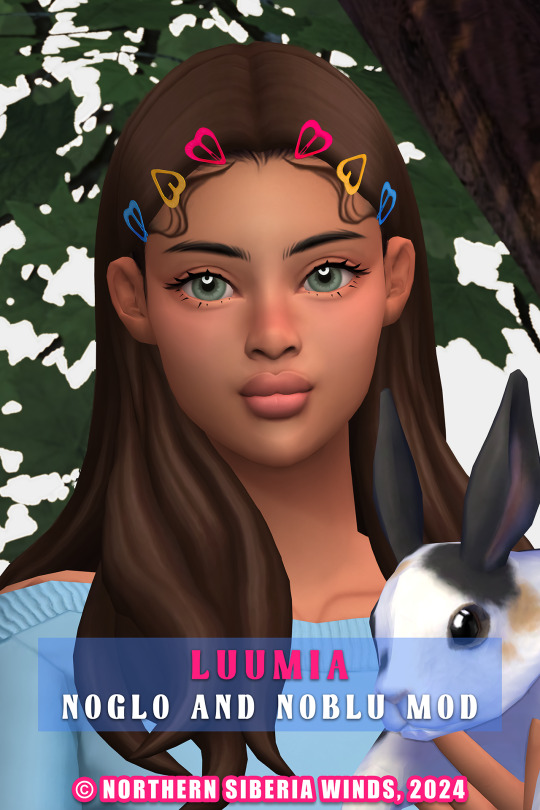

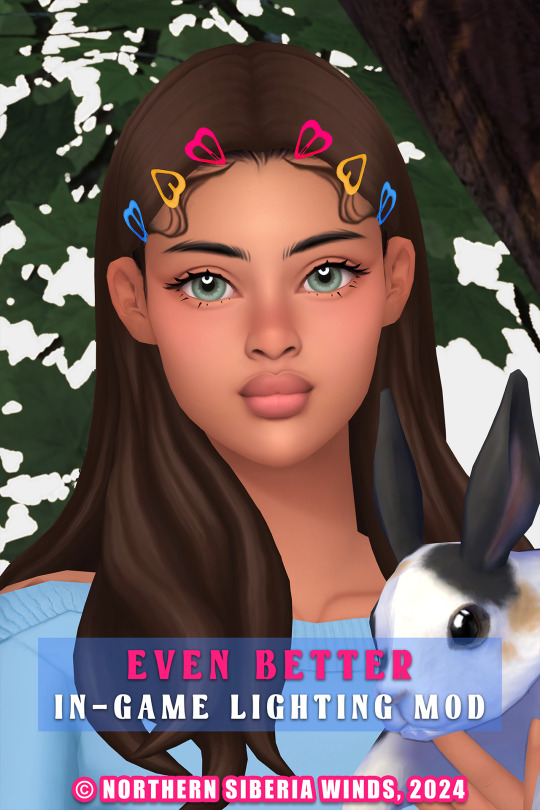

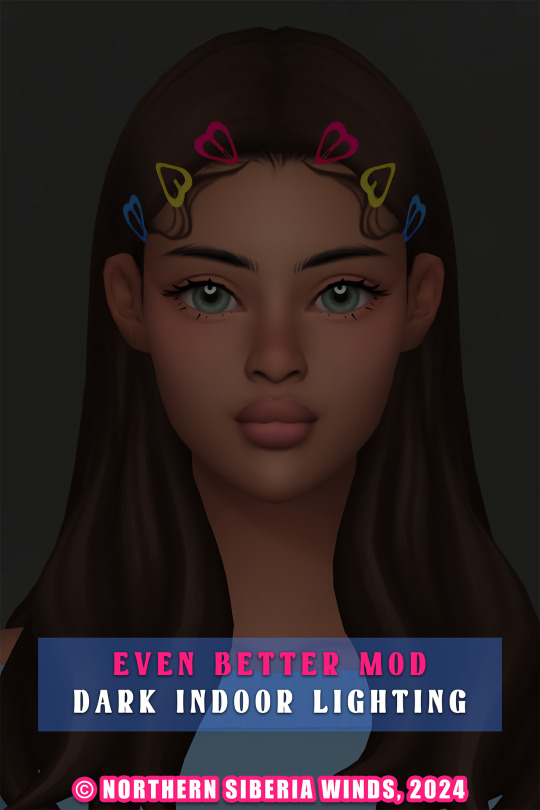
EVEN BETTER IN-GAME LIGHTING MOD v1.0
Finally, I've made the in-game lighting bright and juicy as my cas lighting 🫠.
The screenshots were taken in the game, no reshade or edit was used on it. And I also added a screenshots of the comparison with other lighting mods so that you can choose what you like more.
📑 GENERAL DESCRIPTION
default in-game lighting mod for The Sims 4;
base game compatible;
does not affect game performance in any way;
completely redesigned outdoor and indoor lighting;
brighter and cleaner lighting everywhere at any time of the day and weather;
the brightness of the lighting varies depending on the time of day and weather;
conflicts with mods that affect in-game lighting, you can only install one such mod in your game;
it works for mac!
📑 FILE TYPES (install only one!)
It affects the brightness inside rooms without lamps. I'm using the bright version.
Even Better In-Game Lighting Mod v1.0 (bright indoor);
Even Better In-Game Lighting Mod v1.0 (dark indoor).
✅ INSTALLATION INSTRUCTION
Just put one of the versions directly in the "mods" folder;
Do not change the name and do not put the file in subfolders.
conflicts with mods that affect in-game lighting, you can only install one such mod in your game!

MORE INFO AND DOWNLOAD
Any likes and reblogs is honestly appreciated! 🩷
Thank you for supporting the development process!
#sims 4#ts4 mods#sims 4 cc#s4cc#ts4cc#s4cc maxis match#s4ccfinds#s4 maxis match#sims 4 maxis cc#ts4 mm cc#s4 mm cc#s4mm#ts4 alpha
5K notes
·
View notes
Text
i think its so funny that like half of all ppl i see in lectures have macbooks instead of windows. how did microsoft fumble the bag so bad that compsci students would rather have like 10% the software instead of using windows
#o#apparently windows now has bing chat builtin and its meant to help with tasks#but like most the time it just gives instructions rather than do a thing#but even still. why would you pull up a thing and ask “take a screenshot” instead of like. pressing print screen#whatever#anyway i use linux its got the software and no bloat#sorry mac/windows users i upset but im just being real <3
1 note
·
View note
Text
he is very pretty :3 <3
#⋯ ꒰ა starry thoughts ໒꒱ *·˚#⋯ ꒰ა bg3 ໒꒱ *·˚#hashtag apollo shows his tav named apollo for the first time LMFAO HELLO <3#i'm looking thru my screenshots and doing random stuff so that's why there's no background here :P#i'm still in early access bcs i use a mac (but my twin & dad have pcs...! but either the game doesn't work for some reason or Busy)#anyway so he's a bard actually but i undressed wyll just so i could see this on my tav ^_^ bcs i looove the color red#i think it's funny that the 'leave' is highlighted here lol ... sorry astarion ily tho#RAGHH FULL RELEASE SUPER SOON <3 excited. and really scared! in a good way!!
0 notes
Text

netflix is stupid and wont let me take screenshots but woag can u guys believe they put me in sonic boom
#<< its vector saying this#i hate netflix i hate netflix i hate netflix. let me take screenshots tou stupid fucking application.#reaction time#me when i forget that mac is also used as a slang term for 'just some guy' sometimes#or like. whatever it means. u know what i mean. when usually tough guys will say sup mac or whatever.#name jumpscare.
1 note
·
View note
Text


Someone on the Date Everything discord server is posting screenshots from the playable demo that dropped on Steam today.
Why Mac gotta call us out like that?! 🤣
#still love them tho#date everything#date everything!#date everything spoilers#mac#date everything mac
537 notes
·
View notes
Text
My GIF Making process: Screen capturing using MPV player, Organizing files, 3 Sharpening settings, Basic Coloring PSD + Actions set

This is a very long post so heads up.
I’ll try to be as thorough and true as much as possible to the way I make my gifs (I already use Photoshop Actions which I’ve long since set up but now for this tutorial I’m reviewing them to show you the exact steps I’ve learned to create my gifs 😃) and present them to you in a semi-coherent way. Also, please bear with me since English is my second language.
First things first. Below are the things and tools we need to do this:
Downloaded 4K or 1080p quality videos (let’s all assume we know where to get these—especially for high definition movies and tv series—so this post doesn’t get removed, okay? 😛)
Adobe Photoshop CC or the CS versions can work as well, but full disclosure I haven’t created gifs using the CS versions since 2020. I’m currently using Adobe Photoshop 2024.
mpv player. Use mpv player to get those frames/screenshots or any other video player that has a screen grabber feature. I’ve used adapter for the longest time but I’ve switched to mpv because the press to screenshot feature while the video is playing has been a game changer not to mention ultimate time saver for me. For adapter you need to play it in another video player (like VLC player), to get the start and end timestamps of the scene you want to gif which takes me ages before I can even open Photoshop.
Anyway! Please stop reading this post for a moment and head over to this amazing tutorial by kylos. She perfectly tells you how to install and use mpv player, both for Mac and Windows users.
One thing I have to share though, I had a tough time when I updated my MacOS to Sonoma since MPV is suddenly either duplicating frames or when I delete the duplicates the player seems to be skipping frames :/ I searched and found a solution here, though it didn’t work for me lol. My workaround for this in the meantime is decreasing the speed down to 0.70 then start screenshotting—it’s not the same pre Sonoma update but it works so I’ll have to accept it rather than have jumpy looking gifs.
Now, after this part of kylos’ tutorial:

you can continue reading the following sections of my gif tutorial below.
I want to share this little tip (sorry, this will only cater to Mac users) that I hope will be helpful for organizing the screenshots that MPV saved to the folder you have selected. Because believe me you don’t want to go through 1k+ of screenshots to select just 42-50 frames for your gif.
The Control + Command + N shortcut
This shortcut allows you to create a new folder from files you have pre-selected. As you can see below I have already created a couple of folders, and inside each folder I have selected screenshots that I want to include in one single gif. It's up to you how you want to divide yours, assuming you intend to create and post a Tumblr gifset rather than just one gif.

Another tip is making use of tags. Most of, if not all the time, I make supercorp gifs so I tag blue for Kara and red (or green) for Lena—just being ridiculously on brand and all that.
Before we finally open Photoshop, there's one more thing I want to say—I know, please bear with me for the third? fourth? time 😅
It's helpful to organize everything into their respective folders so you know the total number of items/frames you have. This way, you can add or delete excess or unnecessary shots before uploading them in Photoshop.
For example below there are 80 screenshots of Kara inside this folder and for a 1:1 (540 x 540 px) Tumblr gif, Photoshop can just work around with 42-50 max number of frames with color adjustments applied before it exceeds the 10 MB file size limit of Tumblr.

Sometimes I skip this step because it can be exhausting (haha) and include everything so I can decide visually which frames to keep later on. You'll understand what I mean later on. But it's important to keep the Tumblr 10 MB file size limit in mind. Fewer frames, or just the right amount of frames, is better.
So, with the screenshot organization out of the way, let's finally head over to Photoshop.
Giffing in Photoshop, yay!
Let’s begin by navigating to File > Scripts > Load Files into Stack…

The Load Layers window will appear. Click the Browse button next.
Find your chosen screenshots folder, press Command + A to select all files from that folder then click Open. Then click OK.
After importing and stacking your files, Photoshop should display the following view:

By the way, I'll be providing the clip I've used in this tutorial so if want to use them to follow along be my guest :)
If you haven't already opened your Timeline panel, navigate to Windows > Timeline.
Now, let's focus on the Timeline panel for the next couple of steps.
Click Create Video Timeline, then you’ll have this:

Now click the menu icon on the top right corner then go to Convert Frames > Make Frames from Clips

Still working on the Timeline panel, click the bottom left icon this time—the icon with the three tiny boxes—to Convert to Frame Animation
Select Make Frames From Layers from the top right corner menu button.
So now you have this:

Go and click the top right menu icon again to Select All Frames
Then click the small dropdown icon to set another value for Frame Delay. Select Other…

The best for me and for most is 0.05 but you can always play around and see what you think works for you.
Click the top right menu icon again to Reverse Frames.
I think Photoshop has long since fixed this issue but usually the first animation frame is empty so I just delete it but now going through all these steps there seems to be none of that but anyways, the delete icon is the last one among the line of feature buttons at the bottom part of the Timeline panel.
Yay, now we can have our first proper GIF preview of a thirsty Lena 😜

Press spacebar to watch your gif play for the very first time! After an hour and half of selecting and cutting off screenshots! 😛 Play it some more. No really, I’m serious. I do this so even as early (lol) as this part in the gif making process, I can see which frames I can/should delete to be within the 10 MB file size limit. You can also do it at the end of course 🙂
Now, let’s go to the next important steps of this tutorial post which I’ve numbered below.
Crop and resize to meet Tumblr's required dimensions. The width value should be either 540px, 268px, or 177px.
Convert the gif to a Smart Object for sharpening.
Apply lighting and basic color adjustments before the heavy coloring. I will be sharing the base adjustments layers I use for my gifs 😃.
1. Crop and Resize
Click on the Crop tool (shortcut: the C key)

I like my GIFs big so I always set this to 1:1 ratio if the scene allows it. Press the Enter key after selecting the area of the frame that you want to keep.
Side note: If you find that after cropping, you want to adjust the image to the left or another direction, simply unselect the Delete Cropped Pixels option. This way, you will still have the whole frame area available to crop again as needed and as you prefer.
Now we need to resize our gif and the shortcut for that is Command + Opt + I. Type in 540 as the width measurement, then the height will automatically change to follow the ratio you’ve set while cropping.
540 x 540 px for 1:1
540 x 405 px for 4:3
540 x 304 px for 16:9
For the Resample value I prefer Bilinear—but you can always select the other options to see what you like best.
Click OK. Then Command + 0 and Command + - to properly view the those 540 pixels.

Now we get to the exciting part :) the sharpen settings!
2. Sharpen
First we need to have all these layers “compressed” intro a single smart object from which we can apply filters to.
Select this little button on the the bottom left corner of the Timeline panel.


Select > All Layers
Then go to Filter > Convert for Smart Filters
Just click OK when a pop-up shows up.
Now you should have this view on the Layers panel:

Now I have 3 sharpen settings to share but I’ll have download links to the Action packs at the end of this long ass tutorial so if you want to skip ahead, feel free to do so.
Sharpen v1
Go to Filter > Sharpen > Smart Sharpen…
Below are my settings. I don’t adjust anything under Shadows/Highlights.
Amount: 500
Radius: 0.4
Click OK then do another Smart Sharpen but this time with the below adjustments.
Amount: 12
Radius: 10.0

As you can see Lena’s beautiful eyes are “popping out” now with these filters applied. Click OK.
Now we need to Convert to Frame Animation. Follow the steps below.
Click on the menu icon at the top right corner of the Timeline panel, then click Convert Frames > Flatten Frames into Clips
Then Convert Frames > Convert to Frame Animation
One more click to Make Frames From Layers
Delete the first frame then Select All then Set Frame Delay to 0.05

and there you have it! Play your GIF and make sure it’s just around 42-50 frames. This is the time to select and delete.
To preview and save your GIF go to File > Export > Save for Web (Legacy)…
Below are my Export settings. Make sure to have the file size around 9.2 MB to 9.4 MB max and not exactly 10 MB.

This time I got away with 55 frames but this is because I haven’t applied lighting and color adjustments yet and not to mention the smart sharpen settings aren't to heavy so let’s take that into consideration.
Sharpen v1 preview:

Sharpen v2
Go back to this part of the tutorial and apply the v2 settings.
Smart Sharpen 1:
Amount: 500
Radius: 0.3
Smart Sharpen 2:
Amount: 20
Radius: 0.5
We’re adding a new type of Filter which is Reduce Noise (Filter > Noise > Reduce Noise...) with the below settings.

Then one last Smart Sharpen:
Amount: 500
Radius: 0.3
Your Layers panel should look like this:

Then do the Convert to Frames Animation section again and see below preview.
Sharpen v2 preview:

Sharpen v3:
Smart Sharpen 1:
Amount: 500
Radius: 0.4
Smart Sharpen 2:
Amount: 12
Radius: 10.0
Reduce Noise:
Strength: 5
Preserve Details: 50%
Reduce Color Noise: 0%
Sharpen Details: 50%
Sharpen v3 preview:

And here they are next to each other with coloring applied:
v1

v2

v3

Congratulations, you've made it to the end of the post 😂
As promised, here is the download link to all the files I used in this tutorial which include:
supercorp 2.05 Crossfire clip
3 PSD files with sharpen settings and basic coloring PSD
Actions set
As always, if you're feeling generous here's my Ko-fi link :) Thank you guys and I hope this tutorial will help you and make you love gif making.
P.S. In the next post I'll be sharing more references I found helpful especially with coloring. I just have to search and gather them all.
-Jill
#tutorial#gif tutorial#photoshop tutorial#gif making#sharpening#sharpening tutorial#photoshop#photoshop resources#psd#psd coloring#gif coloring#supercorp#supercorpedit#lena luthor#supergirl#my tutorial#this has been a long time coming#guys. i'm BEGGING you. use the actions set - it was a pain doing all this manually again ngl LMAO#i've been so used to just playing the actions#so this has been a wild refresher course for me too 😆
765 notes
·
View notes
Text
My Favorite Part - Jennie Kim


pairing. idol!jennie x bp!added!member!reader
synopsis. In the aftermath of BLACKPINK’s iconic Coachella 2023 performance, a heartwarming and intimate moment unfolds between Jennie and Y/N
The camera pans backstage as BLACKPINK walks off the Coachella 2023 stage, still basking in the electric energy of their record-breaking performance. The members are visibly glowing, their smiles wide and their faces lit with pride. Crew members erupt in applause, cheering and congratulating them as the group exchanges quick hugs and high-fives, their adrenaline still pumping.
But as the excitement swirls around them, Jennie’s expression shifts. Her proud smile falters as she looks down for a moment, her hands clenching slightly at her sides. Y/N, standing just a step behind her, notices the change immediately. Without a word, Jennie turns and strides directly toward Y/N, her emotions suddenly bubbling to the surface.
As soon as she reaches Y/N, Jennie wraps her arms tightly around their torso, burying her face in their shoulder. Her body trembles, and a soft, muffled sob escapes her. Y/N stiffens in surprise for a split second before gently wrapping their arms around Jennie, holding her close.
The crew’s cheers and the other members’ chatter fade into the background as Jennie clings to Y/N, her shoulders shaking. The camera lingers on the moment, capturing the intimacy and rawness of her emotions.
“Unnie…” Y/N whispers softly, leaning their head slightly against Jennie’s. “What’s wrong? Are you hurt?”
Jennie shakes her head against Y/N’s shoulder, her voice trembling. “No… I’m not hurt. I just—” She pulls back slightly to look at Y/N, tears streaming down her face. “It’s just… it hit me all at once. We did it. We made history. The crowd, the energy—it was all so overwhelming. I didn’t even realize how much it would mean to me until now.”
Y/N’s eyes soften as they gently wipe a tear from Jennie’s cheek. “Jennie, you were incredible out there. You didn’t just perform—you owned the stage. You made history. We all did, but you? You shined so bright.”
Jennie lets out a shaky laugh through her tears, her lips curling into a small, grateful smile. “Thank you… I needed to hear that.”
Y/N tilts their head, brushing a strand of Jennie’s hair behind her ear. “You can always come to me, unnie. I’ve got you, okay? But try not to cry too much, or Lisa’s going to make fun of you forever.”
Jennie laughs more fully this time, still sniffling but visibly more relaxed. “Don’t give her ideas.”
Unfortunately for Jennie, Lisa has already noticed. Turning from her conversation with the crew, Lisa catches sight of the pair and grins. “Yah, Jennie-unnie, are you crying? Don’t tell me Y/N is your emotional support now!”
Jennie groans, pulling away slightly from Y/N while laughing through her tears. “Yah! Lisa, stop it!”
Lisa smirks, nudging Rosé. “Look at them! Jennie and Y/N are having their own little drama over there.”
Rosé chuckles, walking over and offering Jennie a bottle of water. “Don’t tease her too much. I think she’s earned a few tears after what we just pulled off.”
Jisoo, watching from nearby, steps closer and drapes an arm around Jennie’s shoulders. “We all have. That performance? It’s Coachella history. We’ve worked so hard for this, and now we can actually say we’ve made it. We deserve this moment.”
Jennie nods, her expression softening even more. “I’m just… so proud of us. And so grateful for you guys. For all of this.” She glances at Y/N, her voice quieter. “Especially you.”
Y/N smiles, giving her shoulder a reassuring squeeze. “Always, unnie.”
As the members gather closer, laughing and reflecting on their performance, the camera pans out, capturing the warmth of their bond. Jennie’s vulnerability, supported so naturally by Y/N, becomes a standout moment in the episode of Born Pink Memories.
Later, fans watching the episode flood social media with their reactions. Screenshots and clips of Jennie crying in Y/N’s arms quickly trend, with captions like, “Jennie finding comfort in Y/N is so precious” and “The bond between BLACKPINK and Y/N is everything.” Many fans praise Y/N for being Jennie’s rock in such an emotional moment, solidifying Y/N’s place as an irreplaceable part of the group.
#cents works#blackpink#blackpink x reader#jennie x reader#jennie#jennie kim#jennie kim x reader#kpop gg#kpop gg x reader#kpop wlw#fluff#blackpink added member#Spotify
146 notes
·
View notes