#serialport
Explore tagged Tumblr posts
Visit Tumblr Blog
Explore Tumblr blogs with no restrictions, modern design and the best experience.
Last Seen Tumblr Blogs


Fun Fact
Forty percent of Tumblr users are between the ages of 18 to 25.
Link
permasalahan dengan usb serial port yang hanya bisa dipakai oleh satu aplikasi
0 notes
Text
Arduino to P5js & Potentiometers

Circuit Description:
In this project, I used a potentiometer connected to an Arduino to control the horizontal movement of a circle in a p5.js sketch. The potentiometer sends a changing voltage to the Arduino depending on how you turn the knob. This voltage is read by the Arduino as a number using analogRead(). The Arduino then sends this number to the computer through serial communication.
In the p5.js sketch, the computer listens for that data using the p5.serialport library. When new data arrives, the sketch receives the value and maps it to the width of the canvas.
So as I turn the potentiometer knob, the circle on the screen moves left or right smoothly, depending on the input. This makes the potentiometer act like a controller for the position of the shape.
Code:
void setup() { // initialize serial communication at 9600 bits per second: Serial.begin(9600); }
// the loop routine runs over and over again forever: void loop() { // read the input on analog pin 0: int sensorValue = analogRead(A0); // print out the value you read: Serial.println(sensorValue); delay(1); // delay in between reads for stability }
1 note
·
View note
Text
Lab 5: Arduino and P5.js :)
The objective of this lab was to establish serial communication between an Arduino and a P5.js sketch using the P5.SerialControl library. The goal was to read analog input from a potentiometer (or other sensor) and use this data to manipulate a sound parameter in P5.js. This experiment introduces the concept of serial communication and demonstrates how real-world input can create interactive experiences in a digital environment. The materials used were Arduino Uno Hardware , Breadboard, Jumper wires, Potentiometer (10kΩ) Arduino IDE software & P5.js web editor and installed P5.SerialControl library for P5.js (Darwin version).
Descriptive Circuit Overview:
As said above, the circuit consisted of an Arduino Uno, a 10kΩ potentiometer, and a serial connection to a P5.js sketch. The potentiometer is wired with:
The Potentiometer placed in the middle of the bread board.
Ground and power wires connected across the bottom edge of the breadboard.
The middle pin connected to A1 (analog input pin on the Arduino).
One outer pin connected to 5V power in the Arduino.
The other outer pin connected to ground (GND) in the Arduino.
This setup allows the potentiometer to function as a voltage divider. When the potentiometer is turned, the resistance changes, changing the voltage received by the Arduino’s analog input pin. The Arduino was able to read this voltage using the analogRead() command, converted it into a numerical value (range: 0 to 1023), and sent this data to the P5.js sketch over the serial communicator (P5.js Serial.Control).
Schematic:

Code Explanation Overview-Arduino:
The Arduino code initializes one analog pin, A1, to read input from the potentiometer. The values are then sent via the Serial.print() function in a comma-separated format, allowing P5.js to parse them correctly.
Pin Setup: The potentiometer’s pin is set as an input using pinMode(sensorPin, INPUT).
Analog Reading: The values A1 are continuously read using analogRead(sensorPin).
Serial Communication: The values are sent over the serial port using Serial.println(sensorValue);. The comma serves as a delimiter to separate multiple values.
This ensures that the final P5.js sketch can properly interpret and map the incoming data, which would be displayed in the serial console/monitor of the Arduino Uno, Serial Controller, and P5.js web editor console. In other words, the serial controller allows the code to be communicated from the Arduino software to the P5.js. The code is below:
int sensorValue = 0;
int sensorPin = A1;
void setup() {
// put your setup code here, to run once:
pinMode(sensorPin, INPUT);
Serial.begin(9600);
}
void loop() {
// put your main code here, to run repeatedly:
sensorValue = analogRead(sensorPin);
Serial.println(sensorValue);
}
Code Explanation Overview-P5.js:
The P5.js sketch establishes serial communication with the Arduino and reads the sensor data to control a visual representation through the resistance of the potentiometer.
Serial Communication Setup: The script initializes a serial connection using serial = new p5.SerialPort();, lists available ports, and attempts to open the correct one.
Data Reception: The function serial.on('data', gotData); listens for incoming serial data and stores it in a variable.
Data to Visuals: The sensor values are used to control the size of a circle on the canvas (circle(20,20,latestData);) in function draw().
Display of Values: The latest received data is displayed on the screen using text(latestData, 10, 10).
The code is below:
let serial; let latestData = "waiting for data";
function setup() { createCanvas(windowWidth, windowHeight);
serial = new p5.SerialPort();
serial.list(); serial.open('/dev/tty.usbmodem1301');
serial.on('connected', serverConnected);
serial.on('list', gotList);
serial.on('data', gotData);
serial.on('error', gotError);
serial.on('open', gotOpen);
serial.on('close', gotClose); }
function serverConnected() { print("Connected to Server"); }
function gotList(thelist) { print("List of Serial Ports:");
for (let i = 0; i < thelist.length; i++) { print(i + " " + thelist[i]); } }
function gotOpen() { print("Serial Port is Open"); }
function gotClose(){ print("Serial Port is Closed"); latestData = "Serial Port is Closed"; }
function gotError(theerror) { print(theerror); }
function gotData() { let currentString = serial.readLine(); trim(currentString); if (!currentString) return; console.log(currentString); latestData = currentString;
}
function draw() { background(255,255,latestData); fill(0,0,0); text(latestData, 10, 10);
fill(5,200,5); circle (20, 20 latestData);
// Polling method /* if (serial.available() > 0) { let data = serial.read(); ellipse(50,50,data,data); } */ }
Lastly, into the P5.js helm library file of the sketch, we put this P5.js Port Control Script link library in it as well:
<script language="javascript" type="text/javascript" src="https://cdn.jsdelivr.net/npm/[email protected]/lib/p5.serialport.js"></script>
Observations/Analysis:
When manipulating the potentiometer, the values ranged from 0 to 1023 (Arduino’s 10-bit ADC resolution). These values were mapped in P5.js to control the size of the circle in real-time, and went further to change the background color as well. The movement of the shape corresponded smoothly to changes in sensor input, proving the effectiveness of serial communication.
If we had applied the data to sound manipulation, the potentiometer’s values could have been mapped to control frequency, volume, or panning. The map() function would be used to scale the 0-1023 range into an appropriate audio parameter range in P5.js.
A demo video of the outcome is below:
Challenges and Troubleshooting:
Some challenges encountered included:
Serial Port Connection Issues: Initially, P5.js could not detect the correct serial port. This was resolved by having manually specifying the port (serial.open('/dev/tty.usbmodem1301');) in the script. This required a lot of troubleshooting code and hardware at first.
Conclusion:
This lab demonstrated how Arduino and P5.js can communicate through serial data, allowing physical input to control digital outputs. The way. that the potentiometer was able to change the size of the circle, isthe same way it can be used to turn vilume up and down on a device. Understanding serial communication opens up possibilities for interactive installations, such as motion-sensitive visuals or audio-controlled audio experiences. This aspect introduces new ways to map sensor input to audio-visual feedback, an essential skill in creative coding and physical computing.
In the future, this technique could be expanded by integrating multiple sensors and including the synthesis of sound assets to creat an immersive experience.
...Or it could be used in part to make a DIY iPod.
xx
0 notes
Link
Computer Ports: Their Purpose and Dangers http://bit.ly/31f4bLT
#blogpost#computer#ports#purpose#dangers#serialport#parallelport#cable#security#network#office#wireless#secure#protection#business#company#corporation#organization#IT#services#solutions#support
0 notes
Photo
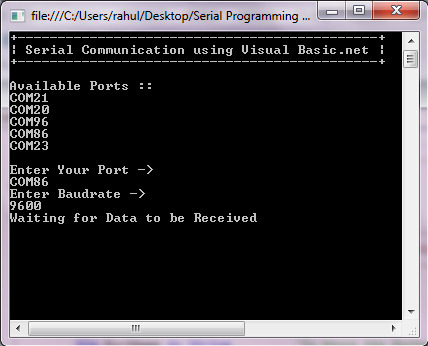
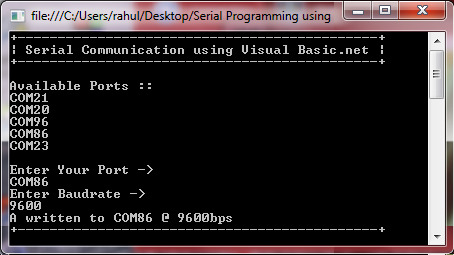
Serial Port programming using Visual Basic for Embedded Developers.Learn how to interface your microcontroller with PC using Visual Basic .net
#serialport#embedded#programming#visualbasic#dotnet#usbtors485#.net development#msp430#avr#atmel#8051#at89s51#microcontroller
3 notes
·
View notes
Link
ZylSerialPort.NET v1.78 - Serial port communication .NET Component
ZylSerialPort.NET is a thread based, event driven, asynchronous / synchronous serial port .NET framework / component.
https://developer.team/dotnet/28234-zylserialportnet-v178-serial-port-communication-net-component.html
1 note
·
View note
Note
what are you coding all day?
Trying to get a C++ code to communicate with an arduino via a usb serialport so I can read values from a sensore that's plugged into the arduino ✌🏻😁🤖
Basically, trying to get a smaller computer to talk to my computer.
3 notes
·
View notes
Text
Reading MHZ-19 sensor data in Node.js
Below is an example on how to read CO2 level readings from MHZ-19 NDIR sensor via serial port in Node.js
/** * MHZ-19 UART Monitor * @author skitsanos */ const winston = require('winston'); const Transport = require('winston-transport'); const fs = require('fs'); const SerialPort = require('serialport'); const port = new SerialPort('/dev/tty.usbserial', {baudRate: 9600, autoOpen: false}); class FileTransport extends Transport { constructor(opts) { super(opts); } log(info, callback) { fs.appendFile(process.cwd() + '/app.log', `${info.level} ${info.message}\n`, (err) => { if (err) { console.log(err.message); } }); callback(); } } const loggingFormat = winston.format.combine( winston.format.colorize(), winston.format.splat(), winston.format.printf(info => { return ` ${(new Date()).getTime()} ${info.level}: ${info.message}`; })); const log = winston.createLogger({ exitOnError: false, //level: 'debug', transports: [ new FileTransport( { format: loggingFormat, timestamp: true } ), new winston.transports.Console({ format: loggingFormat }) ] }); let app = { meta: require('./package'), commands: { READ_VALUE: Buffer.from([0xff, 0x01, 0x86, 0x00, 0x00, 0x00, 0x00, 0x00, 0x79]) }, utils: { ord: (str) => { console.log(str); return str.charCodeAt(0); }, sleep: (ms) => new Promise(resolve => setTimeout(resolve, ms)) }, serial: { list: () => { SerialPort.list().then((arr_portInfo) => { arr_portInfo.map(el => { console.log(el); log.info('Found: ' + el.comName); }); }); }, open: () => { if (port !== undefined) { return new Promise((resolve, reject) => { port.open(err => { if (err) { return reject(err); } return resolve(); }); }); } else { log.error('Failed to open port. Not found?'); } }, close: () => { if (port !== undefined) { log.debug('Closing serial port'); port.close(); } else { log.error('Failed to open port. Not found?'); } }, write: (data) => { return new Promise((resolve, reject) => { if (port !== undefined) { log.debug('Writing to serial port...'); port.write(data, (err) => { if (err) { return reject(err); } return resolve(); }); } else { return reject({message: 'Failed to write. Not found?'}); } }); } } }; log.info(`${app.meta.name} ver. ${app.meta.version}`); app.serial.open().then(() => { log.debug('Port open'); port.on('readable', async () => { const buf = port.read(9); if (buf !== null && Buffer.byteLength(buf) === 9) { if (buf[0] === 0xff && buf[1] === 0x86) { const co2 = Number(buf[2].toString()) * 256 + Number(buf[3].toString()); log.info(`${co2}ppm`); } await app.utils.sleep(5000); app.serial.write(app.commands.READ_VALUE); } }); app.serial.write(app.commands.READ_VALUE).then(() => { }).catch(err => log.error(err.message)); }).catch(err => log.error(err.message));
0 notes
Photo

Validando en el #osciloscopio pulsos de datos del #puertoserie de la #uart en un #arduinopromini proyectoarduino.com . . . #arduino #oscilloscope #hantek #dso5202p #serialport https://www.instagram.com/p/BoNIOwGn5oT/?utm_source=ig_tumblr_share&igshid=rjy7aeaos6m0
0 notes
Video
instagram
#BTS เทพน้องโม #dmapsgworkshop2017 🍉 #p5js #arduino #video #serialport #connection
0 notes
Text
Midterm Project: The Video Game Controller
Introduction: The game initially was supposed to be a game where the objective is to catch water in a bucket for a town experiencing a drought
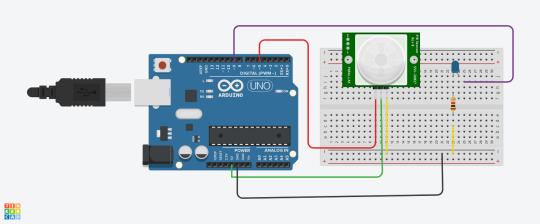
Sensor Rationale: My sensor was the PIR motion sensor, the rationale was to resemble a VR game where the user would be controlling the direction of the bucket depending on which sensor they activated
Controller Design & Construction: To set up two PIR motion sensors with my Arduino and breadboard, I started by gathering everything I needed: an Arduino board, two PIR sensors (like the HC-SR501), a breadboard, and some jumper wires. Each PIR sensor has three pins (VCC for power, GND for ground, and OUT for the signal). Since the sensor pins are small and not ideal for directly plugging into a breadboard, I decided to solder jumper wires directly to the pins. I soldered one wire to each pin and then I plugged them into the breadboard . I connected both VCC wires to the 5V pin on the Arduino and both GND wires to the Arduino’s GND pin. Then, I connected the OUT wire from the first PIR sensor to digital pin 7 and the OUT wire from the second sensor to digital pin 4.
Arduino Code :
const int pirPin1 = 5; // First PIR sensor connected to pin 7
const int pirPin2 = 4; // Second PIR sensor connected to pin 8
int pirState1 = LOW; // State of PIR sensor 1
int pirState2 = LOW; // State of PIR sensor 2
int lastPirState1 = LOW; // Last state of PIR sensor 1
int lastPirState2 = LOW; // Last state of PIR sensor 2
void setup() {
pinMode(pirPin1, INPUT); // Set PIR sensor 1 pin as input
pinMode(pirPin2, INPUT); // Set PIR sensor 2 pin as input
Serial.begin(9600); // Start serial communication at 9600 baud rate
}
void loop() {
pirState1 = digitalRead(pirPin1); // Read state of PIR sensor 1
pirState2 = digitalRead(pirPin2); // Read state of PIR sensor 2
Serial.print(pirState1);
Serial.print (",");
Serial.println(pirState2);
// Save the current state as the last state for the next loop
lastPirState1 = pirState1;
lastPirState2 = pirState2;
// Delay between readings to stabilize sensor input
}
P5.js Game Code (Well-Commented):
let serial; let latestData = "waiting for data"; // To hold the PIR sensor data
// Game variables let basketX, basketY, basketWidth, basketHeight; let fallingRaindrops = []; let score = 0;
let cloudPositions = []; // Store cloud positions for moving clouds
let targetX = 0; // Target x position for sensor 1 (smooth movement) let targetSpeed1 = 0.1; // Smooth speed for sensor 1 (change this value for more smoothness) let targetSpeed2 = 2; // Slower speed for sensor 2 (change this value for slower movement)
function setup() { createCanvas(windowWidth, windowHeight);
// Initialize the serial object for Arduino serial = new p5.SerialPort();
// List all available serial ports serial.list();
// Open the serial port (replace 'COM5' with your correct port) serial.open('COM5');
// Register event handlers for serial communication serial.on('connected', serverConnected); serial.on('list', gotList); serial.on('data', gotData); serial.on('error', gotError); serial.on('open', gotOpen); serial.on('close', gotClose);
// Set initial values for the basket (bucket) basketX = width / 2; basketY = height - 50; basketWidth = 100; basketHeight = 40;
// Initial raindrop setup setInterval(generateRaindrop, 1000); // Add a new raindrop every second
// Initialize cloud positions for (let i = 0; i < 5; i++) { cloudPositions.push({ x: random(width), y: random(height / 2), // Clouds stay at the top part of the screen speed: random(0.5, 1.5) }); } }
function serverConnected() { print("Connected to Server"); }
function gotList(thelist) { print("List of Serial Ports:"); for (let i = 0; i < thelist.length; i++) { print(i + " " + thelist[i]); } }
function gotOpen() { print("Serial Port is Open"); }
function gotClose() { print("Serial Port is Closed"); latestData = "Serial Port is Closed"; }
function gotError(theerror) { print(theerror); }
function gotData() { let currentString = serial.readLine(); // Read incoming data from the serial port if (currentString) { currentString = currentString.trim(); // Trim the string properly if (currentString) { console.log("Received data:", currentString); // Debug: show received data latestData = currentString; // Update the latest data received ("0,0", "1,0", "0,1", "1,1") } } }
function draw() { // Draw the background as a cloudy town drawCloudyTownBackground();
// Draw the bucket (using a rounded rectangle and an ellipse for the base) fill(255, 0, 0); noStroke();
// Draw the bottom of the bucket as a half ellipse arc(basketX + basketWidth / 2, basketY + basketHeight / 2, basketWidth, basketHeight, 0, PI, CHORD);
// Draw the top of the bucket as a rectangle (body) rect(basketX, basketY - basketHeight / 2, basketWidth, basketHeight / 2);
// Update basket movement based on PIR sensor input updateMovement();
// Draw and update raindrops for (let i = fallingRaindrops.length - 1; i >= 0; i--) { let raindrop = fallingRaindrops[i]; fill(0, 0, 255); // Draw the raindrop as an ellipse with more vertical elongation ellipse(raindrop.x, raindrop.y, raindrop.sizeX, raindrop.sizeY); raindrop.y += raindrop.speed; // Make the raindrop fall// Check if the raindrop hits the bucket if (raindrop.y + raindrop.sizeY / 2 >= basketY && raindrop.x > basketX && raindrop.x < basketX + basketWidth) { score++; // Increment score when a raindrop is caught fallingRaindrops.splice(i, 1); // Remove the raindrop after it is caught } // If the raindrop falls out of the screen, remove it if (raindrop.y > height) { fallingRaindrops.splice(i, 1); }
}
// Display score fill(0); textSize(24); text("Score: " + score, 10, 30); }
// Function to update movement based on PIR sensor data function updateMovement() { if (latestData) { // Parse the latest data to get pirState1 and pirState2 let states = latestData.split(","); if (states.length < 2) return; // Ensure there are two elements in the arraylet pirState1 = int(states[0].trim()); // First PIR sensor state let pirState2 = int(states[1].trim()); // Second PIR sensor state // Debugging output to confirm sensor values console.log("1", pirState1, "2", pirState2); // Update basket movement based on sensor states if (pirState1 === 1) { // Move basket to the right if motion is detected on sensor 1 basketX += 10; } if (pirState2 === 1) { // Move basket to the left if motion is detected on sensor 2 basketX -= 10; } // Prevent the basket from moving off the canvas basketX = constrain(basketX, 0, width - basketWidth);
} }
// Function to generate a falling raindrop at a random x position function generateRaindrop() { let raindrop = { x: random(width), y: 0, // Start from the top sizeX: random(10, 15), // Random width for raindrop sizeY: random(20, 40), // Random height for raindrop (more elongated) speed: random(3, 6) // Falling speed }; fallingRaindrops.push(raindrop); }
// Function to draw a cloudy town background function drawCloudyTownBackground() { // Draw sky background(135, 206, 235); // Light blue sky color
// Draw the clouds for (let i = 0; i < cloudPositions.length; i++) { let cloud = cloudPositions[i]; fill(255, 255, 255, 180); // White, semi-transparent clouds noStroke(); ellipse(cloud.x, cloud.y, 200, 80); // Big cloud ellipse(cloud.x + 60, cloud.y - 20, 150, 60); // Smaller cloud part ellipse(cloud.x - 60, cloud.y - 20, 150, 60); // Smaller cloud part cloud.x += cloud.speed; // Move the cloud// If the cloud goes off the screen, reset its position if (cloud.x > width + 100) { cloud.x = -100; }
}
// Draw the city skyline (simple buildings) fill(50, 50, 50); // Dark gray for buildings rect(0, height - 150, 100, 150); // Building 1 rect(150, height - 200, 80, 200); // Building 2 rect(250, height - 180, 100, 180); // Building 3 rect(400, height - 250, 120, 250); // Building 4 rect(550, height - 160, 90, 160); // Building 5 }
Communication Protocol Details: This p5.js code connects to an Arduino using a serial port to receive live data, like numbers from sensors. It uses the p5.SerialPort() library to open the connection (on COM5) and listen for different events, like when the connection is opened, closed, or when new data arrives. When the Arduino sends data, the program reads it as a line of text, removes any extra spaces, and splits the text into two values using a comma. These values are saved as value0 and value1, which can be used in the draw() function to control what’s shown on the screen—like the position or behavior of shapes. This setup lets the webpage respond to what the Arduino senses in real time.
User Instructions: Each motion sensor determines if the bucket moves left, right, or remains stagnant. Using the left sensor, move your hand in front of it to move the bucket to the left. Using the right sensor, move your hand in front of it to move the bucket to the right. If both sensors are activated at the same time, the bucket will stay in the place it is in until one sensor halts detection.
Challenges & Solutions: Challenges included setting up the sensor and activating it. The PIR motion sensors are sensitive so trying to get them to turn off and on was a difficult task. However, I managed to tweak the settings to make the time and sensitivity low. However, that also made the sensor delayed, resulting in the reaction time glitchy in the game.
Future Enhancements: Soldering from the beginning and making sure my code is as simple as possible would help me in the future. I think also changing the game could make more sense for the sensor.
Conclusion: I learned a lot in the end, and even used AI to help me with code and wiring. Next time, I hope to use my skills to develop more complex code for p5.js and Arduino so the sensor can be used for a variety of games.
Link to video game:
0 notes
Text
Clover os x el capitan download

Clover os x el capitan download mac os x#
Clover os x el capitan download install#
Clover os x el capitan download update#
Clover os x el capitan download full#
Clover os x el capitan download install#
Run CustoMac Essentials to install FakeSMC and Ethernet support. For further bootloader customization, download and run the official Clover package.ħ. For further bootloader customization, download and run the official Clover package. Legacy Boot Mode - Root (Clover_v2.3k_r3320_Legacy_Root.pkg) is for older systems that cannot boot from EFI partition. Legacy Boot Mode (Clover_v2.3k_r3320_Legacy.pkg) is recommended for 5/6 Series CustoMac desktops and all BIOS based systems. UEFI Boot Mode (Clover_v2.3k_r3320_UEFI.pkg) is recommended for 7/8/9+ Series CustoMac desktops and all UEFI capable systems. Alternately, continue booting from the USB drive.Ħ. This will provide boot from hard drive in place of MultiBeast. The Post-Installation.zip contains two custom Clover installers and essential kexts. If you have a 6 series or x58 system with AWARD BIOS, disable USB 3.0 If your system has IO SerialPort, disable itĩ. If your system has Secure Boot Mode, disable itħ. If your system has CFG-Lock, disable itĥ. To access BIOS/UEFI Setup, press and hold Delete on a USB Keyboard while the system is booting upĤ. Here are standard AMI UEFI BIOS settings for Gigabyte AMI UEFI BIOS, Gigabyte AWARD BIOS, ASUS AMI UEFI BIOS, and MSI AMI UEFI BIOS.ġ. For other systems make sure to set your BIOS to Optimized Defaults, and your hard drive to AHCI mode. If you're installing on a recommended CustoMac desktop with AMI UEFI BIOS, the options are simple.
Clover os x el capitan download full#
Advanced users may also compile Clover by downloading the full source. Drag MultiBeast to your completed USB drive.Ĭlover Note: UniBeast delivers basic bootloader support based on our testing on recommended CustoMac systems. The Application Install OS X El Capitan will appear in /Applications.
Clover os x el capitan download mac os x#
Download the Application from the Mac App Store using your Apple ID on any Mac or functional computer running Mac OS X 10.6.8 or later. The full operating system is a freeload for anyone who has purchased Mac OS X Snow Leopard, Lion, or Mountain Lion or has a Mac preloaded with OS X Mavericks or Yosemite.
Clover os x el capitan download update#
Follow these steps: Direct Update to OS X El Capitan using Clover. If you have followed updates until OS X Yosemite using Chimera, check out Clover Basics and Switching Advice.Įxisting Clover users may do a direct update to OS X El Capitan by simply running the Install OS X El Capitan app as normal Mac users would. To start from scratch, booting the 10.6 Snow Leopard Retail DVD directly, check out iBoot + MultiBeast.įor the first time is recommending Clover as your default bootloader. This is a requirement, as you need access to the Mac App Store to download OS X and create the installation drive. In order to start fresh, you'll need access to a functional computer running Mac OS X Snow Leopard 10.6.8 or later. UniBeast is a tool that creates a bootable installer out of your downloaded version of OS X. By doing this, you can always go back to your working installation. We strongly recommend performing a full backup of your existing system using Carbon Copy Cloner. Get our latest UniBeast and MultiBeast tools from the downloads section.Ĥ. Register here at tonymacx86! If you don't have a user account, create one!Ģ. Building a CustoMac Hackintosh: Buyer's Guideġ.
0 notes
Text
Chrome 100 with security updates released
Google released Chrome 100 Stable for all supported desktop operating systems on March 29, 2022. The new release is also available for the extended channel for Windows and Mac. The extended stable version skips all odd-numbered version releases.

Chrome 100 is a major milestone release, but an unspectacular one as it does not introduce major changes to the web browser. The new version is available already. Chrome users may load chrome://settings/help to display the current version and download the new release if it has not been downloaded and installed already. Selecting Menu > Help > About Google Chrome opens the same page.
Google Chrome 100 is a security update release first and foremost. The Chrome releases blog reveals that the release contains 28 security fixes, many of which have been reported by third-party security researchers. The highest severity rating is high and none of the issues appear to be exploited in the wild currently, as Google mentions this usually in the announcement.
As far as non-security features are concerned, there are not that many. Chrome 100 updates the parsing of cookie strings by allowing cookie domain attributes to be set to empty strings. Chrome did not handle these according to the specification up until now.
There is also a new multi-screen window placement API to better support multi-screen devices. Google lists a number of use cases for the new capabilities:
Slideshow app presents on a projector, shows speaker notes on a laptop screen.
Financial app opens a dashboard of windows across multiple monitors.
Medical app opens images (e.g. x-rays) on a high-resolution grayscale display.
Creativity app shows secondary windows (e.g. palette) on a separate screen.
Conference room app shows controls on a touch screen device and video on a TV.
Multi-screen layouts in gaming, signage, artistic, and other types of apps.
Site optimizes content and layout when a window spans multiple screens.
Here is a list of the remaining additions in Chrome 100:
The Digital Goods API is now available by default. It is an API for “querying and managing digital products to facilitate in-app purchases from web applications, in conjunction with the Payment Request API (which is used to make the actual purchases)”.
HIDDevice forget() is a new method that developers may implement to “revoke a permission to a HIDDevice that was granted by a user”.
Markup based Client Hints delegation for third-party content. which supports “content negotiation use cases such as differential serving of variable fonts, color vector fonts, responsive images, and other third-party content which requires client information lost by user agent reduction”.
SerialPort integration with WritableStream controller AbortSignal.
TLS ALPN extension in wss-schemed WebSockets connections.
Web NFC: NDEFReader makeReadOnly().
WebTransport serverCertificateHashes option.
mix-blend-mode: plus-lighter.
AbortSignal.prototype.throwIfAborted.
Capability Delegation allows “a frame to relinquish its ability to call a restricted API and transfer the ability to another (sub)frame it trusts”.
Chrome 100 is the last version of the browser that supports the full user-agent string. Google plans to reduce the user-agent string of the browser from April 19, 2022 on.
Now You: did you install the new version?
Summary
Article Name
Chrome 100 with security updates released
Description
Google released Chrome 100 Stable for all supported desktop operating systems on March 29, 2022.
Author
Martin Brinkmann
Publisher
Ghacks Technology News
Logo

Advertisement
Source link
The post Chrome 100 with security updates released appeared first on WHOSE-FKKN-WHO.
from WHOSE-FKKN-WHO https://firstnewsclick.com/chrome-100-with-security-updates-released/5825/ from First Coast News https://firstnewsclick.tumblr.com/post/680130417257529344
0 notes
Text
Microsoft visual studio 2013 express for web 無料ダウンロード.Visual Studio Express
Microsoft visual studio 2013 express for web 無料ダウンロード.Visual Studio 2013 Express for Desktopのインストール

Visual Studio 2013 Express for Desktopとは?.Visual Studio Express | Now Visual Studio Community
ダウンロードするこの Visual Studio Team Foundation Server Express には、最新の更新プログラムが含まれています。Visual Studio に対するこれらの累積的更新プログラムには、さまざまなバグ修正および機能の強化が含まれています。 Visual Studio Express for Desktopとは? Visual Studio Express for Desktopは、無料で商用利用も可能です。 Visual Studio Express. 以前のExpress Editionは、商用利用可能か、あいまいな場合もありましたが、今回は上記リンクの「追加情報」に明記していあります。 Visual Studio の Microsoft Visual C++ 再頒布可能パッケージ Visual Studio Express for Web. Visual Studio Express for Windows. 無料ダウンロード. Visual Studio Code. あらゆる OS で編集し、デバッグする Visual Studio Code を使用することにより、その
Microsoft visual studio 2013 express for web 無料ダウンロード.Visual Studio 無償評価版をダウンロードする場所について
This is the final version of Visual Studio Express, and there is not a UWP or Web offering for Visual Studio Express or later versions. We encourage all users to look at the free development options offered by Microsoft such as Visual Studio Code and Visual Studio Community for future development needs ダウンロードするこの Visual Studio Team Foundation Server Express には、最新の更新プログラムが含まれています。Visual Studio に対するこれらの累積的更新プログラムには、さまざまなバグ修正および機能の強化が含まれています。 これは Visual Studio Express の最後のバージョンであり、Visual Studio Express 以降のバージョンの UWP または Web オファリングはありません。 将来的な開発ニーズには、 Visual Studio Code や Visual Studio Community など、Microsoft が提供する無料の開発オプションを
exeがあります。 ダウンロード時に、どちらか、もしくは両方をダウンロードするか選択します。. Visual Studio Express for Windows Desktopについては、 Visual Studio Express 版(無償)について をご参照ください。 Visual Studio Expressの以前のバージョン では、BasicやC など 、言語ごとに異なるプログラムをインストールしていましたが、Visual Studio Express for Windows Desktopでは有償版と同様に、統合されたIDEを利用するため各言語ごとのインストールはありません。.
Visual Studioの全ての機能を利用したい場合は、有料版のVisual Studioをご利用ください。 継続的に開発を行う場合や、業務として開発に用いる場合は有料版のVisual Studioをお勧めします。. exeをダウンロードして実行します。 DVD焼き込などの手間が不要なので、ネット回線速度が速い場合は、この方法がおすすめです。. エクスペリエンス向上プログラムとは、お客様の作業内容やエラーなどをマイクロソフトへ送信し、開発などの改善の参考にするというものであり、 匿名性はあるものの、開発に関連した情報送信をバックグラウンドで行われることにお客様が同意する場合のみチェックを追加します。. 最近のMicrosoftのソフトウェアの特徴として、インストール時にマイクロソフトアカウントが必要となります。 Windows8でもOSインストール時に求められますが、VisualStudioでも開発者のMicrosoftアカウントを求められます。.
以前のバージョンのVisual Studio Express では、インストール時にBasicやC など言語ごとに分かれていましたが、Visual Studio Express for Windows Desktopでは言語ごとのインストールはありません。 有償版のVSと同様に、VS内に複数の言語を含んでおり、ファイルメニューのプロジェクト作成メニューから選択を行います。. Windows Desktop向けの開発メニューであるが、有償版は無償版に比べ、多くのテンプレートが存在します。 有償版ではGUI画面で使用するコントロールライブラリを作成することができるために、多くのプログラムを作成する場合、コントロール化により開発効率を高めることができます。.
Visual StudioはMicrosoft社の製品です。 このページの内容につきましては、Visual Studio(ビジュアルスタジオ)を利用しての開発を検討される方の参考のために、テクノベインズが独自に調査を行い記述したものです。. Netframework開発情報 ・. Net Framework再頒布パッケージについて. NetFramework再配布パッケージの入手に関する情報 Windows は米国 Microsoft Corporation の米国およびその他の国における登録商標です。Microsoft Corporationのガイドラインに従って画面写真を使用しています。. 戻る トップページへ ご注文方法について 更新情報. VB Expressのインストール. exeをダウンロードして実行します。 DVD焼き込などの手間が不要なので、ネット回線速度が速い場合は、この方法がおすすめです。 インストールへのライセンス条項に同意するチェックボックスをチェックするとダウンロードボタンが現れます。 エクスペリエンス向上プログラムとは、お客様の作業内容やエラーなどをマイクロソフトへ送信し、開発などの改善の参考にするというものであり、 匿名性はあるものの、開発に関連した情報送信をバックグラウンドで行われることにお客様が同意する場合のみチェックを追加します。 インストール過程.
無償で開発ができるマイクロソフトの開発言語 Visual Studio Express のインストール. 無償で開発ができるマイクロソフトの開発言語 VB Expressのインストール. VB と VBExpressでのテンプレート比較.
VBから大型7セグメントLEDディスプレイ LED にメッセージを表示する. VB Expressセットアップ方法の説明. シリアルポートをつかう通信クラス SerialPortについて. バーコードスキャナ [CCDタイプ]. 業務用プリンタ [レシート・ラベルプリンタ]. スマホでPOS機器 SmaSvr[スマサバ ]. バーコードスキャナ [レーザータイプ]. レジプリンタ サプライ品 [レシート用紙]. 業務用キーボード [プログラマブルキーボード]. POS Facille [ファシール].
0 notes
Text
Server-side Development with NodeJS
As you build your web application, you necessarily make a series of foundational decisions that will impact the entire architecture of your applications. One of these core decisions is where to implement rendering logic in your application. This is where Node.js comes into the picture.
What is Node.js?
Node.js is a tool written in C, which allows you to use JavaScript on the server-side that lets you effortlessly develop fast and scalable web applications. It utilizes an event-driven, non-blocking I/O model that makes it lightweight, efficient, and excellent for data-intensive real-time applications that run across shared devices.
What is Node.js used for?
Node.js is used for building various business solutions. Here is a sample list of them, in reality the list is longer, much longer.
1. Backend for Social Media Networking
2. Single-page Application
3. Chat Application
4. Data Streaming
5. Backends and servers
6. Developing APIs
7. Microservices
8. Scripting and Automation
What makes Node.js special?
1. Scalability: Node.js applications are easily scalable, vertically and horizontally. While vertical scaling lets you add more support to the current nodes, horizontal scaling allows you to add new nodes faster.
2. High Performance: High performance is achieved by knowing how to take advantage of every aspect of the hardware, helping memory management act at its best, and correctly deciding how to architect a complex application.
Enterprises that use Node.js
Let's dive into the remarkable realm of Node.js
Unlike the regular web-serving technique, where each call creates a new thread obstructing the system RAM, Node.js operates on a single thread. This enables it to support thousands of concurrent connection handling event loops.
A sneak peek into the areas where Node.js can be used
Use Case 1: Data Streaming
The Problem:
An average consumer spends 40 hours per week watching video content. The gap between Traditional TV and its consumers is growing day by day.
The Solution:
A video streaming solution can be built leveraging the data streaming capability of Node.js. Data Streaming with Node.js is 25% more convenient than traditional means.
How?
The process of sending data is divided into small chunks that are sent to the front-end piece by piece, instead of a huge single package.
Use Case 2: Big Data & Analytic
The Problem:
Trying to deal with large data in a browser is troublesome and affects user experience.
The Solution:
Node.js streams ensure data flow from one end to the other effortlessly which makes implementing analytics easy. Node.js has the capability to handle large amounts of data at one time. To overcome the problem of dealing with larger data, it is important to have a mechanism for breaking the large data into multiple chunks. Using backpressure, which comes from implementing Node.js, you can use a computer's resources while processing very large sets of data.
Use Case 3: Wireless Connectivity
The Problem:
Bi-directional signal connectivity between IoT devices is a key challenge.
The Solution:
Node.js server ensures data connectivity without any request blockage
Node.js is one of the most effective solutions to create a proxy server for data connectivity and routing as it supports I/O connectivity without blocking. Some JavaScript libraries for Node.js such as Node-Red, NodeMcu, and Node Serialport offer ready-made solutions for connecting IoT devices.
Use Case 4: Realtime Data
The Problem:
Scalability bottlenecks in real-time data is very common
The Solution:
Node.js makes real-time data a boon for web apps
Node.js is a good fit for building real-time web apps by using push technology over web sockets (a two-way communication between the servers and clients). What's more revolutionary about Node.js is that it is the best choice for creating server-side web apps.
Use Case 5: Queued I/O Inputs
Read more..
0 notes
Photo

Node Serialport: Access Serial Ports with JavaScript - https://t.co/PKRlqWL0z8
0 notes