#silicon mix
Text
Two brand new hair videos coming your way !
For this week's videos I decided to focus on my hair. Taking some time to take good care of it and practice my braiding skills.
In this video I try a wig hack I found on TikTok. The silicone and and adore 10 mix allegedly helps to soften and restore old wigs so I tested it out.
youtube
Trying silicon mix and adore 10 to restore my old wigs
In this video I take care of my overgrown black roots and fuzzy braids. By giving myself a much needed dye job and attempting to cornrow my hair.
youtube
Giving myself a much needed dye job and attempting to cornrow my hair
Dont forget to check out my channel too for more videos!
All video links
#black youtuber#black creators#wig hack#adore 10#adore dye#wig restore#conrows#braiding#hair braiding#silicon mix#hair dying#dye touch up#Youtube
0 notes
Text


silicone mixing
20 notes
·
View notes
Note
Your nails look so pretty! If you don't mind me asking, I've never mixed nail polish colors before but now I really want to. Is it that you later them on top of eachother, or do you actually mix the liquids before applying? And if you mix the liquids, do you pour them into some other container? How do you know how much to use? Do you use an eye dropper or some other kind of tools? What do you stir them with? Sorry that this is a lot of questions 😅
Omg... It's less complicated than you're thinking! It basically goes like this for me, for when I want to make myself a Whole bottle of a color:
I'll use a not-new bottle of polish with a base color I don't really like. I had a bottle of bright yellow that I didn't really like the formula, and I didn't really wear the color.
Then I just kinda. reach for other polishes and pour them directly into the bottle! arbitrary amounts at a time. For the goldenrod color, I used some really bright orange, a couple drops of black, some neutral jelly polish and a few drops of white. I also normally add some drops of polish thinner, if the polish has thickened, but it's optional tbh.
As far as mixing it together in a nice homogenous way, most nail polish has a couple of small steel balls in the bottle, specifically to mix the polish up! So, if you're shaking up a bottle of polish and you hear clicking, that's what that sound is. I just shake the shit out the bottle until the color evens out, and I swatch it a few times, adding more drops of polish until it turns into the color I want.
tl;dr you just pour the polish all in the bottle.
But for very small batches, you can buy miniature nail polish bottles for really cheap!
#And for VERY very small batches#you can plop a few dabs of nail polish onto a piece of plastic or a silicon mat#mix it together real quick#and apply it before it starts drying down.#sergle answers#nailposting#I have a lot of polishes that I've Edited or just made a new polish from scratch by mixing shit together that I already have#this opportunity presents itself anytime I have an Empty bottle#but it's also just good to breathe life into an uninteresting shade that I don't really wear#I have a lot of polish so I have a lot of options for shades I can mix but you can still do a lot by just having#a black and a white polish#darkening and lightening a shade tbh... changes everything
38 notes
·
View notes
Text
silicon valley hbo in detroit become human au...... where everything is the same but jared is an office worker android sent by hooli but not really bc he deviated when richard declined belson's offer and decided to join pied piper as the first thing after deviating
#silicon valley hbo#thinking about so many hijinks that comes with ai and androids and deviancy in this silly techbro show#mixing both of my fixations bc im silly :3#thinking about making laurie gilfoile and jin yang androids too#and bighead would be thought to be a human but being an android or the other way around#whichever would be funnier#detroit become human#might reblog with more written stuff
2 notes
·
View notes


Text
Mixing mixing in my PP shop ✨
19 notes
·
View notes
Text
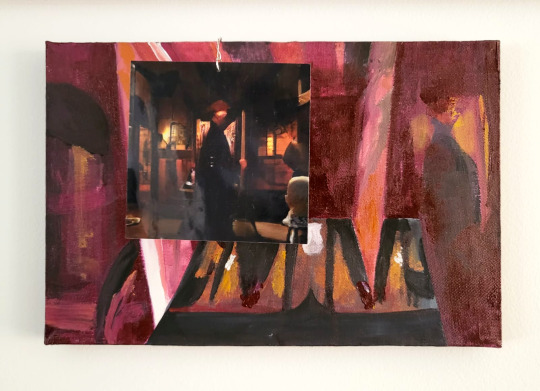

a lofi rendition of a screenshot of my thesis, acrylics and gouache on canvas
#dont tell anyone more serious than me but this wire is attached with old duct tape that i dont really trust that much#plus a dab of silicone glue where it meets the side edge#i dont think its very secure but theres time to change things up a bit before the exhibit#also by 'acrylic on gouache' i mean both at the same time as in i mixed both paints for some colors#artists on tumblr#traditional art#assemblage#abstract art#surrealism#ai art#my art
9 notes
·
View notes
Photo


colorstar699
12 notes
·
View notes
Text

Just realized something about my experiment.
#science shit#its actually a silicone polyethylene glycol mix#hey by the way guess whats the contraction used for polyethylene glycol
2 notes
·
View notes
Text
Sometimes I feel like I have to reassure myself that I actually do know what I'm doing, I'm just sometimes trying something new, am just out of practice, or made a probably admittedly dumb mistake.
Imposter syndrome hits hard when things don't work right but the fact that I'm experienced enough to know what went wrong to fix it in the future or know a way to fix that mistake should also mean something.
#hey guys i goofed again#just finished that blank mold by accidentally cutting into one of the d20s#but i think I'll be able to fix it#if not at least i made it with 2 in it#anyway i was cutting a notch to make it easier to know what orientation the lid goes on because the mold is just a big rectangle#but when i went back to clean it up i realized i had messed up#it's a good thing it was a clean cut because once i got over the stupidity of what i just did i figured out which master was in that one#slid it back in and then mixed up a little bit of silicone and used that to essentially seal it back#I'm hoping it works#usually with silicone you have to be careful when making multiple parts to make sure you cover everything because otherwise it bonds#and it's hard to pull apart without ripping#so using it to glue itself back together makes sense and i had to put the master back in so i hopefully dont ruin it too much#i dont think I'll be able to do powder coated blanks in that mold without that showing but i dont use that effect often anyway#it really shows texture which is why it would be an issue#but anything else would be fine#so as long as the seal holds which i believe it should#everything should be fine#and it's freshly cured and clean so i dont see a reason why it wouldnt bond#anyway I'm having a tough time because it feels like anything i have to talk about is just fails recently
4 notes
·
View notes
Text
The Ultimate Guide to Epoxy Resin and Hardener: Tips for Beginners in Resin Art
If you're interested in exploring your creative side and diving into the world of resin art, you're in the right place! Epoxy resin is a popular medium that can be transformed into stunning artwork, functional home decor, and more. This guide will help you understand the basics of epoxy resin and hardener, and provide tips to get you started with your own resin art projects.
What is Epoxy Resin?
Epoxy resin is a versatile material known for its durability, high-gloss finish, and ability to bond with various surfaces. It's a two-part epoxy system consisting of the resin itself and a hardener. When these two components are mixed, they undergo a chemical reaction that causes the mixture to harden, forming a solid and clear material.
Understanding Epoxy Resin and Hardener
The key to successful resin art lies in understanding the role of epoxy resin and hardener. The resin is a liquid polymer that requires a hardener to cure, or solidify. This curing process can take anywhere from a few hours to several days, depending on the type of resin used and environmental factors such as temperature and humidity.
When selecting an epoxy resin, it's essential to choose a high-quality product designed specifically for art projects. The ratio of resin to hardener is typically 1:1 or 2:1, but it's crucial to follow the manufacturer’s instructions for the best results.
Getting Started with Resin Art
Resin art is an exciting way to create beautiful and unique pieces. Here are some basic steps to help you get started:
1. Gather Your Supplies
To begin, you'll need a resin art kit, which usually includes epoxy resin and hardener, mixing cups, stir sticks, gloves, and a surface to work on. You may also want to have resin pigment powder or liquid dyes on hand to add color to your creations.
2. Choose a Work Area
Resin can be messy, so it's essential to have a well-ventilated workspace, preferably with a flat, level surface. Cover your work area with a plastic sheet or disposable tablecloth to protect it from spills.
3. Mix Your Epoxy Resin and Hardener
Start by measuring the appropriate ratio of epoxy resin and hardener, as indicated by the manufacturer. Pour both parts into a mixing cup and stir slowly for 3-5 minutes. Be sure to scrape the sides and bottom of the cup to ensure thorough mixing. Bubbles may form during this process, but don’t worry – you can remove them later using a heat gun or a torch.
4. Add Resin Pigment Powder
Once your epoxy resin is thoroughly mixed, you can add resin pigment powder or liquid dyes to achieve your desired color. Start with a small amount, as a little goes a long way. Mix well until the color is evenly distributed. You can use multiple colors to create unique patterns and effects.
5. Pour and Create Your Art
Now comes the fun part – pouring the resin! Pour the colored epoxy resin onto your chosen surface, such as a wooden panel or canvas. You can use different techniques, like swirling, layering, or dragging, to create various patterns. Experiment with different tools, like sticks or spatulas, to manipulate the resin and achieve the effect you want.
Tips for Working with Two-Part Epoxy
Working with two-part epoxy can be a bit challenging at first, but these tips will help you master it in no time:
Measure Accurately: The most critical step in resin art is ensuring the correct ratio of epoxy resin and hardener. Inaccurate measurements can result in sticky or improperly cured resin.
Mix Slowly and Thoroughly: To avoid bubbles and ensure a smooth finish, mix the resin and hardener slowly and thoroughly. Stirring too quickly can introduce more air into the mixture, creating bubbles.
Use a Heat Gun or Torch: To eliminate bubbles, lightly run a heat gun or torch over the resin’s surface. Be careful not to overheat, as this can cause the resin to burn or yellow.
Allow for Proper Curing Time: Patience is key when working with epoxy resin. Make sure to give your piece ample time to cure in a dust-free environment to achieve a smooth, clear finish.
Popular Resin Art Projects
There are countless ways to use epoxy resin in your creative projects. Here are a few popular ideas to inspire you:
Coasters and Trays: Create custom coasters or serving trays using epoxy resin. Add embellishments like glitter, dried flowers, or metallic flakes to make your pieces unique.
Jewelry: Epoxy resin is perfect for making unique jewelry pieces like pendants, earrings, or rings. Use molds to shape the resin and add pigments or small decorative items to create stunning accessories.
Geode Art: Mimic the appearance of natural geodes by layering resin with different colors, metallic powders, and crystals. This type of resin art is incredibly popular and makes for eye-catching wall decor.
Conclusion
Epoxy resin art offers endless possibilities for creativity. With the right tools, techniques, and a bit of practice, you can create beautiful, personalized pieces that showcase your unique style. Whether you're making functional items like coasters or diving into intricate geode art, the key is to have fun and enjoy the process!
#candle making supplies#adelaide moulding and candle supplies#epoxy resin and hardener mixing ratio#Epoxy Resin Art#Resin#Resin Art#epoxy resin and hardener#candle fragrance oils#candle making#adelaide candle supplies#quicksil fast set silicone#candle wax
0 notes
Text
Ok actually I don't know what I was scared of?? That wasn't bad. Thank you beautiful toothpick so I could control the resin flow better :) I'm gonna let it cure for a few minutes, then let it set for several hours (both bc I'm so scared of it fucking up if I move it too soon + we are making the black forest cake soon :3) and then I'll update... I think rly the main things I learned is that it is hard as shit to make a 10 mm eye look good. The pupils are so so hard to get round oh my god. I think weirdly the big eyes I'm gonna have to do aren't gonna be bad at all other than getting them even and positioned right. And most of all be so brave about everything ever
#twist rambles#bjd posting#writing my process down here but i made the eyes with polymer clay and silicone molds#used a ball stylus to make the eye indent. let bake and then cleaned up any excess w an exacto knife. painted the inside exactly how i want#ed it and then added the pupil. added glitter before this but would probably want to try glitter in with the resin next time. then added in#any big decor (ie little hearts and stuff). then poured some resin on a paper plate and used a toothpick to kind of dollop it in and mixed#it each time i scooped it in. then cured for a bit. it said 3-4 min i think w this uv lamp but im doing a little more bc i now remembered#ppl saying to do rly small layers. i will do this next time#anyways yeah :3 typing that up bc i know ill forget lol
1 note
·
View note
Text
I'm gonna quit life as a human and become a hermit crab and live with The Party Boys
I'm sure Scupa won't at all mind another tank-mate! And Gurkle won't at ALL mind having a strange new crab in there! I'll even catch the pesky spiders for him!
The party boys: uhhhhh no. No thank you 👋😬
#marquilla#my mom would have to take care of us though and she is so afraid of the crabs agdgdggdgdgdgdg#me: would you still love me if i was a hermit crab? 🥺#my mom grabbing silicone tongs: if i must....#agsgdgdggdgdgdgd the tank would be moved to the living room im sure bc it's such a pain to get to in my room#also she would get so grossed out by the food (mostly the bug mix/shrimp) and be like “yall are vegetarians now bye bye” and just#throw grapes in there from the lid#me: oh wow its so nice to be a crab! this is awesome#tpb: get her 👿👉#the party boys
1 note
·
View note
Text
Wig Styling Tips | Top 30 Hacks for Beginners
Among people of all ages and backgrounds, wigs have become a popular fashion trend. With wigs, you can experiment with different looks, change your hairstyle without committing to a permanent change, or simply protect your natural hair. It can be overwhelming for beginners to get started with wigs. There is a lot to learn about wearing and maintaining wigs, from choosing the right one to choosing…

View On WordPress
#adjustment#baby hair#baby powder#baking soda#beauty#cornstarch#diy#dry shampoo#dryer sheet#fabric glue#fabric softener#flyaways#frizz control#hair oil#human#pantyhose#silicone mix#silk scarf#static guard#styling tips#synthetic#tea bag rinse#texture#vinegar rinse#wig cap#wig clips#wig hacks#wig steamer#wigs
1 note
·
View note
Text
Hair Care Routine with 360 Natural Straight and Silicon Mix Conditioner

At MyBeautyFullHair, we believe in providing top-notch products to enhance your natural beauty. Our 360 Natural Straight hair extensions offer a sleek, smooth look that blends seamlessly with your hair, ensuring a flawless finish. To maintain and nourish your extensions and natural hair, we recommend our Silicon Mix Conditioner. This deep-conditioning treatment revitalizes your hair, adding shine and softness while reducing breakage. Formulated with silicone, keratin, and ceramides, it provides the ultimate hydration and protection. Trust MyBeautyFullHair for premium products that keep your hair looking beautiful and healthy every day.
0 notes


Last Seen Blogs

stpds
do i care if i survive this?

inkyoldtimes
Old Toons Comic

indototo-daftar
INDOTOTO-DAFTAR

grosspop
LONG LIVE THE NEW FLESH

jinxdragon
is meatball an fruit