#slipstitch
Text
Slipstitch
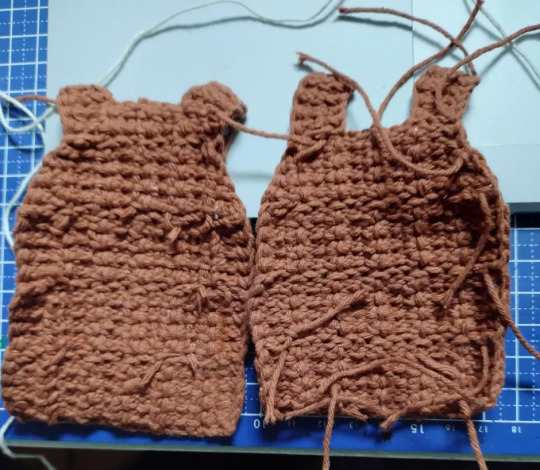
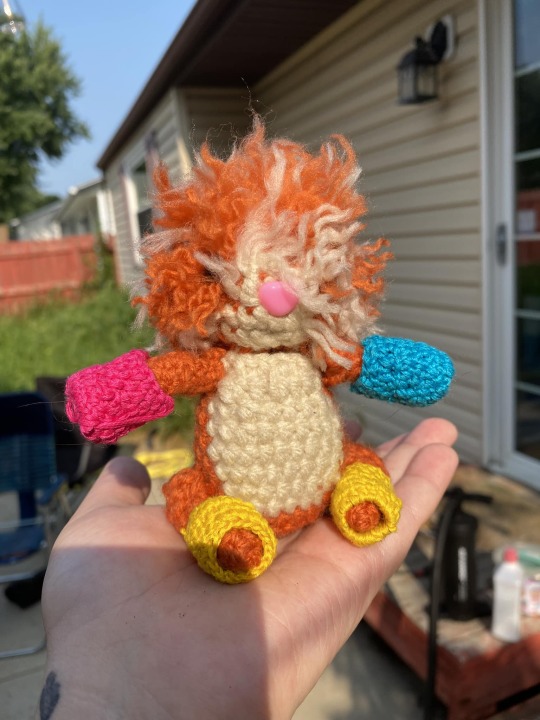
A new Sinner Sona for Hazbin Hotel, Slipstitch

His only real demonic power is being able to summon Demonic Stitches that do not perforate what they attach two, and try to draw the two surfaces they are attached to together regardless of Slip’s input. It’s not string control, it’s specifically *stitches*.

He can abuse this tho for grappling and slamming over short distances like here with some unnamed sinner
His design is based on several things I consider core to my personality, and what I consider my own “sins”.
Firstly, a scar above his stomach and heart, where I have actually had feeding tube surgery and regularly get heart check ups for my bad heart. My left hip goes out, so he has a hoof there. And my hands are bad from a connective tissue disorder, and my overall condition will only get worse with time
So, a broken toy, patched itself together and carried on.
In addition, IRL I was raised very conservative and Mormon. Now an apostate, I purposefully sought out the occult, the lewd, and the “monstrous” to remake my identity in opposition to how I was raised. In other words: blasphemy. Stitching demonic parts to patch up what I tore off of myself
Combine that with some Envy, Sloth, Lust, and Gluttony, and you get the plush rabbit with demonic grafts and a desire to push their body past its limits, trusting they can just patch themselves up. The kind of Pride I exhibited when I went to get my degree even though my doctors said it was unwise
Was a fun character to design! Hazbin Hotel Sinnersonas are a fun way to self reflect
What’s yours ?
2 notes
·
View notes
Text

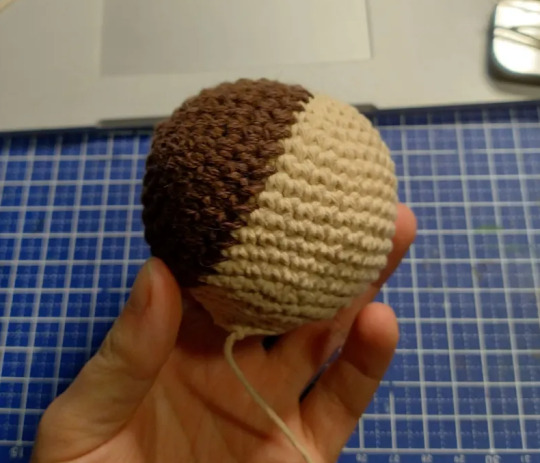
Wooow look at that! A Ponysona redesign!
Meet SlipStitch they/she KidCore pony who loves to crochet. Mostly invested in making foal blankets and an accompanying toy to match.
9 notes
·
View notes
Text

Eurrh
#bandana for my head. i have so many strings to tuck before i slipstitch them together#astr.txt#croshay 🧶
8 notes
·
View notes
Text
Sewing themed metal band called Slipstitch
5 notes
·
View notes
Text
starting over sucks, but sometimes it'll work out even better than you expected and it'll look nicer
#ramblings#i picked up stitches wrong along a slipstitch edge#and i knew it would bug the hell out of me so i started over#losing hours of work#but already it looks much nicer and my colors match up better :)
0 notes
Text

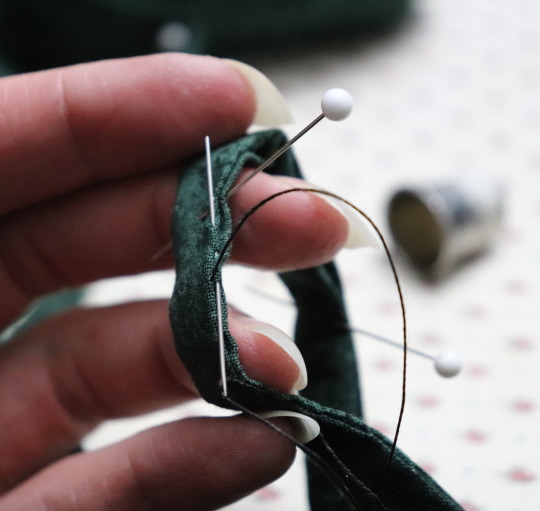

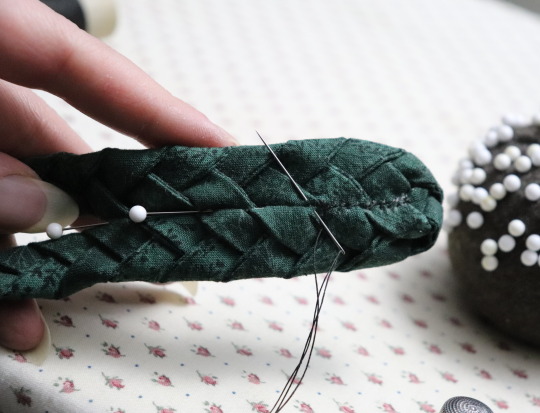
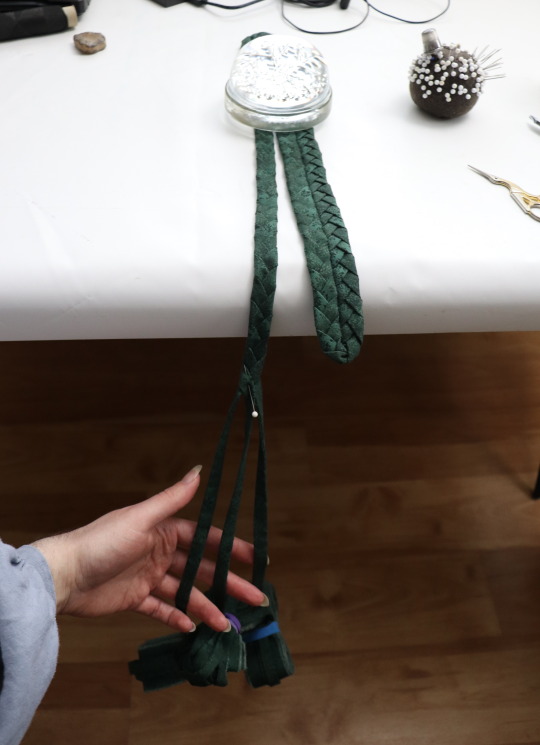

I started working on a braided rug earlier this month, using some of the quilting cotton that I have too much of. It's inspired by some very old rugs that my grandparents had.
I'm tearing the fabric into 4 cm wide strips, double folding it and slipstitching the edges together, then braiding it and whipstitching the edges of the braid together, around and around. I also pressed the fabric strips carefully after tearing them, and have been pressing the rug every time I go around the ends to prevent it from warping. It's coming along slowly and is currently 16 cm wide. I've used up almost one metre of fabric so far, and am about to switch to a different piece of green cotton.
5K notes
·
View notes
Note
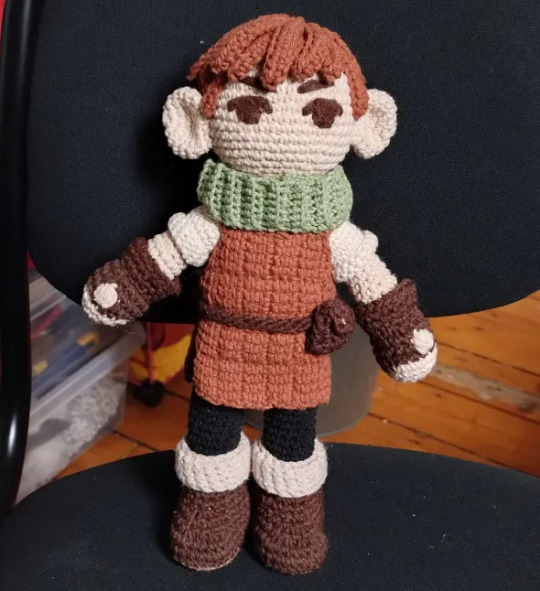
hey if you write a pattern for the chilchuck amigurumi I will buy it instantly
ive gotten multiple asks about this, so ill just answer them all here in one go.
i wrote down everything while i was working on it, but i theres some stuff that i would do diffrently and i also didnt take a lot of process pics so it wont be a full proper pattern for those reasons, but ill add all that i have under the cut!
i dont want any compensation, but if you wanna do me a favor you can donate to esims for gaza, unrwa, any of these gefundme's, or another trusted charity of your choice.
now to the pattern! i would love to see the results of anyone making a squeakychuck, feel free to tag or dm me :)
the dimensions of this depend on the size of ur squeaker and yarn, i had a 4ish cm squeaker and somewhat thick 4/8 cotton yarn (kinda 6/8ish thickness). depending on ur yarn and squeaker u might need to follow a different pattern for the body.
if youre using a different body base pattern, the tunic and blouse pattern are pretty easily adjustable. ill add some notes for that at those sections of the pattern. ill also link some videos i used at relevant sections.
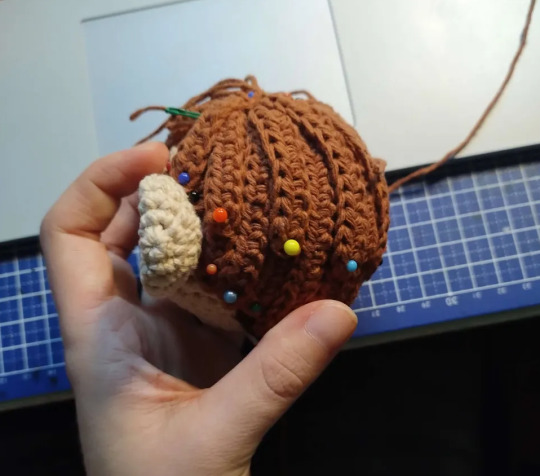
if theres an Action store near where u live, see pic below for the yarn i used for the skin, reddish brown, black and light brown. i got 3 of these but 2 packs was enough. the dark brown and creme were from my stash. i also got the squeaker from a donut dog toy from Action.
-
abreviations list (all in us terms):
mr = magic ring
sc = single crochet
hdc = half dubble crochet
slst = slipstitch
ch = chain
bobble = 5 double crochet in one stitch
4inc = 4 sc in one
4 inc = increase in the next four stitches
BLO = back loop only
FLO = front loop only
what you need:
-skin color of choice yarn
-creme/white yarn (normal for body, thin for blouse)
-greyish creme (for boot flaps)
-black yarn
-dark brown yarn
-light brown yarn
-reddish brown yarn
-green yarn
-4 tiny buttons (for arm joints)
-cardboard (for shoe sole
-3.5mm hook
-squeaker
-needlefelt needle
-stuffing
-stitchmarker (optional, i always mark the first stitch of the round)
-
once again disclaimer, this is not a propper pattern, this is just what i wrote down while i was crochetting. it may not nessecarily be the best way to do it. i wanted most clothes to be removable, but you have to partially disassemble the doll if you want to remove them. if you dont like how something looks or works ur free to do whatever you want. big fan of fucking around and finding out personally.
if you have any questions feel free to dm me, might take me a while to reply though.
-
SQUEAKY CHUCK PATTERN 3.5mm hook
head (skin)
r1: sc 6 in mr
r2: (inc) x6
r3: (sc 1, inc) x6
r4: (sc 2, inc) x6
r5: (sc3, inc) x6
r6: (sc4, inc) x6
r7: (sc 5, inc) x6
r8-15 : sc 42
r16: (sc 5, dec) x6
r17: (sc 4, dec) x6
r18: (sc3, dec) x6
r19: (sc2, dec) x6
r20: (sc 1, dec) x6
r21: sc 12
slst, fasten off
ears x2 (skin)
r1: sc6 in mc
r2: (inc) x6
r3: (sc, inc) x6
r4-6: sc 18
r7: dec 9. slst fatsen off.
Body - leg up (skin, black, thick creme)
start with skin
r1: ch 6, inc in 2nd from hook, sc 3, 4inc, sc 3, inc
r2: inc 2, sc 3, inc 4, sc 3, inc 2
r3: inc 3, sc 5, inc 6, sc 5, inc 3
r4: BLO sc in all
r5: sc 3, dec 2, sc 3, dec 2, sc 6, dec 2, sc 3, dec 2, sc 3
r6: sc 1, dec, sc 4, dec 6, sc 4, dec, sc 1.
r7: sc 6, dec 3, sc 6
stuff
-r8 dec, sc in all
change color to black [color change video]
r9-23: sc in all
1st leg: fasten off
2nd leg [joining legs video]:
r24: sc7, ch 1, sc join in 1st leg after last sc, sc13, sc1 in visible v loop of ch1, sc 7
r25: sc7, sc 1 in remaining v loop of ch1, sc21
r26-31: sc 28
r32: sc 7, change color to creme/white, slst 1, sc 20
r33-35: sc 29
r36: (sc 8, dec) x3
r37: (sc7, dec) x3
r38: (sc6, dec)x3
add squeaker
r39: sc21
r40: (sc 5, dec) x3
r41-42: sc18
r43: (sc 1, dec) x6
fasten off
Arms (skin, dark brown)
i made the arms movable with button joints, but after looking at some videos i discovered that what i did is not called a button joint and i dont have a video explaining it, so i hope this drawing helps.
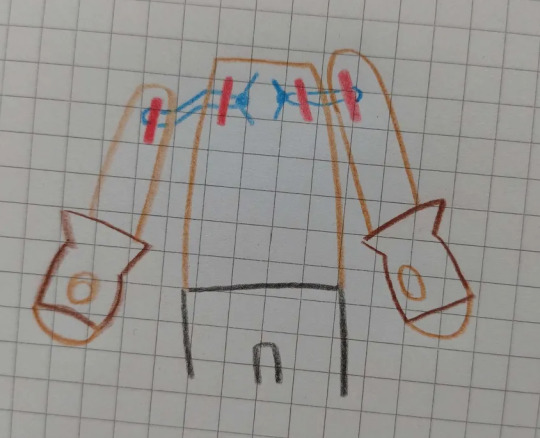
the red bits are the buttons inside of the arms and body, and the thread (blue for clarity, i matched it w the skin) should be pulled tight and finished off with a double or tripple knot inside the body.
or you could just sew on the arms that also works. but wait with doing that until youve finished the blouse as the hands dont fit through the sleeves. i have a seperate section on assembly at the end of the pattern.
start with skin
r1:sc6 in mc
r2: inc x6
r3(sc, inc)x6
r4 : sc 18
change color to brown
r5: sc 18
1st arm r6: sc 3, bobble, sc 14.
2nd arm r6.2: sc 14, boble, sc 3
[i matched the top loop to the bobble color but i think it would look better if u didnt]
r7: sc 18
r8: (sc 4, dec)x3
r9: (sc 3, dec)x3
r10 sc12
color switch to skin (you might want to do this a round earlier, i didnt initially plan on making the gloves flared, and this color change part can sometimes be seen and look kinda weird)
r11-14: sc 12
r15: (sc4, dec)x2
r16-19 : sc 10
r20: (sc3, dec)x2
r21: sc8
insert button joint
r28: (sc2, dec)x2
slst, sew shut
glove flare (dark brown)
r1: ch 15, slst join LONG TAIL
r2: (sc4, inc)x3
r3: sc4, inc, sc8, inc, sc 4
r4: sc 2, slst fasten off
sew 2 rows below thumb bobble
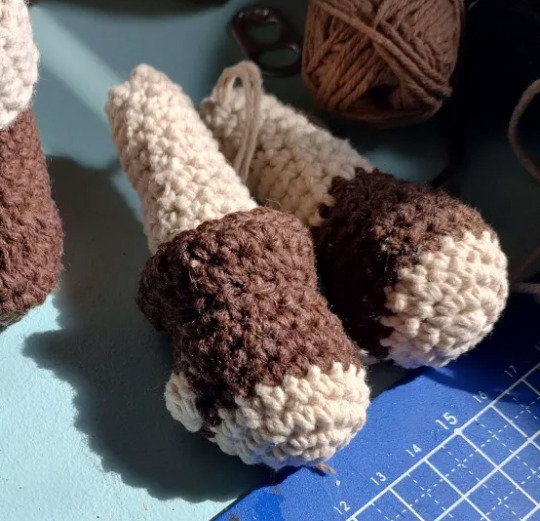
boots (light brown, dark brown, greyish creme) [video]
these are removable but they dont go on easily, so you gotta patiently massage the feet in there.
start with light brown
ch 7, start in 2nd from hook:
r1: sc 5, 3inc, sc 4, inc
r2: inc, sc 4, inc 3, sc 4, inc 2
r3: inc, sc 5, hdc inc 7, sc 5, inc 2
r4: slst fasten off. sew in holes/tails, fray ends for flat gluejob. trace onto cardboard for sole.
switch color to dark brown
r1: BLO join slst, BLO sc in all
r2-3: sc in all
glue in sole
r4: sc 8, dec 5, sc 12
r5: sc 7, dec 4, sc 10
r6: sc7, dec2, sc 10
r7-10: sc in all
switch color to greyish creme
r11-12: sc in all
r13: slst, FLO sc in all
r14-16: sc all
slst fasten off
flip the greyish creme flap over.
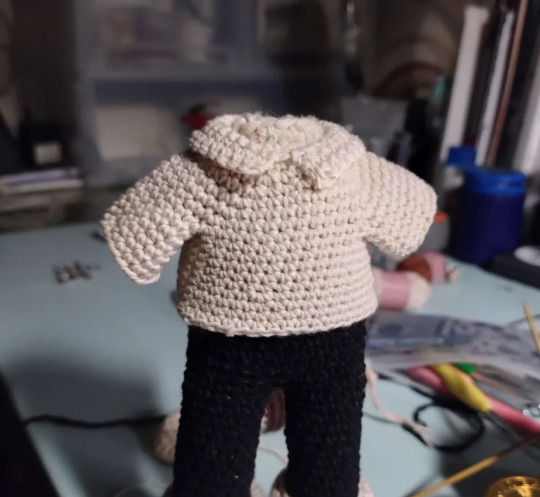
blouse (thinner creme)
this is a standard raglan pattern, if you need the whole thing bigger/smaller you need to have more/less chains at the beginning. this change also carries over to the collar. the increases are evenly spaced for me, and unless your doll has a very broad chest this shouldnt have to change.
if the arms need more space you need to either add more rows to the r3-7 part and/or add more chains in r8 (this part should fit pretty sugg around the body)
i was experimenting a bit w using BLO to minimize the gap where the sleeve and body seperate (r8). it worked p good but you can ignore it if you dont understand it and just sc in all.
(edit: if this confuses you, understandable. I answered an ask abt it here but feel free to ask if its still unclear)
r1: ch24, slst join.
r2: (sc 5, inc) x4
r3-7: inc in first of previous inc. last row should have 10 sc between increases.
r8: sc5, blo sc 1, ch 5, blo sc join in 1st of next inc, sc 11, blo sc1, ch5, blo sc join in 1st st of next inc, sc 5
r9: sc6, blo sc 1, sc 5, blo sc1, sc11, blo sc 1, sc 5, blo sc 1, sc 6
r10-13: sc in all (36)
r14: (sc8, inc)x4
r15: sc in all (40)
slst finish off
Sleeve
r1: join mid armpit, slst ,sc2, sc in the leftover bits from the BLO stitches, sc 11, sc in leftover BLO bits, sc2
r2-6: sc in all
collar
join left-middle front, sc 7, inc, sc8, inc, sc 7. turn
r2: sc7, inc, sc 10, inc, sc 7. turn
r3: sc8, inc, sc 10, inc, sc 8. turn
cuffs
r1: join mid body-facing side, FLO sc 20
r2-4: sc 20, slst fatsen off
Tunic (red brown) [tunesian entrelac crochet]
if you want to make this bigger i recommend keeping the same square layout, but making the squares bigger. its a bit of measuring and math to figure it out.
the tunic is made in tunesian crochet and i dont really know what written patterns for that look like so i hope this makes sense.
for a single square:
r1: ch4, start in 2nd back bump from hook. pull up a loop from ever back bump. you should have 4 loops on your hook total. simplestitch in all
r2-4: simplestitch in all.
r5: slst in all. fasten off
for the slanted parts i did the decrease by pulling through the middle 2 loops in one go on the back pass
this is how the full thing should look, its worked from bottom left to top right.
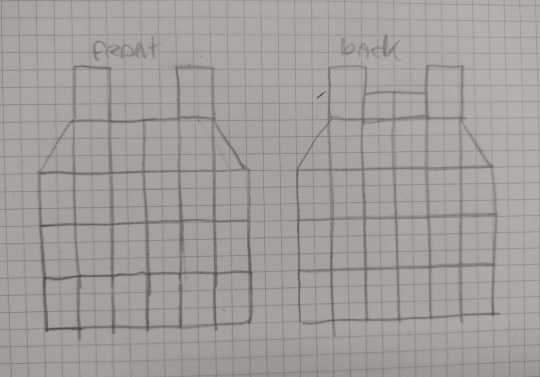
sew together the shoulders together, then sew in all of the ends
:) good luck
tunesian crochet has a tendancy to curl, so if you used cotton i def recommend blocking it
i defined the grid a little bit with a dark brown pencil.
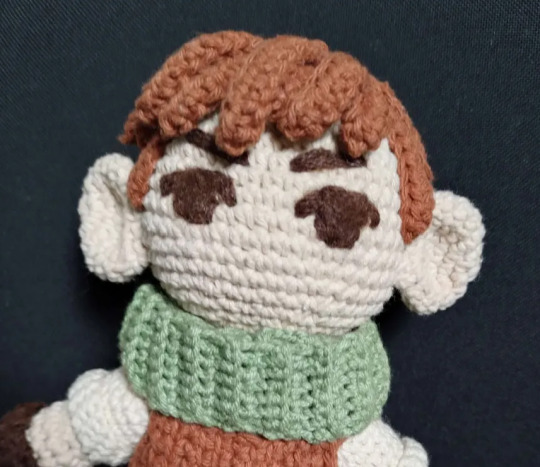
cowl (green)
BLO sc 7, repeat till desired lenght, then BLO slst join the last row to the first.
scalp undercut bit (dark brown)
r1: sc 6 in mr
r2: (inc) x6
r3: (sc 1, inc) x6
r4: (sc 2, inc) x6
r5: (sc3, inc) x6
r6: (sc 4, inc)x6
r7: sc36
sew on back of the head (recommend doing this before the ears and face, see end for more detailed assembly instructions)
hair (reddish brown) [hair video]
disclaimer, this is kind of a mess. the lenghts didnt line up the way i intended so i improvised by adding loose strands and spent a lot of time pinning every strand in place before glueing them down.
i used bison kit contact glue since its sturdy, transparant, flexible and waterproof. you can use hot glue as well, i just personally dont like it because its bulky.
r1: sc 21 in mc. join BLO slst
r2: ch 12, sc in 2nd from hook, gdc10, BLO slst join
r3: ch 12, sc in 2nd from hook, gdc10, BLO slst join
r4: ch13, sc in 2nd from hook, hdc 11, BLO slst join
r5: ch13, sc in 2nd from hook, hdc 11, BLO slst join
r6: ch 14, sc in 2nd from hook, hdc 12, BLO slst join
r7: ch16, sc in 2nd form hook, hdc 14, BLO slst join
r8: ch 18, sc in 2nd from hook, hdc 16, BLO slst join
r9: ch 18, sc in 2nd from hook, hdc 16, BLO slst join
r10: ch 14, sc in 2nd from hook, hdc 12, BLO slst join
r11: ch 12, sc in 2nd from hook, hdc 10, BLO slst join
r12: ch 10, sc in 2nd from hook, hdc 8, BLO slst join
from now on, join in the FLO's of previous round
r13: ch10, sc in 2nd from hook, hdc 8, FLO slst join
r14: ch10, sc in 2nd from hook, hdc 8 , FLO slst join
r15: ch12, sc in 2nd from hook, hdc 10 , FLO slst join
r16: ch12, sc in 2nd from hook, hdc 10 , FLO slst join
r17: ch14, sc in 2nd from hook, hdc 12 , FLO slst join
r18: ch16, sc in 2nd form hook, hdc 14, FLO slst join
r19: ch 18, sc in 2nd from hook, hdc 16, FLO slst join
r20: ch16, sc in 2nd form hook, hdc 14, FLO slst join
r21: ch14, sc in 2nd from hook, hdc 12 , FLO slst join
1x ch 6, sc in 2nd from hook, hdc 4
2x ch8, sc in 2nd from hook, hdc 6
2x ch 10, sc in 2nd from chain, hdc 8, slst in same, fasten off.
2x ch 12, sc in 2nd from chain, hdc 10, slst in same, fasten off.
3x ch14
pin all in place until it looks good, tie +glue loose strands first. then glue back pieces, crown, and lastly bangs/ top back layer. some of the lose strands go behind the ears, one is the left sideburn, and the rest is to cover up the crown. these pics are the best i can do as a guide, this was my first time doing this so i was struggling lol.
i didnt fully glue down the bangs and the top back layer bc i thought it would be fun if u could ruffle his hair, but my friend who i gave the plush to has significantly abused him (its been 2 days) and his hair is a mess so im gonna have to glue it down again lol. might as well do it all the first time if u plan on throwing him down the stairs or something.
Face
for eyes + eyebrows, embroider outline with dark brown, then needle felt [video] the inner parts w unraveled dark brown fluff. the dark brown i used was probably acrylic. cotton doesnt really work well for this.
Belt and pouch (dark brown)
the belt is a 3 strand basic friendship bracelet! [video]
sew together the ends and hide it with by sewing the pouch on top.
i didnt write down the pattern for the pouch, but from the top of my head its the same start as the squares for the tunic
r1-9: simple stitch in all
r10: simple stitch 1, decrease by putting your hook through 2 vertical bars when pulling up a loop, simple stitch edge 1.
r11: slst in all, finish with a long tail
use tail to sew together the sides, and sew the pouch onto the belt. use some yellow thread to make a button.
ASSEMBLY.
put on the blouse, put the arms in their place and finish the button joints.
put on the tunic, lace the sides with dark brown yarn, finish with a knot and hide the tails underneath the chest part of the tunic.
slide on the belt and boots.
sew the scalp undercut bit to the head
sew the ears to the head
tie + glue the loose hair strands behind the ears
glue the back of the hair
glue the back of the hair
glue the middle circle part of the hair
glue the top back layer and bangs
sew the head to the body
put on the cowl
i hope this is somewhat clear, feel free to dm me is you have questions.
enjoy your squeakychuck :D
313 notes
·
View notes
Text


returned to the pacific ocean for the first time in twelve years! promptly collected too many cool shells and bones, which gave me an excuse to improvise a bull kelp mermaid's purse out of a variation on slipstitch. the purse is now loaded up with rocks to keep it stretched as it dries out.


469 notes
·
View notes
Text
furby faceplate
I don't really know how to do this

2 eye pieces
MR 8
inc x 8 (with HDC)
[hdc, inc] until you have 21 stitches, tie off

top
ch 4
SC x 3, ch 2
SC x 4, ch 2
SC x 5, ch 1
DC x 3, slipstitch, DC x 3, slipstitch, DC x 3, tie off
middle piece
ch 4
hdc x 3, tie off

beak piece
MR 8
inc x 8 (with HDC)
[hdc, inc] until you have 20 stitches
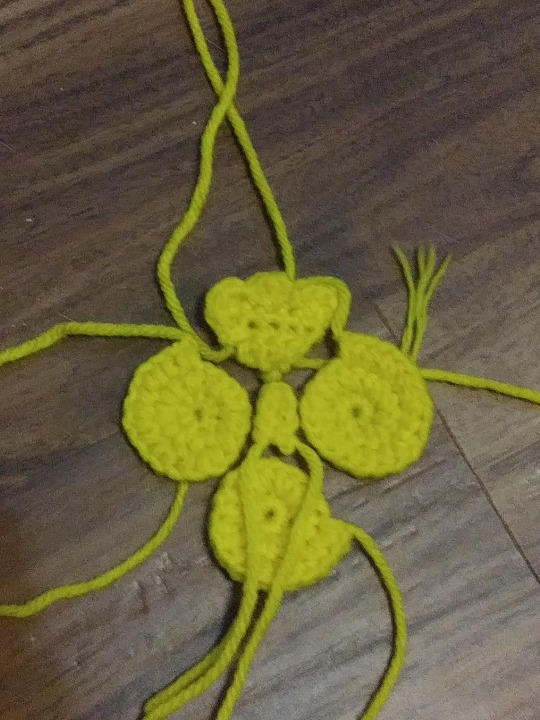
sew them bitches
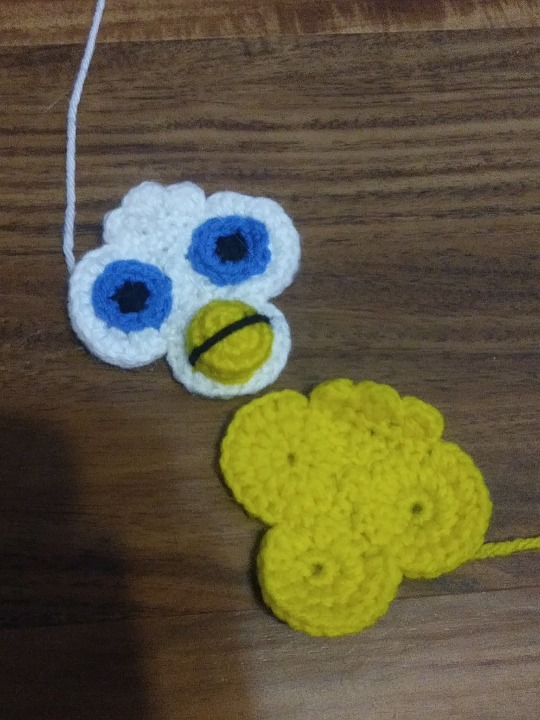
the eyes are
MR 6, inc x 6
and I don't remember the beak but it was very simple
112 notes
·
View notes
Text

Slipstitch working a pole in pentagram city
0 notes
Text
Been deep in the stash for project inspo. found SO MANY balls of fingering and sock yarn (I don't really knit socks except for occassional gifts, these are >80% bestowed upon me in some fashion). Gonna get into some lightweight sweaters I think? a la shifty/seaglass vibes...but probably just a flax light with either a 1x1 fair isle / slipstitch pattern or my beloved linen stitch, since both the seaglass AND the shifty notes are full of people who either couldn't get gauge or had real difficulty sizing (both patterns claim to be updated since the troubles...but flax is tried and true).
In the meantime, a fingering weight yarn hat! This is one of a pair of balls from a BAHYarns club from years ago (maybe a decade?). They were dyeing national parks, and I think this one is the Grand Canyon, although it could also be Zion. I never really thought the colorway would be good socks, so it sat in a drawer until now.
Because I have another identical ball I have no plans for, here's detailed notes for just in case future me.
Crochet cast-on 160 on 2.75mm needle, twisted rib 8 rounds, purl one round, swap needles to 3.25mm, purl another round, then knit 36 46 rounds, begin decreases: *k14, k2tog*, k two rounds, *k13, k2tog*, k two rounds...continue decreases in this manner until 100st remain, then decrease every other round until 10st remain, weave yarn tail through last round of stitches twice, pull tight and weave through the inside.


8 notes
·
View notes
Text

Shadow the hedgehog pattern
downloadable version here
feel free to post pictures of your creations using this pattern (I'll reblog it if you tag me)
if you notice anything wrong with the pattern please let me know!
Intermediate pattern
Tools:
Size 4.5mm crochet hook
Yarn needle
Scissors
Row counter/ stitch marker (optional)
Materials:
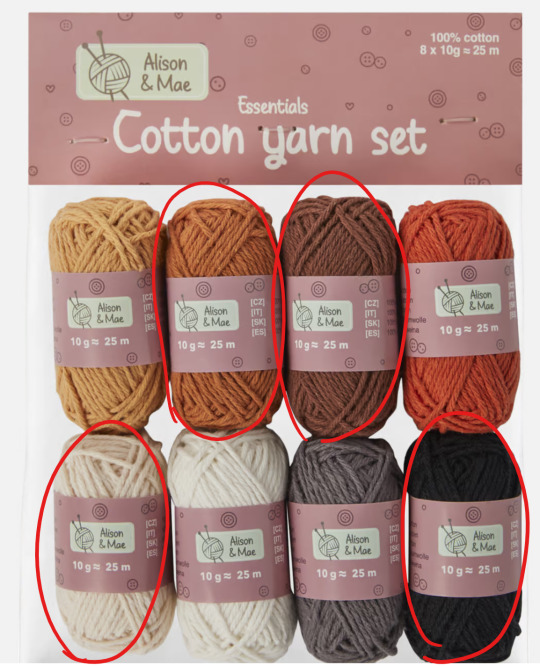
2 skeins Black yarn (I used barely more than 1 skein)
1 skein white yarn*
1 skein yellow yarn*
1 skein red yarn*
1 skein light brown yarn*
1 skein brown yarn*
Doll stuffing
* I didn’t use more than half a skein
Need to know before starting:
(US terminology)
Magic ring
Chain (does not count as stitch)
“SC” = Single crochet
Slipstitch (does not count as stitch)
“INC” = Single increase (counts as 2 stitches)
“DEC” = Single decrease (counts as 1 stitch)
Body:
start with the black yarn
magic ring
round 1: 1 chain, 6 SC into magic ring, slipstitch into the first stitch, turn (6 stitches)
round 2: 1 chain, 6 INC, slipstitch into the first stitch, turn (12 stitches)
round 3: 1 chain, [1 SC, 1 INC] x 6, slipstitch into the first stitch, turn (18 stitches)
round 4: 1 chain, [2 SC, 1 INC] x 6, slipstitch into the first stitch, turn (24 stitches)
round 5: 1 chain, [3 SC, 1 INC] x 6, slipstitch into the first stitch, turn (30 stitches)
round 6: 1 chain, [4 SC, 1 INC] x 6, slipstitch into the first stitch, turn (36 stitches)
round 7: 1 chain, [5 SC, 1 INC] x 6, slipstitch into the first stitch, turn (42 stitches)
round 8: 1 chain, [6 SC, 1 INC] x 6, slipstitch into the first stitch, turn (48 stitches)
rounds 9 - 16: 1 chain, 48 SC, slipstitch into the first stitch, turn (48 stitches)
round 17: 1 chain, [6 SC, 1 DEC] x 6, slipstitch into the first stitch, turn (42 stitches)
round 18: 1 chain, [5 SC, 1 DEC] x 6, slipstitch into the first stitch, turn (36 stitches)
round 19: 1 chain, [4 SC, 1 DEC] x 6, slipstitch into the first stitch, turn (30 stitches)
rounds 20 – 25: 1 chain, 30 SC, slipstitch into first stitch, turn (30 stitches)
stuff the body with doll stuffing
round 26: 1 chain, [3 SC, 1 DEC] x 6, slipstitch into the first stitch, turn (24 stitches)
round 27: 1 chain, [2 SC, 1 DEC] x 6, slipstitch into the first stitch, turn (18 stitches)
round 28: 1 chain, [1 SC, 1 DEC] x 6, slipstitch into the first stitch, turn (12 stitches)
round 29: 1 chain, 6 DEC, slipstitch into the first stitch, tie off (leave a tail) (6 stitches)
sew body closed
Chest Fur:
start with the white yarn
2 chain
row 1: 1 INC in second chain from hook, turn (2 stitches)
row 2: 1 chain, 2 INC, turn (4 stitches)
row 3: 1 chain, 1 INC, 2 SC, 1 INC, turn (6 stitches)
row 4: 1 chain, 1 INC, 4 SC, 1 INC, turn (8 stitches)
row 5: 1 chain, 1 INC, 6 SC, 1 INC, turn (10 stitches)
row 6: 3 slipstitch, 4 chain, 7 SC starting in second chain from hook, turn (7 stitches)
row 7: 4 chain, 6 SC starting in second chain from hook, 1 slipstitch, turn (6 stitches)
row 8: 3 chain, 4 SC starting in second chain from hook, 1 slipstitch, turn (4 stitches)
row 9: 3 chain, 3 SC starting in second chain from hook, 1 slipstitch, turn (3 stitches)
row 10: 2 chain, 1 SC starting in second chain from hook, 1 slipstitch, tie off (leave a tail) (1 stitch)
sew the fur onto the front of the body
Back Spike Panels:
(3 per spike) (2 spikes)
start with the black yarn
6 chain
row 1: 5 SC starting in second chain from hook, turn (5 stitches)
row 2: 1 chain, 1 DEC, 3 SC, turn (4 stitches)
row 3: 1 chain, 4 SC, turn (4 stitches)
row 4: 1 chain, 2 SC, 1 DEC, turn (3 stitches)
row 5: 1 chain, 3 SC, turn (3 stitches)
row 6: 1 chain, 1 DEC, 1 SC, turn (2 stitches)
row 7: 1 chain, 2 SC, turn (2 stitches)
row 8: 1 chain, 1 DEC, turn (1 stitches)
row 9: 1 chain, 1 SC, turn, 1 slipstitch into previous stitch, tie off (1 stitches)
sew 3 pieces together into a spike shape, stuff with doll stuffing and sew on to the back of the body
Legs and Arms:
(1 for each limb) (4 limbs)
start with the black yarn
magic ring
round 1: 6 SC into magic ring, slipstitch into the first stitch, turn (6 stitches)
round 2: 1 chain, 6 INC, slipstitch into the first stitch, turn (12 stitches)
round 3 – 10: 1 chain, 12 SC, slipstitch into the first stitch, turn (12 stitches)
from now on the black yarn will be referred to as (A) and the red yarn will be referred to as (B)
round 11: 1 chain, 4 SC, switch to (B), 1 SC, switch to (A), 7 SC, slipstitch into the first stitch, turn (12 stitches)
round 12: 1 chain, 6 SC, switch to (B), 2 SC, switch to (A), 4 SC, slipstitch into the first stitch, turn (12 stitches)
round 13: 1 chain, 3 SC, switch to (B), 3 SC, switch to (A), 6 SC, slipstitch into the first stitch, turn (12 stitches)
round 14: 1 chain, 5 SC, switch to (B), 4 SC, switch to (A), 3 SC, slipstitch into the first stitch, turn (12 stitch)
round 15: 1 chain, 2 SC, switch to (B), 5 SC, switch to (A), 5 SC, slipstitch into the first stitch, turn (12 stitch)
round 16: 1 chain, 5 SC, switch to (B), 5 SC, switch to (A), 2 SC, slipstitch into the first stitch, turn (12 stitches)
round 17: 1 chain, 2 SC, switch to (B), 5 SC, switch to (A), 5 SC, slipstitch into the first stitch, turn (12 stitch)
round 18: 1 chain, 5 SC, switch to (B), 5 SC, switch to (A), 2 SC, slipstitch into the first stitch, tie off (12 stitches)
set aside
Wrist/Ankle Guards:
(1 per limb) (4 limbs)
piece 1:
start with the black yarn
12 chain, slipstitch into the first chain
Round 1: 1 chain, 3 SC, 1 INC, 4 SC, 1 INC, 3 SC, slipstitch into the first stitch, turn (14 stitches)
Round 2: 1 chain, 3 SC, 1 INC, 5 SC, 1 INC, 4 SC, slipstitch into the first stitch, turn (16 stitches)
Round 3 – 5: 1 chain, 16 SC, slipstitch into the first stitch, Turn (16 stitches)
Tie off and set aside
Piece 2:
Start with red yarn
7 chain
Row 1: 6 SC starting in second chain from hook, turn (6 stitches)
Row 2 – 6: 1 chain, 6 SC, turn (6 stitches)
Row 7: Take piece 1 and layer piece 2 so that the 6th row of piece 2 and the chain of piece 1 line up, 6 SC through both pieces, 6 SC around the rest of piece 1, slipstitch into the first stitch, turn (12 stitches)
Row 8: layer the wrist guard on the limb set aside previously, 12 SC through both the wrist guard and the limb, slipstitch into the first stitch, tie off (12 stitches)
Hands:
(2 hands)
Start with the white yarn
Magic ring
Round 1: 6 SC into magic ring, slipstitch into the first stitch, turn (6 stitches)
Round 2: 1 chain, 6 INC, slipstitch into the first stitch, turn (12 stitches)
Round 3: 1 chain, [1 SC, 1 INC] x 6, slipstitch into the first stitch, turn (18 stitches)
Round 4: 1 chain, [2 SC, 1 INC] x 6, slipstitch into the first stitch, turn (24 stitches)
Round 5 – 8: 1 chain, 24 SC, slipstitch into the first stitch, turn (24 stitches)
Round 9: 1 chain, [2 SC, 1 DEC] x 6, slipstitch into the first stitch, turn (18 stitches)
Round 10: 1 chain, [1 SC, 1 DEC] x 6, slipstitch into the first stitch, tie off (leave a tail) (12 stitches)
Stuff both the arm and the hand. Sew the hand on the arm. Set aside
Shoes:
(two shoes)
Piece 1:
Start with the black yarn
Magic ring
Round 1: 6 SC into magic ring, slipstitch into the first stitch, turn (6 stitches)
Round 2: 1 chain, 6 INC, slipstitch into the first stitch, turn (12 stitches)
Round 3: 1 chain, [1 SC, 1 INC] x 6, slipstitch into the first stitch, turn (18 stitches)
Round 4: 1 chain, [2 SC, 1 INC] x 6, slipstitch into the first stitch, turn (24 stitches)
Round 5 – 8: 1 chain, 24 SC, slipstitch into the first stitch, turn (24 stitches)
Switch to the white yarn
Round 9 – 16: 1 chain, 24 SC, slipstitch into the first stitch, turn (24 stitches)
Stuff with doll stuffing
Round 17: 1 chain, [2 SC, 1 DEC] x 6, slipstitch into the first stitch, turn (18 stitches)
Round 18: 1 chain, [1 SC, 1 DEC] x 6, slipstitch into the first stitch, turn (12 stitches)
Round 19: 1 chain, 6 DEC, slipstitch into the first stitch, tie off (leave a tail) (6 stitches)
Sew piece 1 of the shoe closed and set aside
Piece 2:
Start with the red yarn
9 chain
Row 1: 8 SC starting in second chain from hook, turn (8 stitches)
Row 2 – 4: 1 chain, 8 SC, turn (8 stitches)
Row 5: 1 chain, 1 INC, 6 SC, 1 INC, turn (10 stitches)
Row 6: 1 chain, 1 INC, 8 SC, 1 INC, turn (12 stitches)
Row 7 - 17: 1 chain, 12 SC, turn (12 stitches)
Row 18: 1 chain, 1 DEC, 8 SC, 1 DEC, turn (10 stitches)
Row 19: 1 chain, 1 DEC, 6 SC, 1 DEC, turn (8 stitches)
Row 20: 1 chain, 1 DEC, 4 SC, 1 DEC, turn (6 stitches)
Row 21 – 24: 1 chain, 6 SC, turn (6 stitches)
Tie off (leave a tail), sew piece 2 onto the bottom of piece 1 (the top of piece 2 is the toe and the bottom is the heel), Stuff the leg and sew onto the top of the shoe, set aside
Inhibitor Rings:
(4 rings)
start with the yellow yarn
8 chain slipstitch into the first chain
Row 1 – 18: 1 chain, 8 SC, slipstitch into the first stitch, turn (8 stitches)
Tie off (leave a tail), stuff with doll stuffing, sew closed. Slip on to wrists and ankles over the limbs, sew legs and arms on to body
Head Base:
Start with the black yarn
Magic ring
Round 1: 6 SC into magic ring, slipstitch into the first stitch, turn (6 stitches)
Round 2: 1 chain, 6 INC, slipstitch into the first stitch, slipstitch into the first stitch, turn (12 stitches)
Round 3: 1 chain, [1 SC, 1 INC] x 6, slipstitch into the first stitch, turn (18 stitches)
Round 4: 1 chain, [2 SC, 1 INC] x 6, slipstitch into the first stitch, turn (24 stitches)
Round 5: 1 chain, [3 SC, 1 INC] x 6, slipstitch into the first stitch, turn (30 stitches)
Round 6: 1 chain, [4 SC, 1 INC] x 6, slipstitch into the first stitch, turn (36 stitches)
Round 7: 1 chain, [5 SC, 1 INC] x 6, slipstitch into the first stitch, turn (42 stitches)
Round 8: 1 chain, [6 SC, 1 INC] x 6, slipstitch into the first stitch, turn (48 stitches)
Round 9: 1 chain, [7 SC, 1 INC] x 6, slipstitch into the first stitch, turn (54 stitches)
Round 10 – 18: 1 chain, 54 SC, slipstitch into the first stitch, turn (54 stitches)
Stuff with doll stuffing
Round 19: 1 chain, [ 7 SC, 1 DEC] x 6, slipstitch into the first stitch, turn (48 stitches)
Round 20: 1 chain, [ 6 SC, 1 DEC] x 6, slipstitch into the first stitch, turn (42 stitches)
Round 21: 1 chain, [ 5 SC, 1 DEC] x 6, slipstitch into the first stitch, turn (36 stitches)
Round 22: 1 chain, [ 4 SC, 1 DEC] x 6, slipstitch into the first stitch, turn (30 stitches)
Round 23: 1 chain, [ 3 SC, 1 DEC] x 6, slipstitch into the first stitch, turn (24 stitches)
Round 24: 1 chain, [ 2 SC, 1 DEC] x 6, slipstitch into the first stitch, turn (18 stitches)
Round 25: 1 chain, [ 1 SC, 1 DEC] x 6, slipstitch into the first stitch, turn (12 stitches)
Round 26: 1 chain, 6 DEC, slipstitch into the first stitch, tie off (6 stitches)
Sew closed, set aside
Spikes:
Spike sides:
(2 per spike) (6 spikes)
Start with the black yarn
9 chain
Row 1: 8 SC starting in second chain from hook, turn (8 stitches)
Row 2: 1 chain, 6 SC, 1 DEC, turn (7 stitches)
Row 3: 1 chain, 7 SC, turn (7 stitches)
Row 4: 1 chain, 1 DEC, 5 SC, turn (6 stitches)
Row 5: 1 chain, 6 SC, turn (6 stitches)
Row 6: 1 chain, 4 SC, 1 DEC, turn (5 stitches)
Row 7: 1 chain, 5 SC, turn (5 stitches)
Row 8: 1 chain, 1 DEC, 3 SC, turn (4 stitches)
Row 9: 1 chain, 4 SC, turn (4 stitches)
Row 10: 1 chain, 1 INC, 1 SC, 1 DEC, turn (4 stitches)
Row 11: 1 chain, 1 DEC, 1 SC, 1 INC, turn (4 stitches)
Row 12: 1 chain, 1 INC, 1 SC, 1 DEC, turn (4 stitches)
Row 13: 1 chain, 1 DEC, 1 SC, 1 INC, turn (4 stitches)
Row 14: 1 chain, 2 SC, 1 DEC, turn (3 stitches)
Row 15: 1 chain, 1 DEC, 1 SC, turn (2 stitches)
Row 16: 1 chain, 1 DEC, turn (1 stitch)
Row 17: 1 chain, 1 SC, turn, 1 slipstitch into the previous stitch, tie off (leave tail) (1 stitch)
Spike top:
(1 per spike) (6 spikes)
Start with the black yarn
The black yarn will be referred to as (A), the red yarn will be referred to as (B)
9 chain
Row 1: 2 SC starting in the second chain from hook, switch to (B), 4 SC, switch to (A), 2 SC, turn (8 stitches)
Row 2: 1 chain, 2 SC, switch to (B), 1 SC, 1 DEC, 1 SC, switch to (A), 2 SC, turn (7 stitches)
Row 3: 1 chain, 2 SC, switch to (B), 3 SC, switch to (A), 2 SC, turn (7 stitches)
Row 4: 1 chain, 1 DEC, switch to (B), 3 SC, switch to (A), 2 SC, turn (6 stitches)
Row 5: 1 chain, 2 SC, switch to (B), 3 SC, switch to (A), 1 SC, turn (6 stitches)
Row 6: 1 chain, 1 SC, switch to (B), 3 SC, switch to (A), 1 DEC, turn (5 stitches)
Row 7: 1 chain, 1 SC, switch to (B), 3 SC, switch to (A), 1 SC, turn (5 stitches)
Row 8: 1 chain, 1 SC, switch to (B), 1 DEC, 1 SC, switch to (A), 1 SC, turn (4 stitches)
Row 9 - 11: 1 chain, 1 SC, switch to (B), 2 SC, switch to (A), 1 SC, turn (4 stitches)
Row 12: 1 chain, 1 SC, switch to (B), 1 DEC, switch to (A), 1 SC, turn (3 stitches)
Row 13: 1 chain, 1 SC, switch to (B), 1 SC, switch to (A), 1 SC, turn (3 stitches)
Row 14: 1 chain, 1 DEC, 1 SC, turn (2 stitches)
Row 15: 1 chain, 2 SC, turn (2 stitches)
Row 16: 1 chain, 1 DEC, turn (1 stitch)
Row 17: 1 chain, 1 SC, turn, slipstitch into previous stitch, tie off (leave tail) (1 stitch)
Sew the spikes together, 4 spikes point upward, the side pieces should point toward the top piece. 2 spikes point downward, the side pieces should point away from the top piece. Stuff with doll stuffing and sew on the back of the head base (two upward spikes on each side and the downward spikes in the middle)
Forehead Stripe:
Start with the red yarn
5 chain
Row 1: 4 SC starting in the second chain from hook, turn (4 stitches)
Row 2: 1 chain, 2 SC, 1 DEC, turn (3 stitches)
Row 3: 1 chain, 3 SC, turn (3 stitches)
Row 4: 1 chain, 1 DEC, 1 SC, turn (2 stitches)
Row 5: 1 chain, 2 SC, turn (2 stitches)
Row 6: 1 chain, 1 DEC, turn (1 stitch)
Row 7: 1 chain, 1 SC, turn, 1 slipstitch into previous stitch, tie off (1 stitch)
Line up to continue the red stripe on the middle spike on the head and sew on.
Ears:
(2 ears)
Outer ear:
Start with black yarn
11 chain
Row 1: 10 SC starting second chain from hook, turn (10 stitches)
Row 2: 1 chain, 8 SC, 1 DEC, turn (9 stitches)
Row 3: 1 chain, 7 SC, 1 DEC, turn (8 stitches)
Row 4: 1 chain, 6 SC, 1 DEC, turn (7 stitches)
Row 5: 1 chain, 5 SC, 1 DEC, turn (6 stitches)
Row 6: 1 chain, 4 SC, 1 DEC, turn (5 stitches)
Row 7: 1 chain, 3 SC, 1 DEC, turn (4 stitches)
Row 8: fold the piece in half so that the first and last stitches of the last row are lined up, 1 chain, 2 SC through both layers, tie off (2 stitches),Flip inside out and set aside
Inner ear:
Start with light brown yarn
6 chain
Row 1: 5 SC starting in the second chain from hook, turn (5 stitches)
Row 2: 1 chain, 3 SC, 1 DEC, turn (4 stitches)
Row 3: 1 chain, 2 SC, 1 DEC, turn (3 stitches)
Row 4: 1 chain, 1 SC, 1 DEC, turn (2 stitches)
Row 5: 1 chain, 1 DEC, tie off (leave tail) (1 stitch)
Sew the inner ear into the outer ear, stuff with doll stuffing, sew on either side of the top of the head
Face:
Start with the light brown yarn
26 chain (do not slipstitch into the first)
Round 1: 12 SC starting in the second chain from hook, 6 chain, 17 SC starting in the second chain from hook, 3 SC in the last chain, rotate the piece, 23 SC, 1 INC, slipstitch into the first stitch, turn (56 stitches)
Round 2: 1 chain, 1 INC, 25 SC, 1 INC, 17 SC, 1 INC, 17 SC, slipstitch into the first stitch, turn (65 stitches)
Round 3: 1 chain, 11 SC, 1 DEC, 4 SC, 1 INC, 4 SC, 1 DEC, 12 SC, 1 INC, 27 SC, 1 INC, slipstitch into the first stitch, turn (66 stitches)
Round 4: 1 chain, 1 INC, 28 SC, 1 INC, 12 SC, 1 DEC, 9 SC, 1 DEC, 11 SC, slipstitch into the first stitch, turn (66 stitches)
Round 5: 1 chain, 10 SC, 1 DEC, 9 SC, 1 DEC, 12 SC, 1 INC, 29 SC, 1 INC, slipstitch into the first stitch, turn (66 stitches)
Round 6: 1 chain, 45 SC, 1 DEC, 7 SC, 1 DEC, 10 SC, slipstitch into the first stitch, tie off (64 stitches)
Sew the face onto the front of the head, as you are sewing it on stuff with doll stuffing, use brown yarn to make the mouth
Nose:
Start with the black yarn
5 chain, slipstitch into the first chain
Round 1 – 4: 1 chain, 5 SC, slipstitch into the first stitch, turn (5 stitches)
Tie off, sew 1 side closed, stuff with doll stuffing, sew on face
Eyes:
(2 eyes)
Start with the white yarn
11 chain
Row 1: 10 SC starting in the first chain from hook, turn (10 stitches)
Row 2: 1 chain, 1 DEC, 8 SC, turn (9 stitches)
Row 3: 1 chain, 7 SC, 1 DEC, turn (8 stitches)
Row 4: 1 chain, 1 DEC, 6 SC, turn (7 stitches)
Row 5: 1 chain, 5 SC, 1 DEC, turn (6 stitches)
Row 6: 1 chain, 1 DEC, 4 SC, turn (5 stitches)
Row 7: 1 chain, 3 SC, 1 DEC, tie off (leave a tail) (4 stitches)
Sew on head above the face, use red yarn to make pupils and eye liner
#shadow the hedgehog#crochet pattern#crochet stuffed animal#sonic the hedgehog#woo finally#this is off my chest now#snacks crochet#will probly link this to a pinned post at some point
5 notes
·
View notes
Text
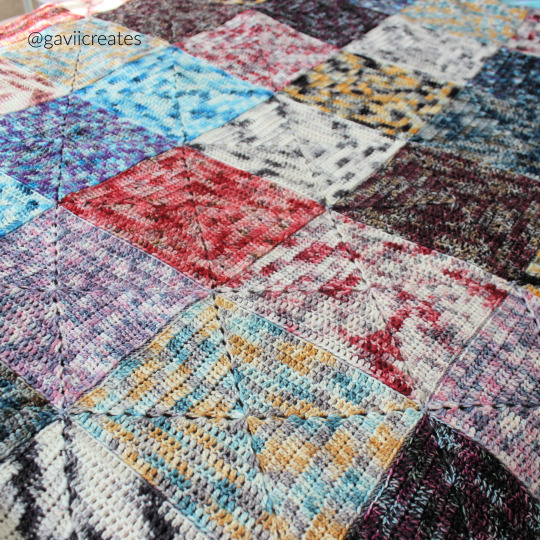
Blanket of the Seventh Dawn - Final FO
After two months, I've finished my FFXIV inspired blanket, and I can't wait to show it to you! For the individual posts: What is this project? Or, for the tl;dr - one colorway per Scion = Big Blanket. #blanket of the seventh dawn. Just be aware the posts may contain spoilers up to FFXIV Endwalker.
I was inspired after making a red cat hat, reminiscent loosely of G'raha Tia, to make a bigger project. Then when I started perusing yarns for my next project, wistfully browsing the yarns from my favorite hand-dyers, I kept seeing colorways that reminded me of other characters. At that point, the idea was hypothetical, but then I started taking notes for what characters I wanted to include, colorway ideas, screenshots to see how they looked together, a few plan layouts for 3 and 4 squares per hank... and it got a whole less hypothetical.
This was in January, so new year, new project, new yarn budget - I took the dive in.
I wanted to really let the colors tell the story. Especially with crochet, sometimes the simpler stitches are better for letting the color variations shine, so I chose a basic stitch but a new-to-me granny design. The solid granny replaces the typical spacings with DC all the way across and then building in the corners.
It wasn't always pretty. On the very first hank my swift broke after I accidentally hadn't secured it it tight enough, and for awhile I started trying to wind by hand.
My second swift was an immediate purchase after THIS happened with two of the hanks.

As I finished squares for each hank (I could get three per color), I blocked them, wove in ends, and put them to the side until all colors were complete. Then, when I finished all the squares, I put them all into a bag, mixed them up, then decided the final design by choosing them at random, displaying them in a 6 square by 7 square rectangle. I exchanged about six squares to make sure no like squares were touching and to better alleviate a block of red all in one place. This gave the blanket the layer of chaos you'll see soon.
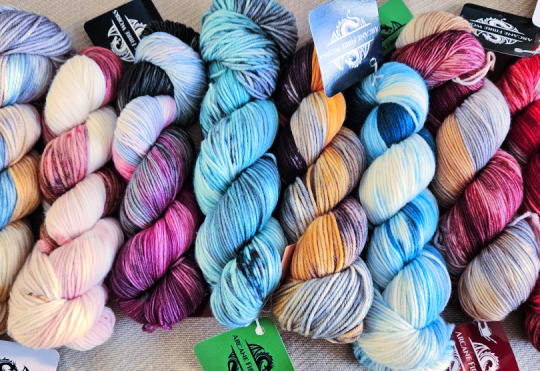
Because of the weight of the blanket, I made a few decisions for connecting squares that felt, to me, like they would be more secure. For the back side, I chose to sc up the row in place of a mattress stich or any other sewing options or even slip stitch. I used Malabrigo, Arroyo for this part and the border. Although it's also dk, it is a little thinner than the dk in Arcane Fibre Works. When I got to a corner, I chose to connect inside the hole made, and not in the stitches. This resulted in the crossing you see here on both sides of the work. I also slipstitched in both sets of adjacent squares on the first pass through before continuing with the connecting single crochets.

March 24 (this is getting posted a little late because I was behind on sharing squares), I finished up the 5th row of hdc in blo for the border, wove in the rest of the ends, and FINALLY she was all finished. You can see some final pictures and the full reveal below!

instagram
Thanks for coming along with me on this journey.
This blanket will be treated like the treasure she is.
#gavii makes stuff#finished object#crochet#crochet blanket#blanket of the seventh dawn#ffxiv blanket#crocheting#Instagram
11 notes
·
View notes
Text
Crotator-Tot Pattern
Pattern under the read more.
This Pattern does NOT have to be done in Half Double Crochet, that's just my personal preference because i don't like Single Crochet lawl. (I'm just poor artist so its also a cost saving management.
This is the first pattern i've ever written, so there will be mistakes because of that and because i've only been crocheting for 2 years ;))K
This Pattern Takes...about 4-5 Hours to complete.
This pattern may NOT be used for profit, there MUST be a donation to your local animal shelter.
For this Particular Tator Tot I used a 3.125mm hook and Impeccable yarn by loops and threads in color "Pumpkin" and Caron 1 Pound in "Off White"
Guide:
Hdc: Half Double Crochet
Hdc-dec: Half Double Crochet Decrease
Hdc-inc: Half Double Crochet Increase
sl st: Slipstitch
CC: Change Color ((the pattern isn't exact with this, take with grain of salt, change color when you feel like it makes sense <3))
Ear 2x:
Chain 7
Sc 5hdc sc
Leave tail to attach to head
Head:
R1: Hdc 6 magic circle
R2: *Hdc-inc*
R3: *1 Hdc hdc-inc*
R4: *2 Hdc hdc-inc*
R5: *3 Hdc hdc-Inc*
R6: Hdc ((2 Hdc change color, 2 Hdc change color)
R7: Hdc CC 6 Hdc CC hdc
R8: *3 Hdc Hdc-dec*
R9: *2 Hdc Hdc-dec*
((Place eyes and nose on and start attaching ears and the bed head floof then stuff the head))
R10-end: Hdc-dec
Leave long tail to attach
Body:
R1: 6 Hdc magic circle
R2: Hdc-inc
R3: 1 Hdc Hdc-inc
R4: 2 Hdc Hdc-inc
R5: 3 hdc hdc-Inc
R6: CC Hdc 6 CC *4hdc hdcdec*
R7: CC Hdc 8 CC *hdc*
R8: CC Hdc 10 CC *5 Hdc Hdc-dec*
R9: CC Hdc Hdcdec 3 Hdc Hdcdec CC 3 Hdc
R10: *Hdc*
R11: CC 10 Hdc CC 3 Hdc 2 Hdcdc Hdc 2 Hdcdec finish row
((Stuff body now))
R12: Hdcdec CC 4Hdc Hdcdec 3Hdc CC Hdc Hdcdec
R13-end: Hdcdec until closed
Arms x2:
R1: 6 Hdc in MC sl st into first Hdc
R2: *Hdc*
R3: 4 Hdc-Dec 4 Hdc
R4-7: Hdc
R8: sl st shut
Should be ~2 inches long
Leave long tail to sew on
Leg x2
R1: 10 HDC in MC
R2: *Sc *
R3: 2 SC-dec SC
Sc around until desired length ~5-6 rounds
Tail
6 hdc in mc
Hdc
Dec 1 each row until close
Bonkers: (using embroidery thread OR halving worsted weight (4 strand into 2 strands) ((Requires some finesse ))
R1: 20 Hdc MC
R2-4: hdc (repetitive testing on arms/legs to make sure they fit, increasing and decreasing as needed)
Constructing the Crotator-Tot
Attach each part of the body to its respective spot (I find it easier to put the tail on straight after the legs are on)
to add the fluff, wrap yarn around your fingers and cut, then tie around stitches. to make fluffy ((Carefully!)) Comb out the yarn


22 notes
·
View notes
Text
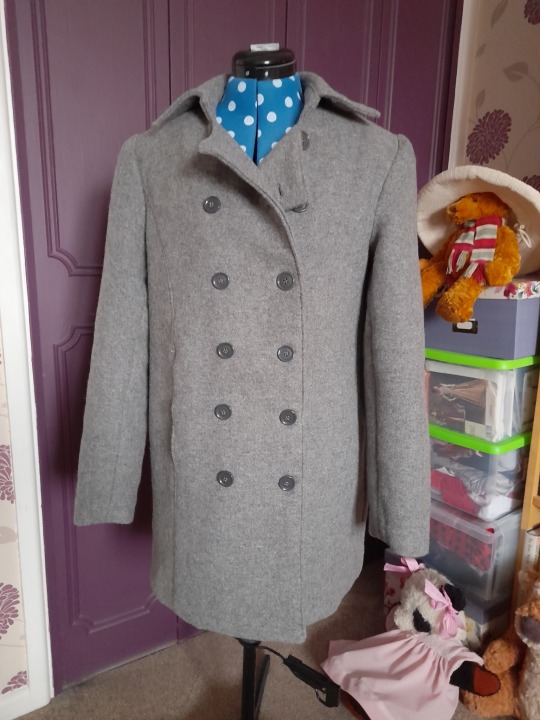
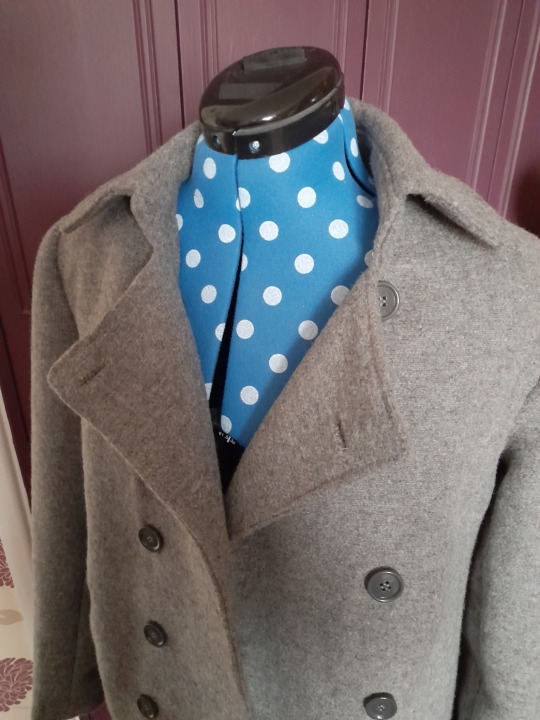
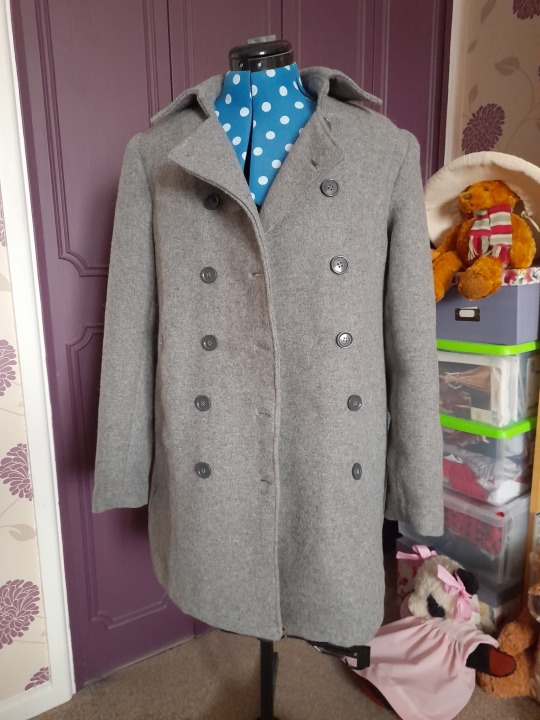
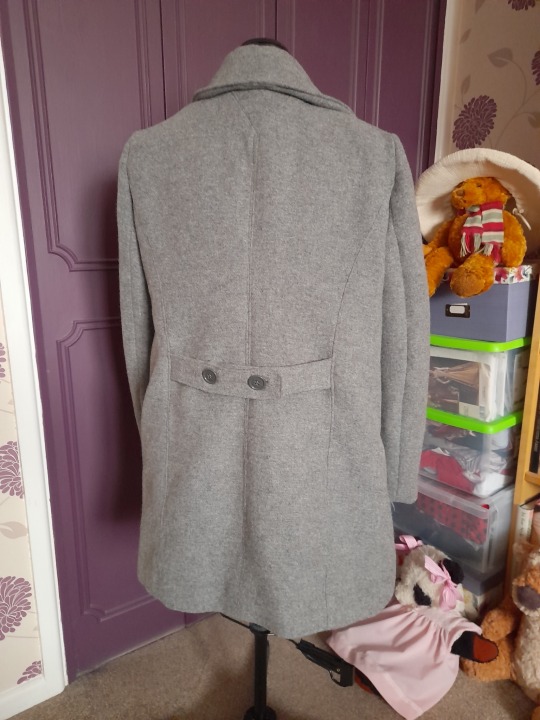
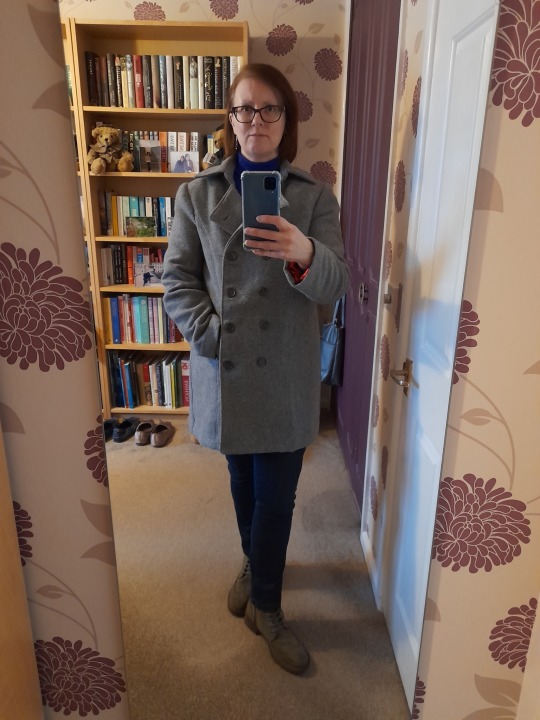
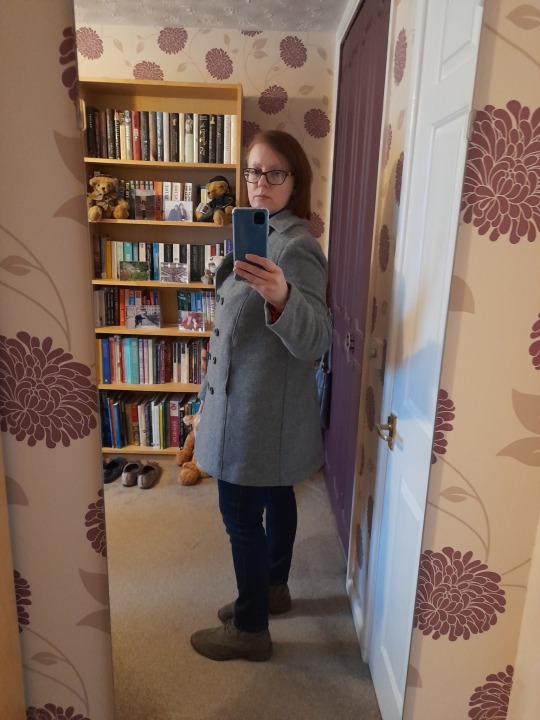
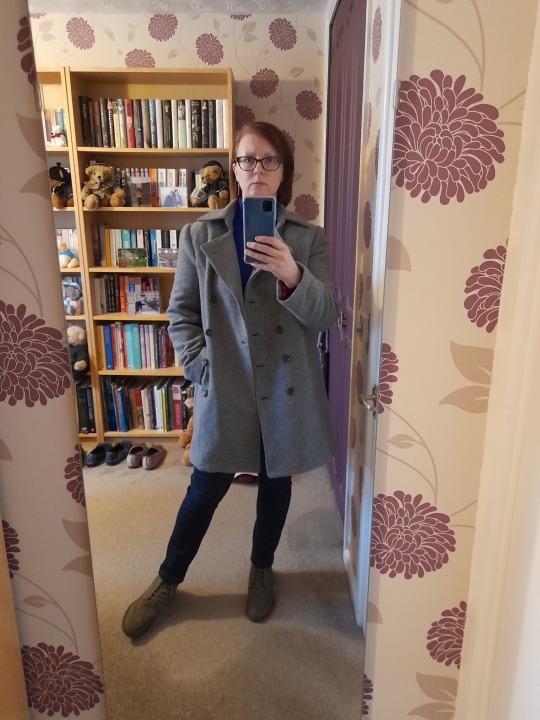
After pretty much a whole weekend’s work, the coat is finished! 😎
It took me most of Saturday to get all the machine sewing done (adjustments to the lining, attaching the lining to the shell, attaching the collar and last bit of topstitching) and I’d forgotten how distracting it is to work in a room full of other people. Usually I’m up in our spare bedroom and unless I’m using a pattern I’m really familiar with I prefer not to listen to music as if I’m singing along (as I do) I’m more likely to make mistakes. Working at the dining table I was having to really concentrate on what I was doing, which wasn’t easy as my mother was watching darts and the guy calling the score sounded like he was about to have an aneurysm!
Last time I used fusible canvas interfacing but as I wanted to get everything from one place and save on postage I decided to go for traditional sew-in stuff on this occasion. That was fine, though time-consuming (and saved my bacon when I belatedly realised I’d cut and sewn it to the facing instead of the front), but if I use it again I’ll only interface one piece of the collar and stand rather than both; it’s quite thick and the collar has ended up a bit bouncier than it would have been with one less layer. The thickness bent two needles when I was topstitching the stand; in the end I had to resort to finishing it off with the heaviest I had left, which happened to be a jeans needle. It did the job!
Yesterday I did all the hand finishing: slipstitching the lining to the cuffs and hem, cutting and securing the bound buttonholes and sewing on the 16 (!) buttons. As I added seven inches to the length and changed the half lining to a full one I had to draft the latter from the pattern pieces I had and thought there would be plenty of volume, but when I came to pin it before stitching the hem I had a horrible moment when it looked as though it wasn’t going to fit. Thankfully it did (just!); if it hadn’t my only option would have been to add a triangle of fabric at the hem, something that would solve the problem but not look as neat, which would have been a shame after all that work.
Annoyingly, the buttons on the belt aren’t central but that’s the fault of the pattern markings. I could have made another belt, as I did with the pea jacket when I noticed the same problem, but I had so much trouble trying to turn two layers of wool, two of interfacing and two bound buttonholes the right way out that I just couldn’t be bothered. I can live with it; I can’t see it anyway. After several failed attempts at trying to get the markings for the buttons in the right place I ended up putting the coat on the ironing board and sewing them on standing up. I moved the closure across a couple of inches from the markings on the pattern as I wanted it to be more fitted; this gives me the option should I put on weight again of just moving the buttons to give myself more room!
Overall I’m very pleased with the way it turned out. I wear my pea jacket a lot and I like the style so it made sense to extend it into a coat. The only other adjustment I made to the pattern was to increase the depth of the pockets, as what’s the use of pockets you can’t properly put your hands in?
Here’s how it looks on (with a flash of my ladybird lining!):

#sfs’s adventures in sewing#vogue pea jacket hack#sewing#dressmaking#the camera has shown up a ripple in the fabric above the right hand pocket that i can’t see when i look at it#argh
43 notes
·
View notes
Note
Hello again. You've been so helpful to me in the past. I have another question if that's okay...
Do you have a recommendation for hand sewing needles? I bought a variety pack of Singer needles and only some of them seem to work well for me while sewing a polycotton skirt. They're so difficult to get through the fabric it feels like I'm bending them against my thimble.
It depends a lot on what kind of stitch you're doing and how thick your material and/or thread is, so it's nice to have a variety of needles. Some fabrics are just more of a pain to get needles through, if they're really tightly woven, but maybe a thinner one would help? But that would also bend more easily, so I don't know.
John James Needles is a good source, and you can get little packs of 25 in tons of different sizes. (Or individual needles, or much larger bulk amounts.)
I can't recommend specific sizes for your specific needs, so probably best to get several different ones, and maybe measure the ones you have and decide what the most comfortable length for various tasks is.
A small difference in length makes a big difference in the sewing.
Like, for my braided rug I've been using a 3.6 cm needle for slipstitching the edges of the tubes together, but that feels much too long and unwieldy for whipstitching the braids together, so for that I use a 3 cm one. Which is perfect for the whipstitching but would feel too short and stumpy for the slipstitching.
54 notes
·
View notes
Last Seen Blogs

conestfire
여자 조교일상

goneandgoneaway-blog
big dumbdumb

sameena-rani
Rani jaan

sonuali2012
SONU ALI
stardusts-kawaii-cafe-blog
Stardust's Kawaii Cafè