#so make dev/sda1 the grub
Explore tagged Tumblr posts
Visit Tumblr Blog
Explore Tumblr blogs with no restrictions, modern design and the best experience.
Last Seen Tumblr Blogs


Fun Fact
Tumblr has been providing a Korean-language service since 2013.
Text
this is so surreal~~
No reblog this time cause I thought that it was too long at this point
are you telling me I've been installing linux on this computer wrong this entire time??
WE BACK ON LINUX BABY~~!!
all I had to do on install was just......
make grub boot from dev/sda1 instead of dev/sda
dev/sdb was the hard drive all of my data was stored on and if I didn't touch that, nothing would happen.
the cool thing here is that mounting the device here is password protected to actually mount and view the data. as opposed to windows having it mounted at all times.
this was simpler than I thought it was and now I feel really stupid...
Linux mint debian edition 6 lets go~~~~~~!!
I'm so excited~~!! come to find out that I've been installing the grub boot loader in the wrong place this entire time.....
*happy screaming*
now idk if I'm smarter than I think or dumber than I think. cause it could be both....
I didn't need to tinker with the bios at all~~ tho I am curious as to what it looks like now. maybe the windows boot loader isn't there anymore and is just the linux one?
#personal#thoughts#thinking#hype#im so excited#it was easier than I thought#and it turns out I was installing grub in the wrong place this whole time#not a reason to feel stupid tho cause I learned something#linux#linux mint#linux mint debian#linux mint debian edition#boot#boot issue#boot issues#boot issue solved#so make dev/sda1 the grub#instead of dev/sda
10 notes
·
View notes
Text
How To Install Arch Linux on Your Computer (Part 1)
. Hello, Today I will show you how to install Arch Linux on Your computer. Arch Linux is well known as one of the most difficult Linux distro for it’s installation steps (not difficult as Gentoo but still) especially for anyone who used linux for the first time. Arch Linux uses CLI for it’s installation, which is why it’s difficult to install. I will install Arch Linux on MBR using dos partition table. Now enough chit-chat, let’s get started.
Downloading The ISO Files
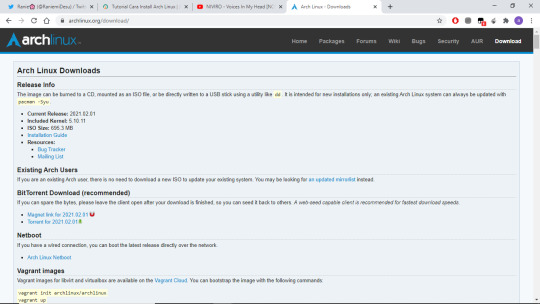
1. Download the installation ISO
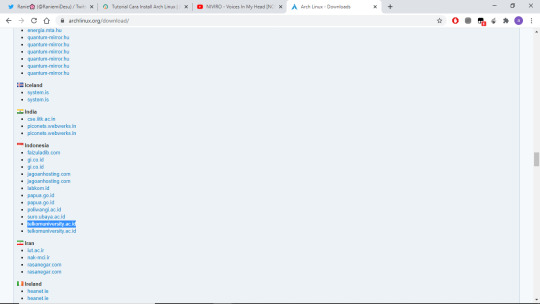
Open your web browser and go to https://archlinux.org/download/ to download the ISO
There are some mirror options for downloading the ISO. In this case, i’m using telkomuniversity.ac.id mirror to download it.
2. Make a bootable USB or use livecd to boot the installer into your computer. You can use rufus, etcher to make a bootable USB, or burn the ISO Files into your CD.
Booting and Preparation
3. Restart your computer

4. Change the boot order on your computer. Usually the button to change the boot devices is F12,F1,F2,F10 or DEL. in this case I’m using VirtualBox And the boot device is in F12
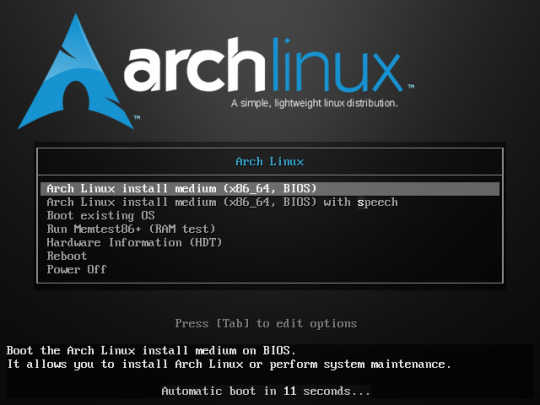
5. Select Arch Linux install mediun / the first choice
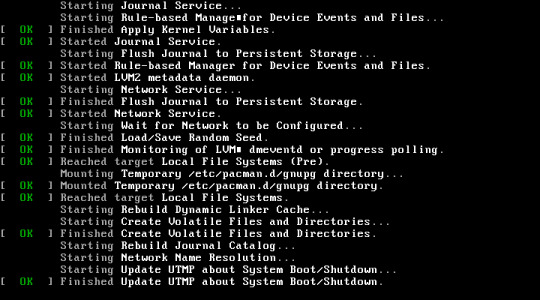
Wait the installer to booting the installation media
Now you’re on Arch Linux installer. And you’re ready to install Arch Linux on your computer.

6. First of all, Make sure your computer is connected to the internet. You can check it by using this command below
“ip addr show” >> Showing your IP Address
“ping 8.8.8.8″ >> pinging internet host, in this case I use google public DNS 8.8.8.8
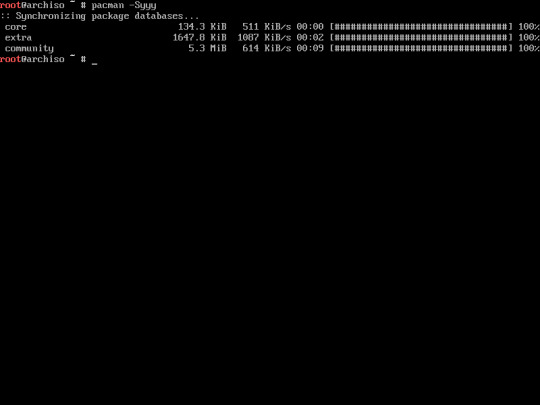
7. Make sure your pacman repository is updated. you can update it using this command
“pacman -Syyy”

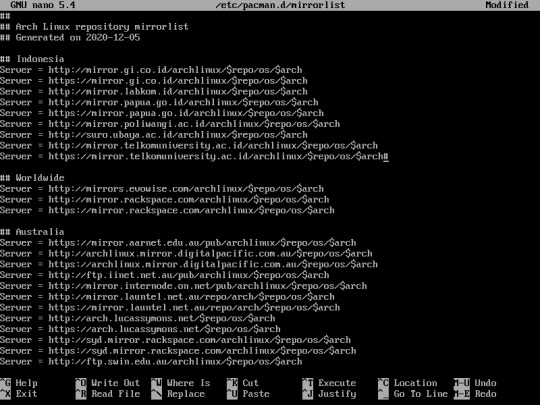
8. (Optional) You can set the mirror server by editing pacman mirrorlist
you can edit the mirrorlist using this command : “nano /etc/pacman.d/mirrorlist”. in this case I put indonesian server at the top of the list.
Partitioning The Disk

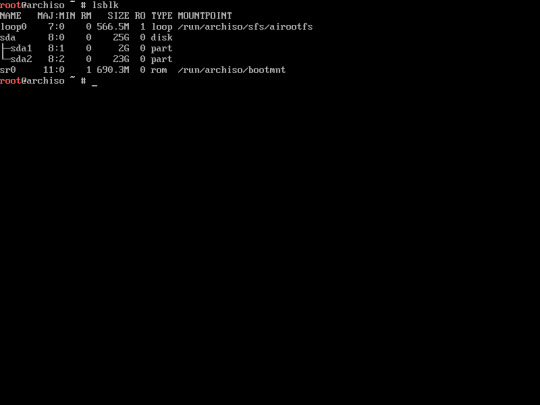
9. Before partitioning the disk you have to know your hard drive structure. To check the Hard Drive structure type “lsblk”. You can use “fdisk -l” though
Find the name of the largest Hard Drive, in this case it’s sda

10. Now, you have to partitioning the disk.
In this case i will allocate my 25GB of hardisk into 2 separate partitions
1st Partition for SWAP with size of 2GB
2nd Partition for my OS
Type the following command :
“cfdisk”
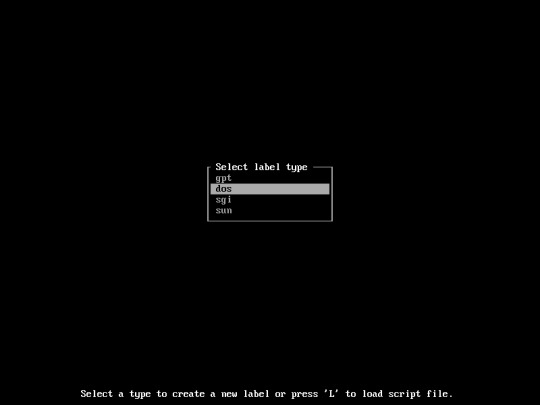
select “dos”
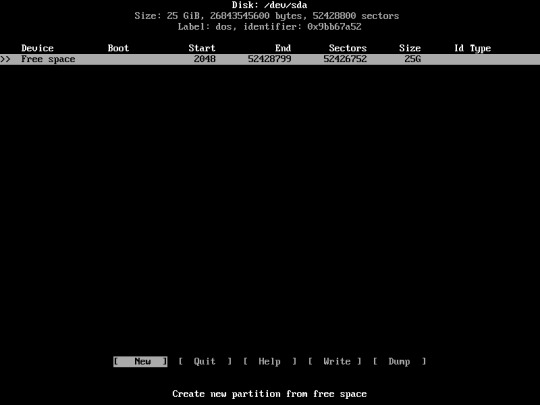
Now you’re going to create a new Partition, Select “New”
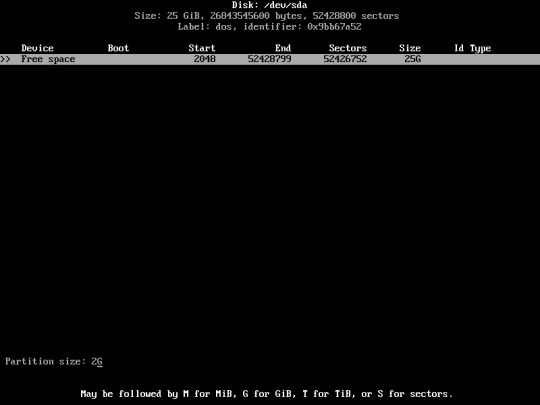
Now, enter your desired swap partition size. In this case i used 2GB for my SWAP partition.
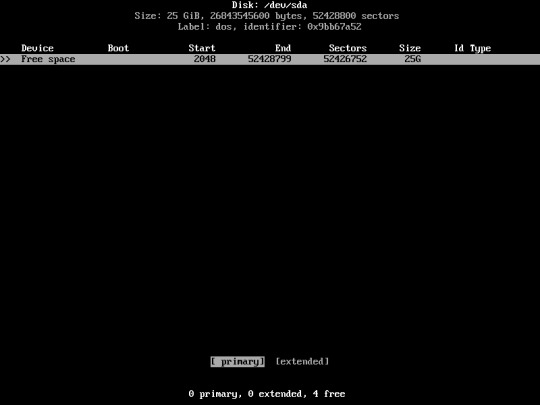
Select “primary”

Change the partition type to SWAP.. Select “Type”
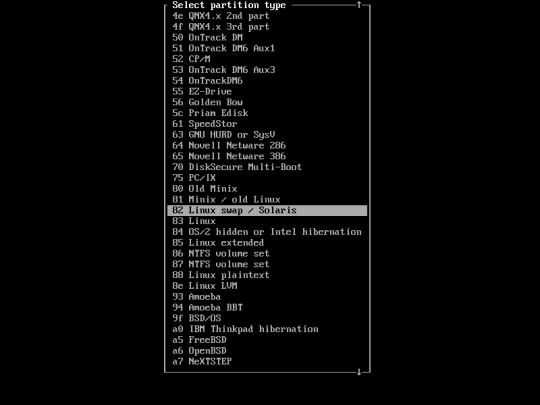
Select “Linux swap/Solaris”

Create Another Partition for your OS. In this case I'll be using my entire Partition for Arch Linux.
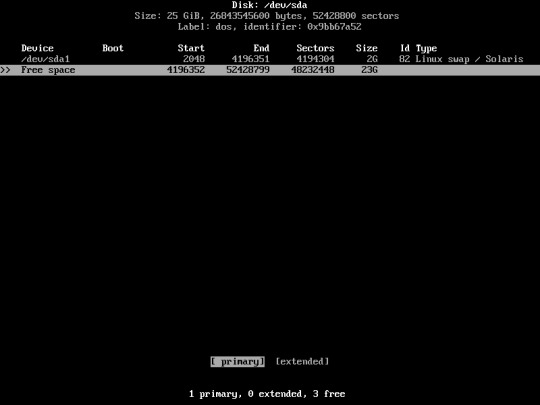
Choose “Primary”
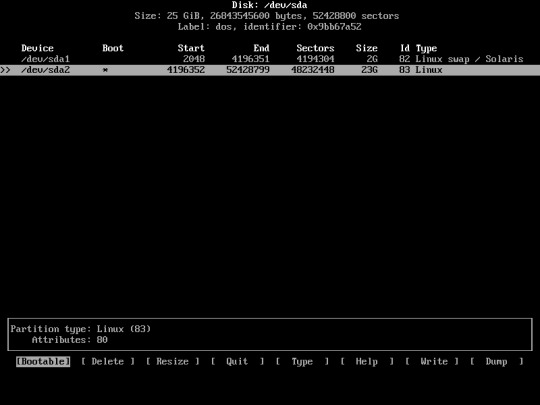
Choose “Bootable”
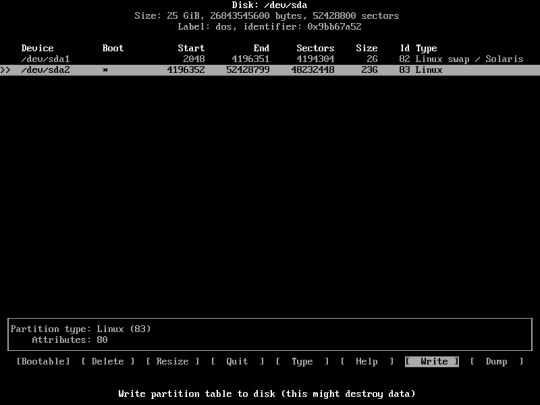
Now Write the partition into the disk
choose “Write”
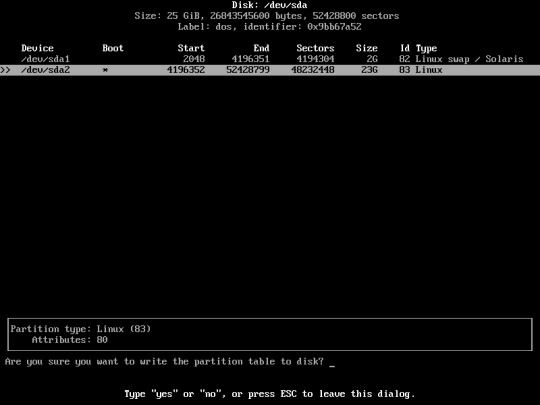
type “yes”
After Finished writing the partition choose “quit”
11. Now, you have created your disk partition. type “lsblk” to check your disk partition again.
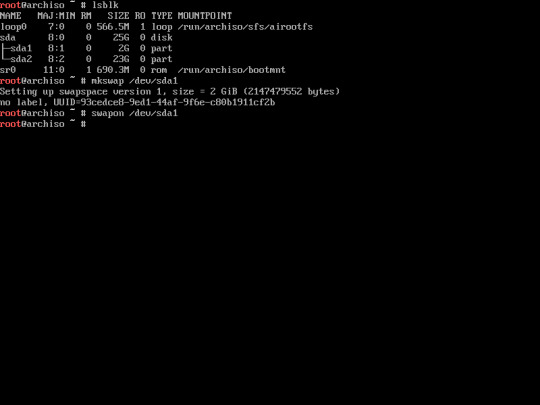
12. Format The swap partition using this command :
“mkswap /dev/sda1″
Then enable it using this command :
“swapon /dev/sda1”

13. Now, format the main partition into ext4 format.
“mkfs.ext4 /dev/sda2″
if you have created another partition other than this, you’ll need to format them as well.
Installing the Base Package
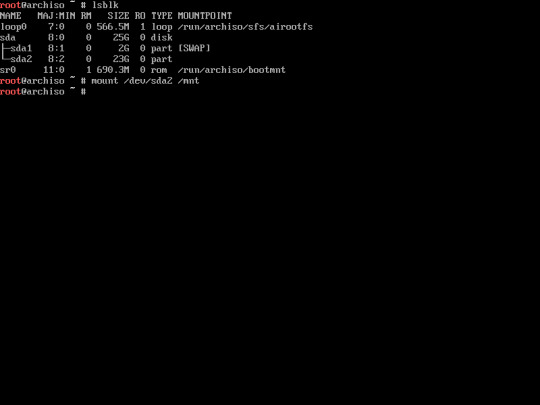
14. mount the main partition / system partition into /mnt directory.
“mount /dev/sda2 /mnt”

15. Install the base package using this command :
“pacstrap /mnt base base-devel”
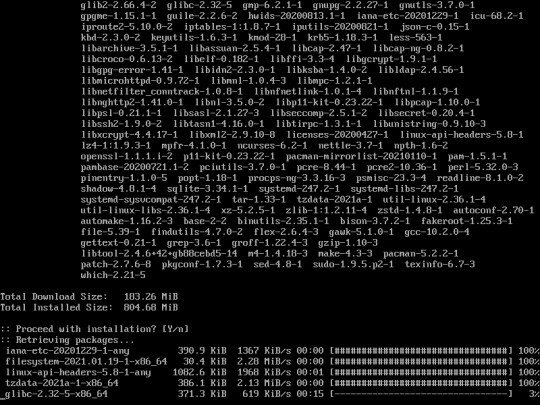
The installation would be take around 20-30 minutes depending on your internet connection.
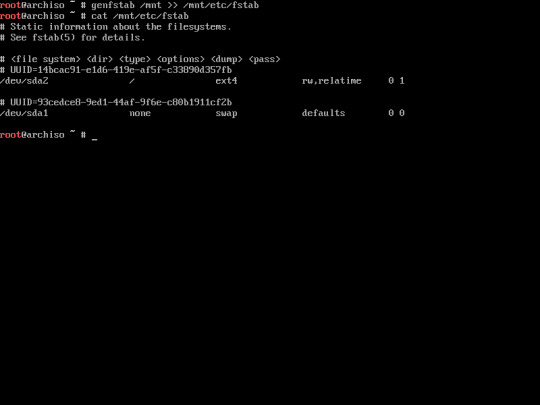
16. Generate fstab by typing this command :
“genfstab /mnt >> mnt/etc/fstab”
Verify the fstab using this command :
“cat /mnt/etc/fstab”
The purpose of the fstab is to recognize the boot partition of your system. Be aware if you didn’t configure it properly, your system will be not able to boot up.
Configure the new System, and installing packages

16. Change the root into the new system with this command :
“arch-chroot /mnt”
Now, you are ready to configure the new system.
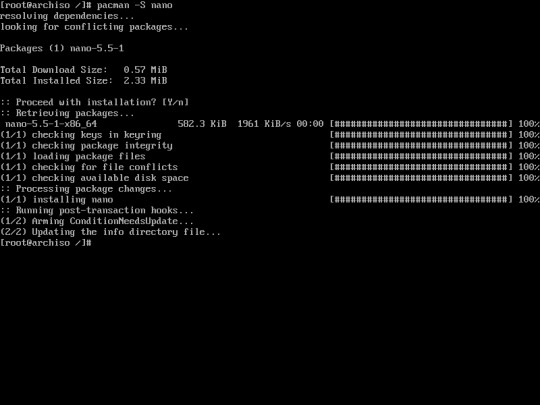
17. Install nano. You’ll need this to configure parameters that uses text editor, for example hostnames, locale, etc...

18. Set Your Timezone using this command :
in this case i’m using Asia/Jakarta as my timezone so the command is
“ln -sf /usr/share/zoneinfo/Asia/Jakarta /etc/localtime”
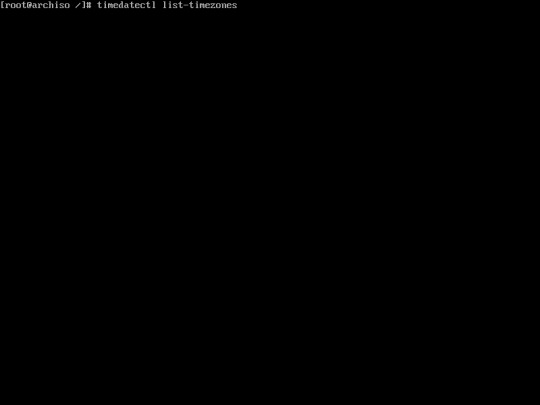
If you don’t know about what timezone to be used, you can see the timezone list using this command :
“timedatectl list-timezones”

19 Sync the hardware clock using this command
“hwclock --systohc”

20. Install Linux kernel, there are 2 types of linux kernel :
1. [linux linux-headers] for latest version kernel
2. [linux-lts linux-lts-headers] this kernel is not the latest version but it received long term support.
in this case I installed the latest version using this command :
“pacman -S linux linux-headers”

21. Edit the locale.gen file using this command :
“nano /etc/locale.gen”
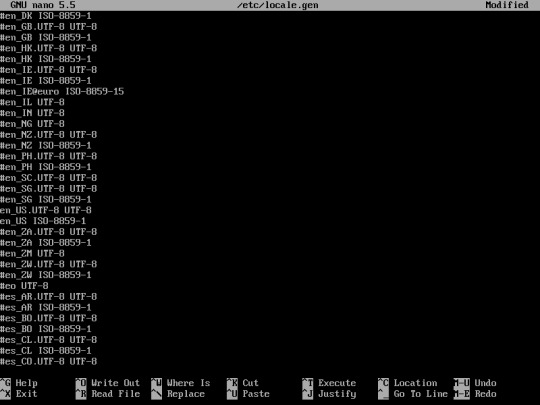
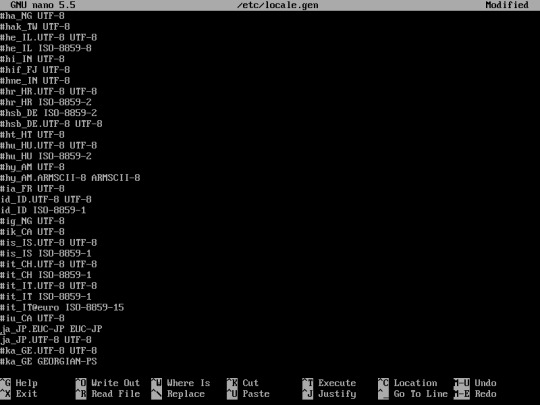

Uncomment the language that you want to use for your system. uncomment by removing “#” in front of the language.
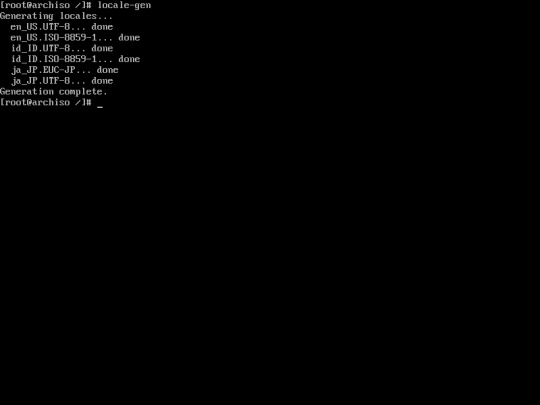
22. Generate locale of the language you have chosen using this command :
“locale-gen”

23. Set the system language by editing locale.conf files
“nano /etc/locale.conf”
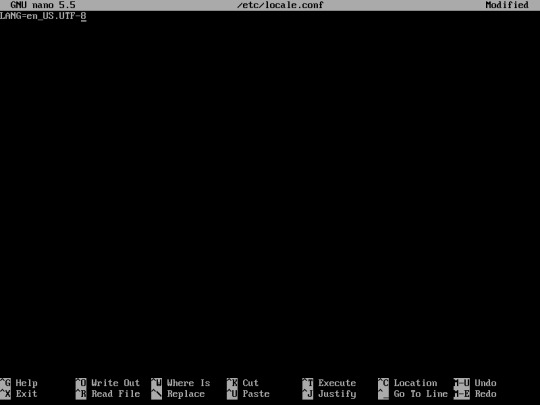
Then, type the languat that you want to be used on your system. For example English US with UTF-8 Unicode
“LANG=en_US.UTF-8″

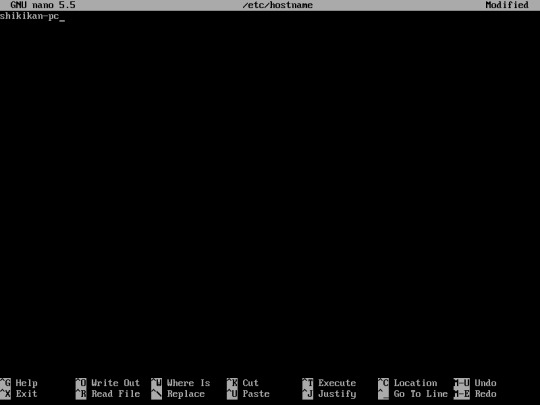
24. Set your computer name by editing /etc/hostname :
“nano /etc/hostname”
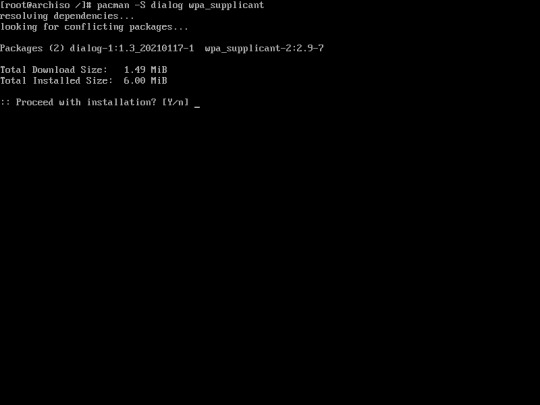
25. You may install dialog and wpa_supplicant for wifi connection. You can install it using this command :
“pacman -S dialog wpa_supplicant”
If you don’t have wifi adapter you may skip this step.
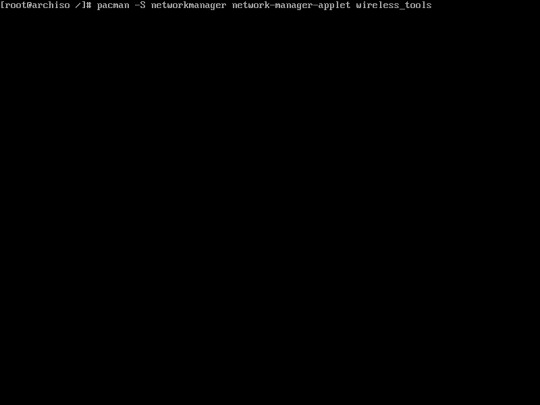
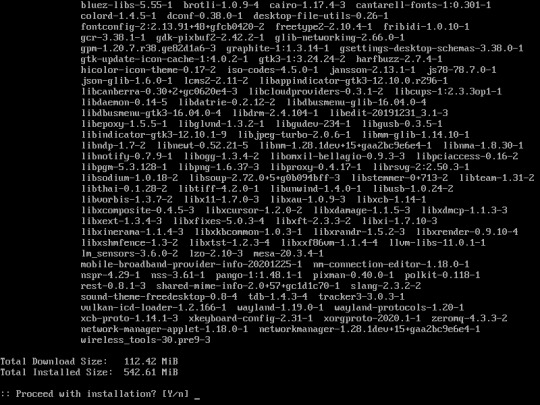
26. Install networkmanager using this command :
“pacman -S networkmanager network-manager-applet”
if you don’t have wifi, installing wireless_tools is not necessary
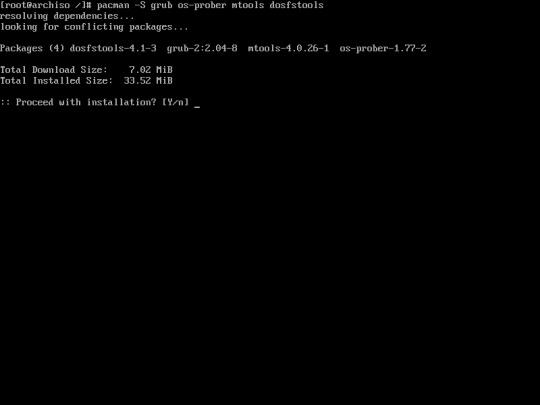
27. The operating system had been already installed in your computer. However the bootloader doesn’t exist causing the system can’t boot the operating system, due to missing bootloader. You must install Grub and os-prober using the following command :
“pacman -S grub”
to be continued, Part 2
0 notes
Text
Mirroring your OpenZFS pools of Ubuntu 20.04 onto a set of new drives
I've blogged about my HPE ProLiant MicroServer Gen10+ in the past. As boot drive, I put in a SK Hynix Gold S31 SSD in one of the 3.5" slots using an adapter. The remaining three disk slots are used for my spinning media OpenZFS pool. Two problems presented themselves, one I could predict, the other a bit unexpectedly. The former problem is that I have my home directory on the spinning media OpenZFS pool, this, by today's standards, is quite dreadfully slow, given I serve my home directory over NFS in certain situation. It's like being back at the late nineties. I'm not a huge fan of keeping this data on a single drive either, as I had planned to move my home directory over to the SSD and just keep copies of the home directory on the spinning media pool. Unless, the unexpected problem, the SSD comes to a screeching halt at times, for no apparent reason. Sometimes it performs well and sometimes it's single digit throughput (MB/s). Unusable. I opened a support case with SK Hynix who got back to me with the very unexpected response that I should install Windows. Bye-bye, SK Hynix, you are the absolute worst.
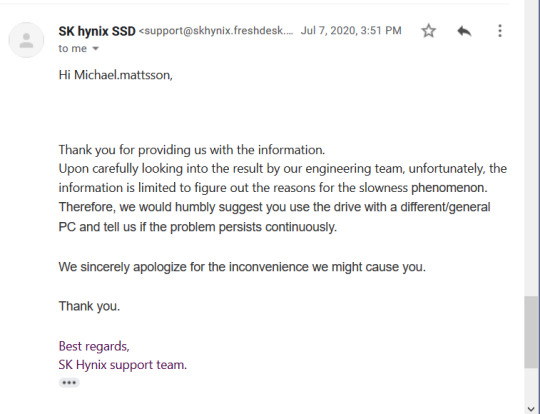
So, here I am.
Problem solving mode
Since I don't have two 2.5" slots to spare for mirrored boot and home directory, I needed to get creative. External drives? USB? eSATA? SAS? Thanks to the extremely well done research by Serve The Home, I did not have to look far. Since the Gen10+ has a spare PCIe slog, it's possible to put two NVMe drives using a PCIe to M.2 adapter card. Said and done, I picked up the StarTech PEX8M2E2 adapter along with two 1TB WD Blue SN550 M.2 2280 NVMe drives.

Presto!
Edit: As snarled at on reddit, bifurcation is not needed with the StarTech card.
Surgery options
The next decision I had to make was if I had to reinstall the system on these drives. If so, would I install on a RAID1 or try cobble the disks together with OpenZFS pre- or post-install? (Ubuntu installer does not yet support any advanced OpenZFS pool schemes, AFAIK). Friends don't let friends to OpenZFS on RAID, so I would end up doing post-install surgery and I simply took the challenge of doing in-place replacement of the SSD onto a NVMe drive and make the OpenZFS pools mirrored (there's one boot pool and one system pool with the default Ubuntu install). My Google Fu completely failed me and I could only find obscenely written guides or vague evidence on how to do this and I decided to DIY since my situation was fairly unique. Going from single SSD to two NVMe drives in one swift stroke.
I hereby present the 100% unofficial guide on how to transfer a Ubuntu 20.04 installation from a single device to two devices, mirrored.
A few pointers.
Keep backups of your data
What works on my computer might not work on yours
What will happen in subsequent updates of Ubuntu if packages touches /boot/efi is unknown at this time
The copy & paste verbiage below is from a VM I practiced on
The practice VM could successfully boot from a single drive if there was a failure
Let's get to it.
Device and partition duplication
As mentioned above, these steps were performed on a VM, not an actual Gen10+. Device names, partition schemes, size and who knows what, WILL differ on your system. Use these steps as guidance, not a copy & and paste template.
Note: All commands below are executed as root.
First, get an idea of what your partition layout looks like on your system with lsblk.
lsblk NAME MAJ:MIN RM SIZE RO TYPE MOUNTPOINT loop0 7:0 0 255.6M 1 loop /snap/gnome-3-34-1804/36 loop1 7:1 0 55.3M 1 loop /snap/core18/1885 loop2 7:2 0 49.8M 1 loop /snap/snap-store/467 loop3 7:3 0 62.1M 1 loop /snap/gtk-common-themes/1506 loop4 7:4 0 29.9M 1 loop /snap/snapd/8790 sda 8:0 0 20G 0 disk ├─sda1 8:1 0 512M 0 part /boot/efi ├─sda2 8:2 0 923M 0 part [SWAP] ├─sda3 8:3 0 998M 0 part └─sda4 8:4 0 17.6G 0 part sdb 8:16 0 20G 0 disk sdc 8:32 0 20G 0 disk sr0 11:0 1 2.6G 0 rom /media/mmattsson/Ubuntu 20.04.1 LTS amd64
The drive of interest here is sda. Dump the partition table to a file.
sfdisk -d /dev/sda > layout-sdb
Your layout-sdb file will initially look something like this.
label: gpt label-id: 0A00C51C-DF26-4237-90F2-28D80EB7542F device: /dev/sda unit: sectors first-lba: 34 last-lba: 41943006 /dev/sda1 : start= 2048, size= 1048576, type=C12A7328-F81F-11D2-BA4B-00A0C93EC93B, uuid=427FBDD1-8CEF-4E2B-9BE1-837BBB3CC087, name="EFI System Partition" /dev/sda2 : start= 1050624, size= 1890304, type=0657FD6D-A4AB-43C4-84E5-0933C84B4F4F, uuid=165B2B55-3BC1-B345-B3EC-5285EBF368BA /dev/sda3 : start= 2940928, size= 2043904, type=6A82CB45-1DD2-11B2-99A6-080020736631, uuid=E43AE096-6764-1245-A9A7-FA091DE6FAEE /dev/sda4 : start= 4984832, size= 36958175, type=6A85CF4D-1DD2-11B2-99A6-080020736631, uuid=8850142A-8094-9B47-88EA-F1ECDB45C4AE
Edit the layout and have these steps in mind: - Change the label-id, I simply decreased the last hex value by one for each disk - Change the source device name to the destination device name - Remove the UUIDs (new ones will be generated)
The results should look like this:
label: gpt label-id: 0A00C51C-DF26-4237-90F2-28D80EB7542E device: /dev/sdb unit: sectors first-lba: 34 last-lba: 41943006 /dev/sdb1 : start= 2048, size= 1048576, type=C12A7328-F81F-11D2-BA4B-00A0C93EC93B, name="EFI System Partition" /dev/sdb2 : start= 1050624, size= 1890304, type=0657FD6D-A4AB-43C4-84E5-0933C84B4F4F /dev/sdb3 : start= 2940928, size= 2043904, type=6A82CB45-1DD2-11B2-99A6-080020736631 /dev/sdb4 : start= 4984832, size= 36958175, type=6A85CF4D-1DD2-11B2-99A6-080020736631
Next, copy the edited layout to your next "disk".
cp layout-sdb layout-sdc
Change the values you just changed (decrease the label-id) to the new disk name. The result should look like this.
label: gpt label-id: 0A00C51C-DF26-4237-90F2-28D80EB7542D device: /dev/sdc unit: sectors first-lba: 34 last-lba: 41943006 /dev/sdc1 : start= 2048, size= 1048576, type=C12A7328-F81F-11D2-BA4B-00A0C93EC93B, name="EFI System Partition" /dev/sdc2 : start= 1050624, size= 1890304, type=0657FD6D-A4AB-43C4-84E5-0933C84B4F4F /dev/sdc3 : start= 2940928, size= 2043904, type=6A82CB45-1DD2-11B2-99A6-080020736631 /dev/sdc4 : start= 4984832, size= 36958175, type=6A85CF4D-1DD2-11B2-99A6-080020736631
Next, "apply" the new partition tables onto your new disks.
sfdisk /dev/sdb ../../sda3 lrwxrwxrwx 1 root root 10 Aug 16 12:36 8850142a-8094-9b47-88ea-f1ecdb45c4ae -> ../../sda4 lrwxrwxrwx 1 root root 10 Aug 16 12:36 165b2b55-3bc1-b345-b3ec-5285ebf368ba -> ../../sda2 lrwxrwxrwx 1 root root 10 Aug 16 12:36 427fbdd1-8cef-4e2b-9be1-837bbb3cc087 -> ../../sda1 lrwxrwxrwx 1 root root 10 Aug 16 12:44 e3115c86-4bc9-b14a-ab62-90efdb67a5af -> ../../sdb3 lrwxrwxrwx 1 root root 10 Aug 16 12:44 edde5235-ceac-f54b-b9cd-279b46c0a996 -> ../../sdb4 lrwxrwxrwx 1 root root 10 Aug 16 12:45 a749fd64-615e-da4b-9ba4-86023a5d7542 -> ../../sdc3 lrwxrwxrwx 1 root root 10 Aug 16 12:45 581ed7e7-1d93-0c4b-b9ce-b690763b0b38 -> ../../sdc4 lrwxrwxrwx 1 root root 10 Aug 16 12:56 183e59f6-84af-124a-9904-07a824ece292 -> ../../sdb1 lrwxrwxrwx 1 root root 10 Aug 16 12:56 f8c90bc4-0a48-094b-8967-46f8e65fde03 -> ../../sdc1 lrwxrwxrwx 1 root root 10 Aug 16 12:56 693f6ba7-499f-d841-9631-2a3d089e602f -> ../../sdb2 lrwxrwxrwx 1 root root 10 Aug 16 12:56 3ab0018f-ba13-6f40-905a-af49456f6788 -> ../../sdc2
In the output above we can see that the UUID maps to sda3. The next set of UUIDs that matter is the ones that use sdb3 and sdc3, as these correspond to the partition UUIDs on our new drives.
When we got the UUIDs, attach the new devices to the current device (this will effectively mirror them).
zpool attach bpool e43ae096-6764-1245-a9a7-fa091de6faee e3115c86-4bc9-b14a-ab62-90efdb67a5af zpool attach bpool e43ae096-6764-1245-a9a7-fa091de6faee a749fd64-615e-da4b-9ba4-86023a5d7542
Checking the status of the pool, we should observe a three=way mirror.
zpool status bpool pool: bpool state: ONLINE scan: resilvered 92.3M in 0 days 00:00:01 with 0 errors on Sun Aug 16 13:05:13 2020 config: NAME STATE READ WRITE CKSUM bpool ONLINE 0 0 0 mirror-0 ONLINE 0 0 0 e43ae096-6764-1245-a9a7-fa091de6faee ONLINE 0 0 0 e3115c86-4bc9-b14a-ab62-90efdb67a5af ONLINE 0 0 0 a749fd64-615e-da4b-9ba4-86023a5d7542 ONLINE 0 0 0 errors: No known data errors
It's now safe to remove the old device from the pool.
zpool detach bpool e43ae096-6764-1245-a9a7-fa091de6faee
Now bpool is done. Repeat the exact same procedure for rpool. Once that is done, power off the system, remove the old disk, make sure the boot order is correct in the BIOS and boot into the new system. Grub will throw an exclamation upon boot saying that it's falling back to defaults, this seems to be what should be happening as the system will come up and behave just fine on subsequent boots.
Summary
Do not try this without understanding how to help yourself to back out of the situation and do not perform any of these procedures on devices where you care about the data (have backups if you do).
My Gen10+ ended up with bpool and rpool looking like this after first boot.
zpool status pool: bpool state: ONLINE scan: resilvered 937M in 0 days 00:00:01 with 0 errors on Sun Aug 16 13:39:05 2020 config: NAME STATE READ WRITE CKSUM bpool ONLINE 0 0 0 mirror-0 ONLINE 0 0 0 nvme0n1p3 ONLINE 0 0 0 nvme1n1p3 ONLINE 0 0 0 errors: No known data errors pool: rpool state: ONLINE scan: resilvered 24.3G in 0 days 00:00:41 with 0 errors on Sun Aug 16 13:41:43 2020 config: NAME STATE READ WRITE CKSUM rpool ONLINE 0 0 0 mirror-0 ONLINE 0 0 0 nvme0n1p4 ONLINE 0 0 0 nvme1n1p4 ONLINE 0 0 0 errors: No known data errors
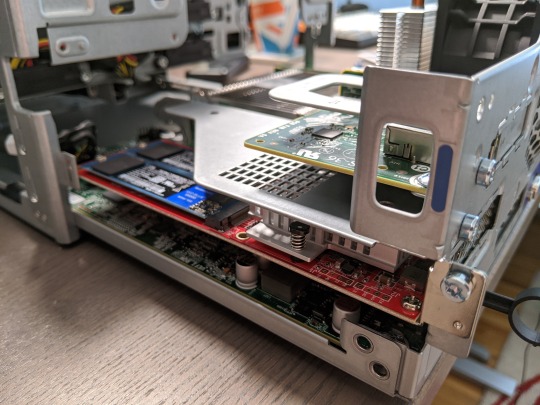
I also snapped a picture of the snug fit with the StarTech NVMe card in the Gen10+
Until next time, happy tinkering!
0 notes
Link
(Via: Hacker News)
Using cgroups to limit I/O
Oct 18, 2017
Developers running their apps on tsuru can choose plans based on memory and cpu usage. We were looking at adding I/O usage as one of the plan’s features, so one could choose how many I/O operations per second or bytes per second a container may be able to read/write.
Being able to limit I/O is particulary important when running a diverse cloud, where applications with different workloads and needs are running together sharing multiple resources. We need to make sure that an application that starts to behave badly does not interfere with others.
Our main scheduler is a docker based and docker exposes some flags to limit a container IOPS (I/O operations per second) and BPS (bytes per second). Docker relies on a linux kernel feature, called cgroups, to be able to limit a process resource usage.
Before exposing this as a possible parameter on tsuru plans, I decided to investigate and do some experimentation using cgroups to limit a process I/O (IOPS or BPS). I came to a conclusion that currently, it is not possible to fulfill our needs and decided to delay the implementation.
In the next section, we are going to discuss cgroups, the main kernel feature used to limit resource usage.
Introduction to cgroups
Cgroups are a mechanism available in Linux to aggregate/partition a set of tasks and all their future children. Different subsystems may hook into cgroups to provide different behaviors, such as resource accounting/limiting (this particular kind of subsystem is called controller).
Cgroups (along with namespaces) are one building blocks of containers, but you don’t need a container runtime to make use of them.
Managing cgroups is done by interacting with the cgroup filesystem, by creating directories and writing to certain files. There are two versions of cgroups available in newest kernels: v1 and v2. Cgroups v2 completely changes the interface between userspace and the kernel and, as of today, container runtimes only support cgroups v1, so we will focus on v1 first.
Cgroups v1
Cgroups v1 has a per-resource (memory, blkio etc) hierarchy, where each resource hierarchy contains cgroups for that resource. They all live in /sys/fs/cgroup:
/sys/fs/cgroup/ resourceA/ cgroup1/ cgroup2/ resourceB/ cgroup3/ cgroup4/
Each PID is in exactly one cgroup per resource. If a PID is not assigned to a specific cgroup for a resource, it is in the root cgroup for that particular resource. Important: Even if a cgroup has the same name in resourceA and resourceB they are considered distinct. Some of the available resources are:
blkio: Block IO controller - limit I/O usage
cpuacct: CPU accounting controller - accouting for CPU usage
cpuset: CPU set controller - allows assigning a set of CPUs and memory nodes to a set of tasks
memory: Memory resource controller - limit memory usage
hugeTLB: Huge TLB controller - allows limiting the usage of huge pages
devices: Device whitelist controller - enforce open and mknode restrictions on device files
pids: Process number controller - limit the number of tasks
In the next section, we are going to investigate the use of the blkio controller to limit the I/O bytes per second of a task running under a cgroup.
Limiting I/O with cgroups v1
To limit I/O we need to create a cgroup in the blkio controller.
$ mkdir -p /sys/fs/cgroup/blkio/g1
We are going to set our limit using blkio.throttle.write_bps_device file. This requires us to specify limits by device, so we must find out our device major and minor version:
$ cat /proc/partitions major minor #blocks name 8 0 10485760 sda 8 1 10484719 sda1 8 16 10240 sdb
Let’s limit the write bytes per second to 1048576 (1MB/s) on the sda device (8:0):
$ echo "8:0 1048576" > /sys/fs/cgroup/blkio/g1/blkio.throttle.write_bps_device
Let’s place our shell into the cgroup, by writing its PID to the cgroup.procs file, so every command we start will run in this cgroup:
$ echo $$ > /sys/fs/cgroup/blkio/g1/cgroup.procs
Let’s run dd to generate some I/O workload while watching the I/O workload using iostat:
$ dd if=/dev/zero of=/tmp/file1 bs=512M count=1 1+0 records in 1+0 records out 536870912 bytes (537 MB, 512 MiB) copied, 1.25273 s, 429 MB/s
At the same time, we get this output from iostat (redacted):
$ iostat 1 -d -h -y -k -p sda Device: tps kB_read/s kB_wrtn/s kB_read kB_wrtn sda 609.00 4.00 382400.00 4 382400 sda1 609.00 4.00 382400.00 4 382400 Device: tps kB_read/s kB_wrtn/s kB_read kB_wrtn sda 260.00 212.00 133696.00 212 133696 sda1 260.00 212.00 133696.00 212 133696 Device: tps kB_read/s kB_wrtn/s kB_read kB_wrtn sda 0.99 0.00 859.41 0 868 sda1 0.99 0.00 859.41 0 868 ...
We were able to write 429 MB/s; we can see from iostat output that all 512MB were writen in the same second. If we try the same command but opening the file with O_DIRECT flag (passing oflag=direct to dd):
$ dd if=/dev/zero of=/tmp/file1 bs=512M count=1 oflag=direct 1+0 records in 1+0 records out 536870912 bytes (537 MB, 512 MiB) copied, 539.509 s, 995 kB/s
At the same time, we get this output from iostat (redacted):
$ iostat 1 -d -h -y -k -p sda Device: tps kB_read/s kB_wrtn/s kB_read kB_wrtn sda 1.00 0.00 1024.00 0 1024 sda1 1.00 0.00 1024.00 0 1024 Device: tps kB_read/s kB_wrtn/s kB_read kB_wrtn sda 1.00 0.00 1024.00 0 1024 sda1 1.00 0.00 1024.00 0 1024 Device: tps kB_read/s kB_wrtn/s kB_read kB_wrtn sda 1.00 0.00 1024.00 0 1024 sda1 1.00 0.00 1024.00 0 1024 ...
Et voila! Our writes were below 1.0 MB/s. Why didn’t it work on the first try? Lets try to understand on the next section.
The I/O Path
So, whats the difference between opening the file with O_DIRECT and opening the file with no flags? The article Ensuring Data Reaches the Disk does a pretty good job explaining all the I/O flavors in Linux and their different paths on the kernel.
That data starts out as one or more blocks of memory, or buffers, in the application itself. Those buffers can also be handed to a library, which may perform its own buffering. Regardless of whether data is buffered in application buffers or by a library, the data lives in the application’s address space. The next layer that the data goes through is the kernel, which keeps its own version of a write-back cache called the page cache. Dirty pages can live in the page cache for an indeterminate amount of time, depending on overall system load and I/O patterns. When dirty data is finally evicted from the kernel’s page cache, it is written to a storage device (such as a hard disk). The storage device may further buffer the data in a volatile write-back cache. If power is lost while data is in this cache, the data will be lost. Finally, at the very bottom of the stack is the non-volatile storage. When the data hits this layer, it is considered to be “safe.”
Basically, when we write to a file (opened without any special flags), the data travels across a bunch of buffers and caches before it is effectively writen to the disk.
Opening a file with O_DIRECT (available since Linux 2.4.10), means (from man pages):
Try to minimize cache effects of the I/O to and from this file. In general this will degrade performance, but it is useful in special situations, such as when applications do their own caching. File I/O is done directly to/from user-space buffers.
So, for some reason, when we bypassed the kernel’s page cache, the cgroup was able to enforce the I/O limit specified.
This commit in Linux adds some documentation that explains exactly what is happening.
On traditional cgroup hierarchies, relationships between different controllers cannot be established making it impossible for writeback to operate accounting for cgroup resource restrictions and all writeback IOs are attributed to the root cgroup.
It’s important to notice that this was added when cgroups v2 were already a reality (but still experimental). So the “traditional cgroup hierarchies” means cgroups v1. Since in cgroups v1, different resources/controllers (memory, blkio) live in different hierarchies on the filesystem, even when those cgroups have the same name, they are completely independent. So, when the memory page is finally being flushed to disk, there is no way that the memory controller can know what blkio cgroup wrote that page. That means it is going to use the root cgroup for the blkio controller.
Right below that statement, we find:
If both the blkio and memory controllers are used on the v2 hierarchy and the filesystem supports cgroup writeback writeback operations correctly follow the resource restrictions imposed by both memory and blkio controllers.
So, in order to limit I/O when this I/O may hit the writeback kernel cache, we need to use both memory and io controllers in the cgroups v2!
Cgroups v2
Since kernel 4.5, the cgroups v2 implementation was marked non-experimental.
In cgroups v2 there is only a single hierarchy, instead of one hierarchy for resource. Supposing the cgroups v2 file system is mounted in `/sys/fs/cgroup/:
/sys/fs/cgroup/ cgroup1/ cgroup3/ cgroup2/ cgroup4/
This hierarchy means that we may impose limits to both I/O and memory by writing to files in the cgroup1 cgroup. Also, those limits may be inherited by cgroup3. Not every controller supported in cgroups v1 is available in cgroups v2. Currently, one may use: memory, io, rdma and pids controller.
Let’s try the same experiment as before using cgroups v2 this time. The following example uses Ubuntu 17.04 (4.10.0-35-generic).
Disabling cgroups v1
First of all, we need to disable cgroups v1. Do to that, I’ve added GRUB_CMDLINE_LINUX_DEFAULT="cgroup_no_v1=all" to /etc/default/grub and rebooted. That kernel config flag disables cgroup v1 for all controllers (blkio, memory, cpu and so on). This guarantees that both the io and memory controllers will be used on the v2 hierarchy (one of the requirements mentioned by the doc on Writeback mentioned earlier).
Limiting I/O
First, let’s mount the cgroups v2 filesystem in /cgroup2:
$ mount -t cgroup2 nodev /cgroup2
Now, create a new cgroup, called cg2 by creating a directory under the mounted fs:
$ mkdir /cgroup2/cg2
To be able to edit the I/O limits using the the I/O controller on the newly created cgroup, we need to write “+io” to the cgroup.subtree_control file in the parent (in this case, root) cgroup:
$ echo "+io" > /cgroup2/cgroup.subtree_control
Checking the cgroup.controllers file for the cg2 cgroup, we see that the io controller is enabled:
$ cat /cgroup2/cg2/cgroup.controllers io
To limit I/O to 1MB/s, as done previously, we write into the io.max file:
$ echo "8:0 wbps=1048576" > io.max
Let’s add our bash session to the cg2 cgroup, by writing its PID to cgroup.procs:
$ echo $$ > /cgroup2/cg2/cgroup.procs
Now, lets use dd to generate some I/O workload and watch with iostat:
dd if=/dev/zero of=/tmp/file1 bs=512M count=1 1+0 records in 1+0 records out 536870912 bytes (537 MB, 512 MiB) copied, 468.137 s, 1.1 MB/s
At the same time, we get this output from iostat (redacted):
Device: tps kB_read/s kB_wrtn/s kB_read kB_wrtn sda 1.02 0.00 693.88 0 680 sda1 1.02 0.00 693.88 0 680 Device: tps kB_read/s kB_wrtn/s kB_read kB_wrtn sda 2.00 0.00 732.00 0 732 sda1 2.00 0.00 732.00 0 732 Device: tps kB_read/s kB_wrtn/s kB_read kB_wrtn sda 0.99 0.00 669.31 0 676 sda1 0.99 0.00 669.31 0 676 Device: tps kB_read/s kB_wrtn/s kB_read kB_wrtn sda 1.00 0.00 672.00 0 672 sda1 1.00 0.00 672.00 0 672 Device: tps kB_read/s kB_wrtn/s kB_read kB_wrtn sda 1.00 0.00 1024.00 0 1024 sda1 1.00 0.00 1024.00 0 1024 ...
So, even relying on the writeback kernel cache we are able to limit the I/O on the disk.
Wraping Up
We’ve seen how limiting I/O is hard using cgroups. After some experimentation and research we found out that using cgroups v2 is the only way to properly limit I/O (if you can’t change your application to do direct or sync I/O).
As a result of this experiment, we decided to not limit I/O using docker at the moment since it does not support cgroups v2 (yet).
0 notes
Text
excited to be using linux on my big screen computer~~
a cool thing I've noticed is that linux I think takes up significantly less space than windows ever did. and I'm just running the cinnamon desktop~~!!
out of the 256 gb of space on the initial OS drive, I've got 217 gb left. windows I forgot how much it left me with tho...
Linux mint is nice so far~~ especially the second hard drive being password protected to mount; rather than being accessible to anyone using the computer.
installed vlc as a media player and now idk what other applications I'd need.
or if I even have enough space currently to try to get steam games working. as the terabyte hard drive is cluttered with anime and music I've saved. and where all of my data is stored separate from the os.
one thing I lost tho that I had forgotten about was my progress in cookie clicker, as I was playing through that, and i don't remember when my last backup was or how much I've lost. By the time I realized I hadn't backed it up, the install was already in progress and it was far too late.
I like cinnamon so far~~ the keyboard shortcuts to reveal all the different desktops,, even found zoom features that are really useful. I thought you had to pinch or push your fingers apart while pushing the hotkey toggle like you do on iphones to zoom in on pictures and stuff, but no. just slide your fingers from the top of the touchpad to the bottom to zoom in, and reverse to go back to small.
I never used zoom on windows; much to my detriment, lol. bad vision is bad. I'm saying it again even tho it might not be relevant here, I'm legally blind. left eye bad vision, right eye none whatsoever. I never liked on board zoom on windows and i'm not sure why... this is nice.
I'm still excited cause I've always wanted to run linux on my big screened gaming pc, but it would never boot. come to find out I was installing grub in the wrong place... needed it on dev/sda1 instead of dev/sda itself. I guess because 1 is the first part of the disk?
hopefully much less spywarey than windows~~ and more secure. I've always assumed that linux/unix/bsd were more secure than windows in general.
funny enough when I first found these types of operating systems as a teenager a long time ago, I jumped into the deep end and immediately tried FreeBSD first. then backed off and stuck with fedora, opensuse for a bit, then to the more user friendly stuff like ubuntu, and linux mint. then many years later I stopped liking what whomever makes ubuntu was doing, and switched to mint, but they still used ubuntu's base, so now I use debian based stuff.
there's my entire fore into linux from being a teenager to now, lol. also very fanboyish high school report on how linux/unix was better than windows. before I even started using linux proper. ahhhh the cringe.
sucks a bunch of corporate stuff doesn't work with linux; cause I'm always seeing like the eye doctors operating systems being windows, and I'm always like "why don't you use linux?" the reason is they want their technology and stuff to work. like it won't on linux?
positive experience and a positive rant~~~ still going to tag it as rant anyway tho~~
#personal#thoughts#thinking#linux#linux mint#debian#linux mint debian#linux mint debian edition#linux mint debian edition 6#good os#better than windows 10 so far#a good rant#rant#rant post#positive#positivity#a positive rant#a positive experience#now I don't need to worry about the stupid windows 10 end of support message#came here from windows 10#windows 10#couldn't run windows 11 anyway cause I didn't want to make a microsoft account#zoom#screen zoom#low vision#legally blind#visually impaired#and so linux gets another user~~#happy to be in linux land
4 notes
·
View notes